

Page 1
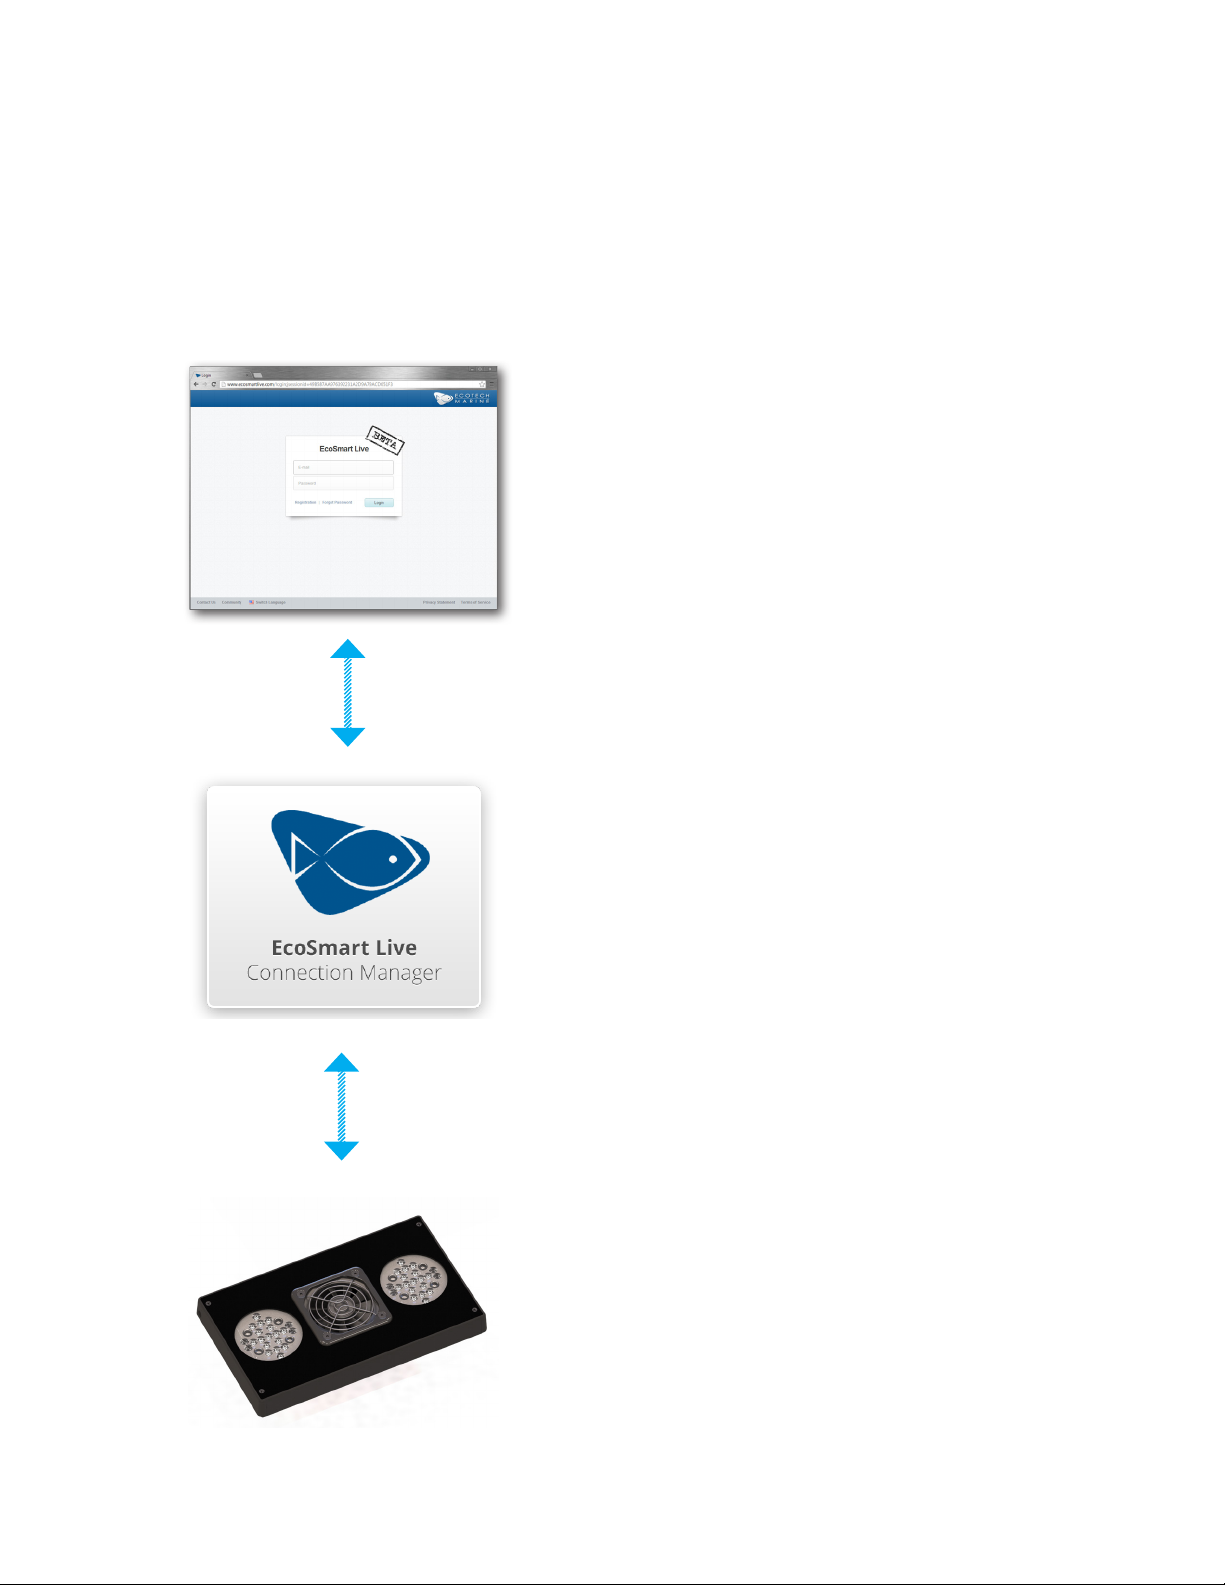
Registering and Connecting Overview
EcoSmart Live is a web based tool which allows you to congure and program your Radion lights.
Your schedule is stored on the server and may be retrieved or updated at any time using a standard
web browser.
The Connection Manager, a software utility, must be installed on your computer in order . The
Connection Manager relays the information from the website to your lights using your computers USB
connection.
STEP 1: User Registration is available on the www.
ecosmartlive.com homepage. Click the Registration
link to create your account.
The webserver will communicate with your Radion using the
connecon manager.
STEP 2: You will be prompted to download the con-
nection manager the rst time you login.
During installation, you will need to supply your website login credentials to the connection manager.
Your Radion must be connected to the computer running the
connecon manager using USB.
STEP 3: Once you have logged in to the website
and have installed and logged into the connection
manager, connect your Radion using the supplied
USB cable.
You are now ready to congure your Radions.
Page 2
Aquarium Setup
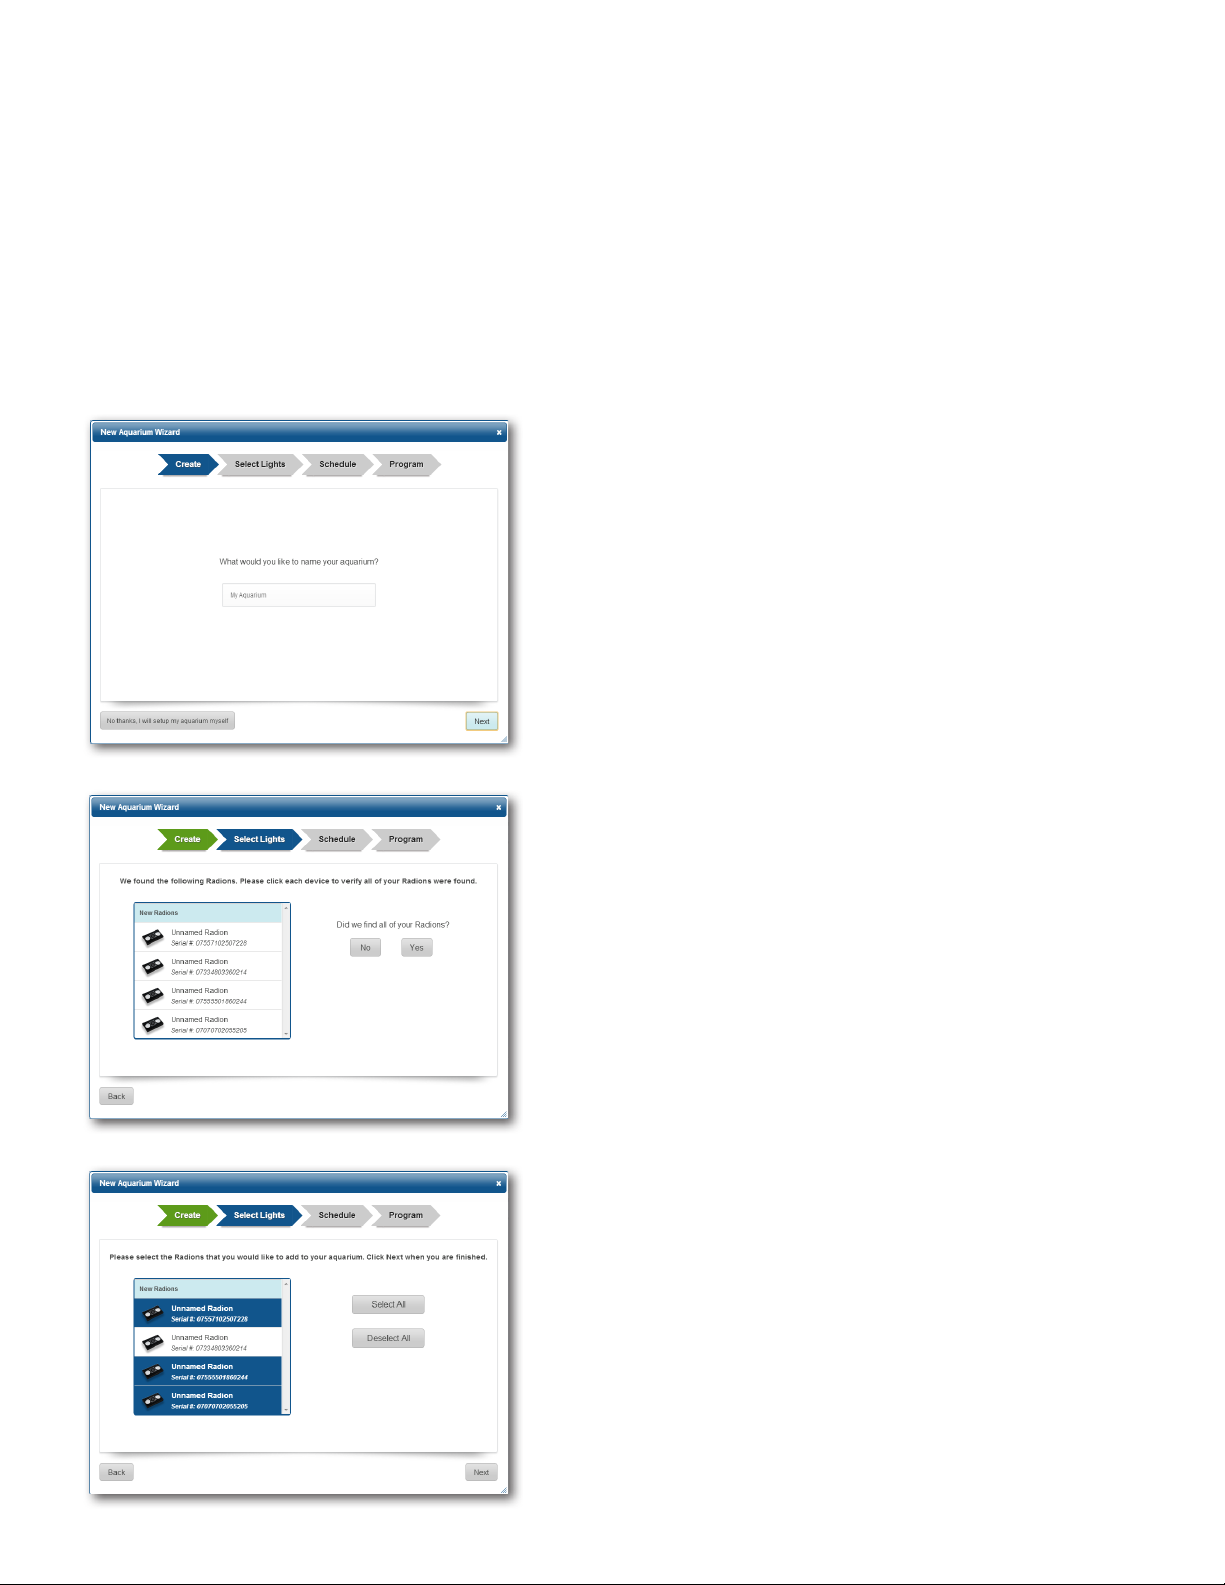
The fastest way to get your Radions congured for the rst time is to use the Aquarium Setup wizard.
This wizard will walk you through the process of creating a single group of Radions and programming them with
one of our provided schedules.
You can cutomize the schedules at any time after the completion of the wizard.
Make sure all of your lights are connected to their power supplies and turned on. One light must be connected
to the computer using USB.
STEP 1: Choose the name of your aquarium. This will be-
come the group name of your Radions.
STEP 2: The wizard will retrieve the details of your lights
and provide a list of devices that are found. Make sure
that all of your lights are detected and click Yes.
TIP! You can click on each of the lights in the list causing them
to ash briey, enabling you to identify them.
STEP 3: Choose the lights you would like to include in
your group and click next.
TIP! It is recommended that you use a single group for all
lights over your aquarium.
Page 3
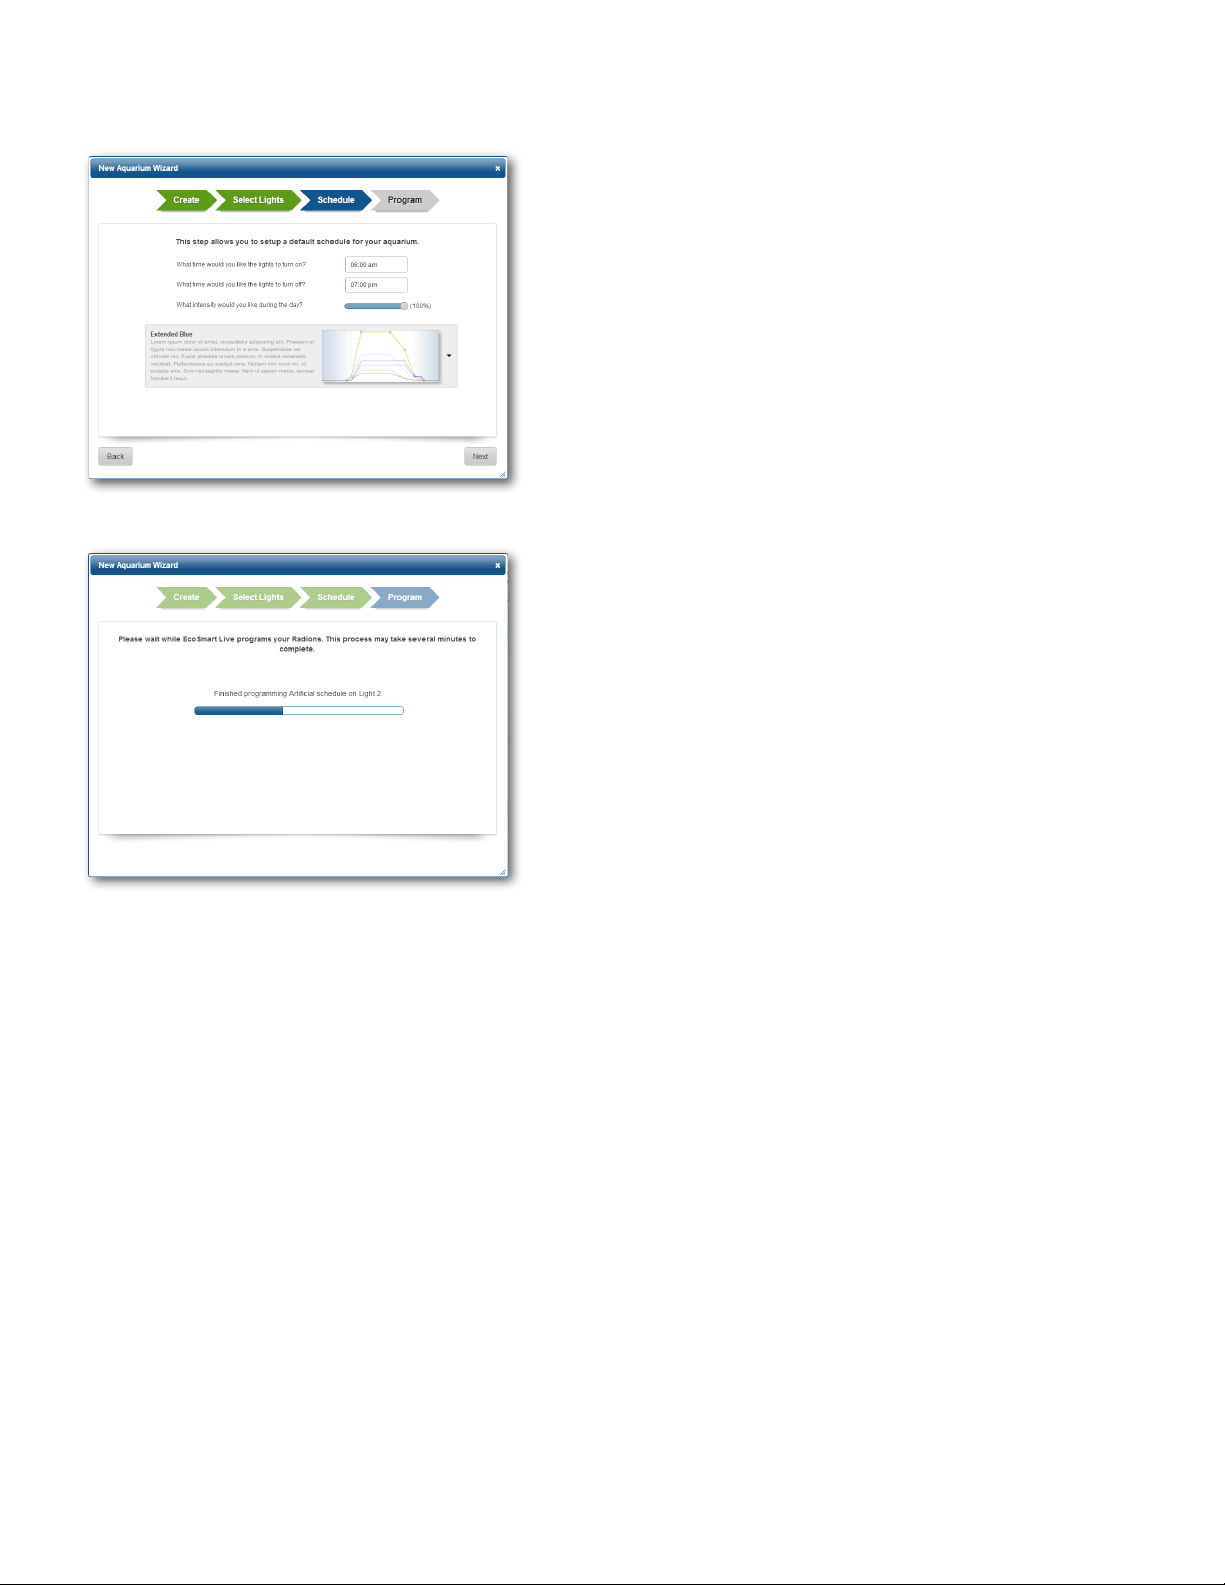
STEP 4: On the schedule tab you will select the start day
and start night points on your light, as well as the maximum brightness each day.
There are several pre-built schedules which you can
choose from. Some modes have night Mode points which
will illuminate the xture at a lower brightiness after the
start night time.
Click Next once you have made your selections.
TIP! You may customize your schedule after the wizard is
complete.
STEP 5: The wizard will now program the schedule to
your xtures. Once it is complete the Radions will restart
and immediately begin the schedule.
Page 4
Creating and Customizing a Schedule
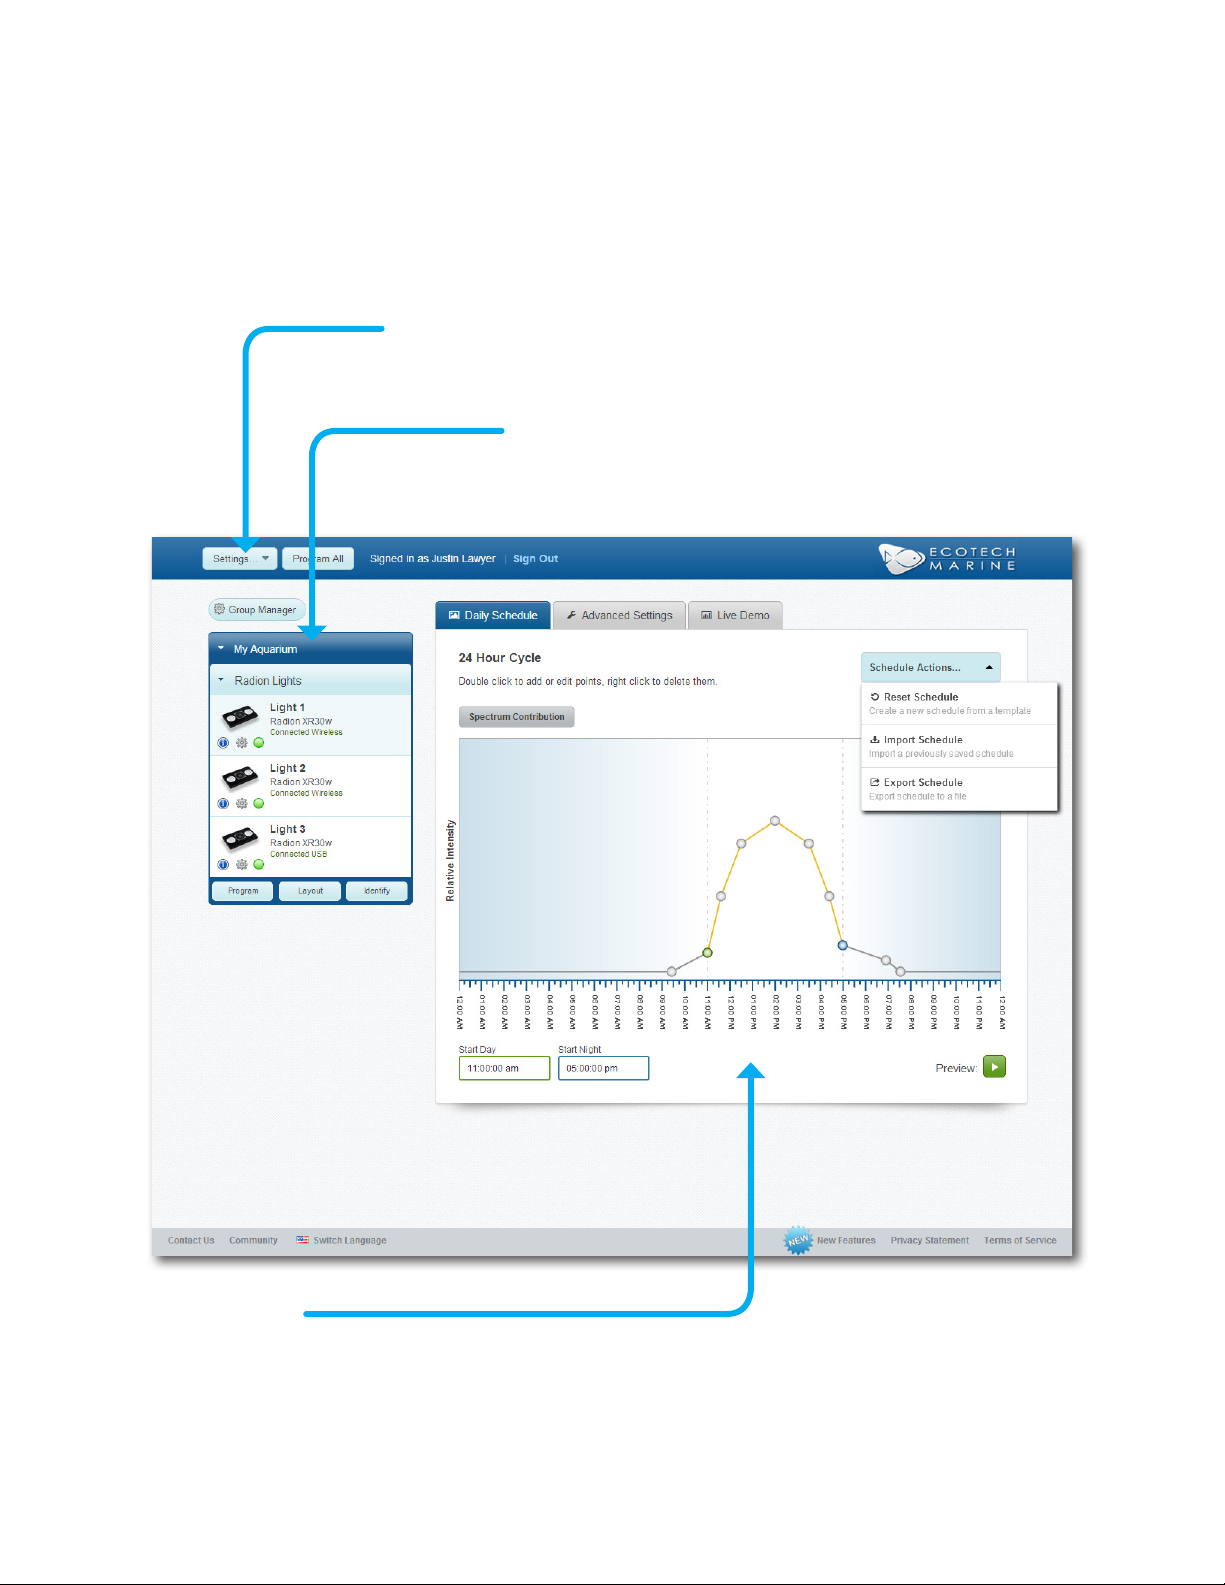
Main Window
There are three main areas of the EcoSmart Live website. The settings menu, the device list, and the daily
schedule tab.
Settings Menu
The settings menu gives access to setup wizards, account prole information, and unit of
measure.
Device List
Once your devices have been associated with your user prole, they
will be shown in their respective groups here. The Group Manager is also
located at the top of the device list if you wish to add or remove lights.
Schedule Tab
The schedule tab is where you create and edit your 24-hour program. Schedule points may be added or
deleted to create your desired lighting schedule. Select the Reset Schedule option on the actions menu to
select from several precongured options.
A more detailed walkthrough the schedule tab is on the follows.
Page 5

Daily Schedule Tab
The schedule graph visually represents when your light will turn on, turn off, and what colors will be used over a
24-hour period. Other options include clouds and storm probabiltiy.*
Once a schedule is programmed to a Radion or group of Radions, they will repeat that schedule daily.
Note: Storms and clouds are randomly generated and may not occur at the same time every day.
Import & Export Schedule
Use these options to import a schedule from a le or export a schedule to a le. (i.e., if you wish to share your schedule with another individual.)
Reset Schedule
Reset schedule will bring up a window where you can select from a list of precongured Radion modes. Some of
these modes are customizable after selection.
Schedule Actions
A dropdown menu to access the import/export and reset schedule tools.
Spectrum Contribution
Displays a graph of each individual color channel.
Start Day & Start Night
Shown on the graph as green and blue points. These are the times that the lights will enter
day mode and enter into night mode. In night mode the maximum intensity is 20% of the
maximum output.
Schedule Graph
The schedule graph is a visual representation of your daily schedule. Double click to add or edit
existing points. Right click to remove them. You may also drag points left/right to change their time.
Preview
Clicking the preview button will give you a 30 second playback of the full 24-hour
period.
Page 6

Color Selection Palette
The color selection palette is presented whenever you select an existing point to edit or create a new point on
the schedule graph. Use this window to adjust the colors, weather, and time of a point in your schedule.
Chance of Storms & Clouds
Use these sliders to set the chance of storm or clouds occuring between this point and the next. NOTE:
storms and clouds are generated randomly and may not occur at the same time every day.
Time Slection
This is the time associated with the currently selected point. Click to edit.
Brightness control
This slider controls the brightness of all channels. The
ratio of each color channel will be preserved.
Color Selection
These sliders control the
brightness of the individual
color channels.
Spectrum output
The output spectrum of the Radion is displayed here.
Save & Close
Click save once you are happy with your settings. Click Close to discard changes and exit.
Preset Controls
You can choose from the available presets or create your own using these controls. To save your own, type the
desired name in the box and click the adjacent save button.
Page 7

Customizing Your Schedule
You can create a custom lighting schedule for your aquarium by creating and deleting points. Radions will
automatically fade the light between each point. The color settings of two points and the time that separates
them will determine how noticeable the transition is.
• DAY MODE AND NIGHT MODE:
• These two periods are dened by the Start Day and Start Night. These times dene: Acclimation Period,
Moonlighting, and Night Mode for Vortech
• GRAPHING CONTROLS:
• DOUBLE-CLICK to add a control point or edit an existing point.
• RIGHT-CLICK on an existing point to delete it.
• CLICK & HOLD to drag a point on the graph in time. Start Day & Start night points can also be moved in
this method.
Quick Transition
Between these two points the light will rapidly fade from 100% to 50%. In this case the
time to fade is ve minutes.
Slow Transition
During this period the lights will slowly increase in brightness
from 50% to 100%. In this case over a period of 3hrs 45min.
TM
Pumps.
Move In Time
Clicking & Hold a point on the graph to move a point left or right and adjust the
time.
Flat Transition
A at line between two points indicates that between these two points no change
in color will occur.
Page 8

Group Layout
The group layout function allows you to create a traveling sunrise and sunset using your Radion lights. Arrange
your lights in their order over the aquarium and choose the offset time. Recommended time is 10 - 15 minutes.
Open Group Layout
To set an order by which your lights will turn on
and off, select the layout button on the group
device list. This is located on the left side of the
main screen.
Set the number of rows and columns
The offset time is divided between the
columns. Two lights in the same column will
come on and go off together.
There is no distiniction between multiple rows.
Set the Total Offset Time
This is the total offset time between the rst column and the
last column.
Drag and Drop to Arrange
Click and drag the Radion icons around to set the order by which they will turn on
and off. Radions will turn on/off from left to right.
Click Save to Exit
Click save to set the arrangment and close the window. Clicking cancel will discard any
changes that were made.
Page 9

Creating Groups and Adding Lights
In addition to the Aquarium Setup process, you can also use the Device Manager to create and delete groups,
as well as add & remove lights from from existing groups.
• When the Device Manager opens, it will query and verify that the lights in your prole are available. If a light
is not listed, use the controls on the left to add the missing device.
Creating and Deleting Groups
The groups and lights in your prole will be shown on the right column. You can add or remove groups
and lights as well as organize lights within a group.
Add New Group
If you want to add a new group or Radions,
use the Add Group button to create the
group.
Click the trash icon to delete the group.
Click the pencil icon to edit the group
name.
Select a device and click the left-arrow
to remove a Radion from the group.
The up and down arrows will allow you to
organize the Radions in the device list.
TIP! Deleting a group will move all of
the Radions in it to the Available Lights
column on the left.
Adding a Light to a New or Existing Group
New Radions and Radions which have not been assigned to a group are listed in the Available Lights
column. Once they are grouped, they will be displayed in the Device List on the Main Window.
First Select The Light(s) to Add
Click on each light in the Available Lights column
that you wish to add to the group. More than
one light can be selected, selected lights will be
highlighted in blue.
Next Click The Group Name
Once you click the group name, the lights will be
addressed and assigned to the group.
Close To Complete
Clicking Close will return you to the main screen.
You will need to program the schedule to your
lights.
Page 10

Adding a Missing Radion
There are circumstances where a Radion may not be inititally identied by the software. Adding missing
Radions can be corrected using the Group Manager.
Add Light(s) Via Wireless
Selecting this option will search for missing Radions
using wireless commands across all previous versions
of rmware. All Radions must be connected to their
power supply and powered on.
TIP!: This method is useful when adding
one or two lights.
Add Light(s) Via USB
Selecting this option will launch a series of on-screen
instructions which will step through the process of
plugging the USB cable into each light which is missing.
TIP!: Firmware updates are much faster
using USB. This method can save a lot of
time if several lights require an update.
Add Light(s) Via Wireless
Use Add Lights Via Wireless if you have a new Radion which you would like to add to a group.
• After selecting Add Lights Via Wireless, the EcoSmart Live site will look for new, unaddressed, Radi-
ons as well as send a query to conrm previously addressed Radions. All lights must be plugged in
and running within wireless range to complete correctly.
Discover Lights
A wireless query is sent out, all lights
which are within wireless range will
respond.
The device details are retrived for all
Radions which are discovered.
Retrieve Details
Return Available Lights
Once the device details have been
retrieved, the missing lights will be
listed as Available.
• Once the new Radions are displayed in the Available Lights column, you can add them to your
prole.
• In the event that no new Radions were discovered, you will be returned to the previous screen and
may launch the USB method using a direct connection to the Radion.
Page 11

Add Light(s) Via USB
Use Add Light(s) Via USB if you are migrating several Radions from the desktop software and they need
a rmware update, or you have a Radion which is not being discovered using the wireless process.
• The EcoSmart Live site will go through a series of guided steps to upgrade the rmware and reset
your Radion, allowing it to become wirelessly discoverable.
• Once you complete the process for all missing Radions, the wireless identication process will be
invoked.
For each Radion you add via USB, you will be prompted through the following ve steps.
Connect USB To Missing Radion
Move your USB cable to the missing Radion
The Site Will Detect USB Device
The computer will detect the USB device and retrieve the details. The serial number will be reported. Click Next to Continue.
Firmware Version Check
The rmware update process will run. It will only update if
necessary.
Factory Reset
Once the rmware update process completes,
the Radion will be factory reset.
Complete
If more than one device is missing,
click Import Another. Otherwise
click Close to contine.
Wireless Verification
Once all missing devices have been updated
and reset. ESL will verify that all Radions are now
communicating wirelessly.
Upon completion all devices are returned to
Device Manager
 Loading...