

Ecostrad Electric Panel Heater
1
500w, 1000w, 1500w, 2000w, 2500w
220-240V, 50/60 HZ, Class I

Introduction
2
Thank you for choosing this convection heater. This product is designed and manufactured according to high
engineering standards. It should be properly used and maintained as described in this manual. Please read
these instructions carefully and retain them for future reference.
User
Instructions
Safety Warnings
• Use only with the voltage specified on the product label.
• The heater must not be used when covered. Covering the heater creates a fire risk
and could activate the safety fuse, which will permanently disable the heater.
• Keep all objects at least 1m away from the front, side or back of the heater.
• When wall mounted, the following safety distances from surrounding surfaces must be observed: 20cm
from the base of the heater to the ground; 80cm from the top of the heater to any ceiling or shelf; 15cm
from the sides to non-flammable surfaces, e.g. brick walls; 30cm from the sides to flammable objects
and surfaces, e.g. curtains or wooden walls.
• This product is not suitable for use by persons (including children) with low physical, sensory or mental
abilities or lacking experience and knowledge, unless they are supervised or instructed to use the device
by a person responsible for their safety.
• Children should be supervised to make sure they do not play with the appliance.
• The heater should only be used according to the instructions in this manual. The manufacturer does not
recommend and cannot support any other uses, which may cause fire, electric shocks or injury.
• Do not sit on the appliance.
• Do not use the appliance to dry clothes.
• Do not insert or allow any objects into the heater vents as this may cause electric shock, fire or
equipment damage.
• Check for transportation damage and make sure all parts are complete after the appliance is unpacked.
Do not use if any parts are missing or damaged.
• Do not connect the product to the power supply until fully assembled and adjusted.
• It is recommended to plug the device directly into a wall socket. Use of extension leads is not
recommended because many models do not support high-power appliances. Make sure any extension
lead used can safely support the power requirements of the product.
• Do not use the heater with the power cable wound up - this can cause a dangerous build up of heat. Do
not wind or tangle the cable around the appliance as this may cause weakening and splitting of
insulation. The power cable should be fully unwound and removed from any storage areas before use.
• The power cable should not be positioned under the carpet or items of furniture. Do not run the cable
where it will be a trip hazard.
• Do not unplug from the power outlet until the device is turned off.
• Do not use the power cord to pull the plug from the power outlet. Hold the plug and pull it out.
• Unplug the appliance when not in use.
• Make sure your hands are dry before handling the plug or control panel.
• Do not use the device around bathtubs, showers, swimming pools or other sources of liquid. This
product is not suitable for bathroom use.
• The product must not be immersed in liquid.
• Do not place this product directly under a power outlet.
• The product should only be mounted on smooth, stable, heat resistant surfaces.
• Do not put the appliance on a bed or long, thick carpet. This can cause the air inlet or outlet to become
clogged and constitutes a fire risk.
• Do not position the appliance near sources of radiant heat.
• Do not use in areas where petrol, paint or other flammable liquids are used or stored.
• Do not use the product in closets or other enclosed spaces as this may cause a fire.
• This product should not be used in places where food, artwork, or delicate scientific objects are stored.
• The product is for domestic and indoor use only. It is not for commercial or industrial use.
• The most common cause of overheating is the build-up of dust or fluff within the heater. Prevent this
from happening by regularly unplugging the heater and dusting the vents and grilles.
:

3
• If the plug or appliance is dropped, damaged, or malfunctions in any other way, seek out a qualified
electrician for inspection and maintenance. If unsure, contact the retailer or manufacturer.
• Check the power cable regularly. Do not use the heater if the cable is damaged.
Cleaning:
The heater should be cleaned regularly to ensure fault-free operation.
1. First unplug the heater and ensure it has cooled down before cleaning.
2. Wipe the surface gently with a soft cloth dipped in water or kitchen surface cleaner.
3. Protect the inside of the product and control panel from water ingress.
4. Let the product dry naturally before using again.
5. If you need to store the product, house it in its original packaging and store it in a dry and ventilated
place.
NOTE - Do not use solvents such as alcohol, gasoline, lacquer thinner or toluene to wash the product.
This can cause the body to turn yellow and corrode.
A - Outlet
B - Display
C - Front Cover
D - Foot
E - Inlet
Installation
Parts suppliedParts supplied::
Heater body x 1
Feet x 2
Wall brackets x 2
Hanging plates x 2
A
B
C
E
D
Wall plugs x 2
ST4*10mm x 6
ST4*18mm x 4
ST4*35mm x 2
Template x 1
Tools required:
6
Assembly
4
Free Standing
If you want to use the heater free standing, you must first affix the feet:
1. Turn the heater upside down.
2. Align the holes on the feet with the holes on the base of the
heater.
3. Use two ST4*18mm screws to attach each foot, see fig. 1.
Fig. 1
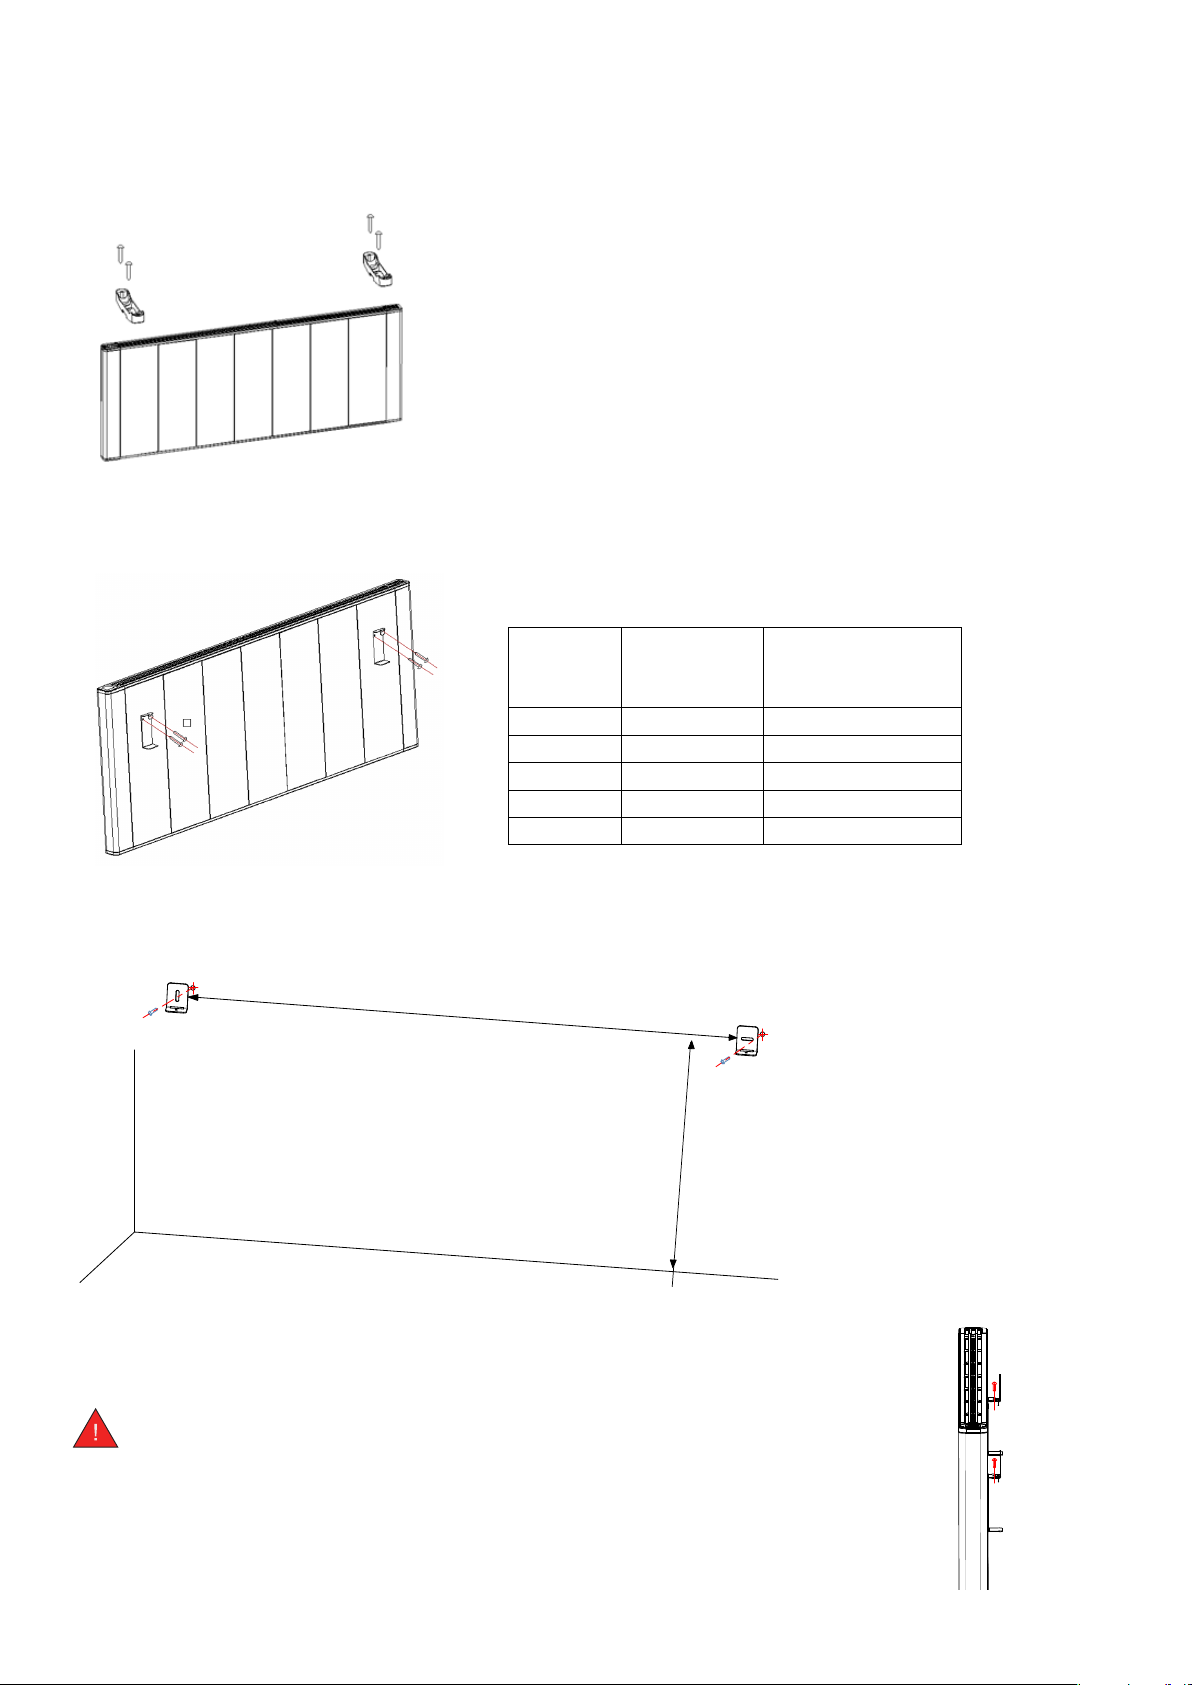
Wall Mounted
1. Fix the hanging plates to the back of the heater using two ST4*10mm for each plate, see fig. 2.
2. Fix the wall brackets:
a) Use a tape measure and pencil to make two marks on the wall as per the table
above. The template provided will help you measure the width.
Fig. 2
Heater
Width
A
Mounting
Width
Mounting Height
B
(minimum)
458mm 160mm 610mm
620mm 321mm 610mm
944mm 642mm 610mm
1106mm 802mm 610mm
1268mm 963mm 610mm
A
b) Using a 6mm drill bit, drill two
holes where you made your marks.
c) Knock a wall plug into each hole
B
using a hammer.
d) Position the wall hangers over the
holes and use the ST4*35mm screws
to fix them in place.
Fig. 3
3. Hang the heater on the wall brackets and fix in place with two
ST4*10mm screws, see. fig. 4.
Mount the heater in a safe location, observing these distances from surrounding
objects:
• Minimum 20cm – from the ground to the base of the heater.
• Minimum 80cm – from the top of the heater to any ceiling or shelf.
• Minimum 15cm – from the sides of the heater to non-flammable surfaces, e.g.
painted walls.
• Minimum 30cm – from the sides of the heater to flammable objects and
surfaces, e.g. curtains.
Fig. 4

Operation Instructions
5
Controls:
Turn on, turn off
Switch between modes
Select, confirm
Up, forwards
Down, backwards
1 - First use
Plug the heater in at a socket and flick the rocker switch on the base to turn it on.
When you first switch on the heater it will come on in standby mode. The standby screen
shows the current room temperature, the time and the day of the week. The heater will not
heat on standby mode unless frost protection mode is enabled and the temperature drops
below 5 °C. You can change the time and the frost protection settings in modes.
Use the key to come out of standby mode and the key to shift between modes.
Functions:
Program mode
Manual mode
Set time
Frost protection setting
Set program
Open window setting
Power consumption check
Standby
Heating in progress
Keypad lock
2 - Program mode
Press
to shift between modes until you see the .
screen. The screen On this mode, the heater will run as per the program set on the
shows you the current time and current temperature.
To adjust the program, press
instructions. You will also
3 - Manual mode
Press
On this mode, the heater will run at a constant temperature. The default screen shows the
time and current room temperature.
To adjust the set temperature:
to shift between modes until you see the
a) Use the and buttons. The set temperature will flash. You can choose any
temperature between 0 - 50 °C.
b) Once you've finished adjusting the temperature, the numbers will stop flashing and
will revert to showing the current room temperature.
c) If the set temperature is higher than the current room temperature, the heater will
start heating and you will see the icon. Once the temperature is reached the
heater will stop heating. Then the thermostat will switch the heater on and off to
maintain a constant temperature.
d) If the set temperature is lower than the current room temperature, the heater will not
heat unless the temperature drops.
need to make sure the correct time is set on the
to navigate to the screen and skip to section 6 for
The default program is this:
screen.
screen.
NOTE - If you set the heater to a very high temperature, it may not be able to reach the set
temperature. If this is the case, it will heat constantly.

4 - Set time
6
Press to shift between modes until you see the
.
To adjust set time:
a) Press .
b) The day of the week will flash. PressThe day of the week will flash. Press to cycle through the days.
c) Press
to confirm.
d) The hours will flash. Use theThe hours wiThe hours will flash. Use the and keys to set the hour.
e) Press to confirm.
f) The minutes will flash. Use theThe minutes The minutes will flash. Use the and keys to set the minutes.
g) Press to confirm.
The controller will then move on to the frost protection screen. Press to move to
your desired mode.
5 - Frost protection setting
Press to shift between modes until you see the
.
On this screen you can toggle the frost protection setting ON or OFF. If enabled, frost
protection monitors the room temperature and will turn the heater on if it drops below
5 °C. This is to help prevent your pipes frosting over if the temperature drops while
you're away. Frost protection, if enabled, will work on any mode, including standby and
program. Frost protection disengages when the temperature rises above 5 °C again.
a) Press to change the frost protection setting.
b) The screen will either show "OFF" or "ON". Use the and keys to choose
your preferred option.
c) Press or to confirm.
6 - Set program
Press to shift between modes until you see the
.
On this screen you can set the program which runs when you put the heater in mode.
The program allows you to set four different heating periods per day.
The default has the same settings for every day:
To adjust the program:
a) Press .
b) P01 and MON will show to signify you are setting the first heating period for Monday.
The hours will flash. Use the and keys to choose the hour.
c) Press to confirm.
d) The minutes will flash. Use the and keys to set the minutes. Minutes can be
set in 15 minute increments.
e) Press to confirm.
f) The temperature for the period will show, flashing. Use the and keys to set
the temperature.
g) Press to confirm.
h) P01 will change to P02 to signify you are now setting the second heating period.
Repeat the process to set each period for each day.
i) If you want to skip to the next period without changing the time or temperature, use
the key.
j) When complete, press to save and exit.

7 - Open window detection setting
7
Press to shift between modes until you see the
.
On this screen you can toggle the open window detection feature ON or OFF. If
enabled, open window detection will switch the heater to standby mode if it senses a
sudden drop in temperature over 5 °C. This is to prevent the heater wasting energy
trying to heat a room in which a window has been opened. This feature is disabled by
default.
To enable:
a) Press to change the open window detection setting.
b) The screen will either show "OFF" or "ON". Use the and keys to choose
your preferred option.
c) Press or to confirm.
When open window detection triggers, the heater immediately stops heating and
switches to standby mode. You will see the icon on the screen. To override,
press . This will return you to the previous working mode.
8 - Power consumption check
Press to shift between modes until you see the .
On this screen you can see the total work time accumulated by the heater.
To view work time accumulated:
a) Press .
b) The total power consumption time is shown in days and hours.
c) Press or to leave the screen.
9 - Keypad lock
a) To activate, long press the key. The symbol will appear on the screen and
the buttons will not respond.
b) To unlock, long press the key. The symbol will disappear and the keypad
will work as normal.
10 - Connecting to the app
NOTE – The Smart Life app is a constantly evolving third party system. The guide below
was correct at time of printing but may differ slightly from future versions of the app.
a) The first step to connect your heater to the WiFi is to download the Smart Life
app onto your smartphone or tablet. You can find the app by scanning the QR
code opposite or searching “Smart Life” in the Google Play or Apple app store.
b) Download and install the app. Unless you already have a Smart Life account,
you will need to create an account by tapping Register. The device will
automatically determine your country, although you can change this if
necessary. Enter your phone number or email address. If you enter a phone
number, a verification number will be sent to your phone: enter this number to
verify, then create a password. If you enter your email address, you’ll just need
to create a password.
This heater has accumulated a
total working time of 1 hour

c)
8
To add the heater to the app, first put it in WiFi connection mode. Press to put it
in standby mode and then hold down to activate pairing mode. The icon
should flash. If the icon does not flash on first attempt, repeat this step until it does.
While the icon is flashing, go to the app and press Add a Device. Select the
d)
device type (Small Appliances > Heater) and confirm that the indicator is flashing.
You will then be prompted to enter your WiFi password. This allows the app to find
your heater using your WiFi. The app will then display its connecting screen.
e)
The heater can connect on
two network bands,
and . If you are having
trouble connecting, press
to switch to the alternate
connection band. Wait 5
seconds and you will see the
icon switch for the
icon on the screen.
Most users will connect easiest
on the band.
The heater will beep and display a solid
icon when the device is connected. The
app will confirm that the heater has been added. You can now name the device,
share it with family members, or proceed to scheduling your heating.
NOTE - When connecting, make sure your router is switched on and your mobile
phone is connected to its WiFi.
The app is only designed to work with 2.4 GHz networks. If you are struggling to
connect your heater, it may be that you have a 5 GHz dual band router. In this
case, you will able to connect by pressing and switching to the 2.4 G band.
This usually has a very similar name to the 5.0G band.
For more information on this issue, tap the 2.4 GHz message when connecting.

Using the Smart Life App
9
You can use the app to control multiple devices. The status of your device is shown on the device list.
• Offline (device is turned off at wall / rocker switch)
• Turned Off (device is in standby mode)
• Turned On (device is in heating mode)
When the heater is online, tap the device name to go to the
control interface.
Note: when the heater is offline, you will not be able to
control it with the app.
Controlling the heater
Set Temperature
Adjust Temperature
ON / OFF
Toggle Mode:
• SMART (program)
• AUTO (set temperature)
Current
Temperature
Toggle
Keypad
Lock
Set Program

Scheduling your Heating
10
Press Settings, then press Week Program to adjust the heating schedule.
Each day of the week is divided into four heating intervals. Tap the intervals to adjust the time the
interval begins and the set temperature. Press done when complete.
Voice Integration
Smart Life is compatible with both Amazon Alexa and Google Home.
To connect, first download the Smart Life skill onto your Alexa or Google Home app. You can
then link your Alexa or Google Home app with your Smart Life app. Depending on your device,
your voice control app may discover your devices automatically, or you may need to prompt it to
do so.
Once the Smart Life skill is enabled and linked with your Smart Life app, you should get
notifications whenever you add a new heater or scenario. The notification will tell you what to say
to control the heater or scenario by voice.
You can find quick guides to connecting the app to both Google Home and Alexa in the app's
FAQ section. Press then . .
Example commands:
• OK Google, turn on iQ Plus
• Alexa, switch off iQ Plus
• OK Google, switch iQ Plus to 25 degrees
• Alexa, set iQ Plus to 9 degrees
Top Tip - Make sure you name the heater something which is easy for you to say and your voice
interface to understand!

Troubleshooting
11
Fault
Heater is
not
switching
on
Heater is
switched
on, but no
heat is
being
produced
Possible Cause
Solution
Is the heater plugged in? Plug in.
Is the socket switched on? Switch on.
Is the heater switched on at the
Switch on.
rocker switch at the base of the
unit?
Is the heater on standby mode? Press to toggle
between standby and
heating modes.
Is the heater set to a lower
temperature than the room
temperature?
Adjust set temperature in
Auto mode or program
settings. The heater will only
heat if it thinks it needs to
raise the temperature.
Is the heater set to follow a
program? It may be programmed to
be off or heating at a lower
Press to switch to Auto
mode or adjust the program
to heat now.
temperature at this time.
Has a door or window been left
open? Open window mode may
have activated.
If is on the screen, open
window mode has activated.
Press and close the
window to reset.
Could the product have
overheated?
Switch the power off, wait
for the heater to cool down
and switch it back on again.
Model Rated Power Rated Voltage Rated Frequency Appliance Class
iQ 500 500W AC220V-240V 50/60HZ Class I
iQ 1000 1000W AC220V-240V 50/60HZ Class I
iQ 1500 1500W AC220V-240V 50/60HZ Class I
iQ 2000 2000W AC220V-240V 50/60HZ Class I
iQ 2500 2500W AC220V-240V 50/60HZ Class I
 Loading...