

Page 1

INSTALLATION INSTRUCTIONS
ECOSMART ELECTRIC TANKLESS WATER HEATER
MODELS: ECO-6 / ECO-8 / ECO-11
The most technologically advanced tankless hot water heater in today's market.
99.8% Energy-efficient
“No Tank, No Wait, No Comparison”
1 / 17
Page 2
IMPORTANT SAFETY INFORMATION
As when installing or operating any high voltage electrical appliance,
basic safety precautions must always be followed.
ALWAYS shut off all power to the Ecosmart unit directly at the electrical
breaker box before attempting to clean, install, inspect, repair,
disassemble, or otherwise service this unit.
SERIOUS BODILY INJURY OR DEATH COULD OCCUR IF
SAFETY PRECAUTIONS ARE NOT FOLLOWED. THIS PRODUCT MUST BE
PROFESSIONALLY INSTALLED BEFORE USE.
FAILURE TO DO SO COULD CAUSE PROPERTY DAMAGE,
SERIOUS PERSONAL INJURY OR DEATH, AND WILL VOID THE WARRANTY.
THIS WATER HEATER MUST BE INSTALLED BY A
LICENSED ELECTRICIAN OR PLUMBER.
PROOF OF INSTALLATION MUST ACCOMPANY
THE WARRANTY REGISTRATION CARD.
PLEASE FOLLOW ALL RECOMMENDATIONS AND LOCAL CODE AND PERMIT REQUIREMENTS
TURN OFF ELECTRICAL SUPPLY MAIN AND WATER SUPPLY BEFORE
ATTEMPTING INSTALLATION OR SERVICING THE UNIT.
DO NOT TURN ON ELECTRICAL SUPPLY OR WATER SUPPLY UNTIL
INSTALLATION IS PROPERLY COMPLETED.
FAILURE TO FOLLOW PROPER PROCEDURES IS HAZARDOUS.
IT MAY ALSO DAMAGE THE WATER HEATER AND WILL VOID THE WARRANTY.
● DO NOT remove the heater cover, open the unit, or break the seal. This could cause DEATH OR INJURY and will VOID THE
WARRANTY.
● DO NOT install the electric tankless water heater unit in a shower or in any location where it might come into contact with
water or where it can be reached or adjusted by anyone while using water.
● DO NOT attempt to install yourself. Although installation is simple, it should only be done by a licensed plumber or
electrician.
● DO NOT operate the unit if water ceases to flow during use. Discontinue use and contact technical support at:
WWW.ECOSMARTUS.COM
phone: 305-623-7900 or 877-47-GOGREEN
2 / 17
Page 3
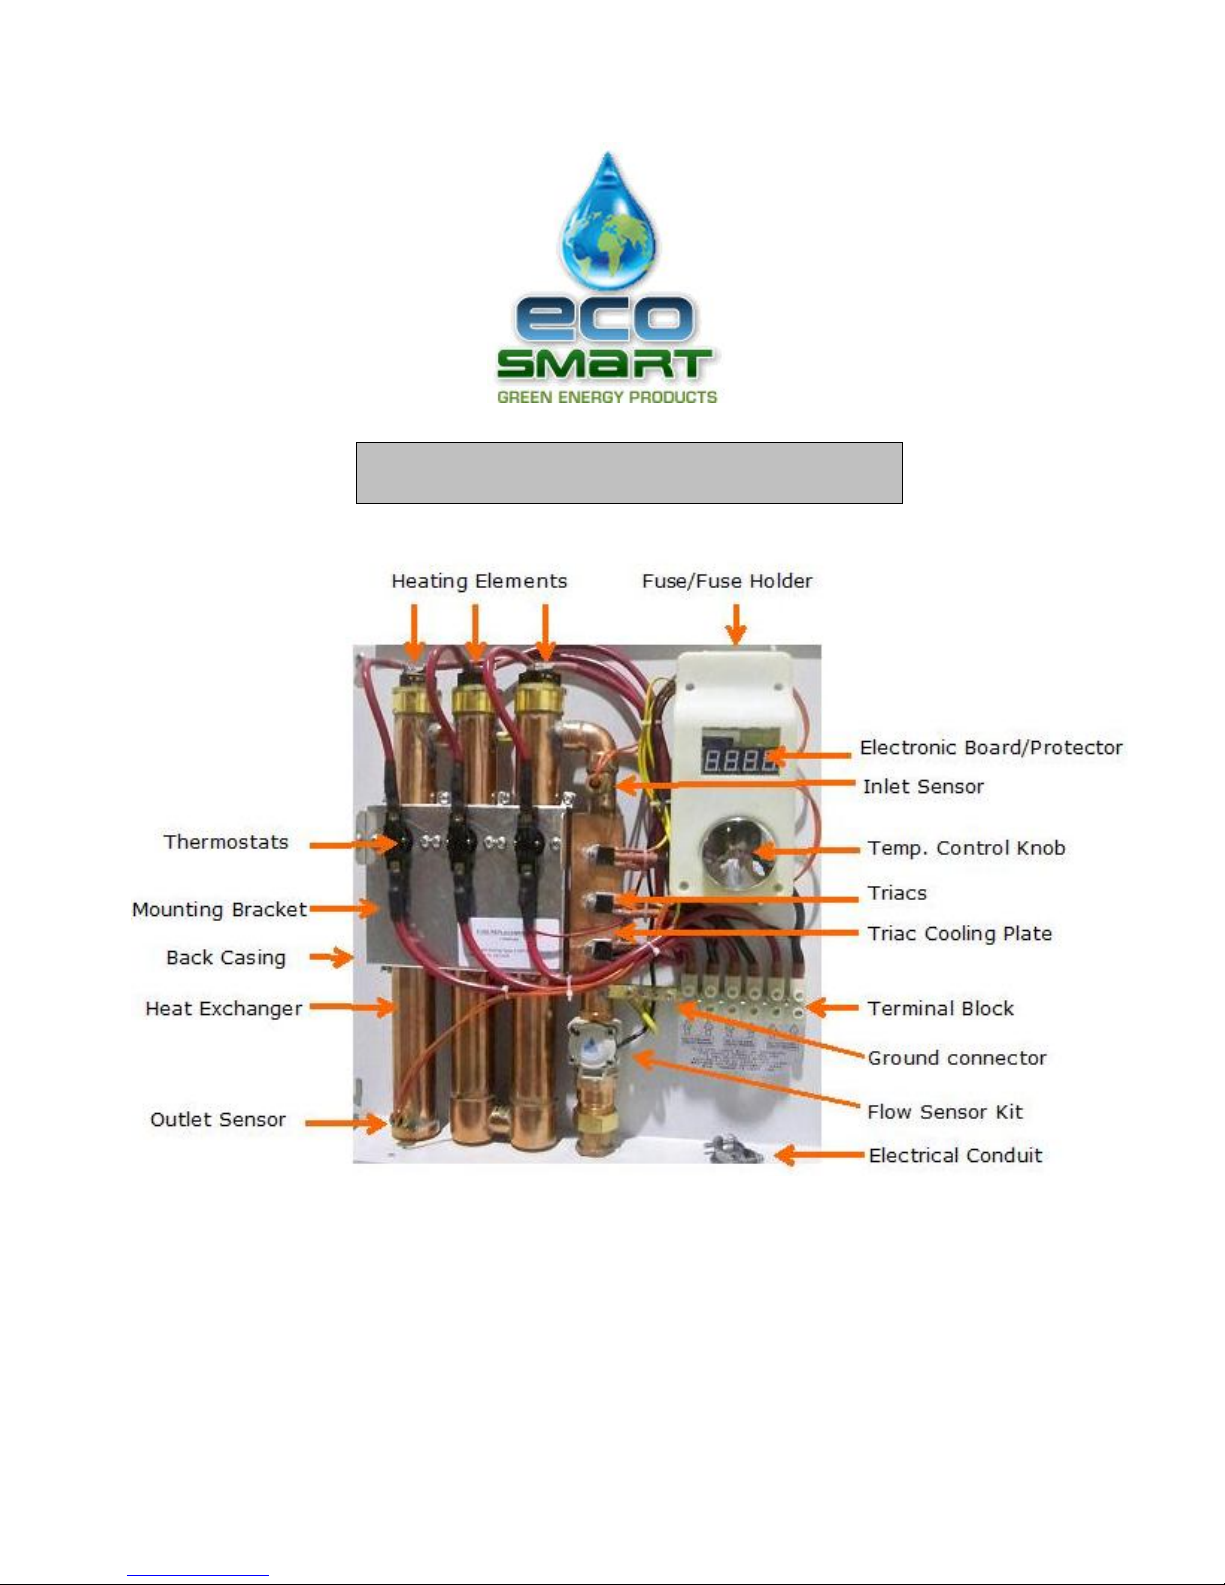
PART IDENTIFICATION
3 / 17
Page 4
PLUMBING
The Ecosmart electric tankless water heater is supplied with 1/2” compression fittings.
Do not weld or use paste or use Teflon on fittings.
Connect the cold water supply line to the right side of the unit ("cold water inlet” in diagram on
page 3).
Connect the hot water supply line to the left side of the unit (“hot water inlet” in diagram on
page 3).
After both water lines are fastened securely, run water through the unit for at least 2 to 3
minutes to flush out any air pockets in the lines (purging). It is recommended that all faucets,
showers, etc. be run during this process. Failure to purge the lines of air can cause permanent
damage to the unit. This procedure MUST be performed before the electrical power is turned on.
4 / 17
Page 5
ELECTRICAL CONNECTION
● The Ecosmart electric tankless water heater unit must be installed to independent
double pole breakers.
● Each Ecosmart model comes supplied with the required wires for installation.
● Breaker size and wire gauge must meet all applicable local, state, provincial, and
national electrical codes for your area – these are only guidelines that will apply to
most installations.
● Some codes require use of electrical sub-panel for installation, especially when heater
is not mounted within line-of-sight of the main electrical panel. Wiring should be sized
to maintain a voltage drop of less than 3% under load.
● If your home is already equipped with a large number of electrical appliances, you may
require a larger electrical service than the one recommended.
● Check all wires to make sure that they are tightly fastened.
● Before turning the power on, the system must be flushed as required in the plumbing
instructions.
● When the unit is powered up the green LED indicator light will turn ON and then OFF.
This is normal.
5 / 17
Page 6
ELECTRICAL SPECIFICATIONS BY MODEL #
MODEL REQUIRED BREAKER MAX AMP DRAW
AWG CABLE
ECO-6 1x30 AMP 28 #8
ECO-8 1x40 AMP 37 #8
ECO-11 1x60 AMP 54 #6
VERIFY ALL VOLTAGE & AMPERAGE INFORMATION LISTED BELOW WITH THE ACTUAL LABEL
SPECIFICIATIONS ON YOUR UNIT, IN CASE OF CHANGES OR VARIATIONS.
BATHS
MODEL KW VOLTS AMPS
SUPPLIED
ECO-6 6.0KW 220V 28 1
ECO-8 8.2KW 220V 37 UP TO 1.5
ECO-11 11.8KW 220V 54 UP TO 2.5
BATHS
MODEL KW VOLTS AMPS
SUPPLIED
ECO-8 7.3KW 240V 34 UP TO 1.5
FLOW RATE
IN GALLONS
PER MINUTE
UP TO 1.7GPM
UP TO 2.2GPM
UP TO 3GPM
FLOW RATE
IN GALLONS
PER MINUTE
UP TO 2.2GPM
RISE IN WATER
TEMP.
FULL CAP. IS
LOWER TEMP.
17 - 43º
16 - 56º
22 - 80º
RISE IN WATER
TEMP.
FULL CAP. IS
LOWER TEMP.
16 - 56º
ECO-11 13.9KW 240V 58 UP TO 2.5
UP TO 3GPM
22 - 80º
6 / 17
Page 7

WIRE GAUGE AND BREAKER SIZE CAN VARY BASED ON A NUMBER OF FACTORS,
INCLUDING SUPPLIED VOLTAGE AND LENGTH OF CIRCUIT.
CHECK LOCAL REQUIREMENTS.
MODEL WIRE GAUGE VOLTAGE & AMPERAGE BREAKER SIZE
ECO-6 #8
ECO-8 #8
ECO-11 #6
2-30 AMP 110V HOT
+ 1 GROUND
2-40 AMP 110V HOT
+ 1 GROUND
2-60 AMP 110V HOT
+1 GROUND
30 AMP DOUBLE POLE
40 AMP DOUBLE POLE
60 AMP DOUBLE POLE
7 / 17
Page 8

HOW TO USE THE KNOB
POWER KNOB:
• Click the power knob once to turn the unit ON.
• Click the power knob again to turn the unit OFF.
ºC/ ºF CONVERSION:
• Press the knob for 3 seconds to change the display from ºC/
ºF.
TEMPERATURE CONTROLLER KNOB:
• Turn the knob clockwise to increase the temperature set on the thermostat.
• This will increase the water outlet temperature.
• Turn the knob counterclockwise to decrease the temperature set on the thermostat.
• This will decrease the water outlet temperature.
• The water temperature can be adjusted at any time to between 0º-125ºF ( 0º-51ºC).
• The temperature indicator light will stay on only when there is hot water in use.
ECOSMART US LLC
3315 NW 167th Street
Miami Gardens, FL 33056
www.ecosmartus.com
Telephone: 305-623-7900
8 / 17
Page 9

Fax: 305-623-7923
Toll Free: 877-47-GOGREEN
ABOUT YOUR TANKLESS WATER HEATER
Congratulations on the purchase of your Tankless Water Heater! You have purchased the most
technologically-advanced tankless water heater in the market today. Your ECOSMART Tankless Water
Heater is backed by the industry’s most comprehensive warranty.
Your new tankless water heater features advanced water flow rate and temperature sensors designed to
modulate power to the heating elements to maintain a precise user-selected output water temperature
between 85F and 140F (subject to incoming water temperature and power of the selected model). To get
the best performance and energy savings from your tankless water heater, it is important that it be
installed in accordance with our instructions and the electrical and plumbing codes applicable to your
area, and that you read this manual thoroughly for important operating instructions and tips.
At any time, if you have any questions, please contact your Authorized Dealer, or contact us directly at:
ECOSMART US, L.L.C.
3315 NW 167TH
STREET, MIAMI GARDENS, FLORIDA 33056
Toll Free: 1-877-474-6473
9 / 17
Page 10

GENERAL OPERATING INSTRUCTIONS
For the most part, operating your new tankless water heater is very similar to using any traditional water
heating system. However, it is very important that you carefully read all of the set-up procedures and
operating instructions and tips to ensure the maximum performance and energy savings from your new
water heater. We recommend that all members of the household read these General Operating
Instructions.
How your new water heater works: Your Tankless Water Heater does not store hot water like a
conventional tank-type water heater. It contains very high powered heating elements that are capable of
heating water instantly on-demand as you need it. As soon as you turn on a hot water faucet, a
sophisticated flow sensor recognizes that you have turned on the water. This sensor measures the water
flow rate while another sensor measures the incoming water temperature. This information is transmitted
continually to the computer logic controls which decide how much power to send to the heating elements
to heat the water to your desired temperature.
Since your new water heater works on a demand basis, it will absolutely never run out of hot water no
matter how many back to back showers you run!
It is important to keep in mind that all tankless water heaters are subject to a maximum flow rate that
they can handle all at once. If you exceed this flow rate, the heater will not be capable of fully heating the
water. How much water you will be able to demand from your water heater at any given time will depend
on the model you have selected and your incoming water temperature. If you live in an area of the
country where inlet water temperatures average 55º F or you have cold winters, you will probably NOT be
able to run multiple large water demands at the same time, however, you will be able to run all your hot
water applications back to back without ever having to wait. You will enjoy UNLIMITED HOT WATER.
10 / 17
Page 11

Moreover, since a tankless water heater eliminates the ongoing thermal losses caused by storing hot
water in a tank, you will enjoy significant energy savings over a conventional water heater. When you use
hot water in your home with a conventional water heater, you need to mix a considerable volume of cold
water to cool the hot water down to a safe, comfortable level for showering and bathing, etc.
You need to do this with a traditional tank-type water heater because they are set at extremely high
temperature setting to prevent them from running out of hot water quickly. With our tankless water heater,
you will generally set the temperature at a much lower level since it is capable of heating your water on
demand. This level will be much closer to the actual temperature at which you feel comfortable showering
or bathing. Accordingly, when you use your faucet controls to run a shower or bath, you will no longer
have to mix as much cold water, in fact, you may mix very little or no cold water. This is perfectly normal
and means that you are no longer wasting energy and water by overheating your water.
SETTING THE OUTLET WATER TEMPERATURE:
The user controls on your new tankless water heater are very easy to operate. The digital display will
show your current set water temperature at all times that the water heater is running.
To set the temperature, start by turning on any water faucet. The digital display will light up and give you
the current temperature setting of the unit. To increase this setting, turn the control knob to
“Increase.” or “Decrease.” your temperature setting. You can set the temperature at any level between 80F
(27C) and 140F (60C). To change the digital display from Fahrenheit to Celsius, simply press the control
knob for 3 seconds.
Most people feel comfortable showering or bathing at a temperature between 98 and 105F (37 to 41C).
We recommend that you set the output water temperature of your water heater at either 105 or 110F
(approx .41 - 43 C). This will ensure you have adequate hot water to meet all of your household needs
while also maximizing your available water flow rate, reducing the risk of scalding to children and the
elderly, and increasing the energy savings you achieve.
Note: All newer model dish washing machines are normally equipped with an internal heating element,
and most clothes washing detergents are now designed for use in cold or warm water. There is no longer
a need set your water heater to a temperature above 125F. Temperatures above this level (which most
traditional water heaters are set to deliver) can cause serious scalding injuries to small children or elderly
persons in your home.
If you ever detect a water leak from your water heater, turn off the water supply at the shut-off valve on
the inlet side of the water heater, turn off the power to the heater and call us for technical assistance.
11 / 17
Page 12

MAINTENANCE
Your new electric tankless water heater requires no maintenance. However, to ensure maximum
performance of your water heater and to reduce the risk of a water leak, we do recommend the following
maintenance:
You should inspect the CONNECTIONS on the inlet and outlet of the water heater at least on an annual
basis for any signs of damage or failure. Any signs of damage, cracks, leakage or weakness should be
replaced. Take care not to over-tighten the connections. Serious internal damage to your water heater
can occur if you over-tighten the water heater connections at the unit.
IMPORTANT NOTES:
As with all electrical appliances, under no circumstances should you attempt to install, repair or
disassemble this water heater without first shutting off all power to the unit directly at the fuse or breaker
box. SERIOUS BODILY INJURY OR DEATH COULD OCCUR IF YOU IGNORE THIS WARNING.
When any maintenance is performed on the water heater or the home’s plumbing system that may
introduce air into the plumbing pipes, it is important to turn the power off to the water heater and purge
the air out of the lines before allowing the unit to power up. FAILURE TO DO SO COULD CAUSE
PERMANENT DAMAGE TO THE HEATING ELEMENTS.
If you have a water supply with a high level of mineralization (hard water), you should increase the
frequency of your maintenance.
12 / 17
Page 13

TROUBLESHOOTING GUIDE
Are you having problems with your water heater?
Do not return your heater to your Authorized Dealer. Please call our customer service dept.
TOLL FREE 877-474-6473
or call your Authorized Dealer for assistance.
All units are thoroughly tested before they leave our factory. In rare instances, your unit could arrive with
internal or external damage that may affect its performance. All units are factory tested as follows:
PRESSURE INTEGRITY TEST
Each unit is pressure tested at 180 PSI to insure against leaks. This is over 3.5 times the water pressure
that the unit will experience in a typical residential installation.
ELECTRICAL INTEGRITY TEST
Each unit is tested to verify that there are no short circuits and that the unit’s circuitry is properly
configured (Die electric voltage test).
SPECIFICATIONS LEVEL TEST
Each unit is temporarily attached to a testing station that duplicates the conditions present in a typical
residential installation. The unit is turned on and the temperature of the water produced by the unit is
13 / 17
Page 14

measured at several flow rates to insure that the proper temperature rise specifications are met and that
the unit self-regulates with the varying flow rates.
The following table represents some of the most common technical support questions we receive.
Before calling us, please read thoroughly to see if your question or problem is addressed.
PROBLEM POSSIBLE CAUSE SOLUTION
Water heater is not heating at all (water is flowing but
the unit is not heating at all - the incoming water
temperature is the same as my cold water supply) - the
digital display does NOT light up.
Water heater is not heating at all (water is flowing but
the unit is not heating at all - the incoming water
temperature is the same as my cold water supply). The
digital display DOES light up.
Water heater is heating but the water temperature is not
hot enough.
No power or incorrect wiring. Make sure the breakers at main electrical panel are ON.
You may have a faulty breaker or the unit may be wired
incorrectly.
Flow rate is too low / water pressure is too low. Your water heater has an activation flow rate of
approximately 0.25 GPM. If your water flow rate is less
than this level, your unit will not activate. Increase the
flow rate.
Internal part failure. Please call us for technical assistance.
User temperature setting too low. Turn up the temperature setting on the unit. (see
General Operating Instructions section of this manual)
Flow rate is too high. Depending on your incoming water temperature and the
power output of your model, your water flow rate may
exceed the physical heating capacity of your water
heater. Reduce the flow rate at the faucet or slightly
close the shut-off valve installed on the inlet side of
your heater to reduce the inlet water flow rate. (see
General Operating Instructions section of this manual)
Crossed wires. If it’s a new installation, have your electrician double
check the wiring. Is possible that the wiring is incorrect.
The water temperature at my faucet is less than the
temperature setting of my water heater.
Voltage less that 240 volts. The heating elements on your water heater are designed
for 240 volts. When use with a lower voltage, they
produce less heating power. You may need to upgrade
to a larger model. Call your authorized dealer for more
information.
Mixing too much cold water. You do not need to mix as much cold water with your
tankless water heater compared to when you use a
conventional water heater. You may also have an antiscald feature on your faucet that is mixing cold water.
These types of faucets can usually be adjusted to reduce
the amount of cold water mixed. (see General Operating
Instructions section of this manual)
Voltage less that 240 volts. The computer chips in your tankless water heater are
programmed with the expectation that your incoming
line voltage is 240 volts. If you have less than 240 volts,
it may affect the reading on your water heater’s digital
display and cause it to read slightly higher than the
actual output temperature. To compensate for this,
increase the setting on your water heater if you need /
want hotter water.
Anti-Scald pressure/balancing valve or tempering valve. Your faucet may have an anti-scald feature or a
tempering valve that automatically mixes cold water
even when you turn your control lever or handle to full
hot. These devices are usually adjustable so you can
turn off the cold mix completely. You can compensate
for this by increasing the setting on your water heater if
14 / 17
Page 15

you need/want hotter water.
Thermal loss due to long pipe run. As the hot water from the heater runs through the hot
water delivery system to you faucet, some heat will be
lost especially if it has long distance to travel or the
pipes are cold. This is normal. You can compensate for
this by increasing the setting on your water if you need/
want hotter water.
ECOSMART U.S. LLC
MANUFACTURERS WARRANTY
MAINLAND USA & CANADA - LIMITED LIFETIME
OUTSIDE MAINLAND USA –5 YEARS
1. PRODUCT WARRANTY: Ecosmart U.S. L.L.C. warrants to the original purchaser at the original address or the authorized
transferee of such purchaser (collectively, the “Buyer”) Ecosmart Tankless Water Heater and its components to be free from defects
in materials and workmanship, under normal use and service from the date of installation, provided that the Product is installed
within thirty (30) days from date of receipt and installed by a licensed electrician and plumber (specific proof required) and
maintained in accordance with Products written instructions. The Product Warranty will be in effect upon receipt of the
Warranty Registration by Ecosmart U.S. offices. The Warranty Registration is included in the Operating and Maintenance
Manual supplied with each new product and must be fully completed and submitted via fax, mail or website within (30) days of
receipt of Product. Incomplete Warranty Registrations will not be accepted. Product Warranties are void without receipt of
Warranty Registration within (30) days of receipt of Product.
SUCH WARRANTIES DO NOT COVER:
• Product failure caused by liming, sediment buildup, chemical corrosion, chlorine/chloride corrosion, or freezing.
• Product failure caused by the failure to remove air from system prior to or during operation.
• Product misuse, tampering or misapplication, accidental damage, improper installation or the application of
improper voltage.
• Costs incurred for shipping, delivery, handling and/or administrative charges.
• Labor charges of any kind.
THE FOREGOING WARRANTIES ARE EXCLUSIVE AND IN LIEU OF ANY OTHER WARRANTY, EXPRESSED OR IMPLIED,
INCLUDING BUT NOT LIMITED TO ANY IMPLIED WARRANTY OF MERCHANTABILITY OR FITNESS FOR A PARTICULAR
PURPOSE OR PATENT OR OTHER INTELLECTUAL PROPERTY RIGHT INFRINGEMENT.
2. LIMITATION OF REMEDIES AND DAMAGES: Ecosmart U.S. L.L.C. liability and Buyer’s exclusive remedy hereunder will be
limited solely to repair or replacement of Product under Warranty by Ecosmart Service Center with respect to any claim
made within the applicable Warranty. Ecosmart U.S. L.L.C. reserves the right to accept or reject any such claim in whole
15 / 17
Page 16

or in part. Ecosmart U.S. L.L.C. will not accept the return of any product without prior written approval from Ecosmart
Service Center and the issuance of a Return Merchandise Authorization Number clearly marked on the outside
packaging of the return shipment.
ECOSMART U.S LLC WILL NOT BE LIABLE, UNDER ANY CIRCUMSTANCES, FOR CONSEQUENTIAL OR INCIDENTAL DAMAGES,
INCLUDING BUT NOT LIMITED TO LABOR COSTS OR LOST PROFITS RESULTING FROM THE USE OF (OR INABILITY TO USE) THE
PRODUCTS OR FROM THE PRODUCTS BEING INCORPORATED IN OR BECOMING A COMPONENT OF ANY OTHER PRODUCT OR GOODS.
Warranty Transfer Information: The Warranty may be transferred to one (1) subsequent homeowner at the same
physical address upon payment to Ecosmart U.S. L.L.C. of the applicable transfer fee:
• ECO 11 and Under $125.00
• ECO16 thru ECO18 $250.00
• ECO 21 thru ECO 27 $350.00
Said transfer fee and second owner information including a copy of new Deed must be submitted by Certified Mail within 7 days of
the sale Closing Date.
3. WARRANTY REGISTRATION: To be covered under the Ecosmart U.S. L.L.C. Manufacturer’s Limited Lifetime Warranty Buyer
must register product within thirty (30) calendar days of receipt of Product using the Warranty Registration Card
included with the Product, this Warranty may be submitted via mail to:
ECOSMART U.S. L.L.C.
3315 NW 167th STREET
MIAMI GARDENS, FLORIDA 33056.
THIS IS A LIMITED LIFETIME MANUFACTURER’S WARRANTY THAT CONVEYS BENEFITS TO THE ORIGINAL PURCHASERS,
SUBJECT TO THE TERMS AND CONDITIONS SET FORTH HEREIN. Keep Product documents in a safe and secure location.
Buyer obligation under the terms of purchase and sale require that Warranty Registration must be returned
within the prescribed timeframe (within 30 calendar days) and retain all proof of purchase, installer
receipts for Warranty in order to protect Buyer’s rights and obtain Manufacturer’s Limited Lifetime
Warranty benefits. The Warranty resides with the Buyer with proof of purchase; not simply with an
individual in possession of a Product. If the Product is to be installed in new construction at a date
later than 30 days from the date of receipt, send further information in advance of thirty (30) day
deadline when known so we may update your Warranty record.
4. FURTHER LIMITATIONS AND EXCLUSIONS AFFECTING YOUR WARRANTY: This warranty is void if the Product is not
installed in accordance with relevant, local electrical and plumbing codes and in accordance with the installation
instructions specified by the manufacturer. Local codes will override manufacturer’s instructions at the time of installation
and if additional installation parts are required, the costs will be the responsibility of Buyer. Above ground level
installations must be protected with drip pans and drains just as the codes call for protective requirements used in
regular hot water tank installations. Buyer hereby accepts the entire responsibility for ascertaining whether they have
sufficient electrical power at their residence to operate our Electric Tankless Water Heaters as indicated in our
specifications which are readily available at our website (WWW.ECOSMARTUS.COM), in our brochures and contained in the
shipping box for installers to read before installations. If, within (30) days of purchase and prior to installation, the Buyer
finds that the purchased unit is not suitable for their demands Buyer must return the unit to the ECOSMART office. Buyer is
responsible for any charges that may be incurred to complete the return. A Buyer is eligible for a full refund or credit ONLY
if the returned unit is received by ECOSMART within thirty (30) calendar days of receipt AND has been inspected by
ECOSMART and found to be in the same condition as when purchased. Only when these two conditions are met will a Buyer
receive a refund or replacement unit. Ecosmart U.S., LLC will not accept the return of any product without prior written
16 / 17
Page 17

approval from Ecosmart U.S., LLC and the issuance of a Return Merchandise Authorization Number clearly marked on the
outside packaging of the return shipment.
AFTER (30) CALENDAR DAYS FROM RECEIPT OF PRODUCT THERE WILL BE NO RETURNS OR WARRANTY WITHOUT RECEIPT OF
WARRANTY REGISTRATION BY ECOSMART US. BUYER ACCEPTS ALL SALES AS FINAL. ANY ALTERATION TO THE PRODUCT VOIDS ALL
WARRANTIES. Ecosmart U.S. L.L.C. IS NOT RESPONSIBLE FOR ANY OTHER CHARGE OR EXPENSE INCURRED, OTHER THAN THE
ORIGINAL PURCHASE PRICE OF THE PRODUCT. Ecosmart U.S. L.L.C. shall not be liable for consequential, special, incidental or
contingent expenses or damages arising directly or indirectly from any defect in or of the Product; nor will Ecosmart U.S. L.L.C. be
liable for any water damage arising directly or indirectly from the use of the Product or from the failure of or defect in any
component part or connecting plumbing. Ecosmart U.S. L.L.C. and Buyer agree to the above terms in their entirety and accept all
sales as final without recourse to a credit card company or other financial institution and hereby agree to stipulations and
specifications defined within Manufacturer’s Limited Lifetime Warranty.
5. WARRANTY PROCEDURE FOR SERVICE: Have a licensed electrician determine the exact issue that requires repair. Please note
that technical support is available for qualified technicians only (licensed electricians and/or plumbers). Technical support that
involves potentially dangerous electrical conditions is not available to unqualified persons. When contacting Ecosmart Service
Center, please be sure that the technician has a copy of the original Warranty Registration and has reviewed the “Homeowners and
Installation Manual” that was supplied with the Product. Ecosmart Technical Assistance, at its sole discretion, will determine the best
method for repair. Methods of repair include, but are not limited to, replacement of specific part of Product or replacement of whole
unit. If a whole unit requires replacement under the terms of this Manufacturer’s Warranty, the original unit must be returned to the
ECOSMART office. Buyer must secure the cost of return delivery and replacement unit with a valid U.S. credit card. Credit Card
Authorization Forms are available upon request. If the replaced unit arrives at the Ecosmart office within ten (10) calendar days of
shipment of new unit and is found to comply within the specifications of this Manufacturer’s Warranty then the credit card will not
be charged, otherwise, Buyer will be charged amount of replacement unit and shipment cost as agreed upon within Credit Card
Authorization Form. If Ecosmart Technical Assistance determines a component requires repair or replacement under the terms of
this Manufacturer’s Limited Lifetime Warranty, the part will be shipped via standard ground delivery. If faster shipping service is
desired, the Buyer must select and pay for same.
ANY QUESTIONS REGARDING OUR WARRANTY SHOULD BE DIRECTED TO OUR SERVICE CENTER BY CALLING
TOLL FREE 877-474-6473 BETWEEN 9:00 AM and 5:00 PM MONDAY thru FRIDAY EASTERN TIME. NO RETURN WILL BE
ACCEPTED BY ECOSMART WITHOUT PRIOR APPROVAL AND THE ISSUANCE OF RETURN MERCHANDISE
AUTHORIZATION NUMBER CLEARLY MARKED ON THE EXTERIOR OF PACKAGING.
Ecosmart US LLC. 3315 NW 167th Street
Miami Gardens, Florida 33056
TOLL FREE: 877-474-6473
17 / 17
 Loading...