

Page 1

®
eclipse
Page 2

Contents
English
Canadian Françis
Español
Page 3
Page 18
Page 34.
Page 3
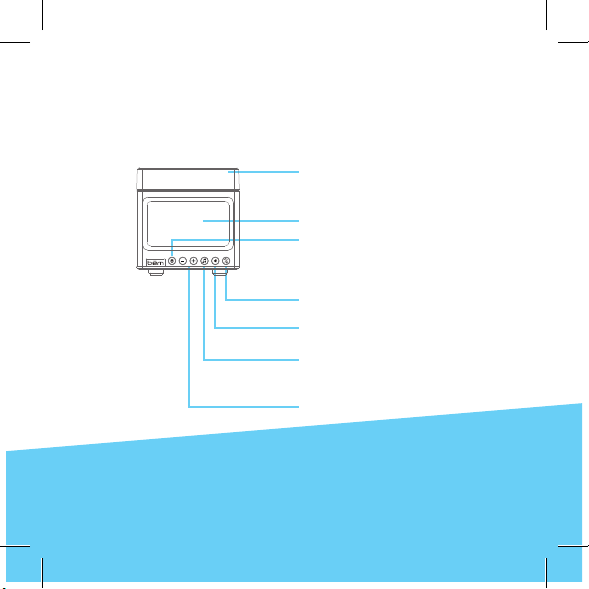
Meet the Eclipse Speaker
Thank you for choosing the Eclipse Speaker. Take a moment
to familiarize yourself with its controls and its many functions,
featuring a push down light that lets you snooze, play / pause
music and answer the phone.
Light / Multi-Function Button
Press down on light to Snooze
/ Play / Pause / Answer
LCD Screen
Sun Icon
Light on / off button changes
light and LCD display
brightness
Double Bell Icon
Choose one or two alarms
Bell Icon
Alarm and light mode settings
Musical Note Icon
Switch between Bluetooth and
Aux play modes
Minus / Plus Icons
Adjust volume, alarm and time
settings
3
Page 4
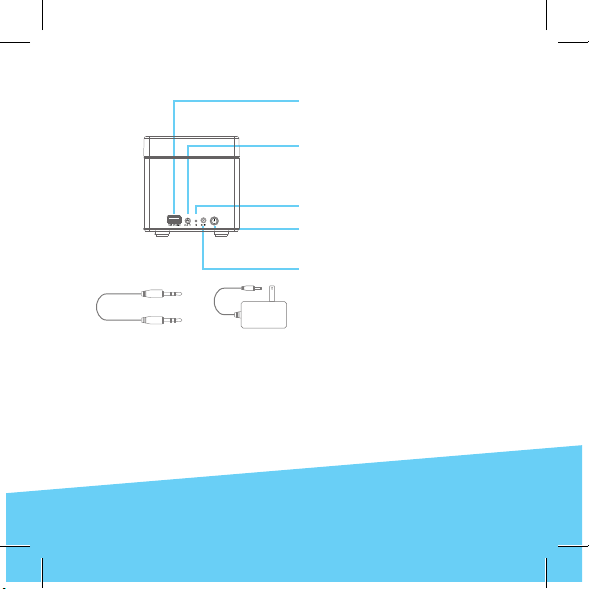
USB Port
For charging your smartphone, tablet or MP3 player
Aux Input
Use the included Aux Cable
to play audio from any device
with a headphone output
Bluetooth Indicator
Clock Setting
Choose between AM / PM,
and set hours and minutes
DC Input
Connect the Power Adapter
here
Aux Cable x 1
4
Power Adapter x 1
If any of these were missing or damaged, please
visit bemwireless.com to obtain a replacement.
Page 5
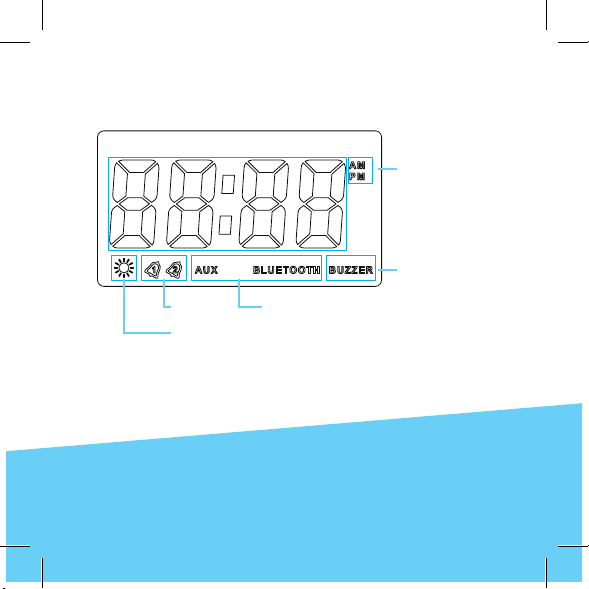
Product Interface: LCD Screen
Sun Icon
AM/PM
Buzzer
Audio ModesAlarm 1/2
5
Page 6
Getting Started
Step 1: Power Up
Connect your Eclipse to an outlet using the included power
adapter. The light will come on and the LCD screen will light up.
(The light defaults to HIGH.)
Press to change the light brightness and cycle between:
HIGH – MEDIUM – LOW – OFF
You can also change the brightness of the LCD display. (The LCD
brightness defaults to HIGH.)
Press and hold and cycle between:
MEDIUM – LOW – OFF – HIGH
Step 2: Audio Modes
Press to select an audio mode, Bluetooth or Aux. (Bluetooth is
the default play mode when the speaker is turned on for the rst
time.)
6
Page 7

Getting Started (cont.)
AUX Mode: The Eclipse can be connected
to any device that has a standard 3.5mm headphone
jack by using the included aux cable. Use the controls
on the attached device to play / pause.
Bluetooth Mode: Play audio wirelessly from a
connected Bluetooth device. When the Bluetooth
mode is selected, the word Bluetooth displays on
the LCD screen. Go to the Bluetooth settings on
your mobile phone, tablet or computer and select
the device named “Eclipse”. A tone sounds to conrm
the device has paired successfully. From now on, this
device will connect automatically with the Eclipse
Speaker.
Step 3: Set the Clock
1. Press and hold on the back of the speaker to shift between
12 hour and 24 hour time. (When in 12 hour mode, PM displays
on the LCD screen during PM hours. When in 24 hour mode,
nothing displays during the AM or PM hours.)
2. Press and the hours will blink on the LCD screen,
press + / - to adjust the hour.
7
Page 8

3. Press again and minutes will blink on the LCD screen, press
+ / - to adjust the minutes.
4. Press and hold for 3 seconds to set and conrm the time
setting.
Step 4: Set the Alarm
The Eclipse Speaker features dual alarms that can be set for two
different times. Once you decide which alarm you wish to activate
(1 or 2), go to Step 2 to set the alarm time.
Step 1: Choose 1 or 2 alarms
1. Press once to select and display the Alarm 1 icon on the
LCD screen. Once Alarm 1 displays, you can set the alarm
time (go to Step 2).
2. Press twice to select and display the Alarm 2 icon on
the LCD screen. Once Alarm 2 displays, you can set the
alarm time (go to Step 2).
3. After the alarm times are set, press three times to
select and display BOTH Alarm 1 and 2 icons on the LCD
screen.
4. Press a fourth time to turn BOTH alarms and the icons
off.
8
Page 9

Getting Started (cont.)
Step 2: Set alarm time and sound mode
Set the alarm time and the sound mode of the activated
alarm (1 or 2). (You cannot set the alarm if Alarm 1 and 2 are
both activated or both off.)
1. Press to begin setting your alarm. The hours blink on
the LCD screen, press + / - to adjust the hour.
2. Press a 2nd time, the minutes blink on the LCD screen,
press + / - to adjust the minutes.
3. Press a 3rd time, ashes on the LCD screen, press
+ / - to shift between turning the light on or off when the
alarm sounds. (A blinking indicates the light will slowly
become bright when the alarm goes off.
4. Press and hold for 3 seconds to conrm the alarm
settings.
The alarm lasts for 3 minutes. Press any button on the front of the
speaker to silence it. Note that the light stays on.
Using the Snooze Function
When the alarm sounds, press down on the light to activate the
snooze function, which postpones the alarm for 9 minutes. (The
snooze function only works once the alarm starts.)
9
Page 10

Operation Details
Push Down Multi-Function Light
Pushing down on the multi-function light lets you snooze, play /
pause music and answer the phone.
Snooze
When the alarm sounds, push down on the light to activate the
snooze function. The alarm will start again in 9 minutes.
Play / Pause Music
After pairing your mobile phone to the Eclipse Speaker via Bluetooth, the speaker phone function is activated.
• Make a Call: Calls you make will automatically transfer to the
speakerphone. If not, push down on the light.
• Answer a Call: Push down on the light to answer an incoming
call.
• End a Call: During a call, push down on the light to end it.
• Reject a Call: Push down on the light and hold to reject an
incoming call.
• Redial the Last Number: Push down on the light twice to call
the last number dialed.
10
Page 11

Troubleshooting
Issue: Pairing is unsuccessful after multiple attempts
Solution:
• Check if the Bluetooth indicator light is on. If the indicator
light is off, press the power button to turn the unit on. If the
Bluetooth indicator light still doesn’t come on after pressing the
power button, please charge the unit.
• Check for other nearby Bluetooth devices that may interfere
with pairing and turn devices off.
• Power off, then power on the unit to restart the Bluetooth
function on the speaker or your Bluetooth device.
• Unplug any cables plugged into the AUX IN port. Restart all
devices and then attempt pairing again.
Issue: Interference or static during playback
Solution:
• Avoid connecting to the speaker through concrete or other
building structures that may interfere with the signal.
• Please check if the battery level of your Bluetooth device and
charge if necessary.
For more troubleshooting help go to bemwireless.com
11
Page 12

Maintenance
Please follow the instructions below for cleaning your Eclipse
Speaker:
• Power off the unit and unplug the power adapter from
wall outlet
• Use a soft, dry, lint-free cloth and wipe gently
• Do not use alcohol, benzene, thinners or other chemical
detergents as these can cause the casing to be warped
or discolored
For questions, comments or to purchase more bem wireless
products go to bemwireless.com
Storage
• Power off the Eclipse Speaker If the unit will not be used for an
extended period of time.
• Do not set the unit in a damp environment, high temperatures
or in direct sunlight.
12
Page 13

Product Name : Eclipse
Model Number : HL2512
Power Supply: 5V,2A
Output power: 2.5W X 2
USB charging output: 5V,1A X 1
Bluetooth working range: Approximately 25ft, 8m
LED Power :1W
Color temperature: 2800- 3200K
Working atmosphere: 0˚C-40˚C / 20%-90%RH
13
Page 14

FCC Statement
1. This device complies with Part 15 of the FCC Rules. Operation
is subject to the following two conditions:
1. This device may not cause harmful interference.
2. This device must accept any interference received, including interference
that may cause undesired operation.
2. Changes or modications not approved by the party responsible for
compliance could void the user’s authority to operate the equipment.
NOTE: This equipment has been tested and found to comply with the limits for
a Class B digital device, pursuant to Part 15 of the FCC Rules. These limits are
designed to provide reasonable protection against harmful interference in a
residential installation.
This equipment generates uses and can radiate radio frequency energy and, if
not installed and used in accordance with the instructions, may cause harmful
interference to radio communications. However, there is no guarantee that
interference will not occur in a particular installation. If this equipment does
cause harmful interference to radio or television reception, which can be
determined by turning the equipment off and on, the user is encouraged to try
to correct the interference by one or more of the following measures:
• Reorient or relocate the receiving antenna.
• Increase the separation between the equipment and receiver.
• Connect the equipment into an outlet on a circuit different from that to
which the receiver is connected.
• Consult the dealer or an experienced radio/TV technician for help
14
Page 15

FCC Radiation Exposure Statement
This equipment complies with FCC radiation exposure limits set forth for an
uncontrolled environment. This equipment should be installed and operated
with minimum distance 20cm between the radiator & your body.
be¯m wireless
http://bemwireless.com/
be¯m wireless LLC.
1725 Kilkenny Ct.
Woodstock, IL. USA
Made in China
15
Page 16

Safety Instructions
This product has been designed with safety in mind; to ensure accident free
operation, please follow the guidelines listed below:
• Always position the unit on a stable and level surfaces. Unstable surface can
cause the unit to topple and fall, resulting in possible damage or injury
• Do not drop, unpack, open, beat, curve, prink and burn the unit
• Avoid using the unit nearby basins or sinks where it may come in contact
with water
• Do not place water-lled containers on the top of the unit (such as vases,
glasses, or pots), and avoid placing candles on the speaker
• Protect the unit from any heating devices (such as radiator, heating instal-
lations, or stoves)
• In the event of damage to the unit, repairs should be performed by mainte-
nance personnel
• Before cleaning the unit, turn off the unit and unplug the power cable from
the outlet
• Set the volume properly to prevent damage to the unit and to protect your
hearing
Correct Disposal of this product. This marking indicates that
this product should not be disposed with other household
wastes throughout the EU. To prevent possible harm to
the environment or human health from uncontrolled waste
disposal, recycle it responsibly to promote the sustainable
reuse of material resources. To return your used device,
please use the return and collection systems or contact the
retailer where the product was purchased. They can take
this product for environmentally safe recycling.
16
Page 17

IC ID Statement
- English: “ This device complies with Industry Canada licence-exempt RSS
standard(s). Operation is subject to the following two conditions: (1) this device
may not cause interference, and (2) this device must accept any interference,
including interference that may cause undesired operation of the device.”
This equipment should be installed and operated with a minumum distance of
20 cm between the radiator and your body.
- French:” Le présent appareil est conforme aux CNR d’Industrie Canada
applicables aux appareils radio exempts de licence. L’exploitation est autorisée
aux deux conditions suivantes : (1) l’appareil nedoit pas produire de brouillage,
et (2) l’utilisateur de l’appareil doit accepter tout brouillage
radioélectrique subi, même si le brouillage est susceptible d’en compromettre
le fonctionnement.”
Cet équipement doit être installé et utilisé à une distance minimale de 20 cm
entre le radiateur et votre corps.
17
 Loading...