

Page 1

EcoMotion Bikes
1
IMPORTANT! In order to ensure your safety and get !
the most from your product please read this Manual !
carefully before first use.
Page 2

!
EcoMotion Bikes
2
Table of Contents
Important general information and warnings
3
Definitions
4
Main parts location
4
General information
5
Assembly instructions
5-9
Folding of the bicycle
9-10
Bicycle prepare / inspection prior to riding
10-13
Operating of bicycle’s electric system
13-14
Tips for proper use
14-15
Bicycle maintenance
16-17
The battery
17-19
Dismounting / mounting of battery from the
bicycle
19
Emphases for battery charging
20-21
Preserving of battery's lifespan
21-22
Warranty, liability and company's policies
22
Problems & solutions
23-24
Page 3

Important general information and warnings:
EcoMotion Bikes
3
IMPORTANT! It is important that your first ride on !
your new bicycle is taken in a controlled environment, !
away from cars, obstacles, and other distractions.
IMPORTANT! Cycling can be a hazardous activity !
even under the best of circumstances. Proper !
maintenance of your bicycle is your responsibility as !
it helps reduce the risk of injury.
IMPORTANT! Parental supervision is advised for !
using this product under the age of 16.
IMPORTANT! It is important to be aware of traffic !
rules prior to using the bicycle.
WARNING! The bicycle is exposed to wear and tear !
as well as high pressures. Various materials and !
components may react differently to fatigue, wear or !
pressure.!
In case the life expectancy of a certain component has !
expired, it may fail unexpectedly and even cause injury !
to the user. !
Any form of cracking, scratching, discoloration in high !
pressure areas are indications that the component's !
integrity has expired and it must be replaced!
WARNING! Accidents / falls may cause severe injuries and !
in extreme cases even to death!!
Please read this user manual responsibly, with care and !
judiciousness!!
Also always make sure that the bicycle is in order by using !
this user manual prior to riding!
Page 4

Definitions:
PAS - Pedal Assist Sensor - Sensor which is located near the
pedals’ axis, recognizes the pedals movement and operates
the motor accordingly.
TAG - Twist And Go - The motor is activated while twisting the
throttle, that is located on the handlebar.
Main parts location:
EcoMotion Bikes
4
Page 5

Based on factory data. The riding range and speed based on
165lbs weight of rider under lab conditions, and may vary with
each rider.
Assembly instructions:
1. Turn the front fork in a way that the front brake (caliper) is
located at the bicycle’s left side. !
Make sure that the handlebars’ wires are loose and not
tight onto the frame / fork so the fork can move freely to
the sides without resistance. !
!
!
!
!
!
!
!
!
EcoMotion Bikes
5
General information:
Weight
57 lbs.
Distance per charge (PAS)
74 miles
Distance per charge (TAG)
37 miles
Motor capacity
500W
Battery capacity
LG 48V15Ah LiPo
Charger output
42V2.3Ah
Input voltage
110V
Power consumption
720 Wh
Motor max speed
20 MPH
Page 6

2. Assemble the front flashlight to its place in the fork. !
!
!
!
!
!
!
!
!
!
!
3. Slide in the handlebar pipe into its stem and lock it with its
hoop. !
!
!
!
!
!
!
!
!
!
!
!
!
!
!
!
!
!
!
!
!
!
!
!
EcoMotion Bikes
6
WARNING! To avoid component
breakage, when raising the
handlebar, make sure the safety
line is unrevealed to the eye!
Page 7

4. Assemble the front wheel by sliding the “wheel lock pin”
through the bicycle’s fork intended holes and into its
place in the wheel, screw the screw-nut to the pin and
lock it.!
!
!
!
!
!
!
!
!
!
!
!
!
!
5. Assemble the seat into the frame, and lock it
into its place with its hoop. !
!
!
!
!
!
!
!
!
!
!
!
!
!
!
EcoMotion Bikes
7
Page 8

6. Assemble bicycle pedals !
!
!
!
!
!
!
!
!
!
!
!
!
!
!
!
!
!
!
7. Tighten handlebar stem !
!
!
!
!
!
!
!
!
!
!
!
!
EcoMotion Bikes
8
Page 9
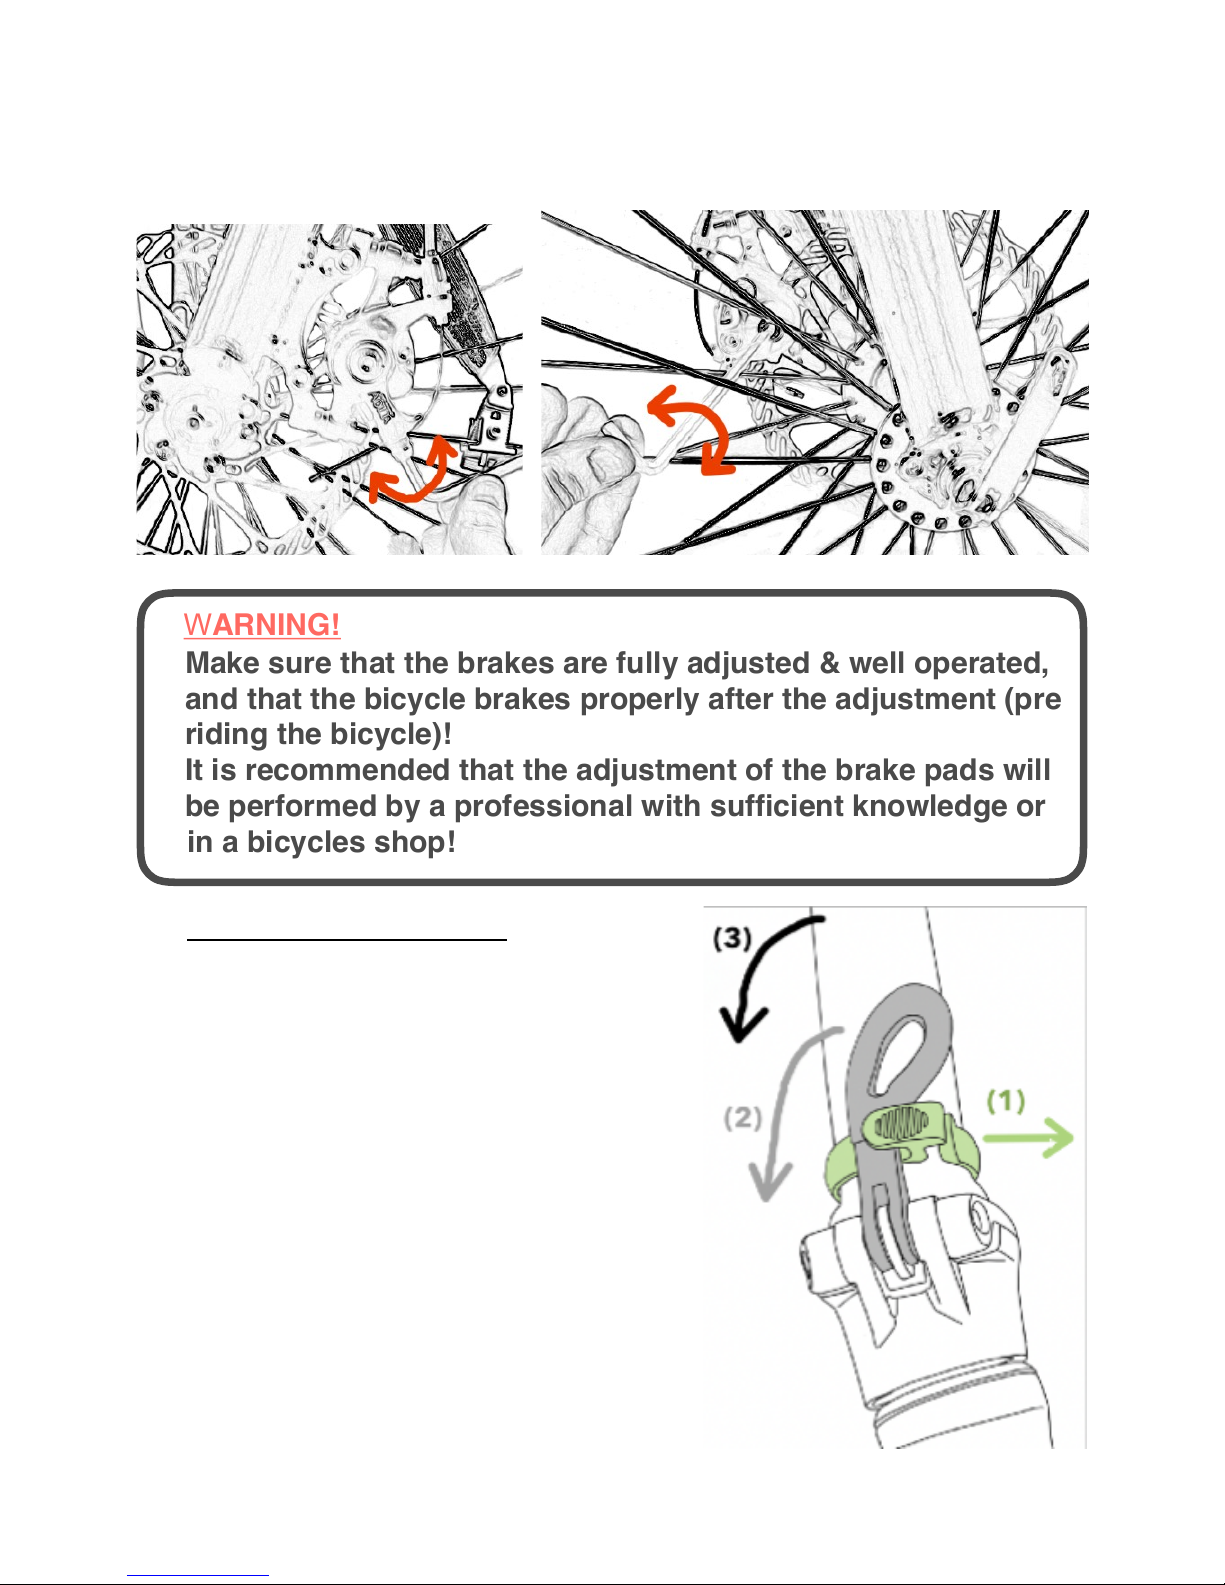
8. Adjust the brake pads by tightening and releasing them from
the disc.
Folding of the bicycle:
Folding the handlebar:
(1) Open the folding mechanism lock.!
(2) Pull the lever down.!
(3) Fold the handlebar.
Rising the handlebar:!
(3) Straighten the handlebar. !
(2) Lock the folding lever. !
(1) Lock the folding mechanism lock.
!
EcoMotion Bikes
9
WARNING!!
Make sure that the brakes are fully adjusted & well operated, !
and that the bicycle brakes properly after the adjustment (pre !
riding the bicycle)!!
It is recommended that the adjustment of the brake pads will !
be performed by a professional with sufficient knowledge or !
in a bicycles shop!
Page 10

Folding the frame:
(1) Unlock the folding mechanism lever. !
(2) Open the lever towards the rear side of the bicycle.!
(3) Lift up the lever until a click is heard (double lock
mechanism).!
(4) Fold the bicycle frame
Return the frame to a riding position:!
!
(3) Lift up the folding mechanism lever.!
(4) Return the frame to its unfolded position!
(2) Close back the lever. !
(1) Lock the lever to its place.
Bicycle prepare / inspection prior to riding:
The height of the seat must be adjusted to the height of the
user. !
It is recommended to adjust the seat in the way that the user’s
feet are touching the ground .!
Important! – To avoid component breakage, when raising the
seat, make sure that its safety line is unrevealed to the eye!
EcoMotion Bikes
10
Page 11

The height of handlebar’s stem must be adjusted to the height
of the user. The desired height is the most comfortable height
to the user. Important! – To avoid component breakage, when
raising the stem, make sure that its safety line is unrevealed
to the eye!
Make sure that the wheels are well connected to the frame
and rotate freely.
Make sure that the steering system is functioning properly and
fully reactive. Also make sure that the handlebar is adjusted to
the user's height and does not exceed the safety line, as well
as that the handlebar screws are not loose.
Make sure that the wheel spokes are tightly screwed and are
not loose. And that the wheels are not missing any of them.
Be sure to check that all of the bicycle’s bearings are
operating and rotating freely (are not jittery or vibrating).
EcoMotion Bikes
11
Page 12

Make sure that the breaks are properly functioning, also be
sure to check that the brake pads are well operating, and are
not overly worn. In such cases in which pads / breaks must be
replaced this must be performed at proper bicycle shop or by
a professional with sufficient knowledge.
Be sure to check that both of the tires are not punctured.
Make sure to check that the tires are not overly worn, as
these will have poorer road grip, if the tires are overly worn,
be sure to replace them before using the bicycle.
Be sure to check that the rims are not broken or cracked if
one or both rims are cracked or broken, it/they must be
replaced.
The bicycle includes front and rear flashlights & a horn, be
sure to check that all of them are functioning prior to riding
the bicycle.
Make sure that all components of the bicycle are well set in
their place.
Make sure that there are no pressure marks or cracks or
breakage in the frame.
Make sure that the tires are properly pressurized, according to
the pressure range indicated on the tires. !
Low tire pressure will result in lower riding range. !
High tire pressure may result in a punctured or flat tire.
Make sure the bicycle’s battery is functioning and any
physical pulping or damage does not appear on it.
Make sure that the battery is properly mounted on the bicycle
prior to use.
Make sure that the TAG / PAS systems are properly
functioning.
EcoMotion Bikes
12
Page 13

Make sure that the pedals are not broken and are properly
attached to the crank, that is properly attached to the axis of
the bicycle.
Make sure that the pedals axis is not bent or deformed.
Make sure that the gears are properly attached to the bicycle
and are not broken or deformed. And that the gears are
working properly.
Operating the bicycle’s electric system:
1. Turn the key (located on the battery) to the rightest position.
2. Press on the central button of the display.!
Bicycle’s electric system is on and ready to be driven in
electric mode.
Operating the motor by using the PAS system: !
There is a sensor that is located in the pedals area. !
As the pedals are rotated, the sensor recognizes the motion
and turns on the motor. !
This model has 5 different speeds of PAS, that can be
controlled from the bicycle's display.
Operating the motor by using the TAG system: !
A throttle is located on the right side of the handlebar. While
turning the throttle, the motor goes into action.
The bicycle can be used as a regular bicycle while the electric
system is off.
EcoMotion Bikes
13
Page 14

Once you are done with using the bicycle, it is important to
turn off the electric system.
Tips for proper use:
Be aware that the right brake lever controls the rear brake,
while the left brake lever controls the front brake.
Avoid braking using front brake only, as doing so may cause
the rider to be thrown forward from the bicycle.
Be aware that the brake range of the bicycle may prolong
under certain circumstances (e.g. wet/moist surface, sand,
etc.)
Do not ride your electric bicycle in water (damp roads,
puddles, rain, streams, etc.) and never immerse it in water as
the electrical system may be damaged.
It is recommended to wear a proper bicycle helmet for riding,
even if this is not mandated by law in certain situations.
All applicable laws and regulations should be read carefully
before using the electric bicycle.
You must comply with traffic laws and regulations.
EcoMotion Bikes
14
IMPORTANT! In case that the electric system is left on, !
while the bicycle is not in use for a long time, the battery may !
reach a state where it is no longer chargeable.
IMPORTANT! This model is equipped with a motor !
shutdown system.!
While pressing on brake handles, the motor shuts down. !
Please verify that the system is operating well before using !
the bicycle.
Page 15

These electric bicycle is not meant for jumps, stunts and
stairs decline, such usage may damage the wheel rims and
the wheel spokes of the bike, which will endanger the rider.
This electric bicycle is meant for a single user and should not
be ridden by two users or more together.
In order to maintain the motor gears while using TAG system,
it is recommended to start using the throttle after several
pedal rotations (as the bicycle is already in motion).
Be sure to assist the motor by pedaling in uphill climbs.
The recommended carrying weight for this electric bicycle is
165lbs., exception from recommended carrying weight will
shorten the riding range per charge.
This model does not meant to carry a weight of over 220lbs
regularly. Such use can cause damage to the motor gears
and/or to the battery. !
EcoMotion Bikes
15
WARNING! Cycling can be a hazardous activity even under !
the best of circumstances.!
Make sure to use protective gear such as a helmet and other !
shields as well as closed shoes, even for short rides!
IMPORTANT! The distance range of the bicycle in electric !
mode varies according to rider's weight, road conditions, !
battery power etc.!
The battery power diminishes with age (and with usage).
IMPORTANT! Using the bicycle near the beach exposes it to !
salt & humidity. The bicycle ought to be cleaned and oiled !
more frequently if used in such areas, to make sure that the !
components do not rust and malfunction.
Page 16

Bicycle maintenance:
The bicycle's motor and/or battery must not be oiled, opened
or punctured.
The bicycle's battery must only be used for its intended
purpose.
Do not disassemble the display, in case of malfunctioning
please see "Problems and Solutions" chapter in this manual.
It is recommended to oil the bicycle chain and the metal parts
which are not aluminum in the bicycle on a regular basis (the
frequency of oiling depends on the climate in which the
bicycle is used, frequency should increase in damp and
humid areas).
Only original spare parts are to be used in the following
components: motor, controller, battery, charger. !
However, unoriginal spare parts can be used for: tires,
brakes, lights etc. !
Nevertheless, be sure to consult with a professional to make
sure non original parts are compatible with this bicycle model. !
In case consultation is required while warranty period still
applies, ask for consultation concerning a specific spare part
by sending an e-mail to: [email protected].
Using spare parts without consulting may void warranty.
Make sure that the base of the battery is clean on a regular
basis, do not clean while using water!
The bicycle should be cleaned using a wet cloth only (do not
pour / spray water directly onto the bicycle). !
After cleaning the bicycle, the metal parts, that are not
aluminum, should be oiled.
All bicycle’s moving components should be cleaned on a
regular basis.
EcoMotion Bikes
16
Page 17
Bicycle’s brakes and brake pads ought to be inspected in a
bicycle store or by a professional on a regular basis.
The wheel spokes must be monthly inspected, in order to
make sure that no spokes are loose or missing, in case
spoke(s) is/are loose or missing there is need to replace it/
them using the aid of a professional. Unqualified person may
cause deformation of the wheel.
The electric wiring must be occasionally inspected to make
sure no wire is torn, and that all connectors are well adjusted. !
!
!
The battery: !
This battery model is a chargeable Lithium Polymer battery
powered by LG cells.
It is highly recommend that the battery will be charged in full
prior to use.
EcoMotion Bikes
17
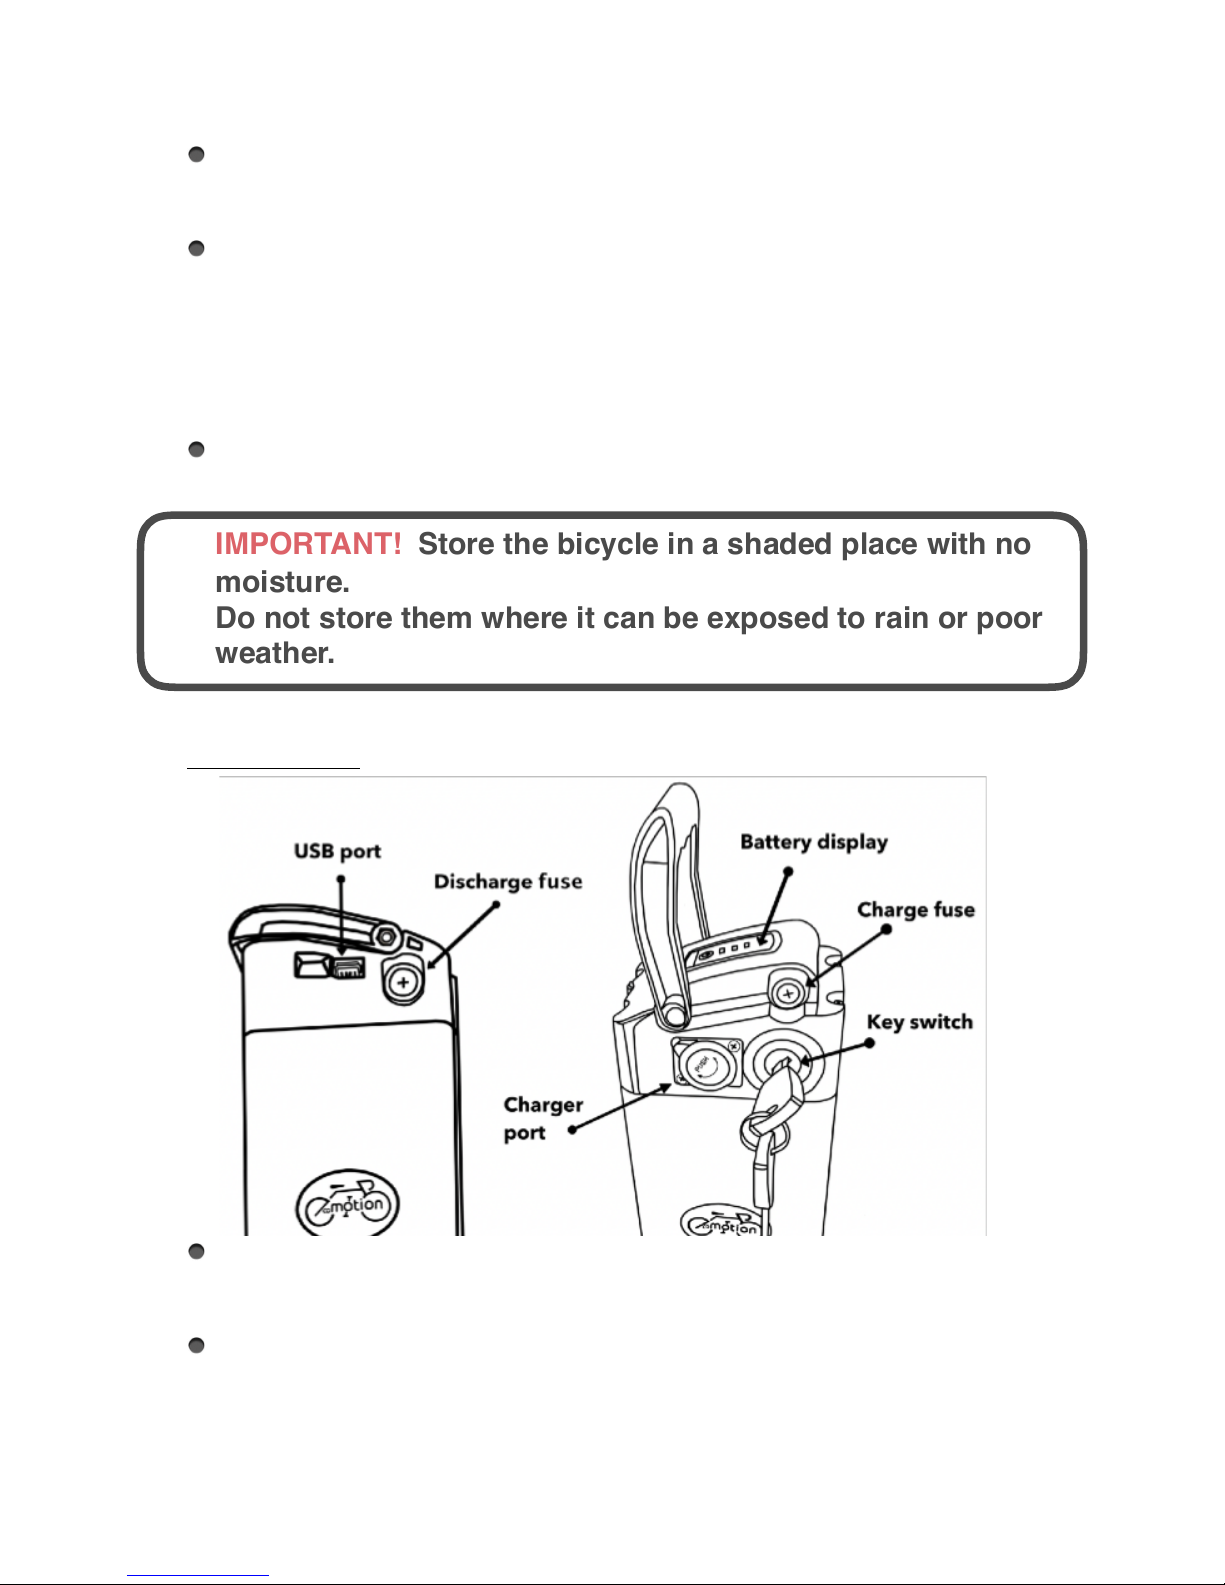
IMPORTANT! Store the bicycle in a shaded place with no
moisture.!
Do not store them where it can be exposed to rain or poor
weather. !
Page 18

You can view the available voltage of the battery at any given
moment by using its display, or by using bicycle’s display
which located in the handlebar.
The battery must not be perforated, and / or placed near fire
or another heat dispersing element, and / or soaked in water,
and / or crushed, and / or disassembled, and / or be used not
for its intended purpose, and / or placed at the vicinity of
strong electromagnetic or electrostatic fields.
All effort should be made to avoid dropping the battery.
The battery and the charger should be kept away from reach
of small children.
The capacity rating of the battery was measured at a
temperature of 77°F. Any change in this temperature brings
about alterations to the capacity of the battery and shortens
its life expectancy, especially as the temperature is higher, the
life expectancy of the battery is lower, and consequently the
electrical riding range decreases !
!
!
!
EcoMotion Bikes
18
SEVERE WARNING!!
Storing battery in extreme hot/cold temperature must be !
avoided. As this will bring about a decrease in battery quality.!
Extremely low temperature may cause corrosion and !
shortening of the battery lifespan.!
Extremely high temperature may cause battery inflation and !
making it dangerous, and in most extreme cases cause !
battery explosion!!
Recommended storage temperature for the battery is between !
32°F - 72°F!
WARNING! Avoid exposing the battery to extreme !
temperatures (104°F or higher) for prolonged period!
Page 19

!
!
!
!
!
!
!
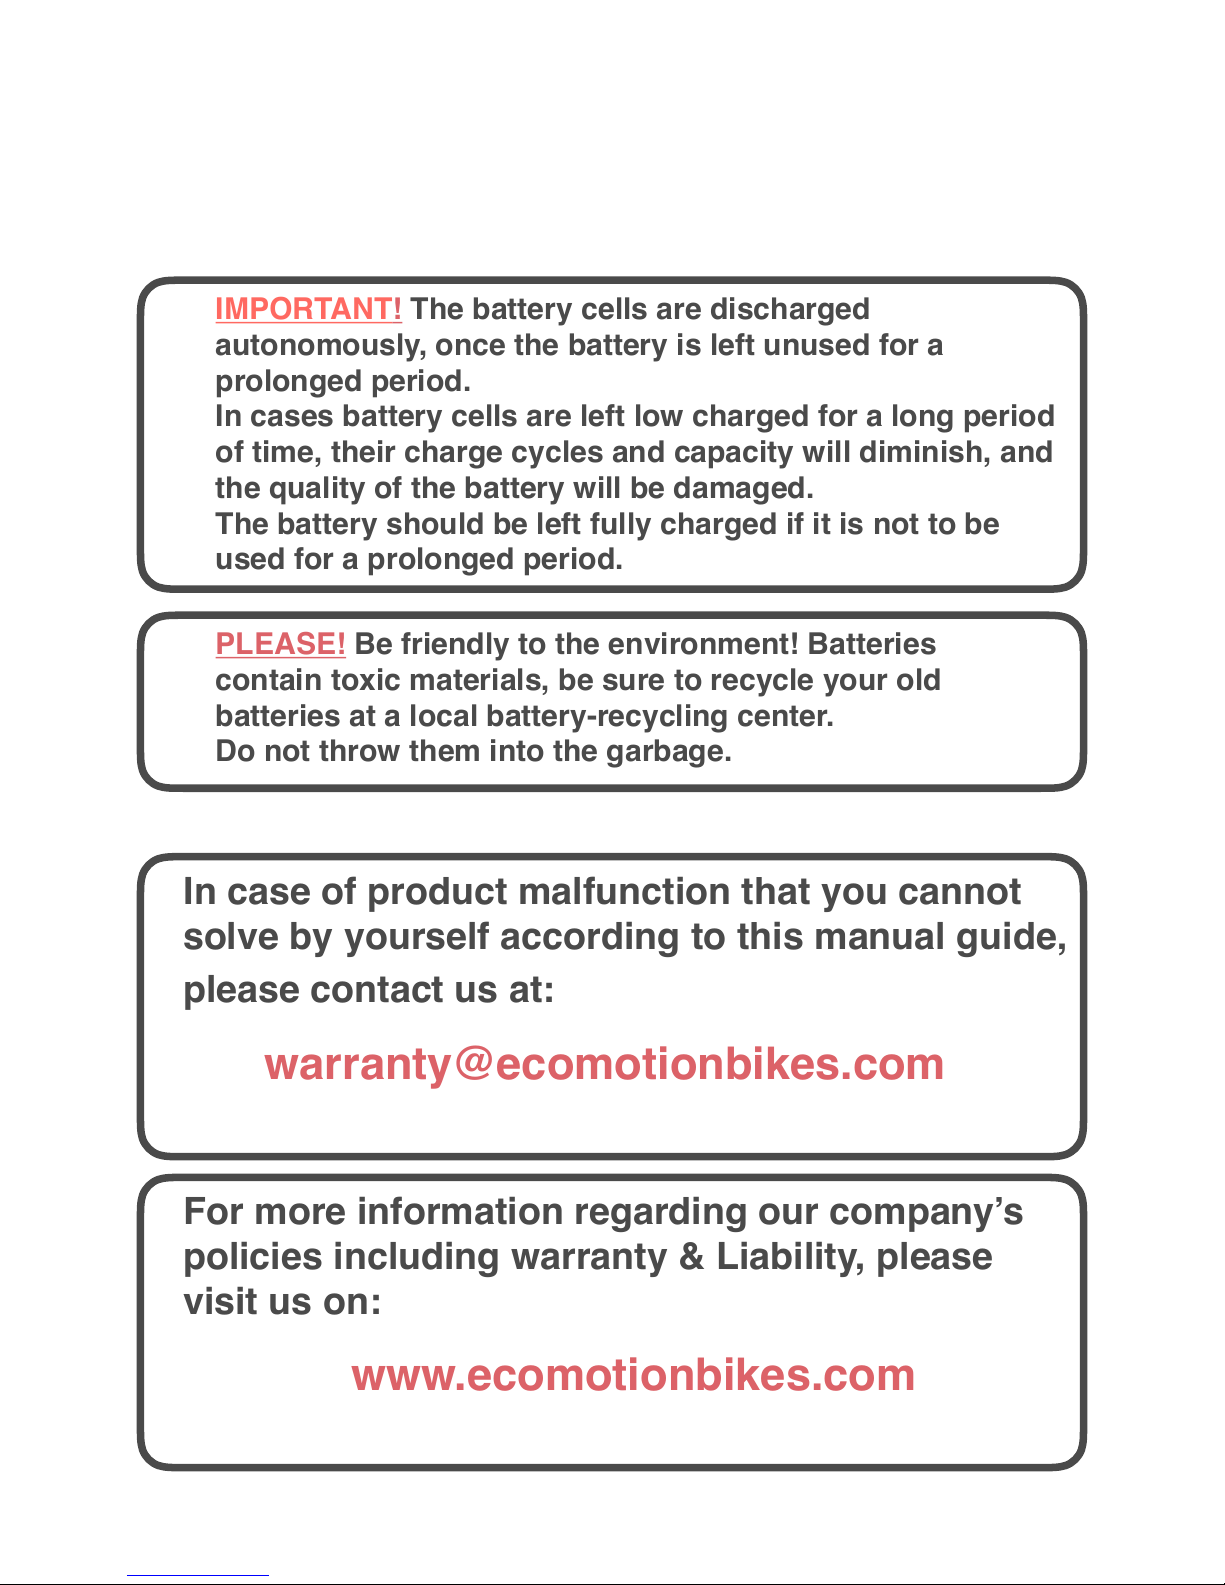
Dismounting / mounting of battery from the bicycle:
The battery switch has three modes:
(1) "A mode in which the battery is shut off and unlocked from
the frame (in this mode the battery can be dismounted).
(2) "A mode in which the battery is shut off and locked onto
the frame (in this mode the electric system is off and the
battery is locked onto the frame).
(3) "A mode in which the battery is turned on and locked onto
the frame (electric system is on and the bicycle is ready
for e-riding). !
!
!
!
In order to switch from mode (2) to mode (1) the key should
be pushed into the battery and then turned towards its left.
!
EcoMotion Bikes
19
WARNING! Do not leave the battery unattended in a closed !
vehicle!!
The vehicle may warm up by the sun and reach high !
temperatures!
IMPORTANT! Proper maintenance of batteries, according to !
this guide, will maximize their lifespan and capacity.
IMPORTANT! Make sure that while mounting the battery !
back onto the frame, the battery is sliding on its allocated rail, !
if the battery is misplaced it may get stuck.
Page 20

Emphasis for battery charging:
The battery must be charged with the provided charger only,
any other form of charger is forbidden and dangerous!
The battery must be charged only when it is in off mode (and
not emitting voltage).
The battery may be charged while assembled to the bicycle
as well as when it is unassembled.
While the battery is in charging, the charger red indicator light
is turned on, as the light turns into green the battery is fully
charged.
Before of the charging, in order to avoid circuit shortening,
the charger should be first connected to the electrical socket
and then connected to the battery.
In order to finish the charging process, the charger should
first be disconnected from the electrical socket and then
disconnected from the battery.
Do not cover the battery and the charger during charging
process.
In case in which the battery overheats during the charging
process, the charging should be stopped immediately! In
such case you must consult us at
[email protected].
It is normal for the charger to become somewhat hotter during
the charging process.
Do not place the battery and / or the charger near flammable
substances during charging.
The battery works better when it is fully charged, it is
recommended to begin riding when battery is fully charged.
EcoMotion Bikes
20
Page 21

!
!
Preserving of battery's lifespan:
It is highly recommended to charge the battery in full
immediately as you get the bicycles.
It is recommended to charge the battery in full within every 20
charging processes at least.
The charger must be disconnected from the electricity and the
battery after the charging process is completed.
The battery must not be left empty for more than 24 hours, if
the battery is left uncharged for too long it may reach a state
in which it is no longer chargeable.
If you know that the bicycle will not be in use for a long period
of time, the battery should be charged in full, separated from
the bicycle and placed in a cool and dry storage location.!
In this case the storage time must not exceed 45 days. !
Upon renewed use of the battery, it is recommended for it be
recharged in full.
Average battery lifespan depends on its use and on its
conditions. Even with proper care, rechargeable batteries do
not last forever. This battery model will last between 700-1000
charging cycles. !
A partial charge/discharge counts fractionally against those
EcoMotion Bikes
21
WARNING! The charger should be checked for physical
damage. Before every charging, make sure that the charger
wiring is not torn or exposed and whether its electrical plug
is damaged!!
In case you notice a problem with the charger, the battery
must not be charged until the charger is fixed / replaced!!
In case of a defective charger contact your bicycle
provider! !
WARNING! Never charge the battery without supervision!!
Do not charge the battery overnight while all people are !
sleeping in the house! !
Page 22
numbers. Running the battery down halfway and then
recharging it completely, uses up to one half of a charge
cycle.
!
EcoMotion Bikes
22
IMPORTANT! The battery cells are discharged
autonomously, once the battery is left unused for a
prolonged period.!
In cases battery cells are left low charged for a long period
of time, their charge cycles and capacity will diminish, and
the quality of the battery will be damaged.!
The battery should be left fully charged if it is not to be
used for a prolonged period. !
PLEASE! Be friendly to the environment! Batteries
contain toxic materials, be sure to recycle your old
batteries at a local battery-recycling center. !
Do not throw them into the garbage. !
In case of product malfunction that you cannot !
solve by yourself according to this manual guide, !
please contact us at:
warranty@ecomotionbikes.com
For more information regarding our company’s !
policies including warranty & Liability, please !
visit us on:
www.ecomotionbikes.com
Page 23

EcoMotion Bikes
23
Problem
Possible cause
Solution
Speed / range
reduce
Low tire air pressure
Inflate tiers to recommended
pressure
Brake pads rubbing
against their discs
Adjust brakes and / or caliper
PAS magnets away
from sensor
Attached the magnets to the
sensor
Low battery
Charge the battery full charge
Battery lifetime is over /
shortened
Replace the battery
Ridding conditions
(headwind, climbing,
etc.)
Reduce range to be expected
No power while
battery switch
“on” (display
doesn't work)
Burnt fuse
Replace the fuse
Loos connector
Check all connectors
Rupture wire
Inspect all wires for damage
Faulty switch
Replace switch and retest
Faulty controller
Replace controller and retest
Battery lifetime is over /
battery not charged.
Replace / charge the battery and
retest
Faulty display
Replace the display and retest
PAS system
doesn't work
Motor shutdown
system operated
Make sure that bake handles in
their place
PAS magnets away
from sensor
Attached the magnets to the
sensor and retest
Faulty PAS sensor
Replace the sensor and retest
Faulty controller
Replace controller and retest
Display rupture wire
Replace the display and retest
Page 24

EcoMotion Bikes
24
Problem
Possible cause
Solution
Motor runs without
using TAG / PAS
systems
Faulty PAS sensor
Replace sensor and retest
Faulty throttle
Replace throttle and retest
Wire short
Replace main cord and
throttle cord and retest
Faulty controller
Replace controller and
retest
TAG system doesn't
work
Motor shutdown system
operated
Make sure that bake
handles in their place
Faulty throttle
Replace the throttle and
retest
Faulty controller
Replace controller and
retest
Display rupture wire
Replace the display and
test
Motor make a “drilling”
noise and reduce
power / shuts off
Low battery
Charge the battery full
charge
Motor gear damaged
Replace motor gears
Charger doesn't
charge the battery
Burnt fuse
Replace the fuse
Faulty charger
Replace the charger
Outlet has no power
Check a different outlet
Charger shows s full
charge in an unusually
short amount of time
Faulty charger
Replace the charger
Battery lifetime is over /
shortened
Replace the battery
Charger indicator light
flashes and not change
into red (not charging)
Faulty charger
Replace the charger
Bicycle has intermittent
power
Loose connector
Check all connectors
Loose fuse
Check fuse connector
Damaged wires
Inspect all wires
 Loading...