

Page 1
Communication
Torches/Flashlights
Mobile Computing
Measuring & Calibration
M o b i l e s o l u t i o n s f o r e x t reme tasks
Getting Started
i.roc x20 (-Ex)
Pocket PC
Picture: i.roc x20 -Ex
Page 2
Getting started
Do not connect the i.roc x20 Pocket PC to your computer
1
until you have finished installing Microsoft Active Sync on
your computer.
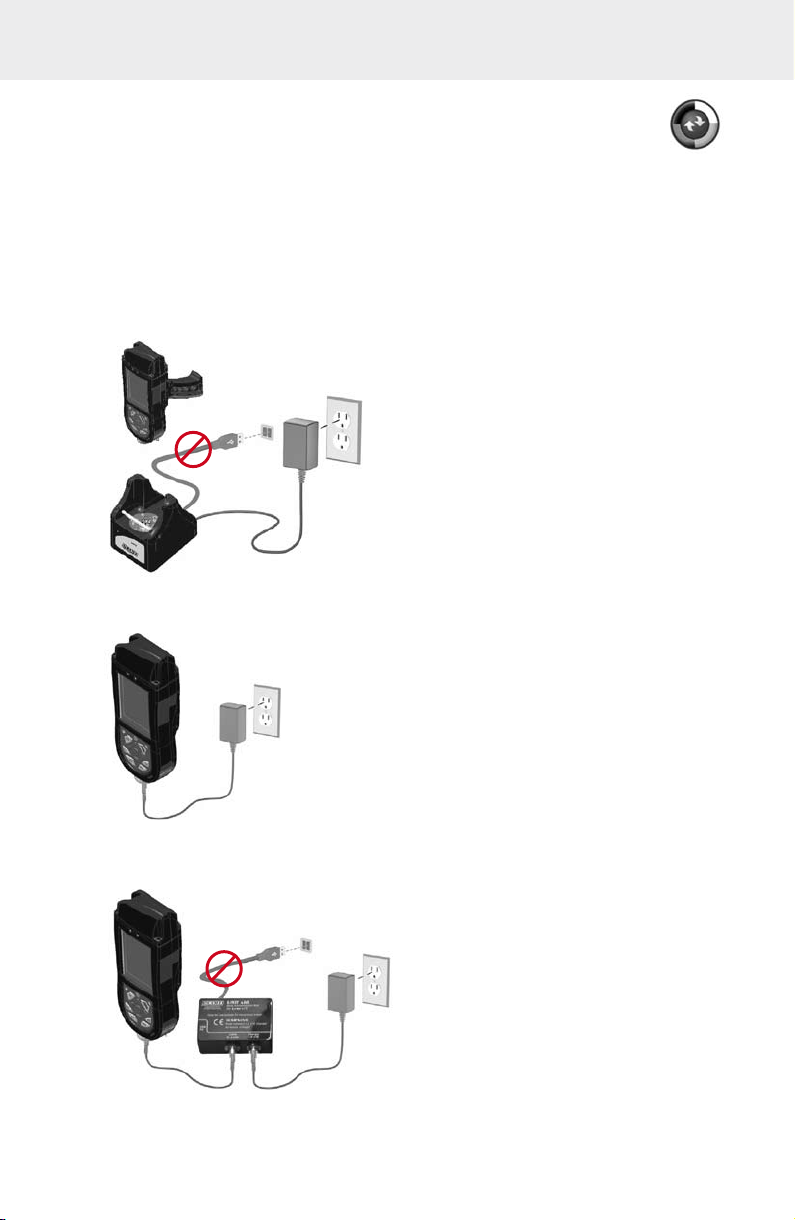
Charge the battery pack of the i.roc x20 Pocket PC
2
Do not connect the Pocket PC to you computer untill the battery pack is not
fully charged. You have following options to charge the i.roc x20:
2.1 Inside Dockingstation with assembled adaptor
2.2 Using direct connected charger
2.3 Using the USB connection set
Page 3

Power On
3
Press the Power button to turn the unit on.
Set up the device
4
When the Windows Mobile screen displays on the screen tap
anywhere on the screen and follow the on-screen instructions until
setup is complete.
Insert the Companion CD into the computer
5
Insert the Companion CD into the computer‘s CD Rom drive.
Click “Start Here“. Follow the on-screen instructions. The setup wizard
installs following:
- Active Sync 4.x or higher
- Microsoft Outlook (if necessary)
- Other optional software applications
Connect the i.roc x20 Pocket PC to your computer when instructed by setup
6
wizard on the computer
Therefore connect the USB connection cable to a free USB port on
your computer, insert the i.roc x20 into docking
station or connect the USB cable to USB
connection set.
Establish a partnership
7
Follow the on-screen Active Sync instructions to establish a connection
between you Pocket PC and your computer or select guest partnership.
Use of HP original documents
The ecom instruments i.roc x20 Pocket PC is based on the HP iPAQ hx2000 Pocket
PC family. Therefore all related HP documents or Software updates can be used
further on. All modifications regarding the hardware are descripted within these
booklet as good as possible. The use of standard software is equal to the original
HP devices.
Page 4

Resetting the unit
Depending on the i.roc x20 operating system, different resets can be performed.
All resets should be performed without connected and powered charger.
Windows Mobile 2003 SE
Performing a Soft-Reset
A Soft-Reset stops all running applications, but does not erase any programs or saved
data. Be sure to save any unsaved data with a running application before
performing a Soft-Reset.
- To perform a Soft-Reset press both reset buttons on the keypad
- The Pocket PC restarts and displays the today screen
Performing a Hard-Reset
Perform a Hard-Reset only when you want to clear all user-installed settings, applications,
and data from RAM, where data and applications you have loaded are stored. Also after
the battery is completely discharged, the device will operate in the same way after HardReset. All i.roc x20 are equipped with a so called AutoInstallation tool, you can reload
predefined programs and settings automatically.
- To perform a Hard-Reset press and hold down the F1 and F4 buttons
- While holding down these buttons, press the reset buttons for about two seconds
- When the Pocket PC screen begins to fade, release the F1 and F4 buttons first
and then release the reset buttons.
- The Pocket PC resets and powers on
Note: If you simultaneously push and hold the Reset, F1 and F4 buttons for more than two
seconds, the battery disconnects. To restart the device, either plug the device into the AC
Adapter or press the reset buttons again.
Windows Mobile 5
Performing a Soft-Reset
A Soft-Reset stops all running applications, but does not erase any programs or saved
data. Be sure to save any unsaved data with a running application before
performing a Soft-Reset.
- To perform a Soft-Reset press both reset buttons on the keypad
- The Pocket PC restarts and displays the today screen
Performing a Hard-Reset
A Hard Reset stops all running applications, but does not erase any programs or saved
data. Additional to a soft reset all hardware registers will be erased.
- To perform a Hard-Reset press and hold down the F1 and F4 buttons
- While holding down these buttons, press the reset buttons for about two seconds
- When the Pocket PC screen begins to fade, release the F1 and F4 buttons first
and then release the reset buttons.
- The Pocket PC resets and powers on
Note: If you simultaneously push and hold the Reset, F1 and F4 buttons for more than two
seconds, the battery disconnects. To restart the device, either plug the device into the AC
Adapter or press the reset buttons again.
Performing a Clean-Reset
A Clean Reset clears all user-installed settings, applications and data from the device.
- To perform a Clean-Reset, press and hold F1, F3 and the power buttons
- While holding down these buttons, press the reset buttons for about two seconds
- When the Pocket PC restarts release first the F1, F3 and power buttons first and
then release the reset buttons
- The Pocket PC resets and powers on
Page 5

System Overview
1
2
3
4
14
13
12
5
11
10
9
6
7
8
Front and bottom panel components
1 Flat top panel, optional long top panels for adding
barcode or RFID modules available
2 Wireless / Notification LED indicator
Off = WiFi or Bluetooth are both off
Blue flash = WiFi and / or Bluetooth are on
Green flash = notification events have occured
3 Charge LED indicator
Off = no charging
Red flash = charging
Red solid = charging complete
4 Touchscreen
5 Power button
6 F4 button (HP indication: iTask button)
7 F3 button (HP indication: Messaging button)
Starting iPAQ Wireless, press and hold for two seconds
8 5 pin charging plug with USB connector
(only active with powered charger)
9 Speaker and microphon in / outputs
10 F2 button (HP indication: Contacts button)
Starting HP Protect Tools, press and hold
for two seconds
11 F1 button (HP indication: Calendar button)
Switching Landscape / Portrait mode,
press and hold for two seconds
12 5-Way Navigation button, scrolling through a list or
pushing to select (similar to using a joystick)
13 F5 button (HP indication: Record button)
Using as trigger button for optional barcode or
RFID modules
14 2 Reset buttons, for Soft Reset press both
buttons at the same time
back and inhousing components*
15 serial interface for connecting optional modules*
16 SD card expansion slot*
17 Typ II CF card slot*
18 Stereo-headphone / headset jack (3,5mm)*
19 IrDA Infrared port*
20 Lower socket for optional handstraps
or handgrips*
21 Two stylus slots*
22 Backcover label, including serial number
and device name*
23 External socket for connecting external
trigger additional to F5 button*
24 Upper sockets for optional handstraps or handgrips*
25 Battery slot*
i.roc 420
with scannermodule
and optional handgrip
inserted in dockingstation
*not all i.roc x20 types provide full functionality in the way
descriped before or are accessible by enduser
22
23
24
25
21
15
16
17
18
19
20
Page 6

Learning more about the i.roc x20 Pocket PC
for information on ... see this source ...
Using your Pocket PC - HP iPAQ hx2000 Pocket PC Family
user guide on the related PC
Companion CD
- HP iPAQ hx2000 product side on
http://www.hp.com/country/de
- i.roc x20 Productside on
http://www.ecom-ex.com
Bluetooth- and WiFi connections HP iPAQ hx2000 Pocket PC Family
user guide on the related HP
Companion CD
Additional programs that can be - HP Companion CD
installed on your Pocket PC - i.roc x20 product side on
http://www.ecom-ex.com
- Use at application ”EcomEdit”
- User guide for ”AutoInstall”
Safety precations and Document ”Safety instructions“
Safety instructions on i.roc x20 prouct side on
http://www.ecom-ex.com
Information about warranty Document ”Safety instructions“
on i.roc x20 product side on
http://www.ecom-ex.com
CE Conformity Document ”CE Conformity“
on i.roc x20 product side on
http://www.ecom-ex.com
Accessory On the i.roc x20 product side on
http://www.ecom-ex.com
Support E-mail: info@ecom-ex.com
Phone: +49(0) 62 94 / 42 24 - 0
Technical data On the i.roc x20 product side on
http://www.ecom-ex.com
WEEE-Reg.-No. DE 934 99306
3500 AL02 A01 01/09 Subject to change without notice!
ecom instruments GmbH · Industriestr. 2 · 97959 Assamstadt · Germany
Tel.: + 49 (0) 62 94 / 42 24 0 · Fax: + 49 (0) 62 94 / 42 24 90 · E-Mail: sales@ecom-ex.com
ww w.ec om- ex.com
 Loading...