

Page 1
x.com 400/401
x.com 500/501-Ex
x.com 600/601-Ex
Operating Instructions
Page 2
Becoming familiar with the x.com
Congratulations on the purchase of an x.com mobile telephone. The x.com series mobile
phone is available in different versions and models.
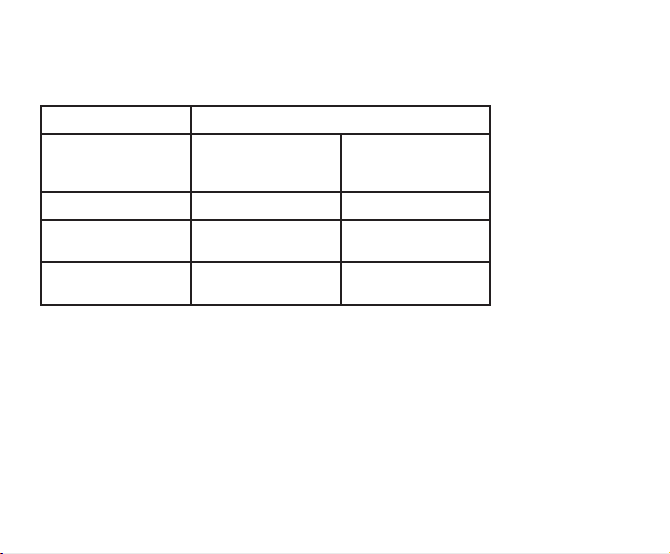
Model
Version Dualband GSM Dualband GSM
+ GPS
+ Deadman
Industrial version 400 401
Category 3G/3D for
use in Zone 2 or 22 500 -Ex 501 -Ex
Category 2G/2D for
use in Zone 1 or 21 600 -Ex 601 -Ex
The differences between these versions and models do not affect the principle operation of the
devices, but rather are found in the constructive design and available functions of the devices.
For further questions regarding the Ex versions 500 -Ex, 501 -Ex, 600 -Ex or 601 -Ex, please
read the Ex safety instructions or contact ecom instruments GmbH in Assamstadt.
The operating instructions do not replace the safety instructions required for the Ex versions
500 -Ex, 501 -Ex, 600 -Ex or 601 -Ex for secure and safe operation in explosive environments.
These are enclosed separately and are to be read carefully prior to use in explosive environments.
67
Page 3

Table of contents
1. Menus 73
2. Purchased parts package 74
3. Description 75
4. Navigation principles 77
5. Initial screen 78
6. Activating your phone 79
Information on the SIM card 79
First use: Inserting the SIM card and battery 80
Remove the battery 80
Getting started 80
PIN number 81
Setting time and date 81
Network 82
First call 82
Calling voicemail 83
Receiving a call 83
Switching off 84
7. Using your phone 84
Keeping the antenna free 84
Increasing the battery duration of your phone 85
Charging the battery 85
8. Phonebook 86
Using the phonebook 86
Storing a new contact 87
Calling a contact 87
Contact options 87
68
Page 4

69
Modifying a contact 87
Sending a message 87
Sending By 88
Copy to SIM/Copy to mobile 88
My numbers 88
Mailing lists 88
Memory 88
Delete/Delete all 89
Set as my card/Business card 89
Synchronise 89
Contacts synchronisation with a computer 89
List selection 89
9. Alert (version x.com 401 / 501 -Ex / 601 -Ex only) 89
Alert activation 90
Alert configuration 90
SMS alert configuration 91
GPS 91
10. Position finding (version x.com 401 / 501 -Ex / 601 -Ex only) 91
Authorisation acceptance during position finding requests 91
Activation of position finding via SMS 91
11. Messages 92
Compose SMS messages 92
Compose MMS messages 95
Receiving messages 96
Inbox 96
Outbox 97
Sentbox 97
Drafts 97
Page 5

Templates 97
Message Status 97
Options 98
Memory 99
Local information 99
Calling voice mail 100
Mailing list 100
12. Multimedia 100
My Pictures 100
My Sounds 100
Memory 100
13. WAP 102
The WAP Menu 102
Configuring WAP parameters 103
WAP Logging on 104
Downloading objects 104
WAP Logging off 105
GPRS 105
14. Applications 105
ToDo 105
ToDo menu 105
ToDo actions menu 105
Sending a vCalendar 106
Receiving a vCalendar 106
Data exchange with a PC 106
Calculator 107
Converter 107
Alarm 108
70
Page 6

71
Timer 108
15. Organizer 108
Calendar menu 108
Sending a vCalendar 109
Receiving a vCalendar 109
16. Settings 110
Energy saving 110
Languages 110
Contacts 110
Calls 110
View last calls 110
Counters 111
Call waiting 111
Help 111
Networks 111
Date / Time 112
Set Date/Time 112
Automatic updating 112
Display 112
Time zone 112
Daylight savings 113
Customise (PIN2) 113
Shortcuts 113
Programmable keys 113
Speed dialling 113
Sounds 114
Security 115
WAP settings 118
Page 7

Call forward 118
Display number 118
Voicemail 118
Blacklist 119
Local info 119
Activate Customise Menu 119
Help 119
17. Connectivity 120
Bluetooth 120
Serial Speed 120
Car kit 120
SyncML 121
18. Technical features 121
19. Safety measures and safety information 122
SAR 123
Advice for limiting exposure to radiofrequency (RF) fields 123
Safety 124
20. Repair 126
21. Cleaning, maintenance and storage 126
22. Disposal 126
23. Warranty and liability 127
24. EC Declaration of Conformity 128
72
Page 8

73
1. Menus
Applications
ToDo
Services
Calculator
Converter
Alarm
Timer
Connectivity
Bluetooth
Serial Speed
Car kit
SyncML
Multimedia
My Pictures
My Sounds
Memory
Messages
Compose
Inbox
Outbox
Sentbox
Drafts
Templates
Status report
Options
Memory
Call Voice Mail
Mailing list
Alert*
Creating manual or
automatic remote alarms.
Organizer
See month
See week
See today
See date
Calendar menu
Help
Phonebook
Contacts menu
Wap
Settings
Customise (PIN2)
Sounds
Security
WAP settings
Call forward
Display number
Voicemail
Black List
Alert*
Activate Menu
Call waiting
Calls
View last calls
Counters
Help
Networks
Languages
Energy saving
Contacts
Shortcuts
Date/Time
Set Date/Time
Automatic upda.
Display
Time zone
Daylight savings
Help
*) only x.com 401 / 501 -Ex
/ 601 -Ex
Page 9
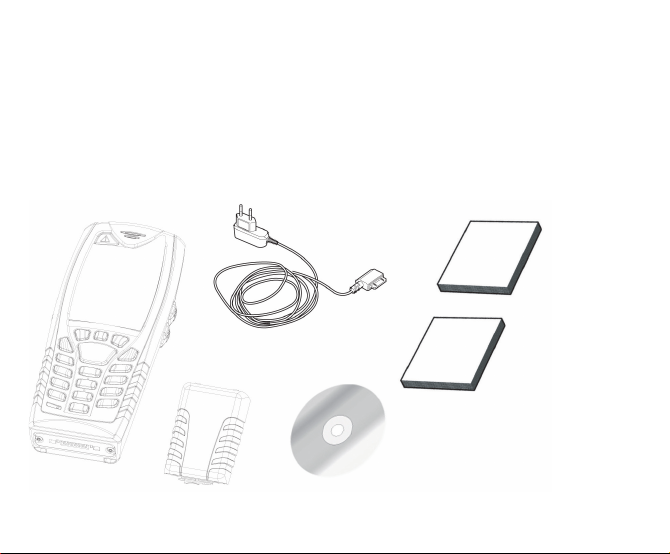
2. Purchased parts package
When you open the box, check that all items listed below are present:
1. Mobile phone
2. Charger
3. Battery
4. User guide
5. Safety instructions (x.com 50x –Ex / 60x –Ex)
6. CD
v
x
y
u
z
w
74
Page 10

75
3. Description
Emergency call (**)
Long press: Switching on/ Switching off
Press briefly:
In a call context: Refuse call – ring off
In menus: Return to initial screen
During a call: Activate/deactivate hands free mode
(WARNING: In this mode do not bring the phone up to your ear.
This could cause damage to your hearing)
In a call context, establish connection – accept call
Right programmable key:
On the start screen: press two times quickly: access to Inbox;
long press: access to network settings
In menus: Access to the selection shown on the screen in the tab(*)
Left programmable key:
On the start screen: two brief presses: access to the Phonebook, access to Bluetooth,
long press: activate/deactivate the alarm
In menus: Access to the selection shown on the screen in the tab(*)
The four-way navigation stick offers the following functions:
- By tilting the navigation stick in a particular direction, you can move the cursor in the
corresponding direction on the screen.
- By pressing the navigation stick, you confirm a selection.
- On the reception screen: Long press in one of the four directions:
Access to specific functions (shortcuts).
Note: When the Ä and ~ icons appear on the screen, access to the corresponding
option is initiated via the navigation stick
Press briefly and [OK]: Activate or deactivate keypad locking
Hold down: In initial screen: Silent mode
In call reception mode: Short press stops ring tone
In ring tone setting mode: Activate/deactivate the ring tone
When composing a message: Short press: Toggle between input modes
(T9, ABC, 123); Long press: upper case/lower case
A long press on one of the keys from 2 to 9 opens the phonebook
2 to 9
The corresponding shortcut is initiated by briefly pressing and one of the keys
0 to 9
from 0 to 9.
(*) In this manual, brackets are used when a function is chosen by pressing on a key
(e.g., [Save]).
(**) If offered by the distributor.
Page 11
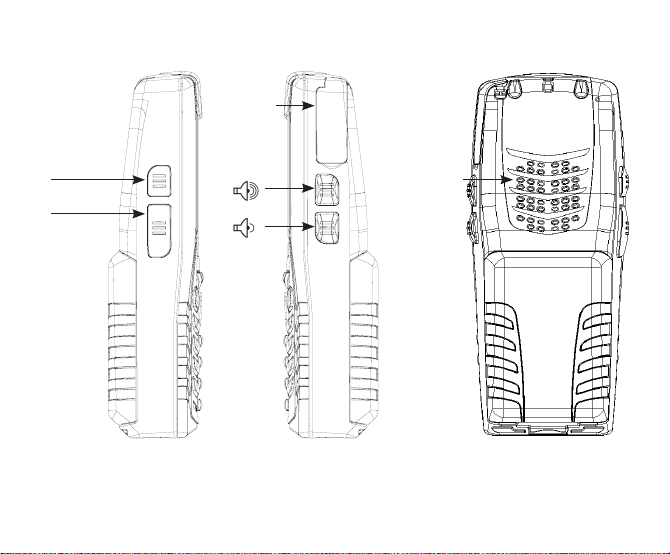
Connectors
Programmable
button
Speaker
PTT
The PTT key is used in hands free mode in order to deactivate the loudspeakers and to activate
the second microphone in the upper part of the mobile phone.
76
Page 12

77
4. Navigation principles
The following principles significantly facilitate the handling of your mobile phone.
Confirm by pressing the key or the navigation stick.
Pressing the key will take you back to the previous level.
The thumbnails at the bottom of the screen refer to the and keys.
In the menus, a title bar reminds you of the previous level.
From the initial screen, pressing the navigation stick displays the icons of the main menus.
When pressing the navigation stick followed by a figure, you can display a particular menu
directly. For instance, pressing the navigation stick and then 8 displays the Phonebook.
The key is used to go from a menu to a sub-menu.
The key is used to go from a sub-menu to the respective menu.
The key (press briefly) is used to go back to the initial screen (current function is abandoned).
In some menus there is a Help sub-menu ( ), which informs you on the various functions of
the sub-menus.
Page 13

5. Initial screen
The initial screen may contain the following information:
1 - The title bar icons:
Battery
Call forward
Call (establishing the call)
Call (hands free)
Message (reception of a message, message memory full)
FAX communication
DATA communication
Silent mode
Message in answering machine
WAP (@) communication
GPRS
home zone
Roaming
Only emergency call is possible
Keypad locking
Protected WAP logon
Protected WAP logon icon with certificate
Signal strength level (5 bars)
2 – Date and time in digital display
3 – Network provider
4 – Thumbnail centred on bottom line of the screen:
The main menu thumbnail shows that the menu can be accessed by pressing the navigation
stick. The following information may also be displayed: „1 message received“ or „1 call“. It can
be deleted by pressing the key briefly.
78
Page 14
79
6. Activating your phone
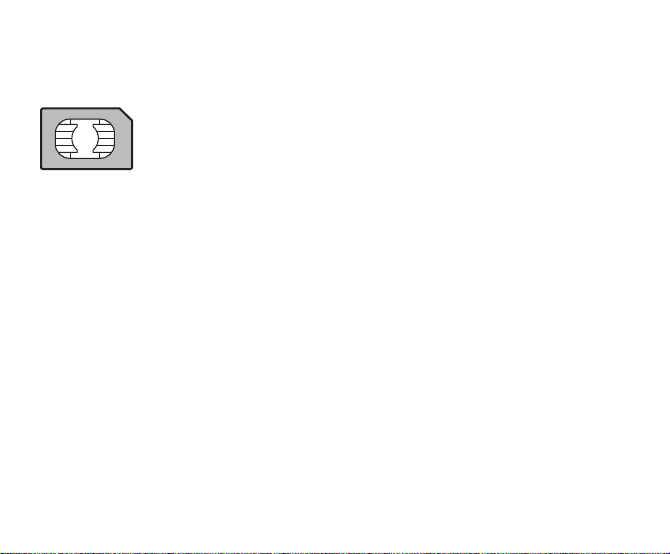
Information on the SIM card
To use your phone, you need a card called a SIM card.
It contains personal information that you can modify:
- Secret codes (PINs, Personal Identification Numbers): These codes allow
- Phonebook,
- How special services work.
- Your phone is compatible with the SIM 3V cards.
WARNING
This card must be handled and stored with care in order not to be damaged. If you should lose
your SIM card, contact your network provider or your SMC (Services Marketing Company)
immediately.
you to protect access your SIM card and phone from unauthorised use.
- Messages,
Please keep your SIM card out of reach of young children.
Page 15
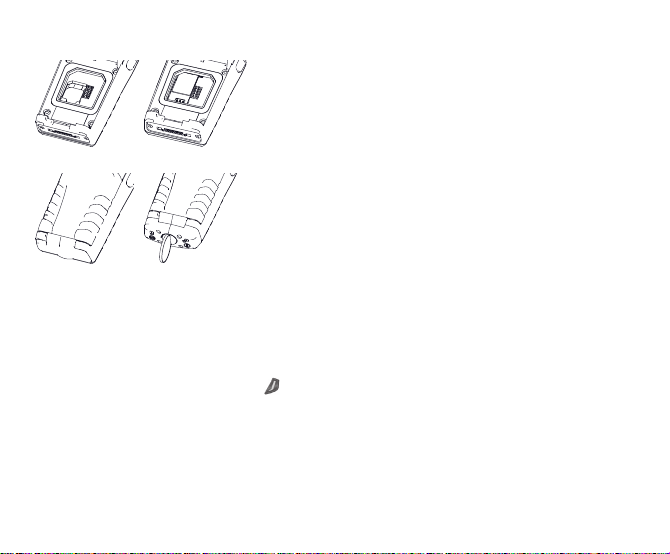
First use: Inserting the SIM card and battery
fi
›
u
Version x.com 40x / 50x -Ex Version x.com 60x -Ex
Version x.com 50x -Ex / 60x -Ex
Set up the safety lock!
Remove the battery
Proceed as follows in order to remove the battery.
Version x.com 50x -Ex / 60x -Ex:
- Turn over the phone. Press on the middle of the cover in the area of the cavity and lift it off.
Getting started
You are now ready to use your phone for the first time.
Switch on the phone by pressing the key. A short display appears. When you switch on your
phone for the first time, you must configure it with various settings that will remain by default
until you choose to modify them.
After entering your PIN code and the date and time, make your choice for the following settings:
Time zone, Daylight Saving Time, ring tone, volume, vibration alarm and voice mail number. If
there are contacts saved in your SIM card, you can copy them in the phone contacts memory if
desired.
80
v
Insert the SIM card into the card holder. When doing
u
this make sure that the tapered side of the card is facing the same way as illustrated in the diagram and/or
the plate on the mobile phone.
Install the battery by first laying down the upper side
v
and then pressing the area of the battery downward.
Remove the safety lock!
Page 16

81
PIN number
This is your SIM‘s secret code.
If access to the SIM card is protected, the device prompts you to enter the PIN number.
Enter the 4- to 8-digit code given to you when the SIM card was issued. These digits do not
appear on the screen for security reasons.
Press [OK] or the navigation stick to validate.
If your phone indicates that the SIM is missing, press the , key to switch off your phone and
check that the SIM card is correctly installed.
Warning
If a wrong PIN number is entered three times in succession, your SIM card will be blocked. In
this case
you must do the following:
- Enter the PUK (Personal Unblocking Key) code provided by your operator,
and validate the entry.
- Enter your PIN number and validate the entry.
- Enter your PIN number again and validate the entry.
Use the following sequence for this: **05*PUK*PIN*PIN#.
After 5 or 10 failed attempts (depending on the type of SIM card), the SIM card will be irrevocably locked. In this case you must contact your operator or your SMC to obtain a new card.
Setting time and date
When you use your phone for the first time, you need to set the date and time. In due course,
when the battery is completely discharged, or if it has been removed, you will automatically be
prompted to confirm the date and time.
Setting the date:
Either enter the date in numerical form with the keys or use the navigation stick in order to
change the default date. Use the navigation stick to access the next (or last) data input field.
Once the date is correct, press the key to validate.
Page 17

Setting the time:
Same procedure as for setting the date.
Network
From now on the phone hunts for a network on which it can make calls. If it finds one, it displays the name of the network on the screen. You are then ready to send or receive a call.
If the network icon appears, it is possible to make calls on your operator‘s network. If the letter
R and a network name are displayed, calls are possible on the network of a different operator.
If only the letter E is displayed without any network name, only emergency services are accessible (ambulance, police, fire brigade). If the network icon flashes, the phone is in permanent
search mode. There is no network available as long as the icon blinks. The signal strength
indicator received allows you to display the quality of reception. If less than three bars are
displayed, search for a location with better reception in order to call in good conditions.
First call
Dial the number of your correspondent.
Press the key.
During the call, the call in progress icon flashes on screen and tones may indicate the establishment of the call.
Once communication has been established, the call icon stops flashing.
You can adjust the sound level (volume) using the navigation stick.
At the end of the conversation press the , key to hang up.
82
Page 18

83
Calling voicemail
In the initial screen, press and hold down the 1 key.
Foreign calls
Press 0 (hold down) until “+” is displayed and then, without waiting for the dial tone, enter the
country code, the city code, and the dial-up number of your correspondent.
Emergency services
Depending on the operator, you can obtain emergency service with or without a SIM card even
when the keypad is locked. It is enough to be in an area served by the corresponding network.
To obtain the international emergency service, dial 112 and then press the key.
Receiving a call
When you receive a call, the number of your correspondent is displayed provided that this
function is supported by the network.
Press the key or the key to answer and speak.
To refuse the call, press the key or the , key.
If you would like to switch off the ring tone or vibration alarm without refusing the call,
press the key.
Hands free mode
During a call, press and hold the keys to switch into hands free mode.
Warning: In this mode do not bring the phone up to your ear.
This could cause damage to your hearing.
Page 19
If you press [Options] during a call, you will have access to various functions: change to hands
free mode, put a call on hold, mute the microphone, end the call, display the menus.
By pressing [Mute ON], you can temporarily mute the microphone to prevent the correspondent from hearing your discussions with other people.
Info: All numbers of previous discussions (received and carried out) are saved in the caller list.
Switching off
Press the key (long press).
The end message is displayed. The phone switches off.
7. Using your phone
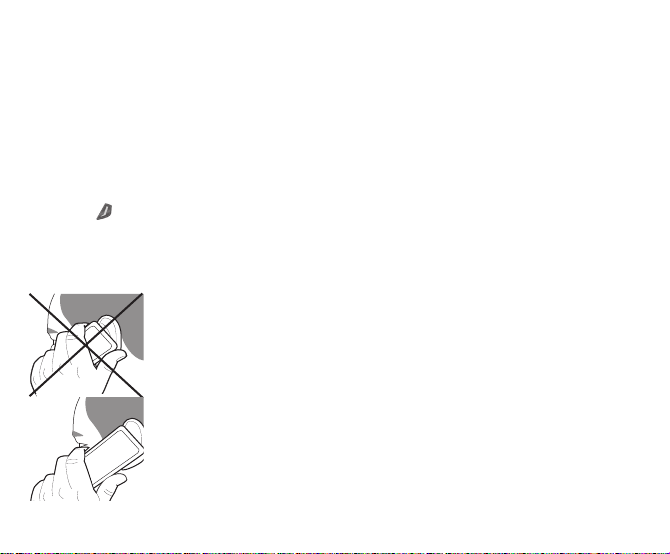
Keeping the antenna free
The antenna is integrated in your phone.
It is located under the back cover on the back.
Avoid putting your fingers on this area when the phone is switched on.
If your fingers obstruct the antenna, the phone may have to operate with
a higher power level than usual thus decreasing its efficiency quickly.
It could also affect the quality of your communications.
Non-ionised radiation
It is best to use your phone in a vertical position.
Your personal safety is thus greater.
84
Page 20

85
Increasing the battery duration of your phone
- Only press the keys when it is truly necessary. Every keystroke activates the background light
and with that increases power use.
- Do not cover the antenna with your fingers.
Charging the battery
Your phone is supplied with power via a rechargeable battery. Before a
new battery can be used for the first time it must have been charged for
at least 8 hours. The full battery performance is only obtained after a few
operating cycles.
If the battery charge level decreases below the operating value, the
phone will indicate this (the empty battery symbol flashes). When this
appears charge the battery for at least 15 minutes before making any
other calls, in order to prevent your discussion from being interrupted.
Proceed as follows to charge the battery:
Connect the charger to a wall outlet.
Version x.com 50x –Ex / 60x –Ex:
- Remove the safety lock!
Place the end of the cable into the lower phone connection.
The phone‘s battery will now be charged.
The scrolling battery symbol indicates that the battery is being
charged. When the battery is fully charged the charging process
stops automatically. Pull out the cable from the phone.
Version x.com 50x –Ex / 60x –Ex:
- Set up the safety lock.
Batteries can easily become warm during the charging process.
This is a normal occurrence.
Page 21

WARNING – There is a risk of explosion if the battery is not replaced properly or is exposed to
a flame. Do not short-circuit the battery. The batter does not contain parts that can be replaced.
The casing of the battery should not be opened under any circumstances. Only use chargers
and batteries authorised by ecom instruments GmbH. The use of other chargers or batteries
may be dangerous. In this case, you will lose your warranty rights.
Used batteries are to be properly disposed of.
If you do not use the phone for a prolonged period, you should remove the battery. It is strongly
advised that you do not place your phone in the charger if the battery is not installed. The
charger is a transformer. It is a security relevant component and may not under any circumstances be altered or replaced by another component (simple power plug, etc.). If the battery is
completely discharged, the phone cannot be switched on. Connect the phone to the charger.
After charging for a few minutes, the phone will turn on. When the Start option appears on the
screen you can turn on the phone again
8. Phonebook
Using the phonebook
Open the Phonebook menu. If contacts were already furnished, the contact list will be displayed (corresponding information can be found in Storing a new contact). When a contact is
selected, an icon is displayed in the title bar:
contact saved on the SIM card
contact saved in the phone
contact saved in the Fixed dialling. See PIN2 number and Fixed dialling in Security menu
for more details about this activation.
You can search for a contact quickly by typing the first letters (up to three). You can display it
by pressing [OK].
86
Page 22

87
Storing a new contact
- Display the Phonebook, press [Options], then select Add SIM contact or
Add phone contact.
- Enter the last name and press the navigator.
- Enter the number and press the navigator [OK].
Note: You can fill other fields if you store the contact in the phone memory (email, address,
ring tone, photo, etc.).
- Press [Save] to save it.
Calling a contact
Several ways:
- Select a contact. Press , to start the call.
- Select a contact, press [OK]. The number is displayed. Press [Call] to start the call.
- Direct call from the idle screen (only for the contacts stored in the SIM card memory): type the
number with which the contact was saved and then enter * (example: 21 *), or enter the number
and confirm pressing [#]. Then confirm the displayed number.
Contact options
To display the various options, select a contact and press [Options].
Modifying a contact
Modify what you want and validate; then select Save once the modifications are completed.
Sending a message
Information on sending an SMS or MMS to a contact can be found in the Messages chapter.
Page 23

Sending By
Information on sending the details of a contact by SMS, MMS or Bluetooth can be found in the
Messages and Connectivity chapters).
Copy to SIM/Copy to mobile
This allows you to copy your phonebook contacts from one memory to the other. Only the name
and the first phone number will be copied.
My numbers
You can create the entries corresponding to your own numbers in order to consult them when
necessary. Select My numbers and validate. Enter the different details and validate.
Mailing lists
A mailing list allows you to send a message to several recipient lists at the same time.
- Select Menu and press the OK key
- Select Mailing lists and press the OK key The phone asks you to confirm the creation of a
new list.
- Select the list type (SMS or MMS) and press the OK key.
- Enter a name and press the OK key.
- Then, on a list press [Options]. Select Add contact each time you want to add a contact in
the list.
Memory
Select Memory and validate the selection. Select SIM or Telephone and validate.
Telephone: the screen displays the amount of memory used. The memory is used by the phone
and other functions. Try to free memory used by other functions if memory becomes low.
SIM: Available memory for contacts.
88
Page 24

89
Delete/Delete all
This allows you to delete the contact selected or all the contacts.
Set as my card/Business card
The details of a contact stored in the phone memory can be saved in a business card.
gespeichert werden.
- Select a contact, press [Options].
- Select Set as my card and [OK]. The details are saved as Business card.
Then you can read it, modify it or send it by SMS or MMS.
Synchronise
Depending on which options are available from your carrier, you can synchronise your phone
book with your archives saved in your carrier’s network. Local synchronisation with the computer is only possible on the computer via Wellphone software (optional). You must activate
Bluetooth in the phone and configure the USB connection.
Contacts synchronisation with a computer
Install Wellphone, the software provided on CD (optional), and click on DIRECTSYNC: you can
synchronise your contacts stored in the phone memory with those of your Lotus Notes™ or
Microsoft Outlook™ bases.
List selection
This menu allows you to select the default phonebook (phone, SIM and Phone and SIM) displayed when the phone switches on.
9. Alert (Version x.com 401 / 501 -Ex / 601 -Ex only)
This function allows you to intentionally alert one or more recipients automatically via SMS or
through a phone call.
Page 25

Alert activation
You can activate the Alert with this menu
LWP: This alarm is automatically activated if the mobile phone detects a
danger associated with a position without response.
GPS: Is used for the activation of the GPS module in order to send the position with the alarm.
The Voluntary Call is a persistent active alarm that is activated by pressing the emergency key.
Alert configuration
You can activate the alarms with this menu
In the Settings menu, first select Customise and then Alert.
Angle: Enables the configuration of input and discharge angles of the alarm mode.
2 parameters to be configured:
- Input angle in alarm mode
- Discharge angle of the alarm mode (< input angle with a difference of at least 20°).
Pre-alarm: Enables the configuration of the period of time during which you must respond
between the moment when the mobile phone exceeds an input angle in alarm mode and the
moment when the local alarm is started. The phone vibrates in order to incite you to respond. If
you don’t respond, the phone activates the local alarm. 2 parameters to be configured:
- Timer: Duration of the pre-alarm period (in seconds).
- Vibration: activates or deactivates the vibration during the pre-alarm
Local alarm: Enables the configuration of the phase of the local alarm during which the phone
sends a signal in order to incite you to respond.
If you still don’t respond, the phone activates the remote alarm. 2 parameters to be configured:
- Beep: activates or deactivates the signal tone during the local alarm.
- Timer: Duration of the local alarm (in seconds).
90
Page 26

91
Remote alarm: Enables the configuration of the sequence LWD alarm or intentional alarm. 5
parameters to be configured:
- SMS: Recipient to which an SMS is sent (up to 5 recipients)
- Call: Recipients who are called (up to 5 recipients)
- Retry time: Waiting period after which the SMS and calls occur again
- Permissible inbound number:
Only this correspondent can call the mobile phone during the alarm
- Marker: Enables the configuration of the signal tone sent from the phone’s loud
speaker during the remote alarm.
Associated problems: Enables the configuration of the recipient of the SMS sent from the
mobile phone during a low battery charge state.
SMS alert configuration
The alarm parameters can be processed via SMS from outside with the help of a message
exchange protocol. This protocol is obtained from your provider.
GPS
In order to achieve optimal satellite position, the mobile phone must be outside in an area free
of obstructions and interference. The time until initial position determination (Time to First Fix,
TTFF) can take a few minutes, depending on reception. The blue GPS symbol displays the
reception status.
10. Position finding (Version x.com 401 / 501 -Ex / 601 -Ex only)
This function determines the position of the terminal by means of periodic transmission of SMS
messages with GPS data.
Authorisation acceptance during position finding requests
The position finding request is automatically accepted or rejected by the mobile phone. By
default, the terminal accepts position finding requests. In the Settings menu, select the option
Customise, then Security, and finally Position Finding in order to authorise the acceptance or
rejection of position finding requests.
Page 27

If position finding is started or stopped from the outside, the user will be notified by means of a
message.
Activation of position finding via SMS
Position finding configuration can take place from outside with the help of a message exchange
via the SMS protocol. This protocol is obtained from your provider.
11. Messages
From this menu, you are able to send SMS and MMS. MMS is a Multimedia Message Service,
which allows you to enclose audio files, images and other rich contents to your messages.
These messages can even be composed of several slides. MMS messages are invoiced differently than SMS. Please contact your network provider to get more information on their cost.
This menu was developed in collaboration with magic™
Compose SMS messages
In the Messages menu select the Compose menu and validate. Choose the SMS option. The
language used is the one selected on the display of the phone. If the language selected is not
compatible with the Easy Message T9™, English will be automatically selected.
When typing a text, a counter showing the number of characters deducted is displayed at the
top of the screen. This counter is not displayed if an icon or sound is inserted into the SMS.
When the text has been entered [Options] is used to access the functions offered.
- Save is used in order to save a draft in memory
- Mode ABC (see page 94)
- Mode 123 (see page 94)
- T9 options (see age 93)
- Cancel deletes the entered text and exits the function.
- Activate/Deactivate Zoom is used in order to change the size of the characters.
- With the option Activate/Deactivate Silent you can switch the key tones off or on when
entering text.
92
Page 28

93
- Formatting is used in order to utilise additional formatting in a text.
- Insert is used to insert an image or audio information in the message (see page 94).
You can compose your messages straightforwardly with Message T9™.
Using T9 Mode
Press once the key corresponding to the letter chosen and compose the word by continuing to
press the keys corresponding to the various letters without paying attention to the display: the
word is highlighted. If you agree on the word proposed on the screen, press the 0 key to validate it. In doing so a space is inserted. Then you can go on writing the next word. It is possible
that several words exist in the dictionary for the entered key sequence. If the word that appears
is not the word you expected, press the Ä~ key to scroll through the words corresponding to
this key sequence. If you agree on the word proposed on the screen, press the 0 key to validate
it. In doing so a space is inserted. Then you can go on writing the next word. If the word you
are expecting is not proposed, please add characters until you get the message Add a word?
Press Yes and validate if the word displayed suits you or modify this word before adding it to
the dictionary.
Page 29

Input modes
When composing a message. The
navigation keys fulfil the following
functions:
-
É key:
Previous word
-
Ñ key:
Next word
-
~ key:
Previous line
-
Ä key:
Next line
-
key:
Deletes the last letter
-
key:
Message options
-
key (short press):
Access to symbol table
-
key (long press):
Writes in upper case
94
In the input screen, the key is used to access other input modes. The mode in which you type the text is displayed at the right top of the screen. A short press of the
key switches from one mode to another. The ABC mode
is used to write words that do not exist in the dictionary. To
get a particular character, please press the corresponding
key several times: the characters will scroll down on your
screen. 123 mode is used to add numbers. Insert mode
is used to add symbols, animations, call group icons and
tunes. There are two types of images and sounds: - predefined and user defined. Predefined images and sounds are
specially customised to sending via a short message and
therefore are smaller in size.
Upper case
A long press of the key will display the next letter in
upper case (Ò icon).
Punctuation characters
Punctuation characters are obtained by pressing the 1 key
(excepting 123 mode) or via Insert mode
(direct access via a short press of the key).
Accented characters
Accented characters are automatically created in T9
Mode. In ABC Mode, you must press the key without an
accent that the corresponding symbol is assigned to so
often in succession until the desired accented character
is displayed.
Page 30

95
Compose MMS messages
In the Messages menu select the Compose menu and validate. Choose the MMS option.
When the text has been entered in the Message field, [Options] is used to access the functions offered.
- Insert: Here you can insert multimedia objects into your message, e.g., images,
animation and sounds.
- ABC mode, 123 mode: You can edit and format the text in this mode.
- T9 options: (see page 93).
- Slide: Here you can create a slideshow of multimedia objects.
- Preview: Here you can display the multimedia objects.
Saving messages
Select Save. It is saved in the Drafts menu.
Sending messages
- Once the text is entered, press the OK key or press [Options] and select Send.
- Enter the receiver’s number (or take it from your phonebook by pressing Contacts) and press
the OK key. You can supply an email address.
Note: It is possible that the voice message format (.amr) is not supported by some PCs. Contact
your PC provider to get additional information.
WARNING: the sending of some messages may fail if the message content is too large.
More options are available if you press [Options] prior to sending the message:
- Send options: With these options you can indicate the validity period or activate or deactivate
the request for a read receipt, the priority, the time received or sender indication.
- Add mailing list: With this option you can select a mailing list to which the message is to be
sent (see Phonebook chapter).
- Add recipient: You can add another recipient with this option.
- Editor: With this option you can edit the text before you send the message.
- Add subject: With this option you can add a subject to the message.
Page 31

Receiving messages
When you receive a message, the phone plays the ring tone that you selected, and the message
icon will be displayed on the screen of your phone.
If you do not read the messages, this icon remains displayed on the screen. When the icon
flashes, the memory is full.
Receiving icons, backgrounds or tunes can take several seconds.
An icon blinks when the download of your message is in progress.
Note that you have two different possibilities for receiving MMS messages: automatically or
manually. If „manual mode“ is activated, then you will receive only a notification in your Inbox,
meaning that an MMS message is available on the MMS Server; select Retrieve, when you
want to retrieve the MMS from the server.
More detailed information on automatic and manual modes can be found in the section
“Options” on page 98.
Further information on icons, backgrounds or tunes can be obtained from your network
provider.
As long as you do not delete received messages, they will be saved on the SIM card or in the
phone itself.
Inbox
In the Messages menu, choose the Inbox menu and [Select]. Each message shows the presence of any attachments, the time and date the message was received and its size.
Messages are listed in chronological order, the latest one being displayed first.
The quantity of Not Read and Not Retrieved messages is shown. Not Retrieved and Not Read
messages are shown in bold. Select a message and press the OK key.
Choose one of the options given: Received attachments (images or audio information) can be
extracted and used again later.
You can invoke the contents of the corresponding menus (WAP bookmarks under WAP, ring
tones Sounds under Sounds, wallpapers in under Energy savings).
96
Page 32

97
Outbox
This menu displays the messages that have not been sent. You can send them again from this
menu.
Sentbox
If the option Store sent messages in the Options menu is activated, all sent messages are
saved under Sentbox.
Too many messages saved will quickly fill up the available memory. This means no further
messages will be received.
For each message, its characteristics (shown with an icon) and the time (or date) of sending are
displayed on the screen. Select a message and press the OK key.
Choose one of the options given: read, edit, forward, delete, delete all.
Drafts
When you store a composed message, it is stored among the drafts.
In the Messages menu, choose the Drafts menu and [Select]. Select a message and press
the key. If you do not delete this message, it will be stored in the draft folder and can be
accessed again after sending. Choose one of the options given: Delete, Read, Details, Modify.
Templates
If you compose a message and select the option Save as template, the template will be saved
in this menu. The same options are available to templates as with drafts.
Message Status
This menu is used to send status messages to a receiving centre. These predefined messages
contain a model, the user status and ID of the mobile phone.
These messages can be modified prior to sending. New messages can also be created. Access
to the function that sends messages occurs via the user-friendly, programmable buttons. By
default, the left programmable button that is found via the PTT key offers quick access to these
functions
Page 33

Sending a message
Select the Message status menu in the Messages menu.
Select a message that is to be sent and validate by pressing OK.
The message can be modified. Validate by pressing OK and send it afterwards.
Recipient
The recipient of the status message corresponds to the number that has been entered into the
Recipient field accessible via the Message status menu in the Message menu.
Pseudonym
The ID (or pseudonym) is appended to the end of the status message by the mobile phone.
In order to change the ID, select the Message status menu in the Messages menu and
subsequently Pseudonym.
Enter the name (maximum 15 characters) and validate. If the field is empty, the ID contains the
IMEI number of the mobile phone.
Note: The ID is automatically added to the status message by the phone prior to sending. The
status message text must be no more than 145 characters long.
New message
Select the Message status menu in the Messages menu and subsequently New message. Enter
the text that appears in the list of status messages (title) and enter a line feed. Enter the remainder of the status message. This and the prior saved messages are saved in the mobile phone
and appear in the Message status menu.
Options
Several sending options are available.
In the Messages menu, choose the Options menu and [Select]. Choose one of the options
given: SMS or MMS.
98
Page 34

99
The SMS sending options are: message centre number, save all messages, reply, period of validity (during that period, the network provider will try to send the message) and message format.
The following options are available:
- Store sent messages: (it is highly recommended that you keep this function deactivated, in
order to avoid a full memory).
- Retrieval mode: if you are in a poor coverage area, it may be more convenient to choose the
manual retrieval mode which gives you the Retrieve later option.
- Priority: selection of a priority with which to send a message.
- Request delivery report: request of a delivery report when sending a message.
- Period of validity:
Advanced settings:
- Send delivery report: sending a delivery report when receiving a message.
- MMS ignore: if you want to deactivate the reception of any MMS in your phone.
- MMS server: to select another MMS provider or set the parameters of a new MMS provider.
- Sender visibility: you hereby choose whether or not to display your phone number together
with the message on the receiver‘s phone screen.
- Maximal size: [undocumented, maximum size] in order to activate or deactivate the option for
the maximum size supported by MMS.
Memory
You can query how much memory is available to store messages.
In the Messages menu, choose the Memory menu and [Select].
Choose one of the options given: SMS or MMS. The SMS display shows the available memory
on either the SIM card or in the phone. The MMS display shows how much memory is being
used in kilobytes.
Local information
This menu is used to activate the reception of local broadcast information through the network.
You can select whether or not you would like to receive this information (please contact your
network provider). In the News menu select the menu Local info and then Select.
Page 35

Calling voice mail
This function allows you to call your voicemail.
In the Messages menu, choose the Calling voice mail menu and [Select].
Note: If you have not already entered the dial-up number for your voicemail, enter it using the
menu Settings/Calls/Voicemail.
Mailing list
In the Messages menu, choose the Mailing lists menu and [Select]. The mailing lists created in
the telephone book will be displayed in this menu. The various options will be displayed if you
press [Options].
- Add mailing list: you can add a new mailing list with this option.
- Modify name: With this option you can change the name of the mailing list.
- Add contact: With this option you can add a contact to the mailing list.
- Properties: With this option you can display the mailing list type and the number of contacts.
- Delete entry: You can delete the mailing list with this option.
- Delete list: to delete all distribution lists.
- Send message: With this option you can create a message and send it to the mailing list
contacts.
12. Multimedia
My Pictures
You can access your pictures via this menu.
In the Multimedia menu select the option My pictures and then [Select].
The saved pictures will be displayed on the screen. Select one of the pictures using the keys
Ä and ~ Press [Options] after selecting one of the pictures. With the help of the Ä and ~
keys, select one of the listed options and validate the selection:
- Use as: allows you to use the picture as a wallpaper or screen saver.
- Delete all: allows you to delete all pictures.
- Send By: makes it possible to transmit a picture.
(Note: You may not send any copyrighted pictures.).
100
Page 36

101
- Delete: allows you to delete a picture.
- Rename: allows you to rename a picture.
- Properties: displays the properties of the picture selected.
You can import or export pictures to or from a computer using My Pictures and Sounds (MPAS).
Visit www.planetsagem.com for downloading this tool. In the menu Picture Menu you can delete
all pictures or take another picture.
My Sounds
You can access your sounds via this menu. To access your sounds, execute the same steps as
accessing your pictures (see My Pictures menu).
In the Multimedia menu select the option My sounds and then [Select]. Via [Options] you
can delete all sounds or record a new sound. The different options are displayed if you press
[Options].
- New sound: to record a new sound.
- Send By: to send a sound via MMS or Bluetooth.
- Use as: to add a sound to the ring tone list.
- Rename: to rename a sound.
- Properties: properties of the selected sound.
- Delete: to delete a sound.
- Delete all: to delete all sounds.
You can import or export sounds to or from a computer using My Pictures and Sounds (MPAS).
Visit www.planetsagem.com for downloading this tool.
Memory
This menu displays the amount of memory used by the individual functions of the mobile
phone. In the Multimedia menu, choose the Memory menu and [Select]. Use the keys Ä and
~, in order to select the different functions with the help of the memory. The amount of memory
used by the respective function will be displayed.
Page 37

13. WAP
WAP (Wireless Application Protocol): a protocol that converts the Internet language into one of
the languages WML or HTML, which can be read by a mobile phone. With the help of the WAP
function you can access specific Internet sites. You can thus establish a connection to sites
from which you can download ring tones, icons, animated screen savers and JavaTM applications to your mobile phone.
The WAP Menu
The WAP navigator is under licence from:
The WAP navigator and the
software included are the
exclusive property of Openwave.
For this reason, it is forbidden to
modify, translate, disassemble or
even decompile all or part of the
software.
102
The Services menu, a dropdown menu, can be
accessed at all times when navigating through WAP
pages by pressing the key. It contains the following
sub-menus: Welcome: logs onto the initial screen
(showing the name of your operator). Bookmarks: is
used to save names and addresses of websites that
you frequently access. You can also receive bookmarks
through SMS and add them to this list (see chapter on
SMS). Furthermore, you can send bookmarks via SMS:
Select a bookmark, press [Options] and select to send
it via SMS. Go to URL: this menu allows you to input an
Internet address directly.
Inbox: this menu allows you to check the messages
sent by the Internet site.
Save objects: is used to save a WAP site item.
Snapshots: takes a snapshot of the currently displayed
page.
History: backward and forward navigation of the pages
displayed are kept in memory.
Reload: refreshes the current page.
Reset cache: clears the stored information on previous
connections.
Page 38

103
Advanced…: offers the following advanced settings:
- Settings
- Show URL
- Disconnect
- Circuit report (if the user wants to validate every connection).
- Security
(is used to access information on making WAP connections secure).
- Delete Cookies
Info: information on the browser.
Back: returns to the phone‘s initial screen.
Configuring WAP parameters
Select the Advanced menu and the Settings menu.
Profiles is used to select or change the login parameters of your network provider or to configure
the settings of other network providers. The active profile is marked with an asterisk. In this Menu
you can add a new profile or display the available memory.
Configuration of GSM and GPRS parameters:
All information to be entered in the parameters is provided by your operator or service provider. On
a profile in the list, press [Options] and select Modify. The different parameters are: Provider title,
Home page, Preferred connections (see next page), GSM parameters and GPRS parameters (see
next page).
Preferred connections:
- GPRS if not GSM (by default): the logon to WAP services uses the GPRS as a priority. However, in
the event of unavailability of the GPRS network, the GSM network is used to establish the link.
- GPRS: the logon to WAP services uses the GPRS network exclusively.
- GSM: the logon to WAP services uses the GSM network exclusively.
Page 39

GSM parameters:
- Login
- Password
- IP address of WAP gateway
- Port type (secure or insecure)
- Dial-up number
- Mode (digital, analog or automatic)
GPRS parameter:
- Login
- Password
- IP address of WAP gateway
- Port type (secure or insecure)
- APN: if no APN has been defined, press [Options], then the APN menu. Select or add an APN.
Once all the settings have been entered, you can activate the chosen service provider. Select
it from the list. Validate your selection. Linger timer: is used to choose the time after which the
call is automatically disconnected if you have forgotten to log off from a service.
WAP Logging on
The connection to a WAP service on the GPRS network is not cut if an incoming call is received.
You can answer the call normally.
Using the Welcome menu, you can log onto your service provider‘s WAP site by pressing the
key. If you are logging onto the GSM or GPRS network, the @ symbol flashes. The metering
of the cost of the call starts as soon as it stops flashing.
Downloading objects
Various website offer ring tones, icons, animated screen savers, games or Java™ applications
for downloading. After the download procedure is complete, these are saved in memory on your
mobile phone. You can then save them in your phone. (This operates in the same manner as
downloading messages).
104
Page 40

105
WAP Logging off
To log off, press the . key. The logoff happens automatically after a few seconds of inactivity
if you forget to log off. This period is defined by the Linger time setting.
GPRS
A flashing icon indicates that the phone is logging onto a GPRS network just now.
A non-flashing icon indicates that the GPRS network is available. If the icon is greyed out, it
indicates that the phone is logged onto the GPRS network.
This icon is not displayed if the GPRS network is not available or if the SIM card inserted in your
phone does not support the GPRS service.
If you are accessing WAP services but are using the GSM network instead of the GPRS network,
the symbol is also not displayed.
14. Applications
ToDo
ToDo menu
In this menu you can add ToDo items, manage ToDo items in categories and delete all ToDo
items in the list. On the Applications menu, select ToDo and press [Options].
Select one of the actions in the list with the navigation stick and validate.
- Add Written ToDo/Add Vocal ToDo: allows you to add ToDo of the text or voice type.
- Categories: allows you to see the different ToDo categories, assign a specific ring tone to
each individual ToDo, know the number of ToDo’s in each category and see them.
- Memory: allows you to view the memory used by the different functions of your ToDo.
- Synchronise: allows you to synchronise a ToDo with a computer.
ToDo actions menu
You can carry out all actions available for your ToDo in this menu.
Select the option ToDo in the menu Applications.
If you would like to display a ToDo, select it in the list and press the navigation stick.
The various options will be displayed if you press [Options].
Page 41

- Modify ToDo: Enables you to change ToDo features.
- Delete: Enables you to delete the ToDo.
- Send By: for sending the Vcalendar corresponding to the task via MMS or Bluetooth.
Sending a vCalendar
A ToDo belongs to an entry in your appointment calendar, which you can send as a vCalendar.
You can send a vCalendar as an MMS to another mobile phone. Select a ToDo in the ToDo list
(in the ToDo main menu) and select the Option Send by in the menu ToDo actions. Select the
contact information (dial-up number or email address) prior to validating.
Receiving a vCalendar
If you received a message that was sent by SMS or MMS, you must open the message in order
to extract the vCalendar. You must first save the event
before you can add it to your calendar.
You can assign each ToDo its own indicator sound.
You can assign each ToDo category its own ring tone.
Data exchange with a PC
Working from a PC, you can save/edit contacts, events and tasks stored in your phone.
To do this, you will need to connect your phone to the PC by means of a suitable data cable.
Next, you will have to install the Wellphone software supplied with your phone (optional). With
this software you can also save contacts, events and ToDos with copy and paste. You can save
and edit non-copyrighted icons and tunes that are saved on your phone to a PC. To do this, you
will need to connect your phone to the PC by means of a suitable data cable. Now you must
install the “My Pictures and Sounds” software (available at www.planetsagem.com).
Note: If a call comes in during an exchange of data with your PC, the link will be interrupted
and will have to be manually restarted.
106
Page 42

107
Calculator
With the help of this menu you can use your mobile phone as a calculator. In the Applications
menu, choose the Calculator menu and [Select]. Use the navigation stick to make calculations:
- Upwards: Add
- Downwards: Subtract
- Rightwards: Multiply
- Leftwards: Divide
The following keys are used for:
- : Left programmable key: Equals or convert
- : Right programmable key: Delete
- : * key or #: Decimal point
If no calculations are being run, pressing [Convert] allows you to use the value in the converter
directly.
Converter
You can convert one currency to another using this menu.
In the Applications menu, choose the Converter menu and [Select]. Enter a value and move
the navigation stick upwards to convert from one currency to another or downwards to convert
back. If you press [Options], the following options are available:
Rapid exchange
When the Rapid exchange option is activated, the conveter is displayed in the initial screen if
you enter the value to be converted and subsequently press the navigation stick to convert it.
Exchange rate
Enter the conversion rate for the selected currency.
Currency
Enter the desired symbol for both of the currencies to be converted.
Page 43

Go to calculator
This option allows you to use immediately the value converted in the calculator.
Alarm
This menu is used to set and activate the alarm. In the Applications menu, choose the Alarm
menu and [Validate]. Activate or Deactivate the alarm and validate.
Set the wake-up time by entering the numbers directly or using the navigation stick and
validate.
This menu is used to set and activate the timer. In the Applications menu, choose the Timer
menu and [Validate]. Activate or Deactivate the timer and validate. Set the duration (hours/minutes) by entering the numbers directly and validate.
The alarm icon appears on the initial screen. The alarm works even when the phone is
switched off.
Timer
This menu is used to set and activate the timer. In the Applications menu, choose the Timer
menu and [Validate]. Activate or Deactivate the timer and validate. Set the duration (hours/
minutes) by entering the numbers directly and validate.
The alarm icon appears on the initial screen.
15. Organizer
This menu gives you access to your agenda and to a specific day, week, month or date. It lets
you add events and access the global actions for all the events. Also, you can manage events
by event category.
Calendar menu
IIn this menu you can add events, manage events in categories, display the
available memory and delete all events.
108
Page 44

109
From the Organizer menu, select the menu Calendar menu.
- Add Written Event/Add Vocal Event: allows you to add events of the text or voice type.
Fill in the different items and save the event.
- Delete: allows you to schedule the automatic deletion of events that took place more than one
day, week or month ago.
- Memory: allows you to view the memory capacity used by the different functions of your
agenda.
- Delete all: allows you to delete all events in a calendar in one step.
- Categories: allows you to see the different event categories, assign a specific ring tone to
each individual category, check the number of events in each category and display them.
- Synchronise: allows you to synchronise an event with a computer.
Sending a vCalendar
An event recorded in your calendar can be sent as a vCalendar.
You can send a vCalendar as an MMS to another mobile phone. Select an event in the See
today list and select the option Send By in the ToDo actions menu.
You should additionally select the contact information with Send By or MMS (telephone number
or email address) before you validate.
If you receive a call while you are sending a vCalendar, the call is given higher priority.
Receiving a vCalendar
If you received a message that was sent by MMS, you must open the message in order to
extract the vCalendar. You must first save the event before you can add it to your calendar.
You can assign every event in your calendar its own indicator sound.
Furthermore, you can assign every event category in your calendar its own ring tone.
Page 45

16. Settings
Energy savings
You can deactivate the background illumination for the display and the keypad with this function. You thereby save energy and rest the phone. On the Display menu, choose the Energy
saving menu and [Select]. Two illumination options are available:
- Screen only and Full backlight.
- The display is switched off (standby mode). To exit this mode press the key.
Languages
In this menu you can select the language in which the menus in your mobile phone are to be
displayed. In the Settings menu, choose the Language menu and [Select]. Select the desired
language and validate.
If you select Automatic, the language used will be the one corresponding to your SIM card.
Contacts
In this menu you can specify how contacts in your phone book are sorted (according to first
or last name) and which filter will be applied to the contact list display (SIM contacts, phone
memory or both).
Calls
The Calls menu allows you to manage all call functions (call forward, displaying numbers, call
waiting, voicemail number, etc.).
View last calls
This menu allows you to access the list of last numbers used. In the Calls menu, choose the
View last calls menu and [Select].
The following information is displayed on the screen for every phone call:
- its characteristics (shown as an icon),
- the time (or date)
- duration.
110
Page 46

111
Select a call from the list and validate.
Choose one of the options given: Add to contacts, Store in your phonebook, Send a message,
Delete, Delete all.
You can also reply to the call by pressing the key.
Fast access to the list of calls from the initial screen: Press the key.
Counters
This menu allows you to consult the duration of the last calls. It can also be used to check the
volume of data exchanged via GPRS.
In the Calls menu, choose the Counters menu and [Select].
Choose one of the options given:
Call waiting
(Operator-dependent service)
During a call, you may be informed that a caller is trying to reach you. You will then hear a
special tone. The caller‘s name or number is displayed on the screen.
In the Calls menu, choose the Call waiting menu and [Select]. You can choose one of the
following options: Activate or Deactivate. If you select Consult status you can see the status of
the call waiting service in order to check if it is active or not. If a second caller attempts to reach
you during a discussion, a corresponding note appears on the screen.
Help
You can activate or deactivate the display of the integrated help function via this menu. Select
the Help menu in the Settings menu and [Select].
Networks
You can configure your network settings via this menu.
In the Settings menu, choose the Networks menu and [Select].
Choose Preferred to view all the pre-registered networks.
Choose Selection to activate (automatically or manually) one of the networks accessible in the
area where you are located.
Page 47

Date / Time
Set Date/Time
You can set the date and time for your mobile phone in this menu.
On the Date / Time menu, select Set Date/Time and [Select].
Date: set the date by entering it directly in digital form or by using the Ä and ~keys.
- Use the key | (or }), in order to access the next (or previous) entry field.
Once the date is correct, validate it.
Time: same procedure as for setting the date.
Automatic updating
This menu allows you to choose manual or automatic updating of date and time (after switch off
of your phone or when going abroad for instance) (service depending on the operator).
On the Date / Time menu, select Automatic upd. and [Select]. Select Automatic, Manual or
On demand and press [Select].
Display
You can set the date and time for your mobile phone in this menu.
On the Date / Time menu, select Display and [Select]. In the list that appears, select the
desired display type from the following:
- Analog
- Digital,
- None; for this use the Ä and ~ keys and validate.
Time zone
You can set the time for another time zone in this menu.
112
Page 48

113
Daylight savings
You can set the summer and winter time for your mobile phone in this menu.
On the Date / Time menu, select Daylight savings and [Select]. Select 1h, 2h Summer time
or Winter time depending on the season, and validate.
Customise (PIN2)
You can configure the settings for your mobile phone via this menu. Access is protected by
means of a code (PIN2) without which you cannot access functions and settings.
Shortcuts
You can customise the settings of your phone on this menu in order to increase ease of use.
This menu enables the assignment of functions to the programmable keys. There are three
types of programmable keys:
- Programmable keys: white, yellow, green, blue and left key.
- Number keys (0-9)
Programmable keys
In the Settings menu, choose the Shortcuts menu and [Select]. Select the key to be
customised and validate the selection. Select the function for this key and validate it.
Speed dialling
With the help of this menu you can assign a particular contact to every number key of the
keypad (0 to 9) in order to be able to dial the contact quickly. This contact can be selected in
the phone book or in the group list.
In order to carry out this call, you simply have to press the respective number key in the initial
screen and then the key. In the Shortcuts menu select the option Number keys and then
[Enter]. Select a number key between 0 and 9 that you want to assign a shortcut to and press
OK. If a number or multi-address call is already taken, the shortcut will be written under the key
number. Alternatively, (inactive) will be displayed. When you have selected the key, select the
shortcut from the contacts in the phone book (PTP selection) and press [OK].
Page 49

Sounds
Volume and ring tone
You can assign every event type its own ring tone on this menu. In the Sounds menu, choose
the Ring tones menu and [Select]. Select the function to which you want to assign a ring tone.
Select the desired ring tone from the list and validate. Select the desired volume with the help of
the Ä and ~ buttons and validate. You can deactivate the sound by pressing the key.
Silent mode
You can change to silent mode via this menu.
In the Sounds menu, choose the Silent mode menu and [Select].
Activate or Deactivate silent mode and validate.
Silent mode can also be activated via the initial screen by holding down the key.
When the phone is in silent mode, the relevant icon appears on the initial screen.
In this mode, the ring tone will not function, except for the alarm clock.
Note: if you have activated silent mode, it does not remain after switching off your phone.
Beeps
You can activate network, key or battery warnings on this menu.
In the Sounds menu, choose the Beeps menu and [Select]. Select the type of beep (key tone,
network tone, battery warning tone) you want to allocate from the proposed choices and validate. Activate or deactivate the beep and validate. If you select keypad beeps, different options
are available.
Sound profiles
This function enables a quick change of the different volumes of the mobile phone (receiver,
beep, hands free, ringing function).
You can access this function via the side volume key. In order to change the volumes, the
receiver, beep and ringing function levels must be set to Automatic.
114
Page 50

115
Recorder
You can record your own melody in this menu.
In the Audio menu, choose the Recorder menu and [Select].
Press [Start] to record your melody or your voice by means of the microphone then save it.
Give it a name and validate. The new tone is saved in the list of ring tones and in Multimedia/
My Sounds. If you select the recorder via a programmable key, the tone is saved in the menu
Applications/ToDo.
Security
You can set the security settings for your mobile phone via this menu.
Keypad locking
You can lock the keypad on this menu in order to prevent unintentional operation of the keys.
In the Security menu, choose the Keypad locking menu and [Select]. Select Activate or
Deactivate and validate.
The keypad locking icon appears on the initial screen. You can also access this function from
the initial screen with the help of the and keys or OK.
PIN number
You can activate and alter your mobile phone via this menu.
In the Security menu, choose the PIN number menu and [Select].
To modify the PIN, select Modify PIN and [Select].
Enter the old PIN number and validate. Enter the new PIN number twice and validate. To activate
or deactivate the PIN, select the Control PIN menu and [Select].
Enter your PIN number and validate.
Select Activate or Deactivate and validate.
PIN2 number
You have a second PIN number to allow you to access certain functions*.
* These functions may or may not be available depending on your SIM card.
Proceed as above in order to activate, deactivate or modify PIN number2 of your phone.
Page 51

Phone code
You can activate the phone code on the phone code menu so that for every switch on of the
mobile phone it is requested and verified in case that another SIM card is used. This code
is automatically linked with the SIM card that is installed if the mobile phone is activated, for
example, if the phone is stolen.
To activate or deactivate the phone code, select the Phone code menu and validate.
Enter 0000 (the factory code, by default) and validate.
Select Activate or Deactivate and validate.
To modify the phone code, select Modify and validate.
Enter the old phone code and validate.
Enter the new phone code and validate.
Enter the phone code again to confirm it and validate.
Confidentiality
The Confidentiality function is used to delete last call numbers and short messages when a new
SIM card is inserted into the phone. On this menu you can specify whether messages and/or
calls saved in the phone should be deleted after switching off and restarting the phone.
In the Security menu, choose the Confidentiality menu and [Select].
Select Activate or Deactivate and validate.
Network locking
This menu allows you to modify the call barring.
In the Security menu, choose the Network locking menu and [Select].
Access to this service is dependent upon your contract type.
Call barring
Call barring can be applied to ALL calls (incoming and outgoing) or only to all incoming calls
when you are away from your home country (if roaming is available). Via this menu you can
block particular outgoing calls, in other words, calls made from your phone or incoming calls.
116
Page 52

117
Before you can use this service, a password will be provided by your operator when you take
out your subscription.
In the Security menu, choose the Call barring menu and [Select]. Select Activate or
Deactivate and validate. Access to this service is dependent upon your contract type.
Fixed dialling
This menu allows you to restrict the outgoing calls. Whether this menu is available on your
phone is dependent upon the respective SIM card.
In the Security menu, choose the Fixed dialling menu and [Select].
Enter PIN2 number and validate.
Select Activate or Deactivate and validate.
Proceed as for any other phonebook.
When activating this function, only the numbers stored in a fixed directory in the phonebook
can be called.
This phonebook is linked to the SIM card, and its size depends on the card‘s capacity.
Cost
This menu allows you to control the cost of your calls (*).
On the Security menu select the Cost menu and validate.
The Cost (*) menu lets you check the cost of the last call you made and of all the calls you
made since you last deleted them.
The Delete costs (*) menu lets you delete the cost of your last call and reset the cost counter.
Enter your PIN2 code first.
(*) NOTE
Depending on how the networks and associated subscription cards are configured, some
functions may be unavailable (these are marked out with *).
Page 53

WAP settings
You can set different WAP connection parameters via this menu.
In the Settings menu, choose the WAP settings menu and [Select]. You can add or modify
URL addresses.
Call forward
Depending on your subscription, this service allows you to forward incoming calls to a different
number or to the voice mailbox.
In the Calls menu, choose the Call forward menu and [Select].
Choose the type of forwarding you want from the options available.
Display number
You can retrieve the status of the function for the number display on this menu.
In the Calls menu, choose the Display number menu and [Select].
Choose one of the options given: Anonymous mode, My number, Callers’ number.
Anonymous mode
You have the facility to mask your own number on the phone of the person you are calling.
- Preset: network default mode.
- No: you choose not to activate anonymous mode, i.e., your number will be displayed on the
recipient‘s display.
- Yes: you choose to activate anonymous mode, i.e., your number will not be displayed on the
recipient‘s display.
Voicemail
This function is used to record your answer phone number.
This number will be used during a call to the voice mailbox using the programmable keys.
In the Calls menu, choose the Voicemail menu and [Select].
Enter your answer phone number and validate.
118
Page 54

119
Blacklist
The blacklist is used to limit failures on automatic calls (calls generated by the automatic redial
function or by other applications such as data or fax programmes).
In the Calls menu, choose the Blacklist menu and [Select]. When several automatic calls
failed with a number (number busy or unknown), this number is put in the blacklist. Automatic
calls for this number will not be resumed until you delete it from the blacklist.
Note: this function does not apply to the calls performed manually.
Local info
This menu is used to activate the reception of local broadcast information through the network.
You can select whether or not you would like to receive this information (please contact your
network provider).
In the News menu select the menu Local info and then [Select].
Activate Customise Menu
On this menu you can specify whether the Customise menu should be automatically activated
when switching on the device.
In the Customise menu first select the sub-menu Activate customise and then [Select].
Activate or deactivate the menu with the help of the PIN2 code and validate.
Help
You can activate or deactivate the display of the integrated help function via this menu. Select
the Help menu in the Settings menu and [Select].
Page 55

17. Connectivity
Bluetooth
This menu allows you to set your phone Bluetooth connection in order to communicate with
other devices equipped with Bluetooth: for example, an audio connection with a car kit or a
data connection with a PC.
Bluetooth is a radio communication which is free of charge that has a maximum range of 10
metres.
My Bluetooth name: allows you to assign a name to your phone for the Bluetooth connection.
This name is displayed on the devices connected.
Paired devices: allows you to search for devices that are to be connected with the phone via a
Bluetooth connection (for instance: headset).
Mode: allows you to activate the phone Bluetooth connection.
- Off: Establishing a Bluetooth connection is not possible.
- On and hidden: your phone is not detected by the other devices but the phone detects the
other devices.
- On and visible: your phone can be detected by another device.
Serial Speed
In this menu you can select the speed that will be used for data transfer over the serial connection of the phone. If no special requirements exist, the default value should be kept: Automatic.
Car kit
In this menu you can configure the phone options for a car kit (Automatic response, Switch off,
Kit volume).
120
Page 56

121
SyncML
You can synchronise the phone book, the organiser or the ToDo with the archives in the network provider’s network depending on the options offered by the provider. Local synchronisation with the computer is only possible on the computer via Wellphone software (optional). You
must activate Bluetooth in the phone and configure the USB connection.
18. Technical features
Weight: approx. 250g*
Dimensions: approx. 142* x 60 x 36 mm
Battery: Type: Li-Ion
AMX 40 (x.com 40x)
AMX 50 (x.com 50x -Ex)
AMX 60 (x.com 60x -Ex)
Operating time: Call: up to 5 hrs.*
Standby: up to 300 hrs.*
(theoretical value, only as reference)
Operating temperature: - 20°C ... + 50°C
Charging
temperature range 0°C ... + 45°C
IP protection class: IP64
*)Dependent upon model
Page 57

Networks: Dual band GSM 900 /1800 MHz
Supported multimedia objects:
- Audio formats: wave
- Graphic formats: wbmp, bmp, png, gif, animated gif, jpeg
- GPS: Sirf III
Size of message cache: up to 200 SMS
Size of memory for phone
book and multimedia objects: 3 MB
Max. size per message:
- SMS < 160 characters
- MMS < 100 KB for outgoing messages,
100 KB for incoming messages
(is dependent upon the phone parameters and the services
subscribed to from the network provider)
19. Safety measures and safety information
Model: x.com 50x -Ex / x.com 60x -Ex
Additionally observe the information and warnings of the Ex safety information.
Document No.: 0340AL02Axx
122
Page 58

123
SAR
THIS MODEL MEETS INTERNATIONAL GUIDELINES FOR EXPOSURE TO RADIO WAVES
Your mobile device is a radio transmitter and receiver. It is designed not to exceed the limits for
exposure to radio waves recommended by international guidelines. These guidelines were developed by the independent scientific organisation ICNIRP and include safety margins designed
to assure the protection of all persons, regardless of age and health. The guidelines use a unit
of measurement known as the Specific Absorption Rate, or SAR. The SAR limit for mobile devices is 2 W/kg and the highest SAR value for this device when tested at the ear was 0.5 W/kg
(*). As mobile devices offer a range of functions, they can be used in other positions, such as on
the body as described in this user guide (**).
(*) The tests are carried out in accordance with international guidelines for testing.
(**) Please see the Safety section about body worn operation.
As SAR is measured utilising the device’s highest transmitting power, the actual SAR of this
device while operating is typically below that indicated above. This is due to automatic changes
to the power level of the device to ensure it only uses the minimum level required to reach the
network. The World Health Organization has stated that present scientific information does not
indicate the need for any special precautions for the use of mobile devices. If you still have concerns regarding exposure to radio waves, you can reduce these by limiting the length of calls
or using headsets and/or a “hands free” device to keep the mobile phone away from the head
and body. Additional information can be found on the websites of the World Health Organization
(http://www.who.int/emf).
Advice for limiting exposure to radiofrequency (RF) fields
For persons concerned about limiting their exposure to RF fields, the World Health Organization
(WHO) provides the following advice: Precautionary measures: Present scientific information
does not indicate the need for any special precautions for the use of mobile phones. If you still
have concerns regarding exposure to radio waves to yourself or your children, you can reduce
these by limiting the length of calls or using headsets and/or a “hands free” device to keep the
mobile phone away from the head and body.
Page 59

Further information on this subject can be obtained from the WHO home page
http://www.who.int/peh-emf WHO Fact sheet 193: June 2000.
Safety
Never attempt to disassemble your phone. You alone are responsible for how you use your
phone and any consequences of its use.
As a general rule, always switch off your phone wherever the use of a phone is prohibited.
Use of your phone is subject to safety measures designed to protect users and their environment. Protect it from liquids and other moisture.
Do not expose your phone to extreme temperatures (lower than-20°C and higher than + 50°C).
The physicochemical processes created by chargers impose temperature limits when charging
the battery. Your phone automatically protects the batteries in extreme temperatures. Do not leave your phone within the reach of small children (certain removable parts may be accidentally
ingested).
Electrical safety
Only use the chargers provided by ecom instruments. Using any other charger may be dangerous. Line voltage must be exactly the one indicated on the charger’s serial plate.
Aircraft safety
When travelling by plane, you will need to switch your phone off when so instructed by the
cabin crew or the warning signs. Using a mobile phone may be dangerous to the operation of
the aircraft. The use of mobile phones in aircraft and noncompliance to safety regulations may
have penal consequences.
Explosive materials
Please comply with warning signs at petrol stations asking you to switch your phone off. You will
need to comply with radio equipment usage restrictions in places such as chemical plants, fuel
depots and at any location where blasting operations are under way.
The models 50x –Ex and 60x –Ex are designated for use in the Ex area (zone 2/22 resp. 1/21).
124
Page 60

125
Electromagnetic material
To avoid the risk of demagnetisation, do not let electromagnetic devices (e.g., cash cards or
credit cards) close to your phone for a long time.
Electronic medical equipment
Your phone transmits radio waves that may interfere with electronic medical equipment or
implants such as hearing aids, pacemakers, insulin pumps, etc. It is recommended that a minimum separation of 15 cm be maintained between the phone and an implant. Your doctor or the
manufacturers of such equipment will be able to give you any advice you may need in this area.
Hospitals
Always make sure that your phone is switched off in hospitals when so instructed by warning
signs or by medical staff.
Road safety
With the exception of emergencies, you should only use your mobile phone with a hand free
system with which you can operate your phone without distraction from traffic events If you still
would like to make a call, stop and park safely before making a call. Be aware that making a call
without a hands free system is prohibited in many countries. You must comply with the prevailing legal requirements as well as the indications in the vehicle operating instructions on the use
of mobile phones in vehicles. Be careful that no part of the body is regularly in the proximity of
the aerial if a metallic shield exists (e.g., automobile roof…).
Distance of operation
This phone has been tested and meets radiofrequency exposure and electromagnetic field
guidelines when used as follows:
- against the ear: place or receive a phone call and hold the phone as you would a wireline
telephone.
- body worn: when transmitting, place the phone in a carry accessory that contains no metal
and positions the phone a minimum of 2.5 cm from your body. Use of other accessories may
not ensure compliance with radiofrequency exposure and electromagnetic field guidelines. If
you do not use a body worn accessory and are not holding the phone at the ear, position the
Page 61

phone a minimum of 2.5 cm from your body.
- data operation: when using a data feature, position the phone a minimum of 2.5 cm from your
body for the whole duration of the data transmission.
20. Repair
The national regulations and guidelines for repairs vary from country to country. We therefore
recommend that all repairs are conducted by ecom instruments GmbH, Germany because the
safety of the unit needs to be tested after repairs are implemented.
21. Cleaning, maintenance and storage
- Only use a damp and suitable cloth or sponge to clean the unit.
Do not use any solvents or abrasive cleaning agents when cleaning.
- It is recommended that you have the functionality and accuracy of the phone inspected by the
manufacturer every two years.
- The battery should be removed from the unit during prolonged periods of storage.
- Do not allow storage temperatures to exceed or fall below the permitted range of
-20°C to +50°C.
22. Disposal
Old electrical devices as well as „historical“ old electrical devices from ecom instruments GmbH
are supplied for disposal at our expense and disposed of free of charge in accordance with
European Directive 2002/96/EC and the German electrical law of 16/03/2005. The costs associated with returning devices to ecom instruments GmbH are to be borne by the sender.
Packaging
To facilitate the recycling of packaging materials, please obey the sorting rules instituted locally
for this type of waste.
Batteries
Spent batteries must be deposited at the designated collection points.
126
Page 62

127
23. Warranty and liability
In accordance with our general terms and conditions ecom instruments GmbH provides a
warranty for this product for a period of two years regarding its function and material under the
specified and permitted operating and maintenance conditions. Exempt from this are all parts
that are subject to wear and tear (e.g. batteries, clips, hand straps, etc.) We provide a 6-month
manufacturer‘s warranty especially for the supplied Ex-battery.
This guarantee does not extend to products that are used improperly, have been modified,
neglected, damaged in accidents or exposed to abnormal operating conditions and inappropriate handling. Claims on the warranty can be asserted by sending in the defective device. We
reserve the right to repair, adjust or exchange the device.
The aforementioned guarantee conditions are the sole and only right of the purchaser to
compensation, are exclusively valid and replace all other contract or legal warranty obligations.
ecom instruments GmbH assumes no liability for special, direct, indirect, accompanying or
consequential damage as well as losses including the loss of data, independent of whether it
was caused by violation of the warranty obligation, lawful or unlawful action, action in good faith
or any other action.
If the limitation of a legal warranty as well as the exclusion or limitation of accompanying or
consequential damage is not permissible in certain countries, it may be that the aforementioned
limitations and exclusions are not valid for every purchaser. Should any such clause of these
warranty conditions be declared ineffective or unenforceable by a competent court, then the
effectiveness or enforceability of any of the other conditions of these warranty conditions shall
remain unaffected by such a judgment.
Usage notes
You can download ring tones, icons and animated screen savers with your mobile phone. Some
of these items may contain data that can lead to malfunctions of your phone or to the loss of
data (e.g., through viruses).
For this reason, ecom instruments GmbH assumes no responsibility whatsoever for (1) the receipt of downloaded data and/or the loss of this data, (2) the consequences on the functionality
of the phone, and (3) damages that arise through the downloaded data and/or the loss of the
Page 63

named data. In addition, ecom instruments GmbH excludes all warranties for malfunctions that
arise from the receipt of downloaded data that does not conform with the specifications stated
by ecom instruments. The cost of troubleshooting and repair of a mobile phone that
is no longer functional due to such downloaded data is therefore borne by the customer.
All data contents that you download to your phone are possibly copyright protected by third
parties so that you may possibly not be or only be partially authorised to use these data contents. Consequently, you are obligated to acquire the corresponding rights, e.g., according to the
provisions of a licence agreement, for the use of the downloaded data contents. Furthermore,
ecom instruments GmbH does not guarantee the accuracy or quality of downloaded data
contents. You are solely responsible for the data contents downloaded on your phone and their
use. ecom instruments GmbH cannot be made responsible for the data contents or for their
use. You are responsible for compliance to the laws and provisions of the respective country in
which the phone will be used.
24. EC Declaration of Conformity
Further details regarding the declaration of conformity can be found at the following address:
http://www.ecom-ex.com in the product download area.
128
Page 64

129
Page 65

130
Page 66

131
Page 67

132
Page 68

133
Page 69

Communication
Torches/Flashlights
Mobile Computing
Measuring & Calibration
Copyright© 2007 ecom instruments GmbH.
The contents of this document, either in part or in their entirety, may not be reproduced, forwarded, distributed or saved in any way without
ecom instruments GmbH prior written consent.
The contents of this document are presented as they currently exist. ecom instruments GmbH does not provide any express or tacit guarantee
for the correctness or completeness of the contents of this document, including, but not restricted to, the tacit guarantee of market suitability or
fitness for a specific purpose unless applicable laws or court decisions make liability mandatory. ecom instruments GmbH reserves the right to
make changes to this document or to withdraw it any time without prior notice.
PA000296 / 01 / 08
WEEE-Reg.-Nr. DE 934 99306
0340AL01A00 01 / 08 Subject to change without notice!
ecom instruments GmbH · Industriestr. 2 · 97959 Assamstadt · Germany
Tel.: + 49 (0) 62 94 / 42 24 0 · Fax: + 49 (0) 62 94 / 42 24 100
E-Mail: sales@ecom-ex.com · www.ecom-ex.com
 Loading...