

Page 1
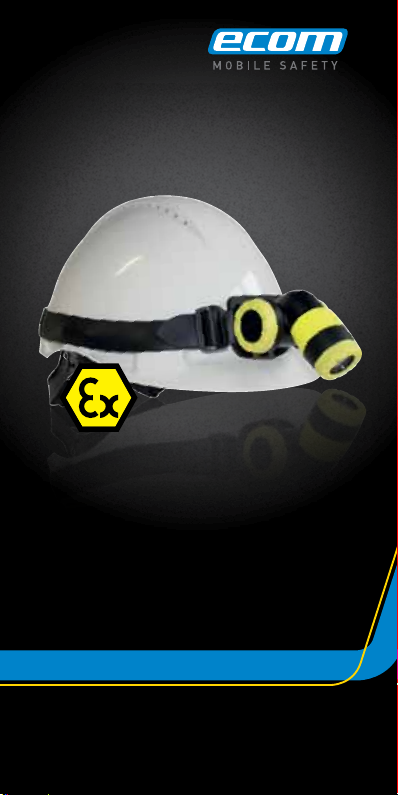
Intrinsically Safe Headlamp Lite-Ex® PL 10 H
Bedienungsanleitung | Operating Instructions
Notice d‘utilisation | Gebruiksaanwijzing
Istruzioni per l‘uso | Instrucciones de uso
Manual de instruçoes | Bruksanvisning
1
Page 2

Deutsch Seite 3
English Page 16
Français Page 29
Nederlands Pagina 42
Italiano Page 55
Español Página 68
Português Página 81
Svenska Sida 94
2
Page 3

Inhalt
1. Anwendung ............................................................................................2
2. Sicherheitshinweise ............................................................................2
3. Fehler und unzulässige Belastungen ..........................................2
4. Sicherheitsvorschriften ..................................................................... 3
4.1 Besondere Bedingungen für den Einsatz in
explosionsgefährdeten Bereichen ..............................................4
5. Sicherheitshinweise ............................................................................4
6. Ex-Daten ..................................................................................................4
7. Technische Daten ................................................................................5
8. Funktionsbeschreibung / Bedienungshinweise ....................6
8.1 Aufbau der Lite-Ex® PL 10 H ......................................................6
8.2 Inbetriebnahme .................................................................................... 6
8.3 Batteriewechsel .................................................................................... 7
8.4 Reinigen des Ringschalters .............................................................8
8.5 Leuchtmittelwechsel ..........................................................................8
8.6 Wechsel der Schutzscheibe ..........................................................8
9. Reparatur .................................................................................................9
10. Entsorgung .............................................................................................. 9
11. Reinigung, Wartung und Lagerung .........................................11
12. Garantie und Haftung .................................................................... 11
13. EG Konformitätserklärung ..........................................................12
14. EG-Baumusterprüfbescheinigung ............................................ 13
Hinweis:
Die jeweils aktuelle Bedienungsanleitung, die EG-Konformitätserklärung und das Ex-Zer tifikat können auf der jeweiligen Produktseite unter www.ecom-ex.com heruntergeladen
werden, oder direkt beim Hersteller angefordert werden.
3
Page 4

1. Anwendung
Die Lite-Ex® PL 10 H ist eine kompakte und robuste LEDStirnlampe für den industriellen Einsatz in explosionsgefährdeten Bereichen der Zonen 2, 1 und 0 sowie 22, 21 und 20
nach Richtlinie 1999/92/EG (ATEX).
2. Sicherheitshinweise
Die vorliegende Bedienungsanleitung enthält Informationen
und Sicherheitsvorschriften, die für eine sichere Funktionsweise bei den beschriebenen Bedingungen unbedingt zu
berücksichtigen sind. Eine Nichtbeachtung dieser Informationen und Hinweise kann gefährliche Folgen haben oder
gegen Vorschriften verstoßen.
Vor dem Gebrauch des Geräts ist die Bedienungsanleitung
aufmerksam zu lesen!
Im Zweifelsfall (in Form von Übersetzungs- oder Druckfehlern) gilt die deutsche Bedienungsanleitung.
3. Fehler und unzulässige Belastungen
Sobald zu befürchten ist, dass die Gerätesicherheit beeinträchtigt wird, muss das Gerät außer Betrieb genommen
und unverzüglich aus dem Ex-Bereich entfernt werden.
Die unbeabsichtigte Wiederinbetriebnahme muss verhindert werden.
Wir empfehlen das Gerät zu einer Überprüfung an den
Hersteller zu schicken.
Die Gerätesicherheit kann z.B. gefährdet sein, wenn:
- am Gehäuse Beschädigungen sichtbar sind.
- das Gerät unsachgemäßen Belastungen ausgesetzt wurde.
- das Gerät unsachgemäß gelagert wurde.
- das Gerät Transportschäden erlitten hat.
- Gerätebeschriftungen unleserlich sind.
- Fehlfunktionen auftreten.
- die zulässigen Grenzwerte überschritten wurden.
4
Page 5

4. Sicherheitsvorschriften
Die Benutzung des Geräts setzt beim Anwender die Beachtung der üblichen Sicherheitsvorschriften und das Lesen
des Zertifikates voraus, um Fehlbedienungen am Gerät
auszuschließen.
Folgende Sicherheitsvorschriften müssen zusätzlich beachtet
werden:
- Das Gerät darf innerhalb des Ex-Bereiches nicht geöffnet
werden.
- Vor Inbetriebnahme der Lampe ist eine Funktionsprüfung
durchzuführen. Bei deutlichem Leuchtkraftverlust sind die
Batterien auf Auslaufen von Elektrolyt zu prüfen.
- Wird ausgetretenes Elektrolyt festgestellt, ist das Gerät
nicht in den Ex-Bereich einzubringen und dem Hersteller
zur Überprüfung zu zusenden.
- Die Batterien dürfen nur außerhalb des Ex-Bereiches
gewechselt werden.
- Schwache Batterien sind unverzüglich auszuwechseln.
- Das Mitführen von zusätzlichen Batterien ist im Ex-Bereich
nicht zulässig.
- Es dürfen nur typgeprüfte Batterien eingesetzt werden.
- Entsprechend Batterietyp kann sich die Temperaturklasse
der Lite-Ex® PL 10 H von T4 auf T3 ändern – Tabelle 1
beachten!
- Es darf nur von ecom instruments GmbH zugelassenes
Zubehör verwendet werden.
- Es dürfen nur original ecom Ersatzdichtungen und Ersatzscheiben Typ PL 10 H verwendet werden.
- Es darf nur das Original-Kopfband HB 10 H verwendet
werden.
- Vermeiden Sie den Einsatz in aggressiven Säuren oder
Basen.
- Das LED-Gehäuse darf nicht geöffnet werden.
5
Page 6
4.1 Besondere Bedingungen für den Einsatz in explosions-
gefährdeten Bereichen
- Ein Lagern der Lampe ist untersagt!
- Nach jedem Batterie- oder Dichtungsringwechsel sind
Dichtungsringe und Gewinde auf Sauberkeit, korrekten
Sitz und Beschädigungen zu überprüfen.
- Die Gehäuseteile der Lampe müssen vor dem Einsatz im
Ex-Bereich handfest bzw. bis zum Anschlag verschraubt
werden, um den IP-Schutz zu gewährleisten.
5. Sicherheitshinweise
Blendgefahr!
- Nicht direkt in den Lichtstrahl blicken!
Lichtkegel nicht direkt auf die Augen einer anderen Person
richten!
6. Ex-Daten
EG-Baumusterprüfbescheinigung-Nr.:
ZELM 05 ATEX 0272 X
Ex-Kennzeichnung:
1G Ex ia op is IIC T4 bzw. T3 Ga
1D Ex ia IIIC T130°C Da
Zugelassen für Zone 2,1 und 0, Gerät der Gruppe II, Gasgruppe IIC explosionsgefährdete Gase, Dämpfe oder Nebel,
Temper aturklasse T4.
Zugelassen für Zone 22, 21 und 20, Gerät der Gruppe III,
explosionsgefährdete Stäube, IIIC – leitfähiger Staub, IIIB –
nicht leitfähiger Staub, IIIA – brennbare Flusen, T130°C
6
Page 7
7. Technische Daten
Umgebungstemp. Ta: -20 ... +50°C
Lagertemperatur: -30 ... +60°C
Batterien /
3 x LR06 nach IEC, AAA
Stromversorgung:
Leuchtmittel:
Leuchtkraft:
Lichtstrom:
Hochleistungs-LED
3.000 lx
(bei 1m Abstand / 6° Optik)
1800 lx
(bei 1m Abstand / 25° Optik)
64 lm
Betriebsdauer: ca.55 Stunden
(Dauerbetrieb)
Abmessungen: 60 x 87 x 69 mm
(H x L x B)
Gewicht: ca. 180g (mit Kopfband)
IP-Schutzart: IP 65 / IP 67
ESD-Schutz: antistatisches Gehäuse
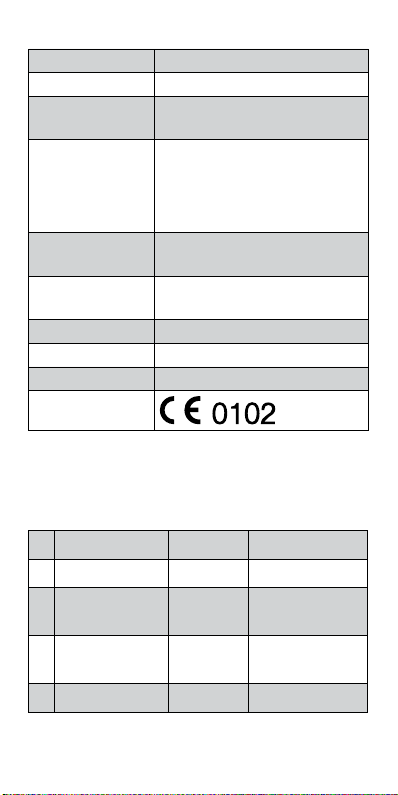
CE-Kennzeichnung:
Achtung! Die Temperaturklasse der Lite-Ex® PL 10 H kann
sich entsprechend der Verwendung des Batterietyps ändern
– s. folgende Tabelle.
Hersteller Typ Temperaturklasse
1 Varta Max Tech No. 4703 T4
2 Varta Industrial
No. 4003 T4
Alcaline
3 Panasonic Pro
LR03 T4
Power
4 Energizer No. E92 T3!
Tabelle 1
7
Page 8

Tabelle mit zugelassenen Dichtungen und Schutzscheiben
Hersteller Typ
ecom Dichtungsringe Typ PL 10 H
ecom Ersatzscheibe PL 10 H
8. Funktionsbeschreibung / Bedienungshinweise
Bitte lesen Sie diese Bedienungsanleitung sorgfältig durch,
damit Sie alle Funktionen Ihrer Lite-Ex
®
PL 10 H kennen
und nutzen können. Lesen Sie zu Ihrer Sicherheit und Information die Hinweise auf den folgenden Seiten!
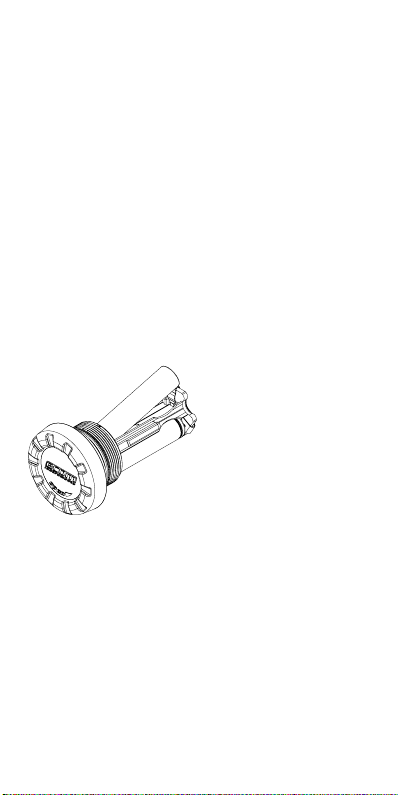
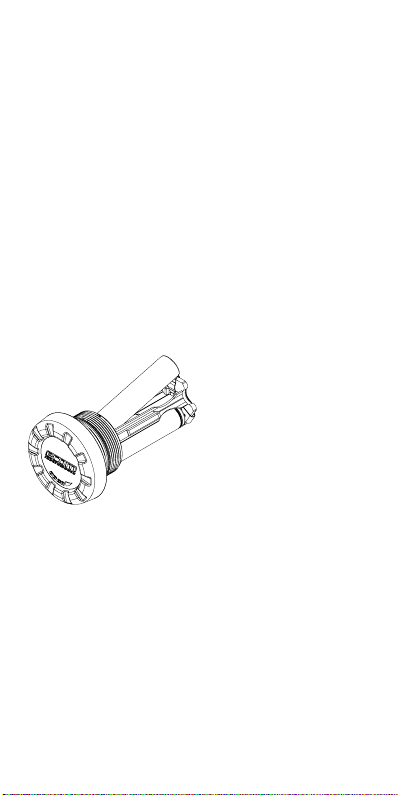
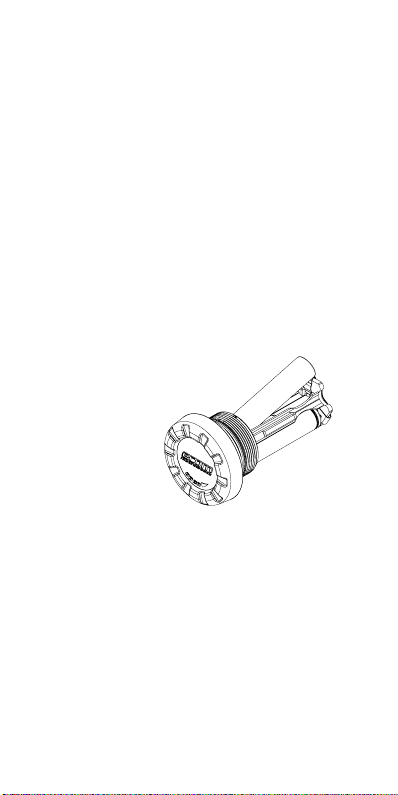
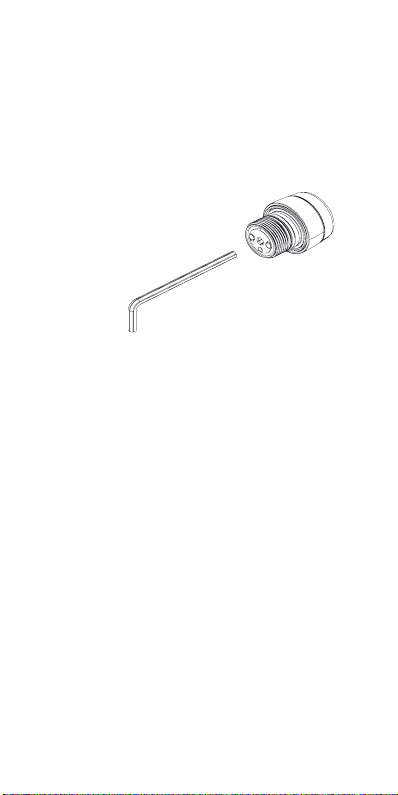
8.1 Aufbau der Lite-Ex® PL 10 H
O-Ring 27 x 1,0
Verschlusskappe
Lampengehäuse
Batterieadapter
Ringschalter
LED-Gehäuse
Scheibe
O-Ring 22,5 x 1,5
O-Ring 22,5 x 2,0
Lampenkopf
Bild 1
8.2 Inbetriebnahme
Zuerst müssen die mitgelieferten Batterien eingesetzt
werden (außerhalb des Ex-Bereiches). Damit die Lampe im
Ex-Bereich eingesetzt werden kann, muss sichergestellt sein,
dass der Lampenkopf und das Lampengehäuse komplett
aufgeschraubt sind. Danach kann die Lampe durch eine
leichte Drehung des gelben Ringschalters im Uhrzeigersinn
eingeschaltet werden.
8
Page 9
8.3 Batteriewechsel
Sollte festgestellt werden, dass die Leuchtkraft nicht mehr
zufriedenstellend ist, sollten die Batterien gewechselt werden. Es empfiehlt sich, alle 3 Batterien gleichzeitig zu wechseln. Es dürfen nur Batterien des entsprechend zugelassenen
Typs eingesetzt werden (siehe Tabelle 1).
Zum Batteriewechsel die linke, seitliche Verschlusskappe
mit der Aufschrift „ecom“ in Richtung des aufgedruckten
Pfeils drehen und dann den gesamten Batterieadapter
herausnehmen (siehe Bild 2). Danach können die Batterien
entnommen und gewechselt werden. Nach dem Einsetzen
der neuen Batterien (Polarität beachten) kann der Batterieadapter wieder eingesetzt werden (Führungsschienen
im Adapter und Batterieschacht beachten). Danach die
Verschlusskappe wieder aufschrauben. Bitte achten sie darauf, dass die Lampe vor dem erneuten Einschalten wieder
komplett verschlossen ist.
Bild 2
Batteriewechsel
- Nur typgeprüfte Batterien verwenden
(siehe Tabelle 1 unter Punkt 7.: Technische Daten)
- Immer alle Batterien gleichzeitig auswechseln.
- Auf richtige Polarität achten.
- Verbrauchte Batterien sach- und umweltgerecht entsorgen!
- Beim Batteriewechsel sind die Gewinde und Dichtungen
auf Sauberkeit und Beschädigung zu überprüfen.
- Wird beim Batteriewechsel ausgetretenes Elektrolyt
festgestellt, ist das Gerät nicht in den Ex-Bereich
einzubringen und dem Hersteller zur Überprüfung zu
zusenden.
9
Page 10

8.4 Reinigen des Ringschalters
Die Lite-Ex® PL 10 H schaltet kontaktlos über den zuvor
schon beschriebenen Ringschalter. Schmutz und Feuchte
können die Schalterfunktion nicht beeinträchtigen. Sollte der
Ringschalter durch starke Schmutzablagerungen schwergängiger werden, kann der Ring einfach und problemlos
gereinigt werden.
Zunächst den Lampenkopf abschrauben. Der Ringschalter
kann nun nach vorne abgezogen und gereinigt werden.
Nach der Reinigung den Ringschalter wieder aufsetzten und
so lange drehen, bis er fest einrastet (Strich-Markierung des
Ringschalters muss über der Kreis-Markierung des Lampenkörpers sitzen). Danach kann der Lampenkopf wieder
aufgeschraubt werden.
8.5 Leuchtmittelwechsel
Die Lite-Ex® PL 10 H ist mit einem extrem langlebigen
LED-Leuchtmittel ausgestattet. Ein Wechsel der LED wird
im Normalfall nicht notwendig sein. Bei einem Defekt oder
bei nachlassender Helligkeit ist die Lampe zur Überprüfung
oder Reparatur an ecom instruments zu senden. Das
LED-Gehäuse darf nicht geöffnet werden! Selbständige
Eingriffe am LED-Gehäuse oder Leuchtmittel gefährden die
Sicherheit der Lampe und sind nicht zulässig.
8.6 Wechsel der Schutzscheibe
Das LED-Gehäuse ist durch den es umgebenden Gehäusekopf und durch eine zusätzliche Scheibe am Lichtaustritt
geschützt. Sollte es trotz der eingesetzten, hochwertigen
Scheibe zu einem Bruch kommen, so kann diese gewechselt
werden. Dazu wird das Lampengehäuse der Lite-Ex®
PL 10 H sowie der Ringschalter festgehalten und der Lampenkopf vorsichtig gegen den Uhrzeigersinn abgeschraubt.
Um den Lampenkopf vom LED-Gehäuse abzuschrauben,
kontert man mit einem Innensechskant SW4 das LEDGehäuse (siehe Bild 3) und schraubt den Lampenkopf
10
Page 11
herunter. Nun kann die Schutzscheibe ausgetauscht werden
(nur original ecom-Schutzscheibe benutzen). Das LED-Gehäuse ist anschließend gut zu reinigen und der Dichtungsring auf Beschädigungen zu prüfen. Sollte der Dichtungsring
Beschädigungen aufweisen, ist er ebenfalls zu tauschen(der
Dichtungsring ist unter der Schutzscheibe in einer Nut
eingefasst / nur Original ecom Dichtungsringe benutzen).
Beim Aufsetzen des Lampenkopfes auf das LED-Gehäuse ist
darauf zu achten, dass Dichtung und Scheibe sauber anliegen. Es dürfen nach der Montage keine Dichtungsanteile im
Lichtaustritt sichtbar sein. Sind der innere Lampenkopf oder
die Linse ebenfalls beschädigt worden, so ist die Lampe zur
Reparatur an den Hersteller zu senden.
Bild 3
9. Reparatur
Reparaturen sind durch ecom instruments GmbH oder
durch von ecom instruments GmbH autorisierte Personen
bzw. Service Center durchzuführen, da eine sicherheitstechnische Überprüfung nach einer Reparatur erforderlich ist.
10. Entsorgung
Elektroaltgeräte sowie „historische“ Elektroaltgeräte von der
Firma ecom instruments GmbH werden zu unseren Lasten
der Entsorgung zugeführt und nach der europäischen Richtlinie 2002/96/EG und dem deutschen Elektro-Gesetz vom
16.03.2005 kostenfrei entsorgt. Der Versand der Geräte zu
ecom instruments GmbH geht auf Kosten des Versenders.
11
Page 12

Nach Artikel 1, §18 und Ar tikel 2 des Gesetzes zur Neuregelung der abfallrechtlichen Produktverantwortung für
Batterien und Akkumulatoren vom 25. Juni 2009 sind wir zu
folgenden Hinweisen verpflichtet.
Ihr Gerät enthält eine alkalische-Batterie.
Sind die Batterien „leer“, dürfen Sie nicht in den normalen
Müll oder Hausmüll. Altbatterien enthalten möglicherweise
Schadstoffe, die Umwelt und Gesundheit schaden können.
Bitte geben Sie die Batterien zurück. Die Rückgabe ist
unentgeltlich und gesetzlich vorgeschrieben. Bitte werfen Sie
nur entladene Batterien in die aufgestellten Behälter oder
tragen Sie Vorsorge gegen Kurzschlüsse.
Achtung: Die im Gerät eingesetzte Batterie birgt eine Feuergefahr und die Gefahr von chemischen Verletzungen bei
nicht ordnungsgemäßem Einsatz. Weder die Batterie noch
die Batteriezellen dürfen geöffnet oder demontiert, nicht
über 100°C erhitzt oder verbrannt werden.
Im Entsorgungsfall kann die Batterie wie in Punkt 8.3 beschrieben entnommen werden. Im Übrigen gelten die oben
genannten Entsorgungsvorschriften für Altgeräte.
Alle Batterien werden wieder verwertet. So lassen sich
wertvolle Rohstoffe wie Eisen, Zink oder Nickel wieder
gewinnen.
Das Symbol hat folgende Bedeutung:
Batterien dürfen nicht in den normalen Müll oder Hausmüll.
Beim Versenden von Batterien sind die Vorschiften der IATA
zu beachten. Diese Vorschriften sind für eingebaute, wie
auch für ausgebaute Batterien immer anzuwenden!
12
Page 13

11. Reinigung, Wartung und Lagerung
- Gerät nur mit einem geeigneten Tuch oder Schwamm
reinigen. Verwenden Sie zur Reinigung keine Lösungs- oder
Scheuermittel.
- Es wird empfohlen, die Funktion und Genauigkeit des Ge-
räts alle zwei Jahre vom Hersteller überprüfen zu lassen.
- Bei längerer Lagerung sind die Batterien aus dem Gerät
zu entnehmen.
- Zulässige Lagertemperaturen -30°C bis +60°C nicht
unter- bzw. überschreiten!
12. Garantie und Haftung
Für dieses Produkt gewährt die ecom instruments GmbH
laut den allgemeinen Geschäftsbedingungen eine Garantie
von zwei Jahren auf Funktion und Material unter den
angegebenen und zulässigen Betriebs- und Wartungsbedingungen. Ausgenommen hiervon sind alle Verschleißteile (z.B.
Batterien, Akkus, Messfühler, Kalibrationen, Leuchtmittel, etc).
Diese Garantie erstreckt sich nicht auf Produkte, die unsachgemäß verwendet, verändert, vernachlässigt, durch Unfälle beschädigt oder anormalen Betriebsbedingungen sowie
einer unsachgemäßen Handhabung ausgesetzt wurden.
Forderungen auf Gewährleistungen können durch Einsenden des defekten Geräts geltend gemacht werden. Reparaturen, neues Einjustieren oder Austauschen des Gerätes
behalten wir uns vor.
Die voranstehenden Garantiebestimmungen sind das
einzige und alleinige Recht auf Schadenersatz des Erwerbers
und gelten ausschließlich und an Stelle von allen anderen
vertraglich oder gesetzlichen Gewährleistungspflichten.
ecom instruments GmbH übernimmt keine Haftung für
spezielle, unmittelbare, mittelbare, Begleit- oder Folgeschäden sowie Verluste einschließlich des Verlusts von Daten,
unabhängig davon, ob sie auf Verletzung der Gewährleis-
13
Page 14

tungspflicht, rechtmäßige oder unrechtmäßige Handlungen,
Handlungen in gutem Glauben sowie andere Handlungen
zurückzuführen sind.
Falls in einigen Ländern die Begrenzung einer gesetzlichen
Gewährleistung sowie der Ausschluss oder Begrenzung von
Begleit- oder Folgeschäden nicht zulässig ist, könnte es sein,
dass die obengenannten Einschränkungen und Ausschlüsse
nicht für jeden Erwerber gelten. Sollte irgendeine Klausel
dieser Garantiebestimmungen von einem zuständigen
Gericht für unwirksam oder nicht durchsetzbar befunden
werden, so bleiben die Wirksamkeit oder Erzwingbarkeit
irgendeiner anderen Bedingung dieser Garantiebestimmungen von einem solchen Spruch unberührt.
13. EG Konformitätserklärung
Die EG-Konformitätserklärung und das Zertifikat liegen der
Verkaufsverpackung als separates Dokument bei.
Bitte beachten Sie auch den Hinweis am Ende des Inhaltsverzeichnisses.
14
Page 15

14. EG-Baumusterprüfbescheinigung
1) Folgende besondere Bedingungen laut EG-Baumuster prüfbescheinigung müssen beachtet werden:
1. Ein Öffnen des Gehäuses im explosionsgefährdeten
Bereich ist nicht zulässig.
2. Vor Inbetriebnahme der Lampe ist eine Funktionsprü fung durchzuführen. Falls ein deutlicher Leuchtkraft verlust festgestellt wird, sind die Batterien zu wechseln.
Bei schwachen Batterien oder sichtbaren Beschädig ungen ist die LED Stirnlampe nicht in den explosionsge fährdeten Bereich einzubringen.
3. Der Austausch der eingebauten Batterien darf nur
außerhalb des explosionsgefährdeten Bereiches und nur
durch vom Hersteller freigegebenen Typen erfolgen.
4. Wird ausgetretenes Elektrolyt festgestellt, ist das Gerät
nicht in den Ex-Bereich einzubringen und dem Herstel-
ler zur Überprüfung zu zusenden.
5. Es darf nur vom Hersteller zugelassenes Zubehör bzw.
Ersatzteile verwendet werden.
6. Beschädigte Dichtungen dürfen nur entsprechend
den Anweisungen in der Betriebsanleitung ausgetauscht
werden.
7. Die Betriebsanleitung ist zu beachten.
Die besonderen Bedingungen der LED-Stirnlampe
®
Lite-Ex
PL 10 H lauten zusätzlich:
8. Es darf nur das Original-Kopfband HB 10 H verwendet
werden.
9. Bei Verwendung des Batterietyps Energizer No. E92
erfüllt die Lite-Ex
®
PL 10 H nur die Temperaturklasse T3.
2) Das jeweils aktuelle Ex-Zertifikat kann auf der jeweiligen
Produktseite unter www.ecom-ex.com heruntergeladen
werden.
15
Page 16

Content
1. Application ........................................................................................... 15
2. Safety information ............................................................................ 15
3. Faults and damage ........................................................................... 15
4. Safety regulations .............................................................................16
4.1 Special conditions for use in potentially
explosive areas ..................................................................................17
5. Safety information ............................................................................ 17
6. Ex-data ................................................................................................... 17
7. Technical specifications .................................................................18
8. Functional description / operating instructions ...............19
8.1 Assembly of the Lite-Ex® PL 10 H .........................................19
8.2 Getting started ................................................................................... 19
8.3 Battery replacement ....................................................................... 20
8.4 Cleaning the ring switch ............................................................... 21
8.5 Bulb replacement..............................................................................21
9. Repair ...................................................................................................... 22
10. Disposal ................................................................................................. 22
11. Cleaning, maintenance and storage .......................................24
12. Warranty and liability .....................................................................24
13. EC Declaration of Conformity ................................................. 25
14. EC type approval test certificate ............................................ 26
Note:
The current operating instructions, the EC Declaration of
Conformity and the Ex-certificate can be downloaded from
the relevant product page at www.ecom-ex.com, or alternatively they can be requested directly from the manufacturer.
16
Page 17

1. Application
The Lite-Ex® PL 10 H is a compact and rugged LED headlamp that is designed for industrial application in potentially
explosive areas classified as Zone 2, 1 and 0, as well as
Zone 22, 21 and 20 in accordance with directive 1999/92/
EC (ATEX).
2. Safety information
These operating instructions contain information and safety
regulations which are to be observed without fail for safe
operation in the described conditions. Non-observance
of this information and these instructions can have serious
consequences or it may violate regulations.
Please read these operating instructions carefully before
starting to use the unit! In case of any doubt (in the form
of translation or printing errors) the German language
operating instructions shall apply.
3. Faults and damage
If there is any reason to suspect that the safety of the unit
has been impaired, it must be withdrawn from use and
removed immediately from the Ex-area.
Measures must be taken to prevent it from being restarted
accidentally.
We recommend that the unit is returned to the manufacturer for inspection.
The safety of the unit may be compromised, if, for example:
- there is visible damage to the housing.
- the unit has been subjected to excessive loads.
- the unit has been improperly stored.
- the unit has been damaged in transit.
- unit markings or inscriptions are illegible.
- malfunctions occur.
- permitted limit values have been exceeded.
17
Page 18

4. Safety regulations
Use of this unit assumes that the operator observes the
conventional safety regulations and has read the certificate
in order to eliminate faulty operation of the unit.
The following safety regulations must also be complied with:
- The unit should not be opened inside the Ex-area.
- A functional inspection should be conducted before
starting to use the unit. If there is a marked decrease in
luminosity, the batteries should be checked for leaking
electrolyte.
- If you notice any electrolyte, do not take the unit into the
Ex-area, but send it to the manufacturer for inspection.
- The batteries should only be exchanged outside the
Ex-area.
- Weak batteries should be replaced immediately.
- Additional batteries must not be carried in the Ex-area.
- Only type-tested batteries should be used.
- The temperature class of the Lite-Ex® PL 10 H can vary
between T4 and T3 depending on the type of battery
used – refer to table 1!
- Only those accessories approved by ecom instruments
GmbH may be used.
- Only original ecom replacement seals and discs (type PL
10 H) should be used.
- Only the original headband (HB 10 H) should be used.
- Avoid use in aggressive acids or bases.
- The LED housing should not be opened.
18
Page 19
4.1 Special conditions for use in potentially explosive
areas
- Storage of the lamp in these areas is prohibited!
- After changing the batteries or the sealing rings always
check to make sure the sealing rings and threads are clean
and in good condition.
- Before using the lamp in the Ex-area make sure the
housing components are screwed tightly by hand and/
or as far as their stop in order to ensure the IP rating is
maintained.
5. Safety information
Risk of blinding!
- Do not look directly into the beam of light!
Do not aim the light directly into the eyes of another
person!
6. Ex-data
EC type approval test certificate no.:
ZELM 05 ATEX 0272 X
Ex-designation:
1G Ex ia op is IIC T4 or T3 Ga
1D Ex ia IIIC T130°C Da
Approved for Zone 2, 1 and 0, device group II, gas group IIC
(explosive gases, vapours or mist), temperature class T4.
Approved for Zone 22, 21 and 20, device group III, explosive dust, IIIC – conductive dust, IIIB – non-conductive dust,
IIIA – flammable fibres, T130°C
19
Page 20
7. Technical specifications
Ambient temperature Ta: -20 ... +50°C
Storage temperature: -30 ... +60°C
Batteries / power supply: 3 x LR03
according to IEC, AAA
Lamp:
Luminosity:
High-performance LED
approx. 3.000 lx
(
at a distance of 1m
/ 6° Optik)
approx. 1800 lx
(at a distance of 1 m / 25° Optics)
Luminous flux:
64 lm
Operating time: approx. 55 hours
(continuous operation)
Dimensions: 60 x 87 x 69 mm
(H x L x W)
Weight: approx. 180g
(with headband)
IP protection class: IP 65 / IP 67
ESD protection: Anti-static housing
CE-designation: CE0102
®
Caution! The temperature class of the Lite-Ex
PL 10 H
can vary depending on the type of battery used - see the
following table.
Manufacturer Model Temperature class
1 Varta Max
No. 4703 T4
Tech
2 Varta Industrial
No. 4003 T4
Alcaline
3 Panasonic Pro
LR03 T4
Power
4 Energizer No. E92 T3 !
Table 1
20
Page 21
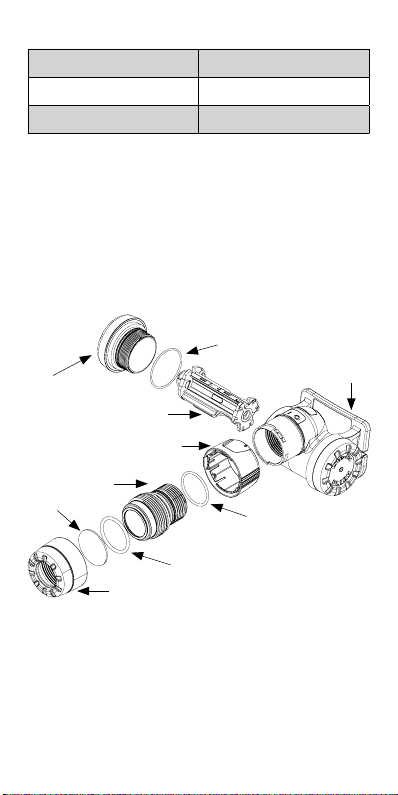
Table of approved sealing rings and protective discs
Manufacturer Model
ecom Sealing ring type PL 10 H
ecom Replacement disc PL 10 H
8. Functional description / operating instructions
Please read these operating instructions carefully so
that you are familiar with, and are able to use, all of the
functions of your Lite-Ex
®
PL 10 H. For your own safety and
information please read the instructions on the following
pages carefully!
8.1 Assembly of the Lite-Ex® PL 10 H
Sealing ring 27.0 x 1.0
Cap
Flashlight body
Battery adapter
Ring switch
LED housing
Disc
Sealing ring 22.5 x 1.5
Sealing ring 22.5 x 2.0
Lamp head
Fig. 1
8.2 Getting started
The supplied batteries must be inserted to begin with
(outside the Ex-area).
In order to be able to use the lamp in the Ex-area it must
be ensured that the lamp head and the body of the lamp
are screwed together tightly. The lamp can then be switched
on by lightly rotating the yellow ring switch clockwise.
21
Page 22
8.3 Battery replacement
The batteries should be replaced if the level of luminance is
no longer deemed to be satisfactory.
It is advisable to change all 3 batteries at the same time.
Only the appropriate, approved types of batteries may be
used (see Table 1).
To replace the batteries turn the left-hand side cap (which
bears the „ecom“ inscription) in the direction of the arrow
and then remove the entire battery adapter (see fig. 2).
You can then remove and exchange the batteries. After
inserting the new batteries (while observing the correct
polarity) the battery adapter can be reinserted (please observe the guides in the adapter and battery compartment
when doing this). Then screw the cap back on.
Please make sure the lamp has been screwed together
completely before switching it on again.
Fig. 2
Battery replacement
- Only use type-tested batteries
(see the table 1 under point 7: Technical specifications)
- Always replace all batteries simultaneously.
- Pay attention to the correct polarity.
- Dispose of depleted batteries in an appropriate and
environmentally friendly manner!
- When changing the batteries examine the threads and
seals for cleanliness and signs of damage.
- If you notice any spilled electrolyte when changing the
battery, do not take the unit into the Ex-area, but send it
to the manufacturer for inspection.
22
Page 23

8.4 Cleaning the ring switch
A non-contacting ring switch is used to switch on the LiteEx® PL 10 H (see 8.2). Dirt and moisture do not impair the
switching function. The ring switch is easy to clean if excessive amounts of dirt and grime have made it difficult to turn.
Start by unscrewing the lamp head. The ring switch can
now be removed and cleaned. When it has been cleaned,
replace the ring switch and rotate it until it engages firmly in
place (the line marking on the ring switch must be located
opposite the circular marking on the lamp body). The lamp
head can then be screwed back onto the lamp.
8.5 Bulb replacement
The Lite-Ex® PL 10 H is equipped with a long-life LED bulb.
Under normal conditions it is not necessary to change the
LED. If, however, the lamp becomes defective or its brightness has diminished, it should be sent to ecom instruments
for inspection or repair. The LED housing should not be
opened! Conducting repairs to the LED housing or bulb
yourself poses a risk to the safety of the lamp and is not
permitted.
8.6 Replacing the protective disc
The LED housing is protected by the surrounding housing
head and an additional protective disc, which is located over
the opening where the beam is emitted. The disc is made
of high-quality material. If, however, it should break, it can be
replaced. To do this, grasp the body of the Lite-Ex® PL 10
H and the ring switch and then carefully unscrew the lamp
head by turning it anti-clockwise. To unscrew the lamp head
from the LED housing use an Allen key (A/F 4) to secure
the LED housing in place (see Fig. 3) and unscrew the
lamp head. The protective disc can now be replaced (only
use original protective discs from ecom). The LED housing
should then be cleaned thoroughly and the sealing ring
checked for signs of damage. If the sealing ring exhibits any
damage, it should also be replaced (the sealing ring is set in
23
Page 24

a groove underneath the protective disc / only use original
sealing rings from ecom). When replacing the lamp head
on the LED housing make sure the seal and disc are seated
properly. After assembly no part of the seal should be visible
through the opening where the beam is emitted. If the inner
lamp head or lens has been damaged, the lamp should be
sent to the manufacturer for repair.
Fig. 3
9. Repair
Repairs are to be conducted by ecom instruments GmbH
or by personnel or service centres authorised by ecom
instruments GmbH, because the safety of the unit needs to
be tested after repairs are implemented.
10. Disposal
Old electrical devices as well as „historical“ old electrical
devices from ecom instruments GmbH are supplied for
disposal at our expense and disposed of free of charge in
accordance with European Directive 2002/96/EC and the
German electrical law of 16/03/2005. The costs associated
with returning devices to ecom instruments GmbH are to
be borne by the sender.
In accordance with Article 1, Section 18 and Article 2 of the
Act Revising the Law of Waste-Related Product Responsibility for Batteries and Accumulators dated 25 June 2009, we
are obligated to provide the following information.
Your device contains an alkaline battery.
24
Page 25
Depleted batteries should never be disposed of along with
normal or household waste. Old batteries can contain
harmful substances that are hazardous to health and damaging to the environment. Please return the batteries. Return
is free of charge and required by law. Please only dispose
of discharged batteries in the designated containers or take
precautions to prevent short circuits.
Note: The battery used in this unit poses a fire hazard and
can cause chemical injuries if it is used improperly. Neither
the battery nor the battery cells should be opened or
disassembled and they should not be burned or exposed to
temperatures exceeding 100°C.
If the battery needs to be disposed of, it can be removed as
described under point 8.3. The disposal regulations specified
above are also applicable for old devices.
All batteries can be recycled. Precious raw materials such as
iron, zinc and nickel can therefore be reused.
The symbol means that batteries should not be disposed of along with normal or household waste.
When sending batteries please observe IATA regulations.
These regulations should always be applied for both built-in
and removable batteries!
25
Page 26

11. Cleaning, maintenance and storage
- Only use a suitable cloth or sponge to clean the unit. Do
not use any solvents or abrasive cleaning agents when
cleaning.
- It is recommended that you have the functionality and
accuracy of the unit inspected by the manufacturer every
two years.
- The batteries should be removed from the unit during
prolonged periods of storage.
- Do not allow storage temperatures to exceed or fall
below the permitted range of –30°C to +60°C!
12. Warranty and liability
In accordance with our general terms and conditions ecom
instruments GmbH provides a warranty for this product for
a period of two years regarding its function and material under the specified and permitted operating and maintenance
conditions. This excludes all parts that are subject to wear
and tear (e.g. batteries, probes, calibration units, LEDs, etc.).
This warranty does not extend to products that are used
improperly, have been modified, neglected, damaged in
accidents or exposed to abnormal operating conditions and
inappropriate handling.
Any claims under the warranty can be invoked by returning
the defective equipment to the manufacturer. We reserve
the right to repair, adjust or exchange the device.
The aforementioned guarantee conditions are the sole and
only right of the purchaser to compensation, are exclusively
valid and replace all other contract or legal warranty
obligations. ecom instruments GmbH assumes no liability
for special, direct, indirect, accompanying or consequential
damage as well as losses including the loss of data, independent of whether it was caused by violation of the warranty
obligation, lawful or unlawful action, action in good faith or
any other action.
26
Page 27

If the limitation of a legal warranty as well as the exclusion
or limitation of accompanying or consequential damage
is not permissible in certain countries, it may be that the
aforementioned limitations and exclusions are not valid for
every purchaser. Should any such clause of these warranty
conditions be declared ineffective or unenforceable by a
competent court, then the effectiveness or enforceability
of any of the other conditions of these warranty conditions
shall remain unaffected by such a judgement.
13. EC Declaration of Conformity
The EC Declaration of Conformity and the certificate are
enclosed with the sales packaging as a separate document.
Please also observe the information provided underneath
the table of contents.
27
Page 28

14. EC type approval test certificate
1) The following special conditions according to the
EC type approval test certificate must be observed:
1. The opening of the enclosure within explosion
hazardous areas is prohibited.
2. Before the lamp will be put into operation, a functional
test shall be made. If a considerable loss of illuminating
power will be detected, the batteries shall be changed.
If the batteries are low or visible damages are detected,
the LED headlamps shall be not put into the explosion
hazardous area.
3. The exchange of the built-in batteries shall be only done
outside the hazardous area and only with battery types
approved by the manufacture.
4. If electrolyte leakage is detected, the device shall not put
into the explosion hazardous area and shall be send to
the manufacturee for inspection.
5. Only by the manufacturer approved accessories resp.
spare parts shall be used..
6. Damaged gaskets shall only be changed according to the
instructions inside the operating manual.
7. The operating manual has to be observed.
The special conditions of the LED headlamp Lite-Ex® PL 10
H are in addition as follows:
8. Only the original headband (HB 10 H) shall be used.
9. If the headlamp will be used with batteries of
type Energzer No. E92, the Lite-Ex
®
PL 10 H only fulfils
the temperature class T3.
2) The current Ex-certificate can be downloaded from the
relevant product page at www.ecom-ex.com
28
Page 29

Sommaire
1. Utilisation .............................................................................................. 28
2. Consignes de sécurité ................................................................... 28
3. Erreurs et effor ts non admissibles ..........................................28
4. Consignes de sécurité ................................................................... 29
4.1 Conditions particulières pour l‘utilisation dans des
zones explosibles ..............................................................................30
5. Consignes de sécurité ................................................................... 30
6. Caractéristiques Ex ......................................................................... 30
7. Caractéristiques techniques ....................................................... 31
8. Description fonctionnelle / consignes d‘utilisation ........ 32
8.1 Structure de la Lite-Ex® PL 10 H............................................32
8.2 Mise en service ..................................................................................32
8.3 Remplacement des piles ..............................................................33
8.4 Nettoyage du commutateur à anneau.................................34
8.5 Remplacement de l‘ampoule .....................................................34
9. Réparation ............................................................................................35
10. Élimination ............................................................................................ 35
11. Nettoyage, entretien et stockage ............................................37
12. Garantie et responsabilité ........................................................... 37
13. Déclaration de conformité CE ................................................. 38
14. Attestation d’examen CE de type ..........................................39
Remarque :
Le mode d‘emploi à jour, la déclaration de conformité CE et
le certificat de conformité Ex peuvent être téléchargés sur
la page produit correspondante, à l‘adresse suivante : www.
ecom-ex.com, ou demandés directement au fabricant.
29
Page 30

1. Utilisation
La Lite-Ex® PL 10 H est une lampe frontale à DEL compacte et robuste destinée à un usage industriel dans les
atmosphères explosives des zones 2, 1 et 0, ainsi que 22, 21
et 20 conformément à la directive 1999/92/CE (ATEX).
2. Consignes de sécurité
Le présent mode d‘emploi contient des informations et
des consignes de sécurité à respecter impérativement pour
un fonctionnement sûr dans les conditions décrites. Le
non-respect de ces informations et consignes peut avoir des
conséquences dangereuses ou être contraire aux directives.
Avant d‘utiliser l‘appareil, lire attentivement le mode
d‘emploi ! En cas de doute (erreurs de traduction ou
d‘impression), le mode d‘emploi allemand fait foi.
3. Erreurs et efforts non admissibles
Dès qu‘il apparaît un doute sur la capacité de l‘appareil à
assurer une sécurité totale, mettre l‘appareil hors service et
le retirer immédiatement de la zone explosible.
Empêcher toute remise en service accidentelle.
Nous vous recommandons d‘envoyer l‘appareil au fabricant
en vue de son contrôle.
La sécurité de l‘appareil peut par exemple être remise en
question si :
- des dommages sont visibles sur le boîtier ;
- l‘appareil a été soumis à des efforts non conformes ;
- l‘appareil a été stocké de façon non conforme ;
- l‘appareil a subi des dommages lors du transpor t ;
- les inscriptions sur l‘appareil sont illisibles ;
- des dysfonctionnements se produisent ;
- les valeurs limites admissibles ont été dépassées.
30
Page 31

4. Consignes de sécurité
L’utilisation de l’appareil suppose, de la par t de l’utilisateur,
le respect des dispositions habituelles relatives à la sécurité
ainsi que la lecture du certificat, et ce afin d’exclure toute
erreur de manipulation de l’appareil.
Par ailleurs, les consignes de sécurité suivantes doivent être
respectées :
- Ne pas ouvrir l‘appareil dans la zone explosible.
- Un essai de fonctionnement doit être réalisé avant la
mise en service de la lampe. Si une per te de puissance
d‘éclairage est constatée, vérifier que l‘électrolyte ne
s‘écoule pas de la pile.
- Si on constate la présence d‘électrolyte, l‘appareil ne doit
pas être introduit dans la zone explosible. Le renvoyer au
fabricant à des fins de contrôle.
- Les piles doivent uniquement être remplacées en dehors
de la zone explosible.
- Les piles déchargées doivent être remplacées sur-le-
champ.
- La présence de piles supplémentaires est interdite dans la
zone explosible.
- Utiliser uniquement des piles homologuées.
- En fonction du type de piles utilisé, la classe de tempéra-
ture de la Lite-Ex® PL 10 H peut passer de T4 à T3. Tenir
compte du tableau 1 !
- Seuls des accessoires autorisés par ecom instruments
GmbH peuvent être utilisés.
- N‘utiliser que des lentilles de rechange de type PL 10 H et
des joints de rechange d‘origine ecom.
- N‘utiliser que le bandeau de tête d‘origine HB 10 H.
- Éviter l’utilisation d’acides ou de bases agressives.
- Ne jamais ouvrir l‘enveloppe de la DEL.
31
Page 32
4.1 Conditions particulières pour l‘utilisation dans des
zones explosibles
- Il est interdit de stocker la lampe !
- Après chaque remplacement de pile ou de bague
d‘étanchéité, soumettre les bagues d‘étanchéité et les
filetages à un contrôle de propreté, de mise en place et
d‘absence de dommages.
- Les pièces du boîtier de la lampe doivent être vissées à la
main ou jusqu‘en butée avant l‘utilisation en zone explosible afin de garantir la protection IP.
5. Consignes de sécurité
Risque d‘éblouissement !
- Ne pas regarder directement dans le faisceau lumineux !
Ne pas orienter le cône lumineux directement vers les yeux
d‘une autre personne !
6. Caractéristiques Ex
N° d‘attestation d‘examen CE de type :
ZELM 05 ATEX 0272 X
Marquage Ex :
1G Ex ia op is IIC T4 ou T3 Ga
1D Ex ia IIIC T130°C Da
Autorisé pour les zones 2, 1 et 0, appareils du groupe II,
groupe de gaz IIC gaz, vapeurs ou nuages explosibles, classe
de température T4.
Autorisé pour les zones 22, 21 et 20, appareils du groupe
III, poussières explosibles, IIIC poussières conductrices, IIIB
poussières non conductrices, IIIA liquides inflammables,
T130 °C
32
Page 33

7. Caractéristiques techniques
Température
-20 ... +50°C
ambiante Ta :
Température
-30 ... +60°C
de stockage :
Piles / alimentation
3 x LR03 d‘après CEI, AAA
électrique :
Ampoules:
Luminosité:
DEL hautes performances
environ 3.000 lux
(à une distance de 1 m / 6° Optique)
environ 1.800 lux
(à une distance de 1 m / 25° Optique)
Courant d’éclairage:
64 lm
Autonomie : environ 55 heures (utilisation
prolongée)
Dimensions : 60 x 87 x 69 mm (h x L x l)
Poids : env. 180g (avec bandeau de tête)
Indice de
IP 65 / IP 67
protection IP :
Indice ESC : boîtier antistatique
Marquage CE : CE0102
Attention ! La classe de température de la Lite-Ex® PL 10 H
peut changer en fonction du type de piles voir tableau
suivant.
Fabricant Type Classe de température
1 Varta
N° 4703 T4
Max Tech
2 Varta Indust-
N° 4003 T4
rial Alcaline
3 Panasonic
LR03 T4
Pro Power
4 Energizer N° E92 T3 !
Tableau 1
33
Page 34

Tableau des joints et lentilles de protection homologués
Fabricant Type
ecom Bagues d‘étanchéité type PL 10 H
ecom Lentille de rechange PL 10 H
8. Description fonctionnelle / consignes d‘utilisation
Veuillez lire attentivement ce mode d‘emploi afin de
connaître et de pouvoir utiliser toutes les fonctions de votre
®
PL 10 H. Pour votre sécurité et votre information,
Lite-Ex
lisez les consignes figurant sur les pages suivantes !
8.1 Structure de la Lite-Ex® PL 10 H
Joint torique 27,0 x 1,0
Cache
Boîtier de la lampe
Adaptateur pour piles
Commutateur à anneau
Enveloppe de la LED
Lentille
Joint torique 22,5 x 1,5
Joint torique 22,5 x 2,0
Tête de lampe
Illustration 1
8.2 Mise en service
Commencer par installer les piles fournies (en dehors de
la zone explosible). Pour pouvoir utiliser la lampe en zone
explosible, s‘assurer que la tête et le boîtier de la lampe
sont complètement vissés. Il est ensuite possible d‘allumer
la lampe en faisant tourner légèrement le commutateur à
anneau jaune dans le sens horaire.
34
Page 35

8.3 Remplacement des piles
S‘il est constaté que l‘intensité lumineuse n‘est plus satisfaisante, remplacer les piles. Il est recommandé de remplacer
les trois piles en même temps. Seules des piles de type
homologué peuvent être utilisées (voir tableau 1).
Pour procéder au remplacement des piles, tournez le
cache latéral gauche portant l‘inscription « ecom » dans
le sens de la flèche imprimée et retirer l‘adaptateur pour
piles dans son intégralité (voir illustration 2). Vous pouvez
ensuite retirer et remplacer les piles. Après l‘installation
de nouvelles piles (respecter la polarité), vous pouvez
réinstaller l‘adaptateur pour piles (utiliser les rails de guidage
présents au niveau de l‘adaptateur et du logement des piles). Revissez ensuite le cache. Veiller à ce que la lampe soit
parfaitement fermée avant de l‘allumer à nouveau.
Illustration 2
Remplacement des piles
- Utiliser uniquement des piles homologuées (voir le tableau
1 sous le point 7: Caractéristiques techniques)
- Toujours remplacer toutes les piles en même temps.
- Respecter la bonne polarité.
- Éliminer les piles usées de manière appropriée et en
respectant l’environnement !
- Lors du remplacement des piles, vérifier l‘état de propreté
et d‘endommagement du filetage et des joints.
- Si lors du changement de piles on constate la présence
d‘électrolyte, l‘appareil ne doit pas être introduit dans la
zone explosible. Le renvoyer au fabricant à des fins de
contrôle.
35
Page 36

8.4 Nettoyage du commutateur à anneau
La Lite-Ex® PL 10 H commute sans contact via le commutateur à anneau décrit précédemment. La saleté et l‘humidité
ne peuvent pas nuire à la fonction de commutation. Si le
commutateur à anneau devient difficile à actionner en
raison d‘importants dépôts de saletés, l‘anneau peut être
nettoyé facilement et sans problème.
Commencer par dévisser la tête de lampe. Le commutateur
à anneau peut alors être retiré vers l‘avant et nettoyé. Après
le nettoyage, réinstaller le commutateur à anneau et tourner
jusqu‘à ce qu‘il s‘enclenche correctement (la ligne marquée
sur le commutateur à anneau doit se trouver au-dessus
du cercle marqué sur le boîtier de la lampe). Il est ensuite
possible de revisser la tête de lampe.
8.5 Remplacement de l‘ampoule
La Lite-Ex® PL 10 H est équipée d‘une DEL à durée de vie
extrêmement longue. En temps normal, le remplacement de
la DEL n‘est pas nécessaire. En cas de défaut ou d‘éclairage
insuffisant, la lampe doit être envoyée à ecom instruments
en vue de sa vérification ou de sa réparation. Ne jamais
ouvrir l‘enveloppe de la DEL ! Toute intervention au niveau
de l‘enveloppe de la DEL ou de l‘ampoule compromet la
sécurité de la lampe et est interdite.
8.6 Remplacement de la lentille de protection
L‘enveloppe de la DEL est protégée au niveau de la sortie
de lumière par la tête de lampe qui l‘entoure et par une
lentille supplémentaire. Si, malgré sa grande qualité, la
lentille se cassait, il serait possible de la remplacer. Pour
cela, maintenir le boîtier de la lampe Lite-Ex® PL 10 H et
le commutateur à anneau et faire tourner délicatement la
tête de lampe dans le sens anti-horaire. Pour dévisser la tête
de lampe de l‘enveloppe de la DEL, bloquer l‘enveloppe
de la DEL avec une clé six pans de 4 (voir illustration 2) et
dévisser la tête de lampe. Remplacer alors la lentille de protection (n‘utiliser que des lentilles de protection d‘origine
36
Page 37

ecom). Bien nettoyer ensuite l‘enveloppe de la DEL et
vérifier que la bague d‘étanchéité n‘est pas endommagée. Si
la bague d‘étanchéité présente des dommages, la remplacer
également (la bague d‘étanchéité est placée dans une rainure sous la lentille de protection / n‘utiliser que des bagues
d‘étanchéité d‘origine ecom). Veiller lors de l‘installation de
la tête de lampe sur l‘enveloppe de la DEL à ce que le joint
et la lentille soient bien en place. Après le montage, aucune
partie du joint ne doit être visible au niveau de la sortie
de lumière. Si l‘enveloppe de la DEL a été endommagée, la
lampe doit être envoyée au fabricant pour réparation.
Illustration 3
9. Réparation
Les réparations doivent être effectuées par ecom instruments GmbH ou par des personnes ou des centres de
réparation autorisés par ecom instruments GmbH, dans la
mesure où un contrôle de la sécurité est nécessaire en cas
de réparation.
10. Élimination
Les appareils électriques usagés ainsi que les appareils
électriques usagés « historiques » de la société ecom
instruments GmbH sont transpor tés à notre charge en vue
de leur élimination et éliminés gratuitement conformément à la directive européenne 2002/96/CE et à la loi
allemande sur les équipements électriques et électroniques
du 16/03/2005. L‘envoi des appareils à ecom instruments
GmbH reste toutefois à la charge de l‘expéditeur.
37
Page 38

Conformément à l‘article 1, §18 et à l‘article 2 de la loi du
25 juin 2009 sur la nouvelle réglementation de la responsabilité pour les produits soumis au droit des déchets pour
les piles et accumulateurs, nous sommes tenus d‘indiquer les
recommandations suivantes.
Votre appareil contient une pile alcaline.
Lorsque la pile est « vide », elle ne doit pas être jetée avec
les déchets normaux ni avec les déchets ménagers. Les
piles usagées peuvent contenir des polluants susceptibles
de nuire à l‘environnement et à la santé. Veuillez restituer
les piles. Cette restitution est gratuite et inscrite dans la
loi. Veuillez ne déposer des piles déchargées que dans les
conteneurs appropriés ou installer des protections contre
les courts-circuits.
Attention : la pile utilisée dans cet appareil peut provoquer
des risques d’incendie ou de blessures chimiques en cas
d‘utilisation non conforme. Ne tentez pas d’ouvrir ou de
démonter la pile ni ses éléments, de les incinérer ni de les
porter à des températures supérieures à 100 °C.
Pour la mise au rebut, la pile peut être retirée comme indiqué au point 8.3. Les directives de mise au rebut indiquées
ci-dessus s‘appliquent en particulier aux appareils usagés.
Toutes les piles sont revalorisées. Il est notamment possible
de réutiliser des matières premières de grande valeur telles
que le fer, le zinc ou le nickel.
Le symbole a la signification suivante : Les piles ne
doivent pas être jetées avec les déchets normaux ni avec les
déchets ménagers.
Lors de l‘envoi de piles, il y a lieu de tenir compte des
réglementations de l‘IATA. Ces réglementations s‘appliquent
aux piles qui se trouvent encore dans les appareils et aux
piles seules !
38
Page 39

11. Nettoyage, entretien et stockage
- Nettoyer l‘appareil uniquement avec un chiffon ou une
éponge appropriée. Lors du nettoyage, ne pas utiliser de
solvants ou d‘agents abrasifs.
- Il est recommandé de faire vérifier tous les deux ans,
par le fabricant, le bon fonctionnement et la précision de
l’appareil.
- En cas de stockage prolongé, retirer les piles de l’appareil.
- Respecter les températures de stockage comprises entre
-30 °C et +60 °C !
12. Garantie et responsabilité
Conformément aux conditions générales de vente, la
société ecom instruments GmbH accorde pour ce produit
une garantie de deux ans sur le fonctionnement et le matériel dans les conditions d’exploitation et de maintenance
prescrites et autorisées. En sont exclues toutes les pièces
d‘usure (par ex. les piles, accumulateurs, capteurs, dispositifs
de calibrage, DEL, etc.).
Cette garantie ne s‘applique pas aux produits qui ont été
utilisés de façon non conforme, modifiés, négligés, endommagés par accident ou soumis à des conditions d‘utilisation
anormales, ainsi qu‘à une manipulation incorrecte.
Toute demande de garantie peut être faite par l‘envoi de
l‘appareil défectueux. Nous nous réservons le droit de
réparer, de régler ou de remplacer l‘appareil.
Les dispositions mentionnées ci-dessus relatives à la garantie
constituent l’unique et seul droit de l’acquéreur d’obtenir
des dommages-intérêts et s’appliquent exclusivement et à
la place de toutes les autres obligations de garantie contractuelles ou légales. ecom instruments GmbH n’assume
aucune responsabilité pour les dommages accessoires ou
consécutifs spéciaux, indirects et directs ainsi que les pertes,
y compris la perte de données, indépendamment du fait de
39
Page 40

savoir s’ils sont dus à une violation de l’obligation de garantie, à des actes légaux ou illégaux, à des actes de bonne foi
ainsi qu’à d’autres actes.
Dans le cas où, dans certains pays, la limite d‘une garantie
légale ainsi que l‘exclusion ou la limite des dommages liés
ou consécutifs n‘est pas autorisée, il pourrait arriver que
les limites et exclusions citées ci-dessus ne s‘appliquent
pas à tous les acquéreurs. Si une clause quelconque de ces
conditions de garantie était déclarée non valable ou non
applicable par un tribunal compétent, la validité ou le caractère obligatoire de toute autre clause de ces conditions de
garantie n‘en serait pas affectés.
13. Déclaration de conformité CE
La déclaration de conformité CE ainsi que le certificat sont
fournis dans l‘emballage sous forme d‘un document séparé.
Tenir également compte de la remarque à la fin du sommaire.
40
Page 41

14. Attestation d’examen CE de type
1) Respecter les conditions particulières suivantes confor-
mément à l‘attestation d’examen CE de type :
1. Il est interdit d‘ouvrir le boîtier dans les atmosphères
explosibles.
2. Un essai de fonctionnement doit être réalisé avant la
mise en service de la lampe. Si une per te significative
de puissance d‘éclairage se produit, alors il faut procé der au remplacement des piles. Si les piles sont déchar gées ou en cas de dommages visibles, la lampe LED ne
peut pas être introduite dans des atmosphères
explosibles.
3. Le remplacement des piles intégrées ne doit être réalisé
qu‘en dehors des atmosphères explosibles et unique ment par des piles de type homologué par le fabricant.
4. Si on constate la présence d‘électrolyte, l‘appareil ne
doit pas être introduit dans la zone explosible.
Le renvoyer au fabricant à des fins de contrôle.
5. Seuls les accessoires et pièces de rechange homologués
par le fabricant peuvent être utilisés.
6. Ne remplacer les joints endommagés que conformé-
ment aux instructions données dans la notice
d’utilisation.
7. Respecter la notice d’utilisation.
De plus, les conditions particulières suivantes sont applicables à la lampe de poche à LED Lite-Ex
®
PL 10 H:
8. N‘utiliser que le bandeau de tête d‘origine HB 10 H.
9. Si elle est alimentée par des piles Energizer n° E92, la
Lite-Ex
®
PL 10 H satisfait uniquement à la classe de
température T3.
2) le certificat de conformité Ex actuel peut être
téléchargé sur la page de produit correspondante sous
www.ecom-ex.com.
41
Page 42

Inhoudsopgave
1. Toepassing ............................................................................................ 41
2. Veiligheidsinstructies .......................................................................41
3. Storingen en ontoelaatbare belastingen ............................. 41
4. Veiligheidsvoorschriften ................................................................42
4.1 Bijzondere voorwaarden voor gebruik op
plaatsen met explosiegevaar ......................................................43
5. Veiligheidsinstructies .......................................................................43
6. Ex-gegevens .........................................................................................43
7. Technische gegevens ......................................................................44
8. Functiebeschrijving/gebruiksaanwijzing ................................ 45
8.1 Constructie van de Lite-Ex
®
PL 10 H ..................................45
8.2 Ingebr uikname ...................................................................................45
8.3 De batterijen vervangen .............................................................. 46
8.4 De ringschakelaar reinigen .......................................................... 47
8.5 De verlichtingseenheid vervangen ......................................... 47
8.6 De lens vervangen ...........................................................................47
9. Reparatie ............................................................................................... 48
10. Afvoer ..................................................................................................... 48
11. Reiniging, onderhoud en opslag ...............................................50
12. Garantie en aansprakelijkheid ................................................... 50
13. EG-Conformiteitsver klaring .......................................................51
14. EG-Verklaring van typeonderzoek .........................................52
Let op:
U kunt de meest actuele gebruikshandleiding, de EGConformiteitsverklaring en het Ex-cer tificaat downloaden
van de betreffende productpagina op www.ecom-ex.com,
of rechtstreeks bij de fabrikant aanvragen.
42
Page 43

1. Toepassing
De Lite-Ex® PL 10 H is een compacte, robuuste ledhoofdlamp voor industrieel gebruik op plaatsen waar
explosiegevaar heerst in de zones 2, 1 en 0 evenals 22, 21
en 20 conform richtlijn 1999/92/EG (ATEX).
2. Veiligheidsinstructies
Deze handleiding bevat informatie en veiligheidsvoorschriften die u te allen tijde in acht moet nemen om een
veilig functioneren van het apparaat onder de beschreven
omstandigheden te garanderen. Het niet in acht nemen
van deze informatie en instructies kan leiden tot gevaarlijke
situaties of het overtreden van geldende voorschriften.
Voordat u het apparaat gebruikt, dient u de gebruikshandleiding zorgvuldig te lezen. In geval van twijfel (wegens
vertaal- of drukfouten) is de Duitse gebruikshandleiding
doorslaggevend.
3. Storingen en ontoelaatbare belastingen
Zodra wordt vermoed dat het apparaat niet meer de
gewenste veiligheid biedt, moet het buiten werking worden
gesteld en onmiddellijk uit de Ex-zone worden verwijderd.
Neem maatregelen om te voorkomen dat het apparaat per
ongeluk weer in gebruik wordt genomen. Wij adviseren het
apparaat voor controle naar de fabrikant op te sturen.
De veiligheid van het apparaat kan onder meer zijn
aangetast als:
- de behuizing zichtbaar is beschadigd;
- het apparaat aan verkeerde belastingen is blootgesteld;
- het apparaat onjuist is bewaard;
- het apparaat transportschade heeft opgelopen;
- de opschriften op het apparaat onleesbaar zijn;
- het apparaat niet goed functioneert;
- de toegestane grenswaarden zijn overschreden.
43
Page 44

4. Veiligheidsvoorschriften
Voor het gebruik van de apparaat wordt ervan uitgegaan
dat de gebruiker de gebruikelijke veiligheidsvoorschriften
opvolgt en het certificaat heeft gelezen, zodat het apparaat
op de juiste manier wordt bediend.
Daarnaast moeten de volgende veiligheidsvoorschriften in
acht worden genomen:
- Het apparaat mag binnen de Ex-zone niet worden
geopend.
- Voor gebruik dient de lamp te worden gecontroleerd op
correct functioneren. Controleer bij sterke achteruitgang
van de lichtopbrengst of de batterijen elektrolyt lekken.
- Als wordt geconstateerd dat elektrolyt is vrijgekomen, mag
het apparaat niet meer in de Ex-zone worden gebruikt.
Zend het ter controle naar de fabrikant.
- De batterijen mogen alleen buiten de Ex-zone worden
vervangen.
- Vervang lege of bijna lege batterijen zo snel mogelijk.
- Het meenemen van reser vebatterijen in de Ex-zone is niet
toegestaan.
- Gebruik in dit apparaat uitsluitend voor dit apparaat
goedgekeurde batterijen.
- Afhankelijk van het type batterijen dat wordt gebruikt, kan
de temperatuurklasse van de Lite-Ex® PL 10 H wijzigen
van T4 naar T3 – lees de informatie in tabel 1!
- Gebruik uitsluitend toebehoren dat door ecom instruments GmbH is goedgekeurd.
- Vervang afdichtingen en lenzen uitsluitend door originele
onderdelen (type PL 10 H) van ecom.
- Gebruik uitsluitend de originele hoofdband HB 10 H.
- Gebruik het apparaat niet in omgevingen met agressieve
zuren of basen.
- De LED-behuizing mag niet worden geopend.
44
Page 45

4.1 Bijzondere voorwaarden voor gebruik op plaatsen
met explosiegevaar
- De lamp mag niet worden opgeslagen op plaatsen waar
explosiegevaar heerst.
- Na iedere vervanging van batterijen of afdichtringen moeten de afdichtringen en schroefdraad worden gecontroleerd op correcte passing en op vervuiling of beschadiging.
- Om de IP-bescherming te garanderen, moeten voor gebruik in de Ex-zone de onderdelen van de lampbehuizing
handvast dan wel tot aan de aanslag worden vastgedraaid.
5. Veiligheidsinstructies
Gevaar voor verblinding!
- Kijk niet direct in de lichtbundel.
Richt de lichtbundel niet rechtstreeks op de ogen van
andere personen.
6. Ex-gegevens
EG-Verklaring van typeonderzoek nr.:
ZELM 05 ATEX 0272 X
Ex-markering:
1G Ex ia op is IIC T4 resp. T3 Ga
1D Ex ia IIIC T130°C Da
Goedgekeurd voor zones 2, 1 en 0, apparaat uit groep II,
gasgroep IIC (explosiegevaarlijke gassen, dampen of nevels),
temperatuurklasse T4.
Goedgekeurd voor zones 22, 21 en 20, apparaat uit groep
III, explosiegevaarlijk stof, IIIC – geleidend stof, IIIB – nietgeleidend stof, IIIA – brandbaar pluis, T130 °C.
45
Page 46

7. Technische gegevens
Omgevingstemperatuur Ta: -20 ... +50°C
Opslagtemperatuur: -30 ... +60°C
Batterijen /
3 x AAA (IEC: LR03)
stroomvoorziening:
Verlichtingseenheid:
Lichtsterkte:
Krachtige LED
ca. 3.000 lx
(op 1 m afstand / 6° Optica)
1800 lx
(op 1 m afstand / 25° Optica)
Lichtopbrengst:
64 lm
Bedrijfsduur: ca. 55 uur (continu gebruik)
Afmetingen: 60 x 87 x 69 mm
(h x l x b)
Gewicht: ca. 180 g (incl. hoofdband)
IP-beschermingsklasse: IP65 / IP67
ESD-bescherming: antistatische behuizing
CE-markering: CE0102
ca.
Let op! Afhankelijk van het gebruikte type batterijen kan de
temperatuurklasse van de Lite-Ex
®
PL 10 H veranderen, –
zie onderstaande tabel.
Fabrikant Type Temperatuurklasse
1 Varta Max Tech Nr. 4703 T4
2 Varta Industrial
Nr. 4003 T4
Alcaline
3 Panasonic Pro
LR03 T4
Power
4 Energizer Nr. E92 T3 !
Tabel 1
46
Page 47

Tabel met goedgekeurde afdichtringen en lenzen
Fabrikant Type
ecom Afdichtringen type PL 10 H
ecom Reservelens PL 10 H
8. Functiebeschrijving/gebruiksaanwijzing
Lees deze gebruikshandleiding zorgvuldig door, zodat u alle
functies van uw Lite-Ex
®
PL 10 H leert kennen en kunt
gebruiken. Lees voor uw veiligheid en ter informatie de
instructies op de volgende pagina‘s zorgvuldig door!
8.1 Constructie van de Lite-Ex® PL 10 H
O-ring 27,0 x 1,0
Lampbehuizing
Afsluitdop
Batterijadapter
Ringschakelaar
LED-behuizing
O-ring 22,5 x 1,5
O-ring 22,5 x 2,0
Lampkop
Afb. 1
8.2 Ingebruikname
Plaats allereerst de meegeleverde batterijen - dit dient
buiten de Ex-zone te worden gedaan.
Om de lamp in de Ex-zone te kunnen gebruiken, moet
worden gecontroleerd of de lampkop en de behuizing van
de lamp goed zijn vastgedraaid. Schakel vervolgens de lamp
worden in door de gele ringschakelaar kort met de klok
mee te draaien.
47
Page 48
8.3 De batterijen vervangen
Vervang de batterijen wanneer de lichtsterkte niet meer
voldoende is voor een goed gebruik. Het wordt aanbevolen
om altijd alle batterijen tegelijk te vervangen. Gebruik uitsluitend batterijen die zijn goedgekeurd voor deze lamp (zie
tabel 1). Om de batterijen te vervangen: draai de afsluitdop
met de opdruk ‚ecom‘ links op de lamp in de richting van
de hierop gedrukte pijl en neem de gehele batterijadapter
uit het apparaat (zie afbeelding 2). Daarna kunt u de oude
batterijen verwijderen en de nieuwe plaatsen. Let bij het
plaatsen van de nieuwe batterijen op de polariteit. Plaats
daarna de batterijadapter weer in de lamp. De geleidingsrichels op de adapter en in het batterijcompartiment zorgen
voor een correcte plaatsing. Plaats daarna de afsluitdop
terug en draai deze goed vast. Controleer voor het inschakelen van de lamp of alle onderdelen weer vast zitten en de
lamp goed is afgedicht.
Afb. 2
De batterijen vervangen
- Gebruik alleen de voor dit type goedgekeurde batterijen
die worden genoemd in de tabel 1 in hoofdstuk 7:
Technische gegevens.
- Vervang altijd alle batterijen tegelijk.
- Let op de juiste polariteit.
- Voer lege batterijen op een juiste en milieuvriendelijke
wijze af!
- Controleer bij het vervangen van de batterijen de schroef-
draad en afdichtingen op verontreiniging en beschadiging.
- Als wordt geconstateerd dat elektrolyt is vrijgekomen, mag
het apparaat niet meer in de Ex-zone worden gebruikt.
Zend het ter controle naar de fabrikant.
48
Page 49

8.4 De ringschakelaar reinigen
Doordat de hierboven genoemde ringschakelaar van de
Lite-Ex® contactloos funktioneert, wordt de schakelfunctie
niet aangetast door vuil en vocht. Sterke vuilaanslag kan er
wel toe leiden dat de ringschakelaar zwaarder te bedienen
is; in dit geval kunt u de ring eenvoudig reinigen.
Draai allereerst de lampkop los. Schuif nu de ringschakelaar
naar voren, verwijder hem van de lamp en reinig hem. Plaats
na het reinigen de ringschakelaar terug en draai deze rond
totdat hij inklikt. De markering (streepje) op de schakelaar
moet zich tegenover de ringmarkering op de behuizing van
de lamp bevinden. Plaats hierna de lampkop weer terug en
draai hem vast.
8.5 De verlichtingseenheid vervangen
De Lite-Ex® PL 10 H is voorzien van een extreem
duurzame LED-eenheid. Bij normaal gebruik hoeft deze
niet te worden vervangen. Zend in geval van een defect of
afnemende lichtsterkte de lamp voor controle of reparatie
naar ecom instruments. De LED-behuizing mag niet worden
geopend. Ingrepen aan de LED-behuizing of de verlichtingseenheden door anderen dan ecom instruments zijn niet
toegestaan, daar deze de veiligheid van de lamp aantasten.
8.6 De lens vervangen
De LED-behuizing wordt beschermd door de omhullende
behuizingskop en een een extra lens bij de lichtopening.
Mocht deze lens ondanks de hoogwaardige kwaliteit toch
breken, vervang hem dan als volgt: houd de lampbehuizing
van de Lite-Ex® PL 10 H en de ringschakelaar vast, en draai
de lampkop voorzichtig tegen de klok in los. De lampkop
schroeft u als volgt los van de LED-behuizing: zet met een
inbussleutel SW4 de LED-behuizing vast (zie afbeelding
3) en draai de lampkop los. Vervang nu de lens: gebruik
hiervoor uitsluitend een originele ecom-lens. Reinig de
LED-behuizing zorgvuldig en controleer de afdichtring op
eventuele beschadigingen. Als de afdichtring beschadigd is,
49
Page 50
dient u deze ook te vervangen. Gebruik uitsluitend originele
afdichtringen van ecom. De ring bevindt zich in een inkeping
onder de lens. Let er bij het plaatsen van de lampkop op
de LED-behuizing op dat de afdichtring en de lens goed
aansluiten. Na montage mag de afdichtring niet zichtbaar
zijn in de lichtopening. Indien u beschadigingen constateert
aan de binnenkant van de LED-behuizing of de lens, zend
dan de lamp ter reparatie naar de fabrikant.
Afb. 3
9. Reparatie
Reparaties dienen te worden uitgevoerd door ecom instruments GmbH of een door ecom geautoriseerde persoon
of reparatiedienst. Dit in verband met de na reparatie
noodzakelijke veiligheidstechnische controle.
10. Afvoer
Oude elektrische apparatuur alsmede „historische“ oude
elektrische apparatuur van de firma ecom instruments
GmbH worden op onze kosten naar afvalverwerkingsbedrijven gebracht en conform de Europese richtlijn 2002/96/
EG en de Duitse wet inzake elektrische apparatuur van 16
maart 2005 gratis afgevoerd. Verzending van de apparaten
naar ecom instruments GmbH geschiedt op kosten van de
verzender.
Conform artikel 1, paragraaf 18, en ar tikel 2 van het “Gesetz
zur Neuregelung der abfallrechtlichen Produktverantwortung für Batterien und Akkumulatoren“ (Wet op het
opnieuw regelen van de wettelijke verantwoordelijkheid
voor verwijdering van batterijen en accumulatoren) van 25
juni 2009 wijzen wij u op het volgende:
50
Page 51

Uw apparaat bevat een alkalinebatterij.
Het is niet toegestaan dergelijke batterijen met het huishoudelijk afval mee te geven als zij “leeg” zijn. Lege batterijen kunnen stoffen bevatten die schadelijk zijn voor milieu
en gezondheid. Lever deze batterijen in. Het inleveren van
batterijen en accu’s is kostenloos en bovendien wettelijk
verplicht. Lever a.u.b. alleen ontladen batterijen en accu‘s in
bij de daarvoor bedoelde inzamelpunten, of zorg ervoor dat
geen kortsluiting kan ontstaan.
Waarschuwing: bij onjuist gebruik kan de accu of batterij in
dit apparaat brand of chemisch letsel veroorzaken. Zowel
de accu of batterij als de accu-/batterijcellen mogen niet
worden geopend, gedemonteerd, verbrand of tot boven
100°C verhit.
Als de batterij moet worden afgevoerd, kunt u hem uit het
apparaat verwijderen volgens de instructies in punt 8.3. Voor
het overige gelden de hierboven genoemde verwijderingsinstructies voor afgedankte apparatuur.
Alle accu’s en batterijen worden gerecycled; hiermee
worden waardevolle grondstoffen zoals ijzer, zink en nikkel
teruggewonnen.
Het symbool heeft de volgende betekenis: batterijen
en accu’s mogen niet met het huishoudelijk afval worden
meegegeven, maar moeten gescheiden worden ingezameld.
Houd u bij het verzenden van batterijen aan de voorschriften van de IATA. Deze voorschriften gelden zowel voor
batterijen die zich in een apparaat bevinden als ook voor
batterijen die uit het apparaat zijn genomen.
51
Page 52

11. Reiniging, onderhoud en opslag
- Reinig het apparaat alleen met een geschikte doek of
spons. Gebruik hiervoor geen oplos- of schuurmiddelen.
- Het wordt aangeraden de werking en nauwkeurigheid van
het apparaat om de twee jaar door de fabrikant te laten
testen.
- Bij langdurige opslag moeten de batterijen uit het toestel
worden verwijderd.
- Bewaar het apparaat alleen bij de toegestane opslagtem-
peraturen: -30°C tot +60°C.
12. Garantie en aansprakelijkheid
Voor dit product verleent ecom instruments GmbH volgens
de algemene voorwaarden een garantie van twee jaar op
functie en materialen onder de aangegeven en toegestane
gebruiks- en onderhoudsomstandigheden. Uitgesloten
hiervan zijn alle aan slijtage onderhavige onderdelen
(zoals accu‘s, sensoren, kalibraties, verlichtingseenheden,
enzovoorts).
Deze garantie strekt zich niet uit tot producten die onjuist
gebruikt, gewijzigd of verwaarloosd zijn, door ongevallen
zijn beschadigd of aan abnormale gebruiksomstandigheden
alsmede een onjuiste hantering zijn blootgesteld.
Garantieclaims kunnen worden ingediend door opsturen
van het defecte apparaat. Wij zullen naar eigen inzicht het
apparaat repareren, opnieuw afstellen of vervangen.
Deze garantiebepalingen zijn het enige en uitsluitende recht
op schadevergoeding van de koper en gelden uitsluitend en
in plaats van alle andere contractuele of wettelijke garantieplichten. ecom instruments GmbH aanvaardt geen aansprakelijkheid voor speciale, directe, indirecte, begeleidende
of vervolgschade alsmede verliezen inclusief het verlies van
gegevens, ongeacht of deze te wijten zijn aan schending van
de garantieplicht, rechtmatige of onrechtmatige handelingen,
handelingen te goeder trouw alsmede andere handelingen.
52
Page 53

Als in enkele landen de begrenzing van een wettelijke garantie alsmede de uitsluiting of begrenzing van begeleidende
of vervolgschade niet is toegestaan, gelden de bovengenoemde beperkingen en uitsluitingen mogelijk niet voor elke
koper. Als een clausule in deze garantiebepalingen door
een bevoegde rechtbank voor ongeldig of niet uitvoerbaar
wordt verklaard, dan wordt de geldigheid of uitvoerbaarheid
van alle overige bepalingen door een dergelijke uitspraak
niet aangetast.
13. EG-Conformiteitsverklaring
Die EG-Conformiteitsverklaring en het cer tificaat worden
als afzonderlijk document toegevoegd aan de verkoopverpakking.
Neem alstublieft ook nota van de opmerking onderaan de
inhoudsopgave.
53
Page 54

14. EG-Verklaring van typeonderzoek
1) Conform de EG-Verklaring van type-onderzoek dienen
de volgende bijzondere voorwaarden in acht te worden
genomen:
1. Het is niet toegestaan de behuizing te openen op
plaatsen waar explosiegevaar heerst.
2. Voor gebruik dient de lamp te worden gecontroleerd
op correct functioneren. Vervang onmiddelijk de batteri jen als de lichtopbrengst van de lamp duidelijk afneemt.
Breng de LED-hoofdlamp niet in een gebied waar
explosie gevaar heerst, indien de batterijen bijna leeg
zijn of de lamp zichtbaar is beschadigd.
3. De batterijen in de lamp mogen uitsluitend worden
vervangen op plaatsen waar geen explosiegevaar heerst
en uitsluitend door batterijen die de fabrikant hiervoor
heeft goedgekeurd.
4. Als wordt geconstateerd dat elektrolyt is vrijgekomen,
mag het apparaat niet meer in de Ex-zone worden
gebruikt. Zend het ter controle naar de fabrikant.
5. Gebruik uitsluitend door de fabrikant goedgekeurde
accessoires en reserveonderdelen.
6. Beschadigde afdichtingen mogen uitsluitend worden
vervangen conform de aanwijzingen in de gebruikshand leiding.
7. Houd u aan de aanwijzingen in de gebruikshandleiding.
Voor de LED-hoofdlamp van het type Lite-Ex® PL 10 H
gelden aanvullend de volgende bijzondere bepalingen:
8. Gebruik uitsluitend de originele hoofdband HB 10 H.
9. Bij gebruik van batterijen van het type Energizer Nr. E92
voldoet de Lite-Ex® PL 10 H alleen aan de voorwaar-
den voor temperatuurklasse T3.
2) U kunt het actuele Ex-certificaat downloaden van de
betreffende productpagina op www.ecom-ex.com.
54
Page 55

Indice
1. Uso ........................................................................................................... 54
2. Indicazioni di sicurezza .................................................................. 54
3. Guasti e sollecitazioni non consentite .................................. 54
4. Prescrizioni di sicurezza ................................................................ 55
4.1 Particolari condizioni per l’impiego in ambienti
esposti al rischio di esplosione ................................................. 56
5. Indicazioni di sicurezza .................................................................. 56
6. Dati sulle proprietà antideflagranti .........................................56
7. Dati tecnici ........................................................................................... 57
8. Descrizione delle funzioni / Funzionamento .................... 58
8.1 Struttura della Lite-Ex® PL 10 H .............................................58
8.2 Messa in funzione .............................................................................58
8.3 Sostituzione delle batterie .......................................................... 59
8.4 Pulizia del commutatore ad anello .........................................60
8.5 Sostituzione della lampadina ......................................................60
8.6 Sostituzione del vetro di protezione.....................................60
9. Riparazione .......................................................................................... 61
10. Smaltimento ........................................................................................ 61
11. Pulizia, manutenzione e conservazione ...............................63
12. Garanzia e responsabilità ............................................................. 63
13. Dichiarazione di conformità CE .............................................. 64
14. Attestato di cer tificazione CE ..................................................65
Nota:
La versione aggiornata del manuale d’uso, la dichiarazione
di conformità CE ed il certificato sul rischio di esplosione
possono essere scaricati dalla pagina relativa al prodotto
all’indirizzo www.ecom-ex.com oppure essere richiesti
direttamente al produttore.
55
Page 56

1. Uso
Lite-Ex® PL 10 H è una lampada frontale a LED robusta e
compatta per l’impiego industriale in aree a rischio esplosione delle zone 2,1 e 0 e 22, 21 e 20 come previsto dalla
direttiva 1999/92/EG (ATEX).
2. Indicazioni di sicurezza
Le presenti istruzioni per l’uso contengono informazioni
e prescrizioni di sicurezza che occorre assolutamente
rispettare ai fini di un funzionamento sicuro alle condizioni
descritte. La mancata osservanza di tali informazioni e
indicazioni può avere conseguenze pericolose o violare le
prescrizioni previste.
Prima di usare l’apparecchio, leggere attentamente le
istruzioni per l’uso!
In caso di dubbi (errori di traduzione o di stampa) è da
ritenersi valida la versione in lingua tedesca.
3. Guasti e sollecitazioni non consentite
Se si teme che la sicurezza dell’apparecchio sia pregiudicata,
è necessario spegnerlo immediatamente e allontanarlo dalla
zona a rischio di esplosione.
Evitare la messa in funzione involontaria.
Consigliamo di inviare l’apparecchio al produttore per
essere sottoposto a controllo.
La sicurezza dell’apparecchio può essere pregiudicata se
ad es.:
- la parte esterna è stata visibilmente danneggiata.
- l’apparecchio è stato esposto a sollecitazioni inopportune.
- l’apparecchio è stato conservato in modo inoppor tuno.
- l’apparecchio ha subito danni durante il trasporto.
- le diciture sull’apparecchio sono illeggibili.
- si verificano malfunzionamenti.
- sono stati superati i valori limite consentiti.
56
Page 57

4. Prescrizioni di sicurezza
L’uso dell’apparecchio presuppone l’osservanza da parte
dell’utente delle comuni prescrizioni di sicurezza e la lettura
del certificato al fine di evitare impieghi impropri dello
stesso.
Rispettare inoltre le seguenti prescrizioni di sicurezza:
- Non è ammesso aprire l’apparecchio all’interno dell’area a
rischio di esplosione.
- Prima di utilizzare la lampada è necessario eseguire una
prova di funzionamento. In caso di una chiara diminuzione della luminosità verificare che dalle batterie non sia
fuoriuscito l’elettrolita.
- Se si nota una fuoriuscita di elettrolita, non utilizzare
l’apparecchio nella zona a rischio esplosione e inviarlo al
produttore perché venga sottoposto a controllo.
- Le batterie possono essere sostituite solo all’esterno
dell’area a rischio di esplosione.
- Le batterie scariche vanno cambiate immediatamente.
- Non è ammesso por tare batterie di riserva all’interno
dell’area a rischio di esplosione.
- Possono essere impiegate solo batterie sottoposte a
prove di tipo.
- A seconda del tipo di batteria la classe di temperatura
della Lite-Ex® PL 10 H può variare da T4 a T3 – Vedi
tabella tabella 1!
- È consentito utilizzare solo accessori autorizzati da ecom
instruments GmbH.
- È consentito utilizzare solo guarnizioni e vetri di ricambio
ecom originali tipo PL 10.
- È consentito utilizzare solo la fascia HB 10 H originale.
- Evitare l’impiego in acidi o basi aggressivi.
- L’alloggiamento del LED non va aperto.
57
Page 58
4.1 Particolari condizioni per l’impiego in ambienti esposti
al rischio di esplosione
- Non è consentito lo stoccaggio della lampada!
- Dopo aver sostituito le batterie o le guarnizioni, control-
lare che le guarnizioni e la filettatura siano puliti, verificare
che non ci siano danni e che tutto sia stato montato
correttamente.
- Prima di utilizzare l’apparecchio nella zona a rischio di
esplosione, le parti esterne della lampada vanno avvitate
saldamente ovvero fino a battuta, in modo da garantire la
protezione IP.
5. Indicazioni di sicurezza
Pericolo di accecamento!
- Non guardare direttamente la fonte luminosa!
Non puntare la fonte luminosa direttamente negli occhi di
altre persone!
6. Dati sulle proprietà antideflagranti
Attestato di certificazione CE n.:
ZELM 05 ATEX 0272 X
Classificazione per aree esplosive:
1G Ex ia op is IIC T4 e/o T3 Ga
1D Ex ia IIIC T130°C Da
Omologato per la zona 2, 1 e 0, apparecchio del gruppo
II, gruppo gas IIC gas a rischio esplosione, vapori o nebbia,
classe di temperatura T4.
Omologato per la zona 22, 21 e 20, apparecchio del gruppo
III, polveri a rischio di esplosione, IIIC – polvere conduttrice,
IIIB – polvere non conduttrice, IIIA – fibre infiammabili,
T130 °C
58
Page 59
7. Dati tecnici
Temper atura ambiente Ta: -20 ... +50°C
Temperatura di stoccaggio: -30 ... +60°C
Batterie / Alimentazione
elettrica:
Lampadine:
Intensità luminosa:
3 x LR03 a norma IEC,
AAA
LED ad alto rendimento
ca. 3.000 lx
(ad una distanza di 1 m / 6° Ottica)
ca. 1.800 lx
(ad una distanza di 1 m / 25° Ottica)
Flusso luminoso:
64 lm
Durata di funzionamento: ca. 55 ore
(funzionamento continuo)
Dimensioni: 60 x 87 x 69 mm
(A x L x P)
Peso: ca. 180g
(con fascia per la testa)
Tipo di protezione IP: IP 65 / IP 67
Protezione ESD: Parti esterne antistatiche
Marchio CE: CE0102
®
Attenzione! La classe di temperatura di Lite-Ex
PL 10 H
può variare a seconda del tipo di batteria utilizzata – v. la
seguente tabella.
Produttore Modello Classe di temperatura
1 Var ta Max Tech No. 4703 T4
2 Varta Industrial
No. 4003 T4
Alcaline
3 Panasonic Pro
LR03 T4
Power
4 Energizer No. E92 T3 !
Tabella 1
59
Page 60

Tabella guarnizioni e vetri di protezione omologati
Produttore Modello
ecom Guarnizioni mod. PL 10 H
ecom Vetro di ricambio PL 10 H
8. Descrizione delle funzioni / Funzionamento
Leggere attentamente le presenti istruzioni per l´uso per
conoscere ed utilizzare tutte le funzioni della vostra Lite-Ex
®
PL 10 H. Per la propria sicurezza e a titolo informativo,
leggere le indicazioni riportate alle pagine seguenti!
8.1 Struttura della Lite-Ex® PL 10 H
Guarnizione 27,0 x 1,0
Cappuccio
Alloggiamento lampada
Adattatore
Commutatore ad anello
Alloggiamento
LED
Vetro
Guarnizione 22,5 x 1,5
Guarnizione 22,5 x 2,0
Testa lampada
Figura 1
8.2 Messa in funzione
Inserire in primo luogo le batterie fornite in dotazione (fuori
dell’area a rischio di esplosione).
Affinché la lampada possa essere impiegata in ambienti a
rischio di esplosione è necessario accertarsi che tutte le
parti esterne e la fascia siano stati avvitati completamente.
Dopodiché la lampada, può essere azionata girando leggermente il commutatore ad anello giallo in senso orario.
60
Page 61

8.3 Sostituzione delle batterie
Quando si nota che l’intensità luminosa è diminuita, è necessario sostituire le batterie. Si consiglia di sostituire tutte
e 3 le batterie. Devono essere utilizzate solo batterie dei
modelli omologati (vedi tabella 1).
Per cambiare le batterie ruotare, il cappuccio laterale
sinistro con la dicitura „ecom“ nella direzione della freccia
stampata, dopodiché rimuovere l’adattatore (vedi fig. 2).
Fatto questo, le batterie possono essere rimosse e sostituite. Dopo aver inserito le nuove batterie (facendo attenzione
alla polarità) l’adattatore può essere reinserito (seguendo
le guide dell’adattatore e del vano batterie). Infine riavvitare
il cappuccio.
Assicurarsi che la lampada sia completamente chiusa prima
di procedere alla riaccensione.
Figura 2
Sostituzione delle batterie
- Utilizzare solo batterie omologate (vedi tabella 1 al punto
7: Dati tecnici)
- Sostituire sempre tutte le batterie nello stesso momento.
- Accertarsi della corretta polarità.
- Provvedere allo smaltimento corretto ed ecologico delle
batterie esauste!
- Al momento della sostituzione delle batterie, verificare che
la filettatura e le guarnizioni siano pulite e non siano state
danneggiate.
- Se al momento della sostituzione delle batterie si nota una
fuoriuscita di elettrolita, non utilizzare l’apparecchio nella
zona a rischio esplosione e inviarlo al produttore affinché
venga sottoposto a controllo.
61
Page 62

8.4 Pulizia del commutatore ad anello
La Lite-Ex® PL 10 H si aziona senza contatti mediante il
commutatore ad anello sovradescritto. Sporco e umidità
non interferiscono sul funzionamento del meccanismo.
Nel caso in cui il commutatore ad anello risultasse poco
scorrevole a causa di sporco intenso, l’anello può essere
facilmente pulito.
Per prima cosa svitare la testa della lampada. Sfilare quindi
il commutatore ad anello tirandolo in avanti e procedere
alla rispettiva pulizia. Dopo aver ripulito il commutatore ad
anello reinserirlo e ruotarlo finché non scatta (la lineetta del
commutatore ad anello deve corrispondere al cerchietto
riportato nel corpo della lampada). Fatto questo, riavvitare
la testa della lampada.
8.5 Sostituzione della lampadina
La Lite-Ex® PL 10 H è dotata di una lampadina a LED di
lunga durata. Solitamente non è necessaria
una sostituzione dei LED. In caso di guasto o calo della
luminosità, inviare la lampada alla ecom instruments affinché
venga sottoposta a controllo o riparazione. L’alloggiamento
del LED non deve essere aperto! Interventi arbitrari
sull’alloggiamento del LED o
sulla lampadina compromettono la sicurezza della lampada
e non sono consentiti.
8.6 Sostituzione del vetro di protezione
L’alloggiamento del LED è protetto da un cappuccio che lo
circonda e da un vetro supplementare
in corrispondenza del punto di fuoriuscita della luce. Se,
nonostante la sua qualità, il vetro montato dovesse
rompersi, può essere facilmente sostituito. Per farlo è necessario tenere fermi la parte esterna della Lite-Ex® PL 10
H e il commutatore ad anello e, facendo molta attenzione,
svitare la testa della lampada in senso antiorario. Per svitare
la testa della lampada dell’alloggiamento del LED, assicurare
l’alloggiamento del LED con un esagono incassato SW4
62
Page 63
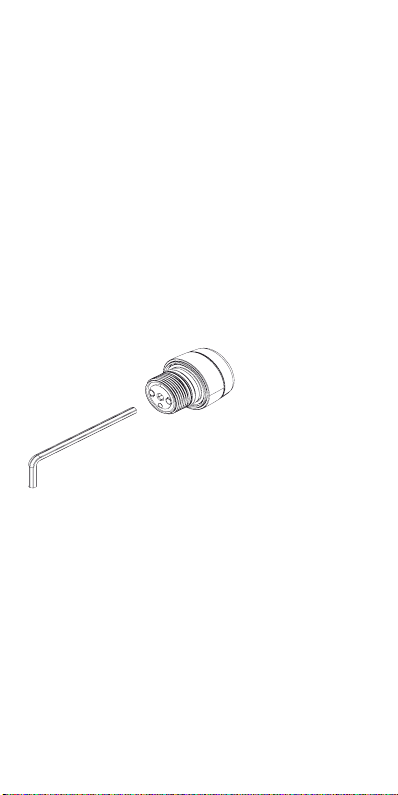
(vedi fig. 3) e svitare la testa della lampada verso il basso.
Sostituire quindi il vetro di protezione (utilizzare solo vetri
di protezione ecom originali). Dopodiché pulire bene
l’alloggiamento del LED e verificare che la guarnizione
ad anello non sia danneggiata. Se la guarnizione ad anello
dovesse essere danneggiata, provvedere alla sua sostituzione
(la guarnizione ad anello è posizionata nella scanalatura
sotto il vetro di protezione / utilizzare solo guarnizioni ecom
originali). Durante il rimontaggio della testa della lampada
sull’alloggiamento LED assicurarsi che guarnizione e vetro
siano correttamente posizionati. Alla fine del montaggio la
guarnizione o parti della guarnizione non devono essere
visibili nel punto di fuoriuscita luce. In caso di danni alla lente
o all’interno della lampada, inviare l’apparecchio al produttore affinché venga sottoposto a riparazione.
Figura 3
9. Riparazione
Gli interventi di riparazione devono essere eseguiti da
ecom instruments GmbH, da persone autorizzate da ecom
instruments GmbH o dal Centro assistenza poiché dopo la
riparazione è necessario un controllo tecnico di sicurezza.
63
Page 64

10. Smaltimento
Gli apparecchi vecchi e gli apparecchi „storici“ della ditta
ecom instruments GmbH saranno smaltiti a carico nostro
e gratuitamente secondo la direttiva europea 2002/96/UE
e la legge tedesca sui dispositivi elettrici del 16.03.2005. La
spedizione dei dispositivi alla sede ecom instruments GmbH
è a carico del mittente.
Ai sensi di art. 1, §18 e art. 2 della legge del 25 giugno 2009
che disciplina le nuove regole sullo smaltimento di pile e accumulatori in termini di responsabilità di prodotto (Gesetz
zur Neuregelung der abfallrechtlichen Produktverantwortung für Batterien und Akkumulatoren), siamo obbligati a
fornire le seguenti informazioni.
L’apparecchio contiene una batteria alcalina.
Non è consentito gettare batterie „scariche“ nei rifiuti
normali o domestici. Le batterie esauste possono contenere
sostanze nocive per la salute e l’ambiente. Si prega di
consegnare le batterie esauste agli appositi centri di raccolta.
Il servizio è gratuito ed è prescritto dalle normative vigenti.
Gettare solo batterie scariche negli appositi contenitori di
raccolta o adottare precauzioni contro i cortocircuiti.
Attenzione: la batteria utilizzata nell’apparecchio può essere
causa di incendio e lesioni chimiche in caso di impiego non
conforme. Non è consentito aprire o smontare la batteria o
le celle della batteria, né esporle a temperature superiori a
100° C o gettarle nel fuoco.
In caso di smaltimento è possibile rimuovere la batteria
come descritto al punto 8.3. Per tutti gli altri casi sono valide
le norme sullo smaltimento di apparecchi esausti o usati.
Tutte le batterie sono riciclabili. In questo modo è possibile
recuperare materie prime preziose come ferro, zinco o
nichel.
64
Page 65

Il simbolo ha il seguente significato: non è consentito
gettare batterie esauste nei rifiuti normali o domestici.
In caso d’invio di batterie attenersi alle disposizioni IATA.
Tali disposizioni vanno sempre rispettate sia che si tratti di
batterie inserite che di batterie rimosse!
11. Pulizia, manutenzione e conservazione
- Pulire l’apparecchio solo con uno straccio adatto o una
spugna. Non usare solventi o detergenti abrasivi per pulire
l’apparecchio.
- Ogni due anni si consiglia di far controllare dalla casa
produttrice le funzioni e la precisione dell’apparecchio.
- In caso di stoccaggio prolungato rimuovere le batterie
dall’apparecchio.
- La temperatura di stoccaggio deve sempre essere com-
presa tra –30°C e +60°C!
12. Garanzia e responsabilità
Per questo prodotto la ecom instruments GmbH concede,
conformemente alle condizioni generali di vendita, una garanzia di due anni in merito al funzionamento ed ai materiali
usati alle condizioni di funzionamento e di manutenzione
indicate e consentite. Sono esclusi da tale garanzia tutti i
componenti soggetti ad usura (ad es. batterie, accumulatori,
sensori, calibrazioni, lampadine, ecc).
Questa garanzia non copre i prodotti usati in modo improprio, modificati, trascurati, danneggiati in seguito ad incidenti
o esposti a condizioni di funzionamento non usuali, nonché
ad un uso improprio.
Interventi di garanzia possono essere richiesti con l’invio
dell’apparecchio difettoso alla casa produttrice. Ci riserviamo il diritto di effettuare riparazioni, interventi di regolazione o di sostituire l’apparecchio.
65
Page 66

Le disposizioni di garanzia premesse rappresentano l’unico
diritto di risarcimento per l’acquirente e hanno valore esclusivo rispetto a tutti gli altri obblighi di garanzia contrattuali e
previsti per legge. ecom instruments GmbH non si assume
alcuna responsabilità per danni speciali, diretti, indiretti, danni
secondari o conseguenti o per perdite compresa la perdita
di dati, a prescindere dal fatto che essi siano riconducibili a
violazione dell’obbligo di garanzia, ad atti legittimi o illegittimi, ad azioni in buona fede o altri tipi di azioni.
Nel caso in cui in alcuni paesi non sia possibile la limitazione di una prestazione di garanzia prevista dalla legge e
l’esclusione o la limitazione di danni secondari o conseguenti, potrebbe risultare che le limitazioni citate non siano da
considerarsi valide per l’acquirente. Nel caso in cui una clausola di queste disposizioni di garanzia non dovesse essere
considerata valida o eseguibile da un tribunale competente
in materia, tutte le altre disposizioni saranno comunque
considerate valide ed applicabili.
13. Dichiarazione di conformità CE
La dichiarazione di conformità CE e il certificato sono
allegati in un documento separato alla confezione per la
vendita.
Si prega di osservare altresì l’indicazione alla fine dell’indice.
66
Page 67

14. Attestato di certificazione CE
1) L’attestato di certificazione CE impone l’osservanza
delle seguenti condizioni:
1. Non è consentito aprire l’apparecchio in aree a rischio
di esplosione.
2. Prima utilizzare la lampada è necessario eseguire una
prova di funzionamento Se si nota un’evidente diminuzi one della luminosità, è necessario cambiare le batterie.
Se le batterie sono quasi scariche o se l’apparecchio è
visibilmente danneggiato, non utilizzare la lampada a
LED nelle aree a rischio esplosione.
3. La sostituzione delle batterie inserite va effettuato
soltanto fuori dell’area a rischio di esplosione utilizzando
unicamente tipi di batteria autorizzati dal produttore.
4. Se si nota una fuoriuscita di elettrolita, non utilizzare
l’apparecchio nella zona a rischio esplosione e inviarlo al
produttore affinché venga sottoposto a controllo.
5. Utilizzare unicamente accessori e ricambi autorizzati dal
produttore.
6. Sostituire le guarnizioni danneggiate solo secondo
quanto indicato nel manuale d’uso.
7. Osservare il manuale d’uso.
Le condizioni speciali della torcia a Led Lite-Ex® PL 10 H
prevedono inoltre:
8. È consentito utilizzare solo la fascia HB 10 H originale.
9. Se si utilizza la batteria Energizer No. E92, la classe di
temperatura della Lite-Ex® PL 10 H sarà T3.
2) La versione aggiornata del certificato sul rischio di
esplosione può essere scaricata alla pagina relativa al
prodotto sul sito www.ecom-ex.com.
67
Page 68

Índice
1. Aplicación ............................................................................................. 67
2. Advertencias ....................................................................................... 67
3. Errores y sometimiento de presiones no permitidas ..67
4. Normativas de seguridad ............................................................ 68
4.1 Condiciones especiales para la aplicación en
áreas con peligro de explosión ................................................69
5. Advertencias ....................................................................................... 69
6. Datos para la zona Ex ................................................................... 69
7. Especificaciones técnicas .............................................................. 70
8. Descripción del funcionamiento /
instrucciones de manejo .............................................................. 71
8.1 Montaje de la Lite-Ex® PL 10 H ..............................................71
8.2 Puesta en marcha .............................................................................71
8.3 Intercambio de las pilas ................................................................72
8.4 Limpieza del anillo interruptor ................................................. 73
8.5 Cambio del foco de luz ................................................................73
8.6 Cambio del cristal de protección ........................................... 73
9. Reparación ........................................................................................... 74
10. Eliminación ........................................................................................... 75
11. Limpieza, mantenimiento y almacenamiento ...................76
12. Garantía y responsabilidad ..........................................................76
13. Declaración de conformidad de la CE ................................ 77
14. Certificado de examen CE de tipo ....................................... 78
Aviso:
El correspondiente manual de instrucciones actualizado, la
declaración de conformidad CE y el certificado Ex pueden
descargarse desde la página del producto respectivo en
www.ecom-ex.com o ser solicitados directamente al
fabricante.
68
Page 69

1. Aplicación
La Lite-Ex® PL 10 H es una compacta y robusta lámpara
frontal LED para el uso industrial en áreas con peligro de
explosión de las zonas 2,1 y 0, así como 22, 21 y 20 según la
directiva 1999/92/CE (ATEX).
2. Advertencias
El presente manual de instrucciones contiene informaciones
y normas de seguridad, las que deben considerarse de
forma estricta para un funcionamiento seguro en las condiciones descritas. La no observancia de estas informaciones
e indicaciones puede tener consecuencias peligrosas o
infringir las normativas.
¡Antes de utilizar el aparato lea detenidamente el manual de
instrucciones!
En caso de duda (debido a errores de traducción o de
imprenta) regirá el manual de instrucciones en alemán.
3. Errores y sometimiento de presiones no permitidas
En cuanto se tema que la seguridad del aparato esté afectada, hay que apagar el aparato y sacarlo inmediatamente
de la zona Ex. Se tiene que evitar que el aparato vuelva a
entrar en función involuntariamente. Recomendamos enviar
el aparato al fabricante para una revisión.
La seguridad del aparato puede estar en peligro, p. ej., si:
- hay daños visibles en la carcasa.
- el aparato ha sido expuesto a presiones inadecuadas.
- el aparato ha sido almacenado inadecuadamente.
- el aparato ha sufrido daños durante el transporte.
- las rotulaciones del aparato son ilegibles.
- surgen fallas en las funciones.
- se han sobrepasado los límites de los valores permitidos.
69
Page 70

4. Normativas de seguridad
El uso del aparato demanda de parte del usuario la observancia de las normas de seguridad habituales y la lectura
del certificado, para descartar así operaciones erróneas en
el aparato.
Complementariamente se tienen que considerar las siguientes normativas de seguridad:
- El aparato no debe abrirse dentro de la zona Ex.
- Realizar un control de funcionamiento antes de hacer
funcionar la lámpara. Ante una notoria pérdida de luminosidad, hay que controlar que las pilas no tengan una fuga
de electrolito.
- Si se comprueba un escape de electrolito, no ingrese
el aparato a la zona Ex y envíelo al fabricante para un
control.
- Sólo deben cambiarse las pilas fuera de la zona Ex.
- Cambiar inmediatamente pilas agotadas.
- No está permitido llevar pilas adicionales a la zona Ex.
- Sólo se deben emplear pilas homologadas.
- El tipo de pila respectivo puede cambiar la clase de
temperatura de la Lite-Ex® PL10 H de T4 a T3 tabla 1
¡Ponga atención!
- Sólo se pueden utilizar accesorios autorizados por ecom
instruments GmbH.
- Utilizar sólo las juntas de repuesto originales y los cristales
de repuesto originales para el Tipo PL 10 H.
- Sólo está permitido usar la cinta original para la cabeza
HB 10 H.
- Evite el uso en ácidos agresivos o bases.
- No está permitido abrir las carcasas LED.
70
Page 71

4.1 Condiciones especiales para la aplicación en áreas con
peligro de explosión
- ¡Está prohibido el almacenamiento de la lámpara!
- Después de cada cambio de pila o de anillo de junta hay
que controlar que los anillos de junta y los roscados estén
limpios, en la posición correcta y que no presenten daños.
- Antes de usar la lámpara dentro de la zona Ex se deben
atornillar las partes de la carcasa con fuerza o hasta el
tope, para garantizar así la protección IP.
5. Advertencias
¡Peligro de ceguera!
- ¡No mirar directamente el rayo de luz!
¡No apuntar directamente el foco de luz a los ojos de otra
persona!
6. Datos para la zona Ex
Certificado de examen CE de tipo núm.:
ZELM 05 ATEX 0272 X
Rotulación de zona Ex:
1G Ex ia op is IIC T4 o T3 Ga
1D Ex ia IIIC T130°C Da
Autorizada para la zona 2,1 y 0, clase de aparatos II, clase
de gases IIC, gases, vapores o niebla capaces de generar
explosiones, clase de temperatura T4.
Autorizada para zonas 22, 21 y 20, aparatos del grupo III,
polvos con peligro de explosión, IIIC polvo conductor
de electricidad, IIIB polvo no conductor, IIIA pelusas
inflamables, T130°C
71
Page 72

7. Especificaciones técnicas
Temper atura ambiente Ta: -20 ... +50°C
Temperatura de
-30 ... +60°C
almacenamiento:
pilas / alimentación de
corriente:
Fuente de iluminación:
Luminosidad:
3 x LR03 de acuerdo a
IEC, AAA
LED de gran potencia
aprox. 3.000 lx
(a 1 m de distancia / 6° Óptica)
aprox. 1.800 lx
(a 1 m de distancia / 25° Óptica)
Flujo luminoso:
64 lm
Tiempo operativo: aprox. 55 horas
(funcionamiento continuo)
Dimensiones: 60 x 87 x 69 mm
(alto/ largo/ ancho)
Peso: aprox. 180g
(con cinta para la cabeza)
Tipo de protección IP: IP 65 / IP 67
Protección ESD: Carcasa antiestática
Rotulación de la CE: CE0102
®
¡Atención! La clase de temperatura de la Lite-Ex
PL 10 H
puede cambiar según el tipo de pila que se utilice observe
la siguiente tabla.
Fabricante Tipo Clase de temperatura
1 Varta Max
No. 4703 T4
Tech
2 Varta Alcalina
No. 4003 T4
Industrial
3 Panasonic Pro
LR03 T4
Power
4 Energizer No. E92 T3 !
Tabla 1
72
Page 73

Tabla con juntas y cristales de protección aprobados
Fabricante Tipo
ecom Anillos de juntas tipo PL 10 H
ecom Cristal de repuesto PL 10 H
8. Descripción del funcionamiento / instrucciones de
manejo
Por favor, lea cuidadosamente este manual de instrucciones, a fin de que pueda conocer y aprovechar todas las
funciones de su Lite-Ex
®
PL 10 H. ¡Para su seguridad e infor-
mación, lea las indicaciones en las páginas siguientes!
8.1 Montaje de la Lite-Ex® PL 10 H
Junta tórica, 27,0 x 1,0
Tapa de la carcasa
Cuerpo de la linterna
Adaptador para pilas
Conmutador anular
Compartimento de
la bombilla LED
Disco
Junta tórica, 22,5 x 1,5
Junta tórica, 22,5 x 2,0
Cabezal de iluminación
Fig. 1
8.2 Puesta en marcha
Primero, hay que colocar las pilas suministradas (fuera de la
zona Ex). Para que la lámpara pueda ser utilizada en la zona
Ex, tiene que estar seguro de que la cabeza y la carcasa de
la lámpara estén completamente atornilladas. Entonces se
puede encender la lámpara girando suavemente el anillo
interruptor amarillo, en el sentido de las manecillas del reloj.
73
Page 74
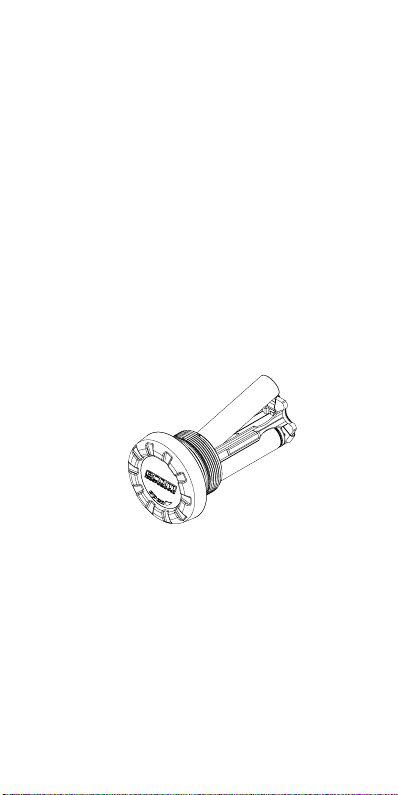
8.3 Intercambio de las pilas
Si se determina que la intensidad luminosa ya no es satisfactoria, entonces deben cambiarse las pilas. Se recomienda
intercambiar las 3 pilas al mismo tiempo. Sólo está permitido colocar pilas que correspondan a los tipos que están
autorizados (ver Tabla 1).
Para intercambiar las pilas, gire la tapa en el lado izquierdo
de la carcasa, señalada con la inscripción „ecom“, en la dirección que indica la flecha impresa y entonces retire todo
el adaptador para pilas (ver figura 2).
A continuación se pueden extraer las pilas e intercambiarlas. Después de colocar las pilas nuevas (atención con la
polaridad) se puede volver a poner el adaptador para pilas
(fijarse en las guías lineales en el adaptador y las ranuras
de las pilas). A continuación vuelva a atornillar la tapa de
la carcasa. Antes de volver a encender la lámpara, por favor
ponga atención a que la lámpara esté completamente
cerrada.
Fig. 2
Cambio de pilas
- Utilizar sólo pilas homologadas (ver en la tabla 1 bajo el
punto 7: Especificaciones técnicas)
- Cambie siempre todas las pilas al mismo tiempo.
- Ponga atención a la polaridad correcta.
- ¡Elimine las pilas gastadas adecuadamente y con respeto al
medio ambiente!
- Al cambiar las pilas, hay que controlar si los roscados y
anillos de juntas están limpios y libres de daños.
- Si durante el cambio de pilas se comprueba un escape de
electrolito, no hay que ingresar el aparato en la zona Ex y
tiene que enviarse al fabricante para su revisión.
74
Page 75

8.4 Limpieza del anillo interruptor
La Lite-Ex® PL 10 H se activa sin contacto mediante el
anillo interruptor anteriormente descrito. La suciedad y la
humedad no pueden perjudicar la función de encendido.
Si el anillo interruptor funciona con dificultad debido a una
alta acumulación de suciedad, se puede limpiar dicho anillo
de forma fácil y sin problemas.
Primero, desatornillar la cabeza de la lámpara. Ahora se
puede retirar hacia adelante el anillo interruptor y limpiarlo.
Después de la limpieza, volver a poner el anillo interruptor y
girarlo hasta que encaje firmemente (la marca en forma de
raya del anillo interruptor tiene que quedar puesta sobre el
círculo marcado en la cabeza de la lámpara). A continuación
se puede volver a atornillar la cabeza de la lámpara.
8.5 Cambio del foco de luz
La Lite-Ex® PL 10 H está implementada con un foco LED
de vida útil extremadamente larga. Un cambio del foco LED
normalmente no será necesario. En caso de un defecto o
de una disminución
de la luminosidad, se debe enviar la lámpara a ecom instruments para una revisión o reparación. ¡No se permite abrir
la carcasa LED! Las intervenciones por iniciativa propia en la
carcasa LED o en el foco ponen en peligro la seguridad de
la lámpara y no están autorizadas.
8.6 Cambio del cristal de protección
La carcasa LED está protegida a través de la carcasa circundante a la cabeza y mediante un cristal adicional en la parte
de la salida de la luz. Si pese a la alta calidad del cristal de la
lámpara se produce una rotura, entonces podrá cambiarse.
Para esto se sujeta firmemente la carcasa de la Lite-Ex® PL
10 H, así como también el anillo interruptor y se desatornilla cuidadosamente la cabeza de la lámpara en contra
del sentido de las manecillas del reloj. Para desatornillar la
cabeza de la lámpara desde la carcasa LED, se contraatornilla con una llave Allen SW4 la carcasa LED (ver figura 3) y
75
Page 76

se gira la cabeza de la lámpara para desmontarla. Ahora se
puede cambiar el cristal de protección (utilizar sólo cristales
de protección ecom originales). Finalmente se debe limpiar
bien la carcasa LED y controlar posibles daños en el anillo
de junta. Si el anillo de junta presenta daños, entonces se
tiene que cambiar también (el anillo de junta está debajo
del cristal de protección enmarcado en una ranura / utilizar
sólo anillos de junta ecom originales). Al colocar la cabeza
de la lámpara en la carcasa LED, se debe tener en cuenta
que la junta y el cristal se ajusten perfectamente. Tras el
montaje, no debe verse ninguna parte de la junta en la
salida de la luz. Si se llegan a dañar el interior de la cabeza
de la lámpara o la lente, entonces se debe enviar la lámpara
al fabricante para su reparación.
Fig. 3
9. Reparación
Las reparaciones sólo pueden ser realizadas por ecom
instruments GmbH, o mediante personas o centros de
servicios autorizados por ecom instruments GmbH, ya que
después de haberse efectuado una reparación será necesaria una inspección técnica de seguridad.
76
Page 77
10. Eliminación
Los aparatos eléctricos antiguos, así como los „históricos“
de la empresa ecom instruments GmbH, serán llevados por
cuenta de la empresa para su eliminación y, en virtud de la
directiva europea 2002/96/CE y la ley alemana sobre electricidad del 16-03-2005, eliminados gratuitamente. El coste
del envío del aparato a ecom instruments GmbH corre por
cuenta del remitente.
Según el artículo 1, párrafo 18, y el artículo 2 de la ley para
las nuevas normas que fijan la eliminación responsable de
pilas y acumuladores, del 25 de junio de 2009, es nuestra
obligación dar a conocer las siguientes indicaciones.
Su aparato contiene una pila alcalina.
Si las pilas están „vacías“, no está permitido desecharlas
en la basura normal o casera. Las pilas gastadas contienen
probablemente sustancias peligrosas que pueden dañar
el medio ambiente y la salud. Por favor devuelva las pilas.
La devolución es gratuita y está fijada por ley. Por favor
deseche únicamente pilas descargadas en los recipientes
dispuestos o tome precauciones contra cortocircuitos.
Atención: En caso de un uso inadecuado, la batería empleada en este aparato encierra peligro de incendio y de
lesiones químicas. No está permitido abrir o desmontar la
pila ni sus células, ni tampoco calentarla a más de 100°C o
quemarla. En caso de tener que desechar la pila, se puede
extraer como se describe en el punto 8.3. Por lo demás,
rigen las normas antes mencionadas para la eliminación de
aparatos antiguos.
Todas las pilas serán recicladas. Esto permite recuperar
valiosas materias primas como hierro, zinc o níquel.
El símbolo tiene el siguiente significado: las pilas no
deben eliminarse en la basura normal o casera.
77
Page 78

Para el envío de las pilas se deben observar los reglamentos
de la IATA. ¡Dichos reglamentos se aplican siempre, tanto
para pilas empotradas como también para las desmontables!
11. Limpieza, mantenimiento y almacenamiento
- El aparato sólo puede limpiarse con un paño o una
esponja apropiados. No use para la limpieza disolventes
o abrasivos.
- Se recomienda dejar que el fabricante realice una inspec-
ción bianual, con el fin de controlar el funcionamiento y la
precisión del aparato.
- En caso de almacenamiento prolongado, deben retirarse
las pilas del aparato.
- ¡Las temperaturas de almacenamiento permitidas de
30°C hasta +60°C no deben caer o ser sobrepasadas!
12. Garantía y responsabilidad
Para este producto la empresa ecom instruments GmbH
concede, de acuerdo a las condiciones generales de contrato, una garantía de dos años para el funcionamiento y el
material, bajo las condiciones operativas y de mantenimiento indicadas y autorizadas. Se exceptúan todas las piezas
susceptibles de desgaste (p. ej. pilas, acumuladores, sensores,
calibradores, fuentes de iluminación, etc.).
Esta garantía no se extiende a los productos que hayan sido
utilizados indebidamente, modificados, descuidados, dañados
por accidentes, o sometidos a condiciones operativas
anómalas o bien a una manipulación inadecuada.
Las demandas para la garantía pueden hacerse válidas
mediante el envío del equipo defectuoso. Nos reser vamos
el derecho de efectuar reparaciones, nuevos ajustes o un
intercambio del aparato.
78
Page 79

Las condiciones de garantía mencionadas constituyen el
único derecho de compensación para el comprador y
serán las únicas válidas, actuando en sustitución de cualquier
otra responsabilidad contractual o legal. ecom instruments
GmbH no asume ningún tipo de responsabilidad por daños
especiales, directos, indirectos, colaterales o consecuentes,
así como por pérdidas, inclusive de datos, con independencia de si derivan del incumplimiento de las obligaciones de
garantía, de acciones lícitas o ilícitas, guiadas por la buena
fe, u otras.
En caso de que en algunos países no esté permitido limitar
la garantía legal ni excluir o limitar los daños colaterales o
consecuentes, podría ser que las restricciones y exclusiones
mencionadas anteriormente no se apliquen a cada comprador. En caso de que algún tribunal competente declarase
nula o no aplicable alguna de las cláusulas contenidas en las
presentes condiciones de la garantía, tal fallo no alterará la
validez ni la coercibilidad de cualquier otra disposición de
esta garantía.
13. Declaración de conformidad de la CE
La declaración de conformidad de la CE y el certificado vienen adjuntos con el envase de compra, como documento
separado.
Por favor, ponga atención también a la indicación al final del
índice.
79
Page 80

14. Certificado de examen CE de tipo
1) Según el certificado de examen CE de tipo se tienen
que observar las siguientes condiciones especiales:
1. No está permitido abrir la carcasa dentro de zonas con
peligro de explosión.
2. Antes de encender la lámpara hay que realizar una
prueba de funcionamiento. En caso de que se
determine una notoria pérdida de luminosidad, hay que
intercambiar las pilas. En caso de pilas agotadas o daños
visibles no hay que ingresar la lámpara LED en la zona
con peligro de explosión.
3. El cambio de las pilas empotradas se debe efectuar sólo
fuera de las zonas con peligro de explosión y únicamen te mediante los tipos autorizados por el fabricante.
4. Si se comprueba un escape de electrolito, no hay que
ingresar el aparato a la zona Ex y se tiene que enviar al
fabricante para una revisión.
5. Sólo se permite utilizar los accesorios o repuestos
autorizados por el fabricante.
6. Sólo se permite cambiar las juntas dañadas conforme a
las indicaciones del manual de instrucciones.
7. Hay que poner atención al manual de instrucciones.
La Lámpara portátil LED Lite-Ex® PL 10 H tiene, además,
las siguientes condiciones especiales:
8. Sólo está permitido usar la cinta original para la cabeza
HB 10 H.
9. En el uso del tipo de pilas Energizer núm. E92 satisface
la Lite-Ex® PL 10 H sólo la clase temperatura T3.
2) El certificado Ex actualizado correspondiente puede
ser descargado desde la página respectiva del producto
en www.ecom-ex.com.
80
Page 81

Índice
1. Aplicação...............................................................................................80
2. Instruções de segurança ............................................................... 80
3. Erros e cargas inadmissíveis ....................................................... 80
4. Normas de segurança ................................................................... 81
4.1 Condições especiais para a utilização em
áreas potencialmente explosivas .............................................82
5. Instruções de segurança ............................................................... 82
6. Dados Ex .............................................................................................. 82
7. Dados técnicos .................................................................................. 83
8. Descrição das funções / Indicações de utilização .......... 84
8.1 Estrutura da Lite-Ex® PL 10 H .................................................84
8.2 Colocação em funcionamento .................................................84
8.3 Substituição das pilhas ...................................................................85
8.4 Limpar o interruptor em anel ...................................................86
8.5 Substituição dos agentes de iluminação ..............................86
8.6 Substituição do vidro de proteção ........................................86
9. Reparação ............................................................................................ 87
10. Eliminação .............................................................................................87
11. Limpeza, manutenção e armazenamento...........................89
12. Garantia e responsabilidade.......................................................89
13. Declaração de conformidade CE ........................................... 90
14. Certificado de Inspeção Tipo CE ............................................91
Advertência:
O manual de instruções atual, a declaração de conformidade CE e o certificado Ex podem ser transferidos a partir
da página Web do produto, em www.ecom-ex.com, ou
solicitados diretamente ao fabricante.
81
Page 82

1. Aplicação
A Lite-Ex® PL 10 é uma lanterna de cabeça com LED,
compacta e robusta para utilização na indústria, em áreas
potencialmente explosivas, para as zonas 2, 1 e 0, bem
como 22, 21 e 20 conforme a Diretiva 1999/92/CE (ATEX).
2. Instruções de segurança
Este manual de instruções contém informações e normas
de segurança que devem ser tidas em conta para um
funcionamento em segurança nas condições descritas. A
não observação destas informações e advertências pode
ter consequências perigosas ou incorrer no incumprimento
da legislação.
Antes de utilizar o aparelho, leia atentamente este manual
de instruções!
Em caso de dúvida (erros de tradução ou de impressão),
prevalece a versão alemã do manual de instruções.
3. Erros e cargas inadmissíveis
Assim que houver indícios de que a segurança do aparelho
está em causa, desligue-o imediatamente e afaste-o da área
potencialmente explosiva.
Tome as devidas precauções para evitar que o aparelho se
ligue de novo inadvertidamente. Aconselhamos o envio do
aparelho ao fabricante para verificação.
A segurança do aparelho pode estar em risco se, por
exemplo:
- Forem visíveis defeitos na caixa.
- O aparelho for sujeito a uma carga imprópria.
- O aparelho for armazenado de forma imprópria.
- O aparelho sofrer danos durante o transporte.
- As inscrições no aparelho não forem legíveis.
- Surgirem anomalias.
- Os valores-limite permitidos forem ultrapassados.
82
Page 83

4. Normas de segurança
A utilização do aparelho pressupõe que o utilizador tenha
em conta as usuais normas de segurança e a leitura do
Certificado de modo a evitar um mau manuseamento do
mesmo.
Adicionalmente, devem ser consideradas as seguintes
normas de segurança:
- Não abra o aparelho dentro da área potencialmente
explosiva.
- Antes de colocar a lanterna em funcionamento deve
efetuar uma verificação do funcionamento. Em caso de
perda significativa de potência luminosa, deve verificar-se
se há derrame de eletrólito das pilhas.
- No caso de, ao proceder à troca das pilhas, se detetar
derrame de eletrólito, o aparelho não deve ser levado
para a zona explosiva e deve ser enviado ao fabricante
para inspeção.
- As pilhas só devem ser trocadas fora da área potencial-
mente explosiva.
- Pilhas fracas devem ser imediatamente trocadas.
- Não é permitido levar pilhas suplementares para a área
potencialmente explosiva.
- Só podem ser usadas pilhas homologadas.
- Em função do tipo de pilhas, a classe de temperatura da
Lite-Ex® PL 10 H pode alterar-se de T4 para T3 ter em
consideração a tabela 1!
- Só devem ser utilizados os acessórios autorizados pela
ecom instruments GmbH.
- Só podem ser usados vidros e vedações sobresselentes
originais da ecom do tipo PL 10 H.
- Só pode ser utilizada a fita para a cabeça HB 10 H original.
- Evite a utilização em ácidos ou bases agressivos.
- A caixa do LED não pode ser aberta.
83
Page 84

4.1 Condições especiais para a utilização em áreas potencialmente explosivas
- É proibido armazenar a lanterna!
- Após cada substituição das pilhas ou de um anel vedante,
é preciso verificar se os anéis vedantes e a rosca estão
limpos, bem colocados e sem danos.
- Antes da utilização na área potencialmente explosiva, as
peças da caixa da lanterna têm de ser bem apertadas à
mão e até ao encosto, de modo a garantir a proteção IP.
5. Instruções de segurança
Risco de encandeamento!
- Não olhe diretamente para o raio de luz!
Não direcione o feixe de luz diretamente para os olhos de
outra pessoa!
6. Dados Ex
N.º do Certificado de Inspeção Tipo CE:
ZELM 05 ATEX 0272 X
Identificação Ex:
1G Ex ia op is IIC T4 ou T3 Ga
1D Ex ia IIIC T130 °C Da
Permitido para a zona 2, 1 e 0, aparelho de grupo II, grupo
de gás IIC, gases, vapores ou névoas potencialmente explosivos, classe de temperatura T4.
Permitido para a zona 22, 21 e 20, aparelho de grupo II,
poeiras potencialmente explosivas, IIIC poeiras condutoras,
IIIB poeiras não condutoras, IIIA fibras combustíveis,
T130 °C
84
Page 85

7. Dados técnicos
Temper atura ambiente Ta: -20 ... +50 ºC
Temperatura de
-30 ... +60 ºC
armazenamento:
Pilhas/fonte de
alimentação:
Lâmpada:
Potência luminosa:
3 x LR03, em conformidade
com CEI, AAA
LED de alta potência
aprox. 3.000 lx
(a uma distância de 1 m / 6° Ótica)
aprox. 1.800 lx
(a uma distância de 1 m / 25° Ótica)
Fluxo luminoso:
64 lm
Autonomia: aprox. 55 horas (funciona-
mento contínuo)
Dimensões: 60 x 87 x 69 mm
(A x C x L)
Peso: aprox. 180 g
(com fita para a cabeça)
Grau de proteção IP: IP 65 / IP 67
Proteção ESD: caixa antiestática
Identificação CE: CE0102
Atenção! Em função do tipo de pilhas utilizado, a classe
de temperatura da Lite-Ex
®
PL 10 H pode alterar-se ver
tabela seguinte.
Fabricante Tipo Classe de temperatura
1 Varta
N.º 4703 T4
Max Tech
2 Varta Indust-
N.º 4003 T4
rial Alcaline
3 Panasonic
LR03 T4
Pro Power
4 Energizer N.º E92 T3 !
Tabela 1
85
Page 86

Tabela com as vedações e os vidros de proteção autorizados
Fabricante Tipo
ecom Anéis vedantes tipo PL 10 H
ecom Vidro sobresselente PL 10 H
8. Descrição das funções / Indicações de utilização
Leia com atenção este manual de instruções para que
possa conhecer e aproveitar todas as funcionalidades da sua
®
PL 10 H. Para sua segurança e informação, leia as
Lite-Ex
indicações nas páginas que se seguem!
8.1 Estrutura da Lite-Ex® PL 10 H
O-Ring 27,0 x 1,0
Tampa de fecho
Corpo da lanterna
Compartimento
das pilhas
Interruptor em anel
Caixa do LED
Vidro
O-Ring 22,5 x 1,5
O-Ring 22,5 x 2,0
Extremidade da lanterna
Fig. 1
8.2 Colocação em funcionamento
Coloque primeiro as pilhas fornecidas (fora da área
potencialmente explosiva). Para que a lanterna possa ser
instalada numa área potencialmente explosiva, é necessário
garantir que a extremidade da lanterna e a caixa da lanterna
estão completamente aparafusadas. A seguir, pode ligar-se
a lanterna rodando ligeiramente o interruptor amarelo em
forma de anel para a direita.
86
Page 87

8.3 Substituição das pilhas
Se for notado um decréscimo considerável da potência
luminosa, está na altura de substituir as pilhas. É aconselhável
substituir as 3 pilhas em simultâneo. Devem ser substituídas
apenas por pilhas do tipo correspondente autorizado (ver
tabela 1). Para trocar as pilhas, rodar a tampa de fecho
lateral direita, com a inscrição „ecom“ no sentido indicado
pela seta e, a seguir, remover o compartimento das pilhas
completo (ver figura 2).
De seguida, pode retirar as pilhas do respetivo compartimento e substituílas. Depois de ter inserido as pilhas
novas (tenha atenção à polaridade), pode voltar a inserir
o compartimento das pilhas (tenha atenção às guias no
compartimento e no corpo da pilha). A seguir, aparafuse a
tampa de fecho. Antes de voltar a ligar a lanterna, certifiquese de que está bem fechada.
Fig. 2
Substituição das pilhas
- Só podem ser usadas pilhas homologadas (ver a tabela 1
no ponto 7: Dados técnicos).
- Substitua sempre todas as pilhas em simultâneo.
- Tenha atenção à polaridade correta.
- As pilhas gastas devem ser eliminadas de forma correta e
ecológica!
- Aquando da substituição das pilhas, é preciso verificar se
as roscas e as vedações estão limpas e sem danos.
- No caso de, ao proceder à troca das pilhas, se detetar
derrame de eletrólito, o aparelho não deve ser levado
para a zona explosiva e deve ser enviado ao fabricante
para inspeção.
87
Page 88

8.4 Limpar o interruptor em anel
A Lite-Ex® PL 10 H é ligada e desligada sem contactos,
através do interruptor em anel descrito anteriormente. A
sujidade e a humidade não prejudicam o funcionamento do
interruptor. No entanto, se o interruptor em anel perder
mobilidade devido à acumulação de sujidade, este pode
simplesmente ser limpo sem quaisquer problemas.
Desenrosque primeiro a extremidade da lanterna. Remova
o interruptor em anel puxando-o para a frente e limpe o
anel. Após a limpeza, volte a colocar o interruptor em anel
e rode-o até ficar bem preso (as riscas de marcação do
interruptor em anel devem ficar posicionadas por cima dos
círculos de marcação no corpo da lanterna). De seguida,
pode voltar a enroscar a extremidade da lanterna.
8.5 Substituição dos agentes de iluminação
A Lite-Ex® PL 10 H está equipada com um LED de longa
duração. Em casos normais, não será necessário substituir
o LED. Em caso de defeito ou de fraca luminosidade, é
necessário enviar a lanterna à ecom instruments para
ser verificada ou reparada. A caixa do LED não pode ser
aberta! Inter venções por moto próprio na caixa do LED ou
na lâmpada prejudicam a segurança da lanterna e não são
autorizadas.
8.6 Substituição do vidro de proteção
A caixa do LED está protegida através da extremidade da
lanterna, que a envolve, e através de um vidro adicional
na saída da luz. Se, apesar do vidro de elevada qualidade
colocado, este se partir, pode ser substituído. Para tal, segure
o corpo da lanterna da Lite-Ex® PL 10 H e o interruptor
em anel com firmeza e desaperte cuidadosamente a
extremidade da lanterna para a esquerda. Para desenroscar
a extremidade da lanterna da caixa do LED, fixe a caixa do
LED com uma chave para parafusos sextavados internos
de tamanho 4 (ver Figura 3) e desaperte a extremidade
da lanterna. Agora pode proceder à substituição do vidro
88
Page 89
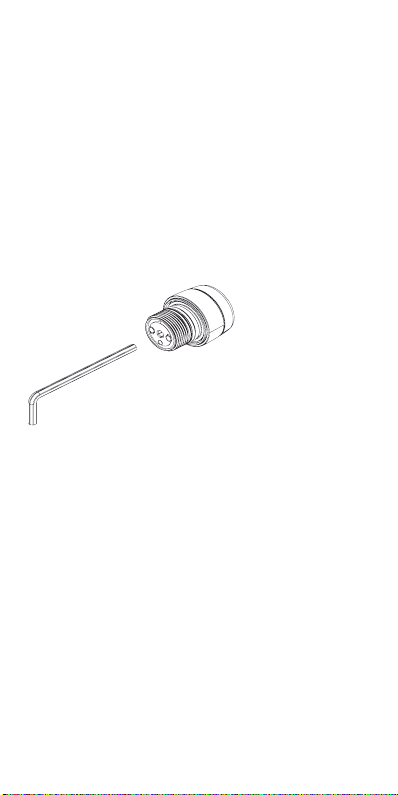
de proteção (utilize apenas vidros de proteção originais da
ecom). De seguida, limpe bem a caixa do LED e verifique se
há danos no anel vedante. Se for o caso, substitua também
o anel vedante (o anel vedante está fixo numa ranhura debaixo do vidro de proteção / utilize apenas anéis vedantes
originais da ecom). Ao colocar a extremidade da lanterna
sobre a caixa do LED, cer tifique-se de que a vedação e o
vidro estão bem colocados. Após a montagem, não pode
ficar visível qualquer parte da vedação na saída da luz. No
caso de as peças no interior da extremidade da lanterna ou
a lente também apresentarem danos, envie a lanterna ao
fabricante para fins de reparação.
Fig. 3
9. Reparação
As reparações têm de ser efetuadas pela ecom instruments
GmbH ou por pessoas ou centros de assistência autorizados pela ecom instruments GmbH, uma vez que, após a
reparação, é necessário realizar um teste de segurança que
garanta o perfeito estado do aparelho.
10. Eliminação
Os aparelhos elétricos antigos, bem como os aparelhos
elétricos „históricos“ da empresa ecom instruments GmbH,
são descartados por nossa conta, de acordo com a diretiva
europeia 2002/96/CE e a lei alemã relativa a dispositivos
elétricos de 16.03.2005, sem quaisquer custos. O custo do
envio dos aparelhos para a ecom instruments GmbH é
suportado pelo remetente.
89
Page 90

Segundo o artigo 1, §18 e o artigo 2 da lei sobre a
nova regulamentação da responsabilidade pelo produto
relativamente à legislação sobre resíduos para baterias e
acumuladores (Gesetz zur Neuregelung der abfallrechtlichen Produktverantwortung für Batterien und Akkumulatoren) de 25 de Junho de 2009, somos obrigados a divulgar as
seguintes informações.
O aparelho contém uma bateria alcalina.
As pilhas gastas não podem ser misturadas com o lixo
normal ou doméstico. As pilhas antigas podem conter poluentes prejudiciais ao ambiente e à saúde. Devolva as pilhas.
A devolução é gratuita e está legalmente prevista. Deite as
pilhas descarregadas apenas nos recipientes próprios ou
tome as precauções necessárias contra curtos-circuitos.
Atenção: a pilha colocada no aparelho pode provocar
incêndios e lesões químicas se não for usada corretamente.
Nem a pilha, nem as respetivas células podem ser abertas
ou desmontadas, aquecidas a uma temperatura superior a
100 °C ou queimadas.
Para eliminar a pilha, esta pode ser retirada como descrito
no ponto 8.3. Nos restantes casos, aplicam-se as normas de
eliminação para aparelhos antigos acima indicadas.
Todas as pilhas são recicláveis. Desta forma, os materiais
úteis como o ferro, o zinco ou o níquel podem ser reaproveitados.
O símbolo tem o seguinte significado: As pilhas não
podem ser misturadas com o lixo normal ou doméstico.
O envio de pilhas deve ser efetuado em conformidade com
as determinações do IATA. Estas regulamentações devem
ser sempre cumpridas tanto quanto a pilhas instaladas
como desinstaladas!
90
Page 91

11. Limpeza, manutenção e armazenamento
- Limpe o aparelho apenas com uma esponja ou pano
adequado. Não utilize produtos solventes ou abrasivos na
limpeza.
- É aconselhável solicitar ao fabricante que verifique o funcionamento e a precisão do aparelho de dois em dois anos.
- Se o aparelho estiver guardado muito tempo, é aconselhável retirar as pilhas.
- Temperaturas de armazenamento permitidas de 30 ºC
a +60 ºC. Este intervalo de temperaturas tem de ser
estritamente observado!
12. Garantia e responsabilidade
Para este produto, a ecom instruments GmbH concede
uma garantia de funcionamento e material de dois anos,
conforme as condições contratuais gerais, sob as condições
operacionais e de manutenção indicadas. Estão excluídas
todas as peças sujeitas a desgaste (por ex. pilhas, baterias,
detetores, calibradores, lâmpadas, etc.).
Esta garantia não se aplica a produtos que tenham sido
utilizados incorretamente, modificados, negligenciados, danificados por acidentes ou com condições de funcionamento
anormais, assim como produtos que tenham sido sujeitos a
um manuseamento incorreto.
Reclamações dentro do prazo de garantia podem ser validadas através do envio do aparelho avariado. Reservamonos o direito de efetuar reparações, novos ajustes ou a
substituição do aparelho.
As presentes especificações da garantia representam o
único e exclusivo direito de indemnização por parte do
comprador, tendo aplicação restrita, e substituem todas as
outras obrigações de garantia contratuais ou legais. A ecom
instruments GmbH não assume qualquer responsabilidade
por danos especiais, diretos, indiretos, danos intrínsecos ou
91
Page 92

provocados, bem como prejuízos, independentemente se
eles tiveram origem na violação da obrigação de garantia,
ações legítimas ou ilegítimas, ações de boa fé ou outras.
Se, em alguns países, a restrição de uma garantia legítima,
bem como a exclusão ou o limite de danos intrínsecos
ou provocados não for aceite, pode acontecer que as
restrições e exclusões supracitadas não sejam válidas para
cada comprador. Caso qualquer cláusula desta garantia seja
considerada ineficaz ou não seja adotada por um tribunal
competente, a eficácia ou obrigação de qualquer outra
condição destas especificações da garantia permanece
incólume desse veredicto.
13. Declaração de conformidade CE
A declaração de conformidade CE e o certificado encontram-se na embalagem, sob a forma de um documento em
separado.
Tenha também em atenção a nota no final do índice.
92
Page 93

14. Certificado de Inspeção Tipo CE
1) Têm de ser observadas as seguintes condições segundo
o certificado de inspeção tipo CE:
1. Não é permitido abrir a caixa em áreas potencialmente
explosivas.
2. Antes de colocar a lanterna em funcionamento,
deve efetuar uma verificação do funcionamento. Caso
se verifique uma perda significativa da potência lumi nosa, deve trocar as pilhas. Se as pilhas estiverem gastas
ou apresentarem danos visíveis, a lanterna com LED
não deve ser transportada para a área potencialmente
explosiva.
3. A substituição das pilhas instaladas só pode ser feita
fora de áreas potencialmente explosivas e por outras
de tipo autorizado pelo fabricante.
4. Se se detetar derrame de eletrólito, o aparelho não
deve ser levado para a zona explosiva e deve ser envia do ao fabricante para inspeção.
5. Só devem ser utilizados os acessórios ou peças de
substituição autorizados pelo fabricante.
6. Os vedantes danificados têm de ser substituídos
segundo as respetivas instruções no manual.
7. O manual de instruções tem de ser respeitado.
As condições especiais do Lanterna de LED Lite-Ex
®
PL
10 H são adicionais:
8. Só pode ser utilizada a fita para a cabeça HB 10 H
original.
9. Quando se utilizam pilhas de tipo Energizer N.º E92, a
Lite-Ex
®
PL 10 H corresponde apenas à classe de
temperatura T3.
2) O presente certificado Ex pode ser descarregado na
respetiva página do produto em www.ecom-ex.com.
93
Page 94

Innehållsförteckning
1. Användningsområde .......................................................................93
2. Säkerhetsanvisningar .......................................................................93
3. Fel och otillåtna belastningar ..................................................... 93
4. Säkerhetsföreskrifter .......................................................................94
4.1 Särskilda villkor för insats i
explosionsfarliga områden .......................................................... 94
5. Säkerhetsanvisningar .......................................................................95
6. Ex-data ................................................................................................... 95
7. Tekniska data .......................................................................................95
8. Funktionsbeskrivning/användningsanvisningar ..................96
8.1 Konstruktion Lite-Ex® PL 10 H ................................................97
8.2 Idrifttagning .......................................................................................... 97
8.3 Byte av batteri ....................................................................................97
8.5 Byte av ljuskälla ..................................................................................99
8.6 Byte av skyddsskiva..........................................................................99
9. Reparation ......................................................................................... 100
10. Skrotning ............................................................................................ 100
11. Rengöring, underhåll och förvaring ..................................... 101
12. Garanti och ansvar ....................................................................... 101
13. EG-konformitetsför säkran ........................................................102
14. EG-typgodkännande .................................................................... 103
Hänvisning:
Den aktuella bruksanvisningen, EG-konformitetsförsäkran
och Ex-certifikatet kan antingen laddas ned från respektive
produktsida på www.ecom-ex.com eller beställas direkt från
tillverkaren.
94
Page 95

1. Användningsområde
Lite-Ex® PL 10 H är en kompakt och robust LED-pannlampa till industriell användning i explosionsfarliga områden
inom zonerna 2, 1 och 0 samt 22, 21 och 20 enligt förordningen 1999/92/EG (ATEX).
2. Säkerhetsanvisningar
Den föreliggande bruksanvisningen innehåller information
och säkerhetsföreskrifter som måste beaktas för att ett säkert funktionssätt ska uppnås utifrån de beskrivna villkoren.
En ignorering av informationen och anvisningarna kan få
farliga följder eller bryta mot föreskrifterna.
Läs igenom bruksanvisningen noga, innan du använder
apparaten!
I tveksamma fall (till exempel vid översättnings- eller tryckfel) gäller den tyska bruksanvisningen.
3. Fel och otillåtna belastningar
Om du befarar, att apparatsäkerheten påverkas negativt,
måste apparaten tas ur drift och omedelbart avlägsnas från
Ex-området.
Ett oavsiktligt återidrifttagande måste förhindras.
Vi rekommenderar att apparaten skickas till tillverkaren för
kontroll.
Apparatsäkerheten kan vara hotad, till exempel:
- om det finns synliga skador på höljet,
- om apparaten har utsatts för otillåtna belastningar,
- om apparaten har förvarats på ett otillåtet sätt,
- om apparaten har fått transportskador,
- om texten på apparaten har blivit oläslig,
- om det uppstår felaktiga funktioner eller
- om de tillåtna gränsvärdena har överskridits.
95
Page 96

4. Säkerhetsföreskrifter
Det förutsätts att användaren beaktar de normala säkerhetsföreskrifterna och att han eller hon har läst certifikatet
för att felaktig användning av apparaten ska uteslutas.
Följande säkerhetsföreskrifter måste också beaktas:
- Apparaten får inte öppnas i Ex-området.
- Före idrifttagning av lampan måste dess funktion kontrolleras. Vid tydlig förlust av lyskraft måste batterierna
kontrolleras på läckage av elektrolyt.
- Fastställs läckage av elektrolyt så får apparaten ej användas
inom Ex-områden och måste skickas till tillverkaren för
kontroll.
- Batterierna får bytas endast utanför Ex-området.
- Svaga batterier måste genast bytas.
- Det är inte tillåtet att medföra extra batterier i Exområdet.
- Endast sådana batterier som är typgodkända får användas.
- Motsvarande batterityp kan förändra temperaturklassen
för Lite-Ex® PL 10 H från T4 till T3 tabell 1 beaktas!
- ndast av ecom instruments GmbH godkänt tillbehör får
användas.
- Endast original ecom reservdelstätningar och reservdelsskivor av typen PL 10 H får användas.
- Endast original-pannbandet HB 10 H får användas.
- Undvik att använda enheten i aggressiva syror eller baser.
- Lysdiodhuset får ej öppnas.
4.1 Särskilda villkor för insats i explosionsfarliga områden
- Förvaring av lampan är förbjuden!
- Efter varje byte av batteri eller tätningsring måste tätningsringarna och gängorna kontrolleras på renhet, korrekt
passning samt skador.
- Lampans kåpa måste skruvas ihop handfast resp. till mothåll innan insats i Ex-områden för att motsvara IP-skyddet.
96
Page 97

5. Säkerhetsanvisningar
Fara för bländning!
- Titta ej direkt in i ljusstrålen!
Rikta ej ljuskäglan på andra personers ögon!
6. Ex-data
EG-typgodkännandenummer:
ZELM 05 ATEX 0272 X
Ex-märkning:
1G Ex ia op is IIC T4 resp. T3 Ga
1D Ex ia IIIC T130°C Da
Godkänd för zonerna 2, 1 och 0, apparat grupp II, gasgrupp
IIC explosiva gaser, ångor eller dimmor, temperaturklass T4.
Godkänd för zonerna 22, 21 och 20, apparat grupp III,
explosivt damm, IIIC ledande damm, IIIB icke ledande
damm, IIIA brännbara tussar, T130°C
7. Tekniska data
Omgivningstemperatur Ta: -20 ... +50°C
Förvaringstemperatur: -30 ... +60°C
Batterier/strömförsörjning: 3 x LR03 enligt IEC, AAA
Ljuskälla:
Lyskraft:
Högeffekts-LED
ca. 3.000 lx
(på ett avstånd av 1 m / 6° Optik)
ca. 1.800 lx
(på ett avstånd av 1 m / 25° Optik)
Ljusflöde:
64 lm
Drifttid: ca.55 timmar
(kontinuerlig drift)
Mått: 60 x 87 x 69 mm
(H x L x B)
Vikt: ca 180g (med pannband)
IP-skyddsklass: IP 65 / IP 67
97
Page 98

ESD-skydd: antistatiskt hölje
CE-märkning: CE0102
®
Observera! Temperaturklassen för Lite-Ex
PL 10 H kan
förändras motsvarande använd batterityp se följande tabell.
Tillverkare Typ Temperaturklass
1 Varta
No. 4703 T4
Max Tech
2 Varta
No. 4003 T4
Industrial Alcaline
3 Panasonic
LR03 T4
Pro Power
4 Energizer No. E92 T3 !
Tabell 1
Tabell med godkända tätningar och skyddsskivor
Tillverkare Ty p
ecom Tätningsringar typ PL 10 H
ecom Utbytesskivor PL 10 H
8. Funktionsbeskrivning/användningsanvisningar
Läs igenom denna bruksanvisningen noga, så att du känner
till och kan använda alla funktionerna på din Lite-Ex
®
PL 10
H. Läs igenom anvisningarna på de följande sidorna för din
egen säkerhet och för information!
98
Page 99

8.1 Konstruktion Lite-Ex® PL 10 H
O-ring 27,0 x 1,0
Locket
Lamphölje
Batteriadapter
Ringbrytare
LED-hölje
Skiva
O-ring 22,5 x 1,5
O-ring 22,5 x 2,0
Lamphuvud
Fig. 1
8.2 Idrifttagning
Först måste de medlevererade batterierna monteras
(utanför Ex-området).
För att lampan ska få användas i Ex-områden måste
säkerställas att lamphuvudet och lampans kåpa är komplett
påskruvade. Därefter kan lampan kopplas på genom en lätt
vridning av den gula ringbrytaren medurs.
8.3 Byte av batteri
Om du konstaterar att lyskraften inte längre är tillfredsställande bör batterierna bytas. Vi rekommenderar att alla tre
batterier byts samtidigt. Endast batterier av motsvarande
godkänd typ får användas (se tabell 1). Byt batteri genom
att vrida det sidliga locket med markeringen „ecom“ i pilens
riktning och sedan ta ut hela batteriadaptern (se bild 2).
Därefter kan batterierna tas ur och bytas. Efter isättning av
nya batterier (beakta polerna) kan batteriadaptern sättas
tillbaka (beakta styrskenorna i adaptern och batterifacket).
Skruva sedan tillbaka locket. Kontrollera att lampan är
ordentligt sluten innan den kopplas på igen.
99
Page 100
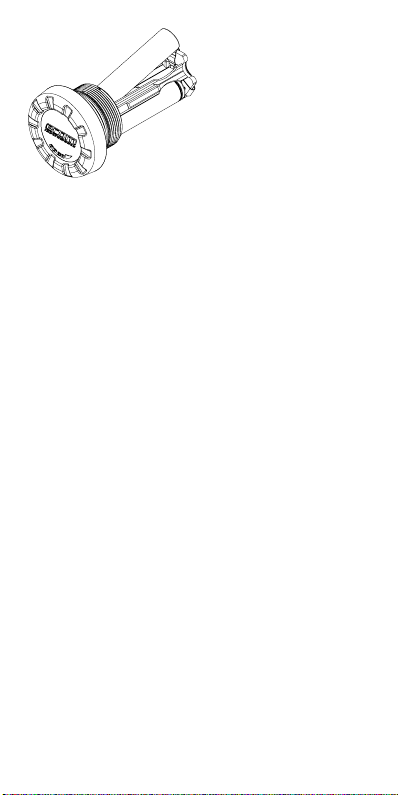
Bild. 2
Byte av batteri
- Använd endast typgodkända batterier (se tabellen 1 under
punkt 7.: Tekniska data)
- Byt alltid alla batterier samtidigt.
- Beakta polariteten.
- Avfallshantera förbrukade batterier miljövänligt!
- Kontrollera vid batteribyte att gängor och tätningar är rena
och oskadda.
- Fastställs vid batteribytet läckage av elektrolyt så får appa-
raten ej användas inom Ex-områden och måste skickas till
tillverkaren för kontroll.
8.4 Rengöring av ringbrytaren
Lite-Ex® PL 10 H kopplas kontaktlöst via den ovan beskrivna ringbrytaren. Smuts och fukt kan ej påverka kopplingsfunktionen. Om ringbrytaren blir tungvriden genom starka
smutsavlagringar så kan ringen enkelt rengöras.
Skruva först av lamphuvudet. Ringbrytaren kan nu dras av
framåt och rengöras. Efter rengöringen sätts ringbrytaren
tillbaka och vrids tills den hakar i ordentligt (streckmarkeringen på ringbrytaren måste sitta över ringmarkeringen på
lampan). Skruva sedan tillbaka lamphuvudet.
100
 Loading...