

Page 1

Version 1.9.2
Quick Guide
Page 2

Page 2
Instrument Design
Connection air
temperature
Slot for multi-
media card
Connections
Pa pressure
sensor
Connection
gas
temperature
Connection
via USB
Connection
gas
Connection
draft
Connection
pressure
Connec
tion
AUX
Integral
printer
Sensors com-
partment
Graphic
display
Optical flow
control
Battery com-
partment
Peltier cooler w/ con-
densate drain and
particulate filter
Bluetooth
Antenna
AC
connection
Charging
indicator
light
Page 3

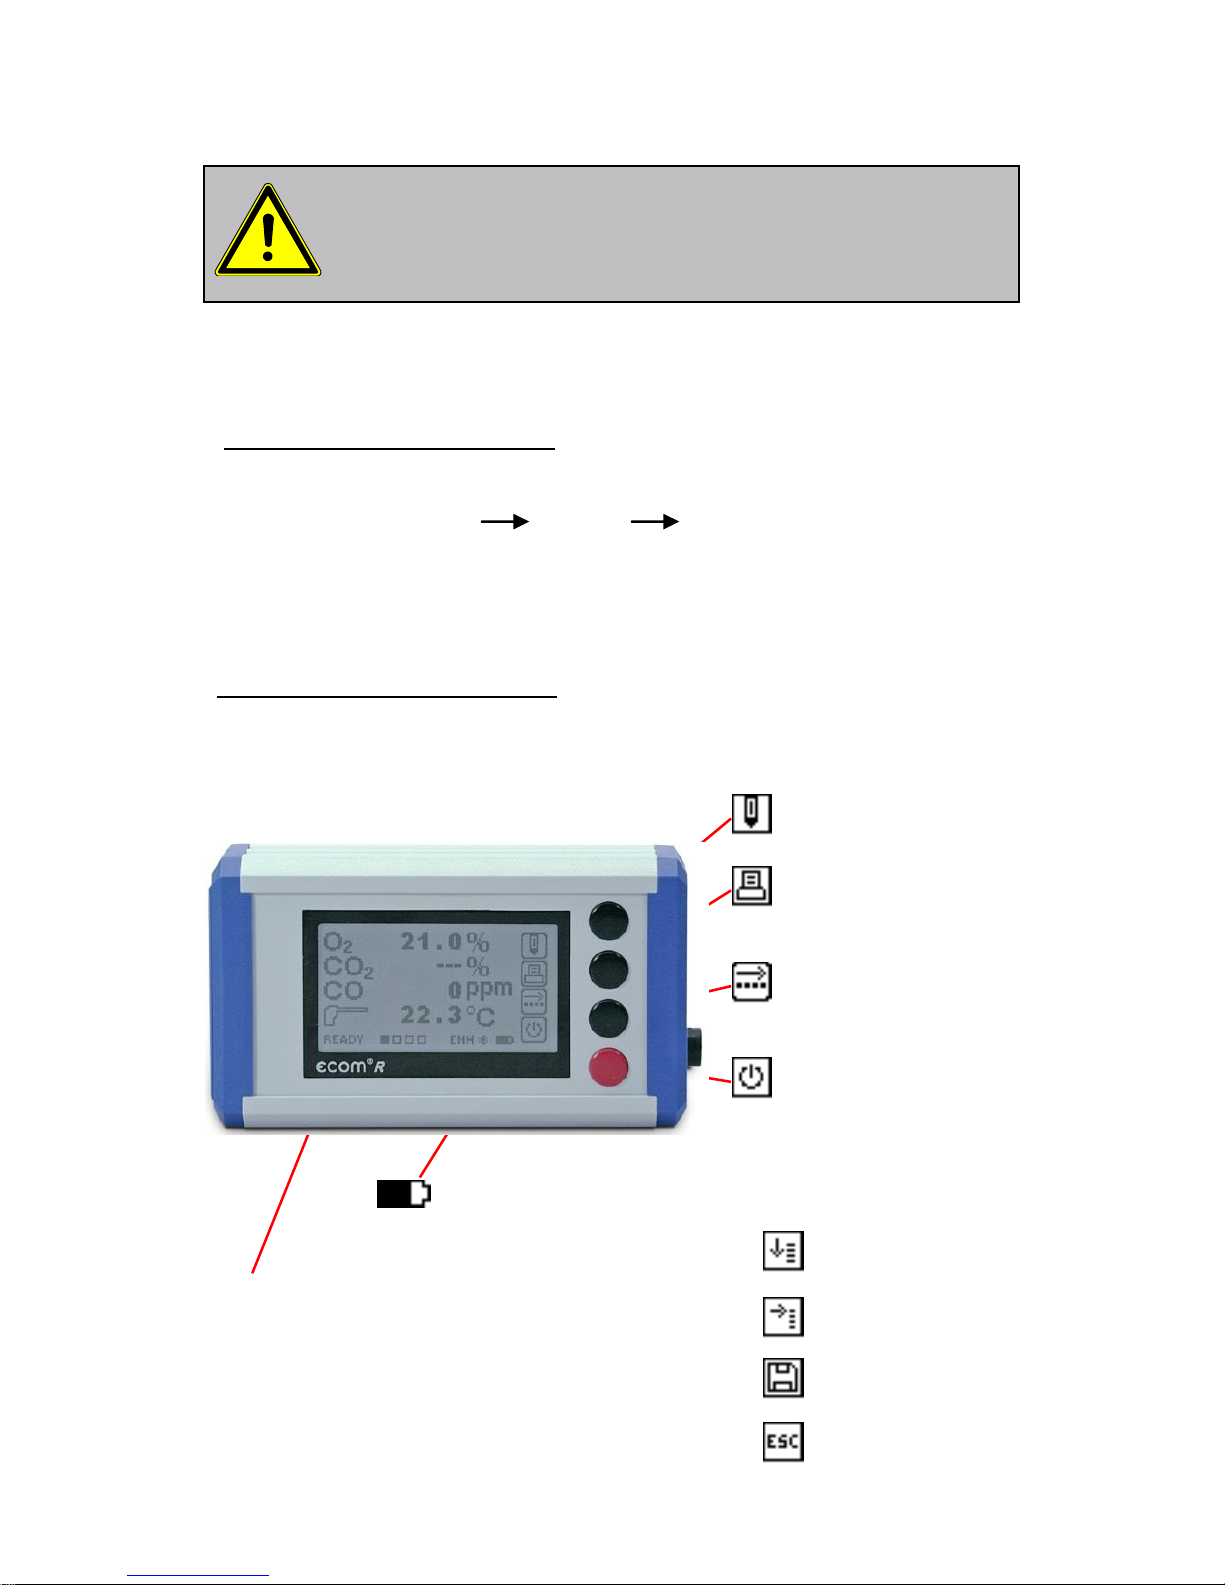
Page 3
Keyboard
Accessories
ESC key
(quit/
escape menu)
In the input mode, the keys are
used for numerical inputs
Enter key
(confirm
selection)
Cursor keys
(Up/Down/Right/
Left/Scroll)
Save snapshot to
internal memory
Access printing
menus (press F2
to quick print)
ON / OFF
key
Info key
(access to
control menu)
F1: Standby – pump shuts off
F2: Quick print
F3: CO purge pump on/off
F4: Edit line items on screen
Page 4
Page 4
Remote display (ECOM-R)
Connection with ECOM analyzer
(The ecom-R connects with only 1 analyzer at a time)
Unpair Bluetooth Connection
- Hold the red key (approx. 5 sec.) until “Unpair:” appears
- When “Unpair: OK” is shown, the connection is deleted
Analyzer must have Bluetooth option!
(wireless range is approx. 10 m)
Setup Bluetooth Connection
- Ensure there is only one instrument with Bluetooth near the ecom-R
- Turn on the analyzer
- Go to Adjustments Internal Bluetooth and select ProtocolEnhanced
- Turn on ecom-R & wait while the Bluetooth connection is made
automatically
*Change display:
Choose line
Adjust line
Set adjustment
Exit adjustment
Change display* (see below)
Start printout
(4 displays)
Choose display screen
Switch on/off ecom-R
(hold approx. 1 sec.)
READY = Connection is active
CALIB = Analyzer in calibration phase
WAIT = Searching for connection
Battery voltage
Page 5

Page 5
Analyzer Start-up
Carrying case & cooler
When opening the case, make
sure to pull out and up on the
two tabs on the front.
Unlock the cooler by pulling out on
the knob and swinging the cooler
90deg upward. The cooler must
be upright and locked into place
before the pump engages.
Sample line & probe
Connect gas sample line, pressure line, and thermocouple as pictured:
The fittings are sized so that you cannot switch the gas and pressure lines.
Page 6

Page 6
Analyzer Start-up
Press the red power button to turn on
the analyzer. The main menu is displayed with 6 (or 7) menu options:
- Gas analysis : Perform gas analysis
- Averaging : Perform averaging test
- Soot test : Perform soot test/smoke dot test
- Data processing : Save snapshots to internal memory or perform
data logging (only displays if MM card is inserted)
- Adjustments : Modify instrument settings
- Control : Check operation state of instrument
- Diagnostics : Only used with ECOM AK tool
To perform measurements, select Gas analysis and confirm with
<Enter>. The instrument starts a 1- minute auto-zero phase and the
fuel types selection list is displayed. The following fuel types are
available:
Natural gas Propane
Butane Number 2 oil
Number 4 oil Number 6 oil
Coal Wood
North Sea gas Diesel oil
Fuel type
Natural gas
CO2max A1 B
11.7 0.37 0.009
Select:
Gas analysis
Averaging
Soot Test
Data Processing
Adjustments
Control
The probe must be in fresh air
when you start the analyzer!
Page 7

Page 7
Gas Analysis
Gas analysis display screen
After the 1-minute auto-zero phase, the instrument switches over to
the measurement mode. The gas measurement values can be
viewed on 4 display pages. Press up/down to scroll between the
pages.
(Note: To view readings with O2 correction, go to Adjustments ->
Ref. O2 and input the O2% correction (usually 3% or 15%). Then go
to Adjustments -> Units and change to undiluted %O2.)
Pressing <F1> goes to “Standby“ mode which turns the pump off. If
you want to change the F1 key, go to Adjustments->Internal->F1
Hotkey. You can set the F1 key to: Soot test, Data processing, View
memory, Display values, Fuel type, Efficiency (K), Internal, and Adjustments.
Press <F2> to print out the values simultaneously to their recording
in the intermediate memory.
Press <F3> to start the CO purge pump. This dashes out the CO
reading on the display and introduces fresh air to the CO sensor to
protect it from over ranging Note: The CO purge pump automati-
cally activates when the CO ppm limit is exceeded – usually set
at 4000ppm.
(Continued on next page)
Standby
<F1>
Edit line
items on
display
<F4>
Print
values
<F2>
CO purge
pump on/off
<F3>
Peltier
cooler
ON/OFF
O2 3.2
%
CO2
13.1 %
T.Gas
184 °C
T.Air 20
°C
BImSchV
Page 8

Page 8
Gas analysis display screen (continued)
Pressing <F4> goes to “Edit” mode which allows the user to change
the line items on the display screen.
In “Edit” mode, the values on the screen can be changed to what the
user wants to see. To change these values, press F4 and you should
see the 1st line start blinking:
Select line you would like to change with Up/Down – it will
blink
Select parameter you would like to see with Right/Left
Repeat until the display screen shows what you want it to
Press F4 to accept changes
Page 9

Page 9
Intentionally left blank
Page 10

Page 10
Intentionally left blank
Page 11

Page 11
Intentionally left blank
Page 12

Page 12
ECOM AME RICA, LTD.
1628 OAKBROOK DRIVE
GAINESVILLE , GA 30507
TOLL FREE (877) 326-6411
PHONE (770) 532-3280
FAX (770) 532-3620
ecom.info@ecomusa.com
w w w . e c o m u s a . c o m
 Loading...