

E-Collar Technologies Pro Educator Owner's Manual

Welcome to the World of
Precision Low Level E-Collar Training
E-Collar Technologies, Inc.
Copyright 2015 All Rights Reserved
Pro Educator
Owner’s Manual
Pro Educator Owner's Manual
Thank you for trusting us with your e-collar purchase, we appreciate it and will
do everything possible to exceed your expectations. We have taken great care
to provide ample safety features to assure a pleasant experience for you and
your dog. It is important to condition your dog to low level stimulation by
pairing it with soft leash pressure; you will always get better results with low level
stimulation combined with consistent training techniques and a patient heart.
The use of high levels of stimulation should only be used as a last resort and in
life-threatening situations. We recommend all first time e-collar users obtain
professional help or immerse themselves in the many online resources. Feel free
to contact our customer service to obtain information on a professional trainer
well versed in low level e-collar training in your area. Your complete satisfaction
and successful training is our only concern.
* Additional information and help is available on www.ecollar.com and by e-
mailing customerservice@ecollar.com. To talk to a live team member, please
contact our customer service department, 8 AM to 8 PM E.S.T., 1-855-326-5527
or (260) 357-0051.
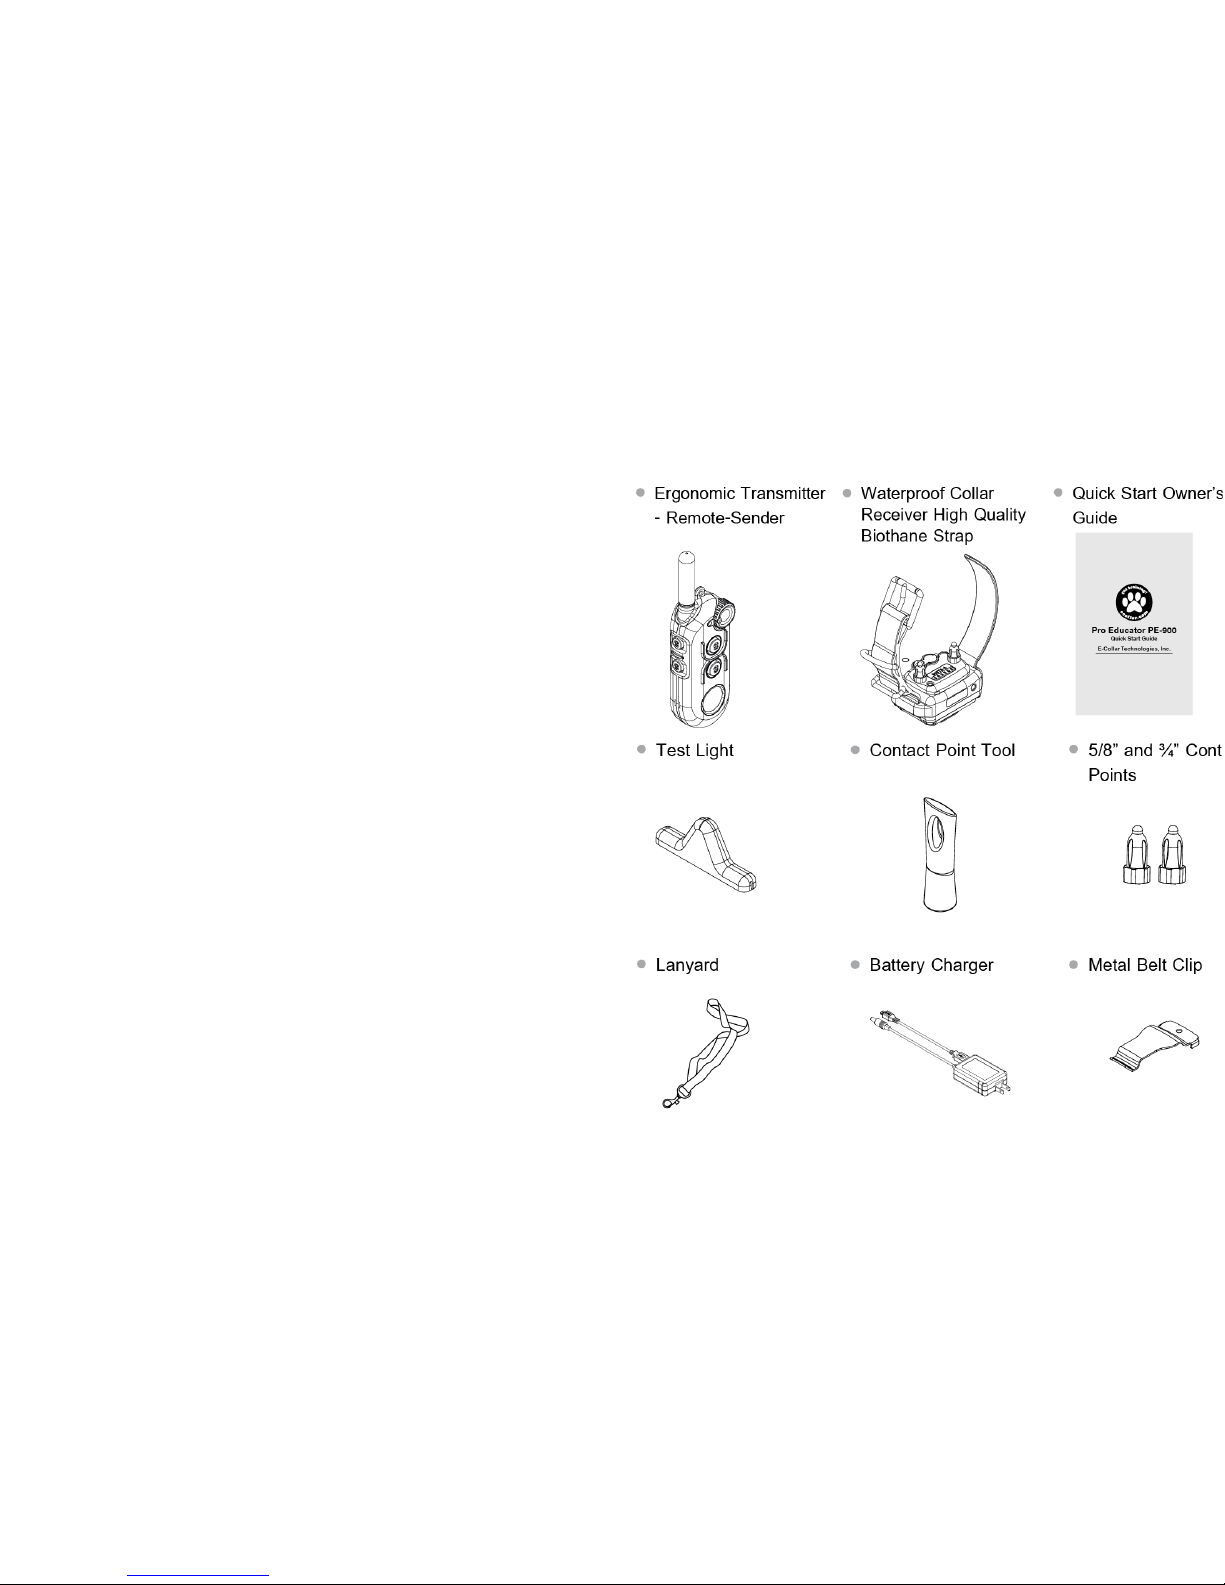
FEATURES
1/2 mile Range
Easily Expandable to 3 Dogs
Waterproof and Shock Resistant
User Adjustable Boosting Levels
Lock and Set Stimulation Feature
Collar Receiver Light for Night Tracking
Stimulation Levels Adjustable from 0 to 100
Employs Quick Charge Li-Polymer Batteries
Computer Connection for Additional Features
Patented “I” Mode Provides Instant Stimulation
Convenient Intensity Dial for Quick Adjustment
7 Selectable Vibrations and 4 Selectable Tones
2 Ramping Modes, 1 Second and 2 Second Ramp Boost
CONTENTS

TABLE OF CONTENTS
05 Safety and General Information
06 Transmitter Parts
07 Collar Receiver Parts
08 Charging the Batteries
Turni n g Yo u r E -Collar On/Off
--- 10
The LCD Display Features --- 11
Button Functions --- 12
Program Stimulation Buttons and Factory Default Setting---14
Maximum Durations for Stimulation, Vibration, Tone---15
I Mode and Lock/Unlock Stimulation Lever---16
Advanced Features---17
Paring/Synching Procedures---18
CHANGING THE INTENSITY LEVEL OF STIMULATION---19
INDICATOR LIGHT---20
TESTING YOUR E-COLLAR---21
RECEPTION---22
REPLACING THE CONTACT POINTS---24
CORRECTLY FITTING THE COLLAR---25
WARRANTY AND REGISTRATION---26
ACCESSORIES---27
SAFETY AND GENERAL INFORMATION
- The Pro Educator Education Collar complies with all National and
International Standards and Guidelines for human exposure to radio
frequency electromagnetic energy.
- Nearly all electronic devices are susceptible to electromagnetic interference
(EMI) if inadequately shielded or designed without precautions to EMI.
- Pro Educator transmitters manufactured by E-Collar Technologies, Inc.
comply with Article 15 of the FCC rules and operate under Part 95 of FCC
regulations.
- Frequency of operation is 27.095 MHz.
IMPORTANT NOTICE
- To avoid Electromagnetic Interference and/or compatibility conflicts, please
turn off your transmitter and collar receiver in any facility where posted
notices instruct you to do so. Never use your equipment in close proximity
of a Hospital or Health Care Facility or enter the facility without turning off
both units.
- An FCC license is not needed to operate Pro Educator transmitters. However,
any change or modification made to the transmitter, including the supplied
antenna, without the expressed written approval of E-Collar Technologies, Inc.
could void your authority to operate pursuant to FCC Rules and Regulations.

TRANSMITTER FEATURES
COLLAR RECEIVER PARTS
CHARGING THE BATTERIES
The collar receiver and transmitter Indicator lights will blink “Green” under normal
operation and will change to “Red” when activated.
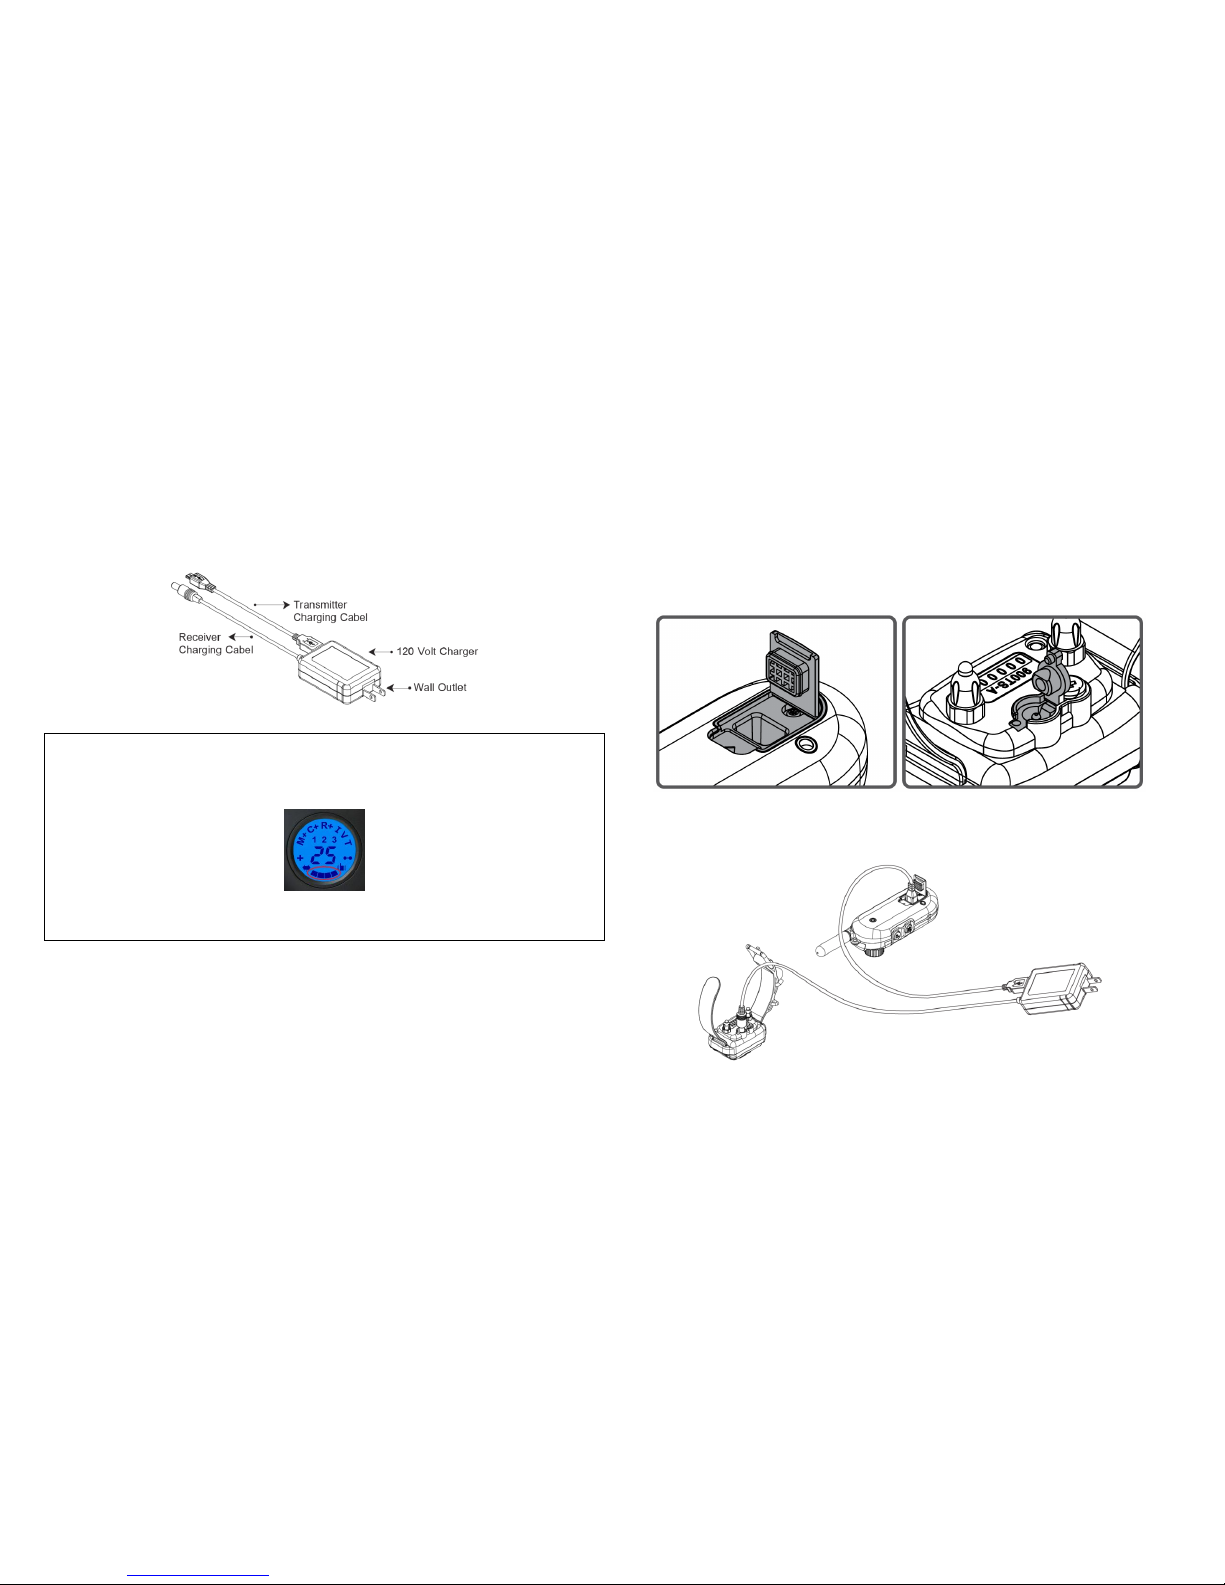
The batteries can be recharged whether the battery is fully drained or not,
leaving them on the chargers in a cool dr y place is okay. To charge insert the
micro USB into transmitter and charging plug into receiver.
Low Battery Indication
Transmitter: The level of Battery life is displayed on the LCD below circled in red,
charge prior to last bar for best battery longevity.
Receiver : Indicator Light will blink “Red” when recharging is required, for best
battery longevity charge prior to red light, after approximately 30 hours of use.
We recommend you recalibrate your battery every six months by letting them
fully discharge then fully charge them. Avoid allowing the batteries to fully
discharge except when calibrating. Under normal use, it does not damage the
batteries to charge them before they are fully discharged. Keep batteries away
from high heat at all times, leaving them in the sun or hot location will damage
them and require replacement. Replacement batteries can be found on
www.ecollar.com at reasonable prices with free shipping, we purposely made
them easy to change.
Long Term Storage: Do not store fully charged or discharged, store at
approximately 60% of charge and in a cool place, heat will lower the lifespan of
Li Polymer type batteries.
WHERE TO CONNECT THE CHARGER
Transmitter Battery Charging receptacle is
a micro USB found under the reubber
cover as seen below:
Collar Receiver Battery Charging
Receptacle can be found under the rubber
dust cover as seen below:
The indicator light will turn solid red during charge cycle and turn green
when it is fully charged.
Special Note: The indicator light may not turn green after the first
few charges due to the nature of the Li-Polymer batteries.
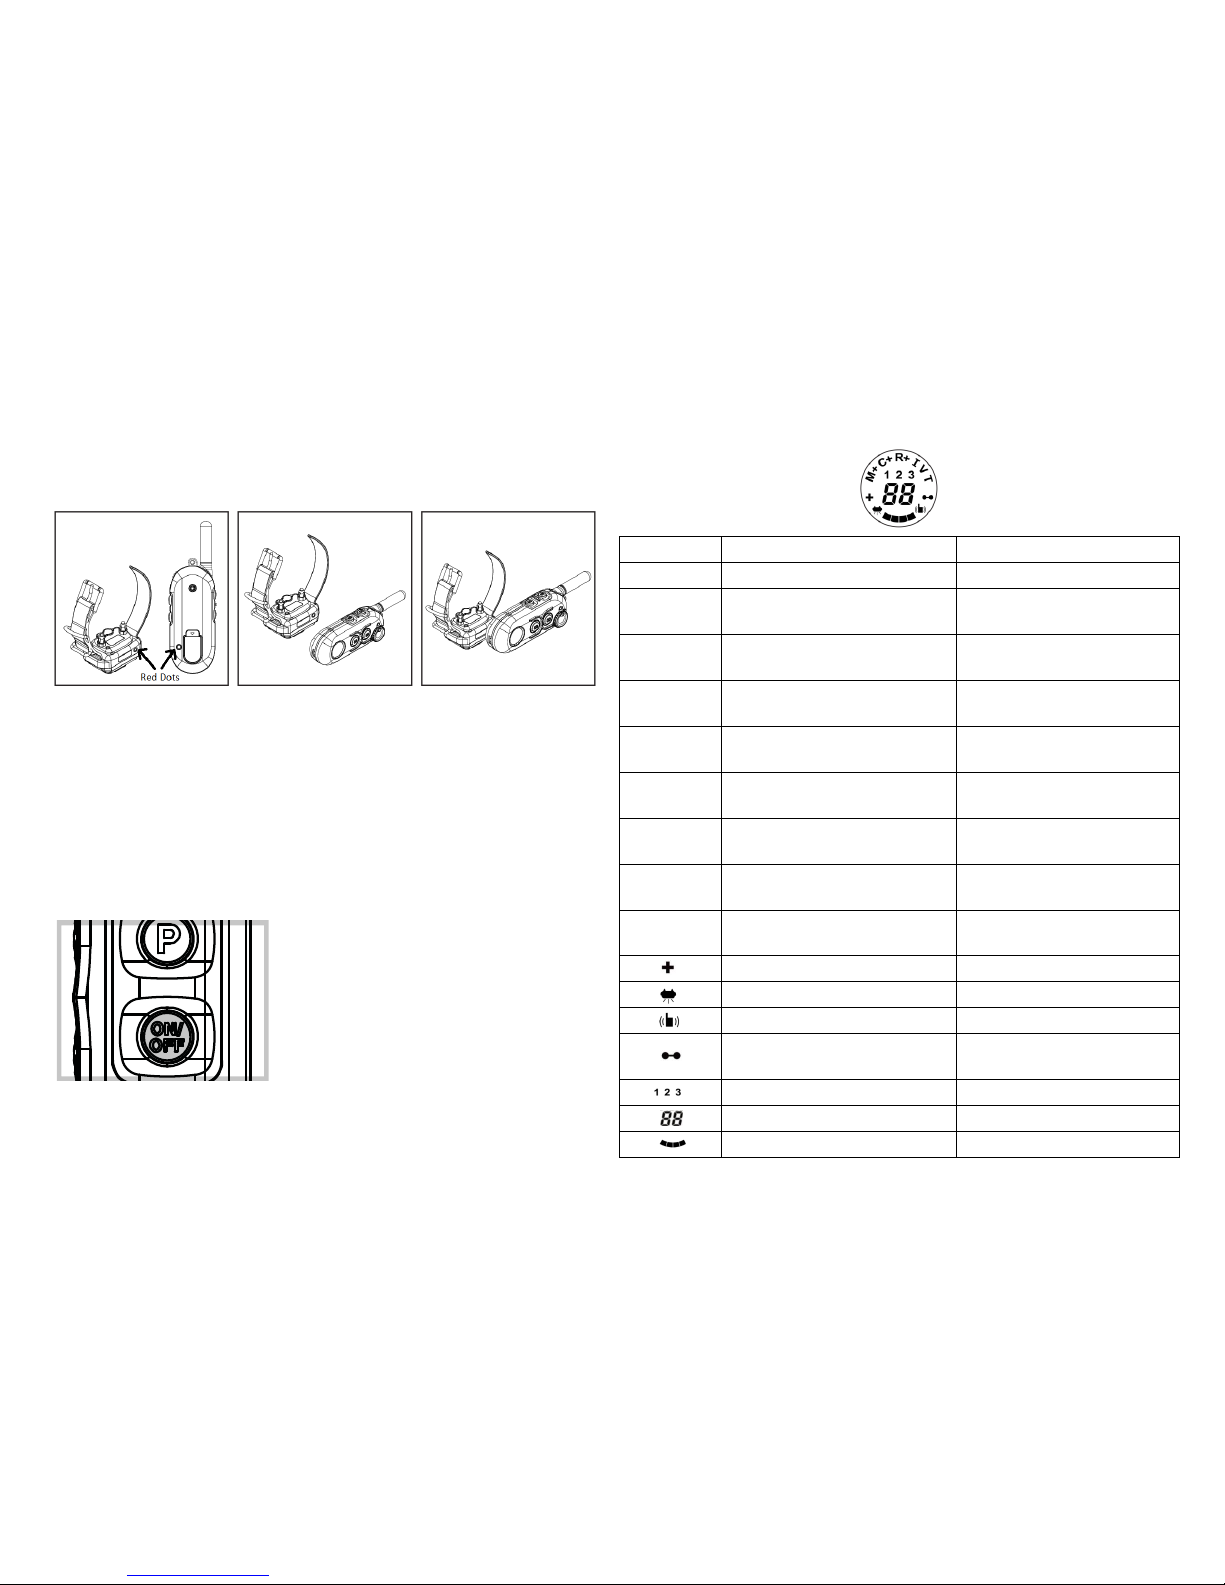
TURNING YOUR E-COLLAR ON and OFF
COLLAR RECEIVER is turned ON/OFF using magnet technology
Position the red dot on the Transmitter close to the small red dot hole on the
receiver. After turning on the unit, push the vibration or tone button to assure
the collar receiver is turned on and functioning properly before putting it on your
dog.
THE ON/OFF BUTTON IS LOCATED ON THE LOWER RIGHT SIDE OF THE
TRANSMITTER:
Turning the Transmitter ON and OFF
To turn ON, press the “ON/OFF Button” for
more than 1 second.
To turn OFF, press the “ON/OFF Button” for
more than 2 seconds.
THE LCD DISPLAY NOMENCLATURE
Icon
Description
Action
M
Momentary Stimulation
Sends Single Pulse of Stimulation
M+
Momentary Boost Stimulation
Sends Single Pulse of Boosted
Stimulation
C
Continuous Stimulation
Sends Continuous Pulses of
Stimulation
C+
Continuous Boost Stimulation
Sends Continuous Pulses of
Boosted Stimulation
R
1 Second Ramp Stimulation
Ramps Stimulation from 0 to Level
Set by the Stimulation Dial
R+
2 Second Ramp Boosted Stimulation
Ramps Stimulation from 0 to
Boosted Stimulation Level
I
Instant Mode
Dial Controls Stimulation for up to
45 Seconds
V
Vibration
Vibration Sensation Similar to Cell
Phone Vibration Mode
T
Tone
Tone can be a Warning or a
Good Dog Marker
Boost Level Setting
Sets Boost Level for Each Dog
Light
Turn ON/OFF Night Tracking Light
Lost Transmitter
6 Hours Timer Setting for Beeper
Pairing/Syncing of Collar Receivers
Allows for “In the Field” Pairing of
Collar Receivers
Selection of Multi Dog Operation
Multi Dog Mode Indicator
Stimulation Level Indication
0 to 100 Levels of Stimulation
Battery Indicator
Indicates Transmitter Battery Level
 Loading...