


Easy Educator EZ-902
Quick Start Guide
E-Collar Technologies, Inc.

Welcome
Thank you for trusting us with your purchase of the 902 Easy Educator
Remote Education Collar. We have made every attempt to provide you
with the most technologically advanced product using the most
stringent quality and manufacturing standards.
We are confident you will be pleased with the results you will attain with
the 902 Easy Educator. Please remember you will get better results with
the use of low level stimulation combined with consistent training techniques. The use of high levels of stimulation should only be used as a last
resort and in life-threatening situations.
Good luck with your training and please feel free to contact us should you
have any questions.
* This guide will familiarize you with the basic functions, programming
features and the contents of the 902 Easy Educator.
Additional information and help is available on www.ecollar.com and
by e-mailing customerservice@ecollar.com. To talk to a live team
member please contact our customer service department, 8 AM to 8
PM E.S.T., 1-855-326-5527 or (260) 357-0051. Your total satisfaction
is our only concern.

TABLE OF CONTENTS
Characteristics
Package Contents
Turning ON/OFF the EZ-902 System / Charging Instructions
EZ-902 Functions
LCD Display 2 Dog Mode
Buttons Descriptions and Stimulation Button Assignments
I Mode
Lock and Unlock Stimulation Level
Booster Level Setup
Lost Transmitter Activation
3
4
5
6
7
8
10
11
12
13
Pairing
EZ-902 Two Dog Default Settings
Warranty and Registration
14
15
16

CHARACTERISTICS
1/2 mile Range
Employs Quick Charge Li-Polymer Batteries
Convenient Intensity Dial for Quick Adjustment
Stimulation Levels Adjustable from 0 to 100 Collar
Receiver Light for Night Tracking
“Lock and Set” Stimulation Safety Feature
User Adjustable Boosting Levels
03
Provides 2 Control Buttons for Each Dog
Patented “I” Mode Provides Instant Stimulation
Waterproof and Shock Resistant

04
PACKAGE CONTENTS
Ergonomic Transmitter
- Remote-Sender
Waterproof Collar
Receiver High Quality
Quick Start Owner’s
Guide
Biothane Strap
Easy Educator EZ-902
Quick Start Guide
E-Collar Technologies, Inc.
Test Light 5/8” and ¾” Contact
Contact Point Tool
Points
Lanyard Battery Charger Splitter Cable

05
Turning ON/OFF the EZ-902 System
Turn ON/OFF the transmitter by pressing the lower
right button for 1 second.
To turn ON/OFF the collar receiver simply position the red dot on the backside
of the transmitter against the red dot on the collar receiver for 1 second.
Charging Instructions
Please charge the units on or before the
low battery indication. It is best not to wait
until the batteries are fully drained to
avoid damage. To charge insert the micro
USB into the transmitter and the charge
plug into the collar receiver as pictured.
Store with 50% charge in cool dry place.
Low Battery Indication
Transmitter: One bar remaining on the LCD display indicates charging is needed.
Collar Receiver: Yellow light indicates low and red indicates very low battery life.
splitter cable

06
EZ-902 Functions
Easy Educator 902 provides 5 types of stimulation sensations, tone, and
vibration.
Stimulation
Icon
M
M+
C
C+
I
Momentary Boost Stimulation
Continuous Boost Stimulation
Function
Momentary Stimulation Send Momentary Stimulation (Volume Level)
Continuous Stimulation
Instant Mode
Icon Function
V
Vibration
Description
Send Momentary Boosted Stimulation
(Volume + Boost Level)
Sends Continuous Stimulation
(max 10 sec, volume level)
Sends Continuous Bboosted Stimulation
(Max 10 Sec, Volume + Boost Level)
Without pressing any button, it will send continuous
stimulation by rotating volume dial. (max 45 sec)
Others
Description Send
Sends Vibration (max 30 sec)
T
Tone
Sends Tone (max 30 sec)
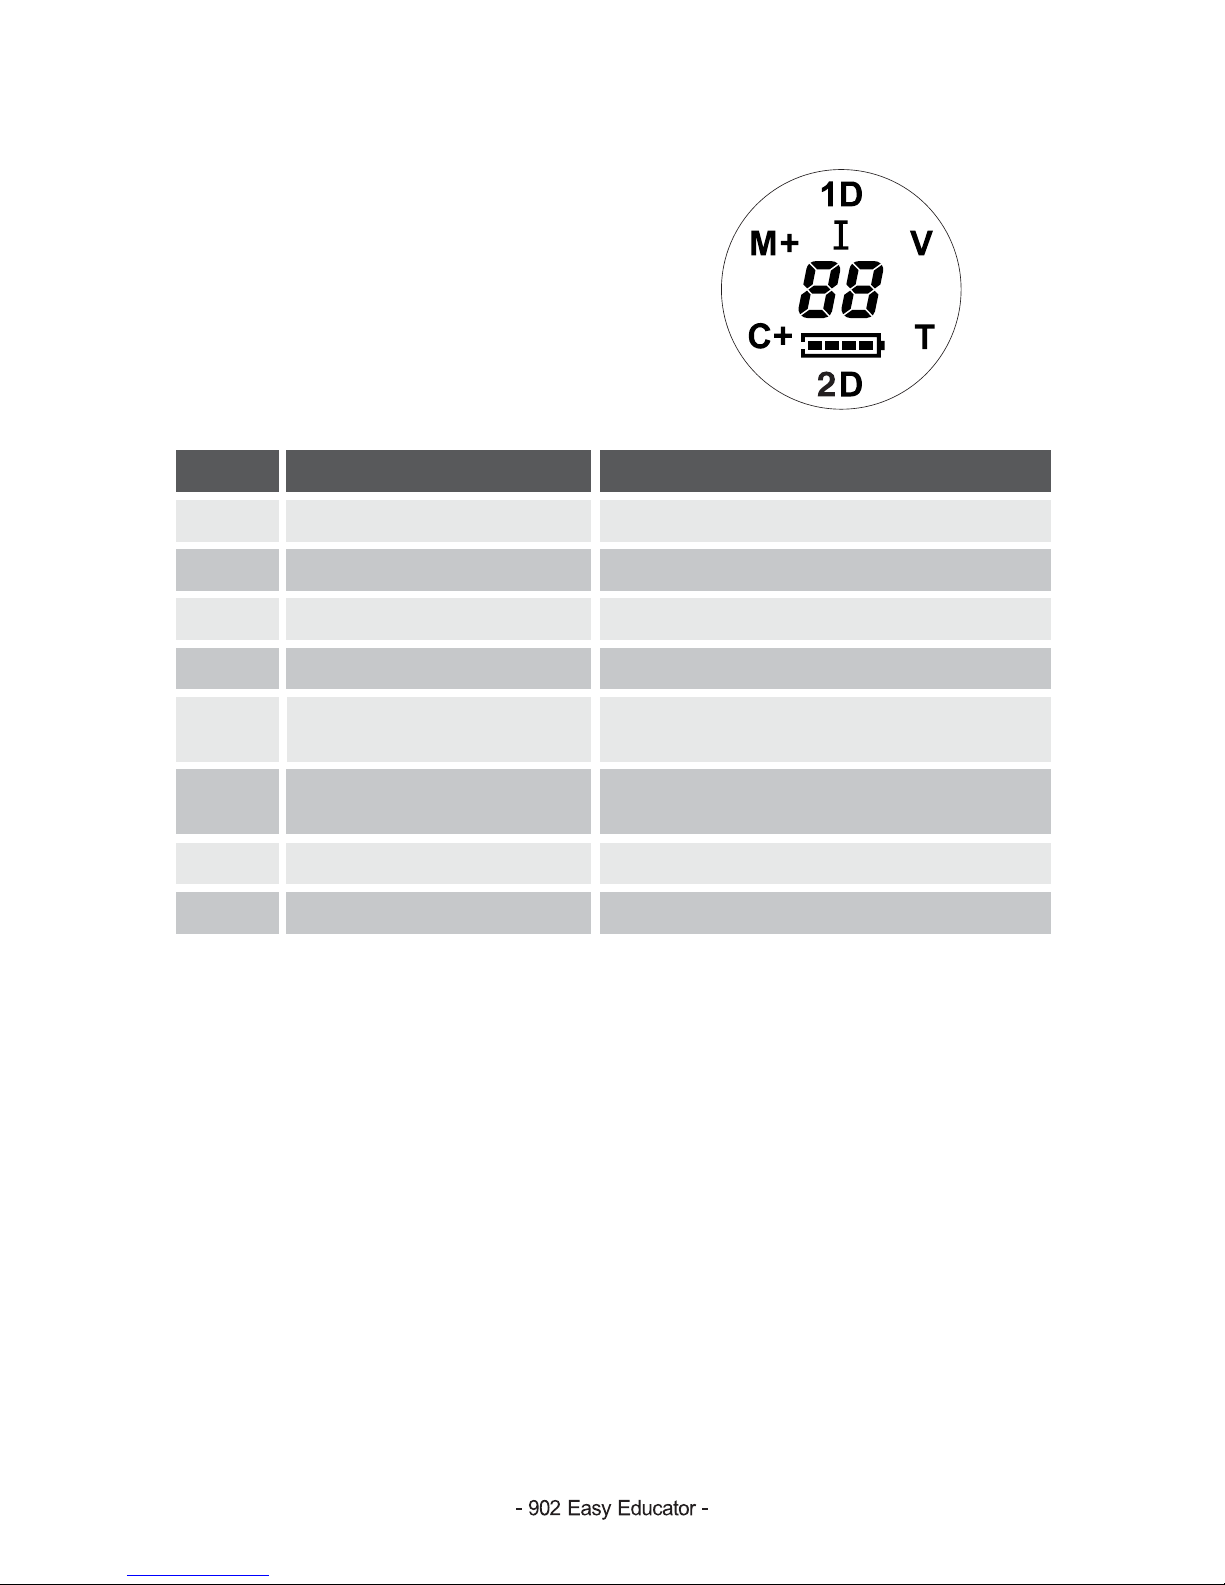
LCD DISPLAY
2 DOG Mode
07
Icon
M
M+
C
C+
I
V
T
Number
Description
Momentary Stimulation Short Pulse of Stimulation
Momentary Boost Stimulation
Continuous Stimulation Up to 10 Seconds of Stimulationㅤ
Continuous Boost Stimulation Up to 10 Seconds of Boosted Stimulation
Instant Stimulation Mode
Vibration
Tone Audible Tone
Stimulation Level 0 to 100(HI) level
Short Pulse of Boosted Stimulation
Stimulation Level Displayed on the LCD,
Non Stimulation Sensation Similar to a
Remarks
Must Start From “0”
Vibrating Cell Phoneㅤ

08
Buttons Descriptions and
Stimulation Button Assignments
The 902 Easy Educator has 4 control buttons which are assigned to
stimulation, vibration and tone. S1 / S3 buttons are programmed for Dog
1 and S2 / S4 buttons are programmed for Dog 2. It also has 2 program
buttons for changing modes (P) and turning the unit ON and OFF. The
conven-ient volume dial provides for easy and sight free control of the
stimulation level.
S1-Button(1D)
S3-Button(1D)
S2-Button(2D)
S4-Button(2D)
Volume Dial
Stimulation Level
P-Button
ON/OFF and Night
Light Control

09
Program
Buttons
ON/OFF
P
Function Description
Press more than 1 sec to turn ON
Power ON/OFF
Night Lights
Volume Lock
Stimulation Level Lock
Mode Buttons
Press more than 2 sec to turn OFF
1D light : ON/OFF + S1
(toggling : blink solid off)
2D light : ON/OFF + S2
(toggling : blink solid off)
1D Volume lock : P+S3 (more than 1 sec)
2D Volume lock : P+S4 (more than 1 sec)
Set Stimulation to Level "0"
S1(Dog1) mode change: P+S1 (M C V T)
S2(Dog2) mode change: P+S2 (M C V T)
S3(Dog1) mode change: P+S3 (V T M C)
S4(Dog2) mode change: P+S4 (V T M C)
Control
Buttons
S1-Button
S2-Button
S3-Button
S4-Button
LCD Display
Booster
Function
1.
To start Instant mode, rotate volume to level 0 and press a button set to continuouss,
1D Booster : S1+S2, S3+S4
It is only activated when
first button is M or C
1Dog 2Dog
M / C(I) / V / T
N / A
M / C(I) / V / T
N / A
Function Possibilities
N / A
M / C(I) / V / T
N / A
M / C(I) / V / T
M / C / V / T / 1D / 2D
2D Booster : S2+S1, S4+S3
It is only activated when
first button is M or C.
"C" mode activates the "I" mode when pushed on level "0"
To exit from Instant mode, press any button or wait for the 45 second time out
2.

How Instant Stimulation “I” Mode Works
10
I Mode
“I” Instant Stim“I” Instant Stimulation Modeulation Mode
The "I" mode is a patented feature which allows the stimulation to
increase gradually as determined by the user. The gradual introduction of
stimulation provides a more gentle sensation and removes the startling
effect sometimes associated with applying a constant level of stimulation.
The dog produces less cortisol and learns to avoid the higher levels by
responding quickly to the command. The user has the flexibility of
increasing the stimulation fast if in an emergency situation which
warrants a quick response from the dog. Slow dial movement is best.
How Instant Stimulation “I” Mode Works
1. Change the mode of any S button to Continuous if not already
programmed to “C” mode : The stimulation dial must be turned to
“0” to enter the “I” mode.
2. To start the “I”, push the assigned Continuous button. The display will
flash On to indicate it is on and ready to begin stimulation.
3. Turning the stimulation will now activate the stimulation at the setting
of the dial and continue for 45 seconds.
Returning to “0” will reset the 45 second safety timer.
4. If you do not rotate the dial for 45 seconds the “I” mode will turn off
and the control button will need to be pushed again.
5. Pushing any of the other control buttons will turn off the “I” mode and
therefore require the “I” mode control be pushed again to reactivate it.
6. Again, to exit the Instant Mode, press any control button or wait for
45 seconds.

Lock and Unlock Stimulation Level for Dog 1
Lock and Unlock Stimulation Level for Dog 2
* Important Note: Blinking “1D” or “2D” Indicates Unlocked Stimulation
Lock and Unlock
Stimulation Level
11
Lock and Unlock Stimulation Level for Dog 1
1. Check LCD display to confirm 1D icon is blinking.
2.
Set the desired stimulation to lock by rotating the volume dial.
3. Press P button and S3 simultaneously and hold one second to lock.
4. Check LCD display to confirm 1D icon changes blinking to solid
5.
To unlock press P button and S3 simultaneously and hold for one
second.
6.
Check LCD display to confirm 1D icon changes from solid to blinking.
Lock and Unlock Stimulation Level for Dog 2
1. Check LCD display to confirm 2D icon is blinking.
2. Set the desired stimulation to lock by rotating volume dial.
3. Press P button and S4 simultaneously and hold one second to lock.
4. Check LCD display to confirm 2D icon changes blinking to solid
5. To unlock press P button and S4 simultaneously and hold one
second.
6.
Check LCD display to confirm 2D icon changes from solid to blinking.
* Important Note: Blinking “1D” or “2D” Indicates Unlocked Stimulation
Solid “1D” or “2D” Indicates Locked Stimulation

12
Boost Level Setup for Dog 1
Boost Level Setup for Dog 2
Booster Level Setup
Boost Level Setup for Dog 1
1. Change the mode of S1 or S3 button to Momentary if not already
programmed to “M” mode.
2. Change the Stimulation level to “0”
(Stimulation level should be unlocked)
Press Momentary button for more than 5 sec to enter the Boost
3.
Level Change Mode.
4. Check LCD displays M+ / C+ icon
Rotate the dial to change the boost level. (The range of boost
5.
level is from 1 to 60, default is 5)
Press Momentary Button again to exit from Boost Level Change
6.
Mode.
Boost Level Setup for Dog 2
1. Change the mode of S2 or S4 button to Momentary if not already
programmed to “M” mode.
2. Change the Stimulation level to “0”
(Stimulation level should be unlocked)
Press the momentary button for more than 5 sec to enter the Boost
3.
Level Change Mode.
4. Check LCD displays M+ / C+ icon
Rotate the dial to change the boosted level. (The range of boosted
5.
level is between 1 and 60, default is 5)
Press Momentary Button again to exit from Boost Level
6.
Change Mode.

Lost Transmitter Activation
Lost Transmitter Activation (6 Hour Timer)
1. Change the Stimulation level to “0”
2. Press ON/OFF button and then press P button simultaneously.
3. One short beep will sound confirming the activation of the locator
timer.
4. To deactivate, press ON/OFF button and P button one more time.
5. Two short beeps will sound confirming the deactivation of the locator
timer.
13
The transmitter will start beeping exactly 6 hours from activation so
6.
plan your excursion accordingly.

14
Pairing for Dog 1 (ON/OFF + S3)
Pairing for Dog 2 (ON/OFF + S4)
Pairing/Syncing
When you change transmitters or collar receivers they will need to be paired/
synced to each other for them to communicate with each other.
Pairing for Dog 1 (ON/OFF + S3)
1. Turn on the Transmitter.
Rotate the volume dial to “0”.
2.
3. Turn off the collar receiver. Put the red dot on the transmitter against
the red dot on the collar receiver for more than 5 seconds until
the solid green light starts blinking on and off rapidly.
4. Press the ON/OFF button and then press the S3 button (Front Top)
simultaneously.
Listen for confirmation sound from the collar receiver.
5.
6. Test the collar receiver to make sure it accepted the new transmitter
code.
Pairing for Dog 2 (ON/OFF + S4)
1. Turn on the transmitter.
2. Rotate the intensity dial to “0”.
3.
Turn off the collar receiver. Put the red dot on the transmitter
against the red dot on the collar receiver for more than 5 seconds
until the solid green light starts blinking on and off rapidly.
4. Press the ON/OFF button and then press the S4 button (Front
Bottom) simultaneously.
5.
Listen for confirmation sound from the collar receiver.
Test the collar receiver to make sure it accepted the new transmitter
6.
code.

15
EZ-902 Two Dog Default Settings
Factory default setting of EZ-902 is as below. You can change Tone
Mode, Vibration Mode, and Instant Mode by using computer interface
tool which can be downloaded on our website www.ecollar.com.
Factory Default Setting
S1-Button
S2-Button
S3-Button
S4-Button
Boost Level
Tone Mode
Vibration Mode
Instant Mode Normal Mode
1D Momentary
2D Momentary
1D Vibration
2D Vibration
5
Mode – 2
Mode – 4

WARRANTY AND REGISTRATION
To register your Pro Educator please select one of the
following procedures
16
(1) Go to the “Products” section on www.ecollar.com
and click the “Register Your e-Collar Products” tab and
complete the form
(2) Fill out the provided warranty registration card and
mail it or fax it to us at 1-855-226-5527.
(3) Call us at (260) 357-0051 and one of our customer
service representatives will register your products for
you, please have your serial number(s) available.
www.ecollar.com
Two Year Full Warranty:
Your product is covered by our full two year warranty. During the
warranty period we will repair and or replace your product for any reason
due to workmanship and component failures. Dog chews and misuse are
not covered by the warranty and are subject to a repair/replacement fee.

CONTACT INFORMATION
E-Collar Technologies, Inc.
2120 Forrest Park Drive
Garrett, IN 46738
Toll-Free 1-855-326-5527
Toll-Free Fax 1-855-226-5527
International : 001-260-357-0051
www.ecollar.com
sales@ecollar.com
customerservice@ecollar.com
This product is covered by various patents including but not limited to
patents 8757098 and 8833309. Patent is pending on the Instant
Stimulation Feature on this device.
Copyright 2014 E-Collar Technologies, Inc. All Rights Reserved.

IMPORTANT INFORMATION
About Contact Points:
Many dogs in our modern society have developed sensitivity to nickel which is a metal in all
stainless steel products. Keep a watchful eye on your dogs skin where the contact points are
touching his/her skin for redness or any signs of irritation. This should be done hourly at
first and slowly transition to once every four hours after a month of daily wearing of the ecollar. At first notice of redness immediately switch to one of our hypo allergenic contact
points, we offer both nickel free stainless steel and titanium contact points. Dogs with
sensitive skin and certain breeds with known skin sensitivities like Pit Bull Terriers and
Boxers should be switched early in the process as a precautionary move.
Nickel Free Stainless Steel
Available on www.ecollar.com or by calling 1-855-326-5527

E-Collar Technologies, Inc.
2120 Forrest Park Drive
Garrett, IN 46738-1887
1-260-357-0051 (US & International)
1-855-326-5527 (US Toll Free)
1-855-226-5527 (US Toll Free Fax)
sales@ecollar.com
www.ecollar.com
 Loading...