


CS-600
A Universal Electronics Company
DRAFT MANUAL- NOT for PRODUCTION
TM
AUDIO DETECTOR
patent pending
Installation Manual & Users
Guide
SPECIFICATIONS
Frequency: 433.92MHz Operating Temperature: 32°-120°F (0°-49°C)
Battery: One 3Vdc lithium CR123A Operating Humidity: 5-95% RH non condensing
Battery life: 5 years Compatible with 433MHz ClearSky Security Systems
Detection distance: 6 in max Supervisory signal interval: 70 min(approx.)
Maximum current draw: 23mA during transmission
OPERATION
The FireFighter™ sensor is designed to listen to any smoke, carbon or combo detector. Once confirmed as an
alarm, it will transmit a signal to the alarm control panel which if connected to a central monitoring station, will
dispatch the fire department.
WARNING: This audio detector is intended only for use with smoke, carbon and combo detectors but it does
not detect the presence of smoke, heat, or fire directly.
ENROLLING
To enroll the sensor remove the top cover by depressing the friction tab in order to reveal the
battery. Pull and discard the battery plastic tab to turn on the device.
Download and install ClearSky App on your android or IOS phone.
Open your ClearSky APP and follow the directions on the app to learn in the sensor.
App will require you to press the learn button when linking (Image 1).
There are 2 modes of detection on the FireFighter™. Mode 1 is smoke only and Mode 2 is smoke and
carbon monoxide alert detection. To switch between modes, remove the battery, press and hold
the tamper switch and learn button until a red LED turns on. Let go of tamper and learn button. 1
red blink indicates smoke alert detection. 2 red blinks indicates smoke + CO alert detection.
MOUNTING
Included with this device is a mounting bracket, hardware and double sided tape. To ensure proper
operation ensure the side of the device with the small holes is directly facing the sounder holes on the smoke
detector. Secure the mounting bracket to the wall or ceiling using the two mounting screws and double
sided tape provided, then secure the audio detector to the mounting bracket using the small screw
provided. The FireFighter™ must be mounting within 6 inches of the detector for optimal operation.
WARNING: Non-interconnected smoke detectors require an audio detector by each smoke detector sounder.
This equipment should be installed in accordance with Chapter 2 of the National Fire Alarm Code, ANSI/NFPA
72, (National Fire Protection Association, Batterymarch Park, Quincy, MA 02269). Printed information describing
proper installation, operation, testing, maintenance, evacuation planning, and repair service is to be provided
with this equipment. Warning: Owner’s instruction notice: ’Not to be removed by anyone except occupant’.
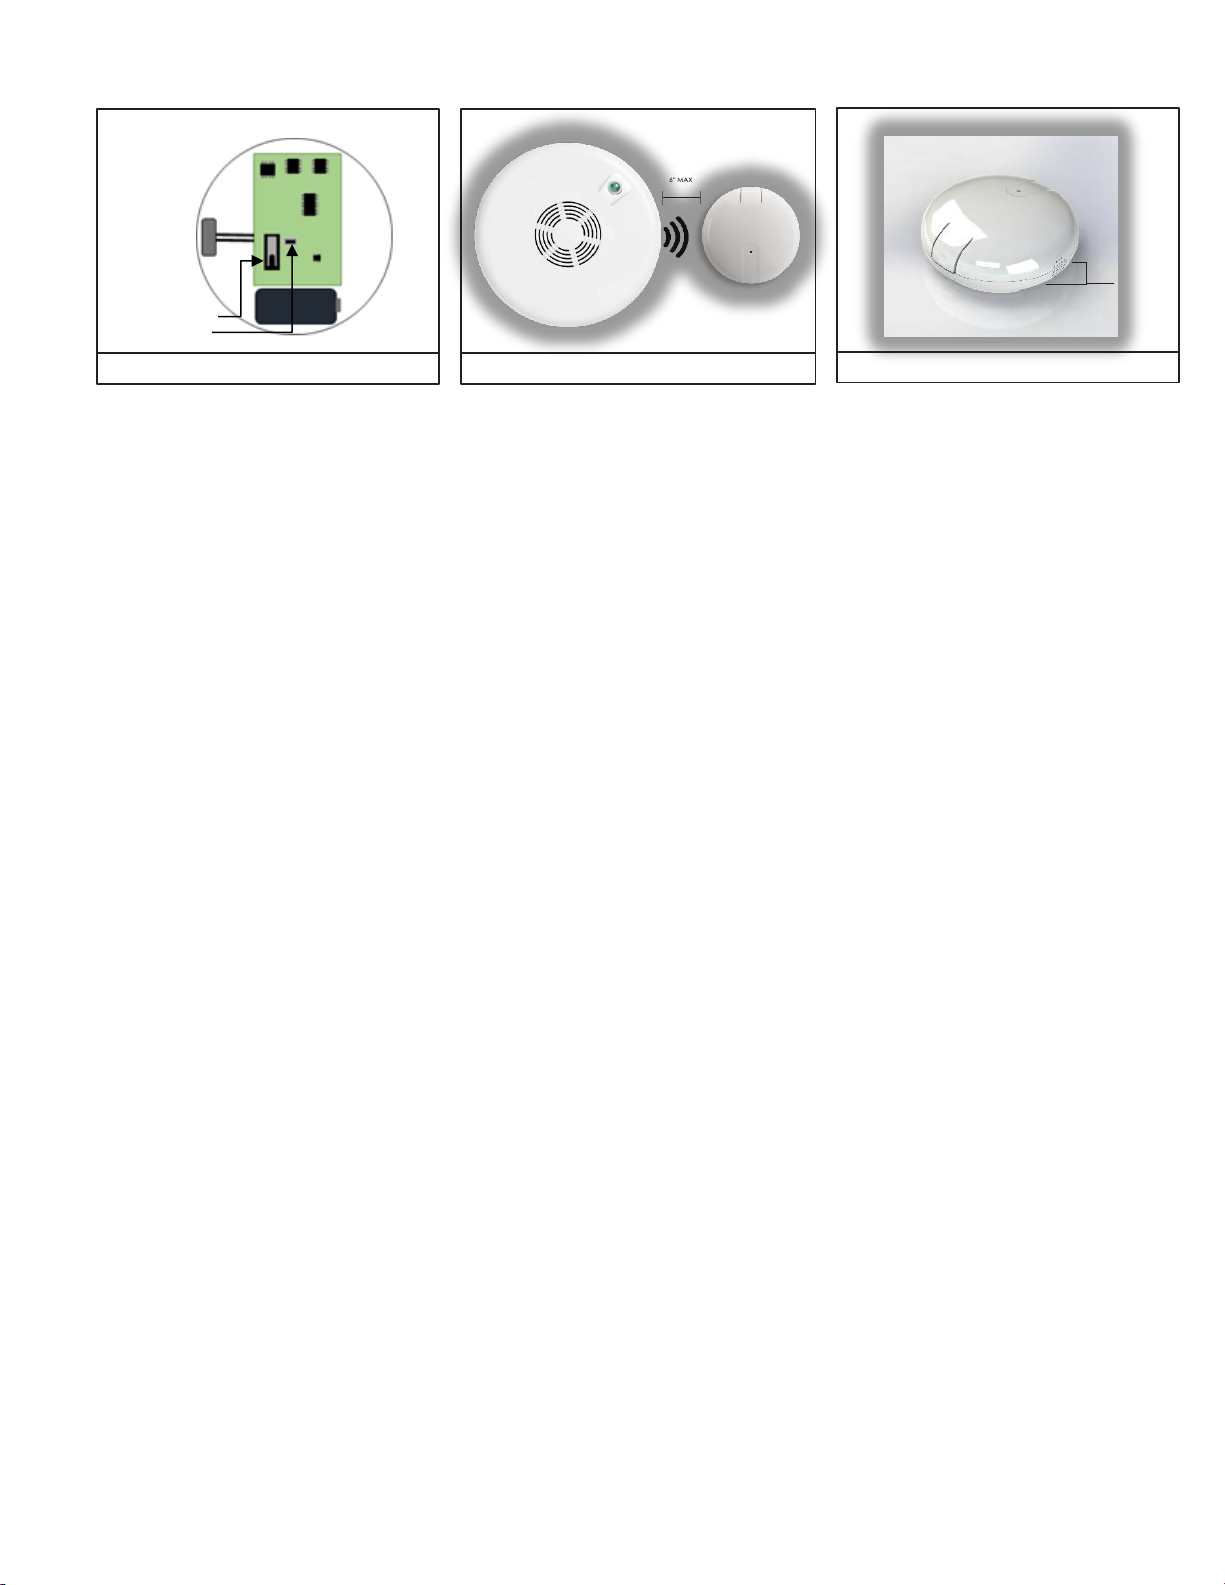
IMAGE 1: ENROLLING / TEST / TAMPER BUTTON
TAMPER SWITCH
LEARN BUTTON
IMAGE 2: INSTALLATION DISTANCE
HOLES TO LINE
UP WITH EXISTING SMOKE
DETECTOR
IMAGE 3: SIDE MARKINGS
TESTING
To test the RF transmission from the mounted position you can either generate a tamper by removing the cover
or press the learn button located next to the tamper switch. Press and release ONCE to send a Smoke signal or
press and HOLD for 2 seconds to send a Carbon signal. To test the audio detection, press and hold the smoke
detector test button. Press and hold the smoke detector button for at least 30 seconds to ensure that
FireFighter™ has had sufficient time to identify the smoke alarm pattern and lock into alarm. Ensure the
FireFighter™ cover is on and that you wear hearing protection.
NOTE: This system must be checked by a qualified technician at least once every three (3) years. Please test the unit
once per week to ensure proper functionality.
LED
The Firefighter™ is equipped with a multi-color LED. When a valid audio signal is heard the LED will
turn red and flash in sequence to the smoke detector sounder. When the Firefighter™ has determined
the audio signal heard is a valid alarm, the LED will turn solid green to indicate it has transmitted to
the panel. The LED will blink yellow following the detected alarm tone. On power up, the LED will
blink red to show which mode it is in, once for smoke only, twice for smoke + CO detection mode.
REPLACING THE BATTERY
When the battery is low a signal will be sent to the control panel. To replace the battery:
1) Remove the FireFighter™ from installation location by sliding the unit off the wall/ceiling mount in
the direction indicated on the FireFighter™ Cover.
2) Unscrew the two screws on the back of the FireFighter™. Remove the top cover by depressing the
friction tab in order to reveal the battery. This will send a tamper signal to the control panel.)
3) Replace with a Panasonic CR123A battery ensuring the + side of the battery faces as indicated on
the device.
4) Re-attach the cover, you should hear a click when the cover engages properly. Then replace the
screws removed in step 2.
5) Replace the on the mounting plate from step 1.
WARNING: While the audio detector monitors its own battery, it does not monitor the battery in the
smoke detectors. Batteries should be changed as per the original smoke detector manufacturer’s
instructions. Always test the audio detector and smoke alarms after battery installation to confirm
proper operation

2055 Corte Del Nogal
Carlsbad, California 92011
1-855-632-6546
www.discoverecolink.com
© 2013 Ecolink Intelligent Technology Inc.
PN CS600 R1.00
PACKAGE CONTENTS
Included Items:
1 x FireFighter™ Wireless Audio Detector
1 x Mounting Plate
2 x Mounting Screws
2 x Double Sided Tape
1 x CR123A battery
1 x Installation Manual
FCC Compliance Statement
This equipment has been tested and found to comply with the limits for Class B digital devices, pursuant
to Part 15 of the FCC Rules. This device complies with part 15 of the FCC Rules. Operation is subject to the following two conditions: (1) This device may not cause harmful interference,
and (2) this device must accept any interference received, including interference that may cause undesired operation. These limits are designed to provide reasonable protection
against harmful interference in a residential installation. This equipment generates uses and can radiate radio frequency energy and, if not installed and used in accordance with the
instruction manual, may cause harmful interference to radio communications. However, there is no guarantee that interference will not occur in a particular installation. If this equipment
does cause harmful interference to radio or television reception, which can be determined by turning the equipment off and on, the user is encouraged to try to correct the interference
by one or more of the following measures:
Warning: Changes or modifications not expressly approved by Ecolink Intelligent Technology Inc. could void the user’s authority to operate the equipment.
This device complies with Industry Canada licence-exempt RSS standard(s). Operation is subject to the following two conditions: (1) this device may not cause interference, and (2) this
device must accept any interference, including interference that may cause undesired operation of the device.
C’et appareil est conforme la norme d'Industrie Canada exempts de licence RSS. Son fonctionnement est soumis aux deux conditions suivantes: (1) c’et appareil ne peut pas provoquer
d'interférences, et (2) c’et appareil doit accepter toute interférence, y compris les interférences qui peuvent causer un mauvais fonctionnement de la dispositif.
FCC ID: XQC-WST600 IC:9863B-WST600
Warranty
Ecolink Intelligent Technology Inc. warrants that for a period of 2 years from the date of purchase that this product is free from defects in
material and workmanship. This warranty does not apply to damage caused by shipping or handling, or damage caused by accident,
abuse, misuse, misapplication, ordinary wear, improper maintenance, failure to follow instructions or as a result of any unauthorized
modifications. If there is a defect in materials and workmanship under normal use within the warranty period Ecolink Intelligent Technology
Inc. shall, at its option, repair or replace the defective equipment upon return of the equipment to the original point of purchase.
The foregoing warranty shall apply only to the original buyer, and is and shall be in lieu of any and all other warranties, whether expressed
or implied and of all other obligations or liabilities on the part of Ecolink Intelligent Technology Inc. neither assumes responsibility for, nor
authorizes any other person purporting to act on its behalf to modify or to change this warranty, nor to assume for it any other warranty or
liability concerning this product. The maximum liability for Ecolink Intelligent Technology Inc. under all circumstances for any warranty issue
shall be limited to a replacement of the defective product. It is recommended that the customer check their equipment on a regular basis
for proper operation.
THE LIABILITY OF ECOLINK INTELLIGENT TECHNOLOGY INC, OR ANY OF ITS PARENT OR SUBSIDIARY CORPORATIONS ARISING FROM THE SALE OF
THIS SMOKE ALARM DETECTOR OR UNDER THE TERMS OF THIS LIMITED WARRANTY SHALL NOT IN ANY CASE EXCEED THE COST OF REPLACEMENT
OF A SMOKE ALARM DETECTOR AND, IN NO CASE, SHALL ECOLINK INTELLIGENT TECHNOLOGY INC , OR ANY OF ITS PARENT OR SUBSIDIARY
CORPORATIONS BE LIABLE FOR CONSEQUENTIAL LOSSES OR DAMAGES RESULTING FROM THE FAILURE OF THE SMOKE ALARM DETECTOR OR FOR
BREACH OF THIS OR ANY OTHER WARRANTY, EXPRESS OR IMPLIED, EVEN IF THE LOSS OR DAMAGE IS CAUSED BY THE COMPANY’S NEGLIGENCE
OR FAULT.
Re-orient or relocate the receiving antenna
Increase the separation between the equipment and receiver
Connect the equipment to an outlet on a different circuit from the receiver
Consult the dealer or an experienced radio/TV contractor for help.
 Loading...