

Page 1
Door/Window Sensor Installation Instructions
Product Overview
Z-Wave+™ enabled device which provides open/closed position status
Transmits open/closed status
Reports tamper condition when cover is open
Product Specifications
For indoor use only
Operating frequency: 908.42 MHz
Operation range: Up to 100 feet (30.5 meters) line-of-sight
Operating temperature: 0° – 49°C, 32° – 120°F (ambient temperature)
Battery type required: 3V Lithium CR123A
Battery life approximately 3 years
Network Inclusion
The sensor must be added to a Z-Wave network prior to use. To include the
sensor in a network both the sensor and the network controller must be in
inclusion mode at the same time. Refer to the instructions provided by the
manufacturer of your specific controller for details on initiating the controller’s
inclusion mode.
STEP ONE Start by placing the controller into inclusion mode.
STEP TWO Activate inclusion mode for the sensor by removing the plastic pull-tab from the back of the sensor. When the
inclusion process in complete, the LED on the sensor will be solid blue, then go out.
STEP THREE Test the sensor. Place the magnet next to the sensor to represent a closed position (see Installation
section to see where to position the magnet). If the LED flashes ONE TIME, it is successfully communicating on
your Zwave network. If the LED on the sensor flashes slow and steady for 5 seconds, you need to repeat the
inclusion process.
Notes: If you need to repeat the inclusion process, repeat STEP ONE above, then for STEP TWO you will need to simply remove the cover of the sensor, remove the
battery for 10 seconds, reinsert the battery, and replace the sensor cover. This will re-enter the sensor in inclusion mode.
© 2015 Ecolink Intelligent Technology Inc. PN DW-ZWAVE2.5 R1.04
Page 2
Network Inclusion: Key Points to Remember
Controller inclusion mode must be activated BEFORE starting sensor inclusion mode.
The sensor can only be included into one controller network at a time, and must be excluded from one network before inclusion in another.
Removing the pull tab connects the battery and initiates sensor inclusion mode. Inclusion mode can also be initiated by removing the battery for at least 5 seconds,
reinstalling the battery, then replacing the sensor cover.
The plastic pull tab must be removed to enable sensor operation.
The sensor automatically enters inclusion mode at power-up.
Exclusion mode on the senor is initiated following the same exact procedure as inclusion.
Installation
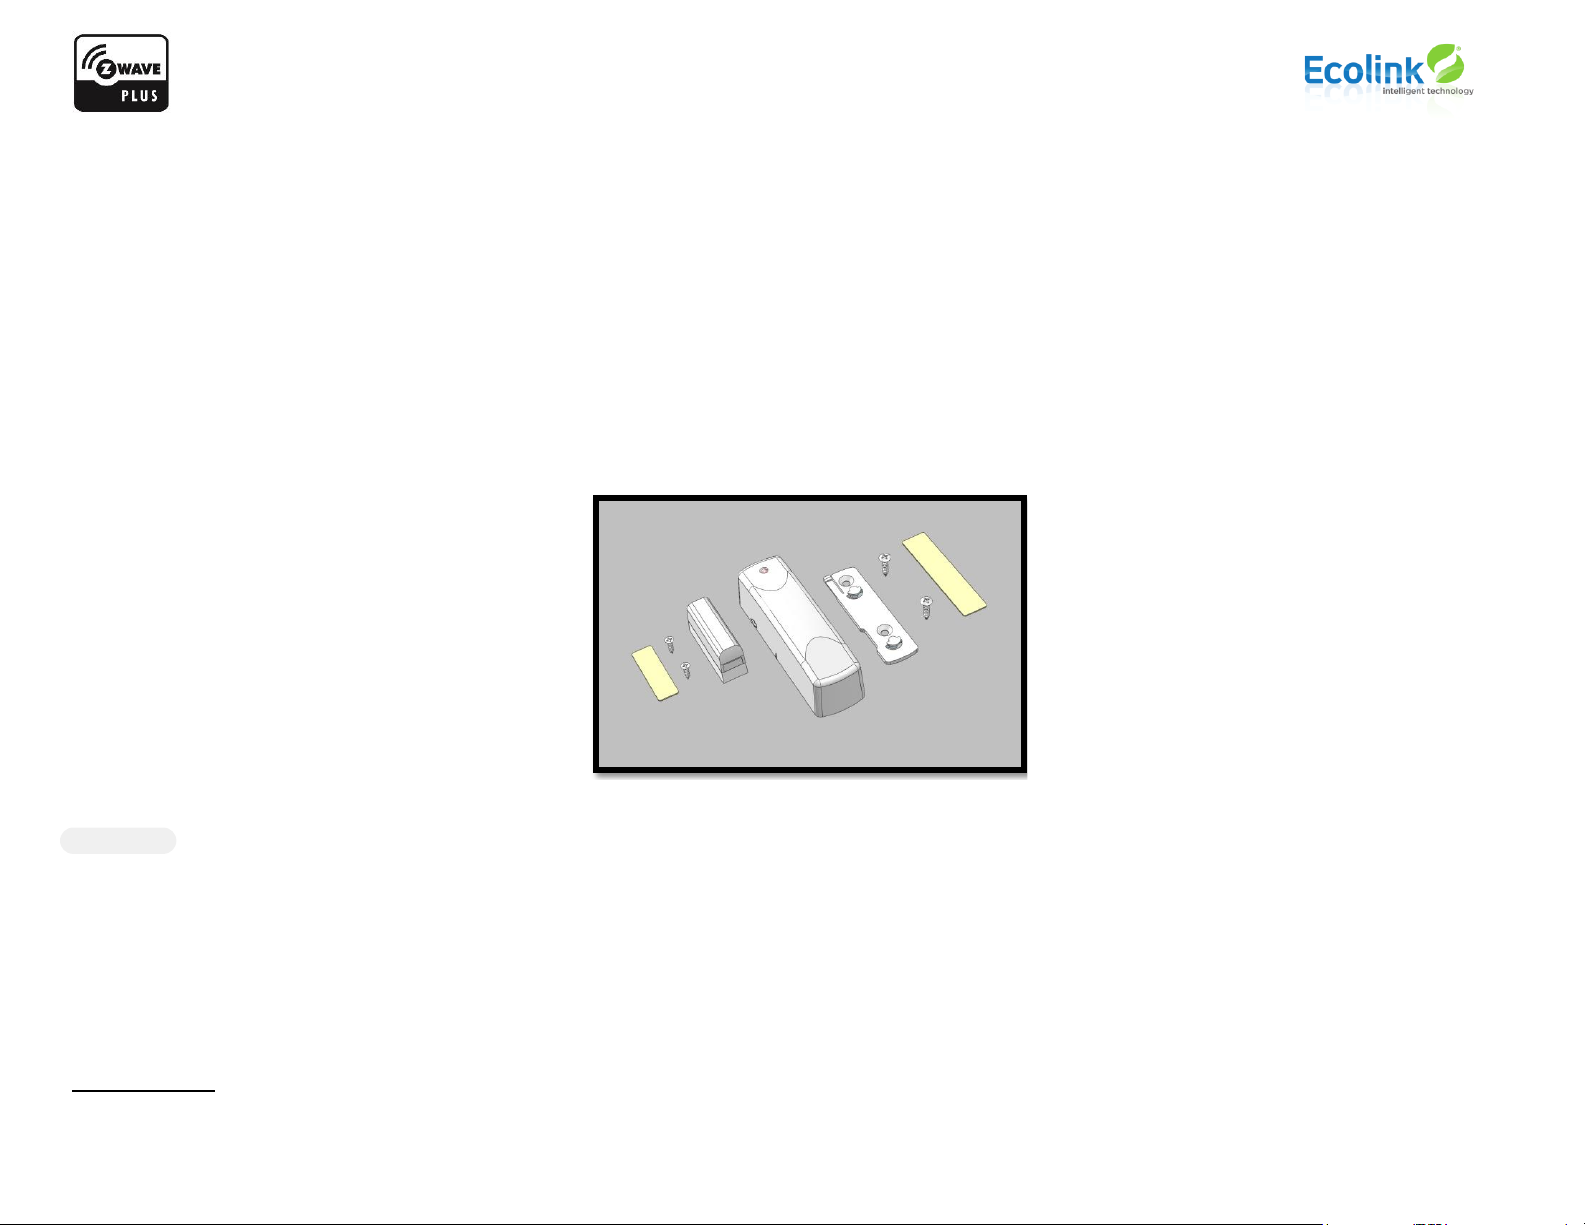
The package contains the following:
1- Door/Window Sensor
1- Sensor Mounting Bracket
2- Screws for Sensor Mounting Bracket
1- Adhesive tape for Sensor Mounting Bracket
1- Sensor Magnet
2- Screws for Sensor Magnet
1- Adhesive tape for Sensor Magnet
STEP ONE Identify Location for Sensor and Magnet:
Determine where on the door or window you are able to mount the sensor and magnet. Note, that the sensor has a line and arrow
that identify where the magnet should be located, relative to the sensor.
The sensor is typically attached to the non-moving part of the door or window (i.e. the door jamb or window frame). For your convenience two mounting methods
are provided. The sensor can be mounted with adhesive tape and/or screws.
First make sure you have a flat clean surface to mount the sensor and magnet to. Please verify the correct orientation of the sensor and location of the magnet
before you continue on to mounting the sensor and magnet.
Magnet Location
© 2015 Ecolink Intelligent Technology Inc. PN DW-ZWAVE2.5 R1.04
Page 3
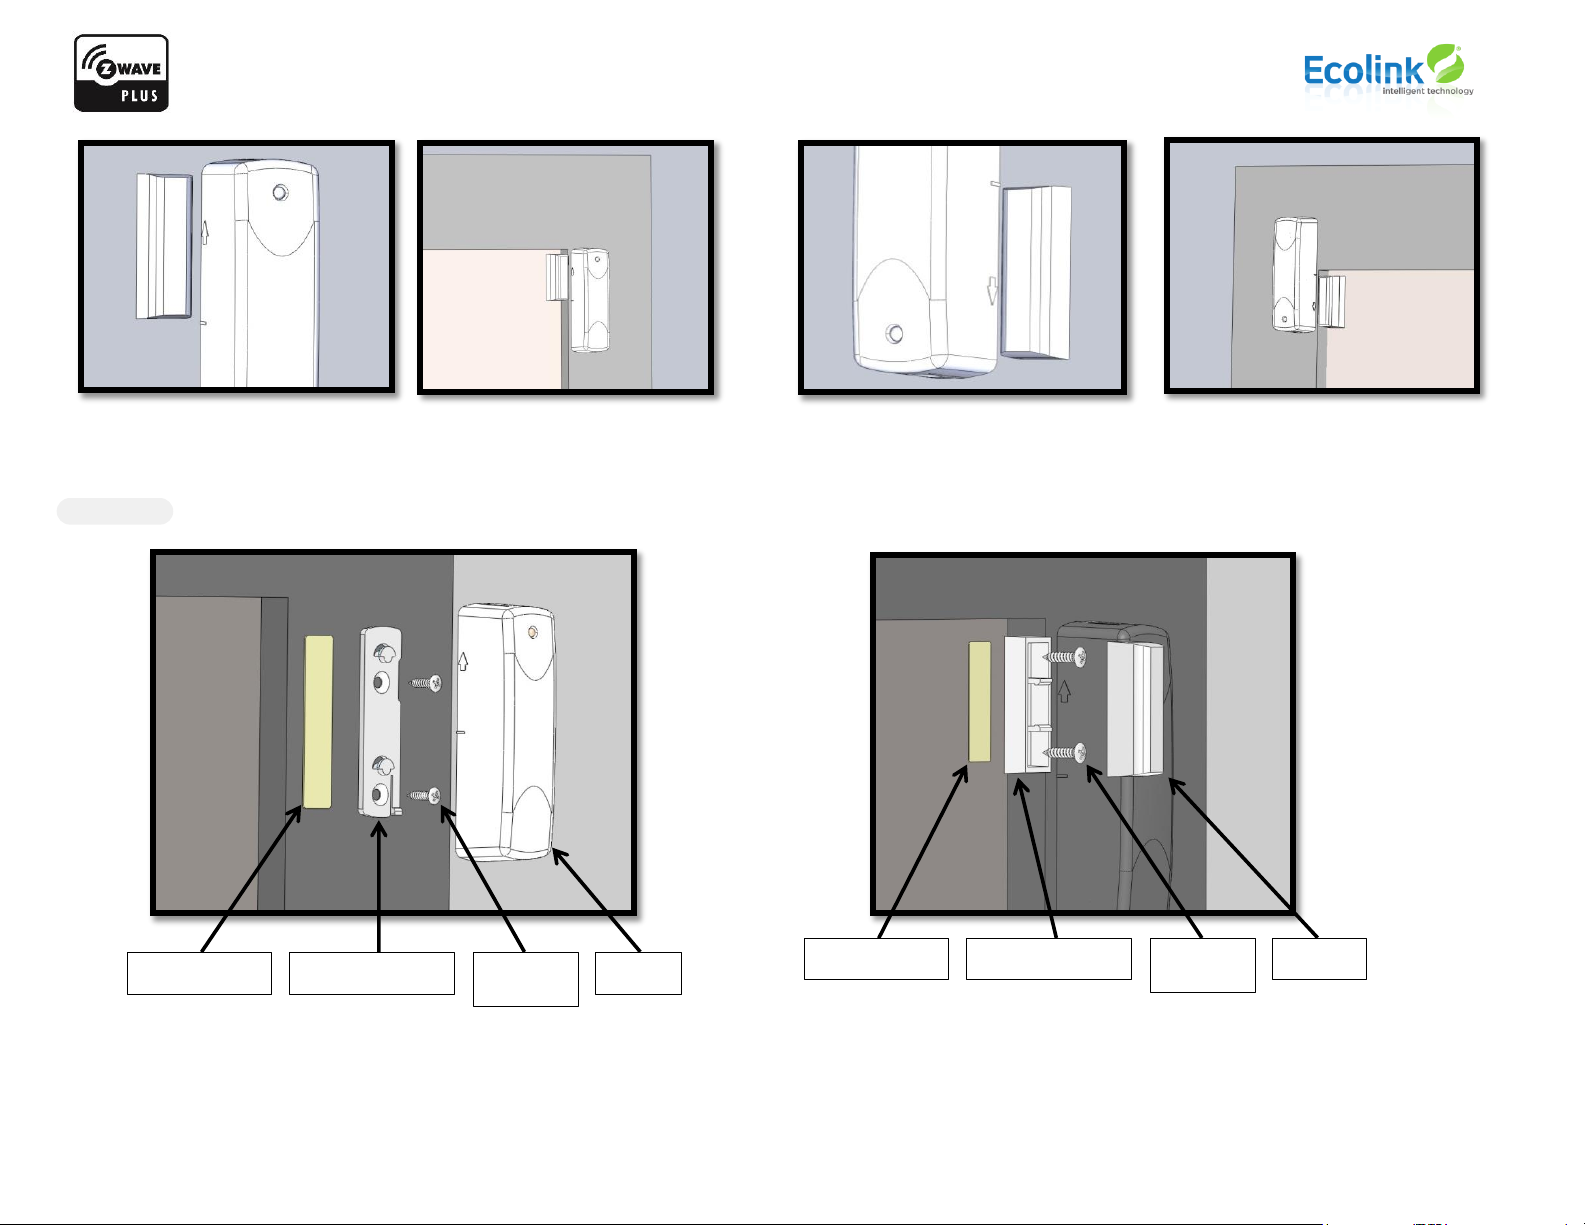
Fixed jamb
Door
Adhesive
Mounting
Screws
(optional)
Senso
Adhesive
Mounting
Screws
(optional)
Magnet
Fixed jamb
Door
Left hand door mounting (arrow pointing UP, magnet on left side) Right hand door mounting (arrow pointing down, magnet on right side)
STEP TWO Mount the sensor and magnet to a clean dry surface with the adheasive tape and/or the screws provided
© 2015 Ecolink Intelligent Technology Inc. PN DW-ZWAVE2.5 R1.04
Page 4
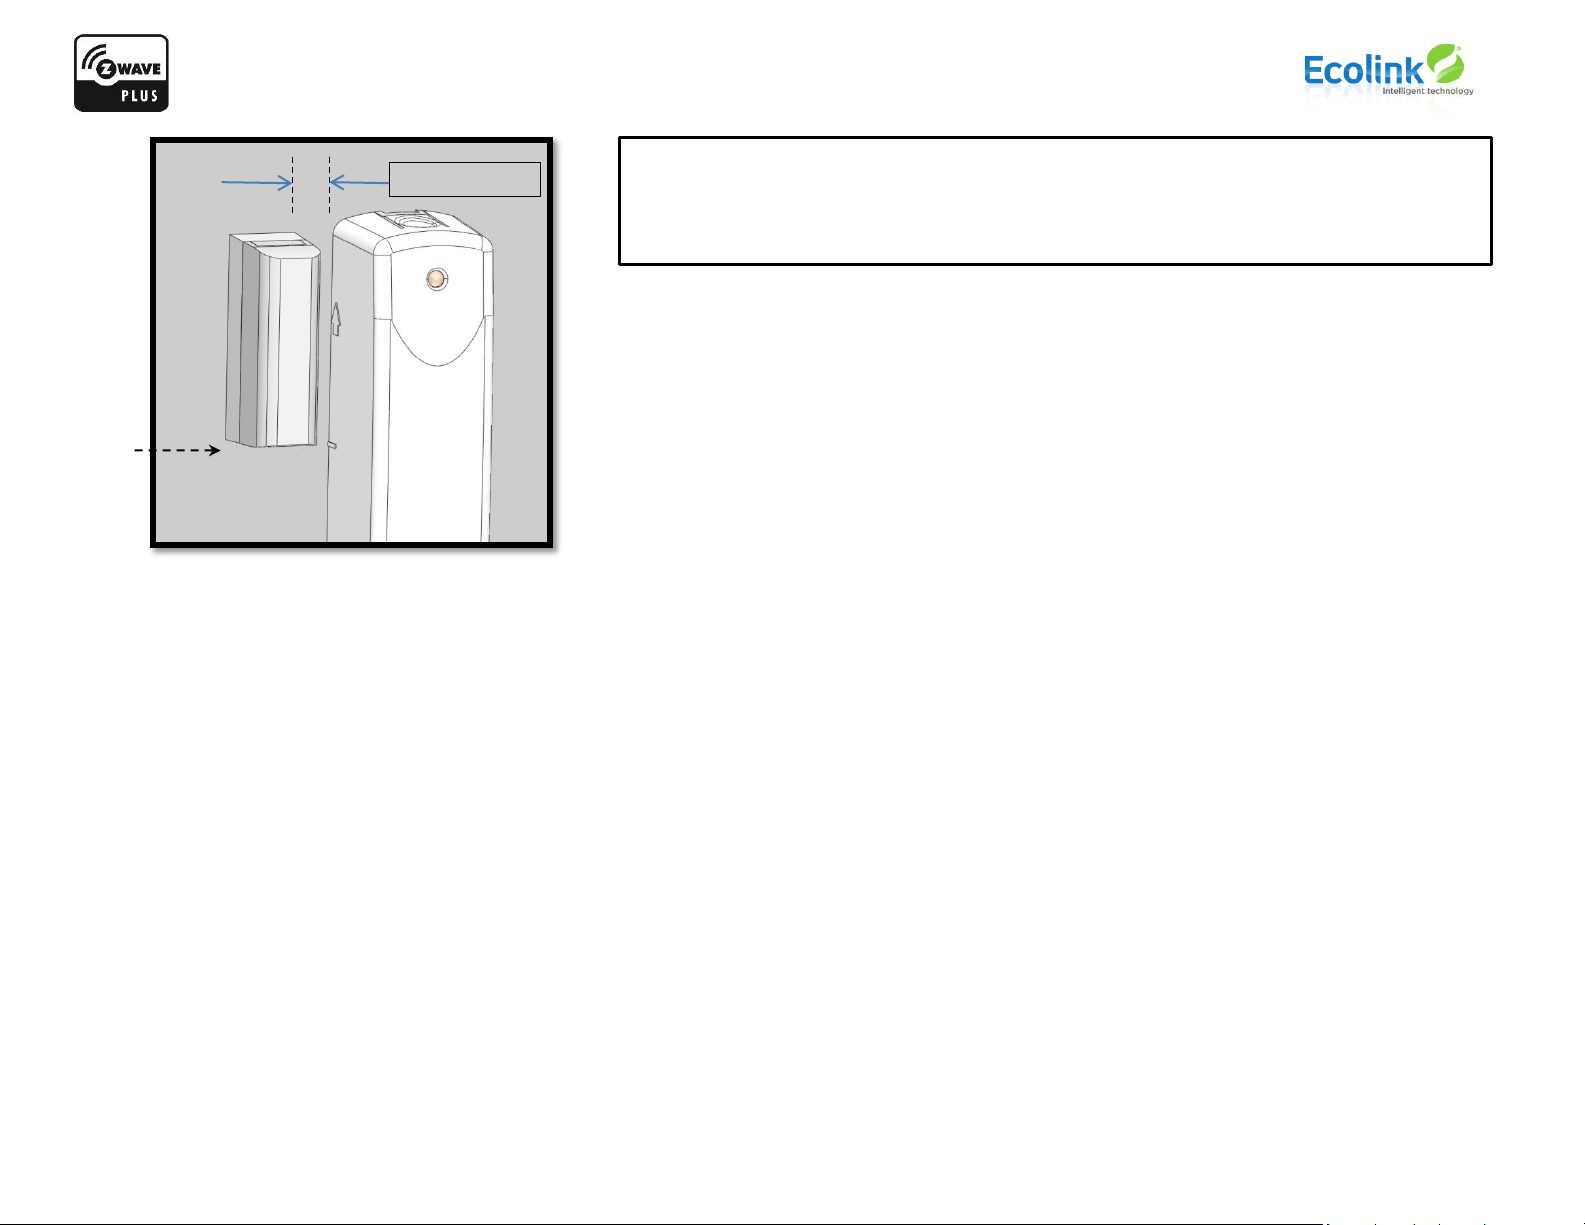
MAX GAP: 5/8”
IMPORTANT: The edge of the magnet must align with the line on the sensor, AND the magnet must
locate next to the arrow on the sensor. Maximum gap between the magnet and the
sensor is 5/8”. If the magnet is not located following these rules, the sensor may not
ADDITIONAL NOTES AND SUMMARY:
With either mounting method the first step is to attach the sensor mounting bracket to door frame or window frame. (The mounting bracket is used regardless of choice
of screws or tape).
The sensor can slide onto the mounting bracket in two different ways. To ensure that the sensor is securely fastened it is recommended that the tab on the bracket
engage the back of the sensor.
Before attaching the bracket to a surface note how the bracket will need to be oriented in order for the tab to engage the sensor. The required orientation of the sensor
determines the bracket orientation.
The sensor slides onto the bracket until the tab engages. Please be advised that adhesive tape may damage the surfaces to which it is attached.
BROWN PLASTIC HOUSINGS ( OPTIONAL )
Included with every Ecolink Door/Window Sensor is a second set of plastics in BROWN. If your door or window is darker in color, you may choose to use the BROWN cover for the
sensor and the BROWN plastics for the magnet.
© 2015 Ecolink Intelligent Technology Inc. PN DW-ZWAVE2.5 R1.04
Page 5

What is Z-Wave?
The Z-Wave protocol is an interoperable, wireless, RF-based communications technology designed specifically for control, monitoring and status reading applications in residential
and light commercial environments. Mature, proven and broadly deployed (with over 35 million products sold worldwide), Z-Wave is by far the world market leader in wireless
control, bringing affordable, reliable and easy-to-use 'smart' products to many millions of people in every aspect of daily life. Certified Z-Wave devices regardless of manufacturer
can work together to form a Z-Wave mesh network. Always on Z-Wave devices can act as repeaters in the mesh increasing range and redundancy.
For a more complete look at Z-Wave technology for non-technologists, and to learn more about Z-Wave's role as a key enabling technology for the Internet of Things and connected
objects, please visit www.z-wave.com.
Z-Wave Device Class and Command Class Information
This Z-Wave sensor is a Z-Wave generic Device Class of GENERIC_TYPE_SENSOR_NOTIFICATION, and a specific device class of SPECIFIC_TYPE_NOTIFICATION_SENSOR,
and the supported command classes are COMMAND_CLASS_ZWAVEPLUS_INFO, COMMAND_CLASS_VERSION, COMMAND_CLASS_MANUFACTURER_SPECIFIC,
COMMAND_CLASS_POWERLEVEL, COMMAND_CLASS_BATTERY, COMMAND_CLASS_NOTIFICATION_V4, COMMAND_CLASS_ASSOCIATION,
COMMAND_CLASS_ASSOCIATION_GRP_INFO, COMMAND_CLASS_WAKE_UP, COMMAND_CLASS_SENSOR_BINARY, COMMAND_CLASS_CONFIGURATION,
COMMAND_CLASS_BASIC.
Manufacturer Specific
Manufacturer ID: 0x014A
Product Type: 4
Product ID: 2
Factory Default
To restore this sensor to factory default settings, follow the instructions in this manual to exclude this sensor from the Z-Wave network. Upon completion of
removal from the network the sensor will restore itself to factory default settings automatically. Use this procedure only in the event that the network primary
controller is missing or otherwise inoperable.
Keeping Awake for Testing and Configuration
To save power, this sensor sleeps most of the time and is therefore not awake to receive messages from a gateway for testing. Removing the top case from the
sensor will put in device into a tampered mode in which the sensor will stay awake and able to receive messages. Most of the time an end user would not do
this, but if the sensor needs to be configured after inclusion, an end user can follow the instructions below for sending Wake-Up notifications.
© 2015 Ecolink Intelligent Technology Inc. PN DW-ZWAVE2.5 R1.04
Page 6

Association
This sensor has two Association groups of 5 nodes each. Group one is a lifeline group who will receive unsolicited messages relating to door/window open/close
notifications, case tampering notifications, low-battery notifications, and sensor binary reports. Group 2 is intended for devices that are to be controlled i.e.
turned on or off (on only by default) with a Basic Set. On inclusion the controller should put its node ID in group 1 but not group 2.
Network Wide Inclusion
This sensor also supports Network Wide Inclusion such that the Sensor can be included into the Z-Wave network over the mesh network and not directly near
the main controller. This mode is automatically activated after regular inclusion was not successful
© 2015 Ecolink Intelligent Technology Inc. PN DW-ZWAVE2.5 R1.04
Page 7

SENSOR
CONDITION
COMMAND CLASS and VALUE
ASSOCIATION GROUP
CONFIGURABLE?
Door/Window Open
Notification Report of Access Control
(0x06), Door/Window is open (0x16)
1
Yes via Notification Set of notificationType
(0x06) and status of 0x00: This type of
notification turned off
0xFF: This type of notification turned on
Sensor Binary Report of 0xFF
Sensor Type: 0xFF
1
Yes via Configuration
Command Class Parameter Number: 2
Size: 1
A Configuration Value: 0xFF (On) / 0x00
(Off)
Basic set of 0xFF (On)
2
No
Door/Window Close
Notification Report of Access Control
(0x06), Door/Window is closed (0x17)
1
Yes via Notification Set of notificationType
(0x06) and status of 0x00: This type of
notification turned off
0xFF: This type of notification turned on
Sensor Binary Report of 0x00
Sensor Type: 0xFF
1
Yes via Configuration Command Class
Parameter Number: 2
Size: 1
A Configuration Value: 0xFF (On) / 0x00
(Off)
Basic Set of 0x00 (Off)
By factory default this feature is disabled
and must be enabled via Configuration
Command Class.
2
Yes via Configuration Command Class
Parameter Number: 1
Size: 1
A Configuration Value: 0xFF (On) / 0x00
(Off) Parameter Number: 2
Sensor Case Removed
Notification Report of Home Security
(0x07), Tampering product cover
removed (0x03)
1
Yes via Notification Set of notificationType
(0x07) and status of 0x00: This type of
notification turned off
0xFF: This type of notification turned on
Sensor Case Fastened
Wake-Up Notification
1
Yes via Wake-Up Notification Command
Class
Battery Level Dipped Below 2.6v
Notification Report of Power
Management (0x08), Replace battery
now (0x0B)
1
Yes via Notification Set of notificationType
(0x08) and status of 0x00: This type of
notification turned off
0xFF: This type of notification turned on
© 2015 Ecolink Intelligent Technology Inc. PN DW-ZWAVE2.5 R1.04
Page 8

Configuration Set Values
Effect
Parameter Number: 1
Size: 1
Configuration Value: 0x00
(Default) Sensor does NOT send Basic Sets to Node
IDs in Association Group 2 when the sensor is
restored ( i.e. Door/Window Closed ).
Parameter Number: 1
Size: 1
Configuration Value: 0xFF
Sensor sends Basic Sets of 0x00 to nodes in
Association Group2 when sensor is restored.
Parameter Number: 2
Size: 1
Configuration Value: 0x00
(Default) Sensor sends Sensor Binary Reports when
sensor is faulted and restored for backwards
compatibility in addition to Notification Reports.
Parameter Number: 2
Size: 1
Configuration Value: 0xFF
Sensor will send only Notification Reports and NOT
Sensor Binary Reports when the sensor is faulted
and restored.
Wake-Up Notification
The sensor will wake up every so often and when the case is closed to send a Wake-Up Notification to allow the life line master node controller that the sensor is
now available for any queued messages that the controller may have for the sensor. The time between Wake-Up Notifications can be configured with the WakeUp Notification command class to be between 1 hour and 1 week with interval steps of 200 seconds.
Configuration
The sensor has two configuration parameters. Parameter 1 configures the sensor to send or not send Basic Set commands of 0x00 to nodes in Association group
2 turning the devices off when the sensor is in a restored state i.e. the door is closed. By default the sensor does NOT send Basic Set commands of 0x00.
Parameter 2 configures the sensor to either to send or not to send Sensor Binary Report commands to Association Group 1 when the sensor is faulted and
restored. If the controller is fully compatible with the Notification Command Class thereby making the Sensor Binary Reports redundant, the controller can
disable the Sensor Binary Report Commands completely. The following table shows the values to enable and disable the two configuration parameters.
© 2015 Ecolink Intelligent Technology Inc. PN DW-ZWAVE2.5 R1.04
Page 9

FCC Compliance Statement
Designed in Carlsbad, CA
www.discoverecolink.com
This device complies with part 15 of the FCC Rules. Operation is subject to the following two conditions: (1) This device may not cause harmful interference, and (2) this device must accept any
interference received, including interference that may cause undesired operation.
This equipment has been tested and found to comply with the limits for Class B digital devices, pursuant to Part 15 of the FCC Rules. These limits are designed to provide reasonable protection against
harmful interference in a residential installation. This equipment generates uses and can radiate radio frequency energy and, if not installed and used in accordance with the instruction manual, may cause
harmful interference to radio communications. However, there is no guarantee that interference will not occur in a particular installation. If this equipment does cause harmful interference to radio or
television reception, which can be determined by turning the equipment off and on, the user is encouraged to try to correct the interference by one or more of the following measures:
Warning: Changes or modifications not expressly approved by Ecolink Intelligent Technology Inc. could void the user’s authority to operate the equipment.
This device complies with Industry Canada license-exempt RSS standard(s). Operation is subject to the following two conditions: (1) this device may not cause interference, and (2) this device must
accept any interference, including interference that may cause undesired operation of the device.
C’et appareil est conforme la norme d'Industrie Canada exempts de licence RSS. Son fonctionnement est soumis aux deux conditions suivantes: (1) c’et appareil ne peut pas provoquer d'interférences, et
(2) c’et appareil doit accepter toute interférence, y compris les interférences qui peuvent causer un mauvais fonctionnement de la dispositif.
FCC ID: XQC-DWZ25 IC: 9863B-DWZ25
Warranty
Ecolink Intelligent Technology Inc . warrants that for a period of 3 years from the date of purchase that this product is free from defects in material and workmanship. This warranty does not apply to
damage caused by shipping or handling, or damage caused by accident, abuse, misuse, misapplication, ordinary wear, improper maintenance, failure to follow instructions or as a result of any
unauthorized modifications.
Re-orient or relocate the receiving antenna
Increase the separation between the equipment and receiver
Connect the equipment to an outlet on a different circuit from the receiver
Consult the dealer or an experienced radio/TV contractor for help.
If there is a defect in materials and workmanship under normal use within the warranty period Ecolink Intelligent Technology Inc. shall, at its option, repair or replace the defective equipment upon return of
the equipment to the original point of purchase.
The foregoing warranty shall apply only to the original buyer, and is and shall be in lieu of any and all other warranties, whether expressed or implied and of all other obligations or liabilities on the part of
Ecolink Intelligent Technology Inc. neither assumes responsibility for, nor authorizes any other person purporting to act on its behalf to modify or to change this warranty, nor to assume for it any other
warranty or liability concerning this product. The maximum liability for Ecolink Intelligent Technology Inc. under all circumstances for any warranty issue shall be limited to a replacement of the defective
product . It is recommended that the customer check their equipment on a regular basis for proper operation.
© 2015 Ecolink Intelligent Technology Inc. PN DW-ZWAVE2.5 R1.04
 Loading...