

Page 1

Ecolink ZWAVE Plus Smart Switch Lighting Control
Installation Tips.
A Universal Electronics Company
Page 2

Confidential © 2016 Universal Electronics Inc.,
Ecolink Intelligent Technology, Inc.
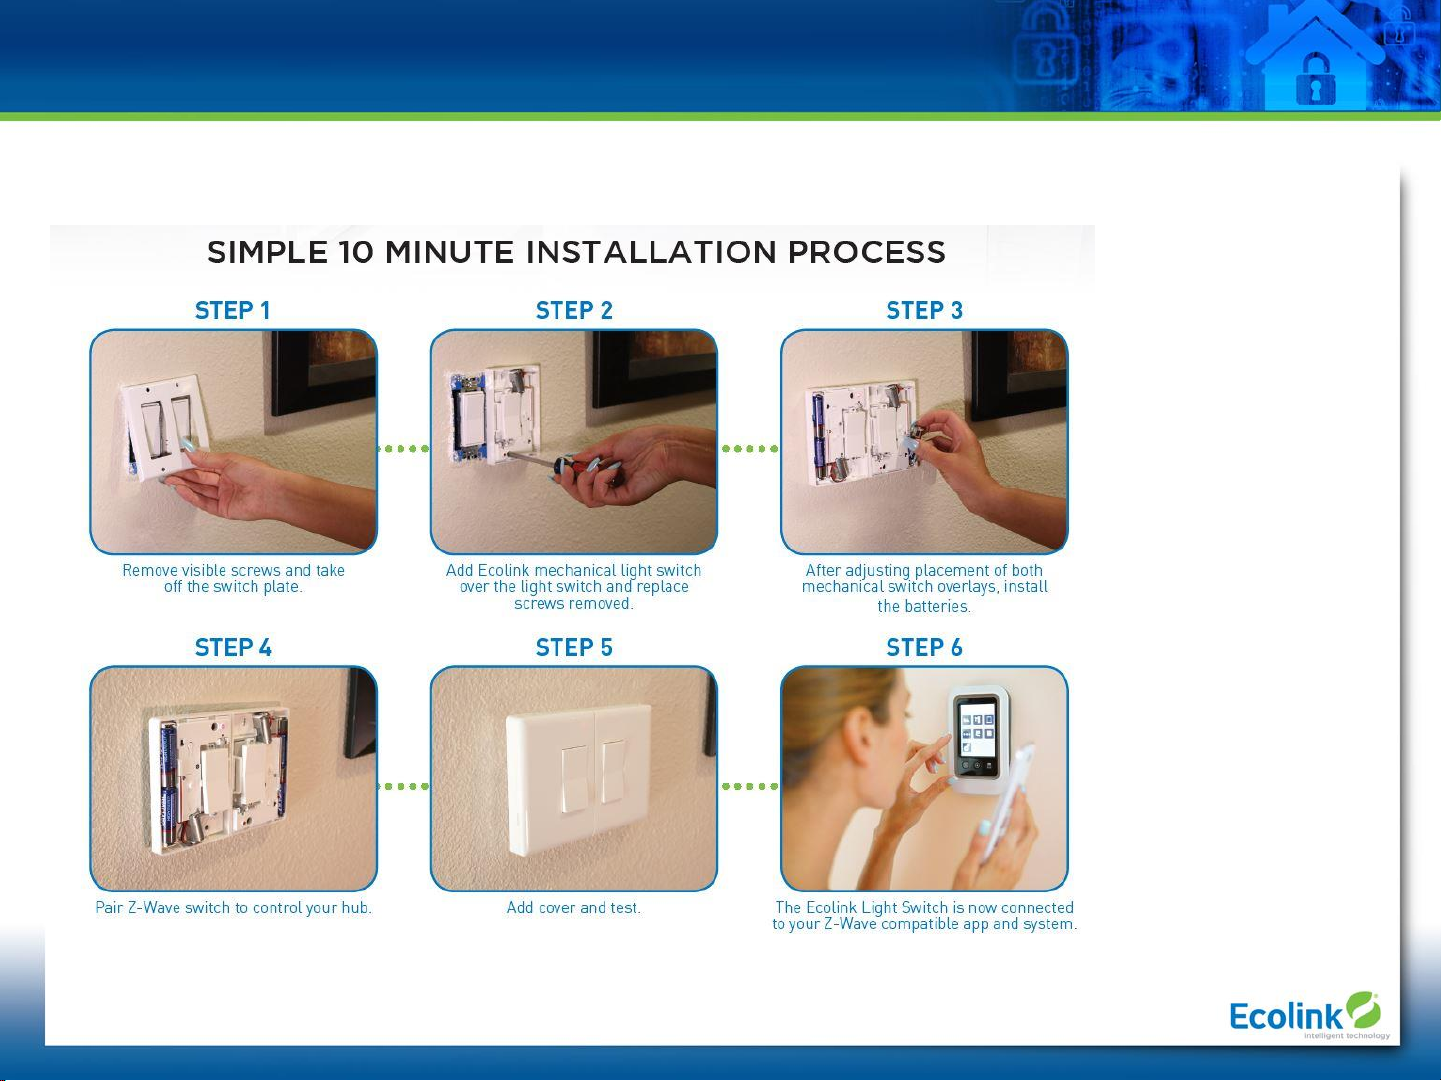
Choose the right Ecolink Smart Switch base on your light switch design. Single and
double options available for toggle or rocker style 110V light switches.
• Smart Switch options will not work properly on 110V light switch banks larger than double switch.
• ** Verify HUB/Controller compatibility before purchasing. (See List)
Page 3
Smart Switch Installation
Confidential © 2016 Universal Electronics Inc.,
Ecolink Intelligent Technology, Inc.
• Before purchasing the Smart Switch, verify HUB/controller compatibility. (See List)
Page 4
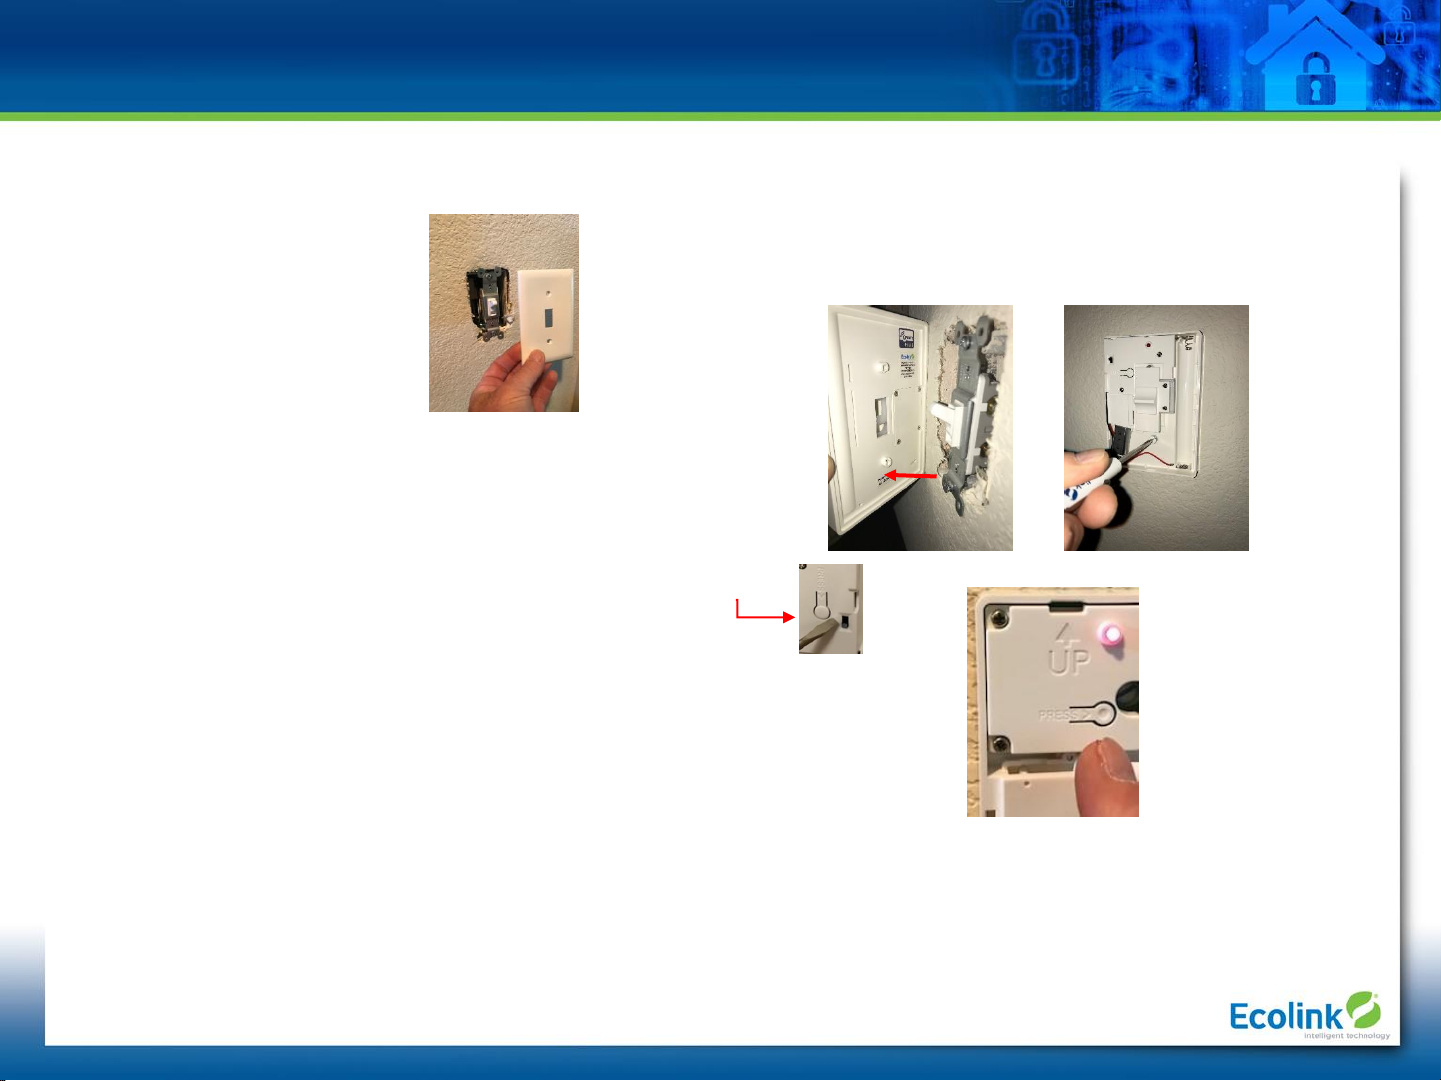
Toggle Style Ecolink Smart Switch Installation
Step 1 – Remove light switch plate. (Save
plate screws.)
Step 2 - Mount Toggle Style EcolinkSmart Switch
• Ensure switch toggle is inserted in up/ down control mechanism.
• Use plate screws to secure Smart Switch.
Step 3 – Power up Ecolink Smart Switch
• Insert 2 “AA” batteries. Red light flashing indicates proper power.
• NOTE: For dual switches, ensure “on” position switch is in the up position.
Step 4 – Add EcolinkSmart Switch to Z-Wave Plus network.
• Verify compatibility with your HUB/controller. (See List)
• Put HUB/controller into “add” or “Inclusion” mode. (see their manual for process)
• Select proper device association in menu. (See List)
• For SmartThings app version 1.6.27-223 choose Ecolink brand for selection
• Press inclusion/exclusion button on Ecolink Smart Switch.
• HUB/controller will provide indication of successful inclusion/exclusion.
Step 5 – Add Smart Switch covers and test manual and automatic operation.
* Review installation instructions for full details on Ecolink Smart Switch operations.
** Some 110V light switch toggles may be mounted crooked or deep in box. Some adjustment of light
switch may be required to ensure smooth operation of Smart Switch and extended battery life. If smart switch
appears to be grinding during trigger, or does not operate 110V light switch, try adjusting light switch in box.
• Before purchasing the Smart Switch, verify HUB/controller compatibility. (See List)
• Do not attempt to test Smart Switch when it is not attached to an actual light switch. This will cause it to lock up and fail to operate.
Page 5
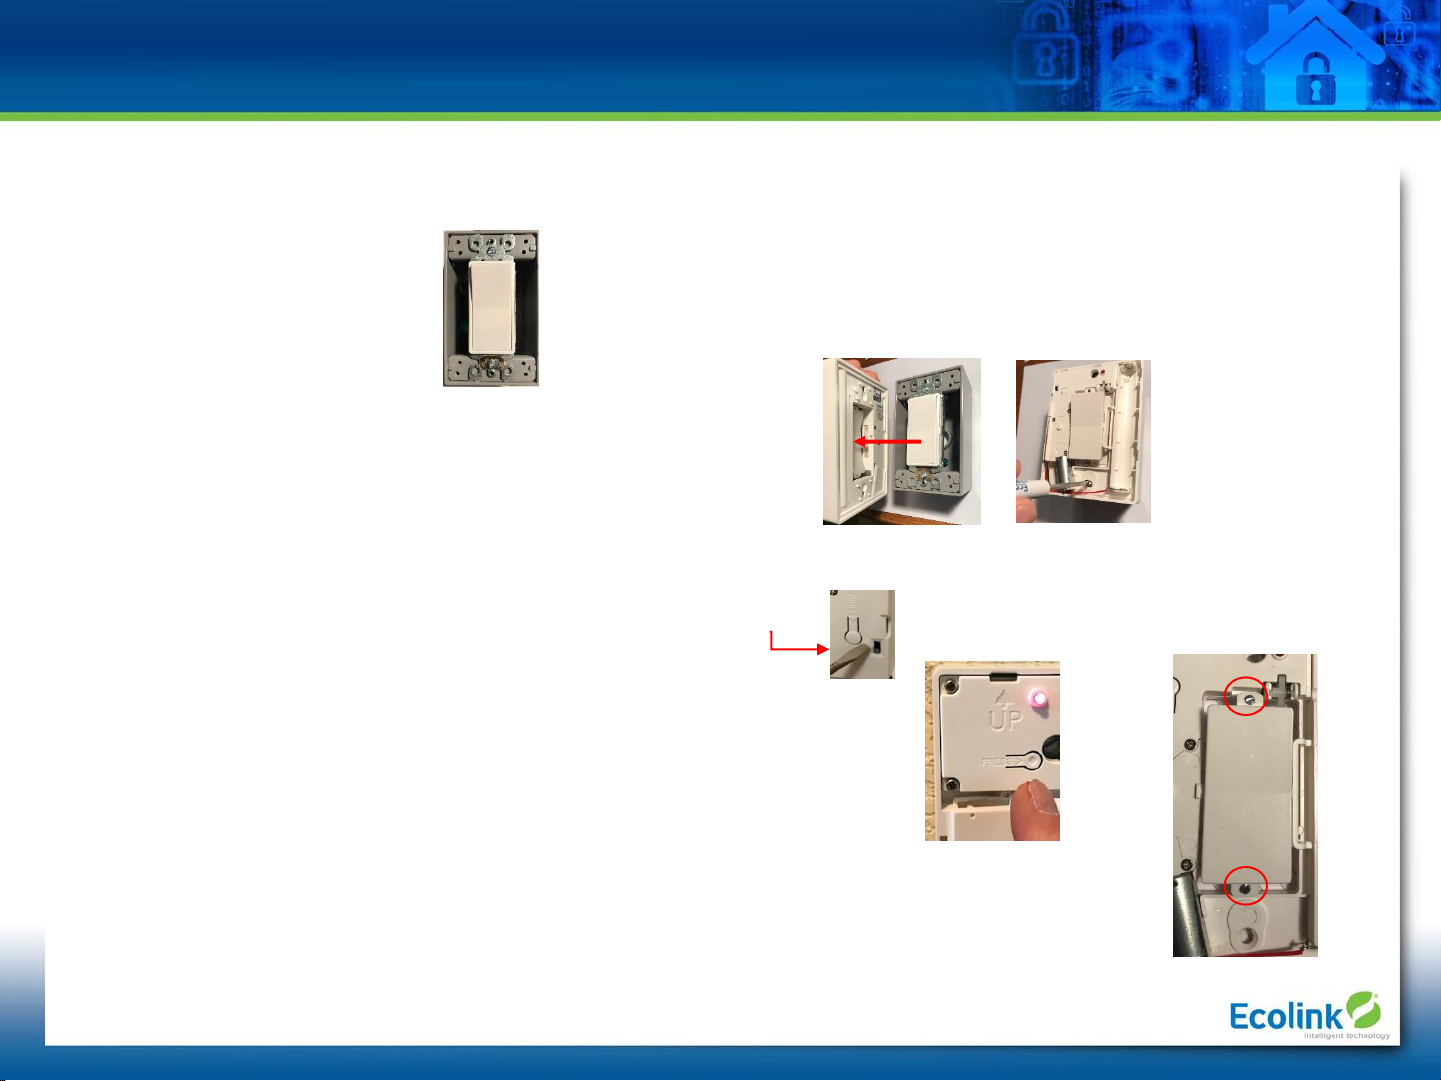
Rocker Style Ecolink Smart Switch Installation
Step 1 – Remove light switch plate. (Save
plate screws.)
Step 2 - Mount Toggle Style EcolinkSmart Switch
• Ensure switch toggle is inserted in up/ down control mechanism.
• Use plate screws to secure Smart Switch.
Step 3 – Power up Ecolink Smart Switch
• Insert 2 “AA” batteries. Red light flashing indicates proper power.
• NOTE: For dual switches, ensure “on” position switch is in the up position.
Step 4 – Add EcolinkSmart Switch to Z-Wave Plus network.
• Verify compatibility with your HUB/controller. (See List)
• Put HUB/controller into “add” or “Inclusion” mode. (see their manual for process)
• Select proper device association in menu. (See List)
• For SmartThings app version 1.6.27-223 choose Ecolink brand for selection
• Press inclusion/exclusion button on EcolinkSmart Switch.
• HUB/controller will provide indication of successful inclusion/exclusion.
Step 5 – Add Smart Switch covers and test manual and automatic operation. If Smart Switch is grinding
or does not operate 110V light switch, use rocker adjustment screws to create smooth operation.
* Review installation instructions for full details on Ecolink Smart Switch operations.
** Some 110V light switch rockers may be mounted crooked or deep in box. Some adjustment of light
switch may be required to ensure smooth operation of Smart Switch and extended battery life.
• Before purchasing the Smart Switch, verify HUB/controller compatibility. (See List)
• Do not attempt to test Smart Switch when it is not attached to an actual light switch. This will cause it to lock up and fail to operate.
Page 6
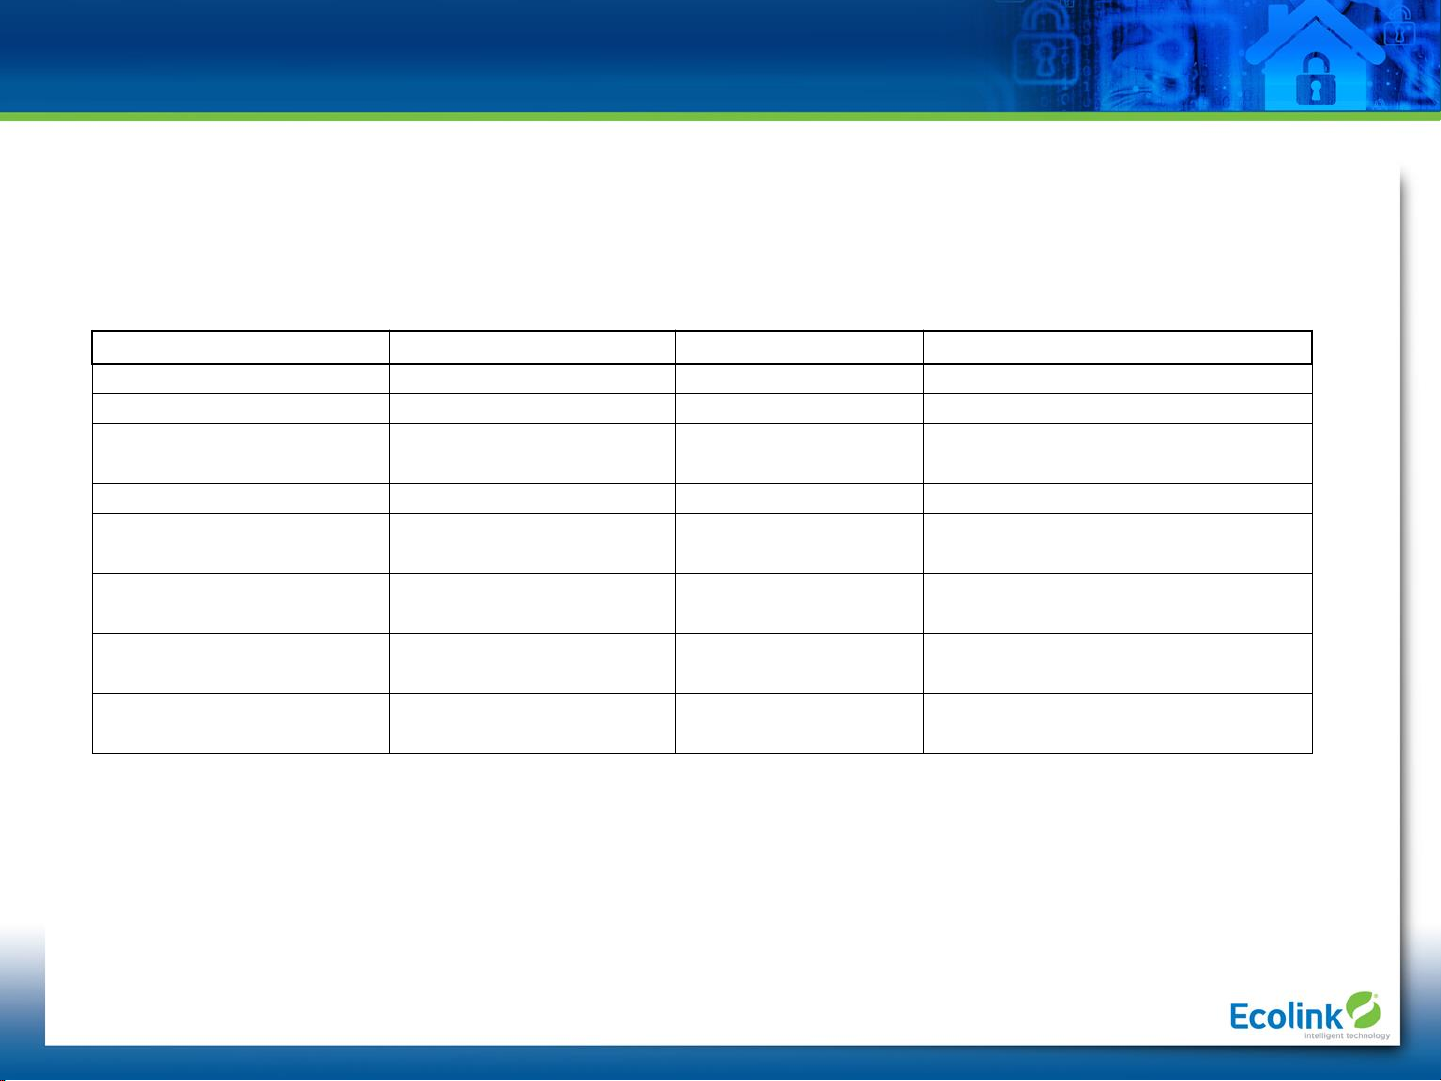
Ecolink Smart Switch HUB/Controller Compatibility
Confidential © 2016 Universal Electronics Inc.,
Ecolink Intelligent Technology, Inc.
Ecolink
Tested Compatibility Listing
Ecolink Device HUB/Controller Add Menu Operation Notes
Ecolink Smart Switch
Samsung SmartThings V1
Generic
- ZWAVE Switch
Will not display battery power level
Samsung SmartThings V2
Generic
- ZWAVE Switch
Will not display battery power level
Samsung SmartThings V3
Ecolink Brand
-
Switch/Dimmer
Works properly.
Includes battery power
level
Vera Plus
No info Available
Works properly. Includes battery power
level
Vera Edge
Generic ZWAVE Light
Switch add
Works properly. Includes battery power
level.
Vera Lite
Generic ZWAVE Light
Switch add
Works properly. Includes battery power
level
HomeSeer
No info Available
Works properly. Includes battery power
level.
* The above HUB/controllers are factory tested and operate properly with the Ecolink Smart Switch. Ecolink cannot
guarantee that other ZWAVE Plus capable systems will work properly.
 Loading...