

ecolight SE1038-TBZ-01LF0-E User Manual
Model/Modèle/Modelo #:
GND
FRONT
GND
FRONT
SE1038-TBZ-01LF0-E
DUSK-TO-DAWN LED SECURITY LIGHT
(Page 1)
ÉCLAIRAGE DE SÉCURITÉ À DEL FONCTIONNANT
DU CRÉPUSCULE À L'AUBE
(Page 4)
LUZ LED DE SEGURIDAD DE ANOCHECER
A AMANECER
(Página 7)
To Begin/Pour commencer/Para comenzar
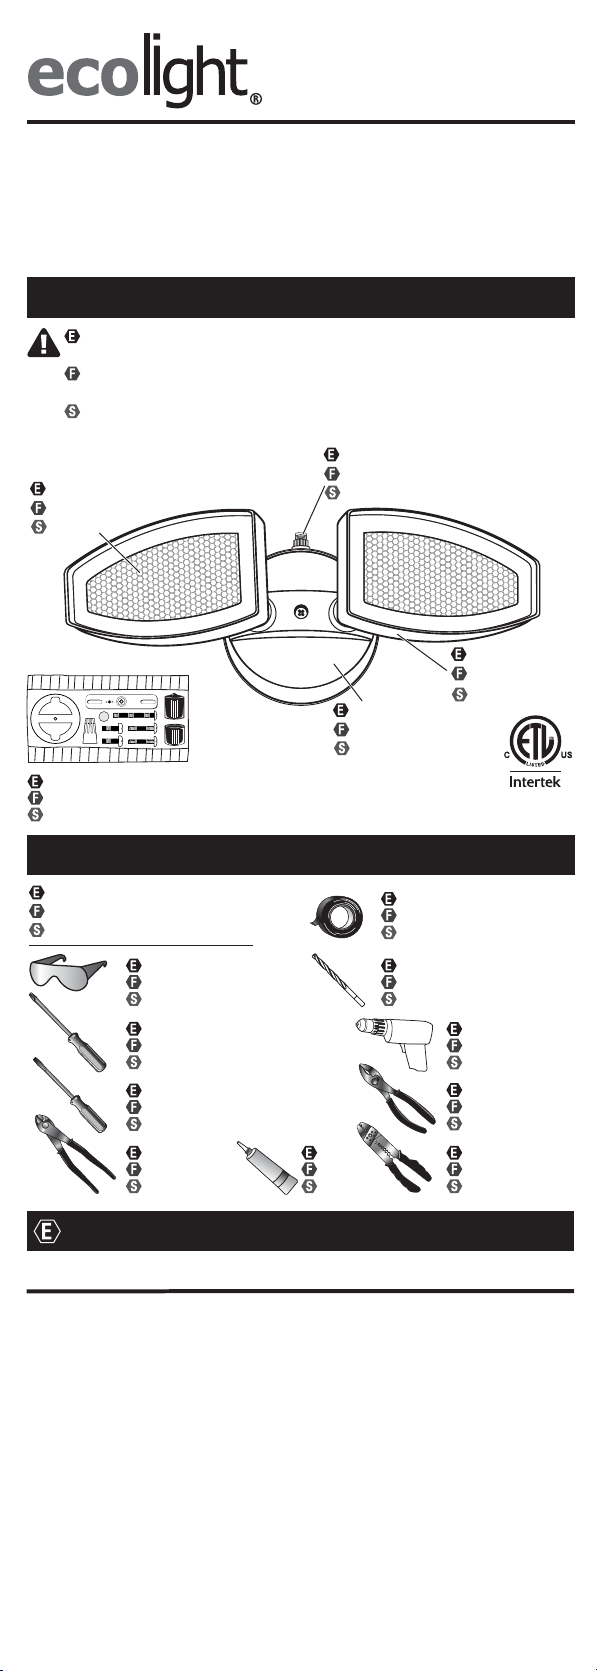
WARNING: Please read this entire manual before installation.
Verify the following contents:
AVERTISSEMENT : Veuillez lire ce mode d'emploi du début à la fin avant
de commencer l'installation. Vérifiez le contenu suivant :
ADVERTENCIA: Por favor, lea este manual completo antes de realizar la
instalación. Verifique el siguiente contenido:
Dusk-to-Dawn sensor
Diffuser
Diffuseur
Difusor
GND
FRONT
Hardware kit (Actual hardware may differ from illustration).
Trousse de quincaillerie (La quincaillerie incluse peut être différente de l’illustration.)
Kit de aditamentos (Los aditamentos reales pueden diferir de los que se muestran en la ilustración.)
Capteur crépusculaire
Sensor anochecer-amanecer
Light head
Tête de lampe
Cabeza de luz
Wall plate
Plaque murale
Pared plana
Required/Nécessaire/Se necesita
Installation time: 45 minutes
Temps d’installation : 45 minutes
Tiempo de instalación: 45 minutos
Safety glasses
Lunettes de sécurité
Gafas de seguridad
Phillips screwdriver
Tournevis cruciforme
Destornillador Phillips
Flathead screwdriver
Tournevis à tête plate
Destornillador de cabeza plana
Wire cutters
Coupe-fil
Pinzas cortacables
Silicone
Silicone
Silicona
Electrical tape
Ruban isolant
Cinta aislante
Drill bits 1/16 in.
Forets de 1/16 po
Brocas para taladro de 1/16 pulg
Drill
Perceuse
Taladro
Pliers
Pinces
Pinzas
Wire strippers
Pinces à dénuder
Pinzas pelacables
English
Warnings and Cautions
WARNING
• Shut off power at the circuit breaker or fuse panel before removing the
old fixture or installing the new one.
• LEDs can be damaged by electrostatic discharge (ESD) shock. Before
installation, discharge yourself by touching a grounded bare metal
surface to remove this hazard. To avoid damage, do not remove the
clear lens over the LED module.
CAUTION
• DO NOT USE THIS FIXTURE WITH A DIMMING CIRCUIT. If dimmer
controls are present, remove them and replace them with regular
electrical switches. If a three-way dimmer is present, replace it with a
regular three-way switch. If unfamiliar with electrical installations, it is
recommended a qualified electrician do the installation.
• This device complies with Part 15 of the FCC rules. Operation is subject
to the following two conditions: (1) This device may not cause harmful
interference, and (2) this device must accept any interference received,
including interference that may cause undesired operation.
- 1 -
GND
FRONT
GND
FRONT
Important Safety Instructions
WARNING: To reduce the risk of FIRE, ELECTRIC SHOCK, OR INJURY TO
PERSONS:
1. Do NOT touch LEDs.
2. Do NOT remove the protective clear LED lens.
3. Do NOT look directly at lighted LEDs for any length of time.
4. Do NOT touch, operate, or install fixture while in contact with water.
5. For electrical requirements, see back of the fixture. Minimum 90° supply
conductors.
6. Do not leave bare wires exposed outside the wall canopy enclosure.
7. Suitable for installation onto round surface mount electrical boxes or
recessed electrical boxes rated for wet locations. Fixture can be wall or
eave mounted. NOT suitable for ground mount installations.
8. Do NOT mount below 5 ft.
SAVE THESE INSTRUCTIONS IN A LOCATION CLOSE TO THE FIXTURE TO
REFER TO THEM AT A LATER TIME.
Select the installation location carefully. Do NOT install near other sources
of light, as this can fool the Dusk-to-Dawn sensor into thinking it is daylight.
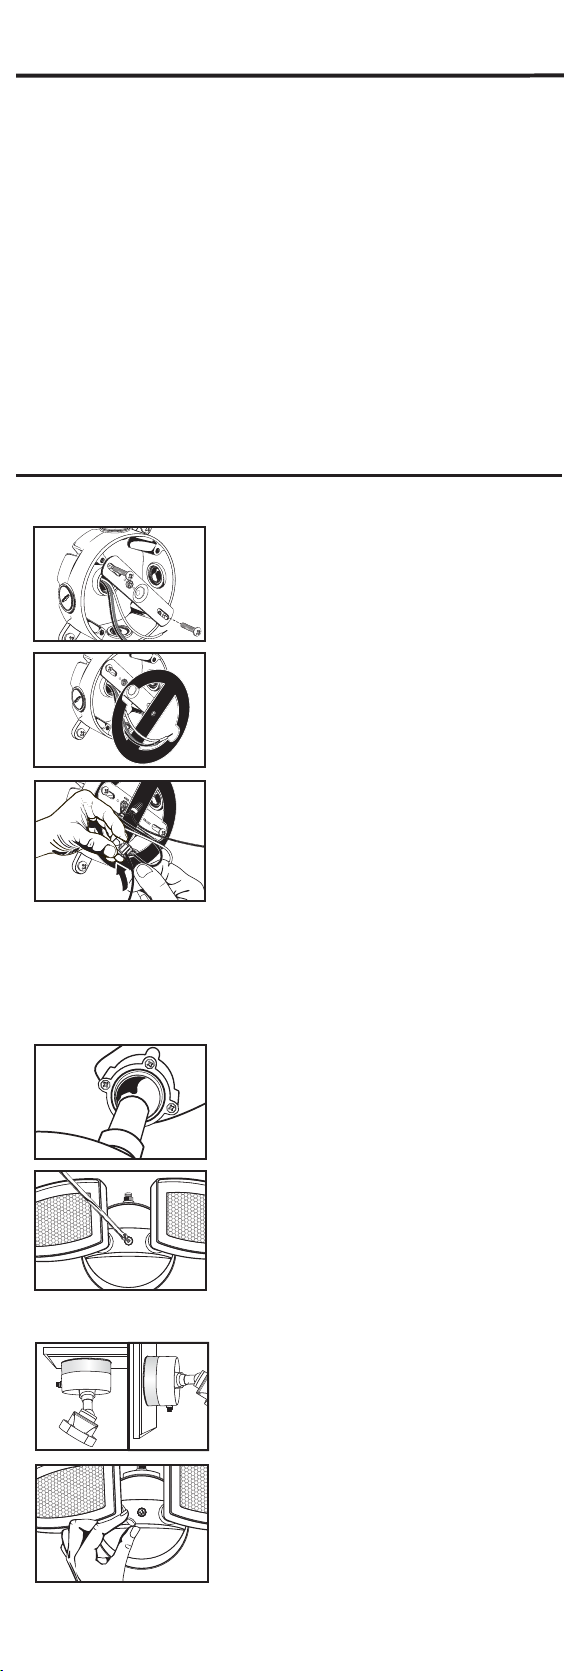
Installation For Round Surface Mount Electrical Boxes
Disconnect power to the electrical box and remove the old fixture. If more than two
wire leads are present, keep track of which wires were connected together.
1
Fig. 1
Pull the supply wires out of the electrical box. Using the
machine screws that fit the electrical box, secure the
mounting strap to the electrical box, making sure that
the side marked “FRONT” is facing out (Fig. 1).
2
Fig. 2
3
Fig. 3
electrical box ground wire should be connected together using the wire nut. If the
electrical box is made of metal and already grounded, secure the bare end of the
fixture ground wire to the mounting strap marked “GND” using the green grounding
screw. Push-in connectors are pre-installed onto the fixture’s wire leads to allow for
easy connection. Insert the black lead from the electrical box into the black wire
push-in connector
into the electrical box.
4
Fig. 4
(Fig. 3)
5
Fig. 5
properly seals the gap between the wall plate and the electrical box to prevent water
seepage into the electrical box.
6
Remove the protective paper barrier from the adhesive
face of the foam gasket. Trace the supply wires through
the openings in the gasket and adhere the gasket to the
mounting strap and outer edge of the round surface
mount electrical box (Fig. 2).
For safety and proper installation, the fixture must be
properly grounded. If unfamiliar with the methods of
properly grounding the fixture, consult with a qualified
electrician. A green copper ground wire is
pre-attached to the fixture. If the electrical box is made
of plastic and/or has a green or bare copper grounding
wire inside, the fixture grounding wire and the
. Repeat with the white leads. Push the excess wires back
If the light head is loose and will not hold its position
tighten the screws located on the backside of the light
head that surround the pivot joint (Fig. 4). NOTE: Tighten
the screws before securing the fixture to the electrical
box.
Position the wall plate over the mounting strap so the
center hole of the wall plate aligns with the center hole
in the mounting strap. While holding the wall plate in
place, put the long machine screw through the center
hole of the wall plate and mounting strap. Tighten the
screw properly to secure the wall plate onto the
electrical box (Fig. 5). NOTE: Make sure the gasket
If eave mounting the fixture, the Dusk-to-Dawn sensor
must be facing outwards (Fig. 6).
Fig. 6
7
Restore power to the electrical box at the circuit
breaker or fuse panel. Make sure the wall switch that
controls the electrical box for your security light is
returned to the “ON”position and check that your light is
functioning properly. If the light is functioning properly,
fit the silicone cap into the mounting screw opening to
Fig. 7
prevent water seepage into the housing (Fig. 7).
- 2 -
 Loading...