

Page 1
Smart Plug
Instruction Manual
At ecobee, we’re not just all about thermostats – we’re about energy solutions.
That’s why we’ve created Smart Plugs, WiFi-enabled electrical outlets that you
can monitor and control from your existing Smart Thermostat and ecobee®
Web Por tal.
Step 1. Check Smart Thermostat Software
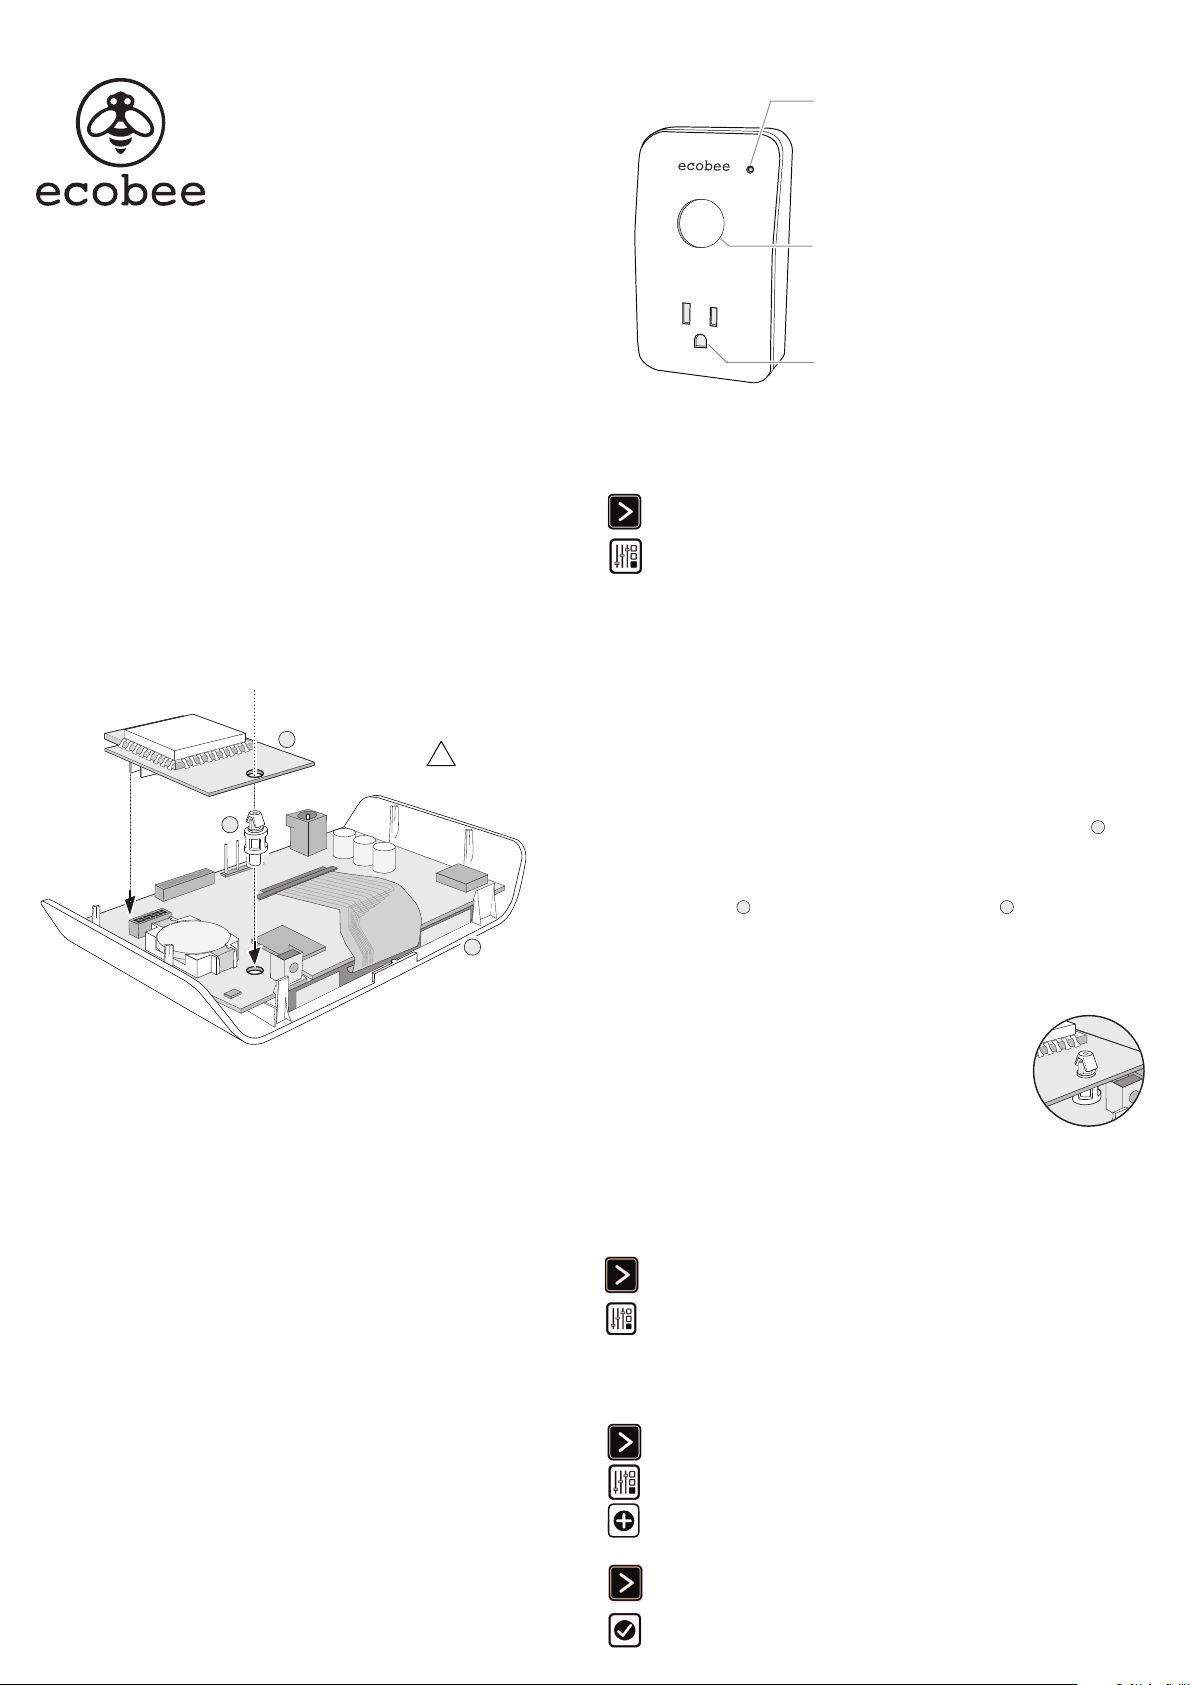
Status LED
Solid Green − Communicating with network
Flashing Green − Searching for network to join
Red − No communication with joined
network
ON/OFF Switch
− Press to quickly power on/o the receptacle
− Press and hold for 6 seconds to join network
(when the LED changes color, you can release it)
Power Receptacle
To use Smart Plugs, your Smart Thermostat needs to be running software
version 2.4.0.298 or later. Software updates occur automatically when the Smart
Thermostat is connected to the Internet. If you are running an earlier software
version, contact ecobee customer service (email support@ecobee.com or call
877-932-6233) to receive a free upgrade.
To verify the software version you are running:
1. From the Smart Thermostat Home screen, press More.
2. Press Settings, select About, then select Vers ion.
Step 2. Install ZigBee® Module
To use Smart Plugs, you need to install a ZigBee Module in your Smart Thermostat. You only need one module per thermostat – it can be connected to an unlimited
number of Smart Plugs. If you already have installed a ZigBee Module, you can skip this step.
To install the ZigBee Module:
C
B
4. Make sure the top of the plastic stand-o snaps through the ZigBee module, as shown in
the illustration on the right.
This equipment is sensitive to electrostatic discharge (ESD). Before starting, discharge your body
!
of static electricity by touching a grounded metal object. Always hold the devices by their edges
and do not touch any of the internal components.
1. Use a at-head screwdriver to gently remove the Smart Thermostat faceplate A from
the gray backplate attached to the wall. Once removed, lay the Smart Thermostat on a
at surface, with the internal components facing up.
2. Insert the plastic stand-o B that comes with the ZigBee Module C into the round hole
A
in the thermostat circuit board, just above the battery.
3. Align the connector of the ZigBee Module to the connector on the Smart Thermostat and
gently push into place. The stand-o will secure the module and ensure it does not move.
5. Attach the Smart Thermostat back onto the backplate on the wall.
Step 3. Install Smart Plug Into Outlet
Plug the Smart Plug into a standard household electrical outlet, then plug in a light or appliance. Ensure that the switch on the actual light or appliance is left in the ON
position. The Status LED should start ashing (indicating that the Smart Plug is looking for a network to join). If the Status LED does not start ashing, press and hold the
switch for 10 seconds.
To setup the ZigBee Home Automation network:
Step 4. Set Up ZigBee Network
If this is your rst Smart Plug you will need to set up a ZigBee Home Automation
network with your ecobee Smart Thermostat. You can skip this step if you
previously connected any ZigBee devices.
Step 5. Adding Smart Plug to Network
After you have set up your ZigBee network (step 4), you connect your Smart Plug
to the Smart thermostat. The ecobee Smart Thermostat will scan the network
and automatically detect any unconnected Smart Plugs.
The default name is the last 4 digits of the Smart Plug’s MAC address (a
unique number printed on the back of each device). You can give it an easier
to remember name (like “Living Room Light”). Providing your own custom
name makes it easier to identify the plug, especially if you have mulitple plugs
installed.
1. From the Home screen, press More.
2. Press Settings and select ZigBeeModule(Internal). Follow the
prompts to congure Home Automation. You may choose to add
your smart plug at this time, as per the prompts or add the plug once
the setup is complete.
To add a Smart Plug:
1. From the Home screen, press More.
2. Press Settings and select Home Automation.
3. Press Add.
4. Press and hold the On/O switch on the Smart Plug for 6 seconds.
The Status LED will start ashing green.
5. On the Smart Thermostat, press Next. The Smart Thermostat will
search for the Smart Plug.
6. Press Done. Your Smart Plug is now joined with the network.
Page 2
Accessing Plugs From Smart Thermostat
Accessing Plugs From Personal Web Portal
Congratulations! You are now ready to use and program your plugs.
To access your plugs:
1. From the Home screen, press More.
2. Press the Plugs button. The screen shows if the plug is currently on or
3.
how long you would like it to stay in this new state.
Managing Your Smart Plug Energy Usage
You can monitor and reduce your energy usage by using the Smart Thermostat’s
energy management functions.
To access energy management functions:
1. From the Home screen, press More.
2. Press the Plugs button.
3. Select More beside the plug you want to manage.
You can control your Smart Plugs from your ecobee personal Web Portal. When
you log into your web portal you will see a new Smart Plugs tab at the top of the
page. It has 4 widgets: Plug Reports, Status, Preferences and Program.
With these widgets, you have total control of your Smart Plug from anywhere with
an Internet connection. If you have any questions, click the ? mark in the top right-
hand corner of the widget.
Identifying or Renaming a Smart Plug
By default, the name of a Smart Plug includes the last 4-digits of its MAC address.
The Smart Plug’s MAC address is printed on the back of the plug. You may want to
give your Smart Plug a more descriptive name (such as “Living Room”) in order to
make it easier to identify.
You can rename a Smart Plug from its Settings menu on the Smart Thermostat or
from the Preferences widget in your ecobee personal Web Portal.
Note: There is a special name, “$router”, that optimizes the Smart Plug to work with
an Internet router. If the Smart Thermostat cannot communicate with the ecobee web
then turn it back on. This feature can be used to automatically reboot a router in order
4. Select an option:
Program
to follow your thermostat schedule. If you choose to follow the
thermostat schedule, you only need to determine if you want the
thermostat schedule, the plugs will follow suit.
Reports — You can view the hourly, daily and weekly electricity
consumption of each plug.
Settings — You can rename the plug, change the default temporary
your Utility issues a demand response event (note that you must be
registered as par t of a Utility program to receive demand response
events).
Removing a Smart Plug From Your Network
1. From the Home screen, press More.
2. Press Settings, Home Automation and select the device you wish
to remove. Press Remove to reset the Smart plug and remove it
from your network.
3.
outlet and pressing the switch for 10 seconds.
Electrical
Operat ing Voltage: 110–240 VAC
Max. Loa d Current: 15A @ 120VAC / 10A @ 240VAC
Environmental
For Indoor Use o nly
Temperatur e: 32°F-122°F (0-5 0°C)
Humidit y: 5-85%RH (n on-condensing)
Dimensions : 2.5" H x 4. 2" L x 2.2" W
(64mm W x 109mm L x 57mm H)
Wireless
Frequency : 2.4GHz
Maximum Tran smit Power: 100mW
Maximum R ange: 100ft (30m)
Contains mo dule FCC ID DI2CT EM250 6
Settings).
Plugs During Vacation Event
When you schedule a vacation event on your ecobee Smart Thermostat, you can
program, so that lights come on at the usual time, or program them to stay on or
return their regular program.
3-Year Limited Warranty
ecobee w arrants that for a p eriod of three (3) years from t he date of purchase by t he consumer
(“Custome r”), the ecobe e Smart Plug (the“Pr oduct”) sh all be free of defe cts in materials and work manship
under norma l use and service . During the warrant y period, ecobee s hall, at its option, re pair or replace any
defec tive products , at no charge. Any replacem ent and/or repaire d device are warrante d for the remainde r
of the original wa rranty or ninety (90) day s, whichever is lon ger.
If the pro duct is defect ive, contact the sup plier from whom t he product was pu rchased to obtain an
equivalent re placement produ ct, provided the su pplier determi nes that the returned Pro duct is defec tive
and the Custo mer is otherwis e eligible to recei ve a replacement pr oduct;
This warr anty does not cover remo val or reinstallation cos ts and shall not apply i f the damages were fo und
to be caused b y something other than defe cts in materials or work manship, including withou t limitation,
if the prod uct:
• was op erated/stored in a bnormal use or mainte nance conditions;
•
alterati on in writing;
• was sub ject to abuse, ne glect, elec trical fault, impr oper handling, accident o r acts of nature;
• was ins talled improp erly.
ecobee ’s sole responsibilit y shall be to repair or rep lace the Product w ithin the terms stated above. E COBEE
SHALL NOT BE LIAB LE FOR ANY LOSS OR DAMAGE OF ANY KI ND, INCLUDING ANY SPECIA L, INCIDENTAL OR
CONSEQUEN TIAL DAMAGES RESULTING, DI RECTLY OR INDIREC TLY, FROM ANY BREACH O F ANY WARRANTY,
EXPRESS OR I MPLIED, OR ANY OTHER FAILUR E OF THIS PRODUCT. Some US sta tes and Canadian provinc es
do not allow t he exclusion or limitat ion of incidental or conse quential damages, so th e above limitation
or exclusion may n ot apply to you. ecob ee’s responsibil ity for malfunct ions and defect s in materials and
workman ship is limited to repair an d replacement as se t forth in this warr anty statement . All express and
implied w arranties for the pro duct, including bu t not limited to any impli ed warranties and cond itions of
warrant y. No warranties, whe ther express or imp lied, will appl y after the limite d warranty period has
expire d. Some US states and Canad ian provinces do not a llow limitations on how lo ng an implied warr anty
lasts, s o this limitation may not app ly. ecobee neithe r assumes responsib ility for nor author izes any other
person p urporting to ac t on its behalf to modi fy or to change this warr anty, nor to assume for it any othe r
other rights wh ich vary from jur isdiction to jur isdiction. If you have a ny questions regar ding this warranty,
please w rite ecobee Custom er Service, 477 Richmond Stree t West, #210, Toronto, Ontario M5V 3E7,
Canada or cont act customer ser vice at 1-877-9-e cobee (32-6233)
ecobee® i s a registered tra de-mark of ecob ee, inc. ZigBee® i s a registered trade -mark of
the ZigBe e Alliance and is used with p ermission. © 2011 ecobee, in c. All rights rese rved.
EB-SPLG- 01
 Loading...