

Page 1

1
User Guide
ecobee3
©2014 ecobee
477 Richmond St West | 2nd Floor, Toronto | Ontario |
M5V 3E7 | Canada Toll free 1.877.932.6233
www.ecobee.com
e3-UG-R001
Page 2

2
Table of Contents
Overview .................................................................................. 4
Getting Help .................................................................................... 4
Touch Screen ................................................................................... 4
Web Portal ....................................................................................... 5
Guided Setup Process ............................................................. 5
Step 1. Wiring Configuration .......................................................... 5
Step 2. Accessory Confirmation ................................................... 5
Step 3. Temperature Preference Setup ....................................... 6
Step 4. Equipment Configuration ................................................. 6
Heat Pumps .................................................................................. 6
Furnaces/Boilers ........................................................................... 6
Fans ............................................................................................... 6
Humidifier ...................................................................................... 6
Dehumidifier ................................................................................. 6
Ventilators (ERV/HRV) ................................................................. 7
Step 5. Name Your Thermostat ..................................................... 7
Step 6. Configure Ideal Temperatures ......................................... 7
Step 7. Select Current HVAC System Mode ................................ 7
Step 8. Configure Sensor Settings ................................................. 7
Step 9. Wi-Fi Configuration ............................................................ 7
Step 10. Date & Time ...................................................................... 8
Step 11. Web Portal/Mobile App Registration ............................ 8
Basic Functions ........................................................................ 9
Home Screen ................................................................................... 9
Standby Screen ............................................................................... 9
Adjusting the Temperature ............................................................ 9
Main Menu ..................................................................................... 10
Quick Changes ............................................................................. 10
Weather ......................................................................................... 11
System Icons .................................................................................. 11
Selecting System Operation Mode ............................................ 11
HVAC System ............................................................................. 11
Fan ............................................................................................... 12
Humidifier (if installed) ............................................................... 12
Dehumidifier (if installed) .......................................................... 12
Ventilator/HRV/ERV (if installed) .............................................. 13
Adjusting Sensor Modes ............................................................... 13
Smart Home/Away .................................................................... 13
Follow Me ................................................................................... 13
Adjusting Comfort Settings .......................................................... 14
Setting Your Weekly Schedule .................................................... 15
Going on Vacation ....................................................................... 16
Caring for your Thermostat ................................................... 17
Cleaning ......................................................................................... 17
Rebooting ...................................................................................... 17
Resetting the Thermostat ............................................................. 17
Troubleshooting ............................................................................. 17
Reminders & Alerts ................................................................ 18
Viewing Reminders ....................................................................... 18
Viewing Alerts ................................................................................ 18
Configuring Reminders & Alert Preferences .............................. 18
HVAC Maintenance ................................................................. 18
Furnace Filter .............................................................................. 19
Ventilator Filter (if installed) ...................................................... 19
UV Lamp ..................................................................................... 19
Low Temp Alert .......................................................................... 19
High Temp Alert ......................................................................... 19
Aux Heat Runtime Alert ............................................................ 19
Aux Outdoor Temp Alert .......................................................... 19
Low Humidity Alert ..................................................................... 19
High Humidity Alert .................................................................... 19
Display Alerts on Thermostat .................................................... 19
Enable Heating/Cooling Alerts ................................................ 19
Lost Communication With Sensor/Low Battery Alerts .......... 20
Customizing Your Thermostat ............................................... 20
Date & Time ................................................................................... 20
Temperature Display..................................................................... 20
Heating/Cooling Ranges ............................................................. 21
Thermostat Name ......................................................................... 21
Screen Brightness .......................................................................... 21
Active to Standby Screen Timer ................................................. 21
Hold Action Duration .................................................................... 21
Page 3

3
Smart Recovery ............................................................................. 22
Access Control .............................................................................. 22
Configuring Wi-Fi Settings ..................................................... 23
Wi-Fi Radio ..................................................................................... 23
Network .......................................................................................... 23
Advanced Settings ................................................................... 23
Diagnostics ..................................................................................... 23
Managing Your Account ...................................................... 24
Registering ..................................................................................... 24
Making Changes to Your Account ............................................ 24
Moving to New House .................................................................. 24
Changing Thermostat Owner ..................................................... 24
Installation Settings ................................................................ 24
Equipment Wiring .......................................................................... 24
Equipment Settings ....................................................................... 24
Heat Pump ................................................................................. 24
Furnace ....................................................................................... 25
Humidifier .................................................................................... 25
Dehumidifier ............................................................................... 25
Ventilator .................................................................................... 26
Reconfiguring Equipment ........................................................ 26
Thresholds ....................................................................................... 26
Auto Heat/Cool ......................................................................... 26
Heat/Cool Min Delta ................................................................ 26
Compressor Min Cycle Off Time .............................................. 26
Compressor Min Outdoor Temp .............................................. 27
AC Overcool Max ..................................................................... 27
Aux Heat Max Temp ................................................................. 27
Heat Differential Temp .............................................................. 27
Heat Dissipation Time ................................................................ 27
Heat Min On Time ...................................................................... 27
Cool Differential Temp .............................................................. 28
Cool Dissipation Time ................................................................ 28
Cool Min On Time ...................................................................... 28
Compressor Reverse Staging ................................................... 28
Compressor Stage 2 Temp Delta ............................................ 28
Compressor Stage 1 Max Runtime ......................................... 28
Compressor to Aux Temp Delta .............................................. 28
Compressor to Aux Runtime .................................................... 29
Temperature Correction........................................................... 29
Installer Code ............................................................................. 29
Test Equipment .............................................................................. 29
Wiring Diagrams .................................................................... 30
Conventional heating and cooling ........................................... 30
Heat Only .................................................................................... 30
Heat and Cool ........................................................................... 30
Heat and Cool (2 Stage Heat) ................................................ 30
Heat pumps ................................................................................... 31
Air or Geothermal Heat Pump with Auxiliary Heat ............... 31
Air or Geothermal Heat Pump (2 Stages) with Auxiliary Heat
..................................................................................................... 31
Boiler or radiant systems ............................................................... 31
Boiler or Radiant System with Air Handler and Conventional
Cooling or Heat Pump .............................................................. 31
Boiler or Radiant System (2 stages) with Air Handler and
Conventional Cooling or Heat Pump ..................................... 32
Accessory devices ........................................................................ 32
PEK thermostat wiring ................................................................... 32
Icon Reference ...................................................................... 33
Home Screen ................................................................................. 33
System Operation ......................................................................... 33
Menus ............................................................................................. 33
Comfort Settings ............................................................................ 33
Weather .......................................................................................... 33
WiFi Connectivity ........................................................................... 33
Menu Reference .................................................................... 33
Approvals ............................................................................... 35
FCC Compliance Statement ................................................ 35
3-Year Limited Warranty ....................................................... 36
End User Software License Agreement ............................... 37
Page 4
4
Overview
Do you hear that?
That’s the sound of hundreds of thousands of ecobee-ers
welcoming you to the hive.
Congratulations on the purchase of your new ecobee3 smarter
wi-fi thermostat with remote sensor. This guide will provide an
overview of the features and capabilities of the new product
and will help you get up and running.
Make sure you also take a look at the Quick Start Guide and the
Installation Guide that come in the box with your ecobee3.
Remote sensors – Deliver the right temperature in the rooms
that matter most as well as detect when these rooms are
occupied.
Smart – Your ecobee3 understands your home’s unique
energy profile and the weather outside, making sure you’re
comfortable at all times.
Intuitive – With its 3.5" full color touch display, your ecobee3
has intuitive controls just like your smartphone.
Accessible from anywhere – Monitor and control the
temperature in your home anytime, anywhere, on your
smartphone, tablet, or computer.
Getting Help
If you have any questions, we have answers. Visit
https://www.ecobee.com/faqs/ecobee-3 for tutorials, how-to
videos and FAQs.
Technical support is also available by email or by phone:
support@ecobee.com
1.877.932.6233 (North America)
1.647.428.2220 (International)
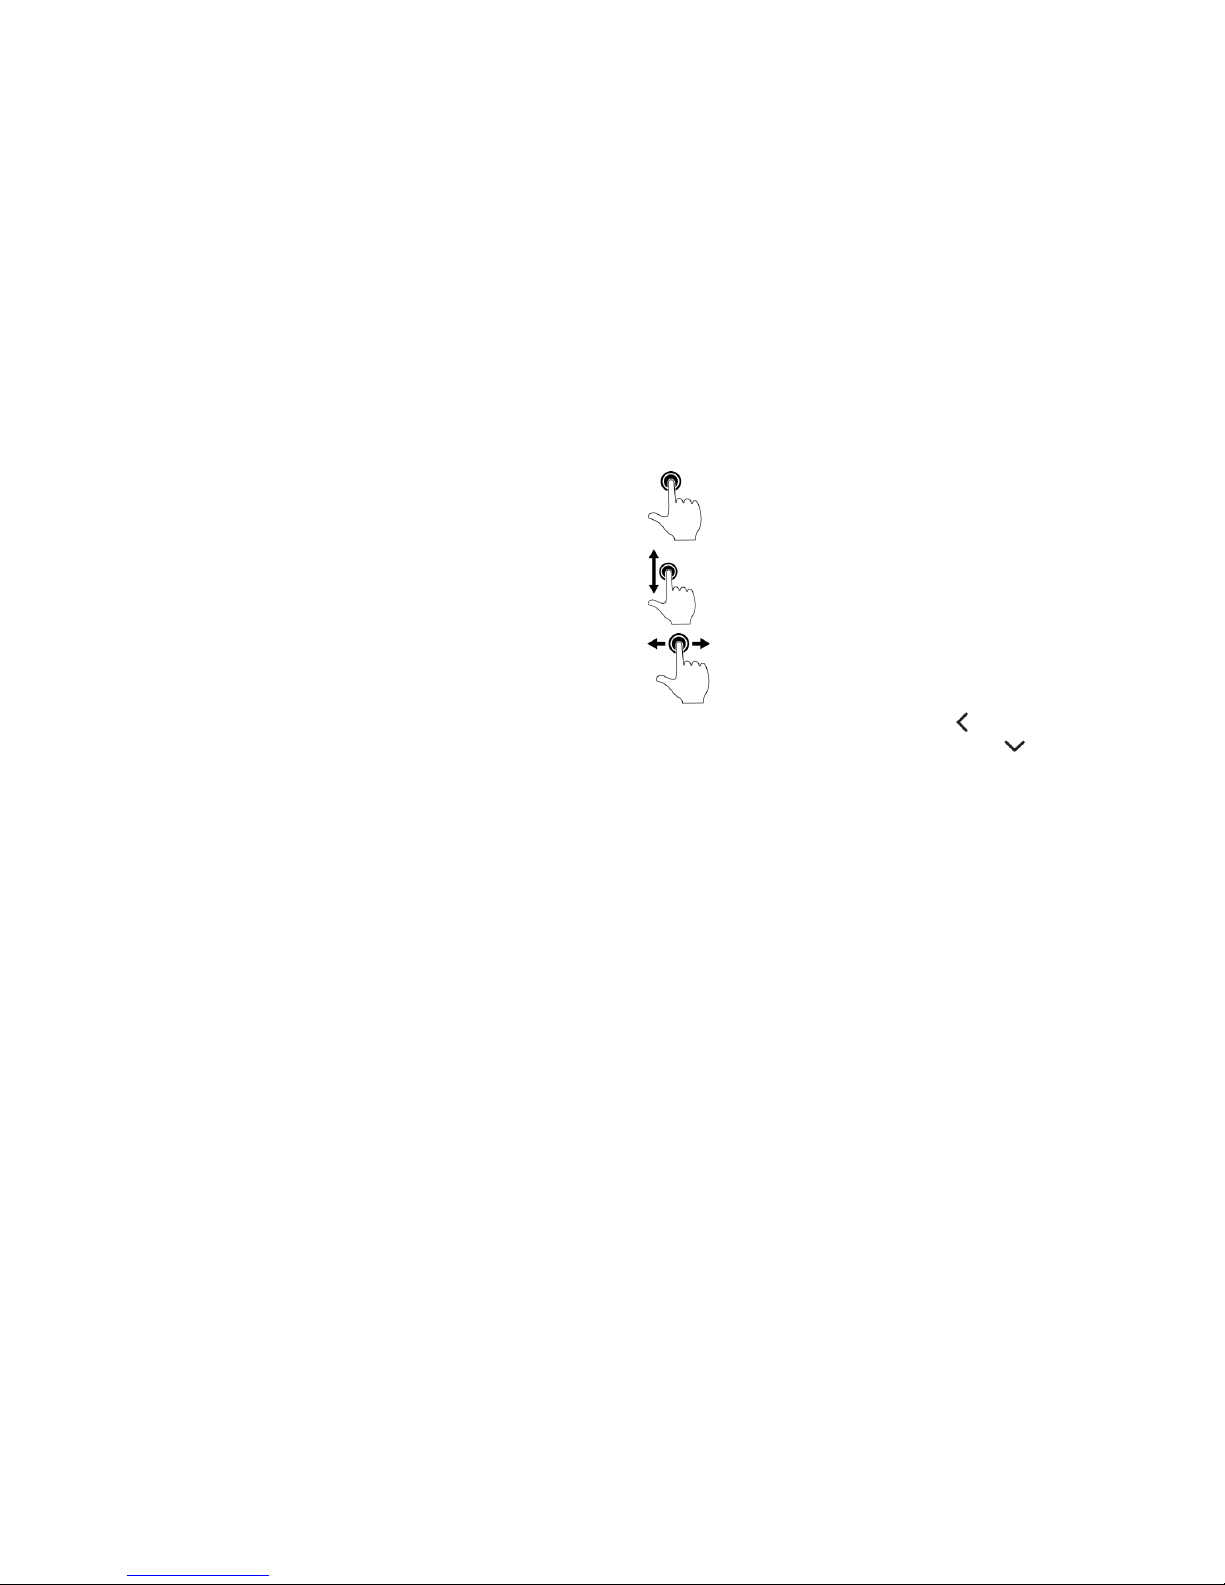
Touch Screen
Your ecobee3 has a touch screen, similar to that used in
smartphones and tablets.
Touch items to select or activate them. For
menus with a >, this will expand the menu to
display additional options or submenus.
Swipe up and down to display additional
information. Swiping on a temperature bar will
also adjust the settings up or down.
Swipe left and right to scroll horizontal lists that
contain multiple items to choose from.
Exit or go
back
To exit a submenu, touch .
To close the main menu, touch .
Page 5

5
Web Portal
Once registered (page 8), you can log in to your web portal
and manage your ecobee3 from your computer or tablet.
From the web portal, you can:
Control current temperature and operation
Adjust your schedule
Set vacation periods
View the weather forecast for your area
Set thermostat preferences
Manage all your ecobee thermostats
Save energy with HomeIQ and insights
To access your customized web portal, visit ecobee.com and
click on the Login link.
To select a tile, touch or click on it. To close a tile and return
back to the main screen, touch or click (top-right corner).
Guided Setup Process
The Installation Guide that ships with your ecobee has the
necessary instructions to wire up and install your device. After
installing your ecobee3 thermostat on the wall and powering it
up, you will be guided through the first-run process. Complete
these steps to get it configured and connected online so you
can make use of all its smart features.
This will take you through the following steps:
Wiring configuration and equipment configuration
Setting your preferences
Wi-Fi configuration
Registering your ecobee3
If you make a mistake at any time or want to review a setting,
you can touch Back to display the previous screen.
Step 1. Wiring Configuration
Your ecobee3 automatically detects and displays which wires
are connected to it when it first powers on. It will warn you if
you’ve wired a configuration that it doesn't recognize.
If the reported connections are different than what you have
actually connected, call ecobee support for guidance.
Touch Next to continue.
Step 2. Accessory Confirmation
Your ecobee3 will ask if you have any accessories like
humidifier, dehumidifier, or ventilator connected to it.
Touch Yes if you have one of these devices; otherwise touch
No.
If you selected Yes, you will need to specify if the accessory is
internally powered:
Touch Yes if your accessory is externally powered
(i.e. the ecobee3 does not provide power to it). This is the
case if there are connected to both ACC+ and ACC-.
Page 6

6
Touch No if your accessory receives power from your
ecobee3. There will be a single wire to ACC+.
Need Help? See page 32 for information on how to determine
your accessory device's power configuration.
Touch Next to continue.
Step 3. Temperature Preference Setup
Your ecobee3 will ask you to select Fahrenheit or Celsius as your
preferred temperature units. Touch Next to continue.
Step 4. Equipment Configuration
Your ecobee3 will ask you to configure your equipment.
Depending on your wiring, different options will be available.
These options will configure basic system operation as well as
optimize the system for your specific type of equipment.
Review the list to see if any devices require additional
configuration ("Configuration needed") and if the default
settings are valid.
Once you are done, touch Next to continue.
Heat Pumps
If you have a heat pump installed:
1. Select the heat pump menu.
2. Select Air to Air or Geothermal depending on the type of
your heat pump system
3. Specify what the heat pump runs when the O/B
Reversing Valve is engaged: On Cool runs cooling when
O/B engages (most cases), or On Heat runs heating
when O/B engages.
4. Touch Next. You will be returned to the Equipment
configuration menu.
Furnaces/Boilers
If you have a furnace or boiler installed:
1. Select the heating menu.
2. Configure the heater type:
Furnace: Optimizes ecobee3 for systems using forced
air
Boiler: Optimizes your ecobee3 for systems using
radiators or in-floor heat.
3. Touch Next. You will be returned to the Equipment
configuration menu.
Fans
If your furnace uses forced air, you may configure fan
operation:
1. Select Fan menu.
2. Select Fan operation:
Thermostat: Your ecobee3 thermostat controls the fan
during heat and cool cycles.
HVAC: Your equipment controls the fan during heat
and cool cycles (typical configuration).
3. Touch Next. You will be returned to the Equipment
configuration menu.
Humidifier
If you have a humidifier installed:
1. Select Accessory menu.
2. Select Humidifier.
3. Touch Next.
4. Select the type of humidifier you have: Evaporative or
Steam. If unsure, select Evaporative.
5. Touch Next. You will be returned to the Equipment
configuration menu.
Dehumidifier
If you have a dehumidifier installed:
1. Select Accessory menu.
2. Select Dehumidifier.
Page 7

7
3. Touch Next.
4. Select Open if the dehumidifier is active when the relay is
open; otherwise select Closed. If unsure, select Closed (if
the dehumidifier runs when it shouldn't, you can change
this option in the Equipment Configuration menu (page
24).
5. Touch Next. You will be returned to the Equipment
configuration menu.
Ventilators (ERV/HRV)
If you have a ventilator (ventilator, ERV or HRV) installed:
1. Select Accessory menu.
2. Select Ventilator.
3. Touch Next.
4. Select the type of ventilator you have installed:
Ventilator, Energy Recovery Ventilator or Heat Recovery
Ventilator.
5. Touch Next.
6. Select the preferred minimum runtime (min/hr) when your
home is occupied and the runtime for when your home is
unoccupied. If unsure, keep the default 20 min/hr value
or contact a professional.
7. For HRVs, select whether or not you would like to use it t
use it to dehumidify in winter.
8. For Ventilators, select whether or not you would like to
enable free cooling.
9. Touch Next. You will be returned to the Equipment
configuration menu.
Step 5. Name Your Thermostat
After configuring your equipment, you will be prompted to give
your ecobee3 a name. Select a name from the list or enter your
own using the on-screen keyboard.
This name will appear in your web portal, so pick a name that
makes it easy to identity your thermostat (this is especially
important if you have more than one in your house).
Touch Next to continue.
Step 6. Configure Ideal Temperatures
Next, slide the set-point bubble up and down to select the
preferred, normal temperature for your home during winter and
summer (touch Next after each). This setting will be used to
generate the default comfort settings.
Step 7. Select Current HVAC System Mode
Select the operating mode of your HVAC equipment. For
example, if you want to set your HVAC system to heat, select
Heat. If you do not want the system to run, select Off.
Touch Next to continue.
Step 8. Configure Sensor Settings
Your ecobee3 includes sensors that can determine when you
are home. You can have your thermostat automatically go into
energy savings mode when you are away. For a detailed
description of how the settings work, see page 13.
1. Enable or disable Smart Home/Away setting.
If enabled, your ecobee3 senses when you are home
during a scheduled Away period, or away during a
scheduled Home period, and will automatically override
your scheduled settings to maximize comfort and
savings.
2. Touch Next to continue.
Step 9. Wi-Fi Configuration
To get the most out of your ecobee3, it needs to connect to
your home's Wi-Fi network.
Touch Next to configure your network settings. If you do not
want the ecobee3 to connect to the Internet, touch Skip and
confirm the action by pressing Next.
When configuring your network settings, your ecobee3 will
display a list of all visible Wi-Fi networks along with their signal
strength. If your network has weak signal strength, try moving
your router closer to the ecobee3.
Page 8

8
If your network appears in the list
1. Select your network from the list
2. Touch Next.
3. Enter your password, if prompted.
4. After connecting to the Internet, your ecobee3 will
register itself with the ecobee servers and provide you
with a 4-digit registration code.
5. Write down the 4-digit code. You will need it when
registering your ecobee3 (You can register from either
ecobee's Mobile App or Web Portal).
If it's not listed, select My network is not visible and touch Next
(you will have to enter your network parameters manually,
including the SSID).
1. If your network is password-protected, enter the
password.
2. This will take you through the manual Wi-Fi set-up process
where you will have to enter in information about your
network such as if it’s a DHCP or a static IP, the network
SSID name, the encryption, the password etc.
3. After connecting to the Internet, your ecobee3 will
register itself with the ecobee servers and provide you
with a 4-digit code.
4. Write down the 4-digit code. You will need it when
registering your ecobee3 (You can register from either
ecobee's Mobile App or Web Portal).
Touch Next to continue.
Step 10. Date & Time
The Date & Time screen lets you configure your time zone
settings. If you didn't configure Wi-Fi in the previous step, you
may need to reconfigure the current time and date. These
settings are required in order for the scheduling features of your
ecobee3 to work properly.
If Wi-Fi is configured:
1. Touch Time zone.
2. Select your country from the list and touch Next.
3. Select your time zone by picking the name of the nearest
community from the list.
4. Touch Next.
5. Touch Next to continue.
If Wi-Fi is not configured:
1. Touch Date.
2. Slide up and down to set the current date and touch
Save
3. Touch Time.
4. Slide up and down to set the current time and touch
Save.
5. Touch Time zone.
6. Select your country from the list and touch Next.
7. Select your time zone by picking the name of the nearest
community from the list.
8. Touch Next.
9. Touch Next to continue.
Step 11. Web Portal/Mobile App Registration
After setting up Wi-Fi on your ecobee3 and obtaining the
registration code, you need to configure your account from
either the ecobee3 Mobile App or the Web Portal.
To register from the Web Portal:
1. From a web browser, visit www.ecobee.com
2. Click on the Register link.
3. Follow the on-screen instructions to register your account.
To register from the Mobile App:
1. Download the app to your iPhone or Android device
from the respective app store.
2. Launch the ecobee3 app.
3. Follow the on-screen instructions to register your account.
Page 9
9
Basic Functions
The bright, easy-to-read touch screen on your ecobee3
thermostat makes it simple to review and adjust settings any
time you want.
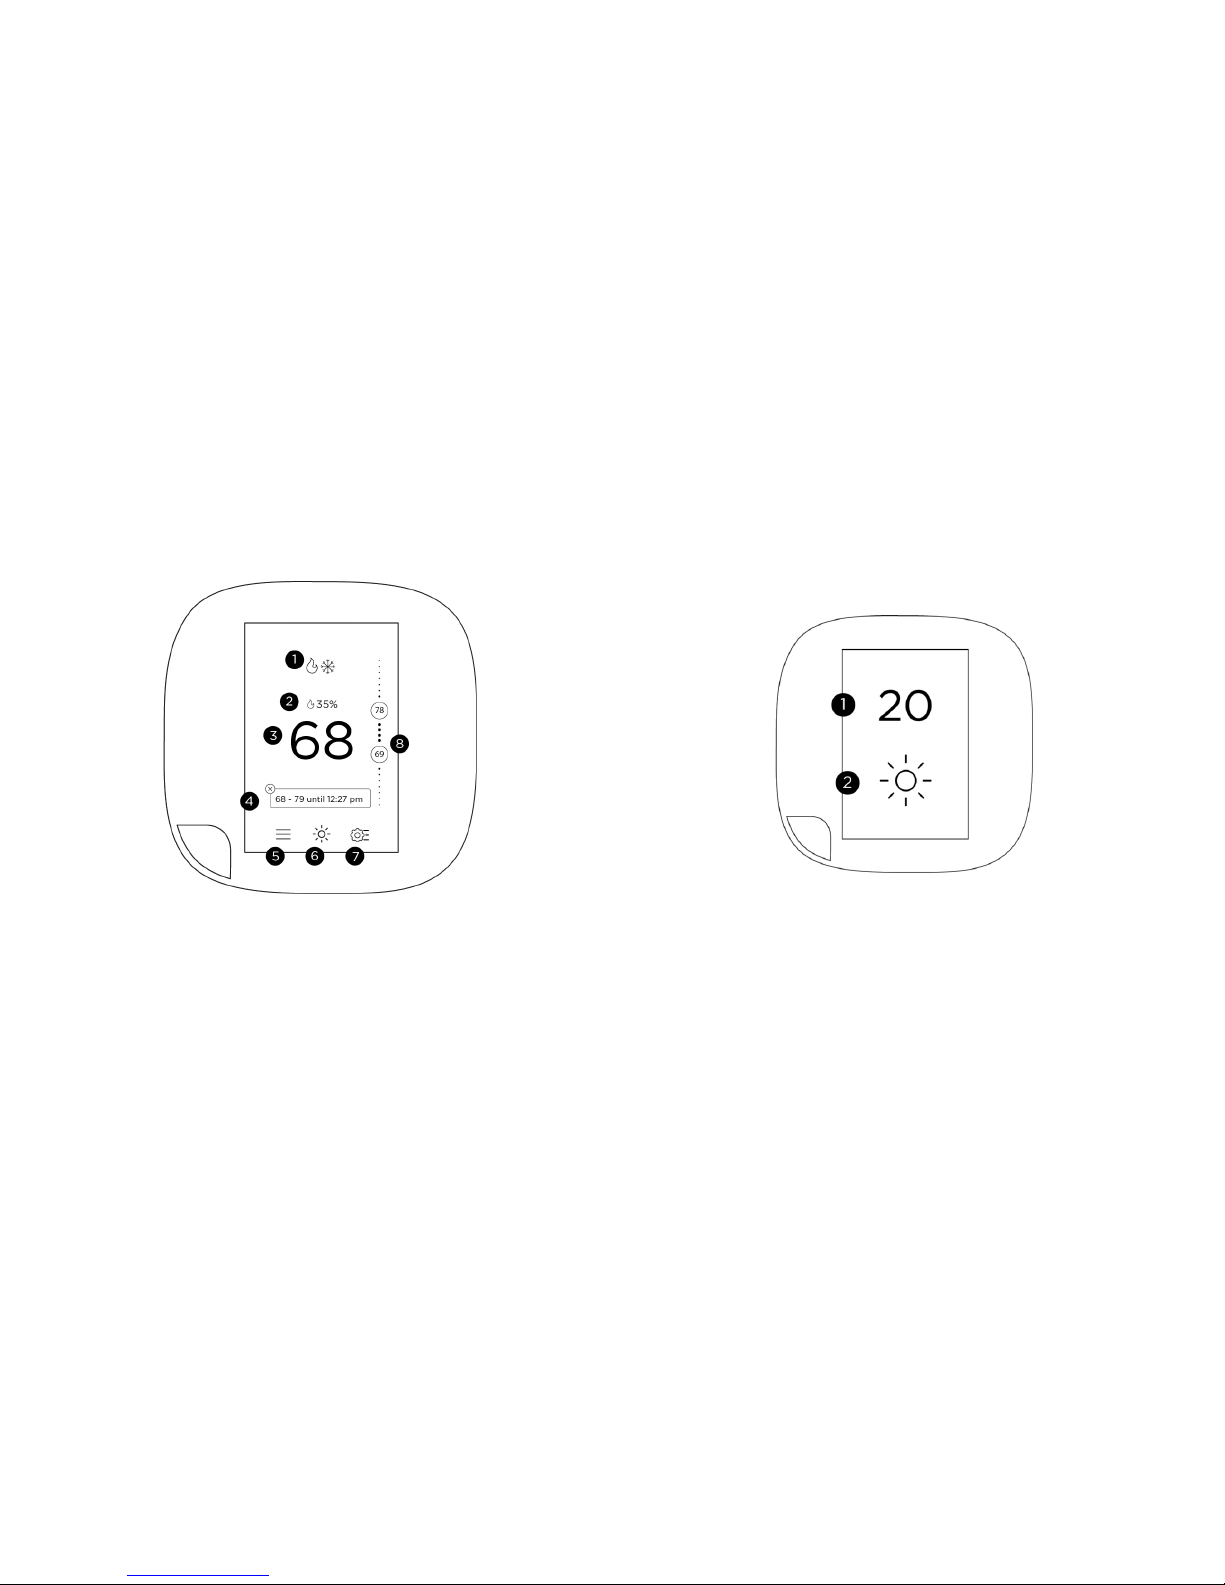
Home Screen
Your ecobee3 will automatically display the home screen when
you approach it.
1
Current system mode and any equipment
currently running
2
Current relative humidity
3
Current indoor temperature
4
Messages indicating any special operating
mode or state (e.g. resume, temperature
hold, etc)
5
Main menu. If a dot appears on the icon,
you have important message(s) to read.
6
Weather forecast
7
Quick Change menu
8
Adjustable heat and cool set points. If the
System Mode is set Auto, both are
displayed; otherwise only heat or cool is
displayed.
Standby Screen
The standby screen activates whenever the thermostat is not in
use. It shows the current indoor temperature and outdoor
weather conditions.
1
Current indoor temperature
2
Current outdoor weather
conditions
The standby screen is configurable. You can adjust:
Standby screen activation time (page 21)
Standby screen brightness (page 21)
Adjusting the Temperature
You can override the scheduled temperature by moving the
bubble on the temperature slider up or down. The blue number
Page 10
10
represents the cool set point; the orange number represents the
heat set point.
The new desired temperature will be the set point used for the
Hold. The duration of the Hold is the last configured value (the
default value is Until I change it, meaning it keeps the value
indefinitely, until you choose to revert to the schedule or
change it). You can adjust the default Hold time in the
Preferences menu (page 21).
To cancel the current Hold, touch the Hold message box
displayed on the Home screen. You can touch the box
anywhere and not just the X displayed on the box.
Main Menu
To show the main menu, touch the screen and touch .
Registration
Registers your ecobee3. This menu item
disappears after you have registered.
System
Selects mode of operation:
heat/cool/auto, fan on/off, and any
accessory (page 11)
Sensors
Manages sensors and lets you adjust Smart
Home/Away and Follow Me settings (page
13)
Schedule
Manages temperature according to time
and day (page 15)
Comfort
Settings
Manages temperature for different climate
states (Away, Home, Sleep) (page 14)
Vacation
Manages thermostat settings for a vacation
period (page 16)
Reminders
& Alerts
Displays any reminder or alert messages
(page 18)
Settings
Manages display preferences (°F/°C,
date, brightness), Wi-Fi, and equipment
operating parameters (thresholds,
sensors, etc) (page 20)
About
Displays technical information about your
thermostat (page 17).
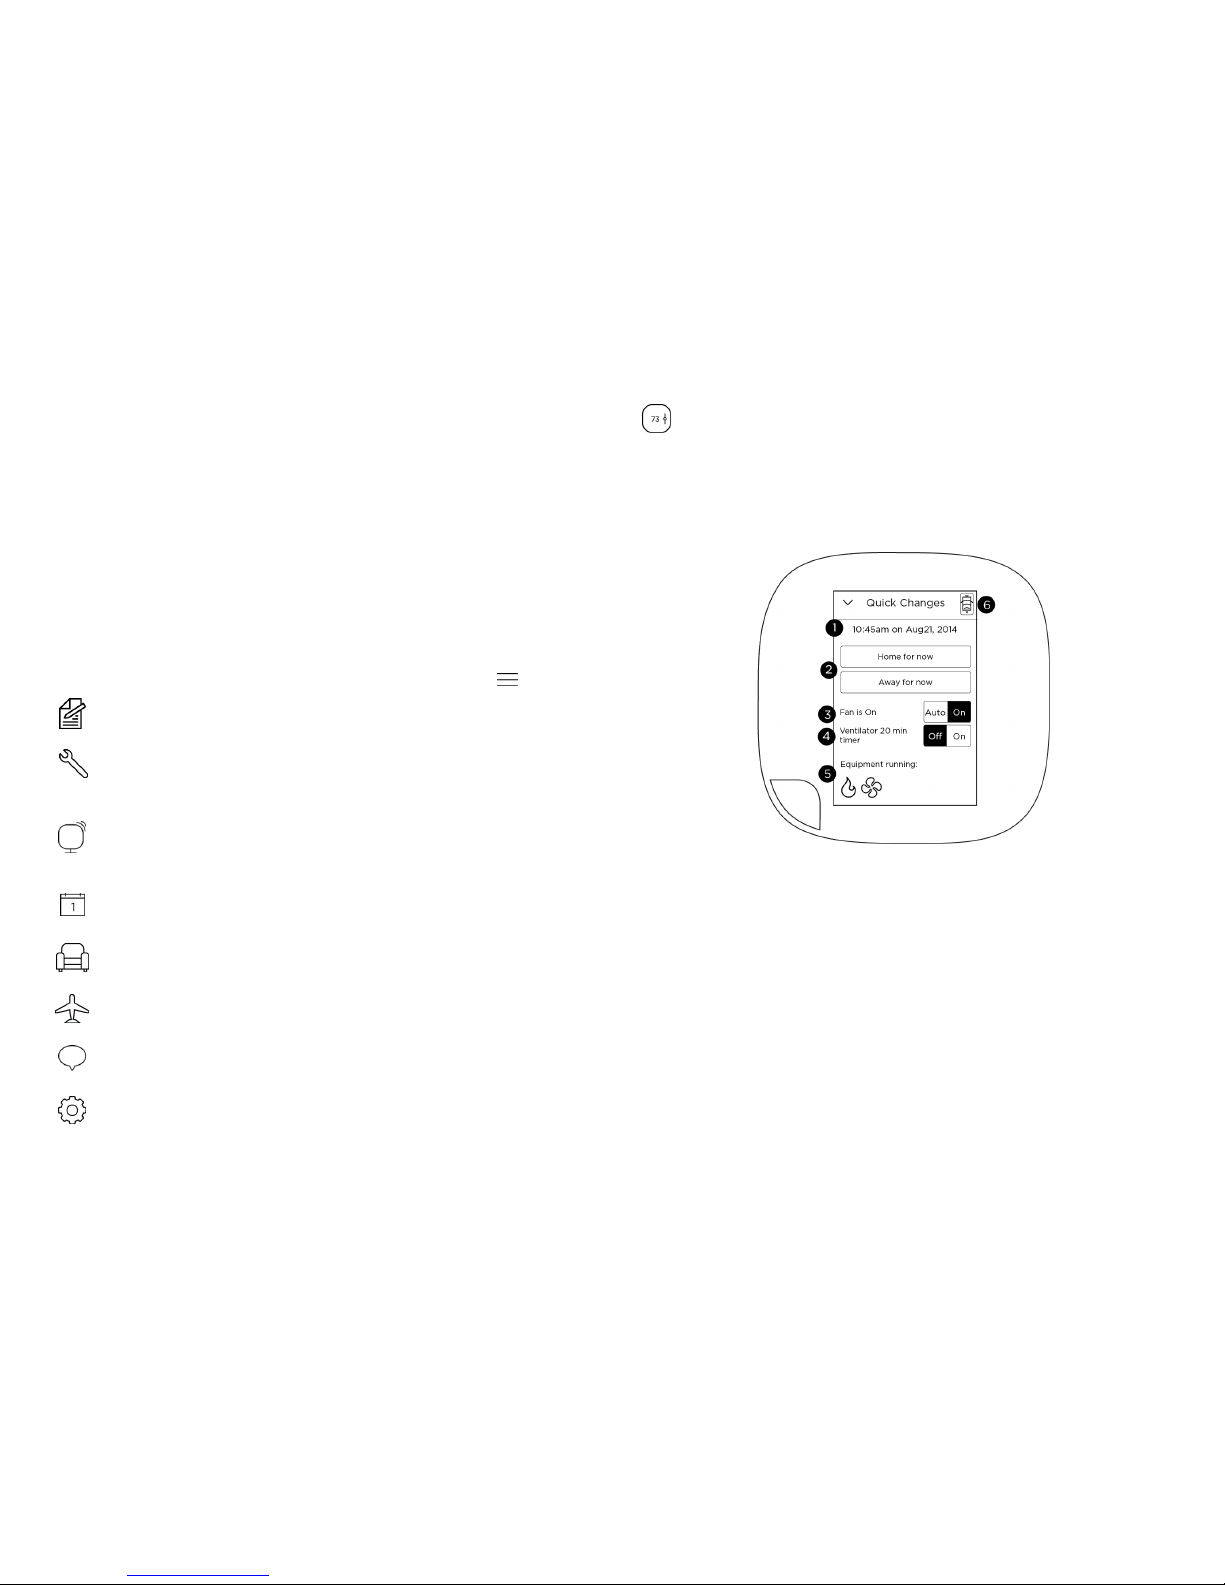
Quick Changes
The Quick Changes screen lets you quickly adjust the operation
of the ecobee3 and your equipment.
1
Current time and date display
2
Home and Away buttons. Touch these buttons
to override your programmed schedule. To
cancel this action, touch the message box on
the Home screen.
3
Toggle fan between Auto and On. Touch On
to run the fan continuously. Touch Auto to run
the fan according to the Minimum Runtime per
Hour setting (page 24).
4
If you have a ventilator, ERV or HRV installed,
touch On to run the device for 20 minutes
(page 26)
5
Icons indicate if heat, cool, fan, and any
accessories are actively running (see page 11
Page 11
11
for icon descriptions)
6
Internet connection and ecobee server
connection status. If this icon is red, you can
contact our technical support team for help
(page 4).
Hint: You can also apply quick changes from the web portal by
clicking on the Fan or Quick Changes tiles.
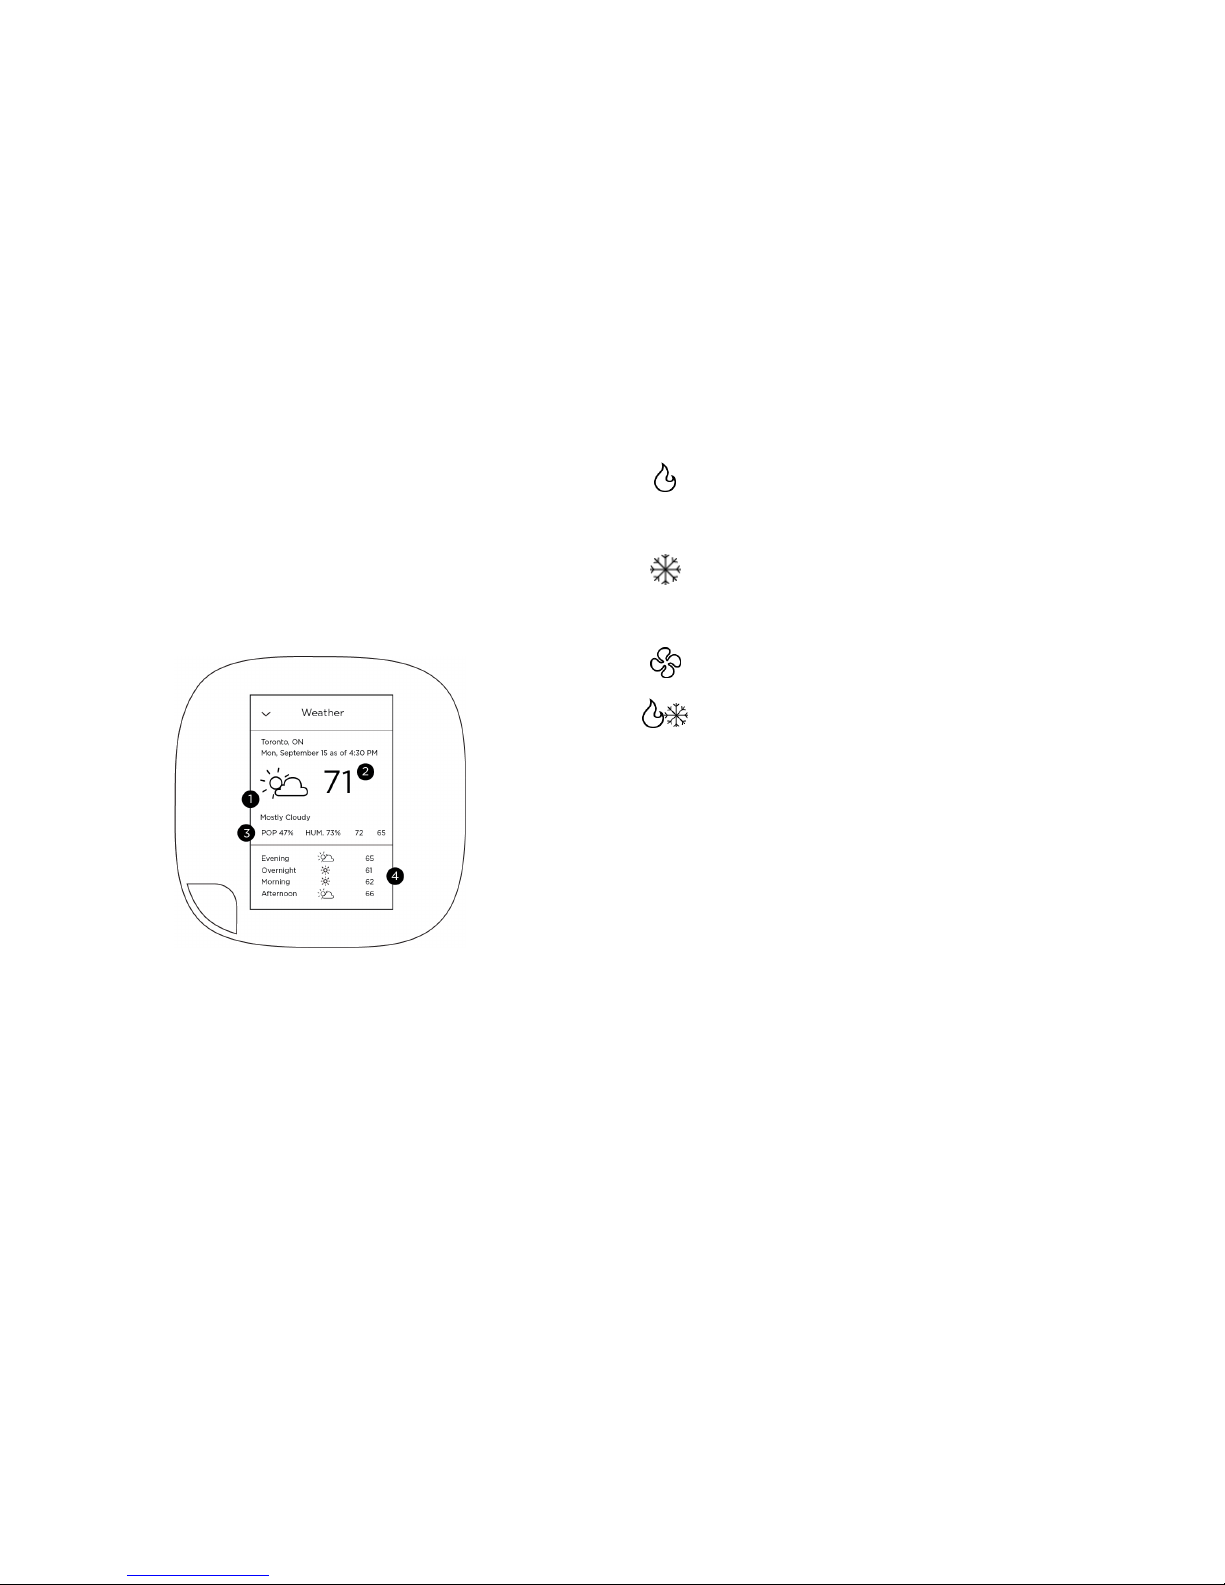
Weather
Touch the Weather icon to display a local weather forecast for
the week as well as a detailed daily forecast.
1
Current weather conditions
2
Current outdoor temperature
3
Probability of precipitation (POP), relative
humidity, and daily high/low temperature
4
24-hour weather forecast
Note: To receive the local weather forecast, you must first
register your thermostat (page 22). For a complete list of
weather icons, see page 33.
System Icons
The icons on the Home screen and Quick Changes menu show
information about the status of your HVAC system.
Heat
An orange heat icon indicates that your
thermostat is calling for heat. A white heat
icon indicates that your system is in heat or
auto mode but is not currently calling for heat.
Cool
A blue cool icon indicates that your
thermostat is calling for cool. A white cool
icon indicates that your system is in cool or
auto mode but is not currently calling for cool.
Fan
A fan icon indicates that your thermostat is
calling for the fan to run.
Auto
If both heat and cool icons are shown, your
system is in Auto mode, meaning your
ecobee3 will call for heat or cool as required.
Selecting System Operation Mode
The System menu controls the basic operation of the different
components in your HVAC system, including the heat/cool
mode, fan operation, and the operation of accessories like
humidifiers, dehumidifiers, and ventilators.
HVAC System
The HVAC System settings depend on the type of system you
have. Depending on your system, one or more the following
options are shown:
Cool: Turn on the air conditioner when the current
temperature rises above the set temperature.
Heat: Turn on the heat when the current temperature drops
below the set temperature.
Auto: Activate the heating or cooling system as required to
keep your home within the configured range of set
temperatures.
Page 12

12
Aux: Only use the auxiliary or backup heat source to
maintain the heat set point temperature. This option only
appears if auxiliary heat is configured in the Equipment
menu.
Off: Turn the system off. When the system is off, only the
current temperature will be displayed on the Home screen.
On Thermostat and Mobile:
Select Main Menu > System > HVAC System
On Web:
Select System tile > HVAC
Fan
The Fan menu displays the current furnace fan setting.
Depending on your system, one or more of the following options
are shown:
On: Force fan to run continuously, regardless of the
scheduled programming. The fan will also run if the System
Mode is Off.
Auto: Enable fan when the system is actively heating or
cooling your home, or to satisfy the Minimum Fan Runtime
setting (page 12).
On Thermostat and Mobile:
Select Main Menu > Quick Changes > Fan
On Web:
Select Fan tile
Minimum Fan Runtime (Auto mode only)
When the fan is in Auto mode, ecobee3 operates it according
to the Minimum Fan Runtime setting. You can adjust this setting
from 0 to 55 minutes.
When your system is in heat or cool mode, the fan will always
run for this minimum amount of time. A longer runtime improves
air circulation and results in a more consistent temperature than
with the Auto setting while being more cost-effective than the
On setting.
Your ecobee3 will meet this minimum runtime over the hour
while making sure it never runs for less than five minutes.
On Thermostat and Mobile:
1. Select Main Menu > System > Fan
2. Swipe left or right to adjust the value.
On Web:
1. Select System Tile > Fan
2. Swipe or drag left or right to adjust the value.
Humidifier (if installed)
The Humidifier menu enables or disables the humidifier, if
installed:
On: Run the humidifier to increase the humidity to the
configured set point.
Off: Do not operate the humidifier.
Frost control: Automatically maintain the humidity to stay
comfortable but prevent condensation or frost on your
windows
To adjust the humidity set point and other options, see page 14.
On Thermostat and Mobile:
Select Main Menu > System > Humidifier
On Web:
Select System tile > Humidifier
Dehumidifier (if installed)
The Dehumidifier menu enables or disables the dehumidifier, if
installed:
On: Run the dehumidifier to reduce the humidity to the
configured set point.
Off: Do not operate the dehumidifier.
To adjust the dehumidifier set point, see page 12.
On Thermostat and Mobile:
Select Main Menu > System > Dehumidifier
Page 13

13
On Web:
Select System tile > Dehumidifier
Ventilator/HRV/ERV (if installed)
The Ventilator/HRV/ERV menu configures the operation of a
ventilator, a Heat Recovery Ventilator (HRV) or an Energy
Recovery Ventilator (ERV), if installed:
Occupied minimum runtime: Configure how many
minutes per hour the device will run during occupied
periods, such as when you’re home or asleep.
Unoccupied minimum runtime: Configure how many
minutes per hour the device will run during unoccupied
periods, such as when you’re away.
Ventilation devices are important to maintain indoor air quality
and, depending on where you live, this might be regulated. The
amount of indoor air required to maintain sufficient indoor air
quality depends on how big your house is, how many people
live there, and the capacity of your ventilation device. You
should consult with a local contractor who can guide you on
how often you should be running your ventilation device.
For devices configured as ventilators (i.e. not HRVs or ERVs) you
can enable a feature called “free cooling” on your ecobee3.
When the outdoor temperatures are cooler than indoors and
your system is calling for cool, your ecobee3 will turn on your
ventilator to bring in outdoor air instead of running your air
conditioner. To configure free cooling options, see page 26.
On Thermostat and Mobile:
1. Select Main Menu > System > Ventilator/HRV/ERV
2. Adjust the Occupied Min Run Time and Unoccupied Min
Run Time by selecting each option and swiping left or
right to adjust the values.
3. If supported by your device, enable or disable Free
Cooling.
On Web:
1. Select System tile > Ventilator/HRV/ERV
2. Adjust the Occupied Min Run Time and Unoccupied Min
Run Time by selecting each option and swiping left or
right to adjust the values.
3. If supported by your device, enable or disable Free
Cooling.
Adjusting Sensor Modes
Your ecobee3 supports wireless remote sensors that detect
motion and temperature in different rooms (one was included
with your thermostat). Your ecobee3 also has a built-in motion
sensor. With these sensors, you can optimize the operation of
your thermostat to ensure comfort in the rooms and times that
matter most.
For information about installing new sensors, see the ecobee
Installation Guide, or the documentation included with the
sensor itself.
Smart Home/Away
Smart Home/Away applies all the sensors in your network –
including the sensors built-in your thermostat. It works by
following your schedule unless any sensor in your network is in
conflict with your schedule. In other words, if your ecobee3
senses that you are home during a scheduled Away period, or
away during a scheduled Home period, it will automatically
override your schedule by placing you in Smart Home/Away
mode to maximize comfort (Smart Home) and savings (Smart
Away).
On Thermostat:
1. Select Main Menu > Sensors > Smart Home/Away
2. Touch Enable to have your sensor network and
thermostat detect occupancy. To have your thermostat
strictly follow your programmed schedule, touch Disable.
Follow Me
Follow Me is a feature that applies to a selected group of the
sensors in your network (including the sensor built-in your
thermostat). It works by looking for motion triggered by any of
Page 14

14
the selected sensors. If motion is detected, the temperature
reading from that sensor will be used by your ecobee3 to
decide when to operate your heating or cooling system. This
ensures that you are comfortable in the rooms that you are
occupying. If more than one sensor detects motion, the
average of these sensors will be used. Your ecobee3 makes
changes gradually when many sensors are detecting motion to
make sure there are no sudden or large changes for your
heating and cooling system to deal with.
When Follow Me is disabled, your ecobee3 will continuously use
the average temperature readings from all the sensors that
you’ve selected as the desired temperature to control your
ecobee3. For example, suppose you have a room in your house
that is far from your thermostat and you want this room to be at
the thermostat's set temperature, regardless if motion is
occurring. In this case, set Follow Me to Disable and only select
this room. Your ecobee3 will now only use the temperature in
this room to decide when to operate your heating or cooling
system.
On Thermostat:
1. Select Main Menu > Sensors > Follow Me
2. Enable or disable the Follow Me feature.
3. If enabled, select which sensors are affected by pressing
on each checkbox.
Adjusting Comfort Settings
You can configure your ecobee3 to fit your schedule and
comfort needs while maximizing your energy savings.
Your ecobee3 organizes your temperature and fan settings into
different Comfort Settings. These settings are used in the
Schedule, Smart Home and Quick Changes menus
By default, your ecobee3 includes three configurable Comfort
Settings:
Away: Settings for when you are not at home.
Home: The normally settings for when you are at home and
awake.
Sleep: Settings for when you are sleeping.
Note: You can create new Comfort Settings (or remove them)
from the Web Portal.
On Thermostat and Mobile:
1. Select Main Menu > Comfort Settings
2. Select the Comfort Setting you want to customize.
3. Adjust the set points for heat and cool, as well as fan
mode as required.
4. Touch Save.
On Web:
1. Select Schedule tile.
2. Select the Comfort Setting you want to customize, or
select New Comfort Setting to add a new one.
3. Adjust the name, set points for heat and cool, as well as
fan mode as required.
4. Select if this Comfort Setting is for when the home is
Occupied or Unoccupied.
5. Select Save. The new Comfort Setting will appear in the
Schedule tile as well as on the thermostat itself.
Page 15

15
To delete a Comfort Setting:
1. Select Schedule tile.
2. Select the Comfort Setting you want to delete.
3. Select Delete.
4. Confirm by selecting Delete.
Setting Your Weekly Schedule
Your heating and cooling needs change depending on the
time of day, day of the week, as well as when you are home or
away. For example, if there’s no one in the house during the
workday you might want to let the temperature go up in the
summer, to reduce energy used by the air conditioning system,
and down in the winter, to reduce heating energy.
The ecobee3 adapts to how your home and heating and
cooling equipment perform. Intelligent algorithms combine
weather data, your equipment run times and occupancy
schedules to optimize performance and maximize energy
savings. This means you can be comfortable when you are
home and save money when you are not.
On Thermostat and Mobile:
1. Select Main Menu > Schedule
2. Touch the day of the week you want to adjust.
3. Select an existing scheduled activity to edit. You can also
create a new activity by touching +.
4. Select Start time.
5. Swipe to select the new time value. Note: You can only
select time values that are at least 30 min after the
previous activity to 30 min before the next scheduled
activity (i.e. you cannot overlap activity times).
6. Touch Save.
7. If you have added a new activity, you need to select
Comfort Setting to use.
8. Touch Save.
9. Touch the Back arrow to return to the Schedule screen
where you can make additional changes as required.
Hint: You can copy the entire schedule from one day to
another day (for example, if all your week days follow the same
schedule). Display the first day, touch the copy button, select
which days to apply the changes to, and touch Save.
On Web:
To edit an existing activity:
1. Select Schedule tile.
2. Select an existing scheduled activity to edit.
3. Select Start time.
4. Select Save.
To create a new activity:
1. On the Schedule tile, select Add activity.
2. Select the day.
3. Select Next.
4. Select the Comfort Setting to use during the activity.
5. Select Next.
6. Select Start time.
7. Select Save.
To copy the entire schedule from one day to another day (for
example, if all your week days follow the same schedule):
1. On the Schedule tile, select Copy.
2. Select the day to copy.
Page 16

16
3. Select Next.
4. Select the days that will use the copied schedule (you
can select more than one).
5. Select Save.
Going on Vacation
Your ecobee3's Vacation feature helps you conserve energy
while you are away for extended periods of time. It also ensures
your home is comfortable when you return.
A vacation event has a start date and time, as well as an end
date and time. You can enter any number of vacations, as long
as each has a unique start time.
The Vacation feature overrides your programmed schedule –
you can leave your Schedule settings as-is when you go away
for a special or unscheduled trip.
On Thermostat and Mobile:
1. Select Main Menu > Vacation
2. Touch + to create a new vacation event.
3. Select Vacation schedule.
4. Enter the Departure date and time.
5. Touch the Back arrow.
6. Select Vacation settings.
7. Select Heat or Cool to enable/disable heat and cool
during the vacation event.
8. Configure the set point(s) for heat and/or cool during the
vacation event by selecting Heat set to or Cool set to,
adjusting the temperature, and then pressing Save.
9. Touch the Back arrow.
10. Touch Save.
The vacation event is now set. You can adjust it at any time by
selecting it from the Vacation menu.
To delete a vacation event:
1. Select Main Menu > Vacation
2. Select the vacation you want to delete.
3. Touch Remove .
4. Confirm the deletion by pressing Delete.
On Web:
1. Select Vacation tile.
2. Select New Vacation
3. Enter the depart and return date and times
4. Select Heat and Cool.
5. Enable or disable heat and cool during the period as
required.
6. Select the set points for heat and/or cool.
7. Select Save.
8. Select Fan and set the minimum fan run time per hour, if
different than your normal settings.
9. Select Save.
The vacation event is now set. You can adjust it at any time by
selecting it from the Vacation tile.
Page 17

17
Caring for your Thermostat
Cleaning
You can clean your ecobee3 screen by spraying water on to a
clean, microfiber cloth. Wipe the surface of the screen with the
dampened cloth.
Note: Never spray any liquids directly onto your ecobee3.
Rebooting
You can reboot your ecobee3 by gently pulling the thermostat
from the back plate. To pull the thermostat off the wall, make
sure you that firmly hold on to the black front of the thermostat.
Ensure that you are not pulling the white trim plate as that is
attached to the wall.
Rebooting will not alter programming or configuration options.
Resetting the Thermostat
At some point during the life of your ecobee3 thermostat you
may want to quickly reconfigure it or restore it to the default
state.
Reset Registration: Deletes your registration settings (i.e.
username and password). Equipment settings and personal
preferences are kept as-is.
Reset Preferences: Resets all your preferences, reminders,
alerts and programming back to the default state.
Reset All: Resets the Smart Si thermostat back to its default
factory settings and removes any registration information.
On Thermostat:
1. Select Main Menu > Settings > Reset
2. Select a reset option:
Reset Registration
Reset Preferences
Reset All
3. Touch Yes to confirm the reset.
Troubleshooting
The About menu shows technical information about your
ecobee3, including:
Thermostat name
Software version
Serial number
Contact information for support
Wi-Fi settings
This information is useful when troubleshooting network issues or
contacting ecobee technical support.
On Thermostat or Mobile:
Select Main Menu > About
On Web:
Select About tile.
Page 18

18
Reminders & Alerts
The Reminders and Alerts list displays the reminders and alerts
that help you know if you need to attend to your HVAC system
or when to perform periodic maintenance.
NOTE: To use and receive email alerts, this thermostat must be
connected to the Internet via Wi-Fi and the end-user must have
a valid email address.
Viewing Reminders
The Reminders list displays the reminders and alerts that help the
homeowner know when to perform periodic maintenance.
On Thermostat and Mobile:
1. Select Main Menu > Reminders & Alerts > Reminders
2. Select the reminder you want to view.
3. For example, if you receive a Furnace Filter or UV Lamp
Change reminder and you have changed the filter or
lamp, or arranged to have your equipment serviced,
touch Filter/Lamp Changed or Service Scheduled;
otherwise touch the Back arrow.
Hint: If the frequency of the reminder is not correct, touch Edit
when viewing the reminder to adjust the settings as required.
On Web:
1. Select Reminders & Alerts tile.
2. Select Reminders.
Viewing Alerts
Your ecobee3 can generate alerts if the temperature in the
home goes over or under a pre-programmed level. This protects
the home from damage due to freezing and/or excessive heat.
This alert, along with optional technician contact information,
will be displayed on the screen. If the homeowner registers the
thermostat, the alert will be emailed to them and be displayed
on the web portal.
On Thermostat and Mobile:
1. Select Main Menu > Reminders & Alerts > Alerts
2. Select the alert you want to view.
3. Touch OK to return to the Alert list.
Hint: If the alert is not configured correctly, touch Edit when
viewing the alert to adjust the settings as required.
On Web:
1. Select Reminders & Alerts tile.
2. Select Alerts.
Configuring Reminders & Alert Preferences
You can configure how and when your ecobee3 generates
reminders and alerts.
Note: Only the options relevant to your equipment are shown in
the thermostat menus.
On Thermostat and Mobile:
1. Select Main Menu > Reminders & Alerts > Preferences
2. Configure each reminder/alert setting as required.
On Web:
1. Select Reminders & Alerts tile.
2. Select Preferences.
3. Configure each reminder/alert setting as required.
HVAC Maintenance
The HVAC Service (maintenance) reminder generates an alert
telling the homeowner that regularly scheduled maintenance is
required.
This reminder, along with technician contact information, can
be displayed on the screen. If homeowners register their
thermostats, the reminders will be emailed to them and be
displayed in the web portal.
You can set the Last Service date, turn the Reminder On or Off,
and set the Frequency of the maintenance interval in months.
Page 19

19
Furnace Filter
Generates an alert that indicates it is time to clean or replace
the filter on the furnace, if installed. You can set the Last Filter
Change date, turn the Reminder On or Off, and set the
Frequency of the maintenance interval.
Ventilator Filter (if installed)
Generates an alert that indicates it is time to clean or replace
the filter on the ventilator, if installed. You can set the Last Filter
Change date, turn the Reminder On or Off, and set the
Frequency of the maintenance interval.
UV Lamp
If the HVAC system uses a UV lamp for air purification, your
ecobee3 can generate an alert indicating that it is time to
clean or replace the lamp. You can set the Last Lamp Change
date, turn the Reminder On or Off, and set the Frequency of the
maintenance interval.
Low Temp Alert
Sets the temperature at which the thermostat will generate a
Low Temperature Alert. The range can be:
Enable/Disable: Configures if alert is shown on thermostat.
A temperature range of 35 to 68 °F (1.5 to 20 °C).
High Temp Alert
Sets the temperature at which the thermostat will generate a
High Temperature Alert. The options are:
Enable/Disable: Configures if alert is shown on thermostat.
A temperature range of 60 to 104 °F (15.5 to 40 °C).
Aux Heat Runtime Alert
Sets the amount of time that the Auxiliary heat source, if
installed, is can run continuously before an alert is generated.
The options are:
Disabled: No alert will be generated.
A time from 30 min to 8 hrs
Aux Outdoor Temp Alert
If you have a heat pump with an auxiliary heat configuration,
you can configure your ecobee3 to generate an alert if the
auxiliary heat is called for when the outdoor temperature
exceeds this programmed set point. The programmed set point
can be between 32 to 80 °F (0 to 26.5 °C)
This feature requires an Internet connection to function properly.
Low Humidity Alert
Sets the percentage of relative indoor humidity at which the
ecobee3 will generate a Low Humidity Alert. The options are:
Off: No alert will be generated.
A humidity range of 5% to 95%.
High Humidity Alert
Sets the percentage of relative indoor humidity at which the
ecobee3 will generate a High Humidity Alert. The options are:
Off: No alert will be generated.
A humidity range of 5% to 95%.
Display Alerts on Thermostat
Select Disable if you do not want any of the alerts to be
displayed on the ecobee3 thermostat screen. Alerts will
continue to be displayed on the web portal and sent via email.
Enable Heating/Cooling Alerts
Select Disable to disable alerts for heat/cool error conditions. If
disabled, alerts indicating that the system failed to heat or cool
will not appear in the screen, web portal, or emails.
Page 20

20
Lost Communication With Sensor/Low Battery Alerts
Select Disable to disable alerts when sensor battery is low or
communication with the sensor is lost.
Customizing Your Thermostat
You can customize the operation and display of your ecobee3
to suit your personal preferences.
Note: System settings are only configurable from the thermostat
itself, not the Mobile App. Some settings, where indicated, are
also configurable from the Web Portal.
Date & Time
You can configure the time to use a 12 or 24-hour format.
Note: The current date and time are programmed during initial
setup and automatically from the Internet. If you need to adjust
the data and time, log in to your personalized web portal.
On Thermostat:
To adjust the time format:
1. Select Main Menu > Settings > Date & time
2. Select Time format.
3. Touch 12 hr or 24 hr.
On Web:
1. Select Settings tile.
2. Select Time.
3. Select 12 Hour or 25 Hour.
Temperature Display
You can configure the ecobee3 to display the temperature
values in Fahrenheit or Celsius.
On Thermostat:
1. Select Main Menu > Settings > Preferences
2. Select Temperature display.
3. Touch °F or °C.
On Web:
1. Select Settings tile.
2. Select Preferences.
3. Select Temperature Display.
4. Select Fahrenheit or Celsius.
Page 21

21
Heating/Cooling Ranges
You can configure the ecobee3 to only display a specific heat
and/or cool set point range. This prevents users from selecting
values outside the displayed range.
On Thermostat:
1. Select Main Menu > Settings > Preferences
2. Select Heating range or Cooling range.
3. Adjust the allowed upper and lower values.
4. Touch Save.
On Web:
1. Select Settings tile.
2. Select Preferences.
3. Select Heat Set Point Range or Cool Set Point Range.
4. Set the allowed upper and lower values by sliding the
values left or right.
Thermostat Name
You can customize the name of your ecobee3 to suit your
needs (i.e. Main Floor). This is useful if you have multiple systems
or zones and are accessing your thermostat from your
personalized web portal.
On Thermostat:
1. Select Main Menu > Settings > Preferences
2. Select Thermostat name.
3. Select an existing name from the list or choose Enter your
own.
4. Touch Save.
5. If you choose your own name, enter the custom name
and touch Save.
Screen Brightness
You can customize the brightness of your ecobee3's screen. The
brightness for both the active and standby screens can be
configured independently. You can also configure the screen
to automatically sleep (i.e. turn off) whenever your ecobee3
enters the Sleep activity period.
For example, if your thermostat is located in a bedroom, you
may want to blank the screen when you are sleeping, whereas
if the thermostat is in a hallway, you may want the screen
displayed all the time.
On Thermostat:
1. Select Main Menu > Settings > Preferences
2. Select Screen brightness.
3. Adjust the values of the Active and Standby screen
brightness.
4. Select Screen sleeps when I sleep if you want to make
the screen blank during the Sleep activity period.
Active to Standby Screen Timer
You can configure how long it takes for the standby screen to
activate after you have finished using the thermostat.
On Thermostat:
1. Select Main Menu > Settings > Preferences
2. Select Active to standby screen timer.
3. Adjust the activation time as required.
On Web:
1. Select Settings tile.
2. Select Preferences.
3. Select Active to Standby Sleep Timer.
4. Select the length of time before the screen sleeps by
sliding the values left or right.
Hold Action Duration
You can configure how long a manual change to the set point
will remain in effect.
On Thermostat:
1. Select Main Menu > Settings > Preferences
2. Select Hold action.
3. Select the hold action from the list:
2 hours
4 hours
Until the next scheduled activity
Page 22

22
Until you change it (default value)
Decide at time of change
On Web:
1. Select Settings tile.
2. Select Preferences.
3. Select Hold Action.
4. Select the hold action from the list:
2 hours
4 hours
Until the next scheduled activity
Until you change it (default value)
Decide at time of change
Smart Recovery
Smart recovery lets your ecobee3 learn how your heating and
cooling system works, taking into account weather and
historical operating performance so that your home reaches
the scheduled set point at the time in which the change occurs
(i.e. not afterwards). For example, if you wake up at 6:00 AM,
you do not need to schedule your Home period to start at 5:30
AM. Smart Recovery will start the HVAC equipment to ensure
that at 6:00 AM, the house is at your desired temperature.
On Thermostat:
1. Select Main Menu > Settings > Preferences
2. Select Heating Smart Recovery or Cooling Smart
Recovery.
3. Touch Enable or Disable.
On Web:
1. Select Settings tile.
2. Select Preferences.
3. Select Smart Recover Heat Mode or Smart Recovery
Cool Mode.
4. Select Enable or Disable.
Access Control
You can prevent people from making changes your
thermostat's schedule, vacation, or system settings by
configuring a 4-digit security code. If enabled, the security code
will be required to access and change these settings.
On Thermostat:
To add a security code or change existing settings:
1. Select Main Menu > Settings > Access control
2. If the security code is currently disabled (default setting),
touch Enable Security Code, enter a new code and
touch Save.
Otherwise, enter the existing security code.
3. Select the feature(s) you want to protect:
Temperature & Quick Changes
Schedule
Vacation
System & Settings
To remove an existing security code:
1. Select Main Menu > Settings > Access control
2. Enter the existing security code.
3. Touch Change Security Code.
4. Delete the existing code and touch Save.
On Web:
1. Select Settings tile.
2. Select Access Control.
3. If the security code is currently disabled (default setting),
select Enable and enter a new code and touch Save.
Otherwise, enter the existing security code.
4. Select the feature(s) you want to protect:
Temperature & Quick Changes
Schedule
Vacation
System & Settings
Page 23

23
Configuring Wi-Fi Settings
Your ecobee3 supports Wi-Fi 802.11 b/g/n. Wi-Fi is normally
configured during initial setup. You may, however, be required
to reconfigure the settings if your Wi-Fi network settings change.
On Thermostat:
Select Main Menu > Settings > Wi-Fi.
Wi-Fi Radio
Select Enabled to use Wi-Fi. Your ecobee3 needs to connect to
Internet for features like the Weather Forecast to work.
Network
The list of available networks appears in the Network menu. If
your network doesn't appear, you can enter the SSID manually
by selecting My network is not visible.
After selecting or entering the SSID, you can configure the
following parameters:
Connect to IP using: Select DHCP to automatically
connector, or select Static IP to type in your own values (if
unsure, leave DHCP Enabled).
SSID Encryption: ecobee3 supports WEP, WEP128, WPA,
and WPA2 encryption schemes.
Password (if encryption is used)
Channel: Leave Any channel selected unless your network is
configured to use a specific Wi-Fi channel.
Advanced Settings
If you are using Static IP addressing, the following additional
parameters will require configuration:
IP Address
Gateway
Subnet Mask
Primary and Secondary DNS
If you need to specify your ecobee3's MAC address in your
router’s configuration, you can obtain it from Main Menu >
About > Wi-Fi.
Diagnostics
Your ecobee3 contains extensive diagnostic tools to help
troubleshoot issues:
View Log: Displays log file information about Wi-Fi operation.
Ping Gateway: Checks to see if the network gateway is
responding.
Ping ecobee.com: Checks to see if the ecobee servers are
responding.
Ping Address: Checks to see if the entered IP address is
responding.
Wi-Fi: Displays the current Wi-Fi network settings.
On Thermostat:
1. Select Main Menu > Settings > Wi-Fi.
2. Select Diagnostics.
3. Run the required diagnostic tool.
Page 24

24
Managing Your Account
Your ecobee3 is designed to securely communicate over the
Internet with ecobee servers in order to obtain precise weather
information and provide your own personalized ecobee web
portal.
Registering
To access all the features of your ecobee3, register your
ecobee3 at ecobee.com. After registration, you can control
your ecobee3 from your smartphone, tablet or desktop, and
access free online energy management tools.
Making Changes to Your Account
To make changes to your account, visit ecobee.com and log in
to your personalized web portal. From there you will be able to
make changes to your account, contact information and
location. You will also be able to access additional features for
your ecobee3 as well as online energy management tools.
Moving to New House
If you’re moving and want to take your ecobee3 with you, you’ll
need to re-connect it to the Internet and update your location
and house information.
Changing Thermostat Owner
If you’re moving and are not taking your ecobee3 with you, log
onto the Web Portal and select Reset under the Settings tab.
Select Reset Registration. This terminates the association
between your ecobee3 thermostat and your personalized web
portal. You can also accomplish the same thing by resetting the
registration your thermostat (page 17).
You can always add another device for your new home with
the same account.
The new homeowners will need to register the ecobee3
thermostat and set up their own web portal.
Installation Settings
The ecobee3 automatically detects which wires are connected
to it. However, you may need to still adjust equipment operating
parameters.
Note: Installation settings are only configurable from the
thermostat itself, not the personalized web portal.
Equipment Wiring
The ecobee3 automatically detects which wires are connected
and displays them on the screen.
On Thermostat:
Select Main Menu > Settings > Installation Settings > Equipment
> Wiring.
Equipment Settings
The Equipment settings let you configure the devices
connected to the thermostat. Depending on your system's
equipment, not all options may be available.
Heat Pump
This menu lets you configure a heat pump with up to 2 heat/2
cool stages and a 2 stage auxiliary heat source.
Type: This setting helps the thermostat determine optimum
performance and default settings. Select Geothermal if you
are using a geothermal heat pump; otherwise select Air to
Air.
O/B Reversing Value: Select Energized on Cool to activate
the reversing valve output (O/B terminal) when there is a call
for cooling. Select Energized on Heat to activate the relay
when there is call for heat.
Min Cycle off time: Configures the minimum compressor off
time between cycles (240 to 900 seconds).
Min outdoor temp: Disables the compressor when the
outside air temperature reaches the configured minimum
setting. This performs two functions. It prevents the
Page 25

25
compressor from running when the outdoor temperature is
too low, thus resulting in damage to the compressor.
You can also set this value to determine when you want the
auxiliary heat (if installed) to engage to help meet the set
temperature. The temperature range is adjustable from 0 to
65 °F (–17.8 to 18.3 °C) or can be completely disabled.
Note: You need an Internet connection for this feature to
operate properly.
Aux Heat Simultaneous Operation: If you select Enable and
there is a source of auxiliary heat, it will turn on in addition to
the heat pump. The heat pump will be engaged for the first
30 minutes. If, after 30 minutes, the set point has not been
met, the auxiliary heat will also be engaged to assist the
heat pump in reaching the set point.
If you select Disable, the heat pump will be engaged for up
to 2 hours. If after 2 hours the set point has not been met, the
thermostat will shutdown the heat pump and engage the
auxiliary heat to reach the set point. This option should also
be used for installation where the heat pump evaporator
coil is downstream from the source of auxiliary heat.
This setting is only available when the Comp to Aux Temp
Delta and Comp to Aux Runtime settings are both set to
Auto (default).
On Thermostat:
1. Select Main Menu > Settings > Installation Settings >
Equipment > Heat Pump.
2. Configure the settings as required.
Furnace
This menu lets you configure up to a 2-stage conventional heat
source. If you have selected a heat pump as your primary
source, this feature allows you to configure the 1st stage of
auxiliary heat connected to the system.
Type: Configured during initial setup (page 4), this optimizes
the system for either a conventional furnace or a boiler.
Fan control in Heat mode: Configures the furnace fan to be
controlled by the ecobee3 or the HVAC system during heat
cycles. Normally the HVAC system controls the fan during
heat cycles.
On Thermostat:
1. Select Main Menu > Settings > Installation Settings >
Equipment > Furnace.
2. Configure the settings as required.
Humidifier
This menu lets you configure a humidifier accessory.
Type: Optimizes the humidifier operation for either
Evaporative or Steam humidification.
Humidify only while heating: Select Yes for the humidifier to
only operate when there is a call for heat. If you want the
humidifier to function at other times, select No.
Min Run Time Delta: Reduces short cycling by running the
humidifier beyond the set point by the selected amount (2%
to 10%).
Window Efficiency: The humidifier frost control setting uses
this efficiency rating to compute the humidity set point
within the range of 15% to 50%. Values are from 1 to 7, with 7
being for the most efficient windows possible.
On Thermostat:
1. Select Main Menu > Settings > Installation Settings >
Equipment > Humidifier.
2. Configure the settings as required.
Dehumidifier
This menu lets you configure a dehumidifier accessory.
Dehumidify with fan: Run dehumidifier when fan is running.
Min Run time delta: Reduces short cycling by running the
humidifier beyond the set point by the selected amount (2%
to 10%).
Page 26

26
Dehumidify in heat mode: Select Yes for the humidifier to
only operate when there is a call for heat. If you want the
humidifier to function at other times, select No.
Dehumidifier Active: Select Open if the dehumidifier is active
when the relay is open; otherwise select Closed.
On Thermostat:
1. Select Main Menu > Settings > Installation Settings >
Equipment > Dehumidifier.
2. Configure the settings as required.
Ventilator
This menu lets you configure a ventilator accessory.
Free Cooling Max Outdoor Temp: Prevents the free-cooling
feature from running when the outdoor temperature is
above the configured value.
Free Cooling Max Outdoor Humidity: Prevents the free-
cooling feature from running when the outdoor humidity is
above the configured value. By default, this option is
disabled. The Auto value determines the maximum humidity
based on the temperature.
Indoor/Outdoor Temp Delta: The temperature difference
between the indoor and outdoor temperatures at which the
ventilator will run.
Max Set Point Temp Delta: The maximum allowed difference
between the current temperature and set point for free
cooling to function. By default, this option is disabled.
On Thermostat:
1. Select Main Menu > Settings > Installation Settings >
Equipment > Ventilator.
2. Configure the settings as required.
Reconfiguring Equipment
Select Main Menu > Reconfigure equipment to run the initial
setup process again.
Note: Reconfiguring the equipment will delete any existing
configuration.
Thresholds
This menu lets you configure the temperature and time
thresholds associated with the heating and cooling equipment.
You must configure the Equipment settings (page 24) before
setting the thresholds. Only the applicable threshold settings will
be displayed (i.e. if no air conditioner is configured, you will not
see the options related to air conditioners).
Auto Heat/Cool
Enabling this option allows the user to select auto change-over
as a system mode.
On Thermostat:
1. Select Main Menu > Settings > Installation Settings >
Thresholds > Auto Heat/Cool.
2. Configure the settings as required.
Heat/Cool Min Delta
The minimum difference between the heat mode set
temperature and the cool mode set temperature when the
system mode is in auto change-over. The delta is adjustable
from 2 to 10 °F (1.1 to 5.5 °C). The default value is 5 °F (2.8 °C).
On Thermostat:
1. Select Main Menu > Settings > Installation Settings >
Thresholds > Heat/Cool Min delta.
2. Configure the settings as required.
Compressor Min Cycle Off Time
This enforces a minimum time that the compressor must be off
between cycles. This ensures the compressor does not short
cycle (which could negatively affect the operating life of the
system). This time is adjustable from 240–900 seconds.
On Thermostat:
1. Select Main Menu > Settings > Installation Settings >
Thresholds > Compress Min Cycle Off Time.
2. Configure the settings as required.
Page 27

27
Compressor Min Outdoor Temp
Enforces a minimum outside air temperature at which the
compressor will be disabled. It prevents the compressor from
running when the outdoor temperature is too low, thus resulting
in damage to the compressor. If the compressor min outdoor
temp is being enforced, auxiliary heat will be used to reach setpoint. The temperature range is adjustable from 0 to 65 °F (–17.8
to 18.3 °C) or can be completely disabled. This feature is
typically used for air-to-air source heat pumps (35 °F min
outdoor temp by default) and is disabled (by default) for
geothermal heat pumps.
On Thermostat:
1. Select Main Menu > Settings > Installation Settings >
Thresholds > Compressor Min Outdoor Temp.
2. Configure the settings as required.
Note: You need an Internet connection for this feature to
operate properly.
AC Overcool Max
Uses the air conditioning to reduce the humidity by cooling
beyond the current set point by the configured amount. Note
that cooling is still determined by the set point, and the system
will not resume cooling until the temperature rises above the
current set point. For example, if your cooling set point is 75 F,
and this value is set to 2 F, it will allow the AC to overcool to 73 F
if the humidity set point has not been met.
On Thermostat:
1. Select Main Menu > Settings > Installation Settings >
Thresholds > AC Overcool Max.
2. Configure the settings as required.
Aux Heat Max Temp
Configures the maximum outdoor temperature above which
the auxiliary heat will not be engaged. The temperature is
adjustable from 0 to 80 °F (26.5 °C) in increments of 0.5°F (0.3°C).
The default value is 70°F (21°C).
On Thermostat:
1. Select Main Menu > Settings > Installation Settings >
Thresholds > Heat Differential Temp.
2. Configure the settings as required.
Heat Differential Temp
The minimum difference between the current temperature and
set temperature before the system calls for heat. A smaller
difference means shorter cycle times, whereas a larger
difference results in longer cycle times. The temperature range is
adjustable from 0 to 3 °F (0 to 1.7 °C) in 0.5°F (0.3°C) increments.
On Thermostat:
1. Select Main Menu > Settings > Installation Settings >
Thresholds > Heat Differential Temp.
2. Configure the settings as required.
Heat Dissipation Time
The amount of time the fan will run after the heat set point has
been reached and the call for heat has been turned off.
Running the fan for a period of time allows for any heated air
left in the ducts to circulate throughout the home. The time is
adjustable from 0 to 900 seconds. The default value is 30
seconds.
On Thermostat:
1. Select Main Menu > Settings > Installation Settings >
Thresholds > Heat Dissipation Time.
2. Configure the settings as required.
Heat Min On Time
Sets the minimum equipment run time in heat mode: 1 to 20 min
(default is 5 min).
On Thermostat:
1. Select Main Menu > Settings > Installation Settings >
Thresholds > Heat Min On Time.
2. Configure the settings as required.
Page 28

28
Cool Differential Temp
The minimum difference between the current temperature and
set temperature before the system calls for cool. A smaller
difference means shorter cycle times, whereas a larger
difference results in longer cycle times. The temperature range is
adjustable from 0 to 3 °F (0 to 1.7 °C) in 0.5°F (0.3°C) increments.
On Thermostat:
1. Select Main Menu > Settings > Installation Settings >
Thresholds > Cool Differential Time.
2. Configure the settings as required.
Cool Dissipation Time
The amount of time the fan will run after the cool has been
turned off. Running the fan for a period of time allows for any
cooled air left in the ducts to circulate throughout the home.
The time is adjustable from 0 to 900 seconds. The default value is
30 seconds.
On Thermostat:
1. Select Main Menu > Settings > Installation Settings >
Thresholds > Cool Dissipation Time.
2. Configure the settings as required.
Cool Min On Time
Sets the minimum equipment run time in cool mode: 1 to 20 min
(default is 5 min).
On Thermostat:
1. Select Main Menu > Settings > Installation Settings >
Thresholds > Cool Min On Time.
2. Configure the settings as required.
Compressor Reverse Staging
If enabled, the thermostat will cycle down from the higher
stages so that as it approaches set point it will only be running in
stage 1. The thermostat calculates which stage to start the
HVAC equipment in depending on the indoor and set point
temperature delta. . As the stage 1 temperature delta is
exceeded, the second stage will engage. Once the equipment
has brought the current temperature back to within the heat or
cool differential setting, stage 2 will disengage and stage 1 will
remain running until the set point is reached.
On Thermostat:
1. Select Main Menu > Settings > Installation Settings >
Thresholds > Compressor Reverse Staging.
2. Configure the settings as required.
Compressor Stage 2 Temp Delta
The minimum difference between the current temperature and
the set temperature that will activate the auxiliary heat
(regardless if the maximum run time of the previous stage was
reached). Options are Auto (default) and 1 to 10 °F (0.6 to 5.6
°C).
On Thermostat:
1. Select Main Menu > Settings > Installation Settings >
Thresholds > Compressor Stage 2 Temp Delta.
2. Configure the settings as required.
Compressor Stage 1 Max Runtime
The maximum amount of time stage 1 will run before engaging
the next stage. Options are Auto (default) and 10 to 120
minutes.
On Thermostat:
1. Select Main Menu > Settings > Installation Settings >
Thresholds > Compressor Stage 1 Max Runtime.
2. Configure the settings as required.
Compressor to Aux Temp Delta
The minimum difference between the current temperature and
the set temperature that will activate this stage (regardless if the
maximum run time of the previous stage was reached). Options
are Auto (default), Disabled, and 1 to 10 °F (0.6 to 5.6 °C).
On Thermostat:
Page 29

29
1. Select Main Menu > Settings > Installation Settings >
Thresholds > Compressor To Aux Temp Delta.
2. Configure the settings as required.
Compressor to Aux Runtime
The maximum amount of time this stage will run before
engaging the next stage. Options are Auto (default) and 1 to 10
°F (0.6 to 5.6 °C).
On Thermostat:
1. Select Main Menu > Settings > Installation Settings >
Thresholds > Compressor To Aux Runtime.
2. Configure the settings as required.
Temperature Correction
Lets you program an offset between the real temperature at
thermostat and the displayed temperature. If you find that the
temperature where the thermostat are located does not
represent the room temperature, change the offset to
compensate for the difference. The correct temperature is
adjustable from +/- 10°F in 0.5°F (0.3°C) increments.
On Thermostat:
1. Select Main Menu > Settings > Installation Settings >
Thresholds > Temperature Correction.
2. Swipe left or right to select the value.
Installer Code
To prevent accidental modifications to the installation settings,
you can enable a 4-digit installer code. This code is preprogrammed to 3262.
On Thermostat:
1. Select Main Menu > Settings > Installation Settings >
Thresholds > Installer Code.
2. Enable or disable the code.
Test Equipment
This menu lets you test the wiring and connections of the
devices connected to the thermostat by turning them on or off.
The equipment will turn off when you exit the menu.
Warning: Compressor protection and minimum run-time
features are not enforced while in this mode.
Page 30

30
Wiring Diagrams
The following pages provide wiring diagrams for common HVAC
equipment configurations.
Need help with your ecobee3 wiring? Find how-to videos and
tutorials on .
Conventional heating and cooling
Heat Only
Do not jumper Rc or Rh, ecobee3 does this automatically.
R can go into either Rc or Rh terminals on your ecobee3.
Heat and Cool
Do not jumper Rc or Rh, ecobee3 does this automatically.
R can go into either Rc or Rh terminals on your ecobee3.
Heat and Cool (2 Stage Heat)
Do not jumper Rc or Rh, ecobee3 does this automatically.
R can go into either Rc or Rh terminals on your ecobee3.
Page 31

31
Heat pumps
Air or Geothermal Heat Pump with Auxiliary Heat
Do not jumper Rc or Rh, ecobee3 does this automatically.
R can go into either Rc or Rh terminals on your ecobee3.
Air or Geothermal Heat Pump (2 Stages) with Auxiliary
Heat
Do not jumper Rc or Rh, ecobee3 does this automatically.
R can go into either Rc or Rh terminals on your ecobee3.
Boiler or radiant systems
Boiler or Radiant System with Air Handler and Conventional
Cooling or Heat Pump
Do not jumper Rc or Rh, ecobee3 does this automatically.
R can go into either Rc or Rh terminals on your ecobee3.
Page 32

32
Boiler or Radiant System (2 stages) with Air Handler and
Conventional Cooling or Heat Pump
Do not jumper Rc or Rh, ecobee3 does this automatically.
R can go into either Rc or Rh terminals on your ecobee3.
Accessory devices
The ecobee3 can control an accessory HVAC device like a
humidifier, dehumidifier, or ventilation device from its ACC
terminals.
If the accessory is internally powered, connect the 24V to
ACC+. Also connect the common for the accessory to
common on the control board.
You will need to configure the accessory device when
you first power on your ecobee3.
PEK thermostat wiring
Page 33

33
Icon Reference
Note: Depending on your equipment configuration, not all the
icons may be available.
Home Screen
System Operation
Menus
Comfort Settings
Weather
Wi-Fi Connectivity
Menu Reference
Note: Depending on your equipment configuration, not all
menu options may be available.
Main Menu
Registration
System
HVAC System
Fan
Humidifier
Dehumidifier
Ventilator/HRV/ERV
Sensors
Smart Home/Away
Follow Me
Your Thermostat
Schedule
Comfort Settings
Home
Away
Sleep
Vacation
Reminders & Alerts
Reminders
Alerts
Preferences
HVAC Maintenance
Page 34

34
Air Handler
Humidifier Filter
Dehumidifier Filter
Furnace Filter
Ventilator Filter
UV Lamp
Low Temp Alert
High Temp Alert
Aux Heat Runtime Alert
Aux Outdoor Temp Alert
Low Humidity Alert
High Humidity Alert
Display Alerts on Thermostat
Enable Heating/Cooling Alerts
Settings
Date & Time
Time Format
Date
Time
Time Zone
Preferences
Temperature display
Heating range
Cooling range
Thermostat name
Screen brightness
Active to standby
Hold action
Heating Smart Recovery
Cooling Smart Recovery
Wi-Fi
Wi-Fi Radio
Network
Diagnostics
Installation Settings
Equipment
Wiring
Heat Pump
Type
O/B Reversing Value
Min Cycle off time
Min outdoor temp
Aux Heat Simultaneous Operation
Furnace
Fan control in Heat mode
Ventilator
Free Cooling Max Outdoor Temp
Free Cooling Max Outdoor Humidity
Indoor/Outdoor Temp Delta
Max Set Point Temp Delta
Air Conditioner
Dehumidifier
Dehumidify with fan
Min Run time delta
Dehumidify in heat mode
Dehumidifier Active
Reconfigure equipment
Thresholds
Auto Heat/Cool
Heat/Cool Min delta
Compressor Min Cycle Off Time
Compressor Min Outdoor Temp
AC Overcool Max
Aux Heat Max Outdoor Temp
Heat Differential Temp
Heat Dissipation Time
Heat Min On Time
Cool Differential Temp
Cool Dissipation Time
Cool Min On Time
Compressor Reverse Staging
Compressor Stage 2 Temp Delta
Compress Stage 1 Max Runtime
Temperature Correction
Installer Code
Test equipment
Access Control
Reset
Reset Preferences
Reset All
About
Support
Wi-Fi
Weather
Page 35

35
Quick Changes
Approvals
This product was designed and built in accordance to RoHS
directive 2002/95/EC and contains no hazardous substances as
defined by this directive.
FCC Compliance Statement
This equipment has been tested and found to comply with the
limits for Class B digital devices, pursuant to Part 15 of the FCC
Rules. These limits are designed to provide reasonable
protection against harmful interference in a residential
installation. This equipment generates, uses, and can radiate
radio frequency energy and, if not installed and used in
accordance with the instruction manual, may cause harmful
interference to radio communications. However, there is no
guarantee that interference will not occur in a particular
installation. If this equipment does cause harmful interference to
radio or tele- vision reception, which can be determined by
turning the equipment off and on, the user is encouraged to try
to correct the interference by one or more of the following
measures:
- Reorient or relocate the receiving antenna. - Increase the
separation between the equipment and receiver. - Connect
the equipment to an outlet on a different circuit from the
receiver. - Consult the dealer or an experienced radio/TV
contractor for help.
To satisfy FCC/IC RF exposure safety requirements, a separation
distance of 8 inches (20 cm) or more should be maintained
between this device and persons. To ensure compliance,
operation at closer than this distance is not allowed.
FCC ID: WR9EBSTATZBE3 IC: 7981A-EBSTATZBE3
Warning: Changes or modifications not expressly approved by
ecobee Inc. could void the user’s authority to operate the
equipment.
Page 36

36
3-Year Limited Warranty
ecobee warrants that for a period of three (3) years from the
date of purchase by the consumer (“Customer”), the ecobee3
thermostat (the “Product”) shall be free of defects in materials
and workmanship under normal use and service. During the
warranty period, ecobee shall, at its option, repair or replace
any defective Products, at no charge. Any replacement and/or
repaired device are warranted for the remainder of the original
warranty or ninety (90) days, whichever is longer.
If the product is defective, call Customer Service at 1-877-932-
6233. ecobee will make the determination whether a
replacement product can be sent to you or whether the
product should be returned to the following address: ecobee
Customer Service, 477 Richmond St West, 2nd Floor, Toronto,
Ontario, M5V 3E7, Canada,. In the event of a failure of a
Product, Customer may:
(a) if Customer did not purchase the Product directly from
ecobee, contact the third party contractor from whom the
Product was purchased to obtain an equivalent replacement
product, provided the contractor determines that the returned
Product is defective and Customer is otherwise eligible to
receive a replacement product;
(b) contact ecobee directly for service assistance at 1-877-9326233 and ecobee will make the determination whether an
advance equivalent replacement Product can be sent to
Customer with return shipping supplies (in which case a hold
shall be put on Customer’s credit card for the value of the
replacement Product until ecobee has received the defective
Product). Product should be returned to the following address:
ecobee Customer Service, 477 Richmond St West, 2nd Floor,
Toronto, Ontario, M5V 3E7, Canada,. If the returned Product is
found by ecobee to be defective and Customer is otherwise
eligible to receive a replacement product, no amount shall be
charged to Customer’s credit card; or
(c) ship the defective Product directly to ecobee, in which case
Customer shall contact ecobee directly at 1-877-932-6233, so
ecobee can make the required shipping arrangements. Upon
receipt of the defective Product, ecobee will ship an equivalent
replacement product to Customer, provided the returned
Product is found by ecobee to be defective and Customer is
otherwise eligible to receive a replacement product.
This warranty does not cover removal or reinstallation costs and
shall not apply if the damages were found to be caused by
something other than defects in materials or workmanship,
including without limitation, if the Product:
was operated/stored in abnormal use or maintenance
conditions; is repaired, modified or altered, unless ecobee
expressly
authorizes such repair, modification or alteration in writing;
was subject to abuse, neglect, electrical fault, improper
handling, accident or acts of nature;
was not installed by a licensed Heating Ventilating and Air
Conditioning (HVAC) contractor; or
was installed improperly.
ecobee’s sole responsibility shall be to repair or replace the
Product within the terms stated above. ECOBEE SHALL NOT BE
LIABLE FOR ANY LOSS OR DAMAGE OF ANY KIND, INCLUDING
ANY SPECIAL, INCIDENTAL OR CONSEQUENTIAL DAMAGES
RESULTING, DIRECTLY OR INDIRECTLY, FROM ANY BREACH OF
ANY WARRANTY, EXPRESS OR IMPLIED, OR ANY OTHER FAILURE
OF THIS PRODUCT. Some US states and Canadian provinces do
not allow the exclusion or limitation of incidental or
consequential damages, so the above limitation or exclusion
may not apply to you.
ecobee’s responsibility for malfunctions and defects in materials
and workmanship is limited to repair and replacement as set
forth in this warranty statement. All express and implied
warranties for the product, including but not limited to any
implied warranties and conditions of merchantability and fitness
Page 37

37
for a particular purpose, are limited to the three-year duration
of this limited warranty. No warranties, whether express or
implied, will apply after the limited warranty period has expired.
Some
US states and Canadian provinces do not allow limitations on
how long an implied warranty lasts, so this limitation may not
apply.
ecobee neither assumes responsibility for nor authorizes any
other person purporting to act on its behalf to modify or to
change this warranty, nor to assume for it any other warranty or
liability concerning this product.
This warranty gives you specific rights, and you may also have
other rights which vary from jurisdiction to jurisdiction. If you
have any questions regarding this warranty, please write
ecobee Customer Service, 477 Richmond St West, 2nd Floor,
Toronto, Ontario, M5V 3E7, Canada.
End User Software License
Agreement
Please read the following carefully, as this end user software
license agreement (“EULA”) is a legal agreement between
ecobee Inc., having its place of business at 477 Richmond St
West, 2nd Floor, Toronto, Ontario, M5V 3E7, Canada,
(“ecobee”) and you (either an individual or the entity that you
represent and referred to in this agreement as “licensee”), The
original purchaser of ecobee product (The “product” or
“products”) embedded with ecobee proprietary software (the
“software”) concerning licensee’s limited access to and use of
the software. By using the product (including the software
embedded in the product), you are indicating your
acceptance of, and you agree to be bound by the terms and
conditions of this EULA which shall govern your access and use
of the software. If you do not agree with the terms and
conditions of this EULA, your access to and use of the software
will not be permitted and you may, within fourteen days of the
date of your purchase if the ecobee product, return the
software together with the product in its original packaging and
sale condition to: (a) ecobee if you have purchased the
ecobee product directly from ecobee or; (b) to an ecobee
authorized reseller or distributor if you have purchased the
ecobee product from such entities, and ecobee or its
authorized reseller or distributor as applicable shall provide a full
refund of the purchase price paid within fourteen days of its
receipt of the return.
In consideration of the license fees paid by LICENSEE as part of
the purchase price of the ecobee Product and the mutual
covenants contained herein and for other good and valuable
consideration, the receipt and sufficiency of which are hereby
acknowledged, ecobee and LICENSEE agree as follows:
1. Definitions: For the purpose of this EULA, the following terms
shall have the meanings hereinafter provided:
“ecobee Web Portal” means the web site portal operated by
ecobee to provide certain services and functionality to
registered users of ecobee Products.
“Error” means any program defect, error, bug or other failure of
all or part of the Software that results in the Software not
conforming to, or performing in accordance with, its published
specifications.
“Software” means ecobee’s computer software program,
which enables data upload and download to and from the
ecobee Web Portal using an ecobee Product, including any
Software Updates.
“User Manual” means the ecobee User Manual provided
together with the Product and Software.
“Software Updates” means updates or patches to the Software,
including updates intended to correct Errors and which may
include enhancements and/or additional features to the
Software, as may be provided or released by ecobee from time
to time to all of its customers at no charge.
Page 38

38
2. Ownership of Software: LICENSEE acknowledges and agrees
that, save and except for the Software license explicitly granted
by the EULA, all right, title and interest
in and to the Software and the User Manual is the sole and
exclusive property of ecobee and/or its licensors), as the case
may be. ecobee reserves all rights not expressly granted to
LICENSEE hereunder, and for greater certainty, ecobee shall
retain all intellectual property and other proprietary rights in and
to the Software and the User Manual. Nothing in this EULA shall,
or shall be deemed or construed to, assign, transfer or convey
to LICENSEE any title, rights or interest in or to any intellectual
property, including in or to the Software or User Manual, other
than the licenses specifically and expressly granted herein.
3. Grant of Limited License: Upon LICENSEE’s use of the Product
(and corresponding acceptance of the terms and conditions of
this EULA), ecobee hereby grants to LICENSEE a limited, nonexclusive, personal, perpetual, non-transferable and revocable
license to use the Software embedded in the Product as and to
the extent described in this EULA for as long as LICENSEE
complies with the terms and condition of this EULA. ecobee
reserves all rights not expressly granted to LICENSEE. For
certainty, this EULA does not apply to or govern LICENSEE’s use
of or access to the ecobee Web Portal or the ecobee Product,
which are each governed by and subject to separate terms
and conditions.
4. Permitted Use: Pursuant to the Software license granted to
LICENSEE under this EULA, LICENSEE shall be permitted to: (a) use
the Software embedded in the Product for
the purposes of using the Product only as intended and
contemplated by the User Manual, provided that the Software
may only be used for its personal and private use in connection
with the use of the Product; and (b) use the User Manual
provided by ecobee solely as is necessary to operate and use
the Software and ecobee Product as and to the extent
permitted thereunder and under this EULA.
5. License Transferable: This EULA shall be binding upon and shall
ensure to the benefit of and be enforceable by each of the
parties, their respective successors and permitted assigns.
LICENSEE may assign this EULA without the prior consent of
ecobee. ecobee may assign this EULA without the consent of
LICENSEE at any time.
6. Copy Restrictions: Unauthorized copying or distribution of
Software or the User Manual is expressly prohibited. LICENSEE
may make a reasonable number of copies of the User Manual
to the extent reasonably required for its use of the Software and
Product as permitted by this EULA; provided that LICENSEE may
not use the User Manual separately from the Product or
Software or for any purpose other than as contemplated herein.
7. Use Restrictions: LICENSEE may not: (a) modify, adapt or
otherwise change the Software or in any way remove the
Software from the Product for any reason or
use the Software separately from the Product for any reason or
purpose; (b) to the maximum extent permitted to be restricted
by applicable law, reverse engineer, decompile, disassemble,
or otherwise in any manner deconstruct all or any part of the
Software; (c) create derivative works based on the Software or
the User Manual; (d) except as expressly permitted by the EULA,
provide, disclose, sublicense, distribute, transfer, assign or
otherwise permit any third party to access, use, read or
otherwise gain access to the Software or User Manual (the
Software and User Manual being the confidential information of
ecobee); or (e) use Software to access or in conjunction with
any other thermostat monitoring services or products of any
ecobee competitor.
8. Support: ecobee may in its discretion, without any obligation
to do so and subject to the limitations of this EULA, provide
LICENSEE with help-desk telephone support concerning
LICENSEE’s use of the SOFTWARE to the extent provided for in
the Product Terms of Sale in connection with purchase and sale
of the Product and the Terms of Service entered into by you
and ecobee, if any, in connection with the thermostat
monitoring and data management services provided by
Page 39

39
ecobee in connection with the Product. Refer to the Product
Terms of Sale and/or the Terms of Service associated with the
Product and related services for further details on Software and
Product support.
9. Relief: LICENSEE agrees that damages would not be an
adequate remedy for any 36 breach of this EULA affecting or
related to a breach or misappropriation of ecobee’s (or its or its
third party licensors’) intellectual property rights in and to the
Software and User Manual. LICENSEE, and nothing in this EULA,
shall interfere with, delay, obstruct, or prevent ecobee from
taking, or require ecobee to take, any steps prior to taking
action to seek an interim and interlocutory equitable remedy on
notice or ex parte to enforce any provision herein to protect its
rights concerning the Software or other intellectual or
proprietary rights. LICENSEE agrees not to contest, object to, or
otherwise oppose an application for equitable relief by ecobee
in such circumstances and LICENSEE waives any and all
immunities from any equitable relief to which it may be entitled.
Any such relief or remedy shall not be exclusive, but shall be in
addition to all other available legal or equitable remedies.
LICENSEE agrees that the provisions of this Section are fair and
reasonable and are necessary to protect ecobee’ intellectual
property rights.
10. Termination: This EULA is effective until and unless
terminated. Subject to Section 13, this EULA will terminate
automatically if LICENSEE fails to comply with any provision of
the License. If LICENSEE is a business entity or other entity, any
failure to comply with the terms and condition of this EULA by
any individual employed or engaged by such entity will be
deemed a failure to comply by LICENSEE. Upon any termination,
LICENSEE shall destroy all copies of Software and User Manual.
11. Warranty: (a)ecobee shall provide its standard Product and
Software limited warranty statement (“Customer Warranty”),
which equally applies to the Software embedded in the
Product, and which is incorporated by reference herein, with
the Product for your benefit only. In the event of an Error in
connection with the Software, refer to the Customer Warranty
and Terms
of Sale provided with the Product for further detail. (b) EXCEPT
FOR THE REPRESENTATIONS, WARRANTIES, AND COVENANTS
EXPRESSLY CONTAINED
IN THIS EULA, THE PRODUCT TERMS OF SALE AND THE PRODUCT
WARRANTY, THE SOFTWARE AND SOFTWARE DOCUMENTATION
AND ANY SUPPORT IS PROVIDED ON AN “AS IS” BASIS, AND
THERE ARE NO OTHER REPRESENTATIONS, WARRANTIES,
COVENANTS, OR CONDITIONS, EXPRESS OR IMPLIED (INCLUDING
ANY IMPLIED WARRANTIES OR CONDITIONS OF MERCHANTABLE
QUALITY OR FITNESS FOR A PARTICULAR PURPOSE AND THOSE
ARISING BY STATUTE OR OTHERWISE IN LAW OR FROM A COURSE
OF DEALING OR USAGE OF TRADE), INCLUDING, BUT NOT LIMITED
TO, NON-INFRINGEMENT, CORRECTNESS, FUNCTIONALITY,
RELIABILITY, ACCURACY, CURRENTNESS, OPERATION, USE
OR THE RESULTS OF THE USE BY LICENSEE, THAT THE OPERATION
OF THE SOFTWARE WILL BE UNINTERRUPTED OR ERROR-FREE (OR
THAT ALL ERRORS CAN OR WILL BE CORRECTED) OR THAT THE
SOFTWARE OR SOFTWARE DOCUMENTATION WILL MEET
LICENSEE’S REQUIREMENTS, ALL OF WHICH ARE EXPRESSLY
DENIED AND DISCLAIMED TO THE MAXIMUM EXTENT PERMITTED
BY LAW. SOME JURISDICTIONS DO NOT PERMIT LIMITATIONS ON
OR EXCLUSIONS OF CERTAIN IMPLIED WARRANTIES, OR THE
EXCLUSION OR LIMITATION OF CERTAIN
DAMAGES; THEREFORE THE ABOVE LIMITATIONS MAY NOT APPLY
TO YO U IN CERTAIN CIRCUMSTANCES. ecobee DISCLAIMS AND
SHALL HAVE NO LIABILITY TO LICENSEE FOR ANY AND ALL ACTS
OF THIRD PARTIES. NO OTHER PERSON IS AUTHORIZED TO EXTEND,
VARY OR TRANSFER ANY PROVIDED WARRANTY ON BEHALF OF
ecobee. THE ENTIRE RISK AS TO THE RESULTS AND PERFORMANCE
AND USE OF THE SOFTWARE, SOFTWARE DOCUMENTATION AND
ANY PROVIDED SUPPORT IS ASSUMED BY LICENSEE.
12. Limitation: IN NO EVENT AND TO THE MAXIMUM EXTENT
PERMITTED UNDER APPLICABLE LAW SHALL ECOBEE, ITS SHAREHOLDERS, AFFILIATES, CONTRACTORS, SUPPLIERS AND AGENTS
Page 40

40
AND THEIR RESPECTIVE DIRECTORS, OFFICERS AND EMPLOYEES
(COLLECTIVELY THE “ECOBEE PARTIES”) BE LIABLE TO LICENSEE
OR ANY THIRD PARTY FOR ANY INDIRECT, INCIDENTAL,
EXEMPLARY, SPECIAL, PUNITIVE OR CONSEQUENTIAL DAMAGES
(INCLUDING WITH RESPECT TO LOSS OF, OR DAMAGE TO, DATA
OR COMPUTER SYSTEMS OR RELIANCE ON ANY DATA DERIVED
FROM LICENSEE’S USE OF THE SOFTWARE, OR LOSS OF REVENUE
OR PROFIT OR OTHER ECONOMIC LOSS) OF ANY KIND OR
NATURE WHATSOEVER SUFFERED BY LICENSEE OR ANY THIRD
PARTY HOWSOEVER CAUSED AND WHETHER RESULTING FROM
THE USE OF OR INABILITY TO USE THE SOFTWARE OR OTHERWISE
(INCLUDING
AS A RESULT OF OR DUE TO USE OF OR RELIANCE ON THE
SOFTWARE AND/OR ecobee WEB PORTAL) AND REGARDLESS OF
THE FORM OR CAUSE OF ACTION, EVEN IF SUCH DAMAGES ARE
FORESEEABLE OR ecobee HAS BEEN ADVISED OF THE POSSIBILITY
OF SUCH DAMAGES. ECOBEE PARTIES’ TOTAL LIABILITY
AND OBLIGATION TO LICENSEE, IN THE AGGREGATE FOR ANY
AND ALL CLAIMS ARISING OUT OF OR IN ANY CONNECTION WITH
THIS EULA, THE TERMS OF SALE IN CONNECTION WITH YOUR
PURCHASE OF THE PRODUCT AND YOUR USE OF
THE SOFTWARE AND PRODUCT, WITH RESPECT TO ANY EXPENSE,
DAMAGE, LOSS, INJURY, OR LIABILITY OF ANY KIND, REGARDLESS
OF THE FORM OF ACTION OR THEORY OF LIABILITY (INCLUDING
FOR BREACH OF CONTRACT, TORT, NEGLIGENCE, BY STATUTE OR
OTHERWISE) SHALL BE LIMITED TO THE ACTUAL DIRECT DAMAGES
SUFFERED AND SHALL NOT EXCEED AN AMOUNT THAT IS
EQUIVALENT TO THE PURCHASE PRICE OF THE ecobee PRODUCT
ACTUALLY PAID BY LICENSEE. THIS SECTION SHALL SURVIVE A
FUNDAMENTAL BREACH OR BREACHES AND/OR FAILURE OF THE
ESSENTIAL PURPOSE OF THE AGREEMENT.
13. Survival: The parties acknowledge and agree that the
provisions of Sections 2, 6, 7, 9, 11(b), 12, 13, 14, 15, 16 and 17
shall survive any termination of this EULA for any reason.
14. English Language: The parties declare that they have
required that this agreement and all documents related hereto,
either present or future, be drawn up in the English language
only. Les parties de clarent par les pre sentes qu’elles exigent que
cette entente et tous les documents y affe rents, soit pour le
pre sent ou le futur, soient re dige s en langue anglaise
seulement.
15. Jurisdiction: This EULA shall be exclusively governed by,
construed and interpreted 38 in accordance with the laws of
the Province of Ontario, Canada. For the purpose of all legal
proceedings this EULA shall be deemed to have been
performed in the Province of Ontario, Canada and the parties
expressly confirm that the law of the Province of Ontario is the
proper law. If Customer is located in a jurisdiction other than
Canada, the parties agree that neither the United Nations
Convention of the International Sale of Goods or the (U.S.)
Uniform Computer Information Transactions Act shall apply to
this EULA. The parties irrevocably attorn to the non- exclusive
jurisdiction of the Courts of the Province of Ontario in respect of
all matters and disputes arising hereunder.
16. Export Law Assurances: LICENSEE acknowledges that the
Software may be subject to export and import control laws, and
agrees to comply fully with those laws in connection with the
Software.
17. General Provisions: No delay or omission by ecobee to
exercise any right or power it has under this EULA or to object to
the failure of any covenant of LICENSEE to be performed in a
timely and complete manner, shall impair any such right or
power or be construed as a waiver of any succeeding breach
or any other covenant. Any waivers by ecobee must be in
writing and signed by an authorized representative of ecobee.
If any provision of this EULA is held by a court of competent
jurisdiction to be invalid or unenforceable in any respect, then
the remaining provisions of this EULA, or the application of
such provisions to persons or circumstances other than those as
to which it is invalid or unenforceable shall not be affected
thereby, and each such provision of this EULA shall be valid and
enforceable to the extent granted by law. The EULA constitutes
the entire agreement between the parties as it relates to the
Page 41

41
license and use of the Software and User Manual and the
subject matter of this EULA and supersedes all prior or
contemporaneous agreements, negotiations, representations
and proposals, written or oral between ecobee and LICENSEE.
The EULA may only be amended or supplemented by written
agreement executed by each of the parties.
 Loading...