

Page 1

Outdoor Wi-Fi Smart Box
N.O. Contacts:
40A Resistive, 120~277VAC
1HP, 16A FLA, 96A LRA, 120VAC
2HP, 10A FLA, 60A LRA, 277VAC
30A Ballast, 120VAC
20A Ballast, 277VAC
15A Tungsten, 120VAC
30A Resistive, 28VDC
N.C. Contacts:
30A Resistive, 120~277VAC
1HP, 16A FLA, 96A LRA, 120VAC
2HP, 12A FLA, 72A LRA, 240VAC
2A Tungsten, 120VAC
10A Ballast, 120VAC
10A Ballast, 277VAC
20A Resistive, 28VDC
CAUTION!
!
wet location conduit hubs that comply with requirements of
For outdoor use. For installation, rain-tight or
UL 514B Conduit, Tubing, and Cable Fittings must be used.
Installation should be made by a licensed electrician.
Note:
Turn power OFF at the circuit breaker before installation.
READ ALL INSTRUCTIONS before using the ECO Smart Box.
Power Indicator
ECO Status Indicator
Blinking Light: Ready to
connect to Wi-Fi router.
Light continuously ON:
Connection to Wi-Fi
router is complete and
the ECO Smart Box is
ready for use via the app.
Light OFF: Check your
internet connection or
Power Button
Press this
button to
manually
override the
ECO Smart
Box and turn
the unit ON/OFF.
Reset Button
review the app FAQ.
IMPORTANT:
Please refer to INSTALLATION INSTRUCTION SHEET
before proceeding with Wi-Fi router connection. ECO Smart Box
must be installed before connecting to Wi-Fi router.
Choose a Network
STEP 2:
Tap the
ECO icon
Device [ECO-XXXXXXXX] Ver: XXX
Home Router
Other Router A
Other Router B
Select the Wi-Fi router that you want to
link to the ECO Smart Box. (Note: It may
take a few seconds for network communication).
STEP 3: Fill in the information (Note: US
residents enter your five-digit ZIP code,
Canadian residents enter your three-digit
telephone number area code). When
Enter Zip Code:
Name Device:
(such as lamp or fan)
finished filling in the information, click
the SAVE SETTINGS or JOIN button.
Enter Wi-Fi Router Password:
(In iOS: if you can't find the JOIN
button, click in the “Password” box).
TO ADD ADDITIONAL ECO SMART BOXES TO THE APP: Repeat steps
1-3 for each additional ECO Smart Box. Remember to give each box a
different name (for example, Master Bedroom, Home Office, etc.).
Note: Each ECO Smart Box can be wired to control one or two circuits.
To control more than two circuits, add additional ECO Smart Boxes.
More: Learn more about this app,
including an FAQ section.
Usage: Function is not available
on this device.
TO CONNECT THE ECO SMART BOX TO A WI-FI ROUTER
• With the ECO Smart Box installed, if the blue light is blinking you can
proceed to the next step to begin the smart phone setup. If not blinking,
you must reset the ECO Smart Box as described in the FAQ section on
the reverse side of this sheet. Make sure the controlled device(s) are
switched ON. Note: the blue light will continue blinking until the setup
is finished via the smartphone app.
• Once you are finished connecting the ECO Smart Box to a Wi-Fi router,
the blue light will remain on continuously to indicate that Wi-Fi connection
has been established and the ECO Smart Box is accessible via the app.
DOWNLOAD
THE ECO APP:
(iOS 7 or higher)
(Version 4 or higher)
STEP 1:
Tap Smartphone’s
Settings icon
Tap the
Wi-Fi icon
Select the
ECO Smart Box
Settings: To set your Wi-Fi Smart Box,
transfer local Wi-Fi to cloud mode, or to
rename the ECO Smart Box.
Timer: To set ON/OFF programs (up to a
maximum of 12 Custom ON/OFF events).
Cloud Icon: Activates remote access
function of device through 3G, 4G, LTE,
public Wi-Fi network, or other Wi-Fi router.
Mailbox: To email consumer service or
share app feedback.
Programmable Timer: To set custom
ON-OFF events.
Countdown Timer: The controlled device
will turn off after selected time.
Astronomic Timer: The controlled device
will turn on or off at sunset or sunrise.
Vacation Random: The controlled device
will turn on or off randomly between one
of three time frames (night, day, all day).
Security Random: The controlled device
will turn on and off randomly between
chosen start and end times.
Page 2
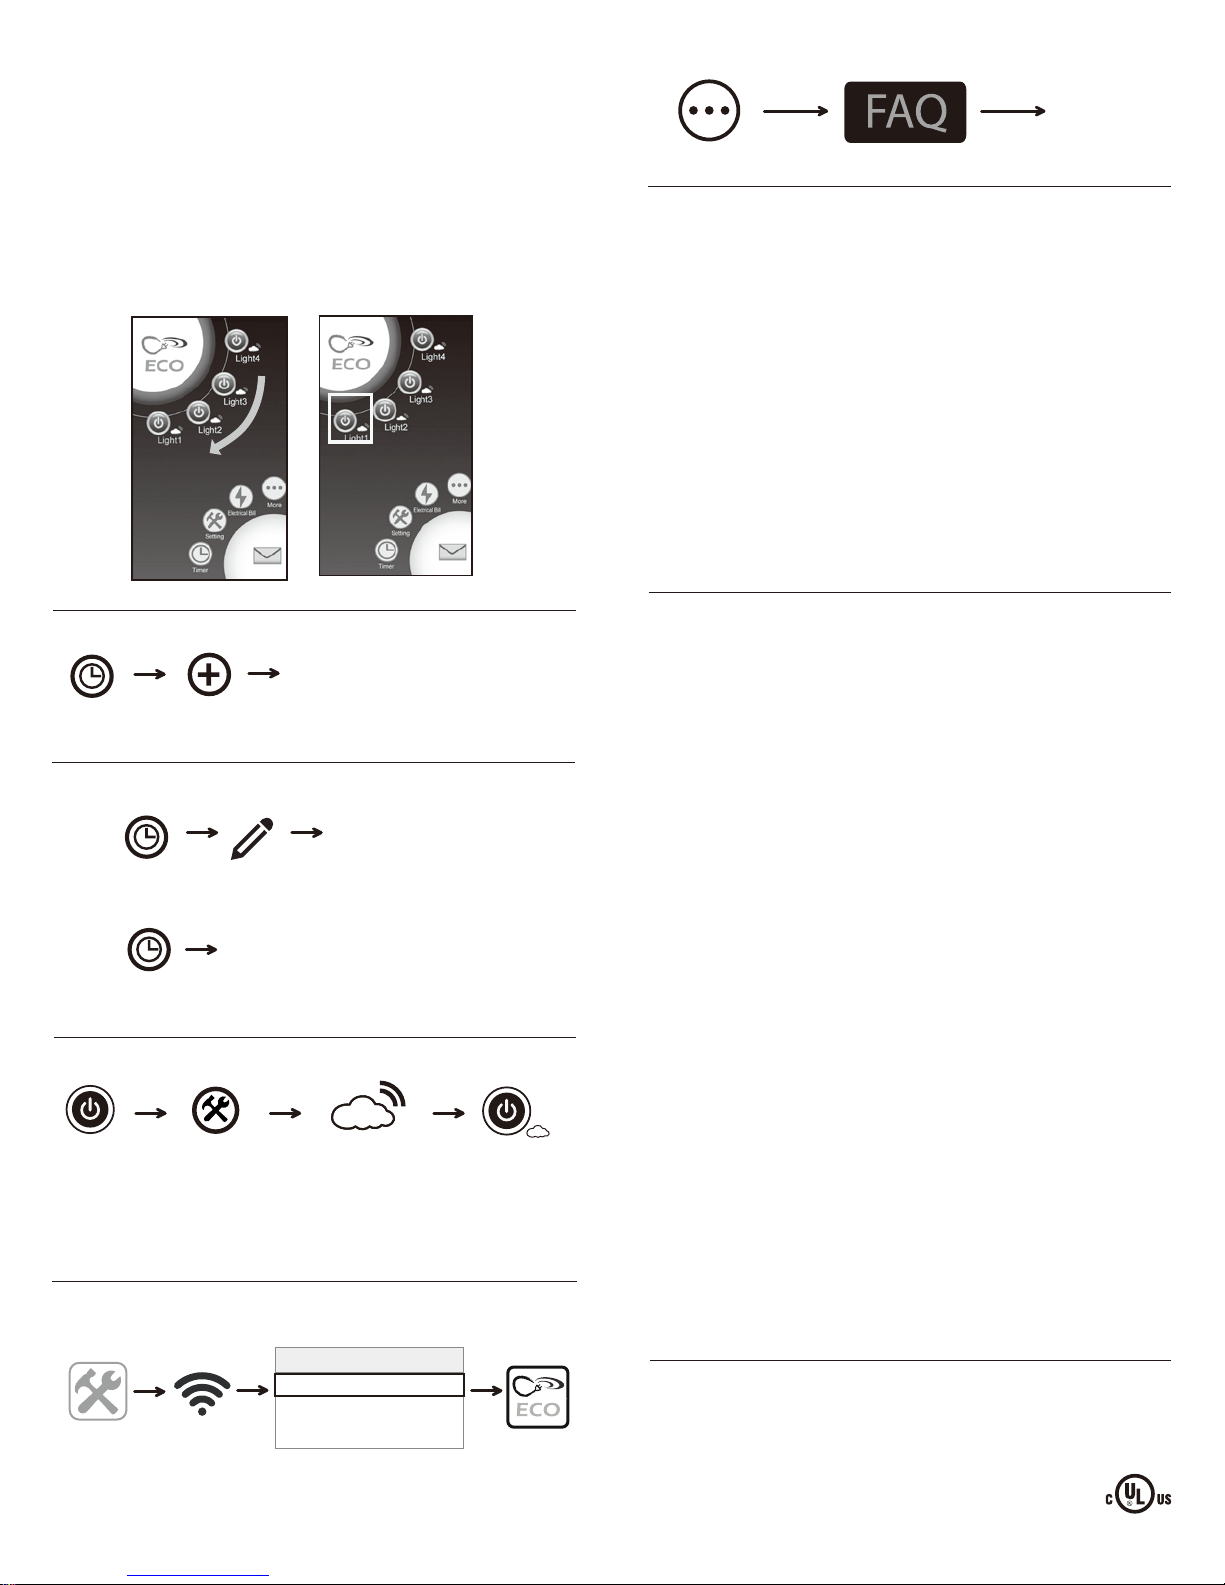
SELECTING WHICH DEVICE TO CONTROL: If you have multiple ECO
Smart Boxes connected to the app, you can choose which device you
want to access (such as Master Bedroom, Home Office, etc.).
To select the device, slide the desired icon to the lower left position. The
ECO Smart Box name (such as “Master Bedroom,” below), will change
color from white to green. Chosen device is now able to be programmed or
edited, such as changing timer settings, updating cloud service, etc.
Note: You can connect to a maximum of twelve (12) ECO Smart Boxes via
the app. You can expand your system to include ECO surge protectors,
indoor or outdoor switches, and more!
PROGRAMMING THE TIMER
• Select the timer function from the list
• Select on/off times for desired hours,
minutes and days
Tap the
Timer icon
Tap the
Add icon
• Tap the checkmark to accept
EDITING THE TIMER PROGRAM
iOS:
Click the arrow that appears on the
right of that setting to enter editing
mode.
Android:
Tap the
Timer icon
Tap the
Edit icon
Select the program to edit, tap and hold
until the edit pop-up window appears.
Tap the
Timer icon
TO ACTIVATE CLOUD SERVICE
FREQUENTLY ASKED QUESTIONS
Or send your
question
via email
Tap the More icon
Tap the FAQ link
TO RESET THE ECO SMART BOX: If you decide to connect this device to
a new router, or are having trouble setting up this device after multiple
attempts, try resetting the ECO Smart Box.
• Press and hold the Power button while at the same time pressing the
Reset button with the tip of a toothpick or similar non-conductive item.
Continue holding the Power button for 3-5 seconds until the Wi-Fi Status
Indicator light turns off.
• When the Wi-Fi Status Indicator light turns off, release the Power button
and the ECO Smart Box has been reset.
• After a few seconds the Wi-Fi Status Indicator light will begin blinking
and the ECO Smart Box is ready to be reconnected to the Wi-Fi router via
the app.
This process removes any programmed settings, disconnects the app
connection to the Wi-Fi router, and restores the ECO Smart Box to the
factory default setting.
FEDERAL COMMUNICATIONS COMMISSION INTERFERENCE STATEMENT
INDUSTRY CANADA STATEMENT
This equipment has been tested and found to comply with the limits for a Class B
digital device, pursuant to part 15 of the FCC Rules. These limits are designed to
provide reasonable protection against harmful interference in a residential installation.
This equipment generates, uses, and can radiate radio frequency energy, and if not
installed and used in accordance with the instructions, may cause harmful interference to radio or television reception, which can be determined by turning the
equipment on and off. The user is encouraged to try to correct the interference by
one or more of the following measures:
• Reorient or relocate the receiving antenna
• Increase the separation between the equipment and the remote receiver.
• Connect the equipment into an outlet on a circuit different from that to which the
receiver is connected
• Consult the dealer or an experienced radio/TV technician for help.
This device complies with Part 15 of the FCC Rules.
Industry Canada Statement: This Class B digital apparatus complies with Canadian
ICES-003. This device complies with Industry Canada license exempt RSS standard(s).
Operation is subject to the following two conditions: (1) This device may not cause
interference, and (2) this device must accept any interference, including interference
that may cause undesired operation of the device.
Cloud
status
inactive
Tap
Settings
icon in the app
Add device
to the cloud
Note: To remove cloud service, follow the same steps and tap Remove
device from the cloud.
TO ADD MULTIPLE USERS TO THE ECO OUTLET (Repeat steps below for
each additional user):
Choose a Network
Home Router
Other Router A
Tap Settings
icon of
additional
user’s
Tap the
Wi-Fi
icon
Other Router B
Link to the same home router
as used by first smartphone
or tablet
smartphone
Cloud status
activated
Tap the
ECO icon
FCC Caution: Any changes or modifications not expressly approved by the party
responsible for compliance could void the user's authority to operate this equipment.
FCC and IC Radiation Exposure Statement: This equipment complies with FCC and
IC RSS-102 radiation exposure limits set forth for an uncontrolled environment.
This equipment should be installed and operated with a minimum distance of 20cm
between the radiator and your body.
Contains FCC ID: PAGECO-PLUG
Contains IC: 4494A-ECOPLUGS
CAN ICES-3(B)/NMB-3(B)
Apple is a registered trademark of Apple Inc.
Android is a registered trademark of Google Inc.
iOS is a trademark or registered trademark of Cisco in
the U.S. and other countries and is used under license.
Wi-Fi™ is a trademark of Wi-Fi Alliance
®
Page 3

Outdoor Wi-Fi Smart Box INSTALLATION INSTRUCTIONS
WARNING: This timer should be installed by a licensed electrician. Turn power off at main panel before servicing this switch or the
!
equipment it controls.
IMPORTANT: For outdoor use. Rain-tight or wet location conduit, hubs, tubing, and cable fitings that comply with requirements
of UL 514B must be used for installation.
1.
Read Important Safety Information below before beginning installation.
2.
Open outer cover by releasing the spring latch.
3.
Remove the interior protective cover by removing the two screws holding the cover in place (Figure 1).
4.
Select the knockouts to be used. Remove the inner 1/2” knockout by inserting a screwdriver in
the slot and carefully punching the knockout loose. Remove slug. If 3/4” knockout is required,
also remove the outer ring with pliers after removing the 1/2” knockout. Smooth any rough edges
with a file or sandpaper, if necessary.
5.
Place the Smart Box in the desired mounting location and mark the location of the mounting
keyhole. Install a screw at mark and drive partially in place. Attach Smart Box by placing keyhole
over screw; then tighten screw firmly.
Figure 1
Figure 2
6.
Wire in accordance with national and local codes (see wiring diagrams below). Use only copper
conductors, #8 AWG wire, suitable for at least 175° F (80° C). Tighten all connections to 12in-Ibf.
7.
Grounding: Terminate all ground wires to grounding lug at the bottom of enclosure (Figure 2).
8.
Replace interior protective cover.
9.
Close outer cover. Smart Box is now ready to be connected to the WiFi router via the app.
Important Safety Information
!
WARNING: Risk of Fire or Electric Shock. Read instructions thoroughly before installation and preserve for future reference.
Disconnect power at circuit breaker and test that power is off before installing (or servicing) the Smart Box (more than one circuit breaker or disconnect switch may be
required to fully disconnect power).
Wiring must be in accordance with all national and local electrical code requirements. Inspect all terminals and wires with voltage meter before touching. The maximum total
load to be controlled must not exceed Smart Box capacity.
The Smart Box enclosure does not provide grounding between conduit connectors. When metallic conduit is used, you must also
install grounding type bushings and jumper wires in accordance with National Electrical Code (NEC) requirements.
Page 4

Outdoor Wi-Fi Smart Box INSTALLATION INSTRUCTIONS
SMART BOX TERMINAL DESIGNATIONS
SMART BOX TYPICAL APPLICATION WIRING DIAGRAMS
Note: Smart Box is capable of being configured for 120
VAC, 240VAC
or 277VAC.
*J1 & J2 are 16 AWG jumper wire for the timer power supply.
120VAC Application Controlling
One 120VAC Load
120VAC Application Controlling
Two 120VAC Loads
L = Line | N = Neutral | NO = Normally Open | NC = Normally Closed
COM = Common Terminal | J = Jumper Wire | T = Timer
HOT WATER HEATER TYPICAL WIRING DIAGRAM
HOT WATER TANK
120VAC
120VAC
SMART BOX
(J1)
(J2)
240VAC Application Controlling
One 240VAC Load
(J1)
(J2)
(J1)
(J2)
277VAC Application Controlling
Two 277VAC Loads
(J1)
(J2)
120VAC
120VAC
* J1 & J2 are 16 AWG jumper wire for the timer
power supply.
L1
T
N NC2 N02 COM2 NC1 NO1 COM1
L
L2/N
J2
J1
120VAC
120VAC
Circuit Breaker Box
240VAC
(Dualphase)
L1 L2
Made in China
 Loading...