

Page 1

END USER LICENSING AGREEMENT
Microsoft, Inc.
You have acquired an ECO™ which includes software licensed by Prentke Romich Company from Microsoft
Licensing Inc. or its affiliates ("MS"). Those installed software products of MS origin, as well as` associated media,
printed materials and "online" or electronic docum ent at i on ( s oftware) are protected by international intellectual
property laws and treaties.
IF YOU DO NOT AGREE TO THIS END USER LICENSE AGREEMENT (EULA), DO NOT USE THE DEVICE OR COPY THE
SOFTWARE. INSTEAD, PROMPTLY CONTACT PRENTKE ROMICH COMPANY FOR INSTRUCTIONS ON RETURN OF THE
UNUSED DEVICE(S) FOR A REFUND. ANY USE OF THE SOFTWARE, INCLUDING BUT NOT LIMITED TO USE ON THE
DEVICE, WILL CONSTITUTE YOUR AGREEMENT TO THIS EULA (OR RATIFICATION OF ANY PREVIOUS CONSENT).
GRANT OF SOFTWARE LICENSE.
This EULA grants you the following license:
• You may use the SOFTWARE only on the PATHFINDER.
• NOT FAULT TOLERANT. THE SOFTWARE IS NOT FAULT TOLERANT. PRC HAS INDEPENDENTLY DETERMINED
HOW TO USE THE SOFTWARE AND MS HAS RELIED UPON PRC TO CONDUCT SUFFICIENT TESTING TO DETERMINE
THAT THE SOFTWARE IS SUITABLE FOR SUCH USE.
• NO WARRANTIES FOR THE SOFTWARE. THE SOFTWARE is provided "AS IS" and with all faults. THE ENTIRE RISK
AS TO SATISFACTORY QUALITY, PERFORMANCE, ACCURACY, AND EFFORT (INCLUDING LACK OF
NEGLIGENCE) IS WITH YOU. ALSO THERE IS NO WARRANTY AGAINST INTERFERENCE WITH YOUR
ENJOYMENT OF THE SOFTWARE OR AGAINST INFRINGEMENT. IF YOU HAVE RECEIVED ANY WARRANTIES
REGARDING THE DEVICE OR SOFTWARE, THOSE WARRANTIES DO NOT ORIGINATE FROM, AND ARE NOT
BINDING ON, MS.
• Note on Java Support. The SOFTWARE may contain support for programs written in Java. Java
technology is not fault tolerant and is not designed, manufactured, or intended for use or resale as online
control equipment in hazardous environments requiring fail-safe performance, such as in the operation of
nuclear facilities, aircraft navigation or communication systems, air traffic control, direct life support
machines, or weapons systems, in which the failure of Java technology could lead directly to death,
personal injury or severe physical or environmental damage. Sun Microsystems, Inc. has contractually
obligated MS to make this disclaimer.
• No Liability for Certain damages. EXCEPT AS PROHIBITED BY LAW, MS SHALL HAVE NO LIABILITY FOR
ANY INDIRECT, SPECIAL CONSQUENTIAL OR INCIDENTAL DAMAGES ARISING FROM OR I N CONNECTI ON
WITH THE USE OR PERFORMANCE OF THE SOFTWARE. THIS LIMITATION SHALL APPLY EVEN IF ANY
REMEDY FAILS OF ITS ESSENTIAL PURPOSE. IN NO EVENT SHALL MS BE LIABLE FOR ANY AMOUNT IN
EXCESS OF U.S. TWO HUNDRED FIFTY DOLLARS (U.S. $250.00).
• Limitations on Reverse Engineering, Decompilation and Disassembly. You may not reverse engineer,
decompile, or disassemble the SOFTWARE, except and only to the extent that such activity is expressly
permitted by applicable law notwithstanding this limitation.
• SOFTWARE TRANSFER ALLOWED BUT WITH RESTRICTIONS. You may permanently transfer
rights under this EULA only as part of a permanent sale or transfer of the Device, and only if the recipient
agrees to this EULA. If the
SOFTWARE.
SOFTWARE is an upgrade, any transfer must also include all prior versions of
• EXPORT RESTRICTIONS. You acknowledge that SOFTWARE is subject to U.S. export jurisdiction.
You agree to comply with all applicable international and national laws that apply to the
SOFTWARE,
including U.S. Export Administration Regulations, as well as end-user, end-use and destination restrictions
issued by U.S. and other governments. For additional information see
http://www.microsoft.com/exporting/.
ECO Manual
14364v2.0
Page 2

Page 3

™
ECO
Operator's Manual
PRENTKE ROMICH COMPANY
1022 Heyl Rd. • Wooster, Ohio 44691
Telephone: (330) 262-1984
Fax: (330) 263-4829
E-Mail Address: [email protected]
Web Site Address: www.prentrom.com
Prentke Romich International
Liberator Ltd. • Minerva Business Park
Lynch Wood • Peterborough
Tel: 0845 226 1144
Fax: 0845 226 1166
Email:
PE2 6FT • UK
ECO Manual
14364v2.0
Page 4

Data can be uploaded from this unit to a personal computer for storage on a hard disk, CD, or other storage medium. Be sure to make multiple
copies of all important data to protect against accidental loss.
ECO, Vantage, Vanguard II, Vanguard, Pathfinder, SpringBoard, WordCore, Language Activity Monitor (LAM), Memory Transfer Interface (MTI) and
PRC Infrared Receiver (IRR) are trademarks of Prentke Romich Company.
Minspeak is a registered trademark of Semantic Compaction Systems. Minspeak uses the methodology derived from the concepts covered by U.S
Patent Numbers 4,661,916; 5,097,425; 5,210,689 and subsequent patents and applications of Bruce Baker.
Unity is a registered trademark, in the USA, UK and Canada, of Semantic Compaction Systems.
MinTalk is a trademark of Semantic Compaction Systems.
PCS Symbols are a product of Mayer-Johnson.
Fonix-DECtalk Text-to-Speech software is a copyright of Fonix Corporation; all rights reserved.
RealSpeak Text-to-Speech is a trademark of Nuance Communications, Inc.
AT&T Natural Voices is a trademark of AT&T Corporation.
Acapela speech technologies licensed from the Acapella Group.
Non-English text-to-speech supplied by the Acapela Group and RealSpeak Text-to-Speech, a trademarked product of Nuance Communications, Inc.
Windows, WindowsXP, Windows Explorer, Windows Media Player, Microsoft Outlook, Microsoft Word, Windows WordPad and Microsoft PowerPoint
are registered trademarks of Microsoft, Inc.
IBM is a registered trademark of International Business Machines.
Tracker is a trademark of Madentec, Inc.
Headpointing technology by Madentec
IntelliTools is a registered trademark of IntelliTools, Inc.
HeadMouse is a trademark of Origin Instruments, Inc.
Bluetooth Wireless Technology is a registered trademark. The Bluetooth word mark and logos are owned by the Bluetooth SIG, Inc. and any use of
such marks by PRC is under license. Other trademarks and trade names are those of their respective owners.
WordQ is a trademark of Bloorview MacMillan Children's Centre
Paint Shop Pro software is copyrighted by JASC Software, Inc.Inmage Viewer/32 is shareware from SB Software.
Digital photos of the devices courtesy of Doug Miller
ELECTRONIC INTERFERENCE INFORMATION
This device complies with Part 15 of the FCC Rules. Operation is subject to two conditions: (1) this device may not cause harmful interference, and (2)
this device must accept any interference received, including interference that may cause undesired operation.
Warning! Changes or modifications to this product which are not authorized by Prentke Romich Company could exceed FCC limits and negate your
authority to use this product.
This equipment has been tested and found to comply with the limits for a Class B digital device, pursuant to Part 15 of the FCC Rules. These limits are
designed to provide reasonable protection against harmful interference in a residential installation. This equipment generates, uses and can radiate
radio frequency energy and, if not installed and used in accordance with the instructions, may cause harmful interference to radio communications.
However, there is no guarantee that interference will not occur in a particular installation. You can determine whether this product is causing
interference in your radio or television by turning this product off. If the interference stops, it was probably caused by this product or one of its
accessories. You can attempt to correct the interference by using one or more of the following measures:
• Turn the television or radio antenna until the interference stops.
• Move this product to one side or the other of the television or radio.
• Move this product farther away form the television or radio.
• Plug this product into an outlet that is on a different circuit from the television or radio; that is, this product should be controlled by different circuit
breakers/fuses from the television or radio.
• If necessary, contact a Prentke Romich Company service technician for assistance.
Bluetooth Adapter
This device complies with Part 15 of the FCC Rules. Operation is subject to the following two conditions: (1) this device may not cause
harmful interference, and (2) this device must accept any interference received, including interference that may cause undesired operation.
This device contains FCC-ID POOWML-C40. Bluetooth QD ID B013848
This Class B digital apparatus meets all requirements of the Canadian Interference-Causing Equipment Regulations. Cet appareil numérique de la
classe B respect toutes les exigences du Règlement sur le matériel brouiller du Canada.
CE ENVIRONMENTAL INFORMATION: Use: 0
o
40
C.
CLASS 1 LED PRODUCT –The Tracker Headpointing option falls within the limits of a Class 1 LED product as specified by CENELEC EN 60825-1,
Amendments 1 and 2.
o
- 45o C; Storage: (-20o) - 50o C; 95% maximum relative humidity @ ambient temperatures less than
Attention! Consult accompanying documents.
Not intended to be an emergency call device or sole communication device.
Warnings!
When operating this device in a medical environment, do not use with any product that is not medically approved.
Any mounts used should be fitted by a qualified person.
Failure to install the mounting system according to the manufacturer's instructions may result in an injury to the user.
©Prentke Romich Company 2007-2009. All rights reserved. Under copyright laws this manual may not be copied, in whole or in part, without the
written consent of the Prentke Romich Company.
ECO MANUAL
iv
Page 5
Remove your device from
Shipping Mode
To conserve the batteries,
your device was put in Shipping Mode at the factory
before it was sent to you.
To use it you must take it out of Shipping Mode:
Plug in your battery charger and then press the key
on the front of the case.
It will take a few moments for the device to boot up.
Prentke Romich Company • 1022 Heyl Rd. • Wooster, Ohio 44691 • (800) 262-1984
ECO MANUAL
v
Page 6

About the RESTORE Disk
In the event that your device's hard drive or the Windows system quit working,
you will have to use the RESTORE disk that came in a separate mailer.
Unless you are very familiar with computers and understand when and how to use
a RESTORE disk,
call the PRC Service Department first and tell them what is wrong with your
device before you attempt to use the RESTORE disk.
Warning!
Never remove the battery in this device to
perform a re-set.
ECO MANUAL
vi
Page 7

Table of Contents
GETTING ACQUAINTED WITH YOUR ECO....................................................................................................11
The Front Panel ...........................................................................................................................................................12
The Top of the ECO....................................................................................................................................................14
The Back of the ECO...................................................................................................................................................15
The Right Side Panel...................................................................................................................................................16
Battery Door and Batteries ..........................................................................................................................................17
Left Side Panel ............................................................................................................................................................18
The Display Areas.......................................................................................................................................................19
Different Ways to Turn your Device Off.....................................................................................................................21
About the Batteries in your ECO.................................................................................................................................23
The Touch Screen and the Exploration Wizard...........................................................................................................25
The Unity® 60 Sequenced Overlay..............................................................................................................................27
About Minspeak®........................................................................................................................................................29
Icon Prediction Shows Where You Have Messages Stored ........................................................................................30
About the Color-Coded Toolbox.................................................................................................................................32
Change the Speaker Volume .......................................................................................................................................33
About the CALL Tool in the Toolbox.........................................................................................................................34
SETTING UP YOUR COMMUNICATION DEVICE..........................................................................................35
About Setting Up your Device ....................................................................................................................................36
Select a User Area.......................................................................................................................................................37
Access Methods...........................................................................................................................................................43
The ACCESS METHOD MENU................................................................................................................................45
Touch Options.............................................................................................................................................................47
1 Switch Scanning Methods........................................................................................................................................48
1 Switch Scanning Options.......................................................................................................................................... 50
2 Switch Scanning Methods........................................................................................................................................52
2 Switch Scanning Options.......................................................................................................................................... 53
Headpointing/Joystick Methods ..................................................................................................................................56
Joystick Options ............................................................................................................... ...........................................56
Tracker Headpointing Options ....................................................................................................................................58
Mouse/Trackball/USB Joystick Options .....................................................................................................................61
The FEEDBACK MENU............................................................................................................................................64
FEEDBACK MENU Options......................................................................................................................................65
SPEECH MENU Options............................................................................................................................................67
The AUDITORY PROMPT MENU............................................................................................................................70
The OUTPUT MENU .................................................................................................................................................73
Save Your Set-Up Settings..........................................................................................................................................75
Store the "Use Settings" Keys on your Overlay ..........................................................................................................76
WORD PREDICTION..............................................................................................................................................77
About Minspeak® and Word Prediction ......................................................................................................................78
Spell and Select Words................................................................................................................................................79
Word Prediction Options.............................................................................................................................................82
USING THE CORE VOCABULARY OVERLAY................................................................................................89
About Core Vocabulary and Activity Row Vocabulary..............................................................................................90
Recorded and Computer Speech..................................................................................................................................91
Before You Begin to Store, Plan What You Want to Say...........................................................................................91
TABLE OF CONTENTS
ECO Manual
vii
Page 8

Record a Vocabulary Message ....................................................................................................................................92
Erase a Recorded Message..........................................................................................................................................99
Store a Computer Speech Message............................................................................................................................100
Edit a Computer Speech Message.............................................................................................................................104
Completely Erase the Contents of a Key...................................................................................................................105
Link an Icon Sequence to an already Created Page...................................................................................................105
Hide Vocabulary Keys...............................................................................................................................................107
Swap Core Vocabulary Keys on Your Overlay.........................................................................................................109
ACTIVITIES............................................................................................................................................................111
Activities....................................................................................................................................................................112
Set Activity Template................................................................................................................................................113
Create a New Activity—An Example .......................................................................................................................115
Dynamic Activities....................................................................................................................................................117
Erase a Dynamic Activity Link; Review All Dynamic Activities.............................................................................118
About the Picture Prediction Option..........................................................................................................................119
Modify an Already Existing Activity ........................................................................................................................122
Link an Activity to a Page or to another Activity......................................................................................................123
Copy Pages/Activities from your Current User Area to Another User Area.............................................................125
Copy Activities or Pages from One Device to Another.............................................................................................127
PAGES......................................................................................................................................................................129
About Custom Pages .................................................................................................................................................130
Set Page Template.....................................................................................................................................................131
Create a Custom Page................................................................................................................................................133
Go to Your Custom Page...........................................................................................................................................136
Modify a Custom Page..............................................................................................................................................137
Context Scene Pages..................................................................................................................................................144
Add Links to other Pages on your Scene Page..........................................................................................................152
Link your Scene Page to the MY SCENES page. .....................................................................................................153
Copy Pages/Activities from your Current User Area to Another User Area.............................................................155
Copy Activities or Pages from One Device to Another.............................................................................................157
Expand a User Area or Page......................................................................................................................................158
STORE/ASSIGN TOOLS AND MACROS IN CORE, ACTIVITIES AND PAGES........................................163
To Store a Tool Use the INSERT TOOL Key on the Spelling Keyboard.................................................................164
Store a Tool Under an Icon Sequence .......................................................................................................................164
Assign a Tool to a Core Key......................................................................................................................................165
Erase the Tool and Restore the Original Icon............................................................................................................166
Assign a Tool to an Activity Row Key......................................................................................................................167
About Macros............................................................................................................................................................168
Store a Macro Under an Icon Sequence.....................................................................................................................169
Assign a Macro to a Core Key...................................................................................................................................171
Erase Macros.............................................................................................................................................................172
Change All Occurrences of an Icon...........................................................................................................................173
Copy or Erase all Sequences Beginning with Selected Icon(s).................................................................................174
REVIEW VOCABULARY.....................................................................................................................................175
Using the REVIEW VOCABULARY MENU..........................................................................................................176
Using the "Review to File" Option............................................................................................................................177
Icon Tutor Options.....................................................................................................................................................177
NOTEBOOKS..........................................................................................................................................................179
Creating and Using Notebooks..................................................................................................................................180
The Notebook Workspace .........................................................................................................................................180
New Notebooks .........................................................................................................................................................181
Close a Notebook; Save a Notebook.......................................................................................................................182
Open or Delete a Notebook .......................................................................................................................................182
TABLE OF CONTENTS
ECO Manual
viii
Page 9

Rename a Notebook; Transfer a Notebook to a Com puter File.................................................................................183
Print a Notebook........................................................................................................................................................184
Speak a Notebook; Lock a Notebook.......................................................................................................................185
Copy a Notebook from One Area to Another............................................................................................................186
Store a Notebook under an Icon Sequence................................................................................................................186
Save/Load a Notebook...............................................................................................................................................187
Editing Tools.............................................................................................................................................................188
THE SPEECH DICTIONARY...............................................................................................................................191
The Speech DICTIONARY MENU..........................................................................................................................192
Add Words to the Dictionary.....................................................................................................................................193
Delete Words from the Dictionary.............................................................................................................................193
Review Words in the Dictionary ...............................................................................................................................194
CALCULATOR.......................................................................................................................................................195
Using the Calculator..................................................................................................................................................196
THE MAINTENANCE MENU..............................................................................................................................199
The MAINTENANCE MENU..................................................................................................................................200
TRANSFER MEMORY MENU ............................................................................................................................205
About Memory Transfers ..........................................................................................................................................206
Memory Transfer using a USB Flash Drive..............................................................................................................207
Importing Icons/Photos (graphics).............................................................................................................................208
Load Icons from an MTI File....................................................................................................................................209
Save Pages and Activities/Load Pages and Activities...............................................................................................210
Load an IR Device/Save an IR Device......................................................................................................................211
Import Scenes............................................................................................................................................................212
Using the FILE ORGANIZER..................................................................................................................................213
USING THE CELL PHONE..................................................................................................................................215
Before You Begin......................................................................................................................................................216
Enable the Phone Card ..............................................................................................................................................217
Phone Tools...............................................................................................................................................................219
Using the Dial Pad.....................................................................................................................................................220
Using the Phone Directory.........................................................................................................................................222
Adjusting Caller and Listener Volume......................................................................................................................223
Send a Text Message.................................................................................................................................................224
Read a Text Message .................................................................................................................................................224
Using the Internal Microphone to Speak...................................................................................................................225
USING THE MP3 PLAYER MENU.....................................................................................................................227
Listening to Music with your Communication Aid (MP3, WAV and WMA files)...................................................228
About the Options in the MP3 PLAYER MENU......................................................................................................229
Creating and Using Playlists......................................................................................................................................231
Music Tools...............................................................................................................................................................232
About Importing Sound Files to Store on your Overlay............................................................................................233
Store a Sound File under an Icon or Icon Sequence on your Overlay.......................................................................234
Using the FILE ORGANIZER..................................................................................................................................235
USING A REMOTE CONTROL...........................................................................................................................237
Using your Communication Aid as a Remote Control..............................................................................................238
About Teaching Remote Control Signals to your Device..........................................................................................239
Teach Remote Control Signals to your Device..........................................................................................................240
Add a New Device to the IR SETUP MENU............................................................................................................242
Create a New REMOTE Page using "Copy from Existing Page".............................................................................244
Place the TV BDRM Page in your REMOTES Activity...........................................................................................245
How to Store the IR Functions under an Icon Sequence...........................................................................................246
Delete a Device..........................................................................................................................................................247
TABLE OF CONTENTS
ECO Manual
ix
Page 10

Rename a Device.......................................................................................................................................................247
Add a New Function to an Existing Device ..............................................................................................................247
Rename a Function....................................................................................................................................................249
Delete a Function.......................................................................................................................................................249
Re-Learn Signals.......................................................................................................................................................250
The IR REMOTE Page..............................................................................................................................................250
ON-OFF Control of Non-Remote Appliances: Using the X-10...............................................................................252
USING THE ECO'S INTERNAL COMPUTER..................................................................................................253
The Optional Internal Computer................................................................................................................................254
To Begin Computer Access.......................................................................................................................................255
Keys in the Computer Access Activity Row.............................................................................................................257
The Computer Programs Page...................................................................................................................................258
Using Microsoft®Word Pad.......................................................................................................................................260
The Magnification Option.........................................................................................................................................262
Using the <RUN PROGRAM> Tool.........................................................................................................................267
Sending Mouse Commands to XP.............................................................................................................................268
Pages and ECO Keyboard Mode...............................................................................................................................270
Minimize ECO...........................................................................................................................................................272
Using an External Computer with a USB Cable........................................................................................................273
Using an External Computer with the PRC Bluetooth Wireless Adapter..................................................................273
Using an External Computer and an Infrared Receiver (IRR)...................................................................................275
APPENDICES..........................................................................................................................................................277
Appendix A: Recalibrate the Touch Screen..............................................................................................................278
Appendix B: Next-Mouse-Right-Click Tool in PASS and ECO..............................................................................279
Appendix C: Serial Macro Tool ...............................................................................................................................281
Appendix D: Modify Scan Pattern............................................................................................................................282
Appendix E: Pagelets................................................................................................................................................290
Appendix F: Vocabulary Builder..............................................................................................................................294
Appendix G: Mid-Sequence Category......................................................................................................................308
Appendix H: Using the LAM (Language Activity Monitoring)...............................................................................310
Appendix I: The ADVANCED INFRARED SETUP MENU (IRR) and IRR Troubleshooting..............................313
Appendix J: All Tools List .......................................................................................................................................316
Appendix K : IBM and Macintosh Computer Keyboard Names; Mouse Commands...............................................327
Appendix L: Troubleshooting...................................................................................................................................336
Appendix M: The Joystick Adapter..........................................................................................................................342
Appendix N: RealSpeak™ Speech Tips ....................................................................................................................343
Appendix O: Helpful DECtalk Speech Tips.............................................................................................................358
INDEX......................................................................................................................................................................367
Index..........................................................................................................................................................................369
TABLE OF CONTENTS
ECO Manual
x
Page 11
Getting Acquainted with your ECO
GETTING ACQUAINTED WITH YOUR ECO
ECO Manual
11
Page 12
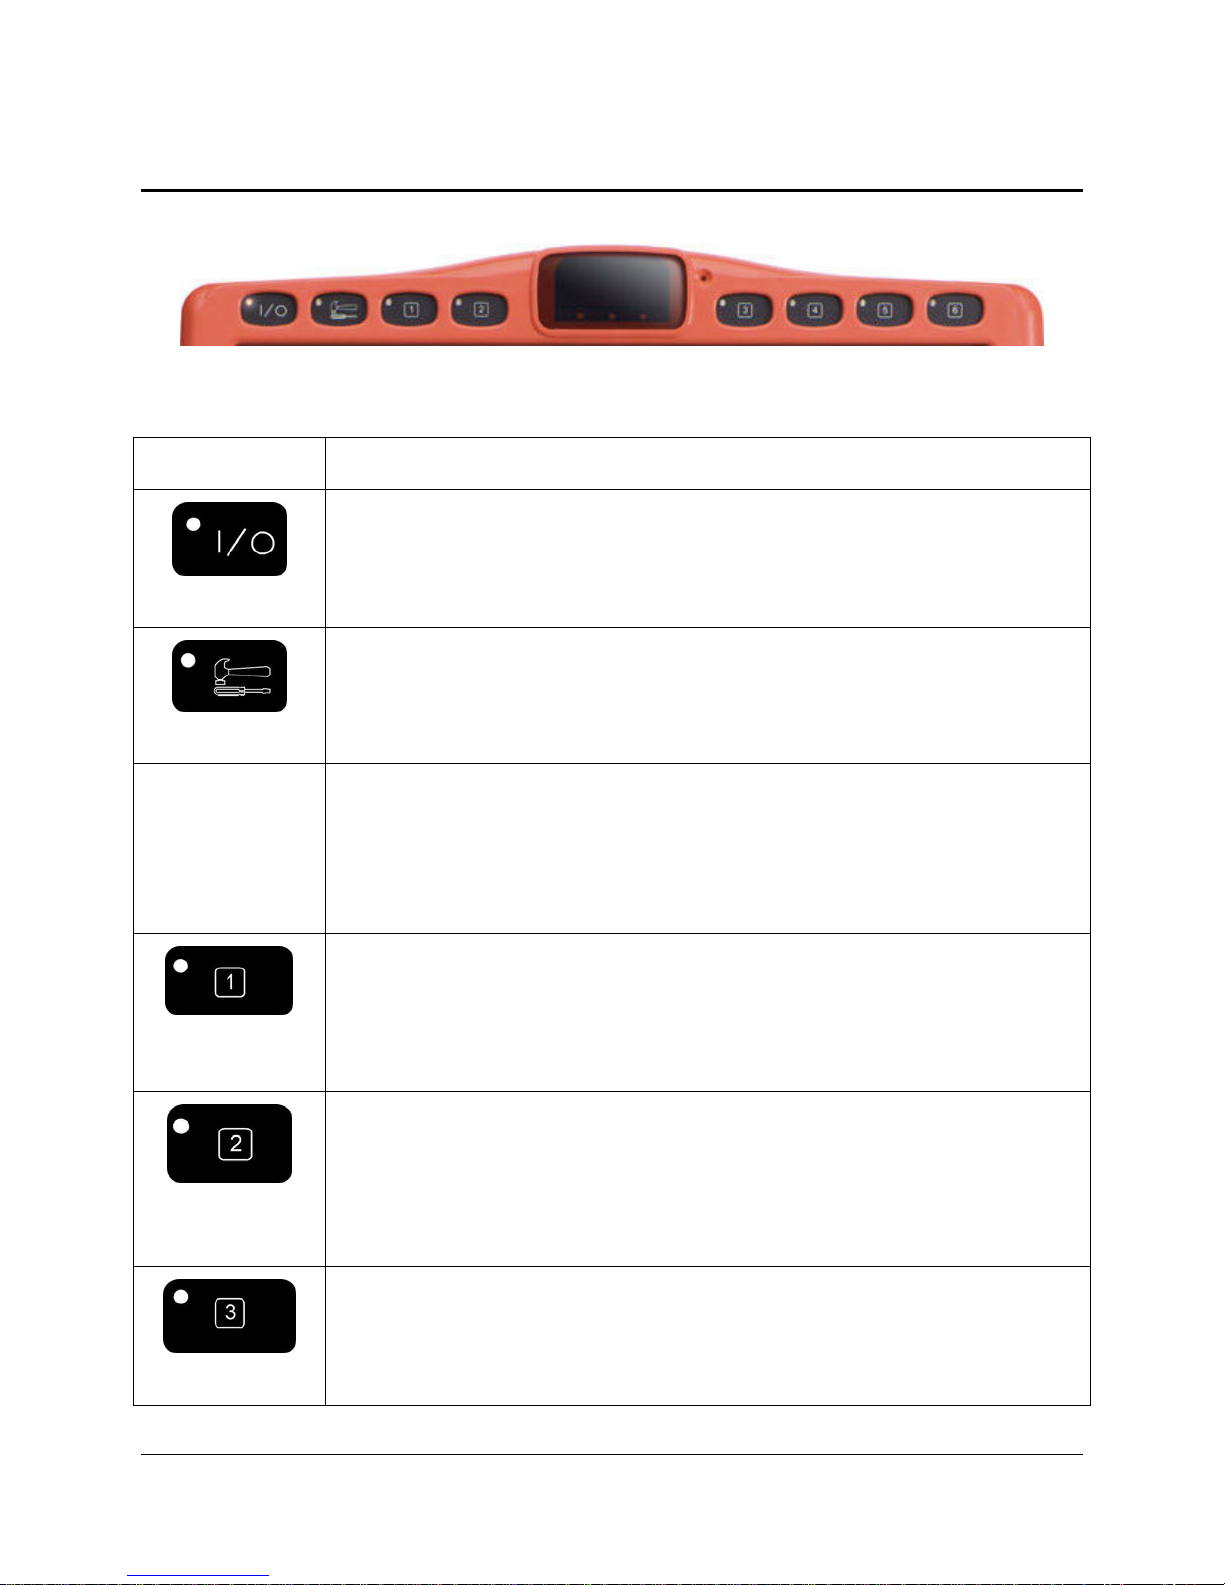
The Front Panel
KEY FUNCTION
Turns the device ON or OFF. If you turn the ECO off with this button, you
must use it to turn the device back on.
ON/OFF
Takes you to the Toolbox where you can use the system menus.
TOOLBOX
*
USER
DEFINED
KEYS
CHOOSE
ACTIVITY
SET-UP*
ECO KYBD*
*
Keys 1-6 are User Defined keys. They have been pre-programmed for you to
perform some often-used functions. You can re-program to do whatever you
wish. See the Store/Assign Tools chapter beginning on page 163.
Press this to toggle through your Activity Row.
This key allows you to program overlay keys without going to the Toolbox.
It works with the MODIFY PAGE, MODIFY ACTIVITY, ASSIGN
CORE KEYS and STORE menus and the Modify Item within an Activity
or Page menu.
This allows you to see both the Windows XP desktop and the ECO screens
at the same time. This means you can use your overlay to interact with the
XP programs. Your ECO keyboard goes to half-screen so you see half your
overlay and half of the Windows environment.
GETTING ACQUAINTED WITH YOUR ECO
ECO Manual
12
Page 13
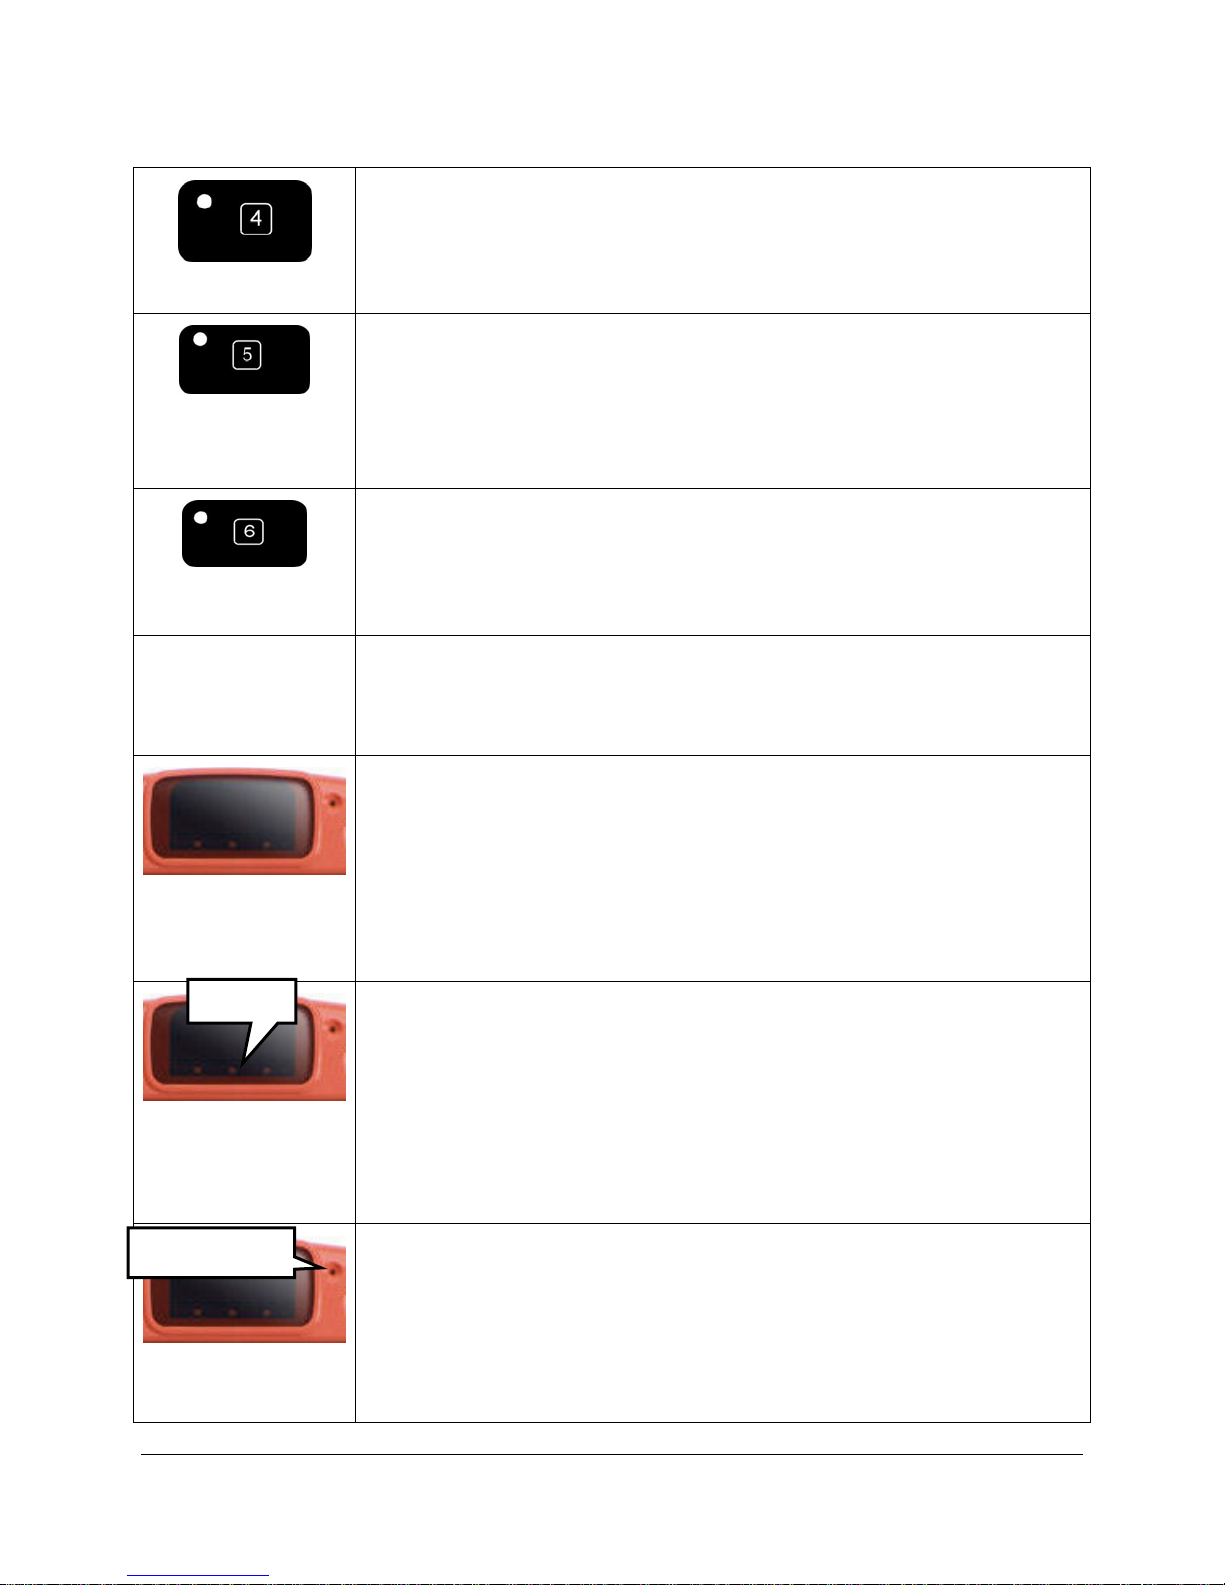
SCROLL*
MOUSE-RIGHT-
CLICK*
MINIMIZE ECO*
Use with the internal computer.
Select this key to scroll through your overlay when you are in Keyboard
Mode, so you can access all your overlay keys.
Use this with the internal computer.
Select this key then select a key on your overlay. A small context-
sensitive menu will pop up next to the overlay key you selected that will
allow you to perform various functions such as Cut, Copy, Paste or use
the Setup key.
Use this with the internal computer.
This maximizes and minimizes your communication overlay when you
are in Keyboard Mode so you can see all of the Windows application
you are using. ECO goes into the Windows task bar.
RECORDING
MICROPHONE
HP IR Window
HEADPOINTING
INFRARED
WINDOW (IR)
LEDs
3 LEDs IN
BOTTOM OF
WINDOW
REC. MIC.
This is the small round hole near the top right of the case. When you
record messages, speak toward this area.
Receives IR information from the Tracker or other IR headpointer.
The LED on the left flashes when the battery charger is plugged in. A
rapid flash means the battery is recharging. A slow flash means the
battery is full and is just trickle-charging.
The LED in the middle indicates a low battery. If you see this LED
flashing, plug in the battery charger.
The LED on the far right flashes when the hard drive in the ECO
system is working, just as the hard drive LED in your computer does.
This is the small round hole near the top of the case, to the right of the IR
window. When you record messages, speak toward this area.
RECORDING
MICROPHONE
GETTING ACQUAINTED WITH YOUR ECO
ECO Manual
13
Page 14
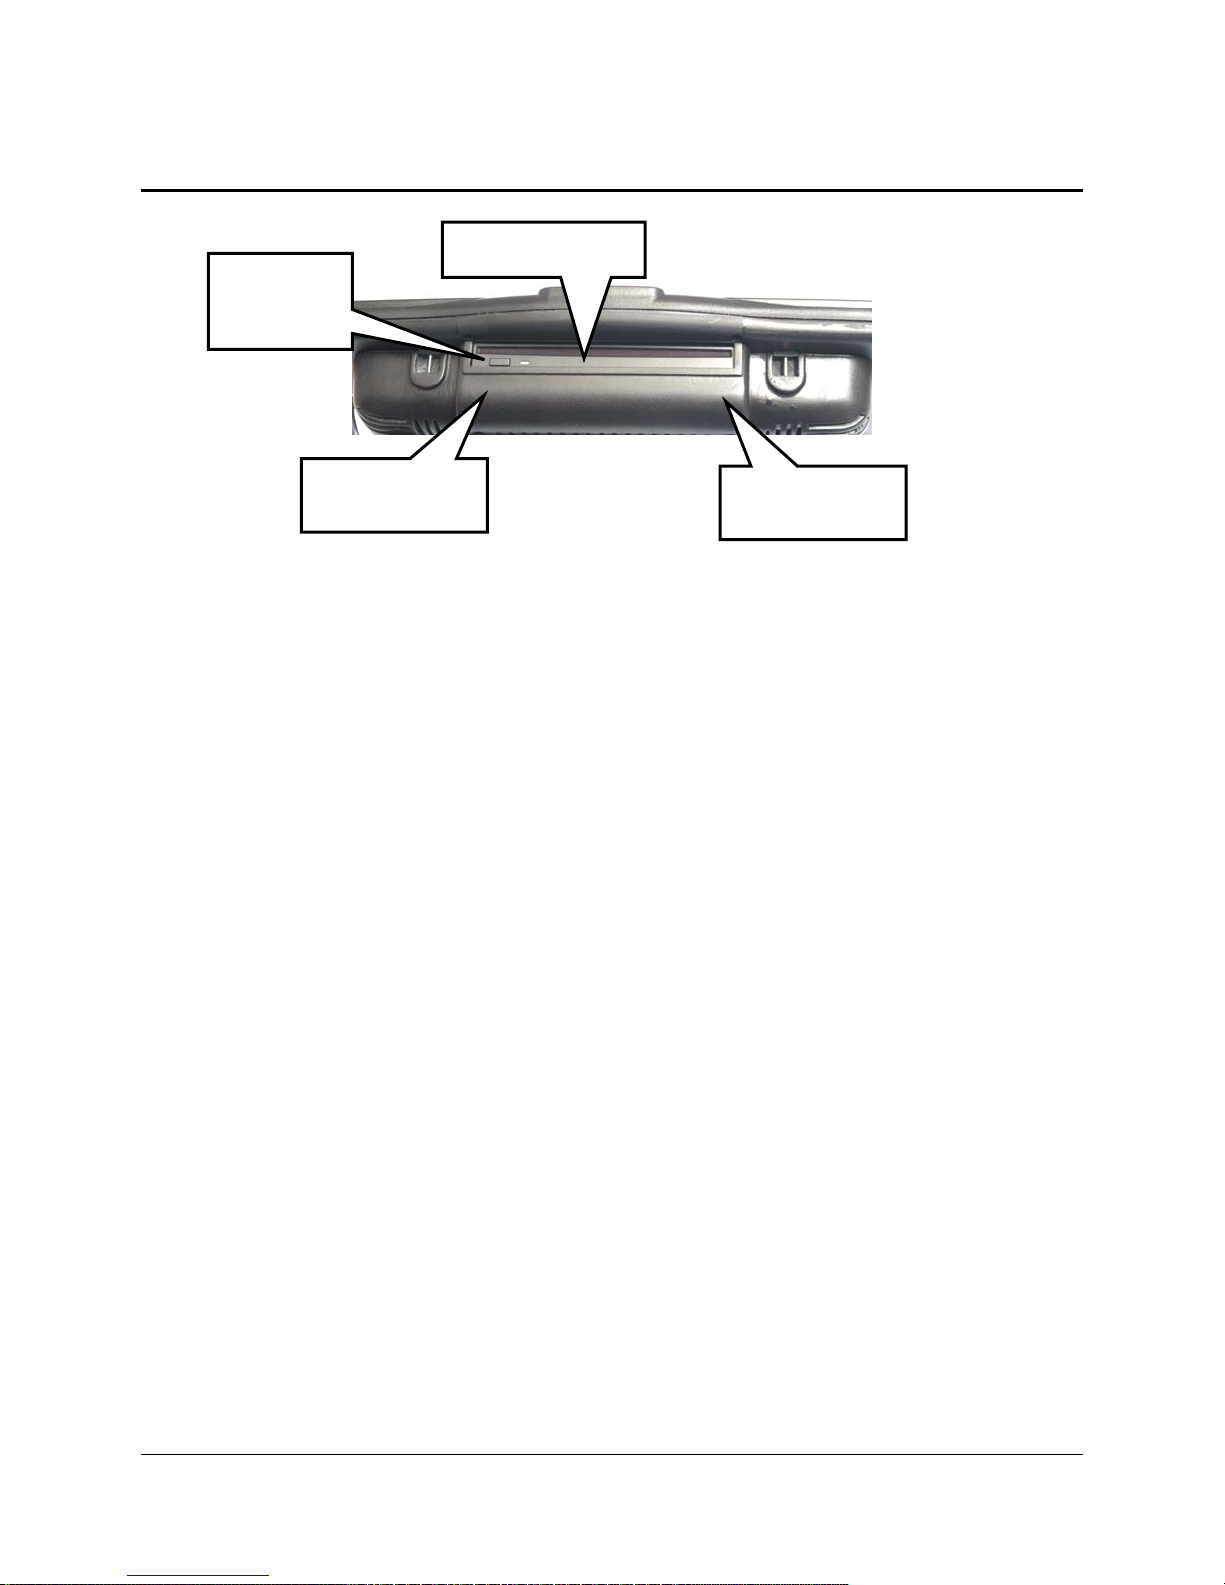
The Top of the ECO
DVD Player
Eject
button
Learning IR
Area
DVD/CD Player
The DVD/CD player is at the top of the case above the rounded area. Use this to play movie
DVDs, Audio DVDs and CDs. If you purchased the optional internal computer, you can also
install software and burn CDs using the DVD player.
To Use: If your device is On, simply slide a disk into the CD/DVD Player. The device will
accept it. If your device is Off, slide a disk about half-way into the player, then turn your device
On. The ECO will accept the disk. Press the small button on the Player door to eject a disk.
Sending IR
Area
Learning Infrared Area
Sending Infrared Area
The rounded area below the DVD player is the learning and sending infrared area. You point a
remote control at this area to teach remote control signals to your ECO. When the ECO is
sending remote control signals to control things like a TV or DVD player, this window must be
facing in the general direction of the object you want to control.
GETTING ACQUAINTED WITH YOUR ECO
ECO Manual
14
Page 15
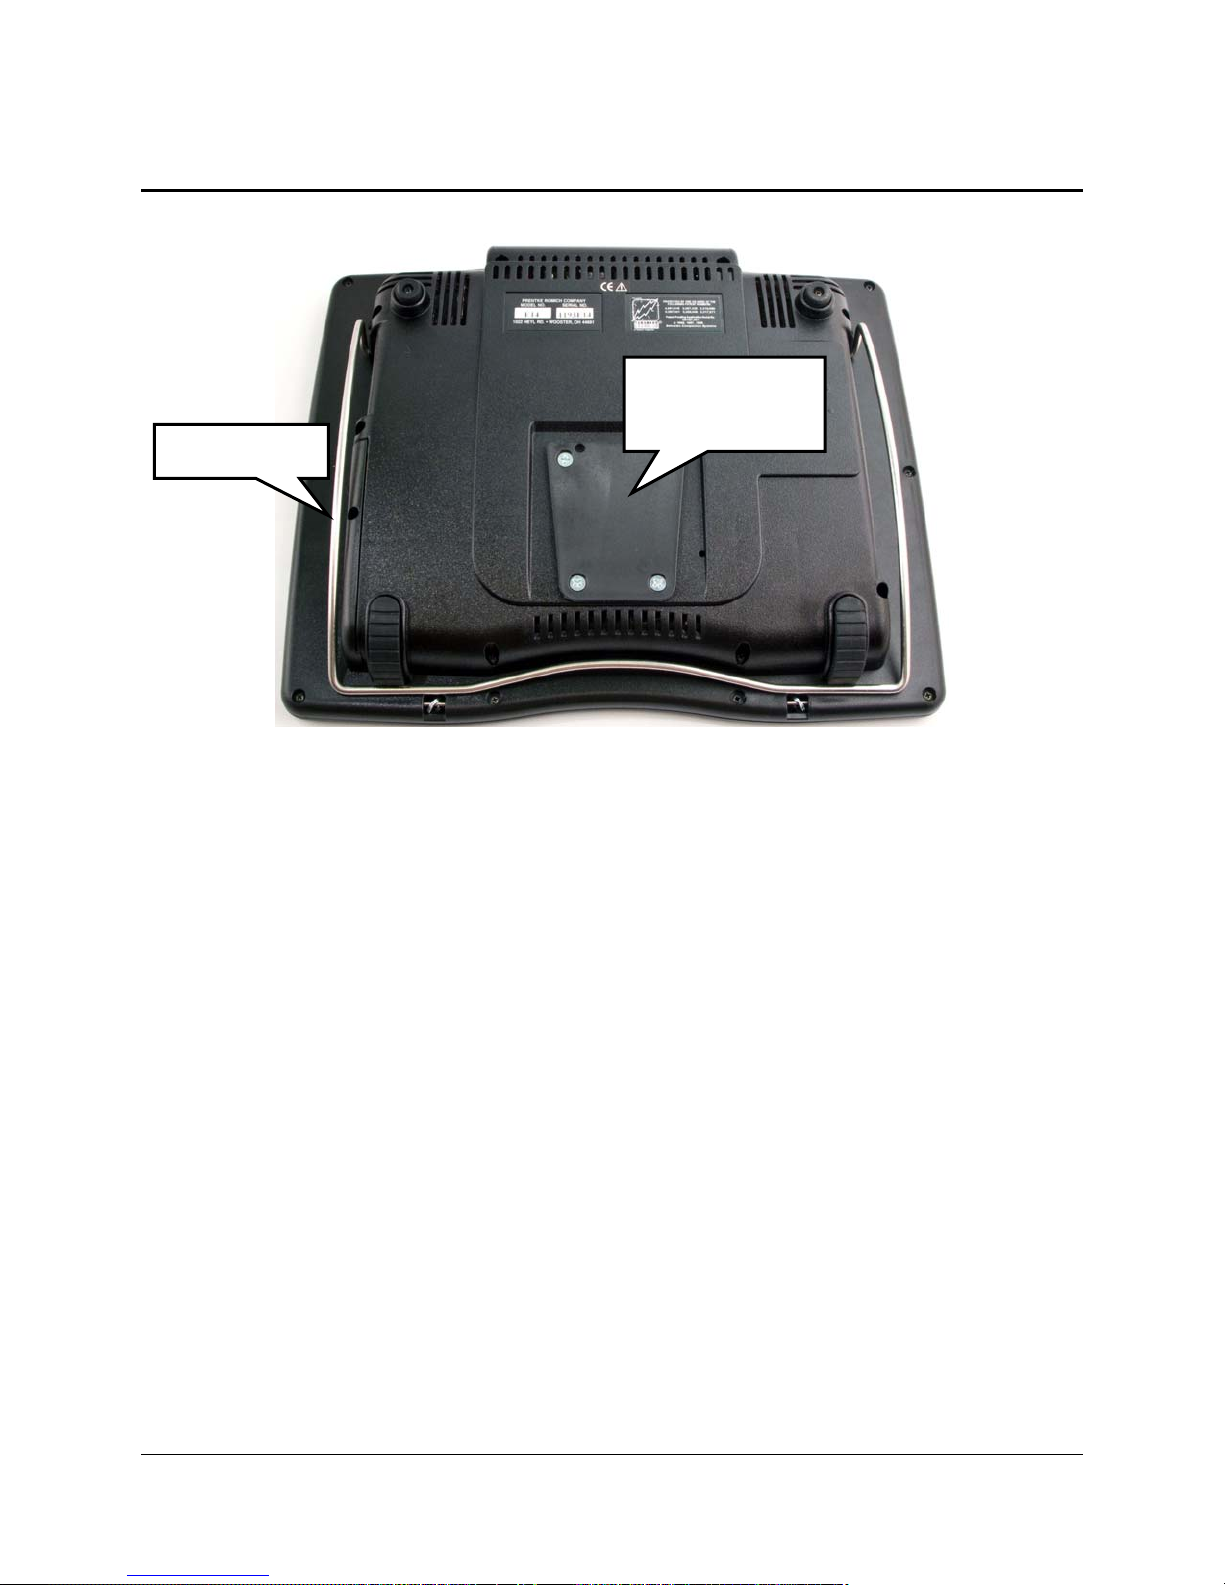
The Back of the ECO
Table Stand
Wheelchair
Mounting Plate
Back
Wire Table Stand
Pull the stand out from the case and set your device on a flat surface. If you want your device to
sit at a lower or higher angle, remove the table stand from the holes that hold it in place and
place it in the second set of holes. The bottom holes are lower; the top holes are higher.
Wheelchair Mounting Plate
Slide the optional QRM2 onto the wheelchair mounting plate until the Release Knob pin drops
into its hole on the plate. This secures the QRM2 to the mounting plate so you can mount the
ECO onto a wheelchair mount.
GETTING ACQUAINTED WITH YOUR ECO
ECO Manual
15
Page 16
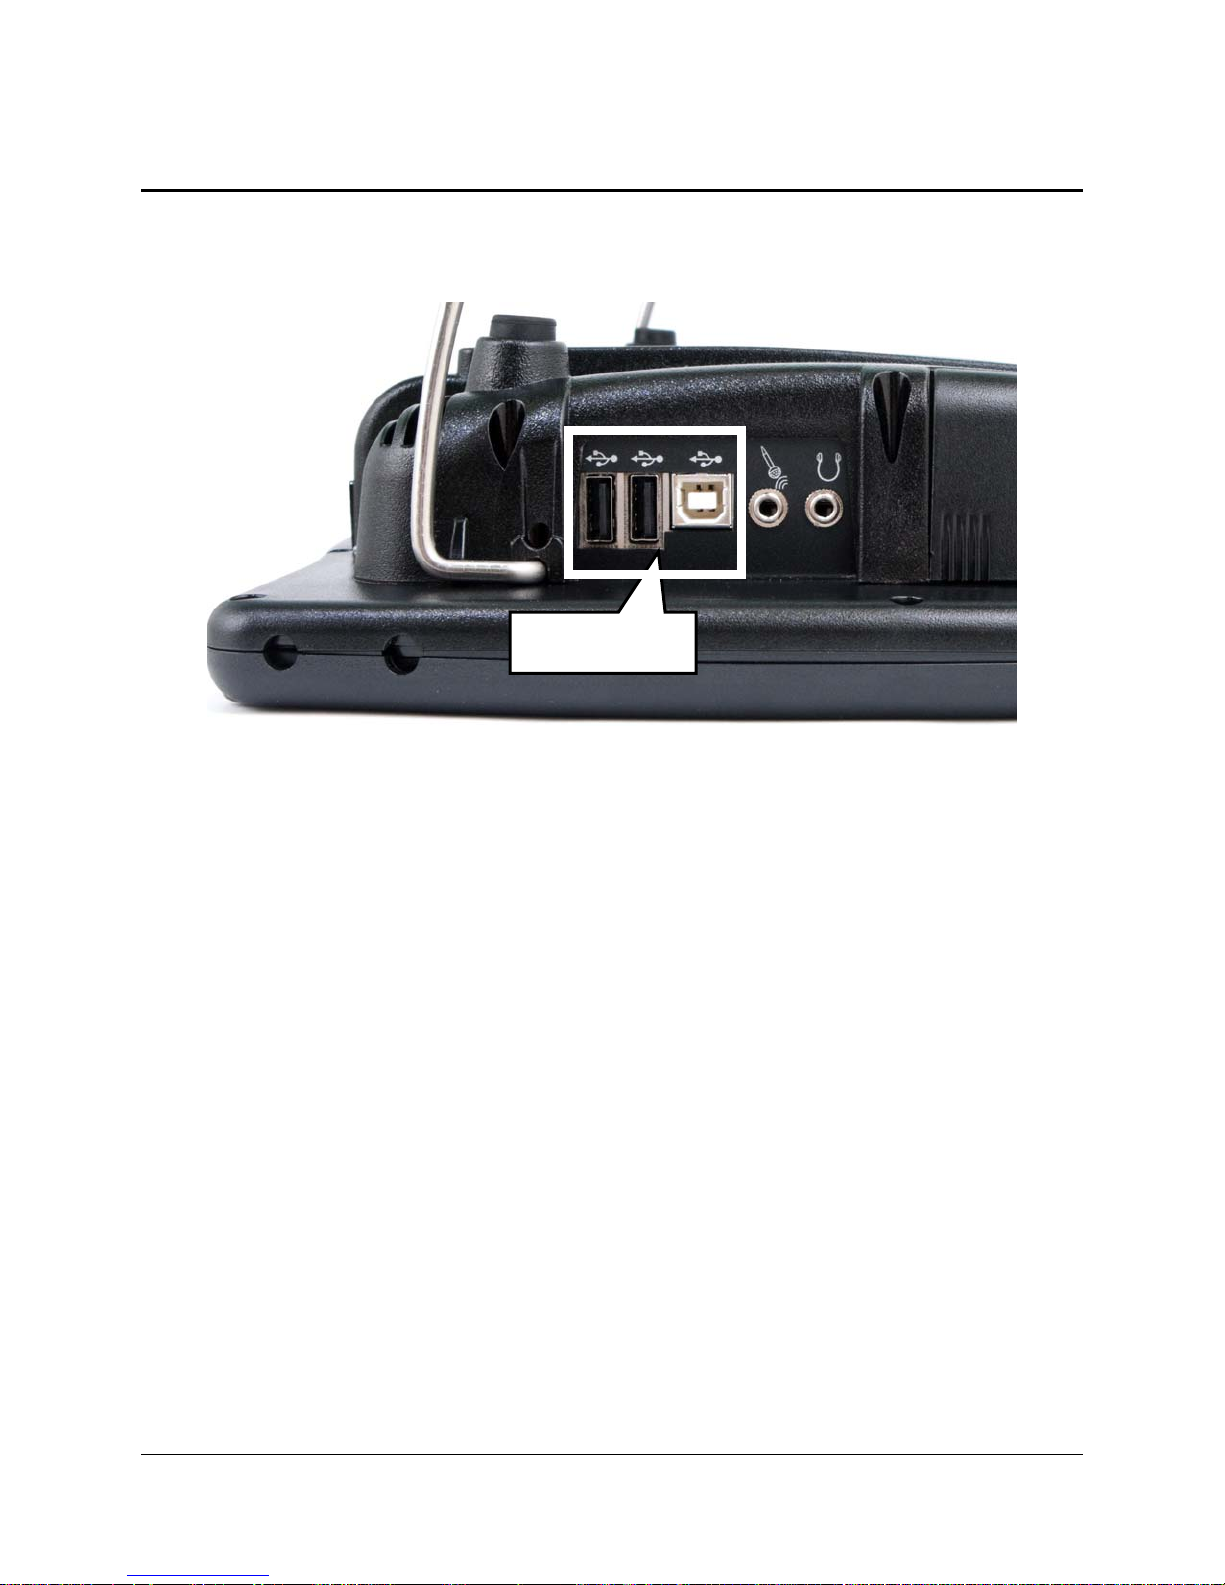
The Right Side Panel
USB Ports
The Connectors from Left to Right
2 Rectangular USB Connectors
Use these for USB flash drives, a USB mouse and keyboard, etc.
Square USB Connector
Use this to connect to an external computer with a USB cable.
External Microphone Jack (Note: you can also use a USB microphone)
Plug an external microphone in here.
External Headphones Jack
Plug external stereo headphones or speakers in here.
GETTING ACQUAINTED WITH YOUR ECO
ECO Manual
16
Page 17
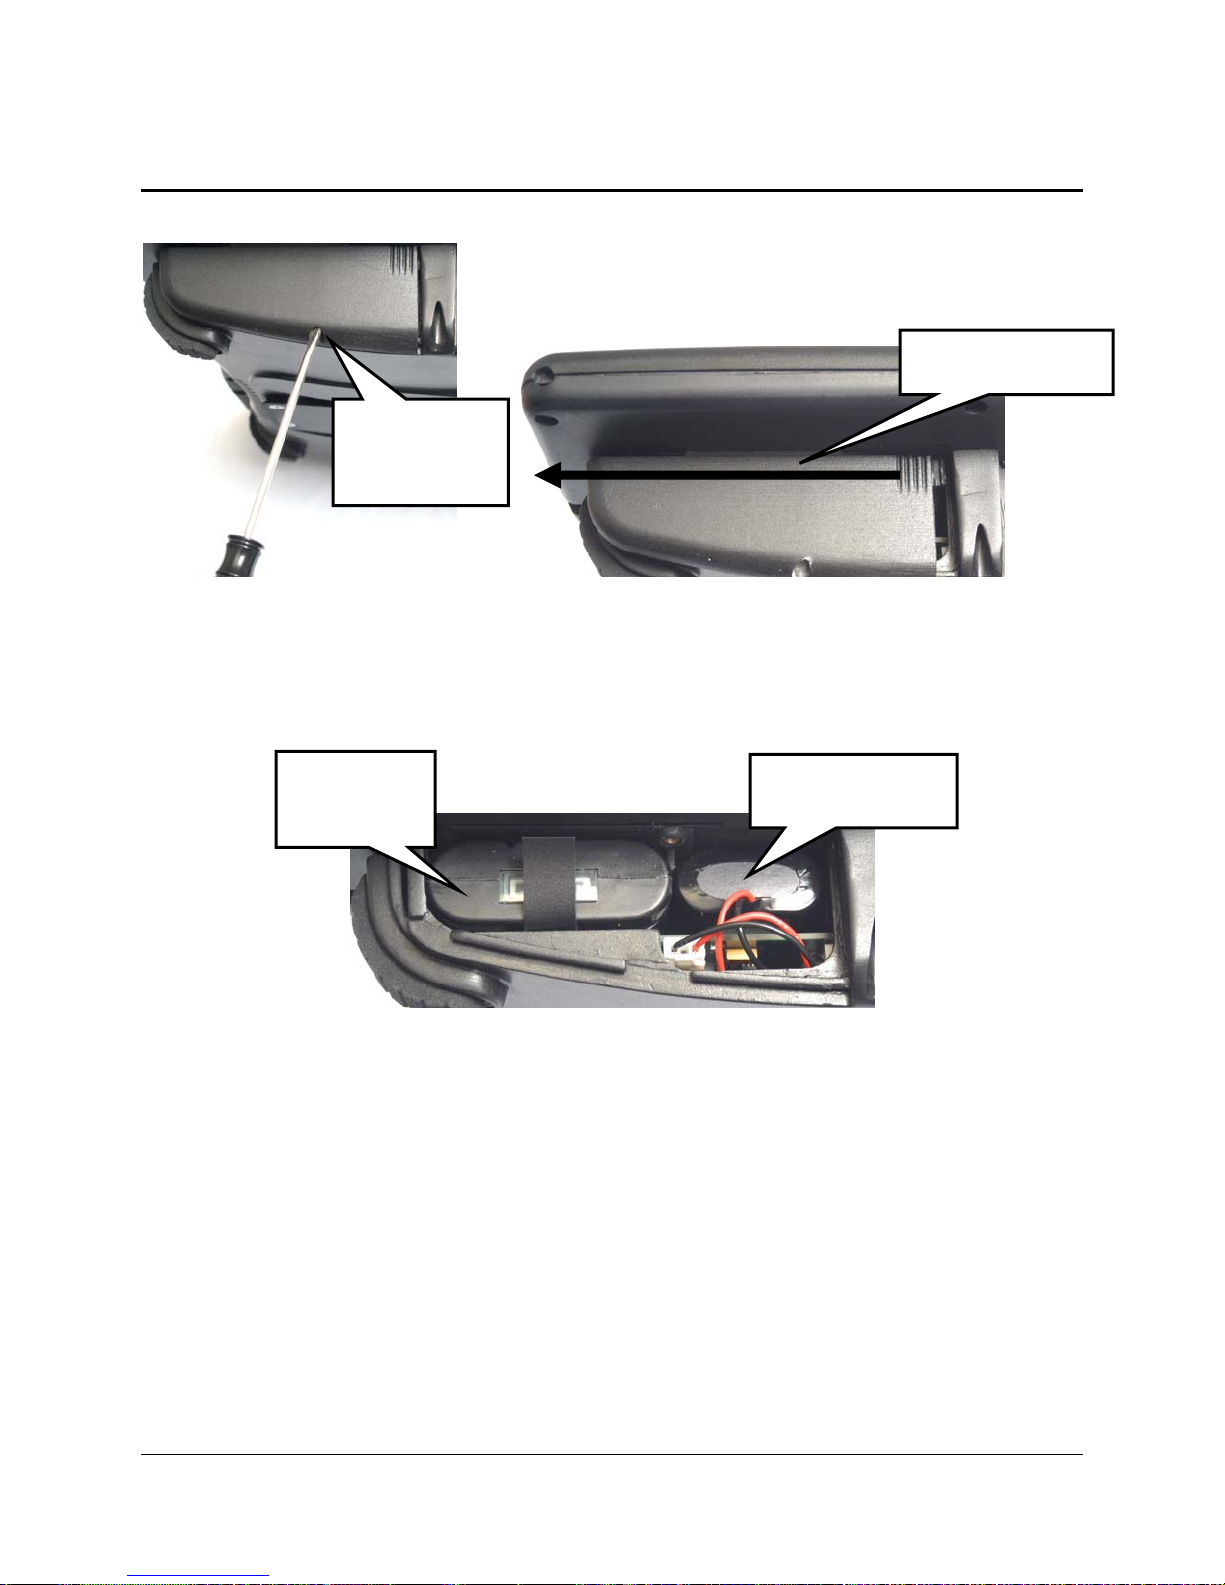
Battery Door and Batteries
Slide door off.
Unscrew
battery door
screw
Use a flathead screwdriver to remove the battery door screw. This is a long screw and takes a
few seconds to remove. When the screw is removed, slide the door to the left until it comes off.
Removable
Battery
Internal Battery
Removable Battery
This is the large battery on the left with a flexible tab on the end you can pull to remove the
battery, should this be necessary. When replacing the battery, make sure it clicks into place
before replacing the door.
Internal Battery
This is the smaller battery on the right. This battery remains in the case and should not be
removed.
GETTING ACQUAINTED WITH YOUR ECO
ECO Manual
17
Page 18

Left Side Panel
Re-set Button
Phone Card Cable
Connector
Battery Charger
Card Slots and Connectors from Left to Right
Reset Button (circled in graphic above): Unbend a paper clip and poke it into the hole to press
the re-set button. Read Appendix L: Troubleshooting: The Internal Computer on page 336
before using this button.
PCMCIA Card Slot (large rectangular slot): will accept an AirCard, wireless card, etc.
Compact Flash Card Slot (smaller rectangular slot): will accept a storage card, network card,
Bluetooth device, etc.
Phone Card Cable Connector: an AirCard phone cable plugs in here.
Switch A and Switch B Connectors: plug single and dual switches into Switch A and Switch B
ports. A joystick will need an adapter that fits these ports.
XGA Connector: connect a computer monitor here.
Battery Charger: Plug in the battery charger that came with your device.
GETTING ACQUAINTED WITH YOUR ECO
ECO Manual
18
Page 19
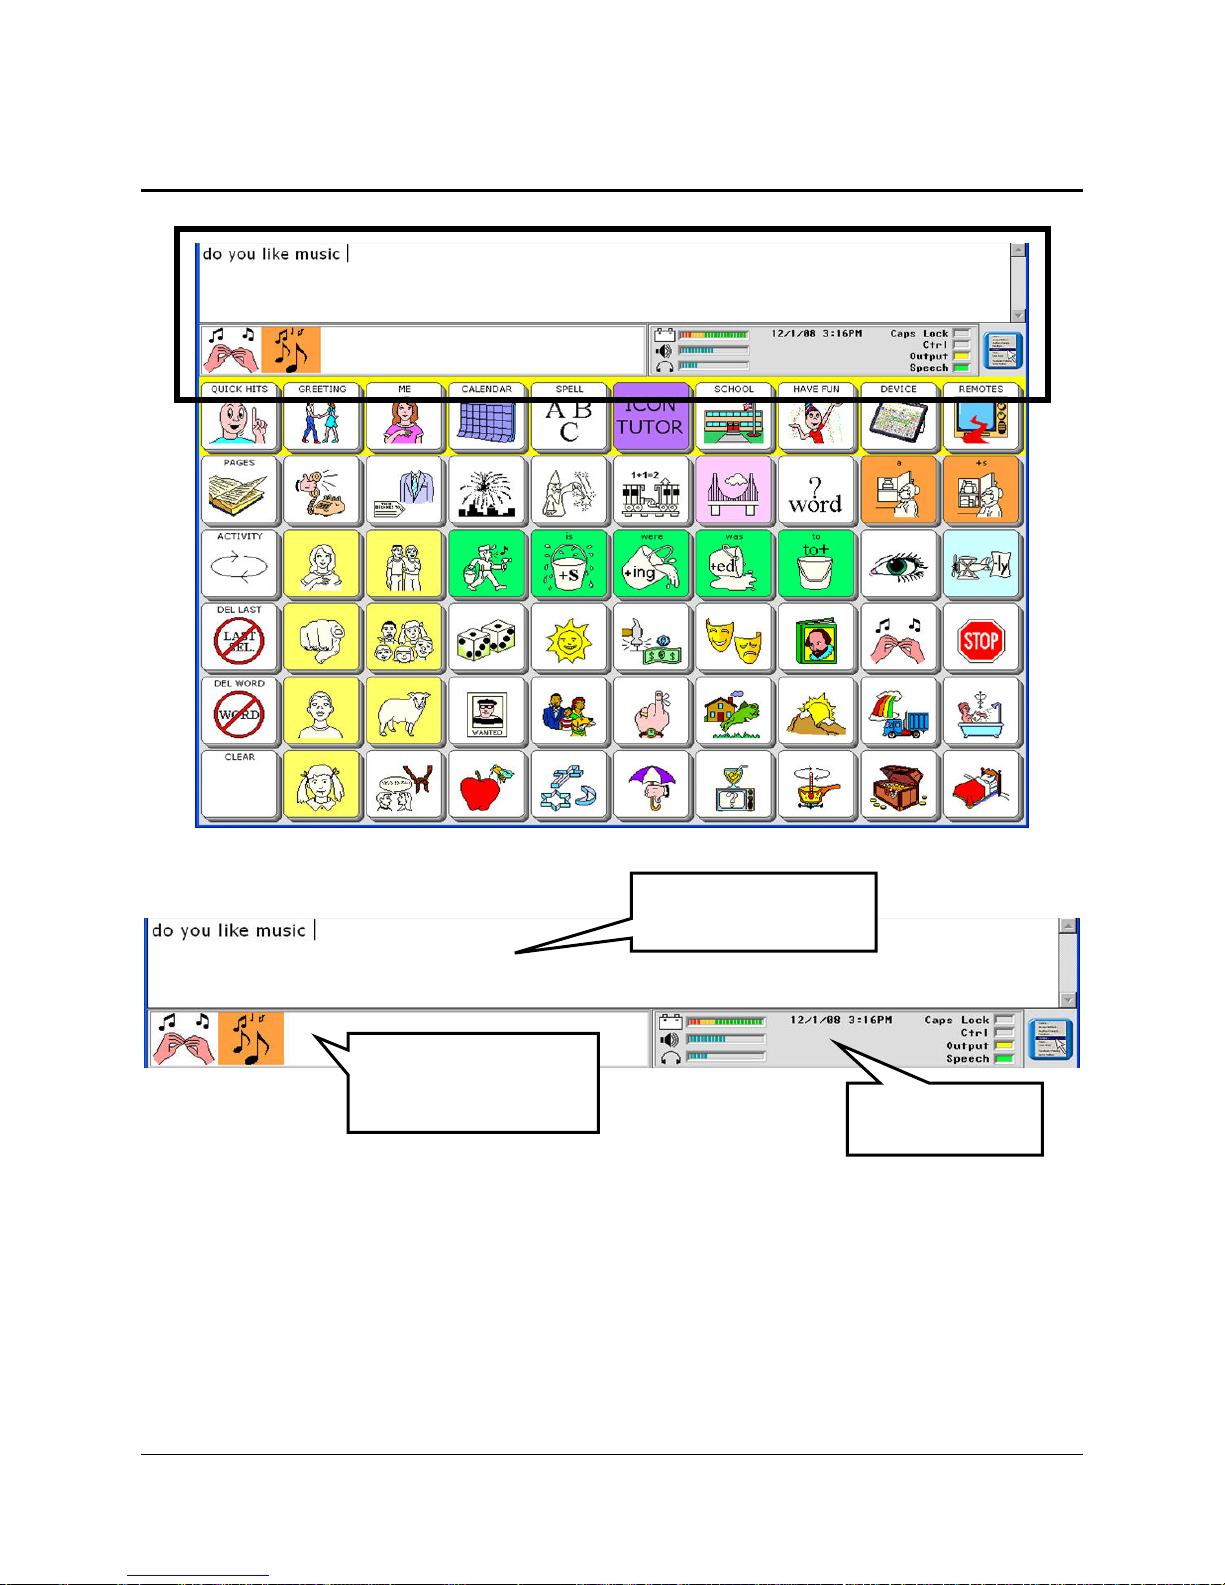
The Display Areas
A
A
Text Display Area
Icon or Word
Prediction Display
rea
Status Display
rea
Text Display Area
This is where you will see any text that appears, either from messages that you have retrieved by
selecting icon sequences or from typing in text. Touch this area and your device will speak any
text on the display.
Icon Display Area/Word Prediction List Area
This is where you will see the icons that you activate on your communication overlay or, if you
are using your spelling overlay and Word Prediction is On, you will see a list of predicted words.
GETTING ACQUAINTED WITH YOUR ECO
ECO Manual
19
Page 20
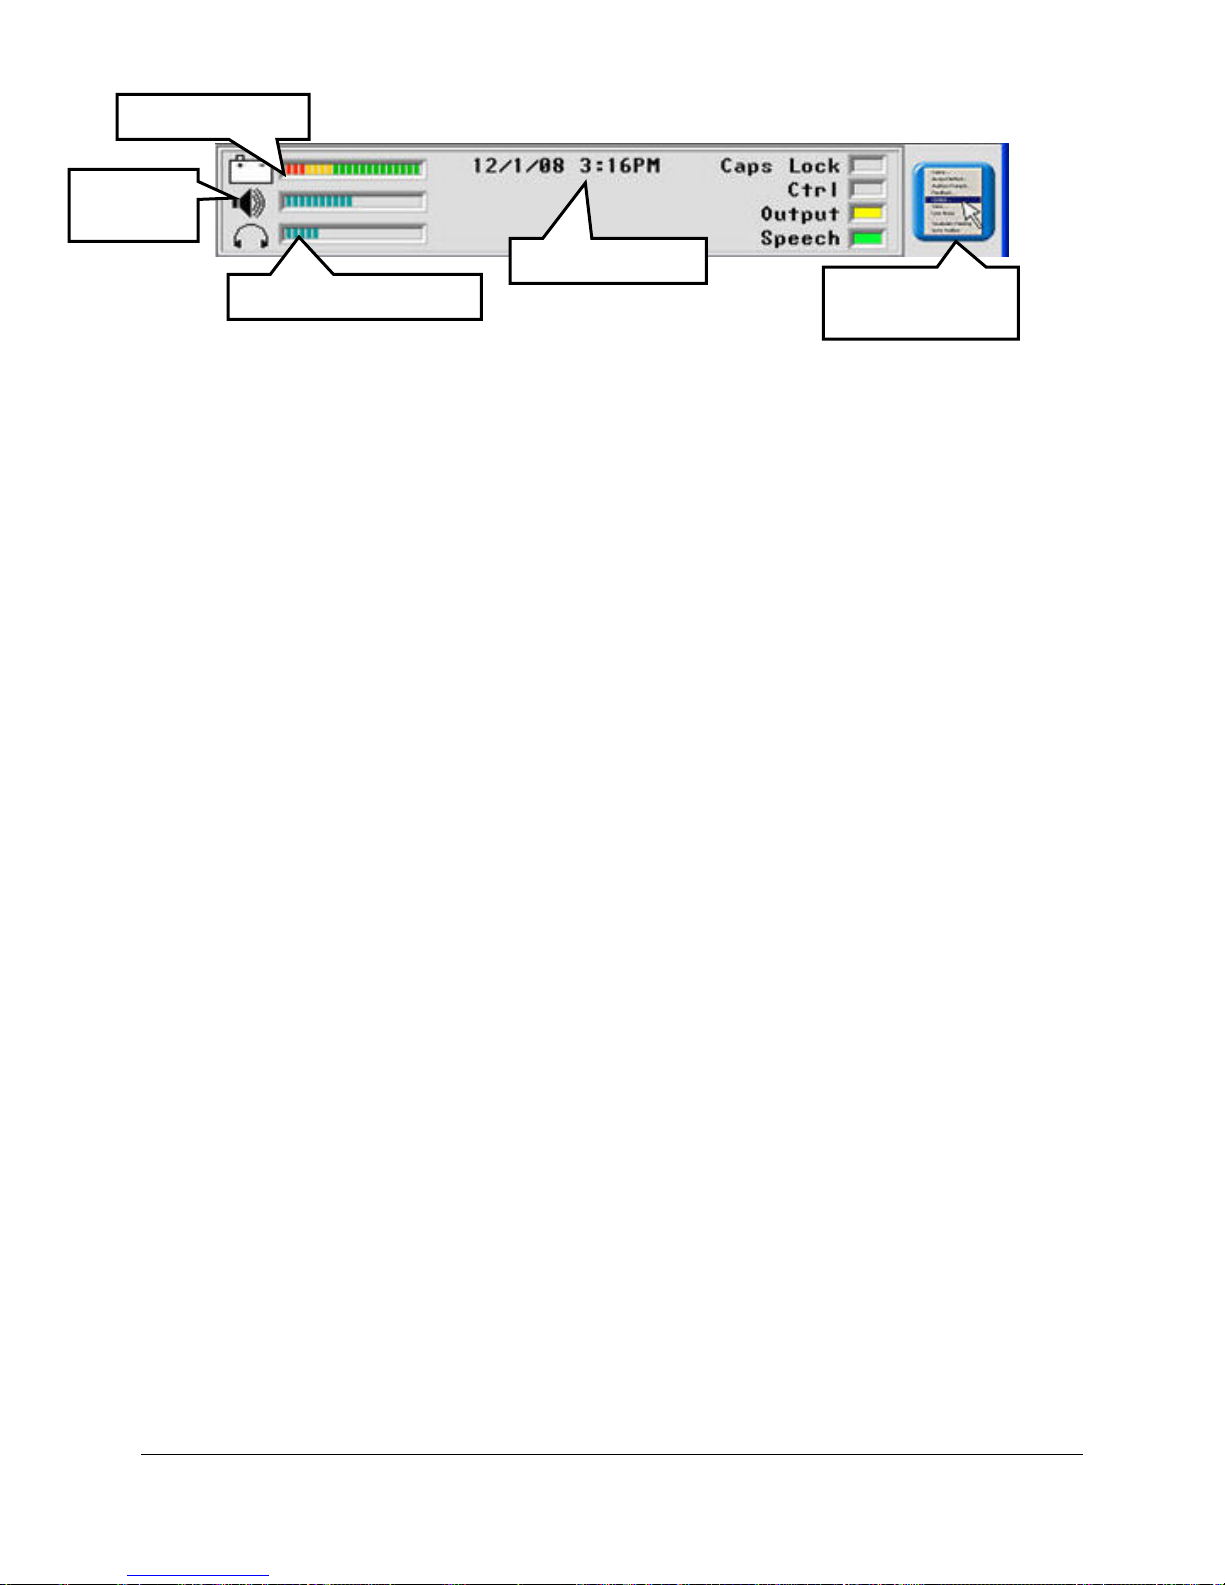
Battery Status
Speaker
Volume
Date and Time
Headphone Volume
Toolbox Drop
Down Menu
Status Display Area
Date and Time
Set this in the CLOCK MENU in the Toolbox to display the current date and time.
Battery Bar Graph
This shows the status of the batteries. A FULL battery shows mostly green lines, with only a
few red and yellow lines. A LOW battery shows only red and yellow lines. Plug in the charger.
You cannot store when the battery is low.
An ALMOST DEAD battery shows only red lines. You will hear a warning beep that the ECO
is going to shut down. Plug in the charger.
Speaker Icon and Headphone Icon
These indicate speaker and headphone volume. When the lines fill up the bar graph, the volume
is at its loudest.
Caps Lock
When this is lit, you have turned Caps lock on in your spelling overlay. All letters you type will
be in CAPITAL letters.
Note: Do not use Caps Lock when storing messages for RealSpeak voices.
Ctrl
When this is lit, you are sending a CONTROL command.
Output
When this is lit, your Output option is On in the OUTPUT MENU. Anything you type, or any
messages you retrieve will appear on the Text Display Area of your overlay and will also be sent
to the internal computer.
Speech
When this is lit, your device will speak anything that appears in the Text Display Area.
Drop-Down Menu
This mini-menu to the right of the Status Display Area gives you quick access to some of the
menus in the Toolbox. You can open this menu by touching it with your finger or a stylus or by
plugging in and using a USB mouse.
GETTING ACQUAINTED WITH YOUR ECO
ECO Manual
20
Page 21
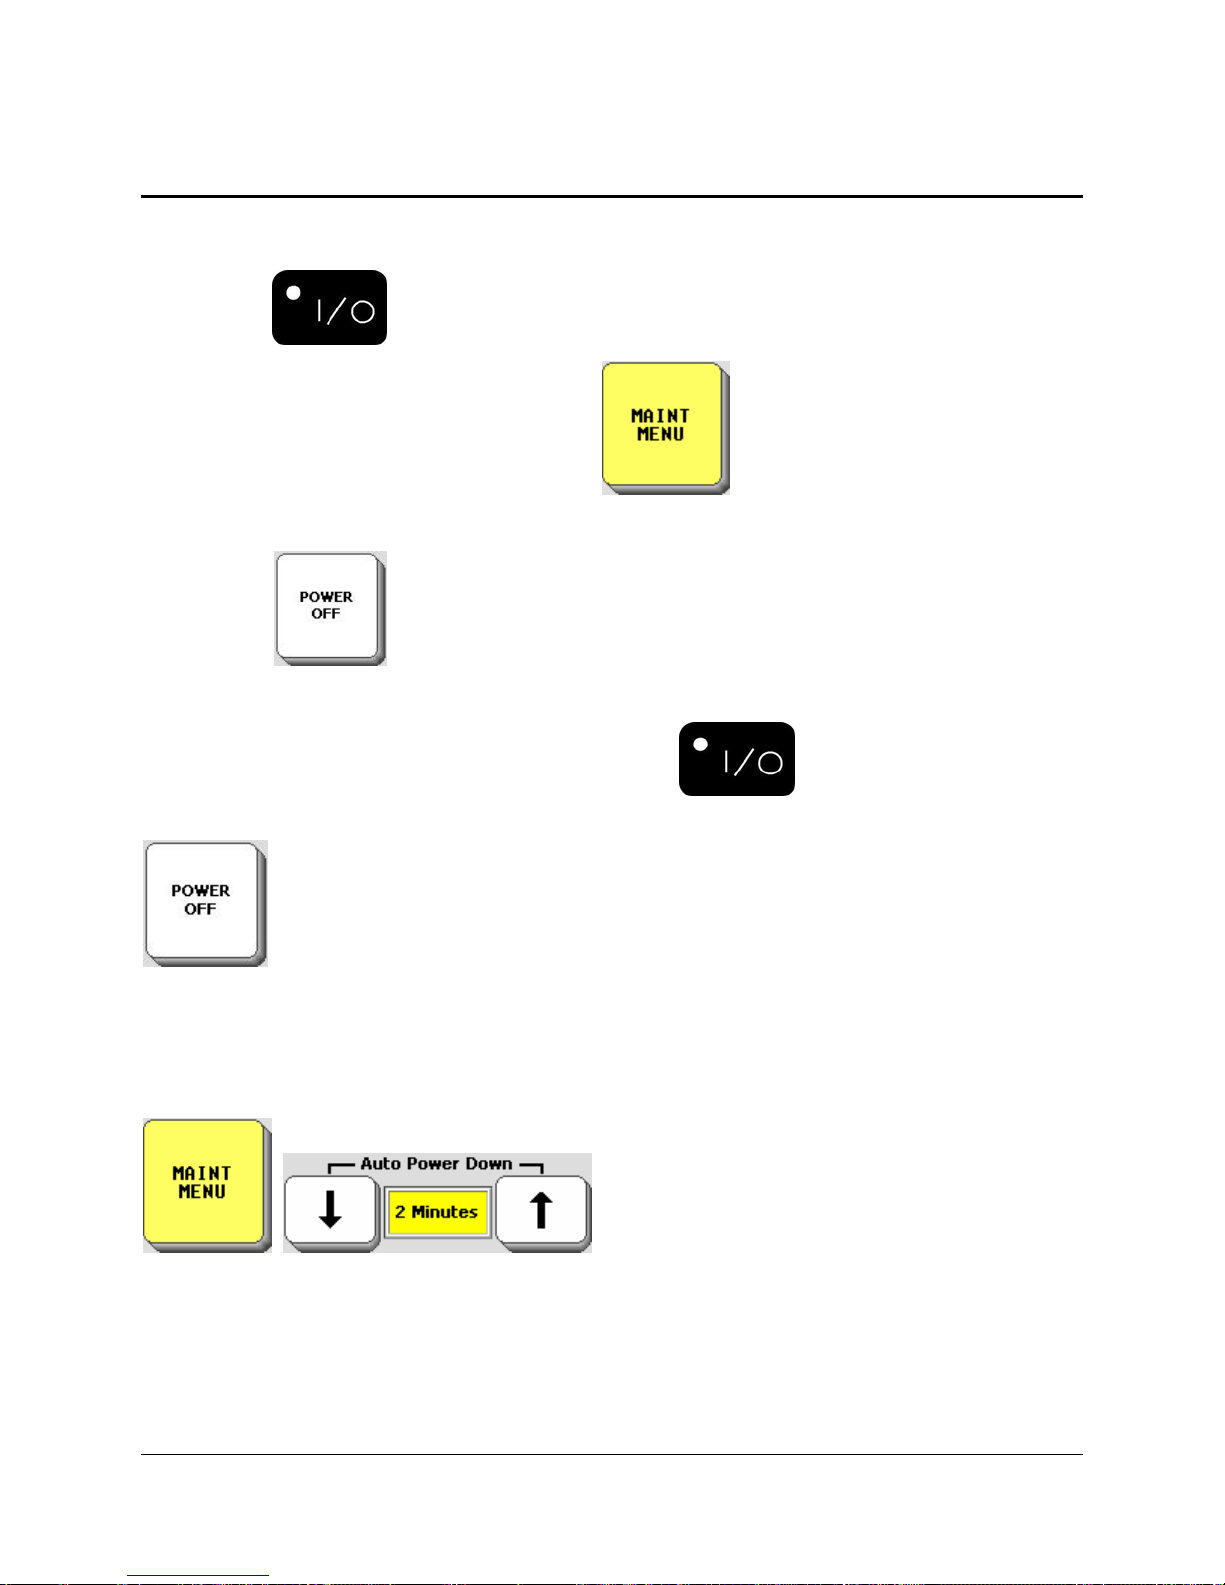
Different Ways to Turn your Device Off
You can turn your device ON and OFF by:
Pressing the ON/OFF button;
Selecting the Auto Power Down option in the MAINTENANCE MENU;
Selecting the POWER OFF key in the Toolbox.
When you turn the device off with the ON/OFF button , you must turn it back on
using with the ON/OFF button.
If you would like to be able to turn the device off yourself but can’t press the
ON/OFF button, you can go to the Toolbox and select POWER OFF or store the POWER
OFF tool on your communication overlay.
To turn the device back on simply tap on the screen or activate a switch.
The Auto Power Down option automatically turns the device off after the amount of time you
set has passed.
When your device is idle (no key activations) for 2, 5 or 10 minutes, the backlight will dim on
your display. Activate any key or switch to bring it back.
GETTING ACQUAINTED WITH YOUR ECO
ECO Manual
21
Page 22

After ten minutes of dimmed backlight and no key activations, the screen goes dark. Activate
any key or switch to bring it back.
We recommend that you leave Auto Power Down set to On. You can select the amount of
time you want to use if 2 minutes is too fast for you.
If you change Auto Power Down to Off, the device will never turn Off unless you press the
ON/OFF button on the top of the case or activate the POWER OFF key in the Toolbox. If you
forget that you turned Auto Power Down to Off and the device never goes Off, the batteries will
eventually go dead.
Note: If you are using a headpointer and your device turns Off, you can activate a
switch to turn it back on. The switch must be plugged into a Switch port on your device.
Use POWER OFF or the ON/OFF button to properly shut down your device.
Troubleshooting Tip: If your device does not turn off or come back on as you expect it
to: Press and hold the ON/OFF button for ten seconds. The device should turn on (or off).
When your device turns off, it saves any storing and/or programming that you have done
up to that point. If you are doing a lot of storing/programming —perhaps setting up an
overlay—make sure the device turns Off periodically so that your work is saved.
GETTING ACQUAINTED WITH YOUR ECO
ECO Manual
22
Page 23
About the Batteries in your ECO
Always use the battery charger that came with your device. Any other charger may
damage your batteries.
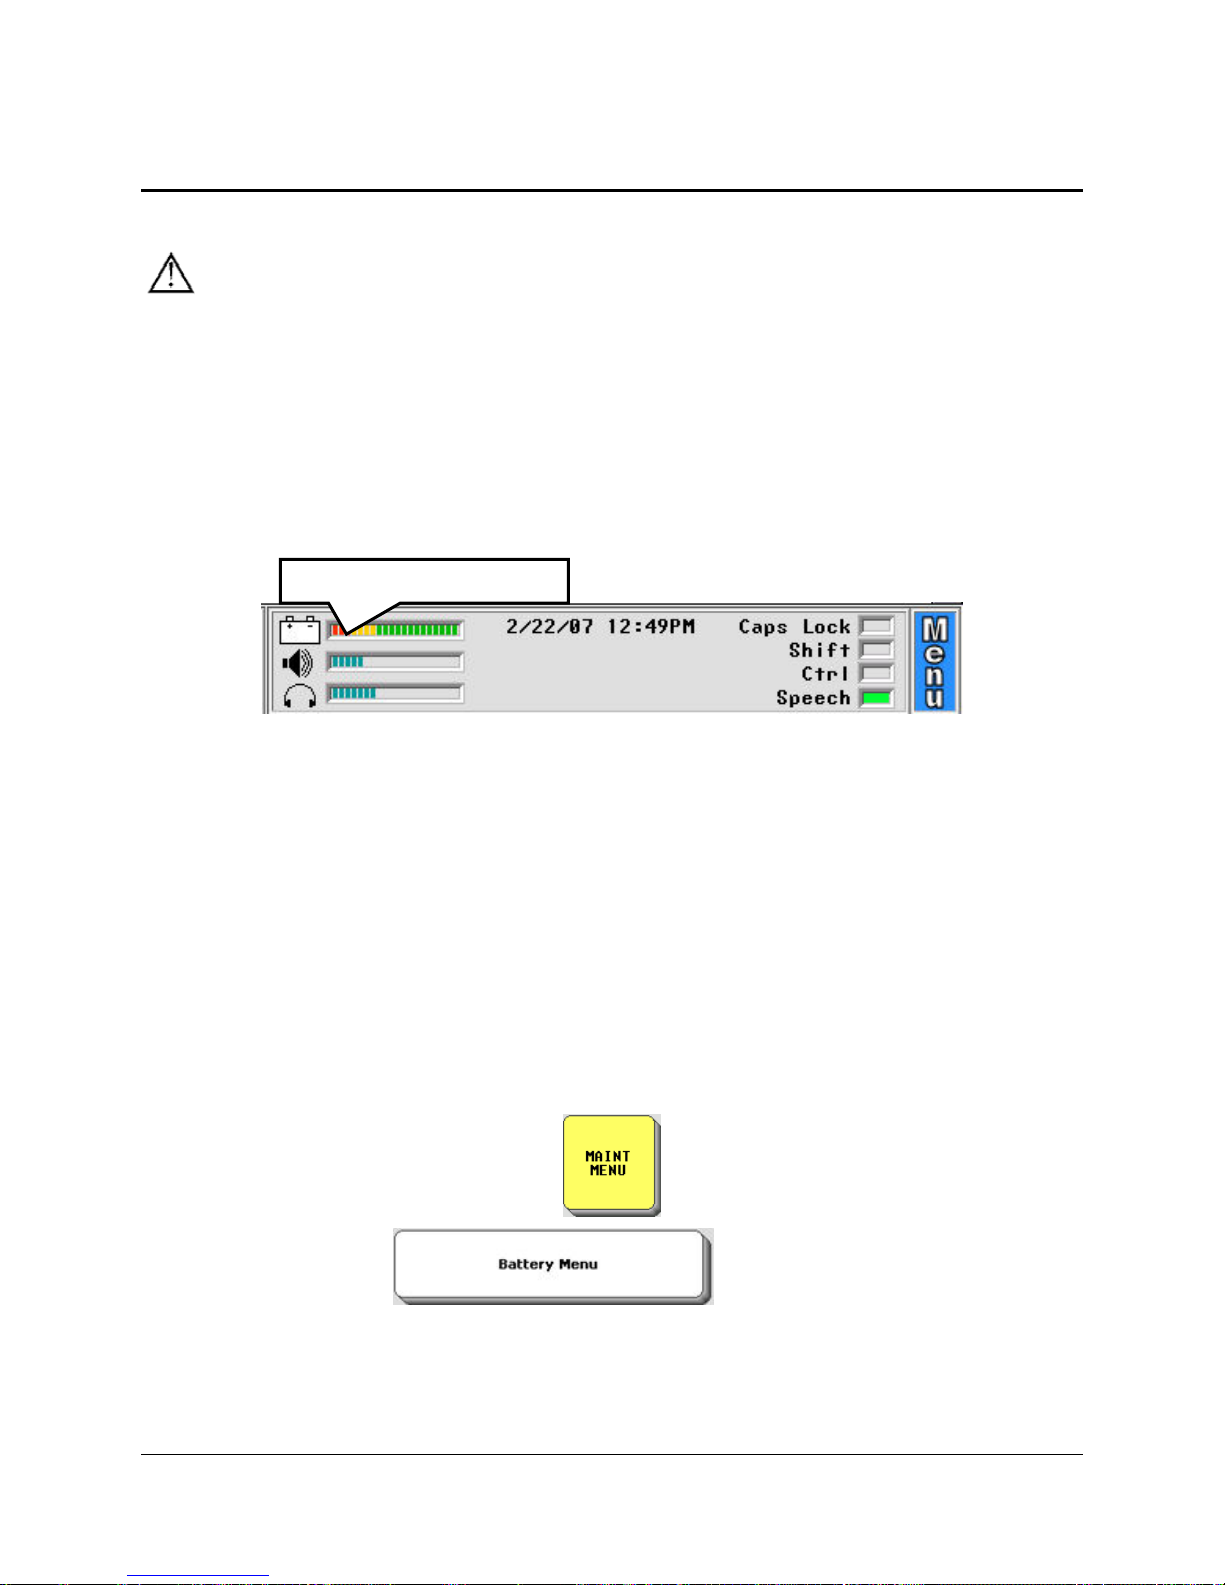
If you plan to store your device for a month or more without using it: put the unit in
Shipping Mode. Open the MAINTENANCE MENU in the Toolbox. Select Battery Menu and
then select Shipping Mode. Unplug the battery charger and store it in a safe place.
Check your battery status in the Status Display Area
Battery Status Graph
The Battery Status bar graph in the Status Display Area on your screen gives you the following
information:
Full Battery: mostly green lines, a few red, a few yellow
Plug in Charger: no green lines at all
Nearly Dead: red lines only (plug in charger now)
Charger Plugged in: blue lines
The Battery Menu
Go to the Toolbox and select the MAINTENANCE MENU
Select the Battery Menu
option.
GETTING ACQUAINTED WITH YOUR ECO
ECO Manual
23
Page 24
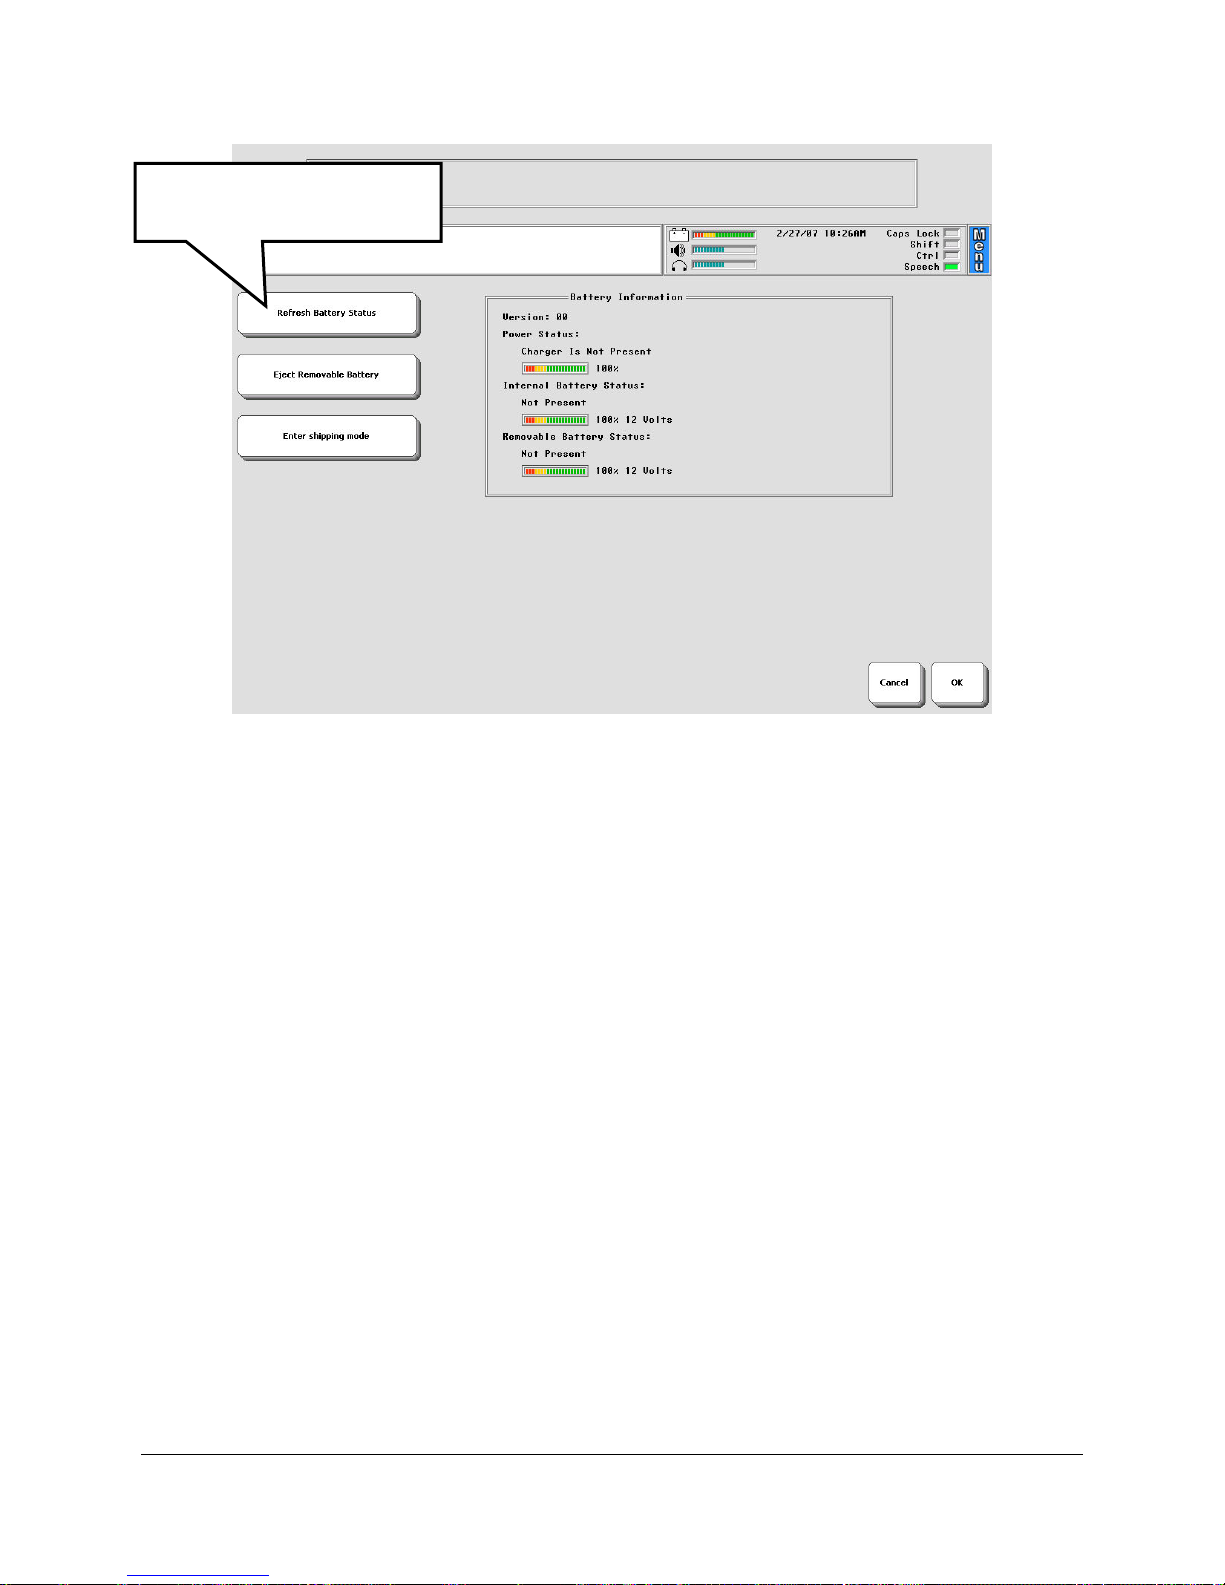
Select this to see the
latest battery information.
The Battery Menu tells you:
if the charger is plugged in;
the amount of charge in the Internal Battery;
the amount of charge in the Replaceable Battery.
You can activate the Refresh Battery Status option to make sure you are seeing the latest
battery information.
Low Battery Warning
When the batteries in your device get low, you will hear a Low Battery Warning. This is a
two-toned running beep. When the Low Battery warning sounds, you can no longer do any
storing. The warning will continue to sound at intervals until the batteries are dead. When the
batteries are dead, the device powers down completely and you cannot use it.
You will also see the Low Battery LED blinking in the IR window on the front of the case.
There are three LEDs near the bottom of this window. The Low Battery LED is the one in the
middle.
When you hear the Low Battery warning and/or see the blinking Low Battery LED, plug in the
battery charger. The LED to the left of the Low Battery LED will begin to blink. This LED
indicates that your charger is plugged in.
A complete charge, from dead battery to fully-charged battery, will take 9-10 hours.
GETTING ACQUAINTED WITH YOUR ECO
ECO Manual
24
Page 25
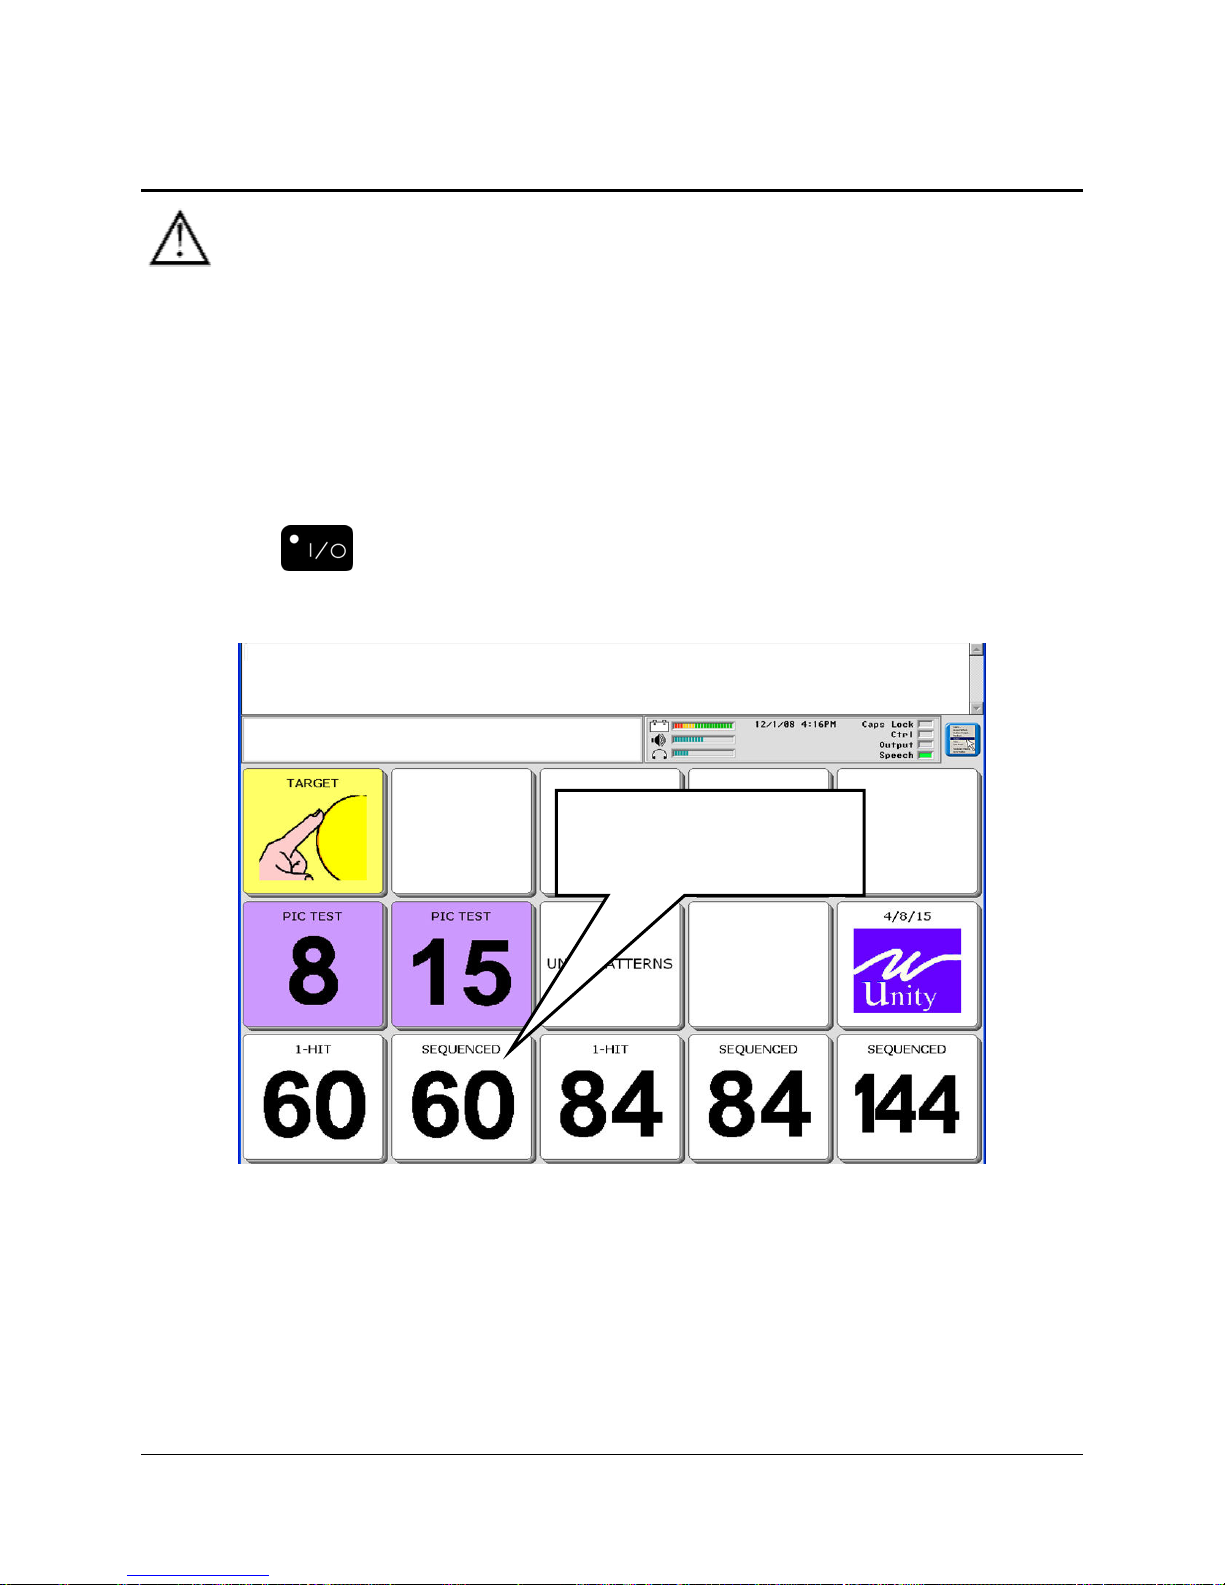
The Touch Screen and the Exploration Wizard
Warning! The touch screen is a liquid crystal display (LCD) screen. Should the
display break (unlikely except under extreme circumstances) and you come into contact with the
liquid crystal, wash or rinse your skin thoroughly. Be careful to avoid splintered glass.
Do not use sharp, pointed objects on the touch screen. They will scratch the screen.
Release the ECO from Shipping Mode:
Before your device was sent to you from PRC, it was put into Shipping Mode. The first time
you use it, you must release it from Shipping Mode. To do this, plug in your battery charger
and press the key on the top front of the case. In a few minutes you will see the
Exploration Wizard overlay.
Select 60 SEQUENCED
to follow examples in this
manual.
Note: Non-English speaking devices may have a different overlay.
The TARGET key allows you to explore key size options.
The PIC TEST keys show you how pictures are used to mean different things.
The UNITY PATTERNS key shows you how verbs, adjectives, nouns and pronouns are placed
on different overlays.
GETTING ACQUAINTED WITH YOUR ECO
ECO Manual
25
Page 26
The 4/8/15 PAGES key allows you to view pages already set up with different key size
locations.
The TARGET, UNITY PATTERNS and 4/8/15 PAGES keys have Back or CORE keys
that allow you to return to the Exploration Wizard main page. The PIC TEST key does not have
a Back or CORE key. See below if you want to leave the PIC TEST pages.
The bottom row of keys takes you to vocabulary overlays that you can use everyday for
communicating.
If you select one of the overlays, the software will take you directly to that overlay and you can
begin using it as your own. These overlays do not allow you to return to the Exploration Wizard.
If you select the PIC TEST key or an overlay from the bottom row and then decide you don't
want to use it, you can return to the Exploration Wizard by following these steps:
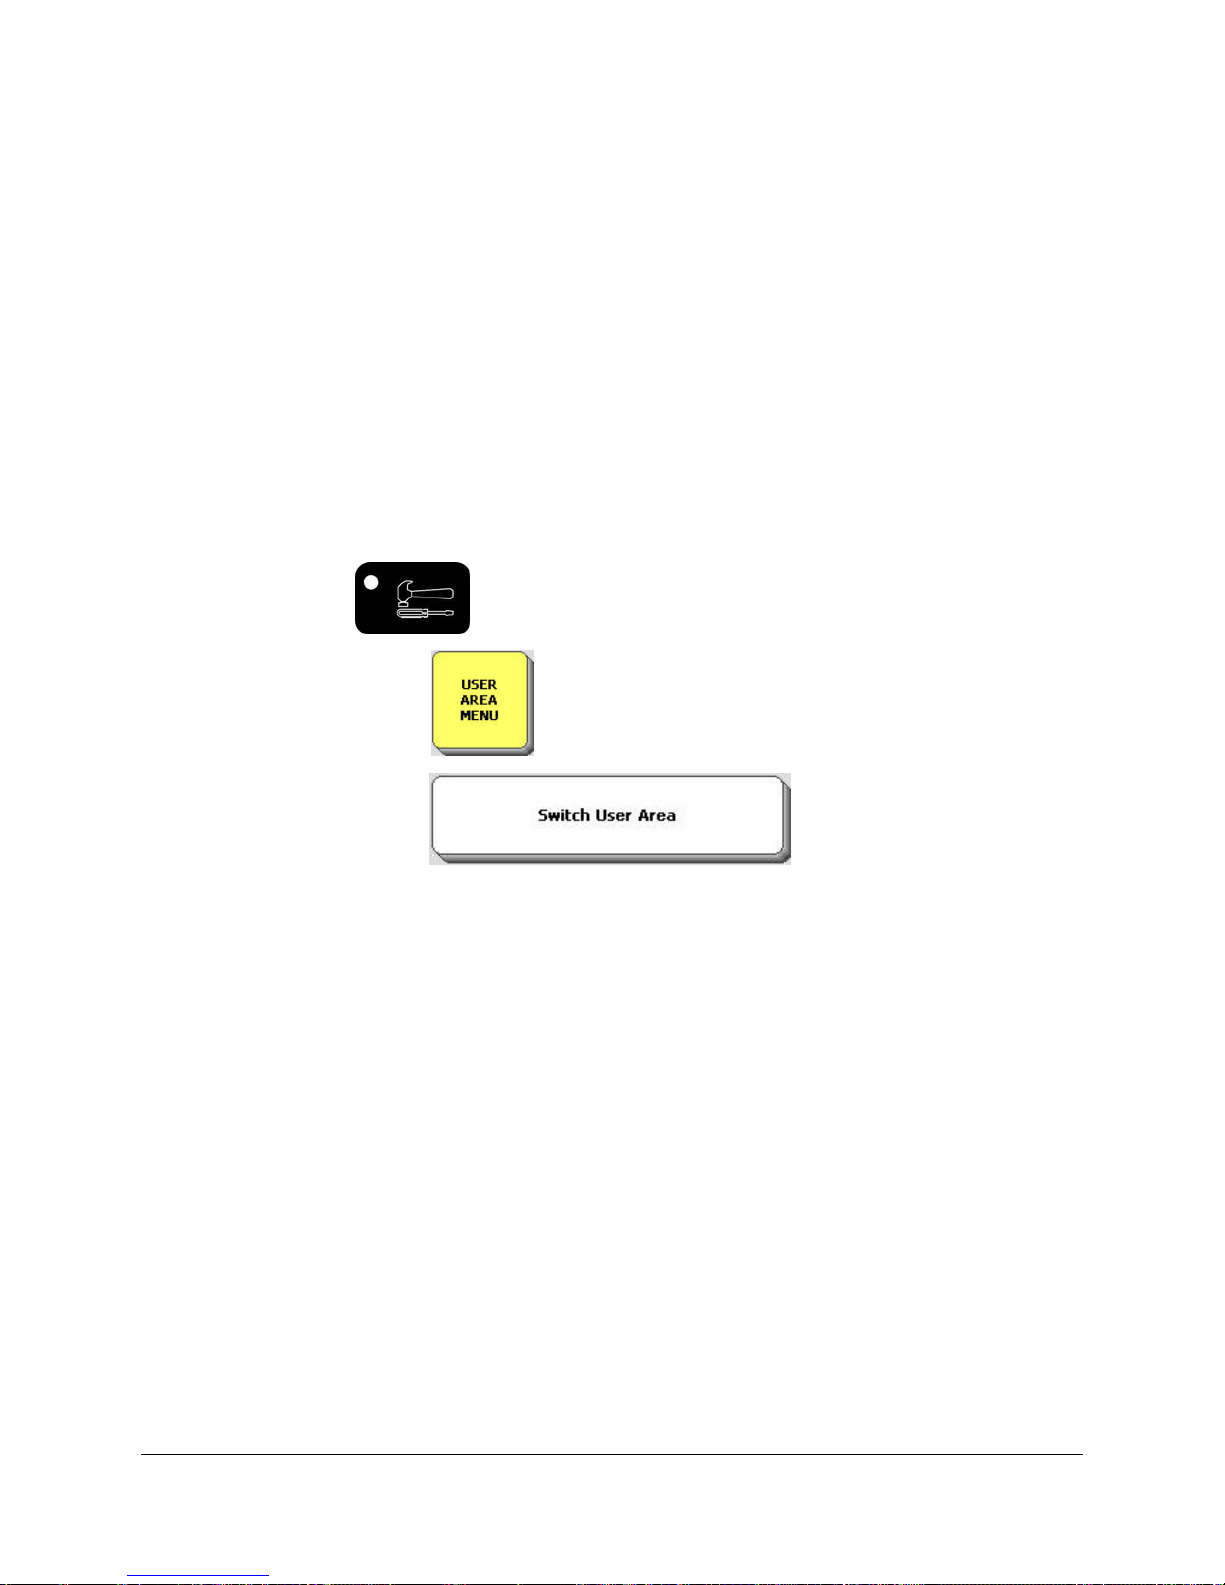
Select the TOOBOX key on the front of the case.
Select USER AREA MENU in the Toolbox.
Select the Switch User Area option.
Select Exploration Wizard (or you may select any User Area you might want to switch to.)
Select OK.
Select GO TO CORE.
You should be in the Exploration Wizard or the Area you selected.
Learn more about the USER AREA MENU beginning on page 37.
GETTING ACQUAINTED WITH YOUR ECO
ECO Manual
26
Page 27
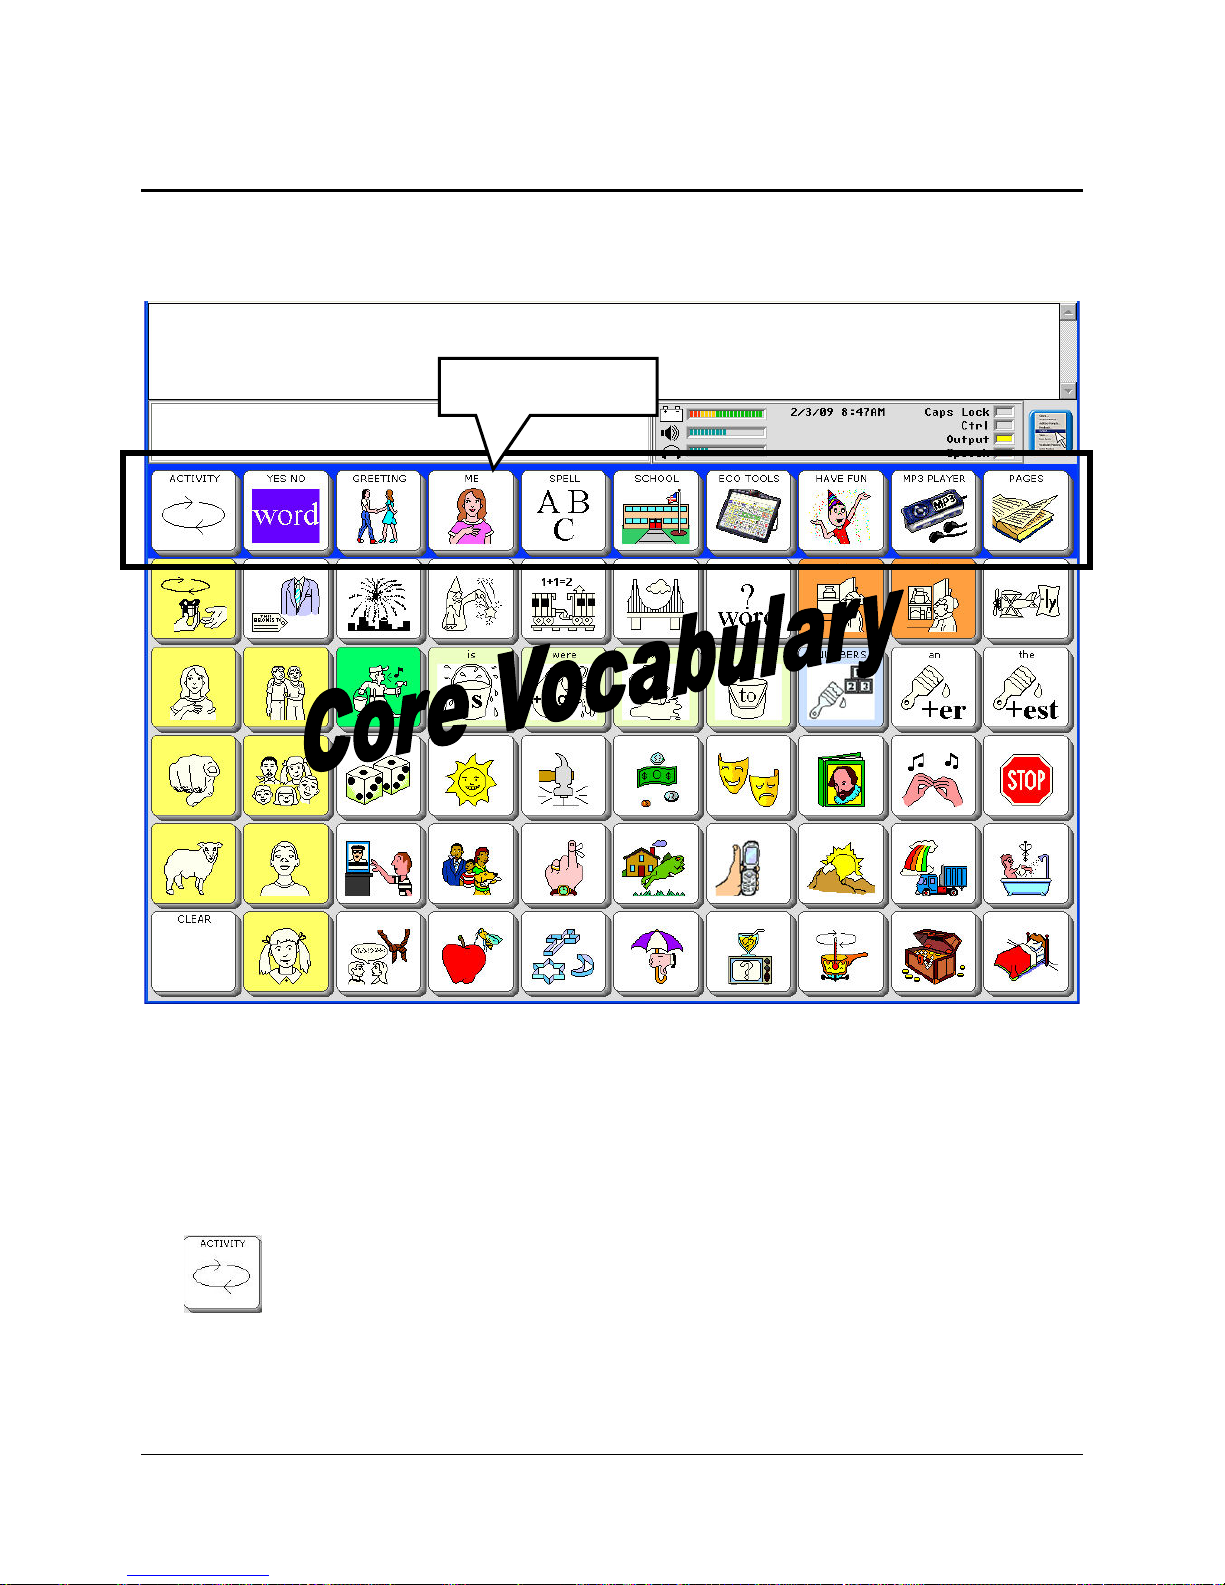
The Unity® 60 Sequenced Overlay
We will use the Unity® 60 Sequenced Overlay for examples in this manual. If you selected this
key from the Exploration Wizard, the overlay should now be visible on your touchscreen.
Activity Row
Right now you can activate a key by simply pressing on it. You do not have to press hard. A
light tap will do it. When you press a key you see that some keys become gray and others stay
bright. Press a bright key.
The device should speak a pre-stored message.
The top row of keys is the Activity Row. The first key in the far left column is the ACTIVITY
key . Press this key to see more activities in the Activity Row. If you want to look at
GETTING ACQUAINTED WITH YOUR ECO
ECO Manual
27
Page 28
some activities, press one of the keys in the Activity Row. Press MORE if you want to
see more keys in any Activity. If you want to exit an Activity, press the key.
The bottom five rows of keys contain the CORE vocabulary. Core vocabulary is vocabulary
that you use all the time when speaking. The Core vocabulary icons are generally consistent
throughout the different Unity overlays.
Finding Keys
You can find any key on an overlay or in the Toolbox by using row and column locations.
®
For example, on the Unity
60 sequenced overlay, there are 6 rows from the top to the bottom of
the overlay. There are 10 columns of keys from left to right across the overlay.
The ACTIVITY key
is at location Row 1 Column 1.
The FEELINGS key is at Row 4, Column7.
Using this method, you can find any key on any overlay.
If you use Auditory Scanning with a Blank overlay, your device uses the numbers 1-36 to
represent Core key locations. Activity Row keys are not numbered.
GETTING ACQUAINTED WITH YOUR ECO
ECO Manual
28
Page 29
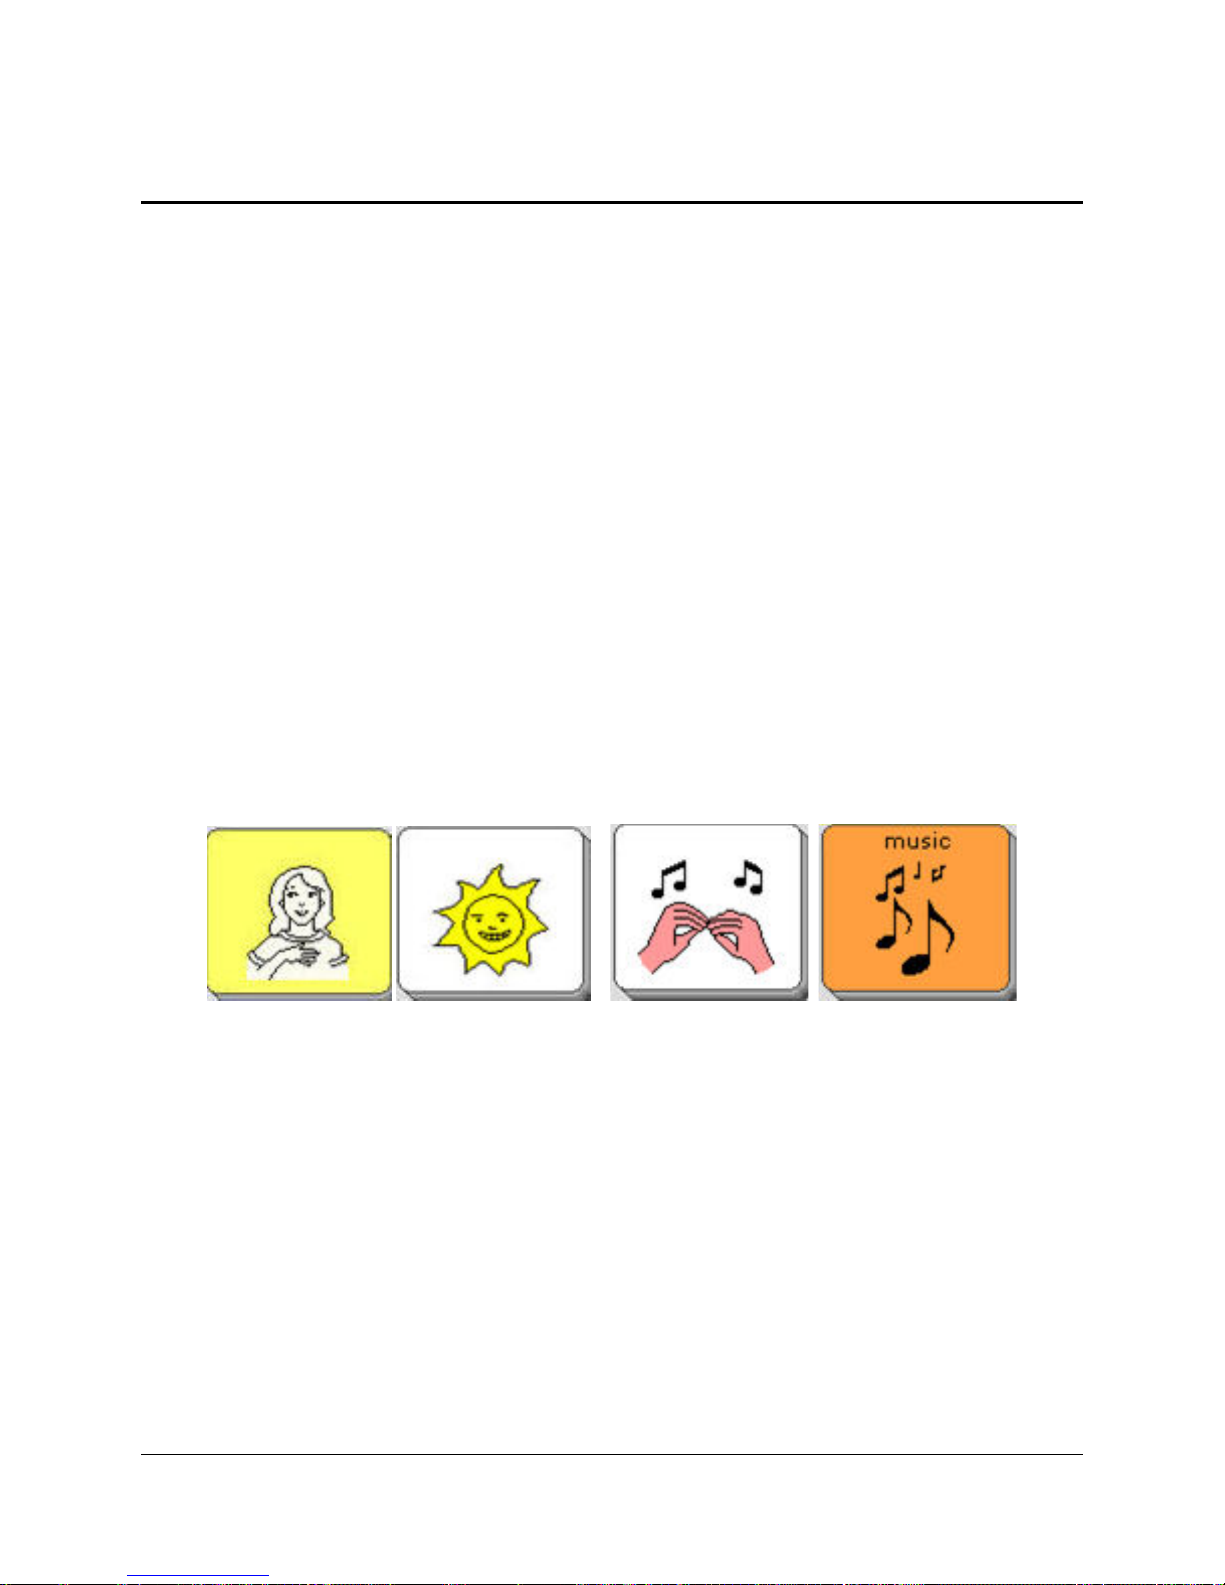
About Minspeak®
Your device uses Minspeak® to help you communicate.
Minspeak is a means of coding vocabulary to a small set of icons that are rich in meaning.
Minspeak's use of icons taps into a person's natural tendency to associate multiple meanings to
pictures. By coding a large vocabulary of words, phrases and whole messages using this small
set of icons, Minspeak offers many advantages:
• it is logical in how it represents a person's language;
• it is easy to learn because it fits into a person's natural ability to associate many meanings to
one picture;
• it promotes language development by providing a rich vocabulary of words that you can
combine into sentences;
• because the small set of icons remains the same on a single overlay, you can, with practice,
learn to recall your vocabulary automatically;
• it promotes further language development by offering many opportunities for language-
learning experiences.
These advantages lead to the ultimate benefit of using Minspeak: it allows for and promotes
independent, effective communication.
I like music
GETTING ACQUAINTED WITH YOUR ECO
ECO Manual
29
Page 30
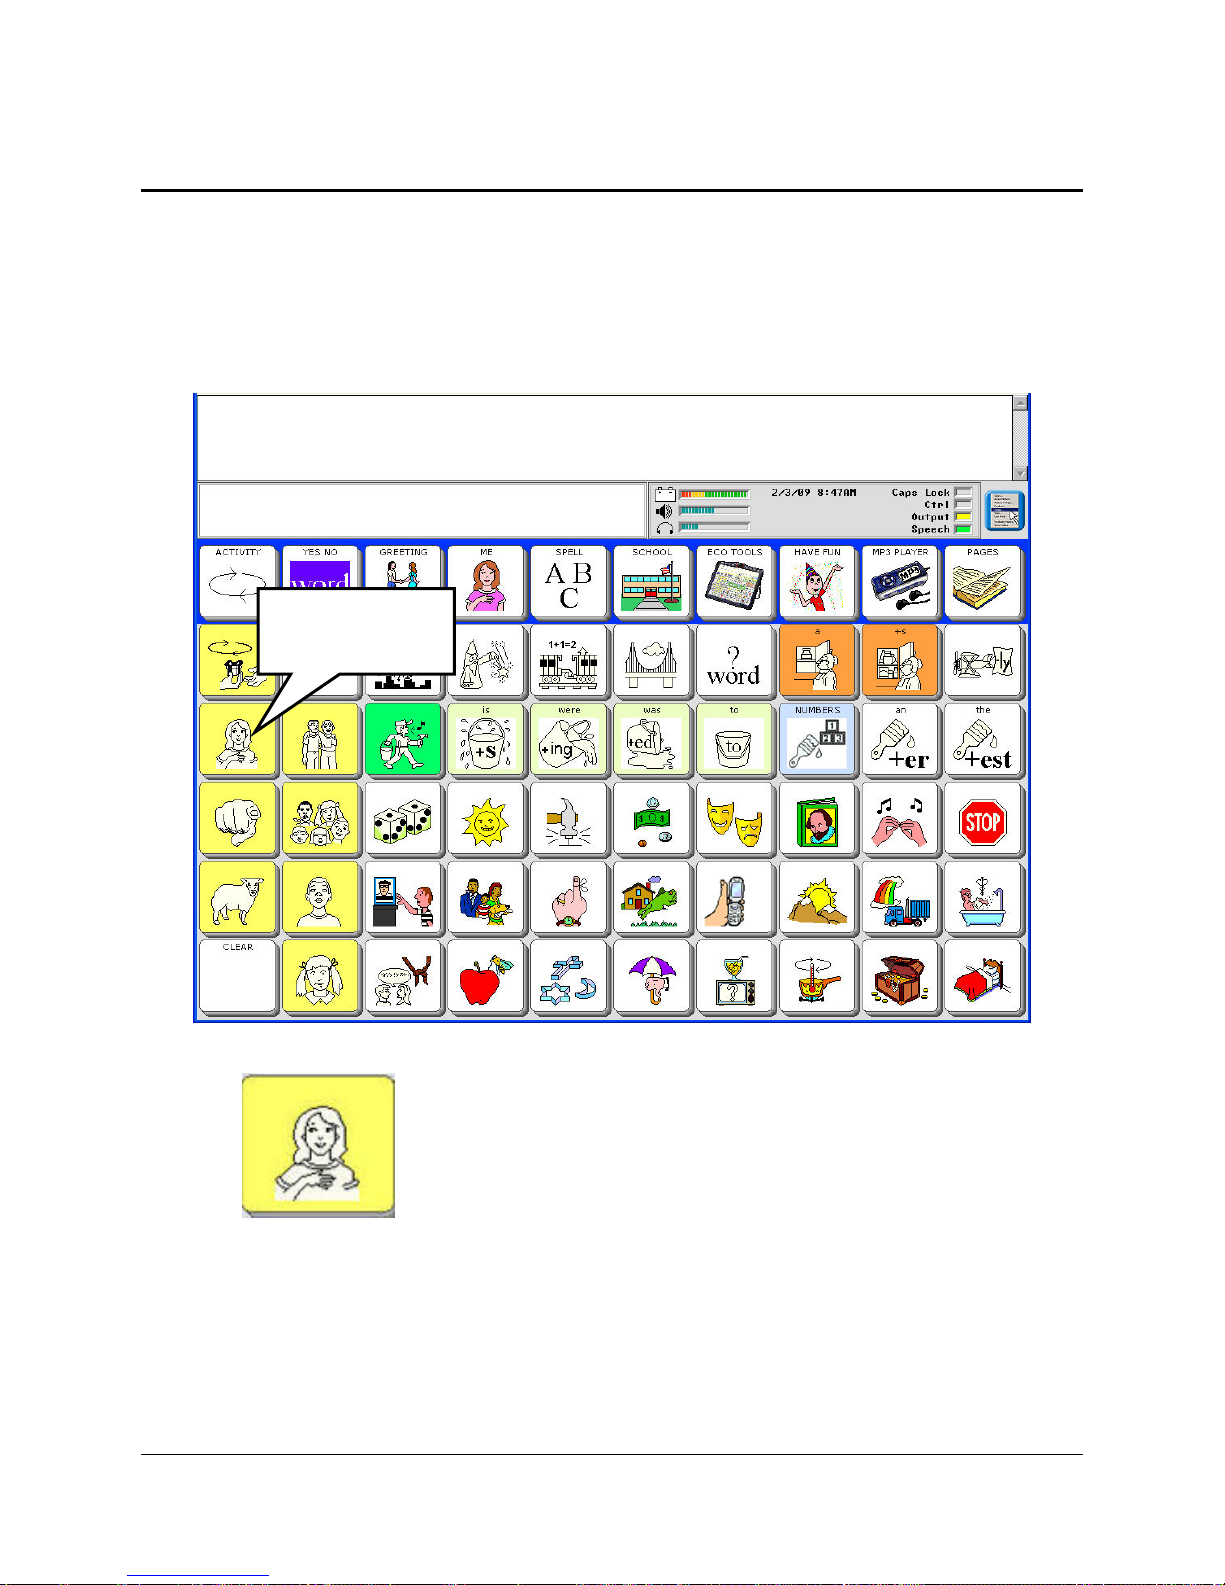
Icon Prediction Shows Where You Have Messages Stored
If you have pressed any keys on the screen, you have probably noticed that some keys on the
keyboard lost their icons and became blank. This is called Icon Prediction. The keys with
icons on them tell you that they are possible selections for messages that are part of the
vocabulary stored in your device. The blank keys offer no messages.
Select this key.
Press the key.
GETTING ACQUAINTED WITH YOUR ECO
ECO Manual
30
Page 31
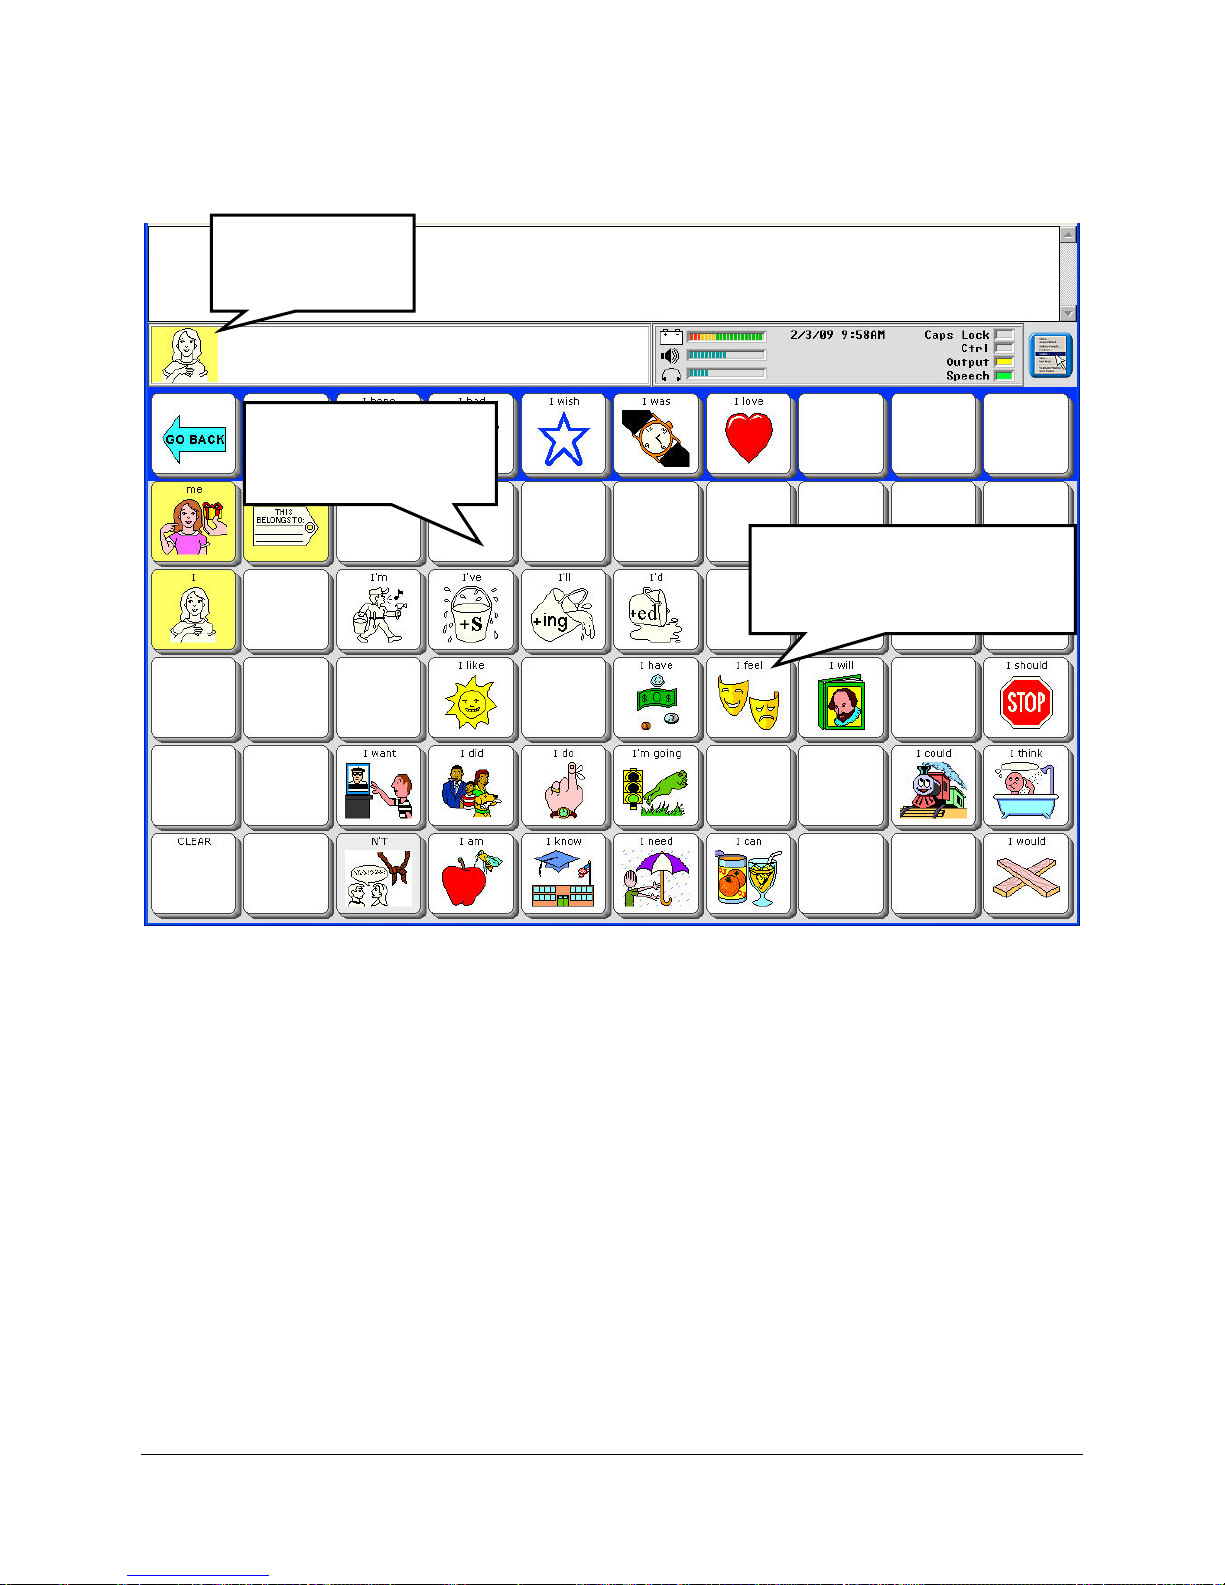
You see:
The icon you
selected shows
up here.
Blank keys will not
complete your
message.
Any bright key with a
visible icon will complete
your message.
The icon for the key you selected will appear in the Icon Display Area.
Some keys on the overlay will go blank.
If you select one of the keys with an icon on it, its icon will appear in the Icon Display Area and
the device will speak the message that is stored under the sequence you just activated.
Once a message is spoken, the device returns to showing all the icons. When you press a key
again, some keys will remain bright and some will turn blank.
If you press a blank key, you will see the icon that belongs to that key in the Icon Display Area
but no message is spoken. The overlay resets and all keys become bright again.
Icon Prediction is a good tool to help you learn your vocabulary.
GETTING ACQUAINTED WITH YOUR ECO
ECO Manual
31
Page 32
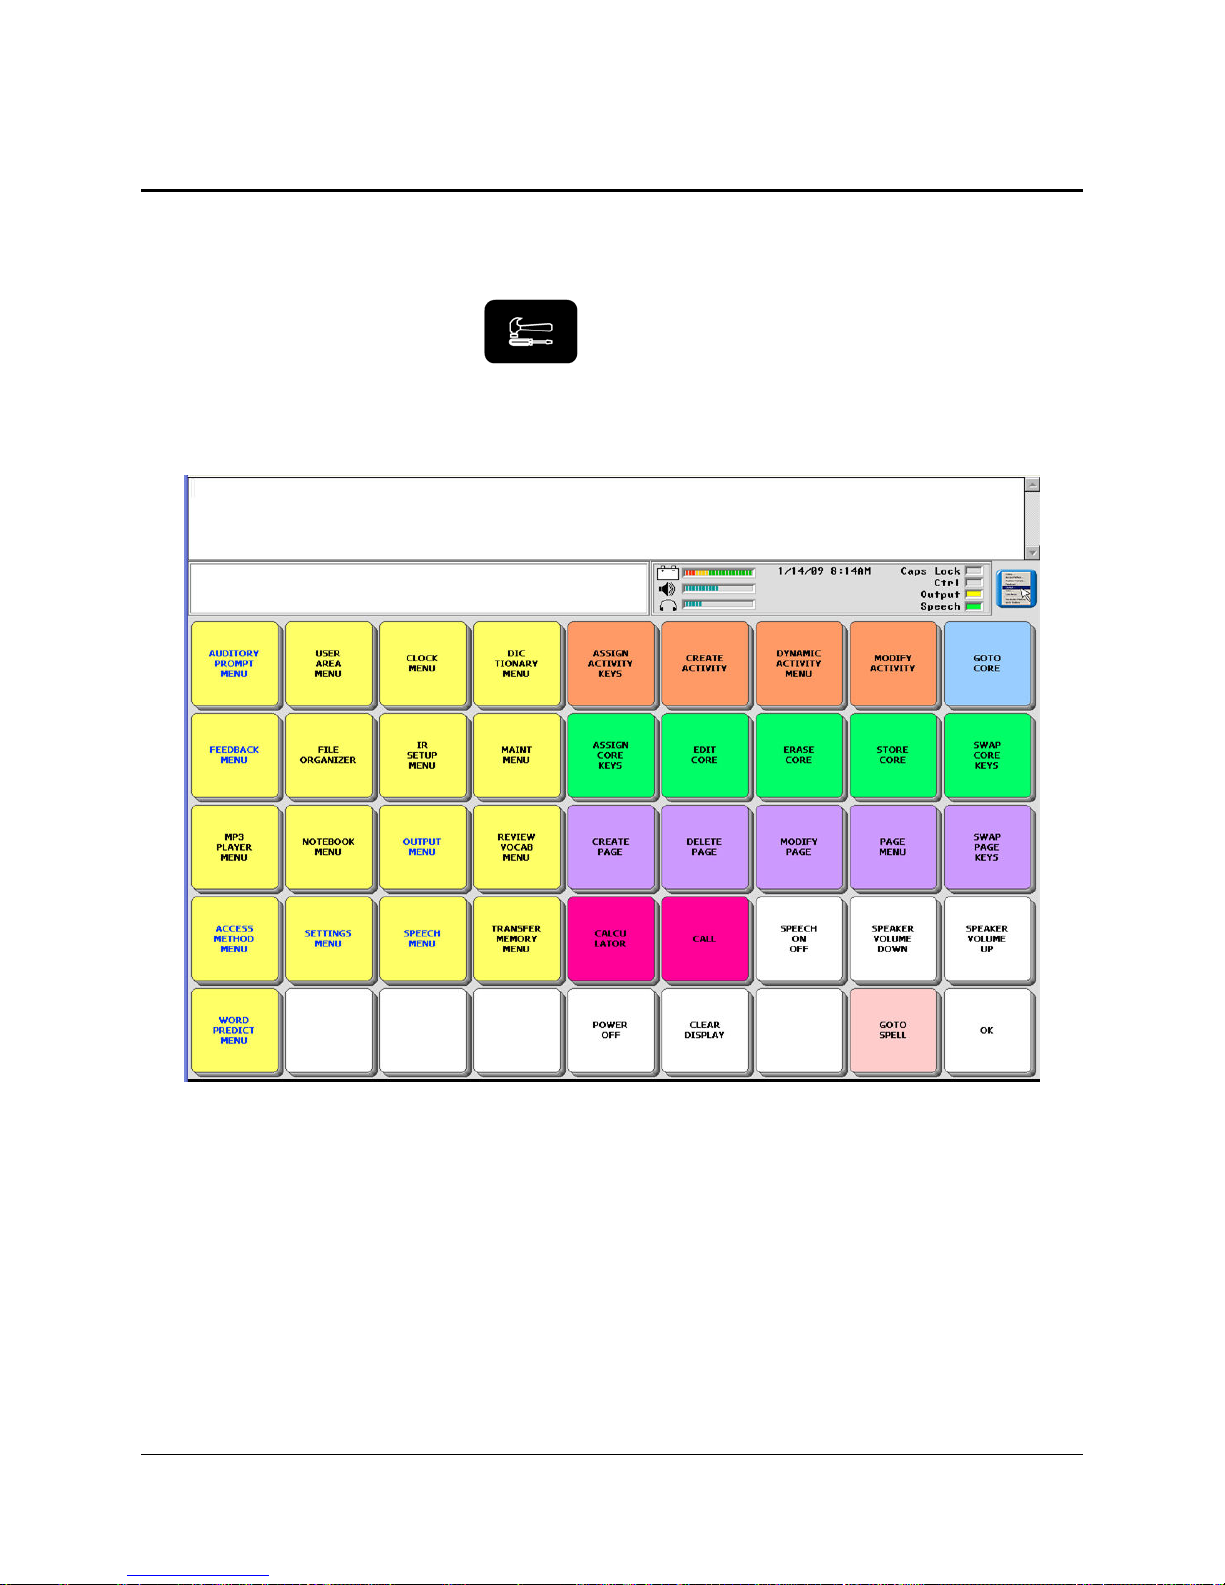
About the Color-Coded Toolbox
The Toolbox is an overlay that contains menus and single function keys. These menus and
functions will help you to make your device into one that is tailored to your specific needs.
Go to the Toolbox by pressing the Toolbox button on the front of the case.
The Toolbox keys are color-coded. Notice that System Menus, Pages, Activity keys, etc. are all
in different color groups to help you remember where the keys are and what they allow you to
do.
Activate the yellow FEEDBACK MENU. This menu allows you to choose the kind of
feedback you want from your device. Activate OK or CANCEL to exit the menu. OK saves
any changes you have made and exits the menu. CANCEL exits the menu without saving
changes.
The USER AREA MENU allows you to choose a keyboard size, a communication overlay and
a spelling overlay. You can load a computer overlay from this menu.
You can go to your communication overlay (CORE) or the spelling keyboard Note: You can
store the Tool, GO TO TOOLBOX, under an icon sequence on your communication overlay if
you decide you want to have access to it on your overlay. See pages starting with
about storing Tools.
163 to learn
GETTING ACQUAINTED WITH YOUR ECO
ECO Manual
32
Page 33
Change the Speaker Volume
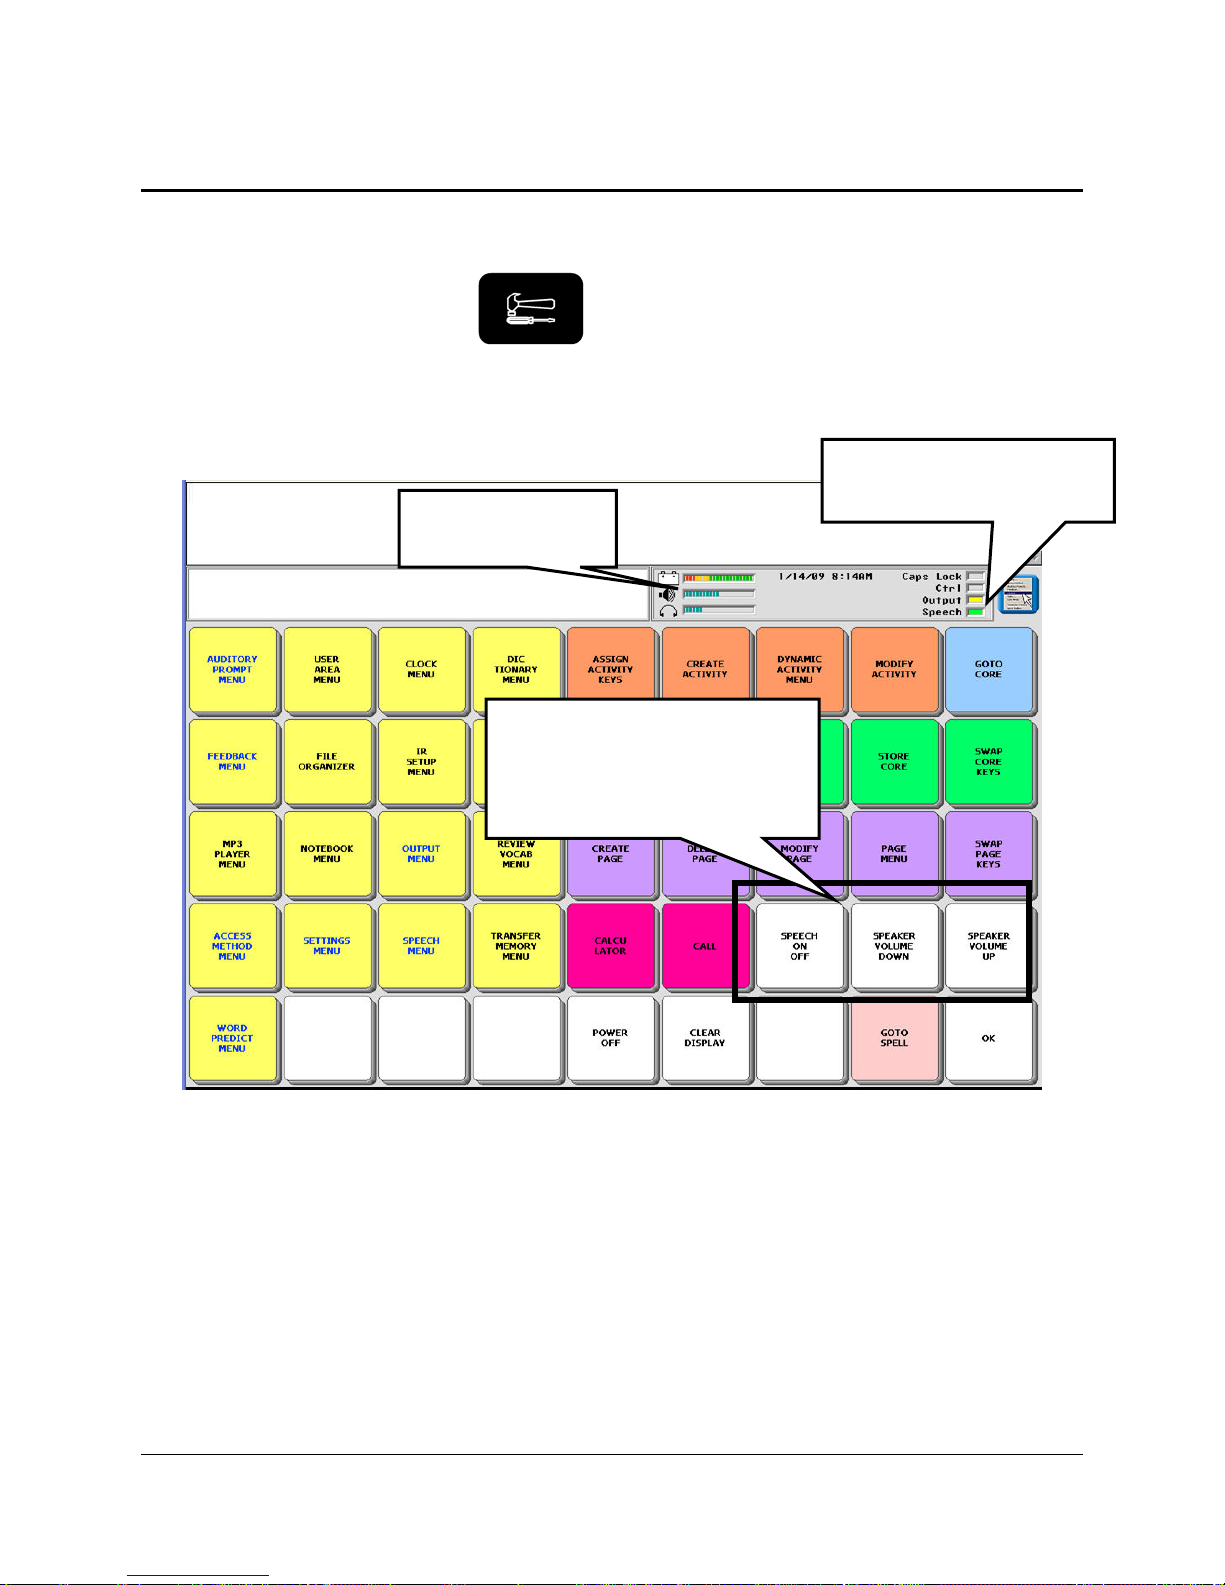
From the Toolbox, you can quickly change the speaker volume on your device.
Go to the Toolbox by pressing the key on the front of the case.
Green light indicates
Speech is ON.
Speaker Volume
indicator
Select these keys to turn
Speech ON or OFF and to
tune the speaker volume
UP or DOWN.
Press the SPEAKER VOLUME DOWN key. Look at the Status Display Area. As you press
the SPEAKER VOLUME DOWN key, the lines on the graph next to the picture of a speaker
disappear. The fewer lines there are in the graph, the lower the volume of the speaker.
Now press SPEAKER VOLUME UP. The lines return to fill up the graph.
You can test the volume by pressing on the Text Display Area. Your device will speak any text
that is in the Text Display Area and you can adjust the volume to your preference.
Adjust the volume for an external headphone in the FEEDBACK MENU.
Change the Scan Beep or Activation Beep volume in the FEEDBACK MENU.
GETTING ACQUAINTED WITH YOUR ECO
ECO Manual
33
Page 34
About the CALL Tool in the Toolbox
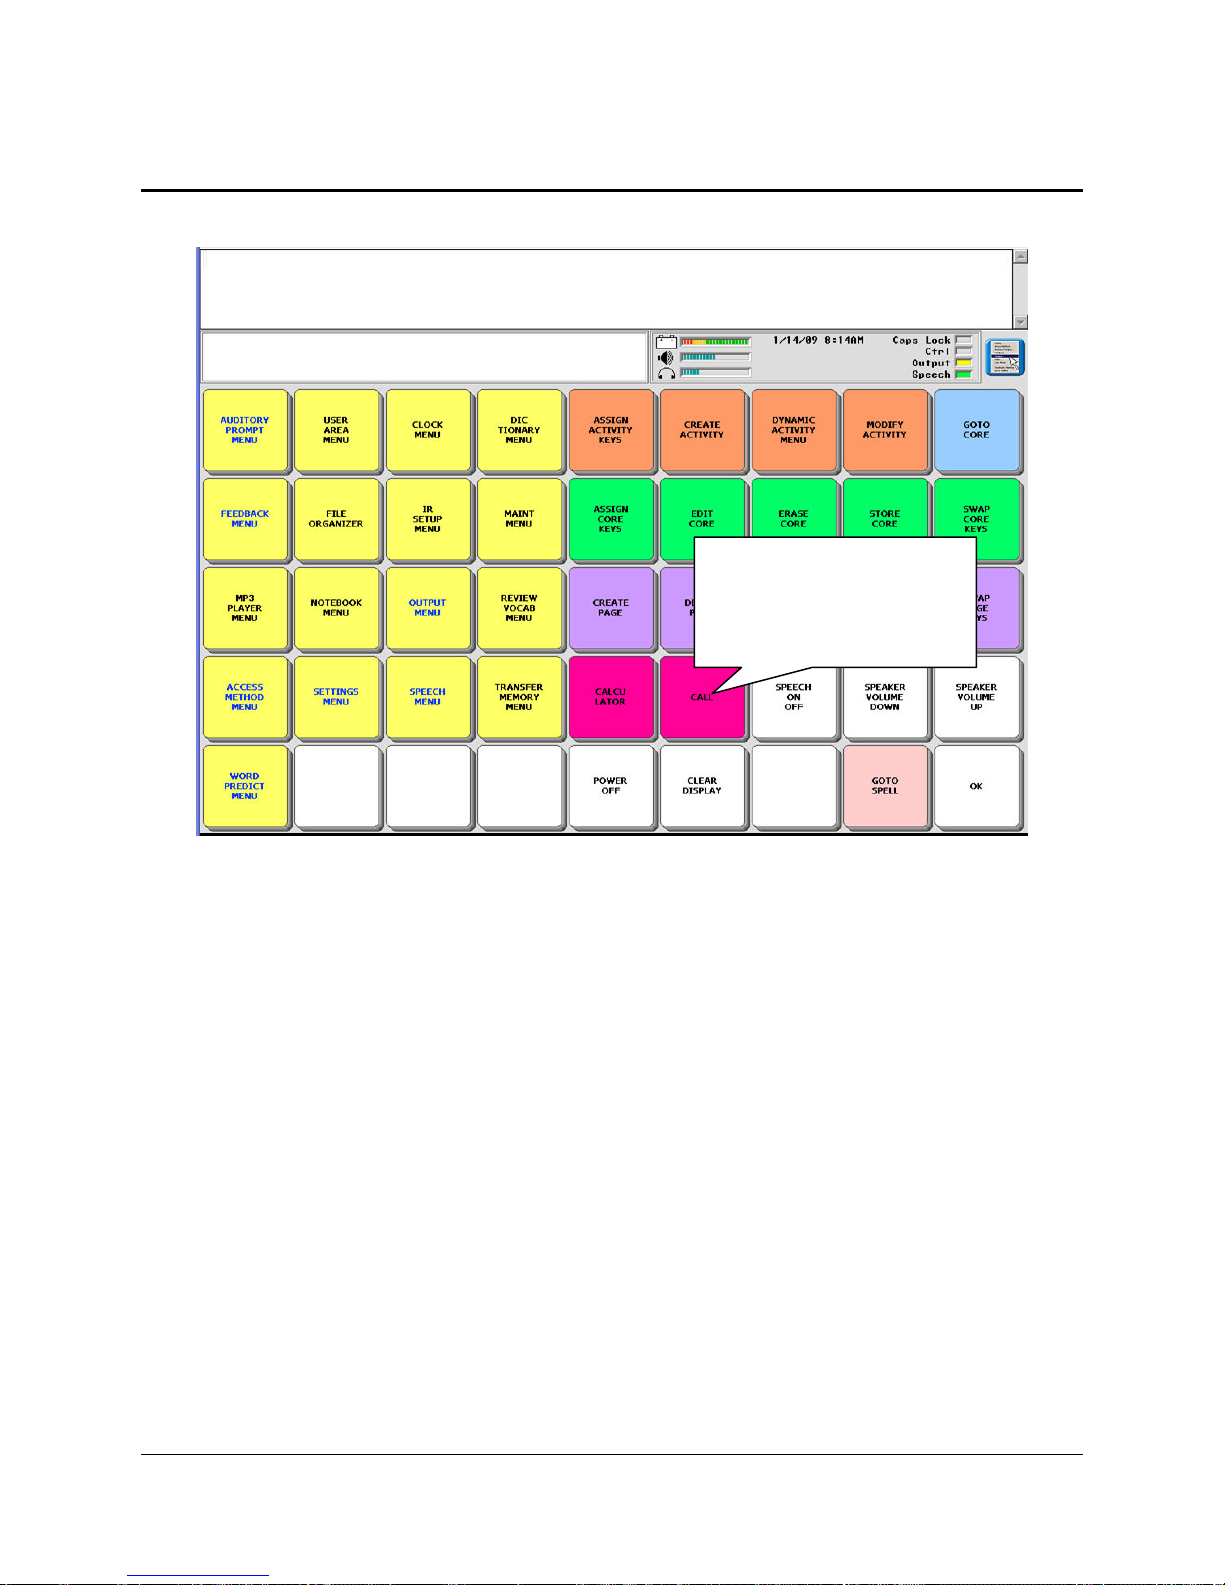
The CALL tool.
Use this key only when
you need assistance.
There will probably be times when you will need to get someone's attention for assistance. The
CALL tool is just for this purpose.
When you activate CALL, your device plays a series of tones that are designed to get someone's
attention. The beeps are not like any other beeps the device makes when it is in regular use.
Because the CALL tool is designed to bring you assistance, it should only be used for that
purpose. Overusing CALL lessens the importance of the beeps to those who hear them.
GETTING ACQUAINTED WITH YOUR ECO
ECO Manual
34
Page 35
Setting Up your Communication Device
SETTING UP YOUR DEVICE
ECO Manual
35
Page 36
About Setting Up your Device
Your ability to use your device for maximum communication will depend in part on setting it up
so that it suits your individual communication needs. You might want to try different
combinations of options before you settle on the ones that you like best.
You will select set-up options from various menus in the Toolbox.
WHAT IS THIS?
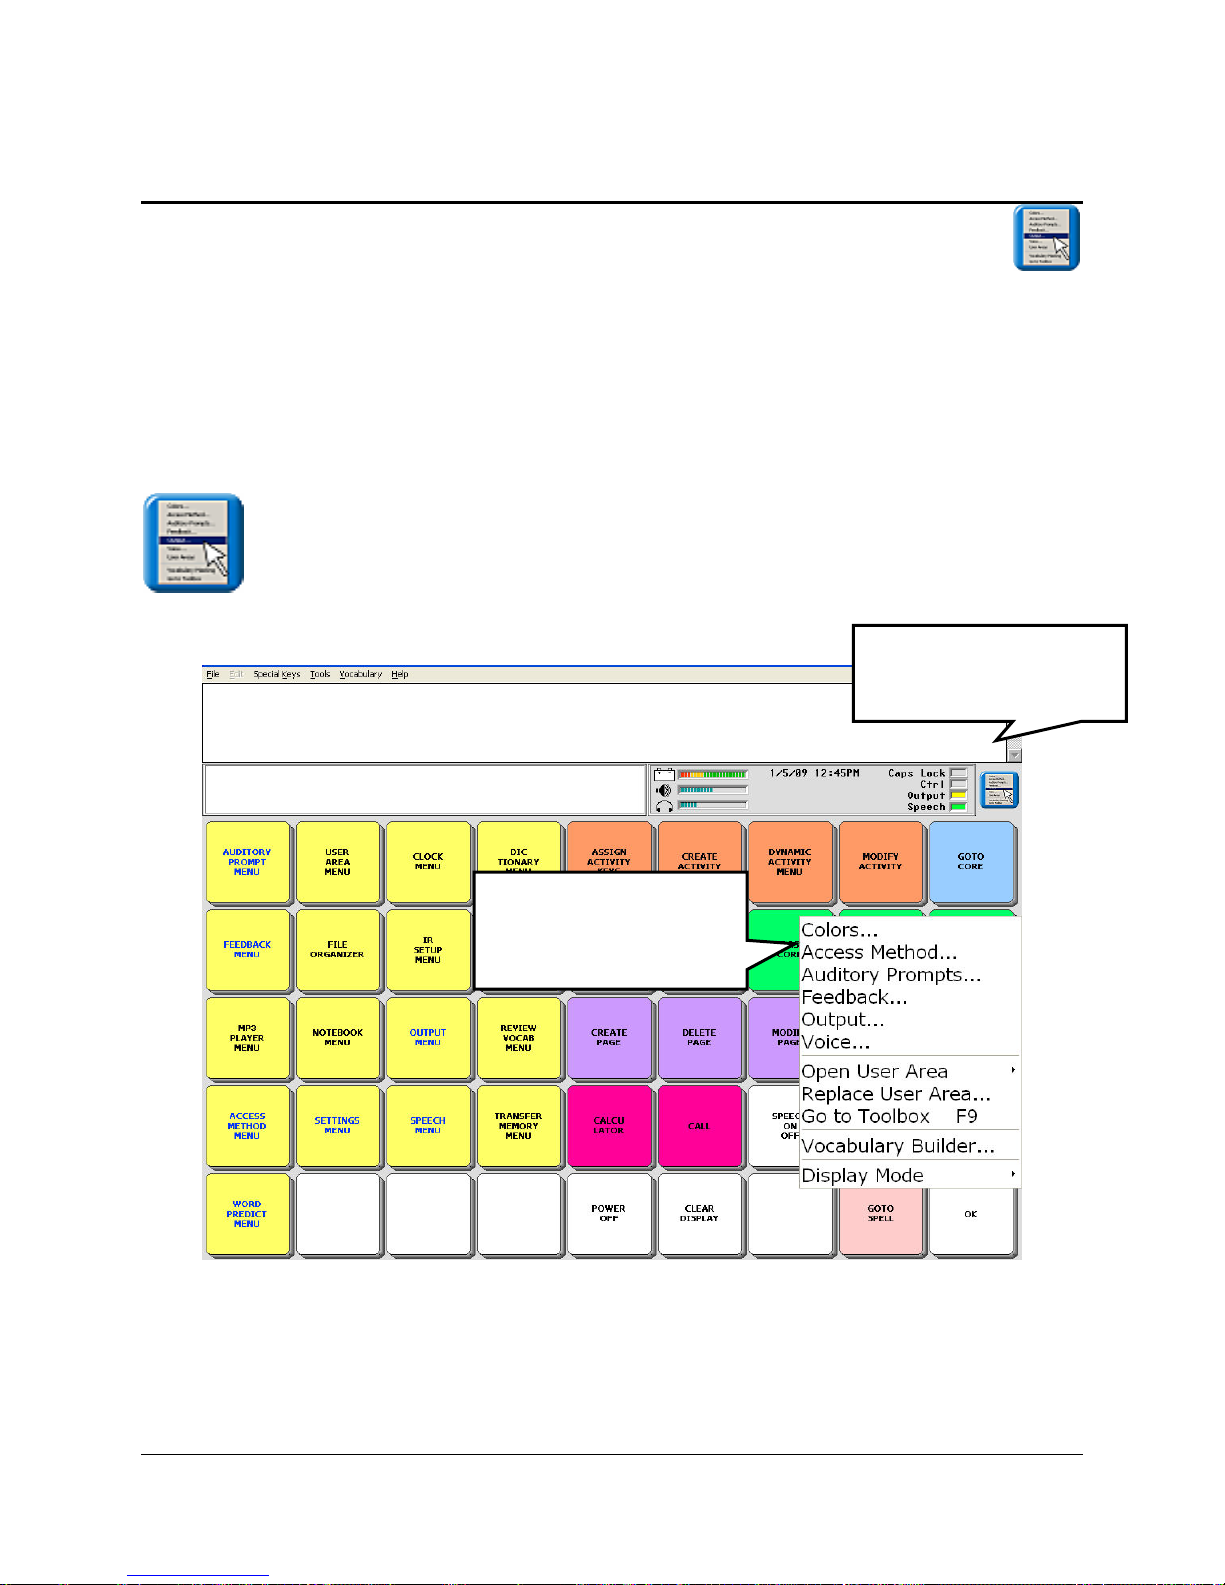
This icon indicates that the options described in a section are also available in a dropdown menu. When you see this icon throughout the manual, you can access the option from the
mini-menu.
Press this to see the
mini drop-down menu.
Select an option from
the mini Drop-Down
Menu.
This mini-menu will be of most benefit to the AAC team and device programmers. The menu
icon is located to the right of the Status Display Area at the top of your display screen. To access
the menu you must tap it with your finger or a stylus. You must be in the Toolbox, your CORE,
Spelling overlay, or a Page to open it.
SETTING UP YOUR DEVICE
ECO Manual
36
Page 37
Select a User Area
Your device has six different User Areas that contain pre-stored vocabulary. If more than one
person is using the device, each person can have his or her own area. A single user can load
different keyboards and overlays into different Areas and use them in specific situations.
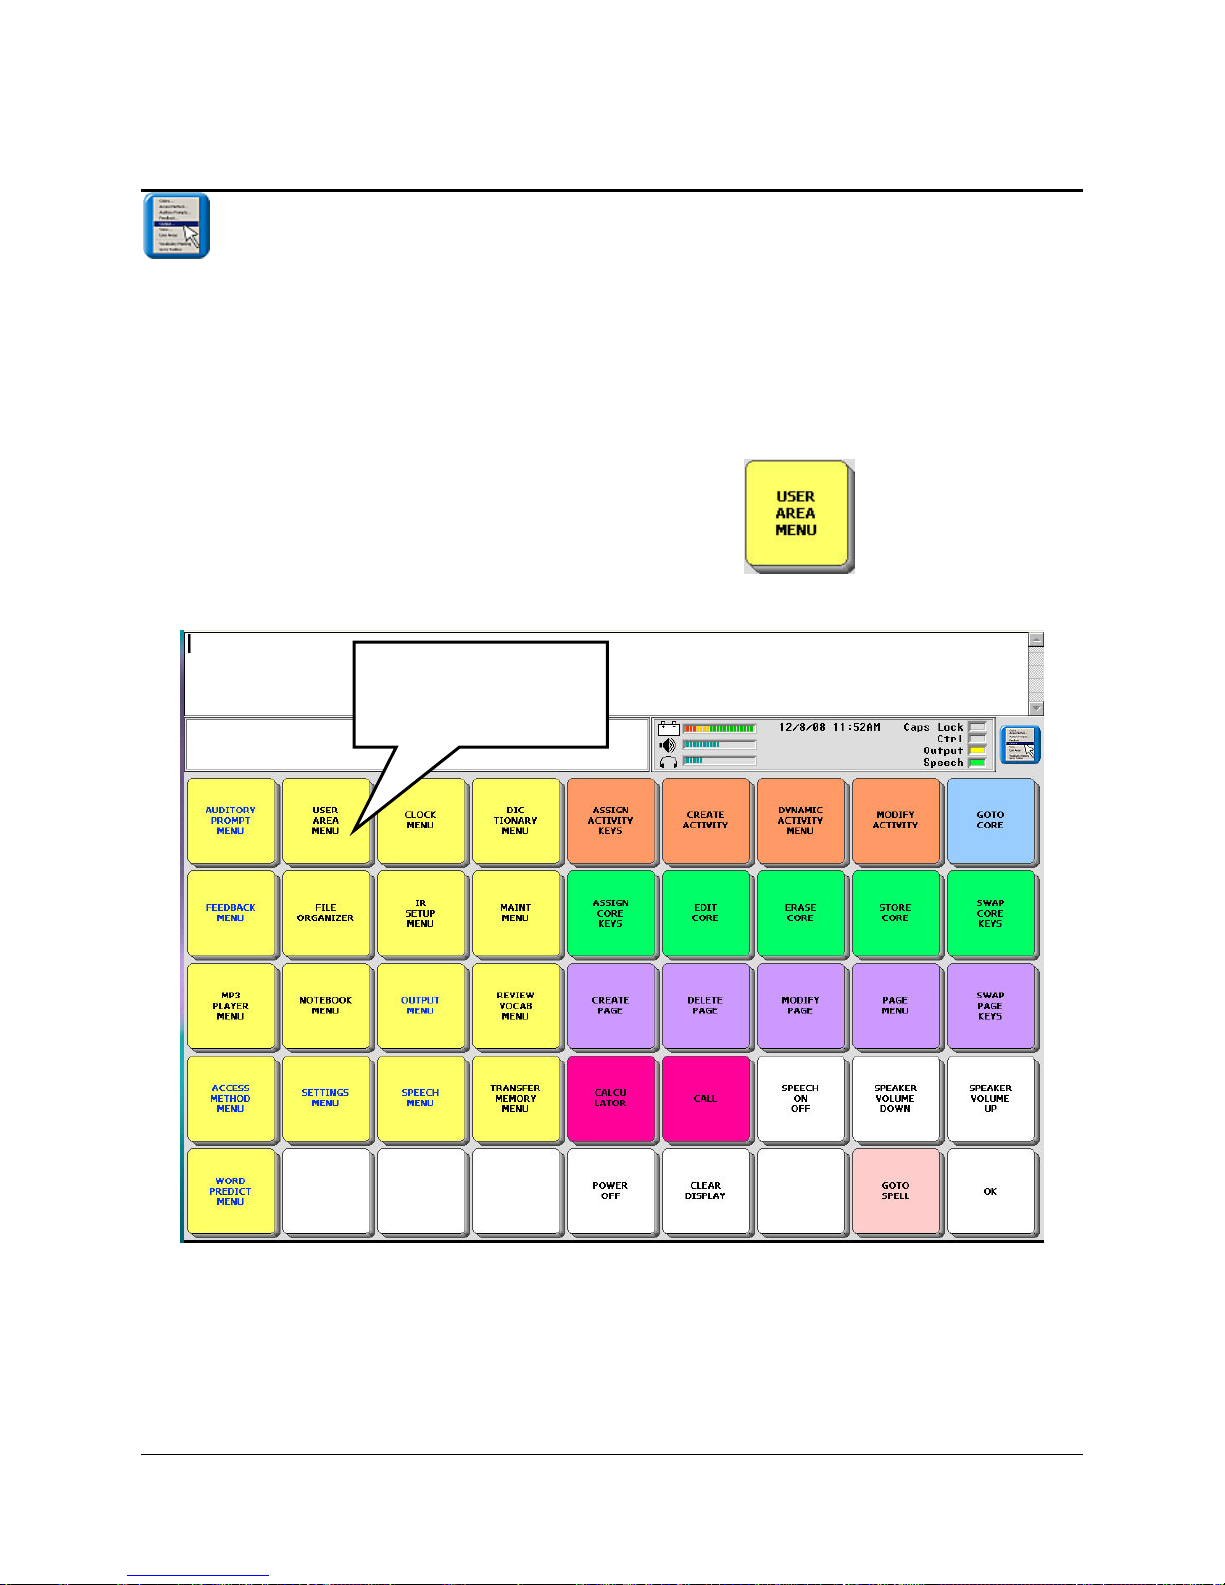
You select a User Area by opening the USER AREA MENU
Select the USER
AREA MENU
in the Toolbox.
SETTING UP YOUR DEVICE
ECO Manual
37
Page 38
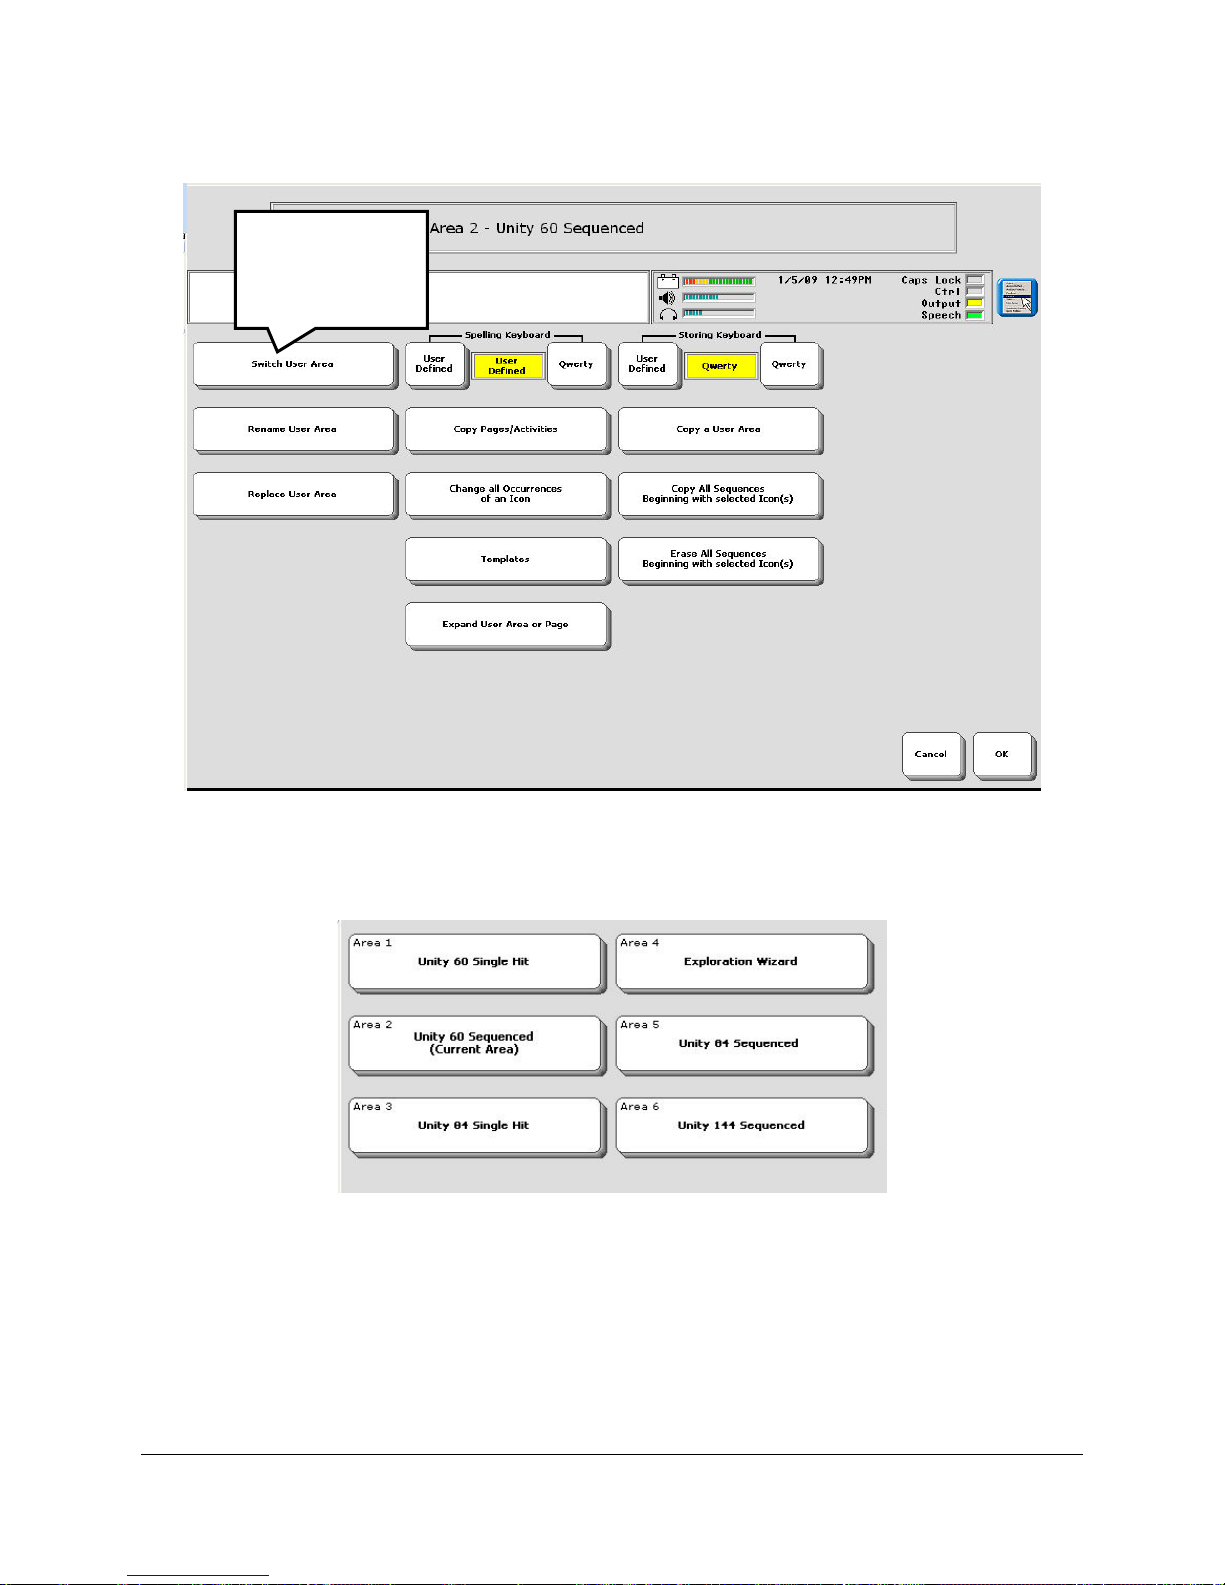
Select Switch
User Area.
Select the Switch User Area option.
Each User Area and overlay is shown on its key. Select the overlay you want to use. Yout device
will make the switch and return you to the first screen of the USER AREA MENU.
For now, select "Cancel" to stay with AREA 2: Unity 60 Sequenced.
SETTING UP YOUR DEVICE
ECO Manual
38
Page 39
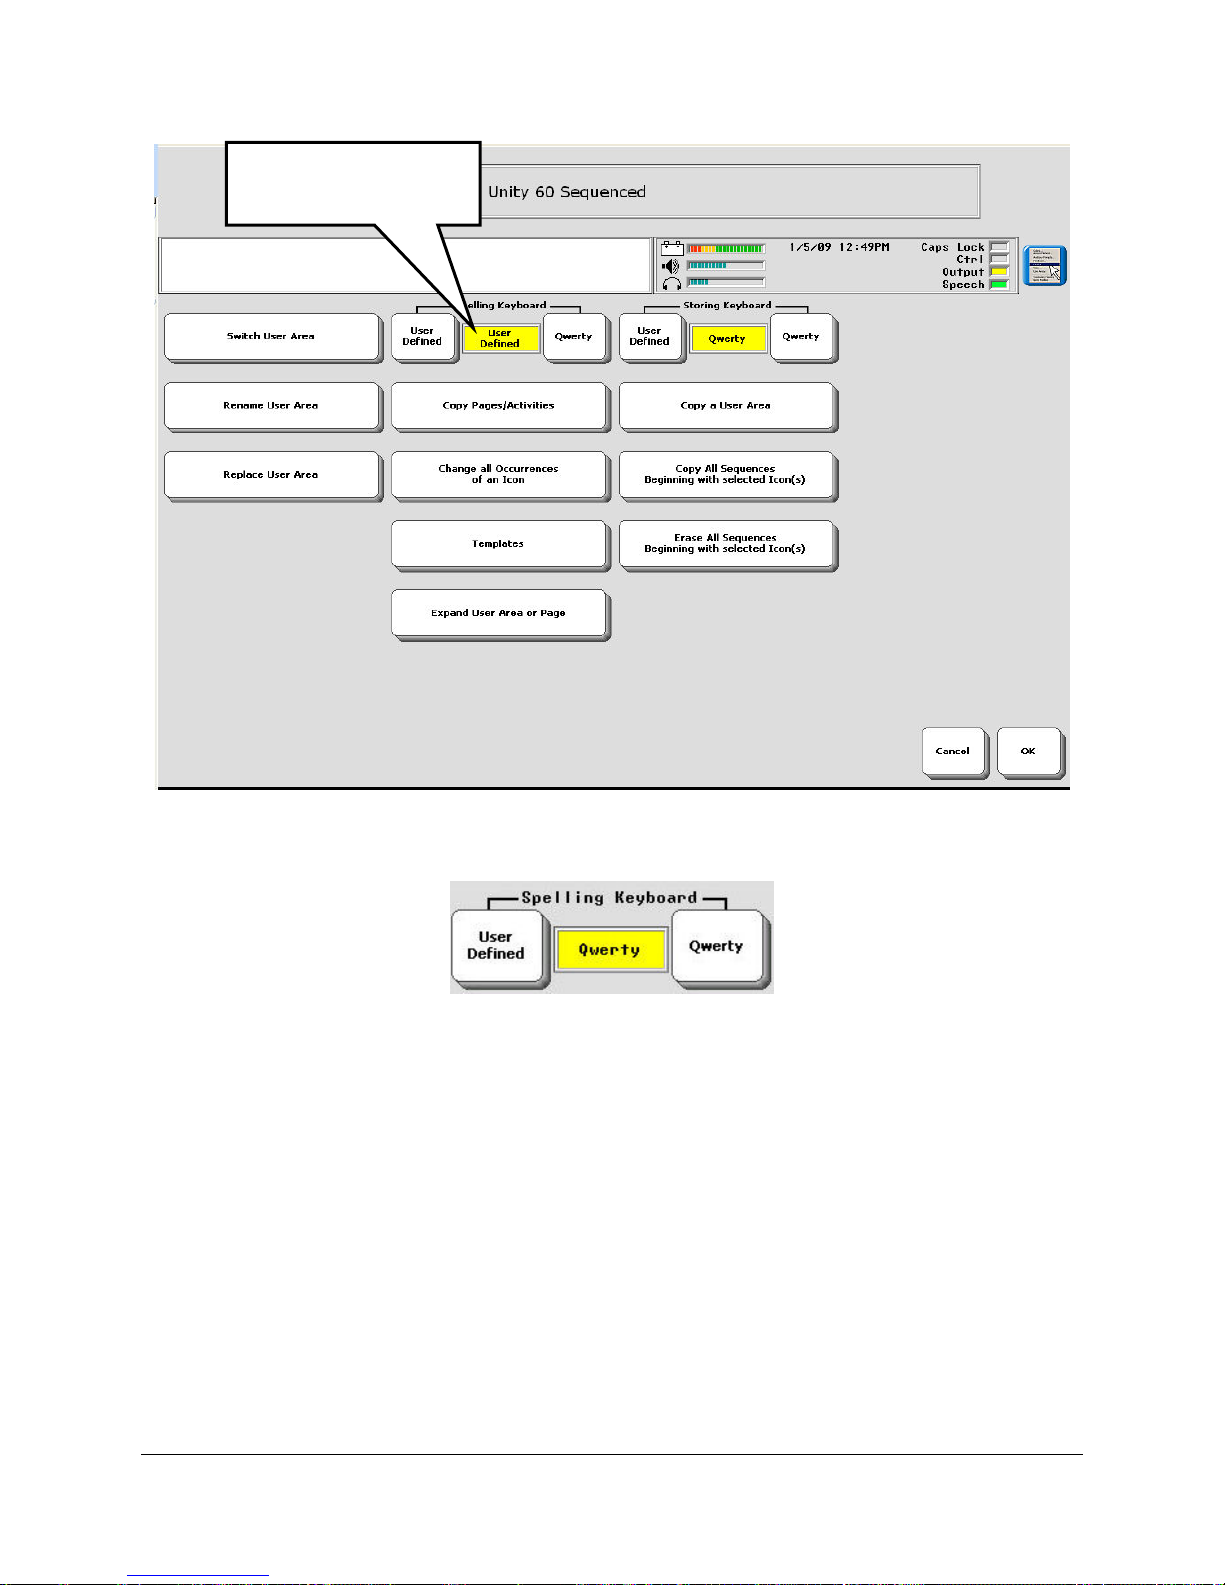
Select a Spelling
Keyboard.
The Spelling Keyboard option defines your Spelling page. The Qwerty keyboard is set up like a
computer keyboard. If you select GO TO SPELL in the Toolbox, you will see the default
Qwerty spelling page. If you select the ABC key on your Unity overlay, you will see a spelling
page that has been designed to go with the overlay you are using.
If you select User Defined, you will see the Pages menu. Select the spelling page you want.. If
you select GO TO SPELL in the Toolbox, you will see the spelling page you selected. If you
select the ABC key on your Unity overlay, you will see the spelling page that was created to go
with the particular overlay you are using.
Other USER AREA MENU Options
Use the Rename User Area to give your Area a name, if you want to.
SETTING UP YOUR DEVICE
ECO Manual
39
Page 40
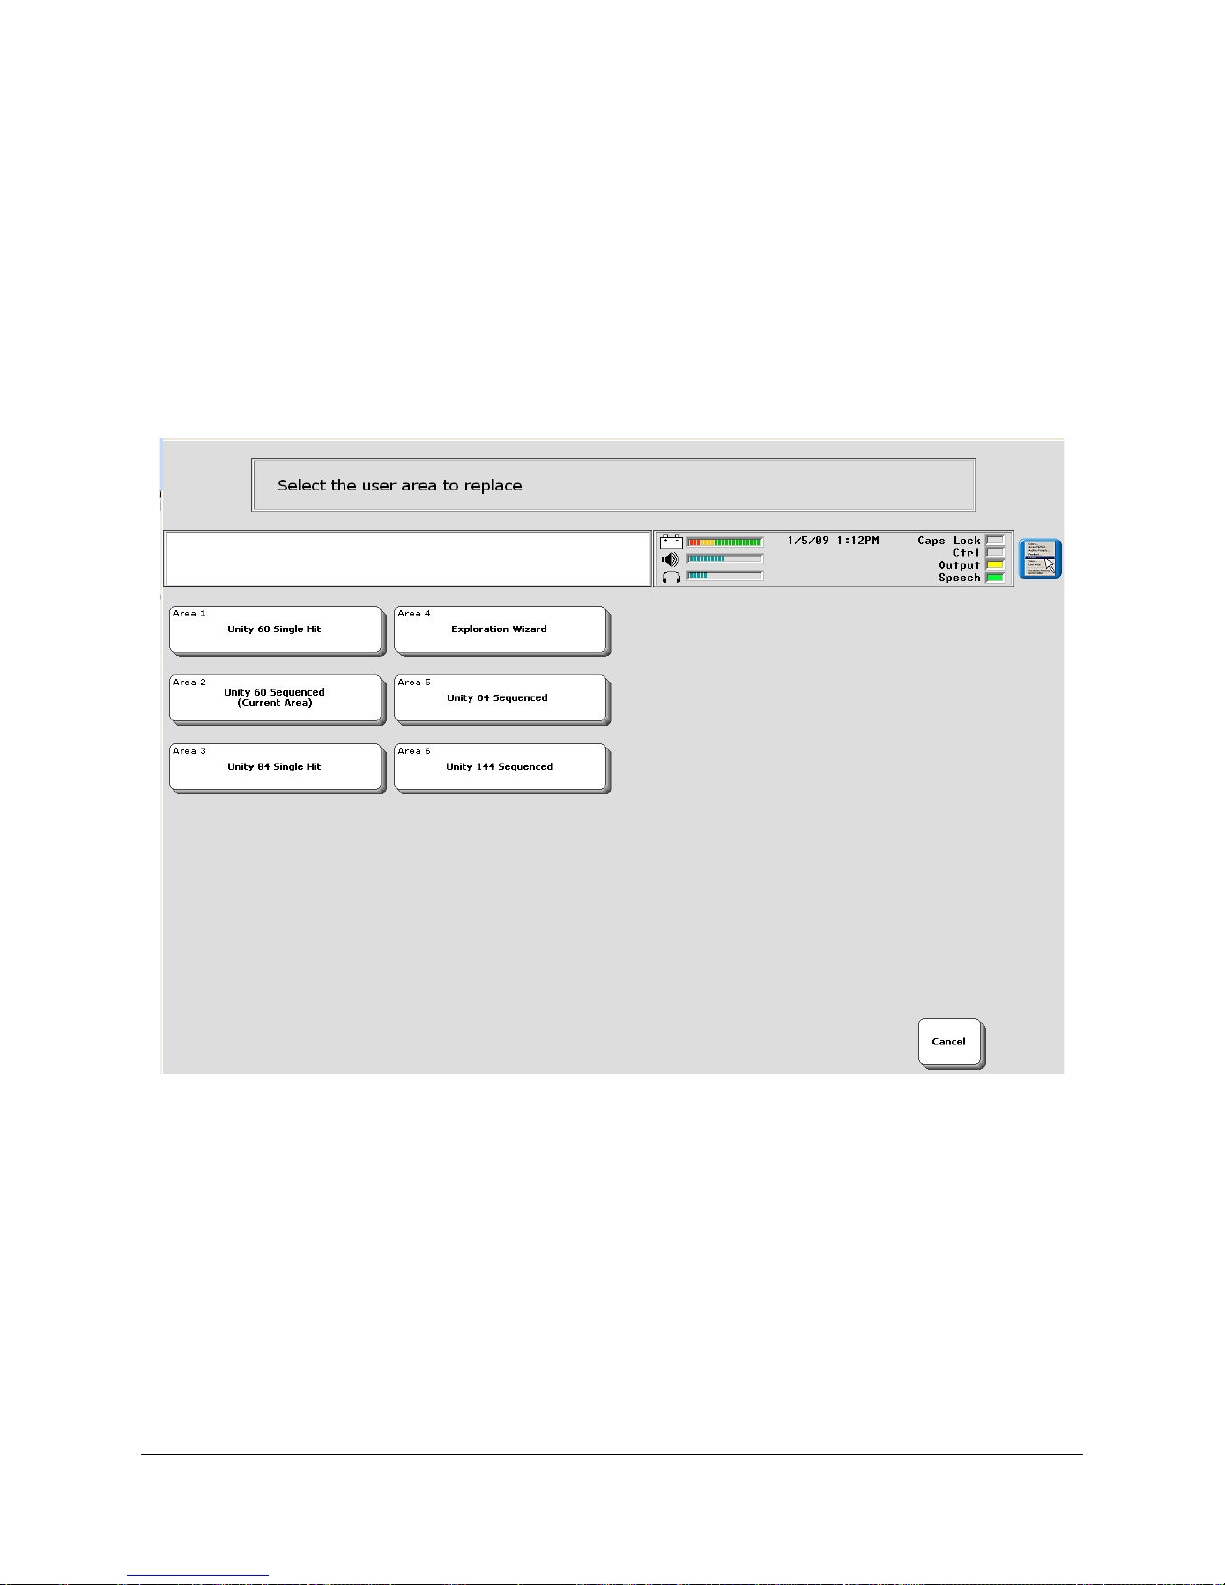
You can Copy a User Area and place it in another Area. Both Areas would have the same
overlay but each Area could have its own access method. One Area might be set up for school
situations and another for when the user is at home.
Important Note!
Replace User Area is a new option. (It replaces the old Overlay menu.)
If you want to replace the overlay you have been using with a different overlay in the same User
Area, you must first select the Area/overlay you are currently using. (If you are replacing an
overlay in an Area you are not currently using, you will not see this screen)
When you have selected your current area, you will see the Replace With menu.
SETTING UP YOUR DEVICE
ECO Manual
40
Page 41
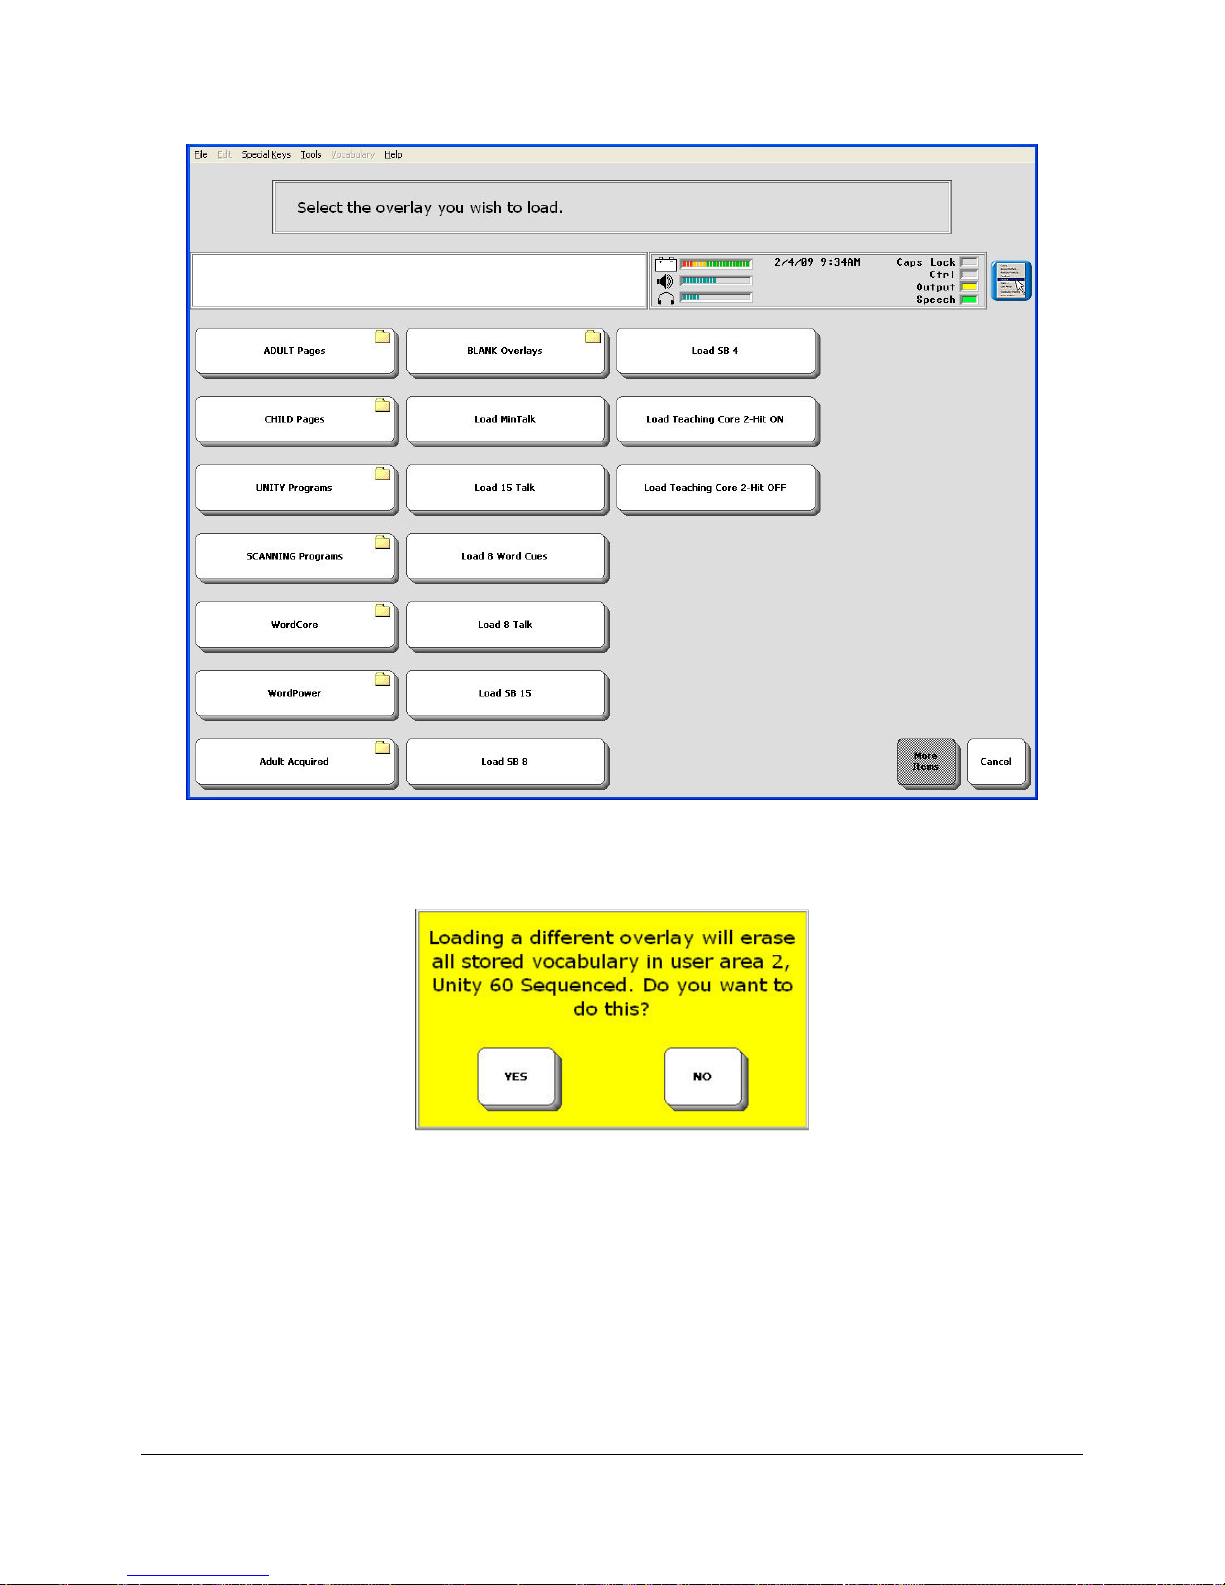
Each option offers you a number of different overlays. If you select Unity Programs you will see
a list of all the Unity overlays. When you select the overlay you want you will see this warning:
Any custom vocabulary (vocabulary that was not pre-stored at the factory) that you have added
to your current overlay will be lost when a new overlay is installed.
If you want to erase your current overlay without saving any of the vocabulary, select YES. If
you want to save the overlay's vocabulary, select NO and then perform andMTI (memory
transfer) before you change to a new overlay. See Using the TRANSFER MEMEORY
MENU chapter for information about making memory transfers.
When you select YES above, you see your Spelling Page:
SETTING UP YOUR DEVICE
ECO Manual
41
Page 42
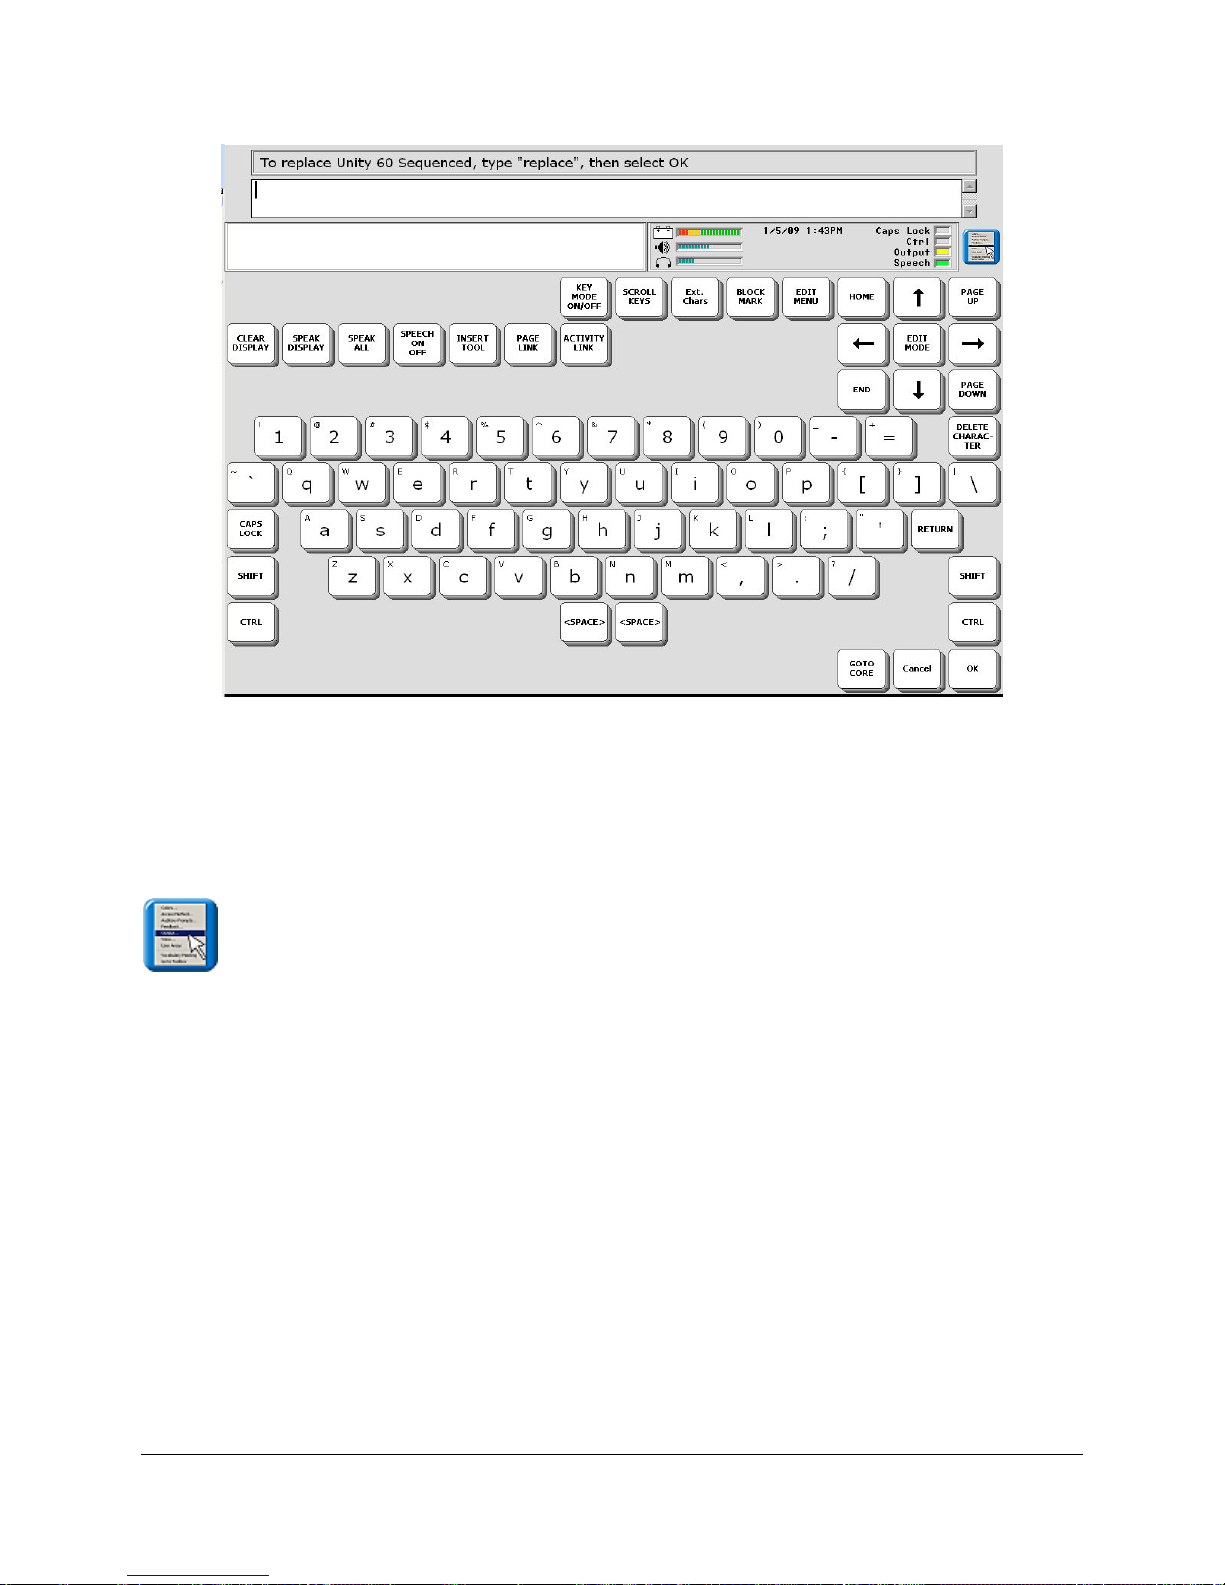
Type the word "replace" and then select OK to exit the menu. Your original overlay will be
replaced by the one you just selected.
Other options in this menu are discussed in other parts of this manual. See the Table of
Contents or the Index.
Open the menu.
Open User Areas allows you to select the pre-stored vocabulary that you want to use. Each
vocabulary overlay is stored in its own Area.
Replace User Area allows you to load any of the available vocabularies into the current User
Area.
The last option will show you the settings for the Area you are currently using. You can make
any changes to settings in the current Area from these menus.
SETTING UP YOUR DEVICE
ECO Manual
42
Page 43

Access Methods
An access method (or selection technique) is how you will control your device. You can select
Touch, Headpointing, 1-Switch, 2-Switch, and Joystick. Any Joystick other than a USB
joystick will need an adapter.
Access Methods and their options are in the ACCESS METHOD MENU in the Toolbox.
Warning! All access methods require a positioning analysis to prevent repetitive stress
injuries.
The Access Methods
Touch:
You must be able to touch the keys on the screen to activate them.
You make direct selections on the keyboard by pressing on the keys you want with your finger
(or with the eraser end of a pencil or some "point and press" device). You can use Touch with
any screen.
The touch screen is hard plastic. Be careful not to scratch it with your pointing device.
Headpointer
Madentec's Tracker™ headpointing technology is already integrated into your device. If you
purchase the headpointing option the only "headpointer" you will need is the reflective dot that
came with your device. You stick this small dot on your forehead, on the bridge of your glasses
or on any moveable location on your body where the headpointing sensor on the front of the case
can see it. As you look at the keys you want the headpointer to activate, you must keep the
reflective dot within a 30-35 degree angle of the sensor. You should be seated within a 1-3 foot
range of your device.
When everything is working correctly, an LED inside the dark window on the top front of the
case will light up. The LED is centered on the left side of the IR window. If the LED does not
light, make sure your head, or whatever part of your body you used for the reflective dot, is
within the 30-35 degree range of the sensor. Also make sure you are seated neither too far away
from, nor too close to your device. Move the dot around and up and down until you see a hand
appear on the touchscreen and the LED stays on.
1-Switch Scanning
Use a single switch to scan to any key on the screen. Choose to scan by rows and columns or by
columns and rows. Plug a single switch into either the SWITCH A or SWITCH B jack on your
device.
SETTING UP YOUR DEVICE
ECO Manual
43
Page 44

Dual or 2-Switch Scanning
Use a dual switch or two single switches to scan left, right, up and down to any key on the
keyboard. Plug a dual switch or two single switches into either switch connector on the device.
Joystick
Unless you are using a USB joystick, you must have an adapter for your joystick. See page
342. You may also need to plug a switch into the adapter so you can make selections.
A Joystick allows you to scan up, down, right, left and diagonally.
Open the menu.
Select Access Method.
Select the method you want and the options you want to use. All of these are described in the
next few pages.
Note: The Colors tab puts the color options from different menus into one menu.
SETTING UP YOUR DEVICE
ECO Manual
44
Page 45
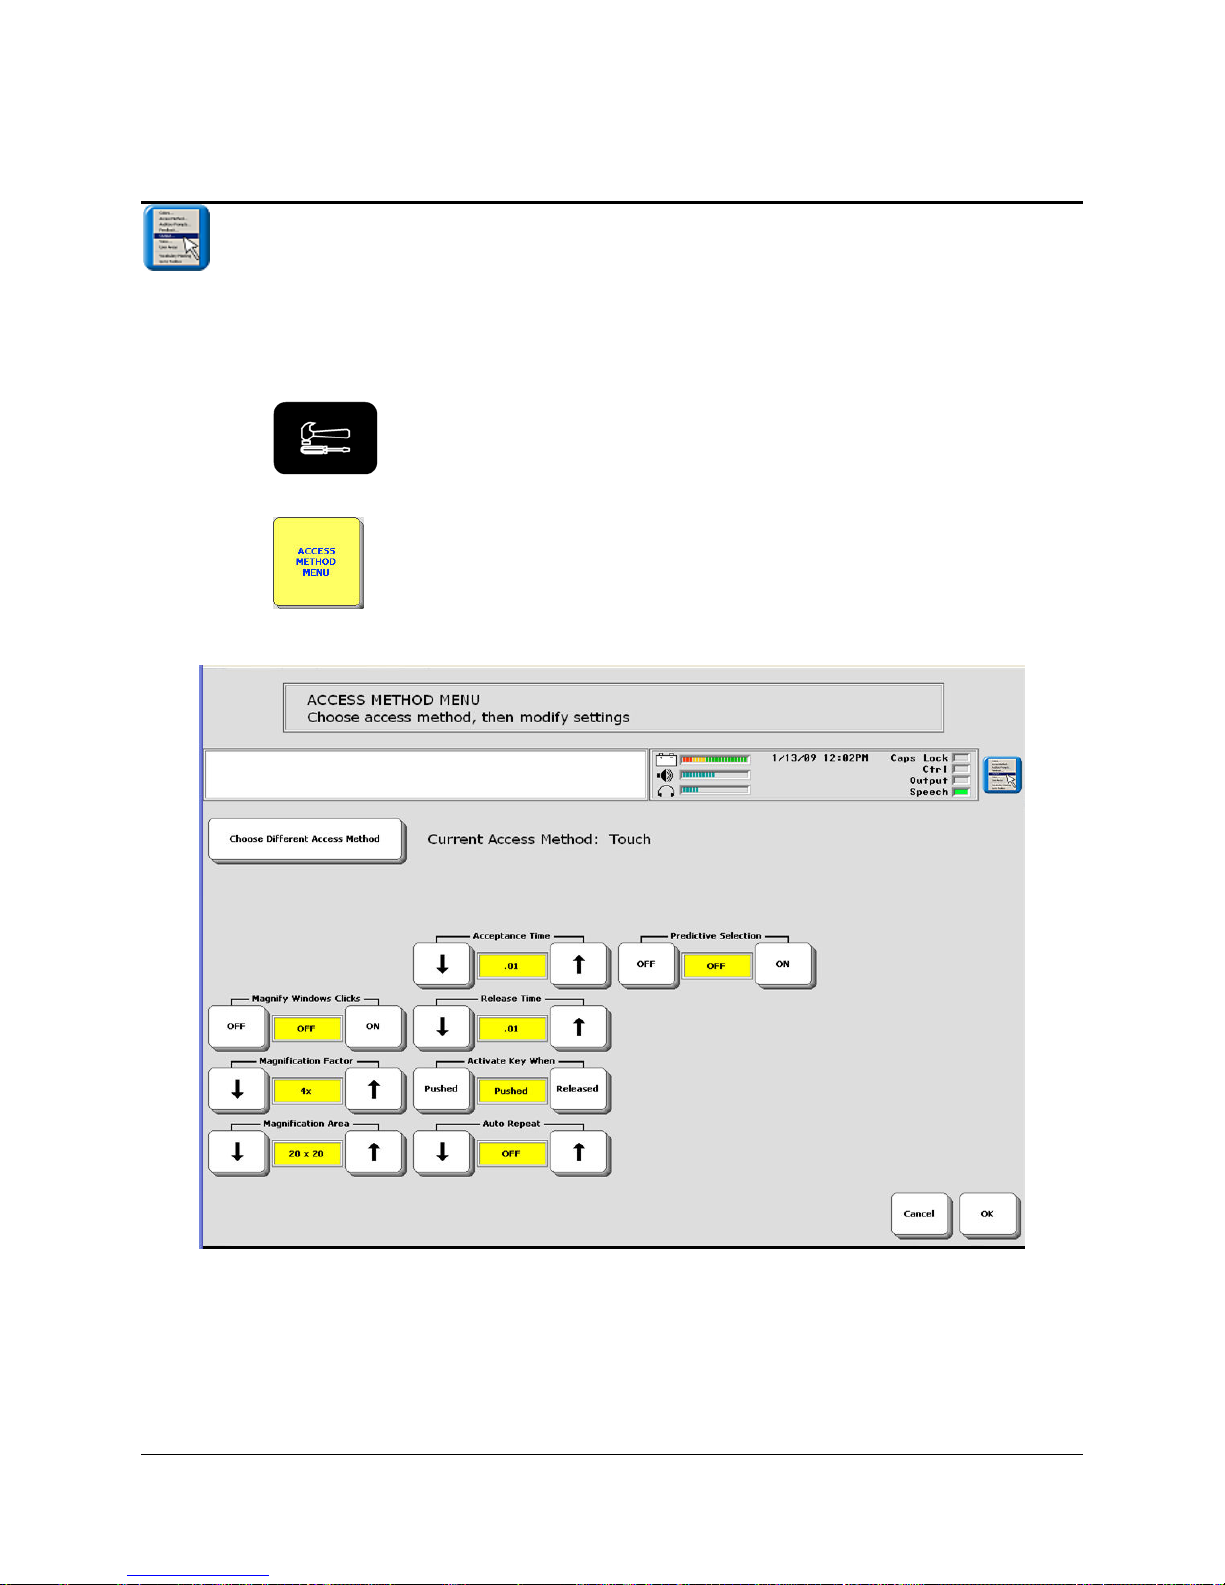
The ACCESS METHOD MENU
To Choose an Access Method:
1. Press the
Toolbox button on the front of the case.
2. Open the ACCESS METHOD MENU.
3. You see the access method for the current User Area. You can change any of the options.
4. You can select Choose Different Access Method to select a different method for this area.
SETTING UP YOUR DEVICE
ECO Manual
45
Page 46
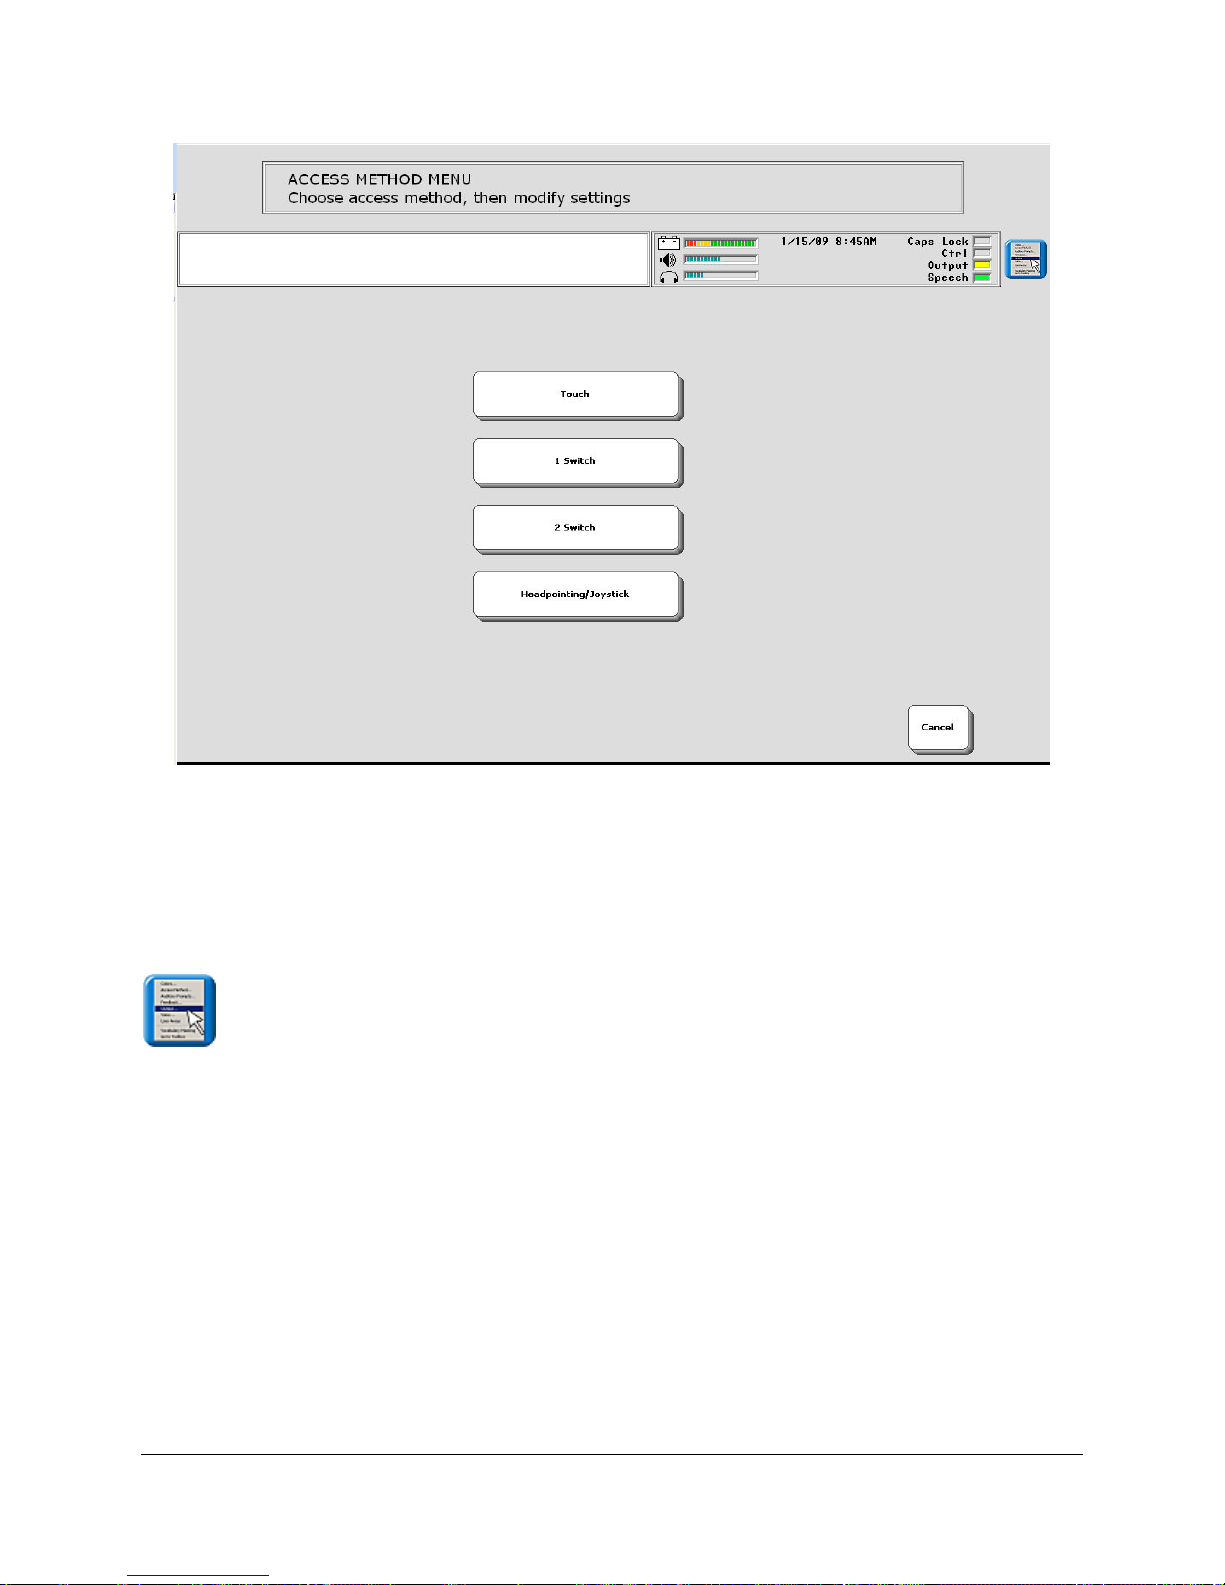
The different access methods and their options are discussed in the next few pages.
Open the menu.
Select Access Method.
Select the method you want and the options you want to use. All of these are described in the
next few pages.
Note: The Colors tab puts the color options from different menus into one menu.
SETTING UP YOUR DEVICE
ECO Manual
46
Page 47

Touch Options
Acceptance Time
This is the amount of time it takes for your device to accept a location you have touched and to
activate the key.
Release Time
This is the amount of time it takes you to release a key and be able to activate another key. For
example, if you set this for 1 second, you must wait one second after you stop touching a key
before you can activate the same key or a new key.
Magnify Windows Clicks
Magnification Factor
Magnification Area
Magnification works when your ECO is in a Windows application.
When Magnify Window Clicks is ON you can select an area in your Windows application and
it will appear in a magnified box. This makes it easier for you to select the options you want in
your application.
Magnification Factor: how large do you want the area magnified—2 times larger (2X) 4 times
larger (4X), etc.
The Magnification Area (in number of pixels) is the size of the area you are magnifying.
We recommend that you select different numbers for Factor and Area and try them out in an
application on your ECO. You'll then have a good idea of what works for you.
For more information see The Magnification Option beginning on page 262.
Activate Key When: Pushed or Released
Pushed means your device will activate a key when you touch it (push it in).
Released means your device will activate a key when you stop touch it.
Auto Repeat
This lets you choose how fast a key will repeat itself when you hold it down.
Predictive Selection
This works hand-in-hand with Icon Prediction. (Icon Prediction is in the FEEDBACK MENU
and the default is ON.)
SETTING UP YOUR DEVICE
ECO Manual
47
Page 48

When you turn Predictive Selection On, your device highlights only those icons where
messages are stored. These highlighted icons are the only keys on the keyboard that will
produce a response.
You can change the color of the non-active keys to grey or white. Go to the FEEDBACK
MENU, Icon Prediction and select Grey or White. Grey allows you to see the shadow of the
icon on the key; white turns the entire key white so it looks blank. But if you try to select a grey
or white key, nothing will happen.
Note: Icon Prediction alone allows you to press grey or white keys. The key's icon will
appear in the Icon display area but no message will be spoken. Icon Prediction will work
whether Predictive Selection is On or not.
1 Switch Scanning Methods
When you select 1 Switch as an access method, you see a screen that contains a number of ways
to scan with one switch. Below are brief descriptions of the technique terms.
Plug a single switch (or a dual switch using only the SELECT side) in either the SWITCH A
or SWITCH B connector on the left side panel of your device.
If you are unsure how you want to use the 1 Switch method, we highly recommend that you
try out the different 1-switch techniques to find the one that suits you best.
Auto Scan
Your device automatically scans the keyboard.
Hold Scan
You must press and hold your switch to scan the keyboard.
Step Scan
You must activate your switch each time you want to move to a new position on the keyboard.
Linear Scan
This allows you to step through the keys on your overlay moving from left to right across the
rows or from top to bottom down each column. You must activate your switch to move the scan.
SETTING UP YOUR DEVICE
ECO Manual
48
Page 49

Row/Column
The scan highlights each row of keys beginning with the top row and moving down the screen.
When the row that contains the key you want is highlighted, activate your switch. The scan will
highlight the separate columns in the row you selected, moving from left to right across the
screen. When the key you want is highlighted, activate your switch. The device beeps when your
key is accepted.
Column/Row
The scan highlights the columns first instead of the rows, moving from left to right across the
screen. When the scan reaches the column that contains the key you want, activate your switch.
The scan begins to highlight each key in that row. When the key you want is highlighted,
activate your switch. The device beeps when your key is accepted.
Quarter Row/Column
Quarter Column/Row:
The scan divides the overlay into quarters. When the scan reaches the quarter you want, activate
your switch. The rows or columns in that quarter are scanned. Select the row or column you
want. Individual keys are then scanned. Select the key you want. You can select Auto, Hold or
Step to scan.
Predictive Selection
This works hand-in-hand with Icon Prediction. (Icon Prediction is in the FEEDBACK MENU
and the default is ON.)
When you turn Predictive Selection On, your device highlights only those icons where
messages are stored. These highlighted icons are the only keys on the keyboard that will
produce a response.
You can change the color of the non-active keys to grey or white. Go to the FEEDBACK
MENU, Icon Prediction and select Grey or White. Grey allows you to see the shadow of the
icon on the key; white turns the entire key white so it looks blank. But if you try to select a grey
or white key, nothing will happen.
Note: Icon Prediction alone allows you to press grey or white keys. The key's icon will
appear in the Icon display area but no message will be spoken. Icon Prediction will work
whether Predictive Selection is On or not.
SETTING UP YOUR DEVICE
ECO Manual
49
Page 50

1 Switch Scanning Options
Magnify Windows Clicks
Magnification Factor
Magnification Area
Magnification works when your ECO is in a Windows application.
When Magnify Window Clicks is ON you can select an area in your Windows application and
it will appear in a magnified box. This makes it easier for you to select the options you want in
your application.
Magnification Factor: how large do you want the area magnified—2 times larger (2X) 4 times
larger (4X)?
The Magnification Area (in number of pixels) is the size of the area you are magnifying.
We recommend that you select different numbers for Factor and Area and try them out in an
application on your ECO. You'll then have a good idea of what works for you.
For more information see The Magnification Option beginning on page 262.
Scanning Speed
This is the amount of time it takes for your device to move from one key, row, or column to the
next in a scan. The default scanning speed is one second. This means it takes one second from
the time one key is highlighted until the next key is highlighted.
Acceptance Time
The amount of time you must maintain contact with your switch before the key you have
scanned to is accepted. The device beeps when your key is accepted. For example, if you set
acceptance time for .50 seconds, you must activate and hold your switch for ½ second before the
key will be selected and the device beeps.
Note: if you are using a 1 switch scanning selection that includes hold, the acceptance time
will begin when you release your switch.
Release Time
This tells your device how long to wait after you release your switch before you can make
another activation with the same key or switch. For example, if you set the Release Time for 1
second, you must wait one second after you release your switch before you can continue to scan
or activate your switch. If you release your switch and then accidentally activate it again before
the release time has passed, your device will not make any activations.
Auto Repeat
This lets you choose how fast a key will repeat when you hold it down.
SETTING UP YOUR DEVICE
ECO Manual
50
Page 51

Activation Delay
This gives you a few seconds to change your mind when you have selected a key. This is
automatically set to your Scanning Speed. For example, let's say your scanning speed is set to
one second (1.0). You scan to and select a key, then realize it's not the key you want. You have
one second to activate your switch again to "de-select" the key and then scan to a new key.
Scan Auto Restart
When this is On, a new scan will automatically start once you have made a key selection. If it is
Off, you must activate your switch to start a new scan.
Number of Rescans
Select the number of times you want your device to automatically scan the overlay. The default
is 3 times, then the scan will stop until you activate a switch to start it again.
Use Screen as Switch
This tells the device to let you use the display screen as a switch. Tap the screen to make
selections. This option does not work in the Toolbox.
Modify Scan Pattern
This allows you to make changes to the default scan pattern. You can select the Preview key on
this menu screen and see the scan move as you create it. You may want to use this option for
selected Pages, especially with Context Scenes. See Appendix D: Modify Scan Pattern beginning
282.
Predictive Selection
This works hand-in-hand with Icon Prediction. (Icon Prediction is in the FEEDBACK MENU
and the default is ON.)
When you turn Predictive Selection On, your device highlights only those icons where
messages are stored. These highlighted icons are the only keys on the keyboard that will
produce a response.
You can change the color of the non-active keys to grey or white. Go to the FEEDBACK
MENU, Icon Prediction and select Grey or White. Grey allows you to see the shadow of the
icon on the key; white turns the entire key white so it looks blank. But if you try to select a grey
or white key, nothing will happen.
Note: Icon Prediction alone allows you to press grey or white keys. The key's icon will
appear in the Icon display area but no message will be spoken. Icon Prediction will work
whether Predictive Selection is On or not.
SETTING UP YOUR DEVICE
ECO Manual
51
Page 52

Bluetooth Switch
See pages 16 and 18- 25 (1 and 2-switch) in the Bluetooth Switch mini-manual for complete
information. Once you have your access method options selected, set the Bluetooth switch to the
default Switch Mode; plug in an extra switch if you need one; select Bluetooth Switch in the
ACCESS METHOD MENU. Press the PAIR button on the Bluetooth Switch, then select the
Pair with Switch Button on your device screen. You will see a box on your device screen
telling you when the pairing is complete and the device and switch are connected.
2 Switch Scanning Methods
Plug two single switches or a dual switch into either the SWITCH A and/or SWITCH B
connectors on the left side of your device.
Auto Scan Directed
Your device automatically scans the keyboard. Change directions by activating your switch.
Hold Scan Directed
You must press and hold your switch to scan the keyboard. Change directions by releasing and
then pressing and holding your switch.
Note: At this time directed scans will not allow you to scan the Word Prediction list.
Step Scan
You must activate your switch each time you want to move to a new position on the keyboard.
Linear Scan
This allows you to step through the keys on your overlay moving from left to right across the
rows or from top to bottom down each column. You must activate your switch to move the scan.
Row/Column
The scan highlights each row of keys beginning with the top row and moving down the screen.
When the row that contains the key you want is highlighted, activate your switch. The scan will
highlight the separate columns in the row you selected, moving from left to right across the
screen. When the key you want is highlighted, activate your switch. The device beeps when your
key is accepted.
SETTING UP YOUR DEVICE
ECO Manual
52
Page 53

Column/Row
The scan highlights the columns first instead of the rows, moving from left to right across the
screen. When the scan reaches the column that contains the key you want, activate your switch.
The scan begins to highlight each key in that row. When the key you want is highlighted,
activate your switch. The device beeps when your key is accepted.
Quarter Row/Column
Quarter Column/Row:
The scan divides the overlay into quarters. When the scan reaches the quarter you want, activate
your switch. The rows or columns in that quarter are scanned. Select the row or column you
want. Individual keys are then scanned. Select the key you want. You can select Auto, Hold or
Step to scan.
2 Switch Scanning Options
Magnify Windows Clicks
Magnification Factor
Magnification Area
Magnification works when your ECO is in a Windows application.
When Magnify Window Clicks is ON you can select an area in your Windows application and
it will appear in a magnified box. This makes it easier for you to select the options you want in
your application.
Magnification Factor: how large do you want the area magnified—2 times larger (2X) 4 times
larger (4X)?
The Magnification Area (in number of pixels) is the size of the area you are magnifying.
We recommend that you select different numbers for Factor and Area and try them out in an
application on your ECO. You'll then have a good idea of what works for you.
For more information see The Magnification Option beginning on page
262.
Acceptance Time
The amount of time you must maintain contact with your switch before the key you have
scanned to is accepted. The device beeps when your key is accepted. For example, if you set
acceptance time for .50 seconds, you must activate and hold your switch for ½ second before the
key will be selected and the device beeps.
SETTING UP YOUR DEVICE
ECO Manual
53
Page 54

Release Time
This tells your device how long to wait after you release your switch before you can make
another activation with the same key or switch. For example, if you set the Release Time for 1
second, you must wait one second after you release your switch before you can continue to scan
or activate your switch. If you release your switch and then accidentally activate it again before
the release time has passed, your device will not make any activations.
Auto Repeat
This lets you choose how fast a key will repeat when you hold it down.
Predictive Selection
This option works hand-in-hand with Icon Prediction. (Icon Prediction is in the FEEDBACK
MENU and the default is ON.)
When you turn Predictive Selection On, your device highlights only those icons where messages
are stored. These highlighted icons are the only keys on the keyboard that will produce a
response.
Note: Icon Prediction will work whether Predictive Selection is On or not.
Scan Speed
This is the amount of time it takes for your device to move from one key, row, or column to the
next in a scan. The default scanning speed is one second. This means it takes one second from
the time one key is highlighted until the next key is highlighted.
Number of Rescans
Select the amount of times you want to scan the overlay.
Selection Type: Manual/Auto
If you select Manual, you must have a third switch plugged into your device. You will use this
switch to make your final selection.
If you select Auto, your device will automatically select the key you have scanned to after the
Acceptance Time has passed.
Activation Delay
This gives you a few seconds to change your mind when you have selected a key. This is
automatically set to your Scanning Speed. For example, let's say your scanning speed is set to
one second (1.0). You scan to and select a key, then realize it's not the key you want. You have
one second to activate your switch again to "de-select" the key and then scan to a new key.
SETTING UP YOUR DEVICE
ECO Manual
54
Page 55

Scan Auto Restart
When this is On, a new scan will automatically start once you have made a key selection. If it is
Off, you must activate your switch to start a new scan.
Cancel Time
If you are in the middle of a scan, get distracted, and forget to activate your switch to make a
selection, the scan will stop and the highlighting will disappear after the Cancel Time has passed.
If you need a lot of time between switch activations, you can set the Cancel Time to a very long
time before the scan stops.
Modify Scan Pattern
This allows you to make changes to the default scan pattern. You can select the Preview key on
this menu screen and see the scan move as you create it. You may want to use this option for
selected Pages, especially with Context Scenes. See Appendix D beginning on page 282 for
complete information.
Bluetooth Switch
See pages 16 and 18- 25 (1 and 2-switch) in the Bluetooth Switch mini-manual for complete
information. Once you have your access method options selected, set the Bluetooth switch to the
default Switch Mode; plug in an extra switch if you need one; select Bluetooth Switch in the
ACCESS METHOD MENU. Press the PAIR button on the Bluetooth Switch, then select the
Pair with Switch Button on your device screen. You will see a box on your device screen
telling you when the pairing is complete and the device and switch are connected.
SETTING UP YOUR DEVICE
ECO Manual
55
Page 56

Headpointing/Joystick Methods
Joystick Auto Scan
Joystick Hold Scan
You must have a Y-adapter for a manual joystick. This plugs into the Switch A and B ports on
the left side of your device case. The other end plugs into your joystick.
If you select Manual for your Selection Type, you may need to plug a third switch into the
adapter in order to make a final selection.
Internal Tracker
This is your Headpointer.
Mouse/Trackball/USB Joystick
Any of these options may be plugged into the USB ports on the right side of the device case.
Joystick Options
Magnify Windows Clicks
Magnification Factor
Magnification Area
Magnification works when your ECO is in a Windows application.
When Magnify Window Clicks is ON you can select an area in your Windows application and
it will appear in a magnified box. This makes it easier for you to select the options you want in
your application.
Magnification Factor: how large do you want the area magnified—2 times larger (2X) 4 times
larger (4X)?
The Magnification Area (in number of pixels) is the size of the area you are magnifying.
We recommend that you select different numbers for Factor and Area and try them out in an
application on your ECO. You'll then have a good idea of what works for you.
For more information see The Magnification Option beginning on page 262.
SETTING UP YOUR DEVICE
ECO Manual
56
Page 57

Auto Scan
Nudge your joystick. The device will automatically scan the overlay beginning in the direction
you moved the joystick.
Hold
You must hold your switch to scan the overlay. Release it to stop the scan.
Scanning Speed
This is the amount of time it takes for your device to move from one key, row, or column to the
next in a scan. The default scanning speed is one second. This means it takes one second from
the time one key is highlighted until the next key is highlighted.
Acceptance Time
The amount of time you must maintain contact with your switch before the key you have
scanned to is accepted. The device beeps when your key is accepted. For example, if you set
acceptance time for .50 seconds, you must activate and hold your switch for ½ second before the
key will be selected and the device beeps.
Release Time
This tells your device how long to wait after you release your switch before you can make
another activation with the same key or switch. For example, if you set the Release Time for 1
second, you must wait one second after you release your switch before you can continue to scan
or activate your switch. If you release your switch and then accidentally activate it again before
the release time has passed, your device will not make any activations.
Auto Repeat
This lets you choose how fast a key will repeat when you hold it down.
Selection Type
Manual means you must activate your switch to make a selection. With a joystick, you may
need to have a third switch plugged into the Y-adapter in order to make a selection.
Auto means your joystick and the device will automatically make selections you want.
Predictive Selection: This works hand-in-hand with Icon Prediction. (Icon Prediction is in the
FEEDBACK MENU and the default is ON.) When you turn Predictive Selection On, your
device highlights only those icons where messages are stored. These highlighted icons are the
only keys on the keyboard that will produce a response. Your scan will go only to the highlighted
keys. Note: Icon Prediction will work whether Predictive Selection is On or not.
SETTING UP YOUR DEVICE
ECO Manual
57
Page 58

Activation Delay
This gives you a few seconds to change your mind when you have selected a key. This is
automatically set to your Scanning Speed. For example, let's say your scanning speed is set to
one second (1.0). You scan to and select a key, then realize it's not the key you want. You have
one second to activate your switch again to "de-select" the key and then scan to a new key.
Number of Rescans
Select the amount of times you want to scan the overlay.
Tracker Headpointing Options
Magnify Windows Clicks
Magnification Factor
Magnification Area
Magnification works when your ECO is in a Windows application.
When Magnify Window Clicks is ON you can select an area in your Windows application and
it will appear in a magnified box. This makes it easier for you to select the options you want in
your application.
Magnification Factor: how large do you want the area magnified—2 times larger (2X) 4 times
larger (4X)?
The Magnification Area (in number of pixels) is the size of the area you are magnifying.
We recommend that you select different numbers for Factor and Area and try them out in an
application on your ECO. You'll then have a good idea of what works for you.
For more information see The Magnification Option beginning on page
Acceptance Time
This is the amount of time it takes from when you point to a key until the device beeps and
accepts the selection.
Horizontal Adjustment
Vertical Adjustment
If you are having trouble reaching the right or left edges, increase the "Horizontal" adjustment
number. If you had trouble reaching the top or bottom edges increase the "Vertical"
adjustment number.
262.
SETTING UP YOUR DEVICE
ECO Manual
58
Page 59

If just the slightest head movement to the left or right moved you off the edges of the screen,
decrease the "Horizontal" number. If the slightest head movement up or down moved you off
the top and bottom edges, decrease the "Vertical" number.
If you had trouble positioning the cursor in the corners of the screen, increase both the
"Horizontal" and "Vertical" adjustment numbers.
If you make large head movements you may lose the cursor easily. Try decreasing the
"Horizontal" and/or "Vertical" adjustment numbers. If you make small head movements, try
increasing the "Horizontal" and "Vertical" adjustment numbers.
Auto Repeat
This lets you choose how fast a key will repeat when you hold it down.
Selection Type
Manual means you must activate a separate switch to make a selection.
Auto means your the device will automatically make your selection for you.
Predictive Selection
Predictive Selection works hand-in-hand with Icon Prediction. (Icon Prediction is in the
FEEDBACK MENU and the default is ON.)
When you turn Predictive Selection On, your device highlights only those icons where messages
are stored. These highlighted icons are the only keys on the keyboard that will produce a
response.
Note: Icon Prediction will work whether Predictive Selection is On or not.
Pointer Color
This allows you to select or create a color for the headpointing pointer.
In the pull-down menu, select Colors. Select Pointer Color in the Mouse Pointer Color box.
Select a color.
Pointer Size
This allows you to choose the size of the pointer.
SETTING UP YOUR DEVICE
ECO Manual
59
Page 60

Averaging
Averaging helps you to cut down on accidental key activations caused by involuntary head
movements. The number you select tells your device how far you must move out of one key
location before a second key is activated. This generally means that when you cross the
centerline between one key and the next key, the first key will become un-highlighted and the
second key will light up.
If you select an averaging number higher than "1" you are telling the headpointer signal to "lag
behind" any head movements you make. The higher the number you choose, the further into
the next key's area you must move before the second key will become highlighted
Highlight Keys
This tells your device to place a red border around the key that you point to. This may help to
make the selected key easier to see.
Field of View
This option allows the Tracker to adjust to they way your device is positioned—whether
mounted on a wheelchair, placed flat on a surface or propped up on its table-stand.
If the communication device is straight up and down, or nearly so on your mount or a table,
select High. If it is lying flat, or nearly flat, on a surface or mounted so that it is nearly
horizontal, select Low. For positions in between these extremes, select Medium.
SETTING UP YOUR DEVICE
ECO Manual
60
Page 61

Mouse/Trackball/USB Joystick Options
You can plug a USB mouse, trackball or joystick into any of the three USB connectors on the
right side of the device case. Once the mouse, trackball or joystick is plugged in, make sure you
have selected the Mouse/Trackball/USB Joystick option in the SELECTION TECHNIQUE
MENU.
Magnify Windows Clicks
Magnification Factor
Magnification Area
Magnification works when your ECO is in a Windows application.
When Magnify Window Clicks is ON you can select an area in your Windows application and
it will appear in a magnified box. This makes it easier for you to select the options you want in
your application.
Magnification Factor: how large do you want the area magnified—2 times larger (2X) 4 times
larger (4X)?
The Magnification Area (in number of pixels) is the size of the area you are magnifying.
We recommend that you select different numbers for Factor and Area and try them out in an
application on your ECO. You'll then have a good idea of what works for you.
For more information see The Magnification Option beginning on page 262.
Acceptance Time
This is the amount of time it takes from when you point to a key until the device beeps and
accepts the selection.
Horizontal Adjustment
Vertical Adjustment
If you are having trouble reaching the right or left edges, increase the "Horizontal" adjustment
number. If you had trouble reaching the top or bottom edges increase the "Vertical"
adjustment number.
If just the slightest head movement to the left or right moved you off the edges of the screen,
decrease the "Horizontal" number. If the slightest head movement up or down moved you off
the top and bottom edges, decrease the "Vertical" number.
If you had trouble positioning the cursor in the corners of the screen, increase both the
"Horizontal" and "Vertical" adjustment numbers.
SETTING UP YOUR DEVICE
ECO Manual
61
Page 62

If you make large head movements you may lose the cursor easily. Try decreasing the
"Horizontal" and/or "Vertical" adjustment numbers. If you make small head movements, try
increasing the "Horizontal" and "Vertical" adjustment numbers.
Auto Repeat
This lets you choose how fast a key will repeat when you hold it down.
Selection Type
Manual means you must activate a separate switch to make a selection.
Auto means your the device will automatically make your selection for you.
Predictive Selection
Predictive Selection works hand-in-hand with Icon Prediction. (Icon Prediction is in the
FEEDBACK MENU and the default is ON.)
When you turn Predictive Selection On, your device highlights only those icons where
messages are stored. These highlighted icons are the only keys on the keyboard that will
produce a response.
Note: Icon Prediction will work whether Predictive Selection is On or not.
Pointer Color
This allows you to select or create a color for the headpointing pointer.
In the pull-down menu, select Colors. Select Pointer Color in the Mouse Pointer Color box.
Select a color.
Pointer Size
This allows you to choose the size of the pointer.
Averaging
Averaging helps you to cut down on accidental key activations caused by involuntary head
movements. The number you select tells your device how far you must move out of one key
location before a second key is activated. This generally means that when you cross the
centerline between one key and the next key, the first key will become un-highlighted and the
second key will light up.
SETTING UP YOUR DEVICE
ECO Manual
62
Page 63

If you select an averaging number higher than "1" you are telling the headpointer signal to "lag
behind" any head movements you make. The higher the number you choose, the further into
the next key's area you must move before the second key will become highlighted
Highlight Keys
This tells your device to place a red border around the key that you point to. This may help to
make the selected key easier to see.
SETTING UP YOUR DEVICE
ECO Manual
63
Page 64
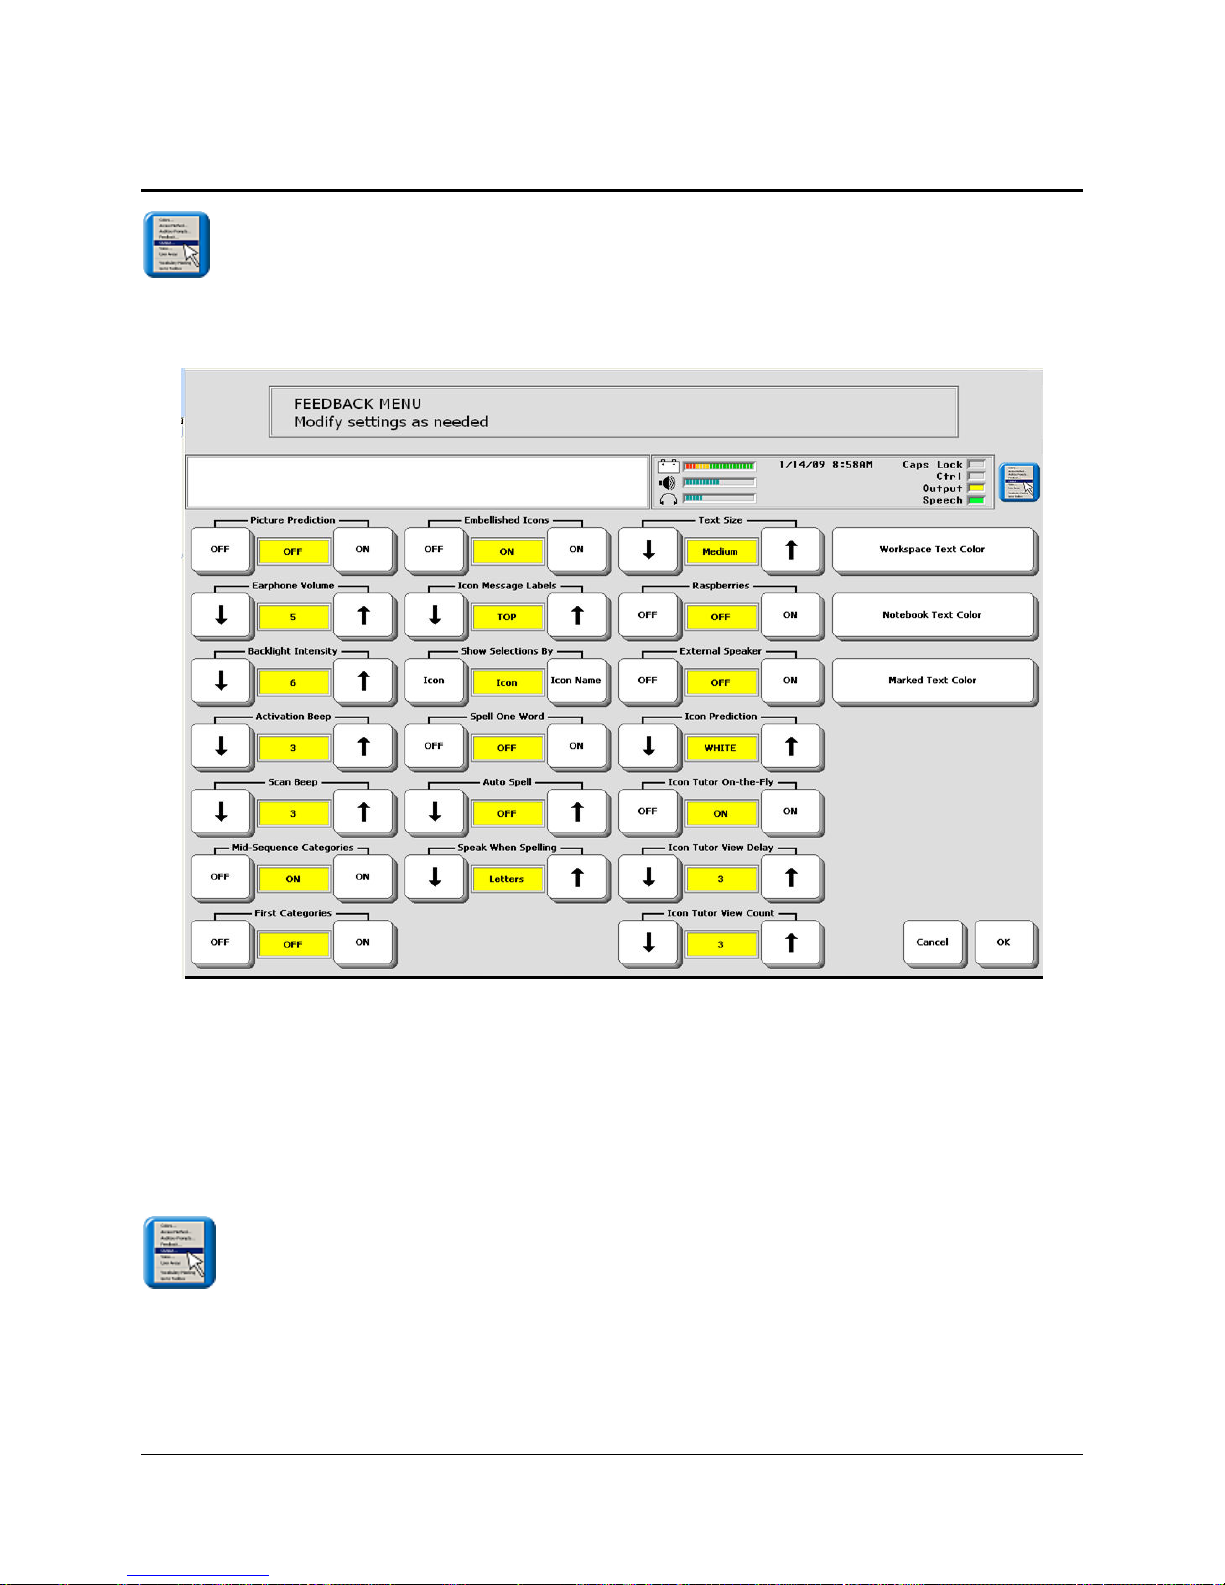
The FEEDBACK MENU
Go to the Toolbox and open the FEEDBACK MENU.
The FEEDBACK MENU options give you information about what your device is doing and
sometimes about what you are doing on the device.
Open the menu.
Select Feedback.
Select the options you want to use.
SETTING UP YOUR DEVICE
ECO Manual
64
Page 65

FEEDBACK MENU Options
Picture Prediction:
When this is ON, items you select from the Activity Row will move to the front of the row in
order of frequency of use.
Beep Volume:
This allows you to change the volume of the beep independently from the device's internal
volume. The loudest level is 20. The default is 10.
Backlight Intensity:
Activate the UP or DOWN option keys. The highest intensity is 6; the lowest is 0; the default is
3. The intensity of the backlight changes as you change the setting so that you can see the
difference. See the Troubleshooting Appendix beginning on page 336 for more information.
Activation Beep and Scan Beep:
The default is ON. If you do not want to hear a beep, activate the OFF key.
Spell One Word:
When you are using your spelling screen and decide that you want to return to your overlay, you
can type a word on your Spelling screen and activate the SPACE key after the word. Your
device will automatically return you to your overlay. The default for Spell One Word is Off.
Auto Spell:
When this is ON and you activate and empty sequence on your Core overlay, ECO automatically
switches you to Spell mode. It also displays the spelling characters that the icons you activated
represent and you can type in a completed word you want. Activate GO TO CORE when you
have finished spelling. If Spell One Word is also ON, you can activate a space to go to your
Core.
Raspberries On/Off:
This is the error beep. You can turn this On or Off.
Scan Text Area: On/Off
When this is On your device will scan the text area of the display as well as the keyboard.
SETTING UP YOUR DEVICE
ECO Manual
65
Page 66
External Speaker: On/Off
If you have amplified stereo speakers plugged into the device, turn this option to On.
Icon Prediction: On/Grey/White/Off
ON is the default. Gray turns unpredicted keys gray but you can still see an outline of the icon;
White turns the key all white and you see nothing on it; OFF turns Icon Prediction Off.
Show Selections By: Icon or Icon Name
If you select ICON, the picture of any icon you activate will be displayed in the icon display
area.
If you select ICON NAME, the default name of any icon you activate will be displayed in the
icon display area along with the icon.
Icon Message Label: Top or Bottom
TOP means the label on your icon will be at the top of the key. This is the default.
BOTTOM means the label on your icon will be at the bottom of the key.
Embellished Icon: On/Off
If you have modified (or embellished) the final icon in any sequence, you can choose to have the
embellished icon displayed on your overlay instead of the original icon. An embellished icon is
one that has been partially changed from the original Unity® icon. The default is On.
Icon-Tutor-on-the-Fly
When this is ON, you can spell a word and find out if it is stored under a sequence in your
vocabulary. You must be in Spell mode. Spell a word and activate a space or punctuation mark.
If the word is stored in your vocabulary, your device will display the sequence(s) in the
Icon/Word Prediction area.
Icon Tutor View Display
Select the amount of seconds you would like to see the sequence displayed (1-10 seconds).
Icon Tutor View Count
Select the number of sequences you would like to see displayed (1-5 sequences).
SETTING UP YOUR DEVICE
ECO Manual
66
Page 67
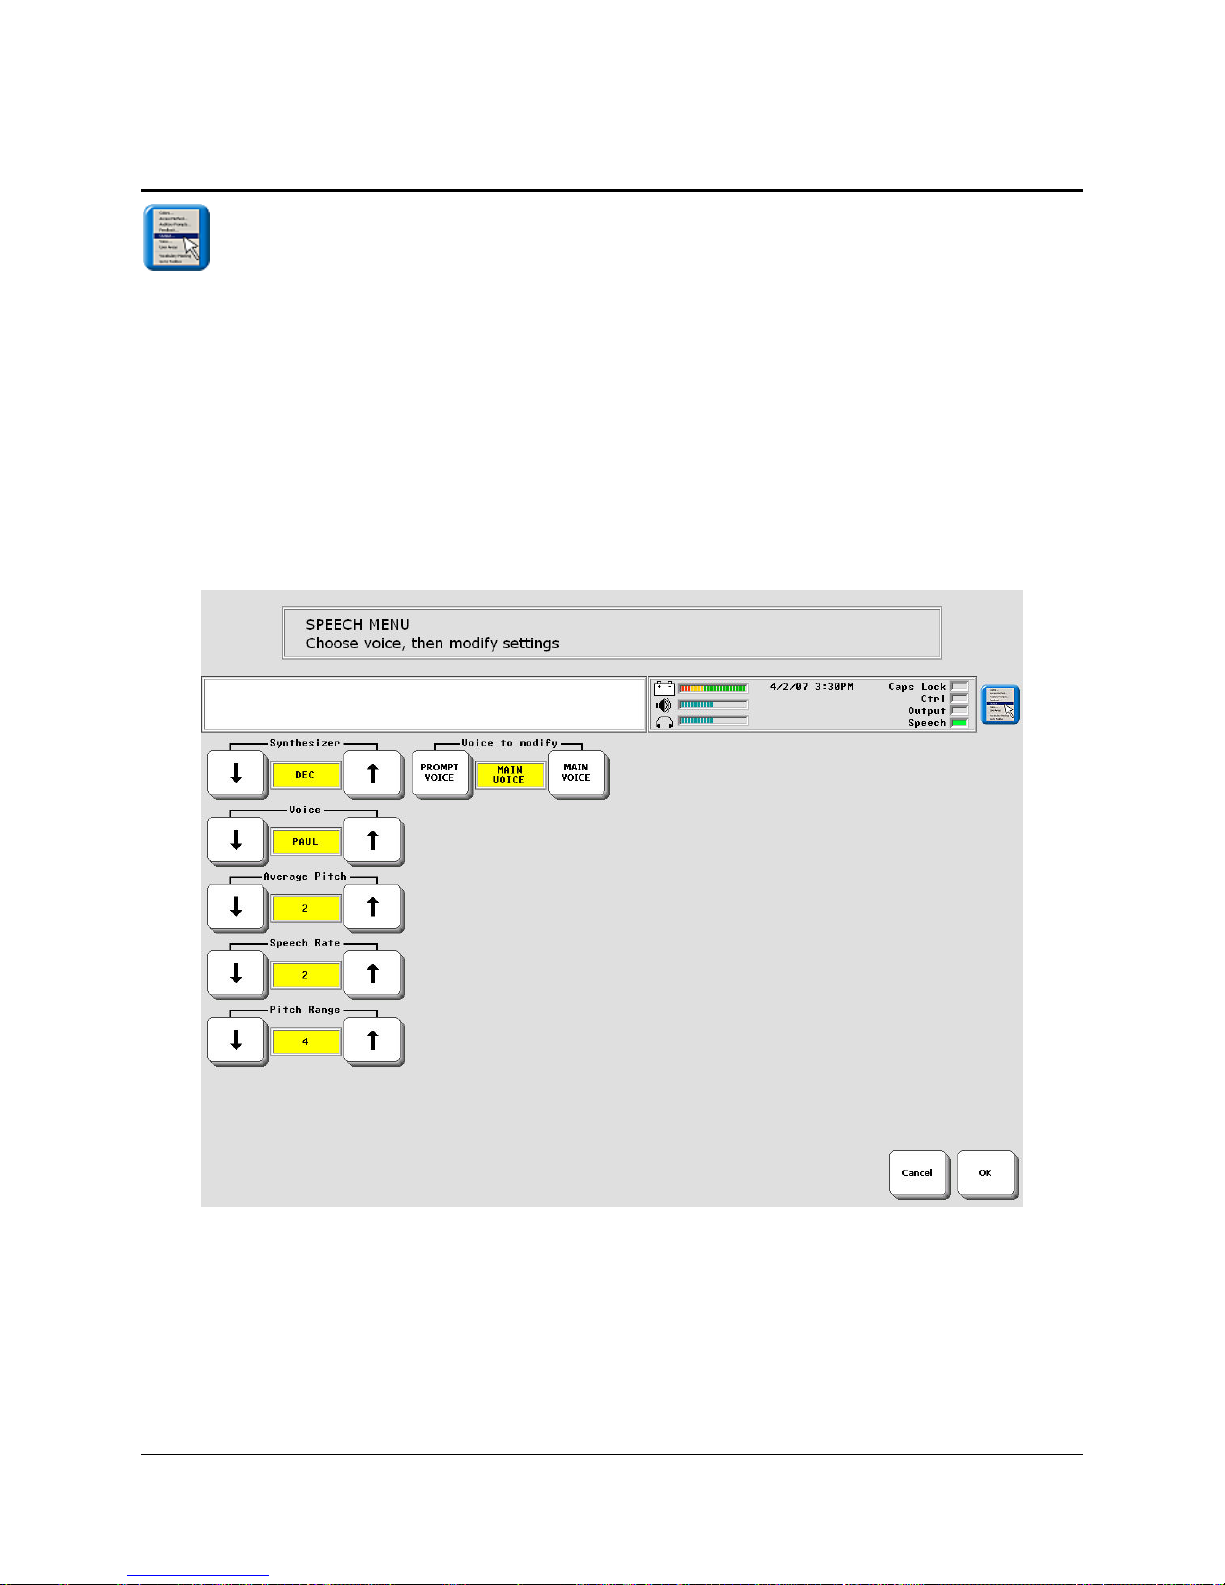
SPEECH MENU Options
The SPEECH MENU is available for synthesized speech. From it you can choose the voice that
you want your device to use for speaking messages. You can choose a different voice for
auditory prompts. Other options allow you to refine the voice.
Voice Options
Synthesizer: DECtalk, RealSpeak, AT&T Natural Voices, Acapela
You can choose a voice from any of these speech synthisizers: DECtalk speech, RealSpeak,
AT&T Natural Voices and Acapela. Not all of the options below are available with all voices.
SETTING UP YOUR DEVICE
ECO Manual
67
Page 68
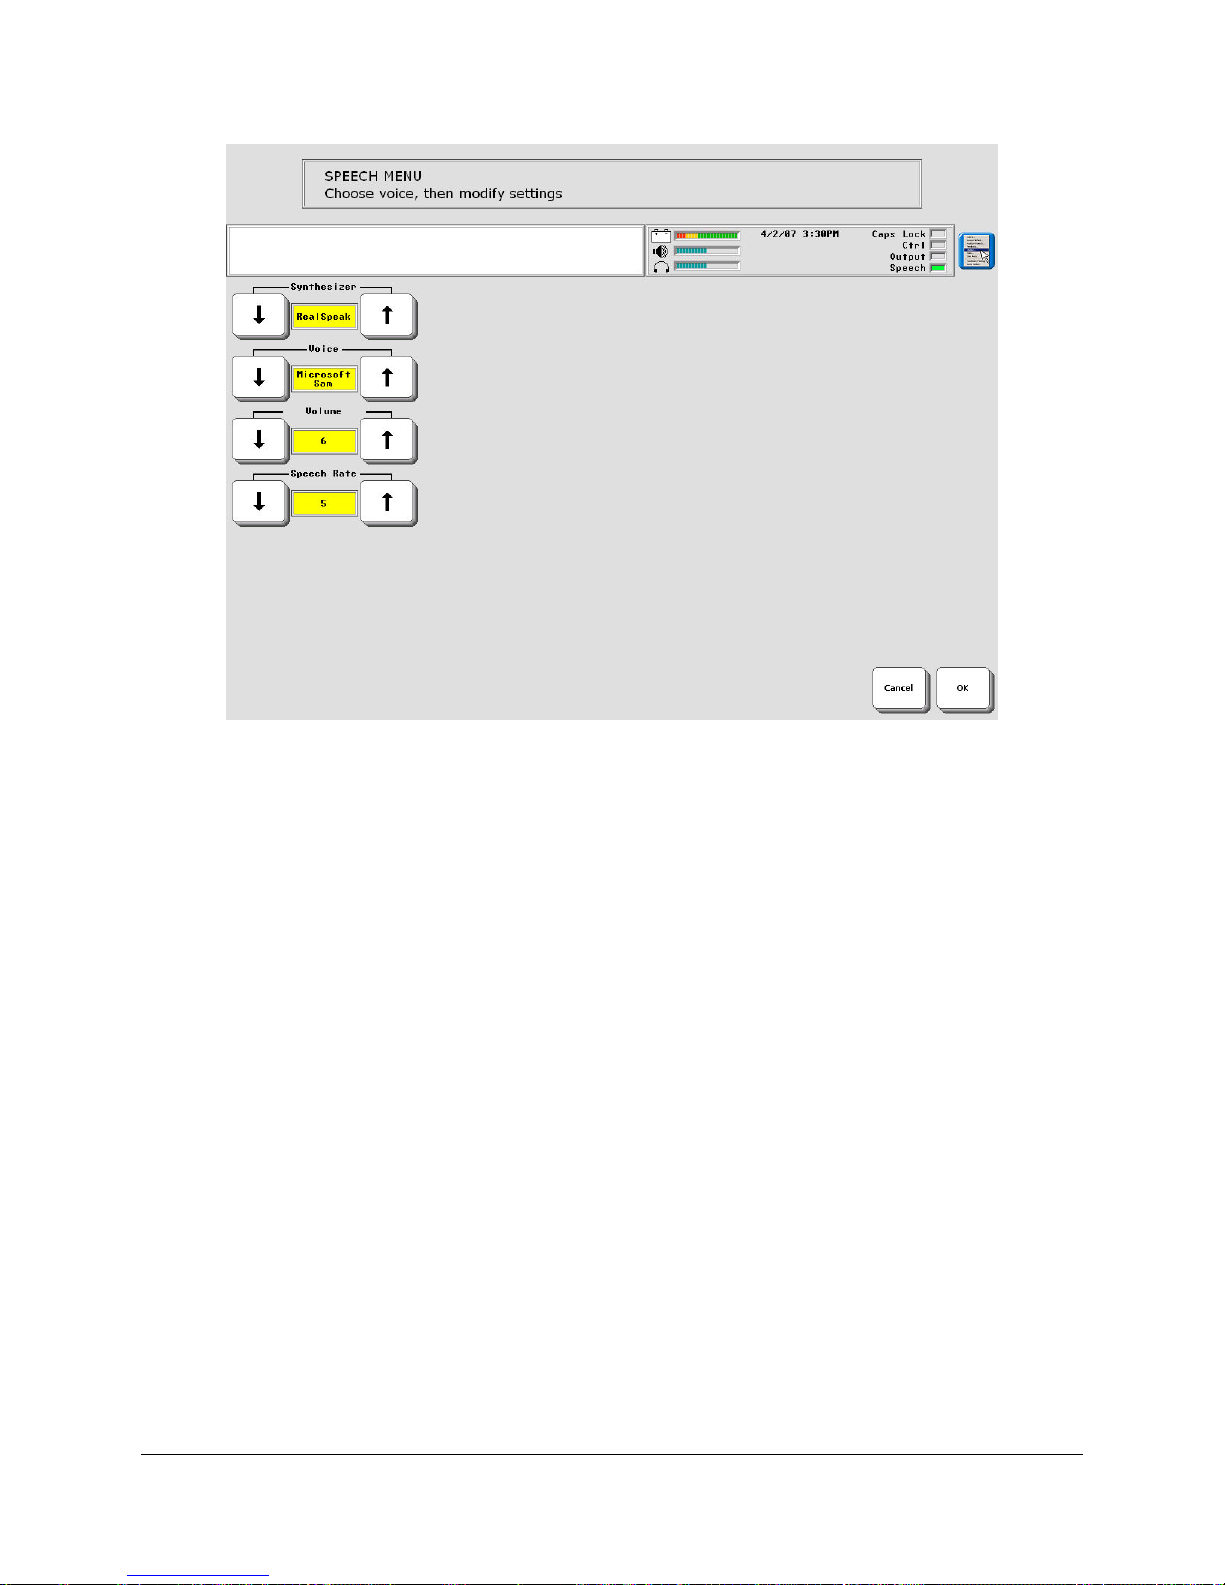
Voice to Modify: MAIN VOICE or PROMPT VOICE
MAIN VOICE: This is the voice your device will use to speak everything except Auditory
Prompts.
PROMPT VOICE: If you use Auditory Prompts, you will want to select a voice from this menu
that is different from your Main voice to speak the prompts.
Voice
If you are selecting a Main voice, remember that this will be your voice. When people hear this
voice, even if they can't see you, they will know it's you.
Recommendation: We recommend that you try the options listed below with their
default settings first. Write the default settings down before you make any changes. This
way you can always return to the original voice.
Volume
When this available it changes the volume of the voice. 1 is the softest; 10 is the loudest.
Average Pitch
Pitch is how high or low a voice sounds.
SETTING UP YOUR DEVICE
ECO Manual
68
Page 69

Speech Rate
Speech rate is how fast or slowly words are spoken. When the rate is too fast, words cannot be
easily understood; when it is too slow, listeners get restless and bored.
Pitch Range
Pitch Range is the amount of variation (or inflection) there is in the voice's pitch during speech.
A pitch range of 0 produces a boring monotone; a pitch of 9 produces wildly inflected speech as
if you were very afraid or very excited. A good pitch range is one where words can be easily
understood but are also interesting to listen to.
Helpful Hint: You can listen to the MAIN voice by selecting the voice you want to hear and
then pressing the Text Display area.
Open the menu.
Select Voice.
Select the options you want to use.
SETTING UP YOUR DEVICE
ECO Manual
69
Page 70
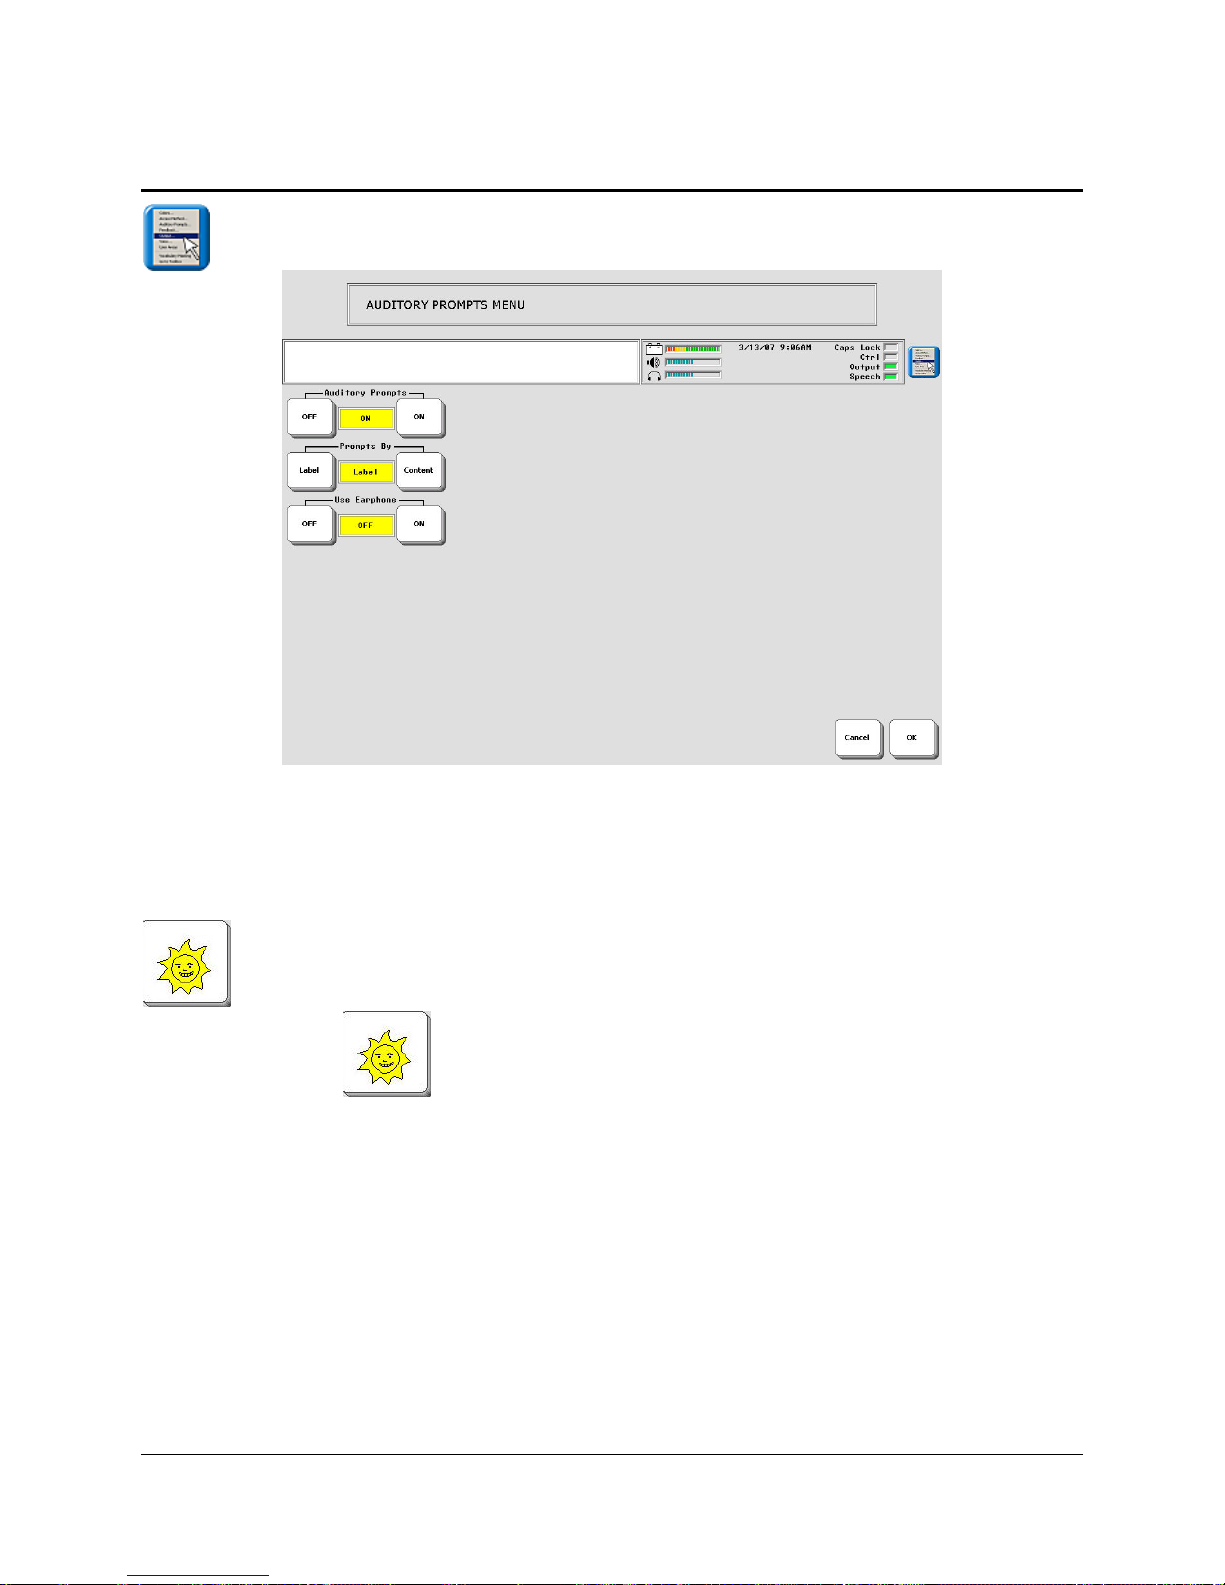
The AUDITORY PROMPT MENU
Auditory Prompts may help you to learn which keys are where on your overlay.
When Auditory Prompts are turned On in the AUDITORY PROMPT MENU, your device
defaults to speaking the label of any key you activate. That is, if you press and hold the
key on your overlay, you will hear, "Like" or "Sun" or whatever the label is that has
been assigned to the key.
When Auditory Prompts are On, you must press and hold a key to hear the auditory prompt. If
you are scanning, simply activate your switch. To retrieve a message, activate the key or switch
again after you have heard the prompt.
You can hear prompts through the device's speaker. You can also plug stereo headphones
into the Headphone jack on the side of the case. This allows you, but not others, to hear the
prompts. If you are using headphones, turn the Use Earphone option On in the AUDITORY
PROMPT MENU. If you want to use both headphones and a speaker at the same time, you
must have an adapter. See Appendix N for more information on adapters.
SETTING UP YOUR DEVICE
ECO Manual
70
Page 71

You can choose to have Label Prompts or Content Prompts spoken. You might also want
Category Prompts. You must turn the prompts On in the AUDITORY PROMPTS MENU.
Label Prompt
This is whatever the label (or name) is that has been assigned to a specific icon. If you changed a
label during the storing process, the prompt will be whatever you changed the label to. For
example, you may have changed the UMBRELLA label to "Weather." The prompt will be
"Weather" in that case.
Content Prompt
This tells your device to speak whatever message is stored with a particular icon. If no message
is stored, the label is spoken. For example, if "Salad" is stored under the sequence APPLE
FROG, when you activate APPLE you will hear "Apple." When you activate FROG you will
hear, "Salad."
Sometimes the contents of a message may be too long to be a helpful prompt. For example, the
message may be a song, in which case you would not want the Content Prompt to be the singing
of the whole song. To avoid this, when you assign a content prompt to a long message, use
EDIT CORE, select the message, scroll to the end of the message, use INSERT TOOL to
insert the Tool, PROMPT MARKER, then type the prompt you want to use, such as the name
of the song. Your device will speak the text that follows the Prompt Marker. The prompt will
not be displayed on the screen or spoken with the rest of the text in the regular message.
Category Prompt
Category Prompts are used only if you are scanning.
Category prompts should help you locate where you are on the keyboard, e.g., "Row 1 Column
1" or "Row 3 Column E". In some cases you may have a number of similar messages stored in
one row or column. In this case, you might want the prompt to say something like, "Row 1,
School."
Use the ASSIGN CORE KEYS menu to create Category Prompts for Core vocabulary keys.
Use the MODIFY ACTIVITY and MODIFY PAGE menus to assign Category Prompts to
Activity Rows or Pages.
During the storing process you are asked to select a key to create or modify. You select a key
from your overlay. If the key you select is a possible Category key (that is, it is a key in the first
row or the first column of your overlay) an option to Store a Category Prompt becomes visible
in the menu. When you select this option, your device takes you to your spelling overlay where
you spell the prompt you want to use, for instance, "School" or "Science." When you are
through, activate OK.
To Erase a Category Prompt:
1. In the Toolbox, activate ASSIGN CORE KEYS; MODIFY PAGE or MODIFY
ACTIVITY menus.
SETTING UP YOUR DEVICE
ECO Manual
71
Page 72

2. Select the key on your overlay that contains the prompt you want to erase.
3. Select Store Category Prompt from the options that you see.
4. Activate CLEAR DISPLAY instead of spelling a prompt.
5. Activate OK.
To Erase a Label Prompt:
1. In the Toolbox, activate ASSIGN CORE KEYS.
2. Select the key on your overlay that contains the label you want to erase.
3. Activate the Rename Icon key
4. Activate CLEAR DISPLAY from your spelling overlay to erase the name of the label. The
current name disappears from the text display area. If you do not want to add a different
label to the icon, activate OK.
4a.If you want a new label, type it in and then activate OK.
To Erase a Content Prompt
1. In the Toolbox, activate ERASE CORE.
2. Activate the icon sequence whose contents you want to erase.
3. Activate YES (or NO if you change your mind).
Important! When you delete a Content Prompt, you are deleting the message that was
stored under that icon sequence.
Open the menu.
Select Auditory Prompts.
Select the options you want to use.
SETTING UP YOUR DEVICE
ECO Manual
72
Page 73
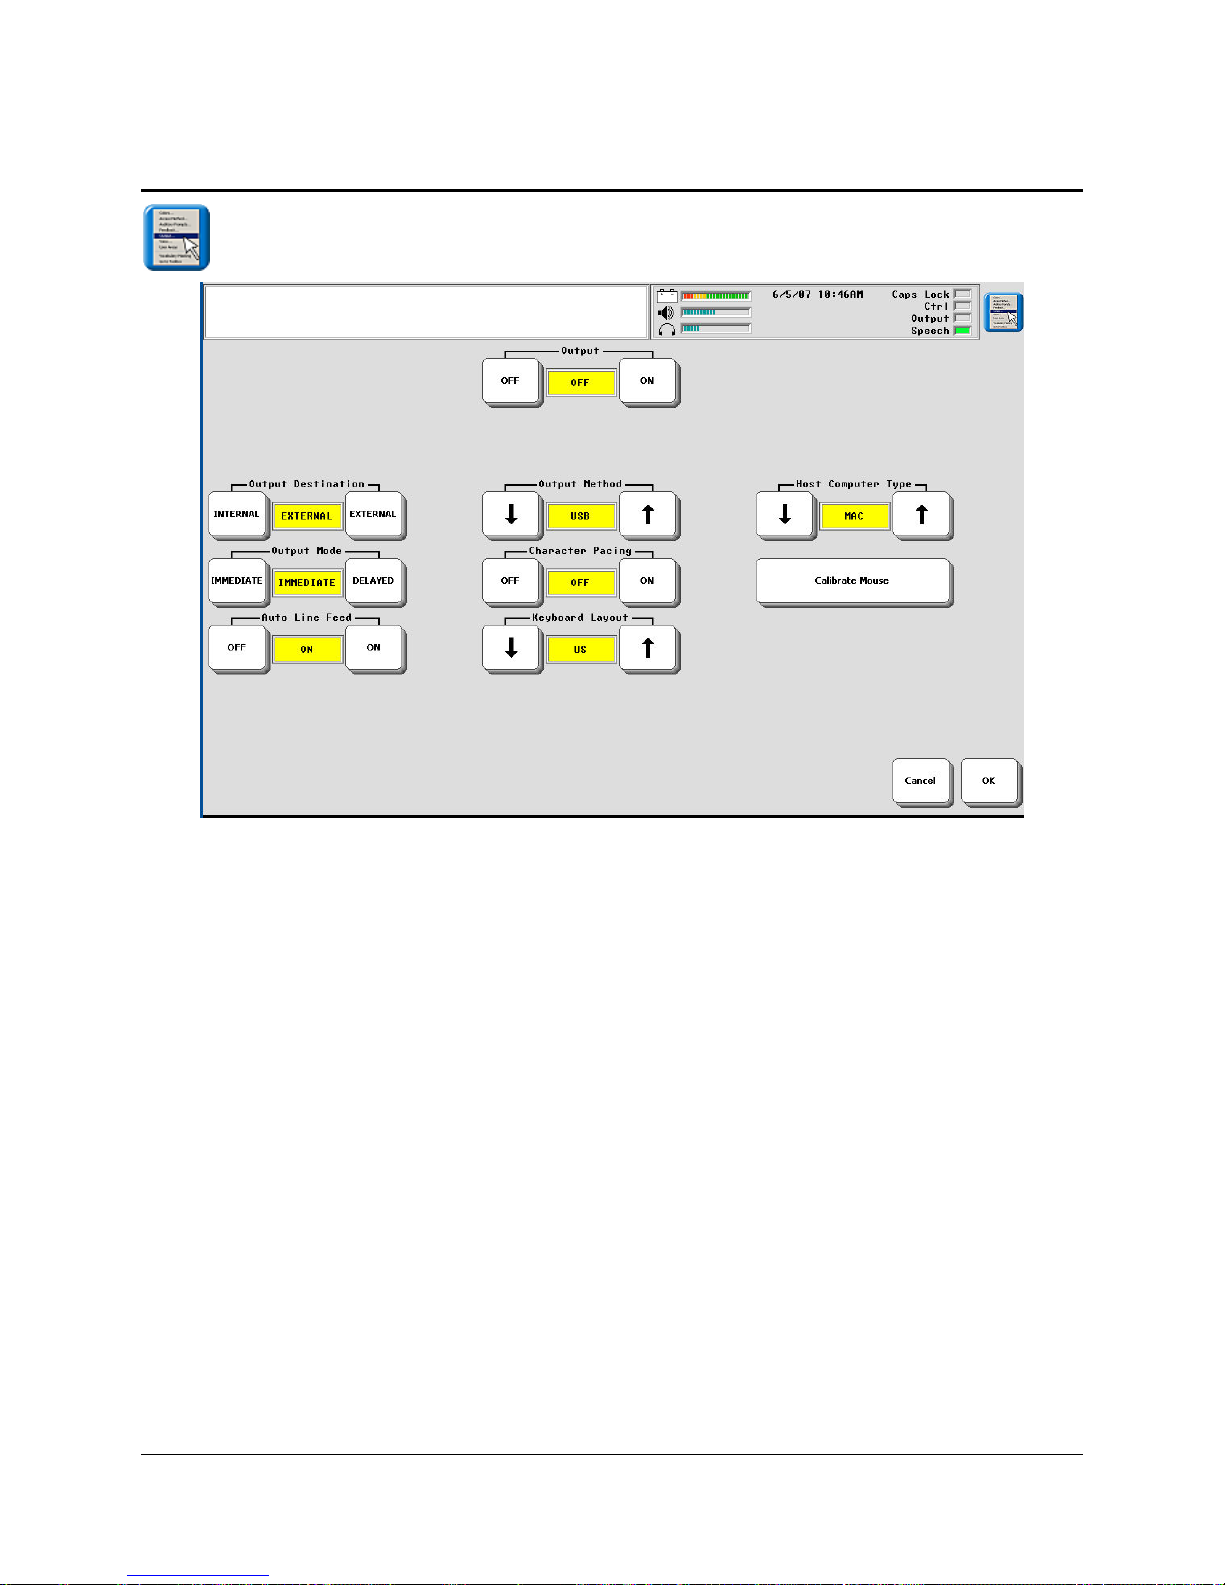
The OUTPUT MENU
You will use this menu if you purchased the integrated ECO which has an internal computer.
You will also use it if you connect to an external computer or printer.
The Unity computer access overlays have keys assigned to either automatically turn output on
and off or allow you to do it when you are using a computer.
OUTPUT MENU Options
Output
When you are using the internal computer or when you are connected to an external device that
can receive information from your ECO, you must have the Output option turned ON.
Output Method
This option allows you select how you are connected to an external device: IrDA is a wireless
connection to an IrDA printer; Bluetooth indicates you are using the PRC Bluetooth adapter to
connect to a computer; USB indicates you are using a USB cable to connect to a computer; IRR
indicates that you are using the PRC infrared receiver to send signals to your computer.
SETTING UP YOUR DEVICE
ECO Manual
73
Page 74

Output Destination
Select INTERNAL if you are using the ECO's internal computer.
Select EXTERNAL if you are want to connect to an external computer for computer emulation.
Host Computer Type
If you are sending information to an external computer, select the kind of computer that will
receive the information, MAC or IBM.
If you are using the internal computer, this option doesn't matter.
Output Mode
IMMEDIATE sends information from your communication aid to the computer or printer as
soon as you enter it.
DELAYED means you must select CLEAR DISPLAY to send text from your device to a
computer.
Auto Line Feed
If your printer does not automatically add lines at carriage returns when it prints, turn this option
ON. This tells the printer to start a new line when it sees a carriage return.
Character Pacing
When this is ON, the rate at which individual characters are sent from your device to a computer
is slowed down. You may need to turn this on if you are sending large groups of text at one time
(e.g., complete sentences).
Keyboard Layout
Select the appropriate keyboard layout for the country you are in.
Calibrate Mouse
If your mouse is not going where you want it to go on the screen, this option allows you to
calibrate it to fit your screen. Follow the directions on the screen.
You can always check to see whether output is On or Off by looking at the Status Display Area
on your device. There is an Output light: When you see the lit LED, Output is ON, otherwise it
is OFF.
OUTPUT ON
OUTPUT OFF
SETTING UP YOUR DEVICE
ECO Manual
74
Page 75
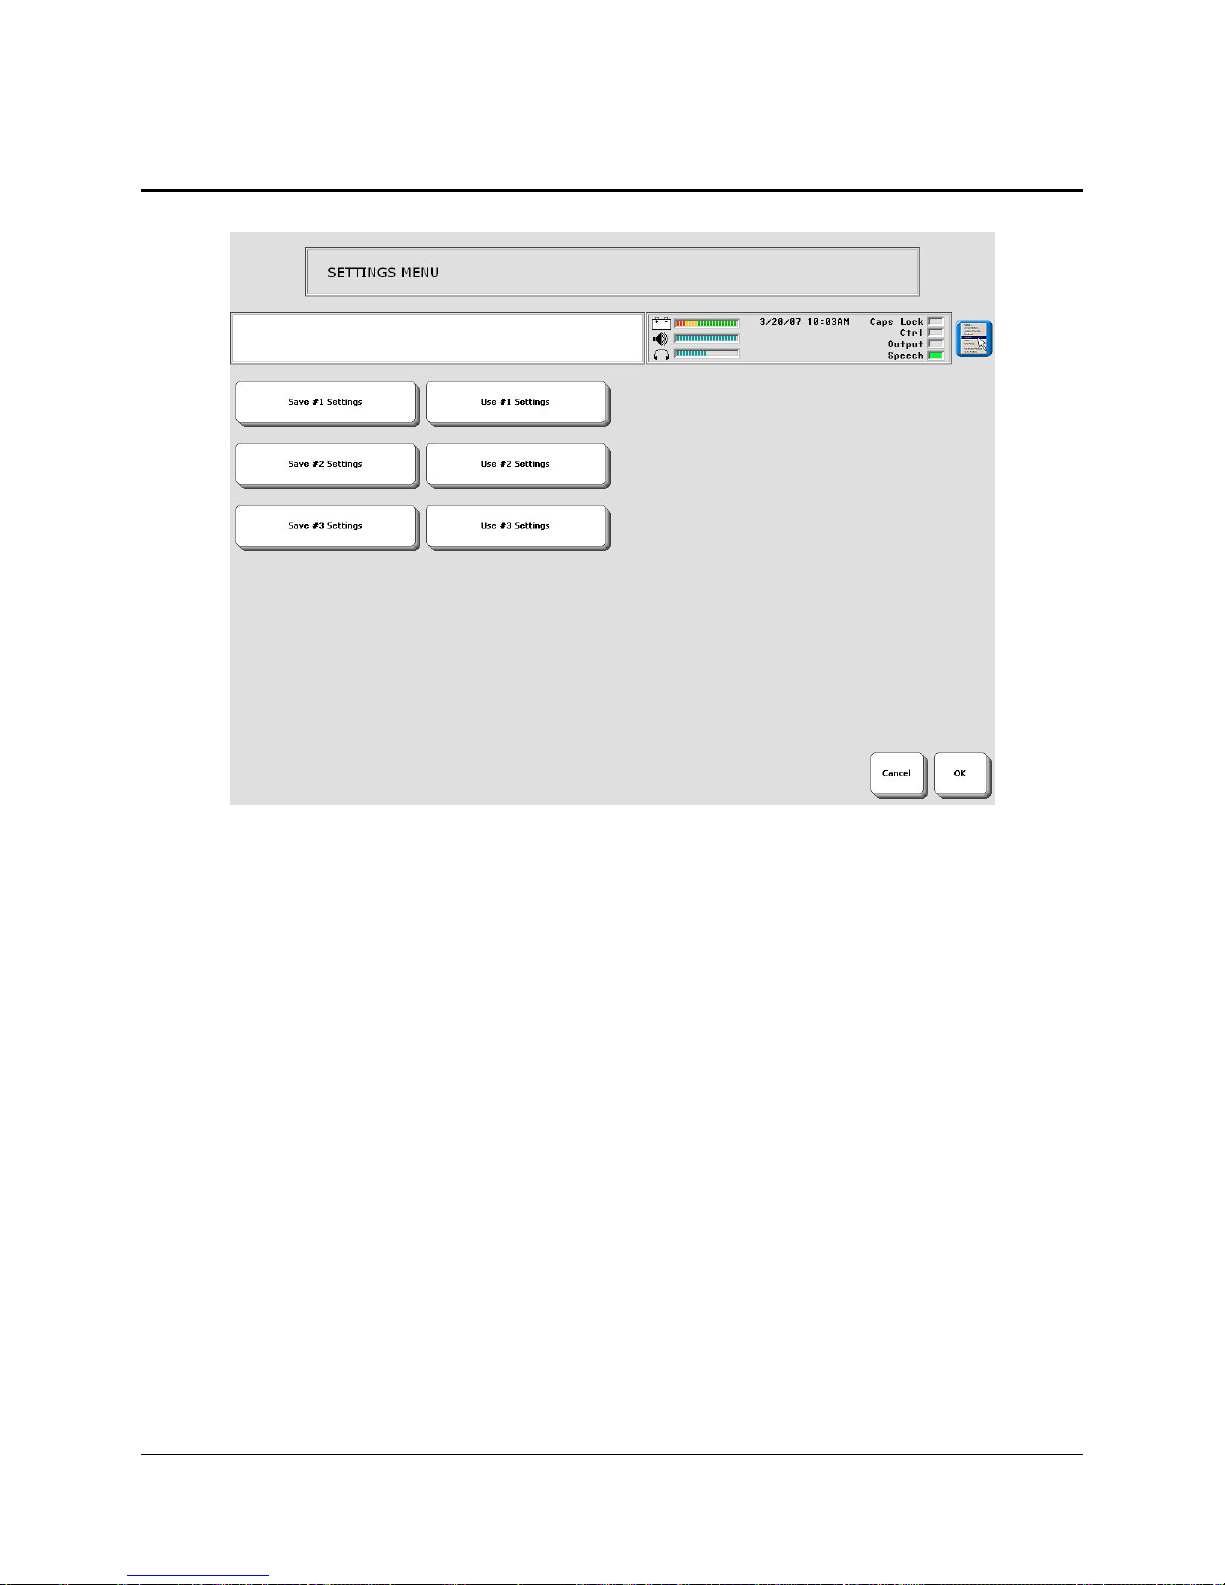
Save Your Set-Up Settings
The SETTINGS MENU in the Toolbox allows you to set up 1 to 3 different groups of settings
and then save the settings for each group under a key or an icon sequence. The settings you have
selected in the Toolbox menus that have blue titles can be saved.
(The menus are: AUDITORY PROMPT MENU, FEEDBACK MENU, OUTPUT MENU,
SELECTION TECHNIQUE MENU, SPEECH MENU, WORD PREDICTION MENU).
You may want to set up more than one access method in an Area. Perhaps you use a headpointer
in the morning when you are fresh, but like to use a switch in the afternoon or evening when you
begin to tire. You can save the settings for up to three different set-ups.
When you save settings, you open the SETTINGS MENU and then one of the Save Settings #1,
#2 or #3 keys. Any options you have set in the menus that have blue titles are saved when you
activate one of the 3 settings location keys.
To Save Settings:
1. Open the SETTINGS MENU. Select a Save Settings key.
For example: Save #1 Settings.
2. You see:
"Are you sure you want to save settings under #1?"
3. Select YES or NO.
4. Select OK.
SETTING UP YOUR DEVICE
ECO Manual
75
Page 76

When you want to use one of your settings, open the SETTINGS MENU and select the Use
Settings key that you want.
Store the "Use Settings" Keys on your Overlay
You can copy your Use Settings keys and store them under icon sequences on your
communication overlay. When you do this, you do not have to go to the Toolbox each time you
want to change to different settings. You can also assign your settings to a specific key using
ASSIGN KEY.
. Use the procedure that is described abpve. The example below describes storing a Use
Settings key under an icon sequence.
Store the Use #1, 2 or 3 Settings Key Under an Icon Sequence:
1. First, save the settings you want to use, then:
2. Go to the Toolbox.
3. Activate STORE CORE.
4. Activate the icon sequence you want to use.
5. Type in any text you want to use to describe the settings: for example, "afternoon settings."
This text will be visible on the display when you activate your sequence.
6. Activate INSERT TOOL on your spelling keyboard.
7. Find the USE SETTINGS #1, 2 or 3 keys in the All Tools List and activate the one you want
to store.
8. Activate OK.
9. You see the storing screen. Activate OK.
10. Go to your communication overlay. Activate the icon sequence you stored the settings
under. You should see: "Are you sure you want to replace your current settings with Settings
#X?" If you want to use the new settings, activate YES. If you don't, activate NO.
Programmer Tip: You can plug a USB mouse and/or keyboard into the USB ports on the
side of the device case and use it to store. When the keyboard is plugged in, you can use it for
storing. You must be in STORE CORE or EDIT CORE for the text to appear in your device's
Text Display Area. When the mouse is plugged in, move the cursor to the key you want. Click
the mouse to activate the key.
SETTING UP YOUR DEVICE
ECO Manual
76
Page 77
Word Prediction
WORD PREDICTION
ECO Manual
77
Page 78

About Minspeak® and Word Prediction
Minspeak Benefits
Minspeak vocabulary represents your core vocabulary—verbs, adjectives, nouns, interjections,
phrases, etc. These are words that make up most sentences and turn sentences into conversation.
But lots of sentences also contain words that are not exactly "core" words. They are more like
"fringe" vocabulary; words that help to make the sentences interesting or to clarify something.
These fringe words often are not stored in your Minspeak vocabulary because they are words
that you only use occasionally. To use them, you must spell them out which takes time, cuts
down on your ability to communicate rapidly and is labor-intensive. This is where Word
Prediction helps.
Word Prediction Benefits
Word Prediction systems help improve a person's ability to communicate by cutting down on the
amount of time spent in spelling out long and/or seldom used words.
ECO has Two Word Prediction Systems
The PRC Word Prediction system predicts words based on how often (frequency) or how
recently (recency) you have used the word.
The WordQ™ system predicts words based on words that are most likely to follow the word you
just typed.
When to use Word Prediction
Use Minspeak when words are less than six letters in length.
With words longer than six letters, you can save time by selecting the predicted word in the
window.
WORD PREDICTION
ECO Manual
78
Page 79
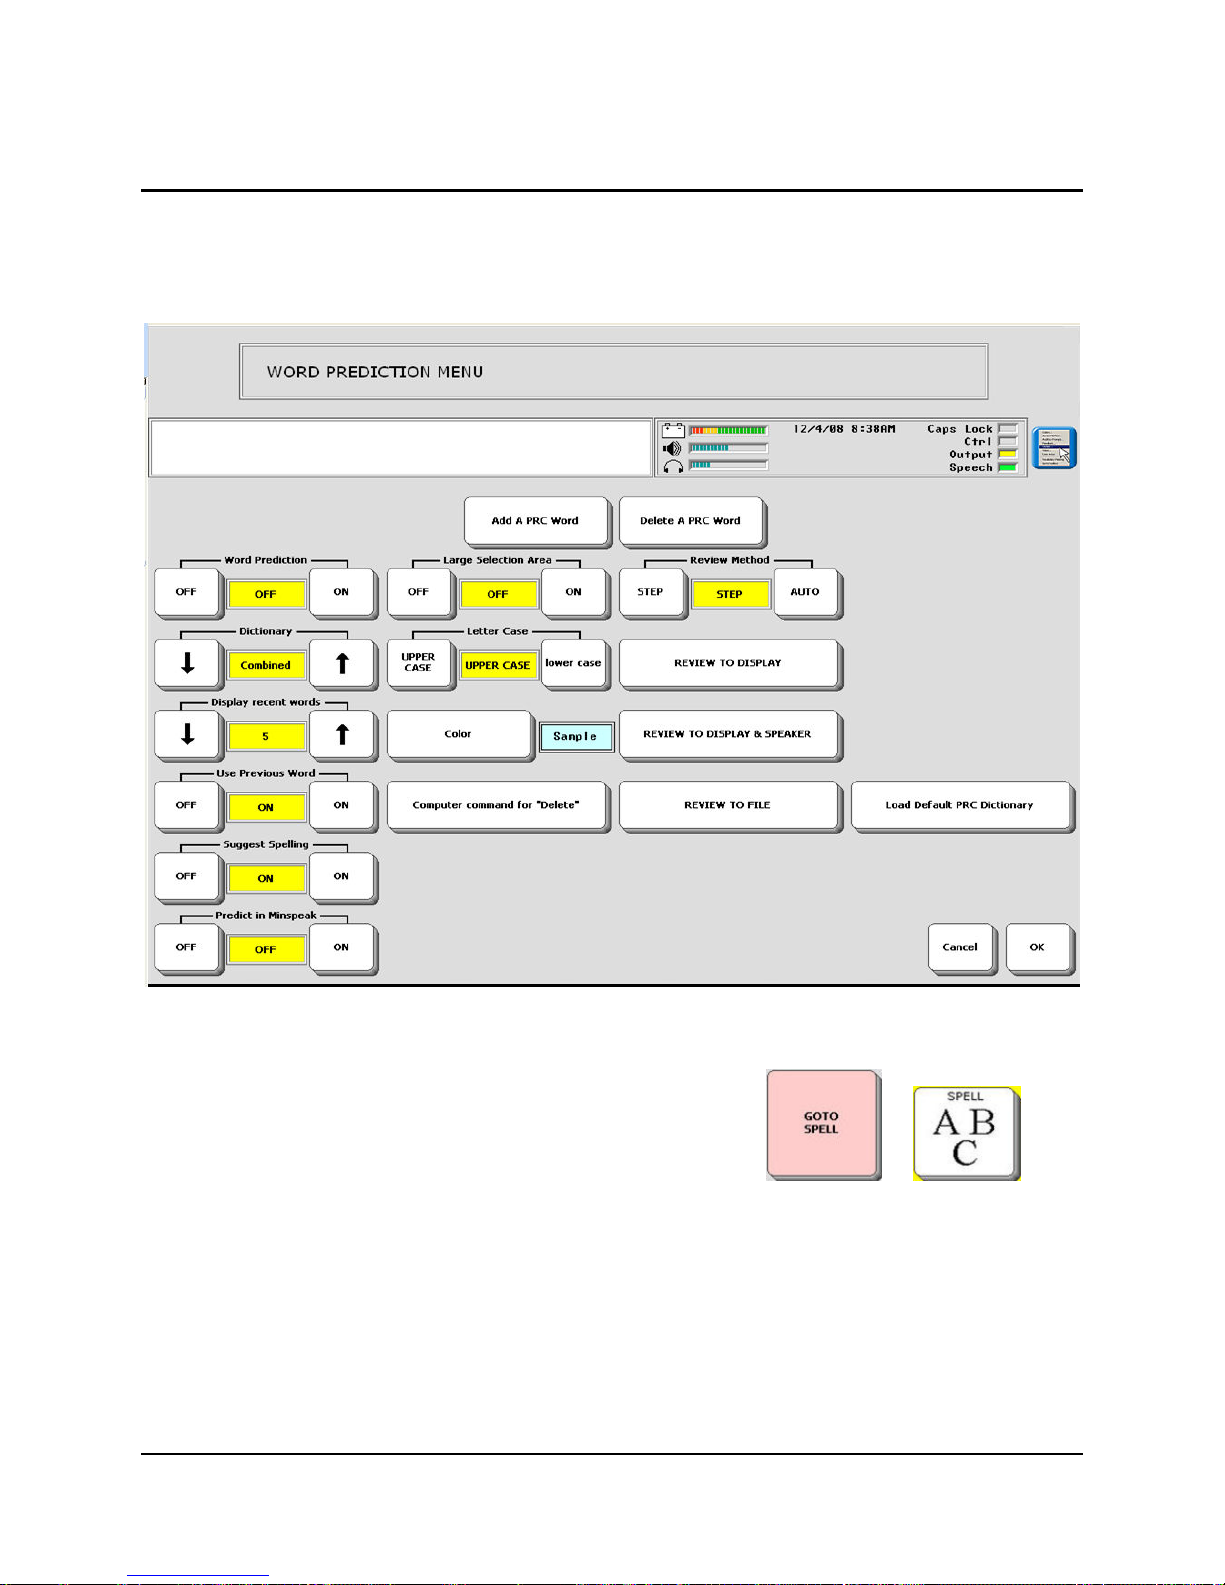
Spell and Select Words
Turn Word Prediction On in the WORD PREDICTION MENU. Select OK.
From the Toolbox or from CORE, select your Spelling overlay: or .
Begin to spell a word. Watch the display as you spell.
WORD PREDICTION
ECO Manual
79
Page 80
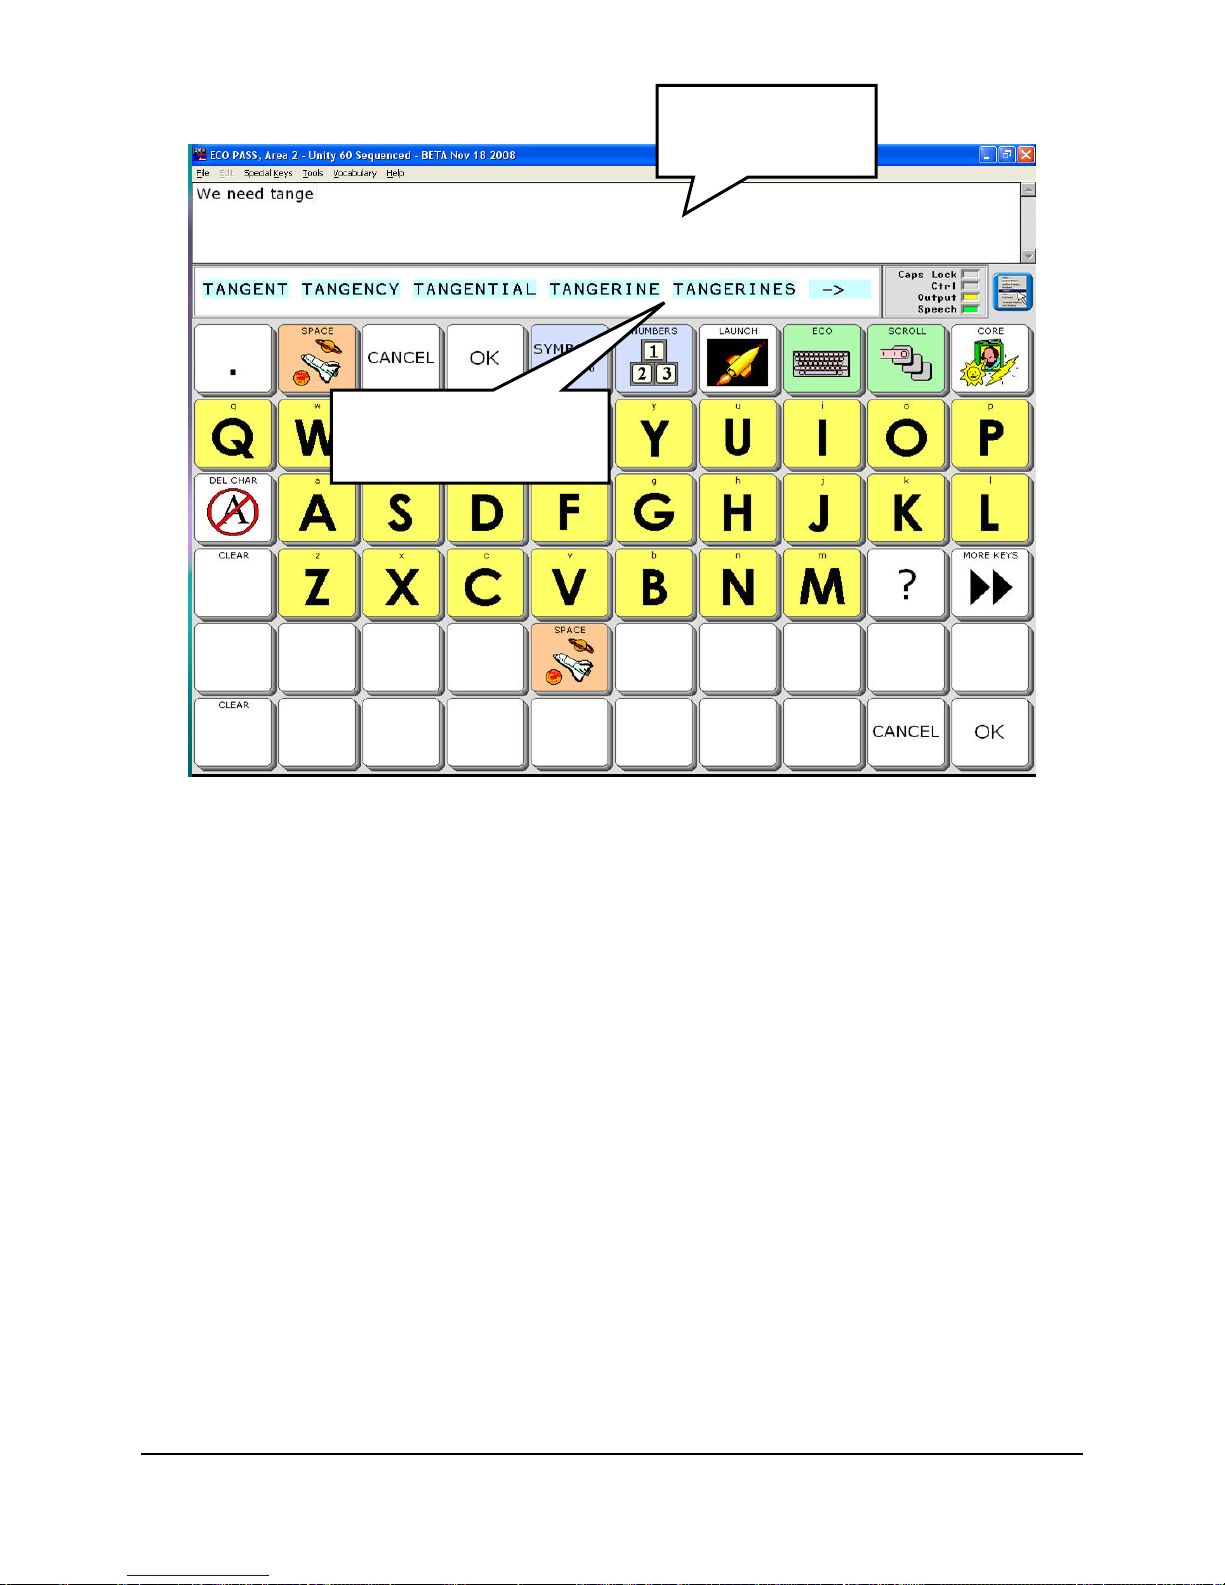
Select the word you
want.
Word Prediction
window
Your Spelling overlay may look different.
Notice the words that appear in the rectangle beneath the Text Display Area. This area is the
Word Prediction window. Words that appear here are words your device is predicting that you
might want from the letters you have spelled.
To select a word from the Word Prediction window, press on the word.
If you are scanning, activate your switch when the word you want is highlighted.
If you are scanning, you may need to switch to a Scanning Spell Page or select the SCAN
WORD PREDICTION key if that is available on your spelling page.
One of two things happens when you select a word: the word you selected goes in the Text
Display Area and the Word Prediction window disappears, or you will see a list of words that are
derived from the word you selected. You can select one of these words or you can continue to
spell and watch more words come up in the Word Prediction window.
You can continue to spell words and select them from the Word Prediction window as long as
you want.
WORD PREDICTION
ECO Manual
80
Page 81
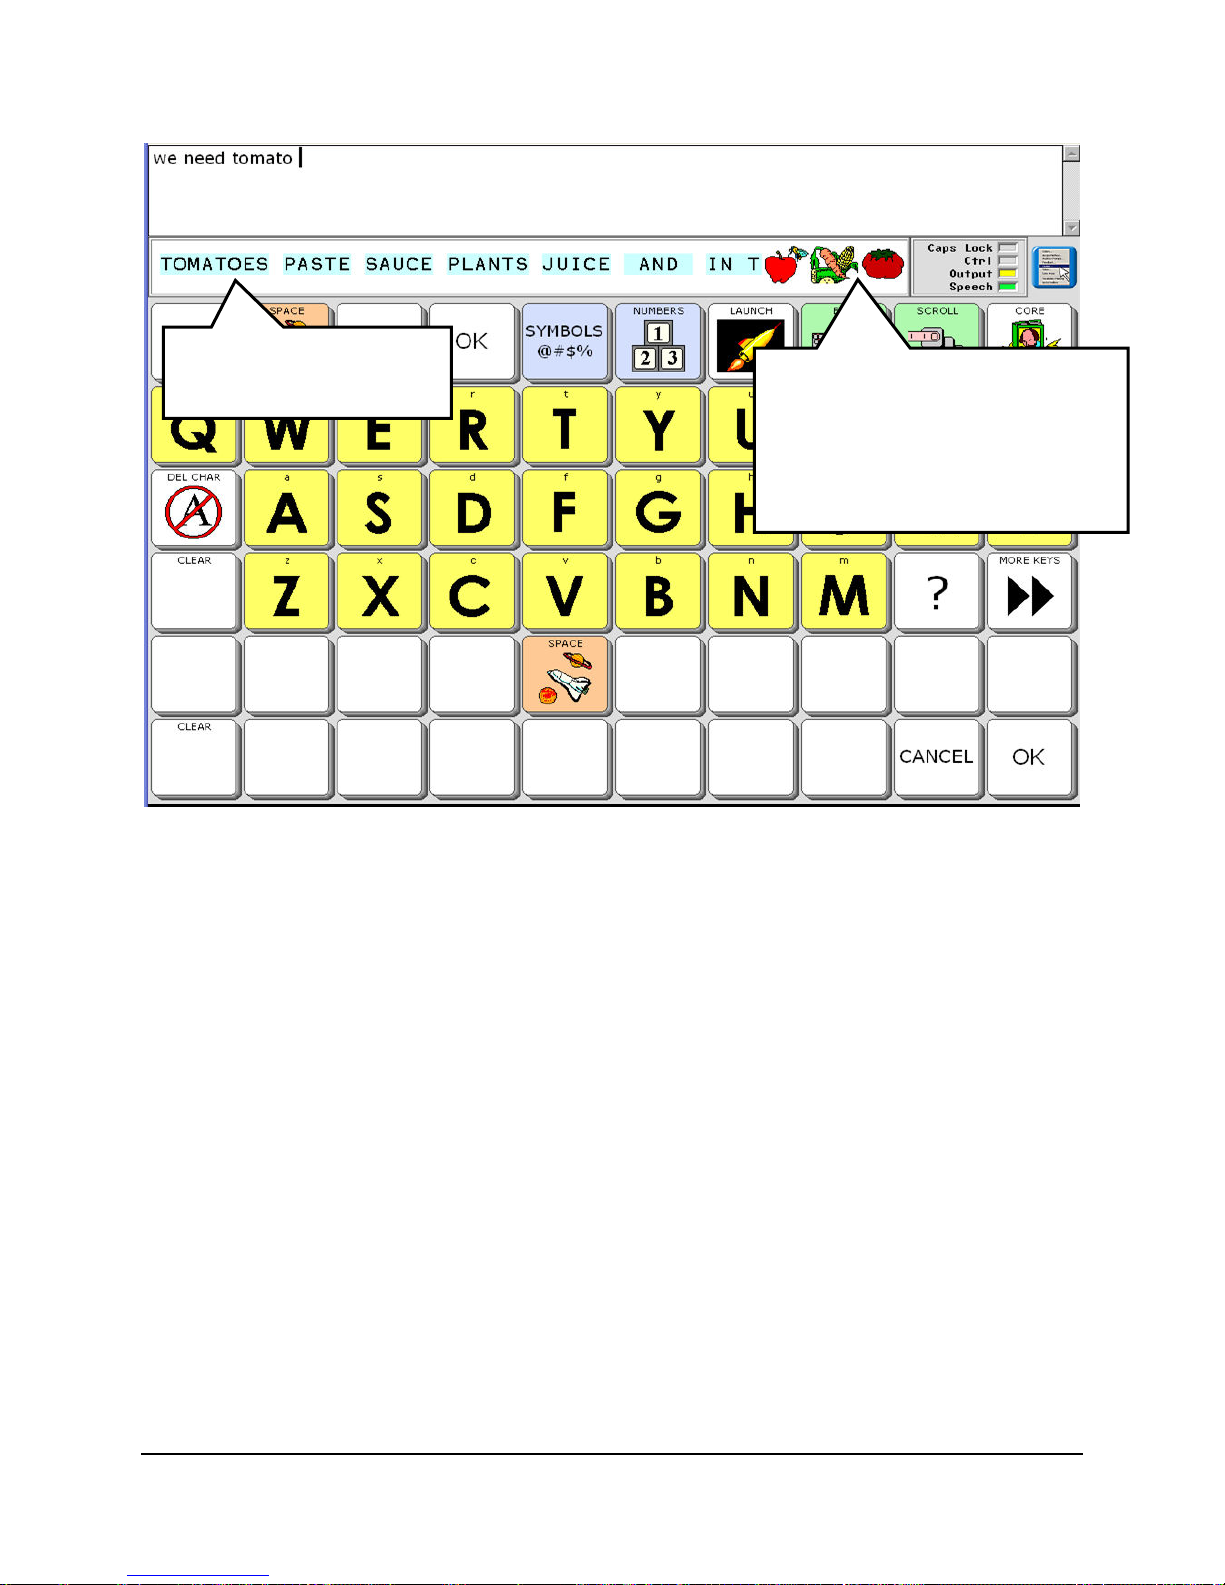
You may also see the
plural of your word.
Icon Tutor on the Fly shows
you possible sequences for
your word.
You can find this option in the
FEEDBACK MENU.
Icon Tutor on the Fly is an option in the FEEDBACK MENU (page 65). When this is ON
Icon Tutor on the Fly will show you any sequences where your Word Prediction word is stored.
Recommendation: We recommend that you learn your Minspeak vocabulary before you
begin to rely on Word Prediction. When you are familiar with your Minspeak vocabulary, you
will find that communication is more spontaneous and interactive than it is when you are using
Word Prediction. Word Prediction is a Tool that should be used to enhance Minspeak, never
replace it.
WORD PREDICTION
ECO Manual
81
Page 82
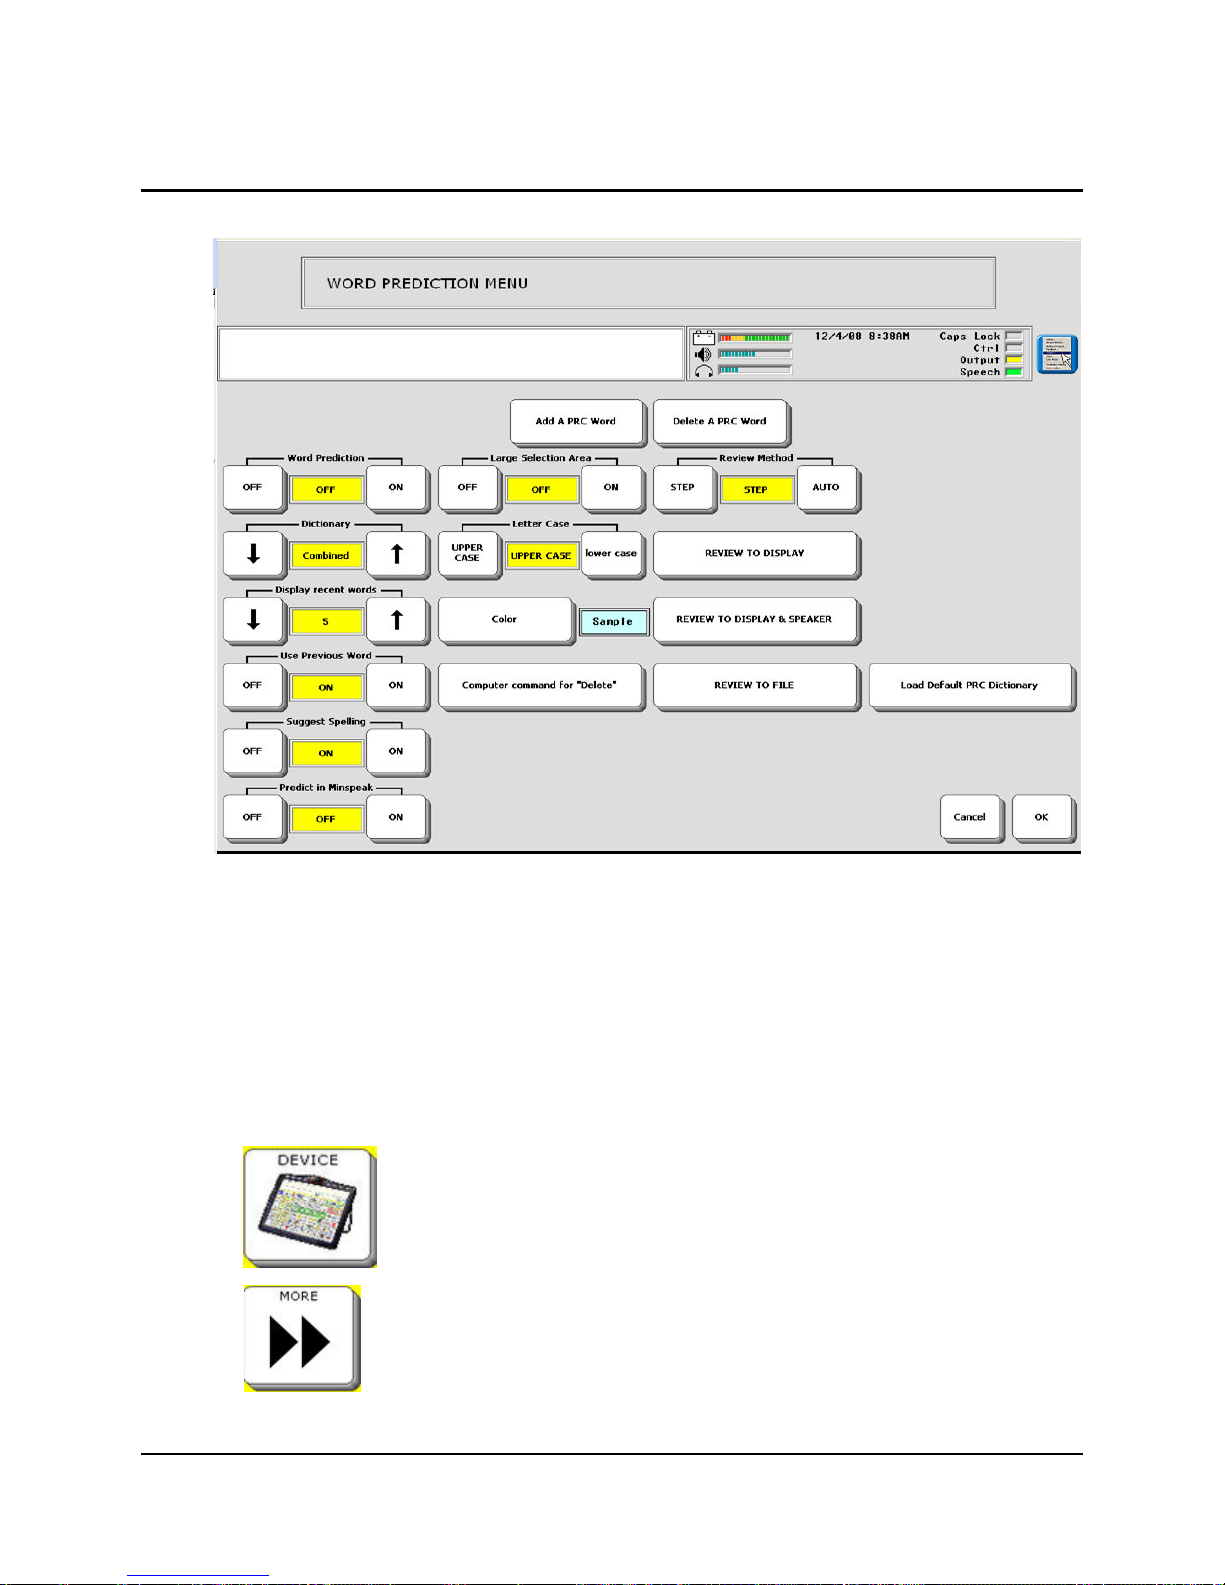
Word Prediction Options
Word Prediction: On/Off
This must be ON in order to use Word Prediction. The default for word prediction is OFF.
You can also turn Word Prediction On from the Activity row.
On the 60 Sequenced overlay:
Select the
DEVICE key in the Activity row.
Select the MORE key.
WORD PREDICTION
ECO Manual
82
Page 83
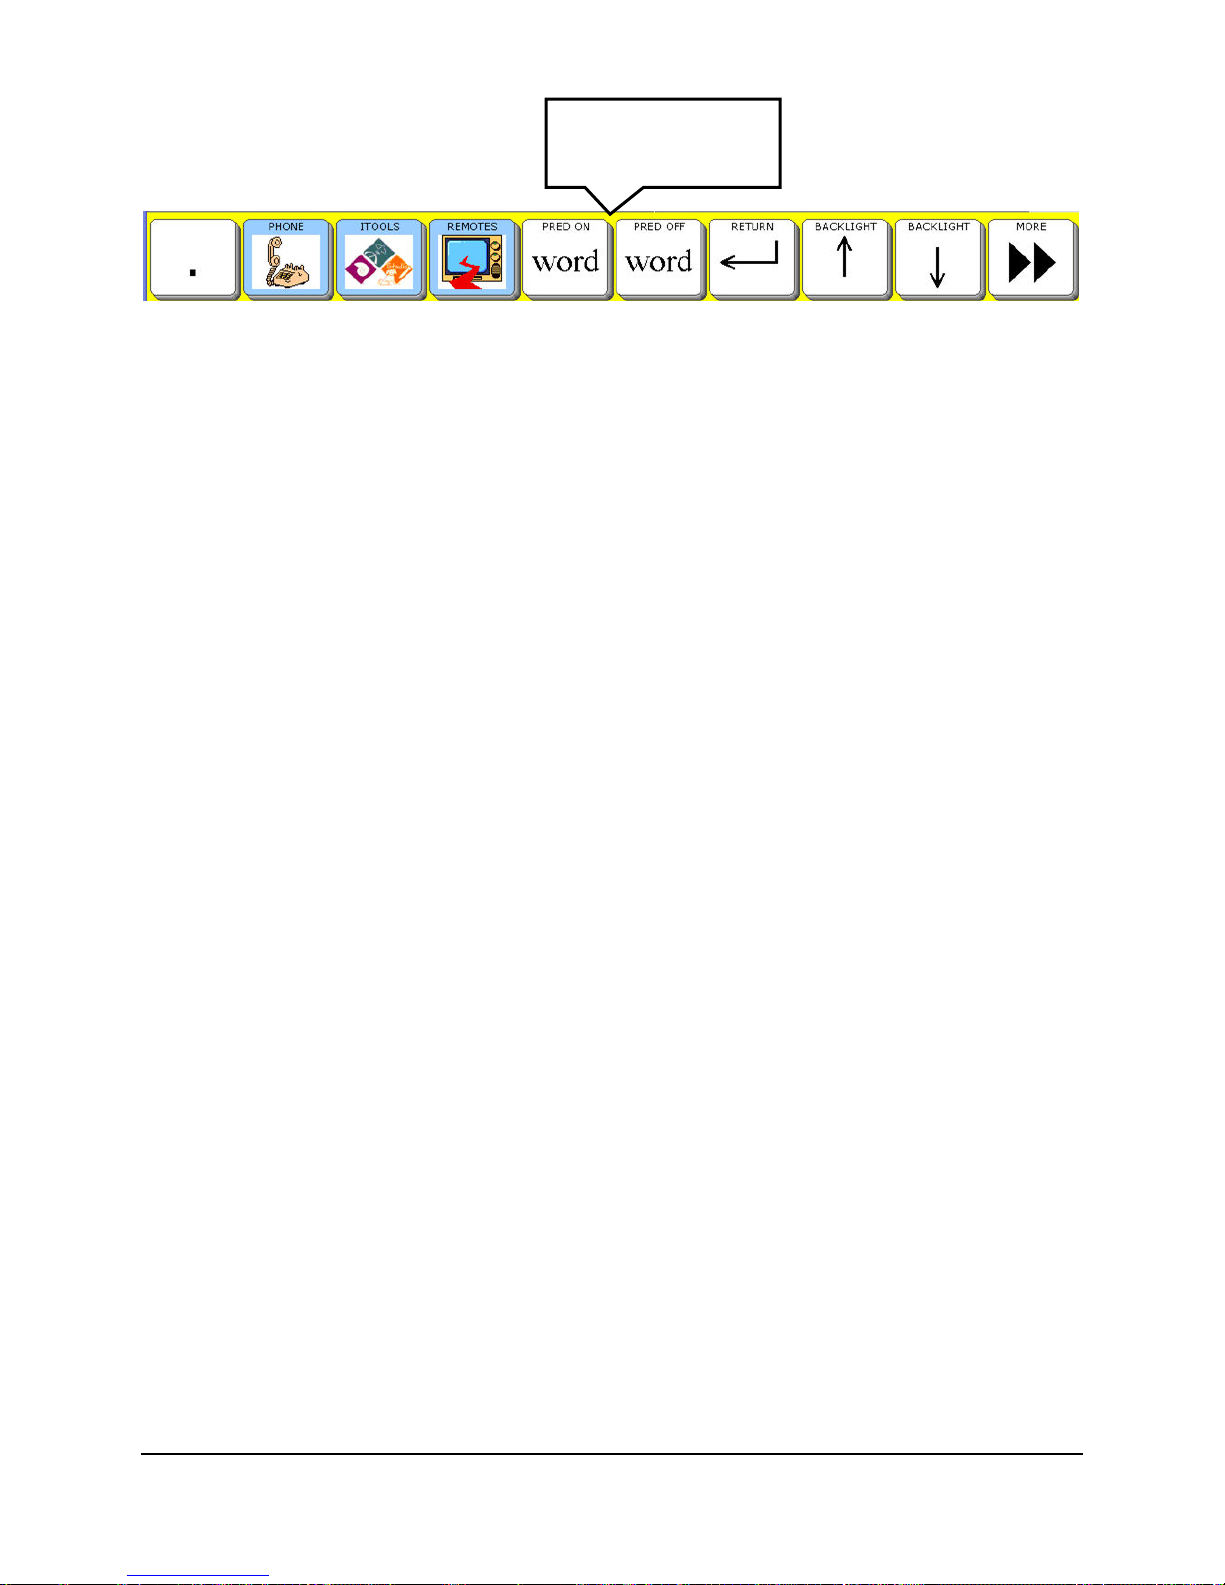
Word Prediction
On/Off keys
Select the word PRED ON or word PRED OFF key.
Dictionaries
Combined Dictionaries
If you select Combined, both the PRC and WordQ dictionaries will work together to predict
words. All three display options can be set: Recent Words, Previous Word and Spelling.
Words you used most recently will be predicted first and then the words most likely to follow the
word you typed or selected.
PRC Dictionary
If you select PRC Dictionary, the only display option you can set is Display Recent Words.
The Word Prediction system will keep track of and predict all the words that apply that you have
used most recently. Once the most recently used words are displayed, the words that you see will
be in the order of most frequently used.
In the Display Recent Words option, select the number of recently used words that you would
like to see on the display. When you begin to spell a word, your device will display the 5 (or
whatever number you have selected) most recently used words that begin with the letter(s) you
have typed. The rest of the words on the display will be the most frequently used words that
begin with the letter(s) you have typed.
If you set the number to "0", the words that appear in the Word Prediction Window will be the
words that you use most frequently, but not necessarily the most recently used words.
Display Recent Words does not work if you have selected the WordQ dictionary alone.
WordQ™ Dictionary
If you select WordQ Dictionary, you can set two display options: Use Previous Words and
Suggest Spelling. Both of these options default to ON.
Use Previous Words means that once you have selected a predicted word, WordQ will then
display the words that are most likely to follow it. This may save you from having to start typing
another word. If you turn this OFF, once you have selected a predicted word, WordQ will not
predict another word until you begin to type in what you want.
Suggest Spelling tells WordQ to try to predict the word you want if you have misspelled it.
WORD PREDICTION
ECO Manual
83
Page 84

Predict in Minspeak
When this is on Word Prediction will work when you are using your CORE.
Add a PRC Word
This option allows you to add words to the PRC Dictionary.
Activate Add a Word and type in the root word of the word you want to add. (A root word has
no endings to it, such as 'es', 'ing', etc.) For example, enter the word "abominate".
The display asks you to enter a word with similar word endings (that is, a word used the same
way in sentences and with the same kind of endings as the word you entered). Type in a similar
word. For this example, type "Terminate". "Terminate" shows in your Word Prediction window
so you can select it. Activate OK.
You see a box containing the word you want to add with all its endings. If most of the endings
are correct for the way you want to use your word, activate YES. The new word is entered into
the dictionary. If the endings aren't right, activate NO, type in a new "similar word" and try
again.
At this time you cannot make changes to the WordQ Dictionary.
Delete a Word
This allows you to delete a word from the dictionary.
Activate Delete a Word. Type in the word you want to delete. Select the word from the Word
Prediction Window. Activate OK. The word is deleted.
Reviewing Words in the Dictionary
You can review words in the dictionary. Perhaps you want to check out the words that begin
with specific letters or maybe you just want to see the whole dictionary. You can review the
dictionary by viewing it on your display screen, by seeing it on the display and also hearing it
spoken, or by seeing it on a computer monitor or printing it out.
STEP or AUTO are options for how you can go through the pages of words. STEP means that
you must activate a switch or touch the screen to move from page to page. AUTO means that
your device will automatically change pages for you after the pre-set amount of "looking" time
has passed.
You can activate the Previous Items, More Items or the Cancel keys at any time whether
you are using Step or Auto.
WORD PREDICTION
ECO Manual
84
Page 85
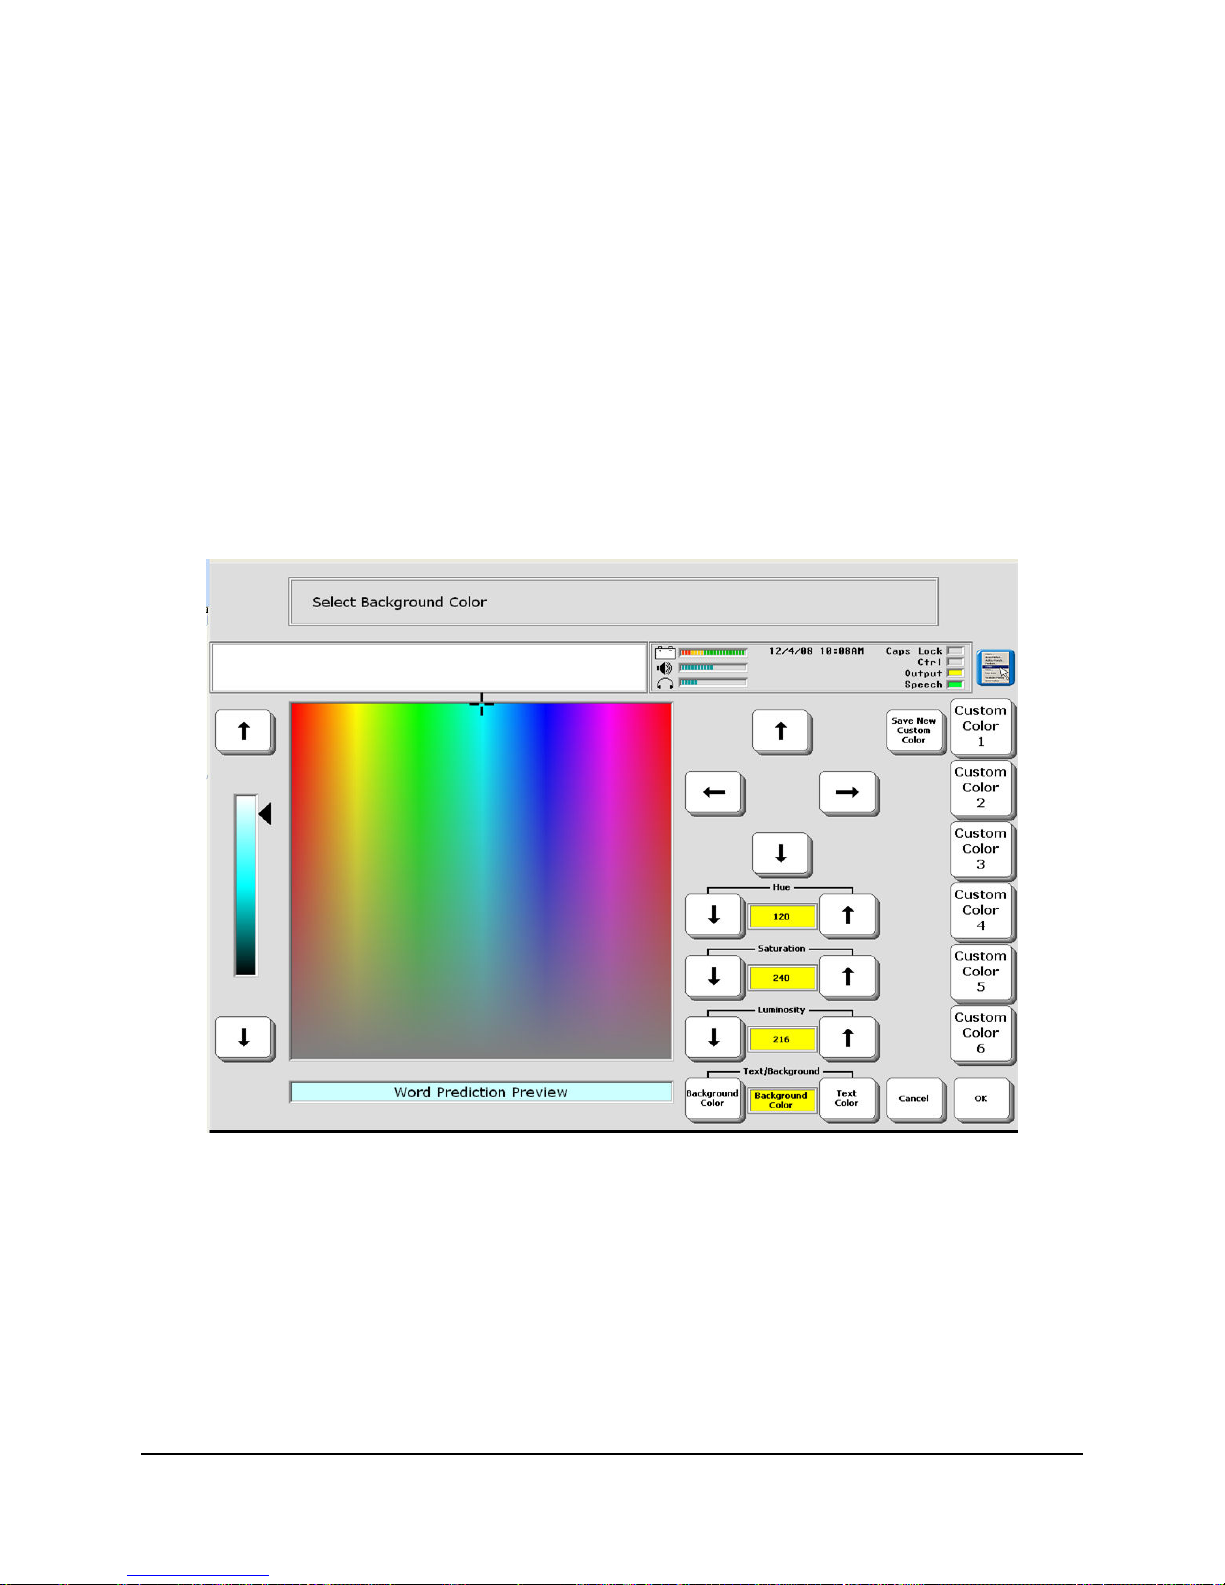
Large Selection Area On or Off
Predicted words are visible in the area below the regular Text Display Area. You select a word
by pressing on it. If this area is too small for easy use, you can turn the Large Selection Area
option to On. This allows you to select a word by pressing on it in the Word Prediction Area or
by pressing on the space above the word in the Text Display Area. The default for this option is
Off.
Letter Case
You can select to see predicted words in UPPER CASE or lower case.
Color
The words in the Word Prediction window can be highlighted in any color. The background area
can be a different color. Activate the Highlight Color option to select the background color and
the text color that you want to use.
In the Text/Background option, select Background Color box or Text Color box. Select a
color area in the large box and then use the color bar and arrows to the left of the screen. The
very top of the color bar is always white and the very bottom of it is always black. You can
touch areas of the large color chart to change colors and then move the arrows to select a color.
The four arrows to the right of the screen move the cursor on the color chart in increments of
WORD PREDICTION
ECO Manual
85
Page 86

five. Hue, Saturation and Luminosity can be controlled through these four arrows or with the
arrows that come with each option.
If you create a color that you want to save, select the Save New Custom Color key. Then select
one of the Custom Color keys to store it under. If you select a Custom Color key where you
have already stored a color, the new color will take the place of the older color.
The Color Menu is available in the pull-down menu. Select Colors. Select Text or
Background in the Word Prediction Color box. Select a color.
Computer Command for "Delete"
You will only use this option if you are using a computer emulation program that has a command
for delete that is different from your device's default command. The default "delete"
command is: backspace.
If the delete command for your computer is different you must activate the Computer
command for delete option and type in the keyboard emulation command that your program
uses. Activate OK when you have finished typing.
When Word Prediction is On and Output is set to Immediate in the OUTPUT MENU, any
characters you type are sent to the display and to the computer monitor. When you select a word
from the Word Prediction window, the characters that you spelled are deleted from your device
display and are replaced by the word that you want. These spelled characters must also be
deleted from your computer display. Your device sends the Delete command for each character
that is to be erased from your computer, so it is important that it knows the correct command.
The computer delete command must be used to delete one character at a time. Delete Word
will not work correctly.
Review to Display
This sends the dictionary to the display screen. When you select this option your device tells you
to enter the start letters of the words you want to review. If you want to review all the words that
begin with a certain letter(s), just type that letter and activate OK. If you want to see more
specific words, type in more letters. For example, if you type in "chu" you will see all the words
that begin with "chu".
If you want to look at the entire dictionary, do not type in anything. Just activate OK.
WORD PREDICTION
ECO Manual
86
Page 87

Review to Display and Speaker
This works the same way as Review to Display except that your device will speak the entries on
each page.
Review to File
This allows you to save the dictionary review in a file on a USB drive or on the ECO's hard
drive. If you have the optional internal computer, you can open the file in Word Pad on your
ECO. If you do not have the internal computer, you should save a review to your USB flash
drive. Then you can transfer it to your external computer and open it in a word processing
program. Remember to set the correct options in the OUTPUT MENU.
Load PRC Default Dictionary
When you receive your device, the default PRC Dictionary is already loaded into it. You can
add words to, and delete words from, this dictionary.
If you make many changes to the dictionary and then decide you want the original PRC
dictionary loaded back into your device, you can use the Load Default PRC Dictionary option.
When you load the original dictionary back into your device, all of the changes you have made to
your current dictionary will be lost.
If you want to save your current PRC dictionary, perform an MTI and select the Save
Entire Device option. See Using the Transfer Memory Menu chapter.
At this time you cannot make changes to the WordQ dictionary.
WORD PREDICTION
ECO Manual
87
Page 88

88
Page 89
Using the Core Vocabulary Overlay
USING THE CORE VOCABULARY OVERLAY
ECO Manual
89
Page 90
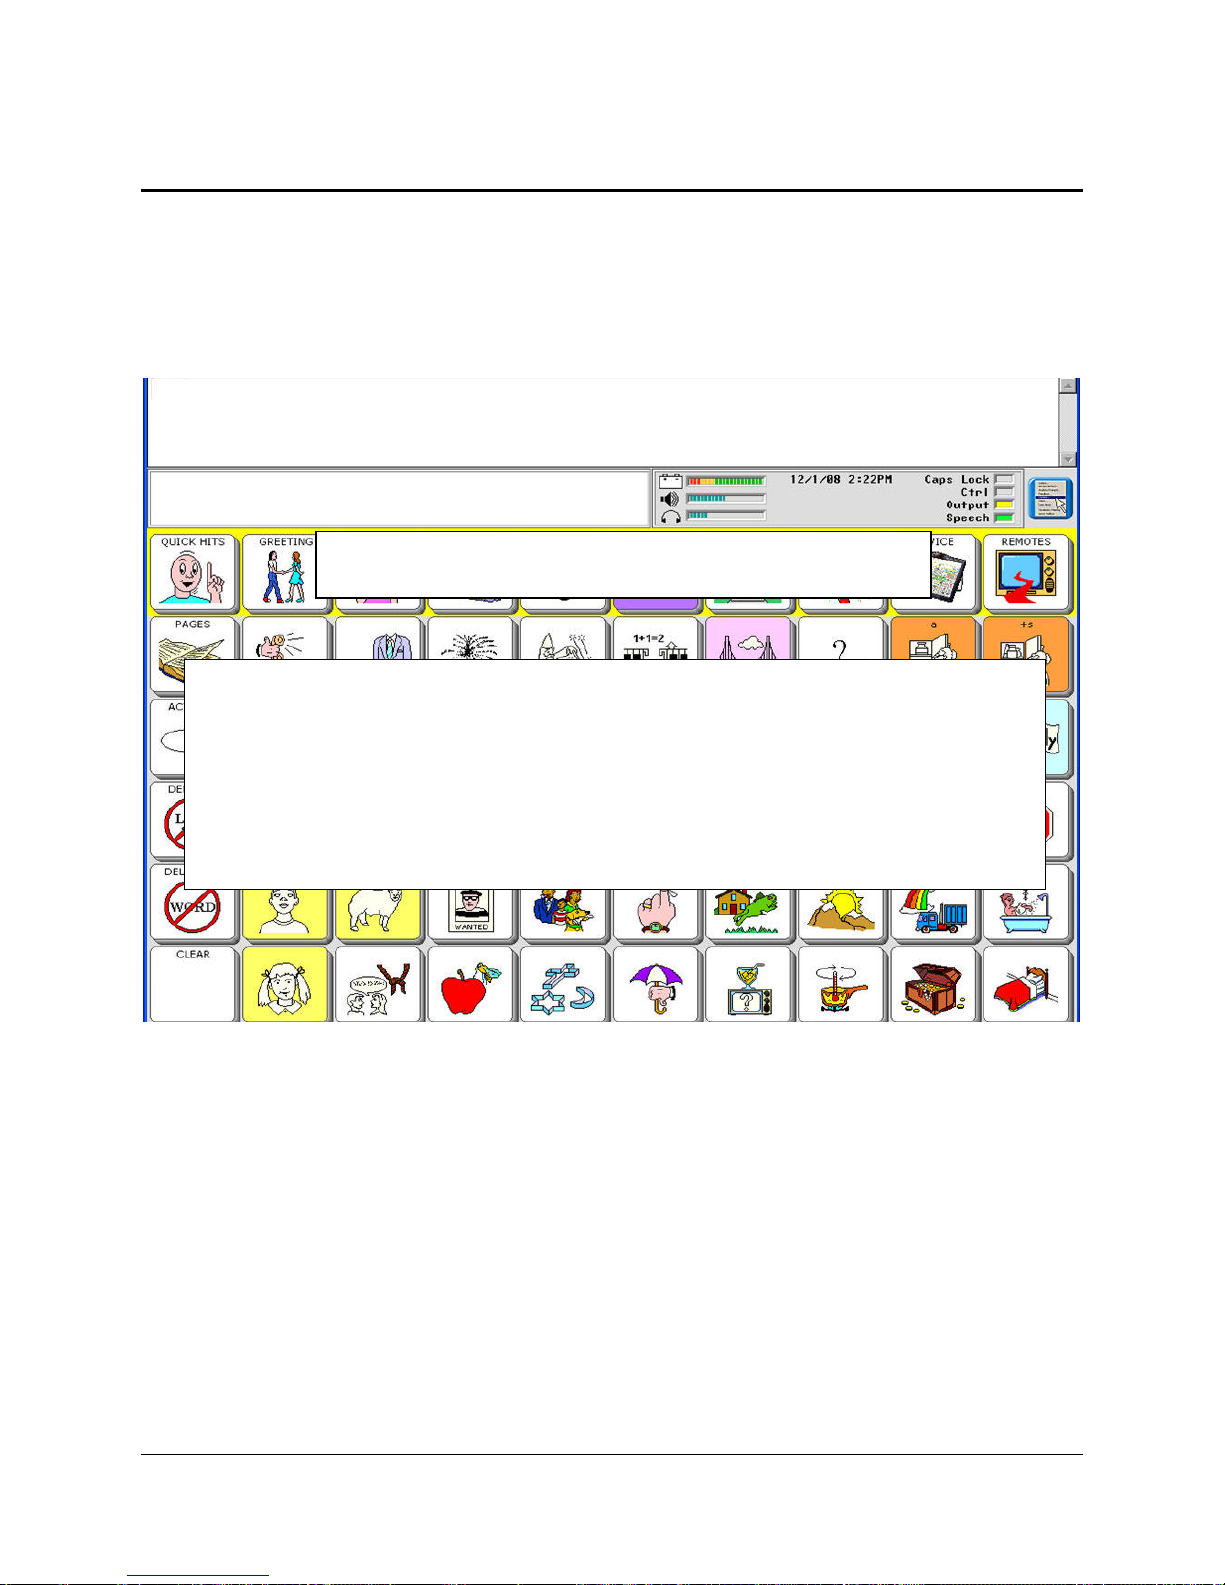
About Core Vocabulary and Activity Row Vocabulary
The Unity® overlays have two kinds of vocabularies stored in them, Core vocabulary and
Activity Row vocabulary. The Activity Row vocabulary is in Row 1, the top row on your
overlay. Core Vocabulary is stored in the rest of the rows on the overlay.
Activity Row
Core Vocabulary
Area
In general, Core vocabulary is made up of words that you use everyday to make sentences.
Pronouns, verbs and words like, "it," "and," "about," "the" can be found here. Core vocabulary is
stored under icon sequences and can be accessed with one, two or three-hit sequences.
Activity Row vocabulary generally contains single-hit vocabulary that is more specialized than
your Core vocabulary. Activities can be centered around a theme such as "School" or
"Greetings". Activities contain words that can help you create complete sentences on topics you
want to talk about.
In PRC devices, Core vocabulary is very important. Many of the Core icons and messages
are consistent throughout the Unity overlays. Once you become familiar with your Core
vocabulary you will be able to communicate easily and rapidly in any situation. For this reason
we recommend that you rarely, if ever, customize your Core vocabulary.
USING THE CORE VOCABULARY OVERLAY
ECO Manual
90
Page 91

Recorded and Computer Speech
Your device allows you to store messages in two different kinds of speech.
Recorded (digitized) speech is speech that someone records into your device, just like recording
something into a tape recorder.
Computer speech (RealSpeak™, AT&T Natural Voices™, Acapela™ or optional DECtalk™) is
speech that your device produces from words that are typed into it. Each time you store a
message you can select which kind of speech you want to use.
Select a computer voice from
the SPEECH MENU in the Toolbox.
When you import icons you use up digitized speech memory.
Before You Begin to Store, Plan What You Want to Say
Helpful Hint! Before you begin to store new messages, look over the Vocabulary Sort on the
CD or do a vocabulary review from the REVIEW VOCABULARY MENU in the Toolbox to
see what is already stored in the device. You may find that you do not need to store many new
messages.
You can record and store any spoken or typed message (words, phrases or sentences) into your
device's memory. You can also link icon sequences to activities (Dynamic Activities) and even
to Pages. If you have sound files (wav, wma and mp3 files) stored on a USB or flash drive or on
your computer, you can use Record to store the sounds instead of a message.
Before you store, you should make some decisions. What do you want to say? Are you storing
Core vocabulary or Activity Row vocabulary? Decide on the icon or icons you want to use. Are
you going to use synthesized or recorded speech or both? If you are recording, write down the
messages and their icon or icon sequences. This helps to save on the amount of time you must
hold down the RECORD key. The longer you hold down RECORD, the more memory is used.
If you are storing synthesized messages, you can store more quickly if you know what you want
to type and what sequences you want to use.
The recording microphone is the small hole located to the top right of the infrared window on
the front of the case.
USING THE CORE VOCABULARY OVERLAY
ECO Manual
91
Page 92
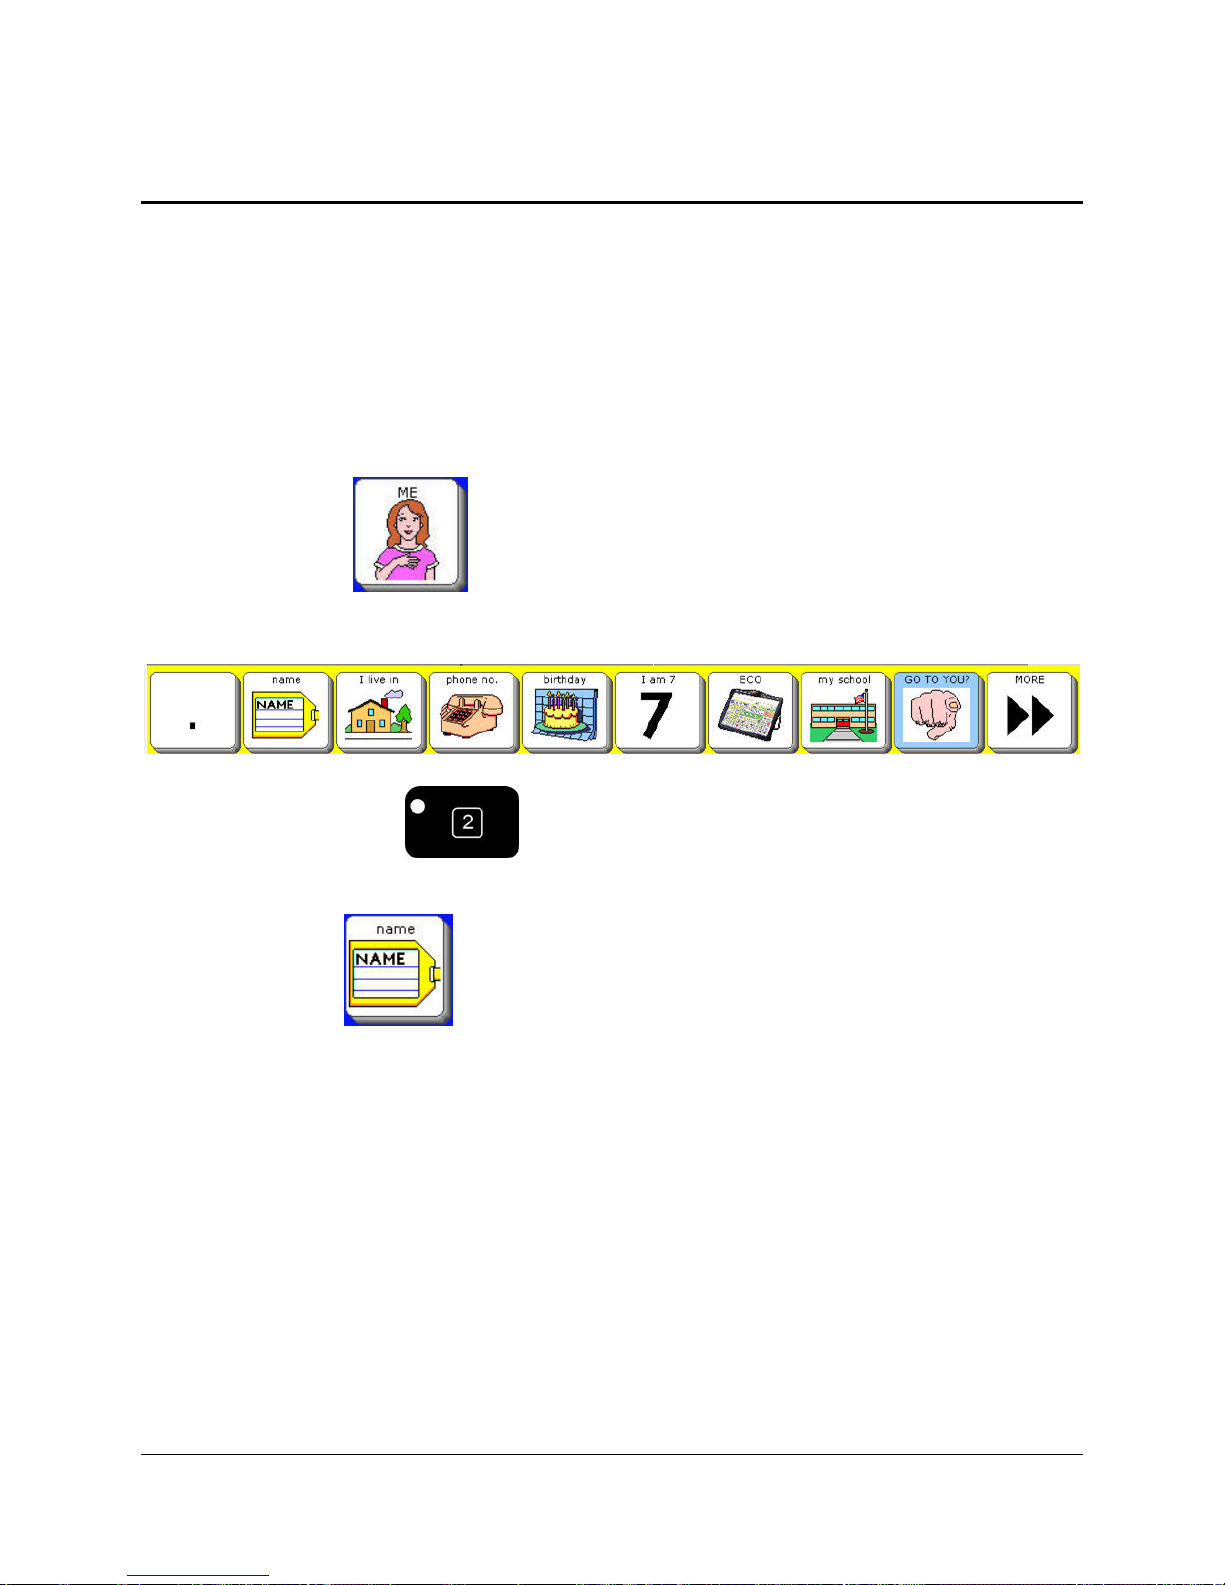
Record a Vocabulary Message
In the Activity Row of your Core vocabulary overlay, there is a ME Activity. This activity has
keys where you can record your name and other information about yourself.
Tip! When you are doing any storing or editing, the OK key accepts and saves any changes
you have made. The Cancel key returns the key to the way it was before you began to modify it.
To Record and Store a Message
1. Select the ME key from the Activity Row (the top row on your overlay). You see
some of the messages in the ME Activity.
2. Select the SET-UP key on the front of the case.
3. Select the NAME key.
USING THE CORE VOCABULARY OVERLAY
ECO Manual
92
Page 93
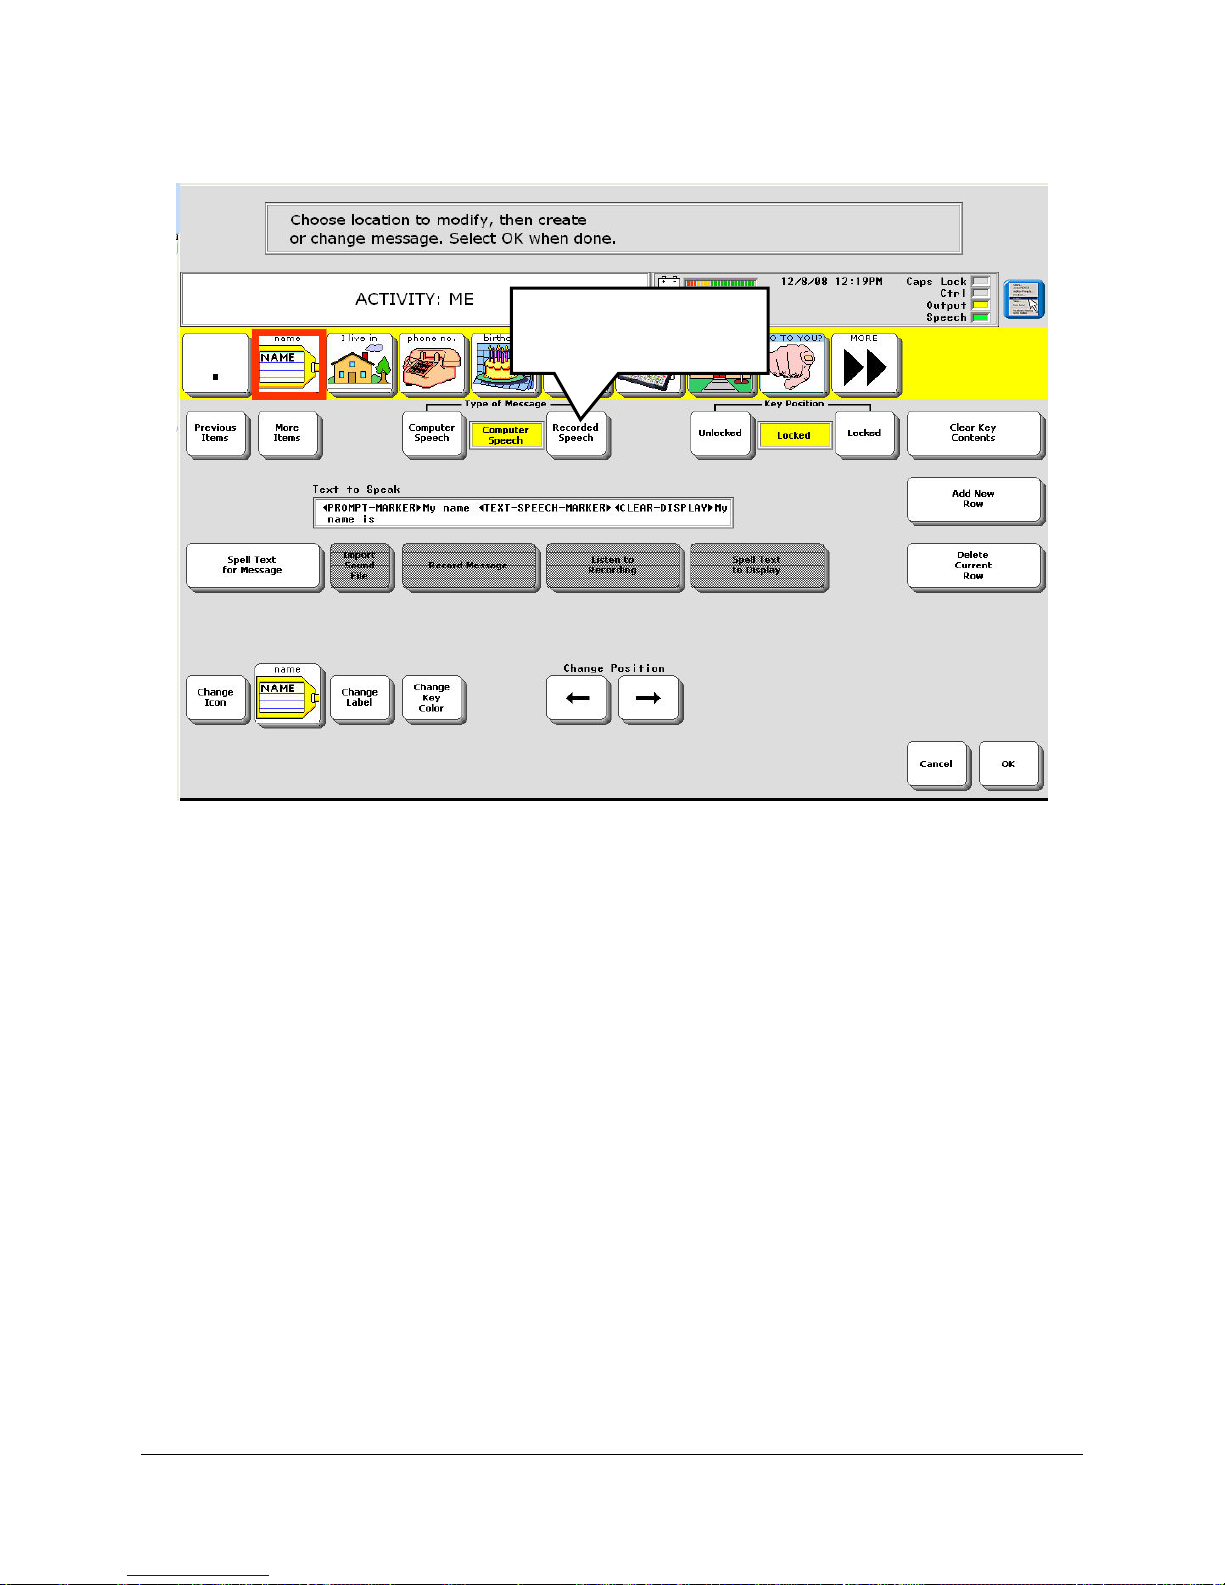
You see:
Select Recorded
Speech
4. Change the Type of Message box to Recorded Speech
USING THE CORE VOCABULARY OVERLAY
ECO Manual
93
Page 94
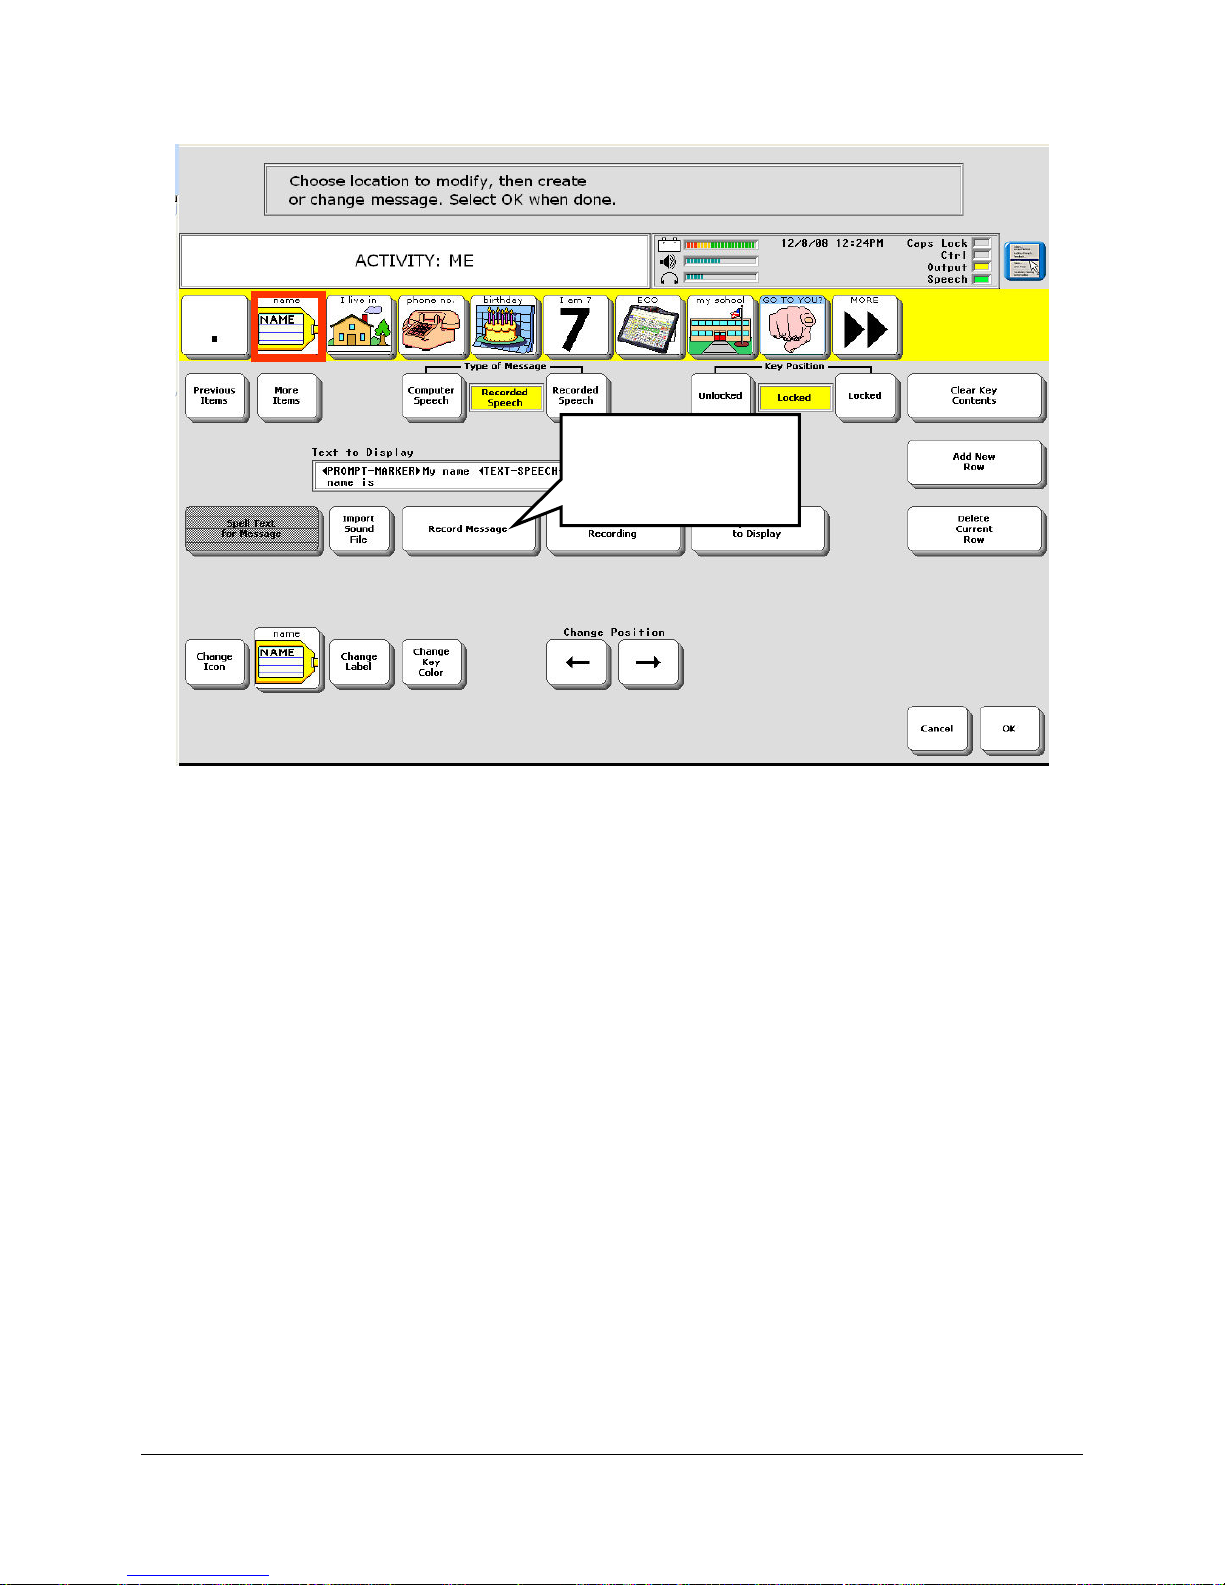
Select Record
Message.
5. Select the Record Message key.
Note: If you want to include written text that will be displayed while your message is
spoken, set the Type of Message option to Computer Speech. Then activate the Spell Text to
Display key and type in the text you want to have displayed. Activate OK when you have
finished. Then set the Type of Message option to Recorded Speech.
USING THE CORE VOCABULARY OVERLAY
ECO Manual
94
Page 95
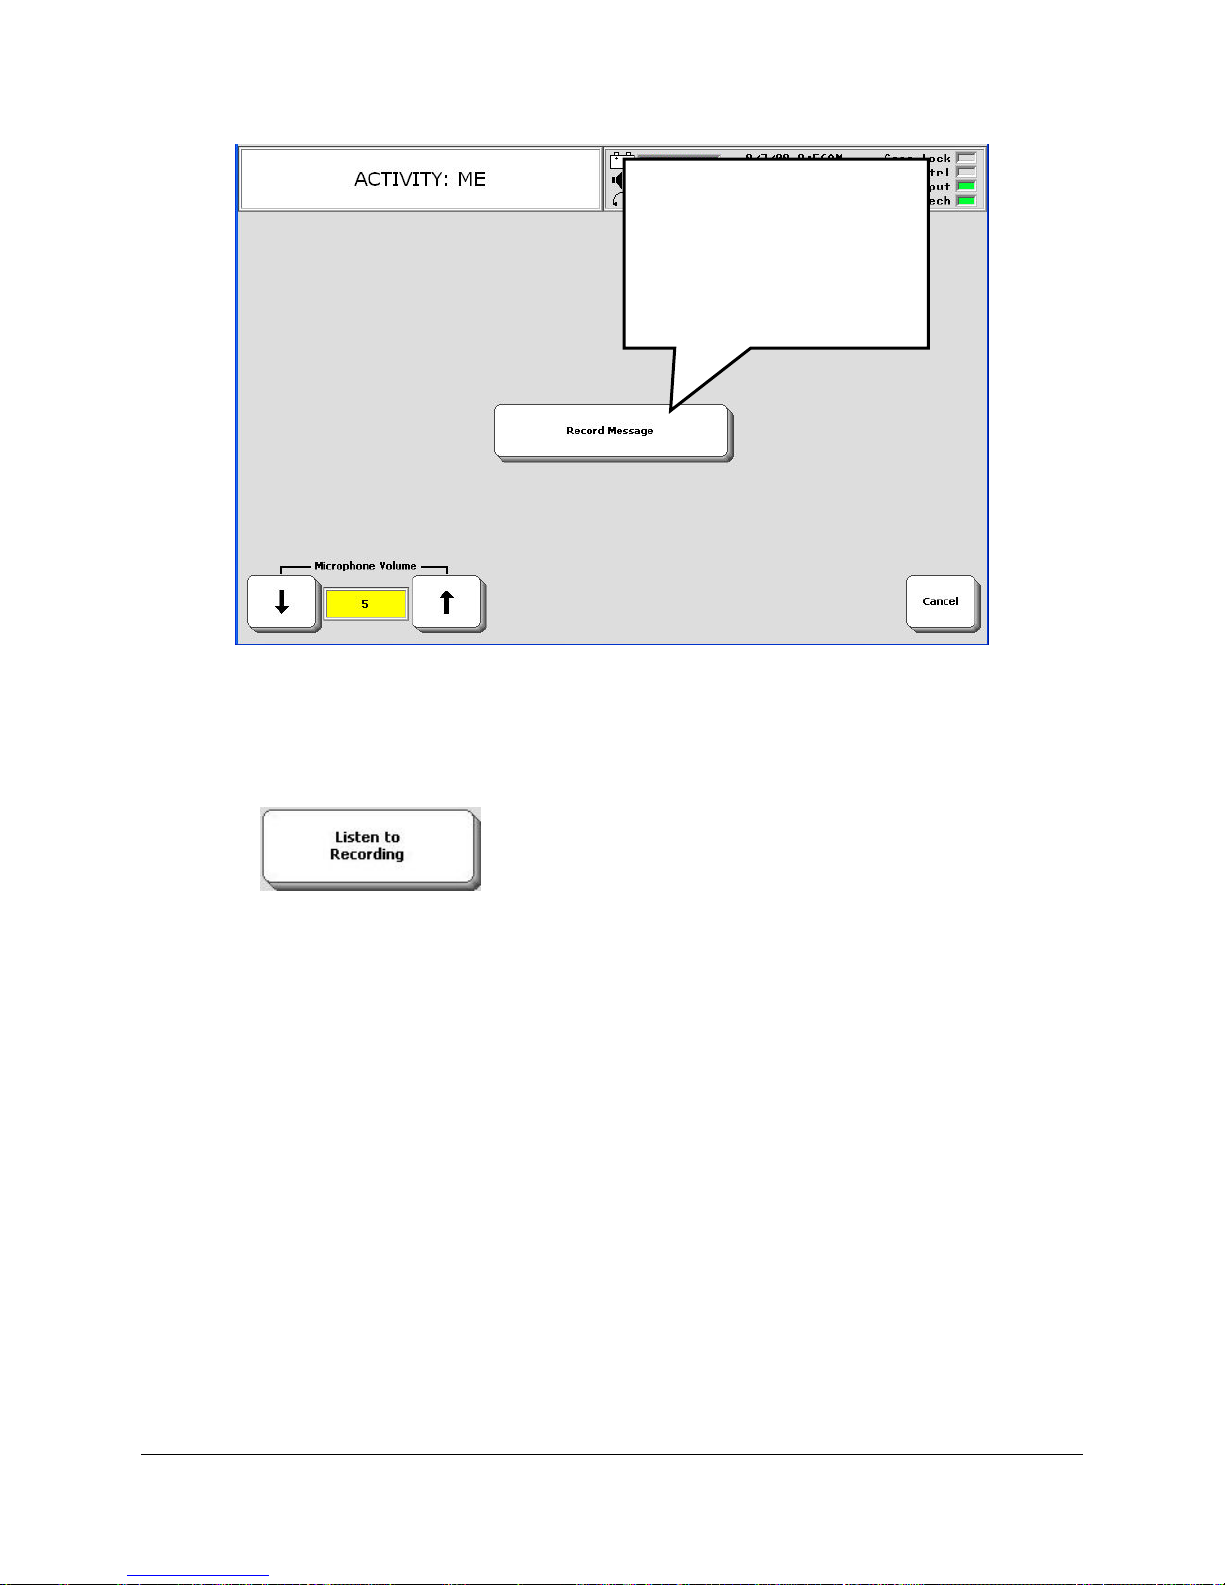
Press and hold this key
g
while you say your
message.
Release the key as soon
as you have finished
recordin
.
7. When you are ready, press and hold the Record Message key and speak "My name is [say
your name]."
8. Release the Record Message key as soon as you have finished recording. The device returns
you to the menu.
9. Press the Listen to Recording key.
10. If the message is fine, select OK. You are finished.
If the message was too loud select a lower number in the Microphone Volume option.
If the message was too soft, select a higher number.
Select Record Message and re-record your message.
Activate Listen to Message to see if you like the new recording.
If the recording is still too loud or too soft, repeat these steps.
.
Once you have the Microphone Volume adjusted to your liking, you should not have to re-
adjust it for recording any new messages.
Add your Name to the Display
Now let's add your name so that it shows up on the display when you select the NAME key.
USING THE CORE VOCABULARY OVERLAY
ECO Manual
95
Page 96
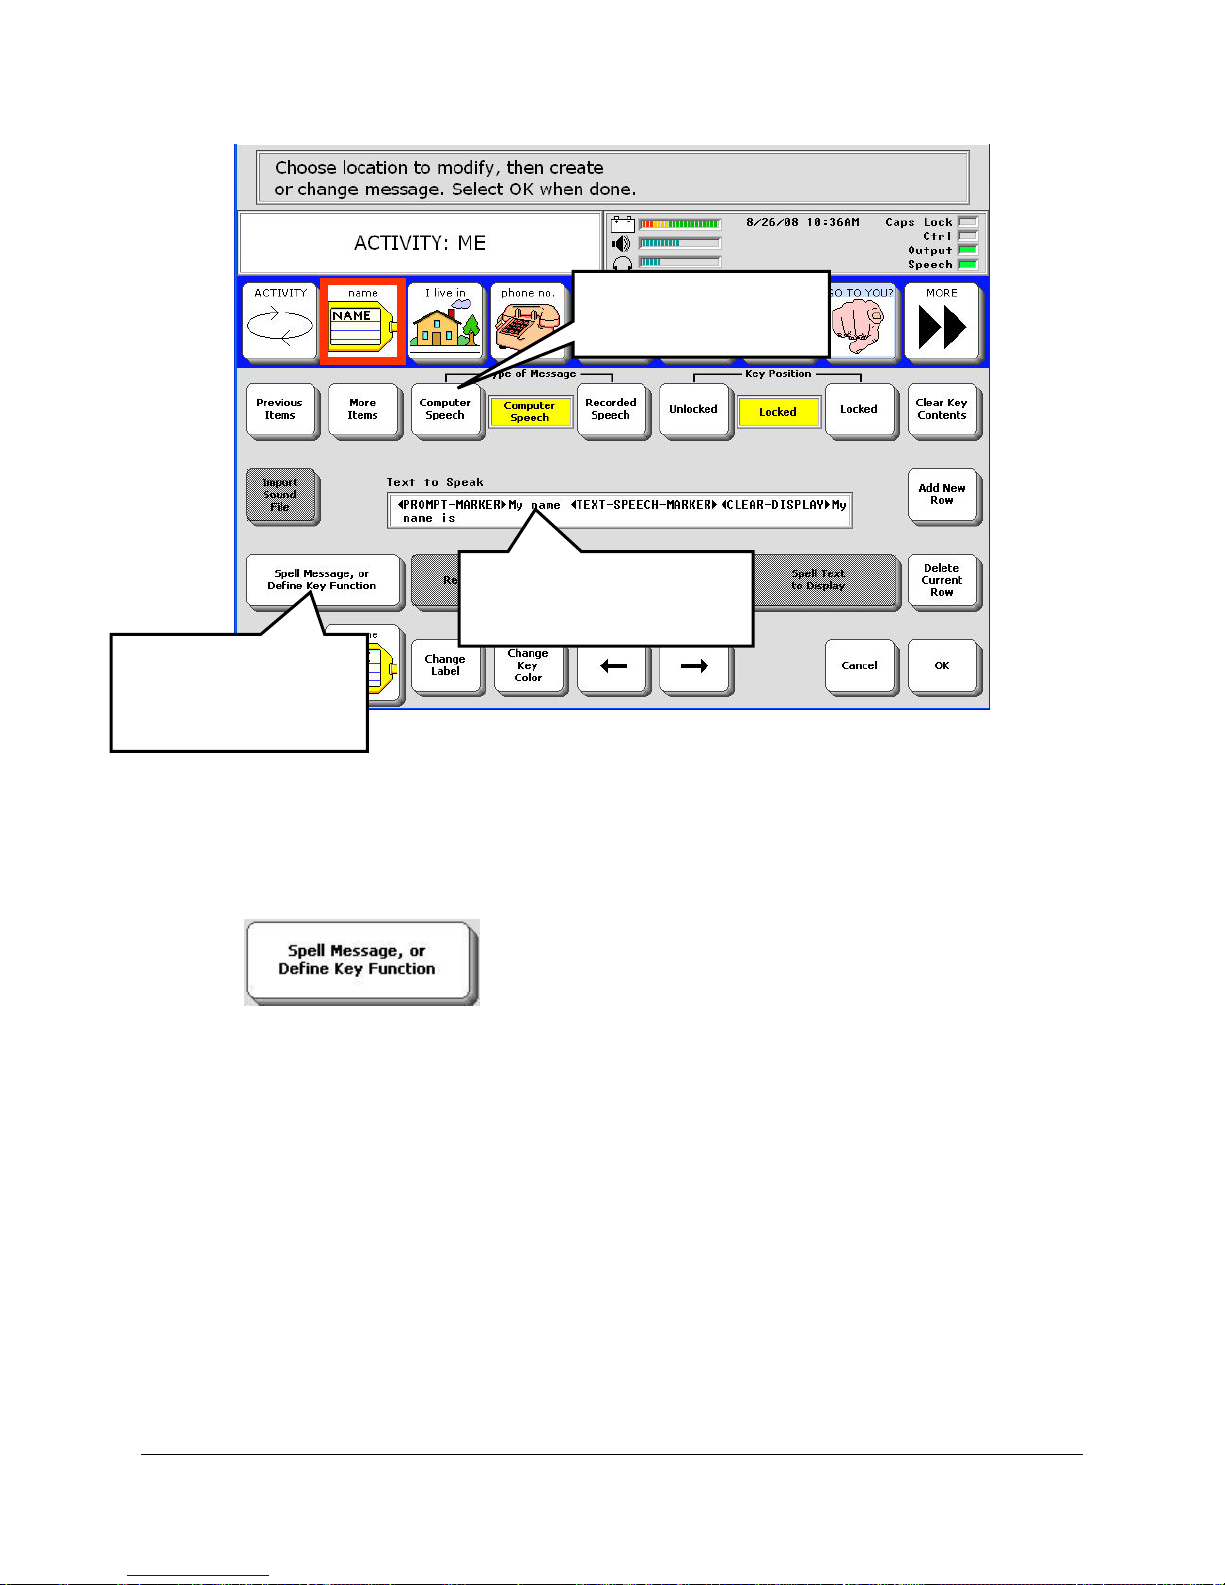
Select Computer
Speech
You will type your name
so that it shows up here.
Select Spell
Message or Define
Key Function
Select Computer Speech in the Type of Message option.
Select the
Spell Message… key.
USING THE CORE VOCABULARY OVERLAY
ECO Manual
96
Page 97
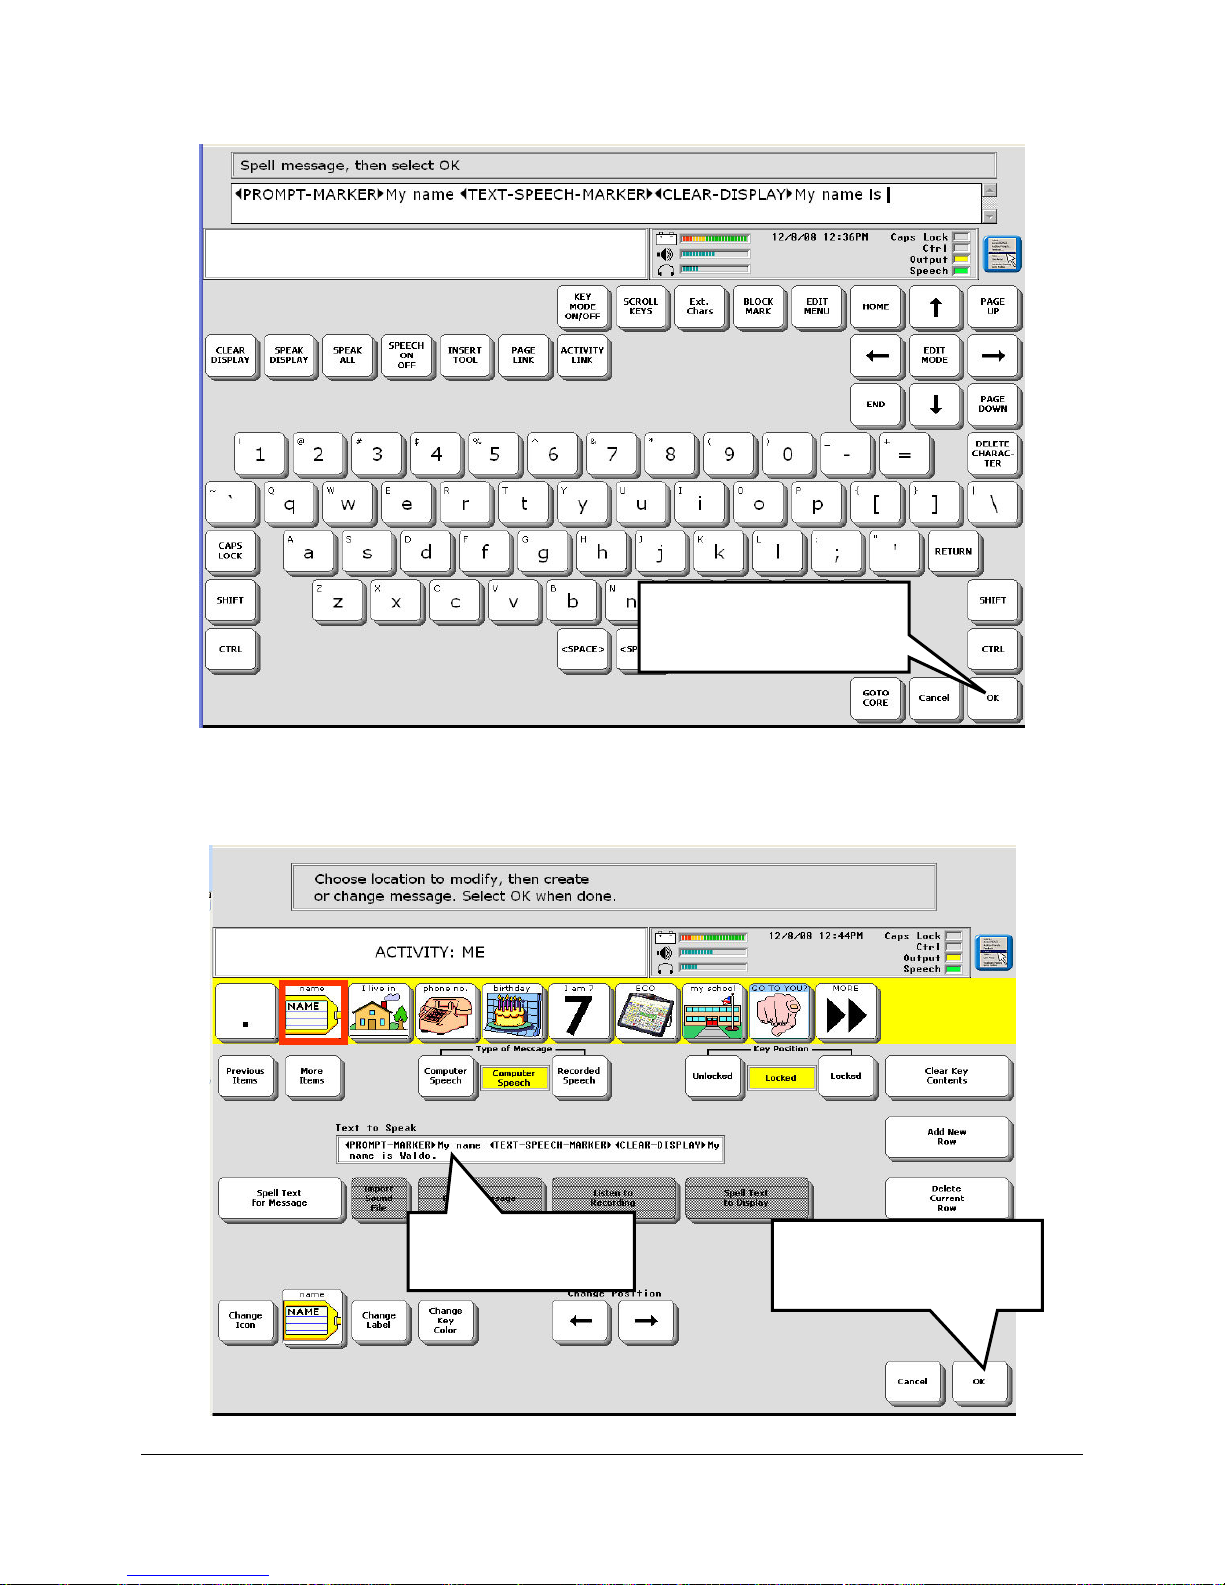
Select OK when you
have finished.
Type in your name where you see the cursor blinking. Select OK in the bottom right corner
when you have finished.
Notice your name
now appears here
USING THE CORE VOCABULARY OVERLAY
ECO Manual
97
Select OK to exit and
return to CORE.
Page 98
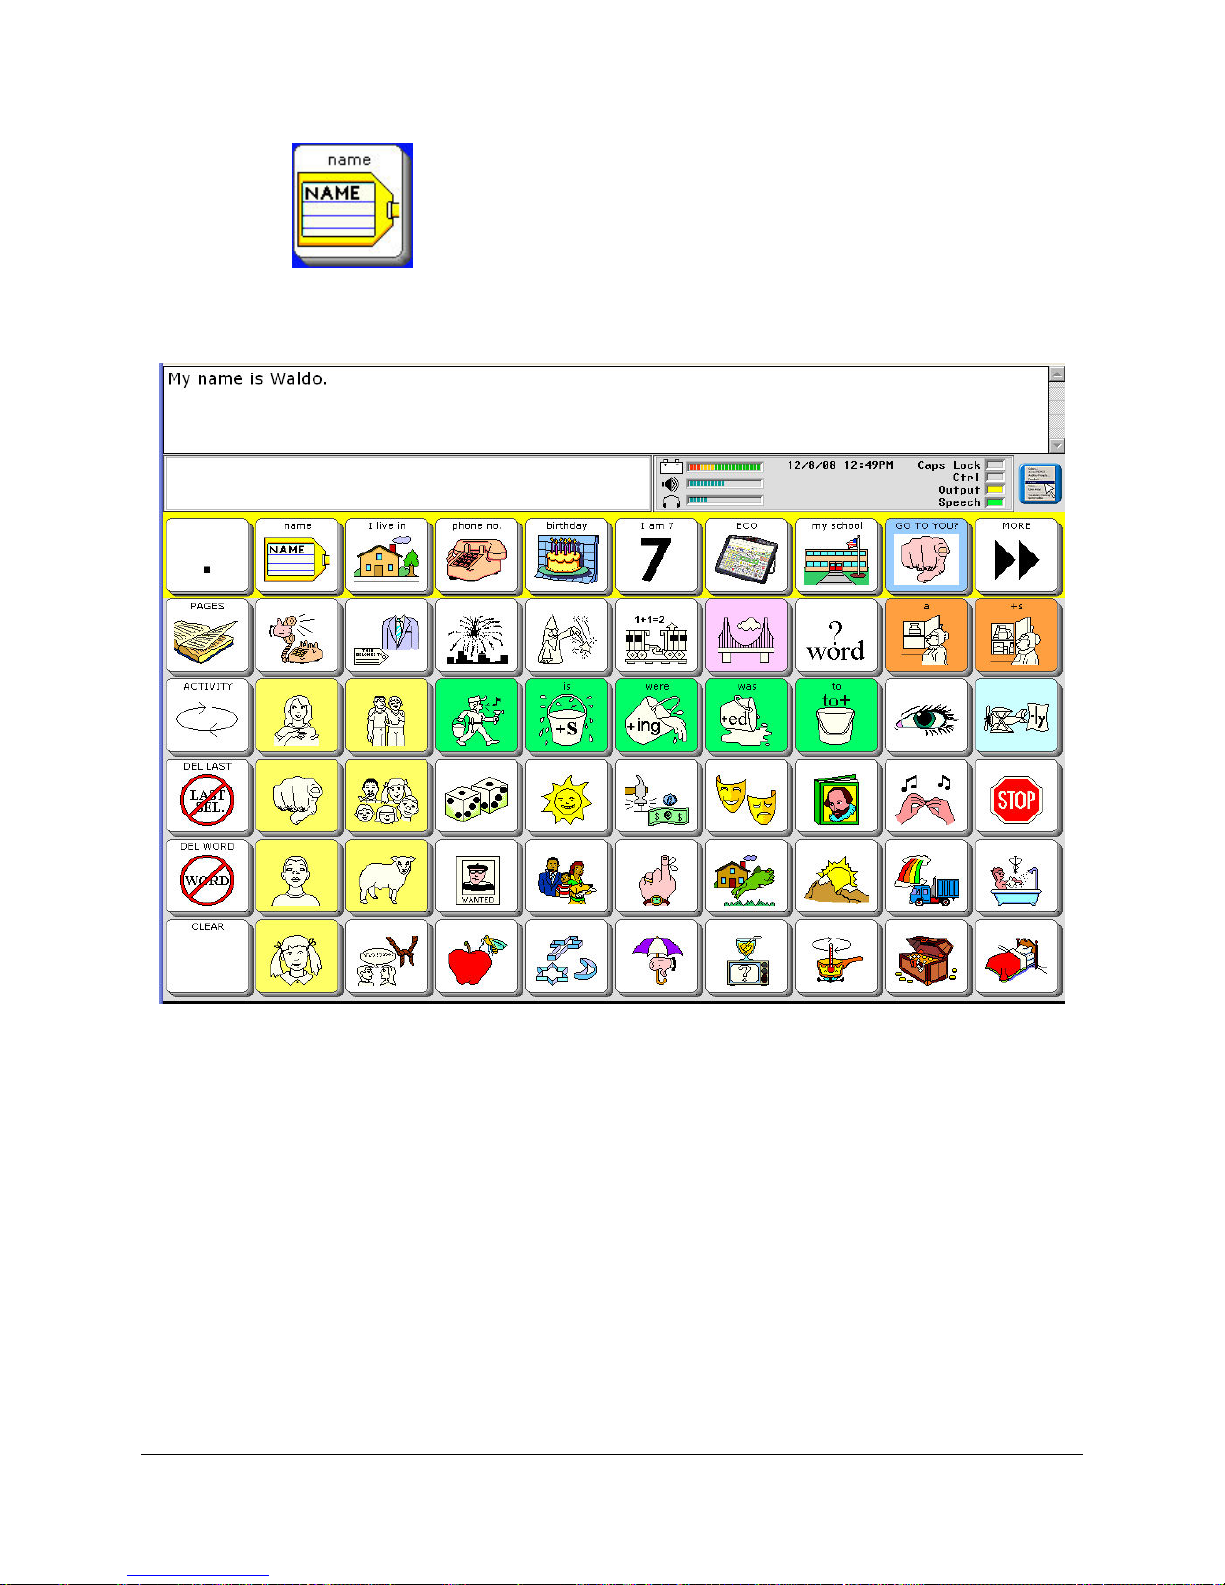
Now select the NAME key in the Activity Row.
You see "My name is Waldo" in your Text Display Area and you hear your device speak, "My
name is Waldo." You have recorded and stored a message.
You can erase the message by reading the instructions on the next page. Or you can go to the
Modify Activity chapter and learn about many other things you can do when you store
messages.
USING THE CORE VOCABULARY OVERLAY
ECO Manual
98
Page 99
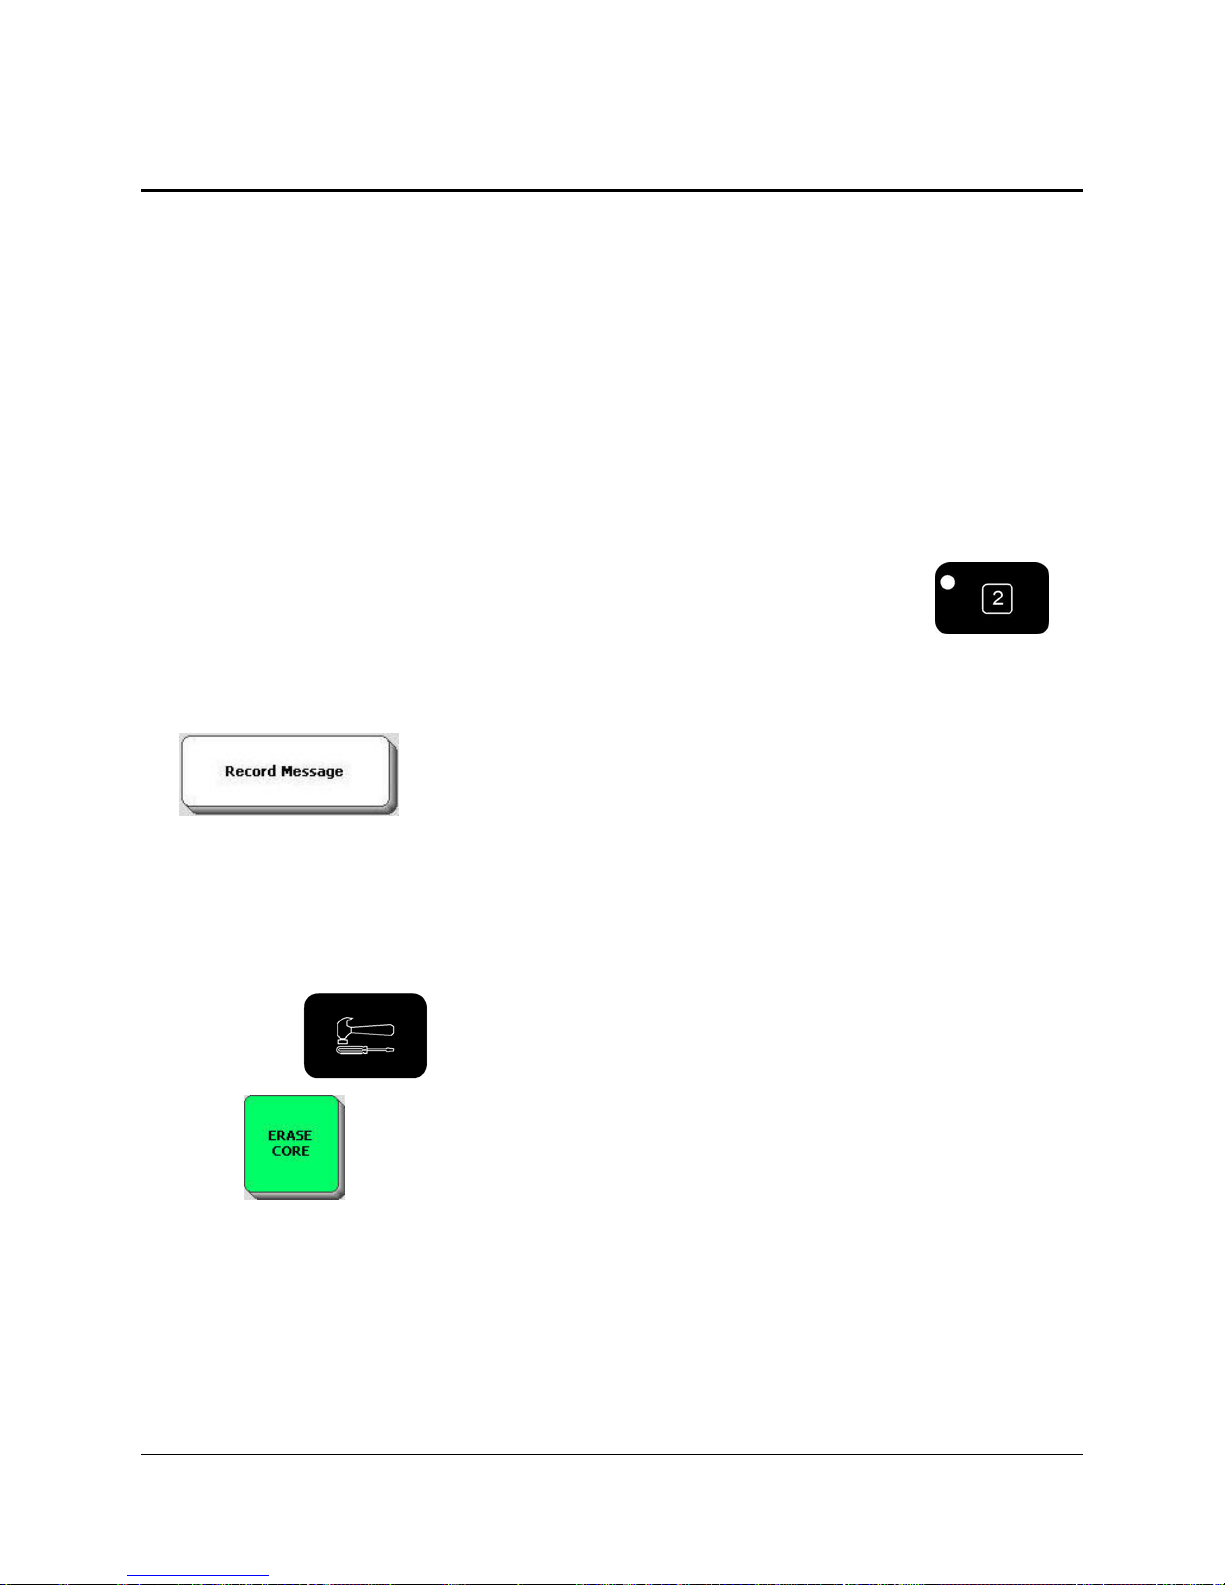
Erase a Recorded Message
You can erase messages that have been recorded in Activities and Pages and you can erase
messages that have been recorded and stored under icon sequences.
To erase a recorded message you simply record over the old message.
To Erase a Recorded Message in an Activity
To erase a message on a PAGE, just select the Page you want in step one.
We will erase the recording you just made in the ME Activity.
1. If the NAME key is still visible in your Activity Row, select the SET-UP key on
the front of your case, then select the NAME key. If it is not visible, select the ME Activity,
then select the SET-UP key then select the NAME key.
2. Make sure the Type of Message option is set to Recorded Speech. Select the
Record Message key.
3. Record a new name. This will erase the old name and replace it with the new name.
3. Listen to your recording and select OK when you are satisfied.
To Erase a Recorded Message stored under an Icon Sequence
1. Activate the
TOOLS key to go to the Toolbox.
2. Select ERASE CORE.
3. Select the icon sequence of the message you want to erase.
4. Select OK. You see the warning box below:
USING THE CORE VOCABULARY OVERLAY
ECO Manual
99
Page 100
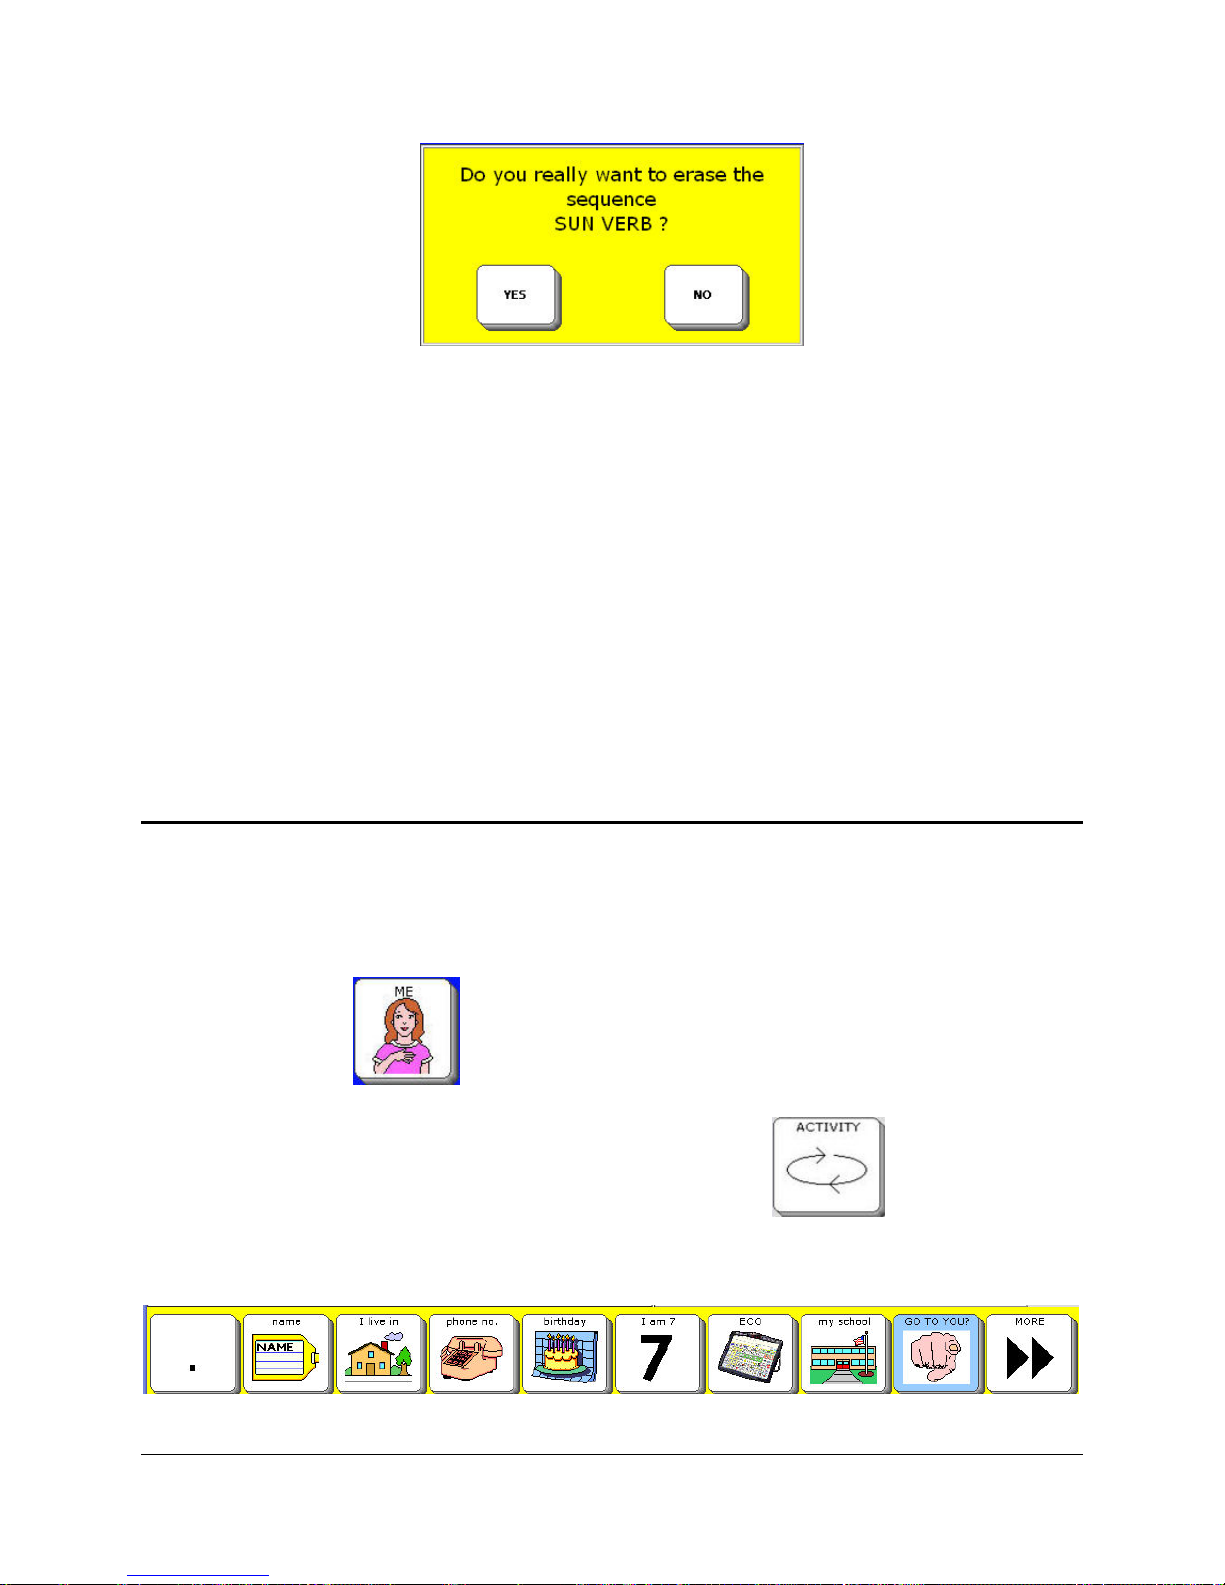
5. If you still want to erase the message, activate YES. If you change your mind, activate NO.
6. The Text Display Area tells you that the sequence has been erased.
You can also erase a message by recording over it. Select STORE CORE in the Toolbox.
Instead of choosing a new icon sequence, select the sequence you want to record over.
You cannot “edit” a recording; you have to either erase it or record over it
Store a Computer Speech Message
To Store a Computer Speech Message
We will add a computer voice message to a blank key in the ME Activity.
1. Select the ME key
from the Activity Row (the top row on your overlay). You see
some of the messages in the ME Activity.
If you do not see the ME key in your Activity Row, select the ACTIVITY key
until you see the ME key.
ME Activity Row
USING THE CORE VOCABULARY OVERLAY
ECO Manual
100
 Loading...