

Page 1
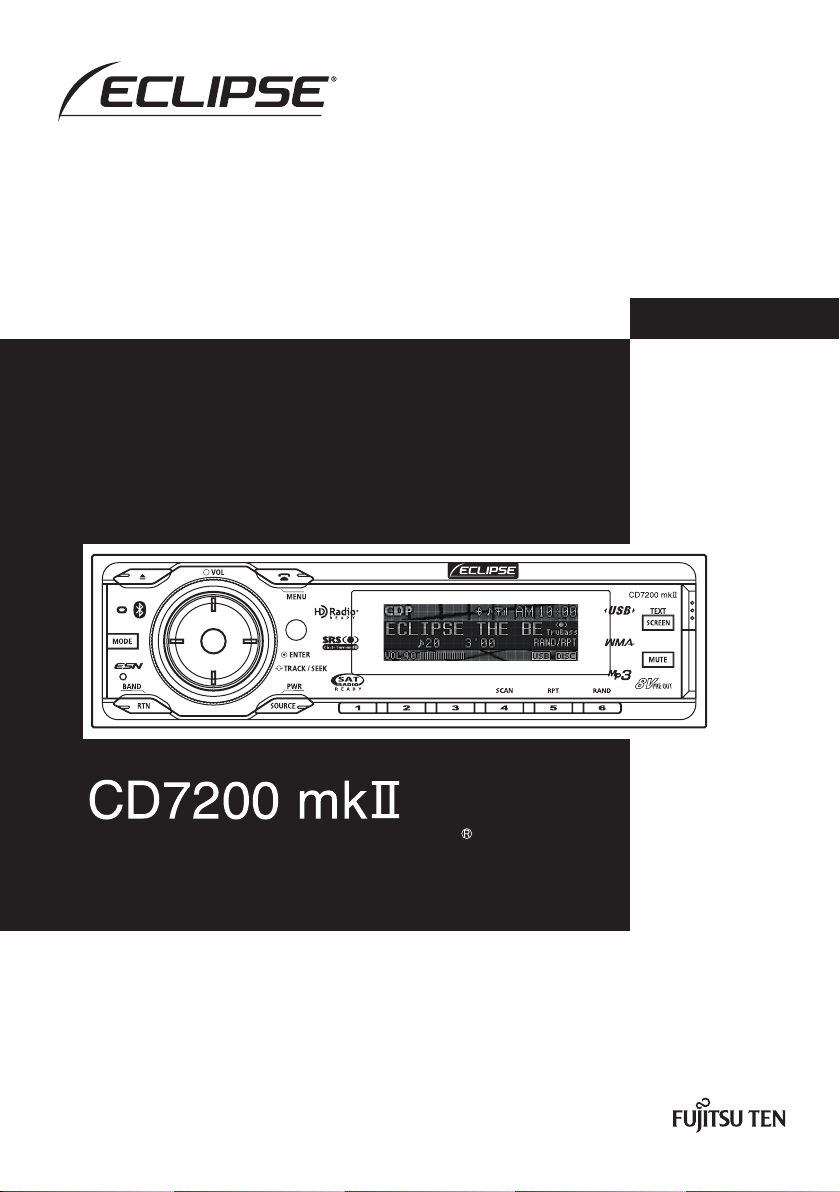
Owner's Manual / Manuel de I'utilisateur / Manual del propietario
CD/USB Multi-Source Tuner with Bluetooth
wireless technology
We appreciate your purchase of this receiver.
Please read through this manual for correct operation.
We suggest that after reading it you keep this manual
in a safe place for future reference.
Nous vous remercions d'avoir acheté ce récepteur.
Veuillez lire ce manuel afin d'utiliser votre appareil correctement.
Nous vous recommandons de conserver ce manuel
dans un endroit sûr afin de pouvoir le consulter ultérieurement.
Tras adquirir este receptor rogamos lea atentamente su
manual para una correcta utilización del equipo.
Igualmente, guarde dicho manual en un lugar adecuado para poder
recurrir a él en caso de futuras consultas.
Page 2
For your safety in using the CD7200 mkII
1
For your safety in using the CD7200 mkII
For your safety in using the CD7200 mkII
Warnings and caution signs, illustrated below, are posted throughout this manual as well as on the
CD7200 mkII. They show safe and correct ways to handle the product so as to prevent personal injury
to you, others and to avoid property damage.
Before reading through the manual, take time to read through and learn the important information listed
in this section.
This "Warning" sign indicates a situation in which incorrect
Warning
Caution
Please read all materials such as manuals and warranties that have come with the product.
Eclipse will not be held liable for unsatisfactory product performance due to failure to follow these
instructions.
WARNING
2
● Do not modify this system for use other than that specified herein. Also, do not deviate
from the installation procedures described herein; Eclipse will not be held liable for
damages including, but not limited to serious injury, death or property damage resulting
from installations that enable unintended operation.
● This main unit requires 12V DC and should only be installed in a vehicle with a 12V negative
ground electrical system. Any other installation may cause a fire or other severe damage to
the main unit and the vehicle.
● Never install this main unit where it will interfere with safe operation of the vehicle. Never
block the drivers' view. Do not install main unit where it may interfere with operation of the
brakes, the steering or any safety equipment, including seat belts and air bags.
● Before drilling holes in a vehicle for installation, you must confirm the locations of pipes,
tanks, electrical wiring, and other vehicle systems and components to ensure that there will
be no interference or contact. In addition, you must also apply rust prevention and leak
prevention measures at the drilling area. Otherwise, fire or electric shock could occur.
● When installing main unit do not remove or alter existing vehicle fasteners, including nuts,
bolts, screws, clips, and fittings. Never detach, move or alter existing vehicle wiring,
including electrical grounds and straps. Alteration of existing vehicle components may
make vehicle unsafe to operate.
● Before installation, remove the negative (-) battery terminal to prevent shocks, electrical
arcing, fires, and damage to vehicle wiring and the main unit you are installing.
● Secure wiring with tape or plastic ties so that wires do not interfere with vehicle operation,
including brake pedal, gear shifter and steering. Position wires so that they will not be
rubbed, abraded, or damaged by moving vehicle components, including power seats.
● To avoid main unit and vehicle damage, including fire, never supply power to the installed
main unit in a way which will overload the capacity of an existing vehicle circuit. Never
leave a power supply wire or connection uninsulated. Always install supplied fuses, circuit
breakers, and relays.
handling or disregard of this sign might result in death or
serious personal injury.
This "Caution" sign indicates a situation in which incorrect
handling or disregard of this sign might result in personal
injury or may result solely in damage to property.
2
Page 3

For your safety in using the CD7200 mkII
1
WARNING
2
● Air bags are vital safety equipment. Never install the main unit in a way which will alter air
bag wiring or interfere with air bag deployment. Air bags must function properly in the
event of an accident.
● When installation is complete, test all vehicle electrical systems for proper operation,
including lights, horn, brake lights, and emergency flashers.
● For your protection, never use a power drill without safety glasses or goggles. Debris or
broken drill bits may cause severe eye injuries, including blindness.
● Use electrical tape to insulate the ends of all wires, even if not used. Proper insulation
prevents arcs, shocks and fires.
● Some equipment or devices require the use of batteries. Never install or place this type of
equipment where young children can get access to batteries. If a battery is swallowed, seek
medical attention immediately.
● When vehicle is moving, never take your eyes off the road to make adjustments to the main
unit. You must pay attention to the road to avoid accidents. Do not let the operation or
adjustment of the main unit distract you from proper vehicle operation.
● The driver should not look at the screen while driving. Accidents may result if you are not
paying attention to the forward direction.
● Do not put foreign objects in the loading slot of disc or USB input terminal. Fires or shocks
may result.
● Do not disassemble or alter this main unit. Accidents, fires or shocks may result.
● Do not let water or foreign objects enter the internal parts of this main unit. Smoke, fires or
shocks may result.
● Pay attention to where the remote control is left. Traffic accidents or problems with driving
may result if the remote control makes its way under the foot pedals etc. when the vehicle
is in motion.
● Do not use when abnormal operation occurs (the screen is not lit or no sound comes out).
Accidents, fires or shocks may result.
● Always replace fuses with fuses of identical capacity and characteristics. Never use a
higher capacity fuse than the original. Using incorrect fuse specifications may cause a fire
or severe damage.
● If foreign objects or water enters the main unit, smoke comes out, or there is a strange
odor, stop using it immediately, and contact your dealer. Accidents, fires, or shocks may
result if you continue to use it in these conditions.
● The driver should not change the CD or USB memory while driving. As accidents may
result if you are not paying attention to the forward direction, first stop the vehicle at a safe
location and then proceed.
● Plastic bags and wrappings may cause suffocation and death. Keep away from babies and
children. Never put bag over your head or mouth.
I
3
Page 4

For your safety in using the CD7200 mkII
1
CAUTION
2
● Wiring and installing this main unit requires expertise and experience. Professional
installation is recommended. Consult with your dealer or a professional installer. Incorrect
wiring may damage the main unit or interfere with safe vehicle operation.
● Use only the accessory parts as specified. Using other parts may cause damage to the main
unit or cause parts to dislodge and/or detach unexpectedly.
● Do not install the main unit in places where it may get dew condensation on (around the air
conditioning hose, etc.), come in contact with water, or in condition of high moisture, dust
or oily smoke. If water, moisture, dust or oily smoke enters this main unit, smoke, fires or
malfunctions may result.
● Avoid installing in places where it cannot be fastened securely or where there are strong
vibrations. Also, if you installed the main unit with double-sided tape, first wipe away dirt
and wax from the installation area. Otherwise, the main unit may come loose due to
vibration while driving, causing problems for driving and resulting in traffic accidents or
injuries.
● Do not install in places with direct sunlight or where it will be hit directly by hot air from the
heater. This may increase the temperature of the interior of this main unit, resulting in fires
and malfunctions.
● Do not obstruct the air flow of the heat sink or vents of this main unit. When the air flow of
the heat sink or vents are obstructed, the interior overheats, and fires may result.
● Connect as specified in the installation manual. If not connected normally, fires or
accidents may result.
● When installing in vehicles equipped with air bags, check the manufacturer's cautions
regarding operation to ensure proper operation of the airbags.
● Install wiring in a manner that will not allow them to be pinched by moving parts, damaged
by screws, or damaged by metal parts. Accidents, fires and shocks may result from
disconnection and electrical shorts.
● Avoid hot surfaces when wiring main unit. High temperatures may damage wiring, causing
shorts, arcing and fires.
● When changing the installation location for this main unit, please consult the dealer where
you bought it for safety reasons. Expertise is necessary for removal and installation.
● Keep volume to a reasonable level so that you can hear sounds from outside the vehicle,
including warning sounds, voices, and sirens. Failure to do so may cause an accident.
● Be careful that hands and fingers are not pinched when closing display. Injuries may result.
● Do not put your hands or fingers into the loading slot of disc or USB input terminal. Injuries
may result.
● Do not touch the heat dissipating part of the amp. Burns may result from the heat of this
part.
● Do not recharge dry batteries. Dry batteries may rupture, resulting in injuries.
● Do not use batteries other than those specified. Also, do not mix old and new batteries.
Injuries or pollution to the surroundings may result from battery ruptures and leakage.
4
Page 5

For your safety in using the CD7200 mkII
1
CAUTION
2
● When inserting batteries into the remote control, be careful with the polarity (positive/
negative), and insert them as indicated. If the battery polarities are incorrect, injuries and
pollution to the surroundings may result from battery ruptures and leakage.
● Replace used batteries as soon as possible; they may leak and damage the remote control.
Battery leakage can burn your skin or your eyes. Wash hands after handling.
● If alkaline solution from alkaline dry batteries makes contact with your skin or clothes,
flush with clean water. If any of the solution gets in your eyes, also flush clean with water
and then seek medical attention.
● Do not short, disassemble or heat the batteries, or place them in fire or water. Fire and
injuries may result from battery rupture and leakage.
● Store the remote control in a place away from direct sunlight, high temperatures, and high
moisture levels. The outer case may change shape, and the batteries may rupture and leak.
● Do not use this main unit except for in-vehicle use. Shocks or injuries may result.
● Be careful of the position of the volume when turning the power source ON. Hearing
damage may result if very loud noise is emitted when the power is turned ON.
● Do not operate under abnormal conditions such as when the sound is broken or distorted.
Fires may result.
● This main unit uses invisible laser light. Do not disassemble or alter this main unit. If
trouble occurs, contact the dealer where you bought the main unit. Altering this main unit
may cause exposure to laser emissions (worsening eyesight), or result in accidents, fires
or shocks.
● If the main unit is dropped or the cosmetics appear broken, turn off the power to the main
unit and contact your dealer. If used in this condition, fires or shocks may result.
I
5
Page 6

For your safety in using the CD7200 mkII
6
Page 7

Table of Contents
For your safety in using the CD7200 mkII ................................ 2
Operating precautions.............................................................. 14
Names of controls and parts ................................................... 16
How to operate the CD/MP3/WMA player ............................... 22
How to operate the USB music file player.............................. 32
The Bluetooth audio function .................................................. 36
How to operate the tuner.......................................................... 42
How to use the remote control ................................................ 46
The Bluetooth hands-free function ......................................... 48
ESN security operating procedure.......................................... 60
How to operate the AUDIO CONTROL .................................... 64
How to operate the Sound Adjustment Mode ........................ 66
Making changes with Display Adjustment Mode................... 80
Making changes with Function Mode ..................................... 84
I
II
III
IV
V
VI
VII
VIII
IX
X
XI
XII
XIII
XIV
How to operate the main unit with an optional CD changer connected
How to operate the tuner with an optional HD Radio tuner connected (U.S.A. only)
How to operate the tuner with an optional XM satellite radio tuner connected (U.S.A./CANADA only)
How to operate the tuner with an optional SIRIUS satellite radio tuner connected (U.S.A./CANADA only)
How to operate the main unit with an optional Interface Adapter for iPod connected
...... 92
..... 94
..... 96
... 100
.... 104
Others ...................................................................................... 108
If you have a question: ........................................................... 110
Specifications.......................................................................... 114
How to contact customer service.......................................... 116
XV
XVI
XVII
XVIII
XIX
XX
XXI
XXII
XXIII
7
Page 8

Table of Contents
For your safety in using the CD7200 mkII............................................ 2
Operating precautions......................................................................... 14
Notes on operation ....................................................................................................... 14
Names of controls and parts............................................................... 16
Turning the power on and off........................................................................................ 18
Switching Audio Modes ................................................................................................ 18
Adjusting volume .......................................................................................................... 18
Switching Rotary Modes............................................................................................... 19
About a shortcut ........................................................................................................... 19
Creating a shortcut................................................................................................. 19
Using a shortcut ..................................................................................................... 20
Switching screen .......................................................................................................... 20
Operation assist function .............................................................................................. 20
Detaching the front panel ............................................................................................. 21
Using the detachable panel.................................................................................... 21
How to remove the detachable panel..................................................................... 21
How to attach the detachable panel....................................................................... 21
How to operate the CD/MP3/WMA player........................................... 22
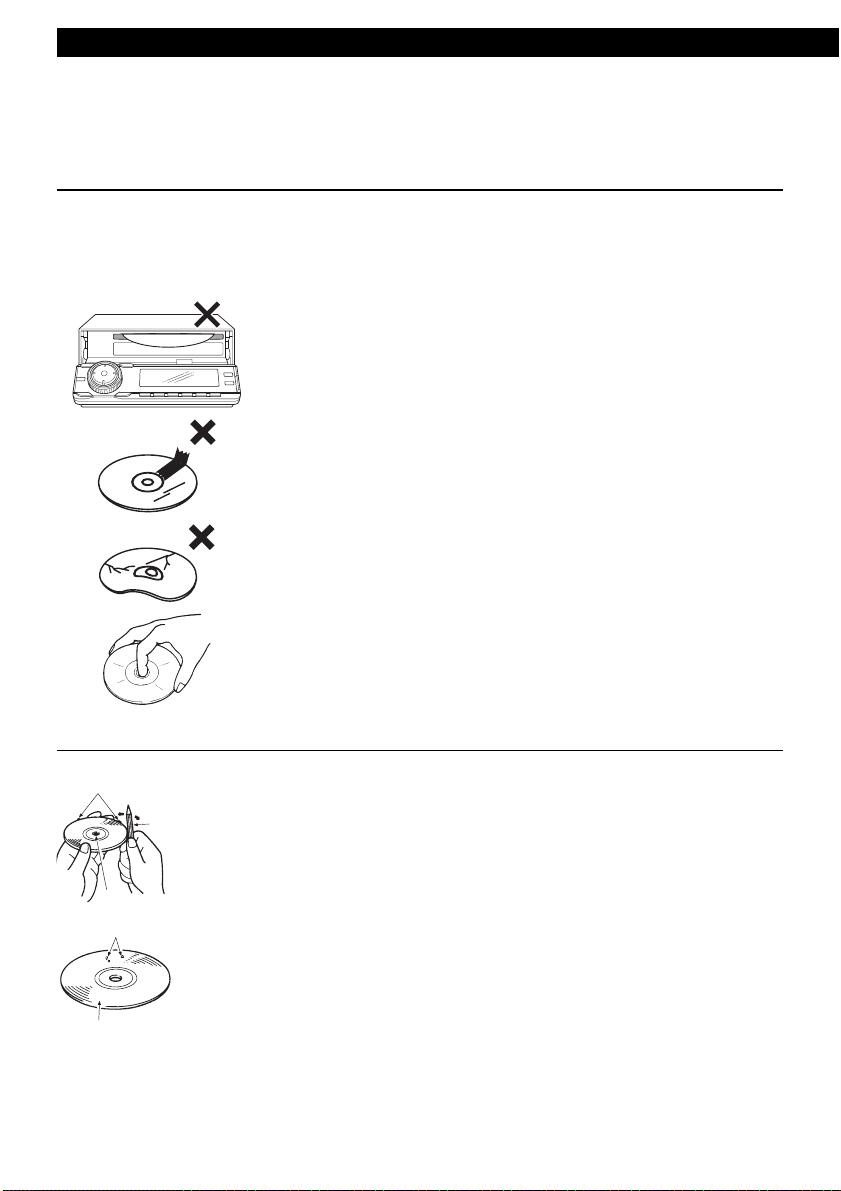
About compact discs .................................................................................................... 22
About brand new CDs ............................................................................................ 22
About CD accessories............................................................................................ 23
About borrowed CDs.............................................................................................. 23
How to remove CDs ............................................................................................... 23
About irregularly-shaped CDs ................................................................................ 23
About cleaning a CD..................................................................................................... 23
About MP3/WMA .......................................................................................................... 24
What is MP3/WMA? ............................................................................................... 24
Playable MP3 file standards................................................................................... 24
Playable WMA file standards ................................................................................. 24
ID3/WMA tag.......................................................................................................... 25
Media ..................................................................................................................... 25
Format of discs....................................................................................................... 25
File names.............................................................................................................. 26
Multi-sessions ........................................................................................................ 26
Playing MP3/WMA ................................................................................................. 26
MP3/WMA playing time display.............................................................................. 26
Display order of MP3/WMA file/folder names ........................................................ 26
Listening to CD ............................................................................................................. 27
TRACK (FILE) UP/DOWN ............................................................................................ 27
FOLDER UP/DOWN..................................................................................................... 28
Returning to the root directory of the CD (MP3/WMA file)............................................ 28
FAST FORWARD/REWIND ......................................................................................... 28
8
Page 9

Table of Contents
SCAN/REPEAT/RANDOM ........................................................................................... 28
FOLDER SCAN/REPEAT/RANDOM............................................................................ 29
DISPLAYING TITLE ..................................................................................................... 29
Ejecting the disc ........................................................................................................... 30
How to operate the USB music file player ......................................... 32
About playable USB memory standards....................................................................... 32
Playable MP3 file standards................................................................................... 32
Playable WMA file standards ................................................................................. 32
Format of USB memory ......................................................................................... 33
How to operate the USB music file player .................................................................... 34
Listening to music files in USB memory ................................................................. 35
Disconnecting USB memory......................................................................................... 35
The Bluetooth audio function ............................................................. 36
About the Bluetooth audio function............................................................................... 36
About the Bluetooth specifications ............................................................................... 36
Supported Bluetooth specifications........................................................................ 36
Supported profile.................................................................................................... 36
What is Bluetooth? ....................................................................................................... 37
Listening to music......................................................................................................... 37
Stopping the music ....................................................................................................... 37
Pausing the music ........................................................................................................ 37
Selecting the music you want to listen to...................................................................... 38
Fast Forward/Rewind ................................................................................................... 38
Bluetooth audio setup................................................................................................... 38
Displaying the BT Audio Set selection mode ......................................................... 38
Switching the Bluetooth audio mode on and off ..................................................... 38
Connecting the main unit and the portable device ................................................. 39
Disconnecting the main unit and the portable device............................................. 39
Displaying device information for the main unit...................................................... 40
How to operate the tuner..................................................................... 42
Listening to the tuner .................................................................................................... 42
Tuning to a station ........................................................................................................ 42
Operations during rotary mode..................................................................................... 42
Automatically storing stations into memory. (The automatic preset mode: ASM) ........ 43
Manually storing stations into memory ......................................................................... 43
Preset station scan ....................................................................................................... 43
Changing the reception sensitivity for automatic scanning........................................... 44
Changing the radio band location................................................................................. 44
How to use the remote control ........................................................... 46
Precautions in use of the remote control ...................................................................... 46
Cleaning the remote control ......................................................................................... 46
Replacing the battery.................................................................................................... 47
9
Page 10

Table of Contents
The Bluetooth hands-free function .................................................... 48
About the Bluetooth hands-free function ...................................................................... 48
About the Bluetooth specifications ............................................................................... 48
Supported Bluetooth specifications........................................................................ 48
Supported profile.................................................................................................... 48
What is Bluetooth? ....................................................................................................... 49
Selecting the Bluetooth hands-free mode .................................................................... 49
Making a call................................................................................................................. 49
Making a call by dialing a phone number ............................................................... 49
Making a call using preset dial ............................................................................... 50
Making a call using the incoming/outgoing call history .......................................... 50
Making a call using the phonebook........................................................................ 51
Making a call from the cell phone........................................................................... 51
Receiving a call ............................................................................................................ 51
Hanging up (refusing a call).......................................................................................... 51
Adjusting the volume .................................................................................................... 51
Adjusting the ring tone volume............................................................................... 51
Adjusting the voice volume .................................................................................... 52
Storing phone numbers in preset dial........................................................................... 52
Setting the Bluetooth hands-free function .................................................................... 52
Displaying the Phone Setting selection mode........................................................ 52
Registering a cell phone......................................................................................... 53
Delete a registered cell phone ............................................................................... 54
Connecting a registered cell phone........................................................................ 54
Disconnecting a cell phone .................................................................................... 55
Registering phone number in the phonebook ........................................................ 55
Setting Auto Answer............................................................................................... 56
Setting the ring tone ............................................................................................... 56
Setting Auto Answer for registered cell phones ..................................................... 56
Displaying device information for the main unit...................................................... 57
Enabling phone numbers to be input directly ......................................................... 57
Deleting data .......................................................................................................... 57
Changing the passcode ......................................................................................... 58
ESN security operating procedure ..................................................... 60
About ESN.................................................................................................................... 60
How to operate the ESN (Key CD) security.................................................................. 60
How to program the Key CD .................................................................................. 60
How to cancel the Key CD ..................................................................................... 60
How to change the Key CD.................................................................................... 61
How to resume normal operation (ESN security lock out) ..................................... 61
What happens if an incorrect CD is inserted? ........................................................ 61
How to turn the security indicator on/off ....................................................................... 62
How to read the Electronic Serial Number ................................................................... 62
How to operate the AUDIO CONTROL ............................................... 64
Switching audio control modes..................................................................................... 64
10
Page 11

Table of Contents
How to operate the Sound Adjustment Mode ................................... 66
About Sound Adjustment Mode.................................................................................... 66
About parametric EQ.............................................................................................. 67
About time alignment ............................................................................................. 68
About crossover ..................................................................................................... 68
About E-iSERV Audio Customize .......................................................................... 70
Switching the sound adjustment mode......................................................................... 71
Circle Surround II (CSII) setting.................................................................................... 71
Parametric equalizer adjustment (PEQ) ....................................................................... 71
Selecting an equalizer mode from memory .................................................................. 73
Measuring/displaying frequency characteristics ........................................................... 73
Displaying measurement results and save to USB memory .................................. 74
Time alignment adjustment (Time Alignment) .............................................................. 74
Crossover adjustment (X-Over).................................................................................... 75
Multi-harmonizer settings (Harmonizer) ....................................................................... 76
Non-fader settings (Non-F Setting)............................................................................... 76
Non-fader phase settings (Phase) ......................................................................... 76
Non-Fader Output settings (Output)....................................................................... 77
Speaker layout settings (SP Layout) ............................................................................ 77
Importing Sound Data (Sound Data) ............................................................................ 77
Reading custom mode Data (Custom Mode) ............................................................... 78
Making changes with Display Adjustment Mode .............................. 80
Switching the Display Adjustment Mode ...................................................................... 80
Switching the brightness (Bright).................................................................................. 80
Changing illumination color .......................................................................................... 80
Changing display type (DISP Type) ............................................................................. 81
Changing Background (Background) ........................................................................... 81
Changing spectrum analyzer (S/A)............................................................................... 81
Importing display data (DISP Data) .............................................................................. 82
Changing the scroll type (Scroll Type).......................................................................... 83
Making changes with Function Mode ................................................ 84
Switching the Function Mode ....................................................................................... 84
Setting a station name/disc title.................................................................................... 84
Deleting a station name/disc title.................................................................................. 85
Setting the guide tone................................................................................................... 85
Setting clock display (Clock ON/OFF) .......................................................................... 85
Setting time (Clock Adjust) ........................................................................................... 86
Switching demonstration screen display (Demo) ......................................................... 86
Setting spectrum analyzer sensitivity (S/A Sensitivity) ................................................. 86
Setting the steering remote function (U.S.A. only) ....................................................... 87
Reading steering remote data (U.S.A. only) .......................................................... 87
11
Page 12

Table of Contents
How to operate the main unit with an optional CD changer
connected ............................................................................................. 92
Listening to a CD .......................................................................................................... 92
Advancing to the next track or returning to the beginning of the track being played .... 92
Operations during rotary mode..................................................................................... 92
Fast Forward/Rewind ................................................................................................... 92
Playing the beginning of tracks (SCAN) ....................................................................... 92
Repeating the same track (REPEAT)........................................................................... 93
Playing tracks in random order (RANDOM) ................................................................. 93
Skipping to the next or previous CD ............................................................................. 93
Specifying a CD to play ................................................................................................ 93
How to operate the tuner with an optional HD Radio tuner
connected (U.S.A. only)....................................................................... 94
About HD Radio............................................................................................................ 94
Switching between displays when receiving HD Radio ................................................ 94
HD Radio reception settings......................................................................................... 94
How to operate the tuner with an optional XM satellite radio
tuner connected (U.S.A./CANADA only) ............................................ 96
About XM satellite radio................................................................................................ 96
Selecting the radio mode.............................................................................................. 96
Selecting a channel ...................................................................................................... 96
Operations during rotary mode .............................................................................. 97
Category selection ................................................................................................. 97
Direct channel selection ............................................................................................... 97
Manually setting channels into memory ....................................................................... 97
Preset channel scan ..................................................................................................... 98
Switching displays when using the XM satellite radio .................................................. 98
Displaying the XM ID .................................................................................................... 98
How to operate the tuner with an optional SIRIUS satellite radio
tuner connected (U.S.A./CANADA only) .......................................... 100
About SIRIUS satellite radio ....................................................................................... 100
Selecting the radio mode............................................................................................ 100
Selecting a channel .................................................................................................... 100
Operations during rotary mode ............................................................................ 100
Category selection ............................................................................................... 101
Direct channel selection ............................................................................................. 101
Manually storing channels into memory ..................................................................... 101
Preset channel scan ................................................................................................... 101
Switching displays when using the SIRIUS satellite radio.......................................... 102
Displaying the SIRIUS ID ........................................................................................... 102
12
Page 13

Table of Contents
How to operate the main unit with an optional Interface Adapter
for iPod connected............................................................................. 104
Listening to iPod music files (If an iPod is not connected) ......................................... 104
Listening to iPod music files (If an iPod is connected) ............................................... 104
Advancing to the next music file or returning to the beginning of the music file
being played ............................................................................................................... 104
Fast forward/rewind .................................................................................................... 104
Searching for a music file ........................................................................................... 105
Repeating the same music file (REPEAT).................................................................. 106
Playing music files in random order (SHUFFLE)........................................................ 106
Displaying text ............................................................................................................ 106
Others.................................................................................................. 108
Connecting a portable audio player to the AUX jack .................................................. 108
Switching the AUX mode on and off .................................................................... 108
Switching the input system................................................................................... 108
Changing auxiliary input sensitivity ...................................................................... 109
If you have a question: ...................................................................... 110
Displayed information (for troubleshooting)................................................................ 110
When you think there is a malfunction........................................................................ 112
Specifications..................................................................................... 114
How to contact customer service..................................................... 116
* For more information on the operation of E-iSERV (Area Shot, display data, steering
remote), refer to the ECLIPSE Website given below and download the operation
manual. (URL:http://www.e-iserv.jp)
13
Page 14
Operating precautions
Operating precautions
Operating precautions
<Your CD7200 mkII will perform well over a long period of time through correct handling and care.>
Notes on operation
• For your safety, play only at volume levels that allow outside sounds to be heard.
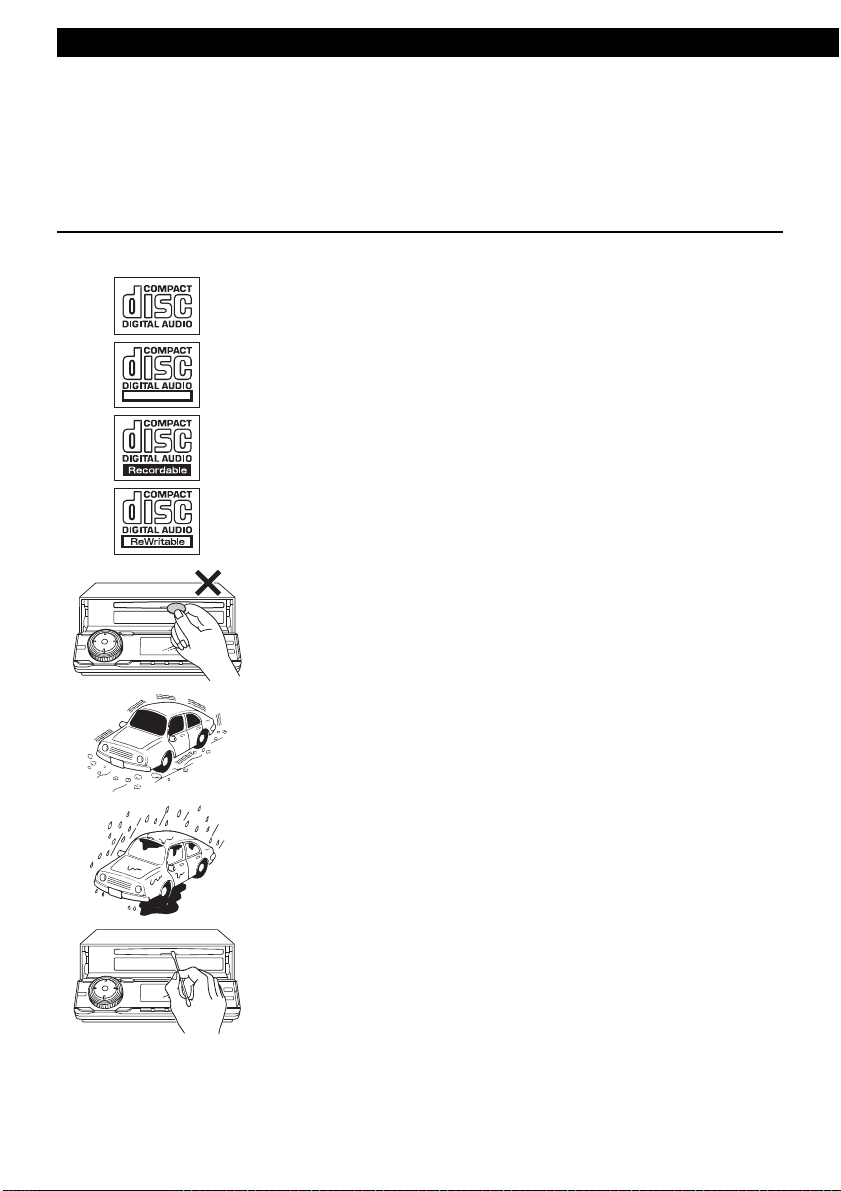
• Discs with the logo shown to the left can be played.
• You can play music CDs (CD-R/CD-RW) on this player. Be sure to
use discs that have been properly processed.
Depending on the editing format and software used, some discs may
not play properly.
TEXT
• Do not insert anything other than a CD into the main unit.
Do not insert any foreign objects, such as coins or credit cards, into
the disc slot.
14
• Avoid severe mechanical shock.
When the player is subjected to severe vibration while traveling over a
rough surface, playback may be intermittent. When a situation like
this occurs, resume playback after returning to a smoother road.
• About dew condensation.
In cold or rainy weather, just as the interior glass surface gets fogged,
dew (water condensation) may also settle on the main unit. When this
occurs, disc playback may become intermittent or impossible.
Dehumidify the air in the vehicle for a while before resuming
playback.
• Cleaning the disc slot.
The disc slot tends to get dusty. Clean it occasionally to prevent
accumulated dust from scratching the discs.
Page 15

15
Page 16
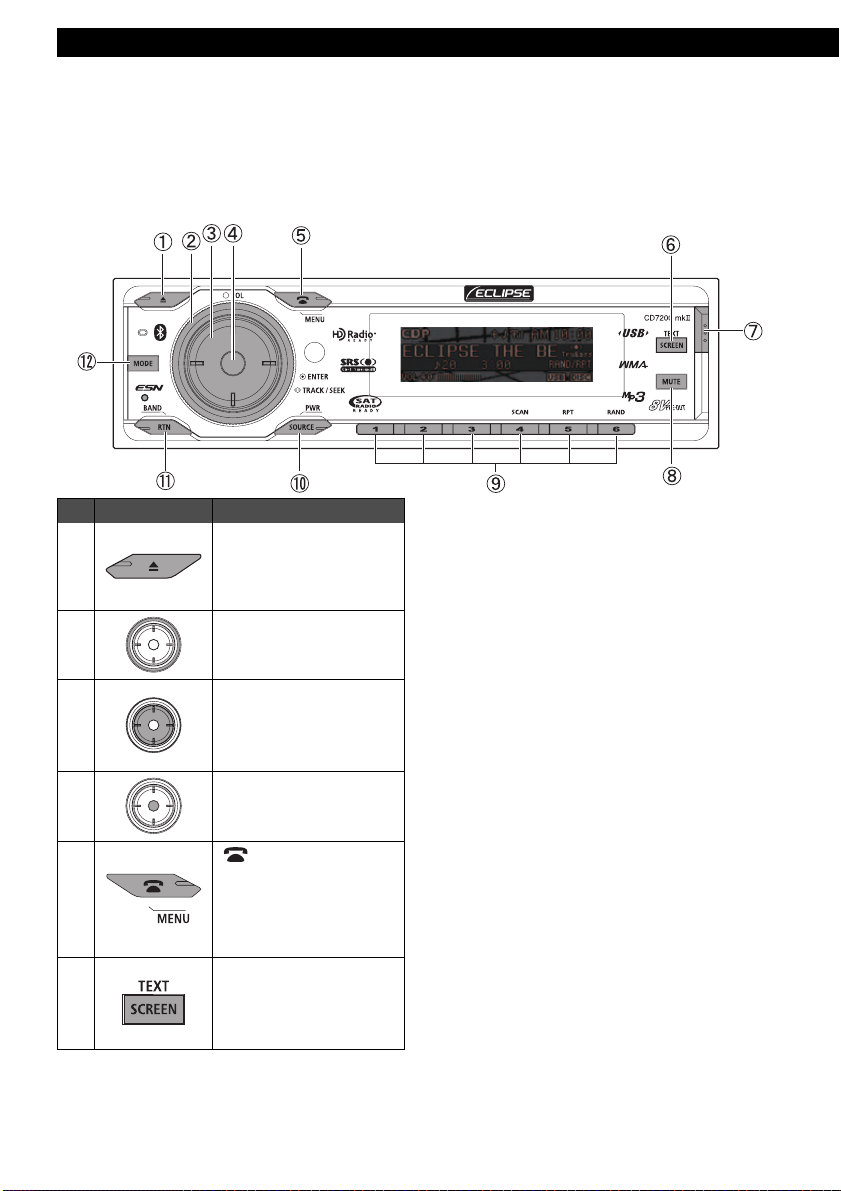
Names of controls and parts
Names of controls and parts
Names of controls and parts
Front view
No. Button Name/Working
[ e (OPEN/EJECT)]
a
b
button
Opens/closes front panel
and ejects CD.
[VOL] button
Adjusts volume.
16
c
d
e
f
[SELECT] button
Selects radio station and
CD tracks.
Selects setting items.
[ENTER] button
Enters selected item.
[ /MENU] button
Switches to the [TEL]
mode.
Switches to the Menu
Selection mode.
[SCREEN/TEXT] button
Switches the screen
pattern.
Switches the title display.
Page 17
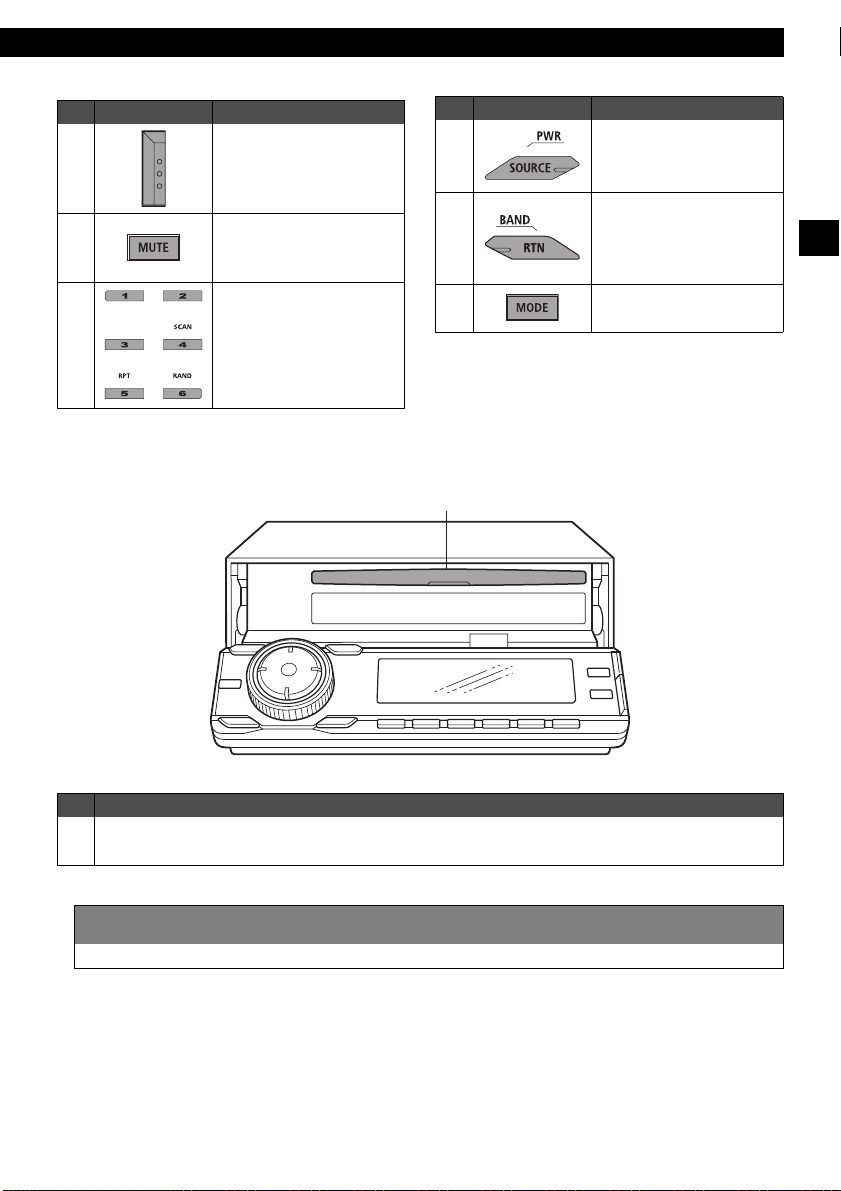
Names of controls and parts
1
No. Button Name/Working
[Release] button
g
h
i
Detach the right end of
the front panel from the
body of the main unit.
[MUTE] button
Activates and
deactivates mute.
Buttons [1] to [6]
Selects radio preset
channels and performs
disc mode functions.
No. Button Name/Working
[SOURCE/PWR] button
j
k
l
m
Switches audio mode.
Turn the power on or off.
[RTN/BAND] button
Returns to previous
screen.
Switches radio band.
[MODE] button
Switches to rotary mode.
III
No. Name/Working
Disc slot
m
Inserts compact discs.
CAUTION
2
Never place an object or rest your hands or the like on the front panel.
17
Page 18
Names of controls and parts
1
Turning the power on and off
When the power is turned on, the state used
when the power was turned off such as CD and
tuner playback is restored.
When the vehicle has no ACC position on the
ignition switch, care is needed when turning off
the main unit. Follow Step 2 or Step 3 when
turning off the power.
Press the [SOURCE/PWR] button
1
while the power is OFF.
The power will come ON.
ATTENTION
When the main unit's power is turned on for
the first time or if the battery terminals have
been disconnected because of a reason such
as vehicle maintenance and the power is then
turned back on, the main unit will start up in
FM1 mode. After this, the broadcast stations
will be searched for automatically and stored in
buttons [1] to [6].
Press the [SOURCE/PWR] button
while the power is ON, for more
2
than one second, until you hear a
beep.
The power will go OFF and the main
unit will be in Standby.
If you press the [SOURCE/PWR]
button again for more than two
seconds, the power will go completely
off.
While the power is ON, press and
hold the [SOURCE/PWR] button
3
until [ACC OFF] is displayed.
The power will go completely OFF.
Switching Audio Modes
Press the [SOURCE] button for
1
less than one second.
Press the button to switch mode in the
following sequence:
FM/AM → SIRIUS*1→ XM*1 →
CD (MP3/WMA)
*3
AUX
→ iPod*1→ BT-Audio*3→ FM/AM →www
*1: Cannot be selected if the corresponding
device is not connected to the main unit.
*2: Not displayed if no disc is inserted.
*3: Cannot be selected if the AUX mode or the
BT-Audio mode is not set to ON. For details,
refer to "Switching the AUX mode on and off"
on page 108 or refer to "Switching the
Bluetooth audio mode on and off" on page 38.
*2
→ CDC*1→ USB*2→
Adjusting volume
Turn the [VOL] button.
1
Turn to the right:
Increases the volume.
Turn to the left:
Decreases the volume.
ATTENTION
Press the [MUTE] button for less than one
second to mute the sound or restore it.
CAUTION
2
Do not adjust the volume or other controls
while driving the vehicle. Do so only while
parked in a safe location.
ATTENTION
If the vehicle does not have an ACC position,
press the [SOURCE/PWR] button until [ACC
OFF] is displayed.
18
Page 19
Names of controls and parts
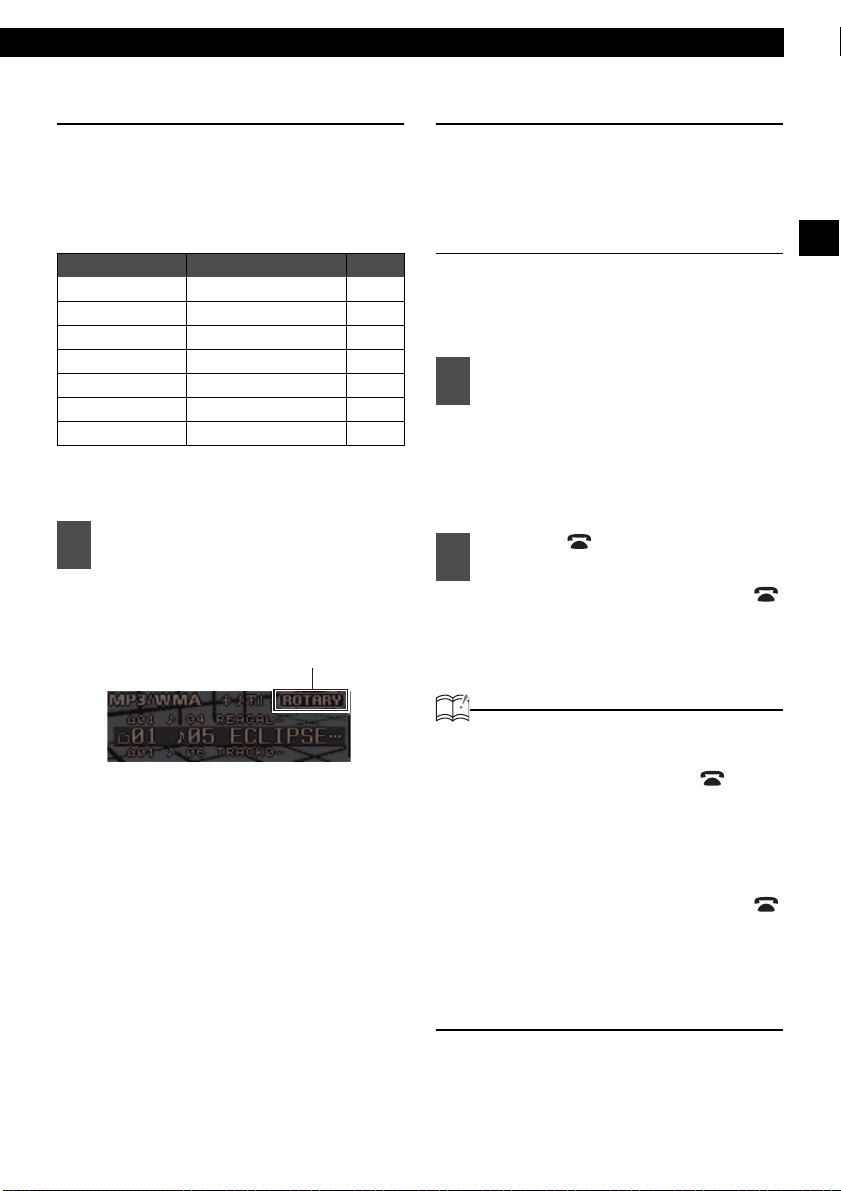
Switching Rotary Modes
The [VOL] button can be switched to other
functions. When the rotary mode is set to ON,
you can switch from the volume adjustment
function to the following functions by pressing the
[VOL] button.
Source Function Page
FM/AM TUNE UP/DOWN 42
XM TRACK UP/DOWN 97
SIRIUS TRACK UP/DOWN 100
CDP/CDC Track search 27
MP3/WMA FILE search 27
USB FILE search 27
iPod Track search 105
For detailed information on the above functions,
see the operation instructions for each related
audio source.
Press the [MODE] button while the
1
main unit is set to any audio mode.
Rotary mode will switch ON. When
rotary mode is set to ON, the rotary
indicator will be displayed as follows.
rotary indicator
About a shortcut
Create a shortcut for frequently-used functions
so that they can be recalled with a single
operation.
Creating a shortcut
A shortcut can be created for one of the
following MENU mode adjustment functions:
sound adjustment mode, display adjustment
mode, or function mode.
Switch to the mode that you want
1
to create a shortcut for.
See the explanation for each adjustment
mode for more information on switching them.
• Sound Adjustment Mode: Page 71
• Display Adjustment Mode: Page 80
• Function Mode: Page 84
Press the [ /MENU] button for
2
more than one second.
A shortcut will be created. If the [ /
MENU] button is held for less than one
second, the previously set adjustment
function will be restored.
III
If the [MODE] button is pressed again,
or if no operations are performed for
more than 10 seconds, the rotary
mode will be cancelled.
ATTENTION
• If you attempt to create a shortcut for a
hierarchy where this is not possible, the
system will beep twice when [ /MENU]
button is pressed for more than one
second.
• Depending on the audio mode and the
system setting, it may not be possible to
operate the shortcut function. In this case,
the system will beep twice when the [ /
MENU] button is pressed.
• Only one shortcut function can be
registered. If a shortcut has already been
registered, its key will be deleted when a
new shortcut is created.
19
Page 20
Names of controls and parts
Using a shortcut
Press the [ /MENU] button for
1
more than one second.
The Menu Selection mode will be
activated.
Press the [SELECT] (Up/Down)
2
button to select SHORTCUT.
Press the [ENTER] button
3
The mode for the shortcut created will
be displayed.
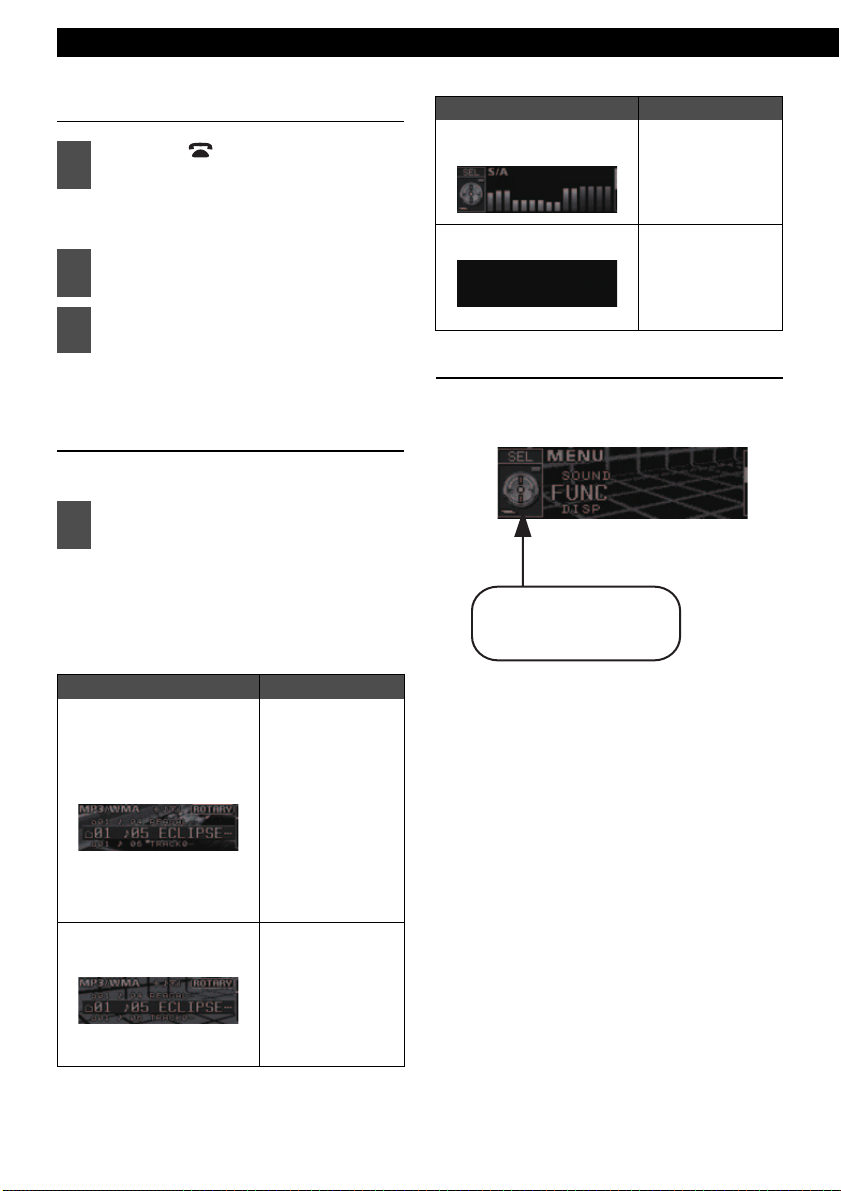
Switching screen
The screen's display pattern can be switched.
Press the [SCREEN/TEXT] for less
1
than one second.
When the button is pressed, the
screen pattern changes display type in
the following order.
Motion picture → Motion picture off → Spectrum
analyzer → Display off → Motion picture → www
Pattern Display
Spectrum analyzer
Display off
Displays the
spectrum analyzer
set in display
adjustment mode
(refer to page 81).
Displays a black
screen.
Operation assist function
In menu mode, the screen displays help to guide
you in carrying out operations.
The function button
selected for adjustment is
displayed.
Pattern Display
Motion picture
Motion picture off
20
Displays a screen
showing the
moving image set
in display
adjustment mode
(refer to page 81)
and information
such as elapsed
CD playing time
and current audio
mode status.
Displays a screen
showing
information such
as elapsed CD
playing time and
current audio
mode status.
Page 21

Detaching the front panel
1
Names of controls and parts
Using the detachable panel
The front panel of the main unit can be
removed.
By removing this panel when you leave the
vehicle, you can prevent the theft of the main
unit.
How to remove the detachable panel
Press the [Release] button.
1
The right end of the front panel
detaches from the body of the main
unit.
Detaching the front panel
2
Hold the front panel and pull it toward
you to remove it.
Put the front panel into the case.
3
Push to open the front panel case and
put the front panel in it.
How to attach the detachable panel
Insert the left end of the front panel
1
into the main unit.
Engage the catch at the left end of the
front panel with the lock on the main
unit itself.
Attach the front panel.
2
Press the right end of the front panel
until it clicks into place.
CAUTION
2
• If you drop the detachable panel or
subject it to impact, it may be damaged
or malfunction.
• Do not attempt to detach or attach the
detachable panel while driving since this
could cause an accident.
• Store the detachable panel in a location
free from humidity, dust, and water.
• Do not leave the detachable panel in
locations that are likely to become hot,
like the dashboard and surroundings.
III
21
Page 22
Operation
How to operate the CD/MP3/WMA player
Operation
About compact discs
• The signal recorded on a compact disc is read by a laser beam, so nothing touches the disc surface.
A scratch on the recorded surface or a badly warped disc may cause deteriorated sound quality
or intermittent playback. Observe the following precautions to ensure high quality sound performance:
• Do not leave an ejected disc in the disc slot for very long; the disc may
warp. Discs should be stored in their cases and kept away from high
temperature and humidity.
• Do not adhere a piece of paper or tape. Do not write on or scratch
either side of a disc.
• Discs spin at a high speed inside the main unit. Keep cracked or
warped discs out of the player to avoid damaging the main unit.
About brand new CDs
Rough Edges
Ballpoint pen
Rough Edges
Flakes
Recorded surface
22
• Avoid touching the recorded surface when handling a disc; handle
discs by their edges.
• You may notice that some brand new discs are rough around the
center hole or outside edge. Remove the rough edges with the side of
a ballpoint pen, etc. Rough edges may prevent proper loading in the
main unit. Flakes from the rough edges may also stick to the recorded
surface and interfere with playback.
Page 23
About CD accessories
How to operate the CD/MP3/WMA player
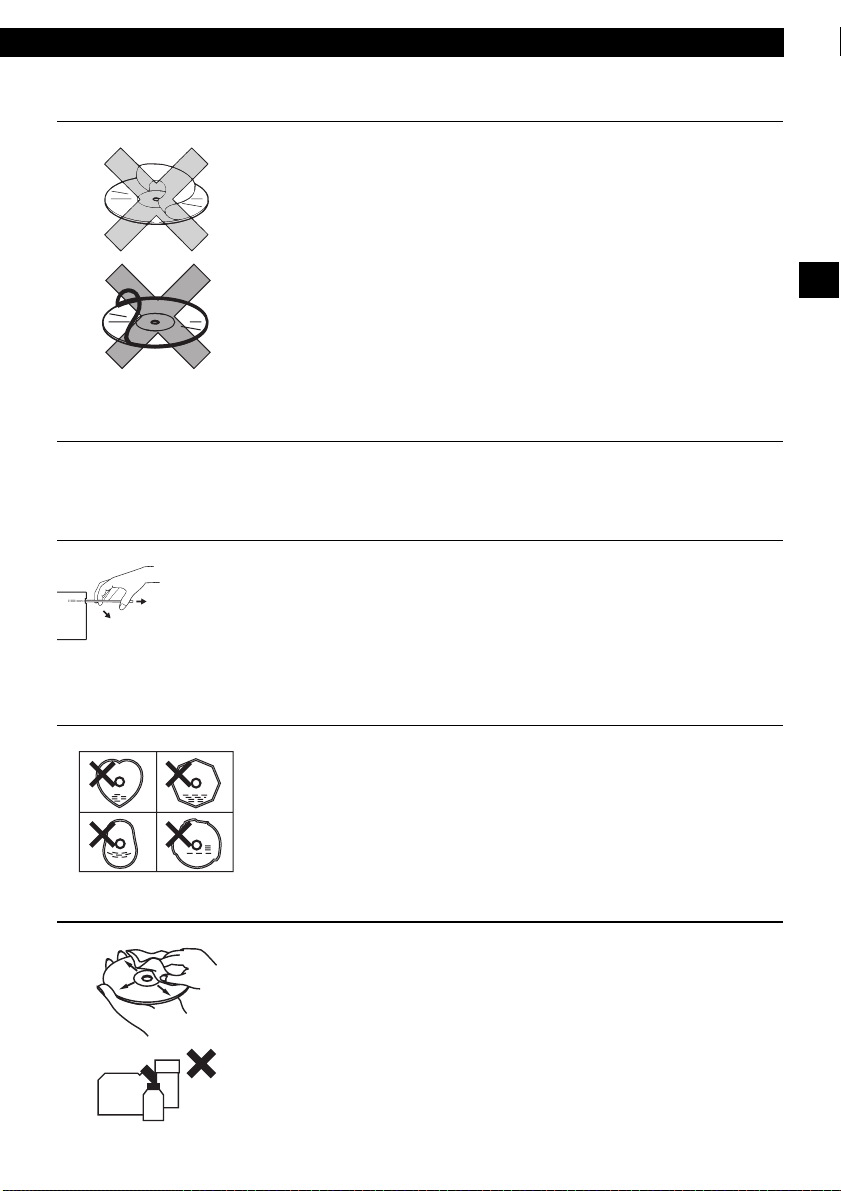
• Do not use accessories (stabilizers, protective seals, laser lens
cleaners, etc.) sold for “improving sound performance” or “protecting
CDs.” The changes in CD thickness or outside dimensions made by
these accessories may cause problems in the player.
• Please be sure NOT to attach any ring-shape protector (or other
accessory) to your discs. Those protectors are commercially available
and said to protect disc and to improve sound quality (and
antivibration effect), but they can do more harm than good in regular
uses. The most common problems are disc insertion, disc ejections,
and won't play problems due to the protector ring that came off in the
disc mechanism.
About borrowed CDs
• Do not use a CD with glue or remnants of adhesive tape or labels. They may cause the CD to get
stuck inside or damage the main unit.
How to remove CDs
• When removing the ejected disc, pull it straight out along the slot.
OKAY
NO GOOD
Removing the disc in a downward or upward angle may scratch the
recorded surface of the disc.
About irregularly-shaped CDs
• Specially-shaped CDs, such as heart-shaped or octagonal CDs,
cannot be played. Do not attempt to play them, even with an adapter
connected, as they may damage the player.
IV
About cleaning a CD
• Use a commercially available compact disc cleaner to clean a CD,
XXXX
XXXX
XXXX
• Do not use benzine, thinner, LP record spray or other cleaners on
wiping gently from the center to the edge.
CDs. They may damage a CD' s finish.
23
Page 24

Operation
About MP3/WMA
ATTENTION
The making of MP3/WMA files by recording from sources such as broadcasts, records, recordings,
videos and live performances without permission from the copyright holder for uses other than
personal enjoyment is prohibited.
What is MP3/WMA?
MP3 (MPEG Audio Layer III) is a standard format for audio compression technology. By using MP3,
a file can be compressed to one-tenth the size of the original.
WMA (Windows Media
compressed to a size smaller than MP3 files.
This main unit has limitations on MP3/WMA file standards and recorded media and formats that can
be used.
Playable MP3 file standards
• Supported standards:
MPEG-1 Audio Layer III
• Supported sampling frequencies:
44.1, 48 (kHz)
• Supported bit rate:
64, 80, 96, 112, 128, 160, 192, 224, 256, 288, 320 (kbps)
* Supports VBR. (64~320 kbps)
* Does not support free format.
• Supported channel modes:
monaural, stereo, joint, dual
TM
Audio) is format for audio compression technology. WMA files can be
Playable WMA file standards
• Supported standards:
WMA Ver.7
WMA Ver.8
WMA Ver.9
• Supported sampling frequencies:
32, 44.1, 48 (kHz)
• Supported bit rate:
48, 64, 80, 96, 128, 160, 192, 256, 320 (kbps)
* Supports VBR (48~192 kbps).
* Does not support lossless compression.
* Does not support WMA files recorded at a frequency of 48 kHz with a bit rate of 96 kbps.
24
Page 25

How to operate the CD/MP3/WMA player
ID3/WMA tag
MP3/WMA files have an “ID3 / WMA Tag” that allows input of information so that data such as song
title and artist can be saved.
This main unit supports ID3v. 1.0, 1.1 and WMA tags.
Media
Media capable of playing MP3/WMA includes CD-R and CD-RW discs. Compared to CD-ROM
media commonly used for music discs, CD-R and CD-RW discs are fragile in high temperature/high
humidity environments and one section of the CD-R and CD-RW may become incapable of
playback. Fingerprints or scratches on the disc may prevent playback or cause skipping during
playback. Sections of a CD-R and CD-RW may deteriorate if left inside a vehicle for long periods of
time. It is also recommended that CD-R and CD-RW discs be kept in a light-blocking case because
the discs are vulnerable to ultra-violet light.
Format of discs
The format of discs to be used must be ISO9660 Level 1 or Level 2.
Control items for this standard are as follows:
• Maximum layers in directory:
8 layers
• Maximum characters for folder names/file names:
32 (including “.” and 3 letter file extension)
• Allowable characters for folder names/file names:
A~Z, 0~9, _ (underscore)
• Number of files possible on a single disc:
999
[Configuration example for CD supporting MP3/WMA]
Root directory (F1)
F2
Folder 2
001.mp3
002.mp3
003.mp3
004.txt
005.mp3
F158
F159
Folder 158
Folder 159
001.mp3
002.mp3
Number of files possible on a single disc is 999.Files aside from MP3/WMA
files (Example: 004.txt) also count as single files.
IV
Folder 255
F255
• Total number of folders possible on a single disc:
255
• Maximum folders this main unit can recognize:
256*
*: A root directory is counted as one folder.
25
Page 26

Operation
1
File names
Only files with the MP3/WMA file extension “.mp3”, “.wma” can be recognized as MP3/WMA and
played. Be sure to save MP3 files with the “.mp3” file extension. Be sure to WMA files with the
“.wma” file extension. The “MP” letters of the file extension will be recognized whether entered as
uppercase letters or lowercase letters.
CAUTION
2
If the “.mp3”, “.wma” file extension is attached to a file other than an MP3/WMA file, that file will be
mistakenly recognized by the main unit as an MP3/WMA file and played, resulting in loud noise
output that can damage the speakers. Be sure to avoid attaching the “.mp3”, “.wma” file extension
to files that are not MP3/WMA files.
Multi-sessions
Multi-sessions are supported, and the playing of CD-R and CD-RW discs with MP3/WMA files
added is possible. However, if files have been written onto a disc using “Track at once”, close the
session or perform the finalization process. Standardize the format so that it does not change with
each session.
Playing MP3/WMA
When a disc with recorded MP3/WMA files is inserted, the main unit first checks all the files on the
disc. No sound is output while the main unit is checking the files on the disc. It is recommended that
the disc be recorded without files other than MP3/WMA files and without unnecessary folders in
order to speed up the checking of disc files by the main unit.
MP3/WMA playing time display
It is possible that playing time will not be correct, depending on the writing condition of the MP3/
WMA file.
* It is possible that playing time will not be correct when VBR Fast Up/Down is operated.
Display order of MP3/WMA file/folder names
Names of MP3/WMA folders and files within the same level are displayed in the following order.
1.MP3/WMA folders displayed first, by ascending order of numbers, letters.
2.Files displayed next, by ascending order of numbers, letters.
26
Page 27
How to operate the CD/MP3/WMA player
1
Listening to CD
Press the [ e (OPEN/EJECT)]
1
button.
The front panel opens.
If a disc has already been loaded, the
disc will be ejected.
Insert a CD into the disc slot, label
2
side up.
The front panel automatically closes
and the CD will immediately start
playing.
ATTENTION
• Playback may be intermittent when there is
a scratch on a CD or when the recorded
side is dirty.
• If a CD has already been loaded, press the
[SOURCE/PWR] button for less than one
second to switch to the CD mode. (For
details, refer to "Switching Audio Modes" on
page 18.)
TRACK (FILE) UP/DOWN
CD, MP3/WMA
Briefly press the [SELECT] (Right/
1
Left) button.
(Right):
Advances to the next track.
(Left):
Returns to the beginning of the
track being played.
CD (Rotary mode)
Turn the [VOL] button.
1
(Right):
Advances to the next track.
(Left):
Returns to the beginning of the
track being played.
IV
CAUTION
2
Do not press the [ e (OPEN/EJECT)]
button while a CD is being loaded. This
could cause injuries or damage to the front
panel.
NOTE
• When music data recorded in the normal
way (CD-DA) is present on the same disc
with MP3/WMA music files, the normally
recorded music data will be played. To
listen to the MP3/WMA music files, press
[MODE] button for more than one second.
• MP3/WMA files which are not supported
cannot be played. In this case, [NO
SUPPORT] is displayed.
• The optional CD changer cannot be used to
play MP3/WMA files.
MP3/WMA (Rotary mode)
Press the [MODE] button for less
than one second to display the file
1
list.
Turn the [VOL] button to select the
2
file.
(Right):
Advances to the next track.
(Left):
Previews previous tracks.
Press the [ENTER] button.
3
27
Page 28
Operation
ATTENTION
For details on how to operate the rotary mode
function, refer to page 19.
FOLDER UP/DOWN
MP3/WMA
Press the [SELECT] (Up/Down)
1
button.
(Up):
Selects the next folder.
(Down):
Selects the previous folder.
Returning to the root directory of the CD (MP3/WMA file)
In the root directory, when a file cannot be
played, the system will return to the first file that
can be played. (In the configuration example, the
file is returning to 001.mp3. Refer to page 25)
FAST FORWARD/REWIND
CD, MP3/WMA
Press and hold the [SELECT]
1
(Right/Left) button.
(Right):
Fast forwards.
(Left):
Rewinds.
SCAN/REPEAT/RANDOM
CD
Press the [4 SCAN] button, the [5
RPT] button or the [6 RAND]
1
button.
:
The main unit will play the first 10
seconds of each track. To cancel,
press button again.
CD, MP3/WMA
Press the [RTN/BAND] button.
1
:
The main unit will move to the root
directory and the first music track
(file) will be played.
ATTENTION
When there is no file to be played in the root
directory, the file in the first folder is played.
28
:
Repeating the same track. To cancel, press button again.
:
Change the order of the tracks,
and play them in random order.
Press the button again to cancel
this operation.
Page 29
How to operate the CD/MP3/WMA player
MP3/WMA
Press the [4 SCAN] button, the [5
RPT] button or the [6 RAND]
1
button.
:
The main unit will play the first 10
seconds of each file located in the
same layer as the folder currently
being played. Press the button
again to cancel this operation.
:
Repeating the same file. To cancel,
press button again.
:
The main unit will randomly play all
files located in the same layer as
the folder currently being played.
Press the button again to cancel
this operation.
ATTENTION
• During random playback, press the [5 RPT]
button to repeat the track (file) being
played. Press the [5 RPT] button again to
cancel repeat play (and return to random
play).
• Occasionally the same track will play two or
more times. This is a normal operation and
is not a sign of a problem.
• [SCAN], [REPEAT], or [RANDOM] will
appear on the display when these functions
are active.
FOLDER SCAN/REPEAT/ RANDOM
MP3/WMA
Press the [4 SCAN] button, the [5
RPT] button or the [6 RAND] button
1
for more than 1 second.
:
The first 10 seconds of the first
song in each folder is played. To
cancel, press button again.
:
The tracks in the same layer as the
folder being played are played
repeatedly. Press the button again
to cancel this operation.
:
The files in all folders are played
randomly. To cancel, press button
again.
DISPLAYING TITLE
(TEXT supported CD's)
Press the [SCREEN/TEXT] button
1
for more than one second.
:
CD text will be scrolled on the display.
IV
29
Page 30
Operation
1
MP3/WMA
Press the [SCREEN/TEXT] button
1
for more than one second.
:
Each time the button is pressed,
the text will be displayed in the following order.
*
Folder Name/File Name
*: A maximum of 14 characters can be
displayed in the display area. The
remaining characters can be
displayed by scrolling. The folder
name is displayed first. The file name
can then be displayed by scrolling.
After the file name has been
displayed, the display will be fixed.
→ Tag
ATTENTION
• CD text cannot be displayed using CD
changers (sold separately).
• If the CD came with a logo shown below, it
is recorded with a disc title and track titles.
These information will be displayed during
playback.
Ejecting the disc
Press the [ e (OPEN/EJECT)]
1
button.
The front panel opens and the disc is
ejected.
ATTENTION
If a loaded CD is not ejected, press the [ e
(OPEN/EJECT)] button for more than five
seconds with the front panel open to eject the
disc.
Remove the disc and press the [ e
2
(OPEN/EJECT)] button.
The front panel closes.
CAUTION
2
• Do not drive with the front panel open.
The panel may cause unexpected
personal injury during a panic stop, or
the like.
• Do not attempt to close the front panel
by hand. Doing so may damage the
panel.
• CD text, Folder name/file name or tag
recorded with characters other than
alphanumeric and symbols cannot be
displayed.
30
Page 31

31
Page 32

Operation
How to operate the USB music file player
Operation
About playable USB memory standards
• Supported File System:
FAT 12/16/32
• Playable Audio Format:
MP3/WMA
• Max.Current:
500mA
• Compatibility:
USB1.1/2.0
• Correspondence:
USB mass storage class
Playable MP3 file standards
• Supported standards:
MPEG-1
MPEG-2
MPEG-2.5
Audio Layer III
• Supported sampling frequencies:
MPEG-1:32, 44.1 (kHz)
MPEG-2:16, 22.05, 24 (kHz)
MPEG-2.5:8, 11.025, 12 (kHz)
• Supported bit rate:
MPEG-1: 32, 40, 48, 56, 64, 80, 96, 112, 128, 160, 192, 224, 256, 288, 320 (kbps)
MPEG-2: 8, 16, 24, 32, 40, 48, 56, 64, 80, 96, 112, 128, 160 (kbps)
MPEG-2.5: 8, 16, 24, 32, 40, 48, 56, 64, 80, 96, 112, 128, 160 (kbps)
* Supports VBR. (8~320 kbps)
* Does not support free format.
• Supported channel modes:
monaural, stereo, joint, dual
Playable WMA file standards
• Supported standards:
WMA Ver. 7
WMA Ver. 8
WMA Ver. 9
• Supported sampling frequencies:
8, 11.025, 12, 22.05, 32, 44.1 (kHz)
• Supported bit rate:
8, 16, 24, 32, 40, 48, 64, 80, 96, 128, 160, 192 (kbps)
* Supports VBR (40~95 kbps)
* Does not play DRM.
32
Page 33

How to operate the USB music file player
• Supported channel modes:
monaural, stereo
Format of USB memory
The USB memory format must be ISO9660 Level 1 or Level 2.
Standards are as follows:
• Maximum directory layers:
8 layers
• Maximum characters for folder names/file names:
128 (including “.” and 3 letter file extension)
• Allowable characters for folder names/file names:
A~Z, 0~9, _ (underscore)
• Number of files possible on a single USB memory:
3000
[Configuration example for USB memory supporting MP3/WMA]
Root directory (F1)
F2
Folder 2
001.mp3
002.mp3
003.mp3
004.txt
005.mp3
F498
F499
Folder 498
Folder 499
001.mp3
002.mp3
Number of files possible on a single USB memory is 3000.
Files aside from MP3/WMA files (Example: 004.txt) also count as
single memories.
V
Folder 999
F999
• Total number of folders possible on a single USB memory:
999
• Maximum folders this main unit can recognize:
1000*
*: A root directory is counted as one folder.
33
Page 34

Operation
How to operate the USB music file player
When a USB memory or a digital audio player with a USB terminal is connected to a USB connector,
music files can be played from the USB memory.
75$EQPPGEVKQPVGTOKPCNHQT75$OGOQT[QT
FKIKVCNCWFKQRNC[GT
34
Page 35

How to operate the USB music file player
1
1
Listening to music files in USB memory
Connect the USB memory to the
1
USB connector.
Switch to the USB mode.
2
For details, refer to "Switching Audio
Modes" on page 18.
Operate the USB music file player.
3
The procedure for playing music is the
same as that are used to play CDs.
For details, refer to "How to operate
the CD/MP3/WMA player" (page 27 -
29).
ATTENTION
If the USB mode is changed to another mode
and then returned to the USB mode, the player
will return to the previous file played.
CAUTION
2
• Do not disconnect the USB memory or turn
the ignition key to ACC OFF position while
accessing the USB memory. Doing so may
corrupt the data.
• Depending on the type connected, the USB
memory may not work in some cases.
• The USB memory does not support multipartition. Also, it does not support USB hub.
• It is highly recommended to back up your
data in case of accidental deletion.
• Install and use the USB device in a place
that provides safe operation of the vehicle.
• The music files under the copyright
protection cannot be played.
• When connecting a digital audio player to
the USB connector, additional USB
adaptors may be required.
Disconnecting USB memory
Disconnect the USB memory
1
parallel to the USB connector.
ATTENTION
Do not remove the USB memory while playing,
reading or writing data.
CAUTION
2
Do not apply excessive force when removing
the USB memory. Doing so may damage the
USB connector and/or the USB memory.
V
35
Page 36

Operation
The Bluetooth audio function
Operation
About the Bluetooth audio function
The use of Bluetooth wireless communication
technology enables a Bluetooth-compatible
portable audio player (hereafter called "a
portable device" ) to be used as a source for the
main unit.
Once the portable device is connected to the
main unit, it is possible to listen to music without
directly operating the portable device.
Because the connection between the portable
device and the main unit is wireless, cable
connection is not needed.
• Before using a Bluetooth-compatible portable
device (including cell phones) with the main
unit, be sure to complete the “Setting the
Bluetooth audio functions”. (See pages 38
and 39 for instructions)
• When the portable device has been
connected to the main unit, the Bluetooth
connection indicators will be displayed.
$NWGVQQVJ
EQPPGEVKQP
KPFKECVQT
$NWGVQQVJCWFKQ
EQPPGEVKQPKPFKECVQT
• If the portable device is used with other
wireless devices, it may have a negative
effect on the communication capabilities of
both.
• The Bluetooth communication connection
may cause the batteries in the portable
device to lose their charge quickly.
About the Bluetooth specifications
The Bluetooth-compatible portable device to be
connected to the main unit must be compatible
with the following specifications. (However,
depending on the models of the portable device,
some of the functions may be limited.)
Supported Bluetooth specifications
Bluetooth Specification Ver.2.0
Supported profile
ATTENTION
• Noise may be experience when using the
Bluetooth cell phone and Bluetooth audio.
• Depending on the version of Bluetooth, some
portable devices may not be able to be
connected to the main unit for
communication.
• Depending on the surrounding environment,
the connection may become unstable, and the
Bluetooth audio function may not be able to
be operated from the main unit.
36
• A2DP (Advanced Audio Distribution Profile)
Version 1.0 :
Profile for transmission of high quality
sound
• AVRCP (Audio/Video Remote Control
Profile) Version 1.0 :
Profile for control of AV equipment by
remote-control
Page 37

The Bluetooth audio function
1
1
What is Bluetooth?
Bluetooth is a form of short-range wireless
communication technology, used to connect cell
phones and personal computers.
This technology enables hands-free calling and
data transmission between Bluetooth-compatible
devices.
Bluetooth is a registered trademark of Bluetooth
SIG, Inc.
WARNING
2
For safety reasons, the driver must not
operate the portable device while driving.
Stop the vehicle in a safe location before
operating the device.
CAUTION
2
• Do not leave the portable device
inside a vehicle. (The temperature
inside a vehicle may increase
dramatically when it is exposed to
extreme heat from the sun.)
• Do not use the portable device in a
location close to the main unit. If they
are too close together, the sound
quality and the connection may be
adversely effected.
Listening to music
ATTENTION
• If the portable device is not connected to
the main unit, its play function is disabled.
• If the portable device does not start playing,
even after you have pressed the [SELECT]
(Up) button, press the Play button on the
portable device.
Stopping the music
Switch to another audio mode.
1
(For details, refer to "Switching Audio
Modes" on page 18.)
ATTENTION
The portable device may continue to play
music even if it is switched to another audio
mode.
Pausing the music
Press button [1].
1
The music being played is paused.
ATTENTION
Press the [SELECT] (Up) button or button [1]
to start playing the music.
VI
Switch to the Bluetooth audio
1
mode.
(For details, refer to "Switching Audio
Modes" on page 18.)
Press the [SELECT] (Up) button.
2
The connected Bluetooth-compatible
portable device starts to play music.
37
Page 38

Operation
Selecting the music you want to listen to
Press the [SELECT] (Right/Left)
1
button.
Right:
Advances to the next track.
Left:
Returns to the beginning of the track
being played.
ATTENTION
Press the [SELECT] (Left) button repeatedly to
return to previous tracks.
Fast Forward/Rewind
Press and hold the [SELECT]
1
(Right/Left) button.
Right:
Fast forwards.
Left:
Rewinds.
ATTENTION
The fast forwarding or rewinding will continue
until the [SELECT] (Right/Left) button is
released.
• Device INFO display:
Displays device information for the main unit.
Displaying the BT Audio Set selection mode
Press the [ /MENU] button for
1
more than one second.
The MENU selection mode is
displayed.
Press the [SELECT] (Up/Down)
2
button to select FUNC.
Press the [ENTER] button.
3
Press the [SELECT] (Up/Down)
4
button to select BT AUDIO Set.
Press the [ENTER] button.
5
The BT Audio Set selection mode is
activated.
Switching the Bluetooth audio mode on and off
The Bluetooth audio function can be selected
while in the audio mode.
Press the [SELECT] (Up/Down)
button while in the BT Audio Set
1
selection mode to select ON or
OFF.
Bluetooth audio setup
A variety of functions available when using the
portable device can be set from the BT Audio Set
mode.
• BT Audio setting:
Bluetooth audio mode on and off.
• Connection setting:
Main unit and portable device connectivity.
• Disconnection setting:
Disconnects the main unit and the portable
device.
38
Press the [ENTER] button.
2
Press the [SELECT] (Up/Down)
3
button to select ON or OFF.
ON:
Enables BT-Audio
OFF:
Disables BT-Audio
Page 39

The Bluetooth audio function
Press the [RTN/BAND] button.
4
The portable device is set as a
Bluetooth audio source.
ATTENTION
• The Bluetooth audio (BT-Audio) function
can only be selected in the audio mode
when the BT Audio Set selection mode is
set to ON.
• The default setting for the Bluetooth audio
mode is OFF (BT-Audio selection is
disabled).
Connecting the main unit and the portable device
Press the [SELECT] (Up/Down)
button while in the BT-Audio Set
1
selection mode to select Connect.
Press the [ENTER] button.
2
The "Waiting" message appears on
the display.
ATTENTION
Press the [RTN/BAND] button to change the
portable device to be connected. The BTAudio Set selection mode is activated again.
When the connection has been
completed, the "COMPLETED"
4
message appears on the display.
The portable device is now connected
to the main unit.
( and appear on the display.)
If the connection has not been
successfully completed, the "FAILED"
message appears on the display.
ATTENTION
• If the portable device is still connected,
disconnect it.
• If the connection has not been successfully
completed, and the "FAILED" message
appears on the display, connect the
portable device again, following the
procedure from the BT Audio Set selection
mode in Step 1.
• The passcode is a password used when
connecting the portable device to the main
unit.
• When the audio of the cell phone is
connected, hands-free can be connected at
the same time for some devices. If you want
to be able to use the hands-free function,
perform the hands-free connection
procedure again.
Disconnecting the main unit and the portable device
VI
Input the passcode using the
3
portable device.
The default setting value of the
passcode is 1234.
ATTENTION
• For details on how to operate the portable
device, read its instruction manual.
• Be sure to perform the connection of the
portable device only while the "Waiting"
message is on the display.
Press the [SELECT] (Up/Down)
button while in the BT Audio Set
1
selection mode to select
Disconnect.
Press the [ENTER] button.
2
The "Disconnect ?" message appears
on the display.
Press the [ENTER] button.
3
39
Page 40

Operation
ATTENTION
If you do not want to cancel the connection,
press the [RTN/BAND] button. The BT Audio
Set selection mode is activated again.
When the disconnection has been
completed, the "COMPLETED"
4
message appears on the display.
The main unit is now disconnected
from the portable device.
( and disappear from the display.
However, will not disappear while
Blutooth hands-free is connected.)
Displaying device information for the main unit
The name of the device (main unit), the
passcode and the BD ADD (device address)
can be displayed.
Press the [SELECT] (Up/Down)
button while in the BT Audio Set
1
selection mode to select Device
INFO.
Press the [ENTER] button.
2
The name of the device and the
passcode are displayed.
ATTENTION
Each time the [SCREEN/TEXT] button is
pressed, the display changes in the following
way.
Device name / passcode ↔ Device name / BD
ADD (device address)
Press the [RTN/BAND] button.
3
The BT Audio Set selection mode is
activated again.
40
Page 41

41
Page 42

Operation
How to operate the tuner
Operation
ATTENTION
• If stations have been stored in memory,
pressing a button from [1] to [6] will enable
you to select a station. (Refer to "Manually
storing stations into memory" on page 43.)
Listening to the tuner
Switch to tuner mode.
1
For details, refer to "Switching Audio
Modes" on page 18.
Tuning to a station
There are both automatic and manual methods
(one of each) for storing stations in memory. The
main unit can store up to 24 stations in memory.
There are 6 stations for AM and 18 stations for
FM (6 each for FM1, FM2 and FM3) (initial
settings).
Press and hold the [SELECT]
(Right/Left) button. The device
3
starts to search for stations
automatically.
Right:
Starts searching toward higher
frequencies.
Left:
Starts searching toward lower
frequencies.
ATTENTION
At times, it may be difficult to maintain
optimum reception because the antenna
attached to your vehicle is constantly in motion
(relative to the broadcast antenna),
encountering continuous variation in the
strength of the radio signals received. Other
factors affecting reception include interference
from natural obstacles, buildings, etc.
When an optional HD Radio tuner unit is
connected, digital broadcasts have reception
priority. (U.S.A. only)
Press the [RTN/BAND] button
briefly (for less than one second)
1
to switch to the desired FM or AM
band.
Radio bands will switch from FM1 →
FM2 → FM3 → AM in order each time
the button is pressed.
Press the [SELECT] (Right/Left)
2
button to tune to a station.
Right:
Tunes to higher frequencies.
Left:
Tunes to lower frequencies.
42
Operations during rotary mode
For the operation method in the Rotary mode,
refer to page 19.
Page 43

How to operate the tuner
1
1
Automatically storing stations into memory. (The automatic preset mode: ASM)
Press the [SELECT] (Up) button for
more than two seconds, until you
1
hear a beep.
The automatic preset mode starts.
“ASM ON” will appear on the display,
and stations are automatically entered
in memory under buttons [1] to [6].
These buttons are called preset
buttons.
ATTENTION
• Pressing the preset buttons ([1] to [6])
allows you to make one-touch station
selections. The frequency of the selected
station is indicated on.
• When a new station is set in memory, the
station previously set in memory will be
deleted.
• If there are fewer than six receivable
stations, the stations set in the remaining
buttons will be retained.
Manually storing stations into memory
Store a station to a preset button.
Press the [SELECT] (Right/Left)
button to tune to the station that
1
you want to store in memory.
Select any button, from [1] to [6],
and press it for more than two
2
seconds.
The selected station is now stored in
a preset button.
Repeat the above procedure to store
additional stations one at a time in
buttons [1] to [6], and store them in
memory.
CAUTION
2
If the vehicle's battery is disconnected (for
repairs to the vehicle or for removing the
main unit), all stations in memory will be
lost. In such a case, store stations in
memory again.
Preset station scan
VII
This function enables reception of all the stations
CAUTION
2
If the vehicle's battery is disconnected (for
repairs to the vehicle or for removing the
main unit), all stations in memory will be
lost. In such a case, store stations in the
memory again.
in the preset buttons for five seconds each.
Press the [SELECT] (Down) button
1
for more than one second.
“P SCAN” will appear on the display,
and stations stored under preset
buttons [1] through [6] will be played
for five seconds each.
When your desired station is
displayed, press the [SELECT]
2
(Down) button again.
The main unit will stay tuned to the
desired station.
43
Page 44

Operation
Changing the reception sensitivity for automatic scanning
The main unit lets you select the reception
sensitivity to be used for automatic scanning of
stations. The two sensitivity modes available for
this main unit are AUTO mode and DX mode.
During automatic scanning, the
reception sensitivity switches
automatically to one of two levels.
Initially the reception sensitivity is
AUTO
Mode
DX Mode
When an optional HD Radio tuner unit is
connected, reception sensitivity is set to the
AUTO Mode. The DX Mode is unavailable.
(U.S.A. only)
set to the low level so that only
stations with strong signals are
received. If no stations could be
received, the reception sensitivity
is increased so that stations with
weaker signals can also be
received.
Because the reception sensitivity
for automatic scanning is set to the
high level from the start, even
stations with weaker signals can
be received. (Signal crossover
may result in some stations being
hard to hear.)
ATTENTION
Changing the radio band location
The location for the radio bands used between
the North American region and the Asia/
Australia/Latin region can be switched. The
default setting is USA (North America).
ATTENTION
When an optional HD Radio tuner unit is
connected, radio band location is set to USA.
Other radio band locations are unavailable.
(U.S.A. only)
Check that the main unit is in
1
standby.
Press and hold button [3] and the
[ /MENU] button simultaneously
2
for more than three seconds.
The radio band switches in the order
shown below each time the buttons
are pressed.
USA → ASIA → AUS → LATIN →
USA www
When the power is turned on, stations
will be searched for automatically, and
stored in buttons [1] to [6].
Check that the main unit is in
1
standby.
Press and hold button [1] and the
[ /MENU] button simultaneously
2
for more than three seconds.
The mode switches between AUTO
mode and DX mode each time the
buttons are pressed.
44
Page 45

45
Page 46

Operation
How to use the remote control
Operation
Precautions in use of the remote control
• Be careful when handling the control, especially because it is small and light. Dropping or striking it
hard may damage it, wear out the battery or cause a malfunction.
• Keep the remote control free of moisture, dust and water. Do not subject it to shock.
• Do not place the remote control unit in places where it could be exposed to high temperatures, such
as on the dashboard or near a heater vent. Allowing the remote control unit to overheat may warp its
case or cause other problems.
• Do not operate the remote control unit while driving because doing so could cause an accident.
• When using the remote control, point it toward the remote control light receptor.
• The light receptor may not operate correctly if it is exposed to bright light such as direct sunlight.
• Remove the batteries from the remote control unit whenever it is not to be used for a long time.
Cleaning the remote control
• Use a dry cloth to keep the remote control clean. If the remote control unit gets extremely dirty, clean
it with a cloth lightly moistened with diluted liquid detergent.
• In no event should alcohol, benzine or thinner be used. These substances will damage the case or
finish.
Remote control
46
(RMC-105)
No. Button Name/Working
[PWR] button
a
b
c
d
e
Turns main unit power ON/
OFF.
[TU] button
Switches to the tuner mode.
[BAND] button
Switches radio band.
[ , ] button
Decreases audio volume
(including hands free mode).
[MUTE] button
Activates and deactivates
mute.
Page 47

How to use the remote control
1
No. Button Name/Working
[ d PRESET CH u ] buttons
[ dDISC u ] buttons
f
g
h
i
j
k
Selects radio preset channels
and performs disc mode
functions.
[MODE] button
Switches audio source mode.
[DISC] button
Switches to DISC mode (CD,
CD changer, USB or iPod).
[AUX] button
Switches to AUX mode.
[ . ] button
Increases audio volume
(including hands free mode)
[ d TUNE•SEEK u ]buttons
[ > TRACK < ] buttons
Selects radio stations and CD
tracks.
Replacing the battery
WARNING
2
To prevent accidents, store batteries out of
the reach of children. If a child has
swallowed one, consult a doctor
immediately.
Use two AAA size batteries.
Insert the two batteries as
indicated into the battery
2
compartment.
Slide the back cover in the
direction indicated by the arrow to
3
close the battery case.
VIII
While pressing the back cover of
the remote control unit, slide it in
1
the direction indicated by the
arrow to remove it.
47
Page 48

Operation
The Bluetooth hands-free function
Operation
About the Bluetooth hands-free function
The use of Bluetooth wireless communication
technology enables a Bluetooth-compatible cell
phone to be able to be used with the main unit.
Once the cell phone is connected to the main
unit, it is possible to make calls without directly
operating the cell phone. Because the
connection between the cell phone and the main
unit is wireless, communication is possible even
when the cell phone is in your bag or pocket.
Cable connection and wiring is not necessary.
• The main unit can be used with Bluetooth-
compatible cell phones.
• Before using a Bluetooth-compatible cell
phone with the main unit, please be sure to
perform the Bluetooth registration and
connection setting procedures. (For details,
refer to "Registering a cell phone" on page 53
and "Connecting a registered cell phone" on
page 54.)
• When the cell phone has been connected to
the main unit, the Bluetooth connection
indicator and the radio wave status/phone
connection status indicator appear on the
displayed as shown below.
$NWGVQQVJ
EQPPGEVKQP
KPFKECVQT
4CFKQYCXGUVCVWURJQPG
EQPPGEVKQPUVCVWU
KPFKECVQT
• Depending on the surrounding environment,
the connection may become unstable, and the
Bluetooth hands-free function may not be
able to be operated from the main unit. In
such cases, confirm that the connection
status is good be referring to the radio wave
status indicator on the display, and then
repeat the procedure.
• Some cell phones may not be compatible with
the main unit.
ATTENTION
Using Bluetooth may cause batteries in
connected devices to drain more quickly.
About the Bluetooth specifications
The Bluetooth-compatible cell phone to be
connected to the main unit must be compatible
with the following specifications. (However,
depending on the model of the cell phone, some
of the functions may be limited.)
Supported Bluetooth specifications
Bluetooth Specification Ver.2.0
Supported profile
• Once the cell phone has been connected to
the main unit, it will remain connected until the
connection is cancelled
• Depending on the version of Bluetooth, some
cell phones may not be able to communicate
with the main unit.
48
• HFP (Hands Free Profile) Version 1.5:
Profile for connection to Bluetoothcompatible hands-free devices
• OPP (Object Push Profile) Version 1.1:
Profile for transmission of address book
and schedule
Page 49

The Bluetooth hands-free function
1
What is Bluetooth?
Bluetooth is a form of short-range wireless
communication technology used to connect cell
phones and personal computers.
This technology enables hands-free calling and
data transmission between Bluetooth-compatible
devices.
ATTENTION
Please check with your cell phone manual for
Bluetooth operation.
Bluetooth is a registered trademark of Bluetooth
SIG, Inc.
WARNING
2
• For safety reasons, the driver must
not operate the cell phone while
driving.
• State and local ordinances must be
strictly followed when using cell
phones.
Selecting the Bluetooth handsfree mode
Press the [ /MENU] button.
1
The Bluetooth hands-free mode is
activated.
ATTENTION
• The Bluetooth hands-free mode can be
activated from any audio mode.
• At any time the [RTN/BAND] button can be
pressed to return to the previous step.
Making a call
This function enables you to dial phone numbers
from the main unit, or to make calls using the
stored phone numbers (phonebook) and
incoming/outgoing call history.
Making a call by dialing a phone number
Calls can be made by dialing phone numbers
from the main unit.
Before dialing a phone number directly from the
main unit, set Dial Setting of the Phone Setting
selection mode to ON. (For details, refer to
"Enabling phone numbers to be input directly" on
page 57.)
Press the [ /MENU] button.
1
Press the [MODE] button
repeatedly until the "Dial Input" is
2
displayed.
Press the [SELECT] (Up/Down)
button, to input numbers between
3
0 and 9.
Up:
Increases the number.
Down:
Decreases the number.
Press the [SELECT] (Right/Left)
4
button to move the cursor.
Right:
The cursor moves to the right.
Left:
The cursor moves to the left.
Repeat the Steps 3 and 4 to input
5
the phone number.
IX
49
Page 50

Operation
ATTENTION
A maximum of 28 digits can be input per
phone number.
If you input an incorrect number, move the
cursor to that number, and input the correct
number by following Step 3.
Press the [ENTER] button when
6
you have input the phone number.
The input number confirmation screen
appears on the display.
Press the [ENTER] button.
7
The input phone number is dialed.
Making a call using preset dial
Calls can be made using the phone numbers
stored to the preset dial buttons.
Press the [ /MENU] button.
1
Press a preset dial button between
2
[1] and [6].
The phone number and name stored
in the selected preset dial button
appear on the display, and the number
is dialed (two beeps will be heard if no
phone number is stored).
Making a call using the incoming/ outgoing call history
Calls can be made using phone numbers stored
in the incoming/outgoing call history of the main
unit.
Press the [MODE] button
repeatedly until the "Incoming
Calls" is displayed. (Incoming call
2
history) message appears on the
display.
The incoming call history appears on
the display.
To make a call from the outgoing call
history, press the [MODE] button
repeatedly until the "Outgoing Calls" is
displayed.
While in the call history selection
mode, turn the [VOL] button to
3
select the number you want to call.
Press the [ENTER] button.
4
The phone number and name stored
in the phonebook appear on the
display to confirm the number to be
dialed.
Press the [ENTER] button.
5
The phone number on the display is
dialed.
ATTENTION
• A maximum of 10 outgoing and 10 incoming
call records can be stored in one cell
phone. If an attempt is made to store more
than 10 call records, the oldest call record
will be deleted.
• If the battery of the vehicle is disconnected,
the call history stored in the main unit will
be deleted.
Press the [ /MENU] button.
1
50
Page 51

The Bluetooth hands-free function
Making a call using the phonebook
Calls can be made using the phone numbers
stored in the phonebook of the main unit.
Press the [ /MENU] button.
1
Press the [MODE] button
repeatedly until the "Phonebook"
2
is displayed.
While in the phonebook selection
mode, turn the [VOL] button to
3
select the number you want to call.
Press the [ENTER] button.
4
The phone number and name stored
in the phonebook appear on the
display to confirm the number to be
dialed.
Press the [ENTER] button.
5
The phone number on the display is
dialed.
Making a call from the cell phone
Calls can be made using a cell phone which is
connected to the main unit.
Make a call using the cell phone.
1
ATTENTION
• If the phone number dialed from the cell
phone has been stored in the phonebook of
the main unit, the name and phone number
will appear on the display.
• Depending on the cell phone, you may have
to use the cell phone to talk even when the
call has been made from the main unit.
Receiving a call
Calls can be received while in any source mode.
There is also an automatic answering function to
answer automatically. For details on answering
calls automatically, refer to "Setting Auto Answer"
on page 56.
When the phone rings, press the
[ENTER] button or the [SELECT]
1
button.
A phone connection is made, and you
can start talking.
Hanging up (refusing a call)
Calls can be terminated or refused.
Press the [ /MENU] button
1
The phone call is terminated.
ATTENTION
Calls which have been refused are also stored
in memory.
Adjusting the volume
The volume of the ring tone and the voice volume
can be adjusted.
For safety reasons, do not adjust the volume of
the ring tone or the voice volume while driving.
Adjusting the ring tone volume
Adjusting the volume of the ring tone while the
phone is ringing.
Turn the [VOL] button to adjust the
1
volume.
To increase the ring tone volume :
Turn the [VOL] button to the right.
To decrease the ring tone volume :
Turn the [VOL] button to the left.
IX
51
Page 52

Operation
Adjusting the voice volume
Adjust the voice volume while the call is in
progress.
Turn the [VOL] button to adjust the
1
volume.
To increase the volume:
Turn the [VOL] button to the right.
To decrease the volume:
Turn the [VOL] button to the left.
Storing phone numbers in preset dial
It may be convenient for you to store phone
numbers that you call regularly in preset dial. A
maximum of 6 phone numbers from the call
history or the phonebook can be stored in one
cell phone’s preset dial.
Displaying the call history or the
1
phonebook.
(See page 50 to display call history).
Select the phone number using the
rotary dial. Press enter to confirm the
phone number to be stored.
Press and hold the preset dial
button between [1] and [6] that you
2
want to store a number in, until you
hear a beep.
The displayed phone number from the
call history or the phonebook is stored
in preset dial.
Setting the Bluetooth hands-free function
A variety of settings that can be used when
operating the cell phone can be made from the
Bluetooth hands-free Phone Setting mode.
• Registration setting:
To register a cell phone.
• Select Phone setting:
To select a registered cell phone, and
connect, disconnect, or delete it.
• Phone Book setting:
To store data from the phonebook of the cell
phone in the phonebook of the main unit.
• Auto Answer setting:
To set the cell phone to Auto Answer.
• Ring tone setting:
To set the ring tone.
• Auto Connect setting:
To connect a registered cell phone.
• Device INFO display setting:
To display device information for the main
unit.
• Dial setting:
To enable a phone number to be input using
the main unit.
• Delete setting:
To delete data from the incoming/outgoing
call history, preset dial, or phonebook of the
main unit.
• Change Code setting:
To change the passcode.
Displaying the Phone Setting selection mode
Press the [ /MENU] button for
1
more than one second.
The MENU selection mode is
displayed.
Press the [SELECT] (Up/Down)
2
button to select FUNC.
Press the [ENTER] button.
3
Press the [SELECT] (Up/Down)
4
button to select Phone Setting.
Press the [ENTER] button.
5
Phone Setting selection mode is
activated.
52
Page 53

The Bluetooth hands-free function
Registering a cell phone
Cell phones can be registered in the main unit.
There are two methods that can be used to
register a cell phone in the main unit.
The cell phone itself can be used or search for
cell phones using the main unit. A maximum of
five cell phones can be registered in the main
unit. Priority of connection will always be in
sequential order from 1 to 5. As cell phones are
added and deleted, the order will always go by
the numbered sequence.
Registering using a cell phone
If a cell phone is currently connected, it must be
disconnected prior to registration of additional
cell phones.
Press the [SELECT] (Up/Down) to
select Registration within the
1
Phone Setting mode.
Press the [ENTER] button.
2
ATTENTION
NO ENTRY will be displayed if available. If not,
a double beep will be heard if the phone
registration memory is not available or full.
• Be sure to perform the registration of the
cell phone only while the "Waiting" message
is on the display.
When the registration has been
completed, the "COMPLETED"
6
message appears on the display.
The cell phone is now registered to the
main unit
( and appear on the display.)
If the registration has not been
successfully completed, the "FAILED"
message appears on the display.
Repeat the registration procedure.
ATTENTION
• To register another cell phone to the main
unit, press the [RTN/BAND] button twice
after Step 6. Perform the registration
procedure from the registered cell phone
selection mode in Step 1.
• You cannot register a cell phone that has
already been registered.
• The hands-free function and the audio
function of the cell phone can be connected
at the same time for some cell phones.
IX
Press the [SELECT] (Up/Down)
3
button to select Allow Connect.
Press the [ENTER] button.
4
The "Waiting" message appears on
the display.
Use the cell phone to input the
5
passcode.
The default passcode is 1234.
ATTENTION
• For details on how to operate the cell
phone, read its instruction manual.
Searching for cell phones to be
registered
Press the [SELECT] (Up/Down) to
select Registration within the
1
Phone Setting mode.
Press the [ENTER] button.
2
ATTENTION
NO ENTRY will be displayed if available. If not,
a double beep will be heard if the phone
registration memory is not available or full.
53
Page 54

Operation
Press the [SELECT] (Up/Down)
3
button to select Device Search.
Press the [ENTER] button.
4
"Searching" will be displayed.
ATTENTION
"FAILED" will be displayed if cell phone cannot
be registered. Repeat Search procedure.
Press the [SELECT] (Up/Down)
button to select the device name of
5
the cell phone you want to register.
ATTENTION
Each time the [SCREEN/TEXT] button is
pressed, the display changes in the following
way, and you can register the cell phone using
the device address (BD ADD) as well.
Device name ↔ Device address (BD ADD)
If the device name cannot be obtained during
the search, "UNKNOWN" is displayed.
Press the [ENTER] button.
6
"Waiting" will be displayed.
Use the cell phone to input the
7
passcode.
The default passcode is 1234.
When the registration has been
completed, "COMPLETED" will be
8
displayed.
The cell phone is now registered.
( and appear on the display.)
"FAILED" will be displayed if
registration is not successful. Repeat
Search procedure.
Delete a registered cell phone
Press the [SELECT] (Up/Down)
button while in the Phone Setting
1
selection mode to select Select
Phone.
Press the [ENTER] button.
2
Press the [SELECT] (Up/Down)
button to select cell phone to be
3
deleted.
Press the [ENTER] button.
4
Press the [SELECT] (Up/Down)
5
button to select Delete.
Press the [ENTER] button.
6
The "Delete ?" message appears on
the display to confirm the cancellation.
Press the [ENTER] button.
7
"COMPLETED" will be displayed
8
when deletion is successful.
ATTENTION
When a cell phone is deleted, all data
associated will also be deleted (including
history, preset dial, and phonebook) from the
main unit.
Connecting a registered cell phone
Press the [SELECT] (Up/Down)
button while in the Phone Setting
1
selection mode to select Select
Phone.
Press the [ENTER] button.
2
54
Page 55

The Bluetooth hands-free function
Press the [SELECT] (Up/Down)
button to select the cell phone to
3
be connected.
Press the [ENTER] button.
4
Press the [SELECT] (Up/Down)
5
button to select Connect.
Press the [ENTER] button.
6
The "Waiting" message appears on
the display.
"COMPLETED" will be displayed.
7
The cell phone is now connected to
the main unit.
( and appear on the display.)
"FAILED" will be displayed if
registration is not successful. Repeat
the connection procedure.
ATTENTION
Cell phones that have not been registered
cannot be connected.
Disconnecting a cell phone
Press the [SELECT] (Up/Down)
5
button to select Disconnect.
Press the [ENTER] button.
6
The "Disconnect ?" message appears
on the display to confirm the
disconnection.
Press the [ENTER] button.
7
"COMPLETED" will be displayed
8
when disconnection is successful.
Registering phone number in the phonebook
Phone numbers can be registered in the
phonebook of the main unit by transferring the
phonebook data from the cell phone.
A maximum of 500 phone numbers can be
registered for each cell phone.
Press the [SELECT] (Up/Down)
button while in the Phone Setting
1
selection mode to select
Phonebook.
Press the [ENTER] button.
2
The "DATA Receiving" message
appears on the display.
IX
Press the [SELECT] (Up/Down)
button while in the Phone Setting
1
selection mode to select Select
Phone.
Press the [ENTER] button.
2
Press the [SELECT] (Up/Down)
button to select the cell phone to
3
be disconnected.
Press the [ENTER] button.
4
Transmit phonebook data using
3
your cell phone.
"COMPLETED" will be displayed
4
when data transfer is successful.
"FAILED" will be displayed if data
transfer is not successful. Repeat the
transmit procedure.
55
Page 56

Operation
ATTENTION
0WODGTQHRJQPGPWODGTUVJCVECP
DGTGIKUVGTGFKPVJGRJQPGDQQM
• If there is no space remaining in the main
unit for phonebook data, the "MEMORY
FULL" message appears on the display
when an attempt is made to transfer data
from the cell phone.
• Some cell phones cannot transfer all of the
phonebook data at once. In this case,
transfer one data at a time.
• If the battery terminal of the vehicle is
disconnected, the phonebook data
registered in the main unit will be deleted.
Setting Auto Answer
When there is an incoming call, the phone can be
set to answer it automatically five seconds after
the phone starts ringing.
Press the [SELECT] (Up/Down)
button while in the Phone Setting
1
selection mode to select Auto
Answer.
Press the [ENTER] button.
2
Press the [SELECT] (Up/Down)
3
button to select ON or OFF.
ON:
Auto Answer is activated
OFF:
Auto Answer is disabled
ATTENTION
The default setting for Auto Answer is OFF
(Auto Answer is disabled).
Setting the ring tone
The ring tone can be set on or off for incoming
calls. Ring tone is set ON by default.
Press the [SELECT] (Up/Down)
button while in the Phone Setting
1
selection mode to select Ring
Tone.
Press the [ENTER] button.
2
Press the [SELECT] (Up/Down)
3
button to select ON or OFF.
Setting Auto Answer for registered cell phones
Cell phones which have been registered to the
main unit will be connected automatically, if the
main unit and the Bluetooth are in an area where
connection is possible.
Auto answer is set ON by default and may not be
available for all cell phones.
Press the [SELECT] (Up/Down)
button while in the Phone Setting
1
selection mode to select Auto
Connect.
Press the [ENTER] button.
2
Press the [SELECT] (Up/Down)
3
button to select ON or OFF.
ON :
Connects automatically.
OFF :
Must be connected manually.
56
Page 57

The Bluetooth hands-free function
Displaying device information for the main unit
The name of the device (ECLIPSE BT), the
passcode (default setting - 1234), and the BD
ADD (device address) can be displayed.
Press the [SELECT] (Up/Down)
button while in the Phone Setting
1
selection mode to select Device
INFO.
Press the [ENTER] button.
2
The name of the device and Passcode
will be displayed. Pressing the
[SCREEN/TEXT] button will toggle
between Passcode and BD ADD.
Enabling phone numbers to be input directly
The default setting is OFF.
Press the [SELECT] (Up/Down)
button while in the Phone Setting
1
selection mode to select Dial
Setting.
Press the [ENTER] button.
2
Deleting data from the phonebook
Press the [SELECT] (Up/Down)
button while in the Phone Setting
1
selection mode to select Delete.
Press the [ENTER] button.
2
Press the [SELECT] (Up/Down)
3
button to select Phonebook.
Press the [ENTER] button.
4
Press the [SELECT] (Up/Down)
button to select ALL, a name, or a
5
phone number.
ALL :
Deletes entire phonebook.
Name or phone number :
Only the selected data is deleted.
Press the [ENTER] button.
6
If ALL is selected "DELETE?" and
"ALL" will be displayed.
If a name or phone number is selected
"DELETE?" and the name or phone
number will be displayed.
IX
Press the [SELECT] (Up/Down)
3
button to select ON or OFF.
Deleting data
Phonebook, Call History, Preset Dial, and All
Data can be deleted.
ATTENTION
If there is no cell phone connected, the data in
the phonebook cannot be deleted.
Press the [ENTER] button.
7
When the data in the phonebook
has been deleted, "COMPLETED"
8
will be displayed.
Deleting call history
Press the [SELECT] (Up/Down)
button while in the Phone Setting
1
selection mode to select Delete.
Press the [ENTER] button.
2
57
Page 58

Operation
Press the [SELECT] (Up/Down)
button to select Outgoing Calls or
3
Incoming Calls.
Outgoing Calls :
Outgoing call history
Incoming Calls :
Incoming call history
Press the [ENTER] button.
4
If Outgoing Calls is selected
"DELETE?" and "Outgoing Calls" will
be displayed.
If Incoming Calls is selected
"DELETE?" and "Incoming Calls" will
be displayed.
Press the [ENTER] button.
5
When the data in the call history
has been deleted, "COMPLETED"
6
will be displayed.
Deleting preset dial
Press the [SELECT] (Up/Down)
button while in the Phone Setting
1
selection mode to select Delete.
Press the [ENTER] button.
2
Press the [SELECT] (Up/Down)
3
button to select Preset Dial.
Press the [ENTER] button.
4
"DELETE?" and "Preset Dial" will be
displayed.
Press the [ENTER] button.
5
When the data in preset dial has
been deleted, "COMPLETED" will
6
be displayed.
Deleting all data
Press the [SELECT] (Up/Down)
button while in the Phone Setting
1
selection mode to select Delete.
Press the [ENTER] button.
2
Press the [SELECT] (Up/Down)
3
button to select ALL.
Press the [ENTER] button.
4
"DELETE?" and "ALL" will be
displayed.
Press the [ENTER] button.
5
When the data has been deleted,
6
"COMPLETED" will be displayed.
Changing the passcode
The passcode for the main unit can be changed.
4 to 8 digits must be used. The default setting is
1234.
Press the [SELECT] (Up/Down)
button while in the Phone Setting
1
selection mode to select Change
Code.
Press the [ENTER] button.
2
Passcode and "0
displayed.
Press the [SELECT] (Up/Down)
button to input numbers between 0
3
and 9.
Up :
Increases the number.
Down :
Decreases the number.
*******
" will be
58
Page 59

Press the [SELECT] (Right/Left)
4
button to move the cursor.
Right :
The cursor moves to the right.
Left :
The cursor moves to the left.
Repeat Steps 3 and 4 to input the
5
passcode to enter the next digit.
Press the [ENTER] button when
6
you have input the passcode.
"NewPasscode?" will be displayed.
Press the [ENTER] button.
7
"COMPLETED" will be displayed.
8
The Bluetooth hands-free function
IX
59
Page 60

Various Settings
ESN security operating procedure
Various Settings
About ESN
The main unit is equipped with ESN (ECLIPSE
Security Network). A music CD (Key CD) which
has been registered in the main unit, is
necessary for ESN. Without it, none of the
functions will operate, even when the battery is
reconnected after it has been disconnected for
maintenance, or the ignition switch is turned to
ACC or ON after it has been turned to OFF. ESN
can be set or cancelled using any of the following
methods:
• Key CD security
You can register a music CD in the main unit as
the “Key CD” to be used to set or cancel the
security settings.
How to operate the ESN (Key CD) security
How to program the Key CD
Insert the Key CD into the disc slot.
4
A “SEC” message appears, then the
Key CD is ejected. The front panel will
close automatically.
ATTENTION
• If there is a problem with the inserted CD,
an “ERR” message will appear for two
seconds and the CD will be ejected.
Reinsert the ejected CD.
• If the “ERR” message appears on the
display twice in a row, the “CHANGE”
message will be displayed for two seconds.
In this case, try another CD.
• Copy Protected CD and MP3/WMA CDROM cannot be programmed for Key CD
security.
• The Security indicator will flash whenever
the vehicle's ignition is switched off.
Check that the power of the main
1
unit is in standby.
While pressing button [6], press
the [SCREEN] button, and hold
2
both for more than one second.
The “SEC” message appears on the
display and changes to the “DISC”
message after two seconds.
ATTENTION
• If a CD has already been inserted, a “SEC”
message appears, and then the front panel
opens and the CD is ejected.
• If a security is activated, programming the
Key CD is not available.
Press the [ e (OPEN/EJECT)]
3
button.
The front panel opens.
60
How to cancel the Key CD
Check that the power of the main
1
unit is in standby.
While pressing button [6], press
the [SCREEN] button, and hold
2
both for more than one second.
The “SEC” message appears on the
display and changes to the “DISC”
message after two seconds.
Press the [ e (OPEN/EJECT)]
3
button.
The front panel opens.
ATTENTION
If a CD has already been inserted, a “SEC”
message appears, and then the front panel
opens and the CD is ejected.
Page 61

ESN security operating procedure
Insert the Key CD into the disc slot.
4
"CANCEL" will be displayed and the
CD will be ejected. ESN is now
deactivated.
ATTENTION
If a CD other than the Key CD is inserted, the
registration cannot be cancelled. In this case,
the “ERR” message is displayed for two
seconds, and the CD playback mode is
activated.
Press the [ e (OPEN/EJECT)]
5
button.
The front panel closes.
How to change the Key CD
First, cancel the existing Key CD.
1
Refer to "How to cancel the Key CD".
Next, program a new Key CD.
2
Refer to "How to program the Key
CD".
How to resume normal operation (ESN security lock out)
If power is disconnected while ESN security is
active (a Key CD was programmed),
operation is disabled until power is restored
and the main unit unlocked. Follow this
procedure to resume normal operation.
When the power is turned on after
the battery power has been
disconnected, the “SEC” message
is displayed for two seconds. The
1
message then changes to the
“DISC” message. Press the [e
(OPEN/EJECT)] button.
Insert the Key CD into the disc slot.
2
"OK" will be displayed for two seconds
and the CD will begin playing.
ATTENTION
• If the incorrect CD is inserted, an “ERR_”
(“ERR” and error number) message will
appear for two seconds, after which the CD
will be ejected.
• If “ERR5” (the 5th time an error has
occurred) appears on the display, the
[HELP] message will appear, and the CD
will be ejected. If the “HELP” message
appears, perform the ESN security lock out
operation by following the procedure in
"What happens if an incorrect CD is
inserted?" on page 61.
• You must be use the same CD used for Key
CD programming; a duplicate CD may not
work properly.
What happens if an incorrect CD is inserted?
After the 5th incorrect attempt, the
“HELP” message will be displayed
1
for five seconds.
"HELP" will be displayed for 5
seconds. Then the serial number will
be displayed.
Press the [e (OPEN/EJECT)]
button
2
to close the front panel.
While pressing button [6], press
the [SCREEN/TEXT] button, and
3
hold both for five seconds.
"SEC" will be displayed for two
seconds. Then the six digit rolling code
will be displayed.
X
61
Page 62

Various Settings
Press the [SCREEN/TEXT] button.
4
“DISC” flashes on the display.
You will have five more attempts to
insert correct disc.
Insert the Key CD into the disc slot.
5
"OK" will be displayed for two seconds
and then the CD will be ejected.
ATTENTION
• If an incorrect CD is inserted, an “ERR_”
(“ERR” and error number) message will
appear for two seconds, after which the CD
will be ejected.
• This process cancels the protection for ESN
main unit.
NOTE
If after 5 tries the correct Key CD is not
inserted, the display reads "CALL".
Contact Eclipse for assistance.
It is easy to forget the name of your
Key CD. Make a note of the album
name to remind yourself. (Refer to
page 118.)
How to turn the security indicator on/off
Once ESN security is activated, the indicator
flashes whenever the vehicle's ignition switch is
turned off, warning potential thieves that the main
unit is protected. However, if do not want this
visible deterrent, it may be turned off.
With the main unit in standby, and
while pressing button [2], press
1
the [SCREEN] button, and hold
both for more than one second.
The “IND. FLASH” message or the
“IND.-----” message appears on the
2
display.
“IND. FLASH” means the security
indicator will flash when the vehicle's
ignition switch is off, and “IND.-----”
means it will not. Repeat the above
steps to reactivate the flash mode.
How to read the Electronic Serial Number
Check that the power of the main
1
unit is in standby.
While pressing button [4], press
the [SCREEN/TEXT] button, and
2
hold both for more than one
second.
After “ESN” appears on the display, an
8 digit number will appear. This
number is the Electronic Serial
Number (ESN) of the device. You may
use this number to identify your
Eclipse CD7200 mkII in the event of
theft recovery.
62
Page 63

63
Page 64

Various Settings
How to operate the AUDIO CONTROL
Various Settings
Switching audio control modes
Various audio control modes may be fine-tuned using this procedure. Refer to Speaker Layout Settings
for more information.
Press the [ENTER] button for less than one second to select the item to be
1
adjusted.
Modes will switch in the order shown below each time the button is pressed.
3-Way Speaker Layout:
BASS → MID → TREB → LOUDNESS → SVC*1→ VOL→ BASS www
4 Speaker + Sub-Woofer Layout:
BALANCE*2→ FADER*2→ NON-F*3→ LOUDNESS*2→ SVC*1→ VOL→ BALANCE*2www
*1: Setting cannot be made in FM mode.
*2: Cannot be set when the CSII is set to ON.
*3: NON-F (non-fader) Output is not affected by the settings of the BASS, MID and
TREB.
Mode Function
BASS Adjusts bass level. Decrease level. Increase level.
MID
(MIDDLE)
TREB
(TREBLE)
SVC
(Source Volume
Control)
FADER
BALANCE
NON-F
(NON-FADER
LEVEL)
LOUDNESS
Adjusts middle level. Decrease level. Increase level.
Adjusts treble level. Decrease level. Increase level.
Adjusts different volume levels for each audio
mode.
Adjusts the audio balance of the front and rear
speakers
Adjusts the audio balance of the right and left
speakers
Adjusts non-fader level (for subwoofer).
The loudness control may be turned on to
emphasize low and high frequencies at low
volume levels.
Loudness boosts bass and treble at low volumes.
Decrease level. Increase level.
Emphasizes rear
speakers.
Emphasizes the left
speakers.
Decrease the subwoofer level.
Select OFF Select ON
Rotary Mode
Left Right
Emphasizes front
speakers.
Emphasizes the
right speakers.
Increase the subwoofer level.
64
Page 65

How to operate the AUDIO CONTROL
SVC Setting examples:
The volume for the default FM mode (default value: 40) is used as a reference for storing the
differences in volume that have been set for each audio mode.
Audio mode FM AM CD USB BT-Audio
Default value
(Volume level)
SVC setting
(Volume level)
When volume level in FM mode is
adjusted from 40 to 45
When volume level in CD mode is
adjusted from 35 to 60
When volume level in AM mode
is adjusted from 80 to 20
When volume level in USB mode
is adjusted from 10 to 35
*: The volume levels can only be set from 0 (min) to 80 (max). The volume difference can be set within a
range of -10 to +20.
Reference
(40)
Reference
(40)
45 55
45
→ 70 60 → 80* 60 50 → 75 40 → 65
→ 52060 → 0* 75 → 10 65 → 0
70
5
→ 30 20 → 45 0 → 20 35 0 → 25
0
(40)
SVC setting
value
+15 (55)
0
(40)
SVC setting
value
-10 (30)
0
(40)
SVC setting
value
+5 (45)
→ 60 30 → 35 45 → 50 35 → 40
SVC setting
0 (40)
value
-5 (35)
XI
65
Page 66

Various Settings
How to operate the Sound Adjustment Mode
Various Settings
About Sound Adjustment Mode
The system has several features that allow you to adjust the acoustic characteristics inside the cabin.
Item Function Page
Sound Data
(E-iSERV Audio
Customize)
CSII
(Circle surround II)
PEQ
(Parametric EQ)
Time Align
(Time Alignment)
X-Over
(Cross over)
Harmonizer
(Multi-harmonizer)
Non-F setting
(Non-fader setting)
SP Layout
(Speaker layout)
Download sound adjustment data from E-iSERV (website) that matches the
vehicle’s interior and store in the main unit.
SRS Circle Surround II delivers a unique surround sound experience
equivalent to 5.1 channels over only four speaker system:
Circle Surround decoder simulates 5.1 channels from any stereo format (L/R
or Lt/Rt including surround sound information), SRS TruBass that makes us
feel the lost fundamental bass sound through psychoacoustic response of the
brain that occurs when two adjacent harmonics are carefully selected and
amplified, and SRS FOCUS that elevates the sound image vertically resulting
from a patented digital sound processing technology based on the HRTF
(Head Related Transfer Function) theory.
is a trademark of SRS Labs, Inc.
Circle Surround II technology is a registered trademark of SRS Labs, Inc.
When a 3-way speaker layout is selected, a 5-band parametric equalizer
adjustment can be performed for each of the Hi and Mid ranges, as well as a
1-band adjustment for the low range.
When a 4-way speaker layout is selected, a 7-band parametric equalizer
adjustment can be performed.
The delay time and level for the sound from each speaker can be adjusted in
order to correct any phase mismatches in the sound resulting from the
listening position.
Specified frequency bands are allocated to each speaker for improved sound
integration.
When original sounds are converted to a MP3/WMA, ATRAC3 format,
frequency ranges that are not normally audible to the human ear are
compressed. The harmonizer can be used to play back these compressed
sounds at as close to their original from as possible so that clear and powerful
sound can be enjoyed.
The sub-woofer settings can be performed. 76
The speaker layout can be configured as a 3-way or 4-speaker system. 77
71
75
70
71
74
76
66
Page 67

How to operate the Sound Adjustment Mode
About parametric EQ
A variety of materials are used inside a vehicle to manufacture the seats and windows, and because
these materials absorb and reflect sound in different ways, the parametric equalizer lets you adjust
the peaks and dips of the frequency characteristics inside the vehicle to compensate for this.
High
[Sound pressure]
Low
Low
[Frequency]
An “equalizer” is a function that corrects these peaks and dips in order to flatten the frequency
characteristics. However with a normal graphic equalizer, the median frequency and the Q
(sharpness and band width) are fixed, so that when neighboring bands are corrected, there is a limit
to the amount by which distortion in the peak and dip characteristics can be corrected. A “parametric
equalizer” lets you adjust the median frequency, Q (sharpness and band width) and gain to variable
levels, so that you can make fine adjustments to spot areas of the frequency band.
[Parametric equalizer characteristics]
1.Median frequency can be varied.
High
[Sound pressure]
Peak
Dip
High
Low
2.Gain can be varied.
High
[Sound pressure]
Low
3.Q (sharpness/band width) can be varied.
High
[Sound pressure]
Low
Low
Low
Low
[Frequency]
[Frequency]
[Frequency]
High
High
High
XII
67
Page 68

Various Settings
About time alignment
With vehicle audio systems, the installation position of the speakers and the position of the listener
mean that the distances from the listener to the left and right speakers are almost always different.
These differences in the distance from the listener to each speaker in turn means that the time taken
for the sound to reach the listener is different for each speaker. The result of this is that the phases
of each speaker (biases) become mismatched and the sound becomes unnatural, as though the
sound stage is not wide enough. The “time alignment” function corrects the time taken for the sound
waves to reach the listener in order to set the optimum phase for the listening position so that the
sound becomes more expansive as though it is being listened to on a sound stage.
The basic adjustment method involves measuring the actual distances to each speaker and
calculating the differences in distance relative to the most distant speaker in order to derive the
delay time for the sound from each speaker.
About crossover
The frequency band that is stored by audio media such as CDs is a fairly wide range from 20 Hz to
20 kHz, and it is difficult for a single speaker to be able to play back all frequencies in such a wide
range.
Because of this, several speakers can be used, with different frequency bands (such as treble,
medium and bass) allotted to each speaker so that wide frequency ranges can be played back. The
“Crossover” function is used to allot the frequency ranges that are to be played back by each
speaker in accordance to the installed speaker units and the layout of the speakers, in order to
obtain the maximum level of performance from the speakers and to provide the most stable
frequency characteristics.
The crossover function includes a high-pass filter (HPF) for playing back treble sounds, and a lowpass filter (LPF) for playing back bass sounds. In addition, the HPF and LPF are used in
combination in order to play back sounds in the mid range.
-3dB -3dB
Bass range Medium range Treble range
20Hz
fc1(LPF) fc2(HPF)
fc3(LPF) fc4(HPF)
*fc:Cutoff frequency
20kHz
68
Page 69

How to operate the Sound Adjustment Mode
For example, when adjusting the HPF, frequencies that are lower than the specified frequency are
progressively dampened, rather than simply not being played back at all. The “slope” adjustment
function is the function that is used to adjust these dampening characteristics.
The slope characteristics of a filter are such that with larger slope values (for example 12 dB/oct),
the slope becomes steeper, and so the amount of sound mixing in with neighboring bands becomes
less so that only the target band is played back. However, it also causes the merging of sound
between speakers to become poorer and can result in greater distortion.
• The crossover function is a filter that allocates the specified frequency bands.
• A high-pass filter (HPF) is a filter that cuts out frequencies that are lower than the specified
frequency (bass range) and allows higher frequencies (treble range) to pass through.
• A low-pass filter (LPF) is a filter that cuts out frequencies that are higher than the specified
frequency (treble range) and allows lower frequencies (bass range) to pass through.
• The slope is the signal level at which frequencies that are one octave higher or one octave lower
are dampened.
When the 4-speaker layout is selected, it corresponds to basic speaker systems which comprise
front speakers, rear speakers and an added sub-woofer if necessary. In such cases, the crossover
can be used to apply the HPF to the front and rear speakers and the LPF to the sub-woofer so that
the sound from all speakers merges properly.
When the 3 way layout is selected, the adjustments can be made to suit speaker system where the
front speaker, rear speaker and non-fader output can be switched between Hi, Mid or Low output
and the speakers can be combined according to each range (treble range: tweeter, medium range:
Mid, bass range: woofer) to provide 3-way playback. In this case, the crossover function can be
used to adjust the playback ranges so that the HPF is applied to the treble-range speakers, the HPF
and LPF is applied to the medium-range speakers, and the LPF is applied to the bass range
speakers so that the sound from all speakers merges properly.
XII
Bass range
(woofers)
20Hz 20kHz
fc(LPF/HPF)
63-200Hz
Medium range (Front and rear speakers)
69
Page 70

Various Settings
About E-iSERV Audio Customize
The parametric equalizer, time alignment and crossover setting can be adjusted directly using the
main unit settings, or through the ECLIPSE website. The following sound quality adjustments can be
performed through the ECLIPSE website (E-iSERV):
• Automatic parametric equalizer
This can be used to automatically correct distortion in frequency characteristics (peaks and dips)
based on the results of measuring the frequency characteristics inside the vehicle.
• Time alignment and crossover adjustment
How to operate the sound adjustment mode or other adjustments besides adjustment of this main
unit can be carried out using the ECLIPSE website.
• Custom mode
Using the custom mode, E-iSERV Audio Customize allows you to make adjustments even more
precise than those available with the main unit alone.
Use the following procedure to make sound quality adjustments through the ECLIPSE website (EiSERV):
Speaker setting
• Crossover (Refer to page 75)
• Time alignment (Refer to page 74)
• Speaker layout (Refer to page 77)
↓
Frequency characteristics measurement/Saving sound data
After measuring frequency characteristics, sound data (frequency
characteristics measurement result, crossover and time alignment adjustment
values) will be written on the USB memory automatically.
( Refer to "Measuring/displaying frequency characteristics" on page 73.)
↓
E-iSERV (website) accessing
Access the following URL: http://www.e-iserv.jp
↓
Login
↓
Sound quality adjusting
Follow the instructions given on the website.
↓
Correction data downloading
Follow the instructions given on the website.
↓
Correction data reading
(Refer to "Importing Sound Data (Sound Data)" on page 77.)
70
Page 71

How to operate the Sound Adjustment Mode
Switching the sound adjustment mode
Press the [ /MENU] button for
1
more than one second.
The Menu selection mode is activated.
Press the [SELECT] (Up/Down)
2
button to select SOUND.
Press the [ENTER] button.
3
The sound selection mode is
activated.
Press the [SELECT] (Up/Down)
4
button to select a setting item.
Each time the button is pressed, the
setting item changes.
The following setting items can be
switched based on the speaker layout
settings (refer to page 77):
When 4–speaker layout is selected:
CS II ↔ PEQ ↔ Time Align ↔
X-Over ↔ Harmonizer ↔ NF Setting ↔
Sound Data ↔ SP Layout ↔ Custom
Mode ↔ CSIIwww
When 3 way speaker layout is
selected:
PEQ ↔ Time Align ↔ X-Over ↔
Harmonizer ↔ NF Setting ↔ Sound
Data ↔ SP Layout ↔ Custom Mode ↔
PEQ ↔ www
Press the [ENTER] button.
5
The adjustment mode is switched.
Circle Surround II (CSII) setting
CSII and TruBass (ON/OFF) settings can be
performed.
Press the [SELECT] (Up/Down)
1
button to select CSII.
Press the [ENTER] button.
2
The CSII setting mode is activated.
Press [SELECT] (Up/Down) button.
3
Press the [SELECT] (Up/Down) button
to set CSII modes as follows:
LOW ↔ Hi ↔ OFF ↔ LOW www
Press the [SELECT] (Right/Left)
4
button.
When CSII is HI or LOW, TruBass can
be set to ON or OFF.
Right:
Sets TruBass ON.
Left:
Sets TruBass OFF.
The TruBass display appears shaded
when TruBass is set to OFF.
The selected settings will take effect.
Parametric equalizer adjustment (PEQ)
When the 4-speaker layout is selected, 7-band
parametric equalizers can be adjusted.
When the 3 way speaker layout is selected, 11band parametric equalizers can be adjusted for
the Hi range, Mid range and Low range.
(For details on speaker layout setting, refer to
"Speaker layout settings (SP Layout)" on page
77.)
Each band can be set to the following median
frequencies:
XII
71
Page 72

Various Settings
When the 4-speaker layout is selected
Band Adjustable frequency (Hz)
1 63, 80, 100
2 125, 160, 200
3 250, 315, 400, 500
4 630, 800, 1 k, 1.25 k
5 1.6 k, 2 k, 2.5 k, 3.15 k
6 4 k, 5 k, 6.3 k, 8 k
7 10 k, 12.5 k, 16 k
When the 3 way speaker layout is selected
Channel Band Adjustable frequency (Hz)
Hi 1
Hi 2
200, 250, 315, 400, 500,
630, 800, 1 k, 1.25 k, 1.6 k,
Hi
Mid
Low Low
Hi 3
Hi 4
Hi 5
Mid 1
Mid 2
Mid 3
Mid 4
Mid 5
2 k, 2.5 k, 3.15 k, 4 k, 5 k,
6.3 k, 8 k, 10 k, 12.5 k, 16 k
63, 80, 100, 125, 160, 200,
250, 315, 400, 500, 630,
800, 1 k, 1.25 k, 1.6 k, 2 k,
2.5 k, 3.15 k, 4 k, 5 k, 6.3 k,
8 k, 10 k, 12.5 k, 16 k
20, 25, 31.5, 40, 50, 63, 80,
100, 125, 160, 200, 250
ATTENTION
It is not possible to set more than one band in
the same channel and median frequency.
Either change the median frequency of the
current band, or change the median frequency
of another band.
Press the [ENTER] button to select
3
the band to be adjusted.
Each time the button is pressed, the
band changes in the following order.
When the 4-speaker layout is selected:
1 → 2 → 3 → 4 → 5 → 6 → 7 → 1 → www
When the 3 way speaker layout is
selected:
Hi 1 → Hi 2 → Hi 3 → Hi 4 → Hi 5 →
Mid 1 → Mid 2 → Mid 3 → Mid 4 → Mid
5 → Low → Hi 1 → www
Press the [SELECT] (Right/Left)
button to select the frequency to
4
be adjusted.
Press the [SELECT] (Up/Down)
button for less than one second to
5
adjust the frequency level.
Up :
Increases the level.
Down :
Decreases the level.
Press the [SELECT] (Up/Down)
button for more than one second
6
to adjust the Q curve pattern.
Each time the button is pressed, the Q
curve pattern changes in the following
order.
WIDE ↔ Mid WIDE ↔ NORMAL ↔
Mid NARROW ↔ NARROW ↔
WIDE ↔ www
Press the [SELECT] (Up/Down)
1
button to select PEQ.
Press the [ENTER] button.
2
The PEQ setting mode is activated.
72
Repeat the steps 3 to 6 to change
the settings for each channel and
7
band.
Page 73

How to operate the Sound Adjustment Mode
1
Press a button from [1] to [5] for
more than two seconds to preset a
8
setting value.
The preset value is overwritten by the
value set using the above steps.
The time alignment and crossover
adjustments will also be stored at this
time.
Selecting an equalizer mode from memory
Press a preset button to select the equalizer
mode set in memory on the button. The buttons
that set equalizer modes in the memory are
called preset buttons.
Select a button from [1] to [5] and
press it for less than one second
1
while the PEQ setting mode is
activated.
The preset pattern stored in the
memory will be retrieved.
ATTENTION
When the preset value is changed, the display
shows as follows:
P
1 to 5 (Preset ch No.)
Measuring/displaying frequency characteristics
Frequency characteristics inside the vehicle can
be measured and shown on the display. The
measurement result can be referred to when
adjusting the parametric equalizer. This result is
also necessary to automatically correct the
parametric equalizer setting using E-iSERV
Audio Customize.
ATTENTION
• Adjust time alignment (refer to page 74) and
crossover (refer to page 75) before
measuring frequency characteristics.
• When measuring frequency characteristics,
CSII and Loudness settings are
automatically cancelled.
• Close all doors and windows while
measurement is in progress.
CAUTION
2
In order to make the measurement of
frequency characteristics easier, slight
errors may occur in the measurement data
under some circumstances when this
function is used. In addition, it is not
equivalent to the precise measurements
that can be made by specialist measuring
devices.
XII
73
Page 74

Various Settings
Displaying measurement results and save to USB memory
Connect the RCA connector of the
optional microphone (MEI-100) to
1
the L-CH of the AUX jack of the
main unit.
Align the microphone with the actual
ear position and attach it to the
headrest or other appropriate fixture.
(Attach the microphone using tape or
string.) Connect the USB memory if
data is to be saved.
Press button [6] on the PEQ screen
2
for less than one second.
After pressing the button, a 10-second
countdown begins. Leave the vehicle
during that time.
After ten seconds, pink noise will be
output from the speakers and the
measurement of the frequency
characteristics will start. The
“Measuring” message appears on the
display while measurement is in
progress.
When measurement is complete, the
measurement results will appear on
the display. You can adjust the volume
(by turning the [VOL] button) and
restart measurement while
measurement is in progress.
Press the button [6] once more to
cancel measurement.
The measurement result can be
referred to when adjusting parametric
equalizer.
Time alignment adjustment (Time Alignment)
The delay time and level of the sound from each
speaker can be adjusted in order to correct any
phase mismatches in the sound resulting from
the listening position. (For details about speaker
layout selection, refer to page 77.)
Press the [SELECT] (Up/Down)
1
button to select Time Align.
Press the [ENTER] button.
2
The time alignment setting mode is
activated.
Press the [ENTER] button to select
3
the speaker band to be adjusted.
Each time the button is pressed, the
band changes in the following order.
4-speaker layout:
FL → FR → RL → RR → SW →
FL → www
3-way speaker layout:
HL → HR → ML → MR → LL → LR →
HL → www
Press the [SELECT] (Right/Left)
button to adjust the time delay in
4
the arrival of the sound.
The delay time can be adjusted within
0.0 to 10.0 ms (0.1 ms for the main
unit).
Right:
Increases the time.
Left:
Decreases the time.
ATTENTION
Do not play music from the USB while
measuring frequency characteristics.
74
Page 75

How to operate the Sound Adjustment Mode
ATTENTION
• Refer to the following for the method of
calculating the delay time.
A = (B-C) / 34
A:Delay time (ms)
B:Distance from the listening position to the
furthest speaker (cm)
C:Distance from the listening position to the
speaker to be adjusted (cm)
C
(Example) Listening position:
Driver's seat (left)
B:200 (cm)
C:50 (cm)
Delay time= 200 (cm) - 50 (cm) / 34
= Approx. 4.4 (ms)
B
Press the [SELECT] (Up/Down)
5
button to adjust the level.
Up :
Increases the dB.
Down :
Decreases the dB.
Crossover adjustment (X-Over)
Specified frequency bands are allocated to each
speaker for improved sound integration.
Press the [SELECT] (Up/Down)
1
button to select the X-Over.
Press the [ENTER] button.
2
The crossover setting mode is
activated.
Press the [ENTER] button to set
3
the crossover adjustment channel.
Each time the button is pressed, the
channel changes in the following
order.
4-speaker layout:
Front → Rear → Woofer → Front → www
3-way speaker layout:
HPF → Mid-LPF → Mid-HPF → LPF →
HPF → www
Press the [SELECT] (Right/Left)
button to select the cut-off
4
frequency.
Each time the button is pressed, the
frequency changes in the following
order.
4-speaker layout:
Front/Rear:
63 Hz ↔ 80 Hz ↔ 100 Hz ↔ 125 Hz ↔
160 Hz ↔ 200 Hz ↔ 250 Hz ↔ 315 Hz
↔ 400 Hz ↔ 500 Hz ↔ 630 Hz ↔
800 Hz ↔ 1kHz ↔ 1.25kHz ↔ 1.6 kHz
↔ 2 kHz ↔ 2.5 kHz ↔ 3.15 kHz ↔
4kHz ↔ 5kHz ↔ 6.3 kHz ↔ 8kHz ↔
10 kHz
Woofer:
20 Hz ↔ 25 Hz ↔ 31.5 Hz ↔ 40 Hz ↔
50 Hz ↔ 63 Hz ↔ 80 Hz ↔ 100 Hz ↔
125 Hz ↔ 160Hz ↔ 200 Hz
3-way speaker layout:
M-LPF/Hi:
200 Hz ↔ 250 Hz ↔ 315 Hz ↔ 400 Hz
↔ 500 Hz ↔ 630 Hz ↔ 800 Hz ↔ 1kHz
↔ 1.25kHz ↔ 1.6 kHz ↔ 2 kHz ↔ 2.5
kHz ↔ 3.15 kHz ↔ 4kHz ↔ 5kHz ↔ 6.3
kHz ↔ 8kHz ↔ 10 kHz
M-HPF/Low:
20 Hz ↔ 25 Hz ↔ 31.5 Hz ↔ 40 Hz ↔
50 Hz ↔ 63 Hz ↔ 80 Hz ↔ 100 Hz ↔
125 Hz ↔ 160Hz ↔ 200 Hz
XII
75
Page 76

Various Settings
Press the [SELECT] (Up/Down)
5
button to set the slope.
The slope can be set to “Pass”, “6dB/
oct”, “12dB/oct”, “18dB/oct” or “24dB/
oct”.
Up:
The slope becomes more gentle.
Down:
The slope becomes steeper.
Repeat the steps 3 to 5 to change
6
the settings for each channel.
Multi-harmonizer settings (Harmonizer)
This function uses harmonic synthesis to restore
the high-frequency component that is lost as a
result of the compression process, so that
fresher sound can be obtained during MP3/
WMA, USB memory playback.
Press the [SELECT] (Up/Down)
1
button to select Harmonizer.
Press the [ENTER] button.
2
The harmonizer setting mode is
activated.
Press the [SELECT] (Up/Down)
3
button to select a setting item.
When the button is pressed, the
setting item changes in the following
order.
www ↔ Low ↔ Hi ↔ OFF↔ www
Hi:High effectiveness
Low:Low effectiveness
The selected settings will take effect.
Non-fader settings (Non-F Setting)
• Non-fader phase (Phase)
The merging of sound between the front and
rear speakers and the woofer can be
improved by selecting the phase. Switch the
phase to a phase which lets the speakers
combine without any disharmony.
• Non-Fader Output (Output)
Non-Fader Output can be stereo or mono.
Select the method that matches the output
method for the sub-woofer system that is
connected to the main unit.
Press the [SELECT] (Up/Down)
1
button to select NF Setting.
Press the [ENTER] button.
2
The non-fader setting mode is
activated.
Non-fader phase settings (Phase)
Press the [SELECT] (Up) button to
1
select Phase.
Press the [SELECT] (Right/Left)
button to select Reverse or
2
Normal.
Right:
Reverse
Left:
Normal
76
Page 77

How to operate the Sound Adjustment Mode
1
Non-Fader Output settings (Output)
Press the [SELECT] (Down) button
1
to select Output.
Press the [SELECT] (Right/Left)
button to select Monaural or
2
Stereo.
Right:
Monaural
Left:
Stereo
Speaker layout settings (SP Layout)
Depending upon speaker layout, you can switch
between 3-way and 4-speaker systems. (Select a
system configuration before adjusting PEQ, time
alignment or cross over.)
Press the [SELECT] (Up/Down)
1
button to select SP Layout.
Press the [ENTER] button.
2
The speaker layout setting mode is
activated.
Press the [SELECT] (Up/Down)
3
button to select 3 WAY or 4 SP+SW.
Press the [ENTER] button for more
4
than five seconds.
"OK?" will be displayed.
Press the [ENTER] button for less
5
than one second.
CAUTION
2
When switching between 3 WAY and 4
SP+SW modes, please make sure that the
volume level is set to 0.
Importing Sound Data (Sound Data)
Sound data adjusted by the E-iSERV website
can be downloaded to a CD-R or a USB memory
and imported into the main unit.
Press the [SELECT] (Up/Down)
1
button to select Sound Data.
Press the [ENTER] button.
2
The sound data importing mode is
activated.
Press the [SELECT] (Up/Down)
button to select the media type
3
(Disc or USB).
Press the [ENTER] button.
4
• When selecting a CD-R:
The front panel will open automatically.
"INSERT DISC" will be displayed.
• When selecting a USB:
"CONNECT USB" will be displayed.
Insert the CD-R or connect the USB
5
memory.
The files are automatically read.
Press the [SELECT] (Up/Down)
6
button to select a file.
Press the [ENTER] button.
7
Select a button from [1] to [5], and
press it for more than two
8
seconds.
The selected file is written on the
selected button.
The CD-R will be ejected automatically
when writing is complete.
The display will return to the file
selection screen.
XII
77
Page 78

Various Settings
1
ATTENTION
To load data into the main unit, you have to
make a special folder. For detail information
about how to make the folder, refer to the EiSERV website.
CAUTION
2
• Do not turn the ignition switch or
power to the main unit ON or OFF (or
remove the front panel of the main
unit) while data reading is in progress.
Data reading will be interrupted and
data may be damaged.
• Only the [VOL] button can be
operated while the system is reading
data.
Reading custom mode Data (Custom Mode)
Values (PEQ, time alignment and crossover
setting values) can be adjusted in the custom
mode on the website. Adjust the values by
following the instructions provided on the EiSERV operational procedure screen, and
download the data to a CD-R or USB memory.
ATTENTION
PEQ, time alignment, and crossover values
cannot be adjusted while the custom mode is
on. To adjust values, turn the custom mode off.
Press the [SELECT] (Up/Down)
1
button to select Custom Mode.
Press the [ENTER] button.
2
The mode will change to the custom
mode.
Insert a CD-R or connect a USB
3
memory containing data.
Press the [SELECT] (Up/Down)
4
button to select ON or OFF.
If there is no custom data, “NO DATA”
will be displayed.
78
Page 79

79
Page 80

Various Settings
Making changes with Display Adjustment Mode
Various Settings
This mode lets you adjust the display brightness, change the button illumination color, etc.
Switching the Display Adjustment Mode
Press the [ /MENU] button for
1
more than one second.
The Menu selection mode is activated.
Press the [SELECT] (Up/Down)
2
button to select DISP.
Press the [ENTER] button.
3
The display adjustment mode is
activated.
Press the [SELECT] (Up/Down)
4
button to select a setting item.
When the button is pressed, the
setting item changes in the following
order.
Bright ↔ Illumination ↔ DISP Type ↔
DISP Data ↔ Scroll Type↔
Bright ↔ www
Press the [ENTER] button.
5
Switches among the adjustment
modes.
Switching the brightness (Bright)
Default setting is maximum brightness (5).
Press the [SELECT] (Up/Down)
1
button to select Bright.
Press the [SELECT] (Right/Left)
3
button to adjust the brightness.
Right:
Increases the brightness level.
Left:
Decreases the brightness level.
Press the [ENTER] button.
4
The selected settings will take effect.
Changing illumination color
You can change the button illumination color in
the following way.
Press the [SELECT] (Up/Down)
1
button to select Illumination.
Press the [ENTER] button.
2
The illumination setting mode is
activated.
Press [SELECT] (Up/Down) button.
3
Press the [SELECT] (Up/Down) button
to set illumination color as follows:
Blue/Red ↔ Blue/Green ↔ Blue/Amber
↔ All Red ↔ All Green ↔ All Amber ↔
Blue/Red ↔ www
Press the [ENTER] button.
4
The selected settings will take effect.
Press the [ENTER] button.
2
The bright setting mode is activated.
80
Page 81

Making changes with Display Adjustment Mode
Changing display type (DISP Type)
You can change the display type (Background or
Spectrum analyzer).
Press the [SELECT] (Up/Down)
1
button to select DISP Type.
Press the [ENTER] button.
2
The display type setting mode is
activated.
Press the [SELECT] (Up/Down)
3
button to select a setting item.
When the button is pressed, the
setting item changes in the following
order.
Background ↔ S/A ↔ Background ↔ www
Press the [ENTER] button.
4
Switches among the adjustments
modes.
Changing Background (Background)
Press the [ENTER] button.
4
The selected settings will take effect.
Changing spectrum analyzer (S/A)
You can change the spectrum analyzer type.
Press the [SELECT] (Up/Down)
1
button to select S/A (Sensitivity).
Press the [ENTER] button.
2
The spectrum analyzer type setting
mode is activated.
Press the [SELECT] (Up/Down)
3
button to select a setting item.
When the button is pressed, the
analyzer type changes in the following
order.
Type 1 ↔ Type 2
Press the [ENTER] button.
4
The selected settings will take effect.
XIII
Press the [SELECT] (Up/Down)
1
button to select Background.
Press the [ENTER] button.
2
The background setting mode is
activated.
Press the [SELECT] (Up/Down)
3
button to select a setting item.
When the button is pressed, the
background changes in the following
order.
Motion picture1 ↔ Motion picture2 ↔
Motion picture1 ↔www
81
Page 82

Various Settings
Importing display data (DISP Data)
Screens can be downloaded from the ECLIPSE
website (E-iSERV) and used instead of the preset motion pictures. Download the data by
following the instructions on the ECLIPSE
website (E-iSERV). After you have downloaded
the data onto your PC, copy it to a CD-R or USB
memory and import it into the main unit.
(URL:http://www.e-iserv.jp) Applications for
creating motion pictures can be downloaded,
allowing you to create your own screen. Screens
can be created by following the procedure shown
below:
Select several pages of images to use in your
picture.
↓
Access The ECLIPSE website.
(URL: http://www.e-iserv.jp)
↓
Download ECLIPSE' s original image editing
software (Cutting Board) following the
instructions provided by the website.
↓
Using the image editing software (Cutting
Board), adjust image size to fit the display. To
edit images follow the instructions provided
with the editing software.
↓
Convert your edited images into moving
pictures following the instructions provided by
the image editing software (Cutting Board).
↓
Copy the images to a CD-R or a USB
memory.
↓
Import into the main unit.
Press the [SELECT] (Up/Down)
1
button to select DISP Data.
Press the [ENTER] button.
2
The display data import mode is
activated.
Press the [SELECT] (Up/Down)
3
button to select the media type.
Press the [ENTER] button.
4
• When using a CD-R:
“INSERT DISC” is displayed, and the front
panel opens automatically. If a CD has
already been loaded into the main unit, it
will automatically eject.
• When using a USB memory:
”CONNECT USB” is displayed until a USB
memory is connected to the main unit.
When a USB memory containing data has
already been connected, the unit starts
reading data immediately after pressing the
[ENTER] button.
Insert the selected media.
5
Press the [e (OPEN/EJECT)]
6
button to close the front panel.
Press the [SELECT] (Up/Down)
7
button to select files.
Press the [ENTER] button.
8
Press the [SELECT] (Up/Down)
button to select the image data you
9
want to overwrite.
Press the [ENTER] button.
10
Start importing the data into the main
unit. If the data has already been
imported, it will be overwritten. When
the data has been imported, the
[Completed] message appears. The
front panel will open automatically, and
the CD-R will be ejected. Press the [e
(OPEN/EJECT)] button to close the
front panel.
82
Page 83

Making changes with Display Adjustment Mode
1
1
CAUTION
2
On the CD-R or USB memory, if there is no
file whose data type is the one you
selected, the “NO DATA” message will be
displayed and return to the previous
screen.
ATTENTION
• When playing a music file in USB memory,
E-iSERV data stored in the USB memory
cannot be read into the main unit.
• To load data into the main unit, you have to
make a special folder. For detailed
information about how to make the folder,
refer to the E-iSERV manuals.
CAUTION
2
• Do not turn the ignition switch or the
power to the main unit ON or OFF (or
remove the front panel of the main
unit) while data reading is in progress.
Data reading will be interrupted and
data may be damaged.
• Only the [VOL] button can be
operated while the system is reading
data.
Changing the scroll type (Scroll Type)
The scroll type of the text display can be
changed.
Press the [SELECT] (Up/Down)
1
button to select the Scroll Type.
Press the [ENTER] button.
2
The scroll type setting mode is
activated.
Press the [SELECT] (Up/Down)
3
button to select the scroll type.
Each time the button is pressed, the
scroll type changes in the following
order.
Once ↔ Repeat
Once:
Text is scrolled once before the
display becomes fixed
Repeat:
Text is scrolled repeatedly
The selected settings will take effect.
XIII
83
Page 84

Various Settings
Making changes with Function Mode
Various Settings
A variety of settings can be changed.
Switching the Function Mode
Press the [ /MENU] button for
1
more than one second.
The Menu selection mode is activated.
Press the [SELECT] (Up/Down)
button to select FUNC, and then
2
press the [ENTER] button.
The function mode is activated.
Press the [SELECT] (Up/Down)
3
button to select a setting item.
When the button is pressed, the
setting item changes in the following
order.
STATION NAME*1 ↔ DISC TITLE*2 ↔
GUIDE TONE ↔ Clock ON/OFF ↔
Clock Adjust ↔ Demo ↔ HD RADIO
↔ AUX ON/ OFF*4 ↔ AUX Sens*4 ↔ S/
A Sens ↔ Steering SW ↔ SIRIUS ID
↔ XM ID*6 ↔ Phone Setting*7 ↔ BT
Audio Set
*1: Cannot make settings other than
for tuner operation.
*2: Cannot make settings other than
for CD/CD changer operation.
*3: This setting can only be chosen
when an optional HD Radio tuner
unit is connected. (Refer to page
94 for details on HD Radio
operation.)
*4: Refer to page 109 for detail on
AUX operation.
*8
*3
*5
*5: This setting can only be chosen
when an optional SIRIUS Satellite
radio tuner unit is connected.
(Refer to page 102 for details on
SIRIUS Satellite radio operation.)
*6: This setting can only be chosen
when an optional XM Satellite
radio tuner unit is connected.
(Refer to page 98 for details on XM
Satellite radio operation.)
*7: (For details, refer to "Setting the
Bluetooth hands-free function" on
page 52.)
*8: (For details, refer to "Bluetooth
audio setup" on page 38.)
Setting a station name/disc title
The name of the station being received, or the
title of the CD being played can be set.
ATTENTION
Not available with HD-Radio or SAT radio.
Press the [SELECT] (Up/Down)
button to select Station Name or
1
Title.
Station Name or Title will be selected
based on the current audio mode
settings.
Press the [ENTER] button.
2
The title setting mode is activated.
Press the [SCREEN/TEXT] button
3
to select the character type.
Pressing the button will switch types
from [ABC] (upper-case alphabet
characters) to, [123] (numeric
characters) and then [!“#] (symbols).
84
Page 85

Making changes with Function Mode
Press the [SELECT] (Right/Left)
button to select the positions
4
where characters will be input.
The character will be inserted where
the cursor is flashing.
Right:
Advances the cursor to the right.
Left:
Returns the cursor to the left.
Press the [SELECT] (Up/Down)
5
button to select characters.
Up:
Moves the character forward in its
type.
Down:
Moves the character backward in its
type.
[Symbol] First character [!]
! ↔ “ ↔ # ↔ $ ↔ % ↔ & ↔ ’↔ ( ↔
) ↔ * ↔ + ↔ , ↔ - ↔ . ↔ / ↔ : ↔ ; ↔
< ↔ = ↔ > ↔ ? ↔ @ ↔ ' ↔ _ ↔
! ↔ www
[Upper-case alphabet characters] Initial
value [A]
A ↔ B ↔ C ↔ www ↔ X ↔ Y ↔ Z ↔
A ↔ www
[Numeric characters] Initial value [1]
1 ↔ 2 ↔ 3 ↔ www ↔ 8 ↔ 9 ↔ 0 ↔
1 ↔ www
Press the [ENTER] button to save
6
the title.
ATTENTION
• To change the type of character to be
entered, repeat steps 3 and 5.
• A maximum of 16 characters may be
entered per title.
• 30 titles can be stored.
• When the data storage area is full, the
“FULL DATA” message appears. If new data
is input, the older data will be deleted.
Deleting a station name/disc title
Press the [RTN/BAND] button for
more than two seconds while the
1
title setting mode is activated.
The station name/disc title that is
displayed at this point will be deleted.
Setting the guide tone
The main unit is set at the factory to emit a beep
tone in response to button operation. The guide
tone feature may be disabled in the following
procedure:
Press the [SELECT] (Up/Down)
1
button to select Guide Tone.
Press the [ENTER] button.
2
The guide tone setting mode is
activated.
Press the [SELECT] (Up/Down)
button to select Guide Tone ON/
3
OFF.
Setting clock display (Clock ON/ OFF)
Switches the clock display to ON/OFF.
Press the [SELECT] (Up/Down)
1
button to select Clock ON/OFF.
Press the [ENTER] button.
2
The clock display setting mode is
activated.
Press the [SELECT] (Up/Down)
button to set the clock display to
3
ON or OFF.
XIV
85
Page 86

Various Settings
ATTENTION
The clock display can also be turned on and off
by pressing the button [6] while the power is
turned off.
Setting time (Clock Adjust)
This main unit uses the 12-hour display notation.
Press the [SELECT] (Up/Down)
1
button to select Clock Adjust.
Press the [ENTER] button.
2
The clock setting mode is activated.
Press the [SELECT] (Right/Left)
button to select the item to be
3
adjusted.
Right:
Minutes will be switched.
Left:
Hours will be switched.
Press the [SELECT] (Up/Down)
4
button to adjust the time.
Up:
Turns the time forward.
Down:
Turns the time back.
Press the [ENTER] button.
5
Switching demonstration screen display (Demo)
Demonstration screen display settings can be
performed. Default setting is ON.
If the demonstration screen display is set to ON,
operation, motion picture, and other screens will
be displayed in succession.
If you press a button while the demonstration
screens are being displayed, the demonstration
screens will be cancelled and the audio operation
screen will be displayed. If you do not operate
the status display function within 15 seconds, the
display will return automatically to the demo
screen.
Press the [SELECT] (Up/Down)
1
button to select Demo.
Press the [ENTER] button.
2
The demo display setting mode is
activated.
Press the [SELECT] (Up/Down)
3
button to select Demo ON/OFF.
Setting spectrum analyzer sensitivity (S/A Sensitivity)
The sensitivity of the spectrum analyzer display
can be changed.
Press the [SELECT] (Up/Down)
1
button to select S/A Sensitivity.
Press the [ENTER] button.
2
The spectrum analyzer sensitivity
setting mode is activated.
86
Press the [SELECT] (Up/Down)
button to select the spectrum
3
analyzer sensitivity.
When the button is pressed, the
spectrum analyzer sensitivity changes
in the following order.
Hi ↔ Mid ↔ Low ↔ Hi ↔ www
Page 87

Making changes with Function Mode
Press the [ENTER] button.
4
The selected settings will take effect.
Setting the steering remote function (U.S.A. only)
The vehicle’s factory loaded steering remote
becomes inoperable when the CD7200 mkII is
installed. The ECLIPSE website (E-iSERV)
provides software that enables steering remote
operation even with the installation of the main
unit. Import this software into your CD7200 mkII.
For details, contact the store from which you
purchased your main unit. Depending on your
vehicle’s make and model, material downloaded
from the website may not be compatible with
your steering remote. Consult the store from
which you purchased your CD7200 mkII about
compatibility and set-up procedures. Software for
the steering remote can be downloaded and
imported into the main unit as follows:
Access The ECLIPSE website.
(URL: http://www.e-iserv.jp)
↓
Download the steering remote software
following instructions provided on the
ECLIPSE website (E-iSERV). (Because
material available on the website may not be
compatible with the steering remotes found
on some automobiles, make sure to check the
website for details about compatibility.)
↓
Copy the downloaded software to CD-R or a
USB memory.
↓
Import into the main unit.
↓
The steering remote can be operated.
Reading steering remote data (U.S.A. only)
The steering remote data that has been
downloaded from E-iSERV (website) to a
USB memory or CD-R can be loaded into the
main unit and save there.
Press the [SELECT] (Up/Down)
1
button to select Steering SW.
Press the [ENTER] button.
2
The steering remote setting mode is
activated.
Press the [SELECT] (Up/Down)
3
button to select the media type.
Press the [ENTER] button.
4
When using a CD-R:
"INSERT DISC" will be displayed and
the front panel will open
automatically.
When a USB memory is used:
"CONNECT USB" will be displayed
until the USB memory is connected.
Insert the CD-R or connect the USB
memory to save the steering
5
remote data.
Press the [e (OPEN/EJECT)]
6
button to close the front panel.
Press the [SELECT] (Up/Down)
7
button to select files.
Press the [ENTER] button.
8
The CD-R or USB memory data is
read. While it is reading, "READING"
is displayed.
If the data can be read successfully,
"COMPLETED" will appear on the
display. When using CD-R data, the
CD-R will automatically eject when
reading is complete.
XIV
87
Page 88

Various Settings
1
ATTENTION
• To load data into the main unit, you have to
make a special folder. For detail information
about how to make the folder, refer to the EiSERV website.
• This function is available only for vehicles
equipped with steering remote with an
interface that operates by detecting voltage
• When playing a music file in USB memory,
E-iSERV data stored in the USB memory
cannot be read into the main unit.
CAUTION
2
• Do not turn the ignition switch or power
to the main unit ON or OFF (or remove
the front panel of the main unit) while
data reading is in progress. Data
reading will be interrupted and data may
be damaged.
• Only the [VOL] button can be operated
while the system is reading data.
88
Page 89

Making changes with Function Mode
Compatibility with various switches
The compatibility of the main unit's various modes and the steering remotes installed on your vehicle
are as follows:
Switch
Name
TRACK+
TRACK-
VOL+
VOL-
MODE
MUTE
POWER
*1
Button
function
Press
briefly
Press and
hold
Press
briefly
Press and
hold
Press
briefly
Press and
hold
Press
briefly
Press and
hold
Press
briefly
Press and
hold
Press
briefly
Press and
hold
Press
briefly
Press and
hold
Mode
Tuner
TUNE UP
SEEK
UP
TUNE
DOWN
SEEK
DOWN
Increases
volume
Gradually
increases
volume
Decrease
s the
volume
Gradually
decreases
volume
Switches
to the next
mode
MUTE MUTE MUTE MUTE — MUTE —
Power
OFF
Disc/USB
mode
TRACK
UP
FAST UP — FAST UP — FAST UP —
*2
TRACK
DOWN
FAST
*2
DOWN
Increases
the
———————
———————
the
volume
Gradually
increases
volume
Decrease
s the
volume
Gradually
decreases
volume
Switches
to the next
mode
Power
OFF
AUX iPod
—
—
—
Increases
the
volume
Gradually
increases
volume
Decrease
s the
volume
Gradually
decreases
volume
Switches
to the next
mode
Power
OFF
TRACK
UP
TRACK
DOWN
FAST
DOWN
Increases
the
volume
Gradually
increases
volume
Decrease
s the
volume
Gradually
decreases
volume
Switches
to the next
mode
Power
OFF
Power
OFF
—
—
—
—
—
—
—
Power ON
in the last
mode
Power ON
in the last
mode
BT-Audio
mode
TRACK
UP
TRACK
DOWN
FAST
DOWN
Increases
the volume
Gradually
increases
the volume
Decreases
the volume
Gradually
decreases
the volume
Switches
to the next
mode
Power
OFF
BT-TEL
mode
—
—
—
Increases
the
volume
(ring tone/
speakers'
voices)
Increases
the
volume
gradually
(ring tone/
speakers'
voices)
Decreases
the
volume
(ring tone/
speakers'
voices)
Decreases
the
volume
gradually
(ring tone/
speakers'
voices)
Switches
to the next
mode
Power
OFF
XIV
89
Page 90

Various Settings
Switch
Name
ON HOOK
OFF HOOK
*1: Switch names change depending on vehicle make and model.
*2: If a SIRIUS/XM satellite radio tuner (purchased separately) is connected, categories can be switched when in the satellite mode.
*1
Button
function
Press
briefly
Press and
hold
Press
briefly
Press and
hold
Tuner
The TEL
mode is
activated.
Disc/USB
mode
——————ON HOOK
———————
The TEL
mode is
activated.
———————
AUX iPod
The TEL
mode is
activated.
Mode
The TEL
mode is
activated.
Power
OFF
The TEL
mode is
activated.
BT-Audio
mode
The TEL
mode is
activated.
BT-TEL
mode
OFF
HOOK
90
Page 91

91
Page 92

About the optional unit
How to operate the main unit with an optional CD changer connected
About the optional unit
This section covers the operation of an optional
CD changer that is connected to the main unit.
Listening to a CD
Switch to CD changer mode.
1
For details, refer to "Switching Audio
Modes" on page 18.
Advancing to the next track or returning to the beginning of the track being played
Press the [SELECT] (Right/Left)
1
button for less than one second.
Right:
Advances to the next track.
Left:
Returns to the beginning of the track
being played.
(Repeat pressing for previous tracks.)
Operations during rotary mode
Turn the [VOL] button.
1
Turn to the right:
Advances to the next track.
Turn to the left:
Return to the beginning of the track
being played.
Repeat turning for previous tracks.
Fast Forward/Rewind
Fast forward or rewind the song currently being
played.
Press and hold the [SELECT]
1
(Right/Left) button.
Right:
Fast forward.
Left:
Rewind.
Playing the beginning of tracks (SCAN)
Press the [4 SCAN] button.
1
Pressing the button for less than one
second causes the changer to move
up to the next track and play it for 10
seconds, then move up to the next
track and play it for 10 seconds, and
so on, on one CD, until the button is
pressed again.
Press the button for longer than a
second to play the first 10 seconds of
the first track of every CD loaded.
ATTENTION
• To continue playing a desired track, press
the button again to stop scanning.
• After the entire disc is scanned once,
ordinary playback starts from the point
where scanning started.
92
Page 93

How to operate the main unit with an optional CD changer connected
Repeating the same track (REPEAT)
Press the [5 RPT] button.
1
Pressing on the button for less than
one second causes the changer to
repeat the track currently being
played, until the button is pressed
again. Press the button for longer than
a second to repeat all tracks on the CD
being played.
Press the button for more than one
second to repeat all the tracks on the
CD being played.
Playing tracks in random order (RANDOM)
Press the [6 RAND] button.
1
Pressing on the button for less than
one second causes the changer to
play the tracks on the currently playing
CD in random order, until the button is
pressed again.
Press the button for longer than a
second to play tracks from all of CDs
loaded in the currently selected
changer, in random order. Tracks can
be repeated during random play. This
is not an abnormal occurrence.
ATTENTION
• During random playback, press the [5 RPT]
button to repeat the track being played. To
cancel the repeat play (and return to
random play), press the [5 RPT] button
again.
• When any of the functions - “Playing the
beginning of tracks”, “Repeating the same
track” and “Playing tracks in random order”
- is selected, a message such as “SCAN“,
“ALL SCAN“, “REPEAT“, “ALL REPEAT“,
“RANDOM“ or “ALL RANDOM“ will appear
on the display to verify the current function.
• Random play is not cancelled even if a
magazine is ejected.
Skipping to the next or previous CD
Press the [SELECT] (Up/Down)
1
button.
Up:
Selects the next higher number disc.
Down:
Selects the next lower number disc.
Specifying a CD to play
A CD of your choice is directly selectable out of
the loaded discs.
Press the [MODE] button for more
1
than one second.
Press a button from [1] to [6].
2
Buttons 1 2 3 4 5 6
CD 123456
789101112
To select a CD from nos. 7 to 12, press
the desired button considerably longer.
Press the [MODE] button for more
than one second to exit the direct
3
selection mode.
XV
93
Page 94

About the optional unit
How to operate the tuner with an optional HD Radio tuner connected (U.S.A. only)
About the optional unit
About HD Radio
If the optional HD Radio tuner unit is connected,
terrestrial digital broadcasts can be received.
When terrestrial digital broadcasts are received,
the FM reception has the same sound quality as
a CD, and the AM reception has the same sound
quality as conventional FM sound. Depending on
the reception status, HD Radio may also be able
to receive analog broadcasts, which means
reception is still possible in regions with no digital
coverage.
There are both automatic and manual methods
(one of each) for storing stations in memory. The
main unit can store up to 24 stations in memory.
There are 6 stations for AM and 18 stations for
FM (6 each for FM1, FM2 and FM3) (initial
settings).
See "How to operate the tuner" on page 42 for
information on the following operations:
• Listening to the tuner
• Tuning to a station
• Entering stations into memory automatically
(The automatic preset mode: ASM)
• Manually setting stations into memory
• Preset station scan
During digital broadcast reception, the [DIGITAL]
messsage appears on the display.
Switching between displays when receiving HD Radio
During digital reception, the name of the station
being received and other information can be
displayed.
Press the [SCREEN/TEXT] button
1
for more than one second.
Each press will switch the display
items in the following sequence:
station name → title* → artist* →
album* → genre.
*: Depending on the nature of the
broadcast, no information may be shown.
HD Radio reception settings
The HD Radio reception method can be
selected. When the HD Radio tuner is connected
to this main unit for the first time, it will be set at
[AUTO] (automatic digital/analog selection).
Press the [ /MENU] button for
1
more than one second.
The Menu selection mode is activated.
Press the [SELECT] (Up/Down)
button to select FUNC, and then
2
press the [ENTER] button.
The function mode is activated.
94
Press the [SELECT] (Up/Down)
3
button to select HD Radio.
Press the [ENTER] button.
4
The reception setting screen is
displayed.
Page 95

How to operate the tuner with an optional HD Radio tuner connected (U.S.A. only)
Press the [SELECT] (Up/Down)
5
button to select Auto or OFF.
In the [Auto] setting, the selection is
switched between digital and analog
reception automatically. In areas
where digital reception is not possible,
reception is automatically switched to
analog to avoid loss of reception.
During digital broadcast reception, the
[DIGITAL] message appears on the
display. This is cleared during analog
reception.
In the [OFF] setting, reception is
always analog.
95
XVI
Page 96

About the optional unit
How to operate the tuner with an optional XM satellite radio tuner connected (U.S.A./CANADA only)
About the optional unit
About XM satellite radio
Selecting a channel
If the optional XM satellite radio tuner unit is
connected, satellite radio broadcasts can be
received.
With XM satellite radio, over 170 channels are
available including music, sports, news, and
entertainment programs.
The channel can be selected from categories
such as ROCK and DANCE, or by selecting
individual channels manually.
Reception of XM satellite radio is fee based; you
have to subscribe to it.
It is possible to subscribe through the XM radio
website.
URL: http://www.xmradio.com
ATTENTION
• For details on the settings and operation of
the XM satellite radio tuner unit, refer to the
XM satellite radio unit owner's manual.
• The main unit will accept up to 24 stations
in memory.
Selecting the radio mode
Switch to the XM satellite radio
1
mode.
For details, refer to "Switching Audio
Modes" on page 18.
Press the [RTN] button for less
than one second to switch to the
1
desired XM band.
The radio bands will switch from XM1
XM2 → XM3 → XM4 in order each
→
time
the button is pressed.
Press the [SELECT] (Right/Left)
2
button to tune to a channel.
Right:
Selects a higher channel.
Left:
Selects a lower channel.
Press the [SELECT] (Right/Left)
button for more than one second
3
to start an automatic channel
search.
Reception is enabled for all channels
within the currently selected category.
(Refer to page 97 for details on
“Category selection”.)
Right:
Starts searching for higher channels.
Left:
Starts searching for lower channels.
96
Page 97

How to operate the tuner with an optional XM satellite radio tuner connected (U.S.A./CANADA only)
Operations during rotary mode
Turn the [VOL] button for left or
1
right.
Turn to the right:
Tunes to higher channels.
Turn to the left:
Tunes to lower channels.
Category selection
The channel can be selected from among
categories such as ROCK and DANCE.
Consult the XM website for the details of the
categories.
Press the [SELECT] (Up/Down)
1
button for less than one second.
The category will switch in the order
shown below each time button is
pressed.
Up:
Advances to the next category.
Down:
Returns to the previous category.
Direct channel selection
The channel can be selected by inputting the
channel directly.
Press the [MODE] button for more
1
than one second.
The mode will change to the direct
channel selection mode.
Press the [SELECT] (Right/Left)
button to select the channel
2
number.
Right:
Advances to the next number.
Left:
Returns to the previous number.
Press the [SELECT] (Up/Down)
button to select the channel
3
number to be input.
Each time the button is pressed, the
channel number changes in the
following order.
0 ↔ 1 ↔ 2 ↔ 3 ↔ 4 ↔ 5 ↔ 6 ↔ 7 ↔
8 ↔ 9 ↔ 0 ↔ www
Press the [ENTER] button.
4
Reception starts.
Manually setting channels into memory
This section covers the setting of channels into
memory under the numbered buttons.
Press the [SELECT] (Right/Left)
button to tune to the channel to be
1
entered in the memory.
Select any button, from [1] to [6],
and press it for more than two
2
seconds.
The tuned channel is now memorized
and set in the button selected. Repeat
the procedure to set additional
manually tuned channels into memory,
in turn, for buttons [1] to [6]. These
buttons are called the preset buttons.
ATTENTION
If the vehicle’s battery is disconnected (for
repairs to the vehicle or when removing the
main unit), all channels stored in memory will
be lost. In such cases, set the channels into
memory again.
XVII
97
Page 98

About the optional unit
Preset channel scan
This function enables the reception of all the
channels in the preset buttons for five seconds
each.
Press the [SELECT] (Down) button
1
for more than one second.
[P SCAN] will appear on the display,
and channels set in preset buttons [1]
through [6] will be received for five
seconds each.
To stop the preset scan mode at
the desired channel, press the
2
[SELECT] (Down) button again.
The main unit will stay tuned to the
desired channel.
Switching displays when using the XM satellite radio
Press the [SCREEN/TEXT] button
1
for more than one second.
Each time the button is pressed the
display item changes in the following
order:
channel name
→ name → channel name → www
→ category name → title
Displaying the XM ID
Displays the XM ID. The XM ID is necessary
when subscribing to programs, etc.
Press the [ /MENU] button for
1
more than one second.
The Menu selection mode is activated.
Press the [SELECT] (Up/Down)
button to select FUNC, and then
2
press the [ENTER] button.
Press the [SELECT] (Up/Down)
3
button to select XM ID.
Press the [ENTER] button.
4
The XM ID is displayed.
ATTENTION
If there are no names, the “NO DATA”
message will appear.
98
Page 99

99
Page 100

About the optional unit
How to operate the tuner with an optional SIRIUS satellite radio tuner connected (U.S.A./CANADA only)
About the optional unit
About SIRIUS satellite radio
Selecting a channel
If the optional SIRIUS satellite radio tuner unit is
connected, satellite radio broadcasts can be
received.
With SIRIUS satellite radio, over 130 channels
are available, including music, sports, news, and
entertainment programs.
The channel can be selected from categories
such as POP and ROCK, or by selecting
individual channels manually.
Reception of SIRIUS satellite radio is fee based;
you have to subscribe to it.
It is possible to subscribe through the SIRIUS
radio website.
URL: http://www.sirius.com
ATTENTION
• For information about the operation and
set-up of the SIRIUS satellite radio tuner
unit, see the SIRIUS satellite radio unit's
owner's manual.
• The main unit will accept up to 24 stations
in memory.
Selecting the radio mode
Switch to the SIRIUS satellite radio
1
mode.
For details, refer to "Switching Audio
Modes" on page 18.
Press the [RTN] button for less
than one second to switch to the
1
desired SR band.
Each time the button is pressed, the
radio band changes in the order
SIRIUS1 → SIRIUS2 → SIRIUS3 →
SIRIUS4.
Press the [SELECT] (Right/Left)
2
button to tune to a channel.
Right:
Selects a higher channel.
Left:
Selects a lower channel.
Press the [SELECT] (Right/Left)
button for more than one second
3
to start a automatic channel
search.
Reception is enabled for all channels
within the currently selected category.
(Refer to page 101 for details on
“Category selection”.)
Right:
Starts searching for higher channels.
Left:
Starts searching for lower channels.
Operations during rotary mode
100
Turn the [VOL] button left or right.
1
Turn to the right:
Tunes to higher channels.
Turn to the left:
Tunes to lower channels.
 Loading...