

Page 1

Page 2
Introduction
For your safety in using the CD3000
Warnings and caution signs, illustrated below, are posted throughout this manual as well as on the
CD3000. They show safe and correct ways to handle the main unit to prevent personal injury to you,
others and to avoid property damage.
Before reading through the manual, take time to read through and learn the important information listed
in this section.
This "WARNING" sign indicates a situation in which incorrect
Warning
Caution
Please read all materials such as manuals and warranties that have come with the main unit.
Eclipse will not be liability for unsatisfactory main unit performance due to failure to follow these
instructions.
WARNING
● Do not modify this system for use other than that specified herein. Also, do not deviate
from the installation procedures described herein; Eclipse will not be held liable for
damages including, but not limited to serious injury, death or property damage resulting
from installations that enable unintended operation.
● This main unit requires 12V DC and should only be installed in a vehicle with a 12V negative
ground electrical system. Any other installation may cause a fire or other severe damage
to the main unit and the vehicle.
● Some main unit uses batteries. Never install main unit where young children can get
access to batteries. If a battery is swallowed, seek medical attention immediately.
● When the vehicle is in motion, never take your eyes off the road to make adjustments to the
main unit. You must pay attention to the road to avoid accidents, do not let the operation or
adjustment of the main unit distract you from proper vehicle operation.
● The driver should not look at the screen while driving. Accidents may result if you are not
paying attention to the forward direction.
● Do not put foreign objects in the loading slot of disc. Fires or shocks may result.
● Do not disassemble or alter this main unit. Accidents, fires or shocks may result.
● Do not let water, dust or foreign objects enter the internal parts of this main unit. Smoke,
fires or shocks may result.
● Pay attention to the location of the remote control. Traffic accidents or problems with
driving may result if the remote control makes its way under the foot pedals etc. when the
vehicle is in motion (Example: during stops, going around corners).
● Do not use when the main unit is malfunctioning (the screen is not lit or no sound comes
out). Accidents, fires or shocks may result.
handling or disregard of this sign may result in death or
serious personal injury.
This "CAUTION" sign indicates a situation in which incorrect
handling or disregard of this sign may result in personal injury
or may result solely in damage to property.
2
Page 3
For your safety in using the CD3000
WARNING
● Always replace fuses with fuses of identical capacity and characteristics. Never use a
higher capacity fuse than the original. Using the wrong type of fuse may cause a fire or
severe damage.
● If foreign objects or water enters the main unit, smoke comes out, or there is a strange
odor, stop using it immediately, and contact your dealer. Accidents, fires, or shocks may
result if you continue to use it in these conditions.
● The driver should not change the CD while driving. As accidents may result if you are not
paying attention to the forward direction, first stop the car at a safe location and then
proceed.
● Plastic bags and wrappings may cause suffocation and death. Keep away from babies and
children. Never put bag over your head or mouth.
CAUTION
● When changing the installation location for this main unit, please consult the dealer where
you bought it for safety reasons. Expertise is necessary for removal and installation.
● Keep volume to a reasonable level so that you can hear sounds from outside the vehicle,
including warning sounds, voices, and sirens. Failure to do so may cause an accident.
● Be careful that hands and fingers are not pinched when adjusting the tilting angle or
closing display. Injuries may result.
● Do not put your hands or fingers into the loading slot of disc. Injuries may result.
● Do not touch the heat dissipating part of the amp. Burns may result from the heat of this
part.
● Do not recharge dry cell batteries. Dry cell batteries may rupture, resulting in injuries.
● Do not use batteries other than those specified. Also, do not mix old and new batteries.
Injuries or pollution to the surroundings may result from battery ruptures and leakage.
● When inserting batteries into the main unit, be careful with the polarity (positive/negative),
and insert them as indicated. If the battery polarities are incorrect, injuries and pollution to
the surroundings may result from battery ruptures and leakage.
● Replace used batteries as soon as possible; they may leak and damage main unit. Battery
leakage can burn your skin or your eyes. Wash hands after handling.
● If alkaline solution from alkaline dry cell batteries makes contact with your skin or clothes,
flush with clean water. If any of the solution gets in your eyes, also flush clean with water
and then seek medical attention.
● When disposing of lithium dry cell batteries, affix insulating tape to the positive and
negative terminals, and after they are insulated, dispose of them according to the "Local
municipal ordinances". Shorts, fires and ruptures may result from disposal when coming
contact with other electrically conductive objects such as metal parts, etc.
● Do not short, disassemble or heat the batteries, or place them in fire or water. Fire and
injuries may result from battery rupture and leakage.
● Store the remote control in a place away from direct sunlight, high temperatures, and high
moisture levels. The case may change shape, and the batteries may rupture and leak.
● Do not use this main unit except for in-vehicle use. Shocks or injuries may result.
I
3
Page 4

Introduction
CAUTION
● Take notice of the volume position prior to turning ON the power. Hearing damage may
result if very loud noise is emitted when the power is turned ON.
● Do not operate under abnormal conditions such as when the sound is broken or distorted.
Fires may result.
● This main unit uses invisible laser light. Do not disassemble or alter this main unit. If
trouble occurs, contact the dealer where you bought the main unit.
Altering this main unit may cause exposure to laser emissions (worsening eyesight), or
result in accidents, fires or shocks.
● If the main unit is dropped or the cosmetics appear broken, turn off the power to the main
unit and contact your dealer. If used in this condition, fires or shocks may result.
4
Page 5

Table of Contents
For your safety in using the CD3000 ...........................................2
Operating precautions ................................................................10
Names of controls and parts .....................................................11
How to operate the CD (MP3/WMA) player ...............................14
How to operate the tuner ............................................................23
How to use the optional remote control ...................................26
ESN security operating procedure ............................................29
How to operate the AREA SHOT function (U.S.A. and CANADA only)
...32
How to operate the AUDIO CONTROL ......................................36
How to operate the Sound Adjustment Mode ..........................39
Setting the contrast of the display ............................................42
Making changes with Function Mode .......................................43
How to operate the receiver with an optional iPod Interface Adaptor
....47
I
II
III
IV
V
VI
VII
VIII
IX
X
XI
XII
XIII
How to operate the equipment with an optional CD changer connected
How to operate the tuner with an optional HD Radio tuner connected
(U.S.A. only)
How to operate the tuner with an optional SIRIUS satellite radio tuner connected
(U.S.A. only)
.......................................................................................52
.......................................................................................54
......50
Others ..........................................................................................56
If you have a question: ...............................................................58
Specifications ..............................................................................61
How to contact customer service ..............................................62
XIV
XV
XVI
XVII
XVIII
XIX
XX
5
Page 6

Table of Contents
For your safety in using the CD3000.................................................... 2
Operating precautions......................................................................... 10
Notes on operation ....................................................................................................... 10
Names of controls and parts............................................................... 11
Turning the power on and off........................................................................................ 13
How to operate the CD (MP3/WMA) player ........................................ 14
About compact discs .................................................................................................... 14
About brand new CDs ............................................................................................ 14
About CD accessories............................................................................................ 15
About borrowed CDs.............................................................................................. 15
How to remove CDs............................................................................................... 15
About irregularly-shaped CDs ................................................................................ 15
About cleaning a CD..................................................................................................... 15
About MP3/WMA .......................................................................................................... 16
What is MP3/WMA?............................................................................................... 16
Playable MP3/WMA file standards ......................................................................... 16
Playable WMA file standards ................................................................................. 16
ID3/WMA tag.......................................................................................................... 16
Media ..................................................................................................................... 17
Format of discs....................................................................................................... 17
File names.............................................................................................................. 17
Multi-sessions ........................................................................................................ 18
Playing MP3/WMA ................................................................................................. 18
MP3/WMA playing time display.............................................................................. 18
Display order of MP3/WMA file/folder names ........................................................ 18
Listening to CD (MP3/WMA file).................................................................................. 19
Switching to the CD player mode ................................................................................. 19
Return to the root directory of the CD........................................................................... 22
Displaying CD text........................................................................................................ 22
Displaying title (MP3/WMA).......................................................................................... 22
Ejecting the disc ........................................................................................................... 22
How to operate the tuner..................................................................... 23
Tuning to a station........................................................................................................ 23
Entering stations into memory automatically
(The automatic preset mode: ASM).............................................................................. 24
Manually setting stations into memory ......................................................................... 24
Preset station scan....................................................................................................... 24
Changing the reception sensitivity for automatic scanning........................................... 25
Changing the radio band location................................................................................. 25
6
Page 7

Table of Contents
How to use the optional remote control ............................................ 26
Precautions in use of the remote control...................................................................... 26
Cleaning the remote control ......................................................................................... 26
Replacing the battery.................................................................................................... 27
ESN security operating procedure ..................................................... 29
About ESN.................................................................................................................... 29
How to operate the ESN (Key CD) security.................................................................. 29
How to program the Key CD .................................................................................. 29
How to cancel the Key CD ..................................................................................... 29
How to change the Key CD .................................................................................... 30
How to resume normal operation (ESN security lock out) ..................................... 30
What happens if an incorrect CD is inserted?........................................................ 31
How to turn the security indicator on/off ....................................................................... 31
How to read the Electronic Serial Number ................................................................... 31
How to operate the AREA SHOT function
(U.S.A. and CANADA only).................................................................. 32
About the AREA SHOT ................................................................................................ 32
To use the AREA SHOT function........................................................................... 32
Map data ................................................................................................................ 32
Reading the AREA SHOT data .................................................................................... 33
Changing the AREA SHOT mode ................................................................................ 33
Using the AREA SHOT mode....................................................................................... 34
Switching between guidance points ....................................................................... 34
Re-scrolling through text information ..................................................................... 34
Changing AREA SHOT screens ............................................................................ 34
Display Arrows ....................................................................................................... 35
How to operate the AUDIO CONTROL ............................................... 36
Switching audio control modes..................................................................................... 36
Making changes with Equalizer Mode .......................................................................... 38
Equalizer user preset memory...................................................................................... 38
How to operate the Sound Adjustment Mode ................................... 39
About Sound Adjustment Mode.................................................................................... 39
Crossover............................................................................................................... 39
Non-Fader phase ................................................................................................... 40
Making changes with Sound Adjustment Mode............................................................ 41
7
Page 8

Table of Contents
Setting the contrast of the display ..................................................... 42
Making changes with Function Mode ................................................ 43
How to operate the receiver with an optional iPod Interface Adaptor
Charging the iPod......................................................................................................... 47
Switching the control mode .......................................................................................... 47
Operating the iPod........................................................................................................ 47
.... 47
How to operate the equipment with an optional
CD changer connected........................................................................ 50
Listening to a CD .......................................................................................................... 50
Advancing to the next track or returning to the beginning of the track being played.... 50
Fast Forward/Rewind ................................................................................................... 50
Playing the beginning of tracks (SCAN) ....................................................................... 50
Repeating the same track (REPEAT)........................................................................... 50
Playing tracks in random order (RANDOM) ................................................................. 51
Skipping to the next or previous CD ............................................................................. 51
Specifying a CD to play ................................................................................................ 51
How to operate the tuner with an optional HD Radio tuner connected
(U.S.A. only).......................................................................................... 52
About HD Radio............................................................................................................ 52
Tuning to a station........................................................................................................ 52
Entering stations into memory automatically (The automatic preset mode: ASM) ...... 52
Manually setting stations into memory ......................................................................... 52
Preset station scan....................................................................................................... 52
Switching between displays when receiving HD Radio ................................................ 52
HD Radio reception settings......................................................................................... 53
How to operate the tuner with an optional SIRIUS satellite radio tuner
connected (U.S.A. only)....................................................................... 54
About SIRIUS satellite radio ......................................................................................... 54
Selecting the radio mode.............................................................................................. 54
Selecting a channel ...................................................................................................... 54
Category selection ................................................................................................. 54
Direct channel selection ............................................................................................... 55
Manually setting channels into memory ....................................................................... 55
Preset channel scan ..................................................................................................... 55
Switching displays when using the SIRIUS satellite radio............................................ 55
8
Page 9

Table of Contents
Others.................................................................................................... 56
Connecting portable audio players to the AUX jack ..................................................... 56
Changing auxiliary input sensitivity ........................................................................ 56
Adjustment of the front panel angle .............................................................................. 57
User Registration Key display ...................................................................................... 57
If you have a question: ........................................................................ 58
Displayed information (for troubleshooting).................................................................. 58
Specifications....................................................................................... 61
How to contact customer service....................................................... 62
9
Page 10
Introduction
Operating precautions
<Your CD3000 will perform over a long period of time through correct handling and care.>
Notes on operation
• For your safety, play only at volume levels that allow outside sounds to be heard.
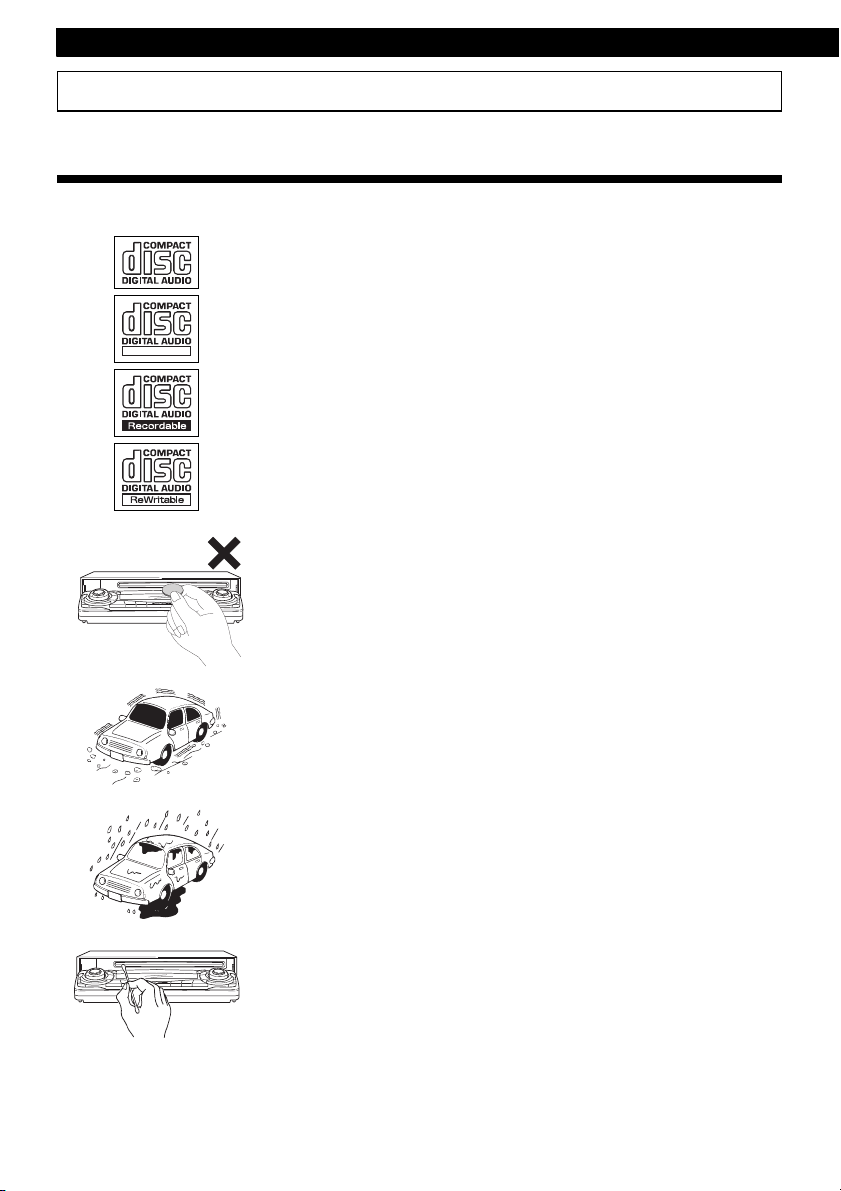
• It is recommended to use the logo shown on the left for this player.
• You can play music CDs(CD-R/CD-RW) on this player. Be sure to use
discs that have been properly processed.
Depending on the editing equipment used, some discs may not play
properly.
TEXT
• Do not insert anything other than a CD into this equipment.
Do not insert any foreign objects, such as coins or credit cards, into
the disc slot. Be especially watchful of children’s mischief in this
regard.
10
• Avoid severe mechanical shock.
When the player is subjected to severe vibration while traveling over a
rough surface, playback may be intermittent. When a situation like
this occurs, resume playback after returning to a smoother road.
• About dew condensation.
In cold or rainy weather, just as the interior glass surface gets fogged,
dew (water condensation) may also settle on the deck. When this
occurs, disc playback may become intermittent or impossible.
Dehumidify the air in the vehicle for a while before resuming
playback.
• Cleaning the disc slot.
The disc slot tends to get dusty. Clean it occasionally to prevent
accumulated dust from scratching the discs.
Page 11
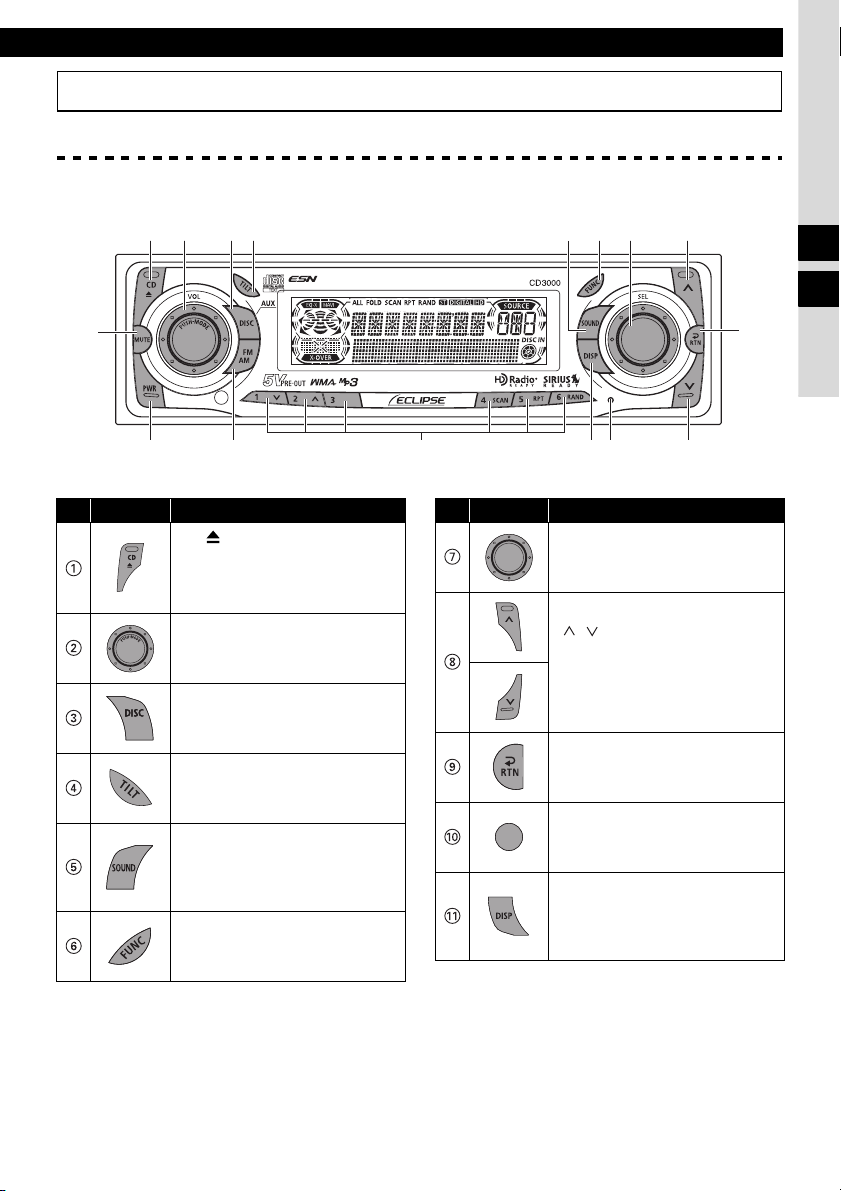
Names of controls and parts
DC B A?8
Front view
Names of controls and parts
1 2 3 4 567 8
E
No. Button Name/Function
[CD (OPEN / EJECT)]
button
Opens/closes front panel and
ejects CD.
[AUDIO CONTROL] button
Adjusts volume and performs
other functions.
[DISC] button
Switches between disc modes
and AUX mode.
[TILT] button
Adjusts the front panel angle.
[SOUND] button
Turns sound adjustment mode
ON/OFF. Makes changes in
equalizer mode.
[FUNC] button
Turns function mode ON/OFF.
II
III
9
No. Button Name/Function
[SEL] button
Selects radio stations and CD
tracks.
[ / ] button
Automatically finds radio
reception and fast forwards/
rewinds.
[RTN] button
Returns to previous screen.
[RESET] button
Resets this equipment
functions to default settings.
[DISP] button
Turns display adjustment mode
ON/OFF and switches screen
display.
11
Page 12
Introduction
No. Button Name/Function
Buttons [1] to [6]
Select radio preset channels
and perform disc mode
functions.
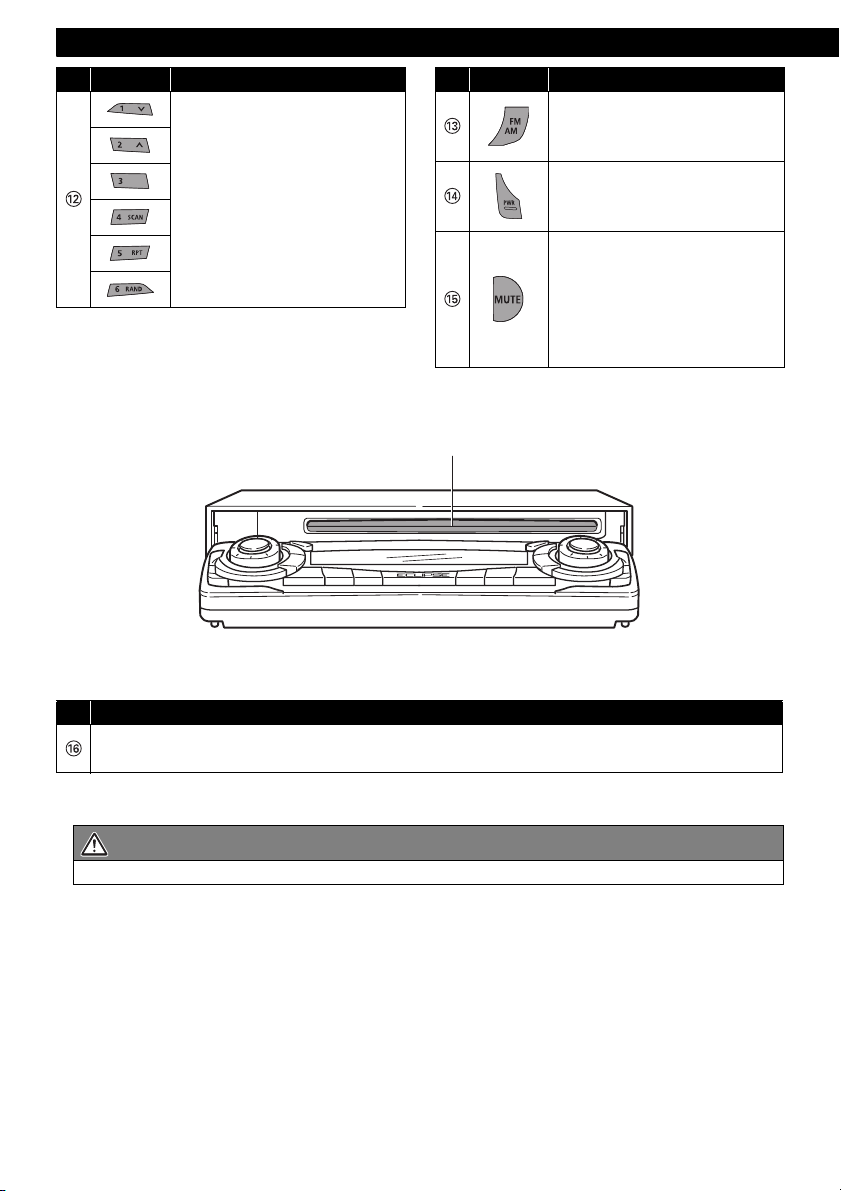
No. Button Name/Function
[FM AM] button
Switches to radio mode and
switches radio bands.
[PWR] button
Turns the equipment power
ON/OFF.
[MUTE] button
Activates and deactivates
mute.
Double function button
➔ "MUTE" & "AREA SHOT"
functions
F
No. Name/Function
Disc slot
Inserts compact discs.
CAUTION
Never place or rest an object or your hands on the front panel.
12
Page 13
Turning the power on and off
When the power is turned ON, the last source
mode (such as CD and tuner) used prior to
turning OFF the power will be restored.
When the vehicle has no ACC position on the
ignition switch, care is needed when turning off
the equipment. Follow Step 2 or Step 3 when
turning off the power.
Names of controls and parts
When power is OFF, press the
1
[PWR] button.
The power will come ON.
ATTENTION
When the equipment's power is turned on
for the first time or if the battery terminals
have been disconnected because of vehicle
maintenance and the power is then turned
back on, the equioment will start up in FM1
mode. After this, the broadcast stations will
be searched for automatically and stored in
buttons [1] to [6].
When power is ON, press the
2
[PWR] button for less than two
seconds.
The power will go OFF and the
equipment will be in Standby.
If you press the [PWR] button again for
more than one second, the power will
go completely off.
When power is ON, press the
3
[PWR] button for more than two
seconds.
The power will go completely OFF.
III
ATTENTION
If a car is not equipped with an ACC position,
press the [PWR] button for more than two
seconds.
13
Page 14
Operation
How to operate the CD (MP3/WMA) player
About compact discs
• The information recorded on a compact disc is read by a laser beam, so nothing touches the disc
surface. A scratch on the recorded surface or a badly warped disc may cause deteriorated sound
quality or intermittent playback. Observe the following precautions to ensure high quality sound
performance:
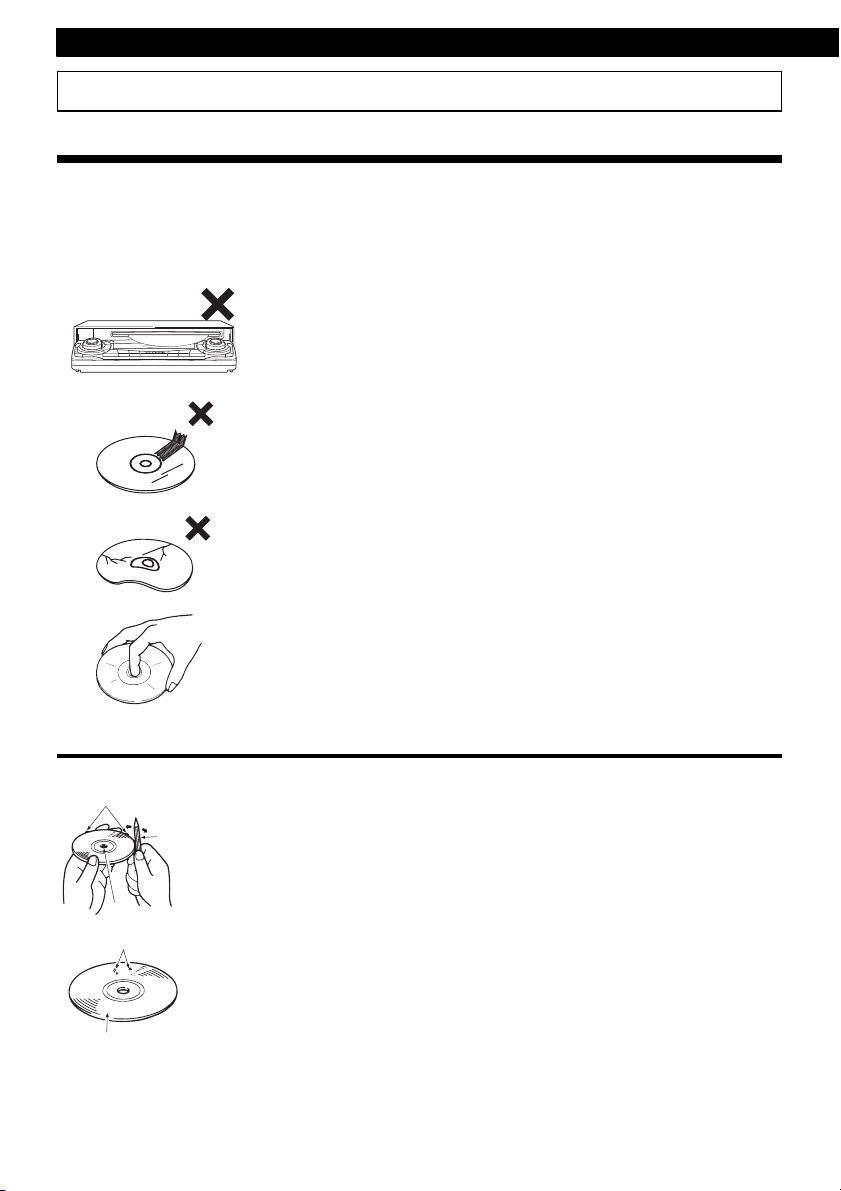
• Do not leave an ejected disc in the disc slot for very long; the disc may
warp. Discs should be stored in their cases and kept away from high
temperature and humidity.
• Do not stick a piece of paper or tape on the disc. Do not write on or
scratch either side of a disc.
• Discs spin at a high speed inside the deck. Keep cracked or warped
discs out of the player to avoid damage to the equipment.
About brand new CDs
Rough Edges
Ballpoint pen
Rough Edges
Flakes
Recorded surface
14
• Avoid touching the recorded surface when handling a disc; handle
discs by their edges.
• You may notice that some brand new discs are rough around the
center hole or outside edge. Remove the rough edges with the side of
a ballpoint pen, etc. Rough edges may prevent proper loading in the
deck. Flakes from the rough edges may also stick to the recorded
surface and interfere with playback.
Page 15
How to operate the CD (MP3/WMA) player
About CD accessories
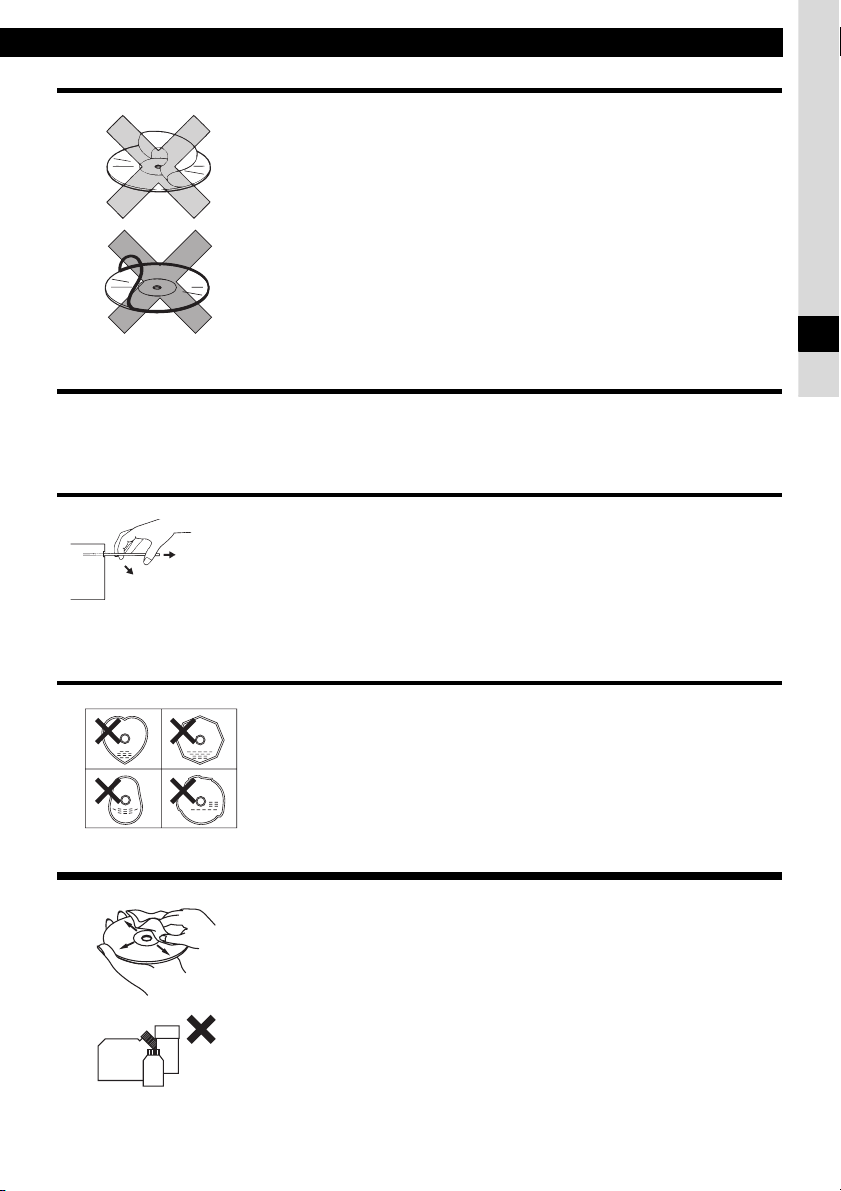
• Do not use accessories (stabilizers, protective seals, laser lens
cleaners, etc.) sold for "improving sound performance" or "protecting
CDs." The changes in CD thickness or outside dimensions made by
these accessories may cause problems in the player.
• Please be sure NOT to attach any ring-shape protector (or other
accessory) to your discs. Those protectors are commercially available
and said to protect disc and to improve sound quality (and antivibration
effect), but they can do more harm than good in regular uses. The most
common problems are disc insertion, disc ejections, and won't play
problems due to the protector ring that came off in the disc mechanism.
About borrowed CDs
• Do not use a CD with glue or remnants of adhesive tape or labels. They may cause the CD to get
stuck inside or damage the deck.
How to remove CDs
• When removing the ejected disc, pull it straight out along the slot.
Pressing downward or lifting upward when removing a disc may
scratch the recorded surface of the disc.
NO
GO
O
D
OKAY
IV
About irregularly-shaped CDs
• Specially-shaped CDs, like heart-shaped or octagonal CDs, cannot be
played. Do not attempt to play them, even with an adapter, since they
may damage the player.
•
About cleaning a CD
• Use a commercially available compact disc cleaner to clean a CD,
wiping gently from the center to the edge.
XXXX
XXXX
XXXX
• Do not use benzine, thinner, LP record spray or other cleaners on
CDs. They may damage a CD’s finish.
15
Page 16

Operation
About MP3/WMA
ATTENTION
The making of MP3/WMA files by recording from sources such as broadcasts, records, recordings, videos and
live performances without permission from the copyright holder for uses other than personal enjoyment is
prohibited.
What is MP3/WMA?
MP3/WMA (MPEG Audio Layer III) is a standard format for audio compression technology. By using
MP3/WMA a file can be compressed to one-tenth the size of the original.
WMA (Windows Media
compressed to a size smaller than MP3 files.
This equipment has limitations on MP3/WMA file standards and recorded media and formats that
can be used.
Playable MP3/WMA file standards
• Supported standards:MPEG-1 Audio Layer III
• Supported sampling frequencies: 44.1, 48 (kHz)
• Supported bit rate: 64, 80, 96, 112, 128, 160, 192, 224, 256, 288, 320 (kbps)
• Supported channel modes: stereo
TM
Audio) is format for audio compression technology. WMA files can be
* Supports VBR. (64~320kbps)
* Does not support free format.
Playable WMA file standards
• Supported standards: WMA Ver. 7
• Supported sampling frequencies: 32, 44.1, 48 (kHz)
• Supported bit rate: 48, 64, 80, 96, 128, 160, 192, 256, 320 (kbps)
WMA Ver. 8
WMA Ver. 9
*Supports VBR (48~192 kbps).
*Does not support lossless compression.
*Does not support WMA files recorded at a frequency of 48kHz with a bit rate
of 48kbps.
ID3/WMA tag
MP3/WMA files have an "ID3 / WMA Tag" that allows input of information so that data such as song
title and artist can be saved.
This deck supports ID3v. 1.0, 1.1 and WMA tags.
16
Page 17

How to operate the CD (MP3/WMA) player
Media
Media capable of playing MP3/WMA includes CD-R and CD-RW discs. Compared to CD-ROM
media commonly used for music discs, CD-R and CD-RW discs are fragile in high temperature/high
humidity environments and one section of the CD-R and CD-RW may become incapable of
playback. Fingerprints or scratches on the disc may prevent playback or cause skipping during
playback. Sections of a CD-R and CD-RW may deteriorate if left inside a vehicle for long periods of
time. It is also recommended that CD-R and CD-RW discs be kept in a light-blocking case because
the discs are vulnerable to ultra-violet light.
Format of discs
The format of discs to be used must be ISO9660 Level 1 or Level 2.
Control items for this standard are as follows:
• Maximum directory layers: 8 layers
• Maximum characters for folder names/file names:32 (including "." and 3 letter file extension)
•
Allowable characters for folder names/file names:
•
Number of files/folders possible on a single disc: 999
[Configuration example for CD supporting MP3/WMA]
Root directory (F1)
F2
Folder 2
001.mp3
002.mp3
003.mp3
004.txt
005.mp3
F158
F159
Folder 158
Folder 159
001.mp3
002.mp3
Number of files/folders possible on a single disc is 999.
Files aside from MP3/WMA files (Example: 004.txt) also count as single files.
A~Z, 0~9, _ (underscore)
IV
Folder 255
F255
• Total number of folders possible on a single disc:255
• Maximum folders this deck can recognize: 256*
*: A root directory is counted as one folder.
File names
Only files with the MP3/WMA file extension ".mp3", ".wma" can be recognized as MP3/WMA and played.
Be sure to save MP3 files with the ".mp3" file extension. Be sure to save WMA files with the ".wma" file
extension. The "MP" letters of the file extension will be recognized whether entered as uppercase letters
or lowercase letters.
CAUTION
If the ".mp3", ".wma" file extension is attached to a file other than an MP3/WMA file, that file will be
mistakenly recognized by this equipment as an MP3/WMA file and played, resulting in loud noise
output that can damage the speakers. Be sure to avoid attaching the ".mp3", ".wma" file extension
to files that are not MP3/WMA files.
17
Page 18

Operation
Multi-sessions
Multi-sessions are supported, and playing of CD-R and CD-RW discs with annotated MP3/WMA
files is possible. However, when "Track at once" has been written, close the session or process the
warning message. Standardize the format of each session without changing the format.
Playing MP3/WMA
When a disc with recorded MP3/WMA files is inserted, the deck first checks all the files on the disc. No sound is
output while the deck is checking the files on the disc. It is recommended that the disc be recorded without files
other than MP3/WMA files and without unnecessary folders in order to speed up the checking of disc files by
the deck.
MP3/WMA playing time display
It is possible that playing time will not be correct, depending on the writing condition of the MP3/
WMA file.
*It is possible that playing time will not be correct when VBR Fast Up/Down is operated.
Display order of MP3/WMA file/folder names
Names of MP3/WMA folders and files within the same level are displayed in the following order.
1.MP3/WMA folders displayed first, by ascending order of numbers, letters.
2.Files displayed next, by ascending order of numbers, letters.
18
Page 19
How to operate the CD (MP3/WMA) player
Listening to CD (MP3/WMA file)
Press the [CD ] button.
1
The front panel opens.
If a disc has already been loaded, the
disc is ejected by pressing the [CD ]
button.
Insert a CD into the disc slot, label
2
side up.
The CD will immediately start playing.
ATTENTION
When a CD is already loaded, press the
[DISC] button to switch to the CD mode.
● Note ●
• When music data recorded in
the normal way (CD-DA) is
present on the same disc with
MP3/WMA music files, the
normally recorded music data
will be played. To listen to the
MP3/WMA music files, press
the button [3] for more than one
second.
• When a non-MP3/WMA file is
played, "NO SUPPORT" will
appear.
• The optional CD changer
cannot be used to play MP3/
WMA files.
Switching to the CD player mode
First press the [DISC] button for less than one
second to switch to the disc mode. It is assumed
here that a CD has already been loaded into the
unit.
Press the [DISC] button for less
1
than one second to switch to the
CD player mode.
This starts CD play.
If an external CD changer and iPod is
connected, each additional press of
the [DISC] button will switch modes
from CD player ➔ CD changer 1 ➔
CD changer 2 ➔ iPod ➔ CD player.
A changer or player with no discs
loaded will be skipped.
ATTENTION
• Playback may be intermittent when there is
a scratch on a CD or when the recorded
side is dirty.
• Only two external CD changers may be
connected.
IV
CAUTION
Do not press the [
being inserted. This could cause an injury
and damage to the front panel.
CD
] button while CD is
19
Page 20
Operation
TRACK (FILE) UP / DOWN
Media
CD
MP3
WMA
Turn the button.
Fast Forward/Rewind
Media
Press and hold the button.
CD
MP3
WMA
: Fast forward.
: Rewind.
SCAN / REPEAT / RANDOM
Media
Press the button.
: Playing the beginning of tracks.
CD
: Repeating the same track. To cancel, press the button again.
: Playing tracks in random order. To cancel, press the button again.
Operation
Turn to the right : Advances to the next track (file).
Turn to the left : Returns to the beginning of the track (file) being played. Repeat
turning for previous tracks (files).
Operation
Operation
On Pressing the button for less than one second.
: Just the first 10 seconds of each file in the folder currently
MP3
WMA
played are played in sequence.
: Repeating the same file. To cancel, press the button again.
: A file is selected from all the files in the folder currently
played and played.
ATTENTION
• To continue playing a desired track, press the button again to stop scanning.
• After the entire disc is scanned once, ordinary playback starts from the point where scanning
started.
20
Page 21
How to operate the CD (MP3/WMA) player
FOLDER UP / DOWN
Media
Operation
Press the button.
MP3
WMA
: Selects the next folder.
: Selects the previous folder.
FOLDER SCAN / FOLDER REPEAT / ALL RANDOM
Media
Operation
On pressing the button for longer than one second.
MP3
WMA
: Just the first 10 seconds of the first song in each folder are played.
: All the files in the same layer as the folder being played are repeated. To cancel,
press the button again.
: The files in all folders are played randomly. To cancel, press the button again.
ATTENTION
• During random playback, press the [5 RPT] button to repeat the track being played. To cancel
repeat play (go back to random play), press the [5 RPT] button again. During playback of a
particular track: The track being played is played repeatedly.
• Occasionally the same track happens to be played (selected) two or more times in a row; this
is normal operation and is not a sign of a problem.
• When any of the functions -" REPEAT " and " RANDOM " -is selected, a message such as
[RPA] or [RAND] appears on the display to verify the current function.
IV
21
Page 22
Operation
Return to the root directory of the CD
In the root directory, when a file cannot replay,
the system will return to the first file that can
perform a replay. (In the configuration example,
the file is returning to 001.mp3. see page 17.)
Press the [RTN] button.
1
Displaying CD text
Only this CD player supports CD TEXT. It can not
be displayed with the optional CD changer. If the
CD came with a logo shown below, it is recorded
with a disc title and track titles. These information
will be displayed during playback.
Press the [DISP] button for more
1
than one second.
Pressing the [DISP] button while text is
displayed scrolls the display in the
order DISC title ➔ TRACK title, and
then the display stops with the TRACK
title.
CD TEXT recorded with characters
other than alphanumeric and symbols
cannot be displayed.
Displaying title (MP3/WMA)
Press the [DISP] button for more
1
than one second.
Each time the button is pressed, the
following will be displayed in order.
Folder Name/File Name* ➔ Folder No.
/File No. ➔ Tag
*:The display area shows a
maximum of 9 characters and then
scrolls to display the remaining
characters.
After the folder name is displayed,
the file name will be displayed by
scrolling. After the file name is
scrolled, the display will be fixed.
ATTENTION
Folder name/file name or tag recorded with
characters other than alphanumeric and
symbols cannot be displayed.
Ejecting the disc
Press the [CD ] button.
1
The front panel opens and the disc is
ejected.
Remove the disc and press the
2
[CD ] button.
The front panel closes.
22
CAUTION
• Do not drive with the front panel open.
The panel may cause unexpected
personal injury during a panic stop or
abrupt changes of vehicle motin.
• Do not attempt to close the front panel
by hand. Doing so may damage the
panel.
Page 23
How to operate the tuner
How to operate the tuner
ATTENTION
• If stations have been stored in memory,
pressing the stored button from [1] to [6] will
directly select a station. (Refer to "Manually
setting stations into memory" on page 24)
CAUTION
If the vehicle’s battery is disconnected (for
repairs to the vehicle or for removing the
receiver), all stations in memory will be lost.
In such a case, set stations in the memory
again.
Tuning to a station
First, press the [FM AM] button to start tuner
operation.
There are automatic and manual methods for
setting stations in memory. The receiver will
accept up to 24 stations in memory: 6 in AM 18 in
FM (6 each for FM1, FM2 and FM3.) (Initial
setting)
Press the [FM AM] button for less
1
than one second to switch to the
desired FM, AM bands.
Radio bands will switch from FM1 ➔
FM2 ➔ FM3 ➔ AM in order each time
the button is pressed.
Press the [ ] or [ ] button to
3
start the automatic station search.
button:
[]
Starts searching toward higher
frequencies.
[] button:
Starts searching toward lower
frequencies.
ATTENTION
At times, it may be difficult to maintain optimum
reception because the antenna affixed to your
vehicle is in motion constantly (relative to the
broadcast antenna), encountering continuous
variation in the received radio signals’ strength.
Other factors affecting reception include
interference from natural obstacles, sign posts,
etc.
When an optional HD Radio tuner unit is
connected, digital broadcasts have reception
priority. (U.S.A. only)
IV
V
Turn the [SEL] button to the left or
2
right to tune to a station.
Turn to the right:
Tunes to higher frequencies.
Turn to the left:
Tunes to lower frequencies.
23
Page 24
Operation
Entering stations into memory automatically (The automatic preset mode: ASM)
Press the [SEL] button for more
1
than two seconds until a beep is
heard.
The automatic preset mode starts.
The [ASM ON] indicator on the screen
flashes, and stations are automatically
entered in memory under buttons [1] to
[6].
These buttons are called preset
buttons.
ATTENTION
• Pressing the preset buttons ([1] to [6])
allows you to make one-touch station
selections. The frequency of the selected
station is indicated on the display.
• When a new station is set in memory, the
station previously set in memory will be
deleted.
• If there are fewer than six receivable
stations, the stations set in the remaining
buttons will be retained.
b
Manually setting stations into memory
This section covers the setting of stations in
memory under the numbered buttons.
Turn the [SEL] button to the right
1
or left to tune to the station to be
entered in memory.
Select any button, from [1] to [6],
2
and press it for more than two
seconds.
The tuned station is now memorized
and set in the selected button.
Repeat the procedure to set
additional manually tuned stations in
memory, in turn, for buttons [1] to [6].
These buttons are called the preset
buttons.
Preset station scan
This function enables reception of all the stations
in the preset buttons for five seconds each.
Press the [SEL] button for less
1
than two seconds.
[P SCAN] will appear on the display,
and stations stored under preset
buttons [1] to [6] will be played for
five seconds each.
24
To stop the preset scan mode at a
2
desired station, press the [SEL]
button again.
The receiver will stay tuned to the
desired station.
Page 25
How to operate the tuner
Changing the reception sensitivity for automatic scanning
The equipment lets you select the reception
sensitivity to be used for automatic scanning of
stations. The two sensitivity modes available for
this equipment are LOC mode and DX mode.
During automatic scanning, the
reception sensitivity switches
automatically to one of two levels.
Initially the reception sensitivity is
set to the low level so that only
LOC Mode
DX Mode
When an optional HD Radio tuner is
connected, reception sensitivity is set to the
LOC Mode. The DX Mode is unavailable.
(U.S.A. only)
1
2
stations with strong signals are
received. If no stations could be
received, the reception sensitivity is
increased so that stations with
weaker signals can also be
received.
Because the reception sensitivity for
automatic scanning is set to the high
level from the start, even stations
with weaker signals can be received.
(Signal crossover may result in
some stations being hard to hear.)
ATTENTION
Check that the equipment is in
standby mode.
Press and hold the button [1], then
the [FM AM] button, and hold both
for more than three seconds.
The mode switches between LOC
mode and DX mode each time the
buttons are pressed.
Changing the radio band location
The location for the radio bands used between
the North American region and the Asia/
Australia/Latin region can be switched. The
default setting is USA (North America).
ATTENTION
When an optional HD Radio tuner is
connected, radio band location is set to USA.
Other radio band locations are unavailable.
(U.S.A. only)
Check that the equipment is in
1
standby mode.
Press and hold the button [3], then
2
the [FM AM] button, and hold both
for more than three seconds.
The radio band switches in the order
shown below each time the buttons
are pressed.
USA ➔ ASIA ➔ AUS ➔ LATIN
➔ USA www
After this, the broadcast stations will
be searched for automatically and
stored in buttons [1] to [6].
V
25
Page 26
Operation
How to use the optional remote control
Precautions in use of the remote control
• Be careful when handling the control, especially because it is small and light. Dropping or striking it
hard may damage it, wear out the battery or cause a malfunction.
• Keep the remote control free of moisture, dust and water. Do not subject it to shock.
• Do not place the remote control where it will get hot, such as on the dashboard or near a heater
vent. Allowing the remote control to overheat may warp its case or cause other problems.
• Do not operate the remote control while driving because doing so could cause an accident.
• When using the remote control, point it toward at the remote control light receptor.
• The light receptor may not operate correctly if it is exposed to bright light such as direct sunlight.
• Be sure to press the [PWR] button on the main unit for more than two seconds to shut it down before
leaving the car, or the car battery may be run down. When the main unit is shut down, the remote
control will not work.
• Remove the batteries from the remote control whenever it is not to be used for a long time.
Cleaning the remote control
• Use a dry cloth to keep the remote control clean. If the remote control gets extremely dirty, clean it
with a cloth moistened with diluted liquid detergent. Do not use alcohol or thinner; these compounds
may damage the finish.
• In no event should benzine or thinner be used. These substances will damage the case or finish.
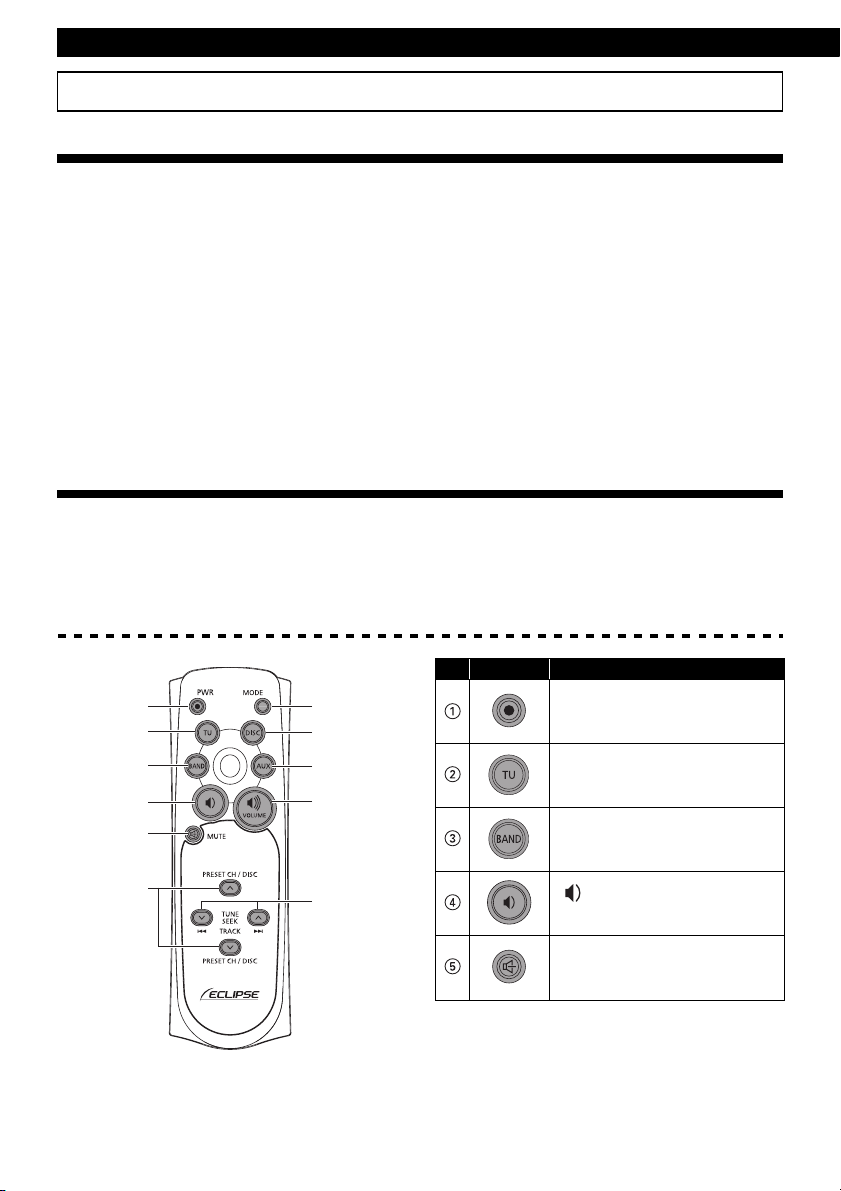
Remote control (optional)
1
2
3
4
5
6
26
7
8
9
?
A
No. Button Name/Function
[PWR] button
Turns equipment power ON/
OFF.
[TU] button
Switches to tuner mode.
[BAND] button
Switches to radio bands and
DISC mode.
[ ] button
Decreases the volume.
[MUTE] button
Activates and deactivates
mute.
Page 27
How to use the optional remote control
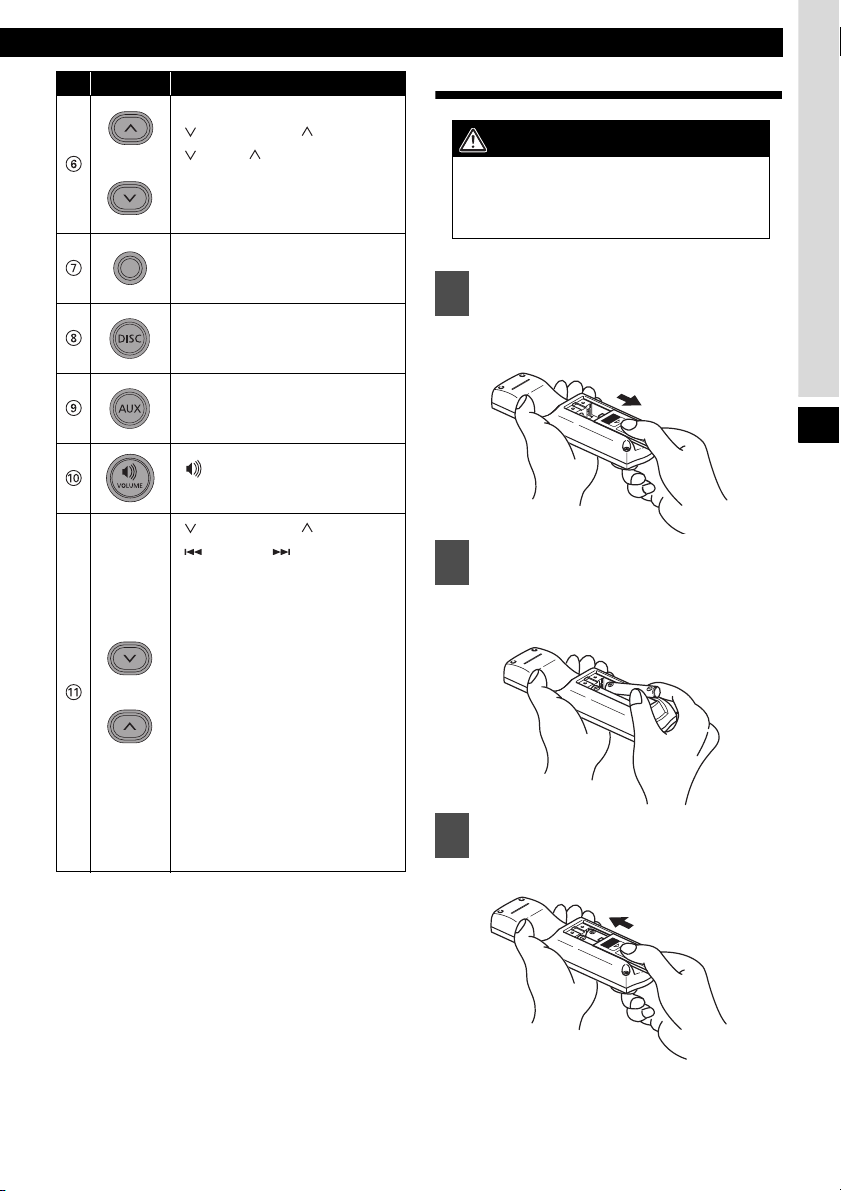
No. Button Name/Working
[ PRESET CH ] buttons
[ DISC ] buttons
Select radio preset channels
and CD discs (folders).
[MODE] button
Switches to playback mode.
[DISC] button
Switches to DISC mode.
[AUX] button
Switches to AUX mode.
[ ] button
Increases the volume.
[ TUNE·SEEK ] buttons
[ TRACK ] buttons
[In the radio mode]
Pressing the buttons briefly:
Tunes to stations manually
Pressing the buttons for several
seconds:
Tunes to stations
automatically.
[In the CD (MP3/WMA) mode]
Pressing the buttons briefly:
Selects tracks (files).
Pressing the buttons for several
seconds:
Fast-forwards/rewinds the
track.
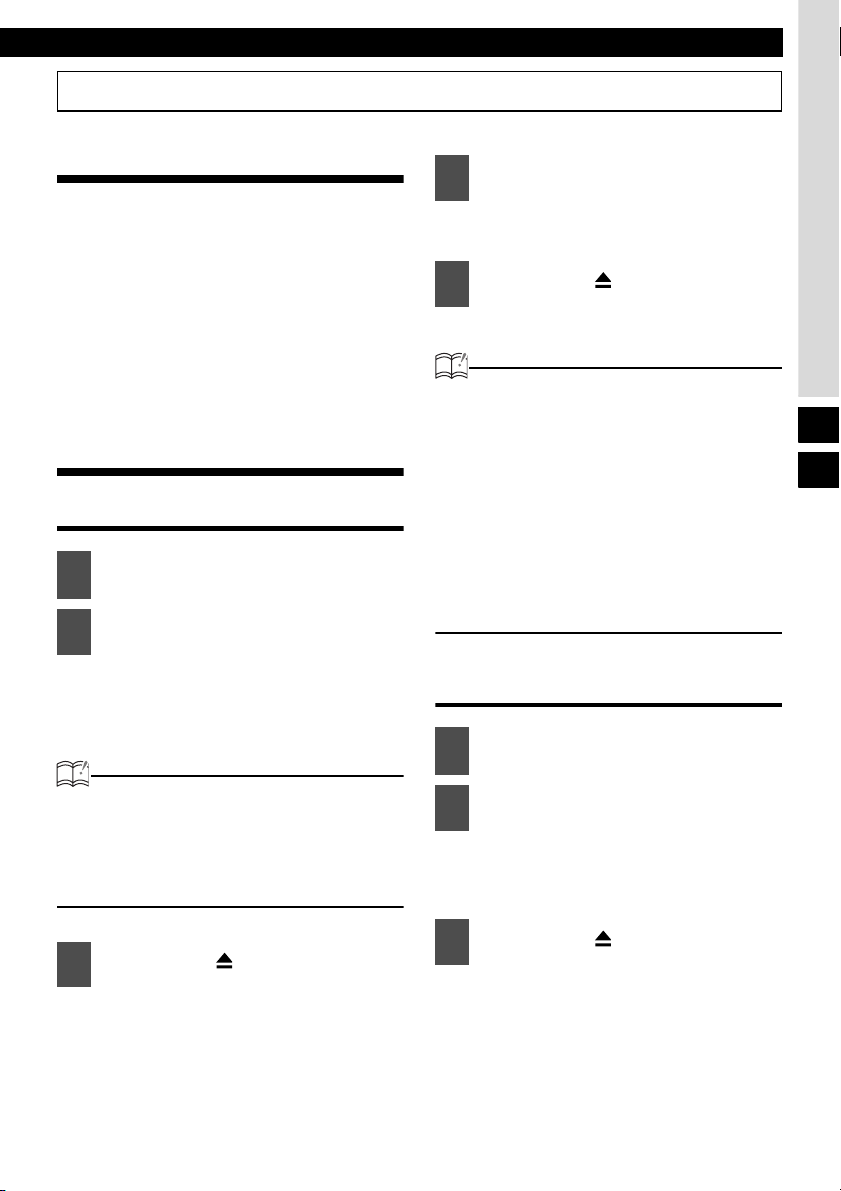
Replacing the battery
WARNING
To prevent accidents, store batteries out of
the reach of children. If a child has
swallowed one, consult a doctor
immediately.
Use two AAA size batteries.
Remove the back cover of the
1
remote control unit by gently
pressing and sliding it in the
direction indicated by the arrow.
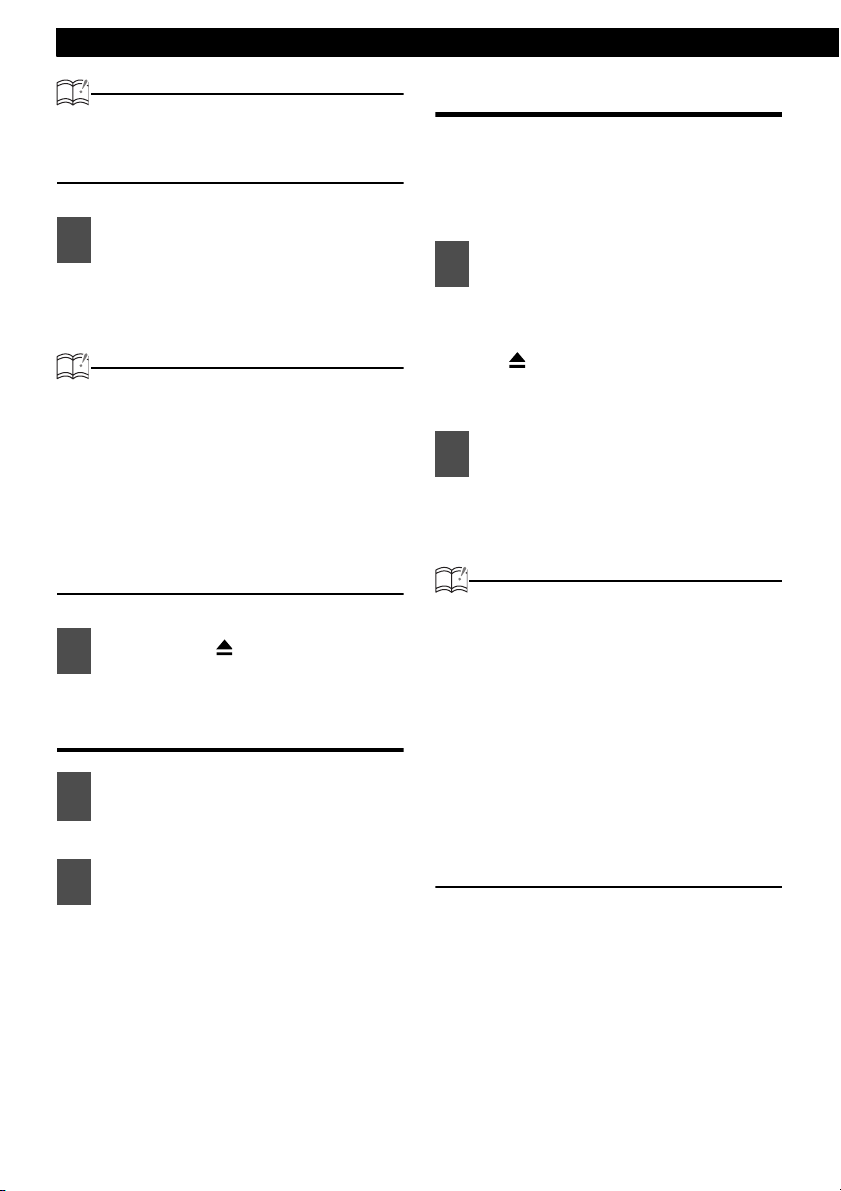
Install the two batteries provided
2
into the compartment as
illustrated inside the
compartment.
Return the back cover into place
3
by sliding it in the direction
indicated by the arrow.
VI
27
Page 28

Operation
CAUTION
• Be extremely careful not to swallow the
battery.
• The battery life is approximately one year.
If the remote control unit does not operate
correctly or if the button lamp gets dim,
replace the batteries.
• Be sure to orient the batteries correctly so
that the positive and negative poles match
the diagram.
• Do not use one new battery and one old
one; use two new batteries.
• Use only two of the same kind of battery.
• If any liquid is seen leaking from the
batteries, remove both batteries and
dispose of them properly. Thoroughly
clean the battery compartment with a dry
cloth. Then install new batteries.
28
Page 29
ESN security operating procedure
ESN security operating procedure
About ESN
This equipment incorporates ESN (Eclipse
Security Network). The ESN is a security system
which disables all the equipment functions when
the power is restored if the equipment is stolen
from the vehicle. Once the ESN is activated,
removing power to the equipment or vehicle will
activate the security feature. Setting or canceling
of the security feature can be done with a "Key
CD". It is necessary to register a music CD as the
"Key CD" in advance.
How to operate the ESN (Key CD) security
How to program the Key CD
Check that the equipment is in
1
standby.
Press and hold the [FUNC] button,
2
then the button [6], and hold both
for more than one second.
A [SEC] message appears, in two
seconds it will change to [DISC].
ATTENTION
• If a CD has already been inserted, a [SEC]
message appears, and then the front panel
opens and the CD is ejected.
• If a security is activated, programing the
Key CD is not available.
Insert the CD into the slot.
4
A [SEC] message appears, then the
Key CD is ejected.
Press the [CD ] button.
5
The front panel closes.
ATTENTION
• If there is a problem with the inserted CD,
an [ERR] message will appear for two
seconds and the CD will be ejected.
Reinsert the ejected CD.
• If a CD causes the [ERR] message to
appear twice in a row, a [CHANGE]
message will appear for two seconds. Try
another CD.
Copy Protected CD and MP3/WMA CD-ROM
•
cannot be programed for Key CD security.
• The Security indicator will flash whenever
the vehicle's ignition is switched off.
How to cancel the Key CD
Check that the equipment is in
1
standby.
Press and hold the [FUNC] button,
2
then button [6], and hold both for
more than one second.
A [SEC] message appears, then in two
seconds it will change to [DISC].
VI
VII
Press the [CD ] button.
3
The front panel opens; The CD3000 is
now ready for your Key CD in the CD
slot.
Press the [CD ] button.
3
The front panel opens; The CD3000 is
now ready for your Key CD in the CD
slot.
29
Page 30
Various Settings
ATTENTION
If a CD has already been inserted, a [SEC]
message appears, and then the front panel
opens and the CD is ejected.
Insert your Key CD into the slot.
4
A [CANCEL] message appears, then
the Key CD is ejected.
The Key CD is cancelled.
ATTENTION
• This process cancels the protection of ESN
equipment.
• If power to the ESN equipment is
disconnected, then reconnected, a Key CD
will not need to be inserted in order to
return the unit to normal operation.
• Inserting a CD other than the Key CD will
not cancel the protection. Instead, the
display [ERR] for two seconds, then the
normal CD playback mode will activate.
Press the [CD ] button.
5
The front panel closes.
How to change the Key CD
First, cancel the existing Key CD.
1
Refer to "How to cancel the Key CD".
Next, program a new Key CD.
2
Refer to "How to program the Key
CD".
How to resume normal operation (ESN security lock out)
If power is disconnected while ESN security is
active (a Key CD was programed), operation
is disabled until power is restored and the
equipment unlocked. Follow this procedure to
resume normal operation.
When the power is turned on after
1
disconnecting the battery power, a
[SEC] message will appear for two
seconds. Thereafter, the message
changes to [DISC] and press the
[CD ] button, then the CD3000 is
ready to accept your Key CD into
the slot.
Insert your Key CD.
2
If the correct CD is inserted, an [OK]
message will appear for two seconds
and the CD will begin playing.
ATTENTION
• If the incorrect CD is inserted, an [ERR_ ]
("ERR" and error number) message will
appear for two seconds, after which the CD
will be ejected.
• If [ERR5] (the 5th time an error has
occurred) appears, [HELP] will appear, after
which the CD will be ejected. When [HELP]
appears, carry out the operations for an
ESN security lock out by following the
procedure in "What happens if an incorrect
CD is inserted?" on page 31.
• You must use the same CD used for Key
CD programing; a duplicate CD may not
work properly.
30
Page 31

ESN security operating procedure
What happens if an incorrect CD is inserted?
After the 5th incorrect attempt, the
1
display reads [HELP] for five
seconds.
After the [HELP] message will appear
for five seconds, serial number will
appear.
Press the [CD ] button to close
2
the front panel.
Press the [FUNC] button, then the
3
button [6], and hold them for five
seconds.
After the [SEC] message appears for
two seconds, rolling code (six digit) will
appear.
Press the [FUNC] button.
4
[DISC] flashes on the display.
You will have five more attempts to
insert correct disc.
Insert the Key CD into the slot.
5
If the correct CD is inserted, an [OK]
message will appear for two seconds
and the CD will be ejected.
ATTENTION
• If an incorrect CD is inserted, an [ERR_ ] ("ERR"
and error number) message will appear for two
seconds, after which the CD will be ejected.
• This process cancels the protection for ESN
equipment.
● Note ●
If after 5 tries the correct Key CD is not
inserted, the display will read [CALL]; the
equipment must be returned to Eclipse to
be reset. In this case, please contact your
Eclipse dealer for assistance.
Your Key CD can be easily forgotten.
Write the album name in a reminder
note (See page 63).
How to turn the security indicator on/off
Once ESN security is activated, the indicator
flashes whenever the vehicle's ignition switch is
turned off, warning potential thieves that the
equipment is protected. However, if do not want
this visible deterrent, it may be turned off.
With the equipment in standby,
1
press the [FUNC] button, then the
button [2] and hold both for more
than one second.
[IND. FLASH] or [IND.-----] appears
2
on the display.
[IND. FLASH] means the security
indicator will flash when the vehicle's
ignition switch is off, and [IND.-----]
means it will not. Repeat the above
steps to reactivate the flash mode.
How to read the Electronic Serial Number
Check that the equipment is in
1
standby.
Press and hold the [FUNC] button,
2
then the button [4], and hold both
for more than one second.
[ESN] appears on the display, followed
by an eight-digit number; this number
is your electronic serial number (ESN).
You may use this number to identify
your Eclipse CD3000 in the event of
theft recovery.
VII
31
Page 32

Various Settings
How to operate the AREA SHOT function (U.S.A. and CANADA only)
About the AREA SHOT
Using AREA SHOT function, maps to destinations and guidance information can be displayed on your
equipment if you have set route on the ECLIPSE web site (E-iSERV).
ATTENTION
The display in this manual may differ from that of the main unit.
To use the AREA SHOT function
In order to use AREA SHOT, driving instructions for the direction of travel and the street names of intersections
to turn, they must first be downloaded from the ECLIPSE website (E-iSERV) and imported into the CD3000.
The process is as follows:
Access The ECLIPSE Website. (URL: http://www.e-iserv.jp)
Register as a user. A User Registration Key is required when registering. For details
about User Registration Key, see page 57.
(To register, follow the instructions provided by the website. Once you have
registered, there is no need to repeat the procedure.)
Login.
Set your start point and destination on the AREA SHOT page. Address or
intersection, city, state/prov and zip/postal code can be used to search for start
points, routes and destinations. Your home can be registered as a memory point.
(Follow the instructions provided on the website.)
Download information.
Write the downloaded information to a CD-R.
Import the data written to the CD-R into the CD3000. (For details, see 33.)
AREA SHOT is ready for use.
Map data
The map data used by the deck was created based on information provided by NAVTEQ (U.S.A. and
CANADA).
When using the map data, be aware of actual road conditions and obey traffic rules.
Copying, publishing or using maps in electronic media without express written consent is forbidden.
32
Page 33

How to operate the AREA SHOT function (U.S.A. and CANADA only)
Reading the AREA SHOT data
The AREA SHOT data that has been
downloaded from E-iSERV (web site) to a CD-R
can be loaded into the deck and saved there.
Press the [FUNC] button for less
1
than one second.
The function mode is activated.
Turn the [SEL] button to select
2
AreaShot.
Press the [SEL] button.
3
The front panel opens automatically.
Insert the CD-R to be used for read
4
the Area Shot data.
If a CD-R has been inserted, the panel
closes automatically.
After the panel is closed, files in the
CD-R are read. While files are being
read, the [READING...] message
appears. If there are incorrect files on
the CD-R, "No DATA" is displayed.
ATTENTION
• The equipment can only import files from
CD-R that have been written in root
directories.
XXXXXXXX.ast
• Disc formats that may be used are as
follows:
•CD-ROM (MODE 1)
•CD-ROM (MODE2_FORM 1)
*CD-ROMs written in MODE2_FORM2 cannot
be read.
• The file name can be changed using 8
alphameric characters (space’s cannot be
used);
Automatic creation
File extension
CAUTION
Do not turn the power or ignition switch off
while reading. Interrupting reading process
might corrupt the data.
Changing the AREA SHOT mode
VIII
Turn the [SEL] button to select the
5
saving file.
Press the [SEL] button.
6
The selected file will be saved.
"READING" is displayed while data is
being imported. When reading has
finished, [Completed] will appear on
the display and then it will return to the
display for selecting the function
mode.
Press the [MUTE] button for more
1
than one second.
Guidance maps, intersection street
names and turning directions are
displayed on the screen. Pressing and
holding the [MUTE] button (for 1
second or more) a second time closes
the Area Shot mode.
ATTENTION
• Pressing any button other than [ ], [ ],
[DISP] and [RTN] displays the audio control
screen enabling audio system operation. If
no button is pressed within 6 seconds, the
guidance screen returns.
• If the audio control screen is displayed
while the Area Shot mode is ON, pressing
the [RTN], [ ], [ ] or [DISP] buttons
displays the guidance screen.
33
Page 34

Various Settings
CAUTION
• Modes may not be changed if guidance
data has not been imported properly.
• Do not look at the screen while driving.
Using the AREA SHOT mode
By manually switching between guidance points,
both previous and next guidance points can be
confirmed during guidance. Intersection street
names and the direction of turns are shown on
the display in text and with arrows.
Switching between guidance points
After passing each location described in the
guidance, it is necessary to switch manually
to the next guidance screen. The previous
screen can also be accessed manually and
confirmed.
Press the [ ] or [ ] button to
1
switch between guidance points.
[ ] button:
Switches to the next guidance point.
[ ] button:
Switches to the previous guidance
point.
Changing AREA SHOT screens
In the AREA SHOT mode, the audio screen
can be accessed.
Press the [RTN] button.
1
Pressing the button repeatedly allows
you to switch back and forth between
the AREA SHOT screen and the Audio
screen.
● Note ●
• The distance between a
previous and next turn
intersections is displayed on
the screen in miles (“mi”) for
US model and in kilometers
(“km”) for Australia model.
Re-scrolling through text information
Text information including intersection street
names and turn directions can be scrolled
across the screen. A maximum of 9
characters can be displayed on a single
screen. Excess characters are scrolled on the
display. When scrolling is complete, the first
nine characters are once more displayed on
the screen. To re-scroll perform the following
operation:
Press the [DISP] button.
1
Guidance information can be rescrolled.
34
Page 35

Display Arrows
How to operate the AREA SHOT function (U.S.A. and CANADA only)
Arrows for indicating turn directions are displayed as follows.
Diagonally
forward right
Right Left
Diagonally
rear right
Diagonally
left rear
Diagonally
forward left
Depending on driving conditions, arrows indicate the following:
Expressway Intersection
Traffic
merges to
the right
Traffic
merges to
the left
Right hand
entrance
Left hand
entrance
A right hand
exit
Right at the
junction
Left at the
junction
VIII
A left hand
exit
35
Page 36

Various Settings
How to operate the AUDIO CONTROL
Switching audio control modes
Various audio control modes may be fine-tuned using this procedure.
Press the [AUDIO CONTROL] button for less than one second to select the item
1
to be adjusted.
Modes will switch in the order shown below each time the button is pressed.
VOL ➔ BASS ➔ MID ➔ TREB ➔ BAL ➔ FAD ➔ NON-F*
➔ VOL www
*1: NON-F (non-fader) Output is not affected by the settings of the BASS, MID,
TREBLE, loudness function or equalizer.
*2: Setting cannot be made in FM mode.
ATTENTION
Press the [MUTE] button for less than one second to cut the volume or restore it instantly.
WARNING
Do not adjust the volume or other controls while driving the vehicle. Do so only while parked in a
safe location.
1
➔ SVC*2 ➔ LOUD
Mode Function
VOL (VOLUME) Adjusts volume.
Adjusts bass level. Bass mode can be
BASS
MID (MIDDLE)
TREB (TREBLE)
BAL (BALANCE)
FAD (FADER) Adjusts front/rear speaker balance.
NON-F (NON-FADER)
adjusted for each source
(CDP/CDC, FM ,AM).
Adjusts middle level. Mid mode can be
adjusted for each source
(CDP/CDC, FM , AM).
Adjusts treble level. Treble mode can be
adjusted for each source
(CDP/CDC, FM , AM).
Adjusts left/right speaker balance.
Adjusts non-fader level (for connected
sub-woofers, etc.).
36
[AUDIO CONTROL] button
Turn to the Left Turn to the Right
Decreases the
volume.
Softens low sounds.
Softens medium
sounds.
Softens high sounds.
Emphasizes left
speakers.
Emphasizes rear
speakers.
Decreases level. Increases level.
Increases the
volume.
Emphasizes low
sounds.
Emphasizes medium
sounds.
Emphasizes high
sounds.
Emphasizes right
speakers.
Emphasizes front
speakers.
Page 37

How to operate the AUDIO CONTROL
Adjusts different volume levels for each
SVC (Source Volume
Control)
LOUD
audio mode. When SVC is set, the
volume level can change as shown in the
example settings in the table on the this
page.
The loudness control may be turned on to
emphasize low and high frequencies at
low volume levels.
Loudness compensates for the apparent
weakness of low and high frequencies at
low volume by boosting the bass and
treble levels.
Decreases the SVC
setting level.
Turn the loudness control ON/OFF.
Increases the SVC
setting level.
Setting examples:
The volume for the initial FM mode (default value: 40) is used as a reference for storing the differences
in volume that have been set for each audio mode.
Audio mode FM AM CD
Default value
(Volume level)
SVC setting
(Volume level)
Reference
(40)
Reference
(40)
When volume level in FM
mode is adjusted from 40
45 55 ➔ 60 30 ➔ 35
to 45
When volume level in CD
mode is adjusted from 35
45 ➔ 70 60 ➔ 80* 60
to 60
When volume level in AM
mode is adjusted from 80
70 ➔ 52060 ➔ 0*
to 20
*:The volume levels can be set to a maximum of 80 and a minimum of 0. If you try to go past the
maximum or minimum volume level, the level will not change. For the CD changer, SVC
adjusts the volume using the setting value for the CD player.
The volume difference can be set within a range of -10 to +20.
0
(40)
SVC setting
value
+15 (55)
0
(40)
SVC setting
value
-10 (30)
IX
ATTENTION
If the battery terminals have been disconnected because of vehicle maintenance, the SVC settings
will return to their default values. If this happens, you will need to make the settings again.
37
Page 38

Various Settings
Making changes with Equalizer Mode
Using EQ (equalizer), you can adjust the
frequency according to the genre of the music
you are listening to or the kind of the musical
instruments.
This equipment is equipped with three equalizer
modes. Furthermore, the set value in the audio
control mode can be stored and is called as a
CUSTOM mode set value.
Press the [SOUND] button for less
1
than one second.
Each time the button is pressed, the
selection changes in the following
order.
DEFEAT(Equalizer OFF)
POWER (Low frequencies
emphasized)
SHARP (High frequencies
emphasized)
➔➔➔➔➔www
Equalizer user preset memory
The set values for each audio control mode of
BASS, MID and TREB can be stored.
The stored value can be recalled by switching the
equalizer mode to the CUSTOM mode.
Press the [AUDIO CONTROL]
1
button for more than one second.
The set equalizer value is stored in the
CUSTOM mode.
VOCAL (Mid frequencies emphasized)
CUSTOM (Equalizer user preset
value)
DEFEAT(Equalizer OFF) www
38
Page 39

How to operate the Sound Adjustment Mode
How to operate the Sound Adjustment Mode
About Sound Adjustment Mode
This equipment is equipped with various functions to compensate the acoustic characteristics inside
the vehicle.
The following adjustments can be made in the sound adjustment mode.
• Crossover (FRONT/REAR/NON-FADER)
• Switching the non fader phase.
Crossover
The frequency band that is stored by audio media such as CDs is a fairly wide range from 20 Hz to 20
kHz, and it is difficult for a single speaker to be able to play back all frequencies in such a wide range.
Because of this, several speakers can be used, with different frequency bands (such as treble,
medium and bass) allotted to each speaker so that wide frequency ranges can be played back.
The "Crossover" function is used to allot the frequency ranges that are to be played back by each
speaker in accordance with the installed speaker and the layout of the speakers, in order to obtain
the maximum level of performance from the speakers and to provide the most stable frequency
characteristics.
The crossover function includes a high-pass filter (HPF) for playing back treble sounds, and a lowpass filter (LPF) for playing back bass sounds. In addition, the HPF and LPF are used in
combination in order to play back sounds in the medium range.
IX
-3dB
Bass range Mid range Treble range
20Hz
For example, when adjusting the HPF, frequencies that are lower than the specified frequency are
progressively dampened, rather than simply not being played back at all. The "slope" adjustment
function is the function that is used to adjust these dampening characteristics.
The slope characteristics of a filter are such that with larger slope values (for example 12 dB/oct),
the slope becomes steeper, and so the amount of sound mixing in with neighboring bands becomes
less so that only the target band is played back. However, it also causes the merging of sound
between speakers to become poorer and can result in greater distortion.
• The crossover function is a filter that allocates specified frequency bands.
• A high-pass filter (HPF) is a filter that cuts out frequencies that are lower than the specified
frequency (bass range) and allows higher frequencies (treble range) to pass through.
• A low-pass filter (LPF) is a filter that cuts out frequencies that are higher than the specified
frequency (treble range) and allows lower frequencies (bass range) to pass through.
• The slope is the signal level at which frequencies that are one octave higher or one octave lower
are dampened.
The larger the slope value, the greater the slope. In addition, when "PASS" is selected, the slope
is eliminated (sound does not pass through the filters), so that the crossover function has no
effect.
fc1(LPF) fc2(HPF) fc3(LPF) fc4(HPF)
fc*: Cutoff frequency
20kHz
39
X
Page 40

Various Settings
When this deck is in normal mode, it corresponds to basic speaker systems which comprise front
speakers, rear speakers, and subwoofer. In such cases, the crossover can be used to apply the
HPF to the front and rear speakers and the LPF to the sub-woofer so that the sound from all
speakers merges properly. In addition to the 4 speaker system, in pro mode, the adjustments can be
made to suit speaker system where the front speaker, rear speaker and non-fader output can be
switched between Hi, Mid or Low output and the speakers can be combined according to each
range (treble range: tweeter, mid range: mid, bass range: woofer) to provide 3-way playback. In this
case, the crossover function can be used to adjust the playback ranges so that the HPF is applied to
the treble-range speakers, the HPF and LPF is applied to the Mid-range speakers, and the LPF is
applied to the bass-range speakers so that the sound from all speakers merges properly.
Bass range
(woofers)
20Hz
fc(LPF/HPF)
80Hz, 100Hz
Mid range (Front and rear speakers)
20kHz
Non-Fader phase
The sounds that are output from woofers include sounds that are in the same frequency ranges that
are output from the front and rear speakers, and under the various conditions that can occur inside
vehicle compartments, some of these sounds may cancel each other out. This phenomenon can be
eliminated by changing the phase of the woofer.
The phase of the woofer can be set to normal timing (in which the output timing between the front
and rear speakers and the woofer is the same) or reverse timing (in which the output timing between
the front and rear speakers and the woofer is different), depending on the vehicle compartment
conditions.
40
Page 41

How to operate the Sound Adjustment Mode
Making changes with Sound Adjustment Mode
Press the [SOUND] button more than one second.
1
Enters sound adjustment mode.
Turn the [SEL] button to select a setting item.
2
When the button is turned, the setting item changes in the following order.
Press the [SEL] button to select the setting item. After selecting the setting item, follow
the procedures in the list below.
Crossover adjustment (X-Over F/R)
The HPF (high-pass filter) for front and rear speakers can be switched ON and OFF.
Turn the [SEL] button to select ON or OFF.
1
Press the [SEL] button.
2
ATTENTION: The set value of the HPF is 100 Hz, 18 db/oct.
Crossover adjustment (X-Over NF)
The LPF (low-pass filter) for sub-woofer can be switched ON and OFF.
Turn the [SEL] button to select ON or OFF.
1
Press the [SEL] button.
2
ATTENTION: The set value of the LPF is 80 Hz, 18 db/oct.
X
Non-Fader phase selection (Non-F Phase)
The merging of sound between the front and rear speakers and the woofer can be improved by selecting the
phase. Switch to a phase which lets the speakers combine without any disharmony.
Turn the [SEL] button to select the NORMAL or REVERSE.
1
Press the [SEL] button.
2
Press the [RTN] button.
3
At this time, other adjustments can also be made in sound adjustment mode.
Press the [SOUND] or [RTN] button to exit sound adjustment mode.
4
NORMAL: Normal phase
REVERSE: Reverse phase
41
Page 42

Various Settings
Setting the contrast of the display
In accordance with your viewing angle, you can
adjust the contrast of the display.
Press the [DISP] button for less
1
than one second.
Enters contrast adjustment mode.
Turn the [SEL] button to adjust the
2
CONTRAST.
The contrast can be adjusted in the
range of -5 to +5.
Turn to the right:
Increases level.
Turn to the left:
Decreases level.
Press the [SEL] button.
3
The selected settings will take effect.
Press the [DISP] or [RTN] button to
4
exit display adjustment mode.
42
Page 43

Making changes with Function Mode
Making changes with Function Mode
A variety of settings can be changed.
Press the [FUNC] button.
1
The function mode is activated.
ATTENTION
If you press the [FUNC] button during function mode, the adjustment mode is cancelled and the
mode returns to normal music mode.
Turn the [SEL] button in either direction to display setting items for selection.
2
When the button is turned, the setting item changes in the following order.
Press the [SEL] button to select the setting item. After selecting the setting item, follow
the procedures in the list below.
Area Shot (U.S.A. and CANADA only)
Make settings for AREA SHOT operation.
Refer to page 32 for details on AREA SHOT operation.
Disabling the guide tone feature (for button operation)
The equipment is set at the factory to emit a beep tone in response to button operation. The guide tone feature
may be disabled in the following procedure:
Turn the [SEL] button to select ON or OFF.
1
Press the [SEL] button.
2
XI
XII
Clock display on/off
Switches the clock display to ON/OFF.
Turn the [SEL] button to select ON or OFF.
1
Press the [SEL] button.
2
Setting the time
This equipment uses the 12-hour display notation.
Press the [SEL] button to display the item to be selected for adjustment.
1
Turn the [SEL] button.
2
Turn to the right: Turns the time forward.
Turn to the left: Turns the time back.
43
Page 44

Various Settings
Switching demonstration screen display
You can set the demonstration screen display to appear or not appear when the power is turned on.
When the power turns on, the various demonstration screens such as the audio operation screens and motion
picture screens will appear repeatedly in the following order.
If you press a button while the demonstration screens are being displayed, the demonstration screens will be
cancelled and the audio operation screen will be displayed. If you do not operate the status display function
within 15 seconds, the display will return automatically to the demo screen.
Turn the [SEL] button to select ON or OFF.
1
Press the [SEL] button.
2
HD Radio (U.S.A. only)
This setting can only be chosen when HD radio reception is available.
Refer to page 52 for details on HD Radio operation.
AUX Sensitivity
Refer to page 56 for details on AUX Sensitivity.
Reading steering switch data (U.S.A. only.)
The steering switch data that has been downloaded from E-iSERV (website) to a CD-R can be loaded into the
deck and saved there.
When the steering switch mode is selected, the front panel opens automatically.
Insert the CD-R to be used for saving the steering switch data.
1
Turn the [SEL] button to display the file you want to load, and then, press the [SEL] button to start
2
loading.
The CD-R data is read. While it is reading, [READING] is displayed.
If the data can be read successfully, [Completed] will appear on the display.
When using CD-R data, the CD-R will automatically eject when reading is complete.
CAUTION:
ATTENTION: The deck can only import files from CD-R that have been written to root directories.
Do not turn off power or ignition switch during process. This will corrupt the data.
Disc formats that may be used are as follows:
XXXXXXXX.ssw
• CD-ROM (MODE 1)
• CD-ROM (MODE2_FORM 1)
*CD-ROMs written in MODE2_FORM2 cannot be read.
The file name can be changed using 8 alphameric characters (space cannot be used).
Press the [RTN] button.
3
Automatic creation
File extension
At this time, other adjustments can also be made in function mode.
Press the [FUNC] or [RTN] button to exit function mode.
4
44
Page 45

Making changes with Function Mode
Setting the steering switch function (U.S.A. only)
The vehicle’s factory loaded steering switch becomes inoperable when the CD3000 is installed. The
ECLIPSE website (E-iSERV) provides software that enables steering switch operation even with the
installation of the equipment. Import this software into your CD3000. For details, contact the store
from which you purchased your equipment. Depending on your vehicle’s make and model, material
downloaded from the website may not be compatible with your steering switch.
Software for the steering switch can be downloaded and imported into the equipment as follows:
Access The ECLIPSE Website. (URL : http://www.e-iserv.jp)
Download the steering switch software following instructions provided
on the ECLIPSE website (E-iSERV). (Because material available on
the website may not be compatible with the steering switches found on
some automobiles, make sure to check the website for details about
compatibility.)
Copy the downloaded software to CD-R.
Import the data into the equipment from the CD-R.
(For details about importing into the equipment, see page 43.)
The steering switch can be operated.
ATTENTION
Consult the store from which you purchased your CD3000 about compatibility and set-up
procedures.
XII
45
Page 46

Various Settings
Compatibility with various switches
The compatibility of the equipment's various modes and the steering switches installed on your
vehicle are as follows:
Mode
FAST UP –
*2
FAST DOWN –
Switch Name
SEEK+
SEEK-
*1
Button
operation
Tuner Disc mode AUX
Short tap TUNE UP TRACK UP –
Hold
SEEK UP
*2
Short tap TUNE DOWN TRACK DOWN –
Hold
SEEK DOWN
Short tap Volume UP Volume UP Volume UP
VOL+
Hold
Gradually
increases
volume
Gradually
increases
volume
Gradually
increases
volume
Short tap Volume DOWN Volume DOWN Volume DOWN
VOL-
MODE –
Switch Name
*1
Hold
Button
operation
Gradually
decreases
volume
Change to the
disc mode
Others Power OFF
Gradually
decreases
volume
Change to the
AUX mode
Mode
Gradually
decreases
volume
Change to the
tuner mode
SEEK+ – – –
SEEK- – – –
Short tap Volume UP –
VOL+
Hold
Gradually
increases
volume
–
Short tap Volume DOWN –
VOL-
Hold
Gradually
decreases
–
volume
MODE –
Change to the
various audio
modes
*1
: Switch names change depending on vehicle make and model.
*2
: If a Eclipse SIRIUS satellite radio (purchased separately) is connected, categories can be switched when in
the satellite mode.
Power ON in
the tuner mode
46
Page 47

How to operate the receiver with an optional iPod Interface Adaptor
How to operate the receiver with an optional iPod Interface Adaptor
• When an optional iPod interface adaptor (iPC-106) is connected to this deck, it is possible to
operate the iPod
so you can listen to the songs stored in the iPod.
• iPod is for legal or rightholder-authorized copying only. Don't steal music.
• iPod is a trademark of Apple Computer, Inc., registered in the U.S. and other countries.
®
with this deck and to display information relevant to it on the screen of this deck,
ATTENTION
•
For the functions of the iPod, refer to the iPod User's Guide.
•
For the specific details of the iPod operation and connection, refer to the Instruction Manual of the
optional iPod interface adaptor (iPC-106).
Charging the iPod
The iPod connected to an optional iPod interface adaptor (iPC-106) can be charged when this deck is
turned on.
Switching the control mode
Prior to connecting the iPod, switch to the iPod mode with the select switch on an optional iPod
interface adaptor (iPC-106).
When the iPod inerface adapter (iPC-106) is shipped, the iPod mode is selected as default.
Operating the iPod
ATTENTION
It is assumed here that the iPod has already connected to this deck with an optional iPod interface adaptor
(iPC-106).
XII
XIII
47
Page 48

About optional equipment
Listening to the songs stored in the iPod
Operation
Press the button for less than one second.
Each time the button is pressed, the selection items change in the following order.
CD player ➔ CD changer 1 ➔ CD changer 2 ➔ iPod ➔ CD player …
Searching the song you want to listen to
In the song selection mode, search the song you want to listen to using the list of search mode (Play
List, Albums, Artists, Genre, Songs).
Operation
Press the button.
1
Switches the song selection mode.
Turn the button.
2
By pressing the button within 10 seconds, the selection items change in the following order.
Play List ➔ Albums ➔ Artists ➔ Genre ➔ Songs ➔ Play List …
If you select "Songs", music files will be displayed.
● Note ●
• When the [RTN] button is pressed in the song selection mode, the mode will be returned to the previous
mode.
• When you want to use the "Select ALL" command of the iPod, select "ALL" after selecting the Play List.
Note that you cannot use the "Select ALL" command with the Albums, Artists, Songs or Genre items.
Press the button.
3
Proceeds to the layer of the selected item.
Select the desired item on each list until music files are displayed.
When the desired music file is selected, it will start to be played back.
● Note ●
By pressing the [1] button, the song selection mode items and the song name currently played are displayed
alternately.
TRACK UP / DOWN
Turn the button.
Turn to the right :
Advances to the next track.
Turn to the left :
Returns to the beginning of the track being played. Repeat turning for previous tracks.
48
Operation
Page 49

How to operate the receiver with an optional iPod Interface Adaptor
Fast Forward/Rewind
Operation
Press and hold the button.
Fast forwards.
Rewinds.
REPEAT / RANDOM
• EREPEAT, RANDOM and ALBUM RANDOM correspond to the "Song REPEAT", "Shuffle" and "ALBUM
shuffle" functions of the iPod, respectively.
• [REP], [RAND] or [ALL RAND] is displayed when REPEAT, RANDOM or ALBUM RANDOM is selected,
respectively.
Operation
Press the button for less than one second.
Each time the button is pressed, the selection items change in the following order.
REPEAT ON REPEAT OFF
ATTENTION: When the iPod is connected, ALL REPEAT function is turned ON.
➔
➔
Operation
Press the button.
Each time the button is pressed (for less than one second), the selection items change in the
following order.
RANDOM ON RANDOM OFF
Each time the button is pressed (for longer than one second), the selection items change in the
following order.
ALBUM RANDOM ON ALBUM RANDOM OFF
➔
➔
➔
➔
Displaying title
Operation
Press the button for more than one second.
Each time the button is pressed, the selection items change in the following order and the
information on the song will be displayed with scrolling.
Song ➔ Album ➔ Artist
ATTENTION: Only alphabets and symbols can be displayed.
XIII
49
Page 50

About optional equipment
How to operate the equipment with an optional CD changer connected
This section covers the operation of an optional
CD changer that is connected to the equipment.
To switch from another mode, press the [DISC]
button for less than one second.
Listening to a CD
Press the [DISC] button for less
1
than one second.
Each press of the button switches the
mode from CD player ➔ CD Changer
1 ➔ CD Changer 2 ➔ CD player.
A changer or player with no discs
loaded will be skipped.
Advancing to the next track or returning to the beginning of the track being played
Turn the [SEL] button to the left or
1
right.
Turn to the right:
Advances to the next track.
Turn to the left:
Returns to the beginning of the track
being played. (Repeat turning for
previous tracks.)
Playing the beginning of tracks (SCAN)
Press the [4 SCAN] button.
1
Pressing the button for less than one
second causes the changer to move
up to the next track and play it for 10
seconds, then move up to the next
track and play it for 10 seconds, and
so on, on one CD, until the button is
pressed again.
Press the button for longer than a
second to play the first 10 seconds of
the first track of every CD loaded.
ATTENTION
• To continue playing a desired track, press
the button again to stop scanning.
• After the entire disc is scanned once,
ordinary playback starts from the point
where scanning started.
Repeating the same track (REPEAT)
Fast Forward/Rewind
Fast forward or rewind the song currently being
played.
Press and hold the [ ] or [ ]
1
button.
[] button: Fast forward.
[] button: Rewind.
50
Press the [5 RPT] button.
1
Pressing the button for less than one
second causes the changer to repeat
the track currently being played, until
the button is pressed again.
Press the button for longer than a
second to repeat all tracks on the CD
being played.
Page 51

How to operate the equipment with an optional CD changer connected
Playing tracks in random order (RANDOM)
Press the [6 RAND] button.
1
Pressing the button for less than one
second causes the changer to play the
tracks on the currently playing CD in
random order, until the button is
pressed again.
Press the button for longer than a
second to play tracks from all of CDs
loaded in the currently selected
changer, in random order.
ATTENTION
• During random playback, press the [5 RPT]
button to repeat the track being played. To
cancel repeat play (go back to random
play), press the [5 RPT] button again.
During playback of a particular track: The
track being played is played repeatedly.
• Occasionally the same track happens to be
played (selected) two or more times in a
row, but it is not a sign of a problem.
• When any of the functions - "Playing the
beginning of tracks", "Repeating the same
track" and "Playing tracks in random order"
- is selected, a message such as [SCAN],
[ALL SCAN], [REPEAT], [ALL REPEAT],
[RANDOM] or [ALL RANDOM] appears on
the display to verify the current function.
• Random play is not cancelled even if a
magazine is ejected.
Skipping to the next or previous CD
Press the [1 ] or [2 ] button.
1
Button [1 ]:
Selects the next lower number
disc.
Button [2 ]:
Selects the next higher number
disc.
Specifying a CD to play
A CD of your choice is directly selectable out of
the loaded discs.
Press the [SEL] button for less
1
than one second.
Press a button from [1] to [6].
2
Buttons 123456
CD 123456
7 8 9 10 11 12
To select a CD from 7 to 12, press the
desired button considerably longer.
XIV
51
Page 52

About optional equipment
How to operate the tuner with an optional HD Radio tuner connected (U.S.A. only)
About HD Radio
If the optional HD Radio (High Definition Radio)
tuner is connected, terrestrial digital broadcasts
can be received. When terrestrial digital
broadcasts are received, FM reception has the
same quality as a CD, and AM reception has the
same quality as conventional FM sound.
Depending on the reception status, HD Radio
can also receive analog broadcasts, which
means reception is still possible in regions with
no digital coverage.
First, press the [FM AM] button to start tuner
operation.
There are automatic and manual methods for
setting stations in memory. The receiver will
accept up to 24 stations in memory: 6 in AM and
18 in FM (6 each for FM1, FM2 and FM3.) (Initial
setting)
Tuning to a station
See page 23.
The [HD] indicator on the screen flashes in the
HD radio mode.
Entering stations into memory automatically (The automatic preset mode: ASM)
Switching between displays when receiving HD Radio
During digital reception, the name of the station
being received and other information can be
displayed.
Press the [DISP] button for more
1
than one second.
Each press will switch the display
items in the following sequence:
station name ➔ title* ➔ artist* ➔
album* ➔ genre.
*: Depending on the nature of the
broadcast, no information may be shown.
ATTENTION
The maximum number of characters that can
be displayed for each item is as follows:
Long name: 48 characters
Short name: 7 characters
Song title: 32 characters
Album: 32 characters
Genre: 32 characters
See page 24.
Manually setting stations into memory
See page 24.
Preset station scan
See page 24.
52
Page 53

How to operate the tuner with an optional HD Radio tuner connected (U.S.A. only)
HD Radio reception settings
The HD Radio reception method can be
selected. When the HD Radio tuner is connected
to this equipment for the first time, it will be set at
[AUTO] (automatic digital/analog selection).
Press the [FUNC] button for less
1
than one second.
The function mode is activated.
Turn the [SEL] button to select HD
2
Radio.
The selected item will be high lighted.
Press the [SEL] button.
3
Displays the reception setting screen.
Turn the [SEL] button to select
4
AUTO or OFF.
The selected item will be highlighted.
In the [AUTO] setting, the selection is
switched between digital and analog
reception automatically. In areas
where digital reception is not possible,
reception is automatically switched to
analog to avoid loss of reception.
During digital reception, [DIGITAL] is
shown on the display. This is cleared
during analog reception.
In the [OFF] setting, reception is
always analog.
Press the [SEL] button.
5
Press the [RTN] button.
6
At this time, other adjustments can
also be made in function mode.
Press the [FUNC] or [RTN] button
7
to exit function mode.
XV
53
Page 54

About optional equipment
How to operate the tuner with an optional SIRIUS satellite radio tuner connected (U.S.A. only)
About SIRIUS satellite radio
If the optional SIRIUS satellite radio tuner is
connected, satellite radio broadcast can be
received.
With SIRIUS satellite radio, over 100 channels
are available including music, sports, news, and
entertainment programs.
The channel can be selected from categories
such as POP and ROCK, or by selecting
individual channel manually.
Reception of SIRIUS satellite radio is fee based;
you have to subscribe to it.
It is possible to subscribe through the SIRIUS
radio website.
URL: http://cdn.sirius.com
ATTENTION
For information about the operation and set-up
of the SIRIUS satellite radio tuner, see the
SIRIUS satellite radio owner's manual.
The receiver will accept up to 24 stations in
memory.
Selecting the radio mode
Press the [FM AM] button for more
1
than one second.
The mode switches between satellite
radio mode and FM/AM radio mode
each time the button is pressed.
Selecting a channel
Press the [FM AM] button for less
1
than one second to switch to the
desired SR bands.
Radio bands will switch from SR1 ➔
SR2 ➔ SR3 ➔ SR4 in order each time
the button is pressed.
Turn the [SEL] button to the left or
2
right to tune to a channel.
Turn to the right:
Selects the higher channel.
Turn to the left:
Selects the lower channel.
Press the [ ] or [ ] button for
3
less than one second to start the
automatic channel search.
Reception is enabled for all channels
within the currently selected category.
(Refer to page 54 for details on
"Category selection".)
[ ] button:
Starts searching toward higher
channels.
[ ] button:
Starts searching toward lower
channels.
Category selection
The channel can be selected from among
categories such as POP and ROCK.
Consult the SIRIUS website for details of
categories.
Press the [ ] or [ ] button for
1
more than one second.
Categories will switch in order shown
below each time button is pressed.
[ ] button:
Advances to next category.
[ ] button:
Returns to previous category.
54
Page 55

How to operate the tuner with an optional SIRIUS satellite radio tuner connected (U.S.A. only)
Direct channel selection
The channel can be selected by inputting the
channel directly.
Press and hold the [SEL] button for
1
more than two seconds.
The mode will change to direct
channel selection mode.
Press the buttons [1], [2] and [3] to
2
select the channel number to be
input.
[1] button ..........Hundreds
[2] button ..........Tens
[3] button ..........Units
Each time the buttons are pressed, the
numerals change in the following
order.
0 ➔ 1 ➔ 2 ➔ 3 ➔ 4 ➔ 5 ➔ 6 ➔ 7 ➔ 8
➔ 9
Pressing the button [6] clears the
numeral at the previous digit.
Press the button [5].
3
Starts reception.
Manually setting channels into memory
This section covers the setting of channels in
memory under the numbered buttons.
Turn the [SEL] button to the right
1
or left to tune to the channel to be
entered in memory.
Select any button, from [1] to [6],
2
and press it for more than two
seconds.
The tuned channel is now memorized
and set in the selected button. Repeat
the procedure to set additional
manually tuned channels in memory,
in turn, for buttons [1] to [6]. These
buttons are called the preset buttons.
ATTENTION
If the vehicle’s battery is disconnected (for
repairs to the vehicle or for removing the
equipment), all channels in memory will be
lost. In such a case, set channels in memory
again.
Preset channel scan
This function enables reception of all the
channels in the preset buttons for five seconds
each.
Press the [SEL] button for less
1
than two seconds.
[P SCAN] will appear at the display,
and channels stored under preset
buttons [1] to [6] will be played for five
seconds each.
To stop the preset scan mode at a
2
desired channel, press the [SEL]
button again.
The equipment will stay tuned to the
desired channel.
Switching displays when using the SIRIUS satellite radio
Press the [DISP] button for more
1
than one second.
Each time the button is pressed the
display item changes in the following
order:
channel name ➔ category name ➔
title ➔ artist ➔ SIRIUS unit ID.
ATTENTION
• The maximum number of characters that
can be displayed for each item is as follows:
Title: 38 characters
Artist: 38 characters
Channel: 20 characters
Category: 16 characters
• If there is no name, NO_ DATA will appear.
XVI
55
Page 56

About optional equipment
Others
Connecting portable audio players to the AUX jack
Use a commonly available accessory cord. With
a jack for AUX cord (AUX105), portable audio
players and other external inputs can be
connected to the system.
When the AUX cord is connected to the jack, CD
changer cannot be connected to the system.
Turn on the portable audio player
1
and start its play function.
Switch to the AUX mode by
2
pressing the [DISC] button for
more than one second.
Activation of the AUX mode will light
the "AUX" indicator and channel
audio player output to the system
speakers.
ATTENTION
• While the AUX mode is activated, actions
such as turning off the audio player or
pulling out the connection cord may cause
noise spikes that can damage the system
speakers. Be sure to avoid this possibility
by turning off system power or switching
from the AUX mode to another mode before
shutting off or disconnecting the portable
audio player.
• Audio output levels will differ for the various
devices that can be connected by this
method. Carefully adjust volume until the
output level of the connected player is
known.
• Before using a portable audio player in a
vehicle, read the player's operation manual
carefully and confirm problem-free
operation in the vehicle before proceeding.
Changing auxiliary input sensitivity
The sensitivity of the auxiliary mode can be
changed.
Press the [FUNC] button.
1
The function mode is activated.
Turn the [SEL] button to select
2
AUX Sensitivity.
Press the [SEL] button.
3
The AUX sensitivity mode is
activated.
Turn the [SEL] button to select the
4
sensitivity mode.
Turning the button allows you to
toggle through sensitivity modes as
follows:
Low ➔ Mid ➔ Hi ➔ Lowwww
ATTENTION
Input sensitivity modes are roughly as follows:
Low 1 Vrms
Mid 480 mVrms
Hi 240 mVrms
Press the [SEL] button.
5
The selected settings will take effect.
Press the [RTN] button.
6
At this time, other adjustments can
also be mode in function mode.
Press the [FUNC] or [RTN] button
7
to exit function mode.
56
Page 57

Adjustment of the front panel angle
Display angle can be adjusted.
Push and hold the [TILT] button
1
with the display completely closed.
While pressing the [TILT] button, the
display will gradually open.
When the display has opened to
2
the desired angle, release the
[TILT] button.
Pressing the [TILT] button once again
closes the display. After adjusting the
display angle, pressing the [CD ]
button opens the display. After a CD
has been inserted or ejected, the
display will return to its adjusted angle.
User Registration Key display
User Registration Key is your CD3000's unique
ID. In order to use the ECLIPSE website (EiSERV), a 16-digit User Registration Key is
necessary.
Others
Check that the equipment is in
1
standby mode.
Press the [DISP] button for more
2
than one second.
The first 8 digits of your User
Registration Key will be displayed.
Press and hold [DISP] once more (for
a second or more) and the remaining 8
digits will be displayed.
ATTENTION
Your User Registration Key is a 16-digit ID
composed of numbers 0-9 and letters A-F.
XVII
57
Page 58

Other information
If you have a question:
[RESET] button
First check the item mentioned below before attempting to troubleshoot problems.
CAUTION
If a problem occurs, for instance when the equipment does not respond to any button presses, or
the display doesn't work correctly, press the [RESET] button using a paper clip or similar item.
Pressing the [RESET] button will delete all the entries from memory. The settings will return to
those made at the factory prior to shipment.
Displayed information (for troubleshooting)
The information listed in the chart below is displayed to show the status of the CD, Area Shot function,
Sirius Radio and CD changer. Refer to the chart for the appropriate action.
58
Information Contents Explanation and remedial action to take
INFO 1 THE SHUTTER OF THE CD
INFO 2 NO DISC LOADED IN THE
INFO 3 DISCS ARE DIRTY OR
INFO 5 CD PLAYER AND CD
INFO 6 WHEN THE CD PLAYER
INFO 7 AN INTERNAL POWER
LOAD
CHANGER IS OPENED
MAGAZINE
DAMAGED
CHANGER FAILS
MECHANICALLY
AND CD CHANGER
INTERNAL TEMPERATURE
IS HIGH (TO PROTECT
PICKUP UNIT)
SUPPLY FAILURE IS
OCCURRING
Close the shutter.
There is no disc in the magazine or player. Load a
disc in the magazine. (Load a music disc.)
The loaded disc is dirty or upside down. Check it for
proper orientation and verify it is clean.
• The CD player and CD changer is inoperative for
some reason. Go through the magazine removal
procedure.
• If a magazine fails to eject, please contact your
dealer.
• The temperature in the CD player and CD changer
is too high for operation. Wait till it cools down.
• Resume playing after the "High temperature
sensed and CD stopped" display disappears. If the
CD still cannot play, please contact your dealer.
• Turn the ACC off once before turning it on once
again to resume the operation.
• If this condition persists, please contact your
dealer.
CD changer is in the process of verifying the
presence of CDs after a magazine has been inserted
into the CD changer.
Page 59

If you have a question:
AUTH_ERR
ANTENNA
CALL 888-539SIRIUS
ACQUIRING
NO iPod NO iPod IS CONNECTED Connect the iPod correctly.
READING
NO DATA
ERROR 1
ERROR 2
AREA SHOT DATA
CANNOT BE IMPORTED
PROPERLY
Sirius ANTENNA IS
DISCONNECTED
NO SUBSCRIPTION TO
THE SELECTED CHANNEL
Sirius Satellite RADIO
SIGNAL RECEIVING FAILS
THE iPod IS IN DATA
COMMUNICATION
NO SONGS ARE STORED
IN THE iPod
DATA COMMUNICATION
WITH THE iPod IS
INTERRUPTED FOR SOME
REASONS
THE SOFTWARE IS NOT
ADAPTABLE
Mode Problem Causes
Is the volume control up sufficiently? Turn up the volume control. 36
Is the muting function in effect (MUTE)?
Common
to all
Dead or weak
sound
Power does not
turn on.
Frequencies or
titles set in
memory are
deleted.
No guide tone
sounds.
The remote
control does not
work.
Is the fader or balance control set far to one
side?
Other probable causes include broken
audio-signal wiring or a faulty speaker.
Are there too electrical items installed and
causing a lack of power?
Other probable causes include a run-down
car battery, broken power or
interconnection wiring.
Has the car battery been disconnected for
repair or checked out?
Are there too electrical items installed and
causing lack of available power?
Other probable causes include run-down
car battery, broken power or
interconnection wiring.
Is the guide tone disabled? Enable the guide tone. 43
Is the battery low? Replace battery. 27
Is the battery installed in reverse polarity?
Is direct sunlight hitting the remote control
light receptor?
Other probable causes include a
malfunctioning remote control.
Confirm the CD-R data.
Connect the Sirius antenna.
Subscribe to Sirius to receive the service by Sirius
Satellite radio.
Select another channel.
Wait for a while until the message disappears.
Check if music data are stored in the iPod
Check if the iPod is correctly connected.
Check the iPod software.Refer to the Instruction
Manual of the iPod interface adaptor (IPC-106).
Remedial action
to take
Cancel the muting (MUTE)
function.
Readjust the fader and
balance controls to more
normal positions.
Have your dealer check the
problem.
Have your dealer check the
problem.
Have your dealer check the
problem.
Reenter them into memory. 24
Have your dealer check the
problem.
Have your dealer check the
problem.
Reinstall the battery in the
correct polarity.
Use the remote control close
to the receptor.
Have your dealer check the
problem.
Refer to
page
36
36
—
—
—
—
—
27
—
—
XVIII
59
Page 60

Other information
Mode Problem Causes
CD
Tuner
The disc cannot
be inserted.
The disc is
ejected as soon
as it is inserted.
Or, the disc cannot
be ejected.
The disc cannot
be changed.
Sound skips
around.
Sound is
intermittent.
Sound is bad in
quality.
The disc cannot
be ejected.
Receives no
stations, or
receives static
noise.
Is an extra label or seal applied to the disc?
Are there rough edges, deformations or
damaged areas on the disc?
Is the disc damaged?
(scratched, warped, etc.)
Is the disc clean? Clean the disc. 15
Is the player mounted at a proper angle?
Is the player mounted loosely?
Are you driving over a rough surface?
If unknown
Is the antenna retracted? Extend the antenna. —
Is the tuner correctly tuned to a station? Tune to a station. 23
Are you driving outside the service area of
your preset stations?
Are you operating other equipment such as
computer, or a mobile phone, in your
vehicle at the same time as your receiver?
Other problems may include a loose or
disconnected antenna cable, a bad antenna
cable or a bad wiring.
Remedial action
to take
Do not apply labels or seals to
the disc.
Try inserting another disc.
Remove any burrs.
Do not use a deformed or
damaged disc.
Try another disc. Do not play
a damaged disc.
Have your dealer check it out. —
Avoid playback while driving
over rough surfaces.
Press the [CD ] button for
longer than five seconds with
the front panel opened.
Tune to a local station.
(Please note, there may be
no local stations servicing the
area where you are currently
driving.)
Avoid operating such
equipment while using the
equipment.
Have your authorized
Eclipse retailer check the
problem.
Refer to
page
14
14
14
10
—
23
—
—
60
Page 61

Specifications
<GENERAL>
Power Output MOSFET 50W×4
Line Output Level/Impedance
Power Supply 14.4V DC (11-16V)
Current Drain 3A
Dimensions (W x H x D) 7" x 2" x 6-1/8" (178 x 50 x 155mm)
Mass (weight) Approx. 1.4kg
Tone Control BASS: ±12db at 80Hz
Loudness +10dB at 100Hz/+ 6.5dB at 10kHz
<FM TUNER>
Frequency Range
Usable Sensitivity 13dBf
50dB Quieting Sensitivity 14dBf
Frequency Response 30~15,000Hz
Stereo Separation 38dB (1kHz)
Specifications
5V (0dB)/55
MID: ±12db at 630Hz
Treble: ±12db at 10kHz
USA: 87.75~107.9MHz (0.2MHz step)
Asia: 87.5~108MHz (0.05MHz step)
Australia: 87.5~108MHz (0.1MHz step)
Latin America: 87.75~107.9MHz (0.1MHz step)
<AM TUNER>
Frequency Range
Usable Sensitivity 20µV
<CD SECTION>
Frequency Response 20Hz~20,000Hz
Total Harmonic Distortion 0.008%
Wow & Flutter Below measurable limits
S/N Ratio 95dB
Dynamic Range 95dB
Channel Separation 80dB
USA: 530~1,710kHz (10kHz step)
Asia: 522~1,629kHz (9kHz step)
Australia: 522~1710kHz (9kHz step)
Latin America: 530~1710kHz (10kHz step)
XVIII
XIX
61
Page 62

Other information
How to contact customer service
Should the product require service, please contact the following Eclipse dealer near your house.
<U.S.A/CANADA>
Fujitsu Ten Corp. of America
19600 South Vermont Avenue, Torrance, CA 90502
Phone: 1-800-233-2216 (Information)
<AUSTRALIA>
Fujitsu Ten (Australia) PTY LTD.
89 Cook Street Port Melbourne, Victoria 3207, Australia
Phone: 1800 211 411
<MALAYSIA>
CSE Automotive Technologies Sdn. Bhd.
Level 5, Axis Plaza, Jalan U1/44, Glenmarie, 40150 Shah Alam,
Selangor D.E., Malaysia.
Phone: 03-5569-4200
Fax: 03-5569-4201
<SINGAPORE>
Cobra Singapore Pte Ltd
#07-02, King's Centre 390, Havelock Road Singapore 169662
Phone: 6737 2568
Fax : 6737 9538
<KOREA>
Transpectra Co., Ltd.
115-16 nonhyun dong kangnam ku Seoul, Korea.
Phone: 02-540-4595
Fax: 02-2-540-4666
<TAIWAN>
Sentrek Taiwan, LTD.
1, 9F, Lane 155, Section 3, Peishen RD., Shenkeng, Taipei Hsien, 222
Taiwan, R.O.C.
Phone: 02-2662-8110
Fax: 02-2662-8117
<THAILAND>
Safe-T-Cut (Thailand) Co., Ltd.
114/9 Soi Suwansawadi, Thungmahamek, Rama 4 Rd., Sathorn,
Bangkok 10120, Thailand.
Phone: 02-671-9610-12
Fax: 02-671-9614
62
Page 63

How to contact customer service
IMPORTANT
RECORD YOUR “KEY CD”
HERE…
STORE YOUR “KEY CD”
ALONG WITH YOUR
OWNER’S MANUAL.
XX
63
Page 64

Introduction
Pour un fonctionnement en toute sécurité du CD3000
Les symboles Avertissement et Mise en garde représentés ci-dessous apparaissent tout au long de ce
manuel ainsi que sur le CD3000. Ils indiquent comment manipuler l'appareil en toute sécurité et
permettent ainsi d'éviter tout dégât physique ou matériel.
Avant d'avancer dans le manuel, lisez attentivement les informations relatives à la sécurité
développées dans la section suivante.
Ce symbole "AVERTISSEMENT" indique qu'en cas de
manipulation incorrecte de l'appareil ou de non-respect des
Avertissement
Mise en garde
Lisez attentivement l'ensemble des manuels et garanties fournis avec cet appareil.
Eclipse ne saurait être tenu responsable des dysfonctionnements de cet appareil survenant à la suite
du non-respect des consignes d'utilisation et de sécurité.
consignes de sécurité qu'implique ce symbole, vous risquez
de vous exposer à de graves blessures pouvant parfois se
révéler mortelles.
Ce symbole"MISE EN GARDE" indique qu'en cas de
manipulation incorrecte de l'appareil ou de non-respect des
consignes de sécurité qu'implique ce symbole, vous risquez
de vous exposer à de graves blessures ou d'endommager
l'appareil.
AVERTISSEMENT
● Ne destinez pas cet appareil à une utilisation autre que celle pour laquelle il a été conçu.
Respectez également les procédures d'installation décrites dans ce manuel ; Eclipse ne
saurait être tenu responsable des dommages éventuels occasionnés incluant mais ne se
limitant pas à des blessures graves ou mortelles ou encore des dommages matériels
résultant de procédures d'installation accidentogènes.
● Cet appareil nécessite une alimentation en courant continu de 12 V et ne doit être installé
que sur un véhicule équipé d'un circuit électrique avec borne négative à la masse de 12 V.
Toute autre installation risque de provoquer un incendie ou d'endommager gravement
l'appareil ou le véhicule.
● Certains appareils fonctionnent sur piles. N'installez jamais cet appareil dans un endroit où
de jeunes enfants pourraient facilement accéder aux piles. En cas d'ingestion, appelez
immédiatement un médecin.
● Durant la conduite, ne quittez jamais la route des yeux pour effectuer des réglages sur
l'appareil. Restez concentré(e) sur votre conduite afin d'éviter tout accident ; ne vous
laissez pas distraire par le fonctionnement ou le réglage de l'appareil.
● Lorsque vous êtes au volant, ne regardez jamais l'écran de l'appareil. Si vous ne restez pas
concentré(e) sur la route, des accidents peuvent se produire.
● N'introduisez pas d'objets étrangers dans la fente de chargement du disque ; vous
risqueriez de provoquer un incendie ou de subir un choc électrique.
● Cet appareil ne doit jamais être démonté ou modifié de quelque manière que ce soit. Vous
risqueriez de vous blesser ou de provoquer un incendie ou un choc électrique.
64
Page 65

Pour un fonctionnement en toute sécurité du CD3000
AVERTISSEMENT
● Ne laissez jamais d'eau, de poussière ou de corps étrangers pénétrer à l'intérieur de
l'appareil. Un dégagement de fumée, un incendie ou un choc électrique pourrait en résulter.
● Soyez vigilant(e) quant à l'emplacement de la télécommande. Des accidents de la
circulation ou des problèmes de conduite peuvent survenir si la télécommande vient se
glisser sous les pédales etc., lors de la conduite, lorsque le véhicule freine ou prend un
virage, par exemple.
● N'utilisez pas l'appareil s'il présente des dysfonctionnements (l'écran ne s'allume pas ou
l'appareil n'émet aucun son). Vous risqueriez de vous blesser ou de provoquer un incendie
ou un choc électrique.
● Remplacez toujours les fusibles par des fusibles de capacité et de caractéristiques
identiques. N'utilisez jamais de fusible dont la capacité est supérieure à celle de l'original.
L'utilisation du mauvais type de fusible risque de provoquer un incendie ou d'endommager
gravement votre appareil.
● Si des corps étrangers ou de l'eau pénètrent dans l'appareil, si de la fumée s'échappe ou si
une odeur anormale se dégage, éteignez-le immédiatement et contactez votre revendeur. Si
vous continuez à l'utiliser dans de telles conditions, vous risquez de vous blesser ou de
provoquer un incendie ou un choc électrique.
● Ne tentez jamais de changer de CD lorsque vous êtes au volant. Afin d'éviter tout accident,
arrêtez votre véhicule dans un endroit ne gênant pas la circulation, puis procédez au
changement.
● Les sacs plastique et les emballages constituent un risque d'étouffement pouvant entraîner
la mort. Tenez-les hors de portée des bébés et des enfants. Ne recouvrez jamais votre tête
ou votre bouche d'un sac plastique.
I
MISE EN GARDE
● Si vous souhaitez changer l'appareil de place, veuillez contacter votre revendeur pour des
raisons de sécurité. Il vous faut en effet procéder au préalable à un examen des conditions
de dépose et de pose de l'appareil.
● Réglez le volume sonore à un niveau raisonnable afin que les sons provenant de l'extérieur
restent audibles (avertisseurs sonores, voix, sirènes). Vous risquez sans cela de
provoquer un accident.
● Attention à ne pas vous pincer les mains ou les doigts lorsque vous réglez l'angle
d'inclinaison ou fermez l'afficheur. Vous risqueriez de vous blesser.
● Ne mettez pas vos mains ou vos doigts dans la fente de chargement du lecteur CD. Vous
risqueriez de vous blesser.
● Ne touchez pas la partie chaude de l'amplificateur. Vous risqueriez de vous brûler.
● Ne rechargez pas les piles à anode sèche. Elles risqueraient de se briser et de provoquer
des blessures.
● Utilisez uniquement les piles spécifiées par le fabricant. Ne mélangez jamais les piles
neuves avec les anciennes. Les cassures et fuites occasionnées au niveau des piles
peuvent provoquer des blessures et nuire gravement à l'environnement.
● Lorsque vous insérez les piles dans l'appareil, respectez la polarité (positive/négative) en
procédant comme indiqué dans le manuel d'utilisation. Si la polarité n'est pas correcte, les
cassures et les fuites occasionnées au niveau des piles peuvent provoquer des blessures
et nuire gravement à l'environnement.
65
Page 66

Introduction
MISE EN GARDE
● Une fois les piles usées, remplacez-les immédiatement afin d'éviter qu'elles ne fuient et
n'endommagent l'appareil. Le produit contenu dans les piles peut gravement brûler la peau
ou les yeux en cas de fuite. Lavez-vous les mains après toute manipulation.
● Si de la solution alcaline des piles à anode sèche entre en contact avec votre peau ou vos
vêtements, rincez abondamment à l'eau claire. En cas de contact avec les yeux, rincez
abondamment à l'eau claire et consultez immédiatement un médecin.
● Si vous souhaitez vous débarrasser de vos piles à anode sèche au lithium, appliquez du
ruban isolant sur les bornes positive et négative des piles, puis jetez-les conformément à la
"Réglementation locale" sur les déchets dangereux en vigueur. Si les piles entrent en
contact avec d'autres objets conducteurs d'électricité, tels que des composants
métalliques, celles-ci peuvent se briser et un court-circuit ou un incendie risque de se
produire.
● Les piles ne doivent jamais être court-circuitées, démontées, chauffées, jetées au feu ou
plongées dans l'eau. Si les piles venaient à se briser ou à fuir, cela risquerait de provoquer
un incendie ou d'entraîner de graves blessures.
● Evitez de ranger la télécommande dans un endroit exposé à la lumière directe du soleil ou à
des températures et un taux d'humidité élevés. De telles conditions risqueraient de
déformer le boîtier de la télécommande ou d'endommager les piles (fissures, fuites).
● Ne destinez pas cet appareil à une utilisation autre que celle prévue par le manuel. Une telle
situation risquerait de provoquer des dégâts physiques et matériels.
● Vérifiez le niveau du volume avant d'allumer l'appareil. Une telle situation risquerait
d'entraîner des troubles auditifs.
● Ne faites jamais fonctionner l'appareil dans des conditions anormales, par exemple lorsque
le son est coupé ou haché. Une telle situation risquerait de provoquer un incendie.
● Cet appareil exploite la technologie du laser. Cet appareil ne doit jamais être démonté ou
modifié de quelque manière que ce soit. En cas de dysfonctionnement, contactez votre
revendeur.
En modifiant l'appareil, vous risquez de vous exposer au rayonnement laser (trouble de la
vision) ou de provoquer un accident, un incendie ou un choc électrique.
● Si l'appareil venait à tomber ou si la façade est endommagée, mettez-le immédiatement
hors tension et contactez votre revendeur. Utiliser l'appareil dans de telles conditions
présente un risque d'incendie ou de choc électrique.
66
Page 67

Table des matières
Pour un fonctionnement en toute sécurité du CD3000 ...........64
Précautions d'emploi ..................................................................72
Noms des commandes et des éléments ...................................73
Comment utiliser le lecteur CD (MP3/WMA) ? ..........................76
Comment utiliser le syntoniseur ? ............................................85
Comment utiliser la télécommande en option ? ......................88
Procédure d'utilisation de l'ESN en toute sécurité .................. 91
Comment utiliser la fonction AERA SHOT ? (Etats-Unis et Canada uniquement)
........95
Comment utiliser la commande audio ? ...................................99
Comment utiliser le mode Réglage du son ? .........................102
Régler le contraste de l'affichage ............................................105
Changements à l'aide du mode Fonction ...............................106
Comment utiliser le récepteur avec un adaptateur d'interface iPod proposé
en option ?
Comment utiliser l'appareil lorsqu'un changeur de CD fourni séparément
est branché ?
Comment utiliser le syntoniseur lorsqu'un syntoniseur disposant de la norme HD Radio
est connecté (Etats-Unis uniquement) ?
Comment utiliser le syntoniseur lorsqu'un syntoniseur radio par satellite SIRIUS proposé
en option est connecté (Etats-Unis uniquement) ?
.......................................................................................110
.....................................................................................113
......................................................... 115
..............................................117
I
II
III
IV
V
VI
VII
VIII
IX
X
XI
XII
XIII
XIV
XV
XVI
Autres .........................................................................................120
Pour toute question : ................................................................ 122
Caractéristiques ........................................................................ 126
Comment contacter le service client ? ...................................127
XVII
XVIII
XIX
XX
67
Page 68

Table des matières
Pour un fonctionnement en toute sécurité du CD3000 .................... 64
Précautions d'emploi........................................................................... 72
Remarques ................................................................................................................... 72
Noms des commandes et des éléments ............................................ 73
Mise sous et hors tension de l'appareil......................................................................... 75
Comment utiliser le lecteur CD (MP3/WMA) ? ................................... 76
A propos des disques compacts................................................................................... 76
A propos des CD neufs .......................................................................................... 76
A propos des accessoires pour CD........................................................................ 77
A propos des CD que vous avez empruntés.......................................................... 77
Comment retirer un CD du lecteur ......................................................................... 77
A propos des CD de forme irrégulière.................................................................... 77
A propos du nettoyage des CD .................................................................................... 77
À propos de MP3/WMA ................................................................................................ 78
Qu'est ce que le MP3/WMA ? ................................................................................ 78
Fichiers MP3/WMA lisibles..................................................................................... 78
Fichiers WMA lisibles............................................................................................. 78
Etiquettes ID3/WMA............................................................................................... 78
Media ..................................................................................................................... 79
Format des disques................................................................................................ 79
Noms de fichiers .................................................................................................... 79
Multisession ........................................................................................................... 80
Lecture de fichiers MP3/WMA................................................................................ 80
Affichage du temps de lecture MP3/WMA ............................................................. 80
Ordre d'affichage des noms de fichiers et de dossiers MP3/WMA ........................ 80
Lecture d'un CD (fichier MP3/WMA)............................................................................. 81
Basculer en mode Lecteur CD ..................................................................................... 81
Retourner au répertoire de base du CD ....................................................................... 84
Affichage du CD-Texte ................................................................................................. 84
Afficher le titre (MP3/WMA).......................................................................................... 84
Ejecter le disque........................................................................................................... 84
Comment utiliser le syntoniseur ? ..................................................... 85
Régler une station ........................................................................................................ 85
Enregistrer les stations automatiquement (Mode Présélection automatique : ASM)
Enregistrer les stations manuellement ......................................................................... 86
Prérégler le balayage des stations ............................................................................... 86
Modifier la sensibilité de la réception pour un balayage automatique .......................... 87
Changer l'emplacement de la bande radio ................................................................... 87
68
......... 86
Page 69

Table des matières
Comment utiliser la télécommande en option ? ............................... 88
Précautions relatives à l'utilisation de la télécommande .............................................. 88
Nettoyer la télécommande............................................................................................ 88
Remplacer les piles...................................................................................................... 89
Procédure d'utilisation de l'ESN en toute sécurité ........................... 91
A propos du système ESN ........................................................................................... 91
Comment utiliser le système de sécurité ESN (par CD clé) ?...................................... 91
Comment programmer le CD clé ? ........................................................................ 91
Comment désactiver le CD clé ?............................................................................ 91
Comment changer de CD clé ?.............................................................................. 92
Comment retourner à un fonctionnement normal
(verrouillage du système de protection ESN) ?...................................................... 92
Que se passe-t-il si le CD inséré n'est pas le bon ?............................................... 93
Comment allumer / éteindre le voyant de sécurité ? .................................................... 93
Comment lire le numéro de série électronique ?.......................................................... 94
Comment utiliser la fonction AERA SHOT ?
(Etats-Unis et Canada uniquement) ................................................... 95
A propos de la fonction AREA SHOT ........................................................................... 95
Pour utiliser la fonction AREA SHOT..................................................................... 95
Données cartographiques ...................................................................................... 95
Lecture des données AREA SHOT .............................................................................. 96
Changer le mode AREA SHOT .................................................................................... 96
Utiliser le mode AREA SHOT ....................................................................................... 97
Passer d'un point de guidage à un autre................................................................ 97
Parcourir à nouveau les informations..................................................................... 97
Changer les écrans AREA SHOT .......................................................................... 97
Afficher les flèches................................................................................................. 98
Comment utiliser la commande audio ? ............................................ 99
Changer de modes de commande audio ..................................................................... 99
Changements à l'aide du mode Egaliseur.................................................................. 101
Mémoire préréglée par l'utilisateur de l'égaliseur ....................................................... 101
Comment utiliser le mode Réglage du son ? .................................. 102
A propos du mode Réglage du son ............................................................................ 102
Répartiteur ........................................................................................................... 102
Phase non équilibrée ........................................................................................... 103
Modifications en mode Réglage du son ..................................................................... 104
69
Page 70

Table des matières
Régler le contraste de l'affichage ..................................................... 105
Changements à l'aide du mode Fonction ........................................ 106
Comment utiliser le récepteur avec un adaptateur d'interface
iPod proposé en option ?.................................................................. 110
Charger l'iPod............................................................................................................. 110
Changer le mode de commande ................................................................................ 110
Fonctionnement de l'iPod ........................................................................................... 110
Comment utiliser l'appareil lorsqu'un changeur de CD
fourni séparément est branché ? ..................................................... 113
Ecouter un CD............................................................................................................ 113
Passer à la plage suivante ou retourner au début de la plage en cours .................... 113
Avance / Retour rapide............................................................................................... 113
Lire le début des plages (BALAYAGE)....................................................................... 113
Répéter une même plage (REPETITION) .................................................................. 114
Lire les plages dans un ordre aléatoire (RANDOM)................................................... 114
Passer au CD suivant ou précédent........................................................................... 114
Sélectionner un CD en particulier............................................................................... 114
Comment utiliser le syntoniseur lorsqu'un syntoniseur disposant
de la norme HD Radio est connecté (Etats-Unis uniquement) ?......... 115
A propos de la norme HD Radio................................................................................. 115
Régler une station ...................................................................................................... 115
Enregistrer les stations automatiquement (Mode Présélection automatique : ASM)
Enregistrer les stations manuellement ....................................................................... 115
Prérégler le balayage des stations ............................................................................. 115
Changer d'affichage lors de la réception HD Radio.................................................... 115
Réglages de la réception HD Radio ........................................................................... 116
....... 115
Comment utiliser le syntoniseur lorsqu'un syntoniseur radio
par satellite SIRIUS proposé en option est connecté
(Etats-Unis uniquement) ? ...................................................................... 117
A propos de la radio par satellite SIRIUS ................................................................... 117
Sélectionner le mode Radio ....................................................................................... 117
Sélectionner un canal ................................................................................................. 117
Sélection de la catégorie...................................................................................... 118
Sélection directe du canal .......................................................................................... 118
Mémoriser les canaux manuellement ......................................................................... 118
Prérégler le balayage des canaux.............................................................................. 119
Changer d'affichage lors de l'utilisation de la radio par satellite SIRIUS .................... 119
70
Page 71

Table des matières
Autres.................................................................................................. 120
Brancher les lecteurs audio portables sur les sorties auxiliaires ................................ 120
Modifier la sensibilité au niveau des entrées auxiliaires ...................................... 120
Réglage de l'angle de la façade. ................................................................................ 121
Affichage de la clé d'enregistrement de l'utilisateur.................................................... 121
Pour toute question : ......................................................................... 122
Messages d'information (pour le dépannage) ............................................................ 122
Caractéristiques ................................................................................. 126
Comment contacter le service client ? ............................................ 127
71
Page 72
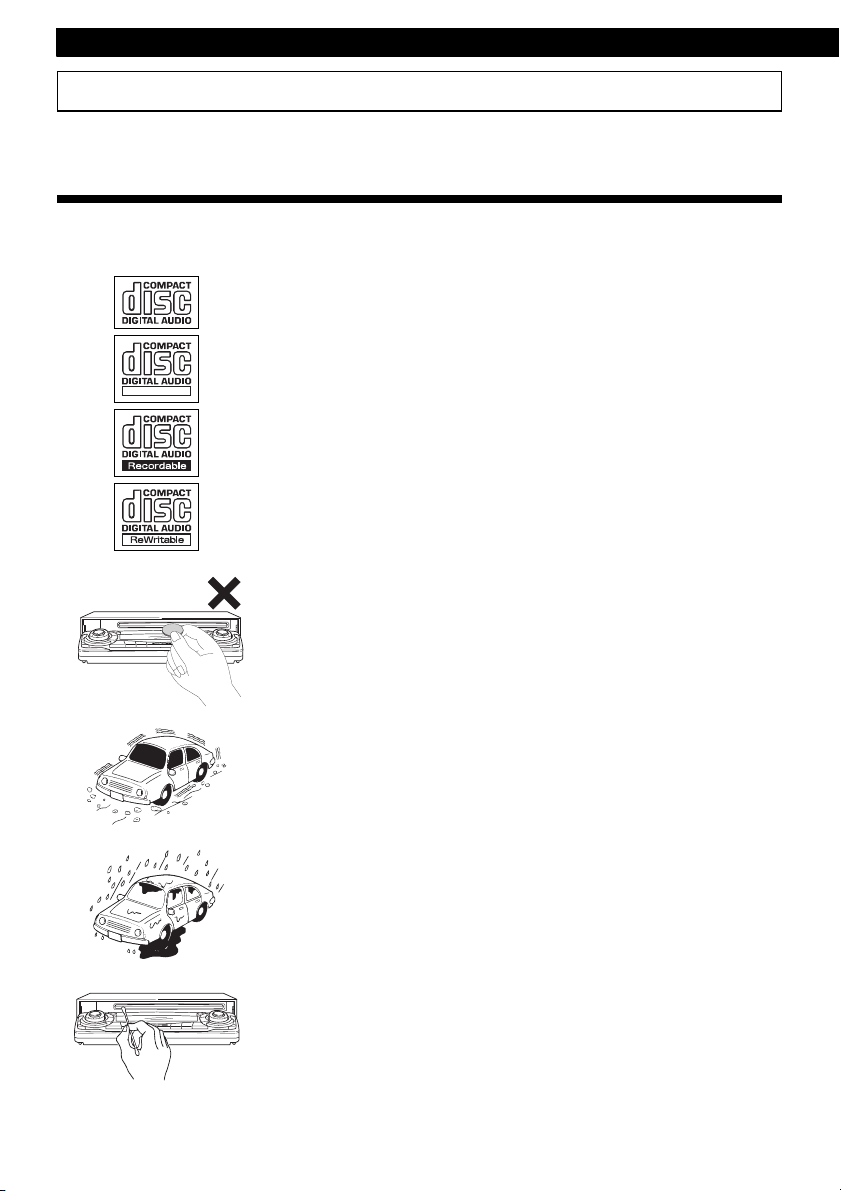
Introduction
Précautions d'emploi
<Votre CD3000 fonctionnera longtemps sans problème si vous l'utilisez correctement et en prenez
soin.>
Remarques
• Pour votre sécurité, n'utilisez votre autoradio qu'avec un volume sonore vous permettant d'entendre
les bruits extérieurs.
• Il est recommandé d'utiliser avec ce lecteur des disques comportant
l'un des symboles représentés à gauche.
• Ce lecteur prend en charge la lecture des CD musicaux (CD-R/CDRW). Assurez-vous que les disques que vous utilisez sont conformes
aux normes en vigueur et ne présentent aucun défaut.
TEXT
Il est possible que sur certains appareils de montage, les disques ne
soient pas toujours lus correctement.
• Cet appareil a été conçu pour ne recevoir que des CD.
N'insérez aucun objet étranger, du type pièces de monnaie ou cartes
de crédit, dans la fente du lecteur. A cet égard, soyez particulièrement
vigilant vis-à-vis des enfants.
72
• Evitez les chocs mécaniques violents.
Si le lecteur est soumis à de fortes vibrations lors d'un passage sur un
sol accidenté, la lecture du CD peut être saccadée. Dans une telle
situation, reprenez la lecture dès que vous roulez à nouveau sur une
surface plus régulière.
• En cas de condensation.
Par temps froid ou pluvieux, de la même façon que la surface
intérieure des vitres se couvre de buée, des gouttelettes d'eau
(condensation de la vapeur d'eau) peuvent également se déposer sur
la tête de lecture. Dans cette situation, la lecture du disque peut
devenir saccadée, voire impossible. Avant de reprendre la lecture,
aérez quelques instants le véhicule afin que la buée disparaisse.
• Nettoyage de la fente de chargement du CD.
Au fil des utilisations, les parois intérieures de la fente de chargement
du CD se couvrent progressivement de poussière. Nettoyez-les de
temps en temps afin d'éviter que la poussière accumulée ne raye les
disques.
Page 73

Noms des commandes et des éléments
DC B A?8
Noms des commandes et des éléments
Vue de face
1 2 3 4 567 8
E
N° Bouton Nom et fonction
Bouton [CD (OPEN /
EJECT)]
Permet d'ouvrir et de fermer la
façade et d'éjecter le CD.
Bouton [AUDIO CONTROL]
Permet de régler le volume
sonore et d'activer d'autres
fonctions.
Bouton [DISC]
Bascule entre les modes
Disque et AUX.
Bouton [TILT]
Permet de régler l'angle de la
façade.
Bouton [SOUND]
Permet d'activer et de
désactiver le son. Permet de
passer en mode Egaliseur.
Bouton [FUNC]
Permet d'activer et de
désactiver le mode Fonction.
II
III
9
N° Bouton Nom et fonction
Bouton [SEL]
Permet de sélectionner les
stations de radio et les plages
de CD.
Bouton [ / ]
Permet de rechercher
automatiquement une station
de radio et d'activer l'avance/le
retour rapide.
Bouton [RTN]
Permet de revenir à l'écran
précédent.
Bouton [RESET]
Permet de réinitialiser les
fonctions de l'appareil sur les
paramètres par défaut.
Bouton [DISP]
Permet d'activer et de
désactiver l'affichage et de
passer d'un écran à un autre.
73
Page 74

Introduction
N° Bouton Nom et fonction
Boutons [1] à [6]
Sélectionnez les stations de
radio préréglées et activez les
fonctions du mode Disque.
N° Bouton Nom et fonction
Bouton [FM AM]
Permet de passer en mode
Radio et de parcourir les
bandes.
Bouton [PWR]
Permet de mettre le lecteur
sous et hors tension.
Bouton [MUTE]
Permet d'activer et de
désactiver le mode Silence.
Bouton à double fonction
➔ Fonctions « MUTE » et
« AREA SHOT »
F
N° Nom et fonction
Fente de chargement du disque
Emplacement où insérer les disques compacts.
MISE EN GARDE
Ne placez jamais d'objet ou n'exercez jamais de pression avec vos mains sur la façade.
74
Page 75

Noms des commandes et des éléments
Mise sous et hors tension de l'appareil
Lorsque l'appareil est mis sous tension, le
dernier mode utilisé (CD ou Syntoniseur, par
exemple) avant d'éteindre l'appareil est restauré.
Lorsque le véhicule ne dispose pas d'un
commutateur d'allumage doté d'une position
ACC, l'appareil doit être mis hors tension avec
précaution. Reportez-vous à l'étape 2 ou à
l'étape 3 lors de sa mise hors tension.
Lorsque l'appareil est hors
1
tension, appuyez sur le bouton
[PWR].
L'appareil s'allume.
ATTENTION
Lorsque l'appareil est mis en marche pour
la première fois ou lorsque les bornes de la
batterie sont débranchées en vue d'une
intervention sur le véhicule et que
l'alimentation est rétablie, l'appareil s'allume
alors en mode FM1. Les stations de radio
sont ensuite recherchées automatiquement
et enregistrées sous les boutons [1] à [6].
ATTENTION
Si le véhicule ne dispose pas d'une position
ACC, maintenez le bouton [PWR] enfoncé
pendant plus de deux secondes.
III
Lorsque l'appareil est sous
2
tension, maintenez le bouton
[PWR] enfoncé pendant moins de
deux secondes.
L'alimentation est alors coupée et
l'appareil se met en veille.
Si vous maintenez à nouveau le
bouton [PWR] enfoncé pendant plus
d'une seconde, l'appareil s'éteint alors
complètement.
Lorsque l'appareil est sous
3
tension, maintenez le bouton
[PWR] enfoncé pendant plus de
deux secondes.
L'appareil se met hors tension.
75
Page 76

Fonctionnement
Comment utiliser le lecteur CD (MP3/WMA) ?
A propos des disques compacts
• Les informations enregistrées sur le disque compact sont lues au moyen d'un laser ; c'est pourquoi
aucun composant ne touche la surface du disque. Si le disque est rayé ou voilé, la qualité du son
risque d'être détériorée et la lecture saccadée. Afin de garantir un son d'une excellente qualité,
prenez les précautions suivantes :
• Ne laissez pas un disque dans la fente une fois celui-ci éjecté ; il
risquerait de se voiler. Les disques doivent être rangés dans leur
boîtier et gardés à l'abri de la chaleur et de l'humidité.
• Ne collez pas de papier ni de ruban adhésif sur le disque. N'écrivez
sur aucune face du disque et faites attention à ne pas le rayer.
• Les disques tournent à très grande vitesse dans l'appareil. N'insérez
jamais de disques fendus ou voilés car vous risqueriez
d'endommager l'appareil.
A propos des CD neufs
Bords rugueux
Stylo à bille
Bords rugueux
Particules
Surface gravée
76
• Evitez de toucher la surface gravée du disque lorsque vous le
saisissez ; tenez-le par les bords.
• Vous avez certainement déjà remarqué que le trou situé au centre et
les bords de certains disques neufs étaient rugueux. Passez le côté
d'un stylo à bille (ou autre) le long de ces bords rugueux, car ils
risquent d'empêcher le chargement correct du disque dans l'appareil.
Il est possible que des particules se détachent des bords rugueux et
viennent se coller sur la surface gravée du CD, gênant ainsi la lecture.
Page 77

Comment utiliser le lecteur CD (MP3/WMA) ?
A propos des accessoires pour CD.
• N'utilisez pas les accessoires (stabilisateurs, enveloppes protectrices,
produits nettoyants pour lentilles laser, etc.) censés « améliorer la
qualité du son » ou « protéger les CD ». Toute modification de
l'épaisseur du CD ou de ses dimensions extérieures suite à
l'utilisation de ces accessoires peut entraîner des problèmes de
lecture.
• Ne placez JAMAIS de bague de protection (ou autres accessoires)
autour de vos disques. Ces bagues de protection sont disponibles
dans le commerce. Elles sont supposées protéger les disques et
améliorer la qualité du son (et les effets de vibration), mais
provoquent généralement plus de mal que de bien. Les problèmes les
plus courants surviennent lors de l'insertion ou de l'éjection du disque,
mais peuvent également affecter la lecture lorsque la bague de
protection se détache du disque à l'intérieur du mécanisme.
A propos des CD que vous avez empruntés
• N'utilisez pas de CD portant des traces de colle, de ruban adhésif ou d'étiquette autocollante. Ils
risqueraient de se coller à l'intérieur de l'appareil et d'endommager celui-ci.
Comment retirer un CD du lecteur
• Lorsque vous retirez un disque, sortez-le parallèlement à la fente.
Lorsque vous retirez un disque, ne l'inclinez pas vers le haut ni vers le
bas, vous risqueriez de rayer sa surface gravée.
NO
OUI
N
IV
A propos des CD de forme irrégulière
• Le lecteur ne prend pas en charge les CD de formes particulières
(ex. : en forme de coeur ou octogonal). Ne tentez pas de les lire,
même à l'aide d'un adaptateur, car ils risquent d'endommager le
lecteur.
•
A propos du nettoyage des CD
• Utilisez un produit nettoyant pour disques compacts disponible dans
le commerce et essuyez doucement la surface du disque en partant
du centre vers les bords.
XXXX
XXXX
XXXX
• N'utilisez pas d'essence spéciale, de diluant, de bombe pour disques
vinyles ou d'autres produits nettoyants. Ils risqueraient d'endommager
la surface polie du CD.
77
Page 78

Fonctionnement
À propos de MP3/WMA
ATTENTION
La création de fichiers MP3/WMA à partir de sources telles que les émissions, les disques, les
enregistrements, les vidéos et les prestations en direct sans la permission des titulaires du droit
d'auteur à des fins autres que privées est interdite.
Qu'est ce que le MP3/WMA ?
Le format MP3/WMA (MPEG Audio Layer III) est une norme de compression de données audio.
Grâce au MP3/WMA, un fichier peut être compressé jusqu'à 1/10e de sa taille d'origine.
WMA (Windows Media
fichiers WMA peuvent être compressés à une taille encore plus petite que les fichiers MP3.
Sur cet appareil, toutes les normes de fichiers, les médias enregistrés et les formats MP3/WMA ne
peuvent pas être utilisés.
Fichiers MP3/WMA lisibles
• Normes prises en charge : MPEG-1 Audio Layer III
• Fréquences d'échantillonnage prises en charge : 44,1 ; 48 (kHz)
• Débit binaire pris en charge : 64, 80, 96, 112, 128, 160, 192, 224, 256, 288, 320 (kbps)
• Canaux pris en charge : stéréo
TM
Audio) est également un format de compression de données audio. Les
* Prend en charge VBR. (64~320 kbps)
* Ne prend pas en charge le format libre.
Fichiers WMA lisibles
• Normes prises en charge : WMA Ver. 7
• Fréquences d'échantillonnage prises en charge : 32 ; 44,1 ; 48 (kHz)
• Débit binaire pris en charge: 48, 64, 80, 96, 128, 160, 192, 256, 320 (kbps)
WMA Ver. 8
WMA Ver. 9
*Prend en charge le débit binaire variable (48~192 kbps).
*Ne prend pas en charge la compression sans perte.
*Ne prend pas en charge les fichiers WMA enregistrés à une
fréquence de 48 kHz avec un débit binaire de 48 kbps.
Etiquettes ID3/WMA
Les fichiers MP3/WMA comportent une « étiquette ID3WMA » permettant de leur associer diverses
informations, telles que le titre de la chanson et le nom de l'artiste.
Cet appareil prend en charge les étiquettes ID3v.1.0, 1.1 et WMA.
78
Page 79

Comment utiliser le lecteur CD (MP3/WMA) ?
Media
Les disques CD-R et CD-RW sont des médias compatibles avec le format MP3/WMA.
Contrairement aux CD-ROM habituellement utilisés pour les enregistrements de fichiers musicaux,
les CD-R et CD-RW sont extrêmement sensibles aux environnements très chauds ou très humides
et il arrive qu'ils ne puissent pas bien être lus. Les traces de doigts et les rayures peuvent empêcher
la lecture ou provoquer des sauts durant celle-ci. Les CD-R et les CD-RW risquent de
s'endommager s'ils restent longtemps dans un véhicule. Il est aussi recommandé de conserver les
CD-R et CD-RW à l'abri de la lumière car ils sont sensibles aux rayons ultraviolets.
Format des disques
Le format des disques à utiliser doit être conforme à la norme ISO 9660 niveau 1 ou 2.
Les caractéristiques de cette norme sont les suivantes :
• Nombre maximum de niveaux de répertoires : 8
• Nombre maximum de caractères des noms de dossiers/fichiers :
• Caractères autorisés pour les noms de dossiers/fichiers :A~Z, 0~9, _ (tiret bas)
• Nombre maximum de fichiers/dossiers sur un disque : 999
[Exemple de configuration pour les CD prenant en charge MP3/WMA]
Répertoire de base (F1)
F2
Dossier 2
001.mp3
002.mp3
003.mp3
004.txt
005.mp3
Nombre maximum de fichiers/dossiers sur un disque : 999
Les fichiers autres que les fichiers MP3/WMA (Exemple : 004.txt)
F158
F159
Dossier 158
Dossier 159
001.mp3
002.mp3
comptent également comme des fichiers simples.
32 (y compris « . » et les extensions de fichier de 3 lettres)
IV
Dossier 255
F255
• Nombre maximum de dossiers sur un disque : 255
• Nombre maximum de dossiers pouvant être reconnus par cet appareil : 256*
*: Un répertoire de base compte comme un dossier.
Noms de fichiers
Seuls les fichiers possédant une extension « .mp3 » et « .wma » peuvent être reconnus comme des
fichiers MP3/WMA et lus. Veillez à enregistrer les fichiers MP3 avec une extension « .mp3 ». Veillez
à enregistrer les fichiers WMA avec une extension « .wma ». Les lettres « MP » de l'extension du
fichier sont reconnues, qu'elles soient saisies en majuscules ou en minuscules.
MISE EN GARDE
Si l'extension « .mp3 » ou « .wma » est associée à tort à un fichier, ce fichier est par erreur reconnu
par l'appareil comme un fichier MP3/WMA et lu, ce qui provoque un bruit assourdissant et risque
d'endommager les haut-parleurs. Veillez à ne pas associer l'extension « .mp3 » ou « .wma » à des
fichiers qui ne sont pas des fichiers MP3/WMA.
79
Page 80

Fonctionnement
Multisession
Les supports multisession sont pris en charge et il est possible de lire des CD-R et des CD-RW
comportant des fichiers MP3/WMA annotés. Toutefois, si le CD a été enregistré en mode « Track at
once », vous devez fermer la session ou traiter le message d'avertissement. Normalisez le format
de chaque session sans en changer le format.
Lecture de fichiers MP3/WMA
Lorsqu'un disque contenant des fichiers MP3/WMA est inséré, l'appareil commence par vérifier tous
les fichiers. Aucun son n'est produit tant que cette opération n'est pas terminée. Il est recommandé
d'utiliser un disque sur lequel ne figurent que des fichiers MP3/WMA et aucun dossier inutile afin
d'accélérer cette procédure de vérification.
Affichage du temps de lecture MP3/WMA
Il est possible que selon les conditions d'écriture du fichier MP3/WMA, le temps de lecture ne soit
pas correct.
* Il est possible que le temps de lecture ne soit pas correct lorsque l'avance ou le retour rapides
sont utilisés en mode VBR.
Ordre d'affichage des noms de fichiers et de dossiers MP3/WMA
Les noms des dossiers et fichiers MP3/WMA situés à un même niveau sont affichés dans l'ordre
suivant :
1. Les dossiers MP3/WMA sont affichés les premiers dans l'ordre croissant puis alphabétique.
2. Les fichiers sont ensuite affichés dans l'ordre croissant puis alphabétique.
80
Page 81

Comment utiliser le lecteur CD (MP3/WMA) ?
Lecture d'un CD (fichier MP3/ WMA)
Appuyez sur le bouton [CD ].
1
La façade s'ouvre.
Si un disque a déjà été chargé, il peut
être éjecté en appuyant sur le bouton
[CD ].
Insérez un CD dans la fente de
2
chargement, côté étiquette dirigé
vers le haut.
La lecture du CD démarre
automatiquement.
ATTENTION
Lorsque le CD est déjà chargé, appuyez sur le
bouton [DISC] pour passer en mode CD.
● Remarque ●
• Si des fichiers musicaux sont
enregistrés normalement (CD
audio) sur un disque contenant
des fichiers MP3/WMA, ce sont
eux qui seront lus. Pour
écouter les fichiers MP3/WMA,
vous devrez appuyer sur le
bouton [3] pendant plus d'une
seconde.
• Lorsqu'un fichier autre que
MP3/WMA est lu, le message
« NO SUPPORT » s'affiche.
• Le changeur de CD fourni
séparément ne peut pas être
utilisé pour lire les fichiers
MP3/WMA.
Basculer en mode Lecteur CD
Appuyez tout d'abord brièvement sur le bouton
[DISC] pendant moins d'une seconde pour
passer en mode Disque. Nous supposons ici
qu'un CD a déjà été chargé dans l'appareil.
Appuyez sur le bouton [DISC] pour
1
basculer en mode Lecteur CD.
La lecture du CD commence.
Si un changeur de CD externe et un
iPod sont branchés sur l'appareil, le
mode Disque alterne entre les modes
Lecteur de CD
➔ Changeur de CD 2 ➔ iPod ➔
Lecteur de CD à chaque fois que vous
appuyez sur le bouton [DISC].
Si un changeur ou un lecteur ne
contient pas de disque, il ne sera pas
pris en compte.
ATTENTION
• Il se peut que la lecture connaisse des ratés
si le CD est rayé ou si la face enregistrée
est sale.
• Seuls deux changeurs de CD externes
peuvent être branchés.
➔ Changeur de CD 1
IV
MISE EN GARDE
N'appuyez pas sur le bouton [
de l'insertion du CD. Vous risqueriez de
vous blesser et d'endommager la façade.
CD
] lors
81
Page 82

Fonctionnement
PLAGE (FICHIER) PRÉCÉDENTE / SUIVANTE
Media
Fonctionnement
Tournez le bouton.
CD
MP3
WMA
Vers la droite : permet de passer à la plage (fichier) suivante.
Vers la gauche : permet de revenir au début de la plage (fichier) en cours de
lecture. Tournez à nouveau pour atteindre la plage (fichier)
précédente.
Avance / Retour rapide
Media
Fonctionnement
Maintenez le bouton enfoncé.
CD
MP3
WMA
: Permet d'activer l'avance rapide.
: Permet d'activer le retour rapide.
BALAYAGE / RÉPÉTITION / ALÉATOIRE
Media
Fonctionnement
Appuyez sur le bouton.
: Lire le début des plages.
CD
: Répéter la lecture d'une même plage. Pour annuler la commande, appuyez de
nouveau sur le bouton.
: Permet de lire les plages dans un ordre aléatoire. Pour annuler la commande,
appuyez de nouveau sur le bouton.
Lorsque vous appuyez sur le bouton pendant moins d'une seconde.
: Seules les 10 premières secondes de chaque fichier contenu dans le dossier en
MP3
WMA
cours de lecture sont lues.
: Répéter la lecture d'un même fichier. Pour annuler la commande, appuyez de
nouveau sur le bouton.
: Un fichier est sélectionné parmi tous les fichiers contenus dans le dossier en cours
de lecture, puis il est lu.
ATTENTION
• Si vous souhaitez poursuivre la lecture d'une plage en particulier, appuyez de nouveau sur le
bouton afin d'arrêter le balayage.
• Lorsque le balayage a été effectué sur l'ensemble du disque, la lecture normale reprend là où
la recherche avait commencé.
82
Page 83

Comment utiliser le lecteur CD (MP3/WMA) ?
DOSSIER PRÉCÉDENT / SUIVANT
Media
Fonctionnement
Appuyez sur le bouton.
MP3
WMA
: Permet de sélectionner le dossier suivant.
: Permet de sélectionner le dossier précédent.
BALAYAGE DU DOSSIER / RÉPÉTITION DU
DOSSIER / LECTURE ALÉATOIRE DE TOUS LES
DOSSIERS
Media
Fonctionnement
Lorsque vous appuyez sur le bouton pendant plus d'une seconde.
: Seules les 10 premières secondes de la première chanson de chaque dossier sont
MP3
WMA
lues.
: Tous les fichiers se trouvant au même niveau que le dossier en cours de lecture
sont répétés. Pour annuler la commande, appuyez de nouveau sur le bouton.
: Les fichiers de tous les dossiers sont lus de manière aléatoire. Pour annuler la
commande, appuyez de nouveau sur le bouton.
ATTENTION
• Pendant la lecture aléatoire, vous pouvez appuyer sur le bouton [5 RPT] pour répéter la plage
en cours. Pour annuler la répétition d'une plage et retourner au mode Lecture aléatoire,
appuyez de nouveau sur le bouton [5 RPT]. Pendant la lecture d'une plage en particulier : la
plage en cours est lue de façon répétée.
• Il peut arriver qu'une plage soit lue (sélectionnée) plusieurs fois de suite ; ceci est
parfaitement normal et ne constitue pas un dysfonctionnement.
• Lorsque la fonction « RÉPÉTITION » ou « ALÉATOIRE » est sélectionnée, le message [RPA]
ou [RAND] s'affiche à l'écran afin que vous sachiez quelle fonction est en cours.
IV
83
Page 84
Fonctionnement
Retourner au répertoire de base du CD
Dans le répertoire de base, lorsqu'un fichier ne
peut être relu, le système retourne au premier
fichier pouvant être relu. (Dans l'exemple de
configuration, le fichier retourne à 001.mp3. voir
page 79.)
Appuyez sur le bouton [RTN].
1
Affichage du CD-Texte
Cet appareil est le seul lecteur CD à prendre en
charge le CD-Texte. Les données de ce dernier
ne peuvent pas être affichées avec le changeur
de CD proposé en option. Le logo affiché cidessous indique que les titres du disque et des
plages ont été enregistrés sur le CD. Ces
informations apparaissent à l'écran durant la
lecture.
Appuyez sur le bouton [DISP]
1
pendant plus d'une seconde.
Si vous appuyez sur le bouton [DISP]
lorsque les informations sont affichées
à l'écran, le texte défile vers le bas
dans l'ordre suivant : DISC title ➔
TRACK title ; l'affichage s'arrête alors
sur le titre de la plage (TRACK).
Les informations CD-Texte comportant
des caractères non alphanumériques
ou des symboles ne peuvent pas être
affichées.
Afficher le titre (MP3/WMA)
Appuyez sur le bouton [DISP]
1
pendant plus d'une seconde.
Chaque fois que vous appuyez sur ce
bouton, les messages ci-dessous
s'affichent dans l'ordre suivant :
Nom de dossier / Nom de fichier* ➔
Etiquette du numéro de dossier /
numéro de fichier ➔
*:L'écran peut afficher un maximum
de 9 caractères ; vous pouvez
ensuite faire défiler les caractères
restants.
Après le nom du dossier, c'est le
nom du fichier qui s'affiche. Une fois
que le nom de fichier s'est affiché,
l'affichage reste fixe.
ATTENTION
Les noms de dossier, noms de fichier ou
étiquettes comportant des signes autres que
des caractères alphanumériques et des
symboles ne peuvent être affichés.
Ejecter le disque
Appuyez sur le bouton [CD ].
1
La façade s'ouvre et le disque est
éjecté.
Retirez le disque et appuyez sur le
2
bouton [CD ].
La façade se ferme.
84
MISE EN GARDE
• Ne conduisez pas avec la façade
ouverte. Vous risqueriez de vous
blesser, lors d'un freinage d'urgence ou
d'un changement de direction brutal du
véhicule par exemple.
• Ne tentez pas de fermer la façade
manuellement. Vous risqueriez de
l'endommager.
Page 85

Comment utiliser le syntoniseur ?
Comment utiliser le syntoniseur ?
ATTENTION
• Si des stations ont été enregistrées dans la
mémoire, appuyez sur l'un des boutons [1]
à [6] ayant fait l'objet d'une mémorisation
pour en sélectionner directement une.
(Reportez-vous à la rubrique « Enregistrer
les stations manuellement » en page 86)
MISE EN GARDE
Si la batterie du véhicule est débranchée
(en cas de réparation ou de dépose du
récepteur), toutes les stations en mémoire
seront supprimées. Dans ce cas, procédez
à une nouvelle mise en mémoire des
stations.
Régler une station
Appuyez tout d'abord sur le bouton [FM AM] pour
activer le syntoniseur.
Les stations peuvent être réglées manuellement
ou automatiquement. Le récepteur peut
enregistrer jusqu'à 24 stations : 6 sur la bande
AM et 18 sur la bande FM (6 sur FM1, FM2 et
FM3). (Réglage initial)
Appuyez très brièvement (moins
1
d'une seconde) sur le bouton [FM
AM] pour sélectionner la bande FM
ou AM.
L'appareil affiche successivement les
bandes radio FM1 ➔ FM2 ➔ FM3 ➔
AM à chaque nouvelle pression sur le
bouton.
Tournez le bouton [SEL] vers la
2
droite ou vers la gauche pour
régler l'appareil sur une station.
Vers la droite :
permet d'accorder l'appareil sur les
hautes fréquences.
Vers la gauche :
permet d'accorder l'appareil sur les
basses fréquences.
Appuyez sur le bouton [ ] ou [ ]
3
pour lancer la recherche
automatique des stations.
Bouton [ ]
:
permet de lancer la recherche sur
les hautes fréquences.
Bouton [ ] :
permet de lancer la recherche sur
les basses fréquences.
ATTENTION
Il est parfois difficile de conserver une
réception optimale ; en effet, l'antenne de votre
véhicule étant constamment en mouvement
(par rapport à l'antenne d'émission), la
puissance des signaux radio reçus varie
constamment. D'autres facteurs peuvent
affecter la réception, comme les obstacles
naturels ou encore les panneaux de
signalisation.
Lorsqu'un syntoniseur disposant de la norme
HD Radio est branché, les émissions
numériques sont reçues en premier. (EtatsUnis uniquement).
IV
V
85
Page 86

Fonctionnement
Enregistrer les stations automatiquement (Mode Présélection automatique : ASM)
Appuyez sur le bouton [SEL]
1
pendant plus de deux secondes
jusqu'à ce que vous entendiez un
signal sonore.
Le mode Présélection automatique est
lancé.
Le voyant [ASM ON] clignote à l'écran
et les stations sont enregistrées
automatiquement sous les boutons [1]
à [6].
Ces boutons sont appelés boutons de
présélection.
ATTENTION
• Ces boutons ([1] à [6]) vous permettent de
sélectionner une station à l'aide d'une seule
touche. La fréquence de la station
sélectionnée est affichée à l'écran.
• Lorsqu'une nouvelle station est enregistrée,
la station précédemment mise en mémoire
est supprimée.
• Si moins de six stations peuvent être
reçues, celles réglées sur les boutons
restants seront conservées.
b
Enregistrer les stations manuellement
Cette section vous indique comment attribuer les
stations aux boutons numérotés.
Tournez le bouton [SEL] vers la
1
droite ou la gauche pour régler
l'appareil sur la station à
enregistrer.
Appuyez sur un bouton compris
2
entre [1] et [6] pendant plus de
deux secondes.
La station est alors attribuée au
bouton sélectionné. Répétez la
procédure pour attribuer
successivement d'autres stations
réglées manuellement aux boutons
[1] à [6]. Ces boutons sont appelés
boutons de présélection.
Prérégler le balayage des stations
Cette fonction permet de recevoir toutes les
stations enregistrées sur les boutons de
présélection pendant cinq secondes chacune.
Appuyez sur le bouton [SEL]
1
pendant moins de deux secondes.
Le message [P SCAN] s'affiche et
les stations enregistrées sous
chaque bouton de présélection (de
[1] à [6]) sont activées pendant 5
secondes chacune.
86
Pour arrêter le mode Balayage des
2
stations présélectionnées sur une
station en particulier, appuyez de
nouveau sur le bouton [SEL].
Le récepteur reste réglé sur la
station souhaitée.
Page 87

Comment utiliser le syntoniseur ?
Modifier la sensibilité de la réception pour un balayage automatique
L'appareil vous permet de sélectionner la
sensibilité de la réception en vue d'un balayage
automatique des stations. Les deux modes de
sensibilité disponibles sur cet appareil sont les
modes LOC et DX.
Au cours d'un balayage
automatique, la sensibilité de la
réception bascule automatiquement
sur l'un des deux niveaux. Par
défaut, le degré de sensibilité de la
réception est peu élevé de manière
à ce que seules les stations
Mode LOC
Mode DX
émettant un puissant signal puissent
être captées. Si l'appareil ne réussit
pas à recevoir de station, le degré
de sensibilité de la réception
augmente de façon à ce que les
stations dont le signal est moins
puissant puissent également être
captées.
Le degré de sensibilité de la
réception pour la recherche
automatique étant élevé dès le
départ, même les stations dont le
signal est plus faible peuvent être
captées. (il est possible que les
signaux des stations difficiles à
capter se croisent)
ATTENTION
Lorsqu'un syntoniseur disposant de la norme
HD Radio proposé en option est branché, la
sensibilité de la réception est réglée sur le
mode LOC. Le mode DX n'est pas disponible.
(Etats-Unis uniquement).
Vérifiez que l'appareil est en veille.
1
Changer l'emplacement de la bande radio
Il est possible de changer la bande radio utilisée
entre l'Amérique du Nord et l'Asie, l'Australie et
l'Amérique Latine. Par défaut, l'appareil est réglé
sur la zone Etats-Unis (Amérique du Nord).
ATTENTION
Lorsqu'un syntoniseur disposant de la norme
HD Radio proposé en option est branché,
l'emplacement de la bande radio est réglé sur
la zone Etats-Unis. Les autres emplacements
ne sont pas disponibles. (Etats-Unis
uniquement).
Vérifiez que l'appareil est en veille.
1
Appuyez sur le bouton [3] et
2
maintenez-le enfoncé, puis faites
de même avec le bouton [FM AM]
et maintenez-les enfoncés tous les
deux pendant plus de trois
secondes.
A chaque nouvelle pression sur les
boutons, la bande radio passe d'une
zone à une autre dans l'ordre indiqué
ci-dessous.
USA ➔ ASIA ➔ AUS ➔ LATIN
➔ USA www
Les stations de radio sont ensuite
recherchées automatiquement et
enregistrées sous les boutons [1] à [6].
V
Appuyez sur le bouton [1] et
2
maintenez-le enfoncé, puis faites
de même avec le bouton [FM AM]
et maintenez-les enfoncés tous les
deux pendant plus de trois
secondes.
L'appareil alterne entre les modes
LOC et DX à chaque pression sur
les boutons.
87
Page 88

Fonctionnement
Comment utiliser la télécommande en option ?
Précautions relatives à l'utilisation de la télécommande
• Manipulez la télécommande avec prudence du fait de sa petite taille et de sa légèreté. La laisser
tomber ou la frapper violemment risque de l'endommager, d'user la pile ou de provoquer un
dysfonctionnement.
• Conservez-la à l'abri de l'eau, de la poussière et de l'humidité. Ne la soumettez à aucun choc.
• Ne la placez pas dans un endroit chaud, par exemple sur le tableau de bord ou près d'un radiateur.
Une surchauffe de la télécommande risque entre autres de déformer le boîtier.
• Ne la manipulez pas en conduite en raison du risque d'accident que cela peut créer.
• Lorsque vous souhaitez utiliser la télécommande, dirigez-la vers le récepteur lumineux.
• Il est possible que celui-ci ne fonctionne pas correctement s'il est exposé à une lumière vive telle
que celle du soleil.
• Pour éteindre l'autoradio, veillez à appuyer pendant plus de deux secondes sur le bouton [PWR]
situé sur le corps de l'appareil avant de quitter la voiture ; faute de quoi la batterie risque de se
décharger. Lorsque l'appareil est éteint, la télécommande ne fonctionne pas.
• Retirez les piles de la télécommande lorsque vous ne l'utilisez pas pendant une période prolongée.
Nettoyer la télécommande
• Utilisez un chiffon sec pour la nettoyer. Si elle est très sale, nettoyez-la avec un chiffon humide et du
détergent liquide dilué dans de l'eau. N'utilisez pas d'alcool ou de solvant, car ces produits
risqueraient d'endommager la finition.
• N'utilisez en aucun cas de l'essence spéciale ou du solvant. Ces produits pourraient endommager le
boîtier ou la finition.
Télécommande (en option)
1
2
3
4
5
6
88
7
8
9
?
A
N° Bouton Nom et fonction
Bouton [PWR]
Permet de mettre le lecteur
sous et hors tension.
Bouton [TU]
Permet de basculer en mode
Syntoniseur.
Bouton [BAND]
Permet d'alterner entre les
bandes radio et le mode DISC.
Bouton [ ]
Permet de diminuer le volume.
Bouton [MUTE]
Permet d'activer et de
désactiver le mode Silence.
Page 89

Comment utiliser la télécommande en option ?
N° Bouton Nom / fonction
Boutons [ PRESET CH ]
Boutons [ DISC ]
Permettent de sélectionner des
stations de radio préréglées et
des CD (dossiers).
Bouton [MODE]
Permet de basculer en mode
Lecture.
Bouton [DISC]
Permet de basculer en mode
DISC.
Bouton [AUX]
Permet de basculer en mode
AUX.
Bouton [ ]
Permet d'augmenter le volume.
Boutons [ TUNE·SEEK ]
Boutons [ TRACK ]
[En mode Radio]
Le fait d'appuyer brièvement
sur les boutons :
permet de régler les stations
manuellement
L'appui prolongé sur les
boutons (plusieurs secondes) :
permet de régler les stations
automatiquement.
[En mode CD (MP3/WMA)]
Le fait d'appuyer brièvement
sur les boutons :
permet de sélectionner les
plages (fichiers).
Le fait d'appuyer pendant
plusieurs secondes sur les
boutons :
permet l'avance/le retour
rapide de la piste.
Remplacer les piles
AVERTISSEMENT
Pour éviter les accidents, tenir les piles
hors de portée des enfants. En cas
d'ingestion, consultez immédiatement un
médecin.
Utilisez deux piles AAA.
Retirez le cache arrière de la
1
télécommande en appuyant
légèrement dessus puis en le
faisant glisser dans le sens de la
flèche.
Placez les deux piles fournies
2
dans le compartiment
conformément au schéma
figurant à l'intérieur.
Remettez le cache en place en le
3
faisant glisser dans le sens de la
flèche.
VI
89
Page 90

Fonctionnement
MISE EN GARDE
• Faites très attention à ne pas avaler les
piles.
• La durée de vie des piles est d'environ un
an. Si la télécommande ne fonctionne pas
correctement ou si le voyant s'affaiblit,
remplacez les piles.
• Veillez à insérez les piles dans le bon
sens de façon à ce que les pôles positifs
et négatifs correspondent aux indications
précisées sur le schéma.
• Ne mélangez pas pile neuve et pile
usagée ; utilisez deux piles neuves.
• N'utilisez que des piles du même modèle.
• Si vous voyez du liquide s'écouler des
piles, retirez-les toutes les deux et jetezles conformément à la législation en
vigueur. Nettoyez soigneusement le
compartiment à piles avec un chiffon sec.
Insérez ensuite les piles neuves.
90
Page 91

Procédure d'utilisation de l'ESN en toute sécurité
Procédure d'utilisation de l'ESN en toute sécurité
A propos du système ESN
Cet appareil est équipé du système de sécurité
ESN (Eclipse Security Network). L'ESN est un
système de sécurité qui désactive toutes les
fonctions de l'appareil si celui-ci est mis sous
tension alors qu'il a été volé. Une fois l'ESN
installé, la fonction de sécurité s'active dès que
l'appareil est mis hors tension ou le moteur du
véhicule arrêté. L'activation ou la désactivation
de la fonction de sécurité peuvent être effectués
à l'aide d'un « CD clé ». Un CD musical doit tout
d'abord être enregistré en tant que « CD clé ».
Comment utiliser le système de sécurité ESN (par CD clé) ?
Comment programmer le CD clé ?
Vérifiez que l'appareil est en veille.
1
Appuyez sur le bouton [FUNC] et
2
maintenez-le enfoncé, puis faites
de même avec le bouton [6] et
maintenez-les enfoncés tous les
deux pendant plus d'une seconde.
Le message [SEC] s'affiche et fait
ensuite place aux lettres [DISC] au
bout de deux secondes.
ATTENTION
• Si un CD a déjà été inséré, le message
[SEC] apparaît, puis la façade s'ouvre et le
CD est éjecté.
• Lorsqu'un système de protection est activé,
la programmation du CD clé est impossible.
Appuyez sur le bouton [CD ].
3
La façade s'ouvre ; vous pouvez
désormais insérer votre CD clé dans la
fente de chargement du CD3000.
Insérez le CD dans la fente.
4
Le message [SEC] s'affiche, puis le
CD clé est éjecté.
Appuyez sur le bouton [CD ].
5
La façade se ferme.
ATTENTION
• En cas de problème avec le CD, le
message [ERR] s'affiche pendant deux
secondes et le CD est éjecté. Réinsérez le
CD.
• Si le message [ERR] s'affiche deux fois de
suite, l'instruction [CHANGE] apparaît
pendant deux secondes. Reprenez
l'opération en utilisant un autre CD.
• Les CD protégés contre la copie et les CD
ROM MP3/WMA ne peuvent pas servir de
CD clé.
• Le voyant de sécurité clignote chaque fois
que le moteur du véhicule est coupé.
Comment désactiver le CD clé ?
Vérifiez que l'appareil est en veille.
1
Appuyez sur le bouton[FUNC] et
2
maintenez-le enfoncé, puis faites
de même avec le bouton [6] et
maintenez-les enfoncés tous les
deux pendant plus d'une seconde.
Le message [SEC] apparaît, puis
l'instruction [DISC] s'affiche au bout de
deux secondes.
VI
VII
91
Page 92

Exemples de réglages
Appuyez sur le bouton [CD ].
3
La façade s'ouvre ; vous pouvez
désormais insérer votre CD clé dans la
fente de chargement du CD3000.
ATTENTION
Si un CD a déjà été inséré, le message
[SEC] apparaît, puis la façade s'ouvre et le
CD est éjecté.
Insérez votre CD clé dans la fente.
4
Le message [CANCEL] s'affiche, puis
le CD clé est éjecté.
Le CD clé est désactivé.
ATTENTION
• Cette procédure permet de désactiver la
protection de l'appareil ESN.
• Si l'alimentation de l'appareil ESN est
coupée puis restaurée, il ne sera pas
nécessaire d'insérer un CD clé pour que
l'appareil retourne à un fonctionnement
normal.
• L'insertion d'un CD autre que le CD clé ne
désactive pas le système de protection. A la
place, le message [ERR] s'affiche pendant
deux secondes, puis le mode normal de
lecture de CD est activé.
Comment changer de CD clé ?
Tout d'abord, désactivez le CD clé
1
existant.
Reportez-vous à la rubrique
« Comment désactiver le CD clé ? ».
Programmez ensuite un nouveau
2
CD clé.
Reportez-vous à la rubrique
« Comment programmer le CD clé ? ».
Comment retourner à un fonctionnement normal (verrouillage du système de protection ESN) ?
Si l'alimentation est coupée alors que le
système de protection ESN est activé (un CD
clé a été programmé), le fonctionnement est
désactivé jusqu'à ce que l'alimentation soit
restaurée et l'appareil déverrouillé. Suivez les
instructions ci-dessous pour retourner à un
fonctionnement normal.
Lorsque le contact est mis après
1
que l'alimentation de la batterie a
été coupée, le message [SEC]
s'affiche pendant deux secondes.
Le message [DISC] s'affiche
ensuite ; appuyez alors sur le
bouton [CD ] pour pouvoir
insérer votre CD clé dans le
CD3000.
Appuyez sur le bouton [CD ].
5
La façade se ferme.
92
Insérez votre CD clé.
2
Si le lecteur reconnaît le CD, le
message [OK]s'affiche pendant deux
secondes et la lecture commence.
Page 93

Procédure d'utilisation de l'ESN en toute sécurité
ATTENTION
• Si le lecteur ne reconnaît pas le CD, le
message [ERR_] (« ERR » et le numéro de
l'erreur) s'affiche pendant deux secondes,
puis le CD est éjecté.
• Si [ERR5] apparaît (la 5ème fois qu'une
erreur se produit), le message [HELP]
s'affiche, puis le CD est éjecté. Lorsque le
message [HELP] apparaît, effectuez les
opérations nécessaires permettant de
verrouiller le système de protection ESN en
suivant la procédure indiquée dans la
rubrique « Que se passe-t-il si le CD inséré
n'est pas le bon ? » en page 93.
• Vous devez utiliser le même CD que celui
ayant servi à la programmation du CD clé ;
un double du CD ne fonctionnera pas
correctement.
Que se passe-t-il si le CD inséré n'est pas le bon ?
Au bout de la 5ème tentative
1
infructueuse, le message [HELP]
s'affiche pendant 5 secondes.
Après l'affichage du message [HELP],
le numéro de série apparaît.
Appuyez sur le bouton [CD ]
2
pour fermer la façade.
Appuyez sur le bouton[FUNC] puis
3
sur le bouton [6] et maintenez-les
enfoncés tous les deux pendant
cinq secondes.
Après l'affichage pendant deux
secondes du message [SEC], le code
tournant (à 6 chiffres) apparaît.
Appuyez sur le bouton [FUNC].
4
Le message [DISC] clignote à l'écran.
Vous avez droit à cinq tentatives
supplémentaires pour insérer le bon
disque.
Insérez le CD clé dans la fente.
5
Si l'appareil reconnaît le CD, le
message [OK] s'affiche pendant deux
secondes et le CD est éjecté.
ATTENTION
• Si l'appareil ne reconnaît pas le CD, le
message [ERR_] (« ERR » et le numéro de
l'erreur) s'affiche pendant deux secondes,
puis le CD est éjecté.
• Cette procédure permet de désactiver la
protection de l'appareil ESN.
● Remarque ●
Si le bon CD n'est toujours pas inséré
au bout de cinq tentatives, le message
[CALL] s'affiche ; l'appareil doit être
renvoyé à Eclipse afin d'être réinitialisé.
Dans ce cas, veuillez contacter votre
revendeur Eclipse pour plus
d'informations.
Afin de ne pas oublier quel est votre
CD clé, notez le nom de l'album sur
un mémento (reportez-vous à la page
128).
Comment allumer / éteindre le voyant de sécurité ?
Une fois le système de protection ESN activé, le
voyant clignote chaque fois que le commutateur
d'allumage du véhicule est placé en position
OFF, avertissant d'éventuels voleurs que
l'appareil est protégé. Cependant, vous pouvez si
vous le souhaitez désactiver ce dispositif de
dissuasion.
Lorsque l'appareil est en veille,
1
appuyez sur le bouton [FUNC],
puis sur le bouton [2] et maintenezles enfoncés tous les deux
pendant plus d'une seconde.
VII
93
Page 94

Exemples de réglages
Le message [IND. FLASH] ou [IND.
2
-----] s'affiche.
[IND. FLASH] signifie que le voyant de
sécurité clignote lorsque le
commutateur d'allumage du véhicule
est en position OFF ; le message
[IND.-----] indique le contraire.
Répétez les étapes ci-dessus pour
réactiver le mode Clignotement.
Comment lire le numéro de série électronique ?
Vérifiez que l'appareil est en veille.
1
Appuyez sur le bouton [FUNC] et
2
maintenez-le enfoncé, puis faites
de même avec le bouton [4] et
maintenez-les enfoncés tous les
deux pendant plus d'une seconde.
Le message [ESN] s'affiche, suivi d'un
numéro à huit chiffres ; il s'agit de
votre numéro de série électronique
(ESN). Ce numéro vous permet
également d'identifier votre appareil
CD3000 Eclipse en cas de vol.
94
Page 95

Comment utiliser la fonction AERA SHOT ? (Etats-Unis et Canada uniquement)
Comment utiliser la fonction AERA SHOT ?
(Etats-Unis et Canada uniquement)
A propos de la fonction AREA SHOT
La fonction AREA SHOT, les cartes de destinations et les informations de guidage peuvent être affichées sur votre
appareil lorsque vous avez préalablement défini votre itinéraire sur le site Internet d'ECLIPSE (E-iSERV).
ATTENTION
Les écrans figurant dans ce manuel peuvent différer de ceux de l'appareil.
Pour utiliser la fonction AREA SHOT
Pour utiliser la fonction AREA SHOT, les instructions concernant la conduite relatives au sens de l'itinéraire et le
nom des rues aux croisements, doivent être téléchargées à partir du site Internet d'ECLIPSE (E-iSERV) et
importées dans le CD3000.
La procédure est la suivante :
Connectez-vous au site Internet d'ECLIPSE. (URL : http://www.e-iserv.jp)
VII
Enregistrez-vous en tant qu'utilisateur. Une clé d'enregistrement de l'utilisateur est
requise lors de l'enregistrement. Pour plus de détails concernant la clé
d'enregistrement de l'utilisateur, reportez-vous à la page voir page 121.
(Pour vous enregistrer, suivez les instructions disponibles sur le site Internet. Une
fois enregistré, il est inutile de répéter la procédure.)
Ouverture de session.
Définissez votre point de départ et votre destination sur la page AREA SHOT.
Vous pouvez utiliser l'adresse ou l'intersection, la ville, l'Etat/la province et le code
zip/postal pour rechercher un point de départ, un itinéraire ou une destination.
Vous pouvez enregistrer votre domicile comme repère. (Veuillez suivre les
consignes exposées sur le site Internet.)
Téléchargez les informations.
Gravez les informations téléchargées sur un CD-R.
Importez les données inscrites sur le CD-R dans le CD3000. (Pour plus de détails, reportez-vous à 96).
Vous pouvez à présent utiliser la fonction AREA SHOT.
Données cartographiques
Les données cartographiques utilisées par l'appareil sont créées grâce aux informations fournies par NAVTEQ (EtatsUnis et Canada).
Lorsque vous utilisez les données cartographiques, tenez compte des conditions de circulation réelles et respectez
les règles de circulation.
Vous ne pouvez pas copier, publier ou utiliser des cartes avec d'autres appareils électroniques à moins d'en avoir
obtenu l'autorisation écrite.
VIII
95
Page 96

Exemples de réglages
Lecture des données AREA SHOT
Les données AREA SHOT, téléchargées à partir
du site Internet E-iSERV et enregistrées sur un
CD-R, peuvent être chargées dans l'appareil et y
être enregistrées.
Appuyez brièvement sur le bouton
1
[FUNC] pendant moins d'une
seconde.
Le mode Fonction est activé.
Tournez le bouton [SEL] pour
2
sélectionner AreaShot.
Appuyez sur le bouton [SEL].
3
La façade s'ouvre automatiquement.
Insérez le CD-R permettant de lire
4
les données Area Shot.
La façade se ferme automatiquement
lorsqu'un CD-R est inséré.
Une fois la façade fermée, les fichiers
du CD-R sont lus. Le message
[READING...] apparaît pendant la
lecture des fichiers. Le message « No
DATA » s'affiche lorsque le CD-R ne
contient pas de données correctes.
Tournez le bouton [SEL] pour
5
sélectionner le fichier enregistré.
Appuyez sur le bouton [SEL].
6
Le fichier sélectionné est enregistré.
Le message « READING » s'affiche
pendant l'importation des données.
Une fois la lecture terminée, le
message [Completed] s'affiche, puis
l'écran permettant la sélection du
mode Fonction apparaît à nouveau.
ATTENTION
• L'appareil ne peut importer que les fichiers
provenant de CD-R et écrits dans des
répertoires de base.
XXXXXXXX.ast
• Les formats de disques pouvant être utilisés
sont les suivants :
•CD-ROM (MODE 1)
•CD-ROM (MODE2_FORM 1)
*Les CD-ROM écrits en MODE2_FORM2 ne
peuvent être lus.
• Le nom du fichier peut être modifié en
utilisant 8 caractères alphanumériques (les
espaces ne peuvent pas être utilisés).
Création automatique
Extension de fichier
MISE EN GARDE
Ne coupez pas l'alimentation et ne mettez
pas le commutateur d'allumage hors
tension pendant la lecture. L'interruption de
la lecture pourrait corrompre les données.
Changer le mode AREA SHOT
Appuyez sur le bouton [MUTE]
1
pendant plus d'une seconde.
Les cartes de guidage, les noms des
rues aux intersections et les
changements de direction s'affichent à
l'écran. Appuyez sur le bouton [MUTE]
et maintenez-le enfoncé (pendant 1 ou
plusieurs secondes) à nouveau pour
désactiver le mode Area Shot.
ATTENTION
• Lorsque vous appuyez sur tout autre
bouton que [ ], [ ], [DISP] et [RTN],
l'écran de contrôle audio permettant le
fonctionnement du système audio s'affiche.
Lorsque aucun bouton n'est actionné
pendant 6 secondes, l'écran de guidage
apparaît à nouveau.
96
Page 97

Comment utiliser la fonction AERA SHOT ? (Etats-Unis et Canada uniquement)
• Si l'écran de contrôle audio s'affiche alors
que le mode Area Shot est activé, l'appui
sur les boutons [RTN], [ ], [ ] ou [DISP]
affiche l'écran de guidage.
MISE EN GARDE
• Vous ne pourrez pas changer de mode
si les données de guidage n'ont pas été
importées correctement.
• Ne regardez pas l'écran lorsque vous
conduisez.
Utiliser le mode AREA SHOT
Lorsque vous passez manuellement d'un point
de guidage à un autre, le point précédent et le
point suivant peuvent être confirmés pendant le
guidage. Les noms des rues aux intersections et
les changements de direction sont représentés
sous forme de texte et de flèches.
Passer d'un point de guidage à un autre
Après avoir passé chacun des emplacements
décrits dans le guide, il est nécessaire de
passer manuellement à l'écran de guidage
suivant. Vous pouvez accéder manuellement
à l'écran précédent et le confirmer.
Parcourir à nouveau les informations
Les informations comportant les noms des
rues aux intersections et les changements de
direction peuvent être parcourues à l'écran.
Vous pouvez afficher un maximum de 9
caractères par écran. Vous pouvez faire
défiler les caractères supplémentaires sur
l'écran. Une fois le défilement terminé, les
neuf premiers caractères s'affichent à
nouveau à l'écran. Pour un nouveau
défilement, effectuez les opérations
suivantes :
Appuyez sur le bouton [DISP].
1
Les informations de guidage peuvent
être parcourues à nouveau.
Changer les écrans AREA SHOT
Vous pouvez accéder à l'écran audio en
mode AREA SHOT.
Appuyez sur le bouton [RTN].
1
Lorsque vous appuyez plusieurs fois
sur ce bouton, vous pouvez passer de
l'écran AREA SHOT à l'écran Audio et
vice-versa.
VIII
Appuyez sur le bouton [ ] ou [ ]
1
pour passer d'un point de guidage
à un autre.
Bouton [ ] :
permet de passer au point de
guidage suivant.
Bouton [ ] :
permet de passer au point de
guidage précédent.
● Remarque ●
• La distance séparant
l'intersection précédente et
l'intersection suivante est
exprimée en miles (« mi ») pour
le modèle américain et en
kilomètres (« km ») pour le
modèle australien.
97
Page 98

Exemples de réglages
Afficher les flèches
Les flèches servant à indiquer les changements de direction sont
affichées de la manière suivante :
Diagonale
dirigée vers
l'avant et la
droite
Droite Gauche
Diagonale
dirigée vers
l'arrière et la
droite
Diagonale
dirigée vers
l'arrière et la
gauche
Diagonale
dirigée vers
l'avant et la
gauche
En fonction des conditions de circulation, les flèches peuvent indiquer
ce qui suit :
Route express Intersection
La
circulation
converge
vers la
droite
La
circulation
converge
vers la
gauche
Voie d'accès
à droite
A droite à
l'intersection
A gauche à
l'intersection
98
Voie d'accès
à gauche
Sortie à
droite
Sortie à
gauche
Page 99

Comment utiliser la commande audio ?
Comment utiliser la commande audio ?
Changer de modes de commande audio
Cette méthode permet d'accorder finement différents modes de commande audio.
Appuyez brièvement sur le bouton [AUDIO CONTROL] pendant moins d'une
1
seconde pour sélectionner l'élément que vous souhaitez régler.
Les modes sont modifiés selon l'ordre établi ci-dessous à chaque nouvelle pression
sur le bouton.
VOL ➔ BASS ➔ MID ➔ TREB ➔ BAL ➔ FAD ➔ NON-F*1 ➔ SVC*2 ➔ LOUD
➔ VOL www
*1: La sortie NON-F (non équilibrée) n'est affectée ni par les réglages des fonctions
BASS, MID, TREBLE, contour ni par l'égaliseur.
*2: Les réglages ne peuvent pas être effectués en mode FM.
ATTENTION
Appuyez brièvement sur le bouton [MUTE] pendant moins d'une seconde pour couper le son ou le
rétablir.
AVERTISSEMENT
Ne réglez pas le volume ou toute autre commande lorsque vous êtes au volant de votre véhicule.
Procédez aux réglages véhicule arrêté.
VIII
IX
Mode Fonction
VOL (VOLUME) Permet de régler le volume.
Permet de régler le niveau des basses. Le
BASS
MID (MEDIUM)
TREB (AIGU)
BAL (BALANCE)
mode Basses peut être réglé pour chaque
source
(CDP/CDC, FM, AM).
Permet de régler le niveau des sons médium.
Le mode Médium peut être réglé pour chaque
source
(CDP/CDC, FM, AM).
Permet de régler le niveau des aigus. Le
mode Aigu peut être réglé pour chaque
source
(CDP/CDC, FM, AM).
Permet de régler le niveau acoustique des
haut-parleurs gauche et droit.
Bouton [AUDIO CONTROL]
Vers la gauche : Vers la droite :
Permet de diminuer le
volume.
Permet d'atténuer les
basses.
Permet d'atténuer les
sons médium.
Permet d'atténuer les
aigus.
Permet de renforcer
l'action des hautparleurs gauches.
Permet d'augmenter
le volume.
Permet d'accentuer
les basses.
Permet d'accentuer
les sons médium.
Permet d'accentuer
les aigus.
Permet de renforcer
l'action des hautparleurs droits.
99
Page 100

Exemples de réglages
Mode Fonction
FAD
(EQUILIBREUR)
Mode NON-F (NON
EQUILIBREUR)
SVC (commande du
volume source)
LOUD
Permet de régler le niveau acoustique des
haut-parleurs avant et arrière.
Permet de régler le niveau non équilibré (pour
les caissons de basse connectés, etc.).
Permet de régler différents volumes pour
chaque mode audio. Lorsque le mode SVC
est réglé, le volume sonore peut être modifié
comme dans les exemples présentés dans le
tableau de cette page.
Le réglage du contour peut être activé pour
relever le niveau des fréquences faibles et
élevées lorsque le volume sonore est bas.
Le contour permet de compenser la faiblesse
apparente des fréquences faibles et élevées
lorsque le volume sonore est bas en
amplifiant les sons graves et aigus.
Bouton [AUDIO CONTROL]
Vers la gauche : Vers la droite :
Permet de renforcer
l'action des hautparleurs arrière.
Permet de diminuer le
niveau.
Permet de diminuer le
niveau SVC.
Activer / désactiver la commande du contour.
Permet de renforcer
l'action des hautparleurs avant.
Permet d'augmenter
le niveau.
Permet d'augmenter
le niveau SVC.
Exemples de réglages :
Le volume du mode FM initial (valeur par défaut : 40) est utilisé comme référence pour enregistrer les
différences du volume sonore réglées pour chaque mode audio.
Mode Audio FM AM CD
Valeur par défaut
(Volume sonore)
Réglage SVC
(Volume sonore)
Lorsque le volume sonore
passe de 40 à 45 en mode FM
Lorsque le volume sonore
passe de 35 à 60 en mode
CD.
Lorsque le volume sonore
passe de 80 à 20 en mode
AM.
*:Le volume sonore peut varier selon une fourchette comprise entre un maximum de 80 et un
minimum de 0. Lorsque vous tentez de dépasser le niveau du volume sonore maximum ou
minimum, la valeur ne change pas. Pour le changeur de CD, le mode SVC permet de régler le
volume en utilisant les valeurs de réglage du lecteur de CD.
Le volume sonore peut varier selon une fourchette comprise entre -10 et +20.
Référence
(40)
Référence
(40)
45 55 ➔ 60 30 ➔ 35
45 ➔ 70 60 ➔ 80* 60
70 ➔ 52060 ➔ 0*
0
(40)
Valeur de
réglage
SVC
+15 (55)
Valeur de
réglage
SVC
-10 (30)
0
(40)
ATTENTION
Si les bornes de la batterie ont été débranchées pour une intervention sur le véhicule, les réglages
du SVC reviennent à leurs valeurs par défaut. Si tel est le cas, vous devrez effectuer de nouveaux
réglages.
100
 Loading...