

Page 1
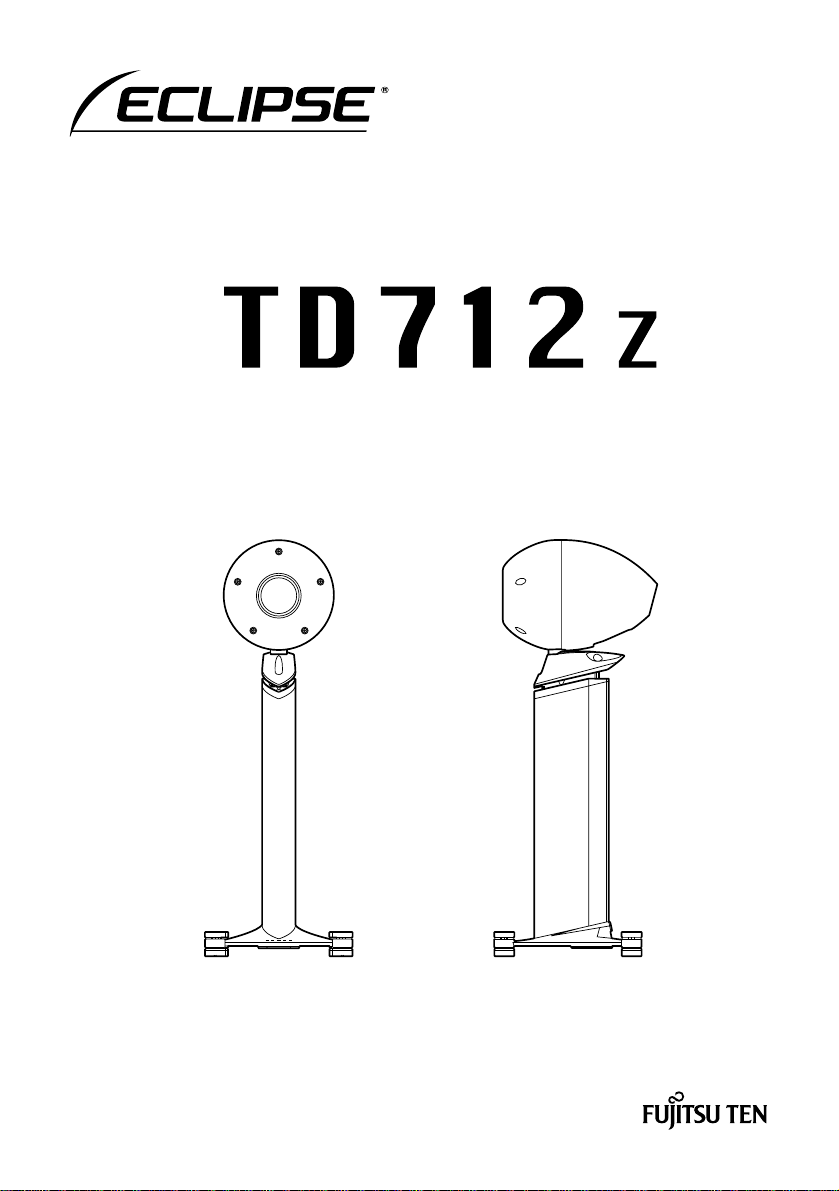
Thank you for purchasing the Eclipse TD Speaker 712Z.
Please read this Owner’s Manual before use.
Be particularly sure to read the Important Safety Instructions section.
Keep this Owner’s Manual together with the Warranty Certificate in a safe place for later
reference.
Owner's Manual
Page 2
−12−
ENGLISH
Foreword
■Contents
Important Safety Instructions ………………………………………………………………………13
Notes on Use…………………………………………………………………………………………14
Part Names and Functions/Connections …………………………………………………………15
Assembly Instructions ………………………………………………………………………………16
Maintenance/Specifications ………………………………………………………………………19
Warranty and After-Sales Service ………………………………………………………………20
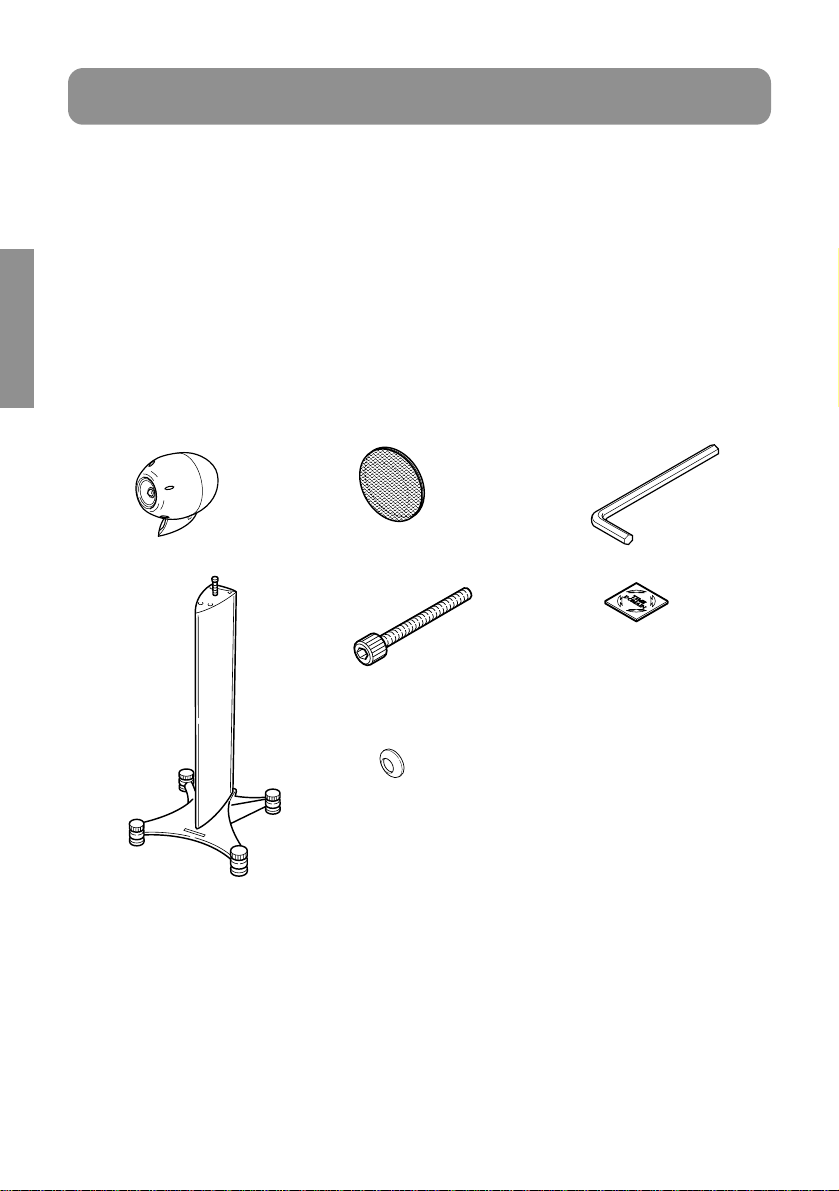
■Accessories
①φ12cm speaker x 1 ③Protective cover x 1 ⑥Hexagonal wrench x 1
②Speaker stand x 1 ④
Hexagonal socket head boltsx 3⑦Eclipse TD logo sticker x 1
⑧Owner's Manual x 1
⑤Washer x 3 ⑨Warranty Certificate
*This product is a speaker which has been designed using Time Domain theory.
《《
What is Time Domain theory?
》》
Time domain recreates the changes that occur in sound waves over time from the moment
of output until their disappearance. Its purpose is to reproduce those sound waves that are
as close to the original recorded sound as possible. Time domain audio systems allow
sound orientation and the nuances that are added by recorded performers to be faithfully
reproduced.
Page 3
ENGLISH
−13−
Important Safety Instructions
■Before use
The warnings contained within this instruction manual and on the unit itself are to ensure safe and
correct use of the unit and thus prevent injury to our customers or other people and damage to
property. Please read and understand the warnings before continuing with the rest of this manual.
These warnings represent occasions where improper use of the product
may result in death or serious injury.
These cautions represent occasions where improper use of the product
may result in serious injury or damage to the product.
WARNING
CAUTION
WARNING
●Do not place the unit in an elevated location. A fall may cause injury.
●Do not open the cabinet of the unit. This may cause electric shock or injury. For internal
inspection, repair or maintenance, please contact a Customer Service Center. Also, do not
attempt to modify the unit. This may cause fire or electric shock.
●Do not place the unit in the bathroom or anywhere exposed to rain. Do not use the unit in places
with high humidity. This may cause fire or electric shock. Be particularly careful when using the
unit in rainy weather or when it is snowing, at the beach or near water. Do not place above or
near the unit, any flower vases, plant pots, cups, makeup, medicine or any vessel containing liquid
or any small metal objects. In case any liquid or small metal objects enter the unit, fire or electric
shock may result. Do not push or drop any metal or combustible objects into the ventilation holes
of this unit. Fire or electric shock may result. (Be particularly cautious in households with young
children).
●Do not use the stand to support any other item. The mounting may become unstable, resulting in
a fall, causing injury.
●This unit should be assembled on a flat, even surface. Failure to do so may cause the stand to fall
over leading to injury.
●Avoid placing the stand where it may obstruct free passage. Injury may result otherwise.
●The unit should be placed on a hard, flat surface. Placing the unit on an unstable surface may
cause it to fall over and cause injury.
●Do not climb on or swing from the unit. In particular, care should be exercised when children are
present. The unit may fall or break and cause injury.
●The unit is heavy so always use two people to unpack and carry the unit. Back pain and injury to
feet may result if the unit is dropped.
CAUTION
Page 4

−14−
ENGLISH
Notes on Use
■Before turning the unit on or changing the input source, be sure to set the volume to Low. Sudden
bursts of loud noise may cause damage to any connected speaker systems.
■To avoid disturbance in your neighborhood, enjoy your unit at an appropriate volume. Remember that
particularly at night, even low volumes carry well into surrounding areas. Help to maintain a pleasant
living environment.
■Always connect speaker systems with the power disconnected. If the speaker cable is inadvertently
shorted, the protection circuit in the amplifier will operate and audio output will stop temporarily. In this
event, disconnect the power cord from the outlet, correct the shorted area and reconnect the power
cord to the outlet.
■Do not separate the speaker from the stand.
■Do not place the speaker unit directly on hard surfaces. It may mark the surface.
■Be careful not to knock the unit over.
■If the unit becomes dirty, use detergent on a soft cloth to wipe it down. Do not use thinners or gasoline.
Page 5
ENGLISH
−15−
Part Names and Functions/Connections
①、、②Speaker Input Terminals
When connecting the speakers, insert the ends of the speaker cables so that they do not touch
neighbouring terminals or other parts.
②
+
①
−
Speaker cable
Page 6

−16−
ENGLISH
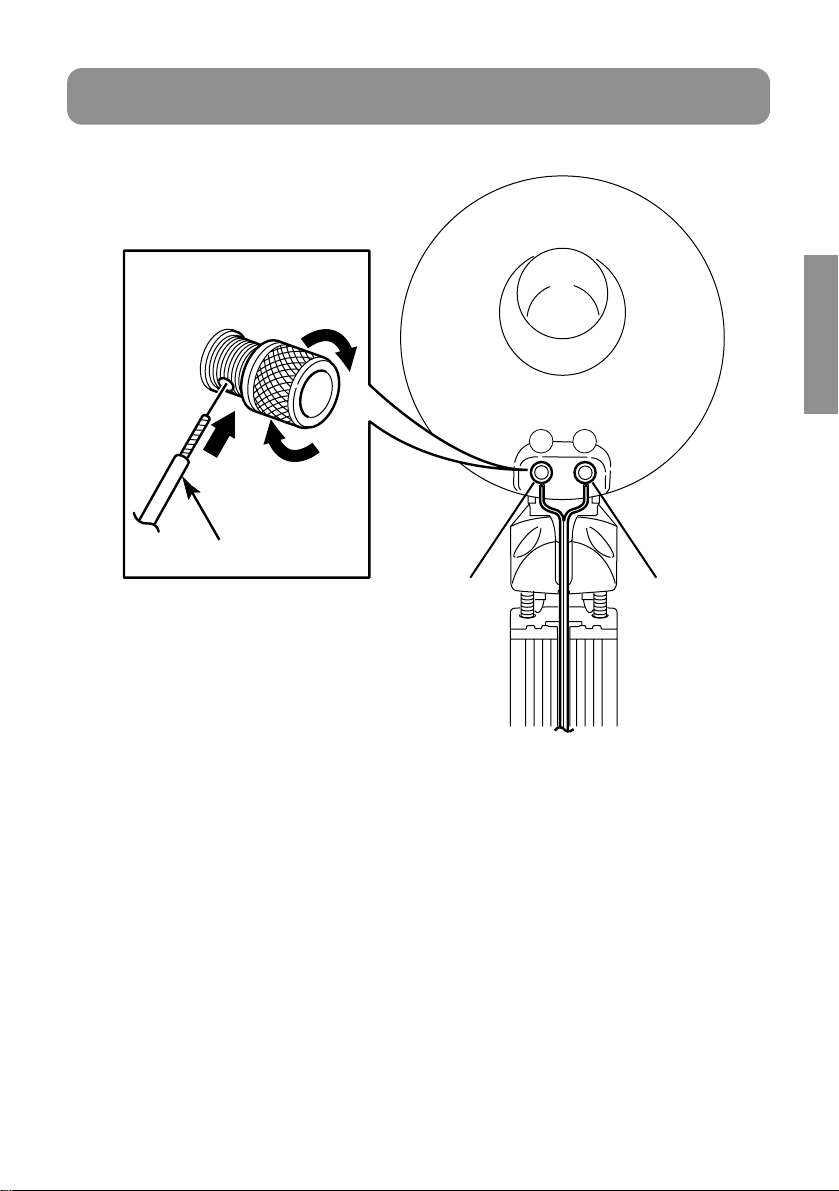
Assembly Instructions
①Place the stand in the desired location.
②As shown in the diagram, mount the speaker
on the stand, constantly checking the
alignment.
③Using the hexagonal wrench with the hexagonal
socket head bolts and washers, fasten the speaker
to the stand (3 places).
[1]Speaker Fitting
④Hexagonal socket head bolts x 3
①φ12cm speaker
②Stand
Align speaker with stand
・
Fasten the hexagonal socket head bolts by hand
first before using the hexagonal wrench to fasten
them securely. To secure the speaker, first tighten
the two rear bolts, then tighten the front bolt.
・
You must use the attached hexagonal socket
head bolts (x 3) to fasten the speaker.
・
The washers must be used with the convex side
facing down.
The assembly of this unit must be done on a
flat, hard surface.
If the stand is placed in such a way that it
obstructs free passage, injury may result.
・
Before securing the speaker to the stand,
follow the instructions in "[3] Setting the angle
adjustment screw at 0 degrees" and use the
cardboard gauge to measure the height of the
angle adjustment screw and ensure the angle
is set at 0 degrees.
・
When placing the speaker, be careful not to
touch the cone paper. Damage to the
speaker may result.
・
When mounting the speaker on to the stand,
be careful not mount it tilted as damage to the
surfaces may result.
CAUTION
⑤Washer×3
Align speaker with stand
[2]Feet adjustment
①As shown in the diagram, turn the feet to
adjust.
Feet
CAUTION
ADVICE
・
Initially, turn the four feet in an anti-clockwise
direction as far as they will go and place the unit
on the floor.
・
Then, turn each foot individually in a clockwise
direction until they touch the bottom foot – then
stop.
ADVICE
※ For the installation, insert the washer ⑤ so the
convex surface is facing down.
※
Page 7

ENGLISH
[4]Adjusting the speaker angle
①Using the hexagonal wrench, loosen the
hexagonal socket head bolts (3 places).
②Using the hexagonal wrench, turn the angle
adjustment screw.
③When finished, use the hexagonal wrench to
tighten the hexagonal socket head bolts.
To secure the speaker, first tighten the two rear
bolts, then tighten the front bolt.
Upward adjustment
Angle adjustment
screw
⑥Hexagonal wrench
When the top surface of the stand and the
bottom surface of the speaker are flush, they
should be level. It is possible to adjust the
speaker upwards by 10 degrees.
ADVICE
[3]Setting the angle adjustment screw at 0 degrees
①Cutoutthetemplateonpage61anddiscard
theportionnotrequired.
Template
②Turnthe speakerbaseupside downand
adjustthe angle adjustment screw to a
heightmatchingthe gaugeasshown inthe
diagram.Atthispoint, theangleissetat 0
degrees.
Angle adjustment screw
Template
When adjusting the speaker angle, follow these
instructions and start from a 0 degrees position.
ADVICE
−17−
Page 8

−18−
ENGLISH
[5]Installation of protective cover.
①As shown in the diagram, install the protective
cover.
③Protectivecover
The protective cover may be attached when the
speaker is not in use or at the userユs discretion.
ADVICE
Page 9

ENGLISH
−19−
Maintenance / Specifications
■Specifications
Specifications and appearance are subject to
change without prior notification.
●TD712z
Diameter: φ12cm
Type: Bass ref/box
Input Resistance:Rated 35W / Maximum
70W
Impedance: 6Ω
Dimensions:
347mm(W)x384mm(D)x988mm(H)
Weight: 32kg
■Maintenance
Before maintaining the unit, ensure that
the power is off and the power cord
removed.
Remove any dirt from the unit by lightly wiping
with a soft cloth.
If it is particularly dirty, use a slightly
damp cloth to wipe it down, then use a dry
cloth.
Do not use gasoline or thinners, etc. on this
unit as it may damage the cabinet.
■
Problems during Operation of the Unit
During operation, the unit may stop working
properly if it suffers from significant external
disruption (impact shock, static electricity,
voltage fluctuation caused by lightning, etc.)
or is operated incorrectly.
In this situation, turn the amplifier power
to switch to the “Off” position. Turn it back
on again and check if normal operation has
resumed.
(If a problem persists, please contact our
Service Centre)
Thinner
Gasoline
Page 10

−20−
ENGLISH
■When Requesting a Repair
Within warranty period
Present your Warranty Certificate
Repairs will be carried out in accordance with
the conditions on the Warranty Certificate
Outside the warranty period
When a repair is possible, it will be carried
out upon your instruction and at your
expense.
■
Warranty Certificate (included)
After reading the contents of the Warranty
Certificate, put it away in a safe place.
Warranty period
The warranty period is one year from
purchase date. Some costs may be incurred
even within the warranty period, so please
read your Warranty Certificate carefully.
■
Life-span of Serviceable Parts
The life-span of the serviceable parts in this
product is a period of 8 years from the date of
manufacture. This is the period stipulated by
the Ministry of International Trade and
Industry. ‘Serviceable parts’ are defined as
those parts which are necessary to ensure
the functionality of the product.
■Repairs and Enquiries
See “Customer Enquiries” Section on the
included sheet.
Warranty and After-Service
RegularChecks
After many years of use, check your audio equipment;
Stop using the unit
Are any of
these
conditions
present?
●
An excessively hot power cord or plug
●
A burning smell
●
Deep cuts or abnormalities of the power cord
●
Any other damage or abnormalities
To prevent damage and accidents, turn off the power switch,
remove the power cord and request a service inspection.
For inspection and repair costs, please check with our Service Centre.
Page 11

−61−
切り取り
Cut and remove
Ausschneiden und entfernen
Découpez et retirez
Tagliare e rimuovere
Recorte y retire
角度調整ねじ先端
Tip of the angle adjustment screw
Spitze der Winkeleinstellschraube
Pointe de la vis de réglage d'angle
Punta della vite di regolazione dell'angolazione
Punta del tornillo de ajuste del ángulo
ネック部 底面
Neck of the screw Base
Schraubenhals Unterteil
Col de la vis Base
Collo della vite Base
Cuello del tornillo Base
角度 0°
Angle 0 degrees
Winkel 0 Grad
Angle 0 degré
Angolo 0 gradi
Angulo 0 grados
Page 12

−62−
Page 13

−63−
Page 14

090001-14710700
0306MT(F.KI)
 Loading...