

Page 1

How to use an optional remote control
How to use an optional remote control (RMC105)
Precautions in use of the remote control
• Be careful when handling the remote control, especially because it is small and
light. Dropping or striking it hard may damage it, wear out the battery or cause a
malfunction.
• Keep the remote control free of moisture, dust and water. Do not subject it to
shock.
• Do not place the remote control unit where it will get hot, such as on the
dashboard or near a heater vent. Allowing the remote control unit to overheat
may warp its case or cause other problems.
• Do not operate the remote control unit while driving because doing so could
cause an accident.
• When using the remote control, point it directly at the remote control light
receptor.
• The light receptor may not operate correctly if it is exposed to bright light such as
direct sunlight.
• Remove the batteries from the remote control unit whenever it is not to be used
for a long time.
Cleaning the remote control
• Use a dry cloth to keep the unit clean. If the remote control unit gets extremely
dirty, clean it with a cloth moistened in diluted liquid detergent. Do not use
alcohol or thinner; these compounds may damage the finish.
• In no event should benzine or thinner be used. These substances will damage
the case or finish.
70
TU, DISC and AUX buttons do not work.
Page 2
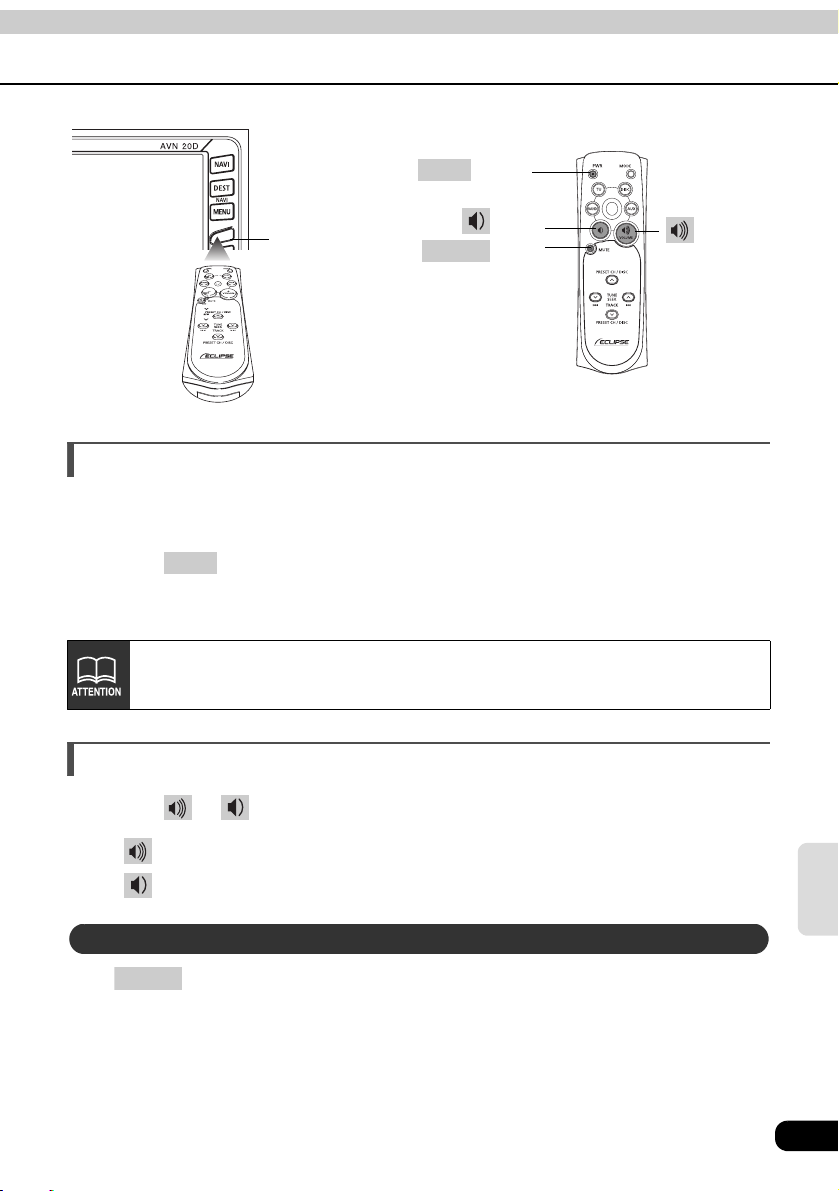
PWR
button
Remote-Control light
receptor
MUTE
button
button
button
Turning the power on/off
When the power is turned on, the state used when the power was turned off such as CD and
tuner will be restored.
Press .
• The power turns on or off each time the button is pressed.
PWR
When the main unit is shut down, the remote control will not work.
Adjusting the audio volume
Press or .
• button: Increases the volume.
button: Decreases the volume.
Muting the Volume
MUTE
Press to cut the volume or restore it instantly.
71
control
Remote
Page 3

How to use an optional remote control
How to use an optional remote control (RMC105)
MODE
button PRESET•CH
button
button TUNE•SEEK
Switching playback modes
Press .
• Press the button to switch modes in the following sequence:
MODE
AM → FM →CD(MP3) →CD Changer1 →CD Changer2 →VTR →SIRIUS
How to play the tuner
Select the tuner mode first.
Selecting a station (manually or automatically)
A short press of the button will allow manual station tuning. Pressing for more than one
second will start automatic tuning.
Press .
• button: Tunes to higher frequency stations.
TUNE•SEEK
button: Tunes to lower frequency stations.
Selecting preset stations
A total of six stations may be selected (preset tuning) out of those already set in memory
through the main unit. (Refer to the Section "Saving radio stations" on page 38)
Press .
• button: Select the next higher number preset button.
button: Select the next lower number preset button.
72
PRESET•CH
Page 4

BAND
button
button DISC
button TRACK
How to play CDs
Switching CD Changer modes
Select the CD Changer mode first.
Press .
Advancing to the next track or returning to the beginning of the track being played
Select the CD or CD Changer mode first.
Press .
• button: Skips to the next track.
BAND
When two CD changers are connected, press to change modes from CD
changer 1 → CD changer 2.
TRACK
button: Returns to the beginning of the track being played. (Press repeatedly to
move to previous tracks.)
BAND
Hold down to fast forward, or to rewind through the track being played.
Skipping to the next or previous disc
Select the CD or CD Changer mode first.
Press .
• button: Selects the next higher number disc.
DISC
button: Selects the next lower number disc.
73
control
Remote
Page 5

How to use an optional remote control
How to use an optional remote control (RMC105)
Replacing the battery
To prevent accidents, store batteries out of the reach of children. If a child has
swallowed one, consult a doctor immediately.
Use two AAA-size batteries.
Remove the back cover of the remote control
unit by gently pressing and sliding it in the
direction indicated by the arrow.
Install the two batteries provided into the
compartment as illustrated.
Return the back cover into place by sliding it in
the direction indicated by the arrow.
• The battery life is approximately one year. If the remote control unit does not
operate correctly or if the button lamp gets dim, replace the batteries.
• Be sure to orient the batteries correctly so that the positive and negative poles
match the diagram.
• Do not use one new battery and one old one; use two new batteries.
• Use only two of the same kind of battery.
• If any liquid is seen leaking from the batteries, remove both batteries and
dispose of them properly. Thoroughly clean the battery compartment with a dry
cloth. Then install new batteries.
74
Page 6

75
control
Remote
 Loading...