

Page 1
Page 2

CONTENTS
WELCOME 2
CONTACT US 2
NOTES 3
SAFETY & USAGE 4
FEATURES 5
APPEARANCE 6
BASIC OPERATION 7
CONNECTING TO PC 9
MAIN MENU 12
MUSIC 13
VIDEO 15
PICTURES 16
RADIO 17
PEDOMETER 19
USER TIPS 21
SETTINGS 21
FCC INFORMATION 23
LIMITED MANUFACTURER’S WARRANTY 24
Page 3

WELCOME
We love that you are rocking Eclipse by JLab!
We take pride in our products and fully stand
behind them.
We’re pumped you’re joining the JLab family. JLab is
passionate about making amazing audio products with
incredible sound – oering extra features and quality for
your money. If you’re already using Eclipse by JLab and
loving your products, please share your feedback – via word
of mouth, social media or even Amazon or online reviews.
Plus our personal service team has your back! We want to
#ROCKITOUT with you for life.
–Win Cramer, JLab Audio CEO
@wincramer
#ROCKITOUT
CONTACT US
Customer Support VIP Help Line:
1-866-358-6640 (Monday - Friday 9:00 AM - 5:00 PM PST)
Or for even faster service, email us at:
service@jlabaudio.com
For tips and how-to videos, visit:
jlabaudio.com/mp3support
2
Page 4

NOTES
• The playback times listed refer to the maximum playback
times possible, using the best power savings. The actual
playback time may dier as adjustments to screen brightness,
power savings modes, volume, etc. are made.
• As parameters such as formats, bitrate, codecs, framerates,
and resolutions dier, the player will not be compatible with all
les of the listed types. If you are experiencing issues playing
your les on this player, we recommend using a supported
conversion tool to reconvert your le to the specications of
the device.
JLab Audio bears no responsibility for any damage or loss
of personal data due to misuse of software and/or hardware,
damage to the player caused by human factors, replacement
of battery, or other unforeseen circumstances. To prevent loss
of your data, please backup your data regularly.
Information in the manual is subject to change without notice
and is subject to copyright protection. Copying or otherwise
reproducing this material without prior written consent is
prohibited.
Due to rmware changes, some of the pictures and functions
described in this manual may not be the same as are included
with your player.
3
Page 5

SAFETY & USAGE
• Do not use the player in exceptionally cold or hot, dusty,
damp or dry environments.
• Do not drop, strike, or throw your player. Physical damage
to your player will void ALL warranties.
• Please charge your battery when:
> Battery power icon shows an empty icon;
> The system automatically shuts down and the power
is soon o when you switch on the unit once again;
> There is no response if you operate on any key
• Please always follow the correct disconnect procedures for
your operating system. Do not disconnect power abruptly
when the player is being formatted or in the process of
uploading or downloading les. Otherwise it may lead to le
corruption, rmware failure, and even hardware damage.
• We are not liable for any loss of data stored on this device.
• Please do not dismantle this player. Any disassembly not
done by an authorized technician will void ALL warranties.
• Do not listen to your device at high volume for extended
periods of time. Doing so can cause permanent hearing
loss. Protect yourself by using the lowest volume setting
that you can hear comfortably and take frequent breaks
by removing your earphones or headphones.
4
Page 6

FEATURES
• 8GB internal memory; memory card slot (removable)
• 1.8ʺ full color LCD screen (resolution: 160x128)
• File transfer: (1) micro-USB
• Supports the following audio formats:
MP3 and WMA
• Supports the following image formats:
JPEG, BMP, GIF and PNG
• Supports the following video formats:
AVI
5
Page 7
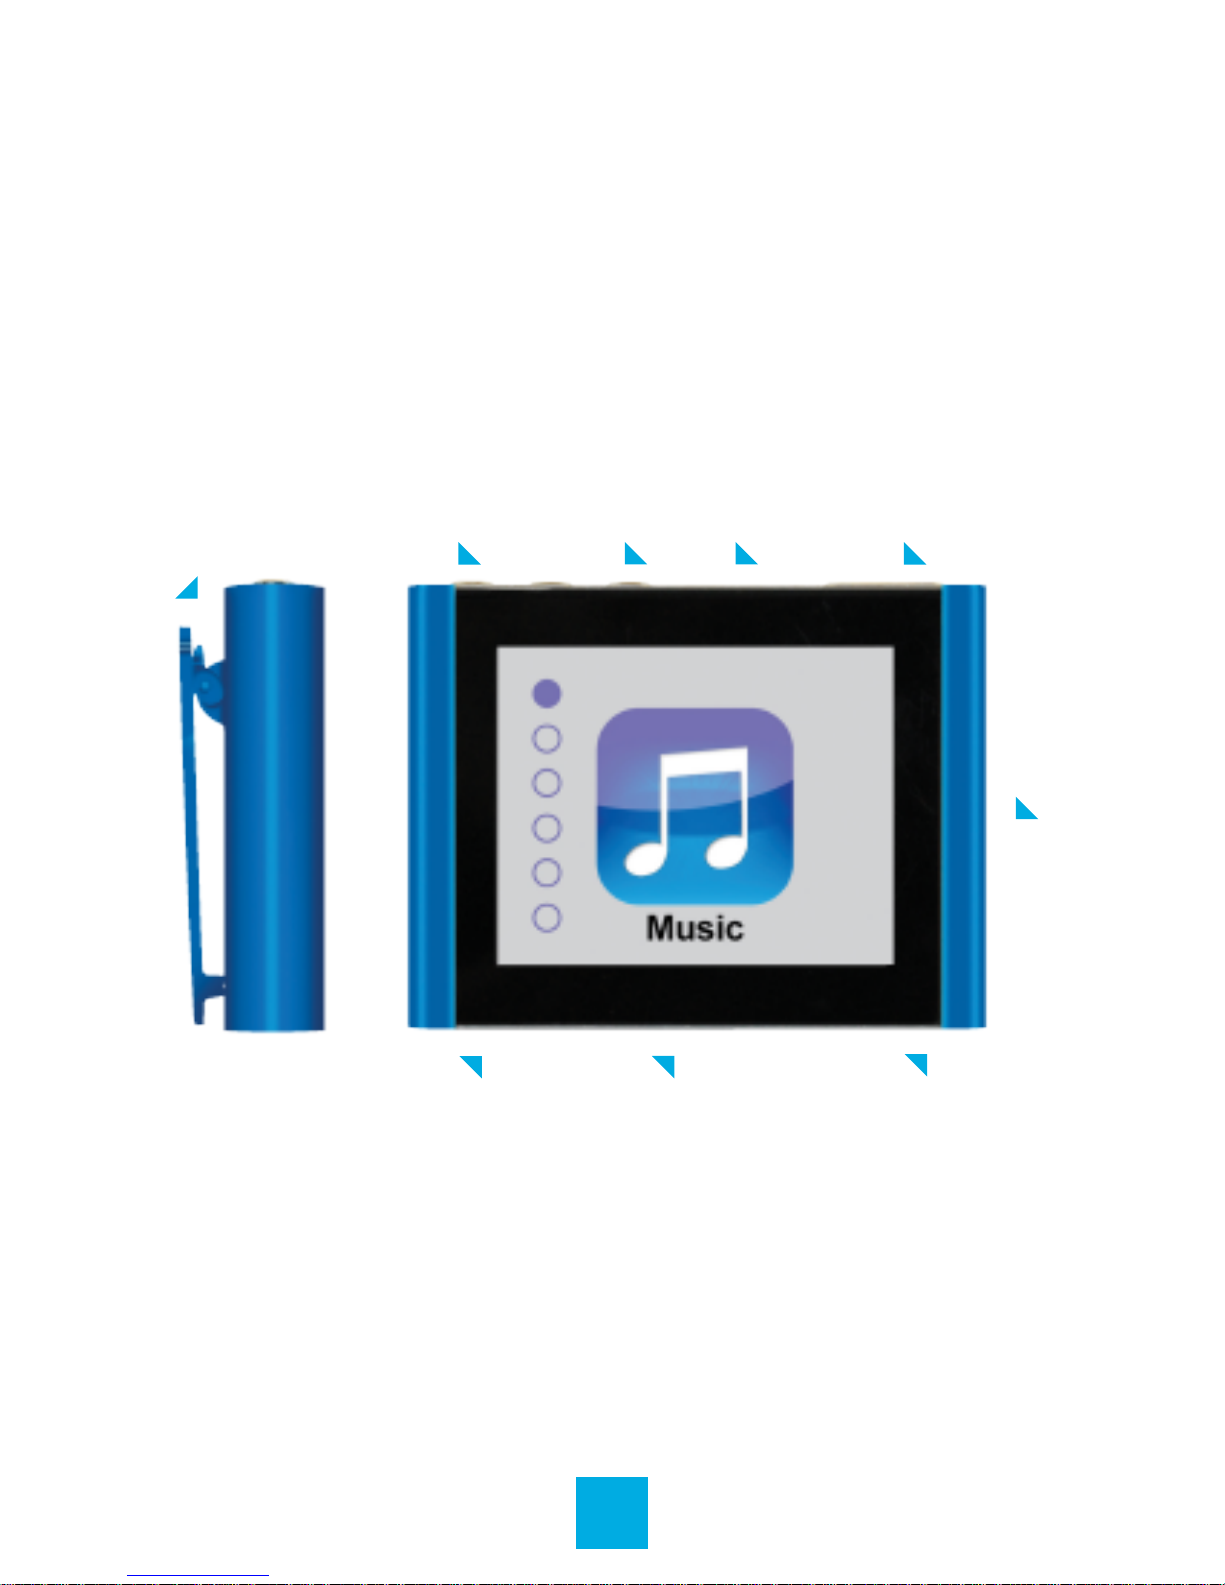
APPEARANCE
Clip
Volume
USB Port
Mode
Memory
Card Port
Play/
Pause
Headphone
Jack
fOn/Of
Switch
Display
6
Page 8

BASIC OPERATION
Power On/O
Slide the power switch to the On or O position. You may
also leave the power switch in the On position and use the
Play / Pause button to turn the player on and o.
Note: If the player is powered o by the power switch while
it is still running, all saved settings such as last song played
or date/time settings will be lost.
Note: If the player’s screen freezes, restart it by sliding the
power switch to the O position, then back to the On position.
Charging
When battery power is low, the player will prompt you,
power o, and enter Standby mode automatically. Do not
try to turn on the unit. You must charge again before using.
Charger current specication recommended: 400-500mA.
To charge the player, simply connect it to a powered USB
port, or external AC adapter.
Note: If you choose to use a third party adapter, please ensure
that it is 5V and between 350 and 1000mA, or 1amp.
1. Connect the small end of the supplied USB cable to the
micro-USB port.
2. Connect the large end of the cable to a computer.
A connection icon will appear on the display when you
connect the device to a computer.
7
Page 9

File Storage
Your device supports a wide variety of media types, so that
you can enjoy your favorite movies, digital images, and music
on the move. Your device acts as a removable disk when
connected to your computer, which makes transferring les
quick and easy.
Extra Storage with a Memory Card
Inserting
Ensure that the player is powered o, and disconnected from
the computer. Hold the memory card face up (side with words
aligned in the opposite direction of the display screen), and
slide the card into the socket on the player, slightly past ush.
When you hear the card click into place, you can access it.
Removing
Ensure that the player is powered o, and push the memory
card just past ush. When you hear the click, release and the
card will slide out.
Caution: Please ensure that the power is o when you
connect or disconnect your memory card, or damage may
occur to the player or your card.
8
Page 10

CONNECTING TO PC
Loading Files: Copy & Paste
Note: This alternate method is used to load videos, pictures,
and eBook les as well as audio les.
1. Connect the MP3 player to a working USB port.
2. Go to the My Computer (or This PC if using Windows 10)
section of your computer. In there you will nd a section called
Devices with Removable Storage.
3. Locate the drive created by the unit, generally just called
Removable Disk with a letter in parentheses. Drive letters vary
depending on your system conguration.
9
Page 11

4. Open the drive by either double
left clicking on the drive itself,
or by right clicking to open the
option menu then left clicking
on the desired drive.
5. Locate the music stored on your
computer. Generally this is stored
in the My Music folder of your
computer.
Note: If you are unable to locate the
music on your computer, click on
start, search, les and folders,
then search for “ *.MP3* ”.
10
Page 12

6. Once you have located the song les, you can right click
on the song itself and select Copy. Open the removable disk
drive, right click on in the empty space and select Paste.
This will transfer the song on to your player.
7. Repeat step 6 for as many songs as you want to copy on to
the unit.
Note: MAC computers
When connected to your MAC computer, the device will act as
a removable drive. Simply drag your les to the device.
11
Page 13

MAIN MENU
Main Interface
Navigation
1. On the main menu interface, press the + and – buttons at
the top of the player to scroll through the player’s features.
2. Press the Play / Pause button to select an item.
3. Press M (Mode) to access the main menu or return to the
previous screen.
12
Page 14

MUSIC
Music mode allows you to listen to your audio les loaded
on the player. Connect your wired listening devices to the
headphone jack. Compatible with MP3 and WAV formats.
Main Interface
Music Playback
When you enter Music mode, the most recent track will begin
playing immediately.
Play / Pause: Press Play button / Press again to pause.
Previous: Press – to skip to previous song.
Next: Press + to skip to next song.
13
Page 15

Volume Control
Press and hold – to decrease volume or + to increase volume.
Settings
Press Mode (M) to access the Music menu.
Select Music: Album, Artist, or Genre
1. Press – or + to highlight a folder, and then press
Play / Pause to open the folder.
2. Press – or + to highlight a le, and then press
Play / Pause to select it.
Change the Repeat or Equalizer Settings
1. Select Repeat or Equalizer from the Music menu.
2. Press – or + to highlight an option, and then press
Play / Pause to select it.
Synchronize Music Downloaded from Your Computer
Select Organize Music from the Music menu.
14
Page 16

VIDEO
Video mode allows you to watch your video les loaded on
the player. Compatible with AVI format.
Note: If you are having a hard time viewing your video les,
ensure that they are converted to the AVI le format.
If you need assistance converting your videos or have
questions please visit: http://support.jlabaudio.com/hc/en-
us/categories/201688557-MP3
Watch Videos
1. Press – or + until Local Folder is highlighted and press
Play / Pause to open it.
2. Press – or + until the desired video le is highlighted
and press Play / Pause to select it.
Video Playback
Play / Pause: Press Play button / Press again to pause.
Previous: Press – to skip to previous video.
Next: Press + to skip to next video.
Volume Control
Press and hold – to decrease volume or + to increase volume.
15
Page 17

PICTURES
Pictures mode allows you to view your image les.
Compatible with JPEG, BMP, GIF, and PNG.
Note: We recommend resizing your les to 160x128 or
128x160 dimensions before loading them onto the player
for optimum quality.
View Images
1. Press – or + until Local Folder is highlighted and press
Play / Pause to open it.
2. Press – or + until the appropriate image le is highlighted
and press Play / Pause to view it.
Images Playback
Previous: Press – to skip to previous image.
Next: Press + to skip to next image.
Slideshow Settings
From the Pictures menu:
1. Press – or + until Playback Set is highlighted and select it.
2. Press – or + until Slideshow is highlighted and select it.
3. Press – or + to select a slideshow interval, and then press
Play / Pause to set it.
16
Page 18

RADIO
Radio mode allows you to listen to FM Radio channels.
Main Interface
Browse Radio Stations
From the Radio menu:
1. Press – or + until Normal Band is highlighted and press
Play / Pause to select it.
2. Press – or + to search for local radio stations.
Volume Control
Press and hold – to decrease volume or + to increase volume.
17
Page 19

Scan for Available Stations
From the Radio menu:
Press – or + until Auto Search is highlighted, and then press
Play / Pause to select it. The radio will scan and save all
available stations in your area.
Save Stations
From the Radio menu:
Make sure you’re currently on the station you’d like saved.
1. Press – or + until Save is highlighted and press Play / Pause
to save the current station.
2. Repeat this process for all stations you would like saved.
3. Cycle through saved stations by pressing Play / Pause
while in the Radio interface.
Delete Stations
From the Radio menu:
Make sure you’re currently on the station you’d like deleted.
1. Press – or + until Delete is highlighted and press
Play / Pause to delete the current station.
2. Repeat this process for all stations you would like deleted
or select Delete All to quickly remove all saved stations.
18
Page 20

PEDOMETER
Your device includes a pedometer to record the time, number
of steps, distance, and calories you expend while walking.
Main Interface
Pedometer Settings
For the most accurate data, enter this information.
From the Pedometer menu:
1. Press – or + until Setting is highlighted, and then press
Play / Pause to select it.
2. Press Play / Pause to navigate through the weight, height,
and step length settings and press – or + to increase or
decrease the values.
19
Page 21

Turn Pedometer On/O
From the Pedometer menu:
Press – or + until On/O is highlighted and press Play / Pause
to select your desired option.
View Pedometer
From the Pedometer menu:
Press – or + until Pedometer is highlighted, and then press
Play / Pause to select it.
View Pedometer History
From the Pedometer menu:
Press – or + until History is highlighted, and then press
Play / Pause to select it.
Clear Pedometer History
From the Pedometer menu:
Press – or + until Clear History is highlighted, and then press
Play / Pause to select it.
20
Page 22

USER TIPS
Your device includes handy user tips to get the most from
your device.
View the User Tips
Press – or + to scroll through the User Tips.
SETTINGS
Note: If the player is powered o by the power switch while it
is still running, all saved settings such as last song played or
date/time settings will be lost. To avoid losing settings data,
leave the power switch in the On position and use the
Play / Pause button to turn the player on and o.
Change Settings
1. Press – or + until the appropriate setting is highlighted,
then press Play / Pause to select it.
2. Press – or + to navigate through that setting’s options.
3. Press Play / Pause to save the setting.
Equalizer
Select from various equalizing genres including Rock, Pop,
Classic, Jazz, etc.
21
Page 23

Date/Time
1. Press Play / Pause to advance through the elds.
2. Press – or + to decrease or increase the values.
3. Press Mode to save changes.
LCD Set
Brightness
Set the display brightness: Low, Medium, or High.
A higher brightness setting will use more battery power.
Auto Dim
Set the delay (in seconds) before the screen dims
automatically when left idle.
Language
Select to choose dierent languages available for the player.
Auto O
Set the delay (in minutes) before the player turns o
automatically when left idle.
Memory Info
View the percentage of memory that used for media storage.
Firmware Version
View the rmware version.
22
Page 24

FCC INFORMATION
This equipment has been tested and found to comply
with the limits for Class B Digital device, pursuant to part
15 of the FCC rules. These limits are designed to provide
reasonable protection against harmful interference in a
residential installation. This equipment generate, uses and
can radiate radio frequency energy and, if not installed and
used in accordance with the instructions, may cause harmful
interference to radio or telephone reception, which can be
determined by turning the equipment o and on, the user in
encouraged to try to correct the interference by one or more
of the following measures:
• Reorient or relocate the receiving antenna.
• Increase the separation between the equipment
and the receiver.
• Connect the equipment to an outlet on a circuit dierent
from that to which the receiver is connected.
• Consult the dealer or an experienced radio/TV technician
for help.
23
Page 25

LIMITED MANUFACTURER’S
WARRANTY
1. Eclipse by JLab products carry a one year from date of
purchase warranty. This warranty is nontransferable.
2. JLab Audio warrants to the original registered end-user
purchaser that Eclipse by JLab products will be free from
defects in materials and workmanship for one year from the
date of new purchase. During the warranty period, and upon
proof of purchase the product will be repaired or replaced
(with the same or a similar model, which may be a refurbished
model) at JLab Audio option, without charge for either parts or
labor. This warranty shall not apply if the product is modied,
tampered with, misused, physically damaged, or subjected
to abnormal working conditions (including, but not limited
to, electrical, re, and water damage). THIS WARRANTY
DOES NOT GUARANTEE YOU UNINTERRUPTED SERVICE.
REPAIR OR REPLACEMENT AS PROVIDED UNDER THIS
LIMITED WARRANTY IS THE EXCLUSIVE REMEDY OF THE
PURCHASER.
To obtain service under this warranty, you must contact
our Technical department at 1-866-358-6640 to obtain
an RMA number. JLab Audio will only replace or repair
product that is sent to us with an authorized RMA
number.
24
Page 26

Return Merchandise Authorization (RMA)
1. Customers will be charged additional for testing and
repackaging when returned “bad” items are found to have no
problems or defects.
2. Items found to be out-of-warranty or not belonging to JLab
Audio will not be replaced. Instead, they will be returned back
to the customer freight-collect.
3. RMAs will be shipped back to customer via UPS ground
delivery. Express shipping will be at additional costs to the
customer.
4. All RMAs must be accompanied with a copy of original
receipt or invoice with name, return address and phone
number of customer.
Exchanges
1. Items will not be cross-shipped for any reason.
2. The original receipt or invoice must accompany all
exchanges.
3. All exchanges must be shipped freight pre-paid by the
customer and include a pre-paid shipping label for shipment
back to the customer. Furthermore, the customer is expected
to insure all items being shipped back. JLab Audio is not
responsible for any losses or damages for such equipment.
25
Page 27

Discrepancy & Shipping Damage
1. For wrong items, missing items, shipping damage, or other
discrepancy; customer should report to RMA department on
the day in which the items were received. Any claims after one
business day of receipt will not be honored.
2. For any shipping damage, customer must le a claim with
their carrier immediately. All items are shipped insured, thus
must be reported for coverage.
3. Customer is responsible for paying any freight charge
caused by refused shipment or unclaimed goods.
4. JLab Audio will make every reasonable eort to deliver on
time however; JLab Audio will not be liable for late or lost
shipments.
26
Page 28

Consequential Damages & Limitations
1. JLab Audio shall not be liable for any failure to perform or
delay in performing any of its obligations when such failure or
delay is due to circumstances beyond its reasonable control,
including, without limitation, any act of God, war, strike,
riot, re, ood, earthquake, lock-out, late or non-delivery by
suppliers, shortage or unavailability of materials, components
or transportation facilities, or any act, refusal to act, regulation,
order or intervention of any governmental authority.
2. Under no circumstances shall JLab Audio be liable for any
special, indirect, incidental or consequential damages of any
kind or nature whatsoever, including, without limitation; lost
goodwill, lost resale prots, loss of data or software, work
stoppage or impairment of other goods, and whether arising
out of breach of any express or implied warranty, breach of
contract, tort (including negligence), strict product liability or
otherwise, even if advised of the possibility of such damage or
if such damage could have been reasonably foreseen.
27
 Loading...