

Page 1

V1.0
User
Manual
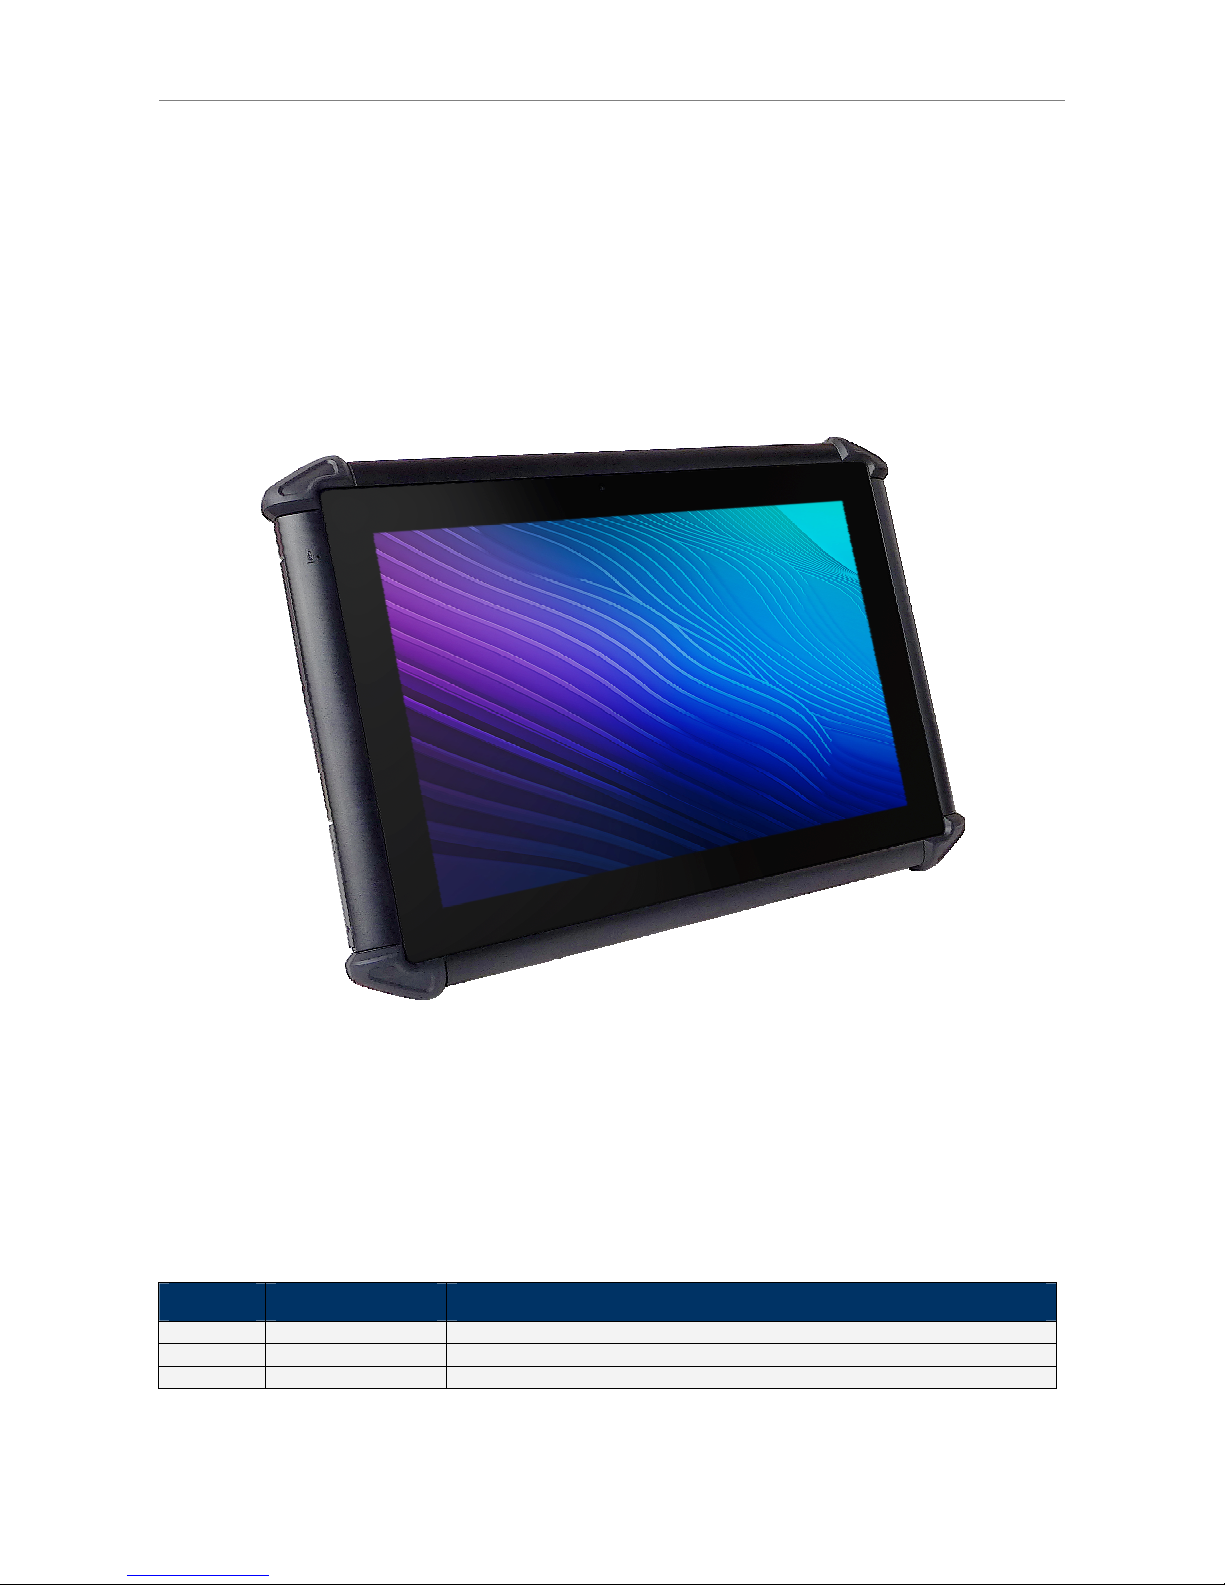
EC-WT-10
Portable Terminal
Page 2
Version 1.0 2
Revision History
Version
Date Description
1.0 5 Oct 2017 First release
Page 3

Version 1.0 3
Copyright
Copyright2017 EC Electronics Limited. All rights reserved.
No part of this document may be reproduced, distributed, translated, or stored in any form without
the prior written permission of EC Electronics Limited. All brands and product names mentioned
herein may be trademarks or registered trademarks of their respective owners. Product
specifications are subject to change without prior notice.
Disclaimer
The contents of this document are provided as is. EC Electronics Limited makes no representations
or warranties with respect to the contents herein and specifically disclaims any express or implied
warranties of merchantability or fitness for any particular purpose. EC Electronics Limited reserves
the right to revise this document at any time without prior notice.
Page 4
Version 1.0 4
Regulatory Information
FCC Statement
This device complies with Part 15 of the FCC Rules. Operation is subject to the following two
conditions: (1) This device may not cause harmful interference, and (2) this device must accept any
interference received, including interference that may cause undesired operation. Changes or
modifications not expressly approved by the party responsible for compliance could void the user’s
authority to operate the equipment.
FCC Radiation Exposure Statement
This device should be installed and operated with a minimum separation distance of 20cm between
the radiator and all persons. This transmitter must not be co-located or operated in conjunction with
any other antenna or transmitter.
CE Statement
The SAR limit of Europe is 2.0 W/kg. The highest SAR value reported under this standard during
product certification for body worn operation is 0.725 W/kg. The use of belt clips, holsters and
similar accessories should not contain metallic components in its assembly. The use of accessories
that do not satisfy these requirements may not comply with RF exposure requirements, and should
be avoided.
Hereby, EC Electronics Limited declares that this device is in compliance with the essential
requirements and other relevant provisions of Radio Equipment Directive (RED) 2014/53/EU.
Page 5

Version 1.0 5
Safety Information
Please read the following information carefully before using the device for the first time, and keep
this User Manual in a safe place for future reference.
Always treat the device with care and keep it in a clean and dust-free environment.
Do not expose the device to extremely hot, cold or humid environment. The operation
temperature is from –10°C to 50°C.
Do not use the device in wet or rainy conditions.
Do not charge the device in extremely hot (> 40°C) or cold conditions (< 0°C).
Do not attempt to disassemble or modify the device including the charger.
Do not operate the device when your hands are wet.
Do not insert foreign objects into the openings of the device.
Use only the adaptor and battery approved for the device.
The adapter shall be installed near the device and shall be easily accessible.
Do not use the adaptor if the power cord or plug is damaged.
Install the cradle on a flat and stable surface.
Do not disassemble, crush or puncture the battery.
Do not expose the battery to high temperatures.
Do not let battery terminals touch other metal objects that could lead to short-circuit of the
battery.
Do not dispose of the battery in fire or water.
Dispose of used battery properly according to local laws and regulations.
The device shall only be connected to a USB interface of version 2.0 or higher. The connection
to so called power USB is prohibited.
Page 6

Version 1.0 6
Contents
Copyright ........................................................................................................................................ 3
Disclaimer....................................................................................................................................... 3
Regulatory Information.................................................................................................................... 4
Safety Information........................................................................................................................... 5
1. Product Specifications.............................................................................................................. 7
2. Device Overview...................................................................................................................... 9
2.1 Tablet................................................................................................................................ 9
2.2 Docking Station ............................................................................................................... 10
2.3 Rear Panel I/O Connectors............................................................................................. 11
3. Getting Started....................................................................................................................... 12
3.1 Charging the Tablet......................................................................................................... 12
3.2 Powering the Tablet On and Off ...................................................................................... 13
3.3 Suspending the Tablet .................................................................................................... 14
3.4 Soft Reset....................................................................................................................... 14
3.5 Activating Windows 10.................................................................................................... 14
3.6 Fixing the Handstrap....................................................................................................... 15
4. Using Wi-Fi ............................................................................................................................ 16
4.1 Connecting to a Wi-Fi Network ....................................................................................... 16
4.1 Disconnecting from a Wi-Fi Network............................................................................... 17
5. Using Bluetooth ..................................................................................................................... 18
5.1 Bluetooth Profiles............................................................................................................ 18
5.2 Connecting a Bluetooth Device....................................................................................... 18
5.3 Managing the Bluetooth COM port.................................................................................. 19
5.4 Disconnecting a Bluetooth Device................................................................................... 20
6. Using Cellular ........................................................................................................................ 20
6.1 Inserting a SIM card........................................................................................................ 20
6.2 Setting up 3G APN.......................................................................................................... 21
7. Using NFC ............................................................................................................................. 23
7.1 Reading a NFC Tag ........................................................................................................ 23
7.2 NFC Application Development ........................................................................................ 23
8. Using LAN ............................................................................................................................. 28
9. Connecting a USB Device...................................................................................................... 28
10. Connecting a Cash Drawer ................................................................................................ 28
10.1 Identifying the Cash Drawer COM port............................................................................ 29
11. Connecting a Serial Port Device......................................................................................... 29
Page 7
Version 1.0 7
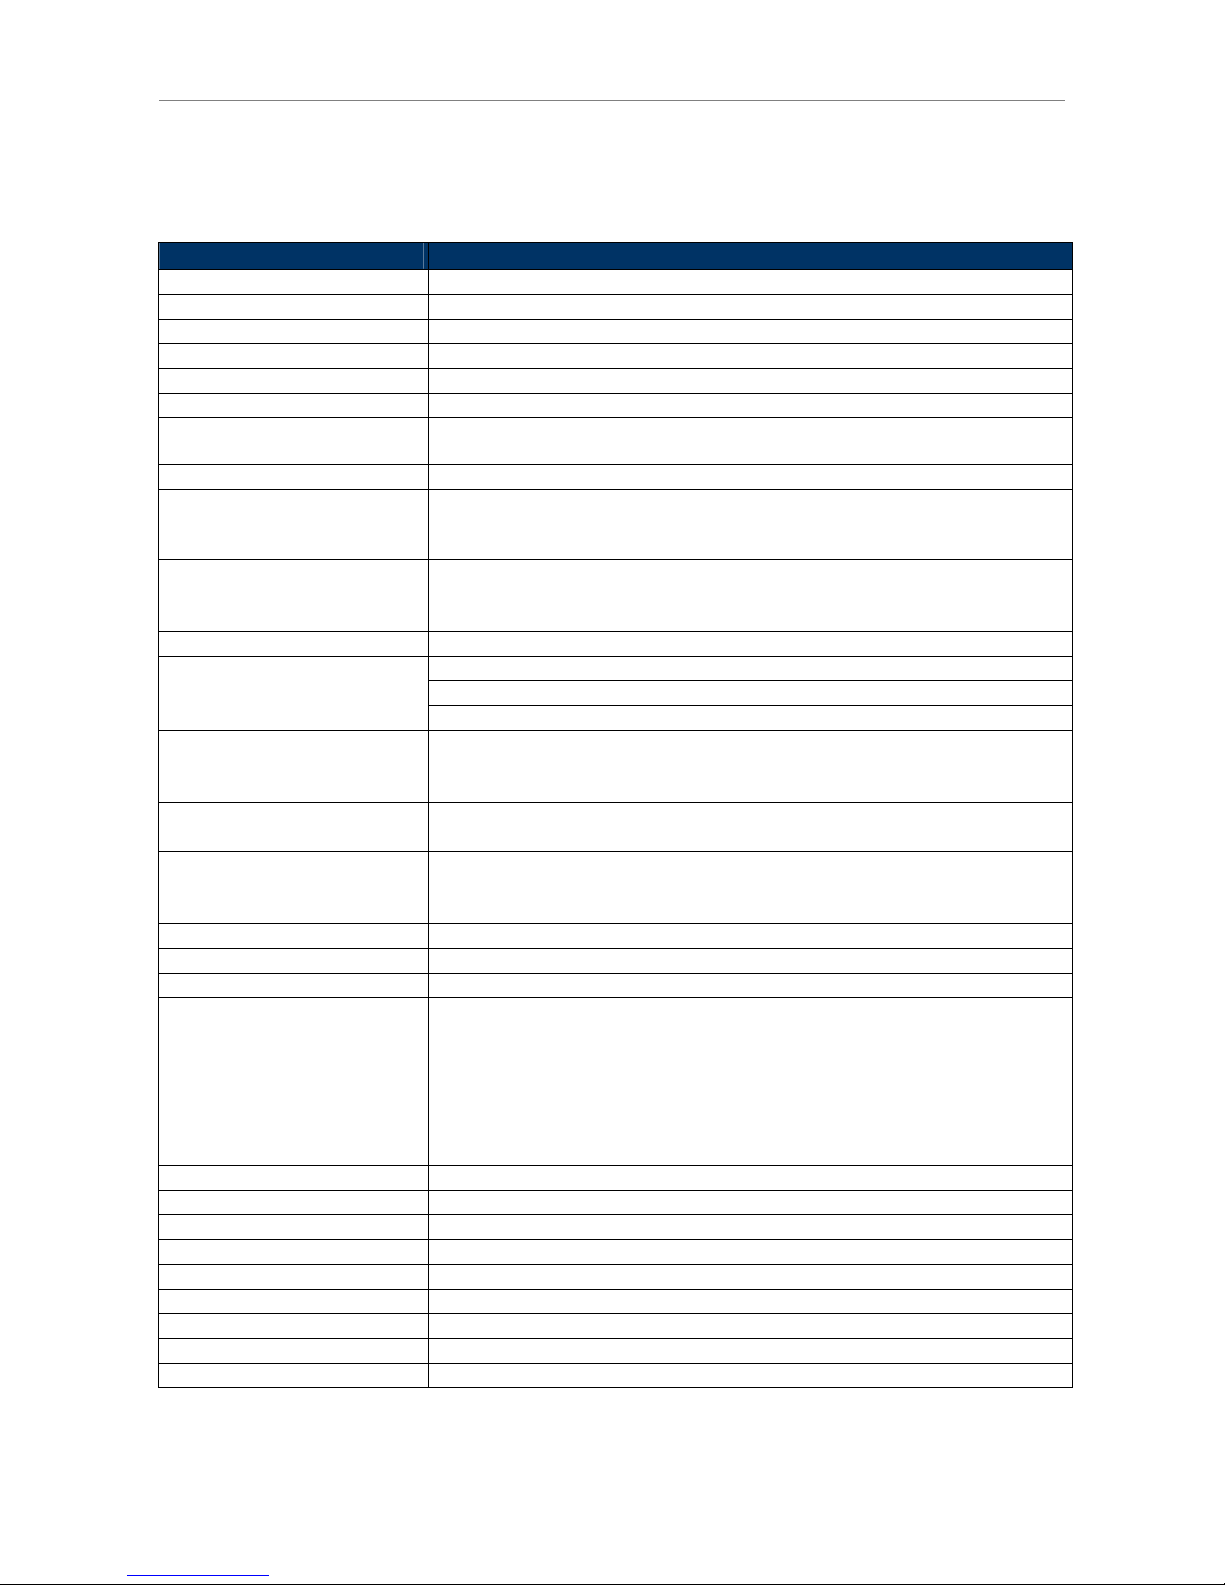
1. Product Specifications
Tablet
Item Specification
Processor Intel X5 Cherry Trail Z8350 Quad Core Processor
Flash 32GB eMMC (Optional 64GB)
RAM 2GB DDR3L (Optional 4GB)
LCM 10.1” 1280 x 800 IPS screen
Touch panel Capacitive multi-touch
Memory Expansion Micro-SD card slot. Support up to 64GB memory card
WLAN 802.11a/b/g/n
2.4GHz and 5GHz. Non-simultaneous dual-band operation
WPAN Bluetooth 4.0+EDR
WWAN 3G data (Optional)
WCDMA: Band I,II,V,VII
1 x MicroSIM slot.
NFC Frequency: 13.56MHz
Support ISO14443A/B, MIFARE, NFC Forum tags, ISO15693
Read/ Write Range: 2cm typical
Sensor G-sensor
Power Key
Volume up key, Volume down key
Keys
Reset key
Audio Dual Speakers
Built-in microphone
3.5mm audio jack
Camera Rear 5MP Auto-focus
Front 2MP
USB USB2.0
1 x USB Micro-B port for charging
1 x USB Type A host port
HDMI 1 x HDMI port
Expansion Module Add-on 2D Barcode scanner module (Optional)
Battery Built-in rechargeable Lithium Polymer battery 7000mAh
Battery life Communication time: 8 hours min. (Screen on. Wi-Fi data
communication every 6 seconds.)
Operating time: 11 hours min. (Wi-Fi connected, Screen on,
Keep alive on)
Standby time: 200 hours min. (Wi-Fi connected, Keep alive on,
Screen off)
Charging Battery charging through docking station or USB port
Dimension
287mm x 197mm x 26mm
Weight 960g
IP Rating IP65
Drop Test 2 cycle drops of 6 sides and 4 corners from 1m onto concrete.
Operating temp. -10 to +50 deg C
Storage temp. -20 to +60 deg C
Operating humidity 15% to 90%
Storage humidity 10% to 95%
Page 8
Version 1.0 8
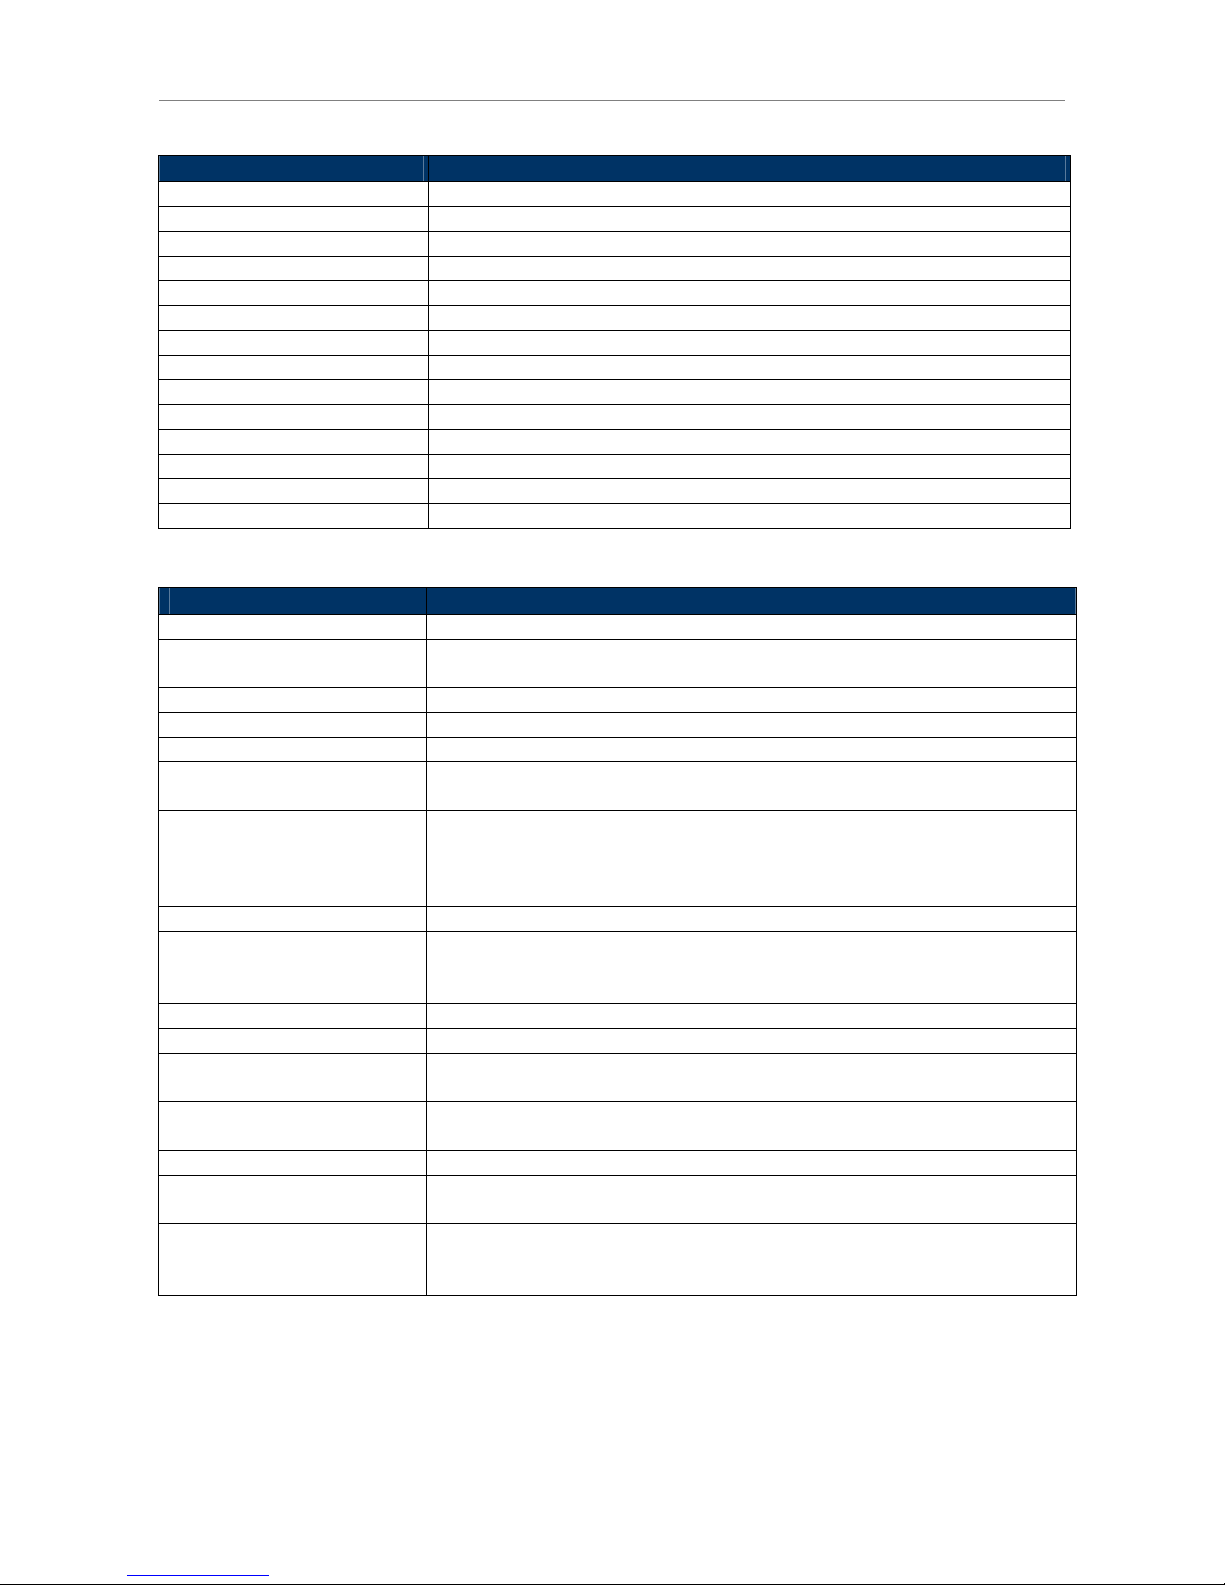
Docking Station
Item Specification
AC/DC adaptor AC IN: 100-240V DC OUT: 24V 2A
Indicator 1 x Green power LED
Pogo pin connector 9-pin interface for USB host and charging
USB port USB 2.0 Type A connector x 4
Serial port RS232 DB9 connector x 4
Ethernet port RJ45 connector x 1
Cash drawer port RJ11 connector x 1
Hinge Dual hinge design for angle and height adjustment
Dimension 240mm x 240mm x 141mm (collapsed dimension)
Weight 2850g
Operating temp. 0 to +40 degree C
Storage temp -20 to +60 degree C
Operating humidity 15% to 90%
Storage humidity 5% to 95%
Software Specification
Item Specification
Operating system Windows 10 IoT Enterprise LTSB 2016
Language English
Other language packs downloadable form Microsoft
BIOS UEFI (BIOS) Setup
File system exFAT file system, FAT file system, NTFS
Display Configurable on screen rotation
Input Capacitive touch input
Power key, volume keys
Peripheral interface USB host interface for HID, Mass Storage and Serial
RS232 ports
RJ11 port
Ethernet port
Memory Expansion Micro-SD card support
Bluetooth Bluetooth 4.0 + EDR
Profiles supported: HID, PANU, SPP, OPP, DUN, HCRP, HFP, A2DP,
AVRCP
NFC Microsoft proximity API
Input methods On-screen keyboard
Battery and Charging Battery level information
Charging status indication
Power management Configurable sleep timeout
Configurable display timeout
Camera Photo capture
Security User mode with limited permission to prevent unauthorized setting
changes and application running.
Wi-Fi Wi-Fi Security supports WEP, WPA-PSK, WPA2-PSK encryption by
WPA supplicant
Page 9
Version 1.0 9
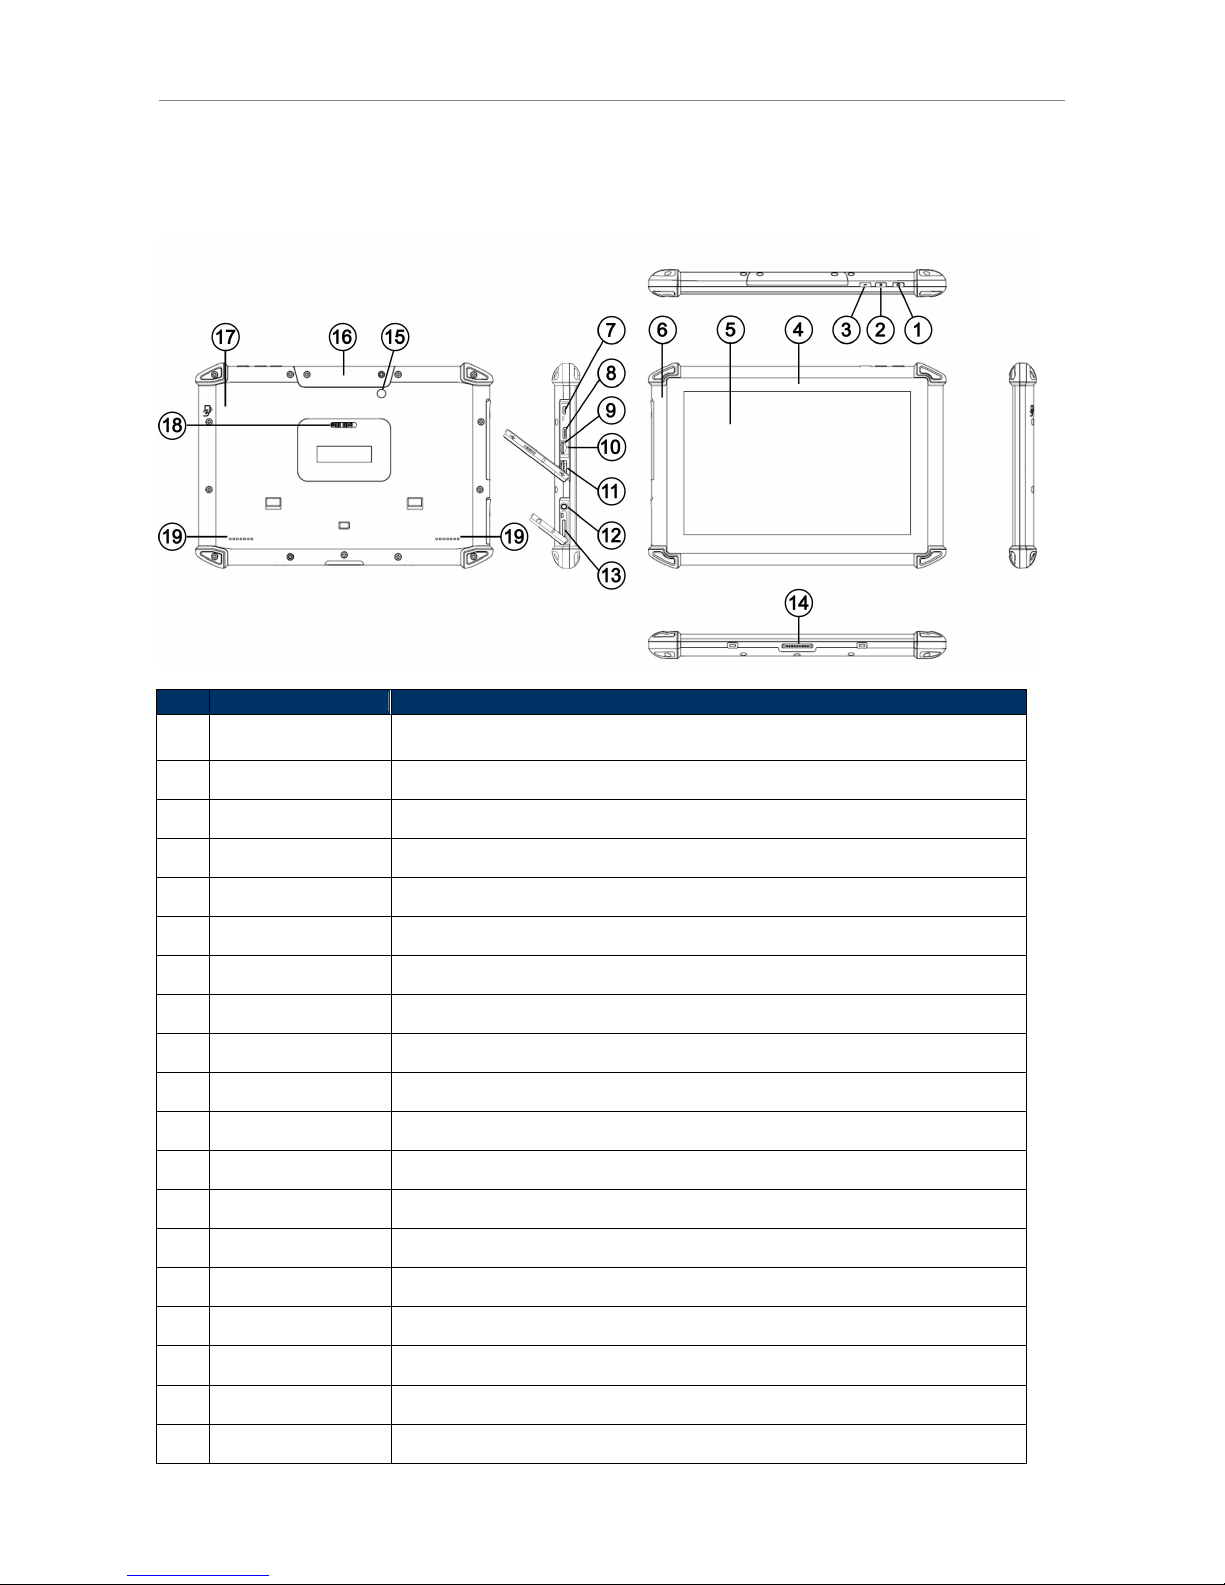
2. Device Overview
2.1 Tablet
No. Item Description
1 Power key Press and hold to turn device on or off
If the device is on, press to suspend
2 Volume up key Press to increase volume
3 Volume down key Press to decrease volume
4 Front camera 2MP camera
5 Touch screen LCD with capacitive touch screen
6 Microphone Built-in microphone
7 Micro-USB port USB2.0. Charging only
8 HDMI port HDMI output
9 MicroSD slot MicroSD card slot. Support up to 64GB memory card
10 Reset key Press to reboot the device
11 USB port USB 2.0 host. Type A connector.
12 Earphone jack Connect a stereo earphone
13 SIM card slot MicroSIM card slot
14 9-pin connector For charging and USB connectivity through the docking
15 Rear camera 5MP camera
16 Extension port Remove the cover to access the extension port.
17 NFC reader Scanning area for NFC tags
18 Handstrap lock Lock and unlock the logo cover or handstrap
19 Speaker Built-in speaker
Page 10
Version 1.0 10
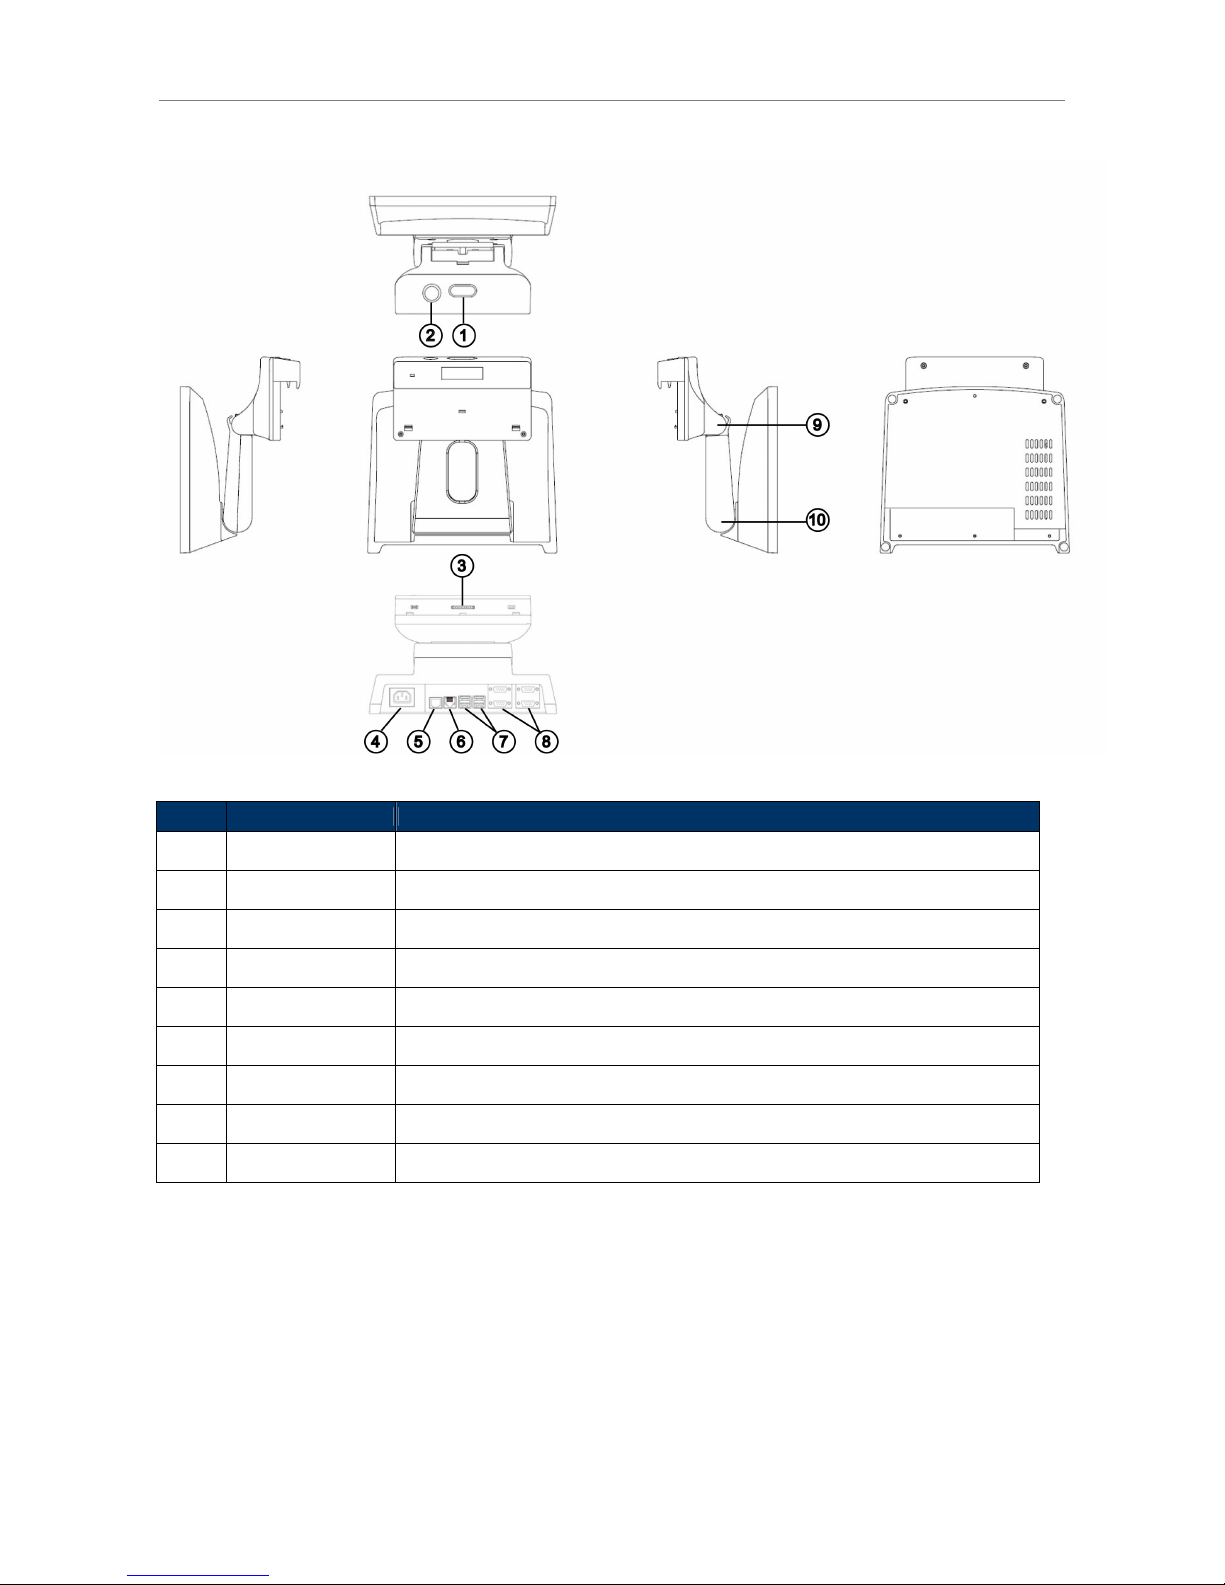
2.2 Docking Station
No. Item Description
1 Release button Press and hold to release the tablet
2 Key lock Lock the tablet with a key
3
Pogo pin
connector
Provide charging and USB connections for the tablet
4 Power connector Connect the power cable
5 Ethernet port RJ45 connector x 1
6 Cash drawer port RJ11 24V connector x 1
7 USB port USB2.0 host Type A connector x 4
8 Serial port RS232 DB9 connector x 4
9 / 10 Hinge Adjust the height and angle of the tablet
Page 11
Version 1.0 11
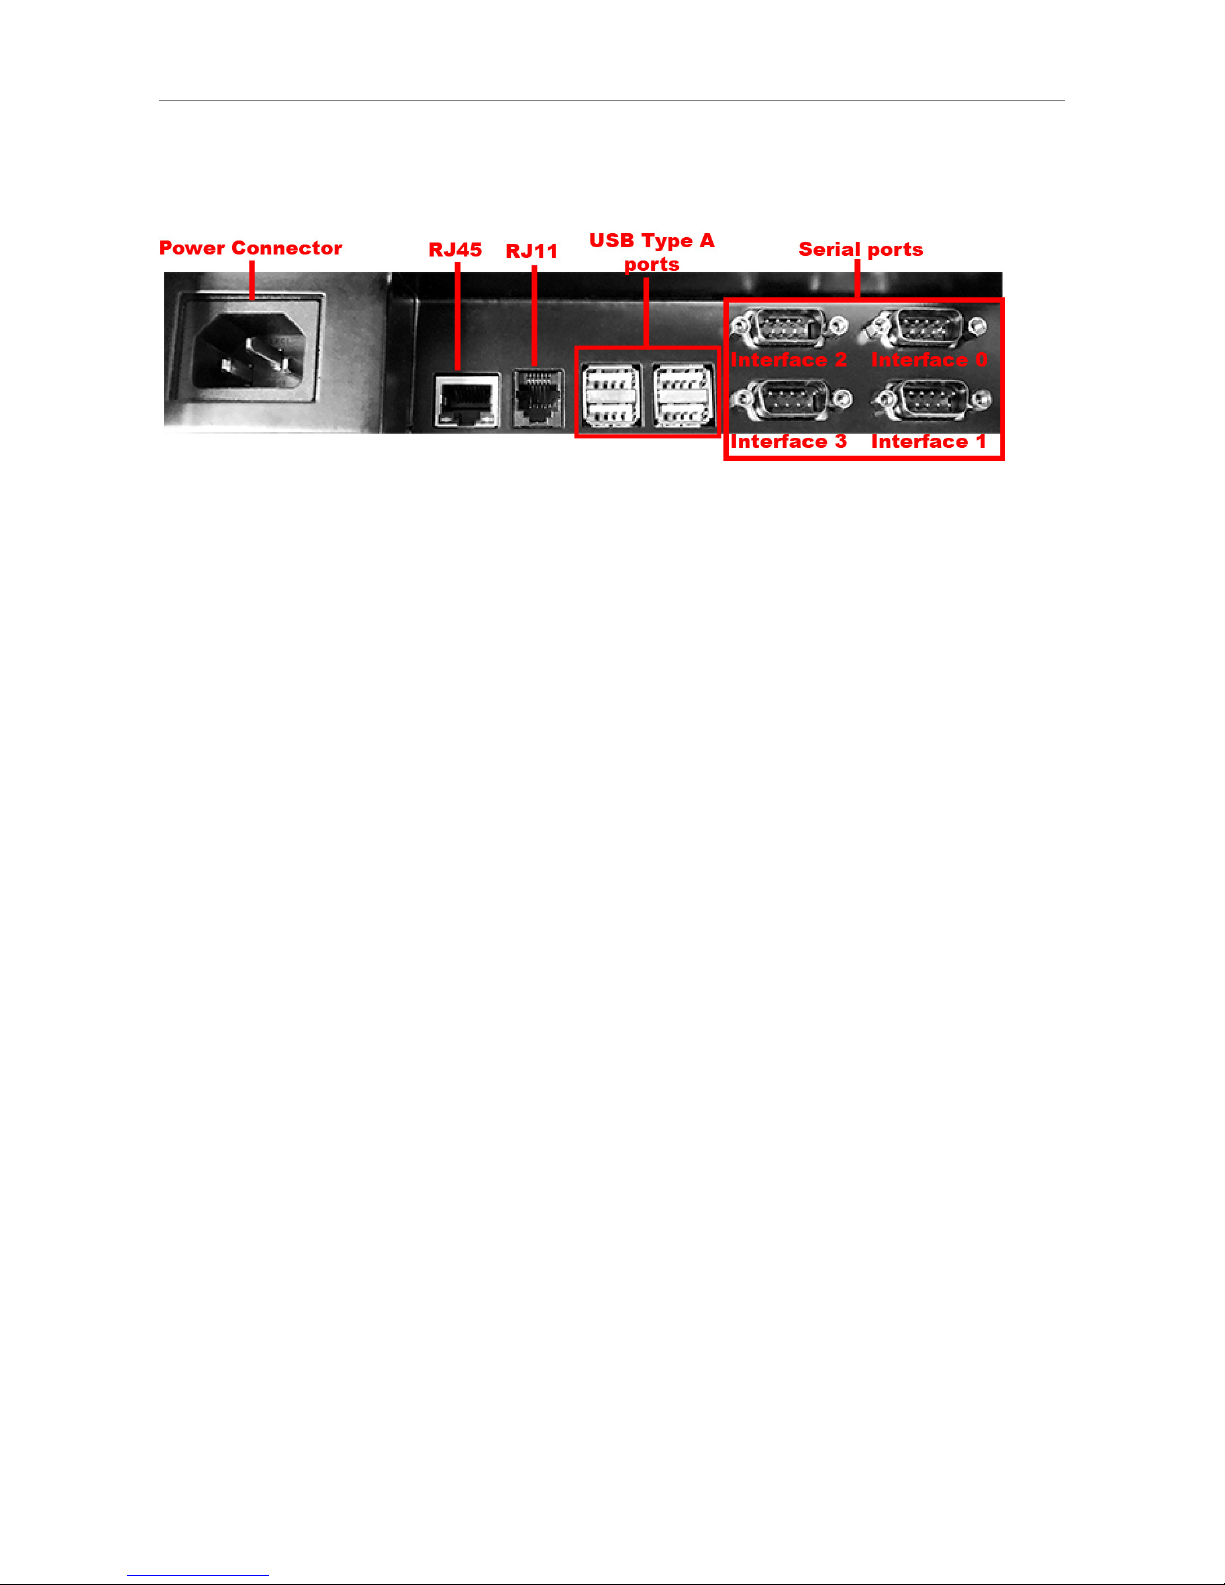
2.3 Rear Panel I/O Connectors
Page 12
Version 1.0 12
3. Getting Started
3.1 Charging the Tablet
The tablet can be charged through the docking station or a USB adaptor.
3.1.1
Charging with the Docking Station
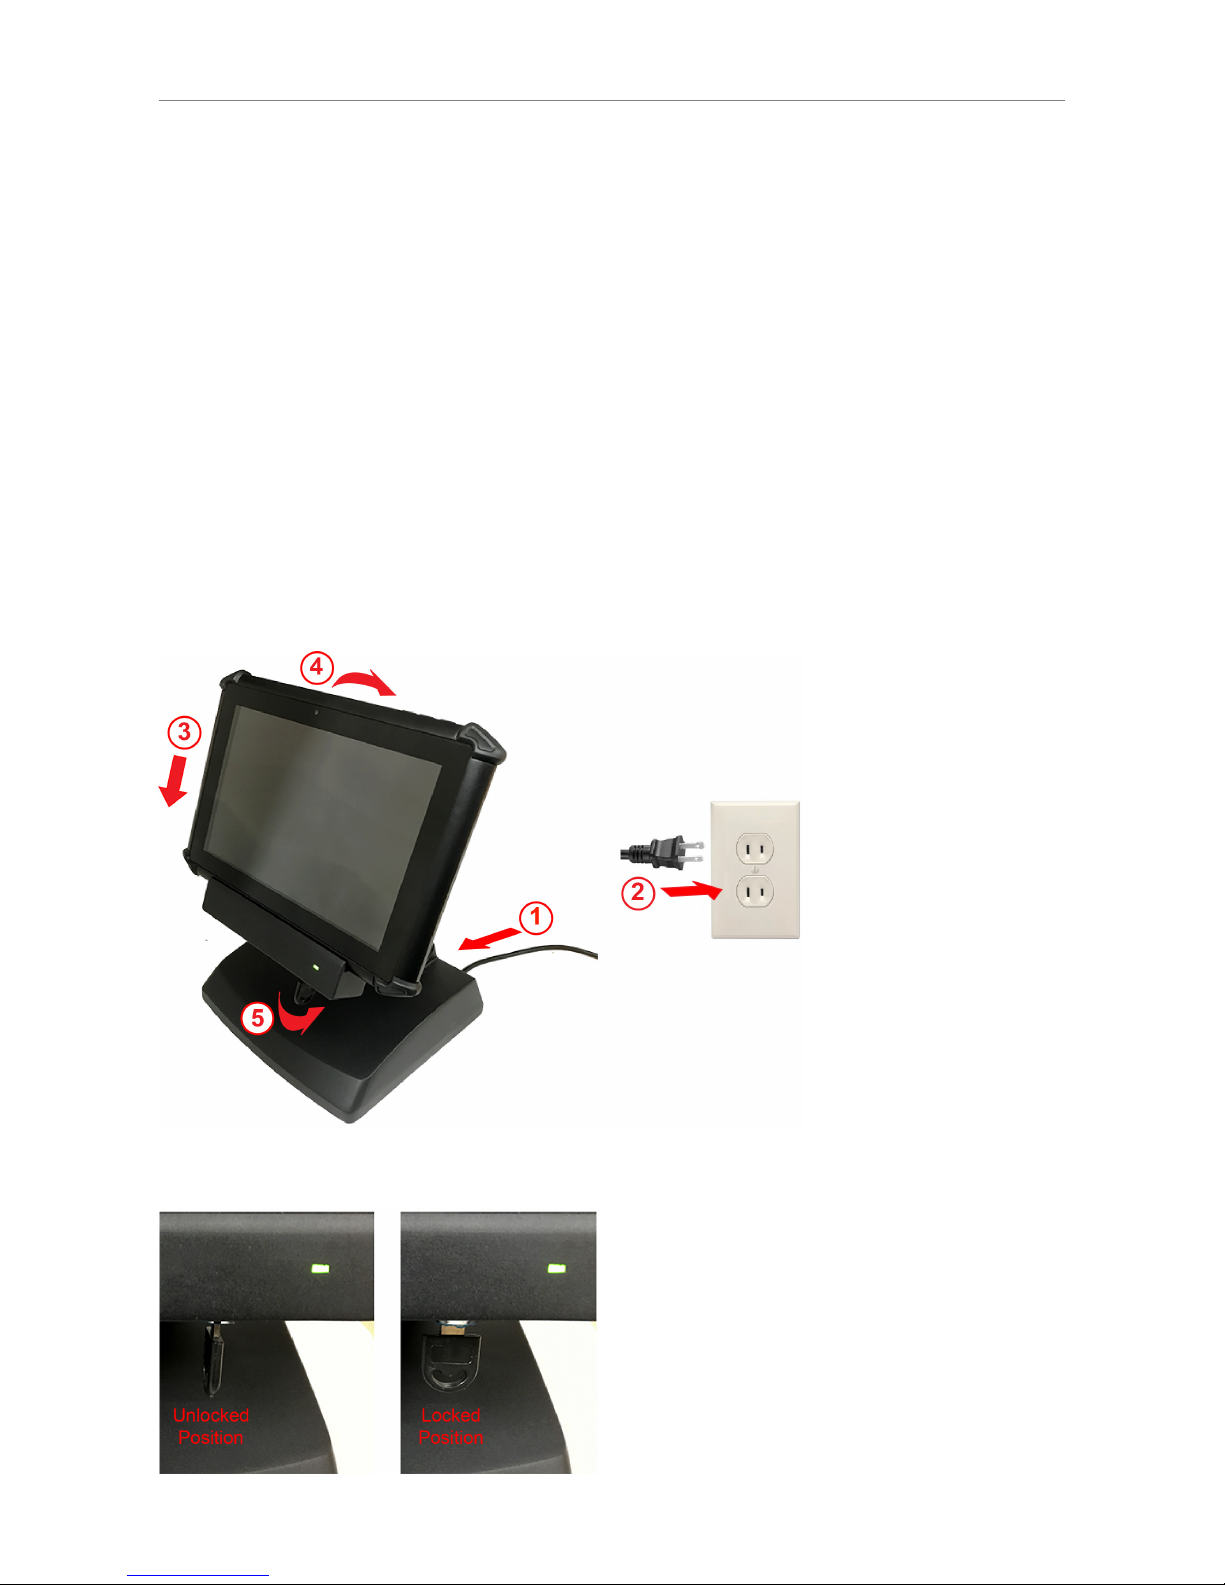
To charge the tablet through the docking station:
1. Connect the power cable into the power connector of the docking station.
2. Plug the other end of the power cable to a suitable power socket. The power LED turns green
when power is supplied to the docking station.
3. With the key in the unlocked position, align the tablet 9-pin connector to the pogo pin connector
at the docking station slot; and then insert the tablet.
4. Gently push the tablet backward until it is clicked into place.
5. Turn the key to lock the tablet.
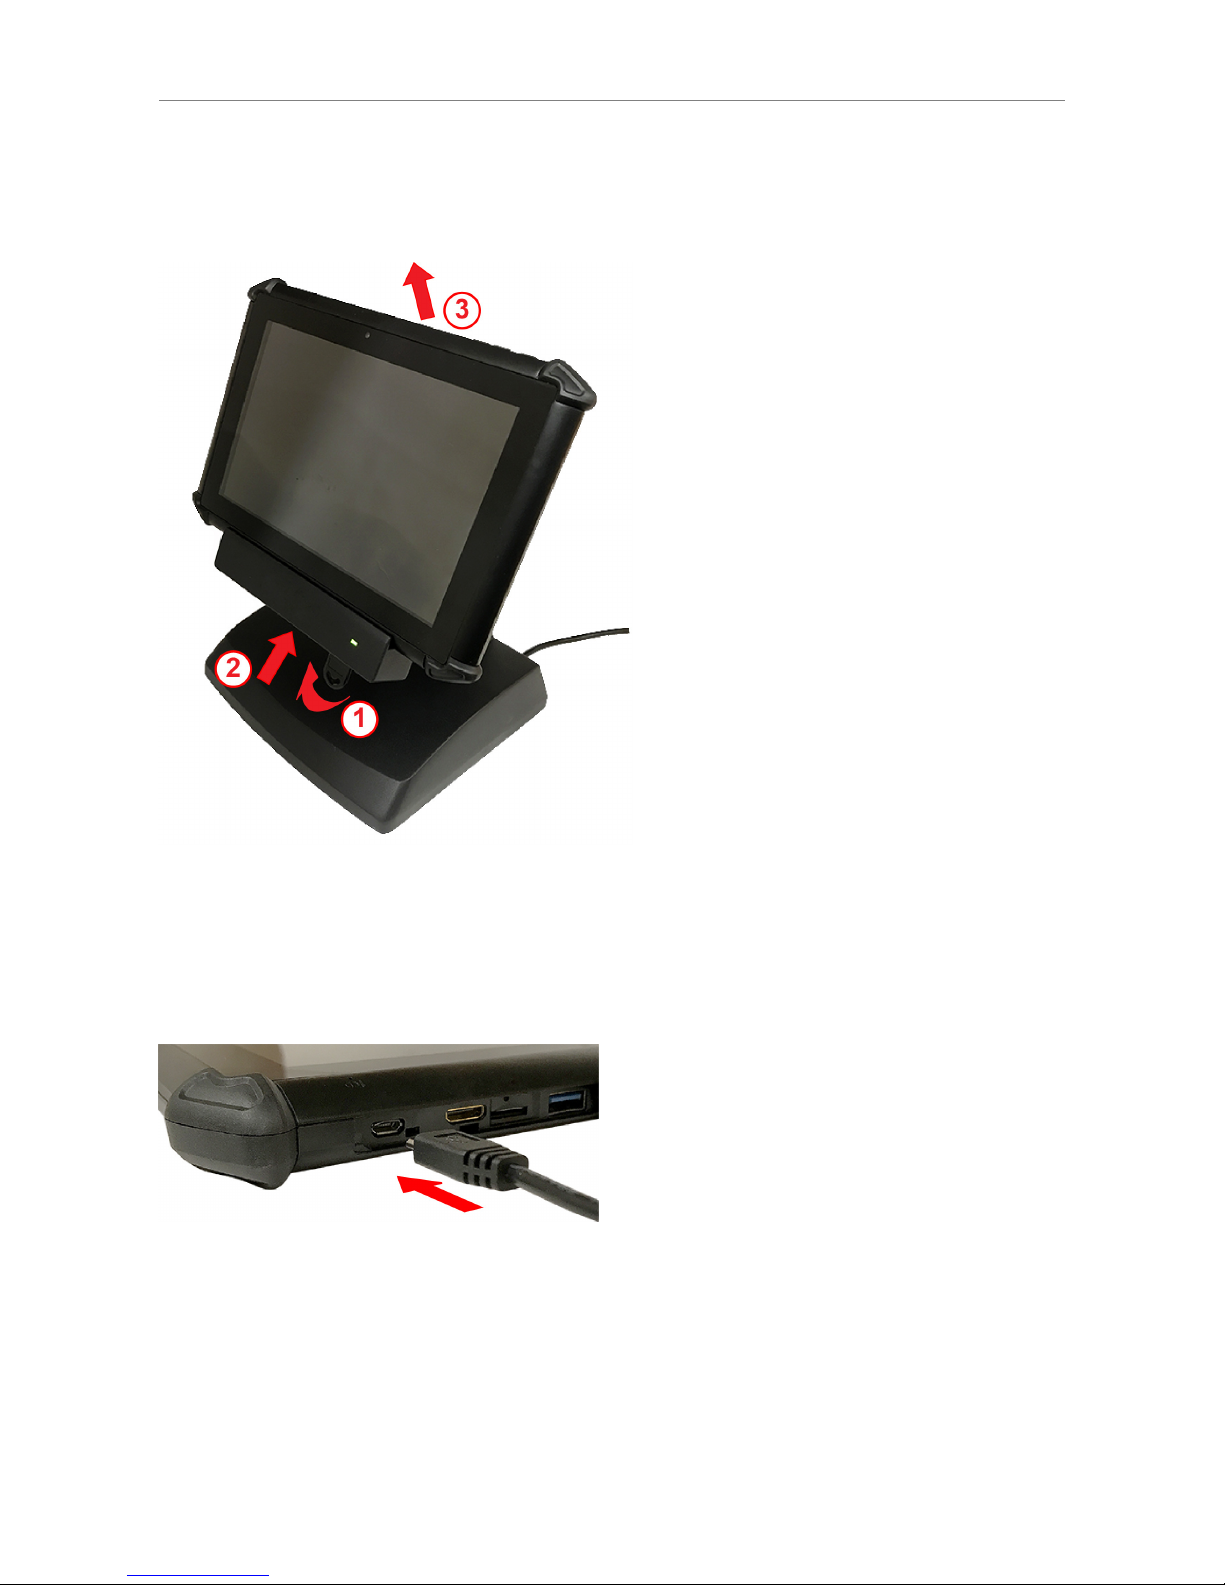
Key locked and unlocked positions
Page 13
Version 1.0 13
To undock the tablet from the docking station:
1. Turn the key to the unlocked position.
2. Press and hold the release button of the docking station.
3. Remove the tablet from the slot.
3.1.2
Charging with a USB charger
1. Plug the USB charging cable supplied with the tablet into a USB charger.
2. Connect the other end of the USB charging cable into the Micro-USB port of the tablet.
3. Plug the USB charger into a suitable power socket, and fully charge the tablet.
3.2 Powering the Tablet On and Off
Powering on the Tablet
Press and hold the Power key for 3 seconds to power on the tablet.
Page 14
Version 1.0 14
Powering off the Tablet
Press and hold the Power key for 3 seconds, and follow the screen instructions to power off the
device.
3.3 Suspending the Tablet
If the tablet is on, press the Power key once to suspend the device (i.e. entering sleep mode),
saving battery power.
To resume operation from sleep mode, press the Power key once.
3.4 Soft Reset
Soft reset shuts down and reboots the device. It preserves installed applications, settings, and
saved data. To perform a soft reset:
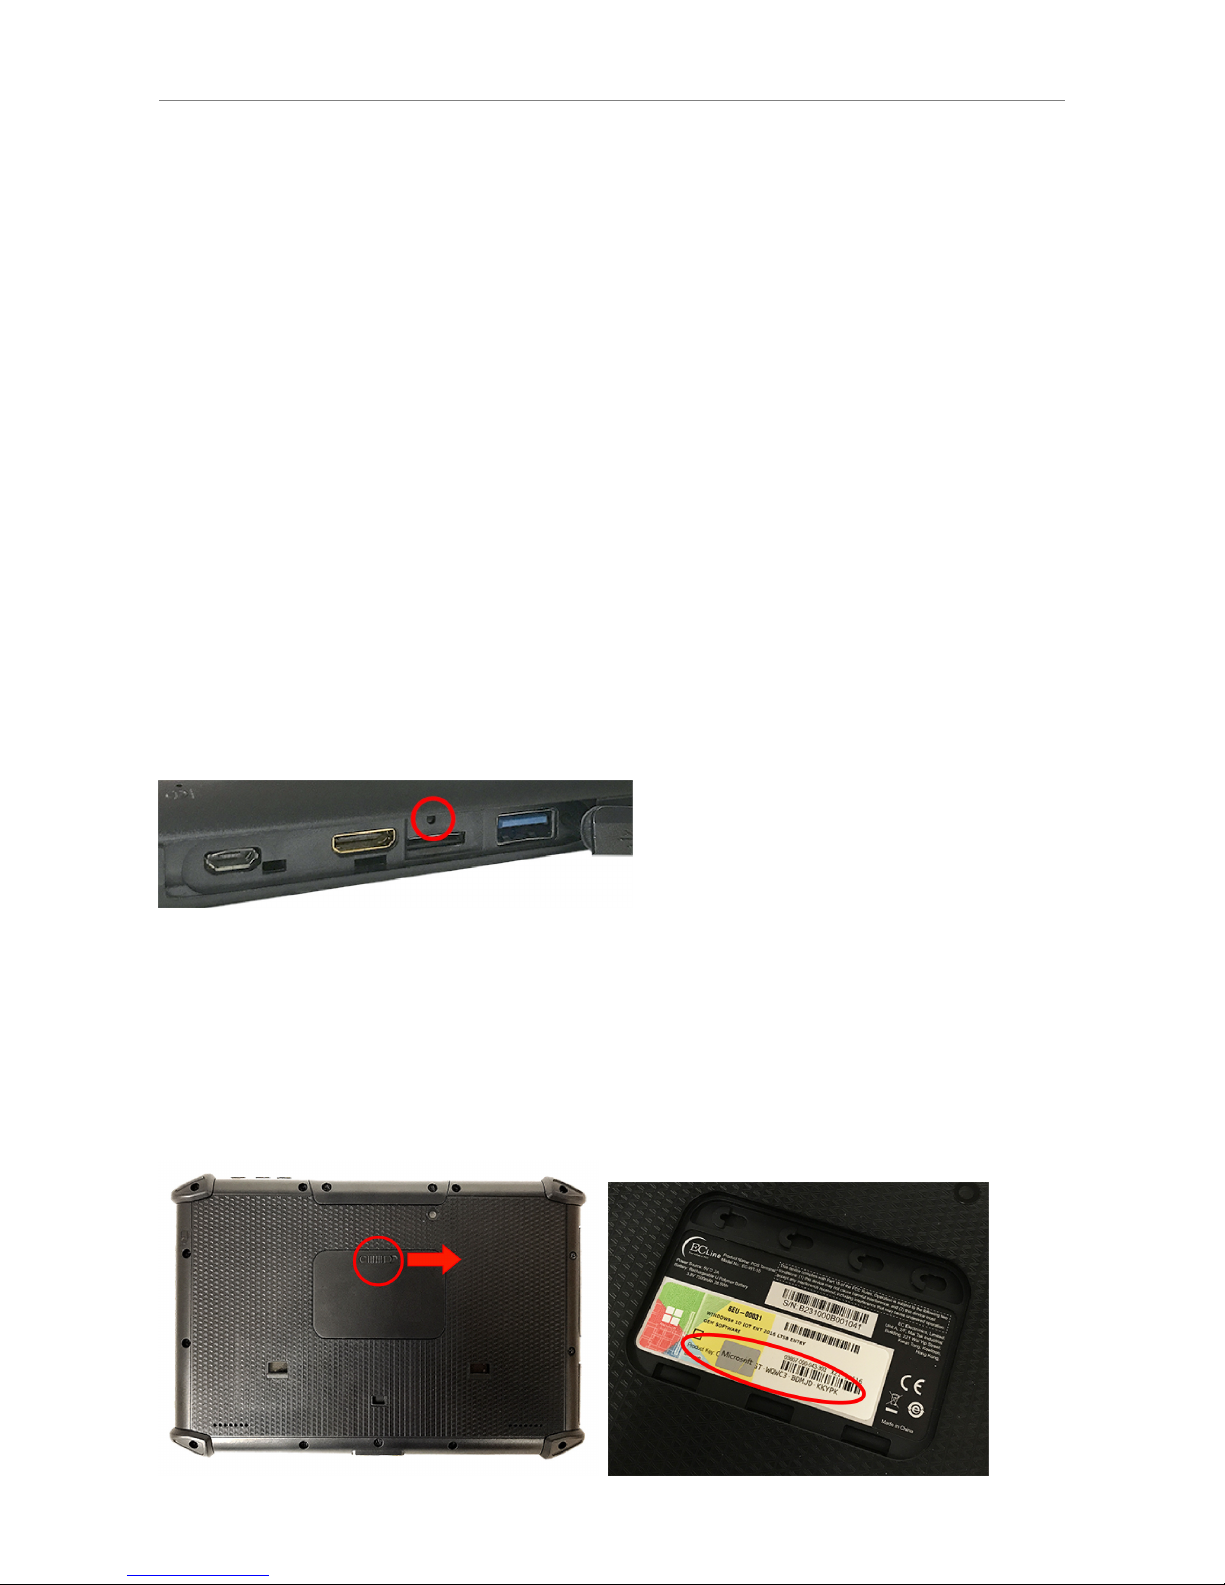
1. Open the rubber cover.
2. Press the reset key once with a pin (e.g. a straightened paper clip).
3. The tablet shuts down and reboots.
Note: The reset key is located above the MicroSD card slot.
3.5 Activating Windows 10
1. To locate the Windows 10 license label, turn over the tablet; slide the lock of the logo plate to the
unlocked position, and remove the logo plate.
2. Gently remove the silver material with a fingernail or a coin on the license label to reveal the
hidden characters of the product key.
3. Enter the 25-character product key and follow the screen instructions to complete the activation.
Page 15
Version 1.0 15
3.6 Fixing the Handstrap
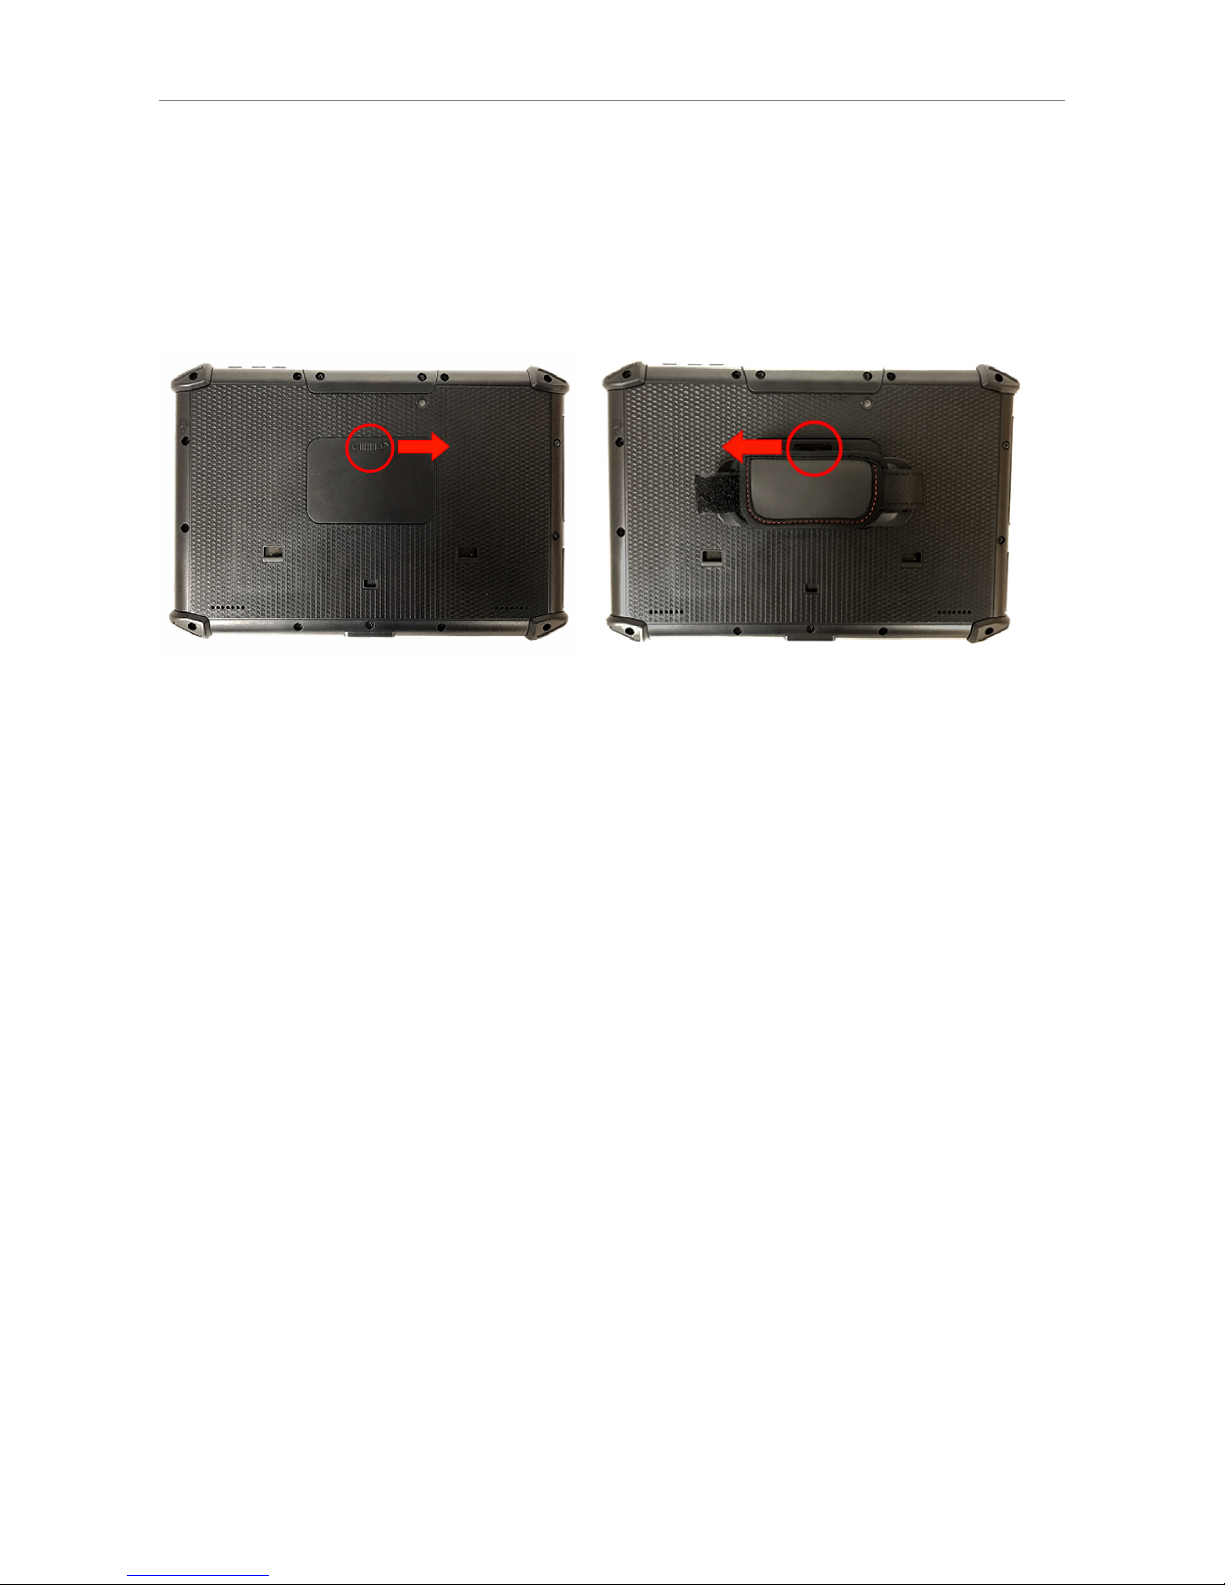
An optional handstrap is available for the tablet. To fix the handstrap on the tablet:
4. Turn over the tablet.
5. Slide the lock of the logo plate to the unlocked position, and remove the logo plate.
6. Place the handstrap module in the recess, and slide the lock to the locked position.
7. Adjust the length of the handstrap to fit.
Page 16
Version 1.0 16
4. Using Wi-Fi
4.1 Connecting to a Wi-Fi Network
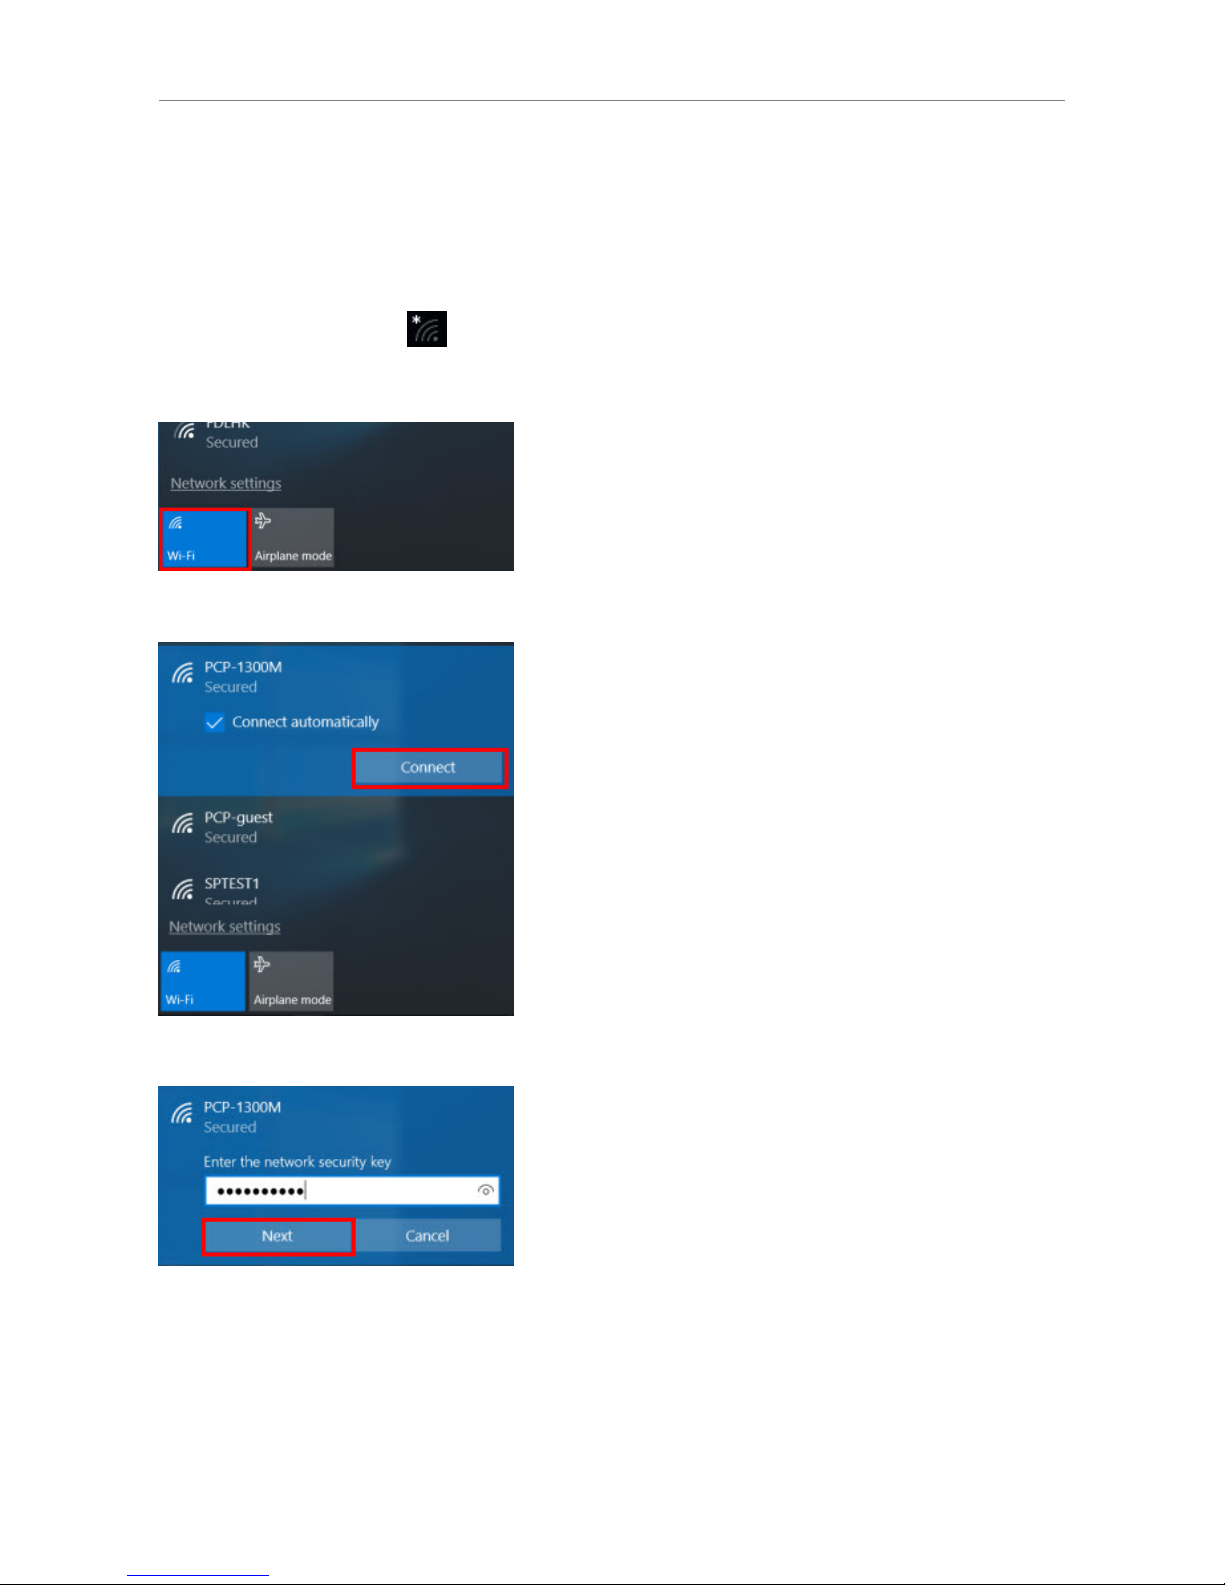
1. Click the Network icon on the taskbar.
2. If the Wi-Fi is off, click the Wi-Fi button on the pop up menu to turn it on.
3. Select a network from the AP list, and click Connect.
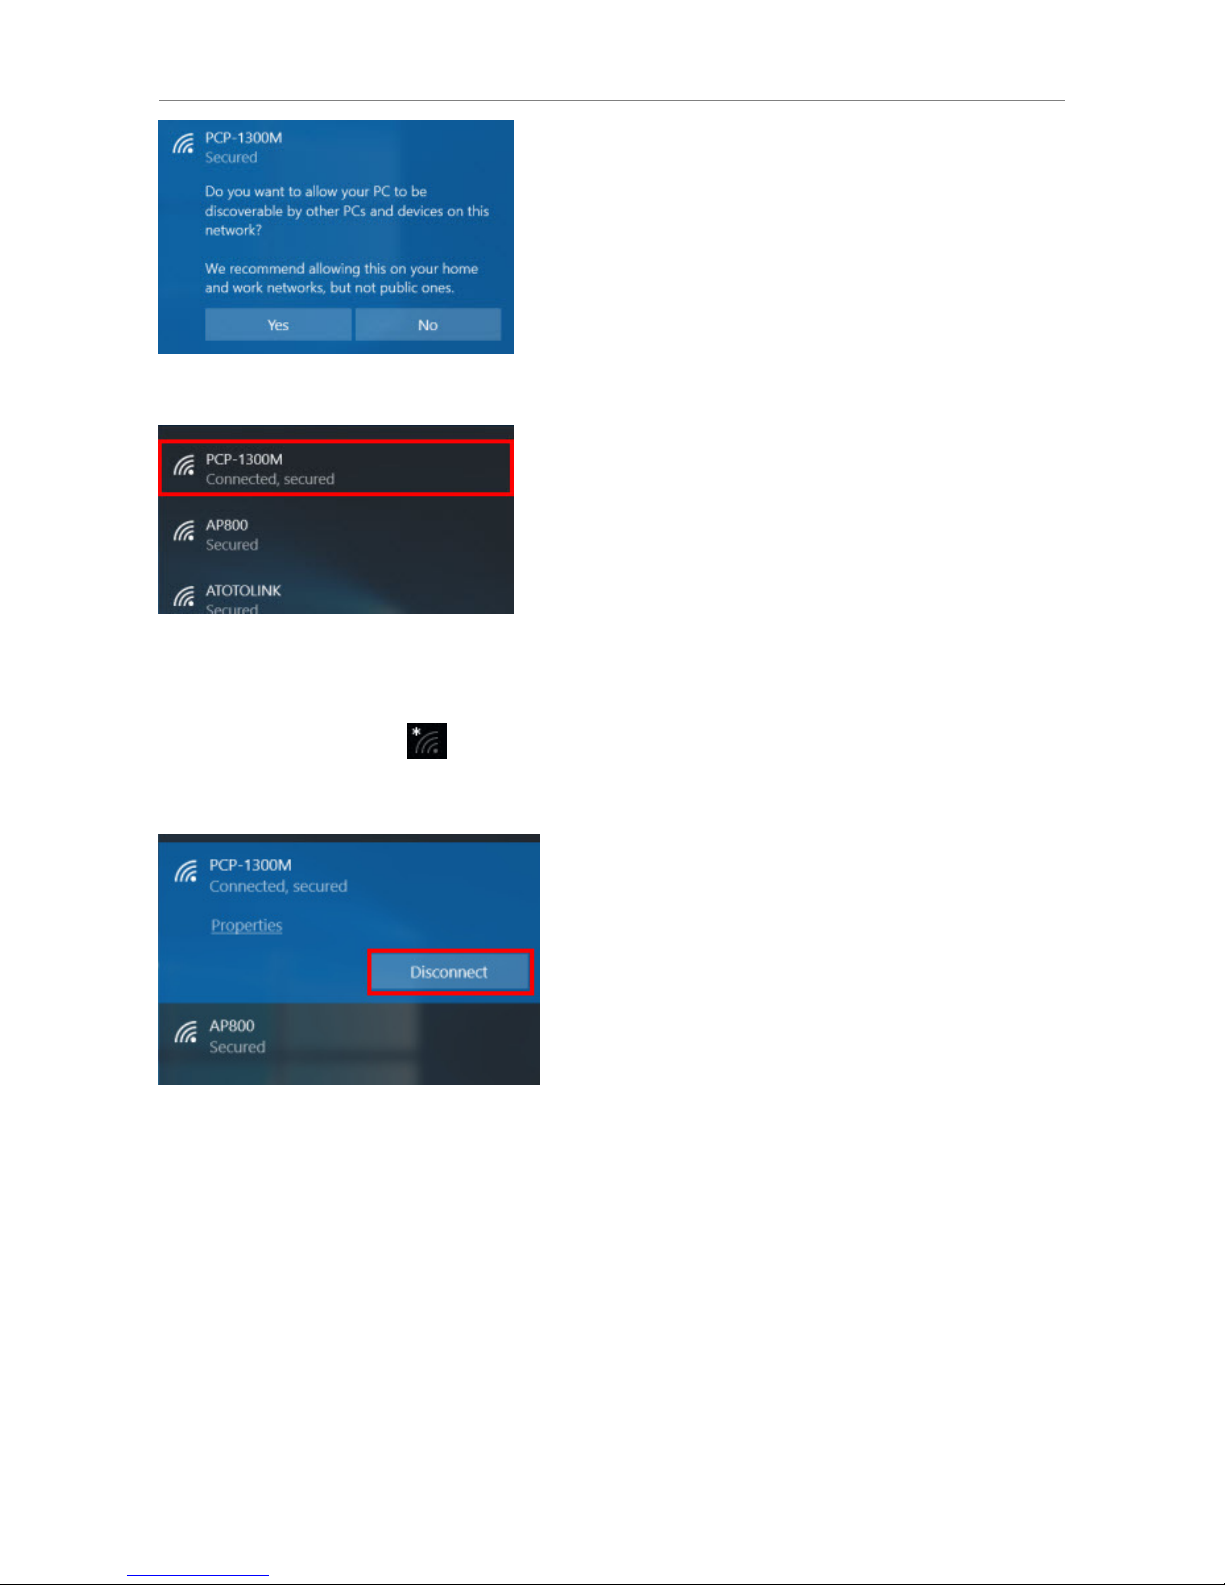
4. Input the network key when prompted, and click Next.
5. Click Yes if allowing other devices to discover the tablet.
Page 17
Version 1.0 17
6. Once connected, it displays Connected under the network name.
4.1 Disconnecting from a Wi-Fi Network
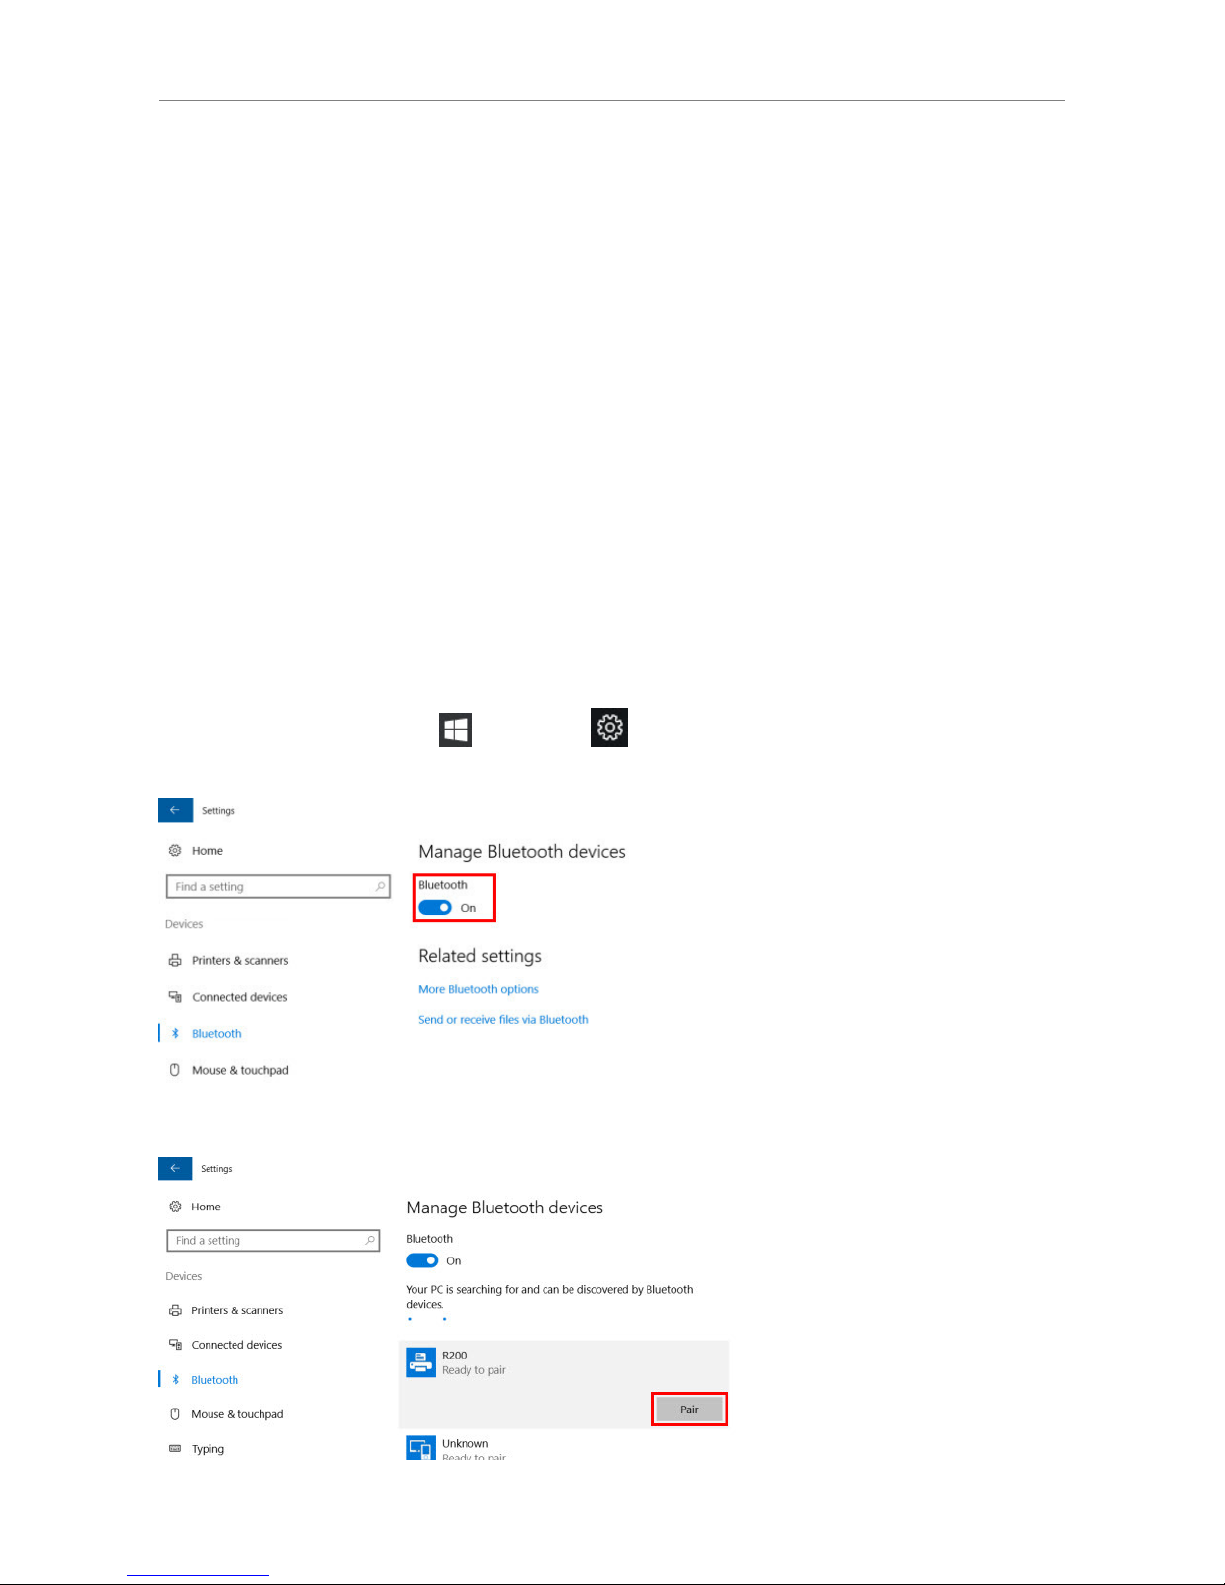
1. Click the Network icon on the taskbar.
2. Click the connected network.
3. Click Disconnect.
Page 18
Version 1.0 18
5. Using Bluetooth
5.1 Bluetooth Profiles
The tablet supports the following Bluetooth profiles:
PANU: PAN User Profile
SPP: Serial Port Profile
OPP: Object Push Profile
A2DP: Advanced Audio Distribution Profile
AVRCP: Audio/ Video Remote Control Profile
HID: Human Interface Device Profile
DUN: Dial Up Networking Profile
HCRP: Hardcopy Cable Replacement Profile
HFP: Hands-free Profile
5.2 Connecting a Bluetooth Device
To connect to a Bluetooth device:
1. Make sure the Bluetooth device is within range and set to be discoverable.
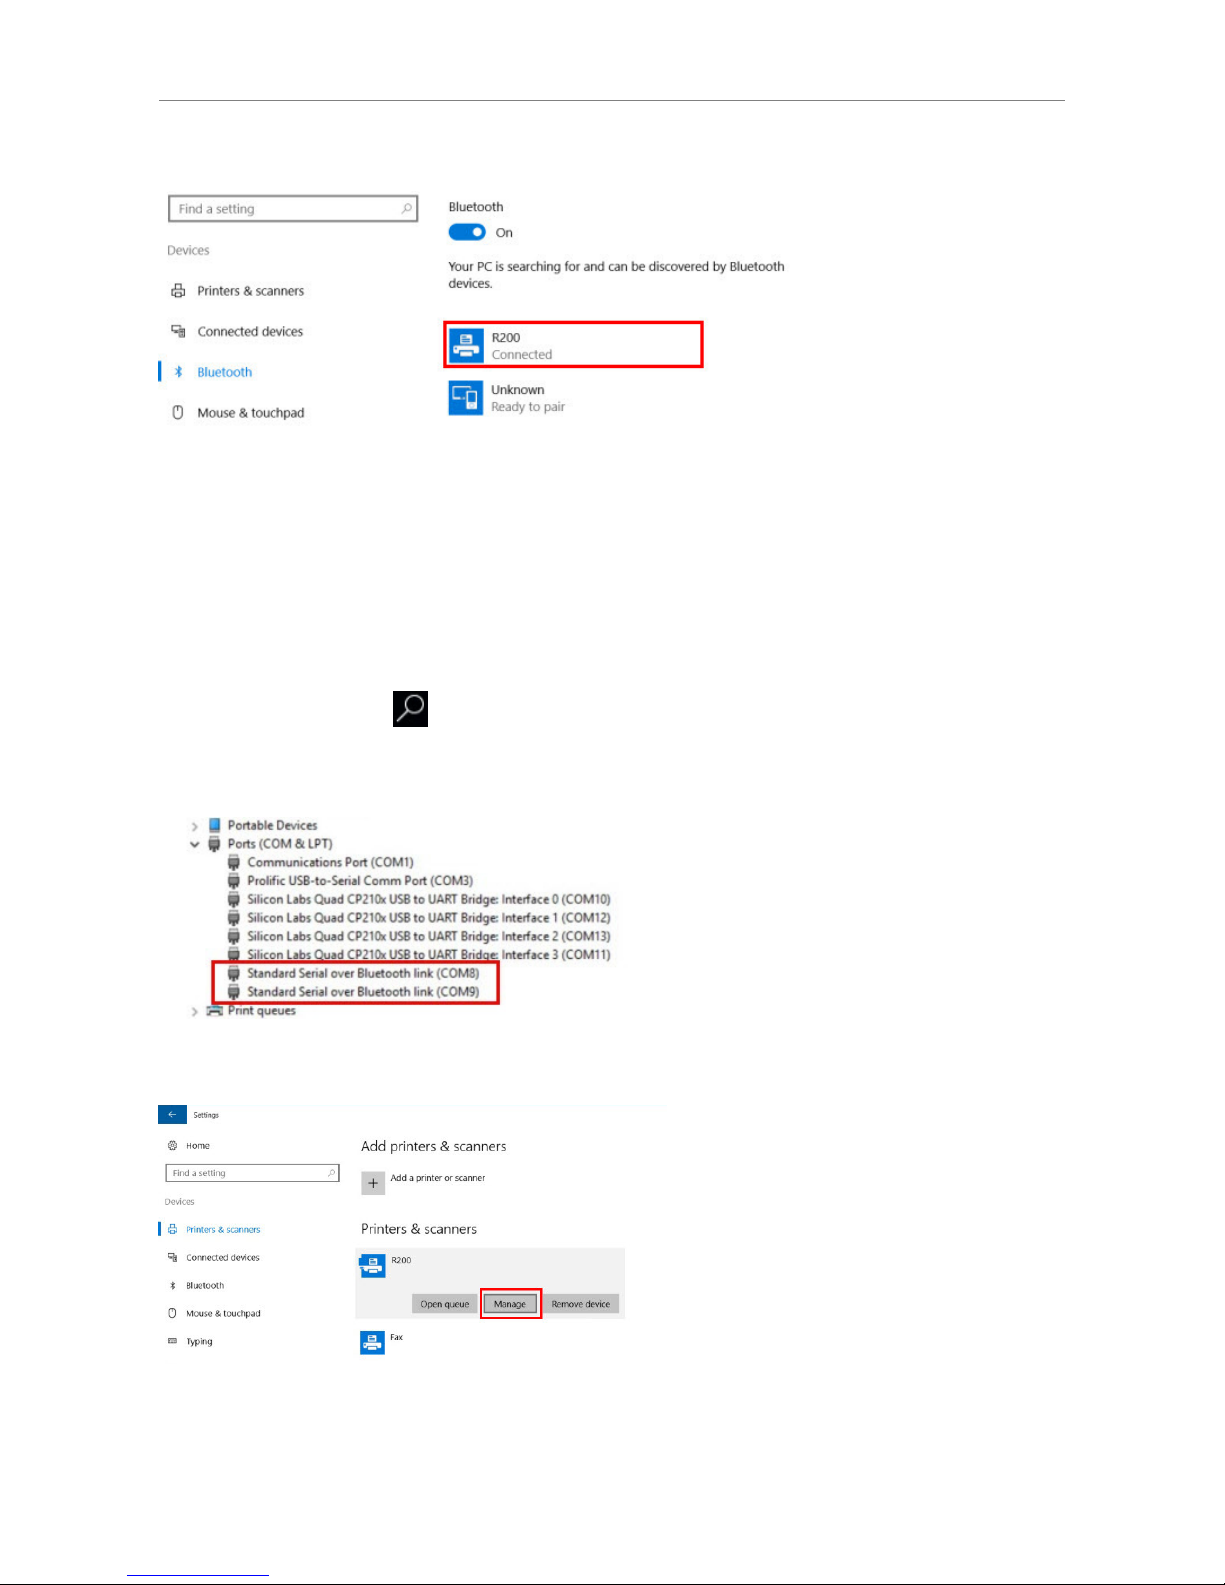
2. On the tablet, select Start > Settings > Devices > Bluetooth.
3. Slide the Bluetooth On/Off button to the On position.
4. Select a device from the Bluetooth device list, and click Pair.
Page 19
Version 1.0 19
5. Follow the screen instructions on both devices to complete the pairing. Once paired, the device
displays Connected status.
Note: Some Bluetooth devices may require software driver installation.
5.3 Managing the Bluetooth COM port
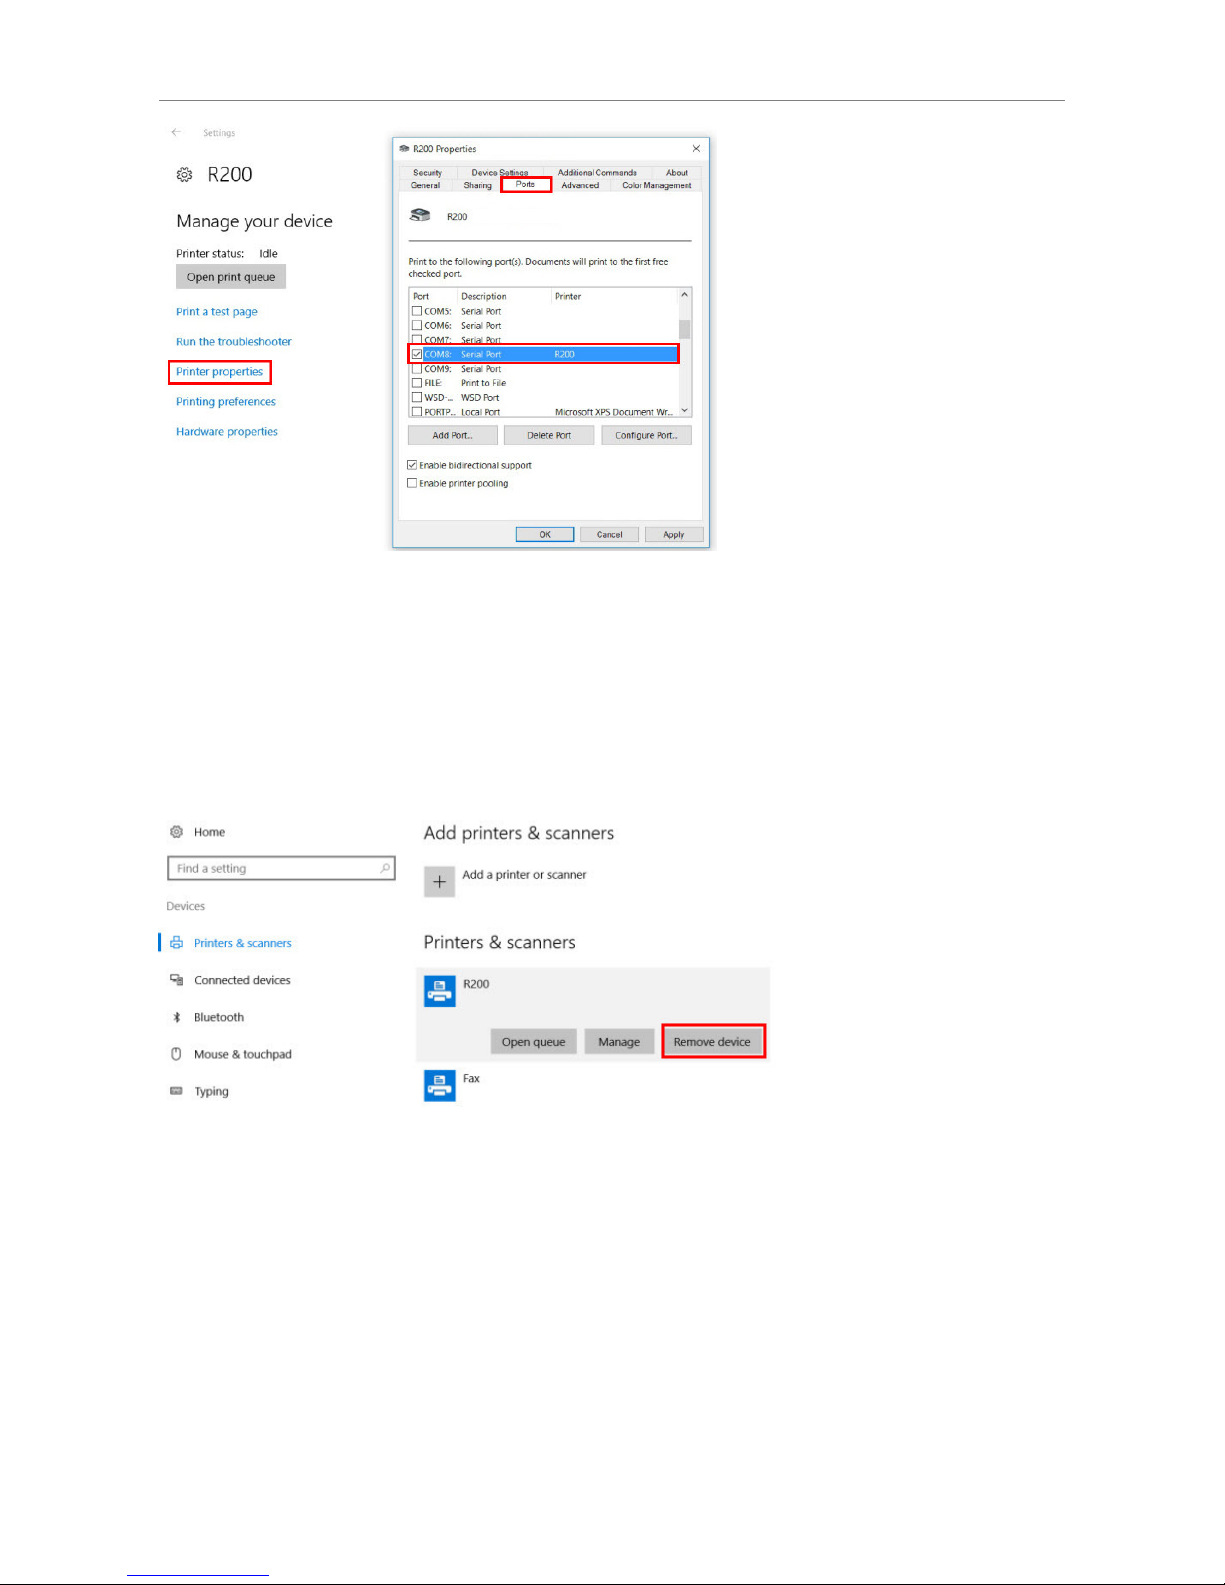
After pairing a Bluetooth device (e.g. a Bluetooth printer), it is recommended to check the port setting and
re-configure the port if necessary. The following example demonstrates how the COM port can be changed for
a paired Bluetooth printer.
1. Select the Search icon on the status bar.
2. Type Device Manager in the search box to open Device Manager.
3. Click Ports (COM & LPT), and check the COM port number assigned for Standard Serial Over
Bluetooth link.
1. Select Start > Settings > Printers & scanners.
2. Click the paired printer, and select Manage.
3. Select Printer properties > Ports.
4.
Select the COM port number assigned for the Bluetooth link, and click Apply.
Page 20
Version 1.0 20
5.4 Disconnecting a Bluetooth Device
To disconnect a Bluetooth Device:
Select Start > Settings > Devices > Bluetooth.
Click the paired device, and select Remove device > Yes.
6. Using Cellular
6.1 Inserting a SIM card
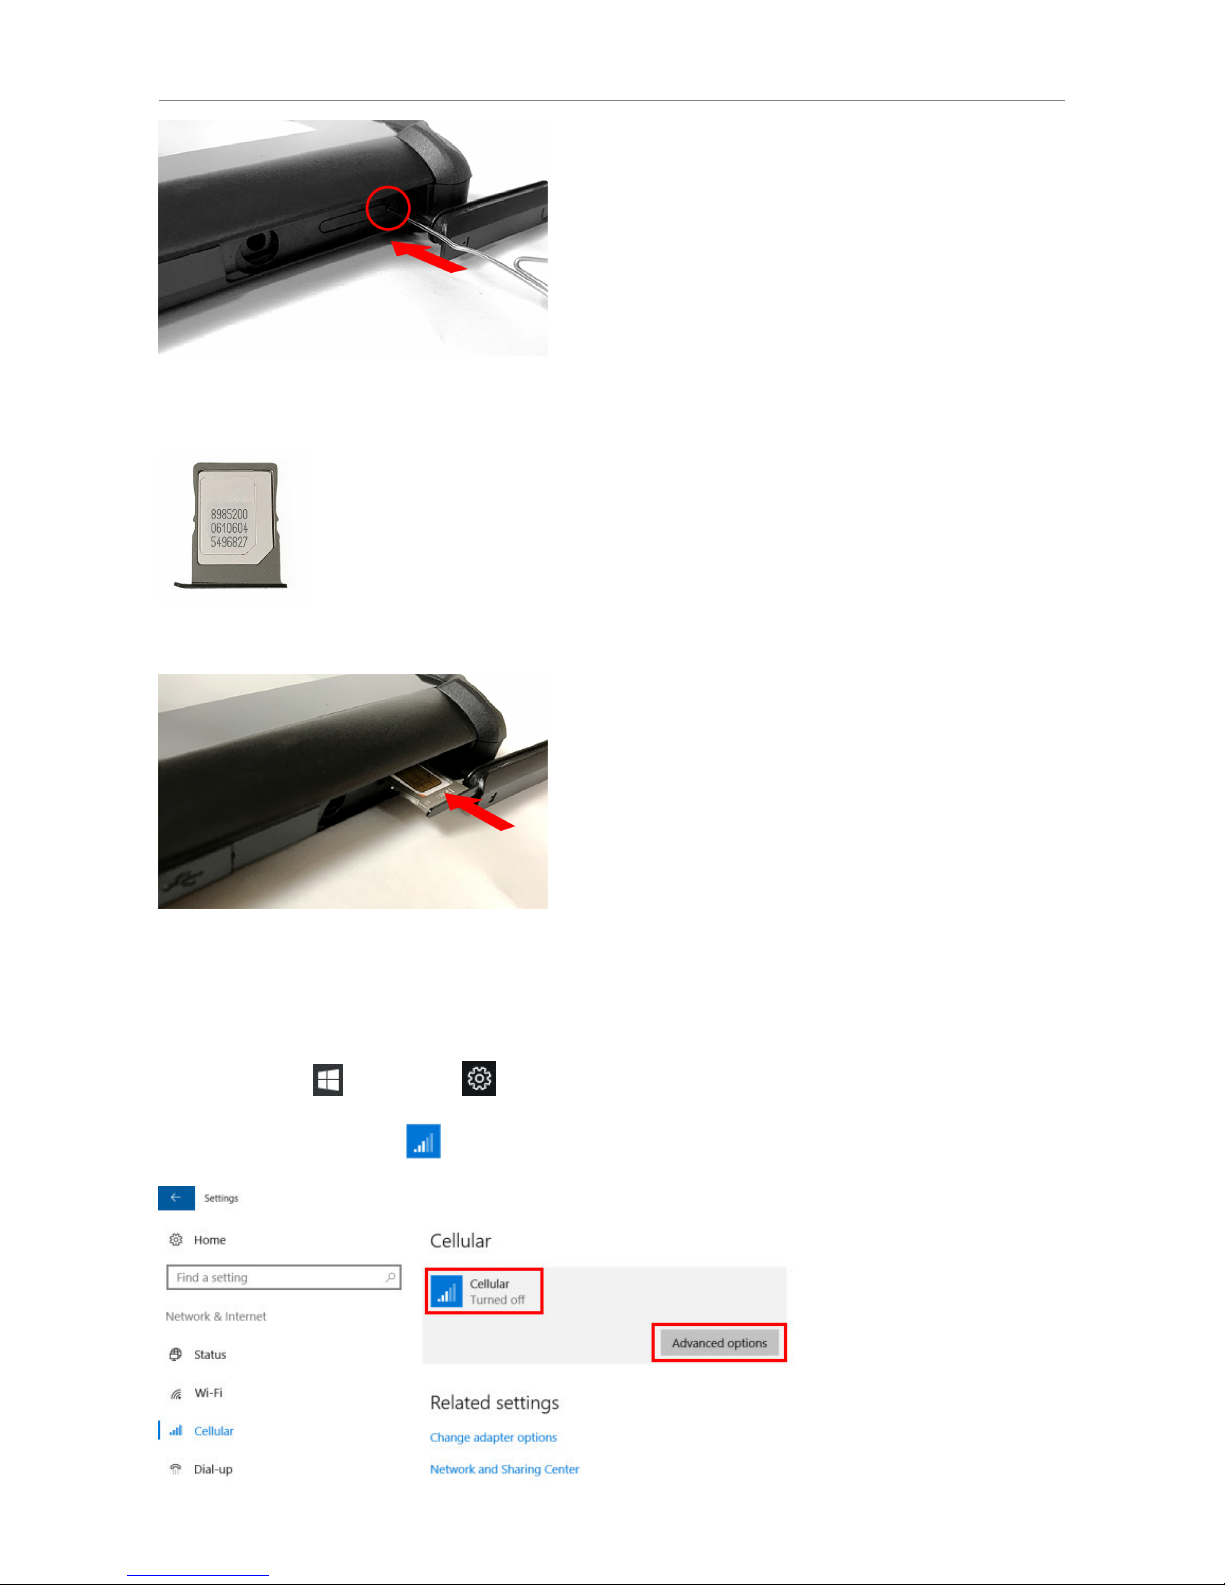
1. Power off the tablet.
2. Open the rubber cover to locate the SIM card slot.
3. Gently push a pin (e.g. a straightened paper clip) into the ejection hole to eject the card tray.
Page 21
Version 1.0 21
4. Remove the card tray from the tablet.
5. Insert a micro SIM card into the card tray.
6. Gently slide the card tray into the SIM card slot, and close the rubber cover.
7. Power on the tablet.
6.2 Setting up 3G APN
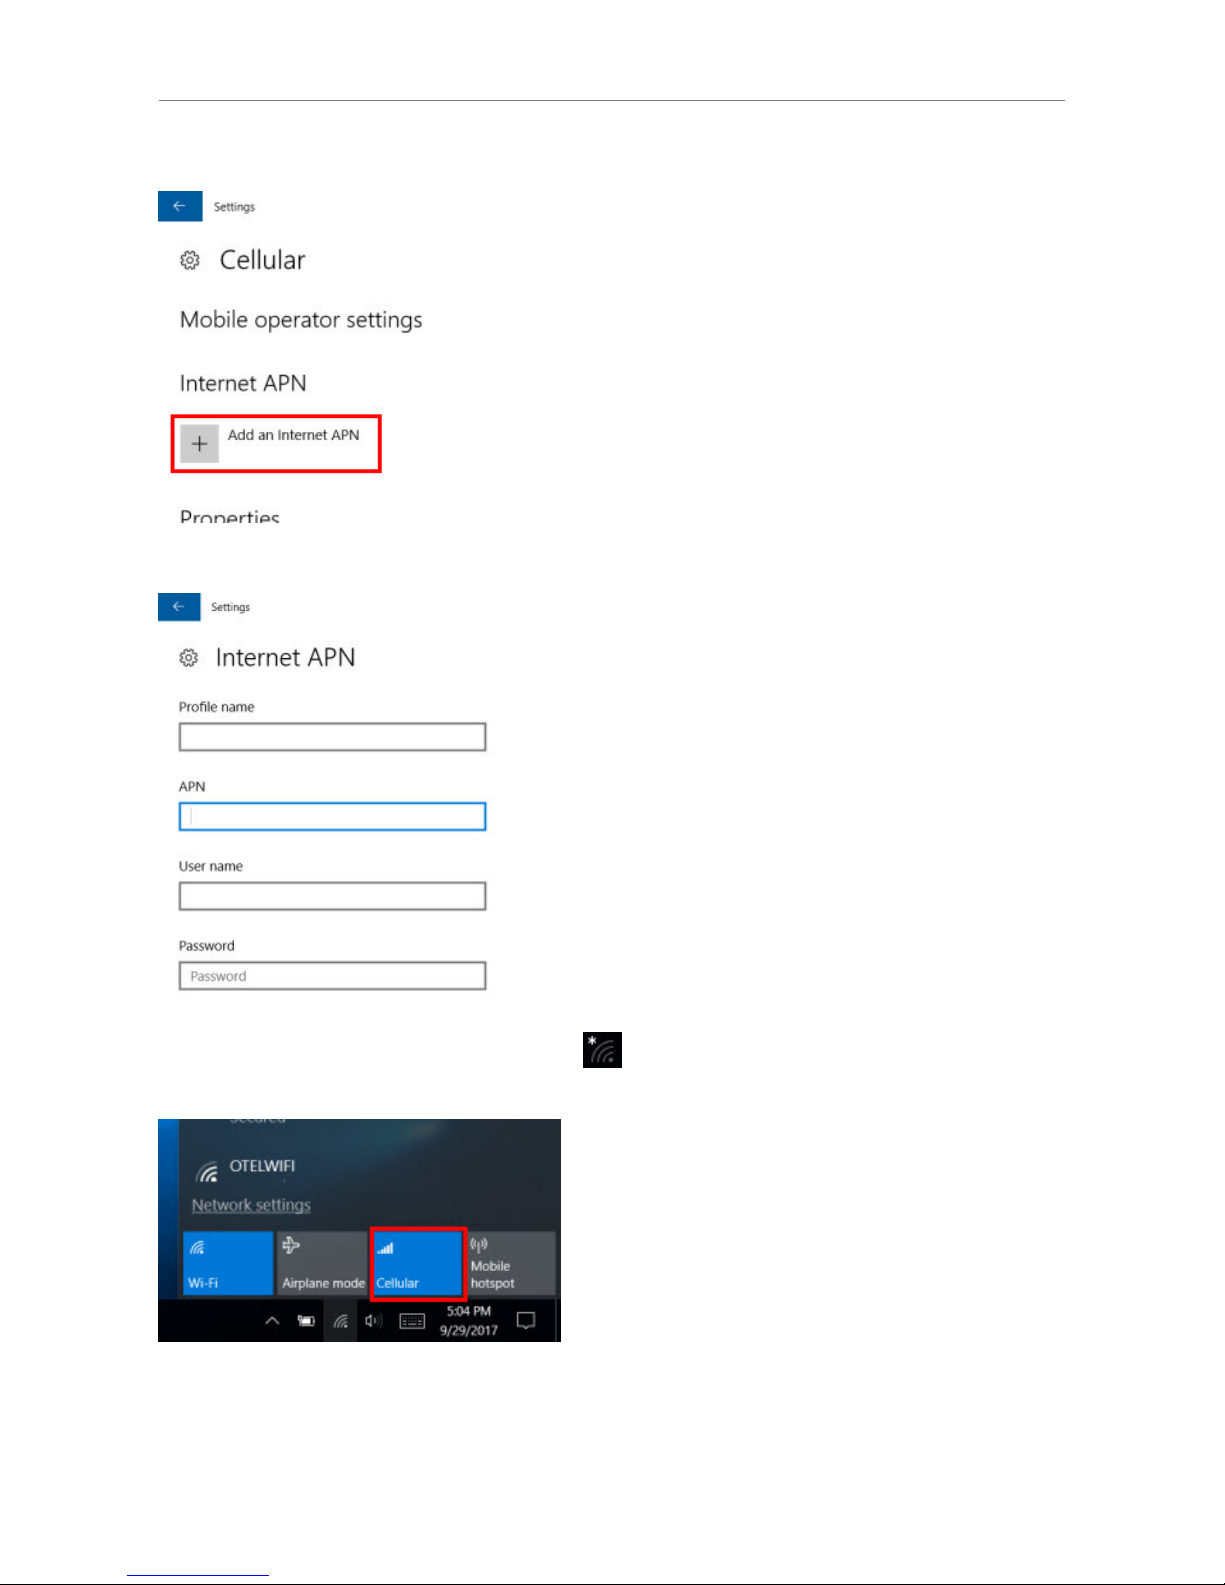
1. Select Start > Settings > Network & Internet > Cellular.
2. Click the Celluar icon > Advanced options.
Page 22
Version 1.0 22
3. Click Add an Internet APN.
4. Enter the APN information of the SIM card, and click save to save the settings.
5. On the status bar, click the Network icon and then click the Cellular button to turn on
cellular.
Page 23
Version 1.0 23
7. Using NFC
DT-10 is equipped with an NFC controller operating at 13.56MHz for reading and writing NFC tags.
It supports the following protocols:
ISO 14443 A/B
MIFARE
Felica
NFC Forum Tags
ISO 15693
7.1 Reading a NFC Tag
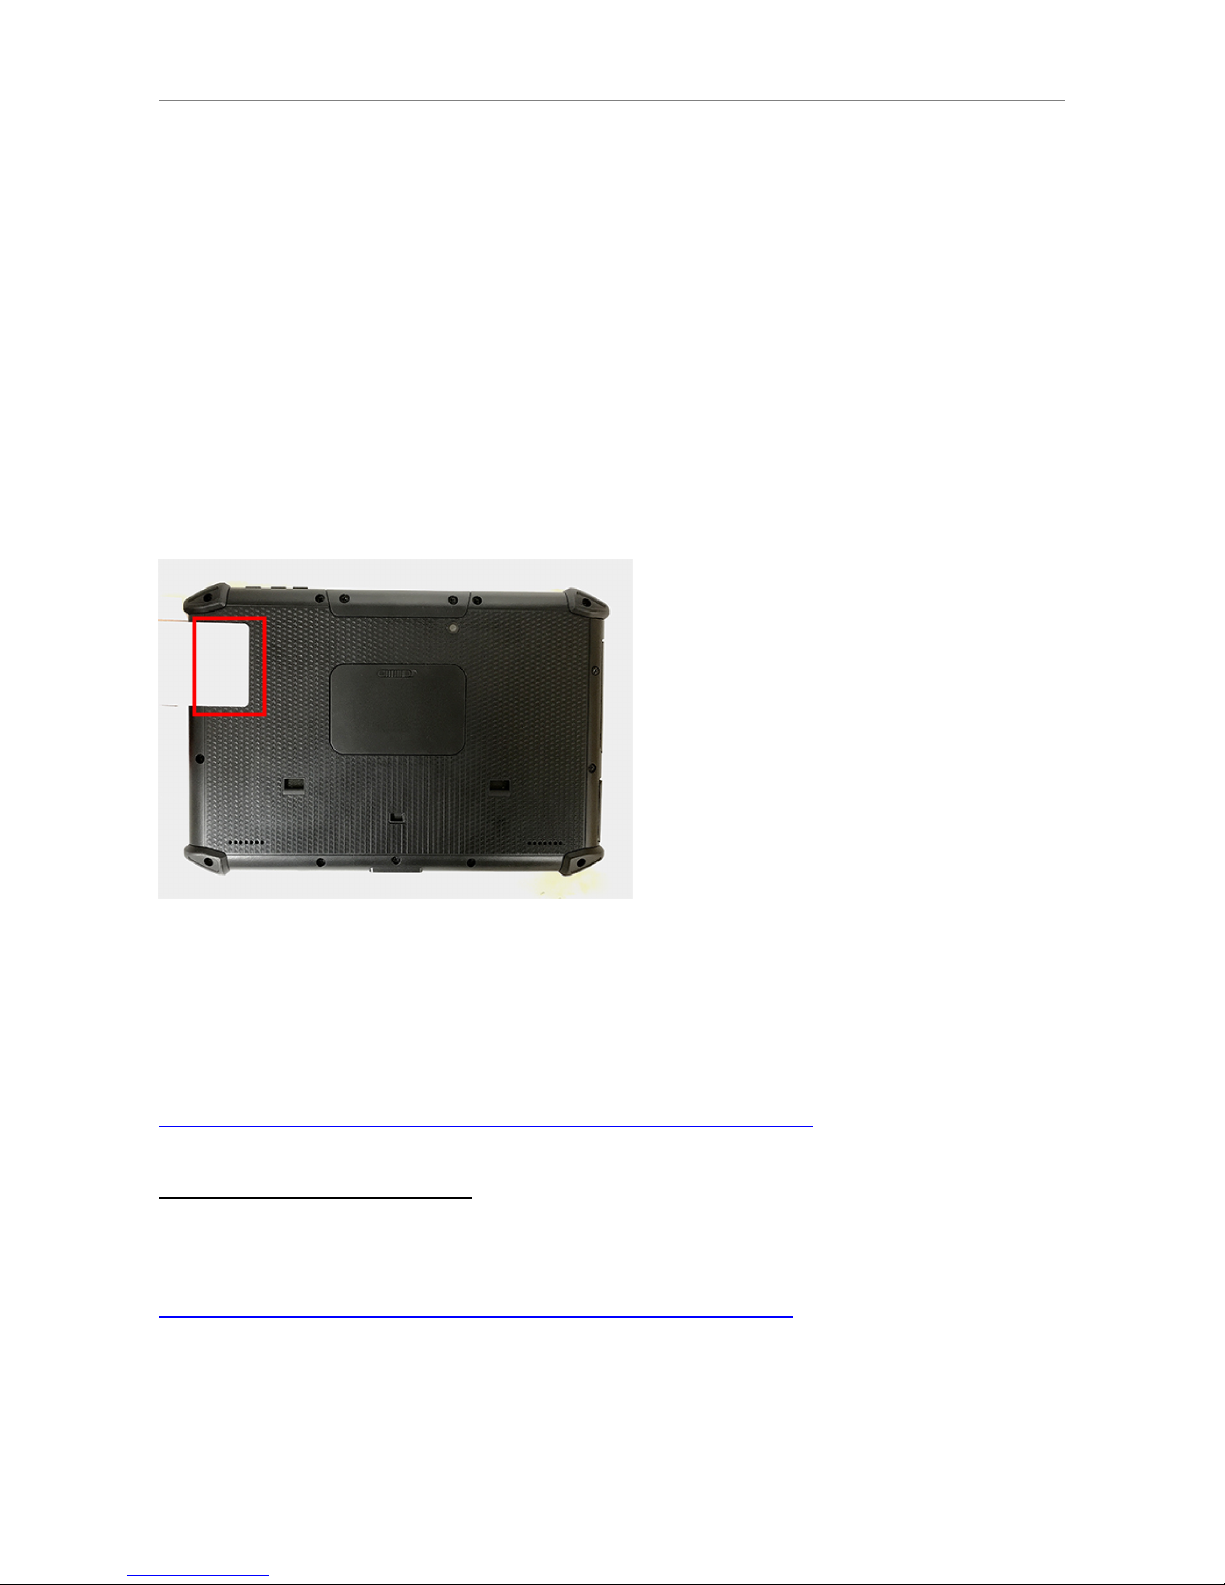
NFC is turned on by default. To read a NFC tag, place the tag at approx. 2 cm from the NFC
scanning area.
7.2 NFC Application Development
The built-in NFC module supports the Microsoft Proximity classes. Refer to the below link for the
Microsoft API reference.
https://docs.microsoft.com/en-us/uwp/api/windows.networking.proximity
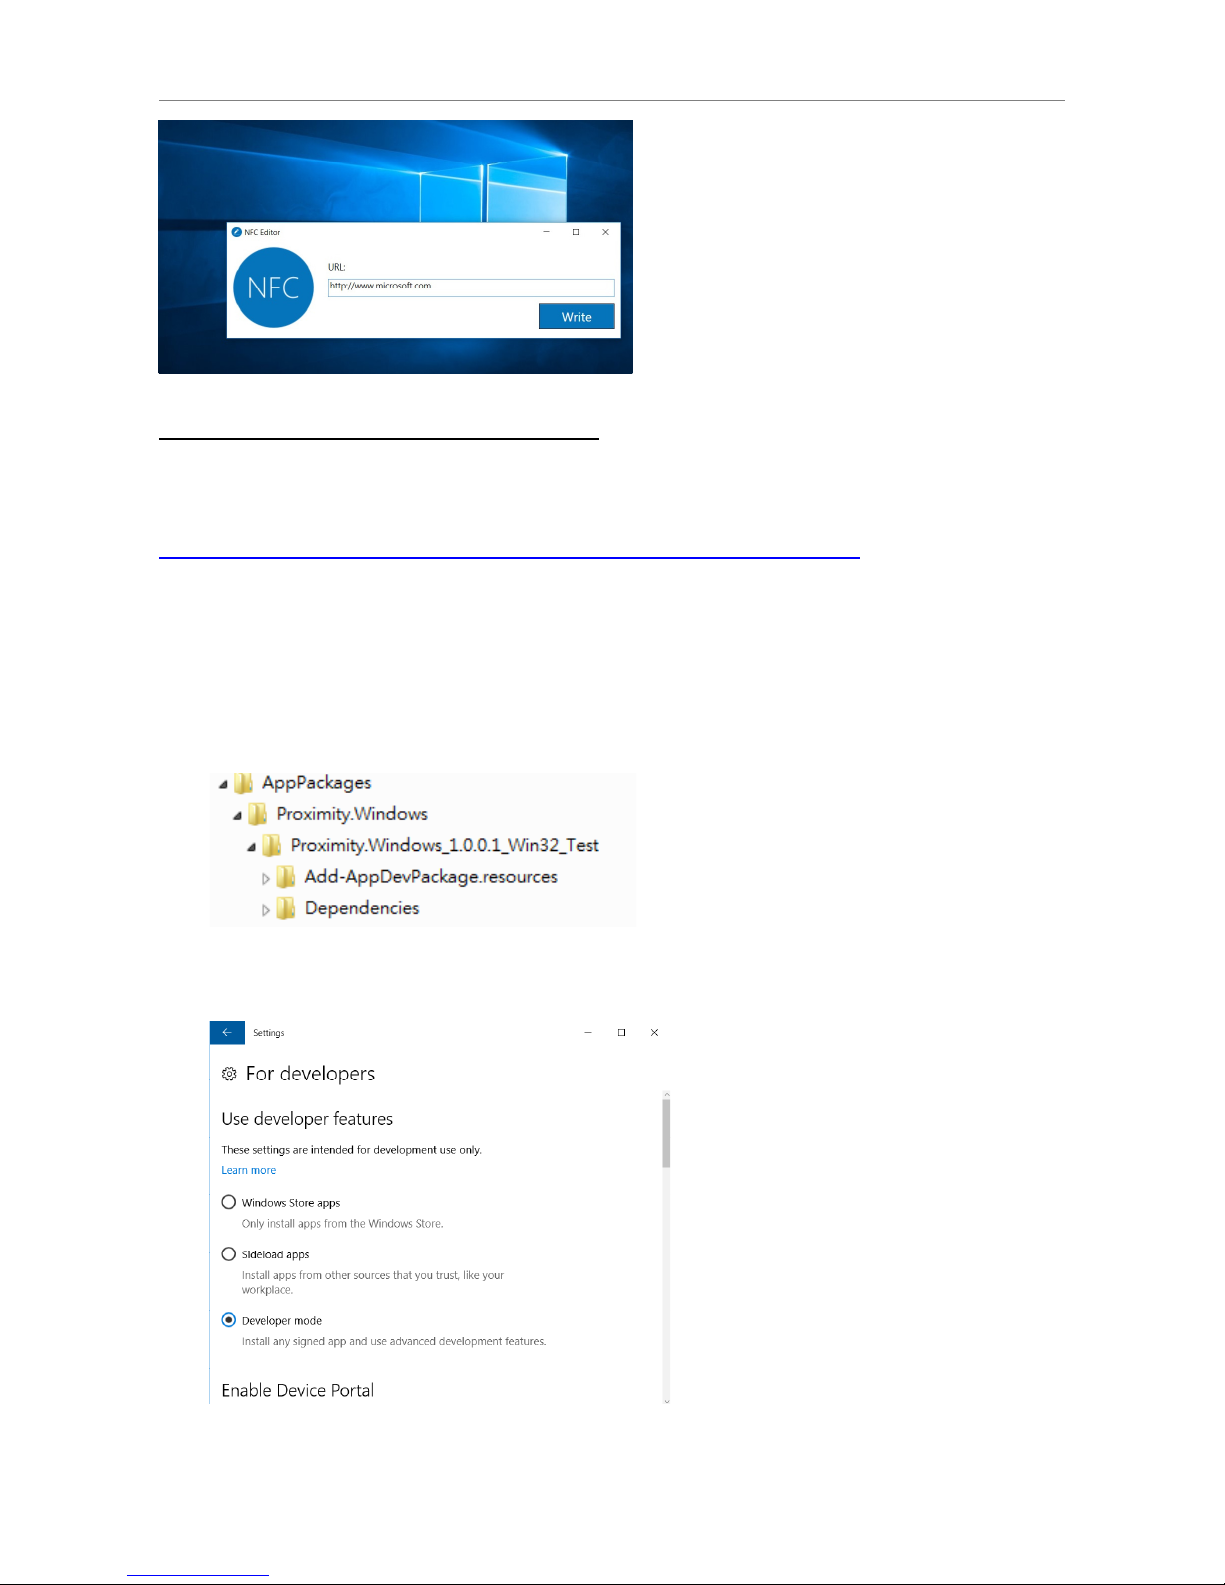
Example program 1: NFC Editor
The following NFC editor example program shows how to use a proximity device for a Windows
8/10 Desktop Application. It implements a simple editor for reading and writing URLs in a NFC tag.
https://code.msdn.microsoft.com/windowsapps/NFC-Editor-529ccda6
Note: A NDEF formatted tag should be used for this example program.
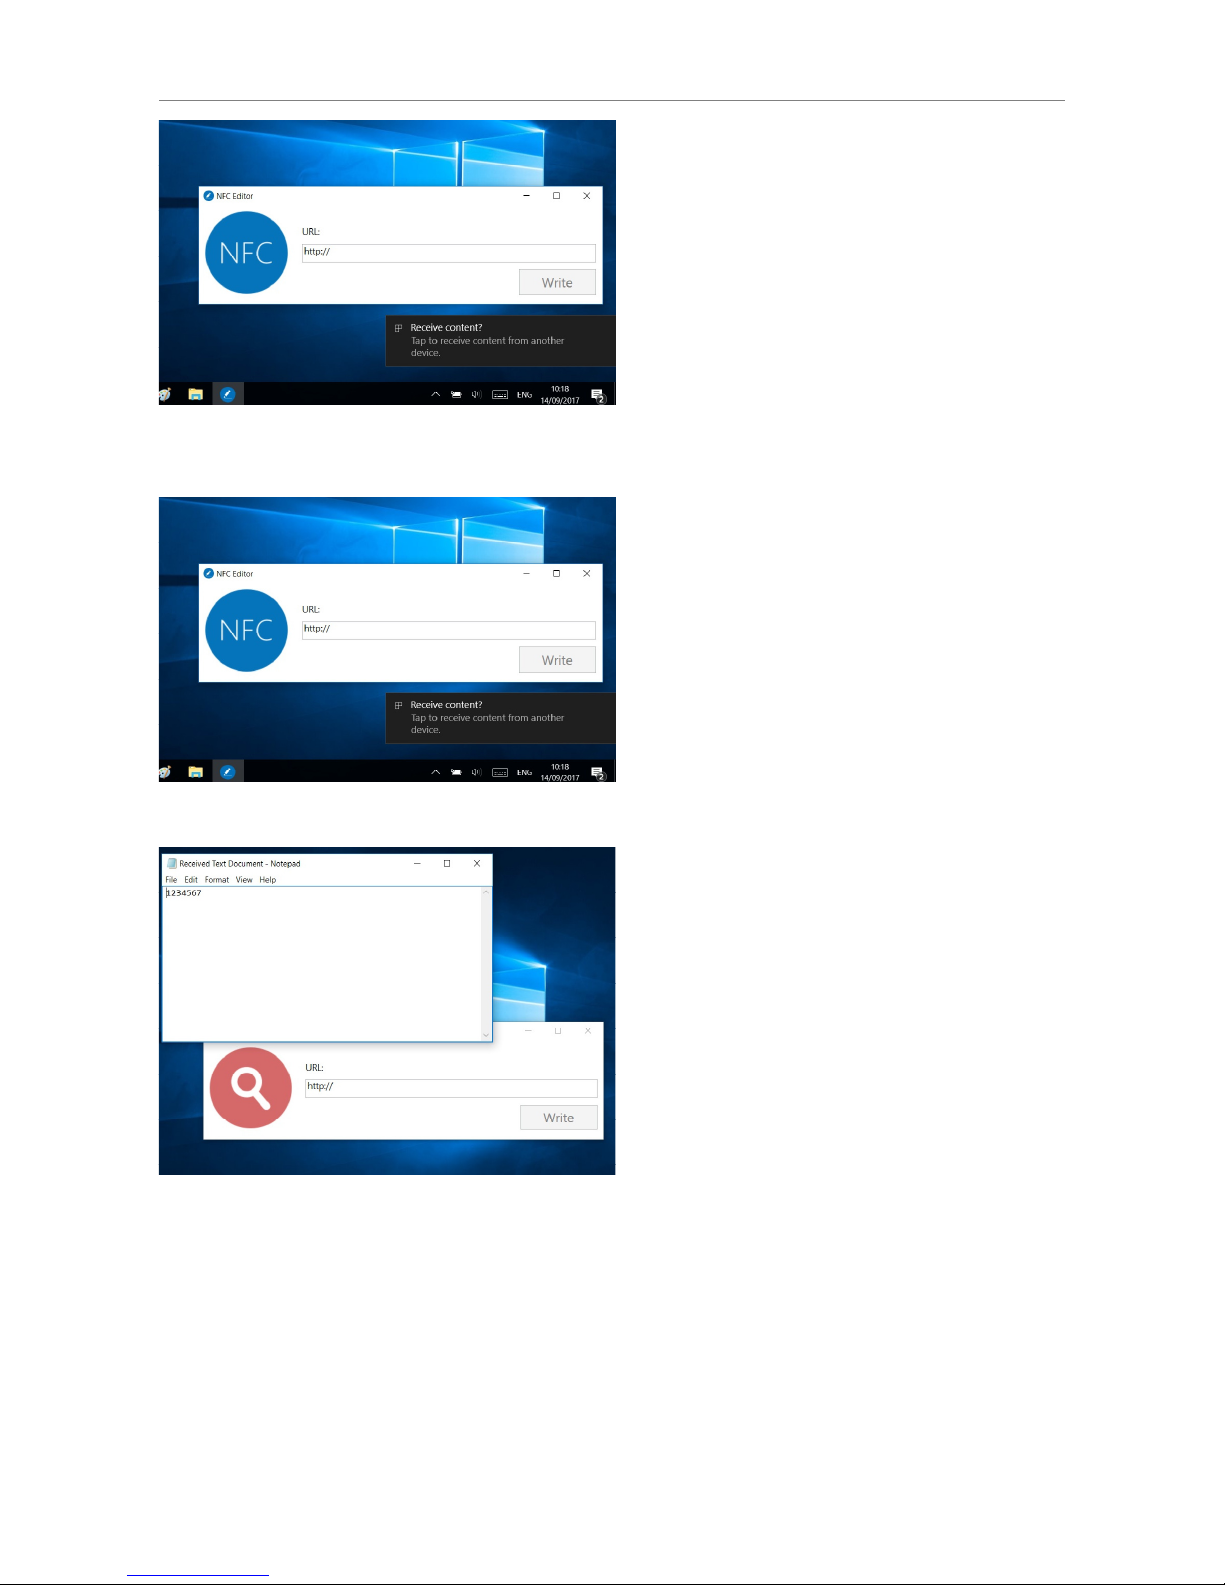
To read data with the example program:
1. Compile and run the application NfcEditor.exe.
Page 24
Version 1.0 24
2. Place a NDEF formatted card on the NFC scanning area of the tablet, and click the Receive
content prompt.
3. Data is displayed.
To write data into a NFC card:
1.
Run the application
NfcEditor.exe.
2. Input the URL data in the field.
3. Place the NFC card in the scanning area, and click Write.
Page 25
Version 1.0 25
E
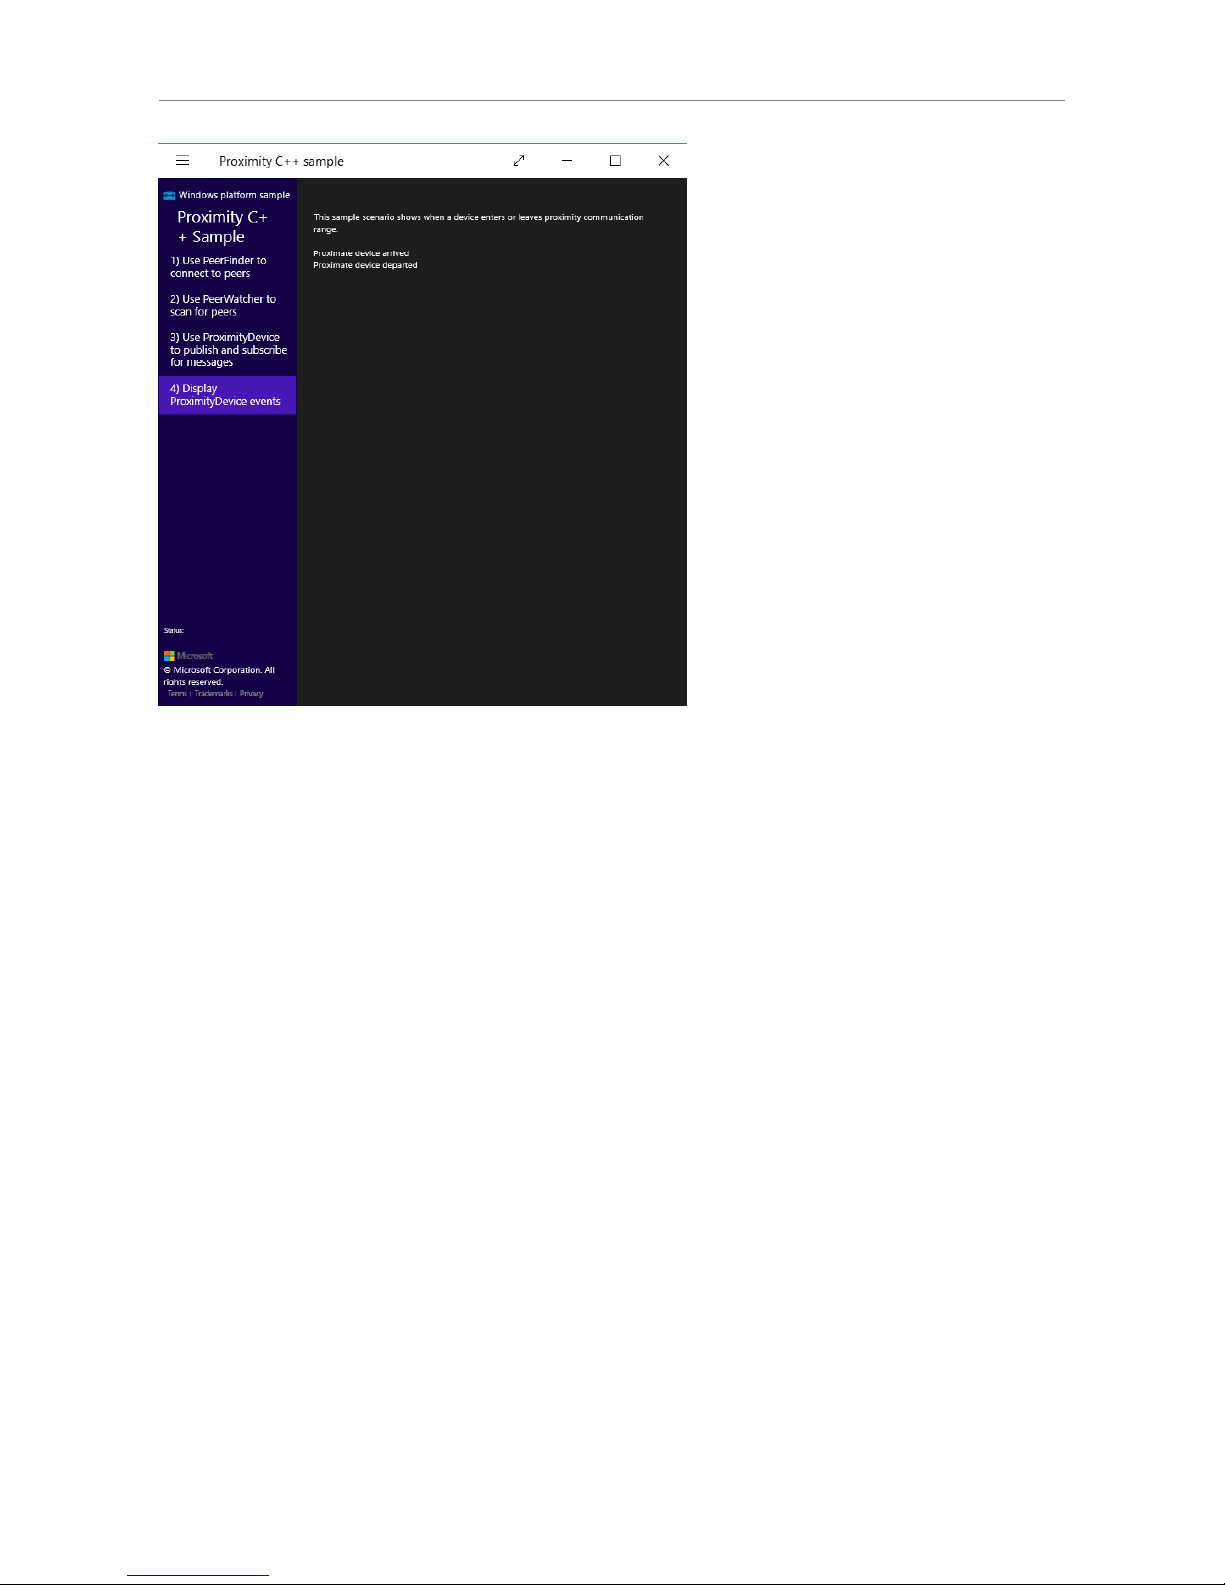
xample program 2: Proximity Sample Apps.
This demonstrates how to use the PeerFinder, ProximityDevice, and PeerWatcher classes to
communicate with nearby devices.
https://code.msdn.microsoft.com/windowsapps/Proximity-Sample-88129731/
Note: The minimum requirement for compiling the project will be running Visual Studio 2013 on
Windows 8.1 PC.
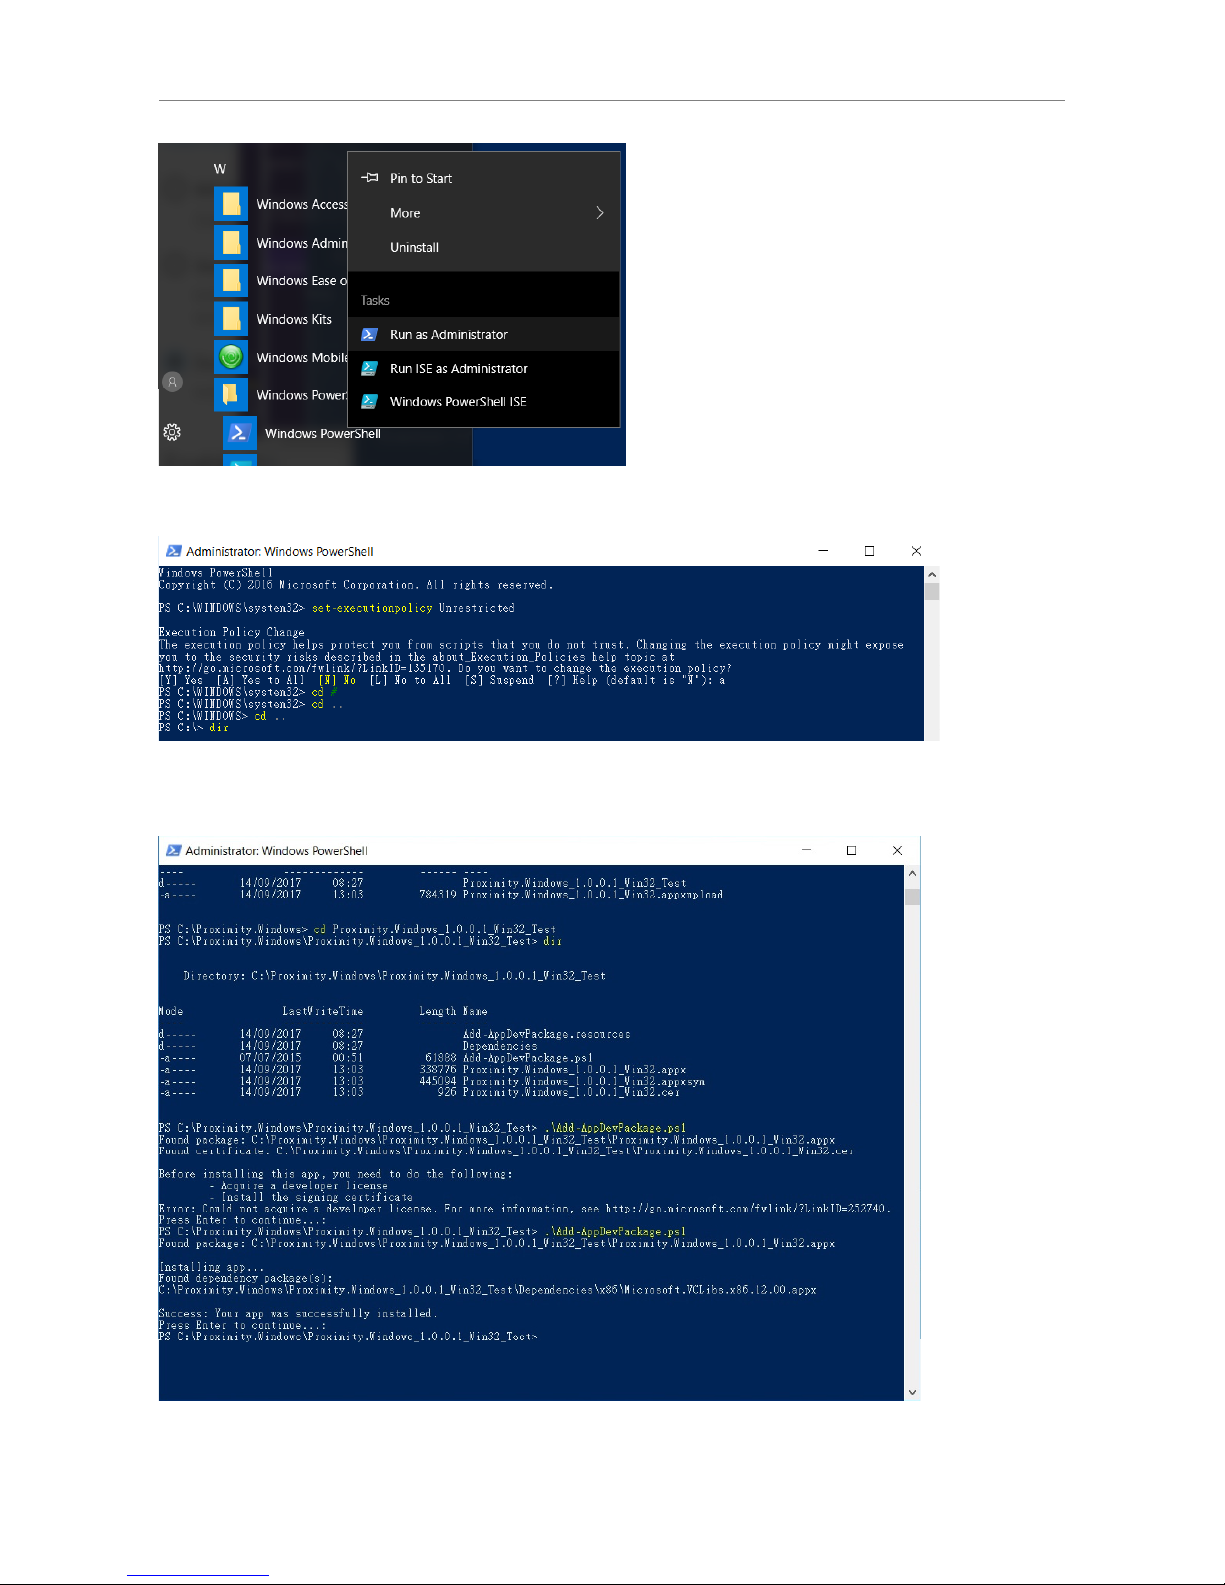
To install the C++ sample:
1. Copy the compiled AppPackages directory in to DT-10
2. On the tablet, select Settings > Update & security > For developers > Developer mode,
and then reboot the tablet.
3. After the reboot, run PowerShell as Administrator
Page 26
Version 1.0 26
4. In PowerShell, use Set-ExecutionPolicy Unrestricted to change the policy
5. Change to the directory containing Add-AppDevPackage.psd1
6. Execute the Add-AppDevPackage.psd1 to install the application.
7. Run the Proximity C++ sample in Windows Start menu.
Page 27
Version 1.0 27
Page 28
Version 1.0 28
8. Using LAN
The tablet can be connected to a local area network (LAN) through the docking station. To connect
to a LAN:
1. Dock the tablet in the docking station.
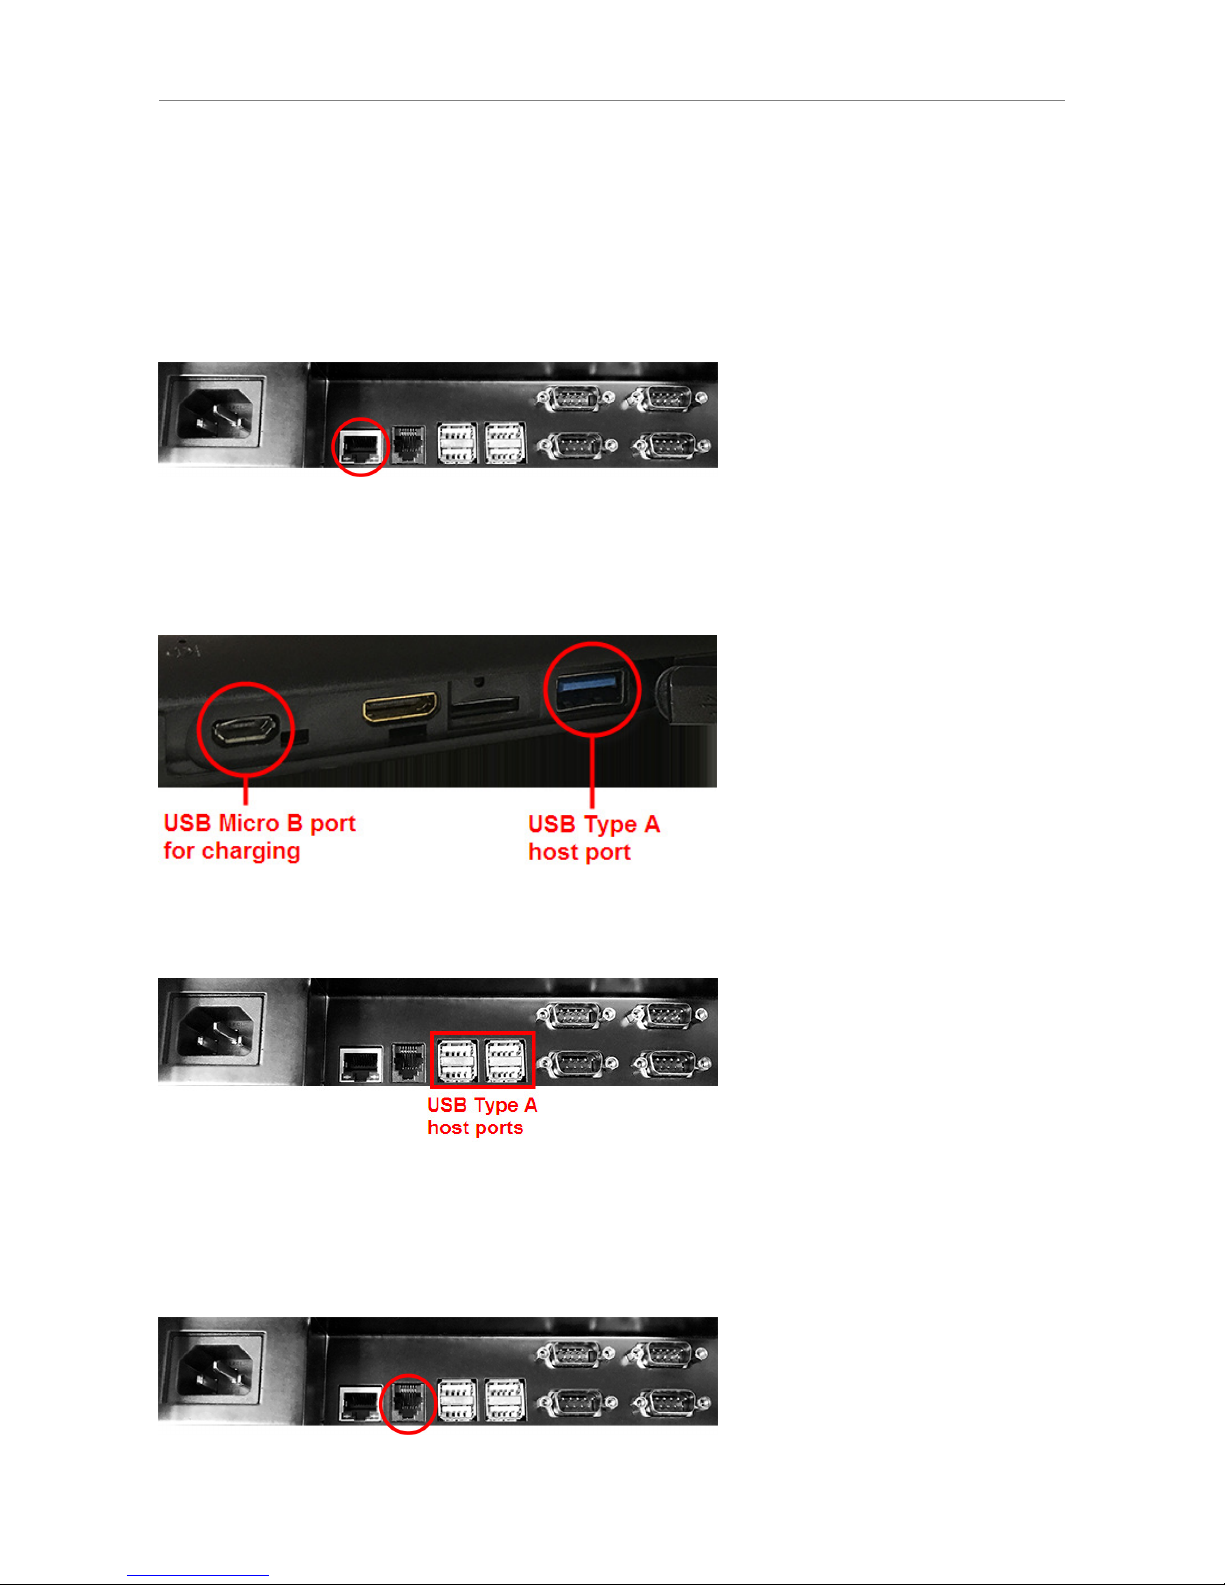
2. Connect a RJ-45 network cable to the RJ45 connector of the docking station.
3. Connect the other end of the network cable to a router, hub or an Ethernet wall jack.
9. Connecting a USB Device
The tablet includes 1 standard USB 2.0 Type A port, and also a Micro B port for charging.
The docking station includes 4 standard USB2.0 Type A ports. A USB device can be connected to
the tablet through the USB ports at the docking.
10. Connecting a Cash Drawer
The docking station has a 24V RJ-11 cash drawer port. Connect the RJ-11 cable from the cash drawer to the
cash drawer port of the docking.
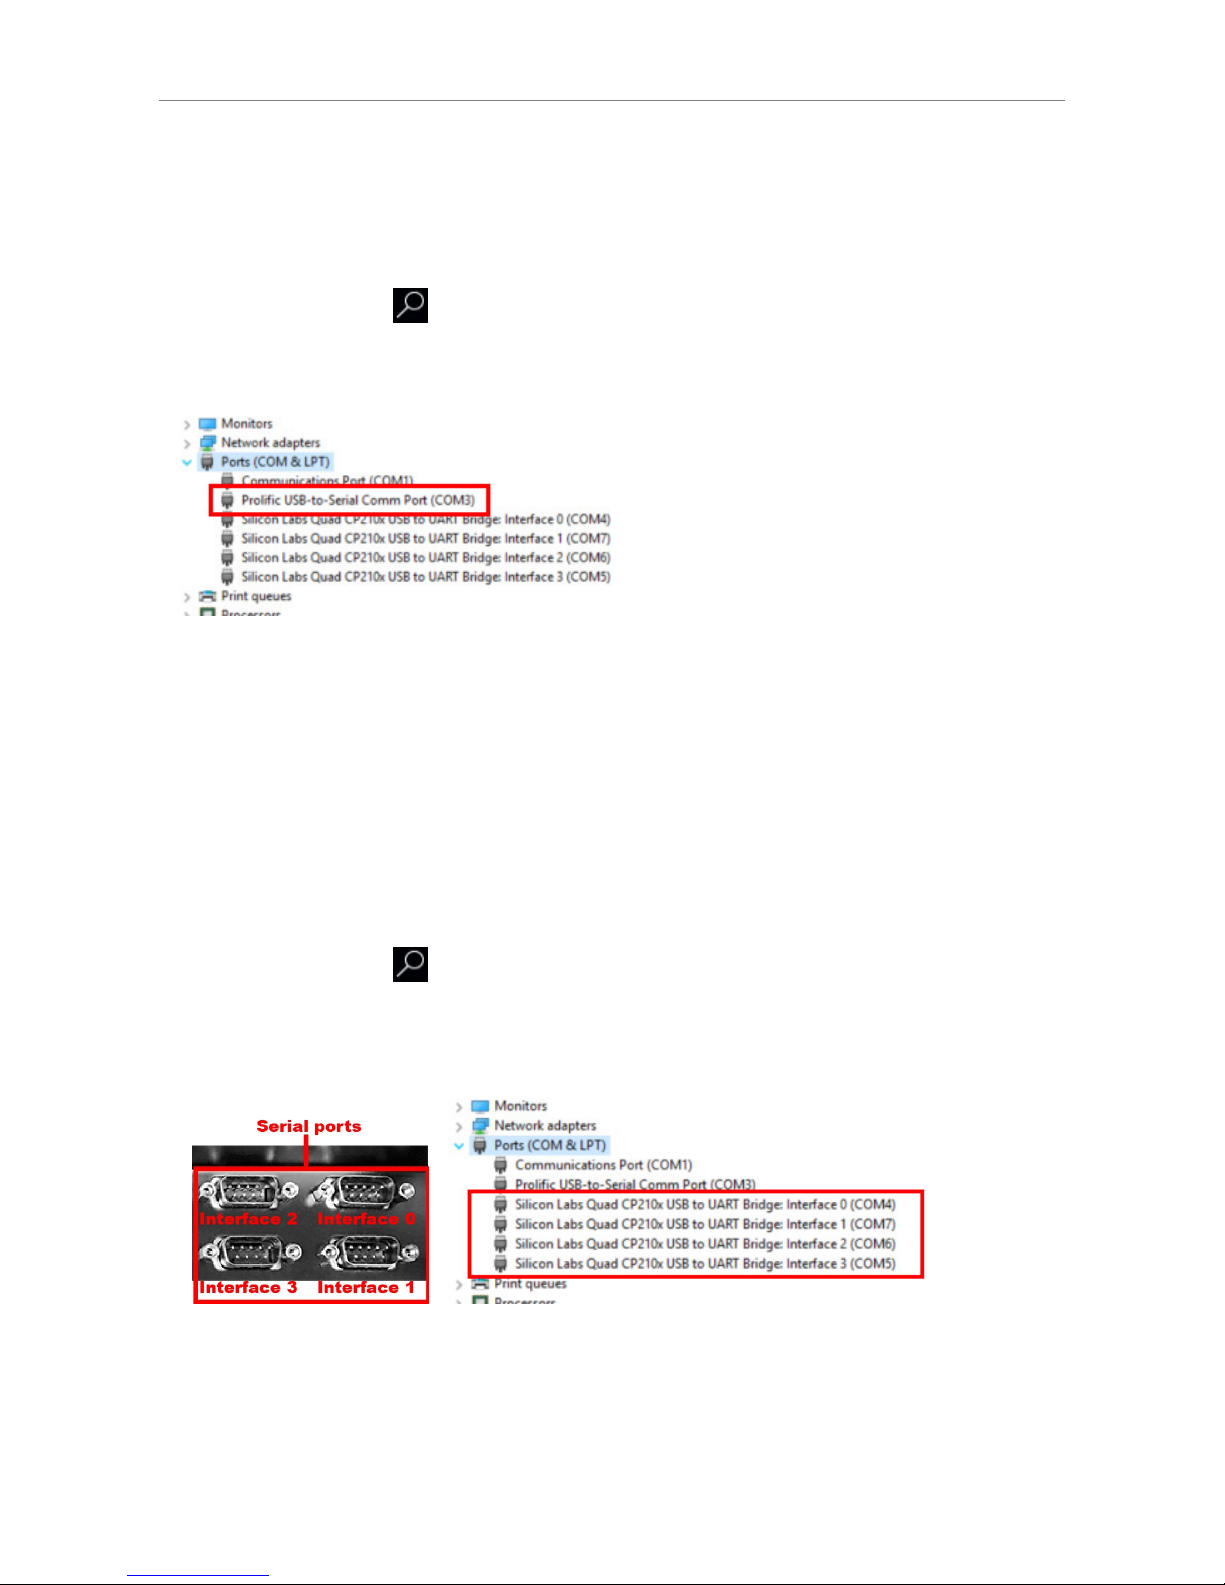
The cash drawer port is a virtual COM port. Sending any character to this COM port will trigger a 24V pulse to
Page 29
Version 1.0 29
open the cash drawer.
10.1 Identifying the Cash Drawer COM port
To identify the COM port number of the cash drawer:
1. Select the Search icon on the status bar.
2. Type Device Manager in the search box to open Device Manager.
3. Click Ports (COM & LPT), and check the COM port number assigned to Prolific USB-to-Serial Comm
Port.
11. Connecting a Serial Port Device
The docking station includes 4 DB9 serial ports.
Connect the DB9 cable from the serial device to the
serial port of the docking.
These serial ports are virtual COM ports. The interface number assignment is shown in the below picture.
The interface number is fixed for each serial port, whereas the COM port numbers assigned by the Windows
OS could be different.
To identify the COM port number for a serial port:
1. Select the Search icon on the status bar.
2. Type Device Manager in the search box to open Device Manager.
3. Click Ports (COM & LPT), and check the COM port numbers assigned to Interface 0, Interface 1,
Interface 2, and Interface 3.
Note: It is required to re-initialize the COM port when inserting the tablet back into the docking. Otherwise, the
system adopts the default settings of baud rate, data bits, parity, stop bits and flow control. The default setting
may be different from the setting for the application.
Page 30

Version 1.0 30
Page 31

Version 1.0 31
Manufacturer: EC LINE
Thank you very much for using EC Line product
For service, please contact [email protected]
www.eclinepos.com
 Loading...