

Page 1

eCA120DN / eCA120HZDN
COMPACT AMPLIFIERS
Dante™ interface amplifier
USER MANUAL
Page 2

SUMMARY
Important note 3
Precautions 3
Introduction 4
Key features 4
Positioning and fitting 5
Connecting 5
Operation and usage 8
Cleaning 10
Front panel 11
Rear panel 11
Technical characteristics 12
Block diagram 12
Packing content 12
2
Page 3

IMPORTANT NOTE
Warning: an inappropriate usage of the device could cause
injury, death or damage the apparatus.
Congratulations. You now own the result of a well-designed, carefully produced
manufacture. We thank you for your trust by having chosen our eCA120DN /
eCA120HZDN amplifier with Dante™ interface.
To achieve its maximum working order and performance, it is VERY IMPORTANT,
before connecting, to read this manual carefully. To guarantee optimum working
order, we recommend that maintenance be carried out by our authorized Technical
Services.
PRECAUTIONS
• Read these instructions
• Keep these instructions
• Heed all warnings
• Follow all instructions
• Do not use this apparatus near water
• Clean only with dry cloth
• Install in accordance with the manufacturer’s instructions
• Do not install near any heat sources such as radiators or heat registers
• Only use attachments/accessories specified by the manufacturer
• Refer all servicing to qualified personnel
3
Page 4

INTRODUCTION
eCA120DN is a 2 x 60 WRMS @ 4Ω high efficiency (class D) stereo compact amplifier.
It features 2 x analogue audio inputs and 2 x Dante
selectable priority function (over the other input signal) as well as an auxiliary audio
output. Auto stand-by function (selectable) and fanless design (100% silent). It also
has a remote control volume port compatible with ECLER WPm wall-panel control
series. Universal external power supply included.
eCA120HZDN is a 120 WRMS @ 70V / 100V efficiency (class D) mono compact
amplifier for high impedance lines
, with the same features than eCA120DN.
TM
audio inputs, both with
KEY FEATURES
• 2 x 60 W RMS @ 4 Ω output (eCA120DN)
• 1 x 120W RMS @ 70V / 100V output (eCA120HZDN)
• 1 x auxiliary audio output (Euroblock connector), for connecting to a sub-
woofer unit e.g.
• 1 x unbalanced stereo input (LINE INPUT), with dual RCA connector and 3-in
Euroblock connector
• 2 x Dante™ audio input (DANTE INPUT), with RJ-45 connector
• Selectable PRIORITY FUNCTION with selectable priority signal: the analogue
audio input (LINE INPUT) can be selected as priority signal over the Dante™
audio input (DANTE INPUT), or vice versa.
• Priority release time adjustment (FAST / SLOW).
• Selectable AUTO STANDBY function: in the absence of an audio signal the
unit automatically goes into STANDBY mode, minimizing power
consumption.
• Gain adjust of audio inputs on front panel (trimmers)
• Local volume control by knob
• Remote volume control (RJ-45 connector.) via WPm wall-panel control series
(0-10 VDC).
• Lightweight, silent, high-performance amplifier (fan-free convection cooling)
External, universal power supply (included)
4
Page 5

POSITIONING AND FITTING
eCA120DN / eCA120HZDN is suitable for installation on a wall or under a surface
(table, shelf, cupboard, etc.), thanks to its design and layout of its connectors, controls
and LED indicator lights. Along with the optional 1UHRMKIT accessory (not included),
it is also possible to install the unit in a standard 19” rack (1RU height).
This unit is intended for users with low technical expertise, for this reason, all input
gain controls are accessible by means of an adjustment turnscrew, except for the
output level adjustments, controlled with classic rotary knobs, easily accessible from
the front panel.
Thanks to its low consumption and heat dissipation the eCA120DN / eCA120HZDN
does not require forced cooling, however, it must be prevented from installing the unit
in dusty environments with extreme temperature and/or humidity conditions.
The unit must be away from noise and interference sources (voltage variators, electric
engines, etc.) as well as mains cables.
CONNECTING
The amplifier is powered by alternating current through its external power source: 100240 VAC and 50-60 Hz.
The atmosphere should be as dry and dust free as possible. Do not expose the unit to
rain or water splashes. Do not place liquid containers or incandescent objects like
candles on top of the unit.
Should any work or connection / disconnection task be done, always
disconnect the unit from the mains supply. There are no elements that can
be manipulated by the user inside the unit.
To avoid buzzing, do not allow the power cable to intertwine with the shielded cables
that transport the audio signal.
5
Page 6

Dante™ audio inputs
eCA120DN / eCA120HZDN allows the reception of 2 Dante™ audio signals via Ethernet
by means of an RJ-45 connector. Routing of Dante™ audio signals trough the Ethernet
network is achieved thanks to the Dante ™ Controller software. To learn more, check the
developer’s documentation:
www.audinate.com/products/software/dante-controller?lang=es"
Make sure that the front panel switch (INPUT SELECT) is in DANTE position, and then
adjust the DANTE input gain with the front panel trimmer (DANTE INPUT) until the
input audio signal is appropriate.
Analogue audio inputs
eCA120DN / eCA120HZDN input channel only supports stereo line signals (or two mono
signals). It has an unbalanced stereo connection with dual RCA connector and 3-pin
Euroblock connector (LINE IN). This input is designed to support -6dBV to 0dBV signals,
given that the rotary volume control of the front panel provides an extra +6dB of gain at
its maximum position.
This audio input can receive signals from CD players, radio tuners, mixing consoles,
media players, audio outputs of computers and tablets, etc..
LINE IN connections are linked, so that when you use one of them as an audio signal
input for your unit, you can use the other to send that signal to another unit or external
equipment.
Audio output connections
eCA120DN:
The powered output (OUT L y R) uses a Euroblock connector.
The connection cable that connects the eCA120DN connectors and the speakers should
be good quality, with a suitable cross section and as short as possible.
Keep in mind that, minimum nominal impedance for each cannel is 4Ω. For a proper
performance, the unit must not work under lower impedance than previously specified,
under no circumstances.
6
Page 7

eCA120HZDN:
The powered output (OUTPUT) uses a Euroblock connector with a common terminal
(0V), a terminal for a 70V line and another terminal for a 100V line. Always use the
common terminal and, depending on the type of speaker in the system, one of the two
others, 70 / 100V, to feed the loudspeaker line.
The connection cable that connects the eCA120HZDN connectors and the speakers
should be good quality, with a suitable cross section and as short as possible.
The OUTPUT provides a powered version of the mono-converted input signal.
Remember that the total power used by the speakers connected to the eCA120HZDN
output should not exceed the maximum power it can provide.
In addition, eCA120DN and eCA120HZDN feature an aux audio output (AUX OUTPUT)
with Euroblock connector. This stereo audio signal is identical to the powered signal,
but with LINE level. Perfect to connect an additional audio system like a self-powered
sub-woofer for bass reinforcement.
Remote control port
The RJ-45 (REMOTE) connector allows to connect a WPmVOL-type wall control panel
(or another model of the WPm series) to adjust the overall output volume. The
connection is made with a standard CAT5/CAT6 cable between the WPm wall panel and
the REMOTE connector of the eCA120DN / eCA120HZDN.
OPERATION AND USAGE
Start up
Start up the eCA120DN / eCA120HZDN by connecting the equipment to an external
power source to which the DC IN 24V connector of the amplifier has already been
connected. The LED indicator ON/STBY immediately lights up on the front panel. We
recommend you turn on all the devices in the following order: sound sources, mixer,
equalisers, active filters and processors and, finally power amplifiers. Powering off
should be done by following the exact reverse sequence. Following this order, the
introduced noise due to turning on or switching off the devices will not affect those
further on in the chain and will be inaudible.
7
Page 8

Once turned on, the front volume control (VOLUME) and the controller connected to
the REMOTE VOLUME port (if any) may be used to set the output volume of the signal
powered by the unit.
To select the audio input signal, use the switch located at the front panel (INPUT
SELECT).
Priority function
When the priority function (PRIO MODE) is activated, one of the input signals will
have priority over the other, that is to say, when signal presence is detected in the
priority input (signal level exceeds the threshold) the input signal selected with
INPUT SELECT switch will be attenuated.
For instance, if priority function is activated (PRIO MODE in ON position) and the
selected audio signal is Dante™ (INPUT SELECT in DANTE position), the priority audio
signal will be the analogue input.
The priority mode allows adjusting the attenuated signal recovery time (PRIO
RELEASE TIME), by means of a switch FAST / SLOW located at the rear panel.
8
Page 9

Auto-standby function
The AUTO STANDBY function (idle or low consumption mode) means you can install the
eCA120DN / eCA120HZDN in inaccessible places and leave the device connected to the
mains power supply permanently because when no signal is detected, it automatically
goes into standby mode, saving energy.
To enable the AUTO STANDBY mode, the switch labelled "AUTO STBY" on the rear
panel has to be in the ON position. When it is enabled and after 2 minutes or more
without any audio signal at the audio input of the device (or a very weak signal, lower
than the activation threshold), the eCA120DN / eCA120HZDN will automatically switch
into standby mode, lighting up the red ON/STBY LED located on the front panel of the
device. When a valid audio signal is detected in any of the inputs, the amplifier leaves
standby mode and starts operating normally again and the ON/STBY LED goes green.
When enabling the AUTO STANDBY mode with the front panel switch (ON position),
one of the 2 following assumptions may occur:
a) There is NO audio signal in the inputs. Result: the amplifier immediately goes
into AUTO STANDBY mode.
b) There is an audio signal in the inputs. Result: the amplifier stays active.
LED indicators
• SP: The signal presence or SP LED indicator shows that there is a signal in the
amplifier input. This lights up when the input level reaches the established
detection threshold.
• CLIP: The saturation (or cut off) CLIP LED indicator comes on when the signal
delivered to the speakers is close to the amplifier's clipping or saturation level.
Input signals should be set to ensure the CLIP indicators never stay on, but that they
do so at most to the beat of the lowest sound frequencies. Otherwise the powered
signal will be distorted with low quality and low intelligibility.
Note: If the input signal is too high, the CLIP indicator lighting up very frequently
over a short time interval (a few seconds), the amplifier may go into protection
mode, being muted to return to normal operation in a short time.
• ON/STBY: The green light comes on when the equipment is in normal operating
mode and it goes red when it is in standby or low consumption mode (STANDBY).
9
Page 10

Setup switches
• INPUT SELECT: selects the audio input (program audio)
o
LINE IN: analogue audio input
o DANTE: Dante™ audio input
• PRIO MODE: turns ON/OFF the priority function.
• PRIO RELEASE TIME: sets the attenuated signal (program audio) recovery time
(FAST / SLOW recovery).
• AUTO STBY: turns ON/OFF the AUTO STANDBY function. When the function is on,
the eCA120DN / eCA120HZDN will automatically go into STANDBY or low
consumption mode in the absence of audio signals in its inputs.
CLEANING
eCA120DN / eCA120HZDN must not be cleaned with solvents or abrasive substances
which may damage the prints. Clean using a dry cloth. Under no circumstances allow
water to enter any of the orifices in the equipment.
10
Page 11

FRONT PANEL
1. INPUT SELECT (audio input) switch
2. PRIO MODE priority function switch
3. DANTE INPUT (Dante™ audio) adjust trimmer
4. LINE INPUT (analogue audio) adjust trimmer
5. MASTER VOLUME control
6. SP (signal presence) indicator light
7. CLIP indicator light
8. ON/STBY (on / standby) indicator light
11
Page 12

REAR PANEL
9. DANTE INPUT RJ-45 connector,
10. PRIO RELEASE TIME attenuated signal recovery time switch (FAST / SLOW)
11. AUTO-STBY (ON / OFF) switch
12. LINE INPUT RCA connector
13. LINE INPUT Euroblock connector
14. REMOTE VOLUME RJ-45 connector
15. AUX. OUTPUT (auxiliary LINE output) Euroblock connector
16A. OUT L / R powered outputs
16B. 0V/70V/100V OUTPUT high impedance output,
17. DC24V power connector
12
Page 13

TECHNICAL CHARACTERISTICS
Analogue input / output
eCA120DN
eCA120HZDN
2x56W@4Ω 1% THD
2x41W@8Ω 10% THD
Frequency response
15Hz - 25kHz (-3dB)
75Hz - 25kHz (-3dB)
THD+Noise @ 1kHz Full Pwr. SPKR OUT
< 0.15%
< 0.07%
Channel crosstalk @ 1kHz
>65dB
Inputs Sensitivity nom/Impedance
0dBV/>20kΩ
Volume adjust
-∞ to +6dBV
High Pass Filter (internal, no removable)
NA
70Hz
Signal Noise Ratio
>85dB
>70dB
Dante™ input / output
Volume adjust
-∞ to 0dBV
Resolution
24 bits
Dynamic range
100dB
Dante™ audio interface
Dante Network outputs
2
Latency
1 / 2 / 5 ms (selectable)
Connector
1 x RJ45
Cable length between devices
100m CAT5 or CAT5e / CAT6
Priority and input mode
Priority function
Threshold: -30dB
Fast: 4seg.
Miscellaneous
Master Volume
Time: 90 seg. (aprox.)
Threshold: -40dBV (L&R)
Signal present
Threshold -40dBV (L&R)
Pressed: Dante™ INPUT
Pressed: Mode ON
Supply
DC supply
24V
Mains (using supplied DC adapter)
90-264VAC 50-60Hz
Power consumption
Pink noise, 1/8 power @ 4 ohm
38,9VA / 26,6W
38,4VA / 26,3W
Pink noise, 1/3 power @ 4 ohm
66,4VA / 56,9W
65,4VA / 55,0W
Standby mode (time 2 minutes)
14,7VA / 4,9W
14,3VA / 4,5W
Mechanical
Dimensions WxHxD
200x44x120mm
435x44x120mm
Weight
0,90 kg.
2,8 kg.
Power
Priority release time (with Fade-in)
Remote control
Auto standby
Input select button
Priority mode button
2x68W@4Ω 10% THD
2x34W@8Ω 1% THD
Analog. 0 -10V based (RJ45 connector)
Released: Line INPUT
Released: Mode OFF
98W@ 100Ω 1% THD 100V
98W@ 50Ω 1% THD 70V
Slow:18 seg.
13
Page 14

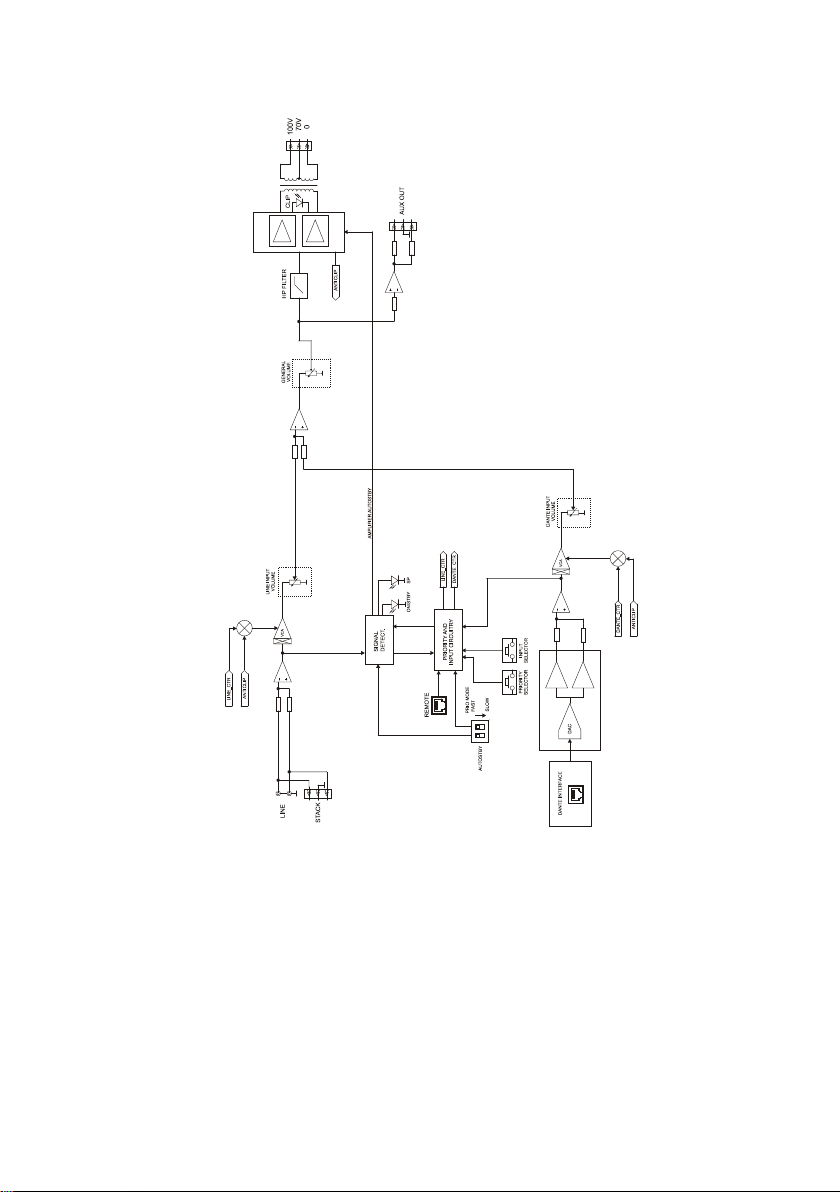
BLOCK DIAGRAM
eCA120DN:
14
Page 15
eCA120HZDN:
15
Page 16

PACKING CONTENT
All product c haracteristics are subject to variation due to production tolerances. NEEC AUDIO BARCELONA S.L. reserves the right to make changes or improvements in the
• eCA120DN or eCA120HZDN
• Universal external power supply DC24V
• 2 x 2-pin Euroblock connectors
• 2 x 3-pin Euroblock connectors
• 4 x adhesive legs for positioning the loudspeakers on a desktop
• Quick start guide
• Warranty card
design or manufacturing that may affect these product specifications.
Motors, 166‐168 08038 Barcelona ‐ Spain ‐ (+34) 932238403 information@ecler.es www.ecler.com
16
 Loading...