

Page 1

USER MANUAL
MANUAL DE INSTRUCCIONES
NOTICE D'UTILISATION
BEDIENUNGSANLEITUNG
Page 2

Page 3

LIST OF CONTENTS
1. IMPORTANT REMARK 04
1.1. Precautions 04
2. INTRODUCTION 04
3. INSTALLATION 04
3.1. Placement and mounting 04
3.2. Connectable video sources 05
3.3. Connectable audio sources 05
3.4. Start up 05
3.5. Settings 06
4. CONSIDERATIONS 06
4.1. Ground loops 06
4.2. Background noise 06
4.3. Cleaning 06
5. FUNCTION LIST 07
6. FUNCTION DIAGRAM 07
7. TECHNICAL CHARACTERISTICS 23
8. SIDE POSITION 23
9. BLOCK DIAGRAM 24
All numbers subject to variation due to production tolerances. ECLER SA reserves the right to make
changes or improvements in manufacturing or design which may affect specifications.
3
Page 4

1. IMPORTANT REMARK
Congratulations! You are the owner of a carefully designed and manufactured equipment.
We thank you for having purchased a DVA1-5c or DVA2-10c Distributor. It is VERY IMPORTANT
that you read this manual before connecting the device in order to obtain its maximum performance.
We recommend our authorised Technical Services whenever any maintenance task should
be needed so that optimum operation shall be achieved.
1.1. Precautions
The DVA1-5c and DVA2-10c must be earthed through its mains cable.
Do not expose the unit to rain or water splashes, and do not place liquid containers or
incandescent objects like candles on top of the unit.
Should any connection / disconnection task be done, always disconnect the unit from the mains
supply.
There are no user serviceable parts inside the unit.
2. INTRODUCTION
The DVA1-5c and DVA2-10c distribution amplifiers are a versatile accessory for every
setup which requires distribution of audio/video signals (VCR, cameras, etc.) to various monitors or
video projectors, ensuring minimal loss, maximal audio/video quality and a guaranteed reliability.
The DVA1-5c features one video input, one stereo audio input, five video outputs and five
stereo audio outputs, with general adjustments for the video, chrominance and audio signal.
The DVA2-10c is in fact two DVA1-5c units stacked into one chassis and can be operated
as two totally independent DVA1-5c or as a single one input - 10 outputs distribution amplifier.
3. INSTALLATION
3.1. Placement and mounting
The DVA1-5c distribution amplifier has a minirack-sized unit. However, with the PUM3
accessory, two minirack modules (9,5'' x 44 mm) can be assembled together into one rack unit (19'').
With the PPM1 and PUM3 accessories you can rack-mount one minirack-sized module.
The DVA2-10c distribution amplifier has a standard rack size (19'', 1U). All these devices
can therefore be mounted into standard rack cases.
As a general rule of thumb, all connections should be held as short as possible using high
quality cables and connectors in order to avoid noise and signal attenuation. Always try to place the
device as far away as possible from noise sources (dimmers, engines, etc...) and mains wires. For
the very same reason, and under any circumstance, should you ever remove the unit's metallic
cover.
4
Page 5

The DVA1-5c / DVA2-10c operates under voltages between 90 and 264 V at 47 to 63 Hz.
This devices features an over dimensioned power supply that adapts to the mains voltage in any
country of the world with no need to make any adjustments.
The power consumption of the DVA1-5c and DVA2-10c is very low, so they don't need any
cooling, but you should avoid extreme temperatures and the atmosphere should be as dry and
dust-free as possible.
In order to protect the unit from an eventual electrical overload it carries a 500mA fuse
(10). Should it ever blow up, unplug the unit from mains and replace it with an identical one. If the
new fuse blows again contact immediately with our Authorized Technical Service. YOU MUST
NEVER USE A HIGHER VALUE FUSE.
3.2. Connectable video sources
ECLERs video accessories accept any composite baseband video signal under one colour
standard (PAL, NTSC or SECAM)
Video Cassette Recorders (VCRs)
The video signal should be taken from the corresponding output and be connected to the
input(s) via a 75 Ohm impedance coaxial cable with BNC connector at the, DVA1-5c (6) or
DVA2-10c (17-14) end. The normalized nominal video level is 1Vpp.
The corresponding audio inputs connect to the RCA sockets DVA1-5c (8-13) or DVA2-10c
(19-27) (16-23). The audio connections should be done with shielded audio cable using RCA (Cinch)
type connectors.
Cameras
The connection of video cameras is similar to that of VCRs. It's necessary that the camera
provides separate audio and video outputs.
Monitors and video projectors
The connection is also similar to that of VCRs, connecting video and audio separately.
3.3. Connectable audio sources
Any unbalanced audio signal may be input. This input has a unity gain, i.e. the incoming
audio signal is not modified unless you use the GAIN ADJ control with ±6dB range found on the
DVA1-5c and DVA2-10c.
3.4. Start up
Power up the unit by pushing the switch labelled POWER (5) and the pilot-light inside the
switch will light up, indicating that the unit is functional. These units are highly reliable, bear in mind
that a not perfect quality may be caused by poor quality cables.
The DVA2-10c features an extra switch (24) located on the back panel which selects the
operating mode: either 1 input and 10 outputs or 2 x 1 input and 5 outputs independent.
5
Page 6

3.5. Settings
These controls let you individually adjust the video (3), chrominance (4) and audio (1-2)
levels. These settings should only be modified by a qualified technician, with the appropriate
measuring instruments.
4. CONSIDERATIONS
4.1. Ground loops
Ensure at all times that no signal sources reaching the device and no devices connected to
its inputs have their earths interconnected; that is, earth should never reach them via two or more
different paths, as this could lead to humming which could even interfere with the video reproduction
quality. In order to avoid earth loops, ensure that the shieldings of cables, if connected to the
chassis, are never connected with each other.
4.2. Background noise
The use of active circuitry can yield, depending on the configuration, to a significant noise
level. The DVA1-5c and DVA2-10c distribution amplifiers have been designed for the minimum
possible noise. Anyway, the noise level will always depend on the correct use and installation of the
unit.
4.3. Cleaning
The front panel should not be cleaned with dissolvent or abrasive substances because
silk-printing could be damaged. To clean it, use a soft cloth slightly wet with water and neutral liquid
soap; dry it with a clean cloth. Be careful that water never gets into the amplifier through the holes of
the front panel.
6
Page 7
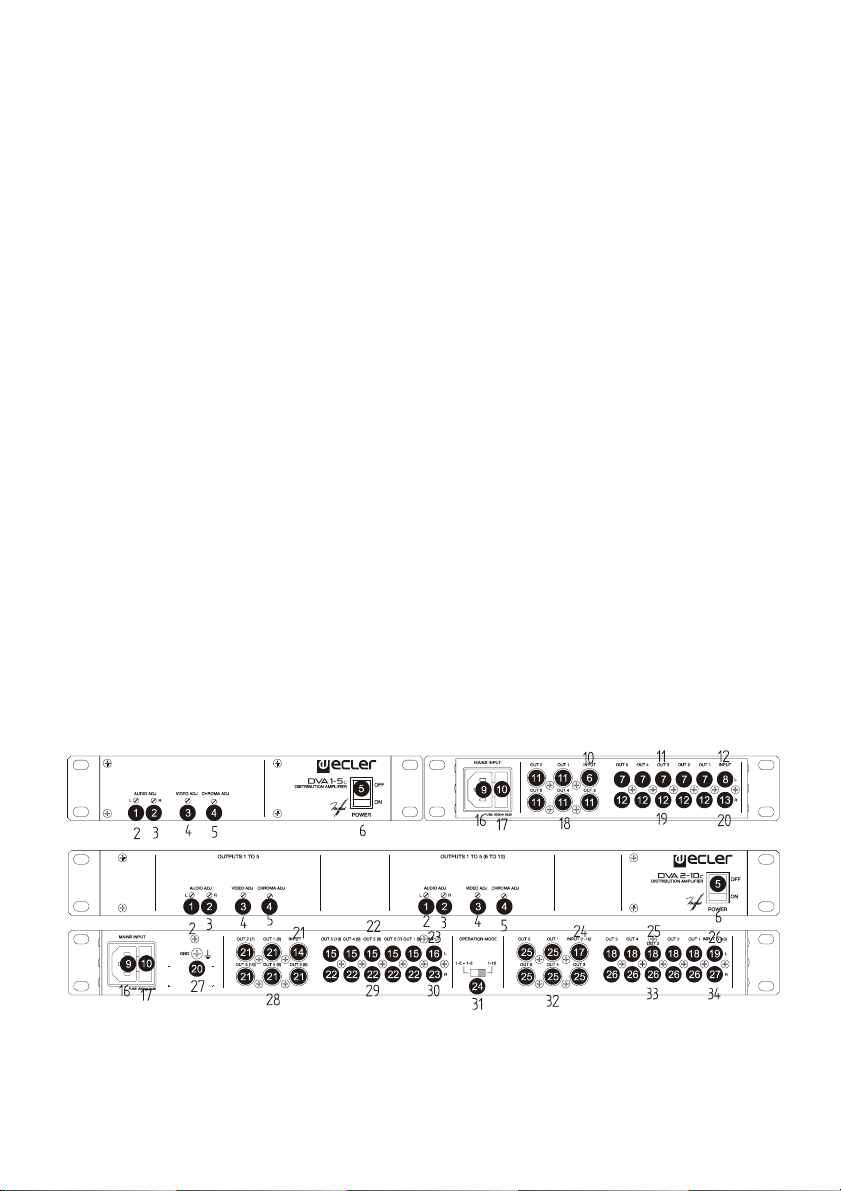
5. FUNCTION LIST
1. Left channel audio gain, AUDIO ADJ L
2. Right channel audio gain, AUDIO ADJ R
3. Video gain, VIDEO ADJ
4. Chrominance gain, CHROMA ADJ
5. Power switch and pilot light, POWER
6. Video input, INPUT
7. Left channel audio output, OUT 1-5
8. Left channel audio input, INPUT
9. Mains plug base
10. Fuse holder
11. Video output, OUT 1-5
12. Right audio channel output, OUT 1-5
13. Right audio channel input, INPUT
14. Video input, INPUT
15. Left audio channel output OUT 1-5 (6-10)
16. Left channel audio input, INPUT
17. Video input, INPUT (1-10)
18. Left channel audio output, OUT 1-5
19. Left channel audio input, INPUT (1-10)
20. Ground connection terminal, GND
21. Video output, OUT 1-5 (6-10)
22. Right audio channel output OUT 1-5 (6-10)
23. Right channel audio input, INPUT
24. 1-5 +1-5 or 1-10 selector, OPERATION MODE
25. Video output, OUT 1-5
26. Right audio channel output, OUT 1-5
27. Right audio channel input, INPUT 1 (10)
6. FUNCTION DIAGRAM
7
Page 8

ÍNDICE
1. NOTA IMPORTANTE 09
1.1. Precauciones 09
2. INTRODUCCIÓN 09
3. INSTALACIÓN 09
3.1. Ubicación y montaje 09
3.2. Fuentes de vídeo conectables 10
3.3. Fuentes de audio conectables 10
3.4. Puesta en funcionamiento 10
3.5. Ajustes 11
4. CONSIDERACIONES 11
4.1. Bucles de masa
11
4.2. Ruido de fondo 11
4.3. Limpieza 11
5. LISTA DE FUNCIONES 12
6. DIAGRAMA DE FUNCIONAMIENTO 12
7. CARACTERÍSTICAS TÉCNICAS 23
8. POSICIÓN DE LOS LATERALES 23
9. DIAGRAMA DE BLOQUES
24
Todos los datos están sujetos a variación debida a tolerancias de producción. ECLER S.A. se
reserva el derecho de realizar cambios o mejoras en la fabricación o diseño que pudieran afectar las
especificaciones.
8
Page 9

1. NOTA IMPORTANTE
Enhorabuena. Vd. posee el resultado de un cuidado diseño y de una esmerada fabricación.
Agradecemos su confianza por haber elegido nuestro distribuidor DVA1-5c / DVA2-10c.
Para conseguir la máxima operatividad del aparato y su máximo rendimiento, es MUY
IMPORTANTE antes de su conexión, leer detenidamente y tener muy presentes las consideraciones
que en este manual se especifican.
Para garantizar el óptimo funcionamiento de este aparato, recomendamos que su
mantenimiento sea llevado a cabo por nuestros Servicios Técnicos autorizados.
1.1. Precauciones
Los DVA deben ser conectados a tierra mediante su cable de alimentación.
No exponga el aparato a la caída de agua o salpicaduras, no ponga encima objetos con
líquido ni fuentes de llama desnuda, como velas.
En caso de requerir alguna intervención y/o conexión desconexión del aparato debe
desconectarse previamente de la alimentación.
En el interior del aparato no existen elementos manipulables por el usuario.
2. INTRODUCCION
Los amplificadores/distribuidores DVA1-5c / DVA2-10c son un versátil complemento en
cualquier instalación que requiera distribuir señales de vídeo audio (VCR, Cámaras... ) a varios
monitores o proyectores, asegurando unas mínimas pérdidas, máxima calidad de imagen/sonido y una
fiabilidad garantizada.
El DVA1-5c dispone de una entrada de vídeo, una entrada estéreo de audio y cinco salidas
de vídeo y audio estéreo con ajustes generales de señal de video, crominancia y audio.
El DVA2-10c es en realidad dos DVA1-5c montados en un mismo chasis con la posibilidad
de tabajar como dos DVA1-5c totalmente independientes o como un único distribuidor de una entrada y
10 salidas.
3. INSTALACIÓN
3.1. Ubicación y montaje
El DVA1-5c es una unidad de tamaño minirack. Dos aparatos minirack (9.5”) unidos mediante
el accesorio PUM3, o un aparato con los accesorios PPM1 y PUM3, forman un aparato de una unidad
rack standard de 19” y una unidad de altura (44mm).
El DVA2-10c es de tamaño rack standard 19” y una unidad de altura. Todos estos aparatos
admiten pues montaje en armarios rack normalizados.
9
Page 10

conectores de calidad a fin de evitar ruido y pérdidas de señal por atenuación. Debe procurar situar la
Como norma general las conexiones deberán ser lo más cortas posible y con cables y
unidad lo más alejada posible de fuentes de ruido (variadores de tensión, motores, etc. ...) así como de
cualquier cable de red. Por esta misma razón y bajo ninguna circunstancia debe quitarse la tapa
metálica del aparato.
El DVA1-5c y DVA2-10c funcionan con corriente alterna, de 90 a 264V y 47 a 63 Hz. Estos
aparatos equipan una fuente de alimentación sobredimensionada capaz de adaptarse sin ningún
tipo de ajuste a la tensión de red de cualquier país del mundo.
Ya que el consumo de estas unidades es muy bajo, no precisan ventilación, sin embargo
debe evitarse que estén expueston a una temperatura extrema y que la atmósfera del local en que esté
emplazado sea lo más seca y limpia de polvo posible.
Para proteger al DVA1-5c / DVA2-10c de eventuales sobrecargas en la línea de red o bien
excesos ocasionales en el consumo de los circuitos internos, existe un fusible de red de 500mA (10).
En caso de que éste se fundiera se desconectaría el aparato y se sustituiría por otro de idénticas
características. Si éste último se volviera a fundir, consulte con nuestro Servicio Técnico. EN NINGÚN
CASO DEBE PONERSE UN FUSIBLE DE VALOR MÁS ELEVADO.
3.2. Fuentes de vídeo conectables
Los accesorios de vídeo ECLER aceptan cualquier fuente de señal de vídeo compuesto en
banda base bajo una misma norma de composición (PAL. NTSC o SECAM).
Vídeo Cassette recorders (VCR)
La señal/es de vídeo se tomarán del conector correspondiente y se conectará a las entrada/s
utilizando un cable coaxial de 75 ohms de impedancia y con conectores BNC en el extremo de las
unidades DVA1-5c (6) o DVA2-10c (17-14). El nivel nominal normalizado de la señal de vídeo es de
1 Vpp.
Las entradas de audio correspondientes se conectarán a las tomas RCA DVA1-5c (8-13) o
DVA2-10c (19-27)(16-23). Las conexiones de audio se realizarán mediante cable apantallado y
empleando conectores tipo Cinch – RCA.
Cámaras.
La conexión a cámaras es similar a la del VCR. Es necesario que la cámara entregue
señales de vídeo y audio por separado.
Monitores y pantallas de proyeccion TVC.
Es asimismo similar a la del VCR debiéndose conectar por separado vídeo y audio.
3.3. Fuentes de audio conetables
A las entradas de audio puede conectarse cualquier señal de audio asimétrica. Esta entrada
tiene un nivel de ganacia x1 es decir las señales existentes en la entrada no se verán modificadas a no
ser que se actúe sobre el congtrol GAIN ADJ que disponen el DVA1-5c y DVA2-10c con un margen de
variación de ±6dB.
3.4. Puesta en funcionamiento
Esta se realizará mediante el interruptor de red POWER (5) automáticamente éste interruptor
se iluminará indicando que la unidad es operativa. Estas unidades son extremadamente fiables, si la
imagen no es del todo perfecta debe tener presente que cables, de pobre calidad, pueden afectar la
calidad de la imagen.
10
Page 11

funcionamiento, 1 entrada 10 salidas o 2 x 1 entrada 5 salidas independientes.
En el DVA2-10c existe un conmutador (24) en el panel posterior para cambiar el modo de
3.5. Ajustes
Estos controles permiten ajustar individualmente las señales de nivel de video (3),
crominancia (4) y nivel de audio (1-2). Estos ajustes deben ser modificados por personal técnico que
disponga del instrumental adecuado.
4. CONSIDERACIONES
4.1. Bucles de masa
Procuraremos en todo momento que todas las señales que lleguen a los aparatos, no tengan
las masas interconectadas, es decir que nunca les llegue masa por dos o más caminos distintos, ya
que de esta manera se podrían producir zumbidos que llegarían incluso a interferir la calidad de la
reproducción. Los blindajes de los cables, de estar conectados a chasis, en ningún momento deben
estar unidos entre si, de esta forma evitaremos la formación de bucles de masa.
4.2. Ruido de fondo
El empleo de circuitería activa puede aportar, según configuración, un nivel de ruido de fondo
más o menos elevado. Los DVA1-5c / DVA2-10c han sido concebidos para generar el menor ruido de
fondo posible. Independientemente de la concepción electrónica con que se hayan realizado, el nivel de
ruido dependerá directamente de la correcta utilización e instalación.
4.3. Limpieza
La carátula no deberá limpiarse con sustancias disolventes o abrasivas puesto que se corre
el riesgo de deteriorar la serigrafía. Para su limpieza se utilizará un trapo humedecido con agua y un
detergente líquido neutro, secándola a continuación con un paño limpio. En ningún caso se debe
permitir la entrada de agua por cualquiera de los orificios del aparato.
11
Page 12

5. LISTA DE FUNCIONES
1. Ganancia de audio canal izquierdo, AUDIO ADJ L
2. Ganancia de audio canal derecho, AUDIO ADJ R
3. Ganancia de video, VIDEO ADJ
4. Ganancia de crominancia, CHROMA ADJ
5. Interruptor y piloto de puesta en marcha, POWER
6. Entrada video, INPUT
7. Salida audio canal izquierdo, OUT 1-5
8. Entrada audio canal izquierdo, INPUT
9. Base toma de red
10. Portafusibles
11. Salida video, OUT 1-5
12. Salida audio canal derecho, OUT 1-5
13. Entrada audio canal derecho, INPUT
14. Entrada video, INPUT
15. Salida audio canal izquierdo, OUT1-5 (6-10)
16. Entrada audio canal izquierdo, INPUT
17. Entrada de video, INPUT (1-10)
18. Salida audio canal izquierdo, OUT 1-5
19. Entrada audio canal izquierdo, INPUT (1-10)
20. Borne toma de masa, GND
21. Salida video, OUT 1-5(6-10)
22. Salida audio canal derecho, OUT1-5(6-10)
23. Entrada audio canal derecho, INPUT
24. Selector 1-5+1-5 o 1-10, OPERATION MODE
25. Salida video, OUT1-5
26. Salida audio canal derecho, OUT 1-5
27. Entrada audio canal derecho, INPUT 1(10)
6. DIAGRAMA DE FUNCIONES
12
Page 13

TABLE DES MATIERES
1. NOTE IMPORTANTE 14
1.1. Précautions 14
2. INTRODUCTION 14
3. INSTALLATION 14
3.1. Situation et montage 14
3.2. Branchement des sources vidéo 15
3.3. Branchement des sources audio 15
3.4. Mise en marche 15
3.5. Réglages 16
4. REMARQUES 16
4.1. Boucles de masse 16
4.2. Bruit de fond 16
4.3. Entretien 16
5. LISTE DE FONCTIONS 17
6. SCHEMA DE FONCTIONNEMENT 17
7. CARACTÉRISTIQUES TECHNIQUES 23
8. POSITION EQUERRES 23
9. DIAGRAMME DE BLOCS 24
Toutes les valeurs mentionnées dans ce document sont susceptibles d’être modifiées en raison
des tolérances de production. ECLER SA se réserve le droit de changer ou d’améliorer les
processus de fabrication ou la présentation de ses produits, occasionnant ainsi des modifications
dans les spécifications techniques.
13
Page 14

1. NOTE IMPORTANTE
Félicitations ! Vous venez d'acquérir le résultat d'un design et d'une fabrication
particulièrement soignée. Nous vous remercions de la confiance que vous nous portez en
choisissant notre distributeur DVA1-5c / DVA2-10c.
Pour obtenir le meilleur résultat de cet appareil, il est important de lire attentivement les
instructions ci-dessous avant de le brancher.
Pour garantir le fonctionnement optimal de cet appareil, il important que le entretien se
réalisé par notre Service Technique Ecler.
1.1. Précautions
Les DVA1-5c et DVA2-10c doit être impérativement relié à la terre via son câble
d'alimentation.
Eviter tout contact avec l'eau. L'appareil doit être installé à l'écart de tout objet contenant un
liquide ou de toute flamme nue, comme une bougie par exemple.
Avant toute intervention et/ou de connexion/déconnexion, le cordon d'alimentation de
l'appareil doit être préalablement débranché.
Il n'existe aucun élément destiné à l'utilisateur à l'intérieur de l'appareil.
2. INTRODUCTION
Les amplificateurs/distributeurs DVA1-5c / DVA2-10c sont un complément idéal pour
distribuer des signaux audio-vidéo (magnétoscopes, caméras, DVD ...) à des moniteurs, des
projecteurs. Leur fiabilité permet de s'assurer d'un minimum de pertes et d'une qualité d'image et de
son maximale.
Le DVA1-5c est dotée d'une entrée vidéo, d'une entrée audio stéréo et de cinq sorties
audio-vidéo avec des réglages vidéo généraux chromatiques et audio.
Le DVA2-10c est en réalité 2 DVA1-5c totalement indépendants ou un seul distributeur
équipé d'une entrée et de 10 sorties.
3. INSTALLATION
3.1. Situation et montage
Le DVA2-5c est au mini-rack (9,5") et d'une unité de hauteur. Pour obtenir un standard 19"
à une unité de hauteur (44 mm), deux possibilités s'offrent à vous : avec un seul appareil, vous
utiliserez l'accessoire PPM1 (qui est une plaque de même dimension 9,5") et l'accessoire PUM3 (qui
relie l'appareil à la plaque), avec deux appareils, vous utiliserez uniquement l'accessoire qui relie les
deux appareils, soit le PUM3.
Le DVA2-10c est au standard 19" et d'une unité de hauteur. Tous ces appareils peuvent
donc être montés en rack dans des baies normalisées.
14
Page 15

En règle générale, il faudra utiliser des câbles le plus court possible avec des connecteurs
de bonne qualité afin d'éviter des bruits et des pertes de signal. Pensez aussi à placer l'unité le plus
loin possible des sources de bruits (ventilateurs, moteurs ...) ainsi que des câbles d'alimentation.
Pour cette raison et en aucune circonstance on ne doit enlever le capot métallique de l’appareil.
Le DVA1-5c et le DVA2-10c fonctionnent sur courant alternatif de 90 à 264 V (47 à 63Hz).
Tous les modèles sont équipés d'une source d'alimentation capable de s'adapter sans aucun
réglage spécifique à la tension secteur en vigueur dans le pays concerné.
Étant donné la faible consommation de courant des DVA1-5c et DVA2-10c aucune
ventilation n'est nécessaire. Par contre, il faut éviter d’exposer les appareils à une forte température
et les maintenir dans une atmosphère sèche et exempte de toute poussière.
Le DVA1-5c et le DVA2-10c sont protégés contre les surcharges de courant par un fusible
de 500mA (10). Si celui-ci venait à fondre, débrancher l'appareil et changer le fusible par un autre,
de même valeur. NE JAMAIS LE REMPLACER PAR UN FUSIBLE DE VALEUR SUPÉRIEURE. En
cas de fontes successives du fusible, veuillez prendre contact avec notre Service Technique.
3.2. Branchement des sources vidéo
Les accessoires vidéo Ecler acceptent toute source de signal vidéo composite de même
norme (PAL. NTSC ou SECAM).
Magnétoscopes
Les signaux vidéo se prendront du connecteur correspondant qui se branchera aux
entrées utilisant un câble coaxial de 75 Ohm d’impédance avec des connecteurs BNC à l’extrémité
DVA1-5 c ( 6 ) o DVA2 - 1 0 c (17-14 ) . Le niveau nominal du signal vidéo est de 1Vpp.
Les entrées audio correspondantes se brancheront aux prises RCA DVA1-5c (8-13) o
DVA2-10c (19-27)(16-23). Les branchements audio se feront avec un câble muni de connecteur de
type Cinch – RCA.
Caméras
Le branchement d’une caméra est identique à celui d’un magnétoscope. La caméra devra
pour cela pouvoir recevoir des signaux audio et vidéo séparés.
Moniteurs et vidéo-projecteurs
Toujours la même configuration que pour les magnétoscopes et les caméras avec des
signaux audio et vidéo séparés.
3.3. Branchement des sources audio
Tout signal audio asymétrique peut être connecté aux entrées audio. Cette entrée a un
niveau de gain x1 c’est à dire que les signaux arrivant à cette entrée ne seront modifiées qu’après
que le contrôle GAIN ADJ du DVA1-5c et du DVA2-10c (avec une marge de variation de ±6dB) soit
activé.
3.4. Mise en marche
La mise en marche se fera par l’interrupteur POWER (5) qui s’illuminera automatiquement
dès que l’unité sera en fonctionnement. Étant donné que ces appareils sont d’une fiabilité
remarquable, l’image doit être parfaite. Si elle ne l’est pas, vous devez alors vérifier les câbles. En
effet, si les câbles utilisés ne sont pas de bonne qualité, ils peuvent affecter la qualité de l’image.
15
Page 16

mode de fonctionnement: soit 1 entrée 10 sorties, soit 2 x 1 entrée 5 sorties indépendantes.
Le DVA2-10c est équipé d’un commutateur (24) sur le bandeau arrière pour modifier le
3.5. Réglages
Ces contrôles permettent de régler individuellement les signaux de niveau vidéo (3), la
chrominance (4) et le niveau audio (1-2). Ces réglages doivent être effectués par un technicien
vidéo.
4. REMARQUES
4.1. Boucles de masse
S'assurer que toutes les sources de signal qui arrivent à la console de mixage ainsi que
tous les appareils qui sont raccordés à sa sortie, n'ont pas les masses interconnectées, c'est à dire
que la masse n'arrive pas par deux ou trois voies différentes ; en effet, ceci peut provoquer des
bruits qui altèrent le signal sonore. S'assurer que les blindages des câbles soient connectés au
châssis sans jamais être reliés entre eux afin d'éviter la formation de boucles de masse.
4.2. Bruit de fond
L'emploi de circuits actifs peut amener, suivant la configuration du circuit, un niveau de
bruit de fond plus ou moins élevé. Les DVA1-5c, DVA2-10c ont été conçus pour obtenir le moins de
bruit de fond possible. Indépendamment de la conception électronique avec laquelle ils ont été
réalisés, le niveau de bruit dépend directement de la bonne installation et de l'utilisation correcte de
l'appareil.
4.3. Entretien
Il est interdit d’utiliser des substances dissolvantes ou abrasives pour nettoyer la face avant,
celles-ci détériorant la sérigraphie. Nettoyer uniquement avec un chiffon humide. Attention! Jamais de
l’eau ou tout autre liquide ne doit pénétrer par les orifices du panneau de commande.
16
Page 17

5. LISTE DE FONCTIONS
1. Gain audio, canal gauche, AUDIO ADJ L
2. Gain audio, canal droit, AUDIO ADJ R
3. Gain vidéo, VIDEO ADJ
4. Gain de chrominance, CHROMA ADJ
5. Interrupteur de mise en marche, POWER
6. Entrée vidéo, INPUT
7. Sortie audio canal gauche, OUT 1-5
8. Entrée audio canal gauche, INPUT
9. Embase secteur
10. Porte-fusibles
11. Sortie vidéo, OUT 1-5
12. Sortie audio canal gauche, OUT 1-5
13. Entrée audio canal droit, INPUT
14. Entrée vidéo, INPUT
15. Sortie audio canal gauche, OUT1-5 (6-10)
16. Entrée audio canal gauche, INPUT
17. Entrée vidéo, INPUT (1-10)
18. Sortie audio canal gauche, OUT 1-5
19. Entrée audio canal gauche, INPUT (1-10)
20. Prise de terre, GND
21. Sortie vidéo, OUT 1-5(6-10)
22. Sortie audio canal droit, OUT1-5 (6-10)
23. Entrée audio canal droit, INPUT
24. Sélecteur 1-5+1-5 o 1-10, OPERATION MODE
25. Sortie vidéo, OUT1-5
26. Sortie audio canal droit, OUT 1-5
27. Entrée audio canal droit, INPUT 1 (10)
6. SCHÉMA DE FONCTIONS
17
Page 18

INHALTSVERZEICHNIS
1. WICHTIGE VORBEMERKUNG 19
1.1. Sicherheitsmaßnahmen 19
2. EINFÜHRUNG 19
3. INSTALLATION 19
3.1. Aufstellungsort 19
3.2. Anschliessbare Videoquellen 20
3.3 Anschliessbare Audioquellen 20
3.4 Inbetriebnahme 20
3.5 Einstellungen 21
4. WEITERE ERLÄUTERUNGEN 21
4.1. Erdungsschleifen 21
4.2. Hintergrundrauschen 21
4.3. Reinigung 21
5. FUNKTIONSLISTE 22
6. FUNKTIONSDIAGRAMM 22
7. TECHNISCHE DATEN 23
8. SEITENLAGE 23
9. BLOCKSCHALTBILD 24
Alle Angaben sind ohne Gewähr. Messwerte können produktionsbedingten Schwankungen
unterliegen. ECLER S.A. nimmt sich das Recht heraus Veränderungen am Gerät vorzunehmen, die
zur Verbesserung des Produktes beitragen.
18
Page 19

1.WICHTIGE VORBEMERKUNG
Herzlichen Glückwunsch zum Kauf einer DVA1-5c / DVA2-10c Einheit. Sie besitzen
hiermit ein hochwertiges Gerät als Ergebnis eines hohen Entwicklungsaufwandes und sorgfältiger
Fertigungsplanung. Wir bedanken uns für Ihr Vertrauen, einen ECLER gewählt zu haben.
Bitte lesen Sie alle Erläuterungen in dieser Bedienungsanleitung sorgfältig durch, bevor
Sie das Gerät anschließen, um eine optimale Funktionalität und Leistung sicherzustellen. Eventuelle
Reparaturen sollten nur von unserer technischen Service-Abteilung vorgenommen werden, um einen
zuverlässigen Betrieb sicherzustellen.
1.1. Sicherheitsmaßnahmen
Die Verteiler-Verstärker DVA1-5c und DVA2-10c muß mittels seines Netzkabels geerdet
werden.
Es darf kein Regen oder andere Flüssigkeiten in das Gerät gelangen. Stellen Sie niemals
Flüssigkeitbehälter oder flammende Gegenstände wie z.B. Kerzen auf die Gerätoberfläche.
Bevor Sie den DVA an andere Geräte anschließen, ziehen Sie immer den Netzstecker.
Im Inneren der Endstufe befinden sich keine für den Benutzer gedachte Bedienelemente.
2. EINFÜHRUNG
Die Verteiler-Verstärker DVA1-5c und DVA2-10c sind ein vielseitiges Zubehör für alle
Installationen in denen es nötig ist, Audio/Video-Signale (VCRs, Kameras, usw.) an mehrere
Monitore oder Projektoren zu verteilen. Dies geschieht mit minimalen Verlüsten, maximaler
Audio/Video-Qualität und höchster Vertraulichkeit.
Der DVA1-5c Verteiler-Verstärker verfügt über einen Video-Eingang, einen Audio-Eingang
(Stereo), fünf Video-AusgÄngen und fünf Audio-Ausgängen (Stereo). Luminanz-, Chrominanz- und
Audio-Pegel können zusätzlich geregelt werden.
Der DVA2-10c Verteiler-Verstärker ist im Grunde zwei DVA1-5c-Einheiten im selben
Gehäuse, wobei sich die Möglichkeit ergibt, das Gerät als zwei vollkommen unabhängige DVA1-5c
oder als einen einzigen Verteiler mit einem Eingang und 10 Ausgängen zu betreiben.
3. INSTALLATION
3.1. Aufstellungsort
Der DVA1-5c Geräte sind im Minirack Format konzipiert. Sie können jedoch mittels dem
PUM3-Zubehör zwei Minirack-Geräte (9.5'') oder mittels den PPM1- und PUM3-Zubehör ein
MiniRack-Gerät in eine normalisierte Rackeinheit (19'' x 44 mm) umbauen.
Der DVA2-10v Verteiler besitzt die Maße einer standard-Rackeinheit (19'').
Sämtiche Geräte können dementsprechend in ein Rackgerüst einbaut werden.
19
Page 20

Stecker und Kabel von bester Qualität zu verwenden, um Probleme wie z.B. Rauschen und
Es ist empfehlenswert, die signalführenden Anschlüsse so kurz wie möglich zu halten und
Signalverlüste zu verhindern.
Es ist ebenso wichtig, das Gerät so weit wie möglich von Störquellen wie Motoren,
Netzgeräten oder -Leitungen usw. entfernt aufzubauen. Entfernen Sie niemals die metallene
Abdeckplatte dieses Gerätes.
Der DVA1-5c und DVA2-10 kann mit Wechselstrom zwischen 90 und 264V, 47 bis 63Hz
betrieben werden. Dieses Gerät benutzt ein überdimensioniertes Netzteil. Damit passt es sich ohne
irgendwelche Einstellungen an alle Weltweit auffindbaren Netzspannungen an.
Da diese Einheiten einen sehr niedrigen Stromverbrauch aufweisen, benötigen sie keine
Kühlung. Trotzdem darf das Gerät weder hohen Temperaturen noch Staub oder Feuchtigkeit
ausgesetzt werden.
Zum Schutz der DVA1-5c und DVA2-10c Verteiler vor eventuellen Überlastungen sind sie
mit einer Sicherung von 500 mA (10) abgesichert. Sollte sie durchbrennen, muß das Gerät von der
Stromversorgung getrennt und die Sicherung gegen eine neue mit identischen Werten ausgetauscht
werden. Falls auch diese durchbrennt, wenden Sie sich bitte an unsere technische Service
Abteilung. NIEMALS DARF EINE SICHERUNG MIT HÖHEREM WERT EINGESETZT WERDEN.
3.2. Anschließbare Videoquellen
ECLERs Videozubehör akzeptiert jedes CVBS-Baseband-Videosignal einer selben
Farbnorm (PAL, NTSC oder SECAM).
Video Casette Recorder (VCR)
Das (Die) Videosignal(e) sollte man aus der entsprechenden Buchse des VCRs
entnehmen. Die Verbindung an den (die) Eingang (Eingänge) des DVA1-5c (6) oder DVA2-10c
(17-14) erfolgt dann über ein 75-Ohm Koaxialkabel mit einem BNC-Stecker an diesem Ende.
Der normalisierte Nennwert des Videosignals beträgt dabei 1 Vpp.
Die zugehörigen Audiosignale werden an die RCA-Buchsen angeschlossen DVA1-5c
(8-13) oder DVA2-10c (19-27) (16-23). Die Verbindung erfolgt durch ein geschirmtes Kabel mit RCA(Cinch-) Steckern
Kameras
Der Anschluss von Kameras ist dem Anschluss von VCRs vergleichbar. Es ist dabei nötig,
daß die Kamera über separate Video- und Audioaugänge verfügt.
Farbmonitore und Videoprojektoren
Die Verbindung ist ebenso vergleichbar mit den VCR. Audio- und Videosignale müssen
separat angeschlossen werden.
3.3. Anschließbare Audioquellen
An die Audioeingänge können sie ein beliebiges unsymmetrisches Audiosignal
anschliessen. Der Audioeingang modifiziert im Prinzip das Signal nicht. Bei den Geräten DVA1-5c
und DVA2-10c kann man jedoch mit dem Regler GAIN ADJ eine Verstärkung des Audiosignals im
Bereich ±6dB einstellen.
3.4. Inbetriebnahme
Das Gerät schaltet sich mittels dem POWER-Schalter (5) an, wobei dieser gleichzeitig
aufglüht und anzeigt, das das Gerät fuktionsbereit ist. Diese Verteiler sind äußerst vertaulich, jeder
mögliche Qualitätsverlust kann durch minderwertige Kabelverbindungen verursacht sein.
20
Page 21

Funktionsmodus schaltet: Entweder 1 Eingang und 10 Ausgänge oder 2 x 1 Eingang und 5
Der DVA2-10c verfügt ausserdem über einen Wahlschalter (24) an der Rückseite, der den
unabhängige Ausgänge.
3.5. Einstellungen
Diese Regler erlauben eine unabhägige Pegeleistellung des Video- Chrominanz- (3-4) und
Audiosignals (1-2). Diese Einstellungen sollten durch einen qualifizierten Techniker mit geeigneten
Messgeräten durchgeführt werden.
4. WEITERE ERLÄUTERUNGEN
4.1. Erdungsschleifen
Die an das Gerät angeschlossene Signale sollten keine Masseverbindungen haben. Solte
das Gerät über verschiedene Wege an die Masse angeschlossen sein, kann dies zu Störgeräuschen
(''Brummschleife'') und Einbußen der Bildqualität führen. Um das Auftreten von Erdungsschleifen zu
verhindern, dürfen die Abschirmungen der Anschlußkabel keinesfalls miteinander verbunden
werden.
4.2. Hintergrundrauschen
Die Verwendung aktiver Komponenten bringt zwangsläufig einen mehr oder weniger
erhöhten Grundrauschpegel mit sich. Bei der Entwicklung der DVA1-5c und DVA2-10c wurde
größter Wert auf die Minimierung des Hintergrundrauschens gelegt. Unabhängig davon hängt der
Rauschpegel direkt von der korrekten Installation und Bedienung des Mischpults ab.
4.3. Reinigung
Die Frontplatte darf nicht mit lösungsmittelhaltigen oder scheuernden Substanzen gereinigt
werden, da hierbei die Oberfläche beschädigt werden könnte. Verwenden Sie zur Reinigung der
Frontplatte ein feuchtes Tuch und etwas milde Seifenlauge. Trocknen Sie danach die Oberfläche
sorgfältig ab. Lassen Sie niemals Wasser in die Öffnungen der Frontplatte gelangen.
21
Page 22

5. FUNKTIONSLISTE
1. Verstärkung des linken Audiokanals, AUDIO ADJ L
2. Verstärkung des rechten Audiokanals, AUDIO ADJ R
3. Verstärkung des Videosignals, VIDEO ADJ
4. Verstärkung des Chrominanzsignals, CHROMA ADJ
5. Netzschalter mit Glühlampe, POWER
6. Videoeingang, INPUT
7. Ausgang linker Audiokanal, OUT 1-5
8. Eingang linker Audiokanal, INPUT
9. Netzanschlubbuchse
10. Sicherungshalter
11. Videoausgang, OUT 1-5
12. Ausgang rechter Audiokanal, OUT 1-5
13. Eingang rechter Audiokanal, INPUT
14. Videoeingang, INPUT
15. Ausgang linker Audiokanal, OUT 1-5 (6-10)
16. Eingang linker Audiokanal, INPUT (1-10)
17. Videoeingang, INPUT (1-10)
18. Ausgang linker Audiokanal, OUT 1-5
19. Eingang linker Audiokanal, INPUT (1-10)
20. Erdungsanschluss, GND
21. Videoausgang, OUT 1-5 (6-10)
22. Ausgang rechter Audiokanal, OUT 1-5 (6-10)
23. Eingang rechter Audiokanal, INPUT
24. Wahlshalter 1-5+1-5 oder 1-10, OPERATION MODE
25. Videoausgang, OUT 1-5
26. Ausgang rechter Audiokanal, OUT 1-5
27. Eingang rechter Audiokanal, INPUT 1 (10)
6. FUNKTIONSDIAGRAMM
22
Page 23

7. TECHNICAL CHARACTERISTICS 7. CARACTERÍSTICAS TÉCNICAS
7. CARACTÉRISTIQUES TECHNIQUES 7. TECHNISCHE DATEN
AUDIO
Zin
Zout
Gain (@ 600Ω load) ±6dB adj.
Max. Out level (@ 600Ω load)
THD 0.05% Typ.
Frequency response 6Hz to 148kHz@-3dB
Noise (Without video)
Noise (With video)
Crosstalk
VIDEO
Zin
Zout
Vout (1Vpp Vin) 0.65Vpp to 1.4Vpp
Chroma gain (@ 4.43MHz) -5% to + 35% approx
Diff. Phase (5 outs loaded) <0.05 deg.
Diff. Gain (5 outs loaded) <0.1%
Bandwidth (-3dB) approx) 28MHz Gaussian Roll-off
In/out (phase @ 4.43 MHz) <-18 deg.
Lum. Lin. Error <1% approx.
Vertical tilt (black pattern ref.) <1% approx.
Signal noise ratio (100Hz to 20MHz) >65dB
Vdc offset at any input <5mV DC
Chroma/Lum. Delay error (@ 10T & 4.43MHz) 18ns LAG. approx.
Mains 90-264VCA 47-63Hz.
Power consumption 7.5VA 8VA
Dimensions Panel 241X44mm 482.6X44mm
Depth 195mm
Weight 1.3kg 2.4kg
8. SIDE POSITION
8. POSICIÓN DE LOS LATERALES
8. POSITION EQUERRES
8. SEITENLAGE
DVA1-5c DVA2-10c
60kΩ approx.
600Ω approx.
+10dBV
<-100dB Lin (10Hz÷30kHz)
<-87dB Lin (10Hz ÷ 30kHz)
>57 dB Lin (10Hz ÷ 30kHz)
75Ω ±5%
75Ω ±4%
23
Page 24

9. BLOCK DIAGRAM 9. DIAGRAMA DE BLOQUES
9. DIAGRAMME DE BLOCS 9. BLOCKSCHALTBILD
ECLER Laboratorio de electro-acústica S.A.
Motors 166-168, 08038 Barcelona, Spain
INTERNET http://www.ecler.com e-mail: info@ecler.es
50.0011.02.02
 Loading...