

Page 1

USER MANUAL
MANUAL DE INSTRUCCIONES
NOTICE D'UTILISATION
BEDIENUNGSANLEITUNG
COMPACT 8
Page 2

Page 3

INSTRUCTION MANUAL
1. IMPORTANT REMARK 04
1.1. Safety Precautions 04
2. INTRODUCTION 04
3. INSTALLATION 05
3.1. Placement and mounting 05
3.2. Connectable Signal Sources 05
4. OPERATION AND USAGE 06
4.1. Start up 06
4.2. Monitoring 06
4.3. Channel gain and equalization 06
4.4. Channel indicators 06
4.5. Talkover 06
4.6. Outputs 07
5. CONSIDERATIONS 07
5.1. Ground loops, background noise 07
5.2. Cleaning 07
6. FUNCTION LIST 08
7. FUNCTION DIAGRAM 08
8. TECHNICAL CHARACTERISTICS 30
9. DIAGRAMS 31
9.1. Configuration diagram 31
9.2. Block diagram 32
All numbers subject to variation due to production tolerances. ECLER SA reserves the right to make changes or
improvements in manufacturing or design which may affect specifications.
3
Page 4

1. IMPORTANT REMARK
We thank you for trusting on us and choosing our COMPACT 8 mixer. In order to get the most in
operation and efficiency from your mixing unit, it is VERY IMPORTANT - before you plug anything - to
read this manual very carefully and take seriously into account all considerations specified within it.
In order to guarantee the optimum operation of this unit, we strongly recommend that its
maintenance be carried out by our Authorised Technical Services.
1.1. Safety Precautions
This apparatus must be earthed through its mains cable.
Do not expose the unit to rain or water splashes, and do not place liquid containers or
incandescent objects like candles on top of the unit. Do not obstruct the ventilation openings
with any kind of material.
Any change in the configuration of the unit must be carried out by a qualified technician.
Should any connection / disconnection task be done, always disconnect the unit from the mains
supply.
There are no user serviceable parts inside the unit.
2. INTRODUCTION
The COMPACT 8 merges flexibility, simplicity and ECLERs renowned quality into an universal
mixer which has been specially designed for non-technical users. This simple and intuitive mixer is
suited for a broad variety of installations, ranging from conference rooms, church sound systems, or
sport events to outdoor P.A. or presentations just to name a few.
Its reduced size and the specially designed chassis make it ideal both for rack mounting or as a
table-top unit. Last but not least, the technological concept and the carefully selected electronic
components make this mixer a 100% professional unit.
The COMPACT 8 incorporates 8 mixable channel, each with different input capabilities:
Channel 1-2-3 LINE A / LINE B / MICRO
LINE B switchable to PHONO from rear panel
MICRO switchable to MICRO ATT from rear panel
Channel 4-5-6 LINE A / LINE B / MICRO
MICRO switchable to MICRO ATT from rear panel
Channel 7 LINE A / AUX / MICRO
AUXILIARY on front panel
MICRO switchable to MICRO ATT from rear panel
Channel 8 LINE A / MICRO ATT / MICRO
Additional MICRO input on front panel
All channels feature a lever switch input selector, independent gain control for each channel and
3-band tone controls with semiparametric adjustment for the mid-band. (Center frequency adjustable,
fixed Q)
All inputs are PFL capable in order to visually (through the VU meters) and acoustically (through
headphones) monitor any signal connected to the inputs of the unit.
4
Page 5

3. INSTALLATION
3.1. Placement and mounting
The first thing to take into account when looking for the placement of the COMPACT 8 is your
comfort and an easy access to all the connections.
The COMPACT 8 has 19" (482.6mm), 4U (177mm) rack mounting ears that allow you to place it
in a standard rack.
Because of the high gain of the PHONO and MIC inputs, the mixer must be placed as far as
possible from noise sources (dimmers, engines, etc.) as well as from any mains cable. You should
never, under any circumstance, remove the metallic cover of the mixer.
The COMPACT 8, being a low consumption unit, does not need any cooling; you should anyway
avoid exposure to extreme temperatures and the operating environment must be as dry and dust free as
possible.
The COMPACT 8 operates under voltages between 90 and 264 V at 47 to 63 Hz. This device
features an over dimensioned power supply that adapts to the mains voltage in any country of the world
with no need to make any adjustments.
In order to protect the mixer from eventual mains overloads, it has a time-lag 0,5 A (32) mains
protection fuse. Should this fuse ever blow off, disconnect the mixer from mains and replace it with an
identical one. NEVER REPLACE THE FUSE WITH ANOTHER ONE WITH A HIGHER VALUE.
ATTENTION: Changing the fuse must be performed by qualified technical personnel.
3.2. Connectable Signal Sources
- Turntables / Phono: They must be fitted with a magnetic cartridge with nominal output level
between -60dBV and -20dBV (1 to 100 mV). The PHONO (38) inputs of the COMPACT 8 have a high
headroom (margin before saturation) and it can handle higher output cartridges than what is usual.
These inputs are supplied with a nominal input sensitivity of -40dBV (10mV).
- Microphones: The MIC inputs (23-27) are ready for a nominal input level of -50dBV (3,16 mV)
and are equipped with COMBO connectors. The MIC ATT switch on the rear panel (28) allows a 20dB
attenuation on the input sensibility, so that it is changed from –50 to –30dB (3,16 to 31,6 mV). The
COMBO connector provides both a XLR plug and a ¼’’ Jack in the same receptacle. The connection of
balanced signals is as follows:
XLR-3 ¼‘’ Jack
Hot or direct signal > Pin 2 Tip
Cold or inverted signal > Pin 3 Ring
Ground > Pin 1 Sleeve
Low impedance (200 to 600) monophonic microphones must be used. In case of working with
an unbalanced connection, the ground pin and Pin 3 (or the ring of a TRS Jack) must be shortcircuited.
The COMPACT 8 features a Phantom power supply for the connection of condenser
microphones. A switch for general activation of the phantom power can be found on the rear panel of the
unit (30). The supplied phantom power is 18 VDC.
- LINE Inputs. The sensibility of the line inputs (13-37-38) is rated at 0dBV (1V). CD, DAT, MP3,
DVD Audio Players, Tape recorders, cassettes, tuners or videos should be connected to LINE inputs.
Additional line level sources may be connected to the “AUX 7” (13) input, which is located on the
front panel and is electrically linked to channel 7.
- Headphones: In order to achieve the best performance, they should be high impedance type
(200-600). They must be connected to the headphones out (22) connector, a standard 1/4" stereo jack.
Connect ground to sleeve, ring to right and tip to left.
- Power amplifiers: See paragraph 4.6.
5
Page 6

4. OPERATION AND USAGE
4.1. Start up
Power up the mixer by pushing the POWER (15) switch. The green pilot-light, integrated into the
switch itself, will immediately light up. Although the noise generated by powering up the COMPACT 8 is
reduced to a bare minimum and is nearly null with the OUT (17 and 20) controls down, it is always
advisable not to forget about this power-up sequence: sound sources, mixer, equalizers, active filters
and power amplifiers. Power down the equipment by following the inverse sequence. This way the peaks
or transients produced by powering up / down a device do not affect the following one in the audio chain
and, as a result, they do not reach the loudspeakers, which are the most vulnerable audio elements in
this case.
4.2. Monitoring
The COMPACT 8 is equipped with an acoustical and visual monitoring system, through
headphones and VU METER. When switching ON any of the PFL buttons (7), signal(s) present at the
input(s) will be heard through the headphones and seen on the VU METER. If no switch is at the ON
position, the signal present at the main mix bus is monitored (open faders).
4.3. Channel gain and equalization
These controls allow individual input sensitivity and tone adjustments for each channel.
Thanks to the GAIN (1) control, you can precisely adjust the signal level of an incoming musical
signal to match the level of the music that is playing on air through another channel. This operation may
be performed visually (through the left VU-meter) and acoustically (through the headphones),
successively comparing both signals with the PFL buttons. The Gain knobs offer an adjustment range of
±20dB.
The three band tone controls (6-9-10) affect bass, mid and treble frequencies and offer a ±15dB
variation range. Please be careful when using the tone controls in order not to overload the
loudspeakers.
Furthermore, the mid section features a semiparametric control (8) that allows adjustment of the
center frequency. The frequency adjustment range goes from 300Hz to 6k5Hz.
4.4. Channel indicators
Each of the 8 input channels features two indicators. The green SP LED (4) shows the presence
of signal on the currently selected input. The indicator lights up at a threshold of –40dBV.
The red PEAK LED (3) warns about the risk of saturation, that is exceeding the recommended
signal input level limit. This LED may sporadically flash without risk of damaging the unit, but it should
never stay lit continuously. This indicator lights up at a threshold of 10dBV
4.5. Talkover
This device automatically reduces the signal level of the main output. This happens at the first
voice "hit" of the speaker on the microphone (or line) plugged into channel 8. When the speaker stops
talking, the music level comes up to the initial level. This function is enabled through the TALKOVER
(25) switch, and has efficiency, EFF (26), i.e. main signal level attenuation (between 0 and 30dB) and
recovery time, TIME (14), the time necessary for a progressive come back to the original level (between
0,1 and 3 sec).
The Talkover can be activated by channel 7 if certain internal jumpers for the bus-assignment
are re-soldered. See configuration diagram.
This modification must be performed by an Authorized Technical Service.
6
Page 7

4.6. Outputs
The COMPACT 8 mixer has two independent outputs, OUT 1 (34-35) and OUT 2 (33). Each one
has its own volume control.
The COMPACT 8 is adjusted by default at 0dBV(1V) outputs level. This can be internally
modified to +6dBV(2V). See configuration diagram. This modification must be performed by an
Authorized Technical Service.
You must be careful when setting up the general output level of the mixer. The "clip"
display of the connected power amplifiers must never remain permanently lit, but do it only occasionally
by following the rhythm of the bass signals that are being played.
The OUT1 output (34-35) is balanced or symmetrical, and the pin-out of the connector is as
follows:
Hot or direct signal > Pin 2
Cold or inverted signal > Pin 3
Ground > Pin 1
The balanced circuit simulates an output transformer, so if you wish to use OUT 1 in nonbalanced mode, you should short circuit the unused pin to ground. Otherwise, the signal will not have an
appropriate level and quality.
The OUT 2 output (33) is non-balanced or asymmetrical.
The COMPACT 8 has one recording output REC (36), which is pre-talkover, i.e. no signals which
activate the talkover are passed to this output, so no attenuation occurs).
5. CONSIDERATIONS
5.1. Ground loops, background noise
You should always make sure that the signal sources coming to the unit, as well as all devices
connected to its outputs do not have their grounds interconnected, that is; ground must never come from
two different devices. Should this ever happen, noises could occur and seriously interfere the sound
quality.
Cable shielding, when connected to the chassis, must never be interconnected, so as to avoid
ground loops.
The COMPACT 8 mixer has been designed for the lowest possible background noise.
Independently from the electronic design itself, background noise level will directly depend on the right
installation and use of the mixing unit.
I. e.: setting a channel VOL to "2" and the output to "10" is not the same as the other way round.
In the first case, the signal coming to the mixing amplifier - which has got its own noise - is low, and so is
the signal-to-noise ratio (low signal). When the output amplifier boosts the whole signal we will get a very
high background noise. In the second case - with the channel fader at maximum - the mixing level is
high, and so is the signal-to-noise ratio. When the signal reaches the VOL OUTPUT and is boosted, it
will keep a much better signal-to-noise ratio than in the preceding case.
5.2. Cleaning
The front panel should not be cleaned with dissolvent or abrasive substances because
silk-printing could be damaged. To clean it, use a soft cloth slightly wet with water and neutral liquid
soap; dry it with a clean cloth. Be careful that water never gets into the unit through the holes of the front
panel.
7
Page 8
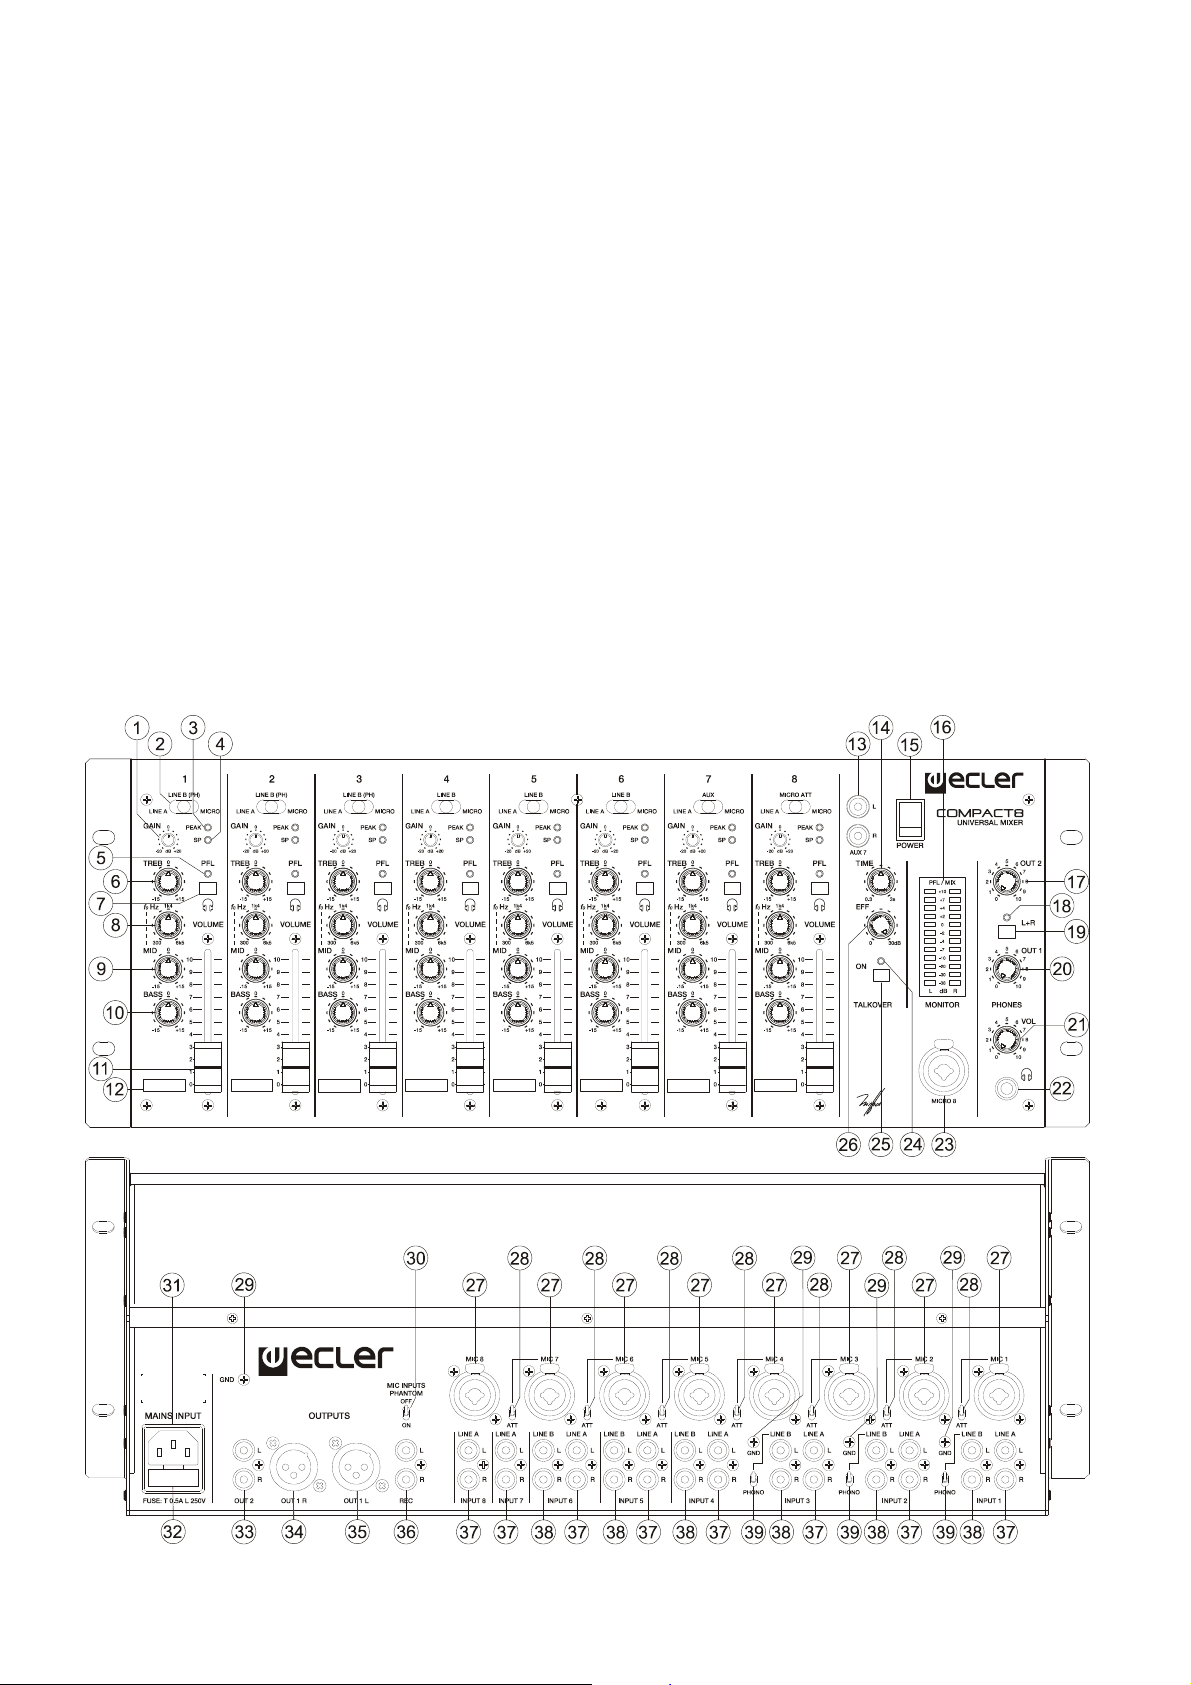
6. FUNCTION LIST
1. Input sensitivity adjust, GAIN 21. Headphones volume control, VOL
2. Input selector 22. Stereo jack, headphones
3. LED indicator, PEAK 23. Microphone balanced input, MICRO 8
4. LED indicator, SP 24. LED indicator, TALKOVER ON
5. LED indicator, PFL 25. Talkover switch
6. Treble control, TREB 26. Talkover effect control, EFF
7. Prefader listening control, PFL 27. Microphone balanced input, MIC
8. Midrange semiparametric frequency adjust, FREQ 28. Microphone input sensitivity switch, ATT
9. Midrange control, MID 29. Ground pin, GND
10. Bass control, BASS 30. Phantom switch, PHANTOM
11. Channel gain, VOLUME 31. Mains socket
12. Space for identifying label 32. Fuse holder
13. Line input, AUX 7 33. RCA output, OUT 2
14. Talkover Recovery time control, TIME 34. Right channel balanced output, OUT1 R
15. Mains switch and indicator, POWER 35. Left channel balanced output, OUT1 L
16. LED VU Meter 36. Recording output, REC
17. Volume control OUTPUT 2, OUT 2 37. Line input, LINE A
18. LED indicator, L+R 38. Line input, LINE B
19. Left and Right signal sum, L+R 39. Phono – line switch, PHONO – LINE B
20. Volume control OUTPUT1, OUT 1
7. FUNCTION DIAGRAM
8
Page 9

MANUAL DE INSTRUCCIONES
1. NOTA IMPORTANTE 10
1.1. Precauciones 10
2. INTRODUCCIÓN 10
3. INSTALACIÓN 11
3.1. Ubicación y montaje 11
3.2. Fuentes de señal conectables 11
4. OPERACIÓN Y USO 12
4.1. Puesta en funcionamiento 12
4.2. Monitoraje 12
4.3. Ganancia y ecualización de vía 12
4.4. Indicadores de vía 12
4.5. Talkover 13
4.6. Salidas 13
5. CONSIDERACIONES 14
5.1. Bucles de masa, ruido de fondo 14
5.2. Limpieza 14
6. LISTA DE FUNCIONES 15
7. DIAGRAMA DE FUNCIONES 15
8. CARACTERÍSTICAS TÉCNICAS 30
9. DIAGRAMAS 31
9.1. Diagrama de configuración 31
9.2. Diagrama de bloques 32
Todos los datos están sujetos a variación debida a tolerancias de producción. ECLER S.A. se reserva el derecho de
realizar cambios o mejoras en la fabricación o diseño que pudieran afectar las especificaciones.
9
Page 10

1. NOTA IMPORTANTE
Agradecemos su confianza por haber elegido nuestro mezclador COMPACT 8. Para conseguir la
máxima operatividad y rendimiento de su mesa de mezclas es MUY IMPORTANTE antes de su
conexión leer detenidamente y tener muy presentes las consideraciones que en este manual se
especifican.
Para garantizar el óptimo funcionamiento de este aparato recomendamos que su mantenimiento
sea llevado a cabo por nuestros Servicios Técnicos autorizados.
1.1. Precauciones
Este aparato debe ser conectado a tierra mediante su cable de alimentación.
No exponga el aparato a la caída de agua o salpicaduras, no ponga encima objetos con líquido
ni fuentes de llama desnuda, como velas. No obstruya los orificios de ventilación con ningún
tipo de material.
Cualquier cambio en la configuración debe ser realizado por personal técnico cualificado.
En caso de requerir alguna intervención y/o conexión desconexión del aparato debe
desconectarse previamente de la alimentación.
En el interior del aparato no existen elementos manipulables por el usuario.
2. INTRODUCCIÓN
En el COMPACT 8 ECLER ha unido versatilidad, simplicidad y su reconocida calidad en un
mezclador universal especialmente adaptado para ser utilizado por personal no técnico. De fácil e
intuitiva utilización este mezclador cubre un amplio abanico de instalaciones que pueden ir desde las
salas de conferencia o salas de actos, aulas, centros culturales, polideportivos, iglesias, sonorización en
general ... por citar algunos ejemplos.
Su reducido tamaño y chasis especialmente concebido tanto para el montaje en muebles rack
normalizados como en sobremesa posibilitan su adaptación a los más diversos entornos. Finalmente su
concepción tecnología y componentes empleados en su fabricación lo hacen 100% profesional.
El COMPACT 8 dispone de 8 vías mezclables cada una de ellas con diversas posibilidades de
entrada:
Vía 1-2-3 LINE A / LINE B / MICRO
LINE B conmutable a PHONO desde panel posterior
MICRO conmutable a MICRO ATT desde panel posterior
Vía 4-5-6 LINE A / LINE B / MICRO
MICRO conmutable a MICRO ATT desde panel posterior
Vía 7 LINE A / AUX / MICRO
AUXILIAR en panel frontal
MICRO conmutable a MICRO ATT desde panel posterior
Vía 8 LINE A / MICRO ATT / MICRO
Entrada MICRO duplicada en panel frontal
Todos los canales disponen de un selector de entradas de palanca, control de ganancia
independiente para cada una de las vías así como controles de tono de tres bandas con
semi paramétrico en medios. (Ajuste de frecuencia central, Q fija)
Todas las entradas disponen de la función PFL para monitorizar visualmente mediante el
Vu-Metro y acústicamente mediante auriculares cualquier señal conectada a las entradas de la mesa.
10
Page 11

3. INSTALACIÓN
3.1. Ubicación y montaje
La principal consideración a tener en cuenta en el momento de buscar la ubicación del
mezclador COMPACT 8 debe ser la máxima comodidad de trabajo del usuario, permitir una total
facilidad en la realización de las conexiones que el mezclador va a ser punto de partida y llegada.
El COMPACT 8 equipa unos perfiles laterales que permiten, dado su tamaño standard de 19"
(482.6mm) y 4 unidades rack de altura (177mm), montarlo en muebles normalizados.
Dada la elevada ganancia de las entradas de PHONO y de MICRO debe procurarse situar el
mezclador lo más alejado posible de fuentes de ruido (variadores de tensión, motores, etc. ...) así como
de cualquier cable de red. Por esta misma razón y bajo ninguna circunstancia debe quitarse la tapa
metálica del aparato.
Ya que el consumo del COMPACT 8 es muy bajo, éste no precisa ventilación, sin embargo debe
evitarse que esté expuesto a una temperatura extrema y procurar que la atmósfera del local en que esté
emplazado sea lo más seca y limpia de polvo posible.
El COMPACT 8 funciona con tensión alterna de 90 a 264V y 47 a 63 Hz. Este aparato equipa
una fuente de alimentación sobredimensionada capaz de adaptarse sin ningún tipo de ajuste a la
tensión de red de cualquier país del mundo.
Para proteger a la mesa de mezclas de eventuales sobrecargas, el COMPACT 8 está protegido
con un fusible de red (32) de 0.5A temporizado. En el caso de que éste se fundiera se sustituiría por
otro de idénticas características. EN NINGÚN CASO DEBE PONERSE UN FUSIBLE DE VALOR MÁS
ELEVADO.
PRECAUCIÓN: El cambio de fusibles debe ser realizado por personal técnico cualificado.
3.2. Fuentes de señal conectables
- Platos giradiscos: Deben ir equipados con cápsula magnética capaz de entregar un nivel de
salida nominal entre -60 y -20dBV (1 y 100mV). Dado que las entradas de PHONO (38) del
COMPACT 8 tienen una elevada capacidad de sobrecarga, puede admitir cápsulas de mayor nivel de
salida. Estas entradas tienen una sensibilidad nominal de -40dBV(10mV).
- Micrófonos: Las entradas de Micro (23-27) están preparadas para un nivel nominal de entrada
de -50dBV (3.16mV). A través de los conmutadores ubicados en el panel posterior (28), en posición
MIC. ATT se efectúa una reducción de 20dB en la sensibilidad de esta entrada, pasará pues de –50 a
-30dB (3.16 a 31.6mV). Los conectores de micrófono son del tipo “COMBO”. El conector COMBO
combina en un mismo conector la conexión tipo XLR-3 y la conexión tipo jack ¼”. Estas entradas
admiten la conexión en modo balanceado. Para ello se realizará la conexión como se indica:
XLR 3 Jack ¼¨
Vivo o señal directa > Terminal 2 Punta
Frío o señal invertida > Terminal 3 Aro central
Masa > Terminal 1 Base
Los micrófonos deben ser de baja impedancia (de 200 a 600) y monofónicos. Para conexiones
NO balanceadas cortocircuitar a masa el terminal 3 o el aro central, en el caso de emplear jack.
El COMPACT 8 dispone de alimentación phantom para micrófonos de condensador. El
conmutador (30) de activación general de la alimentación phantom se encuentra ubicado en el panel
posterior del aparato. La tensión phantom suministrada es de 18 VDC.
- Entradas LINE. La sensibilidad de las entradas LINE (13-37-38) es 0dBV (1V) y se conectaran los
reproductores CD, DAT, MP3, DVD Audio, Magnetófonos, cassettes, sintonizadores, videos...
La entrada “AUX 7” (13) asociada a la vía 7 y ubicada en el panel de mandos admite las mismas
fuentes de señal que las entradas marcadas como “LINE”.
11
Page 12

- Auriculares: Para obtener el mejor rendimiento en su funcionamiento, éstos deberán ser de alta
impedancia (200-600). Se conectarán a la salida (22) con el símbolo de unos cascos situada en su
propia placa de mandos mediante un conector jack normalizado de 1/4" estereofónico. El casquillo del jack
será la masa, el anillo central el canal derecho y la punta el canal izquierdo.
- Amplificadores de potencia: Ver apartado 4.6.
4. OPERACIÓN Y USO
4.1. Puesta en funcionamiento
Ésta se realizará mediante el interruptor de red POWER (15) e inmediatamente se iluminará el
piloto verde integrado en el propio interruptor. Aunque el ruido producido por la puesta en funcionamiento
del COMPACT 8 es mínimo y queda prácticamente anulado al hacerlo con los controles de OUT (17 y 20)
cerrados, siempre resulta muy recomendable poner en marcha todos los aparatos siguiendo la secuencia
siguiente: Fuentes de sonido, unidad de mezclas, ecualizadores, filtros activos y finalmente amplificadores
de potencia. El paro de los aparatos debe realizarse en la secuencia inversa. Siguiendo este orden los
picos o transitorios producidos por el encendido o apagado de los aparatos no afecta a los siguientes, y
por consiguiente tampoco llegan a los altavoces, elementos extremadamente susceptibles de averiarse en
estos casos.
4.2. Monitoraje
El COMPACT 8 está dotado con un sistema de monitorización auditiva y visual a través de
auriculares y Vu-metro. Accionando cualquiera de los interruptores PFL (7), oiremos por los auriculares
y veremos por el VU METER la señal presente en la-s vía-s de entrada. Cuando no hay ningún
interruptor accionado se monitoriza la señal presente en el bus de mezclas (faders abiertos).
4.3. Ganancia y ecualización de vía
Estos controles permiten ajustar individualmente para cada una de las vías los niveles de
sensibilidad de entrada y tonos.
Mediante el control de GAIN (1), ajuste fino de la ganancia de entrada, equipararemos el nivel de
señal a mezclar con la que esté sonando ya en directo a través de otra vía. Esta operación puede
realizarse visualmente mediante el Vu-metro y auditivamente mediante los auriculares, realizando
sucesivas comparaciones entre ambas señales a través de los interruptores de PFL. Los controles GAIN
proporcionan un margen de ajuste de ±20dB.
Los controles de tono (6-9-10) son de 3 bandas, graves medios y agudos, proporcionan un
margen de actuación de ±15dB. Sea precavido en su utilización para no sobrecargar los altavoces.
Además el mando de medios dispone de un control semi paramétrico (8) que posibilita el ajuste
de la frecuencia central. Tiene un margen de actuación entre 300Hz y 6k5Hz.
4.4. Indicadores de vía
Cada una de las 8 vías de entrada dispone de dos indicadores. El indicador SP (4) de color
verde nos advierte de la presencia de señal en la entrada asignada mediante el selector de entrada
activa. El nivel de señal a partir del cual se ilumina es –40dBV.
El indicador PEAK (3) de color rojo nos advierte del riesgo de saturar, excederse en el nivel de
señal recomendable. Este indicador puede iluminarse de forma esporádica sin riesgo alguno para el
equipo pero nunca debe hacerlo de forma continuada. El nivel de señal a partir del cual se ilumina es
10dBV.
12
Page 13

4.5. Talkover
Este dispositivo reduce de forma automática el nivel de señal del bus de mezcla a partir del
primer golpe de voz sobre el micrófono (o línea) conectado a la vía 8. Cuando se deja de hablar se
recuperará de forma paulatina el volumen primitivo. El talkover se activa mediante el interruptor
TALKOVER (25) existiendo la posibilidad de controlar su eficiencia, EFF (26), nivel de atenuación de la
señal principal (entre 0 y 30dB) y el tiempo de recuperación, TIME (14), tiempo necesario para que de
una forma progresiva regrese al nivel original (entre 0,1 y 3 seg.).
Existe la posibilidad de que el talkover se active desde la vía 7 modificando los puentes
internos, realizados mediante soldaduras, de asignación al bus. Ver el diagrama de
configuración. Esta operación debe ser realizada por un Servicio Técnico Oficial.
4.6. Salidas
La mesa COMPACT 8 dispone de dos salidas OUT 1 (34-35) y OUT 2 (33) independientes.
Cada una dispone de su propio control de volumen.
El COMPACT 8 se suministra con las salidas ajustadas a 0dBV(1V). Siendo posible
modificarlas internamente a +6dBV(2V). Ver el diagrama de configuración. Esta operación
debe ser realizada por un Servicio Técnico Oficial.
Debe tenerse precaución al manipular el nivel general de salida de la mesa de mezclas de que
nunca queden permanentemente encendidos los indicadores de "clip", recorte, de las etapas de
potencia conectadas, sino que lo hagan como máximo al ritmo de las frecuencias más graves que les
llegan.
La salida OUT 1 (34-35) es del tipo balanceado o simétrico siendo la distribución de su patillaje
la siguiente
Vivo o señal directa > Terminal 2
Frío o señal invertida > Terminal 3
Masa > Terminal 1
El circuito balanceador simula un transformador, por lo cual de ser necesario usar la salida
OUT 1 en modo no balanceado debe cortocircuitarse a masa la patilla de salida no utilizada. De no
hacerlo así la señal de salida no tendrá el nivel ni la calidad adecuada.
La salida OUT 2 (33) es del tipo NO BALANCEADO O ASIMÉTRICO.
El COMPACT 8 posee una salida de grabación REC (36) antes del talkover (no hay señal de las
vías que activan el talkover y por lo tanto no existen atenuaciones)
13
Page 14

5. CONSIDERACIONES
5.1. Bucles de masa, ruido de fondo
Debe procurarse en todo momento que las fuentes de señal que lleguen a la mesa de mezclas,
así como todos los aparatos que estén conectados a su salida, no tengan las masas interconectadas,
es decir que nunca les lleguen las masas por dos o más caminos distintos, ya que de esta manera se
podrían producir zumbidos que llegarían incluso a interferir la calidad de la reproducción sonora.
Los blindajes de los cables, de estar conectados a chasis, en ningún momento deben estar
unidos entre sí. De esta forma evitaremos la formación de bucles de masa.
El mezclador COMPACT 8 ha sido concebido para obtener el menor ruido de fondo posible.
Independientemente de la concepción electrónica, el ruido de fondo dependerá directamente de la
correcta utilización e instalación de la unidad de mezcla.
No es lo mismo, por ejemplo, tener el FADER de una vía a "2" y el VOL de la salida OUT a "10"
que a la inversa. En el primer caso la señal que llega al amplificador de mezcla, que intrínsecamente
tiene un nivel de ruido de fondo propio, es débil, por lo que la relación señal / ruido es baja (poca señal).
Cuando el amplificador de salida eleve indistintamente todo el conjunto tendremos a la salida un nivel
de ruido de fondo muy elevado. En el segundo caso, al estar el FADER de la vía al máximo, la señal
que recibe el amplificador de mezcla es grande y por tanto con una relación señal / ruido grande
también, así cuando esta señal llegue al VOL de salida y sea amplificada, guardará mejor relación que
en el caso anterior.
5.2. Limpieza
La carátula no deberá limpiarse con sustancias disolventes o abrasivas puesto que se corre el
riesgo de deteriorar la serigrafía. Para su limpieza se utilizará un trapo humedecido con agua y un
detergente líquido neutro, secándola a continuación con un paño limpio. En ningún caso se debe
permitir la entrada de agua por cualquiera de los orificios del aparato.
14
Page 15

6. LISTA DE FUNCIONES
1. Ajuste de la sensibilidad de entrada, GAIN 20. Control de volumen OUTPUT1, OUT 1
2. Selector de entradas 21. Control de volumen auriculares, VOL
3. Indicador luminoso, PEAK 22. Jack estéreo auriculares
4. Indicador luminoso, SP 23. Entrada balanceada de micrófono, MICRO 8
5. Indicador luminoso, PFL 24. Indicador luminoso, TALKOVER ON
6. Control de agudos, TREB 25. Puesta en marcha Talkover
7. Conmutador de preescucha, PFL 26. Control de efecto talkover, EFF
8. Selección de la frecuencia central de actuación 27. Entrada balanceada de micrófono, MIC
de medios semi paramétrico, FREQ 28. Conmutador de sensibilidad de micro, ATT
9. Control de medios, MID 29. Borne de toma de masa, GND
10. Control de graves, BASS 30. Conmutador phantom, PHANTOM
11. Control de volumen de la vía, VOLUME 31. Base de toma de red
12. Espacio para la etiqueta identificativa 32. Portafusibles
13. Entrada de línea, AUX 7 33. Salida RCA, OUT 2
14. Control tiempo de recuperación talkover, TIME 34. Salida balanceada canal derecho, OUT 1 R
15. Interruptor y piloto puesta en marcha, POWER 35. Salida balanceada canal izquierdo, OUT1 L
16. Vu-meter a leds 36. Salida de grabación, REC
17. Control de volumen OUTPUT2, OUT 2 37. Entrada de línea, LINE A
18. Indicador luminoso, L+R 38. Entrada de línea, LINE B
19. Suma de señales izquierda y derecha, L+R 39. Conmutador, PHONO – LINE B
7. DIAGRAMA DE FUNCIONES
15
Page 16

NOTICE D’UTILISATION
1. NOTE IMPORTANTE 17
1.1. Précautions 17
2. INTRODUCTION 17
3. INSTALLATION 18
3.1. Emplacement et montage 18
3.2. Sources de signal 18
4. FONCTIONNEMENT ET UTILISATION 19
4.1. Mise en service 19
4.2. Pré-écoute 19
4.3. Gain et égalisation des voies 19
4.4. Voyants d'indication de voie 19
4.5. Talkover 20
4.6. Sorties 20
5. DIVERS 21
5.1. Boucles de masse, bruit de fond 21
5.2. Entretien 21
6. LISTE DE FONCTIONS 22
7. DIAGRAMME DE FONCTIONS 22
8. CARACTÉRISTIQUES TECHNIQUES 30
9. SCHÉMAS 31
9.1. Schéma de configuration 31
9.2. Diagramme des blocs 32
Toutes les valeurs mentionnées dans ce document sont susceptibles d’être modifiées en raison des tolérances de
production. ECLER SA se réserve le droit de changer ou d’améliorer les processus de fabrication ou la présentation de
ses produits, occasionnant ainsi des modifications dans les spécifications techniques.
16
Page 17

1. NOTE IMPORTANTE
Nous vous remercions de la confiance que vous nous portez en choisissant notre mélangeur
COMPACT 8. Pour obtenir le meilleur résultat de cet appareil, il est très important de lire attentivement
les instructions ci-dessous avant de le brancher.
Pour obtenir le meilleur rendement de cet appareil, il est important que le entretien se réalisé par
notre Service Technique Ecler.
1.1. Précautions
Cet appareil doit être impérativement relié à la terre via son câble d'alimentation.
Eviter tout contact avec l'eau. L'appareil doit être installé à l'écart de tout objet contenant un
liquide ou de toute flamme nue, comme une bougie par exemple. Les orifices de ventilation
doivent être dégagés en toute circonstance.
Seul un personnel technique qualifié est habilité à effectuer un changement de configuration.
Avant toute intervention et/ou de connexion/déconnexion, le cordon d'alimentation de l'appareil
doit être préalablement débranché.
Il n'existe aucun élément destiné à l'utilisateur à l'intérieur de l'appareil.
2. INTRODUCTION
Dans la COMPACT 8, ECLER a réuni la polyvalence, la simplicité et sa célèbre qualité en une
table de mixage universelle convenant particulièrement à l'emploi par des non techniciens. D'utilisation
facile et intuitive, cette table de mixage couvre un vaste éventail d'installations pouvant aller des salles
de conférence ou de séminaires aux salles de classe en passant par les centres culturels, les salles
omnisports, les églises, la sonorisation en général... pour ne citer que quelques exemples.
Sa taille réduite et son châssis spécialement conçu pour une installation aussi bien en rack
normalisé que sur une surface plane (bureau par exemple) lui permettent de s'adapter aux
environnements les plus divers. Enfin, sa technologie ainsi que ses différents composants font de cette
console un équipement 100% professionnel.
La console COMPACT 8 dispose de 8 voies mixables, chacune d'entre elles bénéficiant de
diverses options d'entrées :
Voie 1-2-3 LINE A / LINE B / MICRO
LINE B commutable sur PHONO depuis le panneau arrière de la console
MICRO commutable sur MICRO ATT depuis le panneau arrière de la console
Voie 4-5-6 LINE A / LINE B / MICRO
MICRO commutable sur MICRO ATT depuis le panneau arrière de la console
Voie 7 LINE A / AUX / MICRO
AUXILIAIRE (entrée en face avant de la console)
MICRO commutable sur MICRO ATT depuis le panneau arrière de la console
Voie 8 LINE A / MICRO ATT / MICRO
MICRO dupliqué en face avant de la console
Toutes les voies disposent d'un levier sélecteur d'entrée, d'une commande de gain indépendante
pour chacune des voies ainsi que de commandes de tonalité à trois bandes avec semi paramétrique
pour les médiums (réglage de fréquence centrale, Q fixe).
Toutes les entrées disposent de la fonction PFL, qui permet une supervision visuelle (par
Vu-Mètre) et acoustique (par casque) de tout signal connecté aux entrées de la console.
17
Page 18

3. INSTALLATION
3.1. Emplacement et montage
Le principal critère dont il faut tenir compte au moment de choisir l'emplacement de la console de
mixage COMPACT 8 doit être le confort optimal de travail de l'opérateur, ainsi que la facilité de
réalisation des connexions dont la console est le point de départ et d'arrivée.
La console COMPACT 8 est équipée de profilés latéraux qui permettent, étant donné sa taille
standard de 19" (482,6mm) et ses 4 unités rack de hauteur (177mm), de l'encastrer au sein de
structures normalisées.
Étant donné le gain élevé des entrées PHONO et MICRO, la console doit être installée le plus
loin possible des sources de bruit (variateurs de tension, moteurs, etc.) et de tout câble secteur. Pour
cette raison et en aucune circonstance, le capot métallique de l'appareil ne doit être retiré.
La consommation de la console COMPACT 8 étant très faible, aucune ventilation n'est
nécessaire. Il faut cependant éviter de l'exposer à des températures extrêmes et veiller à ce que
l'atmosphère du local où elle est installée soit la plus sèche et la plus exempte de poussière possible.
La console COMPACT 8 fonctionne sur courant alternatif de 90 à 264 V (47 à 63 Hz). Tous les
modèles sont équipés d'une source d'alimentation capable de s'adapter sans aucun réglage spécifique à
la tension secteur en vigueur dans le pays concerné.
Pour protéger la console de mixage contre d'éventuelles surcharges, cette dernière est protégée
par un fusible secteur (32) de 0,5A retardé. En cas de fonte de celui-ci, le remplacer par un autre de
caractéristiques identiques. IL NE FAUT EN AUCUN CAS UTILISER UN FUSIBLE DE VALEUR
SUPÉRIEURE.
ATTENTION : Le changement des fusibles doit être effectué par un personnel technique
qualifié.
3.2. Sources de signal
- Platine tourne-disques : celles-ci doivent être équipées d'un dispositif magnétique capable de
délivrer un niveau de sortie nominale compris entre -60 et -20dBV (1 - 100mV). Étant donné que les
entrées PHONO (38) de la console COMPACT 8 ont une capacité de surcharge importante, des boîtiers
ayant un niveau de sortie supérieur peuvent être admis. Ces entrées ont une sensibilité nominale de
-40dBV (10mV).
- Microphones : les entrées Micro (23-27) acceptent un niveau nominal d'entrée de -50dBV
(3,16mV). Les connecteurs du microphone sont du type “COMBO” (mi-XLR-3 / mi-jack 6,35 mm). Quand
les sélecteurs MIC ATT. (28) de la face arrière est en position MIC. ATT, l'atténuateur réduit de 20dB la
sensibilité de cette entrée, qui passe de –50 à –30dB (3,16 à 31,6mV). Ces entrées permettent de
réaliser des connexions symétriques. Pour cela, respecter les indications suivantes :
XLR 3 Jack 6,35 mm
Point chaud ou signal direct > Borne 2 Pointe
Point froid ou signal inversé > Borne 3 Bague centrale
Masse > Borne 1 Base
Les microphones doivent être de basse impédance (de 200 à 600) et monophoniques. Pour
des connexions asymétriques, mettez à la masse la broche 3, ou la bague si vous employez des jacks.
La console COMPACT 8 dispose d'une alimentation fantôme pour micros équipés de
condensateur. Le commutateur d'activation générale de cette alimentation se situe sur le panneau arrière
de l'appareil (30). L'alimentation fantôme fournie est un CC de 18 V.
- Entrées LINE (LIGNE). La sensibilité des entrées LINE (13-37-38) est de 0dBV (1V). Il est
possible d'y raccorder des équipements de type lecteurs CD, DAT, MP3, DVD audio, magnétophones,
cassettes, syntoniseurs, vidéos...
L'entrée “AUX 7” (13) associée à la voie 7 et localisée sur la face avant de l'appareil, admet les
mêmes sources (signal) que les entrées repérées “LINE”.
18
Page 19

- Écouteurs : Pour obtenir leur meilleur rendement de fonctionnement, ceux-ci devront être de
haute impédance (200-600). Ils seront branchés à la sortie (22) ayant un symbole de casque, située
dans le panneau de commandes, au moyen d'une fiche jack 6,35 mm stéréo normalisée. Le manchon
du jack sera la masse, la bague le canal droit et la pointe le canal gauche.
- Amplificateurs de puissance : se reporter au paragraphe 4.6.
4. FONCTIONNEMENT ET UTILISATION
4.1. Mise en service
Cette mise en service s'effectue à l'aide de l'interrupteur secteur POWER (15). Le voyant vert
intégré à l'interrupteur s'allume immédiatement. Bien que le bruit produit par la mise en marche de la
COMPACT 8 soit minime et pratiquement inexistant si l'opération est exécutée avec les commandes OUT
(17 et 20) inhibées, il est vivement conseillé de mettre en marche tous les appareils en respectant la
séquence suivante : sources sonores, unité de mixage, équaliseurs, filtres actifs et enfin amplificateurs de
puissance. L'arrêt des appareils doit s'effectuer selon la séquence inverse. En suivant cet ordre, les crêtes
ou les surtensions transitoires produites par la mise sous/hors tension des appareils n'affectent pas ces
derniers, et par conséquent n'atteignent pas les haut-parleurs, éléments extrêmement susceptibles d'être
endommagés dans de telles circonstances.
4.2. Pré-écoute
La console COMPACT 8 est équipée d'un système de contrôle acoustique et visuel. Cette
supervision s'effectue via un casque et un VU-METRE. En actionnant l'un des interrupteurs PFL (7), on
entend via le casque et l'on visualise sur le VU-METRE le signal présent sur la (les) voie(s) d'entrée. Si
aucun interrupteur n'est actionné, le signal présent sur le bus de mixage (faders ouverts) est supervisé.
Lorsqu' aucun interrupteur n'est actionné, le signal observé est alors celui présent sur le bus de mixage
(faders ouverts).
4.3. Gain et égalisation des voies
Ces commandes permettent de régler les sensibilités d'entrée et les tonalités individuellement
pour chacune des voies.
Grâce au réglage fin du gain d'entrée (GAIN (1)), il est possible de comparer le niveau du signal
à mixer avec celui en cours d'écoute sur une autre voie. Cette opération peut se faire via le VU-METRE
ou bien via le casque, en comparant successivement les deux signaux au moyen des commandes PFL.
La plage de réglage du GAIN est de ±20dB.
Les commandes de tonalité (6-9-10) sont de type tri-bandes (graves médium et aigus). Elles
offrent une plage de réglage de ±15dB. Lors de leur utilisation, veiller à ne pas surcharger les hautparleurs.
En outre les médiums disposent d'une commande semi paramétrique (8) pour régler la fréquence
centrale corrigée. Elle a une plage de fonctionnement comprise entre 300Hz et 6k5Hz.
4.4. Voyants d'indication de voie
Chacune des 8 voies d'entrée dispose de deux voyants. Le voyant vert SP (4) avertit de la
présence d'un signal sur l'entrée assignée via le sélecteur. Ce voyant s'allume lorsque le niveau du
signal détecté atteint –40dBV.
Le voyant rouge PEAK (3) indique un risque de saturation, c'est-à-dire de dépassement du
niveau recommandé pour le signal. Ce voyant peut s'allumer de manière sporadique sans que cela
présente le moindre risque, mais il ne doit en aucun cas s'allumer de façon continue. Enfin, ce voyant
s'allume lorsque le niveau du signal détecté atteint 10dBV.
19
Page 20

4.5. Talkover
Ce dispositif réduit de manière automatique le niveau de signal du bus de mixage dès que le son
de la voix est détecté sur le microphone (ou la ligne) branché à la voie 8. Quand vous arrêtez de parler,
le volume d'origine revient progressivement. La commande de Talkover fonctionne dès que l'interrupteur
TALKOVER correspondant (25) est activé. Il est possible de contrôler son efficacité EFF (26), son
niveau d'atténuation du signal principal (entre 0 et 30dB) et le temps de récupération TIME (14), temps
nécessaire pour que progressivement il revienne au niveau initial (entre 0,1 et 3 secondes).
Il est possible d'activer la fonction Talkover à partir de la voie 7. Il est pour cela nécessaire de
modifier les ponts (straps) internes (réalisés par soudure) d'assignation au bus. Pour plus de
précision, se reporter au schéma de configuration.
Cette opération doit être réalisée par un Service Technique Officiel.
4.6. Sorties
La console COMPACT 8 dispose de deux sorties OUT 1 (34-35) et OUT 2 (33) indépendantes.
Chacune possède sa propre commande du volume.
La console COMPACT 8 sort d'usine avec les sorties pré-réglées à 0dBV(1V). Mais il est
toujours possible de modifier ces réglages de façon interne à +6dBV(2V). Voir schéma de
configuration. Cette opération doit être réalisée par un Service Technique Officiel.
Il faut veiller, lorsque l'on manipule le niveau général de sortie de la table de mixage, à ce que les
indicateurs de "clip", coupure, des amplificateurs de puissance raccordés ne soient jamais allumés en
permanence ou, si tel doit être le cas, s'assurer qu'ils le sont en suivant l'amplitude des graves.
La sortie OUT 1 (34-35) est de type symétrique et son brochage est le suivant :
Point chaud ou signal direct > Broche 2
Point froid ou signal inversé > Broche 3
Masse > Broche 1
Le circuit symétrique simule un transformateur. Si l'on désire se servir de la sortie OUT 1 en
mode asymétrique, il est alors nécessaire de relier à la masse la sortie inutilisée. Si l'on ne procède pas
ainsi, le signal de sortie n'aura ni le niveau ni la qualité adéquats.
La sortie OUT 2 (33) est de type ASYMÉTRIQUE.
La console COMPACT 8 est équipée d'une sortie d'enregistrement REC (36), placée avant le
Talkover (aucun signal présent sur les voies capables d'activer la fonction de Talkover - il n'y a donc pas
d'atténuation).
20
Page 21

5. DIVERS
5.1. Boucles de masse, bruit de fond
S'assurer que toutes les sources de signal qui arrivent à la table de mixage ainsi que tous les
appareils qui sont raccordés à sa sortie, n'ont pas les masses interconnectées, c'est à dire que la masse
n'arrive pas par deux ou trois voies différentes; en effet, ceci peut provoquer des bruits qui altèrent le
signal sonore.
S'assurer aussi que les blindages des câbles soient connectés au châssis sans jamais être reliés
entre eux afin d'éviter la formation de boucles de masse.
Le COMPACT 8 a été conçu pour obtenir le meilleur bruit de fond possible indépendamment de
la conception électronique, avec laquelle a été réalisée le mixeur, le niveau de bruit dépend directement
d'une utilisation correcte.
Ce n'est pas la même chose, par exemple, de mettre le Fader d'une voie à 2 et le Master à 10
que de mettre le Fader à 10 et le Master à 2.
1er cas: Fader à 2 et Master à 10.
Le signal qui arrive à l'amplificateur de mélange, qui par principe a un bruit de fond propre, est
faible, donc le rapport signal/bruit est bas (peu de signal). L'amplificateur de mélange amplifiant sans
distinction l'ensemble, on aura à la sortie un niveau de bruit de fond très élevé.
2ème cas: Fader à 10 et Master à 2.
Le Fader étant au maximum, le signal que reçoit l'amplificateur de sortie est élevé et le rapport
signal/bruit sera automatiquement bien meilleur que dans le cas précédent.
5.2. Entretien
Il est interdit d’utiliser des substances dissolvantes ou abrasives pour nettoyer la face avant,
celles-ci détériorant la sérigraphie. Nettoyer uniquement avec un chiffon humide. Attention! Jamais de
l’eau ou tout autre liquide ne doit pénétrer par les orifices du panneau de commande.
21
Page 22

6. LISTE DE FONCTIONS
1. Réglage de sensibilité d’entrée, GAIN 20. Contrôle de volume OUTPUT1, OUT 1
2. Sélecteur d’entrée 21. Contrôle de volume du casque, VOL
3. Indicateur lumineux, PEAK 22. Jack stéréo connexion casque
4. Indicateur lumineux, SP 23. Entrée symétrique Micro, MICRO 8
5. Indicateur lumineux, PFL 24. Indicateur lumineux, TALKOVER ON
6. Contrôle des aigus, TREB 25. Mise en marche du Talkover
7. Commutateur de pré-écoute, PFL 26. Contrôle de l’effet Talkover, EFF
8. Sélection de la fréquence centrale d'activation du 27. Entrée symétrique Micro, MIC
médium semi paramétrique, FREQ 28. Commutateur de sensibilité micro, ATT
9. Contrôle des médiums, MID 29. Borne de masse, GND
10. Contrôle des graves, BASS 30. Commutateur, PHANTOM
11. Gain de la voie, VOLUME 31. Embase secteur
12. Espace réservé à l'étiquette d'identification 32. Porte fusibles
13. Entrée ligne, AUX 7 33. Sortie RCA, OUT 2
14. Contrôle du temps de Talkover, TIME 34. Sortie symétrique canal droit, OUT1 R
15. Interrupteur de mise en marche, POWER 35. Sortie symétrique canal gauche, OUT1 L
16. VU-mètre à Leds 36. Sortie d'enregistrement, REC
17. Contrôle de volume OUTPUT 2, OUT 2 37. Entrée ligne, LINE A
18. Indicateur lumineux, L+R 38. Entrée ligne, LINE B
19. Somme signal Gauche et Droite, L+R 39. Commutateur, PHONO – LINE B
7. DIAGRAMME DE FONCTIONS
22
Page 23

BEDIENUNGSANLEITUNG
1. WICHTIGE VORBEMERKUNG 24
1.1 Sicherheitsmaßnahmen 24
2. EINFÜHRUNG 24
3. INSTALLATION 25
3.1. Aufstellungsort und Montage: 25
3.2. Anschließbare Signalquellen 25
4. INBETRIEBNAHME 26
4.1. Einschalten 26
4.2. Vorhören 26
4.3. Eingangsempfindlichkeit und Klangregelung 26
4.4. Kanalanzeigen 26
4.5. Talkover 27
4.6. Ausgänge 27
5. WEITERE ERLÄUTERUNGEN 28
5.1. Erdungsschleifen, Hintergrundrauschen 28
5.2. Reinigung 28
6. FUNKTIONSLISTE 29
7. FUNKTIONSÜBERSICHT 29
8. TECHNISCHE DATEN 30
9. DIAGRAMME 31
9.1. Konfigurations diagramm 31
9.2. Blockschaltbild 32
Alle Angaben sind ohne Gewähr. Messwerte können produktionsbedingten Schwankungen unterliegen. ECLER S.A.
nimmt sich das Recht heraus Veränderungen am Gerät vorzunehmen, die zur Verbesserung des Produktes beitragen.
23
Page 24

1. WICHTIGE VORBEMERKUNG
Wir bedanken uns für Ihr Vertrauen, unseren COMPACT 8 Mixer zu wählen. Bitte lesen Sie alle
Erläuterungen in dieser Bedienungsanleitung sorgfältig durch, BEVOR Sie dieses Gerät anschließen.
Eventuelle Reparaturen sollten nur von unserer technischen Service Abteilung durchgeführt
werden, um einen optimalen Betrieb sicherzustellen.
1.1. Sicherheitsmaßnahmen
Dieser Apparat muß mittels seines Netzkabels geerdet werden.
Es darf kein Regen oder andere Flüssigkeiten in das Gerät gelangen. Stellen Sie niemals
Flüssigkeitbehälter oder flammende Gegenstände wie z.B. Kerzen auf die Gerätoberfläche.
Bedecken Sie in keinem Fall die Lüftungsschächte oder verhindern Sie die Frischluftzufuhr.
Überlassen Sie jede Änderung in der Konfiguration des Geräts stets qualifiziertem Fachpersonal.
Bevor Sie den COMPACT 8 an andere Geräte anschließen, ziehen Sie immer den Netzstecker.
Im Inneren der Endstufe befinden sich keine für den Benutzer gedachte Bedienelemente.
2. EINFÜHRUNG
Ecler hat eine vielseitige Verwendbarkeit, einfache Bedienung und seine bewährte
Konstruktionsqualität in den COMPACT 8, einen spezifisch für den nicht technisch orientierten Benutzer
entworfenen Mixer gesteckt. Dieser besonders benutzerfreundliche Mixer ist für ein breites Spektrum an
Audioinstallationen geeignet, von Konferenzräumen und Kirchen bis zu Lautsprecheranlagen im Freiem,
Präsentationen, Sporthallen oder allgemeine Bescahllungsanlagen,um nur einige Beispiele zu nennen.
Dank der Zusammensetzung der technischen Konzeption des COMPACT 8 und der verwendeten
erstklassigen elektronischen Komponenten haben Sie jetzt ein vollkommen professionelles Gerät in
Ihren Händen.
Der COMPACT 8 besitzt 8 mischbare Kanäle, wobei jeder verschiedene Eingangsmöglichkeiten
darbietet:
Kanal 1-2-3 LINE A / LINE B / MICRO
LINE B auf PHONO schaltbar (Schalter auf Rückseite des Geräts)
MICRO auf MICRO ATT schaltbar (Schalter auf Rückseite des Geräts)
Kanal 4-5-6 LINE A / LINE B / MICRO
MICRO auf MICRO ATT schaltbar (Schalter auf Rückseite des Geräts)
Kanal 7 LINE A / AUX / MICRO
AUXILIARY Hilfseingang auf Frontplatte
MICRO auf MICRO ATT schaltbar (Schalter auf Rückseite des Geräts)
Kanal 8 LINE A / MICRO ATT / MICRO
Zusätzlicher MICRO Eingang auf Frontplatte
Alle Kanäle besitzen einen Eingangswahlschalter, individuelle Empfindlichkeitsregler pro Kanal
und eine dreistufige Klangregelung mit halbparametrischer Einstellungsmöglichkeit im Mittelband
(Einstellung der Zentralfrequenz, festgelegter Q)
Alle Eingänge verfügen über eine PFL Funktion, um jedes Eingangssignal direkt auf dem
VU-Meter anzuzeigen und akustisch über Kopfhörer zu kontrollieren.
24
Page 25

3. INSTALLATION
3.1. Aufstellungsort und Montage
Zwei Überlegungen sind bei der Wahl des Aufstellungsortes von besonderer Wichtigkeit: Erstens
der Komfort der Person, die den Mixer bedient und zweitens der einfache Zugriff an alle
Kabelverbindungen vom oder zum Mixer.
Der COMPACT 8 besitzt 4 HE (177mm) Rackohren zum Einbau in ein Standard 19" (482,6mm)
Rack-Gehäuse.
Aufgrund der hohen Empfindlichkeit der Mikrophon- und Phonoeingänge sollte darauf geachtet
werden, dass der Mixer nicht in der Nähe von elektrischen Störquellen aufgestellt wird (z.B. Motoren,
Netzgeräten oder Leitungen usw.). Entfernen Sie außerdem niemals die Metall-Abdeckplatte dieses
Gerätes.
Da der COMPACT 8 einen sehr niedrigen Stromverbrauch aufweist, benötigt er keine Kühlung.
Trotzdem darf er weder hohen Temperaturen noch Staub oder Feuchtigkeit ausgesetzt werden.
Der COMPACT 8 kann mit Wechselstrom zwischen 90 und 264V, 47 bis 63Hz betrieben werden.
Dieses Gerät benutzt ein überdimensioniertes Netzteil. Damit passt es sich ohne irgendwelche
Einstellungen an alle Weltweit auffindbaren Netzspannungen an.
Zum Schutz des Mixers vor eventuellen Überlastungen ist er mit einer Hauptsicherung von 0,5A
(32) abgesichert. Sollte sie durchbrennen, trennen Sie das Gerät von der Stromversorgung und
tauschen Sie die Sicherung gegen eine neue mit identischen Werten aus. NIEMALS DARF EINE
SICHERUNG MIT HÖHEREN WERTEN EINGESETZT WERDEN.
ACHTUNG: Wenden Sie sich bitte für den Wechsel der Sicherung an technisch qualifizierte
Personen.
3.2. Anschließbare Signalquellen
- Plattenspieler müssen mit einem Magnettonabnehmer ausgestattet sein, welcher einen
Nennausgangspegel zwischen -60 und -20dBV (1 bis 100mV) liefert. Da die Phonoeingänge (38) eine
sehr hohe Übersteuerungskapazität vorweisen, ist der Anschluß von Systemen mit höherem
Augangspegel ebenfalls möglich. Die Nennempfindlichkeit der Phono-Eingänge beträgt -40dBV (10mV).
- Mikrophone: Die MIC-Eingänge (23-27) sind für einen Nenneingangspegel von -50dBV
(3,16mV) geeignet. Wenn der Schalter (28) an der Rückseite des Geräts auf Position MIC ATT steht,
wird die Empfindlichkeit des Mikrophoneingangs um 20dB gesenkt. Der Nennpegel wird entsprechend
von -50 auf -30dB (3,16 auf 31,6 mV) gesenkt. Diese Eingänge sind mit "COMBO"-Buchsen
ausgestattet. Die COMBO Buchse enthält einen XLR-3 und einen 1/4'' Jack Anschluss im selben
Gehäuse. Die symmetrischen XLR-Buchsen müssen wie folgt angeschlossen werden:
XLR-3 ¼'' Jack
Direktes (Hot) Signal > Pin2 Spitze
Invertiertes (Cold) Signal > Pin3 Ring
Masse > Pin1 Mantel
Die angeschlossenen Mikrophone sollten eine niedrige Impedanz (200 bis 600) aufweisen und
Monophon sein. Für einen unsymmetrischen Anschluß müssen Pin 1 und Pin 3 (bzw. Mantel und Ring
eines Jacks) kurzgeschlossen werden.
Der COMPACT 8 verfügt über Phantom-Speisung für Kondensatormikrophone. Der Schalter für
die globale Aktivierung dieser Phantom-Speisung befindet sich oben rechts auf der Rückseite des
Geräts (30). Die Spannung der Phantomspeisung beträgt 18VDC.
- Line-Eingänge: Compact Disk, DAT, MP3, DVD-Audio, Tonbandgeräte, Kassettenrecorder,
Videogeräte, Radioempfänger... können an die Line-Eingänge (13-37-38) angeschlossen werden. Diese
weisen eine Eingangsempfindlichkeit von 0dBV (1V) auf.
Der "AUX 7" Hilfseingang (13) befindet sich auf der Frontplatte und ist elektrisch mit Kanal 7
verbunden. Ein beliebiges Line-Level Signal darf diesem Eingang zugespeist werden.
25
Page 26

- Kopfhörer: Um die beste Leistung zu erreichen, sollte der Kopfhörer eine hohe Impedanz
(200-600) aufweisen. Dieser wird durch Standard 1/4" Stereoklinkestecker am HEADPHONESAusgang angeschlossen (22). Der Mantel des Steckers entspricht der Masse, der Ring dem rechten
Kanal und die Spitze dem linken Kanal.
- Endstufen: siehe Abschnitt 4.6.
4. INBETRIEBNAHME
4.1. Einschalten
Dieses Gerät wird durch den Netzschalter POWER (15) eingeschaltet, wobei eine grüne Leuchte
im Schalter den Betriebszustand anzeigt. Das Einschalten bei heruntergeregeltem OUT (17, 20) wird
keine Störgeräusche verursachen; trotzdem empfehlen wir, die Geräte in folgender Reihenfolge
einzuschalten: zuerst die Signalquellen, dann Mischpult, Equalizer, aktive Filter und schließlich die
Endstufe. Um die Geräte auszuschalten, verfahren Sie in umgekehrter Reihenfolge. Wenn Sie dies
beachten, werden die beim Einschalten erzeugten Spannungsspitzen keines der angeschlossenen
Geräte in irgendeiner Weise beeinträchtigen und daher auch nicht die Lautsprecher erreichen, die
dadurch beschädigt werden könnten.
4.2. Vorhören
Der COMPACT 8 ist mit einem Vorhörsystem ausgestattet, welches Ihnen erlaubt, die
verschiedenen Kanäle optisch auf dem VU-Meter oder akustisch über Kopfhörer zu kontrollieren. Durch
Betätigen eines der PFL Schalter (7) können Sie das (die) jeweilige(n) Eingangssignal(e) mit dem
Kopfhörer oder dem VU-Meter überwachen. Wenn kein PFL-Schalter aktiviert ist, hören Sie das Signal
des Main Mix Bus (Fader offen).
4.3. Eingangsempfindlichkeit und Klangregelung
Diese Regler erlauben ein individuelles Einstellen der Eingangsempfindlichkeit und der
Klangcharakters für jeden Kanalzug.
Mittels des GAIN-Reglers (1) können Sie den Pegel eines einzublendenden Musiksignals mit
dem des bereits abspielenden Signals präzise ausgleichen. Diesen Vorgang können Sie entweder
visuell (mittels des linken VU-Meters) oder akustisch (mittels Kopfhörer) realisieren, indem Sie
abwechselnd den Pegel der beiden Signale mittels der PFL-Funktion vergleichen. Der GAIN-Regler
ermöglicht einen Einstellbereich von ±20dB.
Die dreistufigen Klangregler (6-9-10) bieten einen Einstellbereich der Bass-, Mitten- und
Hochfrequenzen von ±15dB. Seien Sie bei der Benutzung der Klangregelung vorsichtig, um Schaden an
den Lautsprechern vorzubeugen.
Die Klangregelung im Mittenband kann zudem halbparametrisch geregelt werden (8). Dabei kann
die Zentralfrequenz zwischen 300Hz und 6k5Hz justiert werden.
4.4. Kanalanzeigen
Jeder der 8 Eingangskanäle verfügt über zwei Anzeigen. Die grüne SP Leuchtdiode (4) informiert
über die Anwesenheit eines Audiosignals am momentan selektierten Eingangsweg. Diese Kontroll-LEDs
leuchten auf, wenn das Eingangssignal -40dBV erreicht oder überschreitet.
Die roten PEAK-Anzeigen (3) leuchten auf, wenn das Eingangssignal einen zu hohen Pegel
besitzt und somit den Mixer übersteuert. Es ist normal, das im Betrieb bei voller Leistung die
PEAK-Anzeigen im Rhythmus der Tieffrequenzen aufleuchtet, da diese die größte Energie besitzen. Es
sollte nur beachtet werden, daß die CLIP-Anzeigen nicht permanent leuchten. Diese Kontroll-LEDs
leuchten auf, wenn das Eingangssignal 10dBV erreicht oder überschreitet.
26
Page 27

4.5. Talkover
Diese Vorrichtung kann auf automatische Weise den Signalpegel des Hauptausgangs absenken,
wenn die Stimme des Sprechers über ein an Kanal 8 angeschlossenes Mikrophon (oder LineSignalquelle) ein Signal erzeugt. Wenn der Pegel dieses Kanals wieder abfällt, wird der Musikpegel
wieder auf den normalen Wert angehoben. Ein TALKOVER-Hauptschalter (25) aktiviert die
Übersprechfunktion. Einstellbar sind die Effizienz der Übersprechfunktion EFF (26) d.h. die Absenkung
des Hauptsinalpegels (zwischen 0 und 30 dB) sowie die Verzögerungszeit TIME(14) bis zur erneuten
Anhebung des Pegels (zwischen 0.1 und 3 Sekunden)
Durch die Modifikation bestimmter gelöteter Brückenkontakte im inneren des Gerätes ist es
möglich, Kanal 7 als Auslöser der Talkover-Funktion zuzuordnen. Siehe
Konfigurationsdiagramm.
Überlassen Sie jede Änderung in der Konfiguration des Geräts stets qualifiziertem
Fachpersonal.
4.6. Ausgänge
Der COMPACT 8 besitzt zwei voneinander unabhängige Ausgänge, OUT 1 (34-35) und OUT 2
(33), für die es auch unabhängige Volume-Regler gibt.
Der COMPACT 8 wird von Werk aus mit einem Nennausgangspegel von 0dBV(1V) geliefert.
Dieser Wert kann jedoch intern bis auf +6dBV(2V) gehoben werden. Siehe
Konfigurationsdiagramm. Überlassen Sie jede Änderung in der Konfiguration des Geräts stets
qualifiziertem Fachpersonal.
Bitte treffen Sie besondere Vorsichtsmaßnahmen bei der Einstellung des
Gesamtausgangspegels, indem Sie sich vergewissern, daß die Clip Indikatoren der Endstufen nicht
dauernd aufleuchten, sondern höchstens dem Rhythmus der niederfrequenten Signale folgen.
Der Ausgang OUT1 (34-35) ist SYMMETRISCH ausgelegt, wobei folgende Pinbelegung gilt:
Direktes (Hot) Signal > Pin 2
Invertiertes (Cold) Signal > Pin 3
Masse > Pin 1
Falls Sie den OUT 1-Ausgang in einer unsymmetrischen Konfiguration benutzen wollen, müssen
Sie den nicht benutzten Pin mit Masse kurzschließen. Anderseits würde der Pegel des Signals
ungenügend und dessen Qualität mangelhaft sein.
Der Ausgang OUT 2 (33) ist UNSYMMETRISCH ausgelegt.
Der COMPACT 8 besitzt einen Aufnahme-Ausgang. REC (36) entnimmt das Signal vor der
Talkover-Schaltung (d.h. Kanalzüge, die das Talkover-System aktivieren, werden nicht miteinbezogen,
dadurch treten keine Pegelschwankungen auf).
27
Page 28

5. WEITERE ERLÄUTERUNGEN
5.1. Erdungsschleifen, Hintergrundrauschen
Bei der Entwicklung dieses Mixers haben wir auszuschließen versucht, daß Signalquellen und am
Ausgang angeschlossenen Geräte Masseverbindung haben können. Sollte der Mixer über verschiedene
Wege an die Masse angeschlossen sein, kann dies zu Störgeräuschen ("Brummschleife") und Einbußen
der Klangqualität führen.
Um das Auftreten von Erdungsschleifen zu verhindern, dürfen die Abschirmungen der
Anschlußkabel keinesfalls miteinander verbunden werden.
Bei der Entwicklung des COMPACT 8 wurde größter Wert auf die Minimierung des
Hintergrundrauschens gelegt. Unabhängig davon hängt der Rauschpegel direkt von der korrekten
Installation und Bedienung des Mixers ab.
Es ist beispielsweise nicht das gleiche, wenn der Kanalfader auf "2" und der Master auf "10" steht,
als umgekehrt. Im ersten Fall ist das Signal, das den Verstärker des Mixers erreicht, schwach, daher ist
auch der relative Rauschanteil gering. Wenn das Signal verstärkt wird, ist das Ergebnis ein sehr hoher
Ausgangs -Rauschpegel. Im zweiten Fall, wo der Kanal Fader auf Maximum steht, ist das zu verstärkende
Signal relativ stark, d.h. der Signal-Rauschabstand ist ebenfalls hoch. Daher ist das Verhältnis, wenn das
Signal den VOL OUTPUT erreicht und verstärkt wird, besser als im ersten Fall und sie erhalten ein
sauberes, rauschfreies Signal.
5.2. Reinigung
Die Frontplatte darf nicht mit lösungsmittelhaltigen oder scheuernden Substanzen gereinigt werden,
da hierbei die Oberfläche beschädigt werden könnte. Verwenden Sie zur Reinigung der Frontplatte ein
feuchtes Tuch und etwas milde Seifenlauge. Trocknen Sie danach die Oberfläche sorgfältig ab. Lassen Sie
niemals Wasser in die Öffnungen der Frontplatte gelangen.
28
Page 29

6. FUNKTIONSLISTE
1. Eingangspegelregler, GAIN 21. Kopfhörerpegelregler, VOL
2. Eingangswahlschalter 22. Stereo Kopfhörerbuchse
3. LED Anzeige, PEAK 23. Symmetrierter Mikrophoneingang, MICRO 8
4. LED Anzeige, SP 24. LED Anzeige, TALKOVER ON
5. LED Anzeige, PFL 25. Übersprechfunktion
6. Höhenregler, TREB 26. Übersprech- Empfindlichkeitsregler, EFF
7. Prefader Vorhörschalter, PFL 27. Symmetrierter Mikrophoneingang, MIC
8. Halbparametrischer Mitteltonregler, FREQ 28. Empfindlichkeits-Einstellung des
9. Mittenregler, MID micro-Eingang, ATT
10. Tiefenregler, BASS 29. Erdungsklemme, GND
11. Kanalpegel, VOLUME 30. Phantom-Schalter, PHANTOM
12. Platz für Identifikationsetikett 31. Netzanschlußbuchse
13. Line Eingang, AUX 7 32. Sicherungshalter
14. Übersprech- Verzögerungsregler, TIME 33. RCA Ausgang, OUT 2
15. Netzschalter und Kontroll, POWER 34. Symmetrierter Hauptausgang rechts, OUT1 R
16. LED VU Meter 35. Symmetrierter Hauptausgang, links, OUT1 L
17. Ausgang OUTPUT 2 Pegelregler, OUT 2 36. Aufnahme-Ausgang, REC
18. LED Anzeige, L+R 37. Line Eingang, LINE A
19. Links und rechts zusammen, L+R 38. Line Eingang, LINE B
20. Ausgang OUTPUT 1 Pegelregler, OUT 1 39. Schalter, PHONO – LINE B
7. FUNKTIONSÜBERSICHT
29
Page 30

8. TECHNICAL CHARACTERISTICS 8. CARACTERÍSTICAS TÉCNICAS
8. CARACTÉRISTIQUES TECHNIQUES 8. TECHNISCHE DATEN
Inputs Sensitivity nom/Impedance LINE (A-B-AUX) 0dBV/50k
PHONO -40dBV/50k
MICRO (BAL) -50dBV/>1k
MICRO ATT (BAL) -30dBV/>1k
Outputs Level/Minimum Load OUT 1 (BAL) 0dBV/600 1V *(+6dB 2V)
OUT 2 0dBV/2.2k 1V *(+6dB 2V)
REC 0dBV/10k
HEADPHONES 200mW/200
Frequency Response LINE 10Hz÷30kHz -1dB
MICRO BAL 10Hz÷30kHz -1dB
PHONO RIAA ±0.5dB
THD+N LINE <0,03%
MICRO <0,06%
PHONO <0,04%
CMRR MICRO >75dB @ 1kHz
Signal Noise Ratio LINE >100dB
MICRO >85dB
PHONO >95dB
Gain control all inputs GAIN ± 20dB
Tone control GAIN ±15dB
BASS 90Hz
MID 300Hz ÷ 6,5kHz
TREBLE 12kHz
Talkover Time 0,3 / 3 seg
Effect 0 / -30 dB
Signal Present indicators LINE -40dB
MICRO -90dB
Clip indicators +10dB
Phantom voltage +18VDC/5mA max.
Mains 90-264VAC 47-63Hz
Power consumption 33VA
Dimensions Panel 482,6x177mm
Depth 221,6mm
Weight 5,2kg
(*) Internally selectable
30
Page 31

9. DIAGRAMS 9. DIAGRAMAS
9. SCHÉMAS 9. DIAGRAMME
9.1. Configuration diagram 9.1. Diagrama de configuración
9.1. Schéma de configuration 9.1. Konfigurations diagramm
MICRO (TALKOVER ENABLED)
BOTTOM VIEW.
SOLDERING CONFIGURATION.
REMOVE THE SHIELDING PLATE.
PROGRAM (TALKOVER DISABLED)
FACTORY ADJUSTED
INPUT 7INPUT 8
BUS ASSIGNMENT
0dB
+6dB
FACTORY ADJUSTED
OUT 2 OUT 1
OUTPUT LEVEL
CAUTION: DISCONNECT THE UNIT FROM THE MAINS SUPPLY
ATTENTION: ANY CHANGE IN THE CONFIGURATION OF THE UNIT MUST BE CARRIED OUT BY A QUALIFIED TECHNICIAN.
31
Page 32

9.2. Block diagram 9.2. Diagrama de bloques
9.2. Diagramme des blocs 9.2. Blockschaltbild
PFL/MIX
LR
PHONES
+
+
VOL.
ANALOG SWICTH
OUT 1
L
BAL
-
R
BAL
GAIN OUT
L+R
GAIN OUT
-
VOL.
REC
L
R
ON
ATTENUATOR
MIC-R
MIC-L
CTR-PFL
PFL-R
PFL-L
PGM-R
PGM-L
PHANTOM
TALKOVER
EFF
TIME
PFL
PFL
+VS
VOL.
+VS
VOL.
PFL
+VS
FREQ
-
MID
TREB
PEAK
-
FREQ
-
MID
TREB
PEAK
-
LINE A - LINE B - MIC
+
+
L
R
BASS
- -
GAIN
PHONO
+
LINE
L
--
S.P.
ATT
+
PHONO
+
LINE
R
LINE A - MIC - AUX
+
L
BASS
- -
+
R
- -
GAIN
+
L
S.P.
LINE A - MIC - MIC ATT
ATT
+
+
R
INPUT 1 TO 6
0dB
LINE A
0dB
LINE B
(inputs 1-2-3)
-40dB
PHONO
MIC
INPUT 7
0dB
LINE A
AUX
0dB
MIC
INPUT 8RLINE A
ECLER Laboratorio de electro-acústica S.A.
Motors 166-168, 08038 Barcelona, Spain
INTERNET http://www.ecler.com e-mail: info@ecler.es
50.0109.01.01
OUT 2
L
R
GAIN OUT
-
VOL.
- -
-
+
L
0dB
GAIN OUT
-
VOL.
+VDC
PHANTOM
FREQ
MIDTREB
BASS
GAIN
+
-50dB
MIC
PEAK
-
- -
S.P.
+
Only Input 8
 Loading...