


ELECTRIC CHAINSAW ECS01
INSTRUCTION MANUAL
Any questions or problems – please contact the Eckman Helpline on 0845 555 4440
Please read these instructions carefully before use and keep them in a safe place for
future reference.

- 1 -
Contents
Guarantee……………………………………………………………………………….1
Environmental protection……………………………………………………………2
Safety instructions………………………………………………………………………2-3-4
Technical Data and Parts identification……………….. ………………….4-5
Setting chain bar and chain……………………………………………………… 5
Setting the chain saw tension…………………………………………………… 5
Oil filling………………………………………………………………………………………5
Checking the automatic oil function…………………………………………..5
Avoiding kickback……………………………………………………………………….6
Avoid jamming…………………………………………………………………………….6
Power cord support……………………………………………………………………..6
Before start-up……………………………………………………………………………6
Start up & Stop…………………………………………………………………………..6
Operating the electric chain saw………………………………………………..6
Bucking……………………………………………………………………………………….7-8
Chainsaw brake………………………………………………………………………….8-9
Chain sharpening……………………………………………………………………….9
Chainsaw maintenance………………………………………………………………9-10
First time user……………………………………………………………………………10
General Inspection…………………………………………………………………….10
Power cord maintenance…………………………………………………………..10
Storage……………………………………………………………………………………… 10
Troubleshooting…………………………………………………………………… ... 10
Guarantee:
This product is guaranteed against faulty workmanship for a period of 12 months
from the date of purchase. If the product is modified in any way or not used in
accordance with these instructions, your guarantee will be void. Your statutory
rights remain unaffected.
Imported by T2 Direct Ltd – London

- 2 -
Environmental Protection
Waste electric products should not be disposed of with household waste. Please recycle where facilities
exist. Check with your local Authority or retailer for recycling advice.
Safety Instructions
Before using the chainsaw, please read the following instructions and follow them during operation! Before putting
this machine into operation, please study the instruction manual and pay special attention to the safety instructions.
Please “Save all warnings and instructions for future reference”
WARNING: Read and follow all safety precautions in the instruction manual. Failure to follow instructions could result
in electric shock, fire or serious injury to user. We highly recommend the use of an RCD (Residual Current Detector)
when using electrical equipment.
Description Of Symbols
Read the instruction manual carefully
Denotes risk of personal injury, loss of life, or damage to the tool in case of non-observance
Contact of the guide bar tip with any object should be avoided. Tip contact may cause the guide bar
to move suddenly upward and backwards, which may cause serious injury to user.
Two hands are always to be used in operation of the chainsaw.
WARNING: To reduce the risk of electric shock and not expose unit to water or operate unit on wet
ground
Remove the plug from the socket or mains immediately before carrying out any adjustments,
servicing or maintenance or if the cable is damaged or cut.
Obtain and wear eye and ear protection at all times while operating the power tool.
Use protective gloves
Wear sturdy, non-slip footwear

- 3 -
Safety Rules – General And For Electric Chainsaws
1. Replacement Parts.
When servicing, use only identical replacement parts.
2. Plugs. Do not modify the plug connected to the power lead in any way.
3. Cleanliness. Keep Work Area Clean. Cluttered areas invite injuries.
Do not start cutting until you have a clear work area, secure footing, and a planned retreat path from the falling tree.
4. Environment. Consider your local environment, including any neighbours.
5. Cutting Small Branches. Use extreme caution when cutting small size brush and saplings because the slender
material may catch the saw chain and be whipped toward you or pull you off balance. When cutting a limb that is
under tension, be alert for spring back so that you will not be struck when the tension in the wood fibers are released.
6. Working Conditions. Do not expose chainsaw to rain or use in damp or wet locations or in the presence of
flammable liquids or gases.
7. Guard Against Electric Shock.
Prevent body contact with grounded surfaces. For example: metal pipes, wire fences etc and preferably use in
conjunction with an RCD. These are inexpensive and can be purchased from most hardware shops.
8. Children. Keep children away from this equipment at all times.
9. Storage. When not in use, chainsaws should be stored in a dry, high, or locked-up place - out of the reach of
children. When storing saw, use the chain cover supplied.
10. Use Correct Force. Let the chain do the work ! Using force won’t help, can be dangerous, and probably means
your saw requires sharpening.
11. Only use this saw to cut wood.
12. Dress Properly. Do not wear loose clothing or jewelry as they could get caught in moving parts. Rubber or
leather gloves and nonskid footwear are recommended when working outdoors. Wear protective hair covering to
contain long hair. Use safety goggles, head and preferably ear protectors.
13. Transporting The Chainsaw. Carry the chainsaw by the front handle with the saw stopped, finger off the
switch, the guide bar and saw chain to the rear. Keep the chain cover fitted.
14. Maintenance.
Inspect periodically and if damaged, have repaired by authorized service facility.
Keep mains power lead clear of he chain and operator at all times. Never carry saw by the mains lead and keep cord
away from oil and sharp edges.
Keep the chain sharp, clean, and properly tension-adjusted for better and safer performance.
Follow instructions for lubricating and changing accessories.
Keep handles dry, clean, and free from oil and grease.
15. When Not In Use. Disconnect chain saw when not in use, before servicing, and when changing accessories and
attachments, such as saw chain and guard.
16. Extension Cords. Use only extension cords intended for use outdoors and so marked.
17. Stay Alert.
Watch what you are doing. Use common sense. Do not operate chainsaw when you are tired. Keep all parts of the
body away from the saw chain when the motor is operating.
Before you start the saw, make sure the saw chain is not contacting anything.
18. Before use
Constantly check for any damaged parts.
That the chain brake operates correctly.
That the oil reservoir is filled with oil.
19. Kickback.
WARNING: Kickback may occur when the nose or tip of the guide bar touches an object, or when the wood closes in
and pinches the saw chain in the cut. Tip contact in some cases may cause a lightning fast reverse reaction, kicking

- 4 -
the guide bar up and back towards the operator. Pinching the saw chain along the top of the guide bar may push the
guide bar rapidly back towards the operator. Either of these reactions may cause you to lose control of the saw that
could result in serious injury to user. The following precautions should be followed to minimize kickback.
① . Grip Saw Firmly.
Hold the chain saw firmly with both hands when the motor is running. Use a firm grip with thumbs and fingers
encircling the chain saw handles.
②. Do not over reach.
③. Keep proper footing and balance at all times.
④. Don’t let the nose of the guide bar contact a log, branch, ground or other obstruction.
⑤. Don’t cut above shoulder height.
⑥. Use devices such as low kickback chain, guide bar nose guard, chain brakes and special guide bars that reduce
the risks associated with kickback.
⑦. Only use replacement bars and chains specified by the manufacturer or the equivalent.
20. Power Supply. Connect chain saw to correct voltage, that is, be sure that the voltage supplied is the same as
that specified on the nameplate of the tool.
Technical Data
Parts Identification
1 Cable + plug
2 Rear handle
3 On/Off switch
4 Lock-off button
5 Oil Tank cap
6 Front handle
7 Activation lever for kickback brake (hand guard)
8 Nose sprocket
9 Chain bar
10 Chain
11 Gripping teeth
12 Tensioning ring
13 Lock knob
14.Cover plate
15 Oil outlet
16 Cable hook
17 Chain guard
Nominal Voltage 230-240V~50Hz
Chain Saw DB6021S / ECS01
Rated Power 2200 W
Length of Oregon Bar 18” / 457 mm
Tool-less Oregon Chain Tensioning ( SDS) YES
No Load Speed 5800rpm
Chain Speed 13 m/s
Front Brake Time 0.15 sec
Oil Tank Capacity (With Automatic /Regulated
Lubrication) 300 ml
Noise Level 107 Db
Vibration 1.5 m/s2
Net Weight 5.3 kg
Protection Class Double Insulation

- 5 -
Setting chain and chain bar
Chain and chain bar assembly for model with SDS tool-less tensioning system
1. Place the chainsaw with the motor on a cover to avoid any mess from the oil.
2. Place the chain in the grove of the bar. Pay attention to the correct running direction. As shown by the running
direction symbol.
3. Place the chain links around the drive sprocket and let the fastening bolt pass through the hole of chain clamp.
If necessary, adjust chain clamp to tension chain a little.
4. Check if all parts are seated properly and hold chain and chain bar in a level position.
5. Fit cover and match the tension ring with the chain clamp. And then tighten the lock knob clockwise and screw
with screwdriver.
Please see Figures:
1. drive sprocket
2. chain clamp
3. fastening bolt
4. tension ring
5. lock knob
6. screw
Setting the chainsaw tension
Tensioning chain for model with SDS tool-less tensioning system
1. Loosen the lock knob by turning it anti-clockwise approximately 1-2 turns.
2. Check whether all chain links lie correctly in the guide tracks of the bar.
3. Press the tension ring inwards and turn it in a clockwise direction until the correct chain tension is reached.
4. The correct tension is reached when the chain in the middle of the bar can only be raised by approximately
3-4mm. Please see the right figure
Oil filling
Note. The chainsaw is shipped without oil in it. The chain saw must never be used without oil or with an oil level that
is below the indicator.
WARNING. Always ensure that the chainsaw is switched off and the plug is removed from the power point before
making any adjustments.
1. Remove oil tank cap and fill the tank with chain oil. Replace the oil tank cap and tighten well.
2. Lubrication is activated only when the machine is working.
3. Check the oil level periodically through the oil level indicator.
4. Use good quality ecological chain oil to ensure long life for the moving parts. Do not use recovered or pre-used
oil containing impurities.
5. Make sure that no dirt gets into the oil tank.
Checking the automatic oil function
Check the automatic operation of the chain lubrication by pointing the tip of the switched-on saw towards a piece of
paper laying on the ground. If a patch of oil appears and becomes larger, then the automatic oil function is working.
If there are no traces of oil even though the oil tank is full, then the automatic oil function is not working.
If the automatic oil function is not working, remove the chain bar and clean out the oil ways of the chainsaw and

- 6 -
chain bar. On reassemble if the chainsaw is still not working. Please take it to an authorized service centre.
Avoiding kickback
Be constantly aware of the position of the upper quadrant of the blade tip. This is the part that triggers a kickback
when it hits resistance.
Never engage the upper quadrant of the guide bar with whatever you are cutting. Look out for hidden branches or
obstructions. Ensure there is a clear work area.
Always clear away brush, vegetation and any obstructing debris before attempting a cut that might trigger a
kickback.
Avoid cuts that will cause the chainsaw to jam in a tree trunk or limb.
Avoid jamming
Always cut into the compression wood first until the cut starts to close. Always make the compression cut beneath
of the log or limb is suspended from one end and on top if it is supported at both ends. Cut from the other side
towards the compression cut. Make a habit of using a wedge to prevent the compression cut jamming tighten the
chainsaw blade.
Power cord support
During use of the chainsaw the power cord will continually be pulled as you move from one area to another.
A cord retention hook (photo.) has been provided on housing of the chainsaw.
Before start-up
1. Check the machine and cable are in good working order before starting the chainsaw.
2. Make sure that the chain lubrication is working and check the oil level.
3. Check the chain tension and the operation of the chain brake.
Start up and stop
1. Remove the bar cover.
2. Release the chain brake by pulling the front hand guard, firmly towards the back of the electric chain saw until
a click is heard. To check the chain brake has been released, you should be able to move the chain by hand.
3. Connect the cable to the power.
Note. Ensure the brake is working efficiency, check its operation every time you use the chain saw before
commencing work with it.
WARNING. The on/off switch must never be depressed before pulling back the front hand guard.
4. Hold the electric chain saw by its grip with both hands.
5. To start the chainsaw, push the lock-off button forward and squeeze the switch lever (ON/OFF) towards the
handle. Release the lock-off button
6. To stop the chain saw, release the switch lever (ON/OFF)
WARNING. Hold the electric chain saw with both hands until the chain is completely still.
Operating the electric chain saw
Safe chainsaw operation whilst cutting - always:
1. Run the chainsaw motor at full revs. This makes the job safer, as there is less chance of pull-in or kick-back.
2. Position your body to the left of the chainsaw so if it kicks back uncontrollably, it goes over your right shoulder.
3. Keep a firm grip with your left hand on the front handle, with your thumb securely below the handle. The swivel
of your wrist in a kick-back situation will activate the chain brake.
4. Make sure the chain is tensioned correctly.
5. Observe the size of wood shavings, if they become dusty your chain probably needs sharpening.

- 7 -
Bucking
Bucking is cutting a fallen log into lengths. Make sure that you have a good footing and stand uphill of the log when
cutting on sloping ground. If possible, the log should be supported so that the end to be cut off is not resting on the
ground.
If the log is supported at both ends and you must cut in the middle, make downward cut halfway through
the log and then make the undercut. This will prevent the log from pinching the bar and chain. Be careful that the
chain does not cut into the ground when bucking as this causes rapid dulling of the chain.
WARNING. Do not touch protruding branches with the bar tip to prevent kickback.
1. Use the metal gripping teeth to secure the saw onto the wood, before starting to cut. Use the gripping teeth as
a leverage point “X” while cutting.
Please see right figure.
2. Reset the gripping teeth at a lower point when sawing thicker logs by pulling the chain saw slightly backwards,
until the gripping teeth release, and reposition at lower level to continue sawing. Do not remove the saw
completely from the wood.
3. Log supported along entire length: cut from bottom under buck),being careful to avoid cutting into the ground
4. Log supported on one end proceed as if using a saw-horse:
First, cut from bottom (under buck) 1/3 diameter of log to avoid splintering.
Second, cut from above (over buck) to meet first cut avoid pinching
5. Log supported on both ends:
First, you must cut in the middle
Second, over buck 1/3 diameter of log to avoid splintering.
Third, under buck to meet first cut and avoid pinching.
Note: The best way to hold a log while bucking is to use a saw horse. When this is not possible, the log should
be raised and supported by limb stumps or by using supporting logs. Be sure the log being cut is securely
supported.
Please see figure right
● BUCKING USING A SAWHORSE
1. Hold the saw firmly with both hands and keep the saw to the right of your body while cutting.
2. Keep the left arm as straight as possible.
3. Keep weight on both feet.
Please see figure right
● The machine should only be used under reliable support conditions. The machine should be held to the right
of the body, slightly distanced there from.
● The chain needs to be moving at full speed before coming into contact with the wood. When this has been
achieved, the machine should be fixed to the wood using dogs. During cutting this support should be used as
a lever.
1. Hold the saw firmly with both hands and keep the saw to the right of your body while cutting.

- 8 -
2. Keep the left arm as straight as possible.
3. Keep weight on both feet.
● The machine should only be used under reliable support conditions. The machine should be held to the right of
the body at a slight distance.
● The chain needs to be moving at full speed before coming into contact with the wood. When this has been
achieved, the machine should be fixed to the wood using dogs. During cutting this support should be used as
a lever
Felling trees
●To fell trees, observe all the safety regulations and proceed as follows:
The chainsaw may be used to fell only trees which are smaller in diameter than the length of the bar and chain. If the
saw chain gets jammed, release it using a wooden wedge.
●Felling trees is dangerous and requires practice. If you are inexperienced, do not try to teach yourself but seek
professional training.
Falling direction:
-First estimate the direction of fall, taking into account the centre of gravity of the crown and the wind direction.
Switch on the chain saw and saw an undercut in the tree in the direction of fall and then -
- make a horizontal cut (back cut) on the side opposite to the undercut. Make the undercut: This will give the tree
a direction and guidance.
-Check the direction of fall: If you have to correct the undercut, always re-cut over the entire width.
-Call now “Timber! “
-Only now make the back cut, which must be higher than the sole of the undercut. Insert wedges in time.
-Leave the wedge in place as it will function as a hinge. If you cut through the wedge, the tree will fall randomly.
-Fell the tree by driving a wedge into the back cut, not by sawing through it.
When the tree falls, step back and watch the crown.
Wait for the crown to stop swinging. Do not continue working under branches which have got stuck
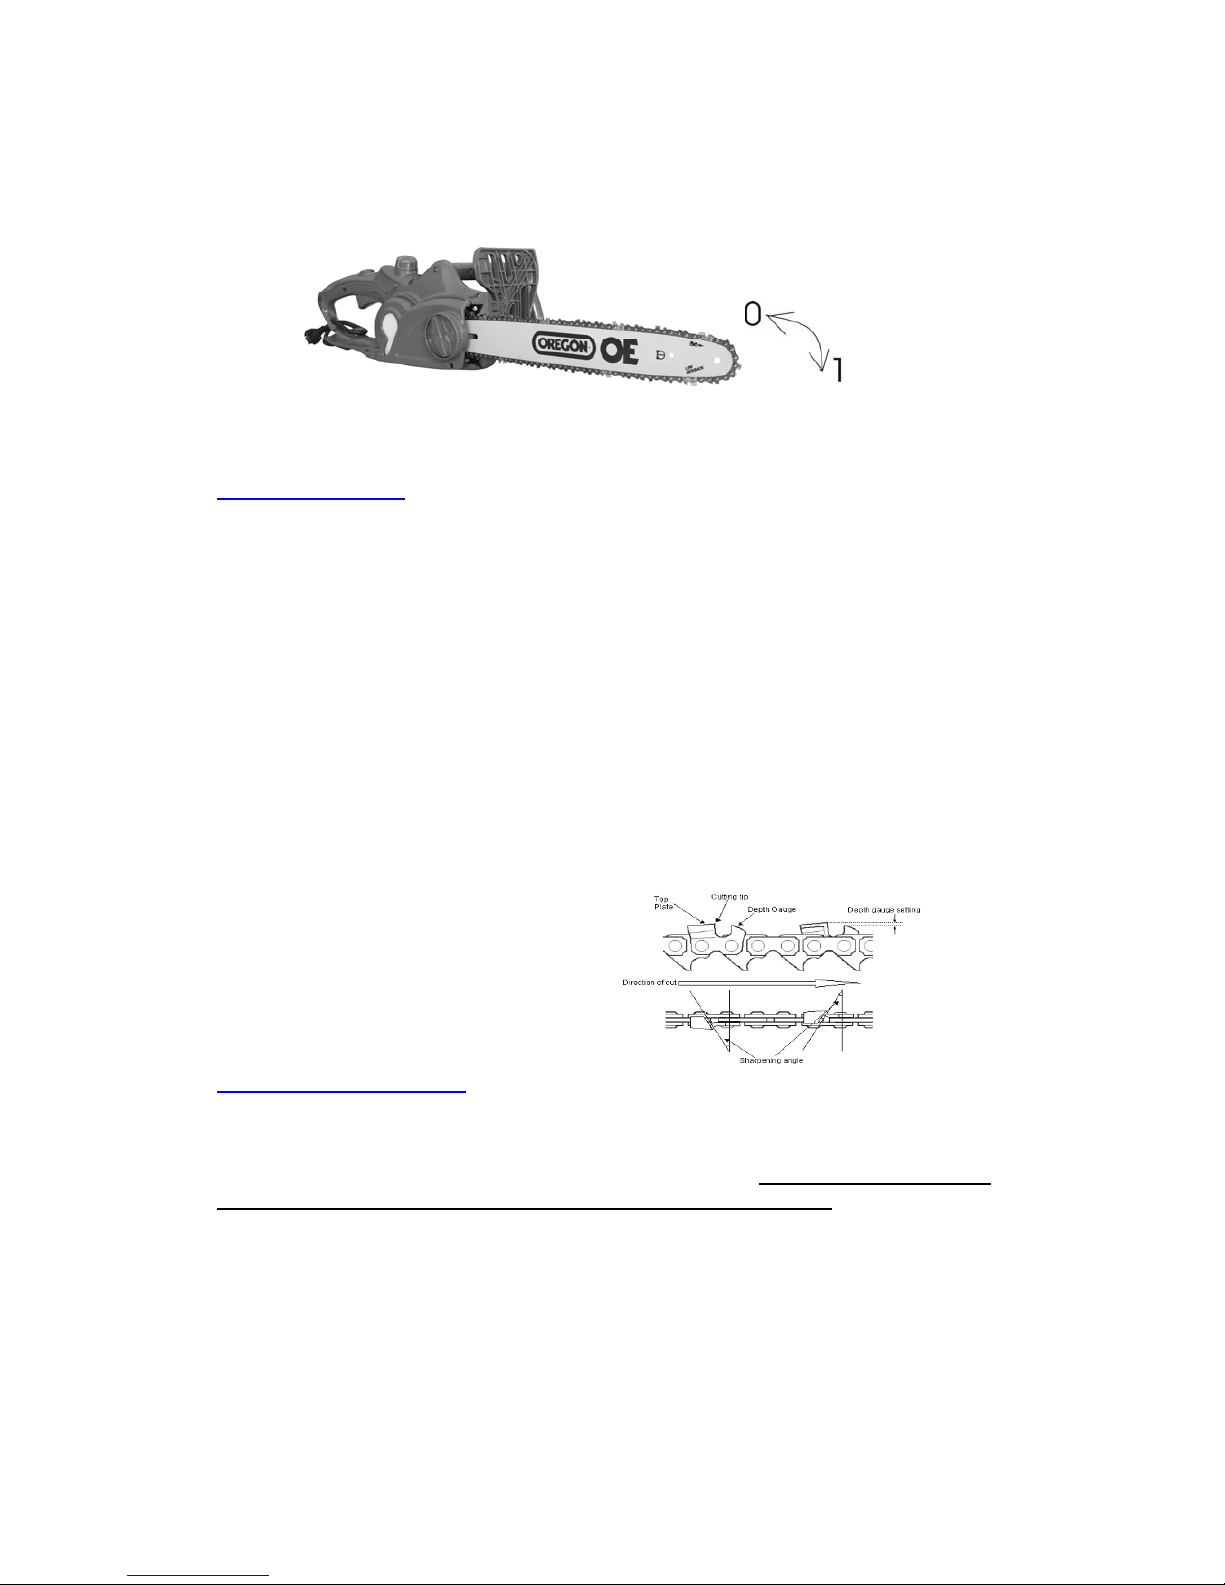
Chain brake
In the event of kick-back, the chain brake will be actuated via the front finger guard. The front finger guard is pushed
forwards by the back of the hand and this causes the chain brake to stop the chain saw, or rather the motor, within
0.15 s (picture A, 1).
Releasing the chain brake
To be able to use your chain saw again, you must release the saw chain again. First, switch off the chainsaw. Then
push the front finger guard back into the vertical position until it locks in place (picture A,0). The chain brake is now
fully functional again.
- 9 -
PIC A 1
Chain sharpening
It is highly recommended that, once the chain loses its ability to cut cleanly and safely, either replace it, have it
sharpened by any garden equipment maintenance company, or sharpen yourself.
To sharpen the chain refer to below and proceed as follows:
Disconnect from the mains supply
Wear protective gloves.
Ensure the chain is correctly tensioned.
Engage the chain brake to lock the chain on the bar.
Use a round file (available from all good garden equipment companies) whose diameter is 1.1 times the cutting
tooth depth.
File at an angle perpendicular to the bar, and 38° to the direction of travel.
File each tooth from inside towards outside only.
Sharpen each tooth equally by using the same number of strokes.
Check the safety depth gauge height every 5-chain sharpening.
If the depth gauges are also trimmed it is essential that the original profile be restored.
Use a depth gauge measuring instrument to check the height of the depth gauge. Depth gauge measuring jigs
are available from most reputable tool merchants.
Please see the right figure
Chainsaw maintenance
WARNING. Always ensure that the machine is switched off and the plug is removed from the power point before
making any adjustments or maintenance procedures.
1. Always keep the air holes clean on the electric chainsaw body. They tend to become clogged with sawdust during
use and this affects the efficiency of cooling, causing overheating of the motor. Electric motors that become
damaged due to being clogged up with debris are not covered by this warranty.
2. Do not operate the chainsaw with the air intake on the ground as this will draw foreign particles into the motor
area and damage the windings of the motor.
3. Regularly check to see if any dust or foreign matter has entered the grills near the motor and around the on/off
switch. Use a soft brush and/or vacuum to remove any accumulated dust. Wear safety glasses to protect your eyes
whilst cleaning.
4. If the body of the tool needs cleaning, wipe it with a soft damp cloth. A mild detergent can be used. Do not use
alcohol, petrol or other cleaning agents or abrasives.
5. Never use caustic agents to clean plastic parts.

- 10 -
6. Turn the bar periodically to use both the sides so that it wears evenly.
7. It is essential that motor cooling vents are kept free from a build-up of sawdust and this decreases the engines
tools cooling capacity and causes overheating equipment, oil pump etc. It is recommended that this is carried out
after every use.
8. Clean the guide and oil holes periodically.
9. De-burr the race sides periodically with a flat file. Time may cause any “burrs” to detach and damage the bar.
10. The bar needs to be evened with a flat file if one of the races is higher than another and then soothed with a file
and fine sandpaper. If races are considerably worn, check that the height is always greater than the chain’s
transmission links so that the latter do not touch the bottom. Replace the bar if required.
The chainsaw should be periodically serviced to check the correct operation of the chain, chain drive, motor and
brake.
CAUTION: Water must never come into contact with the machine.
First time user
If you are not familiar with chainsaws and the felling of trees, it is recommended that you obtain informed
instructions in addition to reading this manual fully. We also recommend as a minimum that you practice cutting logs
in a saw-horse or log cradle.
General inspection
Regularly check that all fixing screws are tight. They may vibrate loose over time.
Power cord maintenance
If the supply cord gets damaged in any way and needs replacing, the task must be carried out by the manufacturer,
the manufacturer’s agent, or an authorized service centre in order to avoid a safety hazard.
Storage
Clean the electric chain saw with a dry cloth, do not use aggressive cleaning fluids.
Replace the electric chain saw blade cover and store in a dry place. Do not store in hot, dry boiler rooms or other
damp places.
TROUBLESHOOTING
Motor does not run
No electricity
Check socket, cables and plugs. Damaged cable:
Have repaired by a service agent.
Do not patch cables with insulation tape.
Damaged switch: Have repaired by a service
agent.
See section on chain brake.
Worn carbon brushes Carbon brushes need replacing.
Chain does not move Chain brake Check the chain brake and release if necessary.
Poor cutting performance
Blunt saw chain Sharpen or replace the saw chain.
Chain tension Check chain tension.
Saw chain fitted incorrectly Check saw chain
Chain jumps off guide bar Chain tension Check chain tension.
Chain works with difficulty Chain tension Check chain tension.
Chain becomes hot Chain lubricant Check oil level. Check chain lubrication.
 Loading...