

Page 1
4U 96-Bay Quick Guide
Version 1.20 Release 2014-07-10
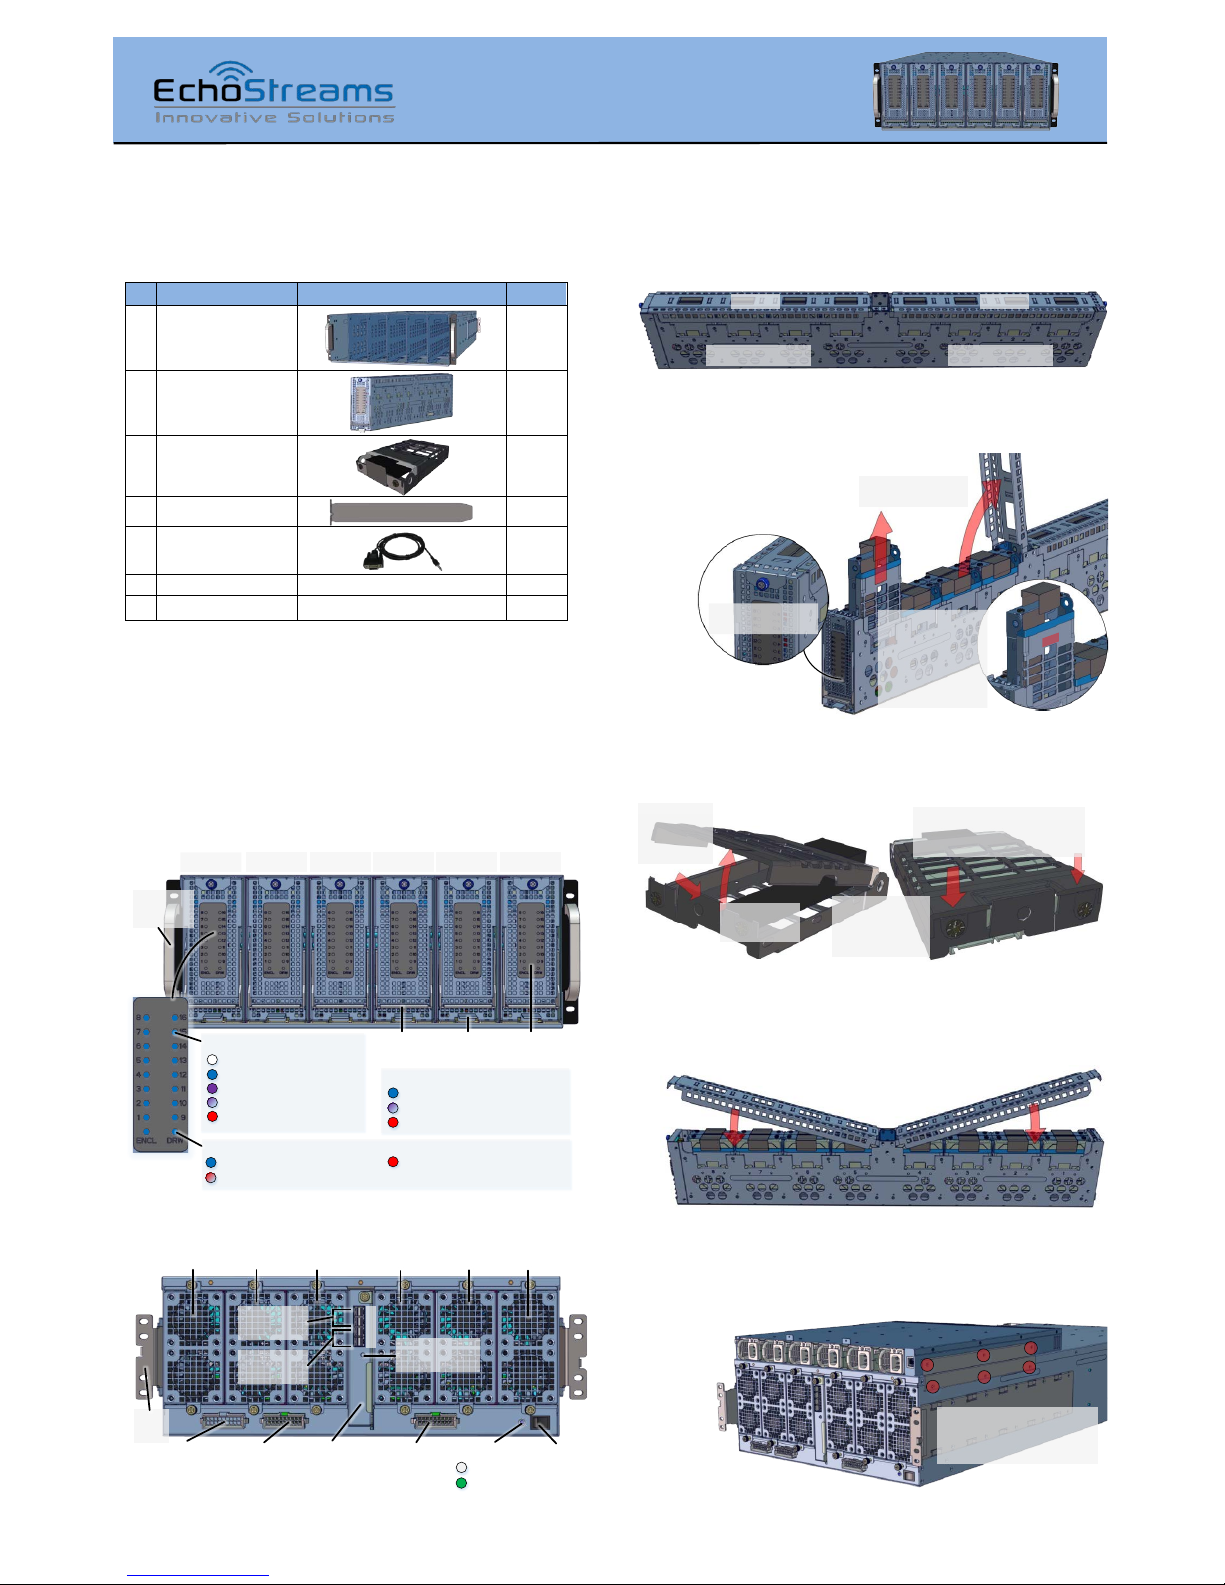
1. Release the
thumbscrew lo ck
2. Open the cover
3. Remove the
drive trays by
pulli ng the ri bbon
up or by lifting it by
the side (red
rectan gle)
1. Check the content of the box. Please confirm that
your package contains the following:
#
Description
Image / Description
Qty
1
4U 96-Bay
Enclosure
1
2
Drawer
6
3
HDD Tray
16 per
drawer
4
Rail Kit
1 set
5
Serial Cable
1
6
This Quick Guide
1
7
Packaging
2 set
If any items are missing, please contact your authorized reseller or sales
representative
2. Get familiar with the unit.
4U96 enclosure arrives with no drawers installed. The drawers
are shipped with separate packaging. The unit has seven
expanders: one master expander at the back of the unit, six
slave expanders in each drawer.
Front view
Enclosure
Ear
Drawer
Handle
Drawer
Latch
Drawer
Pan el
HDD LED:
(Solid) Disk O nline
(Solid) Disk Offline
(Solid) Disk in RAI D / OS
(Blink) Disk Activity
(Solid) Disk Error
Drawer 1
DRAWER LED:
(Solid) Drawer Norma l
(Blink) Drawer Component Faulty e.g. Fan Reading Er ror
ENCLOSURE LED:
(Solid) Enclosure Normal
(Blink) Faulty on any Drawer
(Solid) Enclosure Error
(Solid) Drawer Cr itical Error
Drawer 2 Drawer 3 Drawer 4 Drawer 5 Drawer 6
Rear view
Power
Switch
Master
Expander
Modul e
SAS UP
Ports
SAS DOWN
Ports
Power
Conn ector
1
Management
Port
Fan Mo d.
Drw. 6
Power LED:
Power
Conn ector
3
(Solid) Off
(Solid) On
A
B
A
B
Power
Conn ector
2
Slide
Rail
Fan Mo d.
Drw. 5
Fan Mo d.
Drw. 4
Fan Mo d.
Drw. 3
Fan Mo d.
Drw. 2
Fan Mo d.
Drw. 1
3. Setup the drawers by removing it from their boxes.
One drawers contains two container. Each container can hold
eight (8) 3.5” drives. One drawer encloses 16 hard drives.
Front Container
Rear C ontainer
8 Disks 8 Disks
4. Remove the drive trays from the drawer. See the
illustration below for the directions. Repeat the step for the
other container.
5. Install drives into trays. Follow the diagram closely.
HDD sold separately.
1. Pull the
locking
mechan ism
outwa rd
2. Lift the tray
cover
3. Insert the
HDD. Note the
direc tion of th e
data port
4. Close the cover. Press at
these l ocations (arrows) to
secure the disk to the tray
6. Install drive trays into drawers. Fold the ribbon
tightly to the drive tray. Close the lids of the drawer and secure
the thumbscrews afterwards.
7. Mount the Power Center at the back of the
enclosure (optional). Power Center sold separately. Refer to
Power Center quick guide for the detail of its functions.
Use the bracket to mou nt the
Power Center, and s ecur e it
with screws
Thank you for purchasing the 4U 96-Bay SAS Storage System!
Page 2
4U96 System Quick Guide
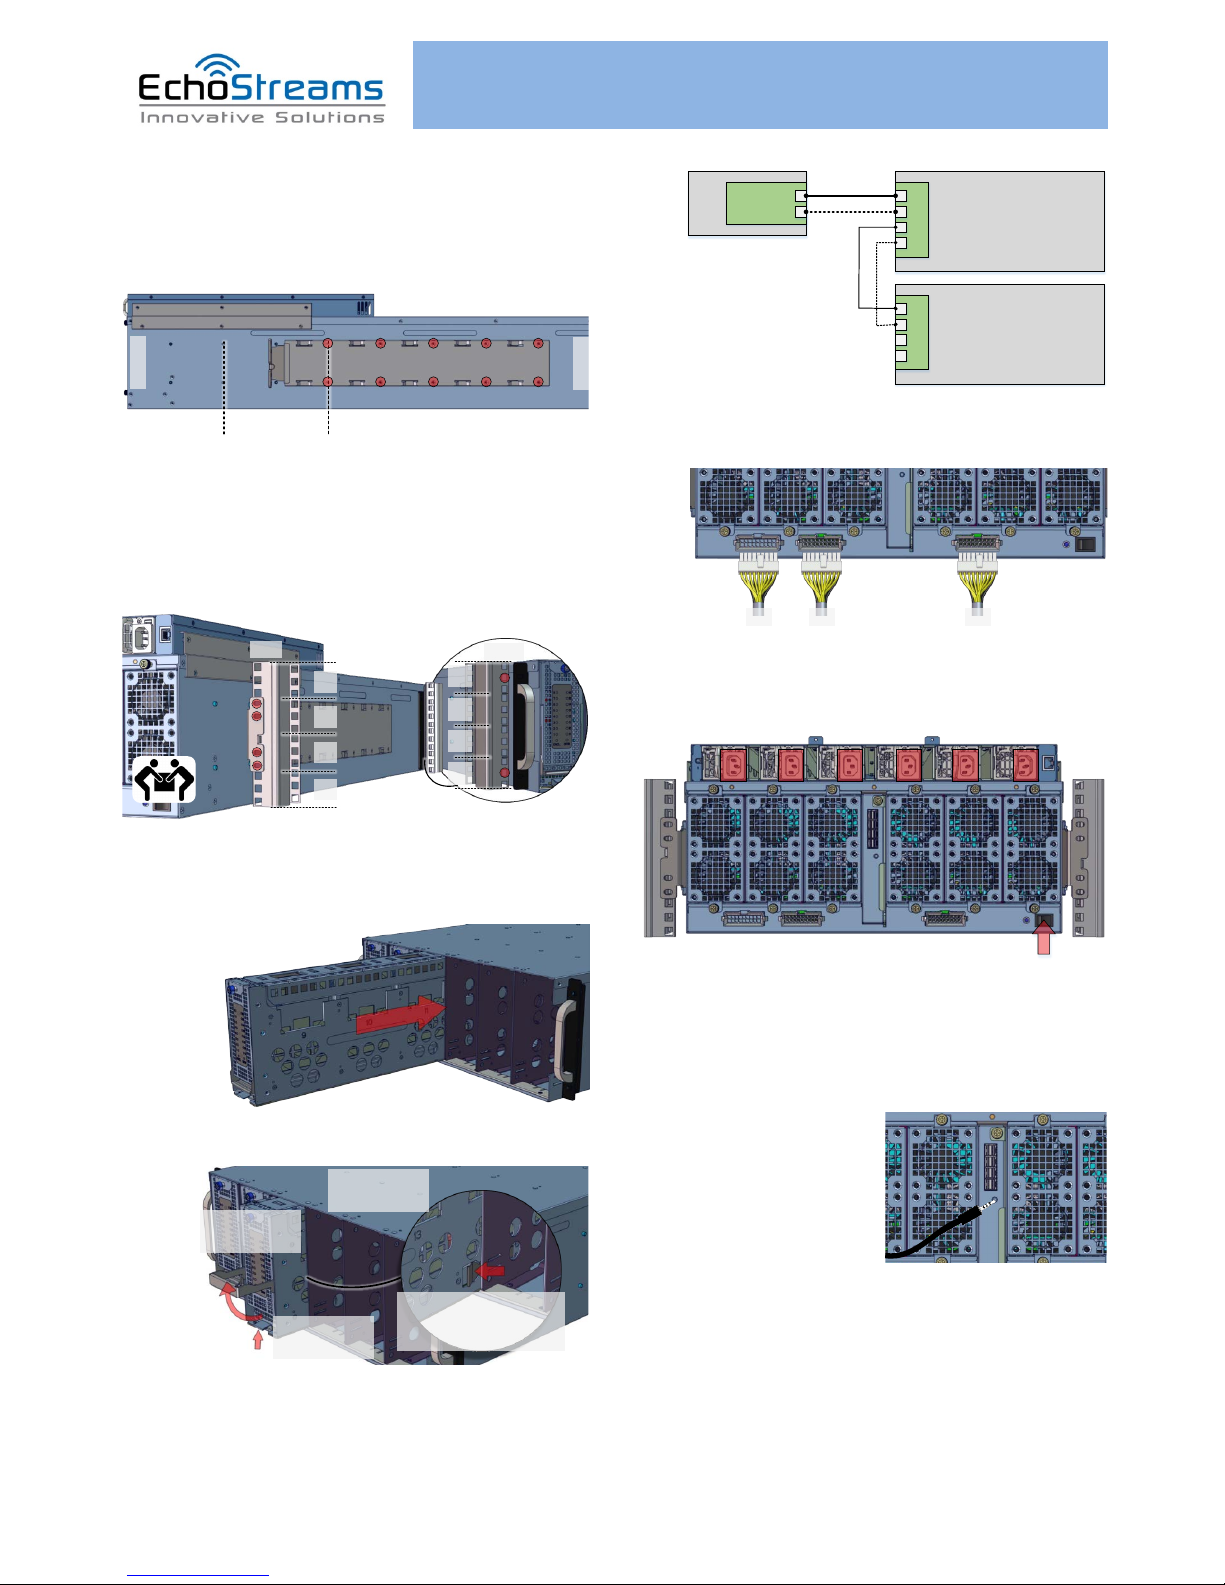
8. Setup the Rail Kit. The 4U96 enclosure has a depth of
42 inches. Adjust the slide rail housing that best fit your rack
depth. See below for the placement suggestions. Slide rail is
extendable to reach the rack post. Secure the slide rail housing
with screws (red circles).
40 - 42"
32 - 36"
Rear
Front
9. Place the unit to the rack. Beforehand, notice the
locations of the enclosure’s ear and slide rail screw holes when
applying the square nuts to the rack posts.
Afterwards, align the sliding rails to the back posts of the rack
and apply the screws to the square nuts. Screw secure the
enclosure ears to the front posts.
1U
2U
3U
4U
1U
2U
3U
4U
Rear
Front
Caution: At least three people are required to mount the
chassis to the rack.
10. Install the drawers to the enclosure.
11. To remove drawers, see the following:
1. Hold the
drawer handle
2. Lift th e drawer
latch upward
3. Pull the
drawer o ut
4. On halfway out, press the
side latch to fully release the
drawer f rom the encl osure
12. Connect to a host. Connect HD-SAS cable between
the UP port on the master expander and the SAS port of the
host’s HBA or RAID controller. See the following illustration for
a sample of recommended configurations:
4U96
SAS UP Port A
SAS UP Port B
SAS DOWN Port A
SAS DOWN Port B
Host
RAID / HBA
4U96 (optional)
SAS UP Port A
SAS UP Port B
SAS DOWN Port A
SAS DOWN Port B
SAS ex pansion cable
SAS c able
(optional)
(optional)
---- Op tional cabl es are
for bandwidth increase
13. Apply power connectors to the back of the
enclosure. Note the power connector numbering.
A1 A2 A3
14. Power on the unit. Plug in the AC power cords to
the AC receptacles of the Power Center and press the power
button on the back of the enclosure.
15. Turn on the hard drives.
The host’s RAID controller will send a signal to turn on all 96
drives of the enclosure upon system power up.
If HBA is used, there will be cases where hard drives are not
powered up by the time power is applied to the enclosure.
To power on the disks:
1. Connect a serial cable to the management port
2. Open console terminal (e.g. HyperTerminal) with baud
setting 38400, 8, N, 1, N
3. Type “con 1” to go to the first drawer (“con 0” is the
master expander).
4. Type “t.dslot a” to turn on all the disk of that drawer
5. Go to Drawer 2 (type “con 2”), type “t.dslot a” to turn
Drawer 2, and so on.
Type “help” for the list of available commands.
If you have any technical questions, please contact your authorized dealer before contacting us.
For more information please visit our website at www.echostreams.com
 Loading...