

Page 1

1Top cover(composite volume)
ENGLISH
FRANÇAIS
DEUTSCH
ITALIANO
ESPAÑOL
OPERATOR'S MANUAL
MANUEL D'UTILISATION
BEDIENUNGSANLEITUNG
MANUALE PER L'OPERATORE
MANUAL DE INSTRUCCIONES
PB-770
WARNING
READ THE INSTRUCTIONS CAREFULLY AND FOLLOW THE RULES FOR
SAFE OPERATION.
FAILURE TO DO SO COULD RESULT IN SERIOUS INJURY.
AVERTISSEMENT
LIRE ATTENTIVEMENT LES INSTRUCTIONS ET SUIVRE LES RE-GLES DE
SECURITE. LE NON-RESPECT DES REGLES DE SECU-RITE ENTRAINE UN
RISQUE DE BLESSURE GRAVE.
WARNUNG
LESEN SIE DIE BEDIENUNGSANLEITUNG SORGFÄLTIG DURCH, UND BEFOLGEN SIE DIE SICHERHEITSREGELN. ANDERNFALLS BESTEHT DAS
RISIKO SCHWERER VERLETZUNGEN.
AVVERTENZA
LEGGERE E SEGUIRE ATTENTAMENTE LE ISTRUZIONI PER LA-VORARE
IN CONDIZIONI DI MASSIMA SICUREZZA. LA MANCA-TA OSSERVANZA
DELLE ISTRUZIONI POTREBBE PROVOCARE LESIONI GRAVI.
ADVERTENCIA
LEA ATENTAMENTE LAS INSTRUCCIONES Y SIGA LAS INDICA-CIONES
PARA UN FUNCIONAMIENTO SEGURO. DE NO HACER-LO, PODRÍA SUFRIR
LESIONES GRAVES.
Page 2

Packing list
Packing list
3
Page 3
1Top cover
ENGLISH
(Original instructions)
OPERATOR'S MANUAL
PB-770
WARNING
READ THE INSTRUCTIONS CAREFULLY AND FOLLOW THE
RULES FOR SAFE OPERATION.
FAILURE TO DO SO COULD RESULT IN SERIOUS INJURY.
Page 4

Important information
2Important information
Please ensure that you read the operator's manual before using your product.
Intended use of this product
ECHO Power Blowers are designed for blowing away dust of various sorts, including fallen leaves.
Do not use this unit for any purpose other than aforementioned.
Users of the product
You should not use this product until you have read the operator's manual carefully and fully absorbed its content.
This product should not be used by anyone who has failed to read the operator's manual properly, is suffering from a
cold, tiredness or otherwise in poor physical condition, or children.
Keep in mind that the operator or user is responsible for accidents or hazards occurring to other people or their prop-
erty.
About your operator's manual
This manual contains necessary information about the assembly, operation, and maintenance of your product. Please
read it carefully and absorb its contents.
Always keep your manual in a place where it is readily accessible.
If you have lost your manual or it is damaged and no longer readable, please purchase a new one from your ECHO
DEALER.
The units used in this manual are SI units (International System of Units). Figures in parentheses are reference values,
and there may be a slight conversion error in some cases.
Loaning or assigning your product
When loaning the product described in this manual to another party, ensure that the person borrowing and working with
the product receives the operator's manual along with the product. If you assign your product to another party, please
enclose the operator's manual with the product when handing it over.
Enquiries
Please contact your ECHO DEALER for requests regarding information about your product, the purchase of consum-
ables, repairs, and other such enquiries.
Notices
The content of this manual may be changed without notice for the purpose of upgrades to the product. Some of the
illustrations used may differ from the product itself in order to make the explanations clearer.
This product requires the assembly of some parts.
Please consult your ECHO DEALER if anything is unclear or of concern.
Manufacturer
YAMABIKO CORPORATION
7-2 SUEHIROCHO 1-CHOME, OHME, TOKYO 198-8760, JAPAN
Authorized Representative in Europe
Atlantic Bridge Limited
Atlantic House, PO Box 4800, Earley, Reading RG5 4GB, United Kingdom
2
Page 5

Contents
For safe use of your product ............................................................................................... 4
Warning notices ............................................................................................................. 4
Other indicators ............................................................................................................. 4
Symbols.........................................................................................................................4
Location in which the safety decal is attached............................................................... 6
Handling fuel.................................................................................................................. 7
Handling the engine....................................................................................................... 8
Handling the product ..................................................................................................... 9
Packing list........................................................................................................................ 12
Description........................................................................................................................13
Before you start ................................................................................................................14
Assembly ..................................................................................................................... 14
Preparing the fuel ........................................................................................................ 15
Engine operation............................................................................................................... 16
Starting the engine ...................................................................................................... 16
Stopping the engine..................................................................................................... 18
Operation ..........................................................................................................................19
Operating blower ......................................................................................................... 19
Maintenance and care ...................................................................................................... 20
Servicing guidelines..................................................................................................... 20
Maintenance and care ................................................................................................. 20
Troubleshooting table .................................................................................................. 24
Long-term storage(30 days or more)........................................................................... 25
Specifications.................................................................................................................... 26
Declaration of conformity .................................................................................................. 27
3
Page 6

For safe use of your product
Be careful to read this section before using your product.
For safe use of your product
The precautions described in this section contain important safety information. Please observe them carefully.
You must also read the precautions that appear in the body of the manual itself.
Text following a [diamond mark] mark describes the potential consequences of failing to observe the precaution.
Warning notices
Situations where there is a risk of physical injury to the operator and other people are indicated in this manual and on the product
itself by the following warning notices. Always read and observe them carefully in order to ensure safe operation.
DANGER WARNING CAUTION
This symbol accompanied by the
word "DANGER" calls attentions to
an act or a condition which will lead to
serious personal injury or death of operators and bystanders.
Other indicators
As well as warning notices, this manual uses the following explanatory symbols:
This symbol accompanied by the
word "WARNING" calls attentions to
an act or a condition which can lead to
serious personal injury or death of operators and bystanders.
"CAUTION" indicates a potentially
hazardous situation which, if not
avoided, may result in minor or moderate injury.
NOTE IMPORTANT
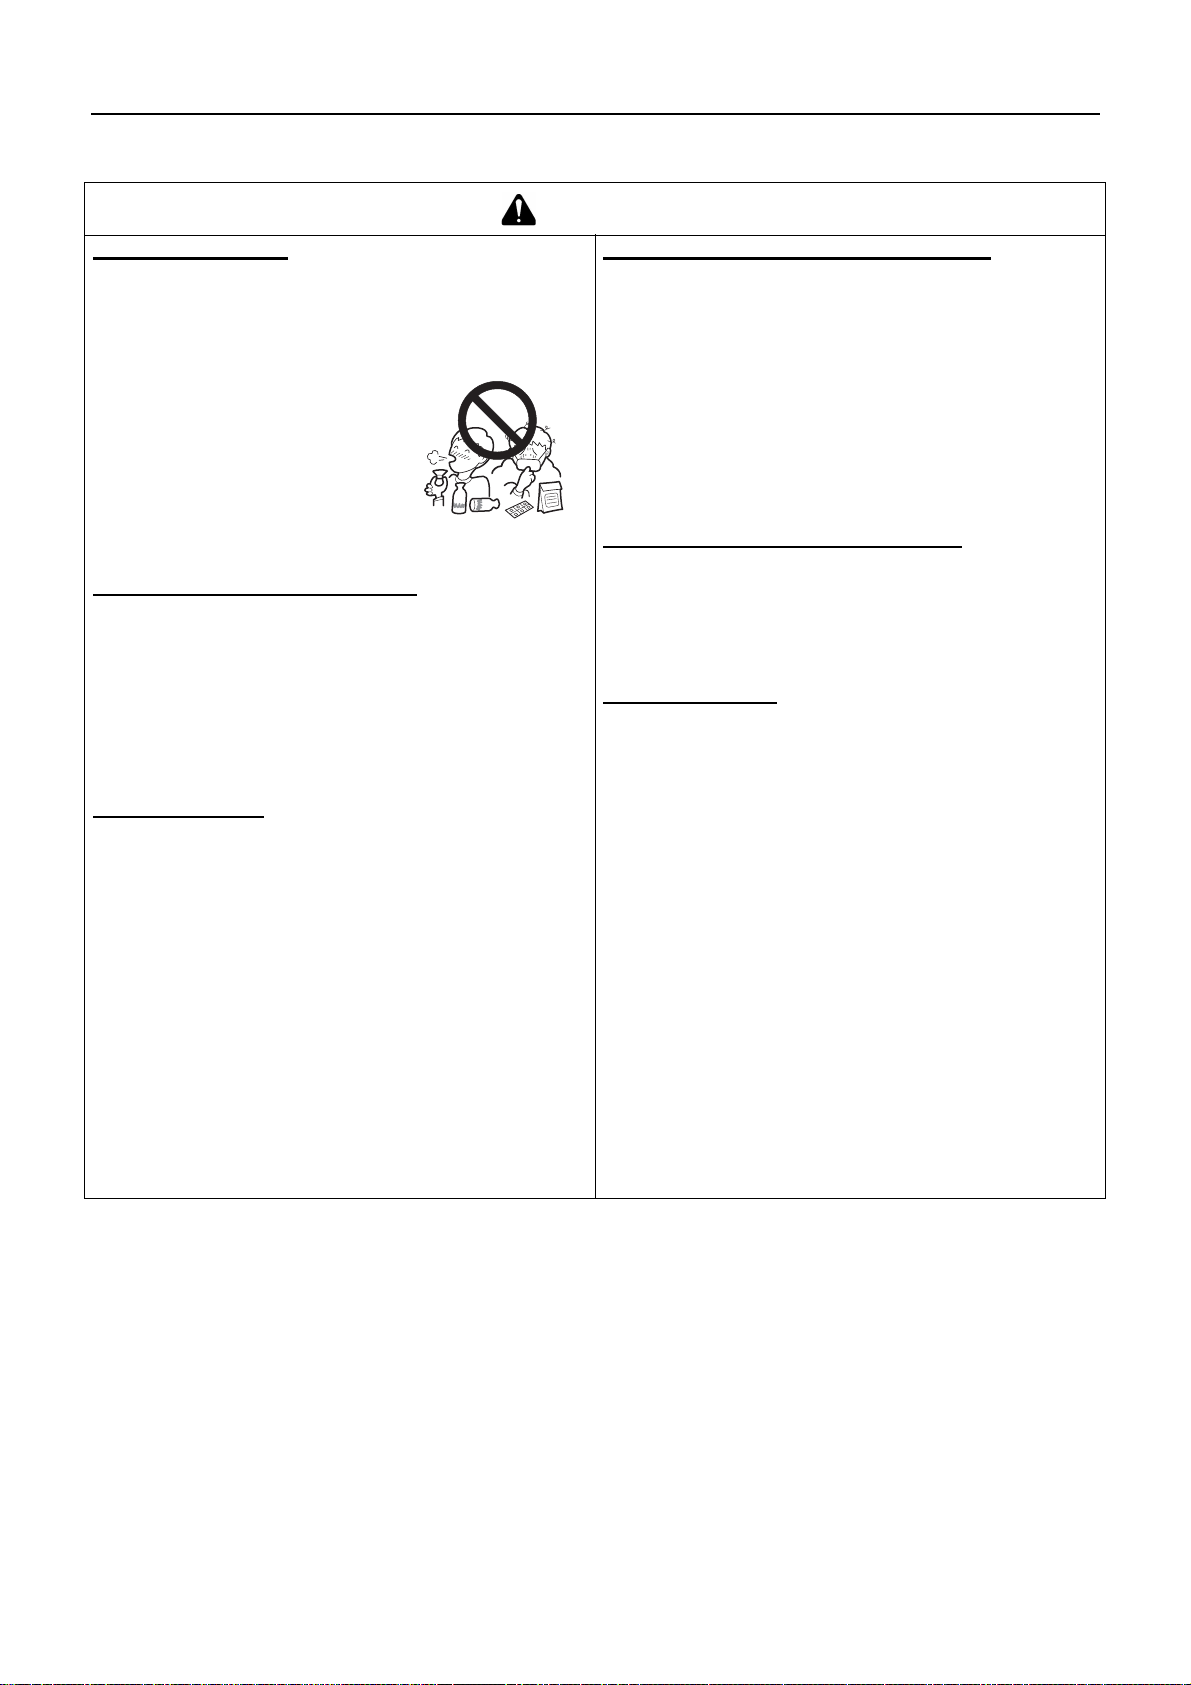
Circle and slash symbol means whatever is
shown is prohibited.
This enclosed message provides tips
for use, care and maintenance of the
product.
Framed text featuring the word "IM-
PORTANT" contains important information about the use, checking,
maintenance and storage of the product described in this manual.
Symbols
In this manual and on the product itself, a series of explanatory symbols is used. Please make sure that you fully understand what
each symbol means.
Symbol form/shape Symbol description/applica-
tion
Carefully read the operator's
manual
Wear eyes, ears and head
protection
Safety / Alert
Emergency stop
Symbol form/shape Symbol description/applica-
tion
Petrol and oil mixture
Purge bulb (Primer)
Carburettor adjustment
- Low speed mixture
Carburettor adjustment
- High speed mixture
Finger Severing
Carburettor adjustment
- Idle speed
4
Page 7

For safe use of your product
Symbol form/shape Symbol description/applica-
tion
Do not use the product in places with poor ventilation
Beware of fire
Beware of electric shocks Idle speed
Guaranteed sound power level
Ignition
ON / OFF
Symbol form/shape Symbol description/applica-
tion
Choke Control
"Cold Start"
Position
(Choke Closed)
Choke Control
"Run"
Position
(Choke Open)
Fast speed
Beware of high-temperature
areas
Engine start
5
Page 8
For safe use of your product
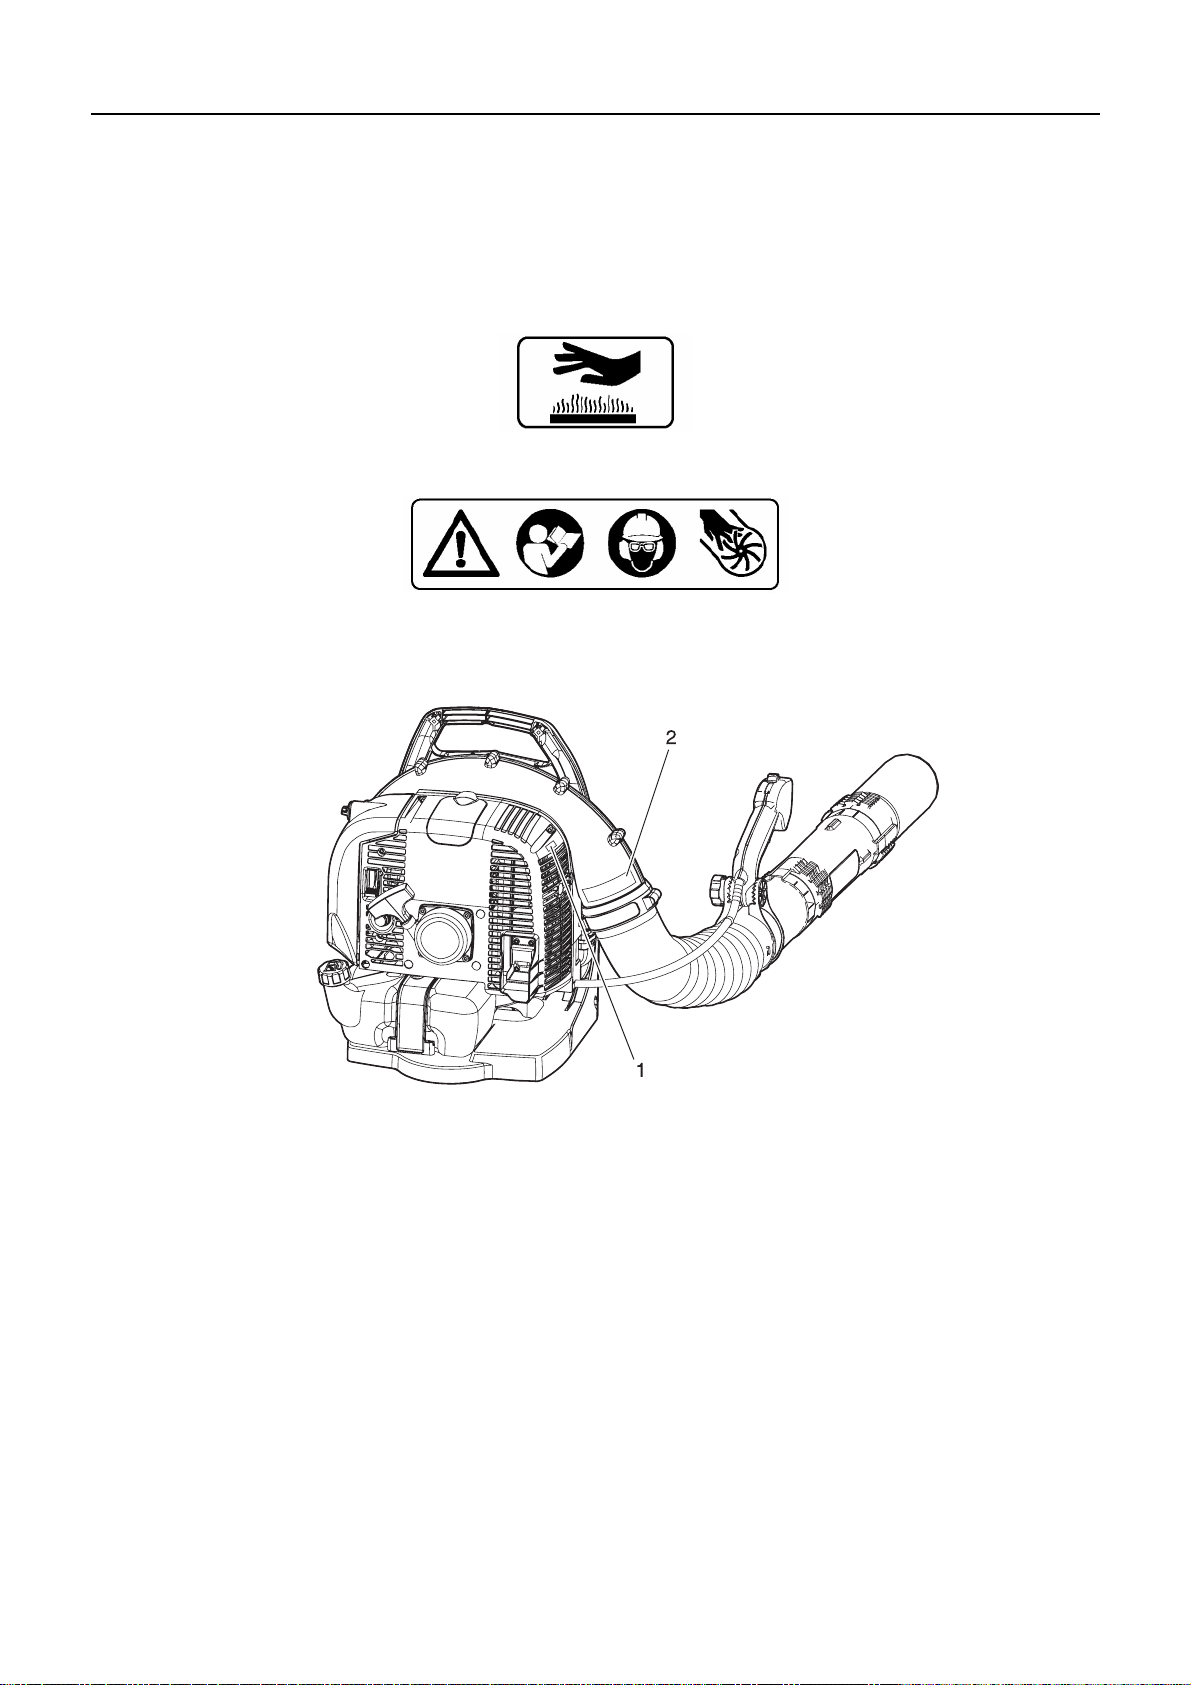
Location in which the safety decal is attached
The safety decal shown below has been attached to the product described in this manual. Ensure that you understand what the
decal means before using your product.
If the decal becomes unreadable due to wear and tear or damage, or peels off and is lost, please purchase a replacement decal
from your ECHO DEALER and attach it in the location shown in the illustrations below. Ensure that the decal is readable at all
times.
1. Safety decal (Part number X505002310)
2. Safety decal (Part number 89016009461)
6
Page 9
For safe use of your product
Handling fuel
DANGER
Always keep well away from fire when refuelling
Fuel is highly inflammable and leads to a risk of fire if mishandled. Use extreme care when mixing, storing or handling
or serious personal injury may result. Be careful to observe the following instructions.
Do not smoke or hold a flame near when refuelling.
Do not fuel up while the engine is hot or in operation.
If you do so, the fuel could ignite and cause fire, leading to burns.
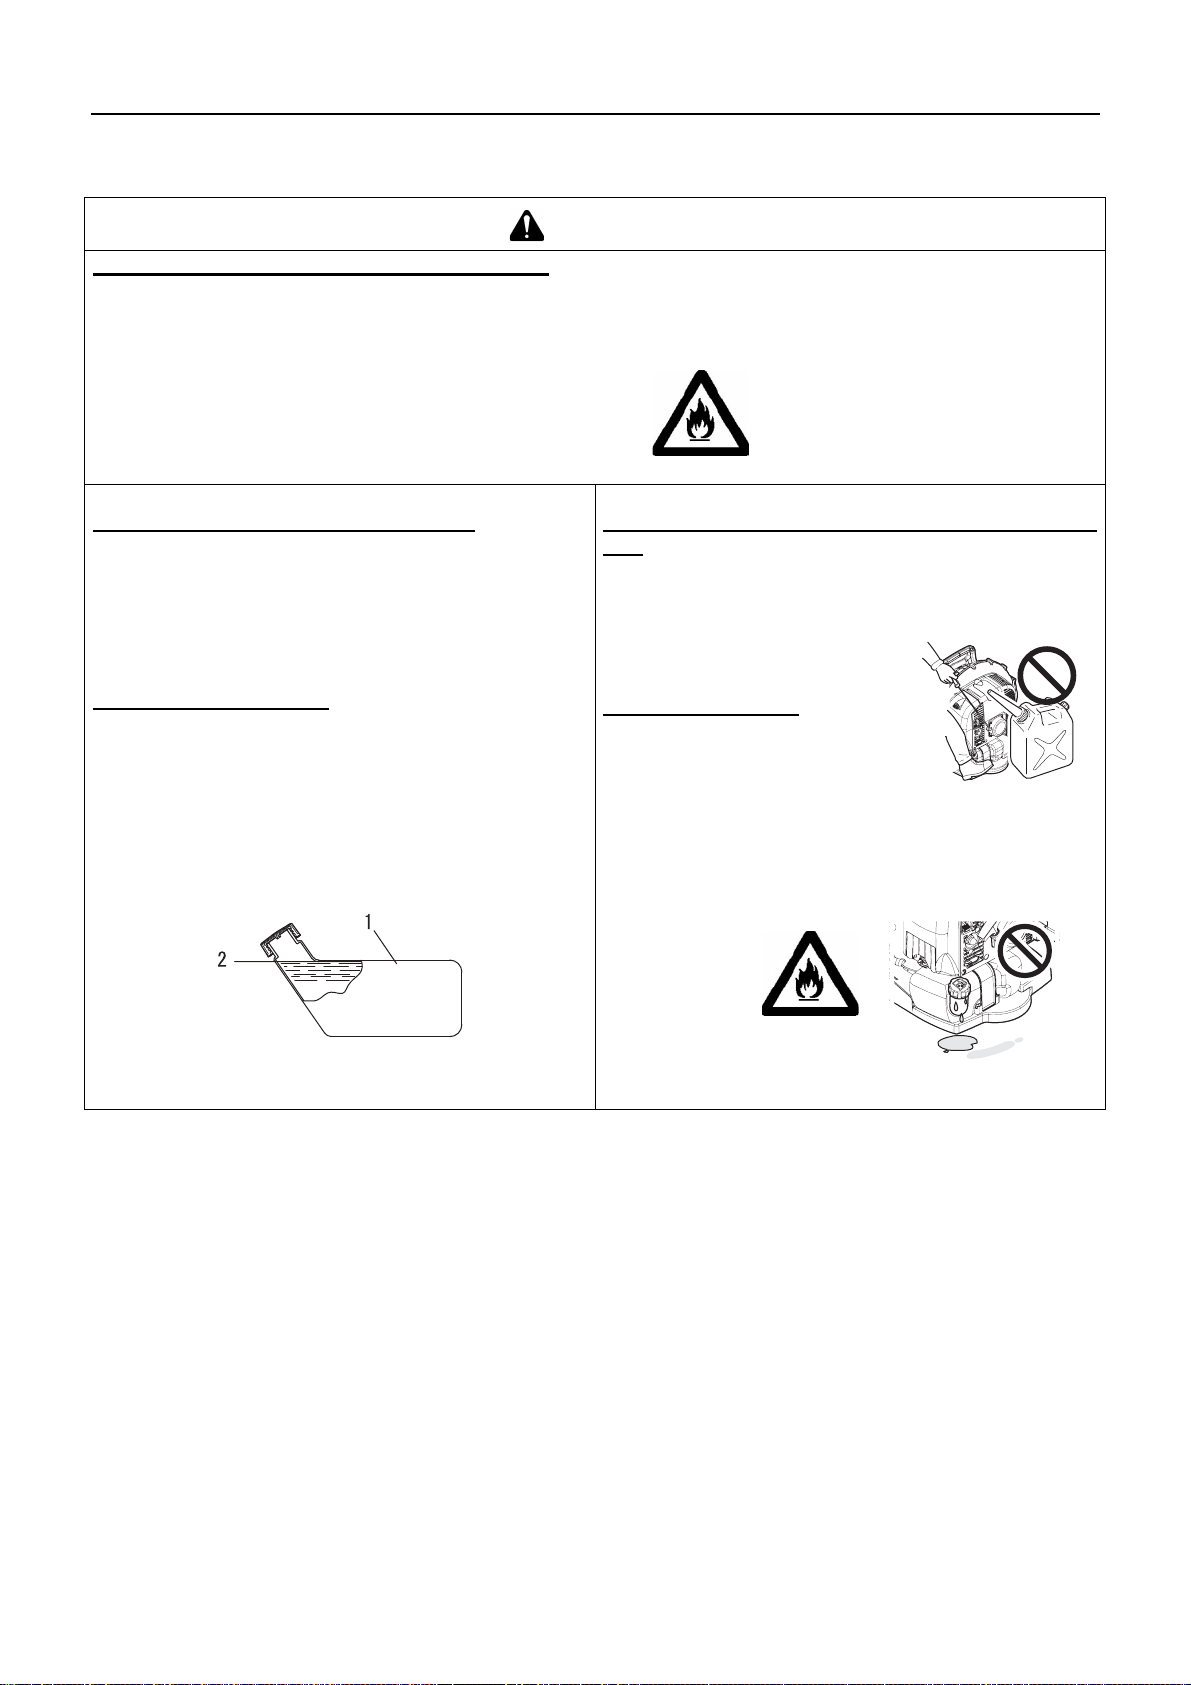
About the container and refuelling place
Use an approved fuel container.
Fuel tanks/cans may be under pressure.
Always loosen fuel caps slowly allowing pressure to
equalize.
DO NOT fill fuel tanks indoors.
ALWAYS fill fuel tanks outdoors over bare ground.
Fuel spills can cause fire
Observe the following precautions when refuelling:
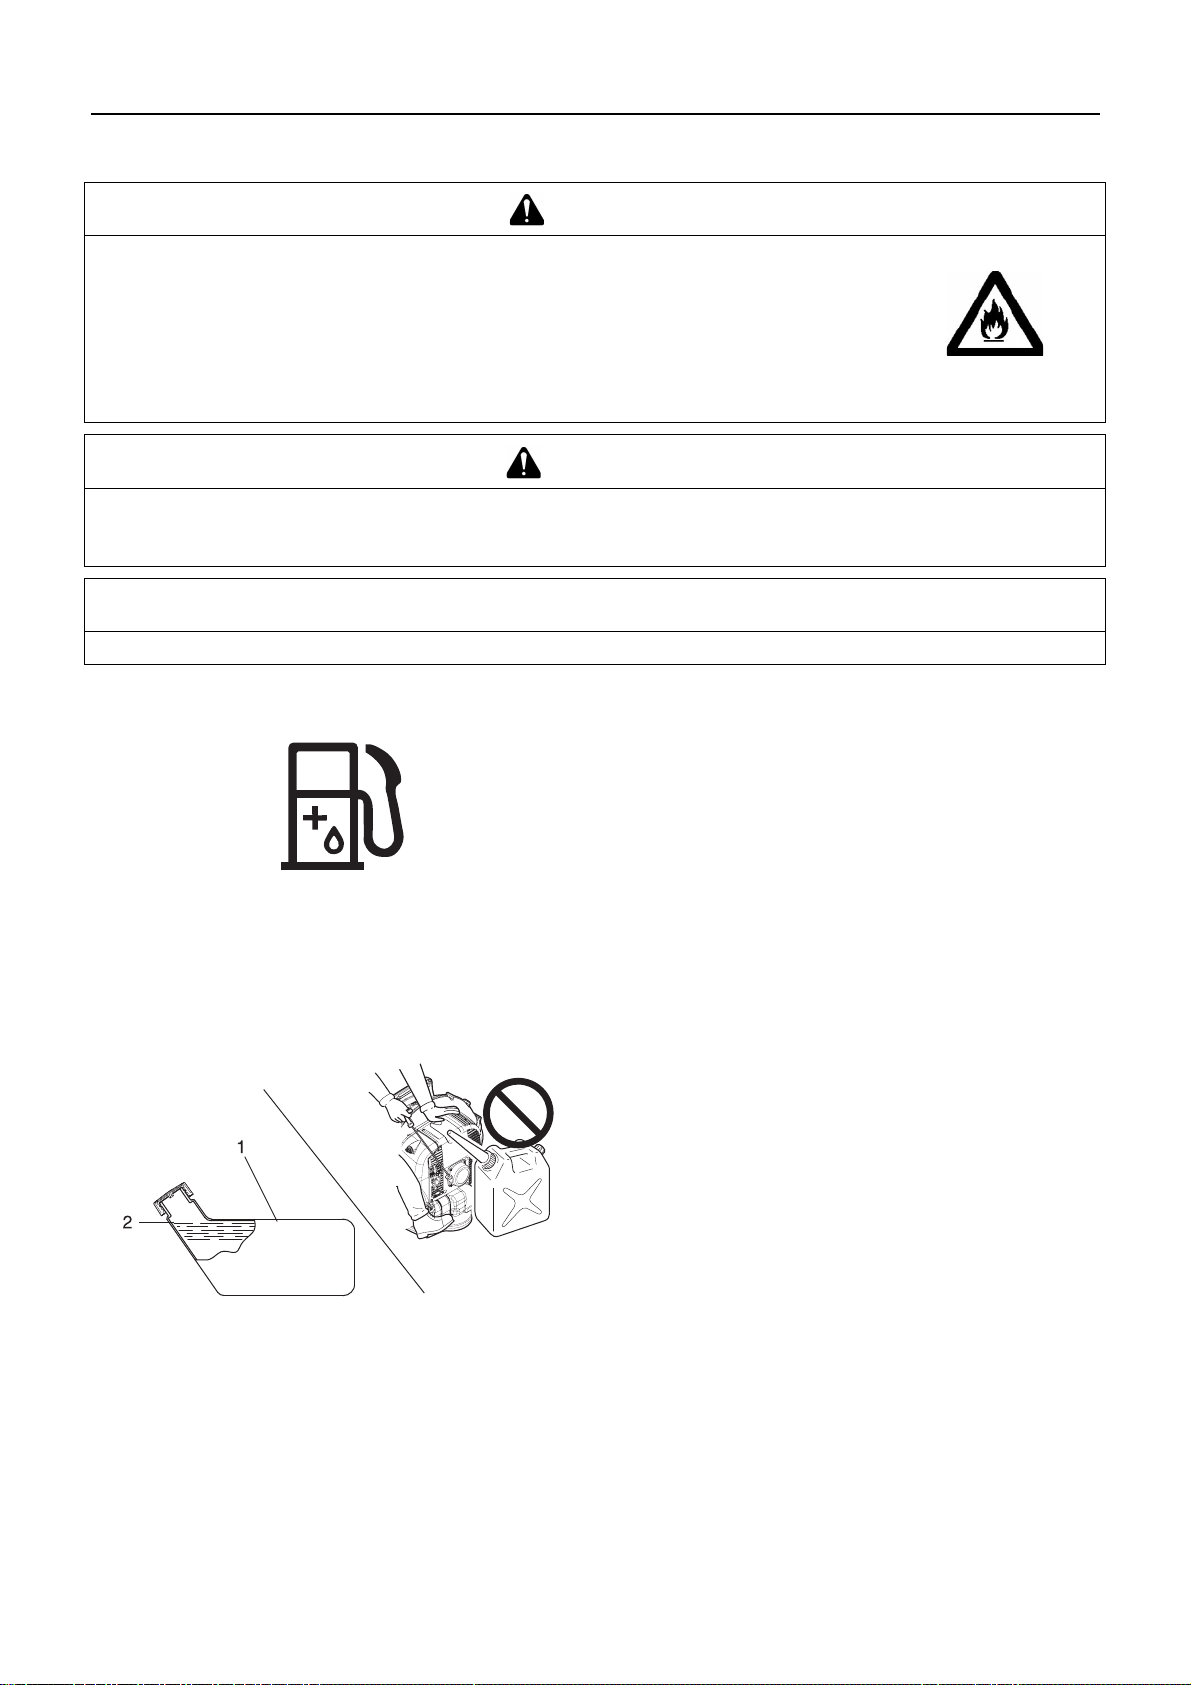
Do not add so much fuel that it reaches the mouth of the
fuel tank. Keep the fuel within the prescribed level (up to
the shoulder level of the fuel tank).
Mop up any fuel that overflows or spills out due to overfilling.
Tighten the fuel tank cap securely after refuelling.
Fuel spills can cause fire and burns when ignited.
1. Fuel tank
2. Shoulder level
Do not start the engine in the area where you refueled
You must not start the engine in the place where you
carried out the refuelling. Move at least 3m from the
place where you refueled before starting the engine.
Fuel leaks that occur while refuel-
ling can cause fire if ignited.
Fuel leaks cause fire
After refuelling, always check
that there are no leaks or discharges of fuel from the fuel
pipe, fuel system grommets, or
around the fuel tank cap.
If you do find fuel leaks or discharges, stop using the
product immediately and contact your ECHO DEALER
to have it repaired.
Any fuel leaks could cause fire.
7
Page 10

For safe use of your product
Handling the engine
WARNING
Starting the engine
Be particularly careful to observe the following precautions when starting the engine:
Check that none of the nuts and bolts are loose
Check that there are no fuel leaks
Do not try to start the engine with the product shouldered
Place the product in a flat, well ventilated place
Leave plenty of space around the product and do not allow people or animals near it
Remove obstructions, if any
Start the engine with the throttle lever in the start/operation position
Hold the product firmly to the ground when starting the
engine
Failure to observe the precautions could cause an accident
or injury, or even lead to a fatality.
Once the engine has started, check for abnormal vibrations and sounds
Check that there are no abnormal vibrations or sounds
once the engine starts. Do not use the product if there
are abnormal vibrations or sounds. Contact your ECHO
DEALER to have it repaired.
Accidents involving parts that fall or shatter off can cause
wounds or serious injury.
Do not touch high temperature or high voltage components while the product is running
Do not touch the following high temperature or high voltage components while the product is running or for some
time after it stops.
Silencer, cylinder, and other high temperature components
You could burn yourself if you touch a high
temperature component.
Spark plug, spark plug wire, and other
high voltage components
You could receive an electric shock if you
touch a high voltage component while the
product is running.
Exhaust fumes are toxic
The exhaust fumes from the engine contain toxic gases.
Do not operate the product indoors or in a plastic greenhouse or in other ill ventilated places.
The exhaust fumes could cause poisoning.
Turn off the engine when checking or maintaining
the product
Observe the following precautions when checking and
maintaining your product after use:
Turn the engine off and do not attempt to check or maintain the product until the engine has cooled
You could burn yourself.
Remove the spark plug cap before performing checks
and maintenance
An accident could occur if the product starts unexpectedly.
Checking the spark plug
Observe the following precautions when checking the
spark plug.
If the electrodes or terminals are worn, or if there are
cracks in the ceramics, replace them with new parts.
The spark test (for checking whether the spark plug is
sparking) must be carried out by a professional. Please
ask your ECHO DEALER.
The spark test must not be carried out in proximity of
the spark plug hole.
The spark test must not be performed in places where
there are fuel spills or inflammable gases
You must not touch the
metal parts of the spark
plug
The spark plug could ig-
nite a fire or give you an
electric shock.
Put safety first in the case of fire or smoke
If fire comes from the engine or smoke appears from
any area other than the exhaust vent, first distance
yourself from the product to ensure your physical safety.
Use a shovel to throw sand or other such
material on the fire to prevent it from
spreading, or put it out with a fire extinguisher.
A panicked reaction could result in the fire and
other damage becoming more extensive.
8
Page 11
For safe use of your product
Handling the product
General precautions
Operator's manual
Be careful to read the operator's manual
properly before using your product in order to ensure correct operation.
Failure to do so could lead to an accident or
serious injury.
Do not use the product for anything
other than its intended purpose
You must not use the product for any purpose other
than those described in the operator's manual.
To do so could lead to an accident or serious injury.
Do not modify the product
You must not modify the product.
To do so could lead to an accident or serious injury. Any
malfunction resulting from a modification to the product will
not be covered by the manufacturer's warranty.
WARNING
Loaning or assigning your product
When loaning your product to another party, ensure
that the person borrowing the product receives the operator's manual along with it.
If you assign your product to another party, please enclose the operator's manual with the product when
handing it over.
Failure to do so could lead to an accident or serious injury.
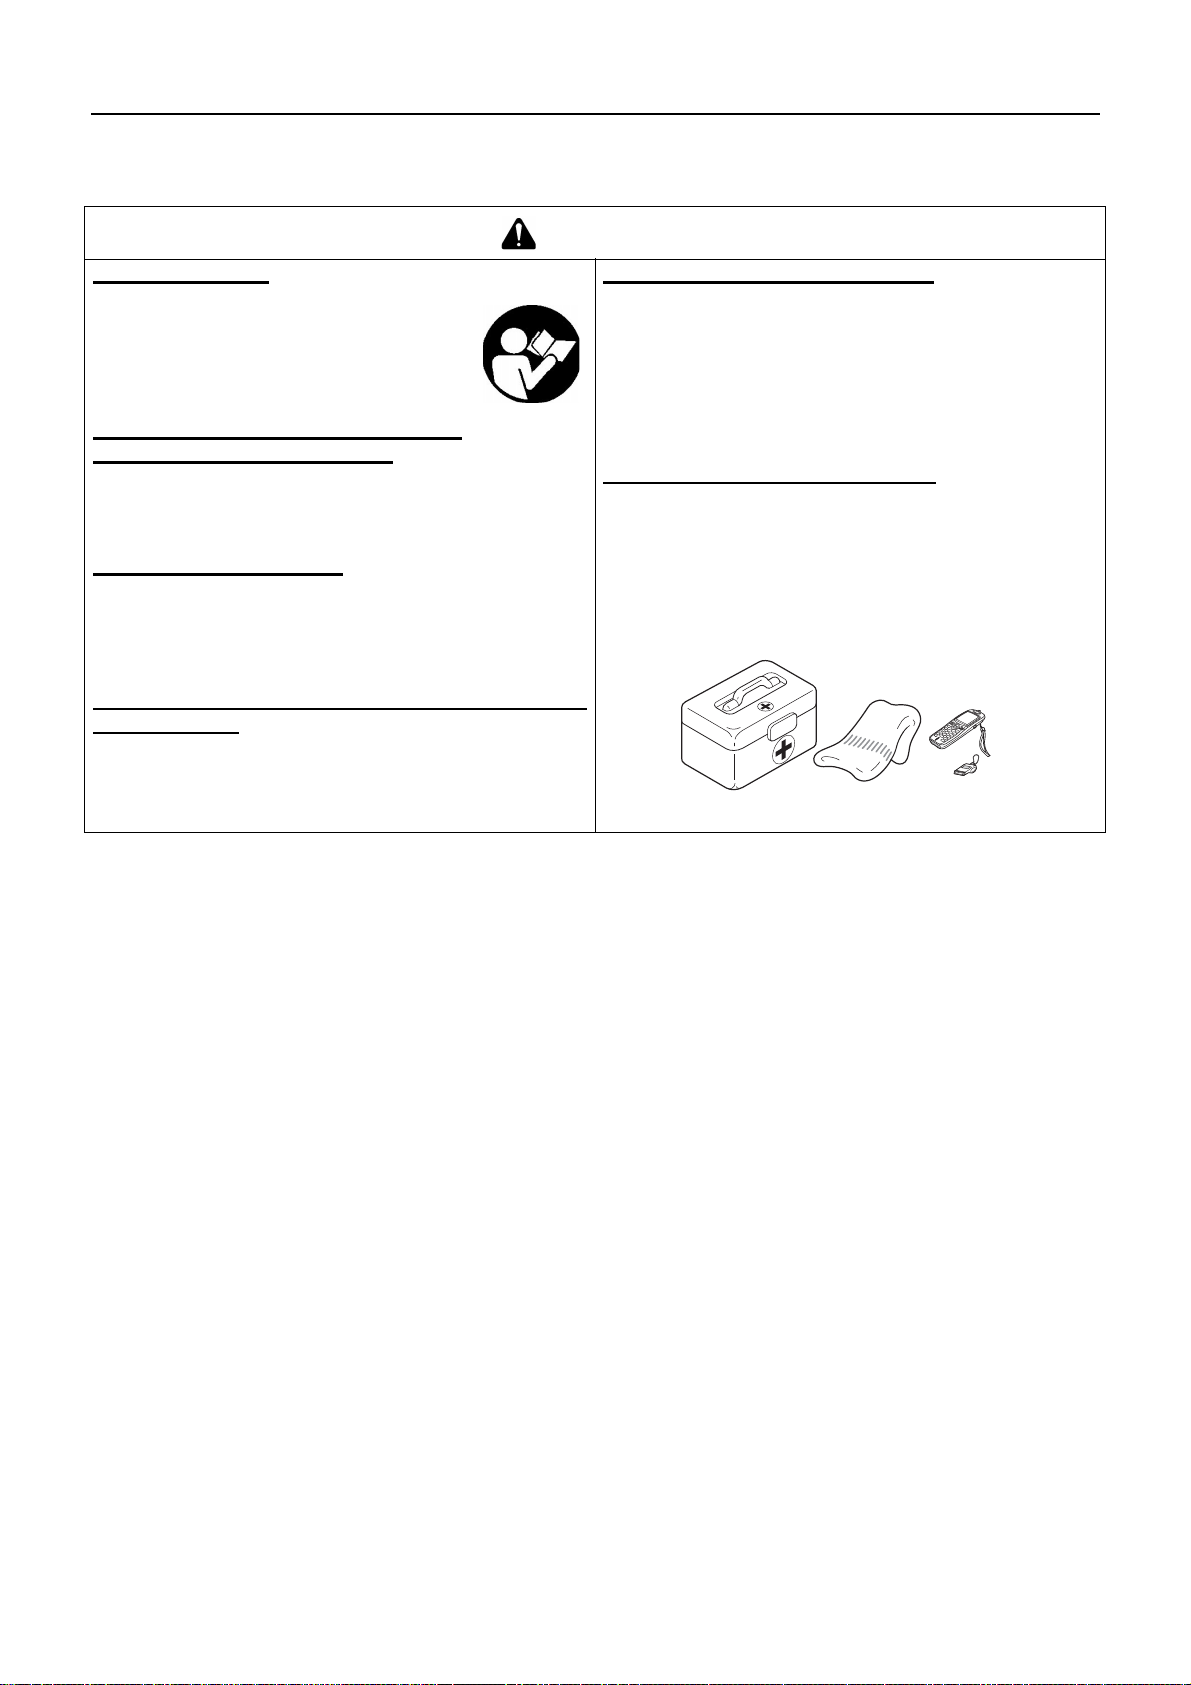
Being prepared in case of an injury
In the unlikely event of an accident or injury, please ensure
that you are prepared.
First aid kit
Towels and wipes (to stop any bleeding)
Whistle or mobile phone (for calling outside help)
If you are unable to perform first aid or call for outside help,
the injury could worsen.
Do not use the product unless it has been checked
and maintained
You must not use the product unless it has been
checked and maintained. Always ensure that the product is checked and maintained on a regular basis.
Failure to do so could lead to an accident or serious injury.
9
Page 12
For safe use of your product
Precautions for use
WARNING
Users of the product
The product should not be used by:
people who are tired
people who have taken alcohol
people who are on medication
people who are pregnant
people who are in poor physical
condition
people who have not read the operator's manual
children
Failure to observe these instruc-
tions could lead to an accident.
Environment of use and operation
Do not use the product:
when it is raining, thundering, or lightning strikes are
likely to occur.
on steep slopes or in place which give no secure foothold and are thus slippery.
at night or in places with poor visibility.
A serious injury could result if you fall or slip, or fail to oper-
ate the product correctly.
Using the product
When using the product, pay special attention to observe
the following precautions.
Do not allow people who are irrelevant to the work conducted or animals to be in the worksite.
Do not point the blower pipe at people or animals.
Do not use the product in places where there is no sure
foothold.
Hold the arm tightly.
Avoid using the product late at night or early in the
morning so that the neighbors will not be disturbed by
noise.
Failure to observe these instructions could lead to an acci-
dent or injury.
Turn off the engine when moving around
When moving around in the situations described below,
turn off the engine and move with the product shouldered.
Failure to observe these precautions could cause burns or
Travelling by car with fuel in the fuel tank could lead to a fire.
Be careful not to get caught in the fan
The wind pressure from the fan could make your hand get
Vibration and cold
It is believed that a condition called Raynaud's Phenomenon which affects the fingers of certain individuals may be
brought about by exposure to vibration and cold. Exposure to vibration and cold may cause tingling and burning,
followed by loss of colour and numbness in the fingers.
The following precautions are strongly recommended because the minimum exposure which might trigger the ailment is unknown.
Failure to observe these instructions could result in damage
Moving to the place where you are working
Moving to another area while you are working
Leaving the place where you have been working
serious injury.
When transporting the product by car, empty the fuel
tank, put the product in the upright position, and secure
it firmly in place to prevent it from moving around.
Be careful not to get your hair caught in the fan.
Never put your hand in between the engine and the
backpack frame when the product is in operation.
caught in the fan, resulting in a serious injury.
Keep your body warm, especially the head and neck,
feet and ankles, and hands and wrists.
Maintain good blood circulation by performing vigorous
arm exercises during frequent work breaks, and also by
not smoking.
Limit the number of hours of operation.
Try to fill each day with jobs where operating the blower
or other hand-held power equipment is not required.
If you experience discomfort redness and swelling of
the fingers, followed by whitening and loss of feeling,
consult your physician before exposing yourself further
to cold and vibration.
to your health.
10
Page 13
For safe use of your product
WARNING
Repetitive stress injuries
It is believed that over-using the muscles and tendons of
the fingers, hands, arms and shoulders may cause soreness, swelling, numbness, weakness and extreme pain to
the areas just mentioned. Certain repetitive hand activities
may put you at a high risk for developing a repetitive
stress injury (RSI).
To reduce the risk of RSI, do the following:
Avoid using your wrist in a bent, extended or twisted
position.
Take periodic breaks to minimize repetition and rest
your hands. Reduce the speed and force in which you
do the repetitive movement.
Do exercises to strengthen hand and arm muscles.
See a doctor if you feel tingling, numbness or pain in
your fingers, hands, wrists or arms. The sooner RSI is
diagnosed, the more likely permanent nerve and muscle
damage can be prevented.
Failure to observe these instructions could result in damage
to your health.
Turn off the engine immediately if anything goes
wrong
Turn off the engine immediately if the product suddenly
starts to emit abnormal sounds or vibrate abnormally.
The product cannot be used when it suffers from abnormal vibration or sounds.
Contact your ECHO DEALER for repair.
Continuing to use parts when they are damaged could lead
to an accident or serious injury.
Protective gear
WARNING
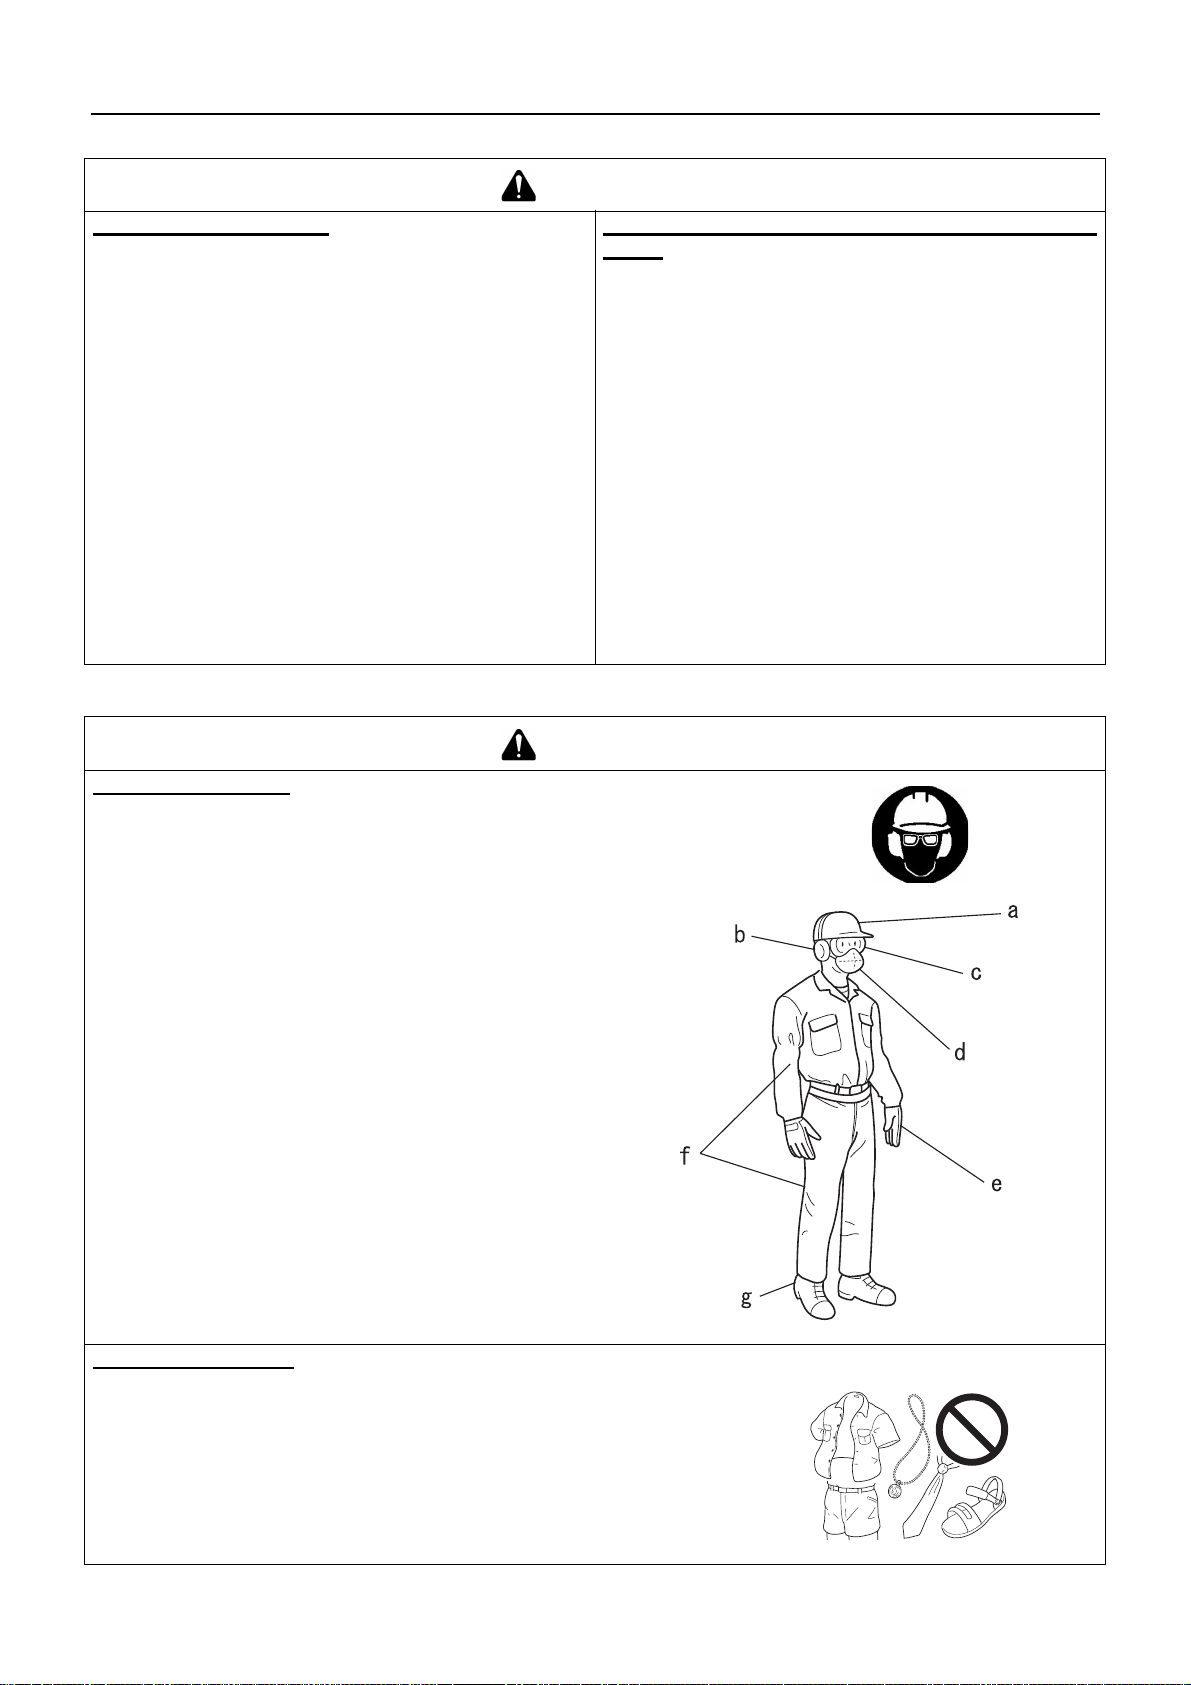
Wear protective gear
Wear appropriate work clothes and protective gear
when working with the power blower. Above all, make
sure to wear safety goggles, a dust mask, and ear muffs
at all times while working.
Without the protective gear, you could inhale the debris or
dust blown away or get them in your eyes, which could lead
to an accident or injury.
a Head protection (helmet): Protects the head
b Ear muffs or ear plugs: Protect the hearing
c Safety goggles: Protect the eyes
d Dust mask
e Safety gloves: Protect the hands from cold and vibration
f Work clothes that fit (long sleeves, long trousers): Pro-
tect the body
g Heavy duty, non-slip protective boots (with toecaps) or
non-slip work shoes (with toecaps): Protect the feet
Failure to observe these precautions could result in damage
to your sight or hearing, or lead to a serious injury.
Wear proper clothing
Do not wear ties, jewellery, or loose, dangling clothing which could be
caught in the unit. Do not wear open toed footwear, or go bare-foot or
barelegged. In certain situations, total face and head protection may be required.
Failure to observe these precautions could result in damage to your sight or
hearing, or lead to a serious injury.
11
Page 14
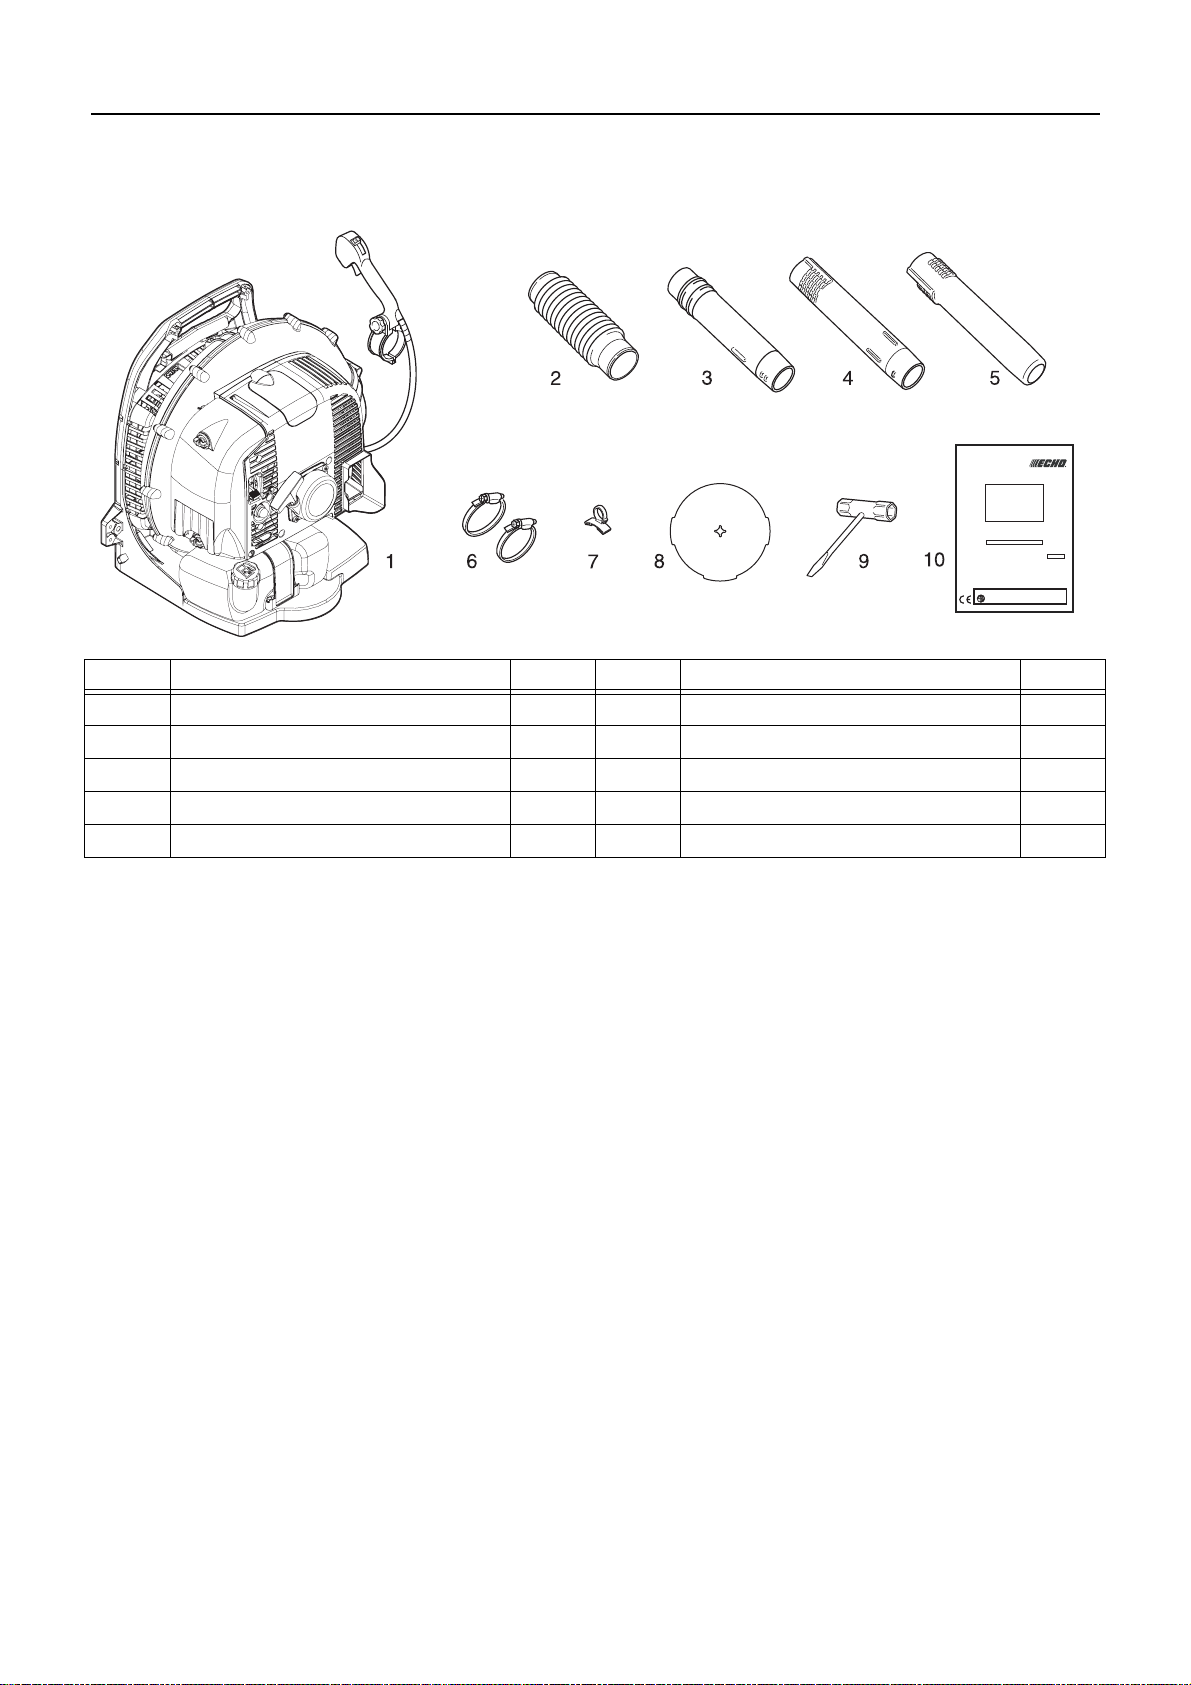
Packing list
The following parts are packed separately in the packing box.
When you have unpacked the box, please check the parts that it contains.
Contact your ECHO DEALER if anything is missing or broken.
Number Part name Quantity Number Part name Quantity
(1) Power Head 1 (6) Clamps w/screws 2
(2) Flex Pipe 1 (7) Guide Loop 1
(3) Swivel Pipe 1 (8) Intake cover 1
(4) Straight Pipe 1 (9) T-Wrench 1
(5) Straight Pipe 1 (10) Operator's Manual 1
Packing list
12
Page 15
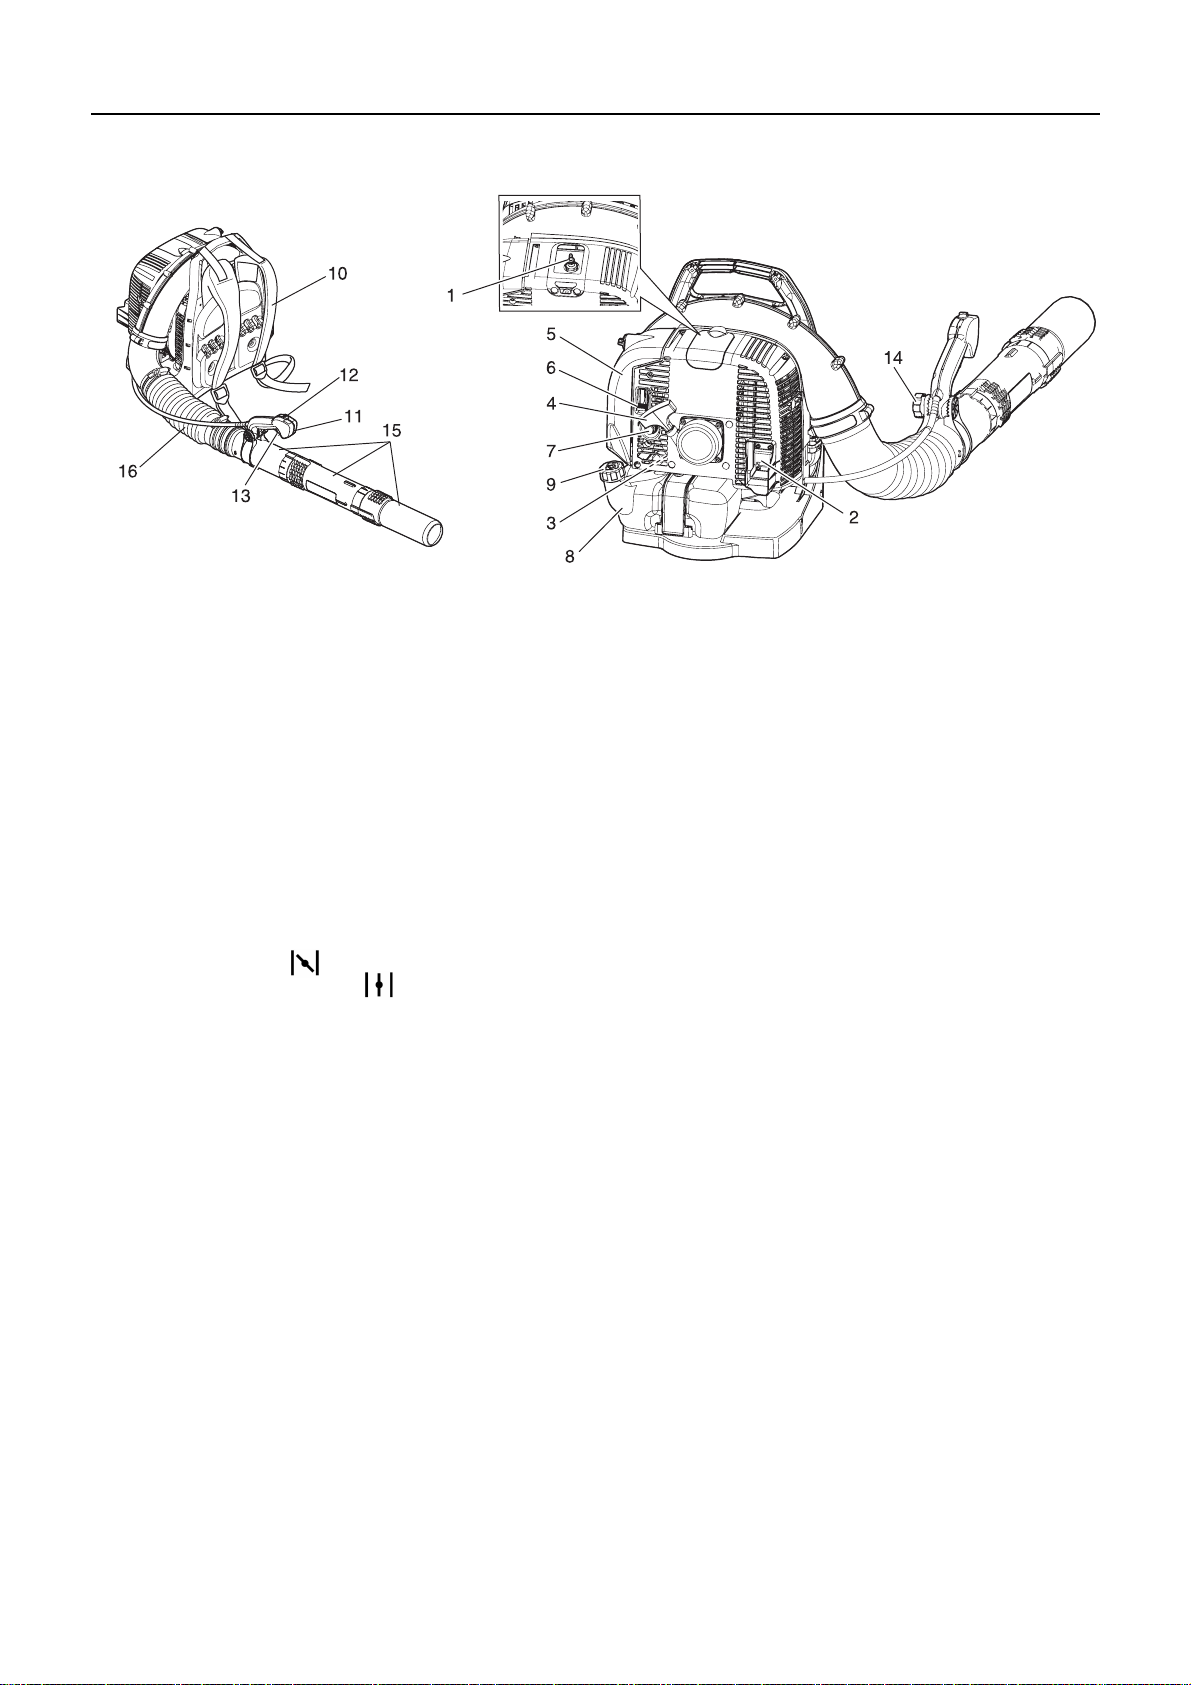
Description
Description
1. Spark plug Provides spark to ignite fuel mixture.
2. Spark arrester - Catalytic silencer / Silencer The si-
lencer or catalytic silencer controls exhaust noise and
emission. The spark arrester screen prevents hot, glowing particles of carbon from leaving the silencer. Keep
exhaust area clear of flammable debris.
3. Serial number label Lists model number and serial
number of unit.
4. Starter handle Pull recoil handle slowly until recoil starter
engages, then quickly and firmly. When engine starts,
return handle slowly. DO NOT let handle snap back or
damage to unit will occur.
5. Air cleaner Contains replaceable air filter element.
6. Choke Choke is located on the side of the air cleaner.
Move choke lever to position to close choke for cold
starting. Move choke lever to position to open
choke.
7. Purge bulb Pumping purge bulb before starting engine
draws fresh fuel from the fuel tank, purging air from the
carburettor. Pump purge bulb until fuel is visible. Pump
purge bulb an additional 4 or 5 times.
8. Fuel tank Contains fuel and fuel filter.
9. Fuel tank cap Covers and seals fuel tank.
10. Shoulder harness Used to support unit on operator's
back. The straps are adjustable.
11. Handle Used by operator to direct and control air flow.
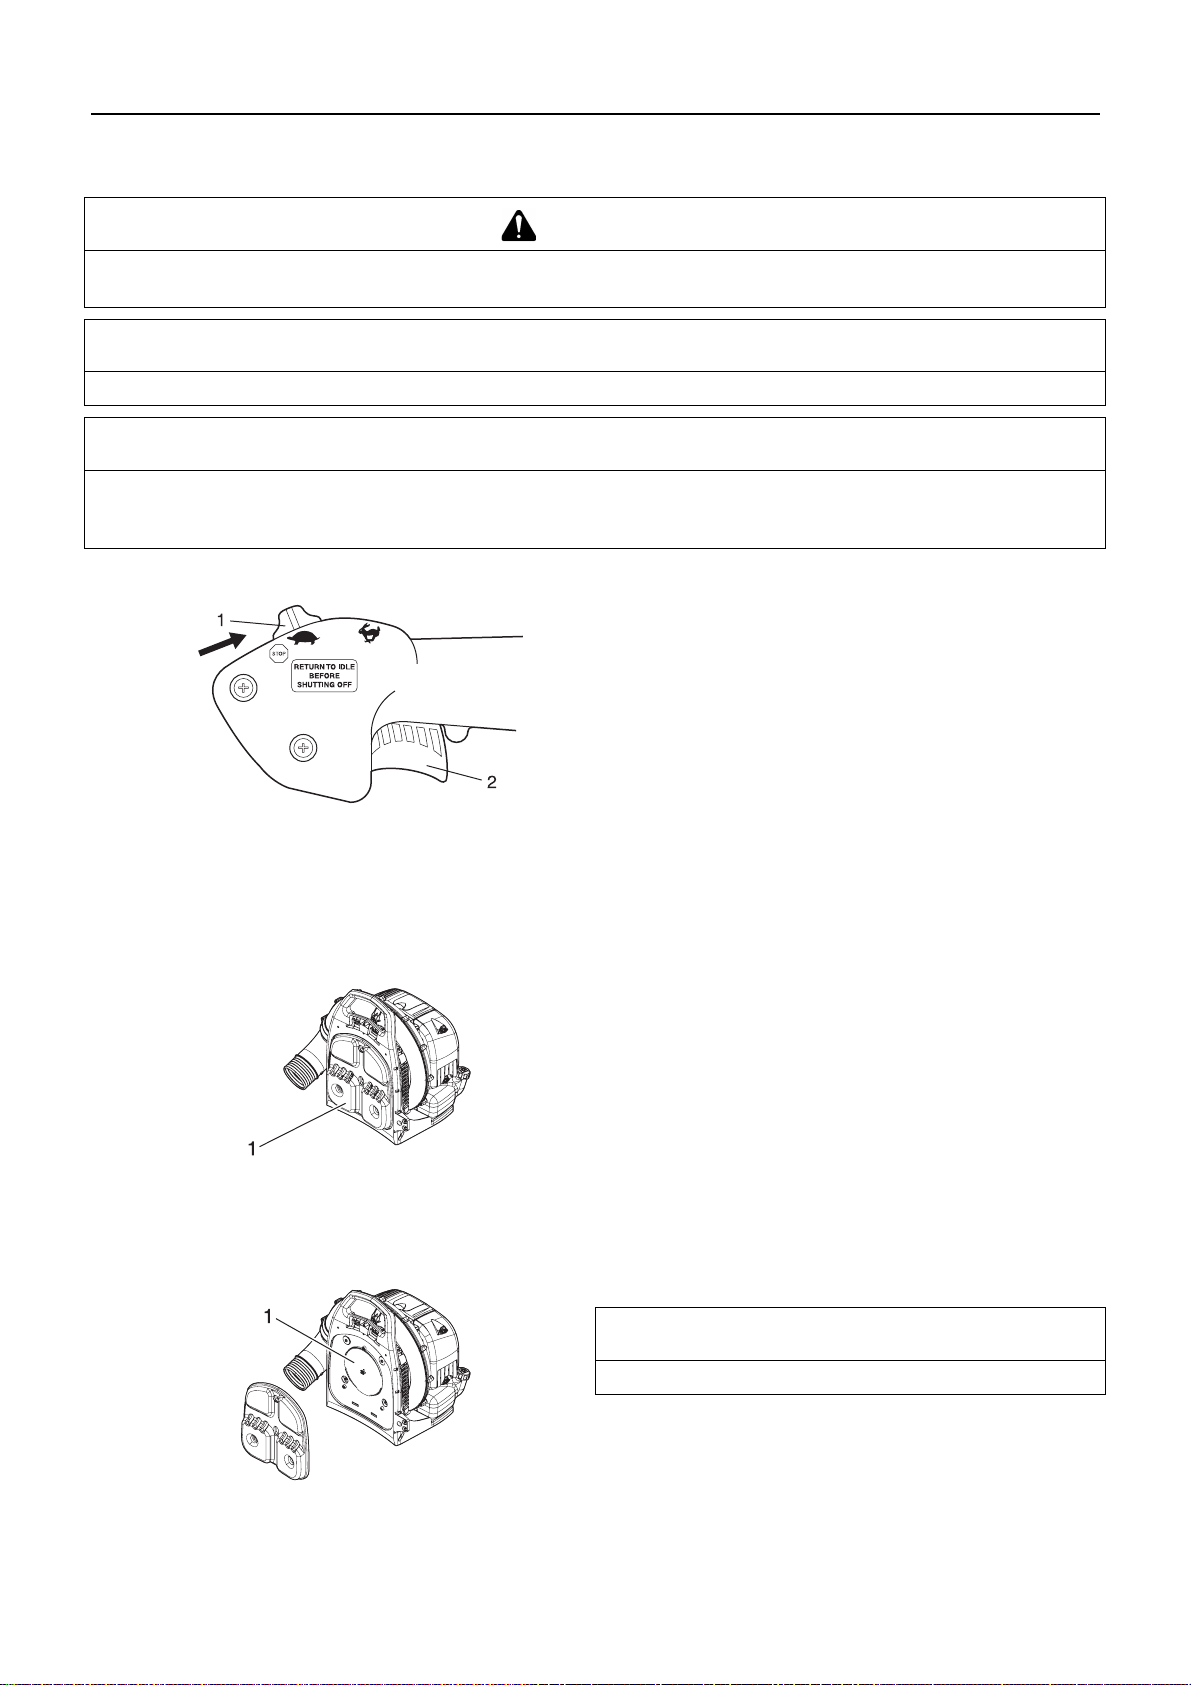
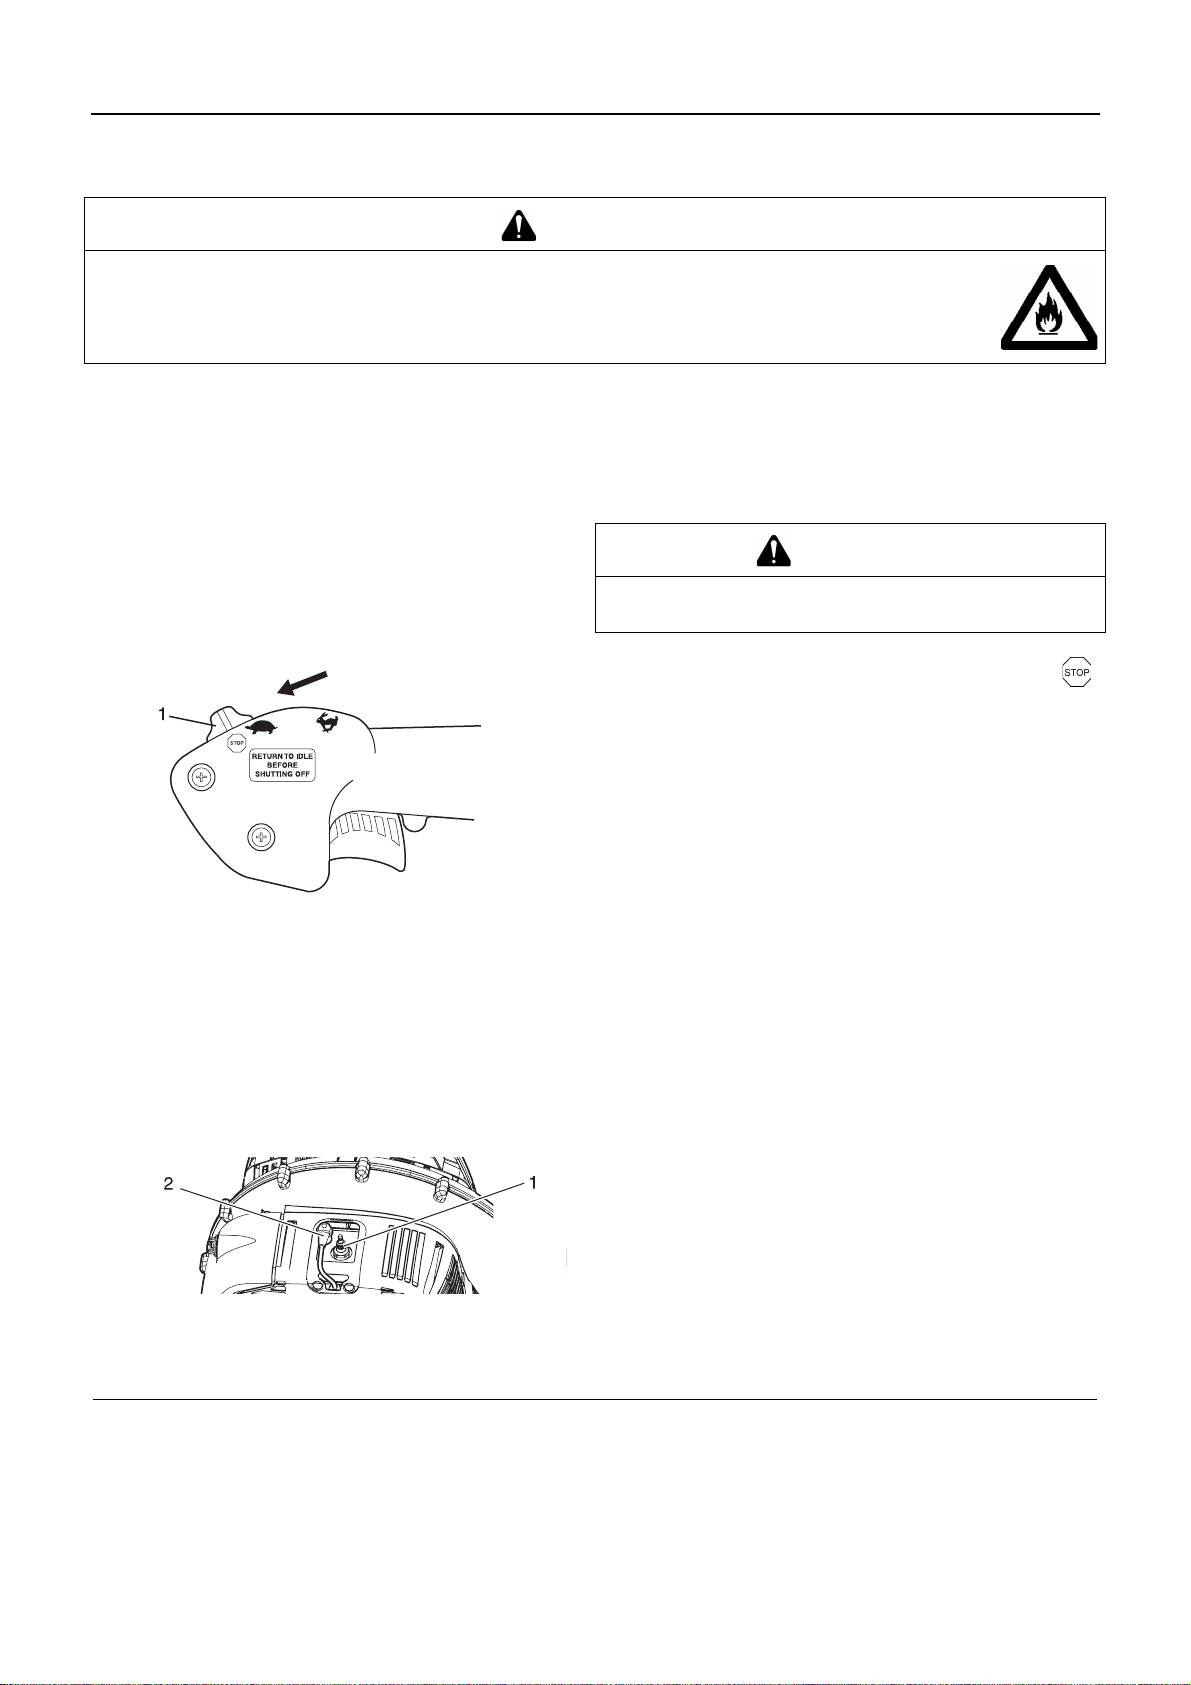
12. Combination Throttle Position / Stop Switch Button
Controls engine speed and turns ignition on or off. Forward position - STOP. First detent position - IDLE. Move
button back to increase speed, forward to decrease
speed. Use throttle position button to set and hold blower speed for continuous operation.
13. Throttle trigger Spring-loaded throttle trigger controls
engine speed. Releasing trigger returns engine to
speed set by Throttle Position / Stop Switch Button. Always release trigger and allow engine to return to idle
before shutting off with Throttle Position / Stop Switch
Button. Use throttle trigger to vary blower speed settings
for intermittent operation.
14. Locking knob Allows operator to adjust handle position
for optimum comfort and control.
15. Blower pipes Exclusive positive locking system.
16. Flexible pipe Allows for full range of movement.
13
Page 16

Before you start
Before you start
Assembly
WARNING
Read the operator's manual carefully to ensure that you assemble the product correctly.
Never perform maintenance or assembly procedures with engine running.
Using a product that has been incorrectly assembled could lead to an accident or serious injury.
Install blower pipes
1. Place guide loop across elbow clamp, and turn until clip fully
engages clamp band.
2. Assemble clamps onto both ends of flexible pipe.
NOTE
Clamp with cable guide loop fits elbow end of flexible pipe.
1. Guide loop
3. Flexible pipe
1. Handle
3. Swivel pipe
5. Anti-static wire
1. Throttle cable
3. Knob
2. Two clamps
4. Swivel pipe
2. Knob
4. Clamp
6. Elbow
2. Guide loop
3. Assemble swivel pipe into flexible pipe and tighten clamp.
4. Loosen knob on handle. AIign notch in handle with tabs. Install onto swivel pipe past long ridges in pipe.
5. Insert anti-static wire through flexible pipe.
6. Assemble flexible pipe to elbow on blower. Position guide
loop on outside of flexible pipe (away from blower) and tighten clamp.
NOTE
A light lubricant may be used to ease assembly of flexible pipe
to blower elbow.
NOTE
Hang handle freely from blower to assure throttle cable is not
twisted before installing handle.
7. Clip throttle cable into throttle cable guide loop.
8. Position handle for comfortable operation, and tighten knob
hand tight.
9. Assemble straight pipe onto swivel pipe, until you feel light
resistance. Do not force connection. Hold swivel pipe and
turn straight pipe clockwise, engaging positive locking channels,until connection is firm. Do not force connection.
10. Assemble straight pipe with decal to straight pipe as in step
9.
1. Swivel pipe
3. Straight pipe
NOTE
Blower use will eventually loosen pipe connections. Exclusive
positive locking system allows pipes to be tightened. If loosening occurs, remove two straight pipes and install according to
instructions 9 & 10.
2. Straight pipe
14
Page 17
Before you start
Preparing the fuel
DANGER
Fuel is highly inflammable and there is a risk of fire if it is handled incorrectly. Carefully read
and observe the precautions in the section of this manual titled "For safe use of your product".
Once the refuelling is complete, securely tighten the fuel tank cap and do not forget to
check that there are no leaks or discharges of fuel from the fuel pipe, fuel system grommets,
or around the fuel tank cap. If you do find fuel leaks or discharges, stop using the product
immediately and contact your ECHO DEALER to have it repaired.
If the fuel ignites, it could cause burns and fire.
CAUTION
There is difference in pressure between the fuel tank and the outside air. When refuelling, loosen the fuel tank cap
slightly to eliminate the difference in pressure.
Otherwise, fuel may get spewed.
NOTE
Stored fuel ages. Do not mix more fuel than you expect use in thirty (30) days. Do not mix directly in fuel tank.
Fuel
Fuel supply
1. Fuel tank 2. Shoulder level
Fuel is a mixture of regular grade petrol and an air-cooled 2-
stroke engine oil of reputable brand name.
Minimum 89 Octane unleaded petrol is recommended. Do not
use fuel containing methyl alcohol or more than 10 % of ethyl
alcohol.
Recommended mixture ratio; 50 : 1 (2 %) for ISO-L-EGD
Standard (ISO/CD 13738), JASO FC,FD grade and ECHO
Premium 50 : 1 oil.
- Do not mix directly in engine fuel tank.
- Avoid spilling petrol or oil. Spilled fuel should always be
wiped up.
- Handle petrol with care, it is highly inflammable.
- Always store fuel in approved container.
Always refuel in a well ventilated location. Do not pour fuel in-
doors.
Place the product and the refuelling tank on the ground when
performing the refuelling operation. Do not refuel the product
on the loading platform of a truck, or in other such places.
Always ensure that the fuel level remains below the shoulder
level of the fuel tank when refuelling.
There is a difference in pressure between the fuel tank and the
outside air. When refuelling, loosen the fuel tank cap slightly to
eliminate the difference in pressure.
Always wipe up any fuel spills.
Move at least 3m away from where you refueled before you
start the engine.
Keep the refuelling tank in a shaded area away from fire.
15
Page 18
Engine operation
Engine operation
Starting the engine
WARNING
When starting the engine, observe the precautions described from Page 4 in the section "For safe use of your product" to ensure that you operate the product correctly.
Failure to observe the precautions could cause an accident or injury, or even lead to a fatality.
NOTE
Pull out the starter grip gently at first, and then more rapidly. Do not pull the starter rope out to more than 2/3 of its length.
Do not let go of the starter grip as it returns.
To start the engine, return the choke knob when you hear the first explosion-like sound and pull on the starter grip again. Be
careful not to miss the first explosion-like sound.
Starting a cold engine
Recoil starter: Use short pulls - only 1/2-2/3 of rope length for
starting. Do not allow the rope to snap back in. Always hold
the unit firmly.
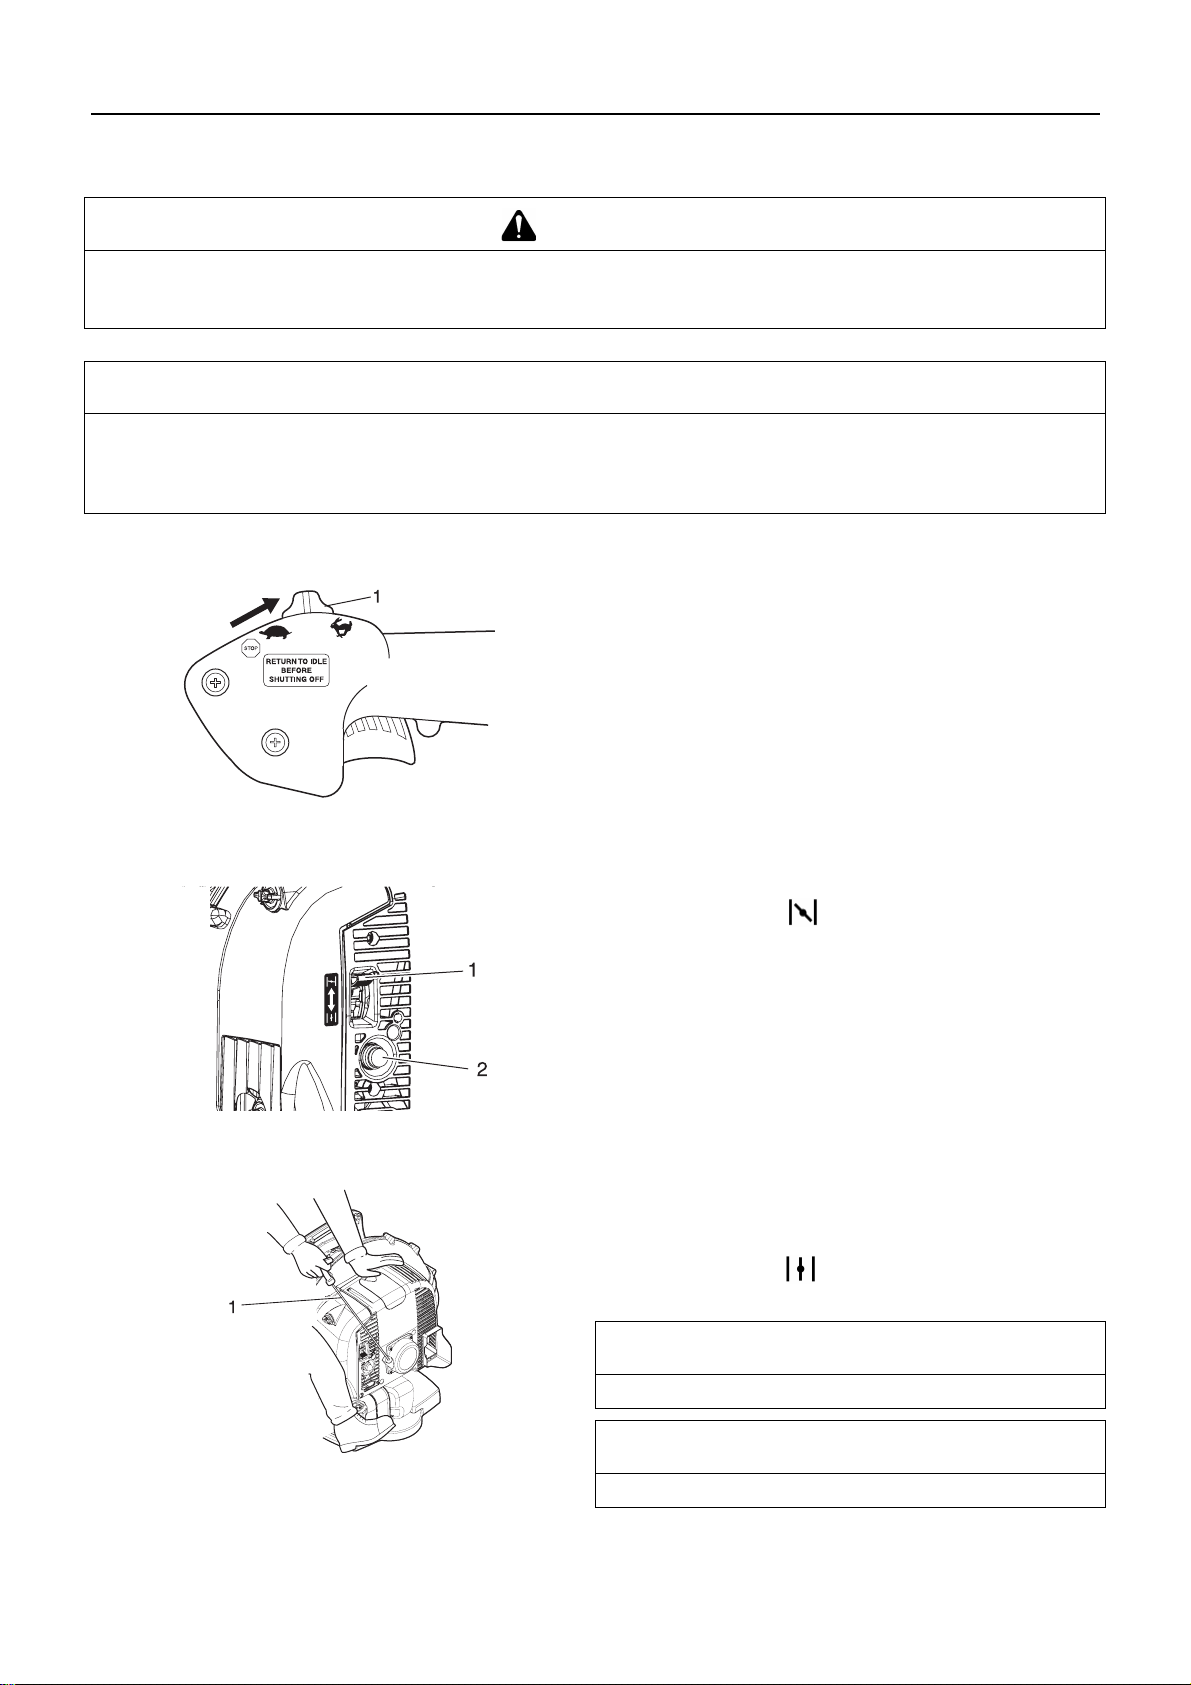
1. Throttle Position / Stop
Switch Button
1. Choke 2. Purge bulb
1. Throttle Position / Stop Switch Button
Slide Throttle Position / Stop Switch Button back to idle position (first detent away from stop position).
2. Choke
Move choke lever to position.
3. Purge Bulb
Pump purge bulb until fuel is visible.
4. Recoil Starter
Pull recoil starter handle until engine fires, or maximum 5
pulls.
5. Choke
Move choke lever to position and if necessary, restart engine.
1. Recoil starter handle
NOTE
If engine does not start after 5 pulls, repeat instructions 2-5.
NOTE
Allow engine to warm up before use.
16
Page 19
Engine warm-up
Starting a warm engine
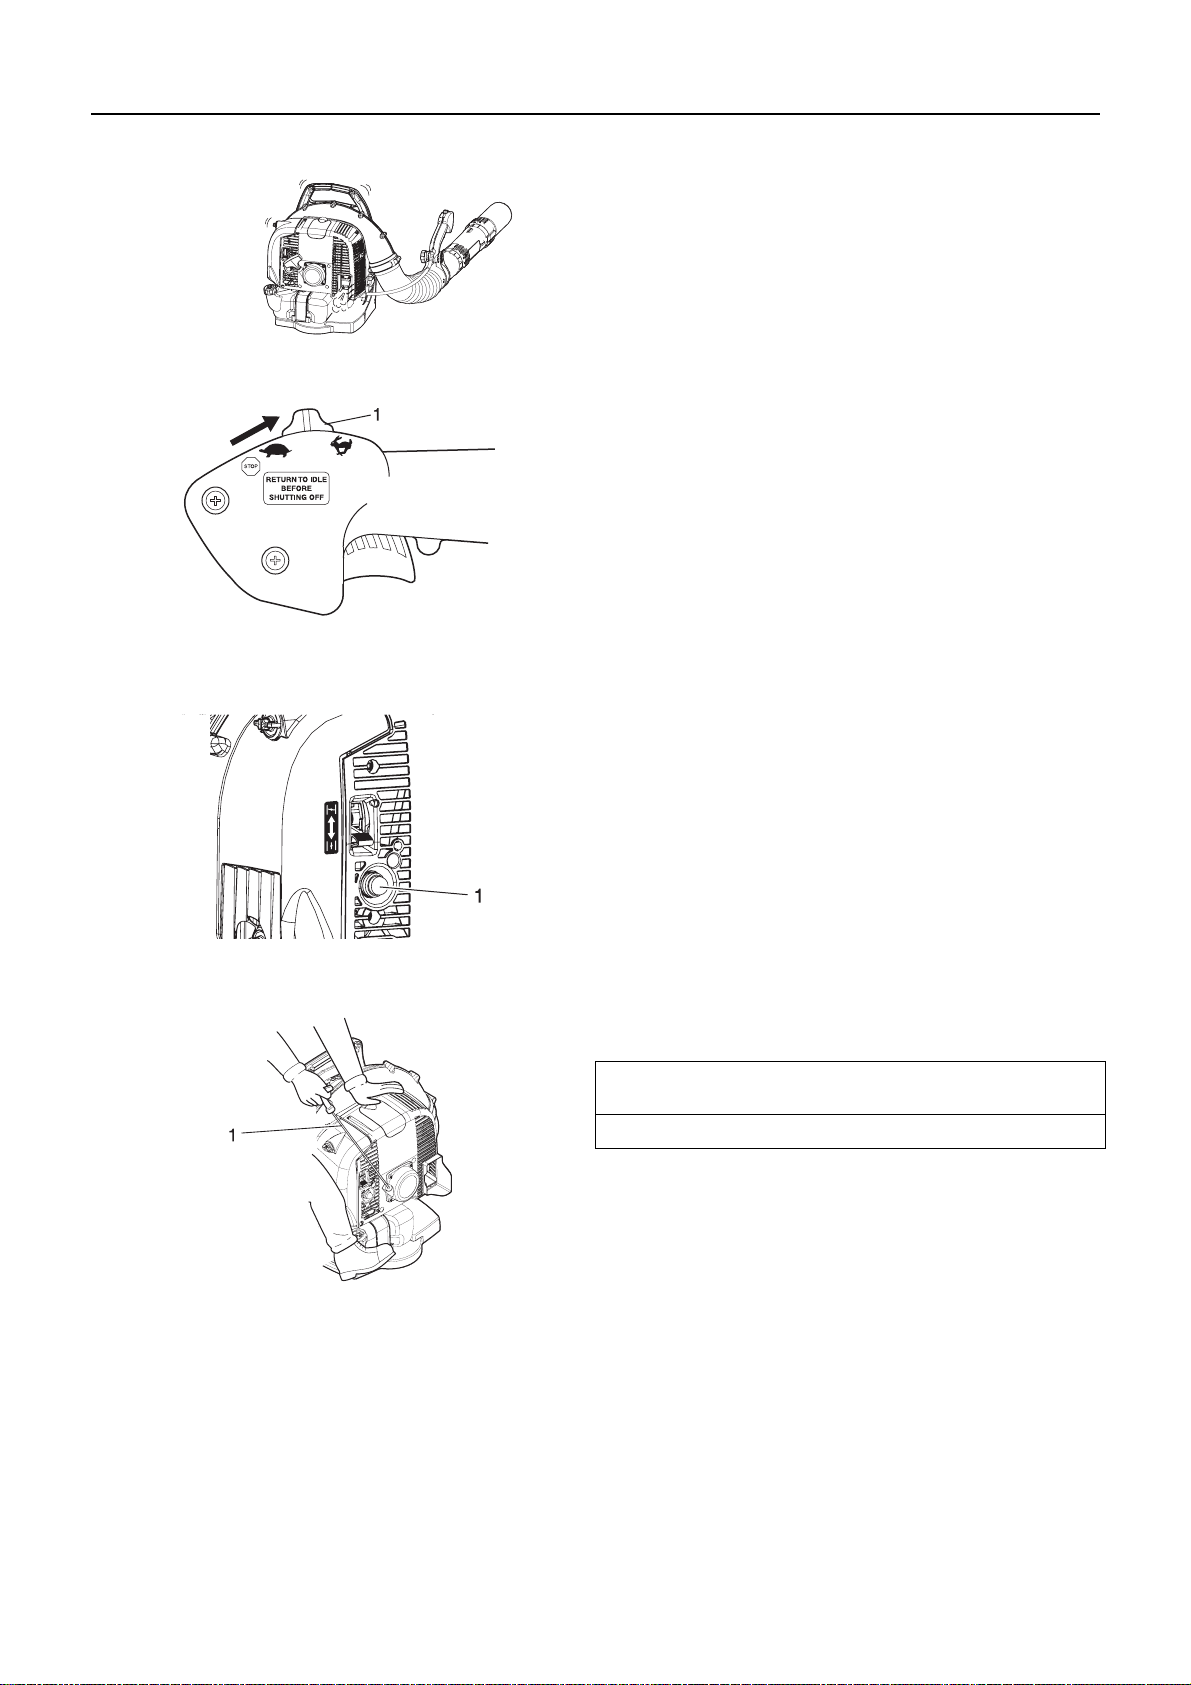
1. Throttle Position / Stop
Switch Button
Engine operation
1. Once the engine starts, allow it to warm up for 2 to 3 minutes
at idling (i.e. low speed).
2. Warming the engine helps to lubricate its internal workings
more smoothly. Allow the engine to warm up fully, especially
when it is cold.
3. Never run the engine without the blower pipes fitted.
The starting procedure is the same as Cold Start except DO
NOT close the choke.
1. Throttle Position / Stop Switch Button
Slide Throttle Position / Stop Switch Button back to idle position (first detent away from stop position).
1. Purge bulb
2. Purge Bulb
Pump purge bulb until fuel is visible.
3. Recoil Starter
Pull recoil starter handle and engine should start.
NOTE
If engine does not start after 5 pulls, use cold start procedures.
1. Recoil starter handle
17
Page 20
Engine operation
Stopping the engine
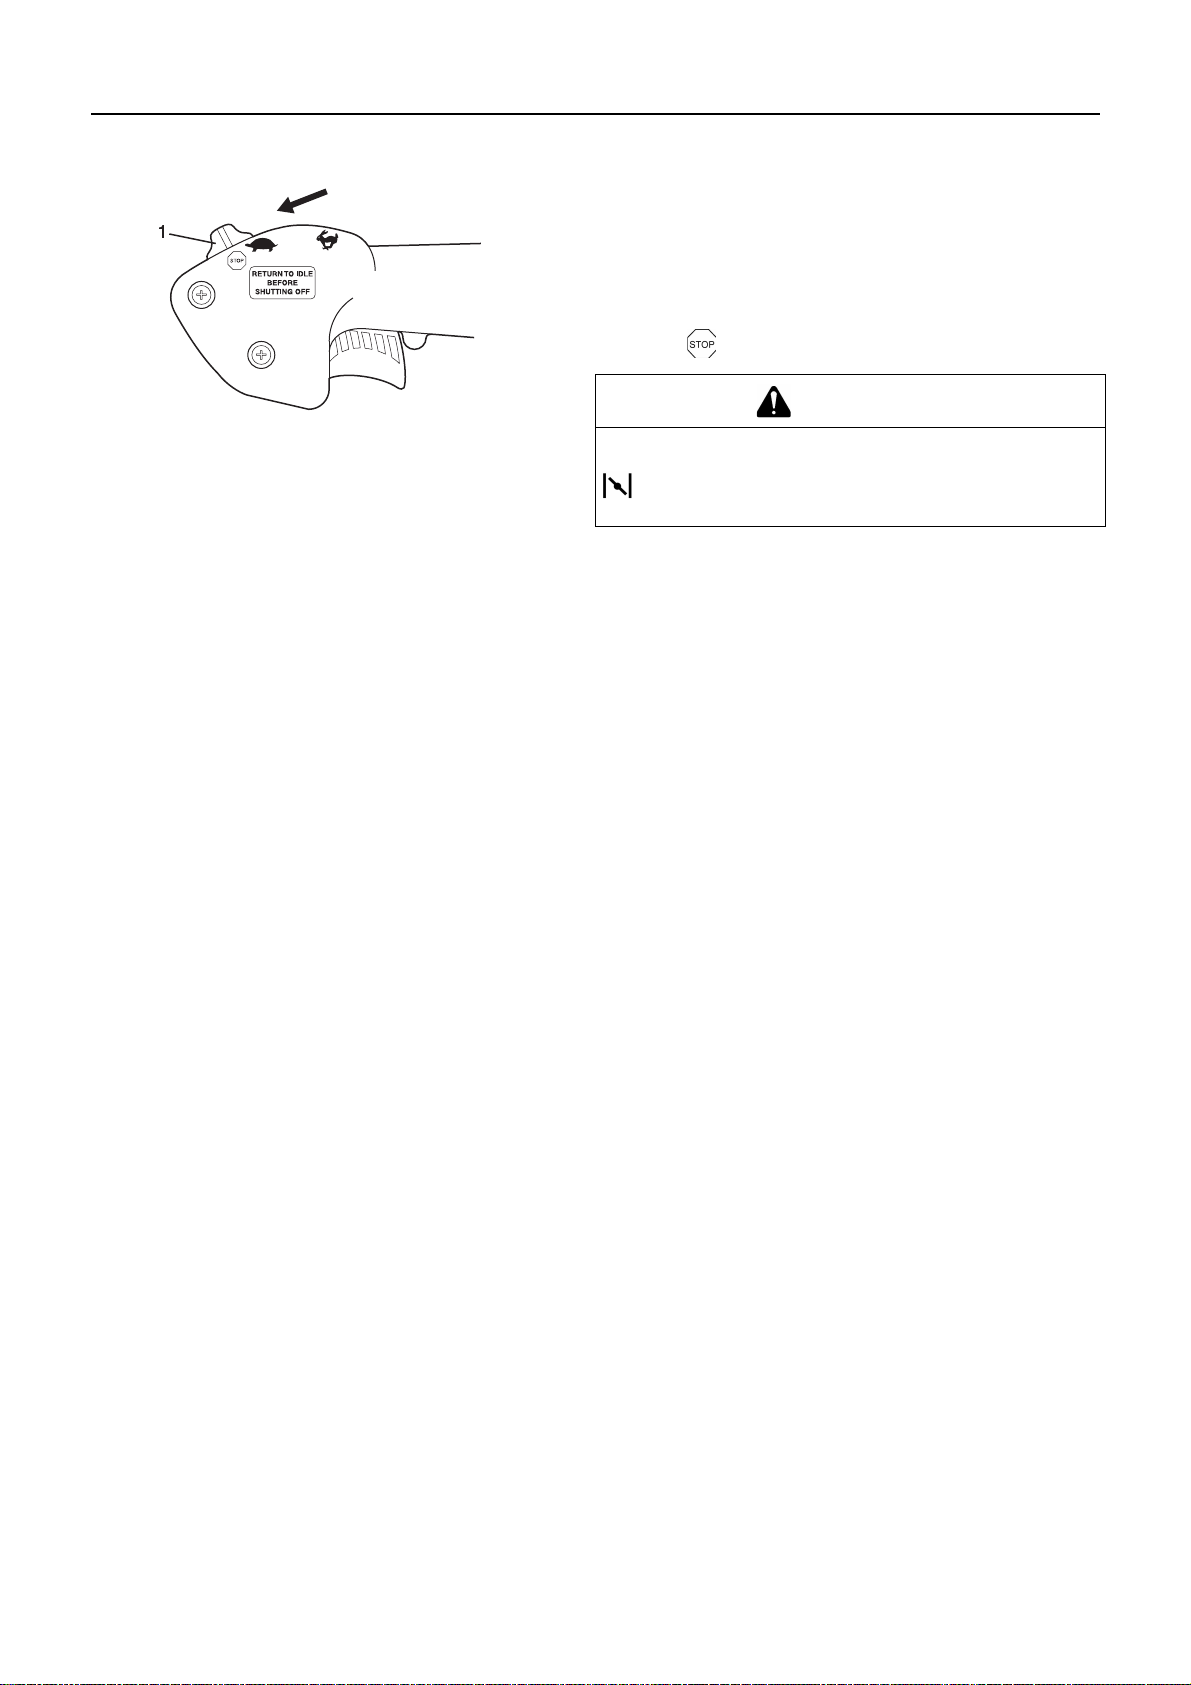
1. Throttle Position / Stop
Switch Button
1. Throttle Position / Stop Switch Button
Release throttle trigger. Move Throttle Position / Stop Switch
Button forward to idle position (first detent away from stop position) and allow engine to return to idle before shutting off engine.
2. Throttle Position / Stop Switch Button
Move Throttle Position / Stop Switch Button all the way forward to (Stop) position.
WARNING
If engine does not stop when Throttle Position / Stop
Switch Button is moved to STOP position, close choke -
position- to stall engine. Have your ECHO dealer repair
stop switch before using blower again.
18
Page 21
Operation
Operation
Operating blower
WARNING
Always wear safety glasses, hearing protection, face filter mask and take all safety precautions or serious personal injury may result. Do not point the blower pipe in the direction of people or pets.
IMPORTANT
To avoid engine damage due to over revving, do not block blower pipe opening.
NOTE
Never use a higher speed setting than necessary to perform a task. Remember, the higher the engine speed, the louder the
blower noise. Minimize dust by using blower at lower speeds and by dampening material with water/mist when necessary. Keep
debris on your property. Be Smart - be a good neighbor.
Read the Safety Section carefully.
1. Use only during appropriate hours.
2. Allow the engine to warm up at a fast idle for a few minutes.
3. Control engine speed with throttle trigger, or for continuous
use, set engine speed with Throttle Position / Stop Switch
Button.
4. Use lower speed to blow dry grass and leaves from walks,
patios and drives.
5. Additional speed may be necessary to clean leaves from a
lawn or flowerbed.
1. Throttle Position / Stop
Switch Button
2. Throttle trigger
6. Higher speed may be necessary to move gravel, dirt, snow,
bottles or cans from a driveway, street, parking lot or stadium.
7. Always stop unit using stop engine procedure.
Cold weather operation
1. Back cushion
1. Intake cover
Install intake cover when you feel cold on your back.
1. Remove back cushion from frame.
2. Install intake cover on frame over air intake.
3. Install back cushion to frame over intake cover.
NOTE
Blower performance may be reduced slightly.
19
Page 22

Maintenance and care
Maintenance and care
Servicing guidelines
Area Maintenance Page Before use Monthly
Air filter Inspect/Clean/Replace 20 •
Fuel filter Inspect/Replace 21 •
Spark plug Inspect/Clean/Adjust/Replace 23 •
Carburettor Inspect 21 •
Cooling system Inspect/Clean 22 •
Exhaust system Inspect/Tighten/Clean 22 •
Starter Inspect - •
Fuel system Inspect - •
Screws, bolts and nuts Inspect/Tighten/Replace - •
IMPORTANT
Time intervals are maximum. Actual use and your experience will determine the frequency of required maintenance.
Maintenance and care
If you have any questions or problems, please contact your ECHO DEALER.
Cleaning air filter
Tools required: 25-50 mm (1-2 in.) Cleaning brush
Parts required: Air filter
1. Move choke lever to position. This prevents dirt from entering the carburettor throat when the air filter is removed.
Brush accumulated dirt from air cleaner area.
2. Remove air filter cover. Brush dirt from inside cover.
3. Remove air filter and element plate, and then lightly brush
debris from them. Replace filter if it is damaged, fuel soaked,
very dirty, or the rubber sealing edges are deformed.
4. If filter can be reused, be certain it:
Fits tightly in the air filter cavity.
Is installed with the original side out.
5. Install air filter cover.
1. Air filter cover
3. Element plate
2. Air filter
20
Page 23
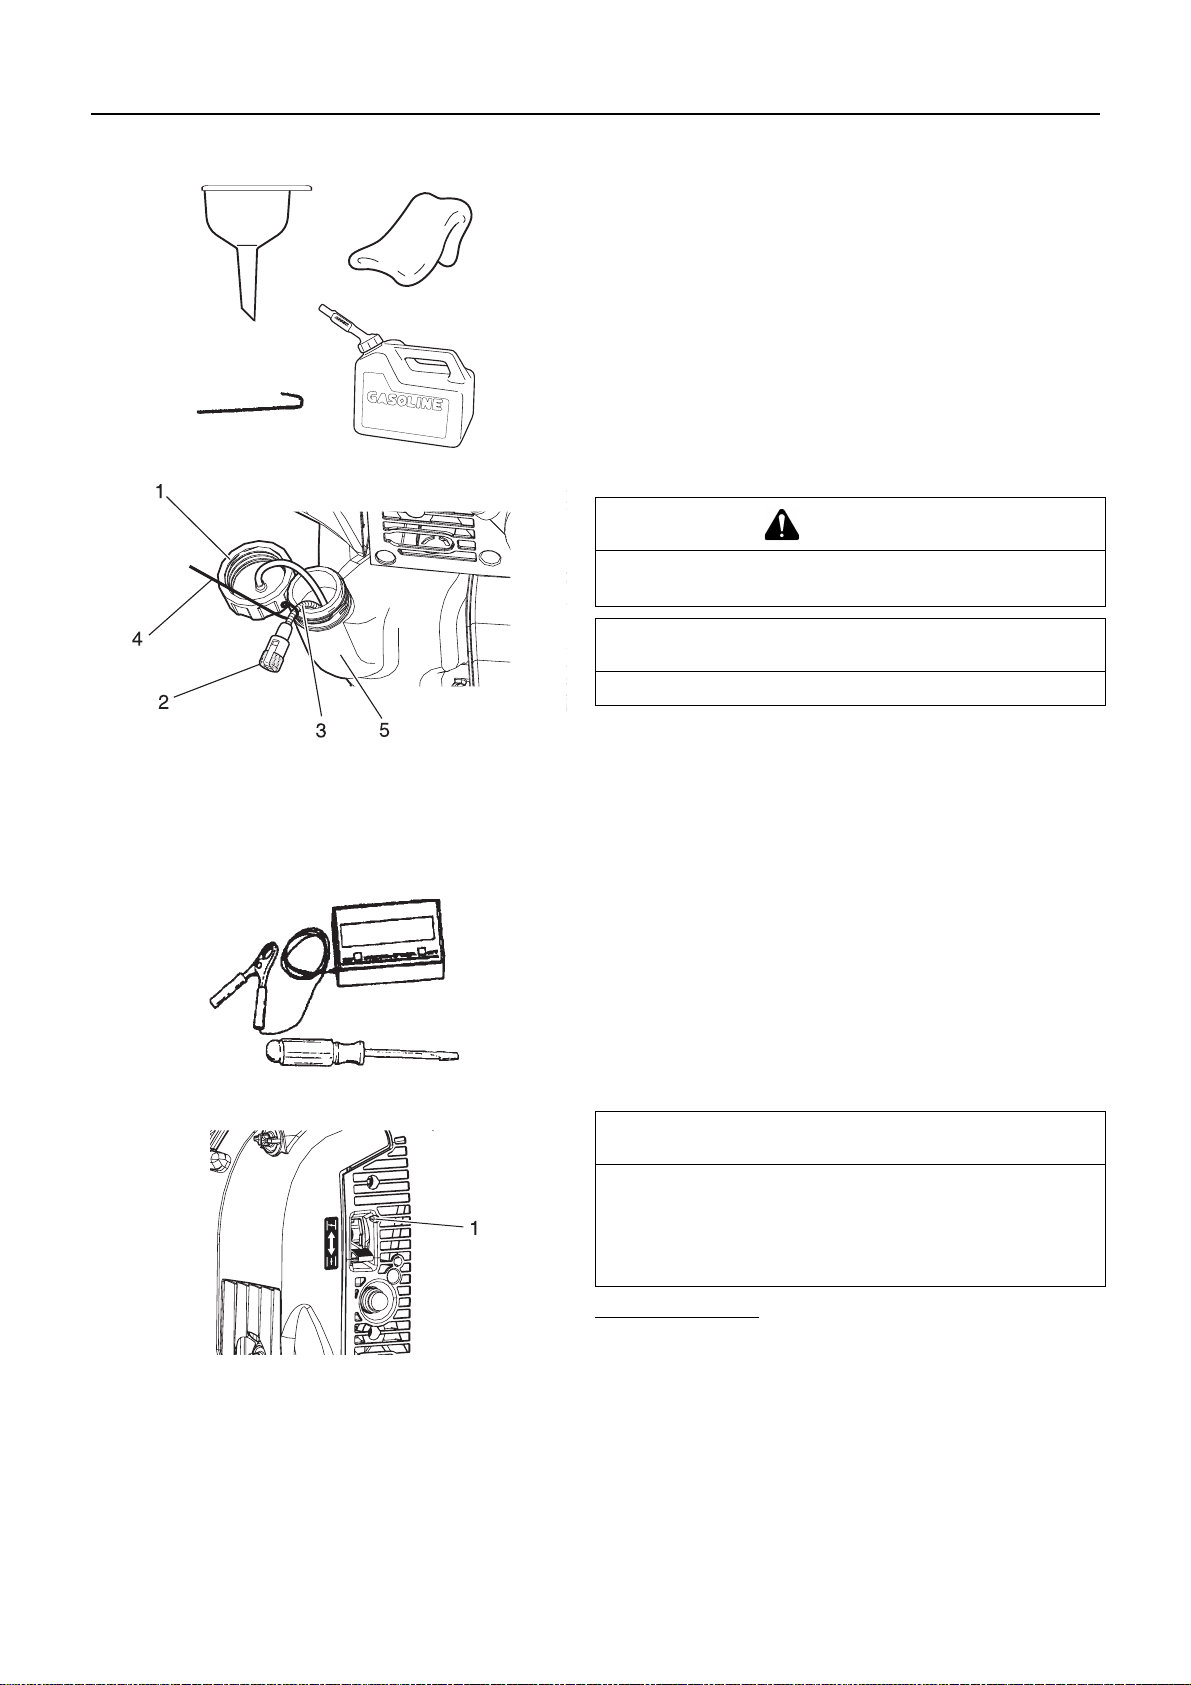
Replacing fuel filter
Maintenance and care
Tools required: 200-250 mm (8-10 in.) length of wire with
one end bent into a hook, clean rag, funnel,
and an approved fuel container
Parts required: Fuel line and filter
DANGER
Fuel is VERY flammable. Use extreme care when mixing,
storing or handling.
NOTE
If filter is excessive dirty or no longer fits properly, replace it.
1. Fuel cap
3. Fuel line
5. Fuel tank
Carburettor adjustment
2. Fuel filter
4. Fuel line hook
1. Use a clean rag to remove loose dirt from around fuel cap
and empty fuel tank.
2. Use the "fuel line hook" to pull the fuel line and filter from the
tank.
3. Remove the filter from the line and install the new filter.
Tools required: Screwdriver, tachometer (Echo P/N
99051130017)
Parts required: None
NOTE
Every unit is run at the factory and the carburettor is set in compliance with Emission Regulations. This carburettor does not
have acceleration and high speed adjustment needles. Do not
attempt to use carburettor adjustment procedures provided in
the Warranty Emissions Booklet.
1. Screw
Before Adjustment
Check that:
Air filter is clean and properly installed.
Spark arrester screen and silencer are free of carbon.
Blower pipes are installed.
1. Start engine, run at idle for one minute.
2. Complete warm up by running at full throttle for 5 minutes,
operating choke twice to clear air from carburettor chambers.
3. Check idle speed and reset if necessary. If a tachometer is
available, idle speed screw should be set to the specifications found on Page 26"Specifications" of this manual. Turn
idle screw clockwise to increase idle speed; anticlockwise to
21
Page 24
Maintenance and care
decrease idle speed.
Cooling system maintenance
IMPORTANT
To maintain proper engine operating temperature, cooling air must pass freely through the cylinder fin area. This flow of air carries combustion heat away from the engine.
Overheating and engine seizure can occur when:
Air intakes are blocked, preventing cooling air from reaching the cylinder,
or
Dust and grass build up on the out side of the cylinder. This build-up insulates the engine and prevents the heat from leaving.
Removal of cooling passage blockages or cleaning of cylinder fins is considered "Normal Maintenance". Any resultant failure
attributed to lack of maintenance is not warranted.
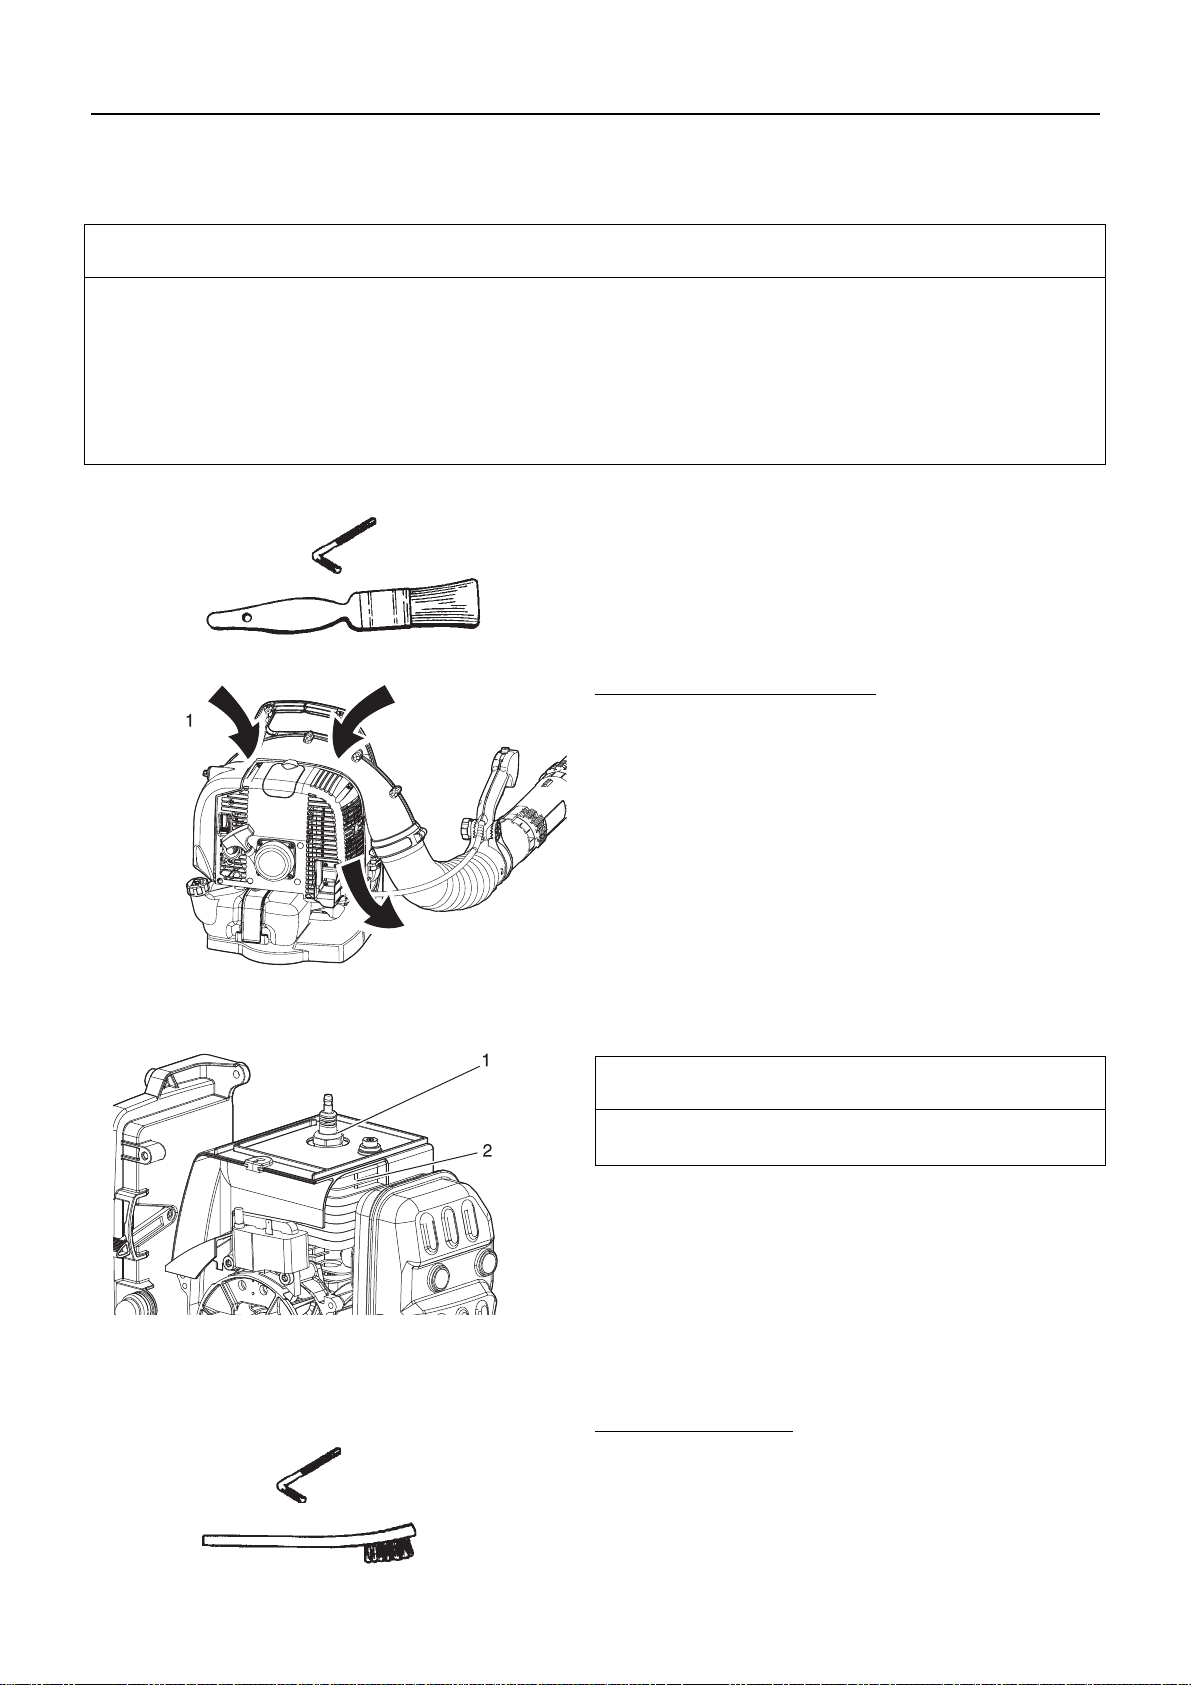
Tools required: Torx L-Wrench T27, Cleaning brush
Parts required: None, if you are careful.
1. Air intake
Cleaning Grill and Cylinder Fins
1. Remove accumulated debris from intake grill between backpack frame and blower housing.
2. Disconnect spark plug lead from spark plug.
3. Remove air filter cover.
4. Remove engine cover (10 screws).
5. Clean cylinder fins to allow cooling air to pass freely.
6. Reassemble parts in reverse order.
IMPORTANT
Do not over-tighten screws, otherwise mounting holes may become stripped.
1. Spark plug 2. Cylinder fins
Exhaust system
Spark Arrester Screen
Tools required: Torx L-Wrench T27, Soft metal brush
Parts required: Spark arrester screen, Gasket
22
Page 25
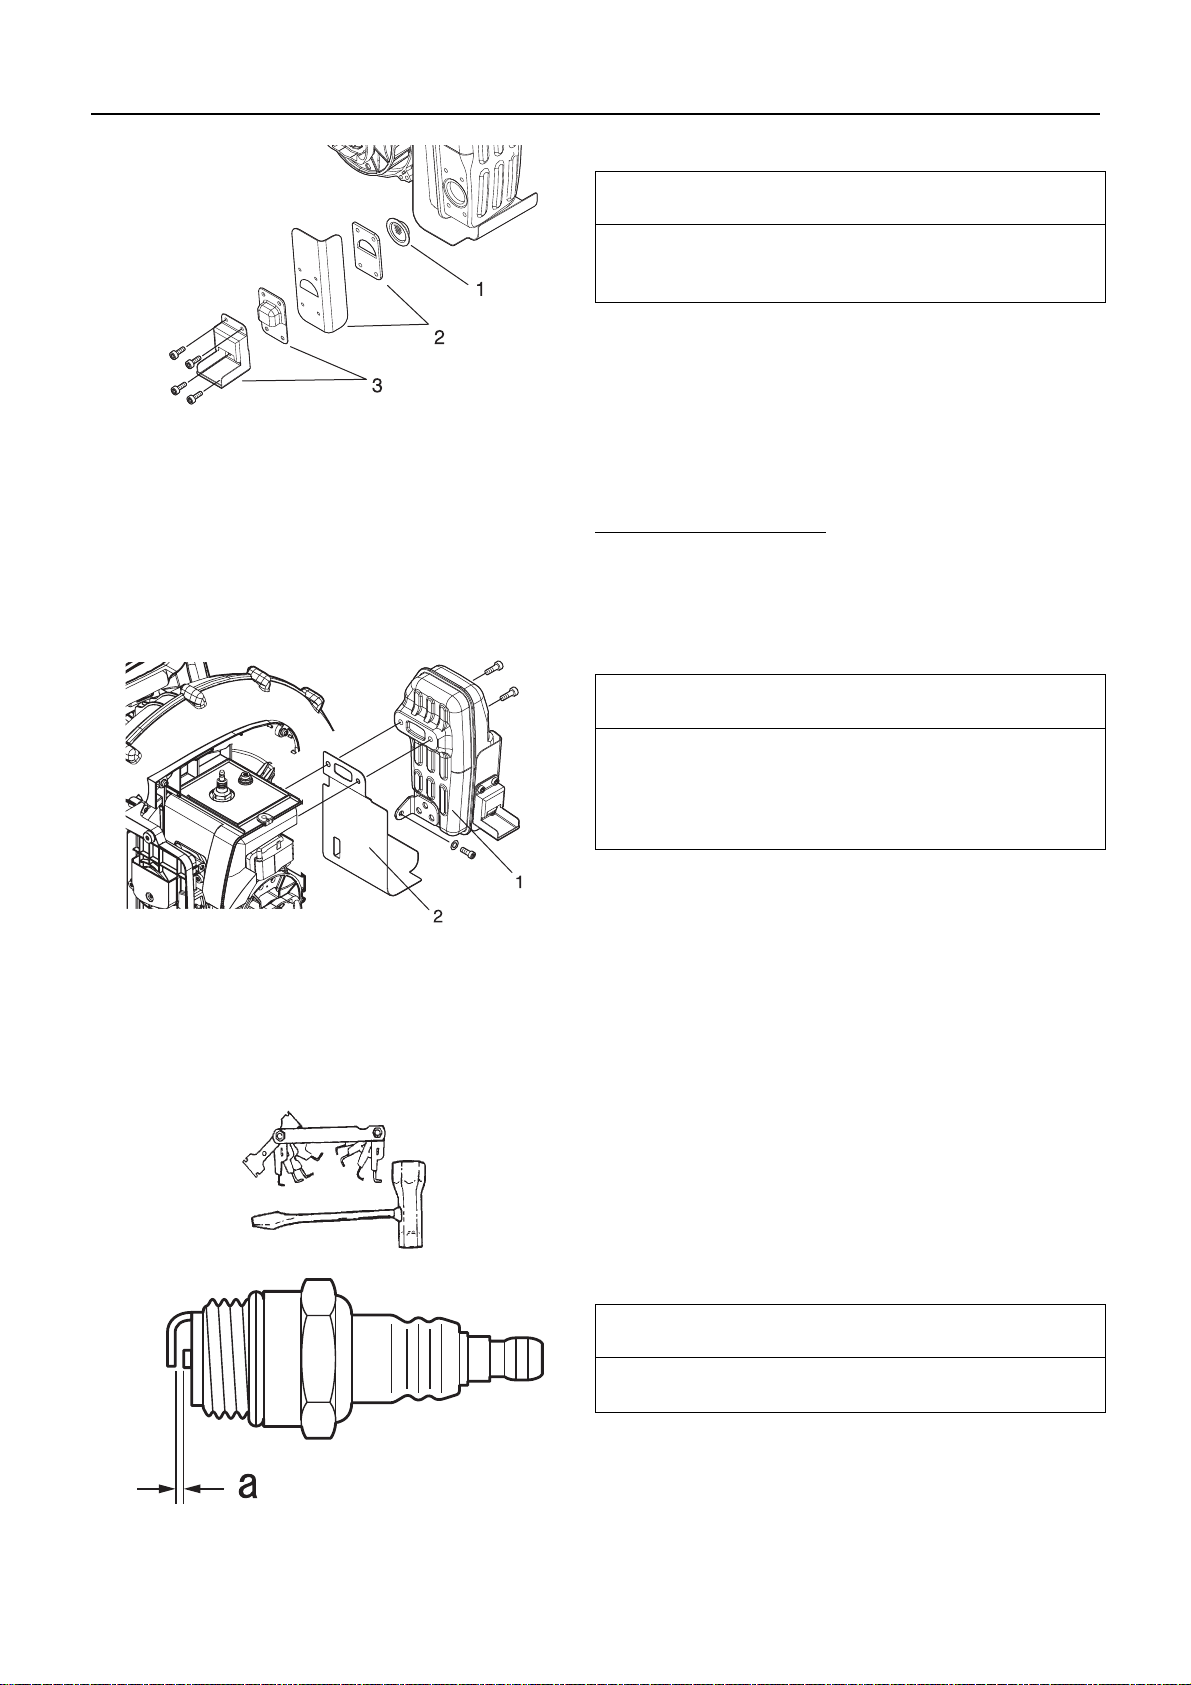
1. Spark arrester screen
3. Spark arrester cover
2. Gasket
Maintenance and care
IMPORTANT
Carbon deposits in silencer will cause a drop in engine output
and overheating. Spark arrester screen must be checked periodically.
1. Disconnect spark plug lead from spark plug.
2. Remove spark arrester cover, gasket, and spark arrester
screen from silencer. Replace screen if plugged with carbon
deposits.
3. Install spark arrester screen, gaskets, and cover.
4. Connect spark plug lead.
Silencer and Exhaust Port
Tools required: Torx L-Wrench T27, Wooden or plastic scraper
Parts required: Gasket
1. Silencer 2. Gasket
Check spark plug
IMPORTANT
Carbon deposits in cylinder exhaust port and silencer will
cause a drop in engine output and overheating. Silencer exhaust port must be checked periodically. Be careful not to
scratch the cylinder or piston when cleaning the cylinder exhaust port.
1. Disconnect spark plug lead from spark plug.
2. Remove engine cover (10 screws).
3. Remove silencer and gasket.
4. Clean cylinder exhaust port being careful not to scratch cylinder or piston, using a wooden or plastic scraper.
5. Install gasket and silencer.
6. Install engine cover.
Tools required: T-Wrench, Feeler gauge
Parts required: Spark plug
a: 0.6 - 0.7 mm
IMPORTANT
Use only NGK BPMR8Y spark plug otherwise severe engine
damage may occur.
1. Check plug gap. Correct gap is 0.6 mm to 0.7 mm.
2. Inspect electrode for wear.
3. Inspect insulator for oil or other deposits.
4. Replace plug if needed and tighten to 15 N·m - 17 N·m (150
kgf·cm to 170 kgf·cm).
23
Page 26

Maintenance and care
Troubleshooting table
Problem Diagnosis Cause Solution
Engine is difficult to start,
fluctuating rotation
No fuel is entering the overflow pipe
Fuel filter is clogged
Fuel system is clogged
Internal carburettor parts sticking
Clean or replace
Clean
Consult your ECHO
DEALER
or
The engine
does not start
Engine starts
but no acceleration is possible
Checking and maintenance requires specialist knowledge. If you are unable to check and maintain the product or deal with a
fault yourself, consult your ECHO DEALER. Do not attempt to dismantle the product.
Consult your ECHO DEALER in the event of a problem that is not covered in the table above, or other such concerns.
For spare parts and consumables, please use only genuine parts and designated products and components. Using parts from
other manufacturers or non-designated components may result in a malfunction.
Fuel is entering the overflow pipe
The crankshaft does not rotate
The spark plug is dirty or
damp
Fuel degradation
Carburettor problem
Internal engine malfunction Consult your ECHO
Fuel degradation
Incorrect electrode gap
Carbon deposits
Electrical fault
Dirty air filter
Dirty fuel filter
Blocked fuel passage
Carburettor adjustment problem
Spark plug problem
Blocked exhaust vent or silencer vent
Spark arrester screen plugged or normal
wear
Replace with new fuel
Consult your ECHO
DEALER
DEALER
Replace with new fuel
Adjust or Replace
Clean or Replace
Consult your ECHO
DEALER
Clean or replace
Clean or replace
Consult your ECHO
DEALER
Consult your ECHO
DEALER
Clean, Adjust or Replace
Clean
Clean or replace
24
Page 27
Maintenance and care
Long-term storage(30 days or more)
WARNING
During operation the silencer - catalytic silencer and surrounding cover become hot. Always keep exhaust
area clear of flammable debris during transportation or when storing, otherwise serious property damage
or personal injury may result.
Do not store your unit for a prolonged period of time (30 days or longer) without performing protective storage maintenance which
includes the following:
1. Store unit in a dry, dust free place, out of the reach of children.
WARNING
Do not store where fuel fumes may accumulate or reach an
open flame or spark.
1. Throttle Position / Stop
Switch Button
2. Place the Throttle Position / Stop Switch Button in the
(Stop) position.
3. Remove accumulation of grease, oil, dirt and debris from exterior of unit.
4. Perform all periodic lubrication and services that are required.
5. Tighten all screws and nuts.
6. Drain the fuel tank completely and pull the recoil starter handle several times to remove fuel from the carburettor.
7. Remove the spark plug and pour 10mL of fresh, clean ECHO
2-stroke engine oil into the cylinder through the spark plug
hole.
A. Place a clean cloth over the spark plug hole.
B. Pull the recoil starter handle 2-3 times to distribute the
oil inside the engine.
C. Observe the piston location through the spark plug hole.
Pull the recoil handle slowly until the piston reaches the
top of its travel and leave it there.
8. Fit the spark plug. (Do not connect the spark plug cap. )
9. Remove blower pipe assembly from unit.
1. Spark plug 2. Spark plug cap
Please contact your ECHO DEALER in order to dispose of the product or its parts in compliance with national laws.
25
Page 28

Specifications
Specifications
Mass: kg 9.8
External dimensions:
Length
Width
Height
Engine:
Type
Engine displacement
Maximum power
Engine speed at maximum engine power
Recommended maximum engine speed
Recommended engine idling speed
Carburettor
Ignition
Spark plug
Starter
Air Volume with straight pipe: m
mm
mm
mm
mL (cm
kW
r/min
r/min
r/min
3
/min 21.7
375
490
475
Air cooled 2-stroke single cylinder
3
)
63.3
2.85
6900
6900
2500
Diaphragm type
Flywheel magneto - CDI system
NGK BPMR8Y
Automatic recoil system
PB-770
Fuel:
Oil
Ratio 50 : 1 (2%)
Tank Capacity: L2.02
Sound pressure level: (ISO 22868) LpAeq = dB(A) 97.7
Guaranteed sound power level:
(2000/14/EC) L
Vibration levels: (ISO 22867) m/s
These specifications are subject to change without notice.
= dB(A) 112
WA
Regular grade petrol. Minimum 89 Octane unleaded
petrol is recommended. Do not use fuel containing
methyl alcohol or more than 10 % of ethyl alcohol.
Two stroke, air-cooled engine oil. ISO-L-EGD Standard (ISO/CD 13738), JASO FC,FD grade and ECHO
Premium 50 : 1 oil.
2
2.1
26
Page 29

The undersigned manufacturer:
YAMABIKO CORPORATION
7-2 SUEHIROCHO 1-CHOME
OHME; TOKYO 198-8760
JAPAN
declares that the hereunder specified new unit:
POWER BLOWER
Brand: ECHO
Type: PB-770
assembled by:
ECHO, INCORPORATED
400 Oakwood Road
Lake Zurich, Illinois 60047-1564
Declaration of conformity
Declaration of conformity
U.S.A.
complies with:
* the requirements of Directive 98/37/EC (1998) (and 2006/42/EC: from 29
* the requirements of Directive 2004/108/EC
(use of harmonized standard EN ISO 14982)
* the requirements of Directive 2002/88/EC
* the requirements of Directive 2000/14/EC
Conformity assessment procedure followed ANNEX V
Measured sound power level : 109dB(A)
Guaranteed sound power level : 112dB(A)
PB-770 Serial Number 37002001 and up
Tokyo,
October 1st 2009
YAMABIKO CORPORATION
The authorized representative in Europe
who is authorized to compile the technical file.
Company: Atlantic Bridge Limited
Address: Atlantic House, PO Box 4800,
Earley, Reading RG5 4GB, United Kingdom
th
December 2009)
K. OYURI General Manager Mr. Philip Wicks
27
Page 30

1Notes and rear cover
7-2 SUEHIROCHO 1-CHOME, OHME, TOKYO 198-8760, JAPAN
PHONE: 81-428-32-6118. FAX: 81-428-32-6145.
©
2009
X753-003 91 0
X753 112-420 0
Printed in Japan
0x0xxxx zzzz ES
28
Page 31

1Couvercle supérieur
FRANÇAIS
(Notice originale)
MANUEL D'UTILISATION
PB-770
AVERTISSEMENT
LIRE ATTENTIVEMENT LES INSTRUCTIONS ET SUIVRE LES REGLES DE SECURITE. LE NON-RESPECT DES REGLES DE SECURITE ENTRAINE UN RISQUE DE BLESSURE GRAVE.
Page 32

Information importante
2Information importante
Lire attentivement le manuel d'utilisation avant d'utiliser l'appareil pour la première fois.
Utilisation de l'appareil
Les souffleurs ECHO sont conçus pour éliminer les poussières et autres déchets, y compris les feuilles mortes.
Ne pas utiliser cet appareil pour d'autres applications que celles mentionnées ci-dessus.
Utilisateurs de l'appareil
Lire attentivement ce manuel d'utilisation et intégrer les informations qu'il contient avant d'utiliser l'appareil pour la pre-
mière fois.
Toute personne n'ayant pas lu attentivement ce manuel d'utilisation, enrhumée, fatiguée ou en mauvaise condition
physique ne doit pas utiliser cet appareil. Ne pas laisser un enfant manipuler l'appareil.
L'utilisateur est tenu pour responsable en cas d'accidents ou de risques pouvant entraîner des blessures corporelles
ou des dommages matériels.
A propos du manuel d'utilisation
Ce manuel contient les informations nécessaires au montage, à l'utilisation et à l'entretien de l'appareil. L'utilisateur
doit donc le lire attentivement et intégrer les informations qu'il contient.
Toujours conserver le manuel à portée de main.
En cas de perte du manuel ou si ce dernier a été détérioré et n'est plus lisible, s'adresser au REVENDEUR ECHO pour
en obtenir un nouveau.
Les unités utilisées dans ce manuel sont les unités SI (Système international d'unités). Les chiffres indiqués entre pa-
renthèses sont des valeurs de référence. De légères erreurs de conversion peuvent survenir dans certains cas.
Prêt ou cession de l'appareil à un tiers
Si l'appareil décrit dans ce manuel est prêté à un tiers, veiller à lui confier également le manuel d'utilisation fourni avec
l'appareil. Si l'appareil est cédé à un tiers, transmettre le manuel d'utilisation fourni avec l'appareil lors de la vente.
Renseignements
Contacter un REVENDEUR ECHO pour toute demande d'information concernant l'appareil, l'achat de consommables,
les réparations ou pour tout autre renseignement.
Remarques
ECHO se réserve le droit de modifier sans préavis le contenu de ce manuel en fonction des améliorations apportées
au produit. Il se peut que certains des schémas de ce manuel soient différents de l'appareil. Ces différences ont pour
objectif de rendre les explications plus claires.
L'appareil nécessite le montage de certains éléments.
En cas de doute, consulter un REVENDEUR ECHO.
Fabricant
YAMABIKO CORPORATION
7-2 SUEHIROCHO 1-CHOME, OHME, TOKYO 198-8760, JAPON
Représentant autorisé en Europe
Atlantic Bridge Limited
Atlantic House, PO Box 4800, Earley, Reading RG5 4GB, Royaume-Uni
2
Page 33

Table des matieres
Pour utiliser l'appareil en toute sécurité .............................................................................. 4
Etiquettes et symboles d'avertissement ........................................................................ 4
Autres indications .......................................................................................................... 4
Symboles....................................................................................................................... 4
Emplacement de l'étiquette de sécurité......................................................................... 6
Manipulation du carburant ............................................................................................. 7
Manipulation du moteur ................................................................................................. 8
Manipulation de l'appareil .............................................................................................. 9
Contenu de l'emballage .................................................................................................... 13
Description........................................................................................................................14
Avant de commencer........................................................................................................ 15
Assemblage ................................................................................................................. 15
Préparation du carburant ............................................................................................. 16
Fonctionnement du moteur ............................................................................................... 18
Démarrage du moteur.................................................................................................. 18
Arrêt du moteur............................................................................................................ 20
Fonctionnement ................................................................................................................ 21
Fonctionnement du souffleur ....................................................................................... 21
Entretien ........................................................................................................................... 23
Instructions d'entretien de l'appareil ............................................................................ 23
Entretien ...................................................................................................................... 23
Guide de dépannage ................................................................................................... 28
Remisage de longue durée (30 jours ou plus)............................................................. 29
Caractéristiques................................................................................................................30
Déclaration de conformité ................................................................................................. 31
3
Page 34

Pour utiliser l'appareil en toute sécurité
Lire attentivement cette section avant d'utiliser l'appareil pour la première fois.
Pour utiliser l'appareil e n toute sécuri té
Les mesures de précaution décrites dans cette section contiennent des informations essentielles pour la sécurité. Les
suivre scrupuleusement.
Il est également nécessaire de prendre connaissance des mesures de précaution exposées tout au long de ce manuel.
Le texte précédé d'une puce [en forme de losange] décrit les risques encourus en cas de non-respect d'une mesure de précaution.
Etiquettes et symboles d'avertissement
Les étiquettes et les symboles d'avertissement dans le manuel et sur l'appareil signalent les situations pouvant entraîner un risque
de blessure de l'utilisateur et d'autres personnes. Pour des raisons de sécurité, toujours lire et suivre attentivement les instructions
figurant sur ces étiquettes.
DANGER AVERTISSEMENT ATTENTION
Ce symbole associé au mot
« DANGER » signale une action ou
une situation présentant un risque de
blessure corporelle grave ou d'accident mortel pour l'utilisateur et les
personnes à proximité.
Ce symbole associé au mot
« AVERTISSEMENT » signale une
action ou une situation présentant un
risque de blessure corporelle grave
ou d'accident mortel pour l'utilisateur
et les personnes à proximité.
Autres indications
Outre les étiquettes et les symboles d'avertissement, ce manuel contient les symboles d'explication suivants :
« ATTENTION » signale une situation potentiellement dangereuse qui,
si elle n'est pas évitée, peut entraîner
une blessure légère à modérée.
REMARQUE IMPORTANT
Le cercle barré indique
une interdiction.
Ce type de message fournit des
conseils relatifs à l'utilisation et à l'entretien de l'appareil.
Le texte dans l'encadré où figure le
mot « IMPORTANT » donne des informations importantes concernant
l'utilisation, la vérification, l'entretien
et le remisage de l'appareil décrit
dans ce manuel.
Symboles
De nombreux symboles d'explication sont utilisés dans ce manuel et sur l'appareil lui-même. S'assurer d'avoir bien compris la signification de chacun de ces symboles.
Forme des symboles Description / application des
symboles
Lire attentivement le manuel
d'utilisation
Port obligatoire de protections
pour les yeux, les oreilles et la
tête
Alerte / sécurité
Arrêt d'urgence
Forme des symboles Description / application des
symboles
Mélange d'essence et d'huile
Pompe d'amorçage (charge
d'amorçage)
Réglage du carburateur - Mélange bas régime
Réglage du carburateur - Mélange haut régime
4
Page 35

Pour utiliser l'appareil en toute sécurité
Forme des symboles Description / application des
symboles
Risque de sectionnement des
doigts
Ne pas utiliser l'appareil dans
des endroits mal aérés
Attention aux risques d'incendie
Attention aux risques de choc
électrique
Niveau de puissance sonore
garanti
Forme des symboles Description / application des
symboles
Réglage du carburateur - Régime de ralenti
Commande de starter en position « Démarrage à froid »
(starter fermé)
Commande de starter en position « Marche » (starter
ouvert)
Régime de ralenti
Régime maximal
Interrupteur ON / OFF
(marche / arrêt)
Démarrage du moteur
Attention aux températures
élevées
5
Page 36

Pour utiliser l'appareil en toute sécurité
Emplacement de l'étiquette de sécurité
L'étiquette de sécurité ci-dessous figure sur l'appareil décrit dans ce manuel. S'assurer de bien comprendre la signification de
l'étiquette avant d'utiliser l'appareil.
Si l'étiquette devient illisible avec le temps ou si elle s'est décollée ou a été déchirée, contacter un REVENDEUR ECHO pour
obtenir une nouvelle étiquette et la coller à l'emplacement indiqué sur les illustrations ci-dessous. Veiller à ce que l'étiquette soit
toujours lisible.
1. Etiquette de sécurité (Numéro de pièce X505002310)
2. Etiquette de sécurité (Numéro de pièce 89016009461)
6
Page 37

Pour utiliser l'appareil en toute sécurité
Manipulation du carburant
DANGER
Toujours effectuer le ravitaillement à l'écart de toute flamme
Le carburant est hautement inflammable et entraîne un risque d'incendie en cas de mauvaise manipulation. Rester extrêmement vigilant lors du mélange, du stockage ou de la manipulation du carburant. Toute erreur entraîne un risque
de blessure corporelle grave. Observer scrupuleusement les règles de sécurité suivantes.
Il est interdit de fumer lors du ravitaillement. Effectuer le ravitaillement à l'écart de toute flamme.
Il est interdit de ravitailler l'appareil lorsque le moteur est chaud ou en marche.
En effet, le carburant risque de s'enflammer et de provoquer un incendie, entraînant ainsi un risque de brûlure.
A propos du réservoir et du point de ravitaillement
Utiliser un réservoir de carburant agréé.
Les bidons/réservoirs de carburant peuvent être sous
pression. Toujours desserrer le bouchon du réservoir
de carburant de façon progressive pour permettre l'égalisation de la pression.
NE JAMAIS remplir les réservoirs de carburant dans un
endroit fermé. TOUJOURS remplir les réservoirs de carburant à l'extérieur, à même le sol.
Tout déversement de carburant entraîne un risque
d'incendie
Respecter les règles de sécurité suivantes lors du
ravitaillement :
Ne pas remplir le réservoir de carburant jusqu'en haut.
Remplir le réservoir jusqu'au niveau recommandé (jusqu'à l'épaulement du réservoir de carburant).
Essuyer le carburant renversé en cas de débordement
ou de trop plein du réservoir.
Une fois le ravitaillement effectué, revisser fermement
le bouchon du réservoir de carburant.
Tout déversement de carburant, s'il s'enflamme, entraîne un
risque d'incendie et de brûlure.
Ne pas démarrer le moteur à l'endroit où le ravitaillement a été effectué
Il ne faut pas démarrer le moteur à l'endroit où le ravitaillement a été effectué. S'éloigner d'au moins 3 mètres
de l'endroit où le ravitaillement a été effectué avant de
démarrer le moteur.
Les fuites de carburant qui peu-
vent survenir lors du ravitaillement
entraînent un risque d'incendie si
le carburant s'enflamme.
Toute fuite de carburant entraîne un risque d'incendie
Après le ravitaillement, toujours
vérifier qu'il n'y a pas de fuite ou d'écoulement de carburant au niveau du tuyau de carburant, du passe-tuyau
de carburant ou autour du bouchon du réservoir de carburant.
En cas de fuite ou d'écoulement de carburant, interrompre immédiatement l'utilisation de l'appareil et contacter un REVENDEUR ECHO pour effectuer les
réparations nécessaires.
Toute fuite de carburant entraîne un risque d'incendie.
1. Réservoir de carburant
2. Epaulement
7
Page 38

Pour utiliser l'appareil en toute sécurité
Manipulation du moteur
AVERTISSEMENT
Démarrage du moteur
Veiller à bien respecter les mesures de précaution suivantes lors du démarrage du moteur :
Vérifier que tous les écrous et toutes les vis sont bien
serrés
Vérifier qu'il n'y a pas de fuite de carburant
Ne pas essayer de démarrer le moteur avec l'appareil
sur l'épaule
Placer l'appareil sur une surface plane et dans un endroit bien aéré
Etablir un périmètre de sécurité autour de l'appareil et
s'assurer que personne ni aucun animal ne se trouve à
proximité.
Retirer tout obstacle éventuel
Démarrer le moteur avec la manette d'accélérateur en
position démarrage/marche
Maintenir fermement l'appareil au sol lors du démarrage
du moteur
Le non-respect de ces mesures de précaution entraîne un
risque d'accident et de blessure grave, voire mortelle.
Une fois le moteur démarré, vérifier que l'appareil
n'émet aucun son ou vibration anormal(e).
Lorsque le moteur est démarré, vérifier que l'appareil
n'émet aucun son ou vibration anormal(e). Ne pas utiliser l'appareil en cas de son ou vibration anormal(e).
Contacter un REVENDEUR ECHO pour effectuer les réparations nécessaires.
La chute ou la rupture accidentelle de pièces entraîne un ris-
que de blessure grave.
Ne pas toucher les composants sous haute tension
ou sous haute température lors du fonctionnement
de l'appareil
Ne pas toucher les composants sous haute tension ou
sous haute température suivants lors du fonctionnement
de l'appareil et pendant la phase qui suit l'arrêt de l'appareil.
Silencieux, cylindre et autres composants
sous haute température
Il existe un risque de brûlure en cas de contact
avec un composant sous haute température.
Bougie d'allumage, fil de la bougie et
autres composants sous haute tension
Il existe un risque de choc électrique en
cas de contact avec un composant sous
haute tension pendant le fonctionnement
de l'appareil.
Toxicité des fumées d'échappement
Les fumées d'échappement du moteur contiennent des
gaz toxiques. Ne pas utiliser l'appareil dans un endroit
fermé, dans une serre en plastique ou dans tout autre
endroit mal aéré.
Il existe un risque d'intoxication due aux fumées d'échappe-
ment.
Arrêter le moteur pour la vérification et l'entretien de
l'appareil
Respecter les mesures de précaution suivantes lors de la
vérification et de l'entretien de l'appareil après utilisation :
Couper le moteur et attendre qu'il refroidisse avant la
vérification ou l'entretien de l'appareil.
Il existe un risque de brûlure.
Retirer le protecteur de bougie avant d'effectuer les
opérations de vérification ou d'entretien
Il existe un risque d'accident en cas de démarrage intem-
pestif de l'appareil.
Vérification de la bougie d'allumage
Respecter les mesures de précaution suivantes lors de la
vérification de la bougie d'allumage.
En cas d'usure des électrodes ou des bornes, ou en cas
de fissure de la céramique, procéder au remplacement
de ces composants.
L'essai de l'étincelle (destiné à vérifier si la bougie d'allumage émet une étincelle) doit être effectué par un professionnel. Contacter un REVENDEUR ECHO.
L'essai de l'étincelle ne doit pas être effectué à proximité du trou de bougie.
L'essai de l'étincelle ne doit pas être effectué à proximité de flaques de carburant ou de gaz inflammables
Ne pas toucher les parties métalliques de la
bougie d'allumage
La bougie d'allumage ris-
que de provoquer un incendie ou un choc
électrique.
Le bon réflexe en cas d'incendie ou de fumée
Si le moteur prend feu ou si de la fumée s'échappe de
l'appareil à un autre endroit que la sortie d'échappement, la première chose à faire est de s'éloigner de l'appareil pour éviter tout risque de blessure.
A l'aide d'une pelle, jeter du sable ou un
autre matériau équivalent sur les flammes
pour éviter que l'incendie ne se propage,
ou éteindre les flammes avec un extincteur.
Ne pas céder à la panique permet d'éviter que l'incendie ne
se propage et donc de limiter l'étendue des dégâts.
8
Page 39

Pour utiliser l'appareil en toute sécurité
Manipulation de l'appareil
Mesures de précaution générales
AVERTISSEMENT
Manuel d'utilisation
Lire attentivement le manuel d'utilisation
avant d'utiliser l'appareil pour la première fois afin d'éviter toute erreur d'utilisation.
Le non-respect de cette mesure de précau-
tion entraîne un risque d'accident ou de
blessure grave.
Ne pas détourner l'appareil de son utilisation normale
Utiliser l'appareil uniquement pour les tâches décrites
dans ce manuel d'utilisation.
Le non-respect de cette règle de sécurité entraîne un risque
d'accident ou de blessure grave.
Ne pas modifier l'appareil
Aucune modification ne doit être apportée à l'appareil.
Le non-respect de cette règle de sécurité entraîne un risque
d'accident ou de blessure grave. Tout dysfonctionnement dû
à une modification de l'appareil n'est pas couvert par la garantie du fabricant.
Prêt ou cession de l'appareil à un tiers
Si l'appareil est prêté à un tiers, veiller à lui confier également le manuel d'utilisation fourni avec l'appareil.
Si l'appareil est cédé à un tiers, transmettre le manuel
d'utilisation fourni avec l'appareil lors de la vente.
Le non-respect de cette règle de sécurité entraîne un risque
d'accident ou de blessure grave.
Savoir réagir en cas de blessure
Même si les cas de blessure ou d'accident restent exceptionnels, l'utilisateur doit savoir réagir à ces situations.
Kit de premiers secours
Serviettes et lingettes (pour arrêter les saignements)
Sifflet ou téléphone portable (pour appeler de l'aide)
Si l'utilisateur n'est pas capable de prodiguer les premiers
soins ou d'appeler à l'aide, la blessure peut s'aggraver.
Ne pas utiliser l'appareil avant d'avoir effectué les
opérations de vérification et d'entretien nécessaires
Il ne faut pas utiliser l'appareil avant d'avoir effectué les
opérations de vérification et d'entretien nécessaires.
Veiller à ce que l'appareil soit vérifié et entretenu régulièrement.
Le non-respect de cette règle de sécurité entraîne un risque
d'accident ou de blessure grave.
9
Page 40

Pour utiliser l'appareil en toute sécurité
Précautions d'utilisation
AVERTISSEMENT
Utilisateurs de l'appareil
L'appareil ne doit pas être utilisé si :
l'utilisateur est fatigué
l'utilisateur a consommé de l'alcool
l'utilisateur prend des médicaments
la personne qui souhaiter utiliser l'appareil est enceinte
l'utilisateur est en mauvaise
condition physique
l'utilisateur n'a pas lu le manuel
d'utilisation
la personne qui souhaite utiliser
l'appareil est un enfant
Le non-respect de ces règles de sé-
curité entraîne un risque d'accident.
Couper le moteur pour se déplacer
Dans les exemples de déplacement décrits ci-dessous,
couper le moteur et se déplacer en gardant l'appareil sur
l'épaule.
Se déplacer vers le lieu de travail
Se déplacer vers un autre endroit tout en travaillant
Quitter le lieu de travail
Le non-respect de ces mesures de précaution entraîne un
risque de brûlure ou de blessure grave.
Pour transporter l'appareil dans une voiture, vider le réservoir de carburant, placer l'appareil en position verticale et s'assurer qu'il est bien calé pour éviter qu'il ne
se déplace lors du trajet.
Rouler en voiture avec du carburant dans le réservoir de
carburant entraîne un risque d'incendie.
Environnement d'utilisation et fonctionnement de
l'appareil
Ne pas utiliser l'appareil :
en cas de pluie, de tonnerre ou de probabilité élevée
d'éclairs.
sur des pentes raides ou sur une surface instable et
glissante.
la nuit ou dans des endroits mal éclairés.
Toute chute, dérapage ou utilisation incorrecte de l'appareil
entraîne un risque de blessure grave pour l'utilisateur.
Utilisation de l'appareil
Veiller à bien respecter les mesures de précaution suivantes lors de l'utilisation de l'appareil.
Les personnes n'ayant pas de rapport avec le travail effectué et les animaux sont interdits sur le lieu de travail.
Ne pas diriger le tuyau de soufflage vers des personnes
ou des animaux.
Ne pas utiliser l'appareil sur une surface instable.
Tenir la poignée fermement.
Afin d'éviter toute nuisance sonore pour le voisinage,
ne pas utiliser l'appareil tard le soir ou tôt le matin.
Le non-respect de ces règles de sécurité entraîne un risque
d'accident ou de blessure.
Attention à ne pas se faire prendre dans la turbine
Veiller à ce que des cheveux ne se prennent pas dans la
turbine.
Ne jamais placer sa main entre le moteur et le cadre de
l'étui de transport lorsque l'appareil fonctionne.
La pression de l'air soufflé par la turbine risque de repousser
la main vers la turbine et donc d'entraîner une blessure grave.
Exposition aux vibrations et au froid
Les personnes exposées aux vibrations et au froid peuvent être victimes du phénomène de Raynaud, une affection qui touche les doigts. L'exposition à des vibrations et
au froid peut provoquer une sensation de picotement et de
brûlure, suivie d'une cyanose et d'un engourdissement
des doigts. Il est vivement recommandé de respecter les
mesures de précaution suivantes car le seuil d'exposition
minimum pouvant provoquer l'apparition de ce phénomène reste inconnu à ce jour.
Limiter la perte de chaleur corporelle, en protégeant en
priorité la tête, le cou, les pieds, les chevilles, les mains
et les poignets.
Stimuler la circulation sanguine en interrompant le travail régulièrement pour remuer énergiquement les bras,
et éviter de fumer.
Limiter le nombre d'heures d'utilisation. Essayer d'intégrer à l'emploi du temps de la journée des tâches ne nécessitant pas l'utilisation du souffleur ou d'une autre
machine portative.
En cas d'inconfort, de rougeur et de gonflement au niveau des doigts, suivis d'un blanchiment et d'une perte
de sensibilité, consulter un médecin avant de s'exposer
à nouveau au froid et aux vibrations.
Le non-respect de ces instructions peut être dangereux pour
la santé.
10
Page 41

Pour utiliser l'appareil en toute sécurité
AVERTISSEMENT
Lésions attribuables au travail répétitif
Une trop grande sollicitation des muscles et des tendons
des doigts, des mains, des bras et des épaules peut entraîner l'apparition d'inflammations, de gonflements, d'engourdissements, d'une sensation de faiblesse ou d'une
douleur aiguë dans ces parties du corps. L'apparition de
lésions attribuables au travail répétitif (LATR) est très fréquente chez les personnes pratiquant certaines activités
manuelles répétitives. Pour réduire le risque d'apparition
de LATR, respecter les mesures de précaution suivantes :
Eviter de plier, d'étirer ou de tordre le poignet pendant
le travail.
Faire des pauses régulières pour réduire l'effet répétitif
et pour reposer ses mains. Effectuer le mouvement répétitif plus lentement et en faisant moins d'effort.
Faire des exercices de musculation des mains et des
bras.
En cas de picotements, d'engourdissement ou de douleur dans les doigts, les mains, les poignets ou les bras,
consulter un médecin. Plus les LATR sont diagnostiquées précocement, plus les chances d'empêcher les
lésions nerveuses et musculaires irréversibles sont
grandes.
Le non-respect de ces instructions peut être dangereux pour
la santé.
Couper immédiatement le moteur en cas d'anomalie
Si l'appareil se met à vibrer soudainement ou émet des
bruits anormaux, couper immédiatement le moteur. Ne
pas utiliser l'appareil en cas de son ou vibration anormal(e). Contacter un REVENDEUR ECHO pour effectuer
les réparations nécessaires.
L'utilisation prolongée de pièces endommagées entraîne un
risque d'accident ou de blessure grave.
11
Page 42

Pour utiliser l'appareil en toute sécurité
Equipement de protection
AVERTISSEMENT
Port d'un équipement de protection
Toujours porter des vêtements et un équipement de
protection adaptés pour utiliser le souffleur. Veiller surtout à toujours porter des lunettes de sécurité, un masque anti-poussière et un casque de protection anti-bruit
pour travailler avec l'appareil.
Sans cet équipement de protection, il existe un risque d'in-
haler les débris ou la poussière soufflés par l'appareil. Ces
corps étrangers peuvent également être projetés vers les
yeux, entraînant ainsi un risque d'accident ou de blessure.
a Protection de la tête (casque) : protège la tête
b Casque de protection anti-bruit ou protecteurs
d'oreilles : protègent l'ouïe
c Lunettes de sécurité : protègent les yeux
d Masque anti-poussière
e Gants de sécurité : protègent les mains contre le froid et
les vibrations
f Vêtements de travail adaptés (manches longues, panta-
lons longs) : protègent le corps
g Bottes résistantes avec semelles anti-dérapantes (à
bouts renforcés) ou chaussures de travail avec semel-
les anti-dérapantes (à bouts renforcés) : protègent les
pieds
Le non-respect de ces mesures de précaution peut entraî-
ner une dégradation de la vue ou de l'ouïe de l'utilisateur,
ainsi qu'un risque de blessure grave.
Port de vêtements adaptés
Ne pas porter de cravates, bijoux ou vêtements amples qui pourraient se
prendre dans l'appareil. Ne pas porter de chaussures ouvertes, ne pas travailler pieds nus ou jambes nues. Dans certains cas, une protection complète du visage et de la tête peut être nécessaire.
Le non-respect de ces mesures de précaution peut entraîner une dégradation
de la vue ou de l'ouïe de l'utilisateur, ainsi qu'un risque de blessure grave.
12
Page 43

Contenu de l'emballage
Les pièces suivantes sont conditionnées séparément dans le carton d'emballage.
Lors de l'ouverture du carton, passer en revue les pièces qu'il contient.
Contacter un REVENDEUR ECHO si une pièce est manquante ou endommagée.
Numéro Désignation Quantité Numéro Désignation Quantité
(1) Tête du souffleur 1 (6) Brides avec vis 2
(2) Tuyau flexible 1 (7) Anneau de guidage 1
(3) Tuyau tournant 1 (8) Couvercle d'admission 1
(4) Tuyau droit 1 (9) Clé en T 1
(5) Tuyau droit 1 (10) Manuel d'utilisation 1
Contenu de l'emballage
13
Page 44

Description
Description
1. Bougie d'allumage Emet une étincelle pour allumer le
mélange de carburant.
2. Pare-étincelles - Pot d'échappement catalytique/silen-
cieux Le silencieux ou pot catalytique régule les émissions et les bruits d'échappement. L'écran pareétincelles empêche que des particules de carbone incandescentes soient projetées hors du silencieux.
Veiller à ce qu'aucun débris inflammable ne se trouve
dans la zone d'échappement.
3. Etiquette avec numéro de série Indique le numéro de
modèle et le numéro de série de l'appareil.
4. Poignée de lanceur Tirer doucement la poignée du lan-
ceur jusqu'à ce que le lanceur à rappel automatique
s'enclenche, puis tirer la poignée rapidement et fermement. Lorsque le moteur démarre, ramener doucement
la poignée dans sa position initiale. NE PAS relâcher
brutalement la poignée. Cela risquerait d'endommager
l'appareil.
5. Filtre à air Contient l'élément remplaçable du filtre à air.
6. Starter Le starter est situé sur le côté du filtre à air. Dépla-
cer la manette de starter en position afin de fermer
le starter pour un démarrage à froid. Déplacer la manette de starter en position pour ouvrir le starter.
7. Pompe d'amorçage Actionner la pompe d'amorçage
avant de démarrer le moteur permet d'aspirer du carburant neuf du réservoir de carburant afin de purger l'air
présent dans le carburateur. Actionner la pompe
d'amorçage jusqu'à ce que ce que du carburant soit visible. Actionner la pompe d'amorçage encore 4 ou
5fois.
8. Réservoir de carburant Contient le carburant et le filtre à
carburant.
9. Bouchon du réservoir de carburant Ferme le réservoir
de carburant et assure son étanchéité.
10. Harnais Permet à l'utilisateur de transporter l'appareil
sur son dos. Les sangles sont réglables.
11. Poignée Permet à l'utilisateur d'orienter le débit d'air.
12. Bouton de position de l'accélérateur/de l'interrup-
teur d'arrêt combiné Permet de contrôler le régime
moteur et de mettre ou couper le contact. Position
avant - ARRET. Première position - RALENTI. Tourner
le bouton vers l'arrière pour réduire le régime, vers
l'avant pour l'augmenter. Utiliser le bouton de position
de l'accélérateur pour régler et maintenir la vitesse du
souffleur afin de permettre un fonctionnement continu.
13. Gâchette d'accélérateur Gâchette d'accélérateur à ressort permettant de contrôler le régime moteur. Lorsque
la gâchette est relâchée, le moteur repasse au régime
défini par le bouton de position de l'accélérateur/de l'interrupteur d'arrêt. Toujours relâcher la gâchette et laisser le moteur retourner en mode de ralenti avant de
couper le moteur à l'aide du bouton de position de l'accélérateur/de l'interrupteur d'arrêt. Utiliser la gâchette
d'accélérateur pour faire varier les réglages de régime
du souffleur pour une utilisation intermittente.
14. Bouton de verrouillage Permet à l'utilisateur de régler
la position de la poignée pour obtenir un confort et un
contrôle optimaux.
15. Tuyaux de soufflage Système de verrouillage automatique exclusif.
16. Tuyau flexible Permet une liberté de mouvement optimale.
14
Page 45

Avant de commencer
Avant de commencer
Assemblage
AVERTISSEMENT
Lire attentivement le manuel d'utilisation pour s'assurer que l'appareil est monté correctement.
Ne jamais effectuer d'opérations d'entretien ou de montage lorsque le moteur tourne.
L'utilisation d'un appareil monté de façon incorrecte entraîne un risque d'accident ou de blessure grave.
Installer les tuyaux de soufflage
1. Placer l'anneau de guidage perpendiculairement sur la bride
du coude puis le tourner jusqu'à ce qu'il soit complètement
enclenché sur la bride.
2. Monter les brides aux deux extrémités du tuyau flexible.
REMARQUE
Le collier avec l'anneau de guidage de câble se fixe à l'extré-
1. Anneau de guidage
3. Tuyau flexible
2. Deux brides
4. Tuyau tournant
mité coudée du tuyau flexible.
3. Insérer le tuyau tournant dans le tuyau flexible et serrer la
bride.
1. Poignée
3. Tuyau tournant
5. Fil antistatique
1. Câble de l'accélérateur
3. Bouton
2. Bouton
4. Bride
6. Coude
2. Anneau de guidage
4. Dévisser le bouton de la poignée. AIigner l'encoche de la
poignée avec les languettes. L'installer sur le tuyau tournant
en aval des longues crêtes du tuyau.
5. Insérer le fil antistatique dans le tuyau flexible.
6. Monter le tuyau flexible sur le coude du souffleur. Placer
l'anneau de guidage à l'extérieur du tuyau flexible (loin du
souffleur) et serrer le collier.
REMARQUE
Un léger lubrifiant peut être utilisé pour faciliter l'assemblage
du tuyau flexible sur le coude du souffleur.
REMARQUE
Tenir la poignée au-dessus du souffleur pour s'assurer que le
câble de l'accélérateur ne soit pas vrillé lors de l'installation de
la poignée.
7. Fixer le câble de l'accélérateur dans l'anneau de guidage du
câble.
8. Positionner la poignée de façon à obtenir un confort d'utilisation optimal et serrer le bouton à la main.
9. Monter le tuyau droit sur le tuyau tournant jusqu'à sentir une
légère résistance. Ne pas forcer. Maintenir le tuyau tournant
et tourner le tuyau droit dans le sens des aiguilles d'une
montre, en engageant les canaux de verrouillage automatique, jusqu'à ce que les éléments s'emboîtent parfaitement.
Ne pas forcer.
10. Monter le tuyau droit portant l'étiquette sur le tuyau droit
comme à l'étape 9.
15
Page 46

Avant de commencer
REMARQUE
Les raccords entre les tuyaux se desserrent au fil de l'utilisation
de l'appareil. Le système de verrouillage automatique exclusif
permet de serrer les raccords entre les tuyaux. En cas de desserrage, déposer et reposer les deux tuyaux droits conformément aux instructions 9 et 10.
1. Tuyau tournant
3. Tuyau droit
Préparation du carburant
Le carburant est un produit hautement inflammable. Toute manipulation incorrecte du carburant entraîne un risque d'incendie. Lire attentivement et respecter les mesures de précaution indiquées dans la section du manuel intitulée « Pour utiliser l'appareil en toute
sécurité ».
Une fois le ravitaillement effectué, visser fermement le bouchon du réservoir de carburant
et vérifier qu'il n'y a pas de fuite ou d'écoulement de carburant au niveau du tuyau et du passe-tuyau de carburant, ou autour du bouchon du réservoir de carburant. En cas de fuite ou
d'écoulement de carburant, interrompre immédiatement l'utilisation de l'appareil et contacter un REVENDEUR ECHO
pour effectuer les réparations nécessaires.
Si le carburant s'enflamme, il entraîne un risque de brûlure et d'incendie.
2. Tuyau droit
DANGER
ATTENTION
Il existe une différence de pression entre le réservoir de carburant et l'air extérieur. Lors du ravitaillement, dévisser légèrement le bouchon du réservoir de carburant pour égaliser la pression.
Dans le cas contraire, le carburant risque de se déverser.
REMARQUE
Le carburant vieillit lorsqu'il est stocké. Ne préparer qu'une quantité de carburant suffisante pour une consommation de trente
(30) jours. Ne pas faire le mélange directement dans le réservoir de carburant.
Carburant
Le carburant est un mélange d'essence ordinaire et d'une hui-
le moteur de grande marque pour moteur deux temps à refroidissement par air. Il est conseillé d'utiliser du Super sans
plomb 95 au minimum. Ne pas utiliser de carburant contenant
du méthanol ou plus de 10 % d'éthanol.
Richesse du mélange recommandée ; 50 : 1 (2%) selon la
norme ISO-L-EGD (ISO/CD 13738), la norme JASO FC,FD et
l'huile ECHO Premium 50 : 1.
- Ne pas faire le mélange directement dans le réservoir de
carburant.
- Eviter de renverser du carburant ou de l'huile. Toujours essuyer les projections de carburant.
- Manipuler le carburant avec précaution : il est hautement
inflammable.
- Toujours stocker le carburant dans un récipient approprié.
16
Page 47

Alimentation en carburant
1. Réservoir de carburant 2. Epaulement
Avant de commencer
Toujours effectuer le ravitaillement dans un endroit bien aéré.
Ne jamais effectuer le ravitaillement dans un endroit fermé.
Placer l'appareil et le réservoir de ravitaillement sur le sol lors
du ravitaillement. Ne jamais ravitailler l'appareil sur la plateforme de chargement d'un camion ou autre endroit du même
type.
Toujours s'assurer que le niveau de carburant ne dépasse pas
l'épaulement du réservoir lors du ravitaillement.
Il existe une différence de pression entre le réservoir de car-
burant et l'air extérieur. Lors du ravitaillement, dévisser légèrement le bouchon du réservoir de carburant pour égaliser la
pression.
Toujours essuyer les projections de carburant.
S'éloigner d'au moins 3 mètres de l'endroit du ravitaillement
avant de démarrer le moteur.
Entreposer le réservoir de ravitaillement dans un endroit om-
bragé et loin de toute flamme.
17
Page 48

Fonctionnement du moteur
Fonctionnement du moteur
Démarrage du moteur
AVERTISSEMENT
Lors du démarrage du moteur, respecter les mesures de précaution décrites à partir de la page 4 dans la section
« Pour utiliser l'appareil en toute sécurité » pour garantir une utilisation correcte de l'appareil.
Le non-respect de ces mesures de précaution entraîne un risque d'accident et de blessure grave, voire mortelle.
REMARQUE
Tirer la poignée de lanceur, doucement dans un premier temps, puis plus rapidement. Ne pas tirer la corde de lanceur à plus
de 2/3 de sa longueur.
Ne pas lâcher la poignée de lanceur lorsqu'elle revient.
Pour démarrer le moteur, remettre le bouton de starter dans sa position initiale au premier bruit d'explosion, puis tirer de nou-
veau la poignée de lanceur. Veiller à ne pas manquer le premier bruit d'explosion.
Démarrage du moteur à froid
Lanceur à rappel automatique : Tirer la corde de lanceur sur
de courtes distances (pas plus de 1/2-2/3 de sa longueur)
pour le démarrage. Ne pas laisser la corde s'enrouler jusqu'au
bout. Toujours tenir l'appareil fermement.
1. Bouton de position de
l'accélérateur/de l'interrupteur d'arrêt
1. Starter 2. Pompe d'amorçage
1. Bouton de position de l'accélérateur/de l'interrupteur d'arrêt
Remettre le bouton de position de l'accélérateur/de l'interrupteur d'arrêt en position de ralenti (première position après la
position d'arrêt).
2. Starter
Placer la manette de starter en position « ».
3. Pompe d'amorçage
Actionner la pompe d'amorçage jusqu'à ce que ce que du carburant soit visible.
4. Lanceur à rappel automatique
Tirer la poignée du lanceur à rappel automatique jusqu'à ce
que le moteur démarre, ou 5 fois maximum.
5. Starter
Placer la manette de starter en position « » et, si nécessaire, redémarrer le moteur.
1. Poignée de lanceur à
rappel automatique
REMARQUE
Si le moteur ne démarre pas après 5 tentatives, répéter les
instructions 2-5.
REMARQUE
Laisser le moteur chauffer avant utilisation.
18
Page 49

Mise en température du moteur
Démarrage du moteur à chaud
1. Bouton de position de
l'accélérateur/de l'interrupteur d'arrêt
Fonctionnement du moteur
1. Lorsque le moteur démarre, le laisser chauffer au ralenti (c.à-d. à bas régime) pendant 2 à 3 minutes.
2. La mise en température du moteur permet de lubrifier progressivement son mécanisme interne. Laisser le moteur
chauffer jusqu'à atteindre la température adéquate, surtout
par temps froid.
3. Ne jamais faire tourner le moteur sans avoir préalablement
fixé les tuyaux de soufflage.
La procédure de démarrage est identique à la procédure de
Démarrage à froid, mais il NE FAUT PAS fermer le starter.
1. Bouton de position de l'accélérateur/de l'interrupteur d'arrêt
Remettre le bouton de position de l'accélérateur/de l'interrupteur d'arrêt en position de ralenti (première position après la
position d'arrêt).
1. Pompe d'amorçage
2. Pompe d'amorçage
Actionner la pompe d'amorçage jusqu'à ce que ce que du carburant soit visible.
3. Lanceur à rappel automatique
Tirer sur la poignée du lanceur à rappel automatique pour démarrer le moteur.
REMARQUE
Si le moteur ne démarre pas après 5 tentatives, suivre la procédure de démarrage à froid.
1. Poignée de lanceur à
rappel automatique
19
Page 50

Fonctionnement du moteur
Arrêt du moteur
1. Bouton de position de
l'accélérateur/de l'interrupteur d'arrêt
1. Bouton de position de l'accélérateur/de l'interrupteur d'arrêt
Relâcher la gâchette de l'accélérateur. Mettre le bouton de
position de l'accélérateur/de l'interrupteur d'arrêt en position
de ralenti (première position après la position d'arrêt) et laisser le moteur repasser en mode de ralenti avant de le couper.
2. Bouton de position de l'accélérateur/de l'interrupteur d'arrêt
Tourner le bouton de position de l'accélérateur/de l'interrupteur d'arrêt complètement jusqu'à la position « » (Arrêt).
AVERTISSEMENT
Si le moteur ne s'arrête pas alors que bouton de position
de l'accélérateur/de l'interrupteur d'arrêt est en position
ARRÊT, fermer le starter (position ) pour faire caler le
moteur. Contacter un revendeur ECHO pour réparer l'interrupteur d'arrêt avant d'utiliser à nouveau le souffleur.
20
Page 51

Fonctionnement
Fonctionnement
Fonctionnement du souffleur
AVERTISSEMENT
Toujours porter des lunettes de protection, un casque de protection anti-bruit, un masque anti-poussière et respecter
impérativement les mesures de précaution afin d'éviter tout risque de blessure. Ne pas diriger le tuyau de soufflage
vers des personnes ou des animaux.
IMPORTANT
Pour éviter d'endommager le moteur en raison d'un surrégime, ne pas obturer l'ouverture du tuyau de soufflage.
REMARQUE
Ne jamais utiliser l'appareil à un régime plus élevé que nécessaire. Rappel : plus le régime moteur est élevé, plus le souffleur
est bruyant. Le cas échéant, utiliser le souffleur à bas régimes et humidifier les surfaces afin de réduire le déplacement de poussière. Garder les déchets sur le lieu de travail par respect pour le voisinage.
Lire attentivement la section Sécurité.
1. Utiliser l'appareil uniquement à des heures appropriées.
2. Laisser le moteur chauffer à un régime de ralenti rapide pen-
dant quelques minutes.
3. Contrôler le régime moteur à l'aide de la gâchette d'accélé-
rateur, ou pour une utilisation en continu, régler le régime
moteur à l'aide du bouton de position de l'accélérateur/de
l'interrupteur d'arrêt.
4. Utiliser l'appareil à bas régime pour souffler les herbes et les
feuilles présentes dans les allées, les cours intérieures et les
1. Bouton de position de
l'accélérateur/de l'interrupteur d'arrêt
2. Gâchette d'accélérateur
passages.
5. Pour souffler les feuilles présentes sur une pelouse ou un
parterre de fleurs, il peut s'avérer nécessaire d'utiliser l'appareil à un régime supérieur.
6. Pour souffler du gravier, de la poussière, de la neige, des canettes ou des bouteilles vides présentes dans une allée, une
rue, un parking ou un stade, il peut s'avérer nécessaire d'utiliser l'appareil à un régime encore supérieur.
7. Toujours arrêter l'appareil en respectant la procédure d'arrêt
du moteur.
21
Page 52

Fonctionnement
Utilisation par temps froid
1. Coussin dorsal
Installer le couvercle d'admission lorsque vous sentez du froid
dans le dos.
1. Retirer le coussin dorsal du cadre.
2. Installer le couvercle d'admission sur le cadre, par dessus
de l'admission d'air.
3. Installer le coussin dorsal sur le cadre, par dessus de l'admission d'air.
REMARQUE
Les performances du souffleur peuvent s'en trouver légèrement réduites.
1. Couvercle d'admission
22
Page 53

Entretien
Entretien
Instructions d'entretien de l'appareil
Pièce Entretien Page Avant utilisation Tous les mois
Filtre à air Contrôler / nettoyer / remplacer 23 •
Filtre à carburant Contrôler / remplacer 24 •
Bougie d'allumage Contrôler / nettoyer / régler / rem-
placer
Carburateur Contrôler 24 •
Circuit de refroidissement Contrôler / nettoyer 25 •
Système d'échappement Contrôler / serrer / nettoyer 26 •
Lanceur Contrôler - •
Circuit d'alimentation Contrôler - •
Vis, boulons et écrous Contrôler/serrer/remplacer - •
26 •
IMPORTANT
Les intervalles indiqués sont un maximum. La fréquence des opérations d'entretien varie en fonction de l'utilisation réelle de l'appareil et de l'expérience de l'utilisateur.
Entretien
En cas de questions ou de problèmes, contacter un REVENDEUR ECHO.
Nettoyage du filtre à air
Outils nécessaires : pinceau de nettoyage de 25-50 mm (12in.)
Pièces nécessaires : Filtre à air
1. Couvercle du filtre à air
3. Plaque de l'élément filtrant
1. Placer la manette de starter en position « ». Cela permet
d'empêcher la pénétration d'impuretés dans l'étranglement
du carburateur lors de la dépose du filtre à air. Brosser la
zone autour du filtre à air pour éliminer les impuretés accumulées.
2. Déposer le couvercle du filtre à air. Brosser l'intérieur du
couvercle pour éliminer les impuretés accumulées.
3. Retirer le filtre à air et la plaque de l'élément filtrant puis les
brosser légèrement pour en éliminer les débris. Remplacer
le filtre s'il est endommagé, contaminé par du carburant, extrêmement encrassé ou si les bords du joint en caoutchouc
sont déformés.
4. Si le filtre peut être réutilisé, s'assurer qu'il :
S'emboîte parfaitement dans le logement du filtre à air.
Est installé avec le côté d'origine vers l'extérieur.
5. Poser le couvercle du filtre à air.
2. Filtre à air
23
Page 54

Entretien
Remplacement du filtre à carburant
Outils nécessaires : câble de 200-250 mm (8-10 in.) de longueur avec une extrémité repliée pour former un crochet, chiffon propre, entonnoir et récipient de carburant approprié
Pièces nécessaires : tuyau d'alimentation et filtre à carburant
DANGER
Le carburant est EXTREMEMENT inflammable. Rester extrêmement vigilant lors du mélange, du stockage ou de la
manipulation du carburant.
1. Bouchon du réservoir
de carburant
3. Tuyau d'alimentation de
carburant
5. Réservoir de carburant
Réglage du carburateur
2. Filtre à carburant
4. Crochet du tuyau d'alimentation
REMARQUE
Si le filtre est extrêmement encrassé ou n'est plus correctement ajusté, il faut le remplacer.
1. A l'aide d'un chiffon propre, éliminer les impuretés présentes
autour du bouchon du réservoir de carburant et vider le réservoir.
2. Utiliser le « crochet du tuyau d'alimentation » pour tirer le
tuyau d'alimentation et le filtre hors du réservoir.
3. Déposer le filtre du tuyau et poser le filtre neuf.
Outils nécessaires : tournevis, tachymètre (Echo, numéro de
pièce 99051130017)
Pièces nécessaires : Aucune
REMARQUE
Chaque appareil est testé en usine et le carburateur est réglé
en conformité avec la réglementation sur les émissions. Le carburateur n'est pas doté d'aiguilles de réglage d'accélération ou
de régime élevé. Ne pas tenter d'appliquer les procédures de
réglage du carburateur décrites dans le Manuel de garantie
concernant les émissions.
1. Vis
Avant le réglage
Vérifier que :
Le filtre à air est propre et installé correctement.
L'écran pare-étincelles et le silencieux sont exempts de carbone.
Les tuyaux de soufflage sont installés.
1. Démarrer le moteur et le laisser tourner au ralenti pendant
une minute.
2. Terminer la phase de mise en température du moteur en le
faisant tourner à plein gaz pendant 5 minutes, en actionnant
24
Page 55

Entretien
deux fois le starter afin de purger l'air présent dans les chambres du carburateur.
3. Contrôler le régime de ralenti et le régler si nécessaire. A
l'aide d'un tachymètre, régler la vis de régime de ralenti
conformément aux spécifications page
30"Caractéristiques » de ce manuel. Tourner la vis de ralenti
dans le sens des aiguilles d'une montre pour augmenter le
régime de ralenti, et dans le sens inverse des aiguilles d'une
montre pour le réduire.
Entretien du système de refroidissement
IMPORTANT
Pour maintenir la température de fonctionnement correcte du moteur, l'air de refroidissement doit circuler librement à travers la
zone des ailettes du cylindre. Ce flux d'air évacue la chaleur de combustion du moteur. Un risque de surchauffe et de grippage
du moteur existe si :
L'admission d'air est bloquée, empêchant l'air de refroidissement d'atteindre le cylindre,
ou
De la poussière et de l'herbe s'accumulent à l'extérieur du cylindre. Cette accumulation isole le moteur et empêche la chaleur
de s'évacuer.
Les opérations de déblocage des canaux de refroidissement ou de nettoyage des ailettes de cylindre sont considérées comme
des « Opérations d'entretien normales ». Toute panne due à un mauvais entretien de l'appareil n'est pas couverte par la garantie.
1. Admission d'air
Outils nécessaires : Clé coudée Torx T27, pinceau de nettoyage
Pièces nécessaires : aucune, si toutes les précautions requises sont prises.
Nettoyage de la grille et des ailettes de cylindre
1. Eliminer les débris accumulés sur la grille d'admission entre
le cadre de portage et le corps du souffleur.
2. Débrancher le fil de la bougie d'allumage.
3. Déposer le couvercle du filtre à air.
4. Déposer le couvercle moteur (10 vis).
5. Nettoyer les ailettes de cylindre pour que l'air de refroidissement puisse circuler librement.
6. Remonter les pièces dans l'ordre inverse.
IMPORTANT
Ne pas serrer les vis de façon excessive, sous peine d'endommager les trous de montage.
1. Bougie d'allumage 2. Ailettes de cylindre
25
Page 56

Entretien
Système d'échappement
1. Ecran pare-étincelles
3. Couvercle pare-étincelles
2. Joint
Ecran pare-étincelles
Outils nécessaires : Clé coudée Torx T27, brosse métallique
souple
Pièces nécessaires : Ecran pare-étincelles, joint
IMPORTANT
Les dépôts de carbone présents dans le silencieux entraînent
une perte de puissance et la surchauffe du moteur. L'écran
pare-étincelles doit être contrôlé régulièrement.
1. Débrancher le fil de la bougie d'allumage.
2. Déposer le couvercle pare-étincelles, le joint et l'écran pareétincelles du silencieux. Si l'écran est obturé par des dépôts
de carbone, le remplacer.
3. Installer l'écran pare-étincelles, les joints et le couvercle.
4. Brancher le fil de la bougie d'allumage.
Silencieux et orifice d'échappement
1. Silencieux 2. Joint
Vérification de la bougie d'allumage
Outils nécessaires : Clé coudée Torx T27, grattoir en bois ou
en plastique
Pièces nécessaires : Joint
IMPORTANT
Les dépôts de carbone présents dans l'orifice d'échappement
du cylindre et le silencieux entraînent une perte de puissance
et la surchauffe du moteur. L'orifice d'échappement du silencieux doit être contrôlé régulièrement. Veiller à ne pas rayer le
cylindre ou le piston lors du nettoyage de l'orifice d'échappement du cylindre.
1. Débrancher le fil de la bougie d'allumage.
2. Déposer le couvercle moteur (10 vis).
3. Déposer le silencieux et le joint.
4. Nettoyer l'orifice d'échappement du cylindre à l'aide d'un
grattoir en bois ou en plastique en veillant à ne pas rayer le
cylindre ou le piston.
5. Poser le joint et le silencieux.
6. Poser le couvercle moteur.
Outils nécessaires : Clé en T, jauge d'épaisseur
Pièces nécessaires : Bougie d'allumage
26
Page 57

a: 0,6- 0,7mm
Entretien
IMPORTANT
Utiliser uniquement une bougie d'allumage NGK BPMR8Y
sous peine d'endommager gravement le moteur.
1. Vérifier l'écartement des bougies. L'écartement correct est
compris entre 0,6 mm et 0,7 mm.
2. Vérifier si l'électrode est usée.
3. Vérifier s'il y a de l'huile ou d'autres dépôts sur l'isolant.
4. Remplacer la bougie si nécessaire et la serrer à 15 N•m 17 N•m (150 kgf cm - 170 kgf cm).
27
Page 58

Entretien
Guide de dépannage
Problème Diagnostic Cause Solution
Le moteur démarre difficilement, tourne
de manière irrégulière
ou
Le moteur ne
démarre pas
Aucun carburant ne pénètre dans le tuyau de trop
plein
Le carburant pénètre dans
le tuyau de trop plein
Le vilebrequin ne tourne
pas
La bougie d'allumage est
encrassée ou humide
Le filtre à carburant est colmaté
Le circuit d'alimentation est colmaté
Blocage de pièces internes du carburateur
Dégradation du carburant
Problème de carburateur
Dysfonctionnement interne du moteur Consulter un REVEN-
Dégradation du carburant
Ecartement incorrect des électrodes
Dépôts de calamine
Dysfonctionnement électrique
Nettoyer ou remplacer
Nettoyer
Consulter un REVENDEUR ECHO
Remplacer le carburant
Consulter un REVENDEUR ECHO
DEUR ECHO
Remplacer le carburant
Régler ou remplacer
Nettoyer ou remplacer
Consulter un REVENDEUR ECHO
Le moteur démarre mais
impossible
d'accélérer
La vérification et l'entretien de l'appareil nécessitent des connaissances spécialisées. Si l'utilisateur ne possède pas les com-
pétences requises pour effectuer les opérations de vérification et d'entretien de l'appareil ou pour remédier à un dysfonctionnement, il doit consulter un REVENDEUR ECHO. Ne pas essayer de démonter l'appareil.
En cas de problème autre que ceux décrits dans le tableau ci-dessus, consulter un REVENDEUR ECHO.
En ce qui concerne les pièces de rechange et les consommables, utiliser uniquement des pièces d'origine et les produits et
les composants recommandés. L'utilisation de pièces d'autres marques ou de composants inappropriés peut entraîner un
dysfonctionnement de l'appareil.
Filtre à air encrassé
Filtre à carburant encrassé
Passage de carburant obstrué
Problème de réglage du carburateur
Problème de bougie d'allumage
Blocage de la sortie d'échappement ou de
l'échappement de silencieux
Ecran pare-étincelles obstrué ou normalement usé
Nettoyer ou remplacer
Nettoyer ou remplacer
Consulter un REVENDEUR ECHO
Consulter un REVENDEUR ECHO
Nettoyer, régler ou remplace
Nettoyer
Nettoyer ou remplacer
28
Page 59

Entretien
Remisage de longue durée (30 jours ou plus)
AVERTISSEMENT
Au cours de l'utilisation, le silencieux, le pot catalytique et le couvercle chauffent. Toujours s'assurer
qu'aucun débris inflammable ne se trouve dans la zone de l'échappement pour le transport ou le remisage
de l'appareil car il existe un risque de dégâts matériels ou de blessure corporelle.
Ne pas remiser l'appareil pendant une période prolongée (30 jours ou plus) sans avoir préalablement effectué les opérations
d'entretien préventives spécifiques au remisage, qui comprennent les mesures suivantes :
1. Remiser l'appareil dans un endroit sec, non poussiéreux et
hors de portée des enfants.
AVERTISSEMENT
Ne pas remiser l'appareil dans un endroit où les vapeurs
de carburant risquent de s'accumuler ou d'entrer en
contact avec une flamme ou une étincelle.
1. Bouton de position de
l'accélérateur/de l'interrupteur d'arrêt
2. Placer le bouton de position de l'accélérateur/de l'interrupteur d'arrêt en position « » (Arrêt).
3. Eliminer la graisse, l'huile, les impuretés et les débris accumulés à l'extérieur de l'appareil.
4. Effectuer régulièrement toutes les opérations de lubrification
et d'entretien nécessaires.
5. Serrer tous les écrous et vis.
6. Vidanger complètement le réservoir de carburant et tirer plusieurs fois la poignée du lanceur à rappel automatique afin
de vidanger le carburant présent dans le carburateur.
7. Retirer la bougie d'allumage et verser dans le cylindre 10mL
d'huile ECHO propre pour moteur à 2 temps, via le trou de
bougie.
A. Placer un chiffon propre sur le trou de bougie.
B. Tirer 2 à 3 fois la poignée du lanceur à rappel automati-
que pour répartir l'huile dans le moteur.
C. Observer l'emplacement du piston à travers le trou de
bougie. Tirer doucement la poignée du lanceur à rappel
automatique jusqu'à ce que le piston atteigne le sommet de sa course et le laisser dans cette position.
8. Installer la bougie d'allumage. (Ne pas connecter le protecteur de bougie. )
9. Enlever l’ensemble des tuyaux de soufflage de l'appareil.
1. Bougie d'allumage 2. Protecteur de bougie
Contacter un REVENDEUR ECHO pour la mise au rebut de l'appareil ou de ses composants conformément à la
législation nationale en vigueur.
29
Page 60

Caractéristiques
Caractéristiques
Masse : kg 9,8
Dimensions externes :
Longueur
Largeur
Hauteur
Moteur :
Type
Cylindrée
Puissance maximale
Régime moteur à puissance maximale
Régime moteur maximum recommandé
Régime moteur de ralenti recommandé
Carburateur
Allumage
Bougie d'allumage
Lanceur
Volume d'air avec tuyau droit : m
mm
mm
mm
ml (cm
kW
tr/min
tr/min
tr/min
3
3
/min 21,7
375
490
475
Monocylindre 2 temps à refroidissement par air
)
63,3
2,85
6900
6900
2500
Type de diaphragme
Volant magnétique - système CDI
NGK BPMR8Y
Système de rappel automatique
PB-770
Carburant :
Huile
Richesse 50 : 1 (2%)
Capacité du réservoir : l2,02
Niveau de pression sonore : (ISO 22868) LpAeq = dB(A) 97,7
Niveau de puissance sonore garanti :
(2000/14/CE) L
Niveaux de vibrations : (ISO 22867) m/s
Ces caractéristiques sont susceptibles d'être modifiées sans préavis.
= dB(A) 112
WA
Essence ordinaire. Il est conseillé d'utiliser du Super
sans plomb 95 au minimum. Ne pas utiliser de carburant contenant du méthanol ou plus de 10 % d'éthanol.
Huile pour moteur 2 temps à refroidissement par air.
Norme ISO-L-EGD (ISO/CD 13738), norme
JASO FC,FD et huile ECHO Premium 50 : 1.
2
2,1
30
Page 61

Le fabricant soussigné :
YAMABIKO CORPORATION
7-2 SUEHIROCHO 1-CHOME
OHME; TOKYO 198-8760
JAPON
déclare que l'appareil neuf désigné ci-après :
SOUFFLEUR
Marque : ECHO
Type : PB-770
assemblée par :
ECHO, INCORPORATED
400 Oakwood Road
Lake Zurich, Illinois 60047-1564
Déclaration de conformité
Déclaration de confor mité
États-Unis
est conforme aux :
* spécifications de la directive 98/37/CE (1998) (et 2006/42/CE : du 29 décembre 2009)
* spécifications de la Directive 2004/108/CE
(utilisation de la norme harmonisée EN ISO 14982)
* spécifications de la Directive 2002/88/CE
* spécifications de la Directive 2000/14/CE
Procédure d'évaluation de la conformité suivant l'ANNEXE V
Niveau de puissance sonore mesuré : 109 dB(A)
Niveau de puissance sonore garanti : 112 dB(A)
PB-770 Numéro de série 37002001 et suivants
Tokyo,
le 1er octobre 2009
YAMABIKO CORPORATION
Représentant autorisé en Europe,
autorisé à constituer le dossier technique.
Société : Atlantic Bridge Limited
Adresse : Atlantic House, PO Box 4800,
Earley, Reading RG5 4GB, Royaume-Uni
K. OYURI Directeur général M. Philip Wicks
31
Page 62

1Remarques et dos de couverture
7-2 SUEHIROCHO 1-CHOME, OHME, TOKYO 198-8760, JAPON
TÉLÉPHONE : 81-428-32-6118. FAX : 81-428-32-6145.
©
2009
X753-003 91 0
X753 112-420 0
Imprimé au Japon
0x0xxxx zzzz ES
32
Page 63

1Buchdeckel
DEUTSCH
(Original Gebrauchsanleitung)
BEDIENUNGSANLEITUNG
PB-770
WARNUNG
LESEN SIE DIE BEDIENUNGSANLEITUNG SORGFÄLTIG
DURCH, UND BEFOLGEN SIE DIE SICHERHEITSREGELN.
ANDERNFALLS BESTEHT DAS RISIKO SCHWERER
VERLETZUNGEN.
Page 64

Wichtige Informationen
2Wichtige Informationen
Lesen Sie unbedingt die Bedienungsanleitung, bevor Sie das Produkt verwenden.
Beabsichtigter Zweck dieses Produkts
ECHO Laubbläser sind darauf ausgelegt, verschiedene Arten Schmutz und Laub zusammenzublasen.
Verwenden Sie das Gerät nur für den oben angegebenen Zweck.
Benutzer des Geräts
Verwenden Sie dieses Produkt erst, nachdem Sie die Bedienungsanleitung sorgfältig gelesen und den Inhalt genau
verstanden haben.
Das Produkt darf von keiner Person verwendet werden, die die Bedienungsanleitung nicht gelesen hat, an Erkältung,
Müdigkeit oder einer anderen körperlichen Schwäche leidet. Das Produkt darf nicht von Kindern verwendet werden.
Seien Sie sich bewusst, dass der Benutzer für Unfälle bzw. Gefährdungen anderer Personen oder deren Eigentum
verantwortlich ist.
Allgemeines zu dieser Bedienungsanleitung
Diese Bedienungsanleitung enthält wichtige Informationen über Montage, Bedienung und Instandhaltung Ihres
Produkts. Bitte lesen Sie sie sorgfältig durch, und machen Sie sich mit dem Inhalt vertraut.
Bewahren Sie die Anleitung stets an einem schnell zugänglichen Ort auf.
Sollte die Anleitung verloren gehen oder aufgrund von Beschädigungen nicht mehr lesbar sein, besorgen Sie sich bitte
eine neue Anleitung von Ihrem ECHO-Händler.
Die in dieser Anleitung verwendeten Einheiten sind SI-Einheiten (Système International d'unités; Internationales
Einheitensystem). Zahlenangaben in Klammern sind Referenzwerte, bei denen mitunter geringe Umrechnungsfehler
vorliegen können.
Verleihen oder Übereignen des Produkts
Wenn Sie das in dieser Anleitung beschriebene Produkt verleihen, muss die Person, die das Produkt ausleiht und
verwendet, auch die zugehörige Bedienungsanleitung erhalten. Wenn Sie das Produkt einer anderen Person
übereignen, muss die Bedienungsanleitung zusammen mit dem Produkt ausgehändigt werden.
Anfragen
Bei Fragen bezüglich Informationen zum Produkt, Erwerb von Verbrauchsmaterial, zu Reparaturen u. Ä. wenden Sie
sich bitte an Ihren ECHO-Händler.
Anmerkungen
Um Weiterentwicklungen des Produkts Rechnung zu tragen, bleiben dem Hersteller Änderungen am Inhalt dieser
Anleitung vorbehalten. Einige Abbildungen in dieser Anleitung können vom Produkt abweichen, um Sachverhalte
klarer darzustellen.
Vor Inbetriebnahme des Produkts müssen einige Teile montiert werden.
Bei Unklarheiten oder Problemen wenden Sie sich bitte an Ihren ECHO-Händler.
Hersteller
YAMABIKO CORPORATION
7-2 SUEHIROCHO 1-CHOME, OHME, TOKIO 198-8760, JAPAN
Autorisierter Repräsentant in Europa
Atlantic Bridge Limited
Atlantic House, PO Box 4800, Earley, Reading RG5 4GB, Vereingtes Königreich
2
Page 65

Inhalt
Sichere Verwendung des Produkts .................................................................................... 4
Warnhinweise ................................................................................................................ 4
Sonstige Kennzeichnungen........................................................................................... 4
Symbole.........................................................................................................................4
Stelle, an der sich der Sicherheitsaufkleber befindet..................................................... 6
Umgang mit Kraftstoff .................................................................................................... 7
Umgang mit dem Motor ................................................................................................. 8
Umgang mit dem Produkt .............................................................................................. 9
Packliste ........................................................................................................................... 13
Beschreibung....................................................................................................................14
Bevor Sie beginnen .......................................................................................................... 15
Zusammenbau............................................................................................................. 15
Bereitstellen des Kraftstoffs......................................................................................... 16
Bedienung des Motors ...................................................................................................... 18
Starten des Motors ...................................................................................................... 18
Stoppen des Motors .................................................................................................... 20
Betrieb ..............................................................................................................................21
Betrieb des Bläsers...................................................................................................... 21
Wartung und Pflege .......................................................................................................... 22
Wartungsrichtlinien ......................................................................................................22
Wartung und Pflege ..................................................................................................... 22
Fehlerbehebung .......................................................................................................... 27
Langfristige Lagerung (30 Tage und länger) ............................................................... 28
Technische Daten............................................................................................................. 29
Konformitätserklärung....................................................................................................... 30
Gewährleistungs- und Garantiebestimmungen für ECHO- Motorgeräte .......................... 31
3
Page 66

Sichere Verwendung des Produkts
Lesen Sie diesen Abschnitt unbedingt durch, bevor Sie das Produkt verwenden.
Sichere Verwendung des Produkts
Er enthält wichtige Informationen zum Thema Sicherheit. Befolgen Sie die Anweisungen sorgfältig.
Lesen Sie außerdem die Sicherheitshinweise im Hauptteil dieser Bedienungsanleitung.
In Textabschnitten, die mit einem [diamond mark]-Symbol beginnen, werden die möglichen Folgen einer Nichtbeachtung von
Sicherheitshinweisen beschrieben.
Warnhinweise
Auf Situationen, in denen eine Verletzungsgefahr für den Bediener und andere Personen besteht, wird in dieser Anleitung und auf
dem Produkt selbst durch die nachstehenden Warnhinweise aufmerksam gemacht. Lesen Sie diese Warnhinweise genau durch,
und befolgen Sie sie, um sicheres Arbeiten zu gewährleisten.
GEFAHR WARNUNG VORSICHT
Dieses Symbol in Verbindung mit
dem Wort „GEFAHR" macht auf
Handlungen oder Bedingungen
aufmerksam, die zu schweren
Verletzungen oder zum Tod von
Bediener und umstehenden
Personen führen.
Sonstige Kennzeichnungen
Zusätzlich zu den Warnhinweisen werden in dieser Anleitung folgende erklärende Symbole verwendet:
Dieses Symbol in Verbindung mit
dem Wort „WARNUNG" macht auf
Handlungen oder Bedingungen
aufmerksam, die zu schweren
Verletzungen oder zum Tod von
Bediener und umstehenden
Personen führen können.
„VORSICHT" warnt vor einer
Gefahrensituation, in der es zu
leichten bis mäßigen Verletzungen
kommen kann.
HINWEIS WICHTIG
Kreis mit umgekehrtem
Schrägstrich bedeutet,
dass das Dargestellte
unzulässig ist.
Symbole
In dieser Anleitung und auf dem Produkt selbst werden verschiedene erklärende Symbole verwendet. Vergewissern Sie sich, dass
Sie die Bedeutung der einzelnen Symbole genau verstehen.
Symbol Beschreibung des Symbols Symbol Beschreibung des Symbols
Bedienungsanleitung
sorgfältig durchlesen
Augen-, Gehör- und
Kopfschutz tragen
Hinweise dieser Art enthalten Tipps
zur Verwendung, Pflege und Wartung
des Produkts.
Umrahmter Text mit der Überschrift
„WICHTIG" enthält wichtige
Informationen zur Verwendung,
Überprüfung, Wartung und Lagerung
des in dieser Anleitung
beschriebenen Produkts.
Benzin- und Ölgemisch
Kraftstoffpumpe
Sicherheit/Alarm
NOTAUS
Vergaserjustierung –
Niederlastbetrieb
Vergaserjustierung –
Volllastbetrieb
4
Page 67

Sichere Verwendung des Produkts
Symbol Beschreibung des Symbols Symbol Beschreibung des Symbols
Abgetrennte Finger
Nicht in Räumen mit
schlechter Belüftung
verwenden
Achtung, Brandgefahr
Achtung, Stromschlag-Gefahr Leerlaufdrehzahl
Garantierter
Schallleistungspegel
Vergaserjustierung –
Leerlaufdrehzahl
Choke-Position bei Kaltstart
(Choke geschlossen)
Choke-Position bei Betrieb
(Choke geöffnet)
Hohe Drehzahl
Zündung EIN/AUS Achtung, heiße Bereiche
Motorstart
5
Page 68

Sichere Verwendung des Produkts
Stelle, an der sich der Sicherheitsaufkleber befindet
Das in dieser Anleitung beschriebene Produkt ist mit dem unten dargestellten Sicherheitsaufkleber versehen. Machen Sie sich
die Bedeutung des Sicherheitsaufklebers bewusst, bevor Sie das Produkt verwenden.
Falls der Sicherheitsaufkleber aufgrund von Verschleiß oder Beschädigung nicht mehr lesbar ist oder sich abgelöst hat,
erwerben Sie bitte einen neuen Sicherheitsaufkleber von Ihrem ECHO-Händler, und bringen Sie ihn an der nachstehend
gezeigten Stelle an. Der Sicherheitsaufkleber muss stets gut lesbar sein.
1. Sicherheitsaufkleber (Teilenummer X505002310)
2. Sicherheitsaufkleber (Teilenummer 89016009461)
6
Page 69

Sichere Verwendung des Produkts
Umgang mit Kraftstoff
GEFAHR
Beim Auftanken in sicherer Entfernung von Brandherden bleiben
Kraftstoff ist leicht entflammbar und kann bei falschem Umgang schnell in Brand geraten. Gehen Sie beim Mischen,
Lagern und Betanken mit äußerster Vorsicht vor. Andernfalls kann es zu schweren Brandverletzungen kommen.
Befolgen Sie sorgfältig die folgenden Anweisungen.
Beim Betanken auf keinen Fall rauchen oder Feuer in die Nähe bringen.
Niemals betanken, während der Motor heiß ist oder läuft.
Andernfalls könnte sich der Kraftstoff entzünden und zu Verbrennungen führen.
Behälter und Ort des Betankens
Verwenden Sie nur zugelassene Kraftstoffbehälter.
Kraftstofftanks und -kanister können unter Druck
stehen. Öffnen Sie Kraftstofftankdeckel immer
langsam, damit sich der Druck ausgleichen kann.
Befüllen Sie Kraftstofftanks NIEMALS in geschlossenen
Räumen. Befüllen Sie Kraftstofftanks IMMER im Freien
und auf sicherem Untergrund.
Verschütteter Kraftstoff ist feuergefährlich
Befolgen Sie beim Betanken folgende Sicherheitsregeln:
Füllen Sie den Tank nicht bis zur Einfüllöffnung auf.
Befüllen Sie den Tank nur bis zur vorgeschriebenen
Höhe (nur bis zum Ansatz des Einfüllstutzens).
Wischen Sie Kraftstoff, der aufgrund von Überfüllung
über- oder ausläuft, sofort auf.
Verschließen Sie den Kraftstofftankdeckel nach dem
Betanken wieder fest.
Verschütteter Kraftstoff kann sich entzünden und
Verbrennungen verursachen.
Motor nicht am Ort der Betankung starten
Der Motor darf nicht an dem Ort gestartet werden, an
dem die Betankung stattfand. Entfernen Sie sich
mindestens 3 m von der Stelle, an der die Betankung
erfolgte, bevor Sie den Motor starten.
Beim Betanken übergelaufener
Kraftstoff kann sich leicht
entzünden.
Ausgetretener Kraftstoff stellt
eine Brandgefahr dar
Achten Sie nach dem Betanken
stets darauf, dass aus der
Kraftstoffleitung, an den Kraftstoffdichtungen und rund
um den Kraftstofftankdeckel kein Kraftstoff austritt.
Sollten Sie feststellen, dass Kraftstoff austritt, stellen
Sie sofort die Verwendung des Produkts ein, und
wenden Sie sich an Ihren ECHO-Händler, um es
reparieren zu lassen.
Ausgetretener Kraftstoff stellt in jedem Fall eine
Brandgefahr dar.
1. Kraftstofftank
2. Ansatz des Einfüllstutzens
7
Page 70

Sichere Verwendung des Produkts
Umgang mit dem Motor
WARNUNG
Starten des Motors
Befolgen Sie beim Starten des Motors unbedingt die
folgenden Sicherheitsregeln:
Überprüfen Sie, ob alle Schrauben und Muttern fest
angezogen sind.
Vergewissern Sie sich, dass nirgendwo Kraftstoff
ausgetreten ist.
Starten Sie den Motor nicht mit dem Produkt auf dem
Rücken.
Platzieren Sie das Produkt an einem ebenen, gut
belüfteten Ort.
Sorgen Sie für ausreichenden Abstand rund um das
Produkt, und lassen Sie keine Personen oder Tiere in
die Nähe.
Entfernen Sie jegliche Hindernisse.
Starten Sie den Motor mit dem Gashebel in der Stellung
Start/Betrieb.
Halten Sie das Produkt beim Starten des Motors auf
dem Boden fest.
Eine Nichtbefolgung der Sicherheitsregeln kann zu
Unfällen, Verletzungen oder sogar zum Tod führen.
Nach dem Starten des Motors auf ungewöhnliche
Vibrationen oder Geräusche achten
Vergewissern Sie sich, dass nach dem Starten des
Motors keine ungewöhnlichen Vibrationen oder
Geräusche wahrzunehmen sind. Verwenden Sie das
Produkt nicht, wenn Sie ungewöhnliche Vibrationen
oder Geräusche feststellen. Wenden Sie sich an Ihren
ECHO-Händler, um es reparieren zu lassen.
Durch abfallende oder absplitternde Teile kann es zu
schweren Verletzungen kommen.
Während des Betriebs keine stark erhitzten oder
spannungsführenden Teile berühren.
Die folgenden stark erhitzten oder spannungsführenden
Teile des Produkts dürfen während des Betriebs und
einige Zeit danach nicht berührt werden:
Schalldämpfer, Zylinder und andere stark
erhitzte Teile
Berührungen solcher stark erhitzter Teile
können zu Verbrennungen führen.
Zündkerze, Zündkabel und andere
spannungsführende Teile
Sie könnten einen Stromschlag erleiden,
wenn Sie während des Betriebs ein
spannungsführendes Teil berühren.
Bei Feuer oder Rauch steht Sicherheit an erster
Stelle
Wenn Flammen aus dem Bereich des Motors kommen
oder Rauch aus einem anderen Teil als dem Auspuff
austritt, entfernen Sie sich zunächst von dem Produkt,
um Ihre eigene körperliche Sicherheit zu gewährleisten.
Werfen Sie mit einer Schaufel Sand oder
ähnliches Material auf das Feuer, um eine
Ausbreitung zu verhindern, oder löschen
Sie den Brand mit einem Feuerlöscher.
Eine Panikreaktion könnte zu einer
Ausbreitung des Feuers oder anderen Schäden führen.
Auspuffgase sind giftig
Die Auspuffgase des Motors enthalten giftige
Substanzen. Verwenden Sie das Produkt nicht in
geschlossenen Räumen, in Treibhäusern aus
Kunststoff oder an anderen schlecht belüfteten Orten.
Die Auspuffgase können zu Vergiftungen führen.
Schalten Sie den Motor ab, bevor Sie das Produkt
überprüfen oder warten
Beachten Sie die folgenden Sicherheitsregeln, wenn Sie
das Produkt nach der Verwendung überprüfen bzw.
warten:
Motor abschalten und Produkt erst überprüfen bzw.
warten, wenn der Motor abgekühlt ist
Andernfalls können Sie sich verbrennen.
Entfernen Sie den Zündkerzenstecker, bevor Sie
Überprüfungen und Wartungen durchführen.
Wenn das Produkt unerwarteterweise gestartet wird, kann
es zu Unfällen kommen.
Überprüfen der Zündkerze
Beachten Sie beim Überprüfen der Zündkerze die
folgenden Sicherheitsregeln:
Wenn die Elektroden oder Kontakte verschlissen sind
oder die Keramikteile Risse aufweisen, ersetzen Sie sie
durch neue Teile.
Die Funkenprüfung (zur Feststellung, ob die Zündkerze
einen Zündfunken wirft) muss von Fachpersonal
durchgeführt werden. Wenden Sie sich hierzu an Ihren
ECHO-Händler.
Die Funkenprüfung darf nicht in der Nähe der
Zündkerzenöffnung durchgeführt werden.
Die Funkenprüfung darf nicht an Orten durchgeführt
werden, an denen verschütteter Kraftstoff oder
entflammbare Gase vorhanden sind.
Die Metallteile der
Zündkerze dürfen nicht
berührt werden.
Die Zündkerze könnte ein
Feuer entzünden oder
Ihnen einen elektrischen
Schlag versetzen.
8
Page 71

Sichere Verwendung des Produkts
Umgang mit dem Produkt
Allgemeine Sicherheitsregeln
WARNUNG
Bedienungsanleitung
Lesen Sie die Bedienungsanleitung vor
der Inbetriebnahme des Produkts
aufmerksam durch, um eine korrekte
Bedienung zu gewährleisten.
Andernfalls kann es zu Unfällen
bzw.schweren Verletzungen kommen.
Produkt nur für den vorgesehenen Zweck
verwenden
Das Produkt darf nicht für andere als die in dieser
Bedienungsanleitung genannten Zwecke verwendet
werden.
Andernfalls kann es zu Unfällen bzw. schweren
Verletzungen kommen.
Keine Veränderungen am Produkt vornehmen
An dem Produkt dürfen keine Veränderungen
vorgenommen werden.
Andernfalls kann es zu Unfällen bzw. schweren
Verletzungen kommen. Funktionsfehler, die auf
Veränderungen am Produkt zurückzuführen sind, fallen
nicht unter die Herstellergarantie.
Verleihen oder Übereignen des Produkts
Wenn Sie das Produkt verleihen, muss die ausleihende
Person auch die zugehörige Bedienungsanleitung
erhalten.
Wenn Sie das Produkt einer anderen Person
übereignen, muss die Bedienungsanleitung zusammen
mit dem Produkt ausgehändigt werden.
Andernfalls kann es zu Unfällen bzw. schweren
Verletzungen kommen.
Vorsorge für den Fall von Verletzungen
Für den unwahrscheinlichen Fall, dass es dennoch zu
Verletzungen kommt, sollten Sie folgende Dinge
vorbereitet haben:
Verbandskasten
Hand- und Wischtücher (um etwaige Blutungen zu
stoppen)
Trillerpfeife oder Mobiltelefon (um Hilfe rufen zu
können)
Wenn Sie weder erste Hilfe leisten noch Hilfe rufen können,
kann sich die Verletzung verschlimmern.
Produkt nur verwenden, wenn es überprüft und
gewartet wurde
Das Produkt darf nur verwendet werden, wenn es
überprüft und gewartet wurde. Die Überprüfung und
Wartung des Produkts muss regelmäßig durchgeführt
werden.
Andernfalls kann es zu Unfällen bzw. schweren
Verletzungen kommen.
9
Page 72

Sichere Verwendung des Produkts
Sicherheitsregeln für die Benutzung
WARNUNG
Benutzer des Geräts
Das Gerät darf von folgenden Personen nicht verwendet
werden:
übermüdeten Personen
alkoholisierten Personen
unter Medikamenteneinfluss stehenden Personen
schwangeren Frauen
Personen in schlechter
körperlicher Verfassung
Personen, die die
Bedienungsanleitung nicht
gelesen haben
Kindern
Eine Nichtbefolgung dieser
Anweisungen kann zu Unfällen führen.
Motor beim Wechsel des Arbeitsorts abstellen
Wenn Sie das Produkt in den unten beschriebenen
Situationen umhertragen müssen, schalten Sie zuvor den
Motor aus und tragen Sie das Produkt auf dem Rücken.
Sie suchen Ihren Arbeitsbereich auf
Sie wechseln im Verlauf der Arbeit den Arbeitsbereich
Sie verlassen Ihren bisherigen Arbeitsbereich
Bei Nichtbeachtung dieser Sicherheitsregeln können
Verbrennungen oder andere schwere Verletzungen die
Folge sein.
Zum Transport des Produkts in Kraftfahrzeugen
entleeren Sie seinen Kraftstofftank, stellen Sie das
Produkt aufrecht ab und sichern Sie es ausreichend, so
dass es nicht verrutschen kann.
Ein Transport des Produkts mit befülltem Kraftstofftank stellt
eine Brandgefahr dar.
Arbeitsumgebung und Bedienung
Produkt nicht verwenden:
bei Regen, Donner, und/oder wenn Gewitter droht.
an steilen Abhängen oder auf rutschigem Untergrund
ohne ausreichenden Halt.
nachts oder bei schlechten Sichtverhältnissen.
Wenn Sie fallen oder ausrutschen oder das Gerät nicht
mehr voll beherrschen, kann dies zu schweren
Verletzungen führen.
Arbeiten mit dem Produkt
Achten Sie bei der Arbeit mit dem Produkt besonders auf
folgende Sicherheitsanweisungen:
Halten Sie Unbeteiligte und Tiere aus dem
Arbeitsbereich fern.
Richten Sie das Rohr nicht auf Menschen oder Tiere.
Arbeiten Sie nicht in Bereichen ohne ausreichenden
Halt.
Halten Sie das Produkt fest.
Arbeiten Sie nicht spät nachts oder früh morgens, da
sich Anwohner vom Geräusch gestört fühlen.
Bei Nichtbeachtung dieser Anweisungen kann es zu
Unfällen mit Verletzungsfolge kommen.
Vorsicht mit dem Gebläse!
Lassen Sie Ihre Haare nicht in das Gebläse gelangen!
Führen Sie bei der Arbeit mit dem Produkt niemals Ihre
Hand zwischen Motor und Rückenpolster.
Ihre Hand kann ins Gebläse gesaugt und schwer verletzt
werden.
Vibration und Kälte
Es wird vermutet, dass das Raynaud-Syndrom, das die
Finger mancher Menschen befällt, durch stark vibrierende
Arbeitsgeräte und dem Arbeiten bei Kälte herbeigeführt
wird. Durch stark vibrierende Arbeitsgeräte und dem
Arbeiten bei Kälte kann sich ein Prickeln und Brennen
bemerkbar machen, dem sich Farblosigkeit und
Gefühllosigkeit der Finger anschließen. Die nachstehend
aufgeführten Vorkehrungen werden dringend empfohlen,
da die Mindestwerte, bei denen diese Krankheit ausgelöst
wird, nicht bekannt sind.
Halten Sie Ihren Körper warm, insbesondere Kopf und
Nacken, Füße und Fußgelenke sowie Hände und
Handgelenke.
Legen Sie häufige Pausen ein, in deren Verlauf Sie den
Kreislauf durch intensive Armübungen anregen, und
rauchen Sie nicht.
Begrenzen Sie die Dauerbetriebszeiten auf ein
Minimum. Teilen Sie jeden Arbeitstag so ein, dass auch
Arbeiten ohne Bläser oder tragbare Motorgeräte
verrichtet werden.
Wenn Ihre Finger schmerzen, rot und angeschwollen
sind und schließlich bleich und gefühllos werden,
müssen Sie einen Arzt aufsuchen, bevor Sie sich
weiterhin Kälte und Vibrationen aussetzen.
Eine Nichtbefolgung dieser Anweisung kann zu
gesundheitlichen Schäden führen.
10
Page 73

Sichere Verwendung des Produkts
WARNUNG
RSI-Syndrom
Es wird angenommen, dass eine Überanstrengung der
Muskeln und Sehnen der Finger, Hände, Arme und
Schultern in den betreffenden Körperteilen Schmerzen,
Schwellungen, Gefühllosigkeit, Schwäche und auch
akuten Schmerz verursachen kann. Durch bestimmte
ständig wiederholte Handbewegungen steigt das Risiko
für die Entwicklung eines RSI-Syndroms. Auf folgende Art
mindern Sie das Risiko des RSI-Syndroms:
Achten Sie darauf, dass Sie Ihr Handgelenk nicht zu
sehr beugen, strecken oder verdrehen.
Legen Sie von Zeit zu Zeit Pausen ein, um wiederholte
Bewegungen zu minimieren, und lassen Sie Ihre Hände
ruhen. Reduzieren Sie die Geschwindigkeit und den
Kraftaufwand, mit denen Sie die
Wiederholungsbewegung ausführen.
Führen Sie geeignete Übungen zur Stärkung der Handund Armmuskulatur durch.
Suchen Sie einen Arzt auf, wenn Sie ein Prickeln,
Gefühllosigkeit oder Schmerzen in Ihren Fingern,
Händen, Handgelenken oder Armen bemerken. Je
früher das RSI-Syndrom erkannt wird, desto eher lässt
sich eine dauerhafte Schädigung von Nerven und
Muskeln verhindern.
Eine Nichtbefolgung dieser Anweisung kann zu
gesundheitlichen Schäden führen.
Motor bei Problemen sofort abstellen
Schalten Sie den Motor sofort aus, wenn das Produkt
plötzlich ungewohnte Geräusche erzeugt oder zu
vibrieren beginnt. Unter diesen Umständen darf das
Produkt nicht betrieben werden. Wenden Sie sich bei
anfallenden Reparaturen an Ihren ECHO-Händler.
Wenn beschädigte Teile weiter verwendet werden, kann
dies zu Unfällen bzw. schweren Verletzungen führen.
11
Page 74

Sichere Verwendung des Produkts
Schutzausrüstung
WARNUNG
Schutzausrüstung tragen
Tragen Sie bei Arbeiten mit dem Bläser angemessene
Arbeitskleidung und eine Schutzausrüstung. Tragen
Sie bei der Arbeit vor allem stets eine Schutzbrille, eine
Staubschutzmaske und Gehörschutzbügel.
Ohne Schutzausrüstung besteht die Gefahr, dass
aufgewirbelte Schmutzpartikel in Atemwege oder Augen
gelangen, was zu Unfällen und Verletzungen führen kann.
a Kopfschutz (Helm): schützt den Kopf
b Gehörschutzbügel oder Ohrenstöpsel: schützen das
Gehör
c Schutzbrille: schützt die Augen
d Staubschutzmaske
e Sicherheitshandschuhe: schützen die Hände vor Kälte
und Vibration
f Eng anliegende Arbeitskleidung (lange Ärmel, lange
Hosen): schützt den Körper
g Robuste, rutschfeste Stiefel (mit Schutzkappe) oder
rutschfeste Schuhe (mit Schutzkappe): schützen die
Füße
Bei Nichtbeachtung dieser Sicherheitsvorkehrungen sind Ihr
Augenlicht und Ihr Gehör gefährdet, und es drohen sonstige
schwere Verletzungen.
Geeignete Schutzkleidung tragen
Tragen Sie keine Krawatten, Schmuckstücke oder lose, weite
Kleidungsstücke, die sich im Gerät verfangen könnten. Tragen Sie keine
Schuhe mit freien Zehen, und arbeiten Sie nicht barfuß oder in kurzen Hosen.
In bestimmten Situationen kann ein Gesichts- und Kopf-Rundumschutz
erforderlich sein.
Bei Nichtbeachtung dieser Sicherheitsvorkehrungen sind Ihr Augenlicht und Ihr
Gehör gefährdet, und es drohen sonstige schwere Verletzungen.
12
Page 75

Packliste
Die nachfolgend aufgeführten Einzelteile sind in der Verpackung enthalten.
Überprüfen Sie nach dem Auspacken die Vollständigkeit des Inhalts.
Wenden Sie sich an Ihren ECHO-Händler, wenn Teile fehlen oder beschädigt sind.
Nummer Bezeichnung des Teils Menge Nummer Bezeichnung des Teils Menge
(1) Motoreinheit 1 (6) Klemmen mit Schrauben 2
(2) Biegsames Rohr 1 (7) Führungsschlaufe 1
(3) Drehrohr 1 (8) Ansaugabdeckung 1
(4) Gerades Rohr 1 (9) T-Schlüssel 1
(5) Gerades Rohr 1 (10) Bedienungsanleitung 1
Packliste
13
Page 76

Beschreibung
Beschreibung
1. Zündkerze Erzeugt den für die Zündung des
Kraftstoffgemischs erforderlichen Funken.
2. Funkenschutz - Katalysatordämpfer/Schalldämpfer
Der Katalysatordämpfer/Schalldämpfer senkt die
Geräuschentwicklung und den Schadstoffausstoß. Der
Funkenschutz verhindert, dass glühende
Kohlenstoffpartikel aus dem Schalldämpfer austreten.
Halten Sie den Auspuffbereich frei von brennbarem
Material.
3. Seriennummernschild Gibt Auskunft über Modell- und
Seriennummer des Geräts.
4. Startergriff Ziehen Sie zunächst langsam am Griff des
Reversierstarters, bis der Reversierstarter einrastet,
und ziehen Sie dann schneller und mit größerer Kraft
weiter. Lassen Sie den Reversierstarter los, sobald der
Motor läuft. Lassen Sie den Reversierstarter NICHT frei
zurückschnellen. Ansonsten können Schäden am Gerät
entstehen.
5. Luftfilter Enthält ein austauschbares Luftfilterelement.
6. Choke Der Choke befindet sich seitlich am Luftfilter.
Rücken Sie den Chokehebel in die Stellung , um
den Choke beim Kaltstart zu schließen. Rücken Sie den
Chokehebel in die Stellung , um den Choke zu
öffnen.
7. Kraftstoffpumpe Durch Betätigen der Kraftstoffpumpe
vor dem Starten des Motors wird frischer Kraftstoff aus
dem Tank gesaugt und die Luft aus dem Vergaser
gelassen. Betätigen Sie die Kraftstoffpumpe, bis
Kraftstoff sichtbar ist. Betätigen Sie die Kraftstoffpumpe
4 bis 5 weitere Male.
8. Kraftstofftank Enthält Kraftstoff und Kraftstofffilter.
9. Kraftstofftankdeckel Verschließt den Kraftstofftank.
10. Schultergurt Hält das Gerät auf dem Rücken des
Bedieners. Die Riemen sind einstellbar.
11. Griff Dient dem Bediener zum Ausrichten des
Luftstroms.
12. Kombinationsschalter für Gashebel/Aus-Schalter
Steuert die Drehzahl und schaltet die Zündung ein und
aus. Vorwärts-Stellung – STOP Erste Stellung –
LEERLAUF Bewegen Sie den Schalter nach hinten, um
zu beschleunigen, und nach vorne, um die
Geschwindigkeit zu verringern. Mithilfe des
Gashebelschalters können Sie die Geschwindigkeit des
Bläsers bei Dauerbetrieb einstellen.
13. Gashebel Steuert die Motorgeschwindigkeit durch
Federkraft. Wenn Sie den Hebel loslassen, wird die
Motorgeschwindigkeit zurückgesetzt auf die, die über
den Kombinationsschalter für Gashebel/Aus-Schalter
eingestellt wurde. Lassen Sie immer den Hebel los, und
warten Sie, bis der Motor sich im Leerlauf befindet,
bevor Sie ihn mit dem Kombinationsschalter für
Gashebel/Aus-Schalter ausschalten. Passen Sie bei
Intervallbetrieb die Bläsergeschwindigkeit mithilfe des
Gashebels an.
14. Arretierungsknopf Ermöglicht dem Benutzer die
Anpassung der Griffposition für maximale Sicherheit
und Bequemlichkeit.
15. Rohre Exklusive, kraftschlüssige Steckverbindungen.
16. Biegsames Rohr Ermöglicht Bewegung in alle
Richtungen.
14
Page 77

Bevor Sie beginnen
Bevor Sie beginnen
Zusammenbau
WARNUNG
Lesen Sie die Bedienungsanleitung aufmerksam durch, um sicherzustellen, dass Sie das Produkt
korrekt zusammenbauen.
Führen Sie bei laufendem Motor niemals Wartungs- oder Einbauarbeiten durch.
Die Verwendung eines falsch zusammengebauten Produkts kann zu Unfällen bzw. schweren Verletzungen
führen.
Montage der Rohre
1. Führen Sie die Führungsschlaufe über die Klemme des
Bogenstücks, und drehen Sie sie, bis die Klemme das Band
vollständig umschließt.
2. Bringen Sie die Klemmen an beiden Enden des biegsamen
Rohrs an.
HINWEIS
1. Führungsschlaufe
3. Biegsames Rohr
2. Zwei Klemmen
4. Drehrohr
Die Klemme mit der Kabelführungsschlaufe passt auf das
Bogenstückende des biegsamen Rohrs.
1. Griff
3. Drehrohr
5. Leitfähiger Draht
2. Knopf
4. Schelle
6. Bogenstück
3. Verbinden Sie das Drehrohr mit dem biegsamen Rohr und
ziehen Sie die Klemme fest.
4. Lösen Sie den Knopf am Griff. Richten Sie die Kerbe am
Griff an den Passfedern aus. Montieren Sie ihn auf dem
Drehrohr entlang der Erhöhungen.
5. Führen Sie den leitfähigen Draht durch das biegsame Rohr.
6. Verbinden Sie das biegsame Rohr mit dem Bogenstück am
Bläser. Bringen Sie die Führungsschlaufe an der
Außenseite des biegsamen Rohrs (gegenüber des Bläsers)
an, und ziehen Sie die Klemme fest.
HINWEIS
Ein sanftes Schmiermittel kann dabei helfen, das biegsame
Rohr mit dem Bogenstück zu verbinden.
HINWEIS
Lassen Sie den Griff vor der Montage lose vom Bläser hängen,
um sicherzustellen, dass der Gaszug nicht verdreht ist.
7. Befestigen Sie den Gaszug in der Führungsschlaufe für den
Gaszug.
8. Bringen Sie den Griff in eine für Sie bequeme Position, und
drehen Sie den Knopf fest.
1. Gaszug
3. Knopf
2. Führungsschlaufe
9. Verbinden Sie das gerade Rohr mit dem Drehrohr, bis Sie
einen leichten Widerstand spüren. Wenden Sie keine
Gewalt an! Halten Sie das Drehrohr fest, und drehen Sie das
gerade Rohr entgegen dem Uhrzeigersinn; lassen Sie die
Verbindung einrasten. Wenden Sie keine Gewalt an!
10. Schieben Sie das gerade Rohr mit dem Aufkleber wie in
Schritt 9 beschrieben auf das bereits montierte gerade Rohr.
15
Page 78

Bevor Sie beginnen
HINWEIS
Durch die Verwendung des Bläsers lockern sich die
Verbindungen mit der Zeit. Die exklusive, formschlüssige
Verbindung hält die Rohre fest zusammen. Sollten sich die
Verbindungen lösen, bauen Sie zwei gerade Rohre aus und
wie in Schritt 9 und 10 wieder ein.
1. Drehrohr
3. Gerades Rohr
Bereitstellen des Kraftstoffs
Kraftstoff ist leicht entflammbar und kann bei falschem Umgang schnell in Brand geraten.
Lesen und befolgen Sie die Sicherheitsanweisungen im Abschnitt „Sichere Verwendung
des Produkts" in dieser Bedienungsanleitung.
Schrauben Sie den Tankdeckel fest zu, nachdem Sie den Tank mit Kraftstoff befüllt haben,
und stellen Sie sicher, dass aus der Kraftstoffleitung, an den Dichtungen und im Bereich
des Tankdeckels kein Kraftstoff austritt. Sollten Sie feststellen, dass Kraftstoff austritt,
stellen Sie sofort die Verwendung des Produkts ein, und wenden Sie sich an Ihren ECHOHändler, um es reparieren zu lassen.
Eine Entzündung des Kraftstoffs kann zu Verbrennungen und Bränden führen.
2. Gerades Rohr
GEFAHR
VORSICHT
Im Kraftstofftank und in der Umgebungsluft herrschen unterschiedliche Drücke. Lösen Sie deshalb zum Betanken den
Tankdeckel zunächst nur leicht, um die Druckdifferenz auszugleichen.
Andernfalls kann es vorkommen, dass Kraftstoff herausspritzt.
HINWEIS
Gelagerter Kraftstoff altert. Mischen Sie nicht mehr Kraftstoff an, als Sie voraussichtlich innerhalb der nächsten dreißig (30) Tage
verbrauchen werden. Mischen Sie den Kraftstoff nicht direkt im Kraftstofftank.
Kraftstoff
Der Kraftstoff ist ein Gemisch aus Normalbenzin und
hochwertigem Markenöl für luftgekühlte Zweitaktmotoren.
Verwenden Sie bleifreies Benzin mit mindestens 89 Oktan.
Verwenden Sie keinen Kraftstoff mit Methylalkohol oder mehr
als 10 % Ethylalkohol.
Empfohlenes Mischverhältnis: 50 : 1 (2%) Öl nach ISO-L-
EGD Standard (ISO/CD 13738), JASO FC, FD und ECHO
Premium 50: 1 Öl.
- Mischen Sie den Kraftstoff nicht direkt im MotorKraftstofftank.
- Achten Sie darauf, dass kein Benzin oder Öl verschüttet
wird. Wischen Sie verschütteten Kraftstoff stets auf.
- Gehen Sie mit Benzin vorsichtig um. Es ist äußerst leicht
entzündlich.
- Lagern Sie Benzin nur in zugelassenen Behältern.
16
Page 79

Kraftstoffversorgung
1. Kraftstofftank 2. Ansatz des
Einfüllstutzens
Bevor Sie beginnen
Führen Sie die Betankung nur an gut belüfteten Orten durch.
Füllen Sie Kraftstoff niemals in Innenräumen ein oder um.
Platzieren Sie das Produkt und den Befüllungskanister
während des Betankens auf dem Boden. Führen Sie die
Betankung nicht auf der Ladefläche von Lkws oder an
ähnlichen Orten durch.
Achten Sie beim Betanken stets darauf, dass der Füllstand
den Ansatz des Einfüllstutzens nicht übersteigt.
Im Kraftstofftank und in der Umgebungsluft herrschen
unterschiedliche Drücke. Lösen Sie deshalb zum Betanken
den Tankdeckel zunächst nur leicht, um die Druckdifferenz
auszugleichen.
Wischen Sie verschütteten Kraftstoff sofort auf.
Bevor Sie den Motor starten, entfernen Sie sich mindestens
3 m von der Stelle, an der die Betankung durchgeführt wurde.
Bewahren Sie den Befüllungskanister an einem schattigen Ort
in weiter Entfernung von Brandquellen auf.
17
Page 80

Bedienung des Motors
Bedienung des Motors
Starten des Motors
WARNUNG
Beachten Sie beim Starten des Motors die Sicherheitsanweisungen ab Seite 4 im Abschnitt „Sichere Verwendung
des Produkts", um eine einwandfreie Bedienung des Geräts sicherzustellen.
Eine Nichtbefolgung der Sicherheitsregeln kann zu Unfällen, Verletzungen oder sogar zum Tod führen.
HINWEIS
Ziehen Sie den Startergriff zuerst langsam und dann allmählich schneller heraus. Ziehen Sie das Starterseil höchstens auf 2/
3 seiner Länge heraus.
Lassen Sie den Startergriff beim Zurückschnellen nicht los.
Stellen Sie den Chokeknopf zum Starten des Motors zurück, sobald Sie das erste explosionsartige Geräusch hören, und
ziehen Sie erneut am Startergriff. Achten Sie aufmerksam auf das erste explosionsartige Geräusch.
Starten eines kalten Motors
Reversierstarter: Nur kurz ziehen: ca. 1/2 bis 2/3 der
Seillänge zum Starten Führen Sie das Seil langsam in seine
Ausgangsposition zurück und halten Sie das Gerät dabei stets
fest.
1. Kombinationsschalter
für Gashebel/AusSchalter
1. Choke 2. Kraftstoffpumpe
1. Kombinationsschalter für Gashebel/Aus-Schalter
Bringen Sie den Kombinationsschalter für Gashebel/AusSchalter zurück in die Leerlaufstellung (erste Stellung nach
der Stop-Stellung).
2. Choke
Bringen Sie den Chokehebel in die Stellung „ ".
3. Kraftstoffpumpe
Betätigen Sie die Kraftstoffpumpe, bis Kraftstoff sichtbar ist.
4. Reversierstarter
Ziehen Sie das Starterseil am Startergriff, bis der Motor
zündet (max. 5 Mal ziehen).
5. Choke
Bringen Sie den Chokehebel in die Stellung „ ", und starten
Sie den Motor bei Bedarf neu.
1. Griff des
Reversierstarters
HINWEIS
Wenn der Motor nach 5-maligem Ziehen nicht zündet,
wiederholen Sie die Schritte 2 bis 5.
HINWEIS
Lassen Sie den Motor zunächst warmlaufen.
18
Page 81

Warmlaufen des Motors
Starten eines warmen Motors
1. Kombinationsschalter
für Gashebel/AusSchalter
Bedienung des Motors
1. Sobald der Motor läuft, lassen Sie ihn 2 bis 3 Minuten im
Leerlauf (niedrige Drehzahl) warmlaufen.
2. Das Warmlaufen des Motors sorgt für eine gleichmäßigere
Schmierung im Inneren. Lassen Sie den Motor vollständig
warmlaufen, insbesondere bei Kälte.
3. Lassen Sie das Gerät niemals ohne montiertes Rohr laufen.
Gehen Sie wie beim Kaltstart vor, aber schließen Sie NICHT
den Choke.
1. Kombinationsschalter für Gashebel/Aus-Schalter
Bringen Sie den Kombinationsschalter für Gashebel/AusSchalter zurück in die Leerlaufstellung (erste Stellung nach
der Stop-Stellung).
1. Kraftstoffpumpe
2. Kraftstoffpumpe
Betätigen Sie die Kraftstoffpumpe, bis Kraftstoff sichtbar ist.
3. Reversierstarter
Ziehen Sie das Startseil am Startergriff, um den Motor zu
starten.
HINWEIS
Wenn der Motor nach 5-maligem Ziehen nicht zündet, gehen
Sie vor wie beim Kaltstart.
1. Griff des
Reversierstarters
19
Page 82

Bedienung des Motors
Stoppen des Motors
1. Kombinationsschalter für Gashebel/Aus-Schalter
Lassen Sie den Gashebel los. Bringen Sie den
Kombinationsschalter für Gashebel/Aus-Schalter zurück in
die Leerlaufstellung (erste Stellung nach der Stop-Stellung),
und warten Sie, bis der Motor sich im Leerlauf befindet, bevor
Sie ihn ausschalten.
2. Kombinationsschalter für Gashebel/Aus-Schalter
Bringen Sie den Kombinationsschalter für Gashebel/AusSchalter ganz nach vorn in die Stellung „ " (Stop).
1. Kombinationsschalter
für Gashebel/AusSchalter
WARNUNG
Sollte der Motor weiter laufen, obwohl der
Kombinationsschalter für Gashebel/Aus-Schalter auf
„STOP" steht, schließen Sie den Choke – Stellung –,
um den Motor auszuschalten. Lassen Sie den AusSchalter bei Ihrem ECHO-Händler reparieren, bevor Sie
das Produkt erneut verwenden.
20
Page 83

Betrieb
Betrieb
Betrieb des Bläsers
WARNUNG
Zur Vermeidung schwerer Verletzungen sollten Sie immer eine Schutzbrille, Gehörschutz und eine Gesichtsfiltermaske
tragen und alle gebotenen Sicherheitsmaßnahmen einhalten. Richten Sie das Rohr nicht auf Menschen oder Tiere.
WICHTIG
Um Motorschäden durch zu hohe Drehzahlen zu verhindern, halten Sie das Rohr stets frei.
HINWEIS
Stellen Sie die Drehzahl nie höher ein als notwendig. Je höher die Motordrehzahl, desto größer die Geräuschentwicklung.
Minimieren Sie die Staubentwicklung gegebenenfalls durch niedrige Drehzahlen und Befeuchten des Materials. Achten Sie
darauf, dass Schmutz auf Ihrem Grundstück bleibt. Nehmen Sie Rücksicht auf Ihre Nachbarn.
Lesen Sie den Abschnitt „Sicherheit" sorgfältig durch.
1. Arbeiten Sie stets zu angemessener Tageszeit.
2. Lassen Sie den Motor im Leerlauf eine Weile warmlaufen.
3. Regeln Sie die Motordrehzahl mithilfe des Gashebels, oder
stellen Sie die Motordrehzahl für Dauerbetrieb mithilfe des
Kombinationsschalters für Gashebel/Aus-Schalter ein.
4. Blasen Sie trockenes Gras und Laub auf Wegen, in
Innenhöfen und Auffahrten mit niedriger Drehzahl
zusammen.
5. Zum Entfernen von feuchtem Laub von Rasenflächen oder
1. Kombinationsschalter
für Gashebel/AusSchalter
2. Gashebel
aus Blumenbeeten sind meist etwas höhere Drehzahlen
erforderlich.
6. Bei Kies, Schmutz, Schnee, Flaschen oder Dosen auf
Auffahrten, Straßen, Parkplätzen oder im Umfeld von
Stadien müssen höhere Drehzahlen eingestellt werden.
7. Halten Sie das Gerät immer durch Anhalten des Motors an.
Betrieb bei Kälte
1. Rückwandpolsterung
1. Ansaugabdeckung
Montieren Sie die Ansaugabdeckung, sobald es Ihnen am
Rücken kalt wird.
1. Nehmen Sie die Rückwandpolsterung vom Gehäuse ab.
2. Bringen Sie die Ansaugabdeckung am Rahmen über dem
Lufteinlass an.
3. Montieren Sie die Rückwandposterung wieder am Rahmen
über der Abdeckung.
HINWEIS
Möglicherweise reduziert sich die Leistung des Bläsers ein
wenig.
21
Page 84

Wartung und Pflege
Wartung und Pflege
Wartungsrichtlinien
Komponente WARTUNG Seite Vor der Verwendung Monatlich
Luftfilter Überprüfen / reinigen / ersetzen 22 •
Kraftstofffilter Überprüfen / ersetzen 23 •
Zündkerze Überprüfen / reinigen / justieren /
ersetzen
Vergaser Überprüfen 23 •
Kühlsystem Überprüfen / reinigen 24 •
Abgasanlage Überprüfen / festziehen / reinigen 25 •
Anlasser Überprüfen - •
Kraftstoffsystem Überprüfen - •
Schrauben, Bolzen und
Muttern
Überprüfen/festziehen/ersetzen - •
25 •
WICHTIG
Angegeben sind die maximalen Zeitabstände. Die Häufigkeit der erforderlichen Wartungsarbeiten richtet sich nach der
tatsächlichen Beanspruchung und Ihrer Erfahrung.
Wartung und Pflege
Bei Fragen oder Problemen wenden Sie sich bitte an Ihren ECHO-Händler.
Reinigen des Luftfilters
1. Luftfilterabdeckung
3. Laubsieb
Erf. Werkzeuge: Reinigungsbürste (25-50 mm)
Erforderliche Teile: Luftfilter
1. Bringen Sie den Chokehebel in die Stellung „ ". So kann
bei ausgebautem Luftfilter kein Schmutz in den Vergaser
dringen. Befreien Sie den Luftfilter mit der Bürste von
Schmutzansammlungen.
2. Bauen Sie die Luftfilterabdeckung aus. Bürsten Sie den
Schmutz im Inneren der Abdeckung ab.
3. Bauen Sie den Luftfilter und das Laubsieb aus. Befreien Sie
diese vorsichtig mit einer Bürste von Ablagerungen.
Ersetzen Sie den Filter, wenn er beschädigt, stark
verschmutzt oder von Kraftstoff durchtränkt ist oder wenn
die Gummidichtlippen verformt sind.
4. Wenn der Filter wieder verwendet werden kann, muss er:
genau in den Filtereinsatz passen.
mit der richtigen Seite nach außen eingebaut werden.
5. Bauen Sie die Luftfilterabdeckung ein.
2. Luftfilter
22
Page 85

Auswechseln des Kraftstofffilters
Wartung und Pflege
Erford. Werkzeuge: 200-250 mm langer Draht (ein Ende zu
einem Haken gebogen), Reinigungslappen, Trichter,
zulässiger Kraftstoffbehälter
Erforderliche Teile: Kraftstoffleitung und -filter
GEFAHR
Kraftstoff ist HOCH entzündlich! Gehen Sie auch beim
Mischen und Lagern von Kraftstoff sehr sorgfältig vor.
HINWEIS
Ersetzen Sie den Filter, wenn er stark verschmutzt oder
beschädigt ist.
1. Tankdeckel
3. Kraftstoffleitung
5. Kraftstofftank
Justieren des Vergasers
2. Kraftstofffilter
4. Haken für die
Kraftstoffleitung
1. Entfernen Sie mit einem Lappen oberflächlichen Schmutz im
Bereich des Tankdeckels, und entleeren Sie den Tank.
2. Ziehen Sie Kraftstoffleitung und Filter mit dem Haken vom
Tank.
3. Trennen Sie den Filter von der Leitung, und bauen Sie den
neuen Filter ein.
Erf. Werkzeuge: Schraubendreher, Drehzahlmesser (EchoTeilenr. 99051130017)
Erforderliche Teile: Keine
HINWEIS
Jedes Gerät wird im Werk getestet, und der Vergaser wird nach
den jeweiligen Vorschriften für den Schadstoffausstoß
eingestellt. Dieser Vergaser hat keine Stellnadeln für
Beschleunigung oder hohe Drehzahlen. Nehmen Sie am
Vergaser keine Einstellungen nach den Angaben im
Garantieschein für den Schadstoffausstoß vor.
1. Schraube
Vor dem Einstellen
Prüfen Sie:
ob der Luftfilter sauber und richtig eingebaut ist.
ob das Funkenschutzsieb und der Schalldämpfer frei von
Kohlenstoff sind.
ob die Rohre angebaut sind.
1. Starten Sie den Motor und lassen Sie ihn eine Minute lang
warmlaufen.
2. Beenden Sie das Warmlaufen, indem Sie den Motor
5 Sekunden lang auf voller Drehzahl laufen lassen und den
Choke dabei zweimal betätigen, um die Luft aus den
23
Page 86

Wartung und Pflege
Vergaserkammern zu lassen.
3. Prüfen Sie die Leerlaufdrehzahl und stellen Sie sie ggf. ein.
Wenn Sie einen Drehzahlmesser haben, stellen Sie die
Leerlaufanschlagschraube nach den Angaben auf Seite
29"Technische Daten" dieser Anleitung ein. Drehen Sie die
Leerlaufanschlagschraube im Uhrzeigersinn, um die
Leerlaufdrehzahl zu erhöhen oder gegen den Uhrzeigersinn,
um sie zu verringern.
Wartung des Kühlsystems
WICHTIG
Um die richtige Motorbetriebstemperatur aufrechtzuerhalten, muss die Kühlluft ungehindert den Zylinderrippenbereich
durchströmen können. Durch diesen Luftstrom wird die Verbrennungswärme vom Motor abgeführt. Unter folgenden Umständen
kann es zu Überhitzung und Kolbenfressern im Motor kommen:
Die Luftzufuhröffnungen sind verstopft. Dadurch gelangt keine Kühlluft zum Zylinder;
oder
Staub und Gras haben sich außen am Zylinder angesammelt. Durch diese Ansammlung wird der Motor isoliert, und die
Wärme kann nicht mehr abgegeben werden.
Das Beheben von Verstopfungen von Kühlluft-Durchgängen bzw. die Reinigung der Zylinderrippen gelten als normale
Wartungsarbeiten. Störungen auf Grund mangelhafter Wartung und Pflege fallen nicht unter die Garantie.
1. Luftzufuhröffnung
Erford. Werkzeuge: Torx-L-Schlüssel T27, Reinigungsbürste
Erforderliche Teile: Keine, wenn Sie sorgfältig arbeiten.
Reinigung von Grill und Kühlrippen
1. Entfernen Sie Schmutzansammlungen vom Ansauggrill
zwischen Rückenpolster und Bläsergehäuse.
2. Trennen Sie das Zündkabel von der Zündkerze.
3. Bauen Sie die Luftfilterabdeckung aus.
4. Bauen Sie die Motorabdeckung aus (10 Schrauben).
5. Reinigen Sie die Kühlrippen des Zylinders, damit die Kühlluft
ungehindert strömen kann.
6. Bauen Sie die Teile in umgekehrter Reihenfolge wieder ein.
WICHTIG
Ziehen Sie die Schrauben nicht zu fest an, um die Gewinde zu
schonen.
1. Zündkerze 2. Zylinderrippen
24
Page 87

Abgasanlage
1. Funkenschutzsieb
3. Siebdeckel
2. Dichtung
Wartung und Pflege
Funkenschutzsieb
Erf. Werkzeuge: Torx-L-Schlüssel T27, Weiche Metallbürste
Erforderliche Teile: Funkenschutzsieb, Dichtung
WICHTIG
Kohlenstoffablagerungen im Schalldämpfer verringern die
Motorleistung und führen zu Überhitzung. Der Funkenschutz
muss regelmäßig geprüft werden.
1. Trennen Sie das Zündkabel von der Zündkerze.
2. Bauen Sie Abgasdeflektor, Dichtung und Funkenschutzsieb
aus dem Schalldämpfer aus. Ersetzen Sie das Sieb, wenn
es verstopft ist.
3. Bauen Sie das Sieb des Funkenschutzes, die Dichtungen
und die Abdeckungen wieder ein.
4. Schließen Sie das Zündkabel wieder an.
1. Schalldämpfer 2. Dichtung
Überprüfen der Zündkerze
Schalldämpfer und Auspuffkanal
Erf. Werkzeuge: Torx-L-Schlüssel T27, Holz- oder
Plastikspachtel
Erforderliche Teile: Dichtung
WICHTIG
Kohlenstoffablagerungen im Schalldämpfer verringern die
Motorleistung und führen zu Überhitzung. Der Auspuffkanal
des Schalldämpfers muss regelmäßig überprüft werden.
Achten Sie darauf, beim Reinigen des Auspuffkanals nicht den
Zylinder oder Kolben zu verkratzen.
1. Trennen Sie das Zündkabel von der Zündkerze.
2. Bauen Sie die Motorabdeckung aus (10 Schrauben).
3. Bauen Sie den Schalldämpfer und die Dichtung aus.
4. Reinigen Sie den Auspuffkanal mit einem Spachtel aus Holz
oder Plastik, ohne dabei den Zylinder oder Kolben zu
verkratzen.
5. Bauen Sie Schalldämpfer und Dichtung wieder ein.
6. Bauen Sie die Motorabdeckung ein.
Erford. Werkzeuge: T-Schlüssel, Fühlerlehre
Erforderliche Teile: Zündkerze
25
Page 88

Wartung und Pflege
a: 0,6 - 0,7 mm
WICHTIG
Verwenden Sie ausschließlich eine Zündkerze vom Typ
NGK BPMR8Y, ansonsten kann es zu schweren
Motorschäden kommen.
1. Prüfen Sie den Elektrodenabstand. Der korrekte Abstand
beträgt 0,6 bis 0,7 mm.
2. Prüfen Sie die Elektrode auf Verschleiß.
3. Prüfen Sie den Isolierkörper auf Öl- oder andere
Ablagerungen.
4. Ersetzen Sie die Zündkerze ggf. durch eine neue, und
ziehen Sie sie mit 15 Nm - 17 Nm (150 kgf·cm - 170 kgf·cm)
fest.
26
Page 89

Wartung und Pflege
Fehlerbehebung
Problem Diagnose Ursache Lösung
Motor lässt
sich schwer
starten,
Drehzahl
schwankt
oder
Der Motor
lässt sich nicht
starten.
In das Überlaufrohr tritt
kein Kraftstoff ein.
Kraftstoff tritt in das
Überlaufrohr ein
Die Kurbelwelle dreht nicht. Interner Defekt des Motors. ECHO-Händler um Rat
Kraftstofffilter ist verstopft
Kraftstoffsystem ist verstopft
Innere Vergaserteile sind verklebt
Kraftstoffalterung
Vergaserstörung
Reinigen oder ersetzen
Reinigen
ECHO-Händler um Rat
fragen
Kraftstoff durch neuen
ersetzen
ECHO-Händler um Rat
fragen
fragen
Die Zündkerze ist
verschmutzt oder feucht.
Motor springt
an, Drehzahl
lässt sich
jedoch nicht
erhöhen.
Für Überprüfung und Wartung sind entsprechende Fachkenntnisse erforderlich. Wenn Sie das Produkt nicht selbst
überprüfen, warten oder instand setzen können, wenden Sie sich an Ihren ECHO-Händler. Versuchen Sie nicht, das Gerät
zu zerlegen.
Bei Problemen oder Störungen, die nicht in der obigen Tabelle genannt werden, wenden Sie sich an Ihren ECHO-Händler.
Verwenden Sie nur Original-Ersatzteile und -Verbrauchsprodukte, die für das Gerät zugelassen sind. Die Verwendung von
Teilen anderer Hersteller oder nicht zugelassener Produkte kann zu Fehlfunktionen führen.
Kraftstoffalterung
Falscher Elektrodenabstand
Kohlenstoffablagerungen
Elektrischer Defekt
Verschmutzter Luftfilter
Verschmutzter Kraftstofffilter
Verstopfte Kraftstoffleitung
Falsch justierter Vergaser.
Zündkerzenproblem
Verstopfte Auspuff- oder
Schalldämpferöffnung
Funkenschutzsieb verstopft oder
abgenutzt
Kraftstoff durch neuen
ersetzen
Einstellen oder
ersetzen
Reinigen oder ersetzen
ECHO-Händler um Rat
fragen
Reinigen oder ersetzen
Reinigen oder ersetzen
ECHO-Händler um Rat
fragen
ECHO-Händler um Rat
fragen
Reinigen, einstellen
oder ersetzen
Reinigen
Reinigen oder ersetzen
27
Page 90

Wartung und Pflege
Langfristige Lagerung (30 Tage und länger)
WARNUNG
Beim Betrieb erwärmen sich Schalldämpfer/Katalysator und Abdeckung stark. Halten Sie den Auspuff bei
Transport oder Lagerung stets frei von brennbarem Schmutz, um Personen- und Sachschaden zu
vermeiden.
Lagern Sie das Gerät länger als 30 Tage, müssen Sie gewisse Vorkehrungen treffen. Gehen Sie wie folgt vor:
1. Lagern Sie das Gerät trocken, staubfrei und für Kinder
unzugänglich.
WARNUNG
Lagern Sie es nicht dort, wo Kraftstoffdämpfe sich
sammeln oder an offene Funken geraten können.
2. Bringen Sie Kombinationsschalter für Gashebel/AusSchalter in die Stellung „ " (Stop).
3. Entfernen Sie Ansammlungen von Schmierfett, Öl, Schmutz
und Fremdkörpern vom Gerät.
4. Schmieren Sie das Gerät regelmäßig nach dem
Wartungsplan.
5. Ziehen Sie alle Schrauben und Muttern fest.
6. Leeren Sie den Kraftstofftank vollständig und ziehen Sie
mehrmals am Reversierstarter, um den Vergaser vom
Kraftstoff zu befreien.
7. Bauen Sie die Zündkerze aus, und gießen Sie 10 ml neues
1. Kombinationsschalter
für Gashebel/AusSchalter
ECHO-Zweitakt-Motoröl durch die Kerzenbohrung in den
Zylinder.
A. Legen Sie ein sauberes Tuch über die Kerzenbohrung.
B. Ziehen Sie 2 bis 3 Mal am Griff des Reversierstarters,
um das Motoröl im Zylinder zu verteilen
C. Beobachten Sie die Lage des Kolbens durch die
Zündkerzenöffnung. Ziehen Sie am Griff des
Reversierstarters, bis der Kolben den oberen Totpunkt
erreicht, und lassen Sie ihn in dieser Stellung.
8. Bauen Sie die Zündkerze ein (schließen Sie den
Zündkerzenstecker nicht an. )
9. Gebläserohr komplett vom Gerät abnehmen.
1. Zündkerze 2. Zündkerzenstecker
Zur vorschriftsmäßigen Entsorgung des Produkts oder seiner Einzelteile wenden Sie sich an Ihren ECHO-Händler.
28
Page 91

Technische Daten
Technische Daten
Gewicht: kg 9,8
Außenabmessungen:
Länge
Breite
Höhe
Motor:
Typ
Hubraum
Maximal-Leistung
Motordrehzahl bei maximaler Motorleistung
Empfohlene maximale Motordrehzahl
Empfohlene Leerlauf-Drehzahl
Vergaser
Zündung
Zündkerze
Anlasser
Luftvolumen bei geradem Rohr: m
mm
mm
mm
ml (cm
kW
U/min
U/min
U/min
3
3
/min 21,7
375
490
475
Luftgekühlter Zweitakt-Einzylindermotor
)
63,3
2,85
6900
6900
2500
Membrantyp
Schwungradmagnet – CDI-System
NGK BPMR8Y
Automatisches Reversiersystem
PB-770
Kraftstoff:
Öl
Verhältnis 50 : 1 (2%)
Tankinhalt: L2,02
Schalldruckpegel: (ISO 22868) LpAeq = dB(A) 97,7
Garantierter Schallleistungspegel:
(2000/14/EG) L
Schwingungspegel: (ISO 22867) m/s
Änderungen der technischen Daten vorbehalten.
= dB(A) 112
WA
Bleifreies Normalbenzin. Verwenden Sie bleifreies
Benzin mit mindestens 89 Oktan. Verwenden Sie
keinen Kraftstoff mit Methylalkohol oder mehr als
10 % Ethylalkohol.
Motoröl für luftgekühlte Zweitaktmotoren. ISO-LEGD-Norm (ISO/CD 13738), JASO FC, FD und
ECHO Premium 50: 1 Öl.
2
2,1
29
Page 92

Konformitätserklärung
Der unterzeichnete Hersteller:
YAMABIKO CORPORATION
7-2 SUEHIROCHO 1-CHOME
OHME, TOKIO 198-8760
JAPAN
erklärt, dass das nachstehend spezifizierte neue Gerät:
BLÄSER
Marke: ECHO
Typ: PB-770
montiert durch:
ECHO, INCORPORATED
400 Oakwood Road
Lake Zurich, Illinois 60047-1564
Konformitätserklärung
U.S.A.
Folgendem entspricht:
* Anforderungen der Richtlinien 98/37/EG (1998) (und 2006/42/EG: vom 29. Dezember 2009)
* Anforderungen der Richtlinie 2004/108/EG
(Verwendung von harmonisierter Norm EN ISO 14982)
* Anforderungen der Richtlinie 2002/88/EG
* Anforderungen der Richtlinie 2000/14/EG
Konformitätsermittlung nach ANHANG V
Gemessener Schallleistungspegel: 109dB(A)
Garantierter Schallleistungspegel: 112dB(A)
PB-770 Seriennummer 37002001 und höher
Tokio,
den 1. Oktober 2009
YAMABIKO CORPORATION
Der Dokumentenbevollmächtigte in Europa, welcher autorisiert
ist die technischen Daten zusammenzustellen.
Unternehmen: Atlantic Bridge Limited
Adresse: Atlantic House, PO Box 4800,
Earley, Reading RG5 4GB, Vereinigtes Königreich
K. OYURI Hauptabteilungsleiter
Herr Philip Wicks
30
Page 93

Gewährleistungs- und Garantiebestimmungen für
Gewährleistungs- und Garantieb estimmungen für ECHO- Moto rgeräte
31
Page 94

1Notizen und hintere U mschlagseite
7-2 SUEHIROCHO 1-CHOME, OHME, TOKIO 198-8760, JAPAN
TELEFON: 81-428-32-6118. FAX: 81-428-32-6145.
©
2009
X753-003 91 0
X753 112-420 0
Gedruckt in Japan
0x0xxxx zzzz ES
32
Page 95

1Copertina
ITALIANO
(Istruzioni originali)
MANUALE PER L'OPERATORE
PB-770
AVVERTENZA
LEGGERE E SEGUIRE ATTENTAMENTE LE ISTRUZIONI PER LAVORARE IN CONDIZIONI DI MASSIMA SICUREZZA. LA MANCATA OSSERVANZA DELLE ISTRUZIONI POTREBBE PROVOCARE
LESIONI GRAVI.
Page 96

Informazioni importanti
2Informazioni importanti
Si raccomanda di leggere il manuale per l'operatore prima di utilizzare questo prodotto.
Funzione di questo prodotto
Il soffiatore ECHO è stato progettato per allontanare polvere e materiali di vario tipo, incluse le foglie cadute dagli alberi.
Non usare questa macchina per fini diversi da quelli sopra menzionati.
Utenti del prodotto
Prima di utilizzare questo prodotto leggere attentamente e assimilare il contenuto del manuale per l'operatore.
Non utilizzare questo prodotto senza aver prima letto attentamente il manuale per l'operatore, in condizioni debilitate
a causa di raffreddore o stanchezza o in condizioni fisiche e psicologiche non ottimali; inoltre vietare l'uso ai bambini.
Tenere presente che l'operatore o l'utente è responsabile di eventuali rischi o incidenti provocati ad altre persone o alle
proprietà altrui.
Informazioni sul manuale per l'operatore
Questo manuale contiene informazioni necessarie per l'assemblaggio, il funzionamento e la manutenzione del prodot-
to. Si raccomanda di leggerlo attentamente e di assimilarne il contenuto.
Tenere sempre il manuale in un posto facilmente accessibile.
Se il manuale viene smarrito o danneggiato e non può essere consultato, acquistarne uno nuovo presso il rivenditore
ECHO.
Le unità di misura utilizzate in questo manuale sono espresse in conformità al sistema internazionale. Le cifre riportate
tra parentesi sono valori di riferimento e in alcuni casi ci potrebbero essere lievi errori di conversione.
Prestito o cessione del prodotto
In caso di prestito o cessione del prodotto descritto in questo manuale, consegnare alla persona che lo riceve in prestito
e che dovrà utilizzarlo anche il manuale per l'operatore. Anche in caso di cessione, consegnare il prodotto insieme al
manuale per l'operatore.
Richieste
Per ricevere ulteriori informazioni sul prodotto, per l'acquisto di articoli di consumo, per riparazioni e altre eventuali ri-
chieste, contattare il proprio rivenditore ECHO.
Avvisi
Il contenuto di questo manuale può essere modificato senza preavviso per renderlo conforme a eventuali aggiorna-
menti al prodotto. Alcune illustrazioni potrebbero essere diverse dal prodotto per rendere le spiegazioni più chiare.
Questo prodotto richiede l'assemblaggio di alcune parti.
Consultare il proprio rivenditore ECHO per ulteriori chiarimenti.
Produttore
YAMABIKO CORPORATION
7-2 SUEHIROCHO 1-CHOME, OHME, TOKYO 198-8760, GIAPPONE
Rappresentante autorizzato in Europa
Atlantic Bridge Limited
Atlantic House, PO Box 4800, Earley, Reading RG5 4GB, Regno Unito
2
Page 97

Contenuto
Per un uso sicuro del prodotto ............................................................................................ 4
Messaggi di avviso ........................................................................................................ 4
Altri indicatori ................................................................................................................. 4
Simboli........................................................................................................................... 4
Posizione in cui è applicata la decalcomania ................................................................ 6
Gestione del carburante ................................................................................................ 7
Gestione del motore ...................................................................................................... 8
Gestione del prodotto .................................................................................................... 9
Contenuto della confezione .............................................................................................. 12
Descrizione .......................................................................................................................13
Prima di iniziare ................................................................................................................14
Montaggio .................................................................................................................... 14
Preparazione del carburante ....................................................................................... 15
Funzionamento del motore ............................................................................................... 17
Avviamento del motore ................................................................................................ 17
Arresto del motore ....................................................................................................... 19
Funzionamento ................................................................................................................. 20
Funzionamento del soffiatore ...................................................................................... 20
Manutenzione e cura ........................................................................................................ 21
Guida alla manutenzione............................................................................................. 21
Manutenzione e cura ................................................................................................... 21
Problemi tecnici ........................................................................................................... 26
Rimessaggio per un lungo periodo (oltre 30 giorni)..................................................... 27
Caratteristiche tecniche .................................................................................................... 28
Dichiarazione di conformità .............................................................................................. 29
3
Page 98

Per un uso sicuro del prodotto
Leggere questa sezione prima di utilizzare il prodotto.
Per un uso sicuro d el prodotto
Le precauzioni descritte in questa sezione contengono importanti informazioni per la sicurezza. Si raccomanda di seguirle scrupolosamente.
Leggere anche le precauzioni presenti all'interno del manuale.
Il testo seguito da un contrassegno [a forma di rombo] descrive le potenziali conseguenze che si potrebbero verificare in caso di
mancata osservanza delle precauzioni.
Messaggi di avviso
Situazioni in cui c'è il rischio di causare lesioni fisiche all'utente e ad altre persone sono indicate in questo manuale e sul prodotto,
con le seguenti avvertenze. Leggerle e osservarle sempre per lavorare in condizioni di massima sicurezza.
PERICOLO AVVERTENZA ATTENZIONE
Questo simbolo accompagnato dalla
parola "PERICOLO" richiama l'attenzione su un'azione o una condizione
che potrebbe causare infortuni gravi o
la morte di utenti o di persone presenti.
Questo simbolo accompagnato dalla
parola "AVVERTENZA" richiama
l'attenzione su un'azione o una condizione che potrebbe causare lesioni
gravi o la morte di utenti o di persone
presenti.
Altri indicatori
Oltre alle avvertenze, questo manuale utilizza i seguenti simboli esplicativi:
"ATTENZIONE" indica una situazione potenzialmente pericolosa che, se
non evitata, potrebbe causare lesioni
minori o moderate.
NOTA IMPORTANTE
Il cerchietto barrato sta
ad indicare che quanto
è illustrato è proibito.
Il messaggio qui riportato fornisce
consigli per l'uso, la cura e la manutenzione del prodotto.
Il testo incorniciato, caratterizzato
dalla parola "IMPORTANTE", contiene informazioni importanti riguardo
l'uso, il controllo, la manutenzione e il
rimessaggio del prodotto descritto in
questo manuale.
Simboli
In questo manuale e sul prodotto sono riportati alcuni simboli esplicativi. Accertarsi di aver ben compreso il significato di tutti i simboli.
Forma del simbolo Descrizione / applicazione del
simbolo
Leggere attentamente il manuale per l'operatore
Indossare protezioni per occhi, orecchie e testa
Protezione/allarme
Arresto di emergenza
Forma del simbolo Descrizione / applicazione del
simbolo
Miscela di benzina e olio
Bulbo di spurgo (adescamento)
Regolazione carburatore Bassi regimi
Regolazione carburatore - Alti
regimi
4
Page 99

Per un uso sicuro del prodotto
Forma del simbolo Descrizione / applicazione del
simbolo
Taglio delle dita
Non utilizzare il prodotto in
luoghi dove c'è scarsa ventilazione
Attenzione al fuoco
Attenzione alle scosse elettriche
Livello di potenza acustica garantito
Forma del simbolo Descrizione / applicazione del
simbolo
Regolazione carburatore Folle
Controllo valvola dell'aria Posizione "Avviamento a freddo"
(Valvola dell'aria chiusa)
Controllo valvola dell'aria Posizione "In funzione" (Valvola
dell'aria aperta)
In folle
Massima velocità
Accensione ON / OFF
Avvio del motore
Prestare attenzione nelle aree
ad alta temperatura
5
Page 100

Per un uso sicuro del prodotto
Posizione in cui è applicata la decalcomania
La decalcomania riportata sotto è stata applicata al prodotto descritto in questo manuale. Prima di utilizzare il prodotto accertarsi
di aver capito il significato della decalcomania.
Se la decalcomania diventa illeggibile a causa dell'usura, si strappa o si stacca e si perde, acquistarne una di ricambio presso
il rivenditore ECHO e fissarla nel punto illustrato nella figura in basso. Accertarsi che la decalcomania sia sempre leggibile.
1. Decalcomania (Codice ricambio X505002310)
2. Decalcomania (Codice ricambio 89016009461)
6
 Loading...