

Page 1

FT 5000 EVB
Hardware Guide
®
078-0390-01B
Page 2

Echelon, LON, LonWorks, Neuron, 3120, 3150, Digital Home,
i.LON, LNS, LonMaker, LonMark, LonPoint, LonTalk,
NodeBuilder, ShortStack, and the Echelon logo are
trademarks of Echelon Corporation registered in the United
States and other countries. FTXL, LonScanner, LonSupport, ISI,
OpenLDV, and LNS Powered by Echelon are trademarks of
Echelon Corporation.
Other brand and product names are trademarks or
registered trademarks of their respective holders.
Neuron
Chips and other OEM Products were not designed for
use in equipment or systems which involve danger to human
health or safety or a risk of property damage and Echelon
assumes no responsibility or liability for use of the Neuron
Chips or LonPoint Modules in such applications.
Parts manufactured by vendors other than Echelon and
referenced in this document have been described for
illustrative purposes only, and may not have been tested by
Echelon. It is the responsibility of the customer to determine
the suitability of these parts for each application.
ECHELON MAKES NO REPRESENTATION, WARRANTY, OR
CONDITION OF ANY KIND, EXPRESS, IMPLIED, STATUTORY, OR
OTHERWISE OR IN ANY COMMUNICATION WITH YOU,
INCLUDING, BUT NOT LIMITED TO, ANY IMPLIED WARRANTIES OF
MERCHANTABILITY, SATISFACTORY QUALITY, FITNESS FOR ANY
PARTICULAR PURPOSE, NONINFRINGEMENT, AND THEIR
EQUIVALENTS.
No part of this publication may be reproduced, stored in a
retrieval system, or transmitted, in any form or by any means,
electronic, mechanical, photocopying, recording, or
otherwise, without the prior written permission of Echelon
Corporation.
Printed in the United States of America.
Copyright ©1997–2009 by Echelon
Corporation.
Echelon Corporation
www.echelon.com
ii
Page 3

Table of Contents
Preface ........................................................................................................... iv
Welcome..........................................................................................................v
Purpose ...........................................................................................................v
Audience..........................................................................................................v
Box Contents................................................................................................... v
Content........................................................................................................... vi
Related Manuals............................................................................................. vi
For More Information and Technical Support.................................................vii
1 Connecting the FT 5000 EVB Hardware..........................................
Connection Instructions...................................................................................2
2 FT 5000 EVB Hardware Details ........................................................
Introduction to FT 5000 EVB Hardware Details ..............................................6
Neuron Core..............................................................................................6
I/O Devices................................................................................................7
Push Button Switches.........................................................................7
LEDs...................................................................................................7
Temperature Sensor...........................................................................7
Light-Level Sensor..............................................................................7
LCD.....................................................................................................8
Joystick...............................................................................................8
Service Pin and Reset Buttons and LEDs ................................................8
Jumper Settings........................................................................................9
External Serial Non-Volatile Memory Device Connection (JP1) ........9
Flash ICE Connection (JP23)...........................................................10
Performing In-Circuit Programming of External Serial
Memory Devices ........................................................................
I/O Line Access (JP24).....................................................................14
LCD, Light Sensor, LEDs, Switch, and Joystick
Connections (JP31)..........................................................................
Switch, Joystick, Temperature Sensor, and USB Connections
(JP32)...............................................................................................
Connecting the USB Interface ...................................................17
Configuring a Device Application for Serial Debugging.............18
LCD 5V Power (JP33)......................................................................19
EIA-232 Interface (JP201and JP203)...............................................20
Connecting the EIA-232 Interface (without handshake lines)....20
Connecting the EIA-232 Interface (with handshake lines).........21
Connecting the ShortStack Interface.........................................23
Gizmo 5V or 3.3V Power Select (JP204).........................................25
Gizmo 3.3V Power (JP205)..............................................................25
I/O Connector..........................................................................................26
Design and Test for Electromagnetic Compatibility.......................................27
1
5
11
15
16
FT 5000 EVB Examples Guide iii
Page 4

Preface
The FT 5000 EVB is a development board for evaluating the LONWORKS 2.0
platform and creating L
5000 LONWORKS device that uses an FT 5000 Smart Transceiver. It includes a
variety of I/O devices that you can use to develop prototype and production devices.
ONWORKS devices. The FT 5000 EVB is a complete Series
iv Preface
Page 5

Welcome
The FT 5000 EVB is a complete Series 5000 LONWORKS device that you can use to evaluate the
ONWORKS 2.0 platform and create LONWORKS devices. The FT 5000 EVB includes a FT 5000
L
Smart Transceiver with an external 10 MHz crystal (you can adjust the system’s internal clock speed
from 5MHz to 80MHz), an FT-X3 communication transformer, 64KB external serial EEPROM and
flash memory devices, and a 3.3V power source. The FT 5000 EVB features a compact design that
includes the following I/O devices that you can use to develop prototype and production devices and
test the FT 5000 EVB example applications:
• 4 x 20 character LCD
• 4-way joystick with center push button
• 2 push-button inputs
• 2 LED outputs
• Light-level sensor
• Temperature sensor
The FT 5000 EVB also includes EIA-232/TIA-232 (formerly RS-232) and USB interfaces that you can
use to connect the board to your development computer and perform application-level testing and
diagnostics. You can also use the EIA-232 interface for development with the ShortStack
Developer’s Kit. Note that you can only use one of the EIA-232 and USB interfaces at a time.
Each FT 5000 EVB also features support for the in-circuit programming of the external serial
non-volatile EEPROM and flash memory devices on the board using the serial peripheral interface bus
(SPI) and Inter-Integrated Circuit (I
2
C) interface.
®
Purpose
This document describes how to connect the FT 5000 EVB boards, and it describes the Neuron core,
I/O devices, service pin and reset buttons and LEDs, and jumper settings on the FT 5000 EVB
hardware.
Audience
This guide is intended for device and system designers with an understanding of control networks.
Box Contents
The FT 5000 EVB hardware ships with the following material:
• FT 5000 EVB Evaluation Boards. The FT 5000 EVB hardware includes two FT 5000 EVBs that
you can connect to a L
• Development Tool CD. The FT 5000 EVB hardware is shipped with either the NodeBuilder FX
Development Tool CD or the Mini FX Application CD. You can use these development tools to
build Neuron C applications and download them to the FT 5000 EVB.
• LonMaker
tool lets you install, bind, monitor and control, and test the FT 5000 EVBs in a managed
ONWORKS network.
L
• LonScanner
you observe, analyze, and diagnose the behavior of the TP/FT-10 channel to which the FT 5000
EVBs
®
Integration Tool CD (with NodeBuilder FX Development Tool only). The LonMaker
™
Protocol Analyzer LNS Turbo Edition CD. The LonScanner Protocol Analyzer lets
are connected.
ONWORKS TP/FT-10 channel.
FT 5000 EVB Hardware Guide v
Page 6

• Quick Start Guide. The FT 5000 EVB hardware is shipped with either a NodeBuilder FX or Mini
FX Quick Start Guide. This document describes how to install the software included with your FT
5000 EVB; connect the FT 5000 EVBs and your development computer to a L
channel; and create a simple L
ONWORKS network using the Neuron C example application
ONWORKS FT-10
pre-loaded on the FT 5000 EVB.
• Power supplies (90–240VAC 50/60Hz) with power cords (US/Japan and Continental European).
•
U10 USB Network Interface and USB Extension Cable. The U10 USB Network Interface lets
you directly connect the development tool running on your computer to your FT 5000 EVB over a
TP/FT-10 Free Topology Twisted Pair (ISO/IEC 14908-2) L
ONWORKS channel.
• Network cable and terminator. The network cable lets you interconnect your FT 5000 EVBs, and
it lets you connect the boards to other devices and to the
ONWORKS FT-10 channel.
L
U10 USB Network Interface over a
• FT 5000 sample chips with FT-X3 transformers (not included in NodeBuilder FX/FT
Development Tool Classroom Edition).
• License Return Envelope
Content
This guide includes the following content:
•
Connecting the FT 5000 EVB Hardware. Describes how to power your FT 5000 EVB and
connect it to a L
•
FT 5000 EVB Hardware Details. Describes the Neuron core, service pin and reset buttons and
ONWORKS FT-10 channel and to your development computer.
LEDs, I/O devices, and jumper settings on the FT 5000 EVB hardware.
Related Manuals
The documentation related to the NodeBuilder tool and Mini FX Application is provided as Adobe
Acrobat PDF files and online help files. The PDF files for the NodeBuilder tool are installed in the
Echelon NodeBuilder program folder when you install the NodeBuilder tool. The PDF files for the
Mini FX Application are installed in the Echelon Mini program folder when you install the Mini FX
application. You can download the latest NodeBuilder and Mini FX documentation, including the
latest version of this guide, from Echelon’s website at
EIA-232C Serial Interfacing with the
Neuron
®
Chip
Describes a simple level conversion circuit to allow the Neuron
Chip to communicate with EIA-232C devices. Also includes
Neuron C software to drive an RS232C CRT terminal.
FT 5000 EVB Examples Guide Describes how to run the Neuron C example applications
included with the NodeBuilder FX Development Tool and Mini
FX Development Kit on an FT 5000 EVB.
I/O Model Reference for Neuron
Chips and Smart Transceivers
Introduction to the L
ONWORKS
Platform
®
®
Describes the I/O objects that are available for use with the
Neuron Chips and Smart Transceivers.
Provides a high-level introduction to L
the tools and components that are used for developing, installing,
operating, and maintaining them.
®
LonWorks
USB Network Interface
User's Guide
Describes how to install and use the U10 USB Network
Interface, which is included with the NodeBuilder FX/FT
Development Tool and the Mini FX/FT Evaluation Kit.
www.echelon.com/docs.
ONWORKS networks and
vi Preface
Page 7

Mini FX User’s Guide Describes how to use the Mini FX Application to develop a
prototype or production control system that requires networking,
particularly in the rapidly growing, price-sensitive mass markets
of smart light switches, thermostats, and other simple devices
and sensors.
Neuron
®
C Reference Guide
Provides reference information for writing programs using the
Neuron C language.
NodeBuilder
®
FX User’s Guide
Describes how to use the NodeBuilder tool to develop
ONWORKS device applications and build and test prototype and
L
production L
ONWORKS devices
Series 5000 Chip Data Book Provides specifications and user instructions for engineers who
develop applications and devices that use FT 5000 Smart
Transceivers or Neuron 5000 Processors, and for users of
network interfaces based on the FT Smart Transceivers or
Neuron Chips.
ShortStack
®
User's Guide Release 2.1
Describes how to develop an application for a
LONWORKS
device using Echelon’s ShortStack 2.1 Micro Server. It
describes the architecture of a ShortStack device and how to
develop a ShortStack device.
For More Information and Technical Support
The NodeBuilder ReadMe and Mini FX ReadMe documents provide descriptions of known
problems, if any, and their workarounds for the NodeBuilder tool and Mini kit, respectively. To view
these ReadMe documents, click Start, point to Programs, point to Echelon NodeBuilder or Echelon
Mini, and then select NodeBuilder ReadMe First or Mini FX ReadMe First. For additional
information about the NodeBuilder tool and Mini kit, you can go to the NodeBuilder and Mini kit Web
pages at
If you have technical questions that are not answered by this document, the NodeBuilder tool or Mini
kit online help, or the NodeBuilder tool or Mini kit ReadMe files, you can contact technical support.
Free e-mail support is available, or you can purchase phone support from Echelon or an Echelon
support partner. See
services.
You can also view free online training or enroll in training classes at Echelon or an Echelon training
center to learn more about developing devices. You can find additional information about device
development training at
You can obtain technical support via phone, fax, or e-mail from your closest Echelon support center.
The contact information is as follows:
www.echelon.com/nodebuilder and www.echelon.com/mini.
www.echelon.com/support for more information on Echelon support and training
www.echelon.com/training.
Region Languages Supported Contact Information
The Americas
English
Japanese
Echelon Corporation
Attn. Customer Support
550 Meridian Avenue
San Jose, CA 95126
Phone (toll-free):
1-800-258-4LON (258-4566)
Phone: +1-408-938-5200
Fax: +1-408-790-3801
lonsupport@echelon.com
FT 5000 EVB Hardware Guide vii
Page 8

Region Languages Supported Contact Information
Europe
English
German
French
Italian
Echelon Europe Ltd.
Suite 12
Building 6
Croxley Green Business Park
Hatters Lane
Watford
Hertfordshire WD18 8YH
United Kingdom
Phone: +44 (0)1923 430200
Fax: +44 (0)1923 430300
lonsupport@echelon.co.uk
Japan
China
Other Regions
Japanese Echelon Japan
Holland Hills Mori Tower, 18F
5-11-2 Toranomon, Minato-ku
Tokyo 105-0001
Japan
Phone: +81-3-5733-3320
Fax: +81-3-5733-3321
lonsupport@echelon.co.jp
Chinese
English
Echelon Greater China
Rm. 1007-1008, IBM Tower
Pacific Century Place
2A Gong Ti Bei Lu
Chaoyang District
Beijing 100027, China
Phone: +86-10-6539-3750
Fax: +86-10-6539-3754
lonsupport@echelon.com.cn
English
Japanese
Phone: +1-408-938-5200
Fax: +1-408-328-3801
lonsupport@echelon.com
viii Preface
Page 9

1
Connecting the FT 5000 EVB Hardware
This chapter describes how to power your FT 5000 EVB and connect it to a
LONWORKS FT-10 channel and to your development computer.
.
.
FT 5000 EVB Hardware Guide 1
Page 10

Connection Instructions
To connect the FT 5000 EVB boards, follow these steps:
1. Unpack the equipment from the shipping carton.
Note: The FT 5000 EVB boards are shipped in protective anti-static packaging. When
assembling the FT 5000 EVB boards, the boards must not be subjected to high electrostatic
potentials. Avoid touching the component pins, or any other metallic equipment on the evaluation
boards.
2. Verify that all of the following hardware and software items are present.
Item Qty
FT 5000 EVB 2
Power supply (90–240VAC 50/60Hz) and power cords (US/Japan and
Continental European)
Network cable and terminator 1
U10 USB Network Interface 1
USB Extension Cable 1
Development tool CD (NodeBuilder FX CD or Mini FX CD) 1
LonMaker CD (with NodeBuilder FX Development Tool only) 1
LonScanner CD (LNS Turbo Edition CD with NodeBuilder FX
Development Tool; Trial Edition CD with Mini FX Evaluation Kit)
3. Install the software included with your development kit on your computer.
• The NodeBuilder FX Development tool includes the NodeBuilder FX Development Tool CD,
LonMaker Integration Tool CD, and the LonScanner Protocol Analyzer LNS Turbo Edition
CD. See the NodeBuilder FX User’s Guide for more information on installing the
NodeBuilder software.
• The Mini FX Evaluation Kit includes the Mini FX CD and LonScanner Protocol Analyzer
Trial Edition CD. See the Mini FX User’s Guide for more information on installing the Mini
kit software.
4. Connect the barrel connectors of the included power supplies into the barrel jacks on the FT 5000
EVBs, connect the power supplies to the included power cords that are appropriate for you region
(US/Japan or Continental European), and then plug the power cords into a power outlet. The
power LEDs on the boards will activate when they are powered on.
2
1
2 Connecting the FT 5000 EVB Hardware
Page 11

5. Connect one of the orange network connectors on each FT 5000 EVB to the included network
cable. Each board contains two orange network connectors (JP101, JP102) that are connected
together. You can use these network connectors to daisy-chain multiple devices.
6. Use the included U10 USB Network Interface to attach your development computer to the
TP/FT-10 channel. To do this, connect the black network connector on the network cable to the
U10 USB Network Interface, and then plug the U10 USB Network Interface into an available
USB port on your computer. You can use the included USB extension cable to help connect the
USB 10 Network Interface to your development computer.
FT 5000 EVB Hardware Guide 3
Page 12

If this is the only L
ONWORKS interface installed on your computer, it will automatically use the
default name LON1, and you can proceed directly to your software application and begin using
the interface as LON1.
If you have another network interface installed on your computer, you can check the name used by
the U10 USB Network Interface in the L
ONWORKS Interfaces application. You can also use this
application to configure the buffer sizes and counts used by the U10 USB Network Interface. To
open the L
ONWORKS Interfaces application, and check the name of the U10 USB Network
Interface and configure it, click Start on the taskbar, click Control Panel, double-click
LonWorks
Interfaces, and then click the USB tab.
For more information on installing and using the U10 USB Network Interface, see the LonWorks
USB Network Interface User's Guide.
Note: You can use a different network interface such as a PCC-10, PCLTA-20, or PCLTA-21;
SLTA-10; remote network interface (i.LON SmartServer, i.LON 100 Internet Server, i.LON 600
ONWORKS-IP Server, or i.LON 10 Ethernet Adapter); or an IP-852 interface (i.LON
L
SmartServer with IP-852 routing, i.LON 100 Internet Server with IP-852 routing, or i.LON 600
ONWORKS-IP Server).
L
To use a PCC-10, a PCLTA-20, or a PCLTA-21 as the network interface, you first need to
configure it as a layer-2 or layer-5 network interface using the L
ONWORKS Plug ‘n Play
application (layer 2 or 5 if you are using the NodeBuilder tool [use layer 2 for best performance],
or layer 5 if you are using the Mini kit). To do this, click Start on the taskbar, click Control
Panel, and then double-click LonWorks Plug ‘n Play. In the Device Selected box, select your
network interface. In the NI application box, select PCC10NSI if you are using a PCC-10, or
select NSIPCLTA if you are using a PCLTA-20 or a PCLTA-21. Click OK to save your changes
and close the LonWorks Plug ‘n Play application.
7. If you are using the NodeBuilder tool, complete the quick-start exercise in Chapter 3 of the
NodeBuilder FX User’s Guide. In the quick-start exercise, you will develop a device with one
sensor and one actuator. The sensor is a simple sensor that monitors a push button on the FT 5000
EVB and toggles a network variable output each time the button is pressed. The actuator drives
the state of an LED on the FT 5000 EVB based on the state of a network variable input.
This quick-start guides you through all the steps of creating a device with the NodeBuilder tool,
including creating the NodeBuilder project, the device template, the device interface, and the
Neuron C code that implements your device interface; implementing device functionality in the
Neuron C code; building and downloading the device application; testing the device in a
ONWORKS network; and debugging the device application.
L
8. Run the Neuron C example applications included with the NodeBuilder FX tool or Mini FX
Application on your FT 5000 EVBs. The NodeBuilder tool and Mini kit include three Neuron C
example applications (NcSimpleExample, NcSimpleIsiExample, and NcMultiSensorExample) that
you can use to test the I/O devices on the FT 5000 EVBs, and create simple managed and
self-installed L
ONWORKS networks.
The NcMultiSensorExample application is pre-loaded on the FT 5000 EVBs and runs in
Interoperable Self-installation (ISI) mode by default. You install and connect this example
application and the other examples using the LonMaker tool or using the ISI protocol. See the FT
5000 EVB Examples Guide for more information on using these example applications.
4 Connecting the FT 5000 EVB Hardware
Page 13

FT 5000 EVB Hardware Details
This chapter describes the Neuron core, service pin and reset buttons and LEDs, I/O
devices, and jumper settings on the FT 5000 EVB hardware.
2
FT 5000 EVB Hardware Guide 5
Page 14

Introduction to FT 5000 EVB Hardware Details
The following sections provide additional details on the FT 5000 EVB hardware, including
descriptions of the core circuit, I/O devices, service and reset buttons and LEDs, and jumper settings.
You can view schematics for the peripheral circuitry of the FT 5000 EVB. The peripheral circuitry is
the section of the evaluation board external to the core circuit that is labeled CORE. To view the FT
5000 EVB schematics, click Start, point to Programs, point to Echelon NodeBuilder or Echelon
Mini, point to Documentation, and then click FT 5000 EVB Schematics.
Neuron Core
The Neuron core of the FT 5000 EVB includes a FT 5000 Smart Transceiver with an external 10 MHz
crystal (you can adjust the system’s internal clock speed from 5MHz to 80MHz), an FT-X3
communication transformer, and a 64KB external serial EEPROM non-volatile memory device. For
details on the FT 5000 core, see the Series 5000 Chip Data Book.
In addition to the 64KB external serial EEPROM device in the Neuron core, the FT 5000 EVB
includes a 64KB external serial flash device. These serial EEPROM and flash memory devices are
used to store your application code, configuration data, and an upgradable system firmware image (the
Series 5000 chips have no user-accessible on-chip non-volatile memory). The external serial
EEPROM and flash memory devices communicate with the FT 5000 Smart Transceiver via the SPI or
2
C interfaces. The EEPROM device on the FT 5000 EVB uses the I2C interface; the flash device uses
I
the SPI interface. When a device is reset, the application code and configuration data are copied from
the external non-volatile memory into the 64 KB internal on-chip RAM, and the device application is
then executed.
6 FT 5000 EVB Hardware Details
Page 15

I/O Devices
This section briefly describes the I/O devices included on the FT 5000 EVB, which consists of two
push buttons, two LEDs, a temperature sensor, a light sensor, an LCD, and a joystick.
Push Button Switches
The FT 5000 EVB includes two push-button switches. The switches are labeled SW1 and SW2. The
SW1 push button is connected to the IO9 pin on the FT 5000 Smart Transceiver. The SW2 push
button is connected to a 74HC165 8-bit parallel-in/serial-out shift register, and data is shifted on the FT
5000 Smart Transceiver IO4 (clock) and IO5 (data) pins, with a latch strobe on IO6 (active low to
capture). The button readings must be debounced under application control.
LEDs
The FT 5000 EVB includes two blue LEDs that are labeled LED1 and LED2. LED1 is connected to
the FT 5000 Smart Transceiver IO2 pin when jumper pins 9-10 on JP31 are connected. LED2 is
connected to the IO3 pin when jumper pins 11-12 on JP31 are connected.
Temperature Sensor
The FT 5000 EVB includes a temperature sensor based on a 1-Wire® Maxim Integrated Products
digital thermometer (Part No. DS18S20). The thermometer uses the Touch I/O interface and is
connected to the FT 5000 Smart Transceiver IO7 pin. For more information about this temperature
sensor, see its data book at
datasheets.maxim-ic.com/en/ds/DS18S20.pdf.
Light-Level Sensor
The FT 5000 EVB includes a light-level sensor based on a Texas Advanced Optoelectronic Solutions®
Light-To-Digital Converter (Part No. TSL2561). The light sensor is connected to the FT 5000 Smart
Transceiver IO0 and IO1 pins (via the I
0x39. For more information about this light sensor, see its data book at
www.taosinc.com/getfile.aspx?type=press&file=tsl2560-e58.pdf.
2
C interface). The I2C address for the light level sensor is
FT 5000 EVB Hardware Guide 7
Page 16
LCD
The FT 5000 EVB includes a 4 x 20 character LCD with a yellow-green backlight from Newhaven
Display International Inc (Part No. NHD-0420D3Z-FL-GBW). The LCD is connected to the FT 5000
Smart Transceiver IO0 and IO1 pins (via the I
its data book at
www.newhavendisplay.com/specs/NHD-0420D3Z-FL-GBW.pdf.
2
C interface). For more information about this LCD, see
Joystick
The FT 5000 EVB includes a 4-way joystick with center push button from ALPS® Electric Co (Part
No. SKQUCAA010). The joystick is connected to a 74HC165 8-bit parallel-in/serial-out shift
register, and data is shifted on the FT 5000 Smart Transceiver IO4 (clock) and IO5 (data) pins, with a
latch strobe on IO6 (active low to capture). For more information about this joystick, go to the ALPS
Web site at
www3.alps.com/WebObjects/catalog.woa/E/HTML/Switch/Tact/SKQU/SKQUAAA010.html.
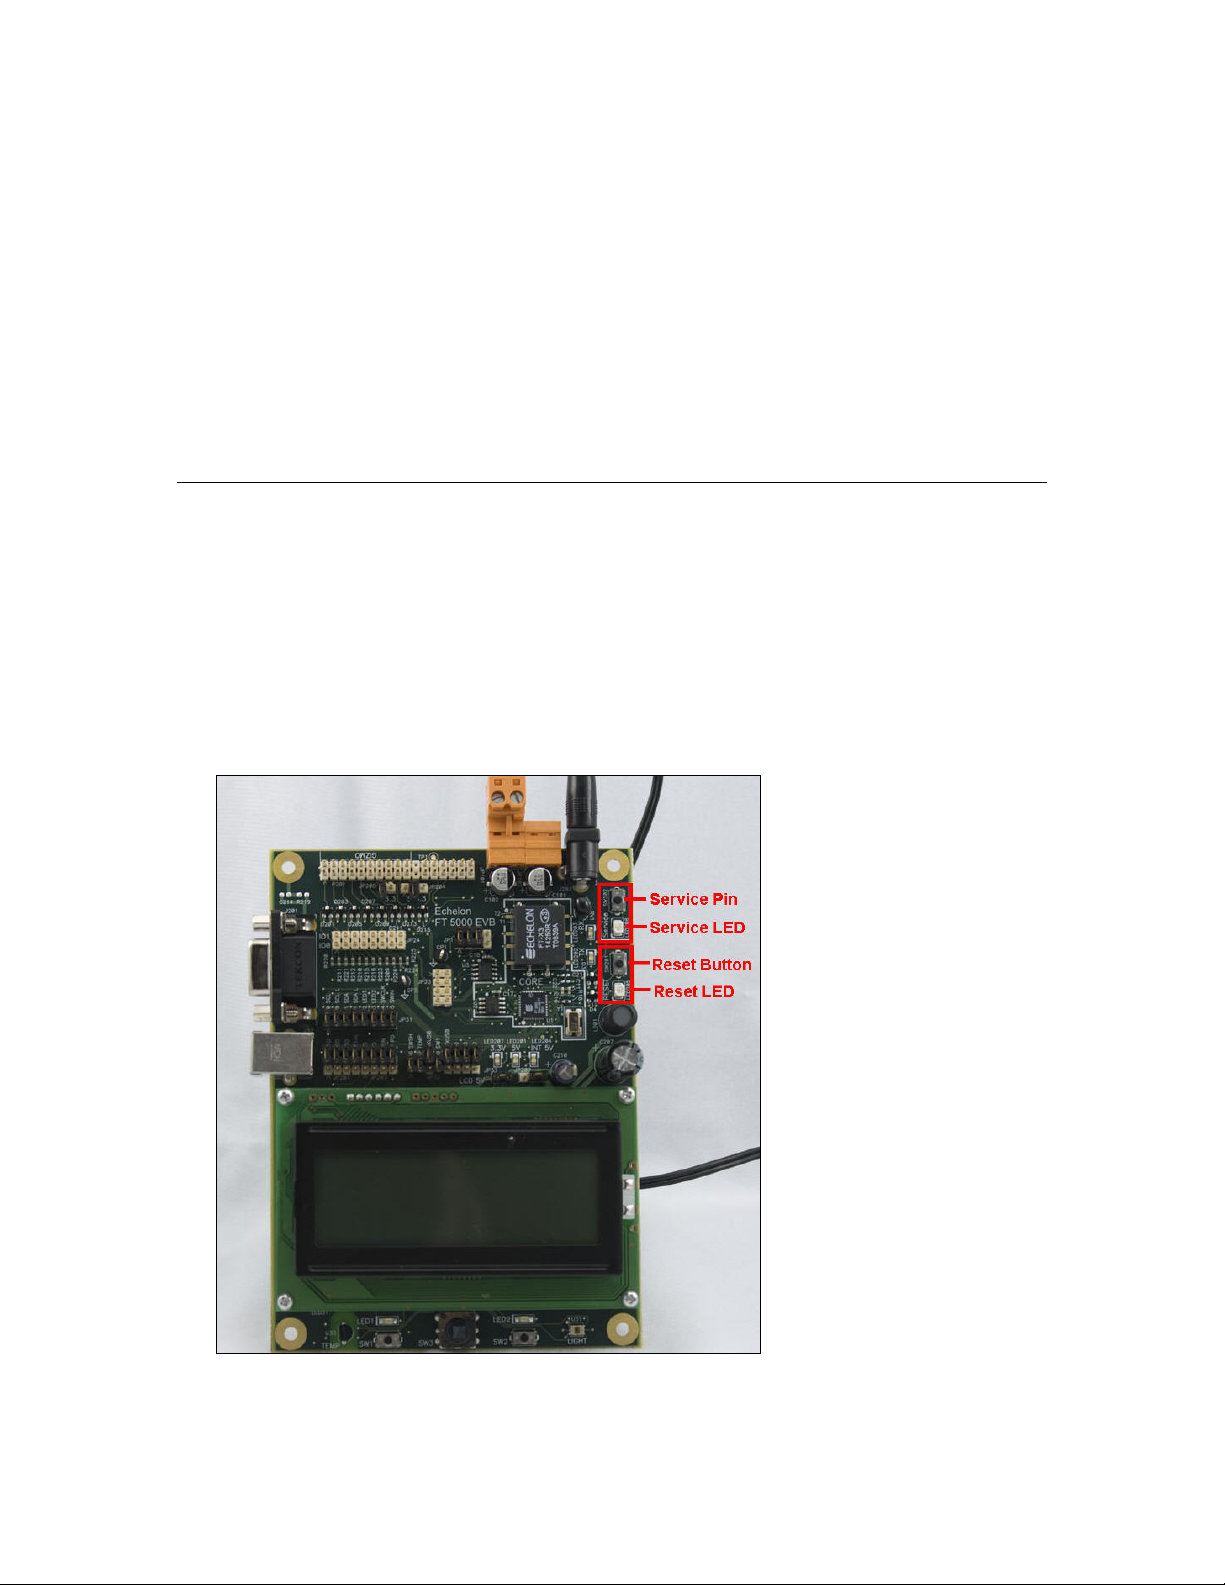
Service Pin and Reset Buttons and LEDs
The FT 5000 EVB includes a Service button and a Reset button that have corresponding LEDs.
You can use the Service Pin button to send a service pin message from an evaluation board. You will
use the Service Pin button when you install the device with the LonMaker tool or Mini kit, as
described in the FT 5000 EVB Examples Guide. You can use the Service LED to identify the device
state (applicationless, unconfigured, configured), and you can also use it to provide additional
application-specific information.
You can use the Reset button to reset the FT 5000 EVB when an application running on the board
appears to have failed, or to test the reset behavior of an application loaded on the board. The Reset
LED illuminates when you press the Reset button, or the FT 5000 Smart Transceiver is reset.
8 FT 5000 EVB Hardware Details
Page 17

Jumper Settings
The FT 5000 EVB contains multiple sets of jumpers that you can use to configure the board. The
following sections display the locations of the jumpers on the FT 5000 EVB, show the default settings
of the jumpers, and describe how to use the jumpers to enable and disable various connections on the
board.
External Serial Non-Volatile Memory Device Connection (JP1)
This set of jumpers is used to connect an external serial non-volatile memory device (EEPROM or
flash) to the FT 5000 Smart Transceiver on the FT 5000 EVB. The FT 5000 Smart Transceiver uses
external serial memory (EEPROM or flash) to store your application code, configuration data, and an
upgradable system firmware image (the FT 5000 Smart Transceiver has no user-accessible on-chip
non-volatile memory). When a device is reset, the application code and configuration data are copied
from the external non-volatile memory into the internal on-chip RAM, and the device application is
then executed.
The external serial non-volatile memory connection on the FT 5000 EVB is enabled by default, as
illustrated in the following figure:
If you need to recover the device running on the FT 5000 EVB because it has failed, you can
disconnect the external serial non-volatile memory from the FT 5000 EVB and then reload the
application image file. To do this, follow these steps:
1. Remove jumpers 1-2, 3-4, and 5-6 to disconnect the external serial non-volatile memory from the
FT 5000 EVB.
2. Ground pin 6 on JP1. To do this, connect pin 6 on JP1 to pin 7 on JP23.
FT 5000 EVB Hardware Guide 9
Page 18

3. Press the Reset button.
4. Re-connect the jumpers.
5. Reload the rebuilt application image file for the device running on the FT 5000 EVB.
Flash ICE Connection (JP23)
This header can be used to connect a SPI interface flash ICE, which you can use instead of the external
serial non-volatile memory flash device on the FT 5000 EVB. When you use a flash ICE on JP23, you
must disconnect the serial flash device on the FT 5000 EVB by disconnecting jumpers 1-2 and 3-4 on
JP1 [see
default, this header is open as illustrated in the following figure:
External Serial Non-Volatile Memory Device Connection (JP1)) for more information]. By
10 FT 5000 EVB Hardware Details
Page 19

Performing In-Circuit Programming of External Serial Memory Devices
The JP23 header along with the jumpers on JP1 provides support for third-party in-circuit device
programmers, which you can use to update the data in the external serial EEPROM and flash devices
used by the FT 5000 Smart Transceiver on the FT 5000 EVB. This provides an alternative to loading
application images into these external serial memory devices over the TP/FT-10 network. Note that
the NodeBuilder tool and Mini kit only support downloading application images over a L
network; they do not directly support loading application images through third-party device
programmers or memory ICE. Echelon has tested a third-party in-circuit programmer, the Aardvark™
I2C/SPI USB Host Adapter from TotalPhase™, as described later in this section.
ONWORKS
To perform in-circuit programming of the external serial EEPROM and flash memory devices on the
FT 5000 EVB, you use the devices’ I2C and SPI interfaces. You must use the I
2
C interface to program
the EEPROM device on the FT 5000 EVB, and you use the SPI interface to program flash device on
the FT 5000 EVB.
To perform in-circuit programming of the external serial EEPROM and flash memory devices on the
FT 5000 EVB, follow these steps:
1. Power off the FT 5000 EVB.
2. Remove jumpers 1-2, 3-4, and 5-6 from JP1 to disconnect the external serial non-volatile memory
from the FT 5000 EVB.
• If you are programming the serial flash device on the FT 5000 EVB, hang the shunt off pin 1
because you will need to use pin 2.
• If you are programming the serial EEPROM device on the FT 5000 EVB, hang the shunt off
pin 5 because you will need to use pin 6.
3. Power on the FT 5000 EVB.
4. Ground the Reset pin on the FT 5000 EVB. To do this, connect pins 16 and 20 on the Gizmo I/O
Connector on the FT 5000 EVB. This holds the RST~ line low, places the I
into a high-impedance state, and idles the Neuron chip. This eliminates the possibility of the
Aardvark programmer conflicting with the Neuron chip when the Aardvark is accessing the I
2
C and SPI interfaces
2
C
and SPI interfaces.
FT 5000 EVB Hardware Guide 11
Page 20

5. Connect your external serial EEPROM or flash memory device to a compatible device
programmer. Echelon has tested the Aardvark™ I2C/SPI USB Host Adapter from TotalPhase™
(Part No. TP240141), with the 10-pin split cable from TotalPhase (Part No. TP240212), as one
method for creating this connection (for more information on this adapter, go to the TotalPhase
Web site at
two for the I
www.totalphase.com/products/aardvark_i2cspi/). The Aardvark has six signal lines:
2
C interface (SDA and SCL), and four for the SPI interface (MOSI, MISO, SCL, and
SS).
2
The I
C/SPI interface used by the FT 5000 Smart Transceiver has some pins that are
multifunctional; therefore you must disconnect the external serial memory device using JP1 [see
External Serial Non-Volatile Memory Device Connection (JP1) for more information] and
program each memory device individually. After you disconnect the external serial memory
device, you can use flying leads provided by the 10-pin split cable to connect the Aardvark
programmer to the external serial EEPROM or flash device.
The following figures display the connections you need to make between the Aardvark
programmer and the external memory devices on the FT 5000 EVB for the in-circuit programming
over the SPI and I
2
C interfaces.
12 FT 5000 EVB Hardware Details
Page 21

Aardvark Programmer
Lead Connector
FT 5000 EVB SPI Interface
(Serial Flash)
SS (White) JP1, pin 2
MISO (Green) JP23, pin 3
SCK (Purple)
GND (Black)
MOSI (Grey)
JP23, pin 6
JP23, pin 7
JP23, pin 8
FT 5000 EVB Hardware Guide 13
Page 22

Aardvark Programmer
Lead Connector
SCL (Brown) JP1, pin 8
SDA (Orange)
GND (Red)
FT 5000 EVB I
(Serial EEPROM)
JP1, pin 6
JP23, pin 7
2
C Interface
6. Program your external serial EEPROM or flash memory device using an application such as the
Flash Center Memory Programmer from TotalPhase. You can download the Flash Center
Memory Programmer for free from the TotalPhase Web site at
www.totalphase.com/products/flash_center/#downloads.
If you use the Flash Center Memory Programmer software, you also need to change the extension
of the .NME and .NMF application image files generated by the NodeBuilder tool to .HEX. This
is because the Flash Center Memory Programmer requires hex files that have .HEX extensions.
Also note that if you are programming the external serial flash device on the FT 5000 EVB, you
must also program the external serial EEPROM device on the board with the configuration data in
the .NME file.
7. Remove the connection from the in-circuit device programmer.
8. Power off the FT 5000 EVB.
9. Re-connect the pins on JP1.
10. Remove ground from the Reset pin by removing the connection between pins 16 and 20 on the
Gizmo I/O Connector (see step 4).
11. Power on the FT 5000 EVB.
For more information on performing in-circuit programming of Series 5000 chips, see Chapter 8 of the
NodeBuilder FX User’s Guide.
I/O Line Access (JP24)
This header provides access to the 12 I/O, service, and reset lines of the FT 5000 Smart Transceiver on
the FT 5000 EVB, and it provides a ground reference for instrumentation with a scope or logic
analyzer. Although JP24 can be used to wire other I/O devices, you should use the Gizmo Header
(P201) to do this because it can also provide power for other devices (see
14 FT 5000 EVB Hardware Details
I/O Connector later in this
Page 23

chapter for more information about the Gizmo header). By default, this header is open as illustrated in
the following figure:
LCD, Light Sensor, LEDs, Switch, and Joystick Connections (JP31)
This set of jumpers is used to connect the LCD, Light Sensor, LEDs, and the shift register for the SW2
push button (lines 1 and 2 of three) and joystick (SW3) on the FT 5000 EVB. The 13-14 and 15-16
pins on JP31 are used with the 1-2 pins on JP32 for bitshift I/O with the SW2 push button and the
Joystick. By default, all the jumpers are connected, as illustrated in the figure below. You can use an
I/O line for other I/O functions by disconnecting the jumper that connects the I/O line to an I/O device
on the FT 5000 EVB.
FT 5000 EVB Hardware Guide 15
Page 24

The following table lists the I/O pins and I/O devices associated with the jumpers on JP31.
Jumper I/O Pin I/O Device/Functionality on FT 5000 EVB
1-2 IO0 SCL LCD
3-4 IO0 SCL L Light sensor
5-6 IO1 SDA LCD
7-8 IO1 SDA L Light sensor
9-10 IO2 LED1
11-12 IO3 LED2
13-14 IO4 SWCLK (Shift register clock for SW2 and Joystick)
15-16 IO5 SWIN (Shift register data in for SW2 and Joystick)
Switch, Joystick, Temperature Sensor, and USB Connections (JP32)
This set of jumpers is used to connect the shift register for the SW2 push button (line 3 of three) and
joystick (SW3), temperature sensor, USB interface, SW1 push button, and I/O pull-downs on the FT
5000 EVB. The 1-2 pins on JP32 are used with the 13-14 and 15-16 pins on JP31 for bitshift I/O with
the SW2 push button and the Joystick. By default, the switch and temperature sensor jumpers are
connected, and the USB interface jumpers are disconnected as illustrated in the figure below. You can
use an I/O line for other I/O functions by disconnecting the jumper that connects the I/O line to an I/O
device on the FT 5000 EVB.
16 FT 5000 EVB Hardware Details
Page 25

The following table lists the IO pins and IO devices associated with the jumpers on JP32.
Jumper I/O Pin IO Device/Functionality on FT 5000 EVB
1-2 IO6 SWSH (Shift register latch strobe for SW2 and Joystick)
3-4 IO7 TEMP (temperature sensor)
5-6 IO8 RXUSB (USB receive)
7-8 IO9 SW1
9-10 IO10 TXUSB (USB transmit)
11-12 IO3 PD (connects a 499 Ω pull-down resistor to IO3)
13-14 IO1 PD (connects a 499 Ω pull-down resistor to IO1)
15-16 IO9 PD (connects a 499 Ω pull-down resistor to IO9)
Connecting the USB Interface
You can enable serial communication without handshake lines and then connect your FT 5000 EVB to
your development computer via a USB interface. This lets you perform application-level debugging,
tests, or diagnosis. Once you create this USB connection, you can output debugging and tracing
information from the device application running on your FT 5000 EVB to a terminal emulation
program on your computer such as Windows HyperTerminal.
To create the USB connection for performing application-level debugging, follow these steps:
1. Connect the type A connector on a USB Type A to Type B Cable to an available USB port on
your computer, and then connect the type B connector to the USB interface on the left side of the
FT 5000 EVB.
2. Connect jumpers 5-6 (IO8 RXUSB) and 9-10 (IO10 TXUSB) on JP32. This connects the IO8 and
IO10 pins on the FT 5000 Smart Transceiver to the USB communications interface on the board.
IO10 is connected to pin 5 RXD as a serial data output to the USB interface, and IO8 is connected
to pin 1 TXD as a serial data input from the USB interface.
FT 5000 EVB Hardware Guide 17
Page 26

3. Run Windows HyperTerminal or another terminal emulation program on your computer to
monitor the serial output. Configure your terminal emulation program for direct connection to
your serial port using the serial parameters specified in the device application. See the next
section,
application for application-level debugging.
Note: You can use only one of the EIA-232 or USB interfaces on the FT 5000 EVB at a time.
For information on implementing serial I/O, see the EIA-232C Serial Interfacing with the Neuron Chip
engineering bulletin (005-0008-01D).
Configuring a Device Application for Serial Debugging, for how to configure your device
Configuring a Device Application for Serial Debugging
If you are connecting the USB or EIA-232 interface to perform application-level debugging, you must
declare an SCI I/O object in your device application that specifies the communication parameters to be
used by Windows HyperTerminal or another terminal emulation program on your computer to monitor
the serial output. In addition, you must specify code in your device application that outputs data to the
interface.
For example, the example applications included with the FT 5000 EVB include the following code that
declares an SCI I/O object in the FT5000EvalBoard.h file specifying a baud rate of 9600 bps (see the
SCI (UART) Input/Output section in Chapter 4 of the I/ O Model Reference for more information on
creating SCI I/O objects):
#ifdef FT5000EVALBOARD_USE_SERIALDEBUG
#include <io_types.h>
#pragma specify_io_clock "10 MHz"
IO_8 sci baud(SCI_9600) ioSerialDebug;
void EvalBoardPrintDebug(char* string);
#endif // FT5000EVALBOARD_USE_SERIALDEBUG
The FT5000EvalBoard.nc file in the example applications includes a
EvalBoardPrintDebug()function. This function calls the built-in io_out_request ( ) function,
which establishes and initiates the output operation over the serial interface [see the Neuron C
Reference Guide for more information on the io_out_request ( ) function]. The declaration of the
EvalBoardPrintDebug()function is as follows:
#ifdef FT5000EVALBOARD_USE_SERIALDEBUG
void EvalBoardPrintDebug(char *string)
{
io_out_request(ioSerialDebug, string, (unsigned int) strlen(string));
while (!io_out_ready(ioSerialDebug));
}
#endif // FT5000EVALBOARD_USE_SERIALDEBUG
18 FT 5000 EVB Hardware Details
Page 27

The Switch.nc and LED.nc files in the example device applications store various values in strings and
then call the EvalBoardPrintDebug()function to output the strings to the serial interface.
if (bOn) {
// Toggle the state of the switch
nvoSwitch[0].state ^= 1;
nvoSwitch[0].value = nvoSwitch[0].state ? 200u : 0;
// Copy to feedback NV
nviSwitchFb[0] = nvoSwitch[0];
(void)strcpy(string, "Switch 1 pressed\r\n");
EvalBoardPrintDebug(string);
}
else {
(void)strcpy(string, "Switch 1 released\r\n");
EvalBoardPrintDebug(string);
}
You can view the source code for the FT 5000 EVB example device applications by clicking Start,
pointing to Programs, pointing to Echelon NodeBuilder or Echelon Mini, pointing to Examples,
pointing to FT5000 EVB, clicking the desired Example Source Code folder, and then clicking the
Source folder. See the FT 5000 EVB Examples Guide for more information on the example device
applications you can run on your FT 5000 EVB.
LCD 5V Power (JP33)
This jumper provides 5V power for the LCD on the FT 5000 EVB. If you are using the FT 5000 EVB
example applications or you are developing a device application that uses the LCD, leave this jumper
connected as illustrated in the following figure:
If you are not using the LCD and you want to reduce the power consumption of the FT 5000 EVB, you
can disconnect the LCD’s power as illustrated in the following figure (you can hang the shunt off pin 1
or pin 2):
FT 5000 EVB Hardware Guide 19
Page 28

EIA-232 Interface (JP201and JP203)
This set of jumpers enables the EIA-232 and ShortStack interfaces on the FT 5000 EVB. These
jumpers are disconnected by default (these interface are disabled) as illustrated in the following figure:
You can enable the EIA-232 interface without and with handshake lines. You can enable the EIA-232
interface without handshake lines to connect your FT 5000 EVB to your development computer for
performing application-level debugging. You can enable the EIA-232 interface with handshake lines
to connect your FT 5000 EVB to a development computer for performing application-level debugging
or to connect it to other microcontrollers.
Note: When you connect the EIA-232 interface, you need to disconnect the same I/O signals from the
on-board I/O devices on jumpers JP31 and JP32.
The following sections describe how to enable the EIA-232 interface without and with handshake
lines.
Connecting the EIA-232 Interface (without handshake lines)
To create the EIA-232 connection without handshake lines, follow these steps:
1. Connect the male end of a DB9 Male-Female Serial Extension Cable to the DB9 socket on the
upper left-hand side of the FT 5000 EVB, and then connect the female end to one of the COM
ports (typically COM1 or COM2) on your computer.
20 FT 5000 EVB Hardware Details
Page 29

2. Verify that jumpers 5-6 (RXUSB) and 9-10 (TXUSB) on JP32 for the USB interface are
disconnected. This is because you can only use one of the EIA-232 and USB interfaces on the FT
5000 EVB at a time. See
earlier in this chapter for more information.
3. Connect jumpers 1-2 (IO8 R10) and 7-8 (IO10 T1IN) on JP201. This connects the IO8 and IO10
pins on the FT 5000 Smart Transceiver to the EIA-232 communications interface on the board.
IO10 is connected to pin 12 as a serial data output (TX) on the EIA-232 interface, and IO8 is
connected to pin 14 as a serial data input (RX).
Switch, Temperature Sensor, Joystick, and USB Connections (JP32)
4. Run Windows HyperTerminal or another terminal emulation program on your computer to
monitor the serial output. Configure your terminal emulation program for direct connection to
your serial port using the serial parameters specified in the device application. See
Device Application for Serial Debugging earlier in this chapter for more information on
configuring your device application for application-level debugging.
Note: You can use only one of the EIA-232 or USB interfaces on the FT 5000 EVB at a time.
For information on implementing serial I/O, see the EIA-232C Serial Interfacing with the Neuron Chip
engineering bulletin (005-0008-01D).
Configuring a
Connecting the EIA-232 Interface (with handshake lines)
You can enable the EIA-232 interface with handshake lines to connect your FT 5000 EVB to a
development computer for performing application-level debugging or to connect it to other
microcontrollers.
To create the EIA-232 connection with handshake lines, follow these steps:
1. If you are connecting your FT 5000 EVB to a development computer for performing
application-level debugging, follow
FT 5000 EVB Hardware Guide 21
step 1 in the previous section.
Page 30

2. Verify that jumpers 5-6 (RXUSB) and 9-10 (TXUSB) on JP32 for the USB interface are
disconnected. This is because you can only use one of the EIA-232 and USB interfaces on the FT
5000 EVB at a time. See
Switch, Temperature Sensor, Joystick, and USB Connections (JP32)
earlier in this chapter for more information.
3. Connect jumpers 1-2 (IO8 R10), 3-4 (IO4 R20), and 7-8 (IO10 T1IN) on JP201. This connects
the IO4, IO8, and IO10 pins on the FT 5000 Smart Transceiver to the EIA-232 communications
interface on the board. IO10 is connected to pin 12 on the EIA-232 connector as a serial data
output (TX), IO8 is connected to pin 14 as a serial data input (RX), and IO4 is connected to pin 7
as a request to send input (RTS).
4. Connect jumpers 5-6 (IO0 T2IN) on JP203 to route the IO0 signal through the EIA-232 interface
level shifter. This signal is connected to the CTS~ signal on the EIA-232 interface.
You can connect the RTS~ signal from the EIA-232 interface to the IO4 input on the FT 5000
Smart Transceiver using jumper 3-4 on JP201.
5. In addition, you can connect jumpers 7-8 (FON PD) on JP 203 to prevent the EIA-232 level shifter
from entering sleep mode during idle periods. See
Connecting the ShortStack Interface later in
this chapter for the locations of these jumpers.
22 FT 5000 EVB Hardware Details
Page 31

6. If you are using the EIA-232 interface to connect your FT 5000 EVB to ShortStack host processor,
or if you planning to connect a microcontroller via an SCI connection but without the EIA-232
level shifter, see
Connecting the ShortStack Interface for more information on how to do this.
Connecting the ShortStack Interface
You can use JP201, JP203, JP24 and JP32 jumpers to control connections to a micro controller, such as
a ShortStack host processor, without or without the EIA-232 level shifter. Jumpers and signal routing
options are provided to support ShortStack Micro Servers on the FT 5000 EVB. The ShortStack
Micro Server provides a simple way to add L
For more information on the ShortStack Micro Server, see the ShortStack User’s Guide. The
ShortStack Micro Server and user’s guide is available as a free download from
www.echelon.com/shortstack.
ONWORKS networking to new or existing smart devices.
Note: You must use the ShortStack FX Developer’s Kit to develop ShortStack applications for the FT
5000 EVB. Earlier versions of the kit do not support the FT 5000 EVB.
The following simplified diagram illustrates the signal routing and configuration options for
ShortStack link layer connections (or other plain SCI connections) provided with the FT 5000 EVB.
Note that when you connect the EIA-232 interface, you need to disconnect the same I/O signals from
the on-board I/O devices on jumpers JP31 and JP32.
FT 5000 EVB Hardware Guide 23
Page 32

24 FT 5000 EVB Hardware Details
Page 33

Gizmo 5V or 3.3V Power Select (JP204)
This jumper connects 5V or 3.3V power to the Gizmo connector (P201, pin 19) on the FT 5000 EVB.
You can use the Gizmo connector for the external use of the 12 I/O pins of the FT 5000 Smart
Transceiver and the power supply (5V or 3.3V). The 5V and 3.3V supplies are disconnected from
JP201 by default as illustrated in the following figure (the shunt hangs off pin 2):
To connect 5V power to the Gizmo connector (P201, pin 19), connect the shunt between pins 1 and 2
as demonstrated in the following figure:
To connect 3.3V power to the Gizmo connector (P201, pin 19), connect the shunt between pins 2 and 3
as demonstrated in the following figure:
Gizmo 3.3V Power (JP205)
This jumper connects 3.3V power to the Gizmo connector (P201, pin 17) on the FT 5000 EVB. The
3.3V jumper is disconnected by default as illustrated in the following figure (the shunt hangs off pin
1):
FT 5000 EVB Hardware Guide 25
Page 34
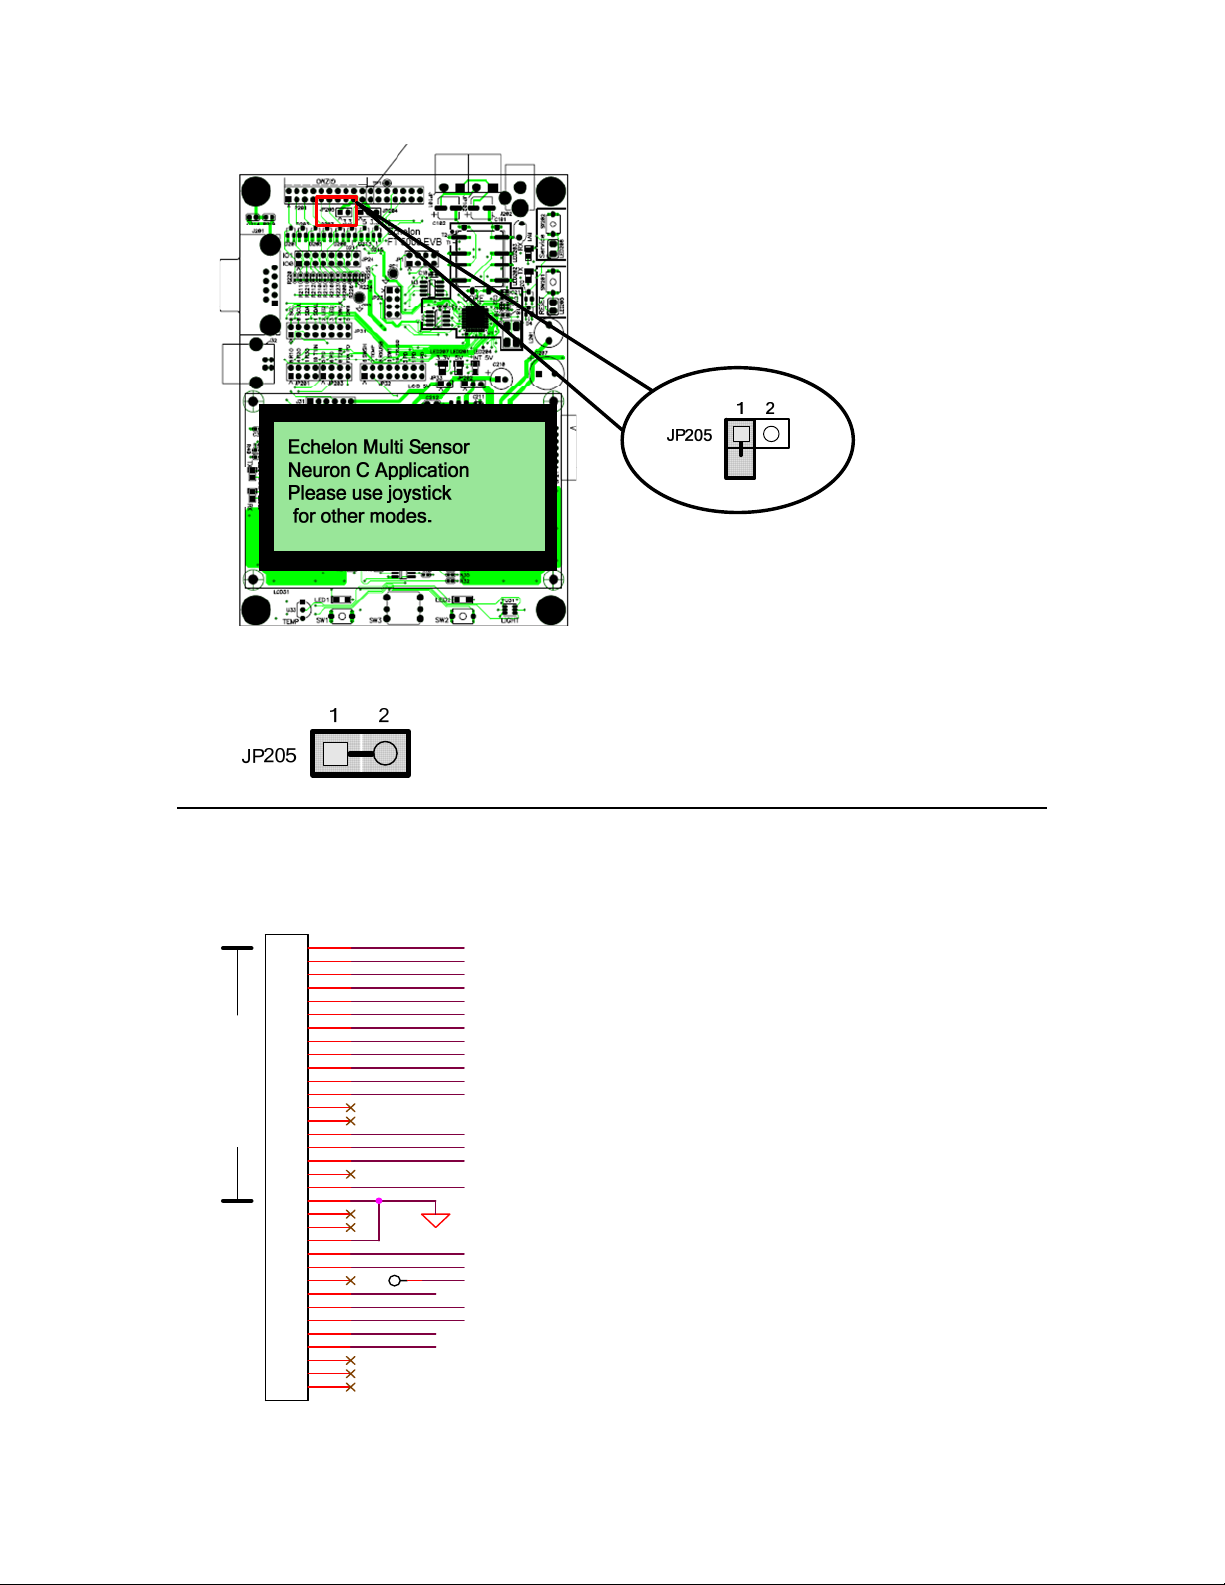
To connect 3.3V power to the 3V pin on the Gizmo connector (P201, pin 17), connect the shunt
between pins 1 and 2 as demonstrated in the following figure:
I/O Connector
The following figure shows the I/O connector pinout for the FT 5000 EVB board. You can use this
connector to attach custom I/O devices to an evaluation board.
P201
GIZMO
Interface
HEADER 17X2
1
2
3
4
5
6
7
8
9
10
11
12
13
14
15
16
17
18
19
20
21
22
23
24
25
26
27
28
29
30
31
32
33
34
IO0
IO1
IO2
IO3
IO4
IO5
IO6
IO7
IO8
IO9
IO10
IO11
SVCRST-
VDD_GIZMO
VA (PWR_IN)
VDD5_EXT
1
TP1
CP4
CP3_RX
CP2_TX
CP1
CP0
VDD5
26 FT 5000 EVB Hardware Details
Page 35

Design and Test for Electromagnetic Compatibility
Echelon’s free topology twisted pair technologies support the creation of products that meet a wide
variety of regulatory requirements. Chapter 4 of the FT 5000 Smart Transceiver Data Book describes
how to create products with Echelon’s free topology twisted pair technology that meet electromagnetic
compatibility regulations.
The FT 5000 EVB boards are designed to facilitate testing of Echelon’s free topology twisted pair
technologies. As such, they have no enclosure, providing open access to the IO connectors, buttons,
LEDs, and other I/O components. They have been developed to allow consumer and commercial
device OEM suppliers to evaluate the technology quickly, and have not been designed to be installed
permanently in homes or commercial buildings. If you work with the FT 5000 EVB boards in a home
environment, operation of other electronic equipment that is sensitive to RF radiated emissions, such as
televisions or radios, might be temporarily impaired during the evaluation period.
The standards for RF emissions vary by geographic region. To determine which standards apply in
your region, consult the appropriate regulatory agencies. In the European Union, CISPR 22 (or
equivalently, EN 55022) applies. In the North American market, the FCC regulates emissions from
unintentional radiators under 47CFR15.109, Subpart B, which allows for substitution of CISPR 22.
The FT 5000 EVB boards comply with CISPR 22 Level A, but not Level B (which is required for
deployment in home and commercial environments).
FT 5000 EVB Hardware Guide 27
Page 36

www.echelon.com
 Loading...