

eChat e360 Quick Start Guide

e360
ENGLISH
Quick Start Guide
Broadband Portable Radio
LEGAL INFORMATION
Copyright ©CALTTA TECHNOLOGIES CO., LTD. 2020
No part of this publication may be quoted, reproduced, translated or
used in any form or by any means, electronic or mechanical, includ-
sion
of CALTTA TECHNOLOGIES CO., LTD.
Violators Will Be Prosecuted.
CALTTA TECHNOLOGIES CO., LTD. reserves the right to make
guide without prior notice.
to the actual product. The accessories provided with the product
may vary with product models and functions.
11
1. GET TO KNOW YOUR RADIO
1.1 Components
The e360 radio is a trunking voice intercom product based on the
public network data service, which can be used in the LTE/WCDMA
networks. With the help of 4G technology, the e360 achieves high-
speed data connection, so that you can communicate with others in
real time.
NOTE:
Before using the radio, read all the instructions contained in
the manual and with special care, those relative to safety.
2
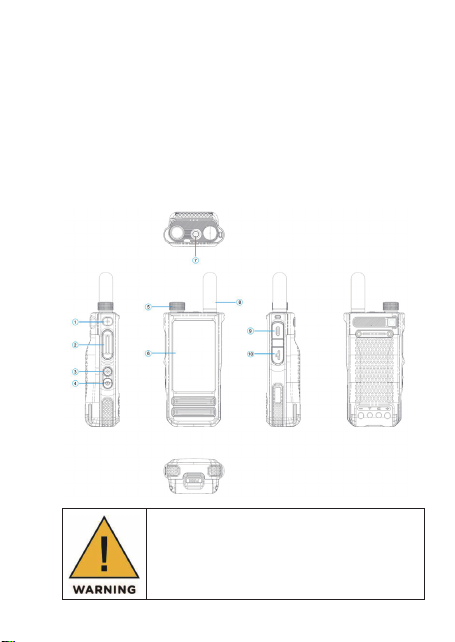
1.2 COMPONENT DESCRIPTIONS
No. Name No. Name
1 F1 (Function 1) button 6 LCD screen
2 PTT button 7 SOS button
F2 (Function 2) button
3
Power button
4
5 Channel/Volume knob 10 Nano-SIM Card Slot
8 Antenna
9 Earphone/USB Type-C Interface
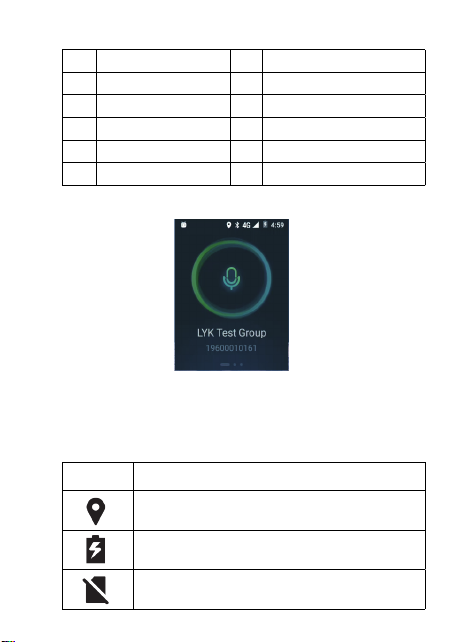
2. SYMBOLS DISPLAY
The main screen of Android system is the starting point for you to
access all Android system functions on your radio. You may study
the status of the radio by the status bar on the top of the screen.
The following icons may be displayed on the LCD.
Icon Status
GPS location ON
Charging
No SIM Card
3
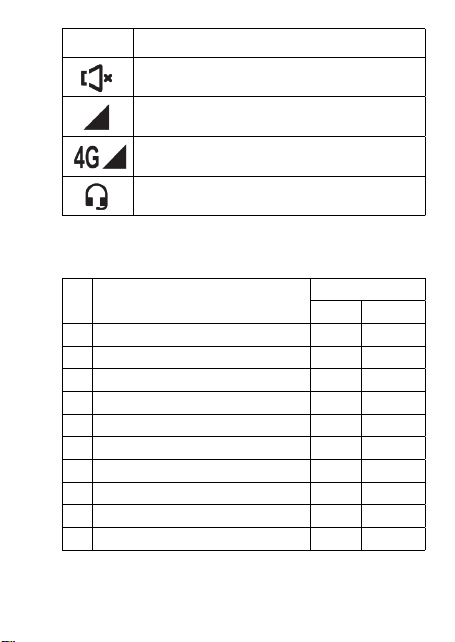
Icon Status
Mute
Signal indicator
Data service indicator
Earphone connected
2.1 LED INDICATOR
The LED indicator indicates the operating status of the radio.
No. Working Status
1 Charging Red Solid
2 Full charge Green Solid
3 Login failed Red Flashing
4 Group selecting mode Green Solid
5 Floor request successful Red Solid
6 Floor request fail Red Flashing
7 Answer the group call/half-duplex private call Green Solid
8 Power on progress Green Solid
9 Power off progress Red Solid
10 Extremely low power (less than 10%) Red Flashing
4
LED Indicator
Color Period
3. GETTING STARTED
3.1 Insert the battery
1. Insert the battery by pushing up from lower left corner in the back
2. Install successfully, ensure the battery contacts match up with
the contacts in the radio.
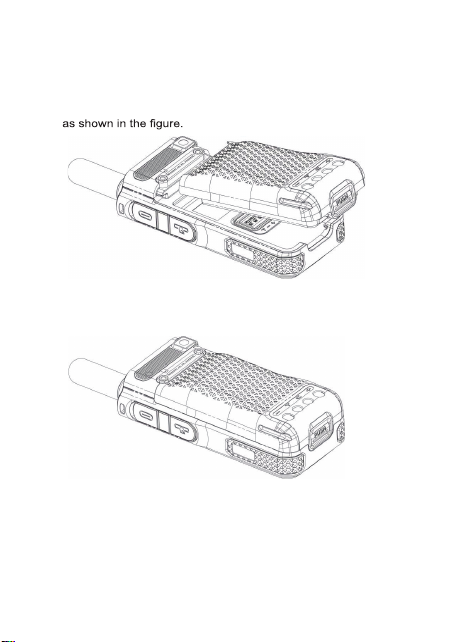
3.2 Insert Nano-SIM card
Insert a valid Nano-SIM card into the radio before using.
The Nano-SIM card can be used in any corresponding format radio
(the new radio will automatically read the Nano-SIM card).
1. Power off the radio.
2. Open the cover of Nano-SIM card and insert it in the right direc-
5
tion.
3. Close the cover of Nano-SIM card.
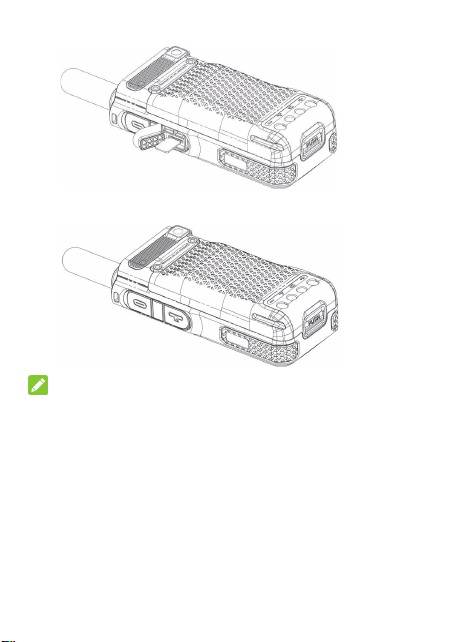
NOTE:
• Please power off the radio before removing Nano-SIM card. It is
inadvisable to insert or take out the Nano-SIM card if connected to
external power source.
• Please avoid touching the metal plane area of the SIM card to
prevent damaging the information held inside. Store the Nano-SIM
card in a place away from electricity and magnetism.
3.3 Battery charging
There are two ways of battery charging, one is desktop charging,
the other one is USB cable charging.
6
Desktop charging:
1. Place the radio in the desktop charger and the radio will be
charged automatically.
2. After charging is completed, take out the radio.
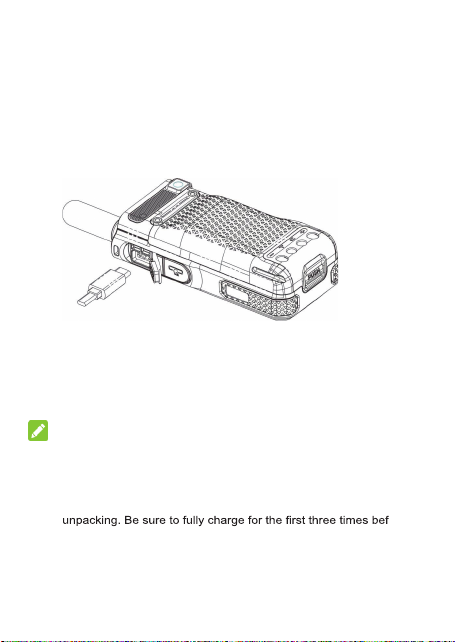
USB cable charging:
3. Connect the charge/data cable to the USB Type-C interface of
the radio.
4. Connect the other end of charge/data cable to the charger, and
then connect the charger to AC power socket. Battery, radio and
charger will be moderately hot during charging, this is normal.
5. After charging, disconnect the charger from AC power source.
NOTE:
• Under the circumstance where data transmission is not supported,
the in-built data cable is for charging only.
• The lithium ion battery attached with the radio can be used after
ore
thorough use, so that the battery can reach its optimum usage
state.
• If the battery voltage is too low, the radio will automatically power
7

off.
• If the battery will be not used for a long period, please take it out
from the radio and store it in a cool, dry place.
3.4 Power on
Press and hold the power button for 3~5s under the power off
mode, after green indicator is lit, the LCD screen displays the power
on picture, prompting that the radio is powering on.
3.5 Power off
Press and hold the power button for 3~5s under the standby mode,
after red indicator is lit, the LCD screen displays the power off
picture, prompting that the radio is powering off.
3.6 Adjust the volume
Rotate the channel/volume knob to adjust the volume under the
standby mode, LCD screen displays the current volume level and
the radio broadcasts the voice assistance at the same time.
3.7 Light up the screen
Press the Power on/off button to light up the screen.
8
 Loading...