

press the reset button. Checking again would verify your findings.
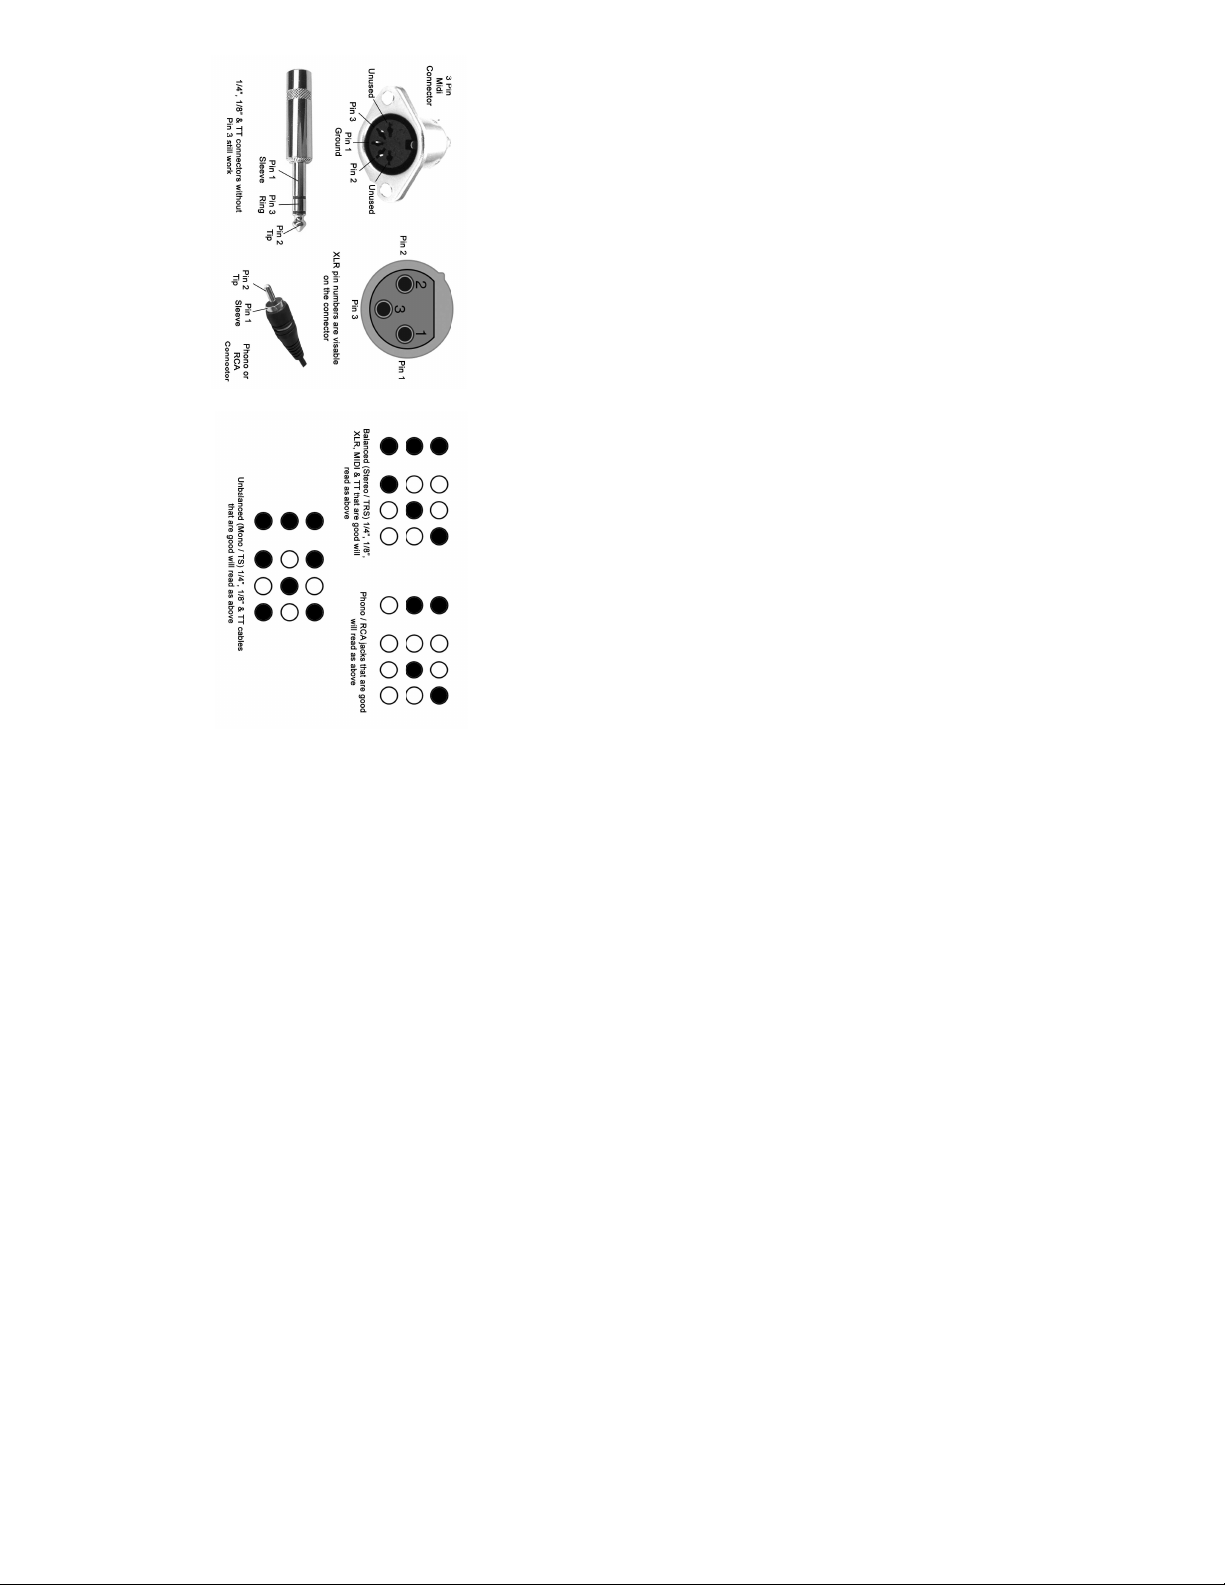
CONNECTOR PIN DIAGRAMS READOUT DIAGRAMS
· To test for an intermittent short in a cable, insert one end of the cable into the IN
The additional LED's that light up indicate which wires have the fault.
jack of the cable tester and set it to "Cable Test Mode". Press the reset button to
make sure it's clear. Move the cable around. If there's an intermittent short in the
cable, the LED corresponding to the shorted wire will light up and stay lit until you
into appropriate jacks (in/out).
will read as a big check mark if cable is good.
· To test if the cable is good, set to "Cable Test Mode". Insert both ends of ccable
· Balanced 1/4" (TS or TRS), 1/8" (TS & TRS), XLR, MIDI (3 pin) and TT cables
· If the LED's look anything other than in diagrams below, there is a cable fault.
To generate test tones through any of the OUT jacks (except the MIDI out), move
the On switch to the Test Tone position.
CABLE TEST MODE:
To use Installed Cable Test mode, hold down the Reset button while moving the
On switch to the Cable Test position. The Power ON LED will blink to indicate the
unit is in Installed Cable Mode.
3) Test Tone Mode:
The 6-in-1 Cable Tester works in three main modes of operation:
1) Cable Test Mode:
To use, move the On switch to the Cable Test position.
2) Installed Cable Test Mode:
The 6-in-1 Cable Tester works with six different types of connectors: XLR, 1/4"
(mono or stereo), RCA (also called phono), 1/8" (mono or stereo), TT, and 3 pin
MIDI. Some MIDI devices now use more that 3 pins but the cable tester will only
check 3 pins.
Included in package: 1 Cable Tester with 4 rubber feet attached.
Not Included: 2 AA batteries. Install batteries via the battery door on the
underside of tester. Remove the battery door phillips head screw for battery
access.
INSTRUCTION MANUAL
6-in-1 Cable Tester
LED grid that can be used to show how a cable is wired. This can be especially
handy to determine is an XLR cable has the ground connector to the connector
housing.
WIRING DISPLAY / GROUNDED SHIELD DETECTOR: The Cable Tester has a handy
Rev. July 26, 2012
PHANTOM POWER DETECT: During Test Tone Mode, pins 2 and 3 are monitored for
external DC voltage as commonly supplied to microphones. The Phantom LEDs will
light any time the presence of a DC voltage greater than 5V is detected.
TEST TONE MODE: To generate test tones through the OUT jacks, move On switch
does not show a pin shorted to itself. The Intermittent testing feature works in the
same way as Cable Test Mode.
between signals in the cable, then none of the LEDs in the Cable Wiring Display will
light. Next, place a shorting jack on the other end of the cable. If the signals in the
cable have no opens, then they'll make it all the way to the shorting jack and the
Cable Wiring Display will show all pins as being shorted to each other. The display
Disconnect both ends of a suspect cable from the equipment it is attached to.
Attach one end of the cable to the appropriate Output jack and leave the other end
disconnected. The Cable Wiring Display works as before except it now shows any
connections between OUT pins, not between OUT and IN pins. If there are no shorts
to the Test Tone position.
Warning: DO NOT use Test Tone Mode for MIDI cables. The cable tester does not
generate MIDI data. While we won't guarantee it, the audio test tone should not
harm MIDI equipment if connected.
A test tone is placed on the Pin2 / Tip signal of all OUT jacks. The level can be set to
either +4 dBu, -10 dBV, or Mic level (approximately -50dBV). Note that battery
voltage level will effect the accuracy of the test tone output level. The Test Tone
Mode is intended for use in checking audio system integrity and the rough setting of
signal levels only and not for use as a voltage standard.
1kHz / 440Hz Selection: Pressing Reset during Test Tone Mode will switch the test
tone frequency between 1kHz and 440Hz. The selection is indicated by its LED: On
= 1kHz, Off = 440Hz. Test tone frequency accuracy is +/- 0.1% and is unaffected
by battery voltage.
TESTING FOR INTERMITTENT CONNECTIONS:
While in Cable Test Mode, pressing Reset stores the current Cable Wiring Display
and clears the Intermittent LEDs. If any change occurs in the wiring displayed, the
Intermittent LED corresponding to any Input pin which had the change will light and
stay lit until the next time Reset is pressed. In this way you'll know if you have an
intermittent cable even if it was intermittent for such a small period of time that you
may have not seen the LED flicker.
INSTALLED CABLE TEST MODE:
To use Installed Cable Test mode, hold down the Reset button while moving the On
switch to the Cable Test position. The Power ON LED will blink to indicate the unit is
in Installed Cable Mode.
INSTRUCTION MANUAL
6-in-1 Cable Tester
 Loading...