

Page 1
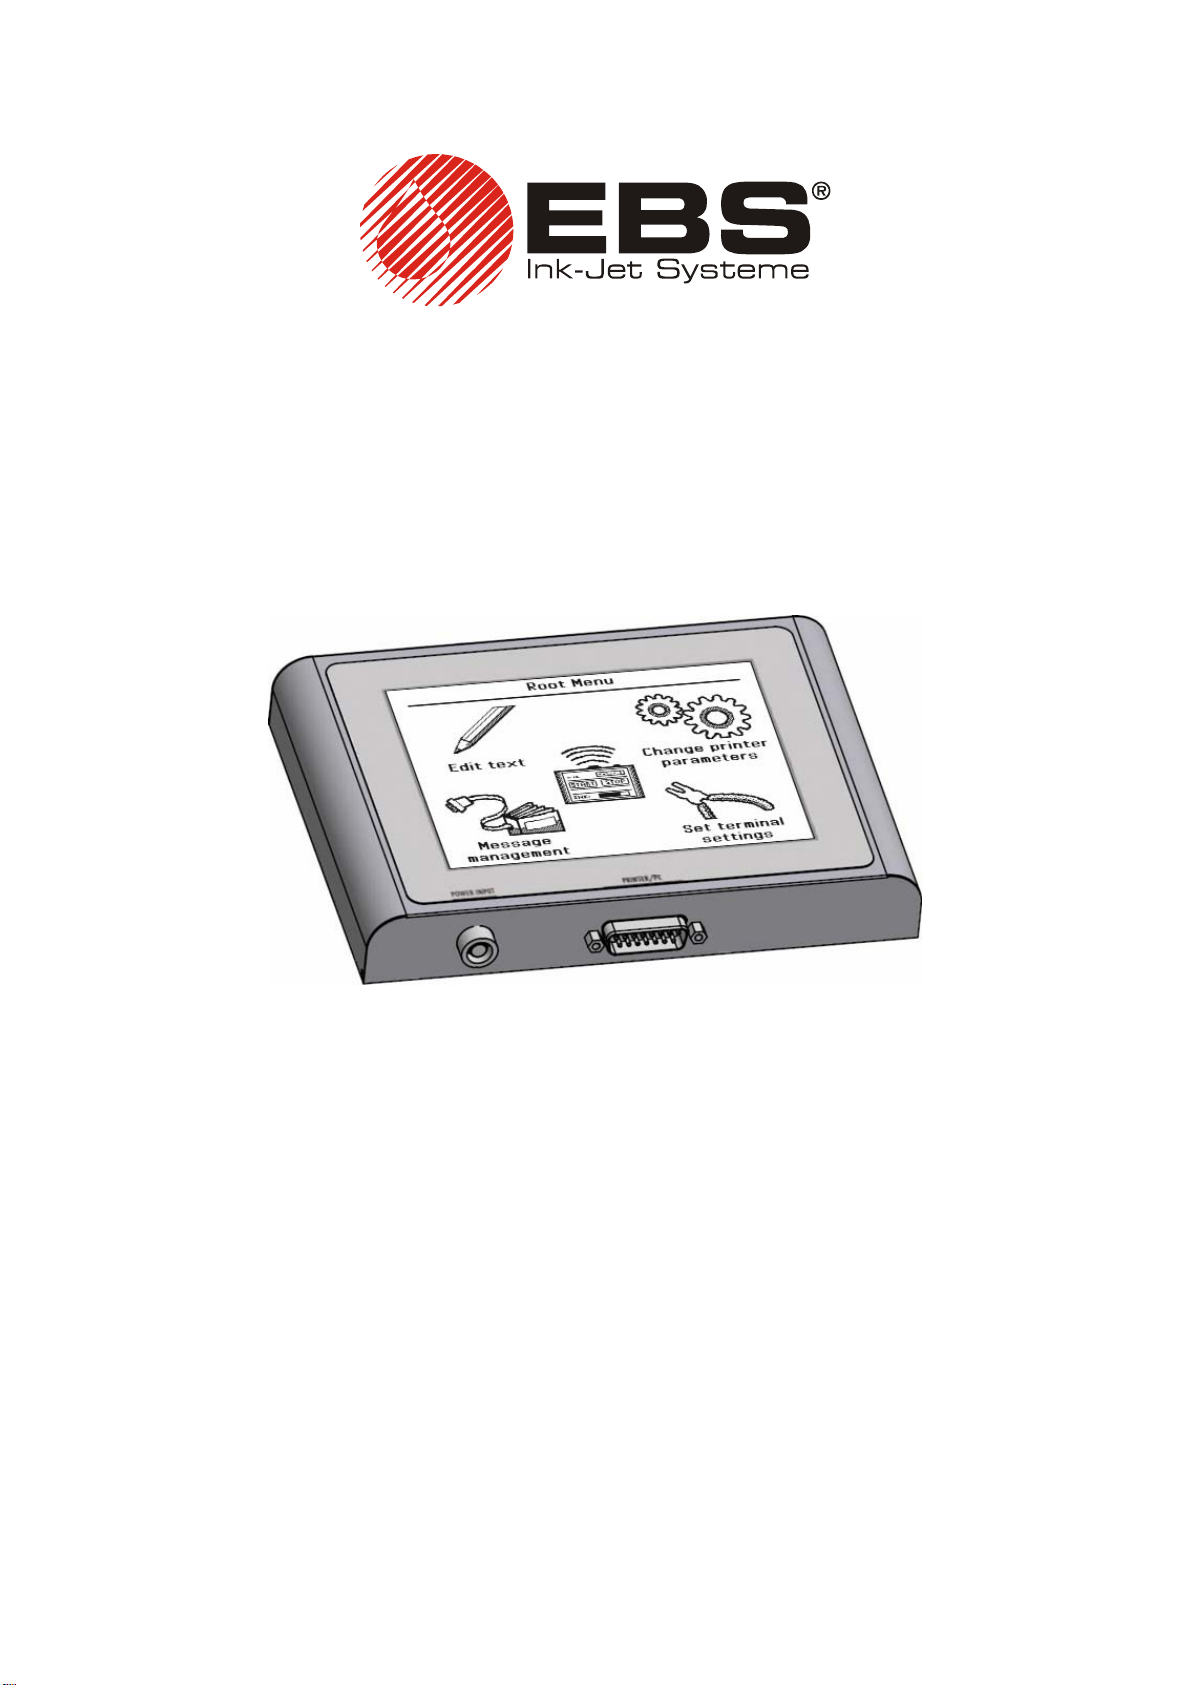
T200 TERMINAL
USER’S MANUAL
VERSION: 20080129#1.0
EBS Ink-Jet Systeme GmbH
Alte Ziegelei 19-25, D-51588 Nümbrecht
+49 (0)2293 / 939-0
Fax +49 (0)2293 / 939-3
http://www.ebs-inkjet.de
©
2008 EBS Ink-Jet Systeme GmbH
Page 2

T200 Terminal User’s Manual
Dear Users of
EBS Ink-Jet Systems equipment,
Please read this manual necessarily in order to get full information about the
operation of your device.
Disclaimer:
• We shall bear no responsibility for damage to the device if it is operated improperly, i.e.,
inconsistently with this manual.
• As we wish to keep pace with permanently progressing technological development and individual
requirements of our clients, we need to reserve the right to change the form, make and technical
solutions of our devices. Therefore no data, illustrations or descriptions of this manual shall form
any grounds for claims.
• We spare no effort to ensure that this manual is reliable, includes all modifications and is free from
errors. However, the drawing up and publication process is complex and an error can occur in
spite of our endeavours and wishes. We shall bear no responsibility for the consequences of
editorial and printing errors in this manual.
If your device contains a particular piece of equipment or needs performing an operation that have not
been illustrated or described in this manual, or if you have queries on reading this manual, please
contact any EBS Ink-Jet Systems agent for additional information.
2
_____________________________________________________
20080129#1.0
Page 3

T200 Terminal User’s Manual
TABLE OF CONTENTS
These instruction apply to the
firmware version is displayed on splash screen – see
T200
terminal that is equipped with firmware version 1.0.29. The
Fig. 6.1.
1. Application............................................................................................................4
2. Safety Requirements............................................................................................4
3. Conformity Marking .............................................................................................4
4. Environmental Protection....................................................................................4
5. Installation ............................................................................................................4
6. Operation ..............................................................................................................6
Starting Up........................................................................................................................6
Using the Root Menu........................................................................................................7
Customising the Terminal ...............................................................................................8
Control Panel – Starting/Stopping Printing ...................................................................9
Setting Printer Parameters ..............................................................................................9
Editing Text Files............................................................................................................11
Text Edit Screen Structure .................................................................................................... 11
Keypad Layout........................................................................................................................ 11
Using Variable Fields ............................................................................................................. 12
Graphics Editor....................................................................................................................... 12
Text Preview............................................................................................................................ 13
Text File Library..............................................................................................................14
Transferring Projects between Printer and Terminal.......................................................... 14
Example of How to Prepare and Print a Simple Text File...........................................14
7. Advanced Information .......................................................................................17
Safe Mode........................................................................................................................17
Changing User Authorisations......................................................................................18
8. Technical Parameters ........................................................................................19
20080129#1.0
______________________________________________________
3
Page 4
T200 Terminal User’s Manual
1. Application
The T200 terminal is a stationary device designed for controlling EBS-230 printers. It can
replace a PC in operating the printers, which is advantageous, especially in the places where the
application of a PC is impossible or hindered. With the terminal, a user can change the printer
parameters, edit text files, send the files to the printer and also start or stop printing. Owing to the
application of a touch pad, the device can be operated intuitively and with ease.
This document contains information about the terminal only and supplements the
Printer User’s Manual.
EBS-230
2. Safety Requirements
There are no dangerous voltages or other hazards in the device. For this reason the conditions for
safe use of the T200 terminal do not exceed the safety requirements described in
Printer User’s Manual.
EBS-230
3. Conformity Marking
The EBS-230 printer has been subjected to conformity assessment procedure, which ended with
the issue of Declaration of Conformity. The Declaration forms the basis for the statement that the
EBS-230 printer together with the manufacturer equipment, to which the Declarations also
applies, meets the requirements of the following European Community Directives, provided that the
printer and equipment are installed and used in compliance with the manufacturer’s instructions:
2006/95/EEC, 89/336/EEC, 91/263/EEC, 92/31/EEC, 93/68/EEC
and meet the following norms, which are harmonised with the above directives:
EN 61000-6-2:2001, EN 61000-6-4:2001, EN 60950-1:2001
On this basis, the following marking has been placed on the EBS-230 printer and T200
terminal since 2007:
4. Environmental Protection
T200 terminal working in the EBS-230 printing system is not subject to Directive
2002/96/EC of the European Parliament and of the Council on waste electrical and
electronic equipment (WEEE). However, following the European Community’s generally
accepted policy on environmental protection, we recommend that after the T200 terminal
has been put out of service, it should be separated from municipal waste and processed in
an environmentally friendly way according to the applicable local regulations.
5. Installation
The T200 terminal is supplied as a selfcontained device in combination with a holder.
The cabling needed to link it to the system is
available in R230 cable distributor.
4
_____________________________________________________
20080129#1.0
Page 5
T200 Terminal User’s Manual
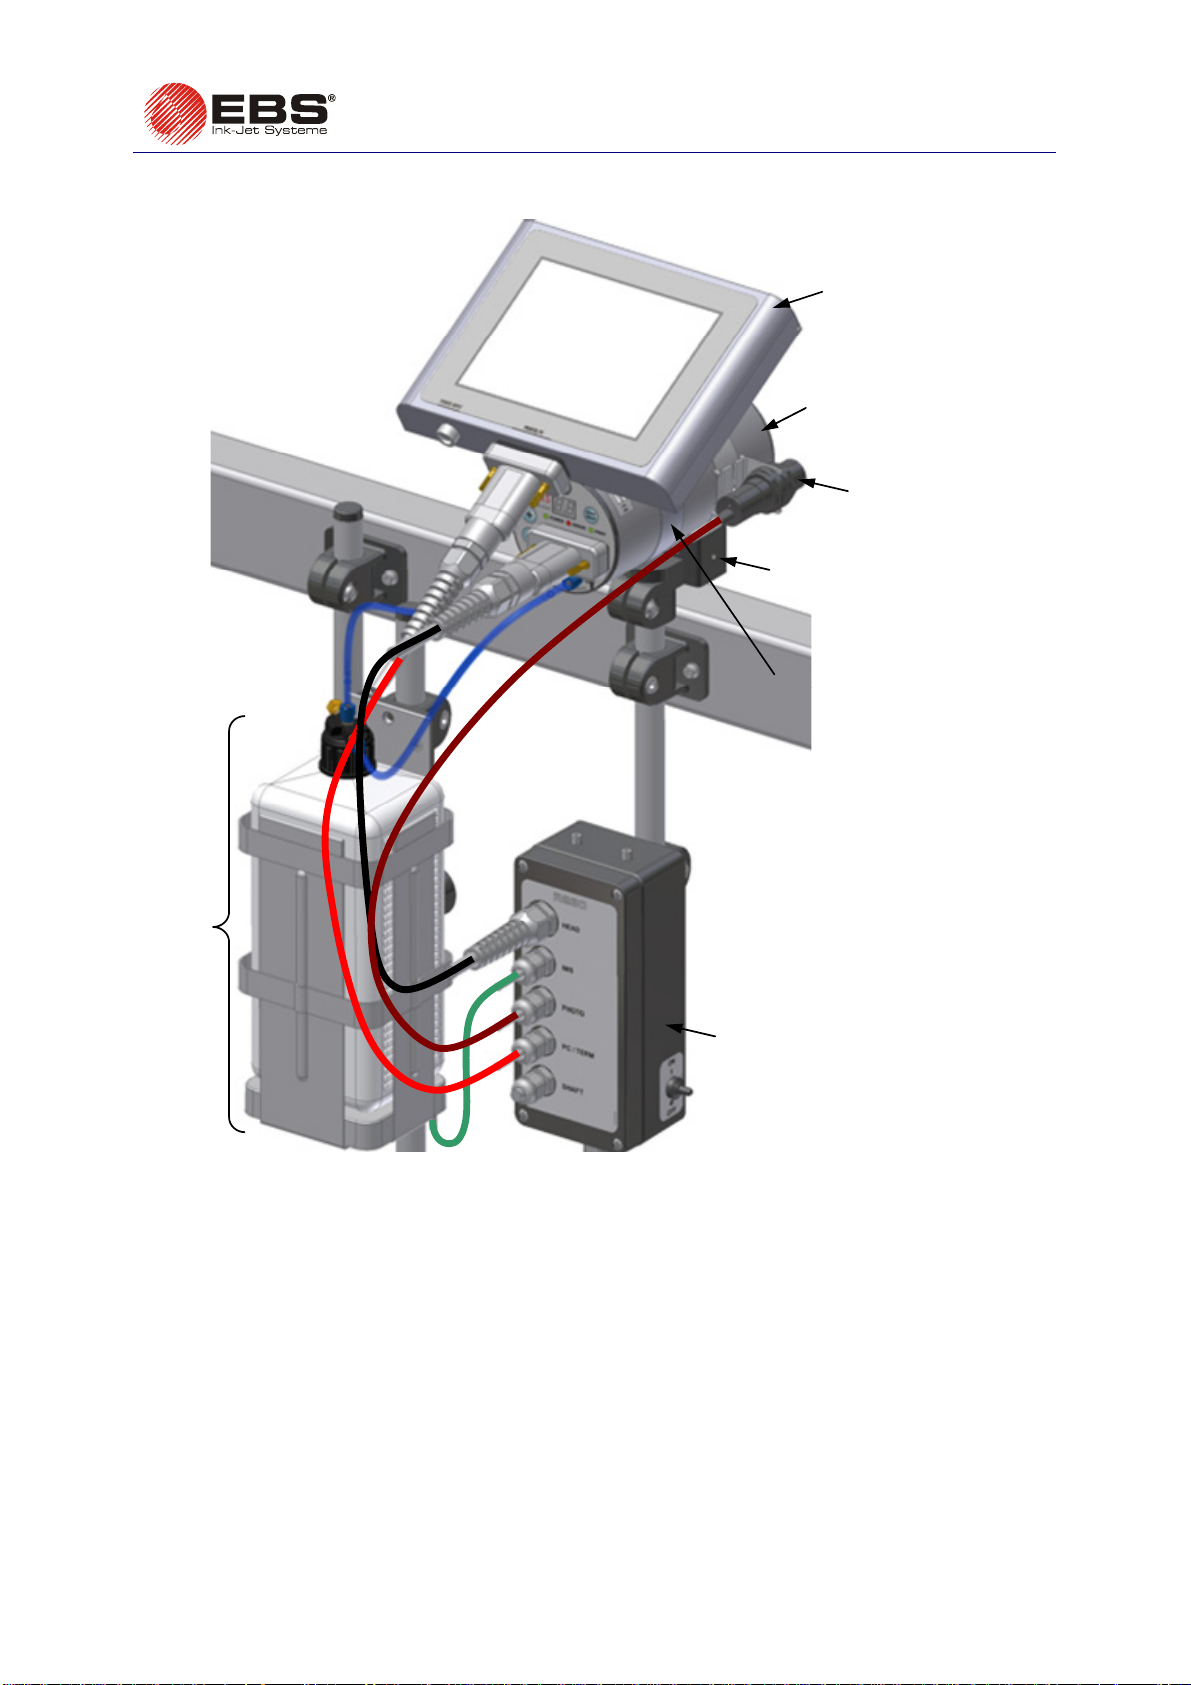
A diagram of a printing system with the T200 terminal is shown in Fig. 5.1.
n
p
t
s
o
r
q
The system consists of the following subassemblies:
¾ EBS-230 printer,
¾ Photo-detector,
¾ Printer holder,
¾ R230 cable distributor,
¾ Ink system with IMS module,
¾ T200 terminal,
¾ Holder,
¾ Printer holder, fixtures and tubes,
¾ Other holders and tubing.
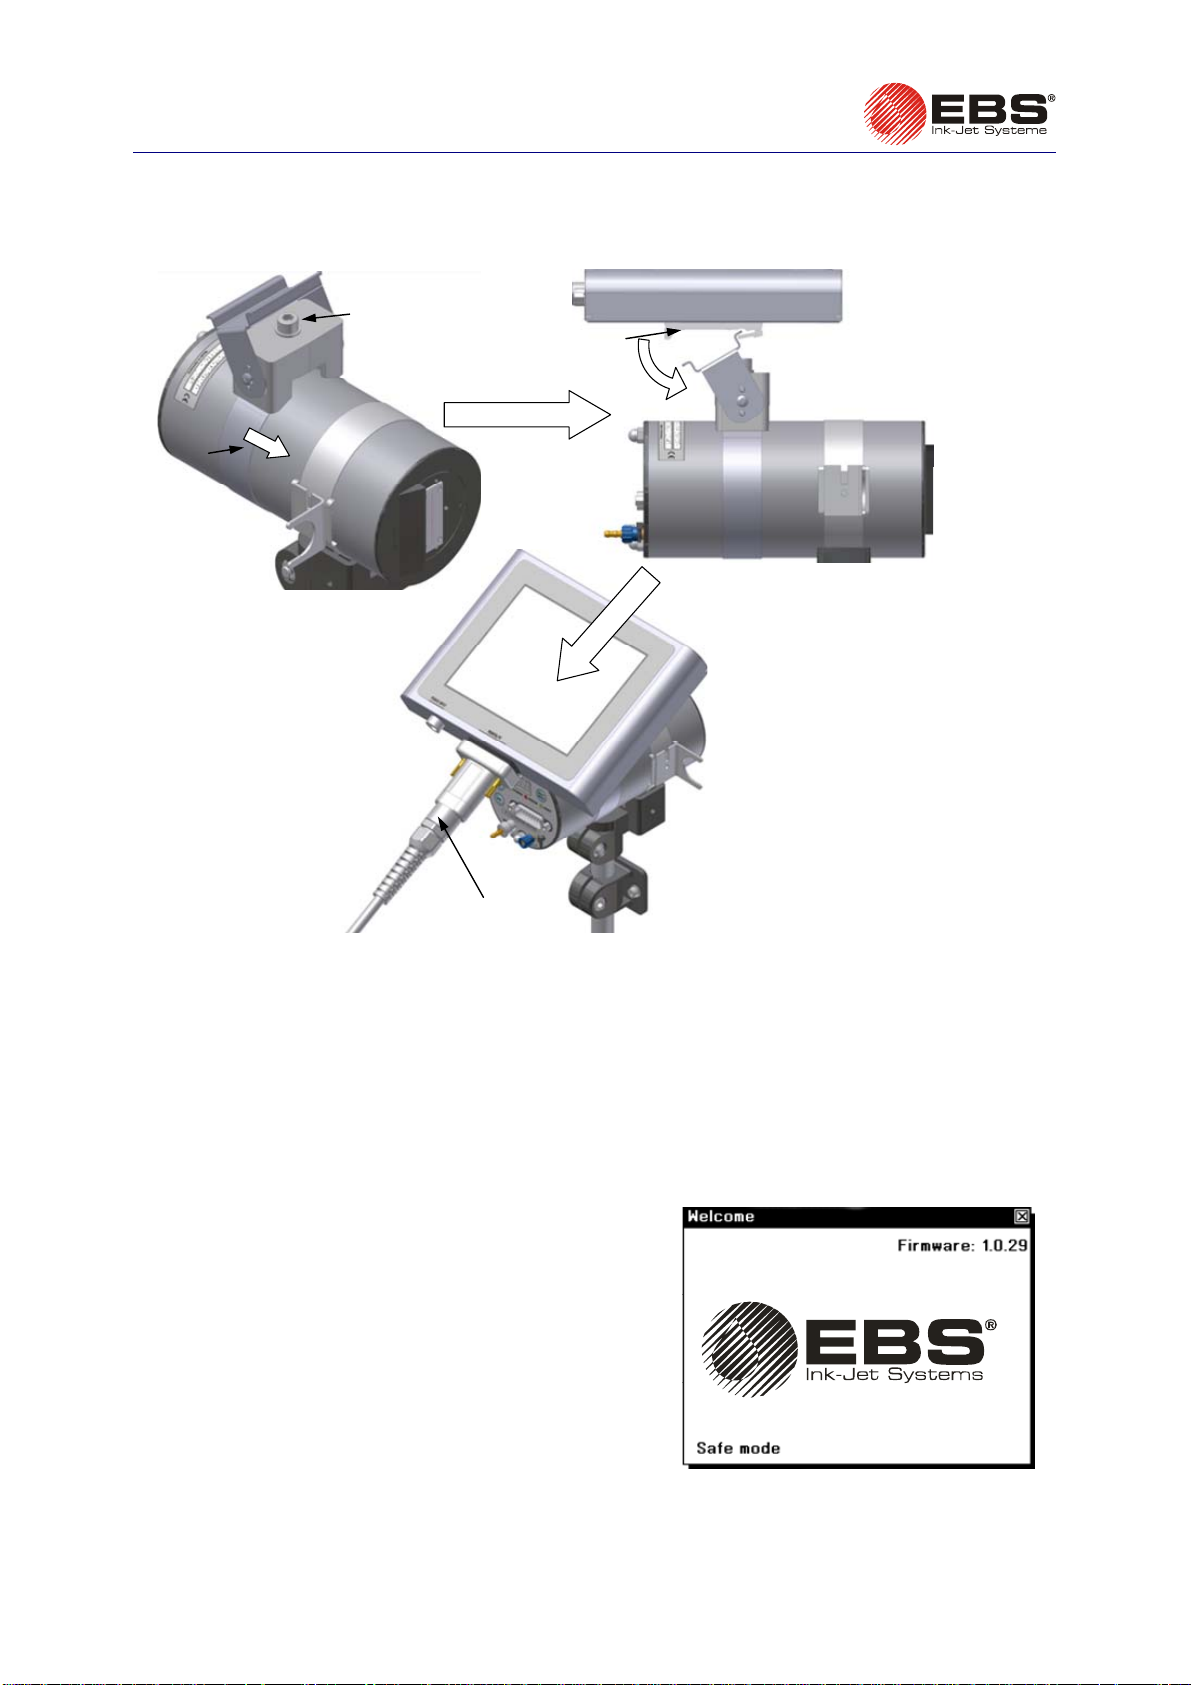
In order to install the terminal on the existing system, you need to do the following (see Fig. 5.2):
1. Attach the terminal holder to the EBS-230 printer,
a) Put a clamping ring,
b) Screw tight the bolt
t
p
, to fix the terminal to the printer,
o
,
,
s,
n
,
q
,
r
,
n
, on the printer casing,
o
with an Allen wrench,
Fig. 5.1
20080129#1.0
______________________________________________________
5
Page 6
T200 Terminal User’s Manual
2. Fix the T200 terminal in the holder with snap fastener that is located at the holder’s back wall,
3. Detach PC/TERM cable,
PRINTER/PC connector on the terminal.
q
, from the R230 cable distributor pack and connect it to
o
p
n
q
NOTE: You can detach the T200 terminal from your printing system and use it for preparing
printing projects (texts, graphics, variable fields, printing parameters) in a place that is
convenient for you. As the terminal needs energizing from an external source, connect a
separate power pack to the terminal socket marked as POWER INPUT. The power pack is
available against a special order.
Fig. 5.2
6. Operation
Starting Up
On connecting the T200 terminal according to the
description given in Chapter
switch of the R230 cable distributor to the ON
position. The operation causes the terminal to start and
splash screen (shown on the right) to be displayed. The
screen contains the manufacturer logo, firmware version
and Safe Mode button (see section
details).
5 Installation, set the power
Safe Mode for more
Fig. 6.1
6
_____________________________________________________
20080129#1.0
Page 7

T200 Terminal User’s Manual
Using the Root Menu
The Root Menu screen appears on the display three seconds after the terminal has been switched on;
the splash screen is displayed in the meantime (see section Starting Up).
to text file library
to text edit screen
(…)
to printer parameter
settings for a given text file
text edit window,
parameter edit window or text
file library
to printer control
panel
to terminal settings screen
The
Root Menu consists of five buttons which perform the following functions:
Icon
Name used further
below
Text editor
To go to text edit screen.
to return to Root Menu
Description/navigation
To go to the screen where you can edit
Parameter editor
the printer parameters that are related
to a given text file.
To go to text file library, where you can
Text file library
also communicate with the printer in
order to send or receive projects.
Printer control
To go to the screen where you can start and stop printing. It is
available from the
Root Menu only.
Fig. 6.2
icons
Simplified navigation via title bar
To go to the screen where you can customise the terminal to
Set terminal settings
a user’s requirements. It is available from the
only.
In order to return to the Root Menu screen, use the icon on the title bar.
20080129#1.0
______________________________________________________
Root Menu
7
Page 8

T200 Terminal User’s Manual
Customising the Terminal
Before you start using the terminal, you can configure it to satisfy your needs. In order to do that,
select the
screen
Set terminal settings button on the Root Menu screen (see Fig. 6.2). A terminal settings
n
, is displayed.
o
n
The terminal settings screen
Parameter
Language
Auto save
Printer type
Advance settings
Save settings
TS calibration
p
Fig. 6.3
n
(see Fig. 6.3) allows you to modify the following parameters:
Description
To choose a language for communication. English is set by default.
To set a time interval after which the parameters being edited are
saved automatically.
To set the type of printer the terminal is to work with. For future
application.
To go to the advanced settings window o.
To save the current parameter settings to the terminal memory.
To calibrate the touch screen.
NOTE:
Improper calibration may destabilise operation of the terminal!!
8
_____________________________________________________
20080129#1.0
Page 9

When you go to the
parameters:
T200 Terminal User’s Manual
Advance settings window, o (see Fig. 6.3) you can modify the following
Parameter
Contrast
Unit system
Date format
LCD Inverse
Set time
Restore default settings
Except for modifying the above mentioned parameters, the Set terminal settings menu is a tool for
defining administrator and user passwords and also for defining user authorisations. This is done with
the
authorisations.
icon. See section Changing User Authorisations for more details on how to modify user
Description
To adjust screen contrast.
To switch to the unit system to be used to define certain quantities, e.g.
distance.
To select a date coding format.
To inverse colours on display.
To set the date and time on the terminal. When this button is pressed,
p
the set-terminal-time window
adjust the date and time settings in the terminal memory.
To restore factory-made settings.
appears on the display and you can
Control Panel – Starting/Stopping Printing
The Printer control window is accessed through selecting button n on the Root Menu screen.
n
o
s
p
q
r
Printer control performs two functions:
¾ Displays information that has a vital impact on printing: the printer status and ink level in ink bottle,
¾ Enables a user to start printing (with the
stop printing (the
Stop printing button,
Start printing button,
p
).
Setting Printer Parameters
The printer parameters are closely associated with a selected text. The name and number of a text file
in the library are shown on the title bar. Except for the title bar, the parameter setting screen consists
of two parts:
¾ Basic parameter window (upper part of the screen),
¾ Additional parameter tabs window. The contents of the window varies according to the tab you
select.
o
) of a selected text file, s, and to
Fig. 6.4
20080129#1.0
______________________________________________________
9
Page 10

T200 Terminal User’s Manual
A
r
r
r
A
Ink drop intensity in text
to be printed
Character resolution in
text to be printed
Print delay
Text number in library Filename in library
Text rotation vertical
and horizontal
Number of text
iterations
Distance between print
iterations
Refresh variable fields
with each iteration
Selective characte
spacing
Buffering text files fo
printing
utomatic restart of
printing after unpredictable
suppression
Number of repetitive
printing of every vertical
row
Source of timing signal
Proportional character
spacing
Height of text to be
printed
Maximum number of print
head nozzles
Conveyor belt travel rate
(m/min)
Photo-detector
operation mode
Inversing photo-detector
signal to light/dark
Ink pressure.
Regulation range:
0.2 bar – 0.5 ba
Date and time shown on
prints
ccess to service options
(password protected)
Reading encoder
constant
Print stop mode
Sending date and time
settings to printer
Setting current date and
time (saved in terminal
memory)
Changing the colour of
ink for printing
Fig. 6.5
A precise description of, and setting range for, each of the parameters are given in
Printer User’s Manual.
Fig. 6.5 contains only basis information about these parameters.
EBS-230
10
_____________________________________________________
20080129#1.0
Page 11

T200 Terminal User’s Manual
Editing Text Files
Text Edit Screen Structure
After the Edit text button has been selected on the Root Menu screen (see Fig. 6.2), the following
screen is displayed:
Text filename in library
Navigation buttons to
switch between text edit
window, printer parameters
and text file library
Button bar to facilitate editing
of texts files
Text file number in library
Scroll bar
Text edit area
Keypad
Fig. 6.6
Keypad Layout
Text files are edited with the use of a QWERTY keypad whose arrangement is the same as that for
PCs. As the display area is limited, it may happen that the area of each of the buttons is insufficient to
use the terminal conveniently. You can rearrange the keypad and ensure that the button areas are
greater. In order to do that, use the
Button bar
button on the button bar (see Fig. 6.6).
Standard keypad Keypad with bigger key areas
Using the terminal, you can insert characters of embedded fonts for the Latin and Cyrillic alphabet, and
also special characters defined by the manufacturer. If you wish to insert characters of other alphabets
(e.g. Arabic or Chinese) it is necessary to use the PC program for controlling the printer.
In order to select the type of build-in font, press the
Button bar
20080129#1.0
_____________________________________________________
button on the button bar (see Fig. 6.6).
Fig. 6.7
Fig. 6.8
11
Page 12

T200 Terminal User’s Manual
w
The SHIFT and Caps Lock keys and the Alt key are used to type in capital letters and diacritical
national characters, respectively, in the same way as on regular PCs. If you press the SHIFT, Caps
Lock and Alt keys, the characters available are displayed on the terminal screen.
Using Variable Fields
Texts to be input via the terminal can contain not only key characters but also the data that is updated
during printing, such as date, time or counters. Variable fields account for such data. For more
information about the variable fields see
variable field in a given text, press the
is displayed in place of the keypad:
Buttons that are useful
hen you edit texts
EBS-230
button on the button bar (see Fig. 6.6). The following screen
Printer User’s Manual. In order to use a
Button bar
List of variable fields
in a given text file
Button for removing
variable fields from
text file
Buttons for inserting
variable fields into
text files
The below table contains a list of variable fields that are available for use and also the field
components and code characters.
Symbol Variable field Component Code characters
When a variable field is inserted into a text file, it is replaced with the characters shown in the Code
characters column of the above table. When a text file is printed, the characters are replaced with the
current data. The order of the code characters can be modified within a given variable field and so can
the initial settings of the counters. The components that are not needed for a given application can be
removed or new ones can be added.
Univ. date & time
Univ. date & time
Univ. date & time
Up counter
Down counter
Buttons for setting variable field
parameters (date shift, counter
increment)
day-month-year DA-MO-RLYE
hour-minute-second BC-IJ-TU
number of day of the year PQS
number 0001
number 0001
Fig. 6.9
For more information about the variable field components see
EBS-230
Printer User’s Manual.
Graphics Editor
The graphics (bitmap) editor enables a user to create and edit drawings which can then be inserted
into texts to be printed.
12
_____________________________________________________
20080129#1.0
Page 13

T200 Terminal User’s Manual
In the Text editor window press
Select
displayed on the screen.
Bitmap editor from the drop-down menu that appears afterwards. The editor window is
Button bar
To insert bitmap into
text file being edited
To delete drawing
being edited
The window where graphics can be created/edited consists of dots and enables a user to generate
graphics with a m
with a blunt tool (
not to damage the display surface.
aximum height of 16 dots and length of 60 dots. Graphic drawings shall be created
see the message that is displayed before you run the editor for the first time) so as
, an auxiliary menu button available on the button bar (see Fig. 6.6).
To exit bitmap editor and go to text
editor, with no drawing being saved
To select draw mode
Scroll bar to scroll
drawing being edited
Fig. 6.10
Text Preview
You can pre
feature is useful especially when variable fields are used to create the text file.
In the Text editor window (see
displayed.
Ruler to measure real
Resolution slider – to
view a text being edited at any time in order to see what it will look like after printing. The
Fig. 6.6) press the
button on the button bar. A text preview screen is
Button bar
length of prints
Preview of three
successive texts
adjust length
To exit preview screen and save
resolution setting (if modified)
Print scroll bar To preview
successive text
Fig. 6.11
20080129#1.0
_____________________________________________________
13
Page 14

T200 Terminal User’s Manual
y
r
Text File Library
In order to display the contents of the text file library, select the Message management button from
the root menu (see
Fig. 6.2). The following screen is displayed.
Edit selected
text file
Select text
from library
Save text file and
related parameters
in librar
Edit print parameters for
selected text
See Fig 6.13
Change name of
selected text file
Managing printer
network
Remove text and
related parameters
from library
Fig. 6.12
Transferring Projects between Printer and Terminal
Every text file and the associated parameters form a project. All projects generated with the use of the
terminal are stored in library. From there they can be transferred to printer both one by one or all of
them (the entire library) at once. The projects can also be
to get texts or pa
before.
In order to transfer projects to (or from) printer, go to the
Send/retrieve button. The following screen is displayed.
rameters edited. Either single projects or the entire library can be downloaded as
downloaded from printer to the terminal, e.g.
Storage menu (see Fig. 6.12) and select the
Transfer selected project or
entire library to printe
If the system is connected properly (see chapter
should be established after any of the buttons shown in
The successful transfer (fetching) of a project or the project library are confirmed with the
successful
message.
Fetch selected
project from printer
5 Installation), then commu
Fetch entire project
library from printer
Fig. 6.13 has been sele
nication with the printer
cted.
Fig. 6.13
Operation
Example of How to Prepare and Print a Simple Text File
This section contains a description of how to create a simple text file using a variable field, how to set
basic parameters for the text, send them to printer and start printing.
The text file used in this example is called Production date and looks like as follows:
14
_____________________________________________________
20080129#1.0
Page 15

T200 Terminal User’s Manual
n
o
q
p
r
s
t
u
Project parameter setting screens
Fig. 6.14
20080129#1.0
_____________________________________________________
v
15
Page 16

T200 Terminal User’s Manual
The settings of the
In order to prepare a text for printing, you need to perform the following operations (the numbering of
successive operations corresponds to that shown in
n
- Select the Edit text button on the Root Menu screen,
o
- Prepare the text for printing following the description given in section Editing Text . The format of
the text in question is as follows:
Auto save function are used to save every modification to the project parameters.
Fig. 6.14):
Simple text typed in via
keypad; a capital “D” and
character “:” are available
after the
p
- Go to auxiliary menu by pressing the button,
q
- If you wish to pre-print the text in question, select the Print it item. The text is sent to printer and
then it is printed but not saved in the printer memory.
r
- In order to save the project, select the Save project item. If the project has not been saved
before, you are prompted to give its name. Once you type it in, the name appears on the title bar,
automatically. The same name is also given to the text file in text file library,
t
- Set the printer parameters that apply to the text you are editing. You can move easily among the
text editor,
simplified navigation via icons on the title bar.
NOTE:
You can edit the contents, s, and parameters, t, of a text file which is highlighted in the library at
a given moment. In order to move to another text or its parameters (or create a new one), you
should select another item (from 1 to 30) from the library.
On finishing editing send the text file to printer. In order to do that, select the Send/retrieve button
from the
Send project(s) button. The terminal display shows the question whether the active project (currently
highlighted in the library) or all projects stored in the library should be sent. In the example in question
it is enough to send the active project. Since then the text file together with its associated parameters
is in the printer memory.
Start printing the text. In order to do that, move to the
on the title bar).
s
, parameter edit window for a given text file, t, and text file library, u, thanks to
Connect menu,
u
button has been
pressed.
. When you do that, menu v is displayed on the terminal. Then press the
Components the Univ.
date and time variable
field are available when
button and then
the
the
button are
pressed.
s
u
.
Root Menu screen (via the button available
,
16
o
p
q
n
_____________________________________________________
Fig. 6.15
20080129#1.0
Page 17

T200 Terminal User’s Manual
r
On the
on the terminal display. If the information (status and ink level) displayed in that window is correct,
select the text (
printing button
to start printing.
In order to suppress printing, press the
Root Menu screen, select button n (see Fig. 6.15). The Printer control screen (
p
) which you wish to print from the drop-down menu, and then press the Start
(
q
). The printer moves to the print state and awaits a signal from the photo-detector
Stop printing button in the Printer control window.
o
) appears
7. Advanced Information
Safe Mode
The Safe Mode allows a user to start the terminal using default settings. The feature can be useful,
when, for example, any of the terminal settings makes operation impossible or hindered (for example,
due to improper calibration). As all user settings (including passwords) are deleted when the user
enters the Safe Mode, access to the mode is protected. In order to avoid entering the mode
accidentally, the Safe Mode button must be pressed three times. The position of the button on the
n
display changes each time the button is pressed (left bottom corner,
left top corner,
Otherwise the device switches on in the regular mode and displays the root menu,
Mode button has been pressed three times, the safe mode window,
to type in a four-figure password (via the numerical keypad,
displayed the
would like to start the device in the regular mode, it is enough to leave the password box empty and
press the OK button.
p
). The button needs to be pressed successively three times within 3 seconds.
r
). If the password is correct, the terminal
Set terminal settings window. However, if the user does not know the password or
→ right bottom corner, o →
s
. After the Safe
q
, is displayed, prompting a user
n
Button not
pressed fo
3 seconds
s
o
Button not
pressed for
3 seconds
Button not
pressed for
3 seconds
p
20080129#1.0
q
r
_____________________________________________________
Fig. 7.1
17
Page 18

T200 Terminal User’s Manual
Changing User Authorisations
The T200 terminal offers different access levels. In the system, a password can be defined by the
administrator, who will be able to exercise full control over the device, and by a user, whose access
rights can be modified. A user password can be saved only when an administrator password has been
defined. The options are available in the
If all four user authorisations (shown in
the user is only unauthorised to enter the
visible in the menu, but remain inactive.
Set passwords window (see Fig. 7.2).
Fig. 7.2
Fig. 7.2) are ticked while the user password is being defined,
Set terminal settings window. Then, the relevant icon is
If the administrator password is set in the terminal
and no user passwords are defined, then only the
administrator who knows the password can use the
terminal. A prompt to enter password is displayed
after the splash screen has been displayed. If the
access permissions are different from the default
settings (where both administrator and user
passwords are defined), the symbol of a key is
displayed on the
whose password is typed in after the device has been
switched on, the terminal starts operation with the
authorisations that are typical of the administrator (full
rights), or of a user (given by the administrator) or the
icons on the
wrong password is typed in. In the latter case you
need to press the key and try to type in the password
again or contact the administrator in order to gain
access to the device.
Root Menu screen. Depending on
Root Menu screen remain inactive if a
Non-default access permissions
Fig. 7.3
18
_____________________________________________________
20080129#1.0
Page 19

8. Technical Parameters
Parameter Value
Working position any
Number of text files and print parameter
sets to be stored in the terminal memory
at the same time
T200 Terminal User’s Manual
1 to 30
Maximum number of characters in a text
Graphics
Special registers
changing content based on occurrence of a
Power supply (power pack integrated with
optionally, an external power supply to use
Class of Protection ensured by housing
(logo, special graphics characters)
editor
Special characters
(texts with dynamically
specific event)
R230 cable distributor)
terminal in a convenient place
Power consumption
Operating temperature range
Storage temperature range
(long term)
according to EN 60529:1991
1300 (together with control characters)
Graphic symbols and text files can be edited with bitmap
editor
National diacritical characters, graphic, warning or
transport characters (a collection of characters
determined by manufacturer), etc.
date and time in any format, expiry dates, incremental
counter, decremental counter,
24 V DC
or
IN: 100-240 V~, 50-60 Hz / 0,66-0,34 A
OUT: 24V
120 mA
from +5°C to +40°C
from -10°C to +45°C
IP54
, max. 1A
Weight
Dimensions
approx. 650 g
housing: height: 145 mm, width: 185 mm, depth: 36 mm
touch screen: height: 85 mm, width: 115 mm
20080129#1.0
_____________________________________________________
19
 Loading...