

Page 1

GPRS TRANSMITTER
PX200N
Installation and
programming manual
Firmware version:
1.11
Issue:
7
GPRS transmitter configurator version:
1.2.0
Release date:
18.03.2010
Page 2

DECLARATION OF CONFORMITY
EBS Ltd. Co. hereby declares that mentioned product conforms to all the
applicable requirements of EU and Council Directive No.1999/5/EC of 9
March 1999. A copy of Conformity Declaration is available at:
http://www.ebs.pl/certyfikaty/
This crossed out dustbin symbol indicates that when the last user wishes
to discard the product at the territory of European Union, it shall be
utilized at an authorized and approved collection point. It applies both to
the device and accessories marked with this symbol. Do not discard these
products along with unsorted municipal wastes.
The content of this document is presented as “it is”. The manufacturer does not
grant any guarantee both expressed or implied, including but not limited to any
understood guaranties in respect of merchantability and any warranty of fitness for
a particular purpose, unless required with effective legal provisions. The
manufacturer reserves the right to amend this document, or withdraw it any time
without prior notice.
Policy of the device manufacturer is to constantly develop the product. The
manufacturer reserves the right to make modifications and changes without prior
notice in respect of any model functions described in this document.
Depending on programming of devices there are varied available functions. Further
details available at Distributor of devices.
Under any circumstances the Manufacturer shall not bear responsibility for any data
or income loss, or any other peculiar, accidental or indirect damages caused in any
way.
Page 3

PX200N_Manual_en-1.11i7 Page 3 / 58
TABLE OF CONTENTS
1.
INTRODUCTION ..................................................................................... 6
2.
FUNCTIONAL AND TECHNICAL PARAMETERS ............................................. 7
3.
ASSEMBLY AND WIRING ......................................................................... 8
4.
QUICK START PROCEDURE.................................................................... 10
5.
OPERATION......................................................................................... 12
6.
CONFIGURATION PROGRAM .................................................................. 13
6.1. INITIAL REMARKS ............................................................................ 13
6.2. COMPUTER – REQUIREMENTS............................................................ 13
6.3. PROGRAM FUNCTIONS...................................................................... 13
6.3.1. File -> New ............................................................................... 14
6.3.2. File -> Open .............................................................................. 14
6.3.3. File -> Save .............................................................................. 15
6.3.4. File -> Language........................................................................ 15
6.3.5. File -> Connections .................................................................... 15
6.3.5.1. Local connection .................................................................. 15
6.3.5.2. Remote connection............................................................... 16
6.3.6. File-> Automatic device settings backup ....................................... 17
6.3.7. File -> Exit ................................................................................ 17
6.3.8. Operations -> Read.................................................................... 18
6.3.9. Operations -> Send.................................................................... 18
6.3.10.
Operation -> Device monitor .................................................... 19
6.3.11.
Operation -> System events history .......................................... 19
6.3.12.
Operation -> Restore default settings ........................................ 19
6.3.13.
Help -> About program............................................................ 19
7.
PROGRAMMABLE PARAMETERS .............................................................. 20
7.1. ACCESS .......................................................................................... 20
7.1.1. Parameters................................................................................ 20
7.1.1.1. Device mode ....................................................................... 20
7.1.1.2. GPRS test time .................................................................... 21
7.1.1.3. SMS mode after unsuccessful attempts................................... 21
7.1.1.4. SMS test time ...................................................................... 21
7.1.1.5. Server phone number ........................................................... 21
7.1.1.6. Send events via SMS immediately.......................................... 21
7.1.2. APN Parameters ......................................................................... 21
7.1.2.1. APN.................................................................................... 21
7.1.2.2. User ID ............................................................................... 21
7.1.2.3. User password ..................................................................... 22
7.1.2.4. DNS1 and DNS2................................................................... 22
7.1.3. Main Server Parameters.............................................................. 22
7.1.3.1. Server IP Address ................................................................ 22
7.1.3.2. Server port.......................................................................... 22
7.1.3.3. Interval between subsequent connection attempts ................... 22
7.1.3.4. Number of connection attempts ............................................. 22
7.1.3.5. Order of connection to servers............................................... 23
7.1.4. Backup server parameters........................................................... 23
7.1.4.1. IP server address ................................................................. 23
7.1.4.2. Server port.......................................................................... 23
7.1.4.3. Interval between subsequent connection................................. 23
7.1.4.4. Number of connection attempts ............................................. 23
7.1.4.5. Disconnect after time limit..................................................... 23
7.1.5. Access ...................................................................................... 24
Page 4

PX200N_Manual_en-1.11i7 Page 4 / 58
7.1.5.1. Service code........................................................................ 24
7.1.5.2. Restricted user’s service code ................................................ 24
7.1.5.3. PIN of SIM card.................................................................... 24
7.2. TRANSMISSION ............................................................................... 24
7.3. INPUTS/OUTPUTS............................................................................. 25
7.3.1. Inputs configuration ................................................................... 25
7.3.1.1. NC / NO .............................................................................. 25
7.3.1.2. Delay [ms] .......................................................................... 26
7.3.1.3. Lock ................................................................................... 26
7.3.2. Outputs..................................................................................... 27
7.3.2.1. Activation mode and timing ................................................... 27
7.3.2.2. Conditions........................................................................... 27
7.3.2.3. Additional conditions............................................................. 28
7.3.3. Advanced outputs control............................................................ 28
7.3.3.1. Output 1/Output 2................................................................ 29
7.3.3.2. Time of output activation ...................................................... 29
7.4. MONITORING................................................................................... 30
7.4.1. GPRS On / GPRS Off ................................................................... 30
7.4.2. SMS On / SMS Off ...................................................................... 30
7.4.3. Skip initial state ......................................................................... 31
7.4.4. Power loss................................................................................. 31
7.4.5. Sleep when the battery voltage less than ...................................... 31
7.5. RESTRICTIONS ................................................................................ 32
7.5.1. SMS Authorized phones .............................................................. 32
7.5.2. GSM modems authorized phones.................................................. 33
7.5.3. Validity period of outgoing SMS messages..................................... 33
7.5.4. SMS limits ................................................................................. 33
7.6. SMS NOTIFICATIONS........................................................................ 34
7.6.1. Phone numbers.......................................................................... 34
7.6.2. Events ...................................................................................... 35
SMS user tests ....................................................................................... 36
7.6.3. Status....................................................................................... 36
7.6.4. SMS Forward ............................................................................. 37
7.7. LINK CONTROL ................................................................................ 38
7.7.1. GSM ......................................................................................... 38
7.7.2. GPRS ........................................................................................ 39
7.8. RS-232 ........................................................................................... 40
7.8.1. Serial port settings ..................................................................... 40
7.8.2. Buffer flushing ........................................................................... 40
7.8.3. Advanced port options ................................................................ 41
7.8.3.1. Disable data receiving........................................................... 41
7.8.3.2. Disable data sending ............................................................ 41
7.8.3.3. Half Duplex mode................................................................. 41
7.8.3.4. Tests of device connection to port .......................................... 41
7.9. PHONE LINE .................................................................................... 41
7.9.1. Phone line settings ..................................................................... 41
7.9.1.1. Use external phone line ........................................................ 42
7.9.1.2. Monitor external phone line voltage ........................................ 42
7.9.1.3. Report off-hook.................................................................... 42
7.9.1.4. Report intervals between dialled digits .................................... 43
7.9.1.5. Generate dial tone................................................................ 43
7.9.2. First and Second phone number................................................... 43
7.9.2.1. DTMF phone number ............................................................ 43
Page 5

PX200N_Manual_en-1.11i7 Page 5 / 58
7.9.2.2. Handshake delay.................................................................. 43
7.9.2.3. Protocol .............................................................................. 43
7.10. FIRMWARE ................................................................................... 45
7.11. DEVICE MONITOR ......................................................................... 46
7.12. EVENTS HISTORY.......................................................................... 47
8.
DEVICE PROGRAMMING ........................................................................ 49
8.1. LOCAL PROGRAMING ........................................................................ 49
8.2. REMOTE PROGRAMMING ................................................................... 49
8.2.1. The first programming of device................................................... 50
8.2.2. Reprogramming of device............................................................ 50
9.
RECEIVING OF SMS MESSAGE ............................................................... 51
9.1. NEW PROTOCOL............................................................................... 51
9.2. OLD PROTOCOL ............................................................................... 53
10. LED DIODES INDICATION ..................................................................... 54
10.1. LOGGING TO GSM NETWORK.......................................................... 54
10.2. GSM RANGE ................................................................................. 54
10.3. DATA TRANSMISSION.................................................................... 55
10.4. RECEIVING OF DTMF DATA............................................................. 55
10.5. PROGRAMMING............................................................................. 56
10.6. FIRMWARE UPDATING ................................................................... 56
10.7. SIM CARD ERROR.......................................................................... 57
10.8. SLEEP MODE................................................................................. 57
10.9. SYSTEM ERROR............................................................................ 57
11. CHANGELOG........................................................................................ 58
Page 6

PX200N_Manual_en-1.11i7 Page 6 / 58
1. INTRODUCTION
Transmitter GPRS type PX200N is purposed for data transmitting from electronic
security systems of facilities and other technical devices with the use of GSM
mobile phone network.
Data transmission follows via GPRS or SMS.
Due to many settings a transmitter may be applied with many systems of various
requirements. The device is basically purposed for data transmission from security
systems installed in detached houses and in small business facilities.
Additionally PX200N transmitter has got input for connection of an alarm control
panel’s phone communicator. This provides for a cheap system of data
transmission.
Communication with a monitoring station follows by GPRS/SMS mode. This device
provides an opportunity to send text messages to private mobile phones.
An advanced encoding methods like a 256 bits encoding key and AES (Advanced
Encryption Standard) provides for security of data transmission. As a result
reception of this transmission is possible with OSM.2007 monitoring receiver
system.
Furthermore there is possibility to transmit not coded messages that are to be
comprehensible by reception solutions and also by GPRS Server software.
Programming of receiver is possible:
o Locally on computer and with recommended “GPRS Transmitters
Configurator” software
o Remotely : - via GPRS connection (or SMS).
- via SMS commands
- via transmission on CSD channel
Page 7

PX200N_Manual_en-1.11i7 Page 7 / 58
2. FUNCTIONAL AND TECHNICAL PARAMETERS
8 Inputs: (NO/NC)
1 (sabotage input)
Outputs:
Sabotage (
OUT1
) - 1 (OC)
Additional (NC,NO,C) - 1 (relay)*
Phone input compatible with
DTMF standard
YES
Digital interface: RS232 (RxD, TxD, RTS, CTS lines)
Operation modes: GPRS transmission only
SMS transmission only
GPRS and SMS transmission
Messages: Sending of text messages for defined mobile
phones
Configuration: Remote - via GPRS link
Remote - SMS
Remote - CSD
Locally - from PC with the use of software and
RS-232 link
Security: SMS/GPRS transmission – AES encoding
Sabotage (OUT1) –
OC type
Additional (NC, NO, C)
- relay
Output current:
Max. 1A Max. 100mA
Voltage supply : 18VAC (16-20VAC)
Current consumption
average/max.:
80mA / 300mA @18VAC**
Dimension: 141mm x 73mm x 35mm
Charge current: Max. 220mA
Charge voltage: 13,8V
Used batteries: Acid-leaded 12V
Battery failure voltage
threshold:
11VDC
+12V Output current Max. 200mA
Used GSM/GPRS modems: Siemens MC55i, Siemens MC55, Siemens
MC56, Wavecom Q55, Simcom SIM300C,
Simcom SIM340C
*
Device can be equipped in additional OC type output (OUT2)
**
Measured with full charged battery
Page 8
PX200N_Manual_en-1.11i7 Page 8 / 58
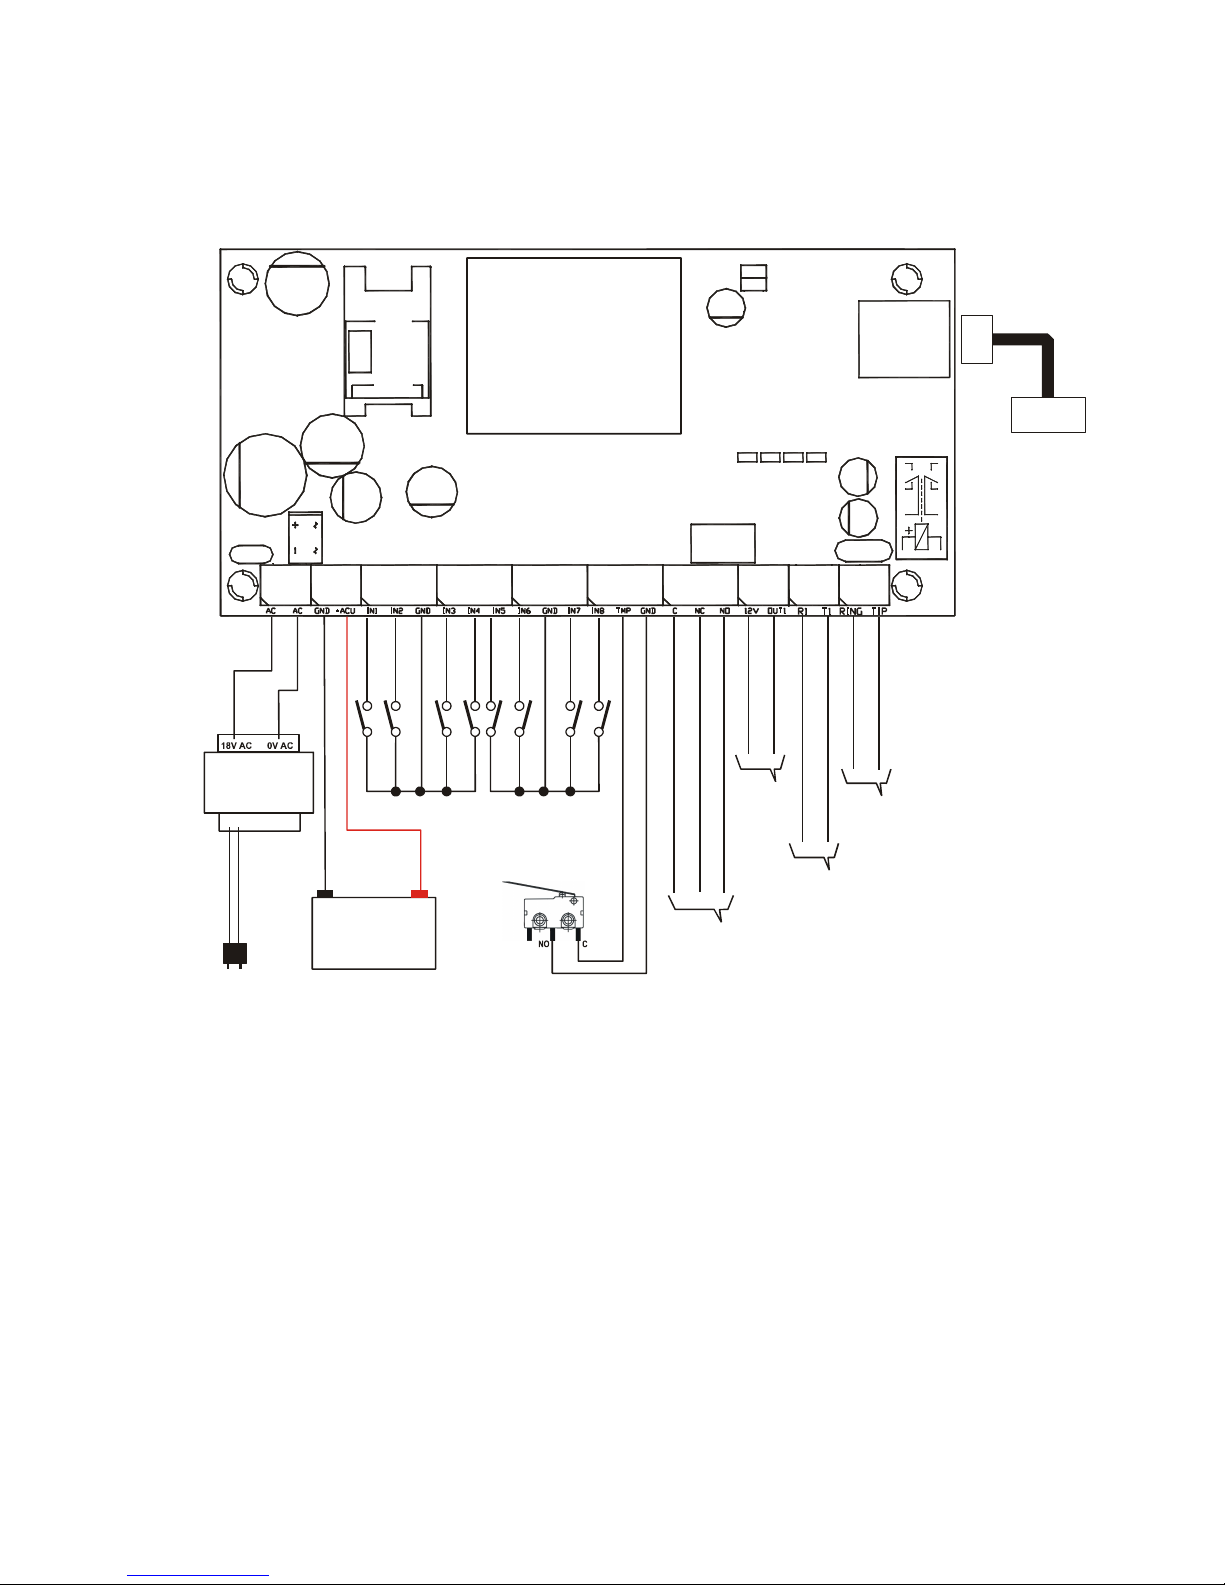
3. ASSEMBLY AND WIRING
PROG
BATTERY
12V 1.2Ah
+
-
TRANSFORMER
230V AC
TAMPER
OUTPUT
(OC TYPE)
RELAY OUTPUT
1A / 125V
8 INPUTS
SIM CARD
GSM MODULE
R
J
4
5
DB-9
SERVICE CABLE
OR
DATA CABLE
PC
PHONE
LINE
DTMF DIALER
(CONTROL PANEL)
RST
ERROR
DTMF
STATUS
OK
PRG
Page 9

PX200N_Manual_en-1.11i7 Page 9 / 58
Connections of wires shall be made with due care to prevent any faults or dead
shorts. Places of connections shall be protected against weather conditions.
According to the above figure terminals of transmitter shall be connected to:
Terminal
Connection description
AC, AC Two terminals for AC power supply (output from AC
transformer)
GND Device ground, common for other input and output
+ACU Positive terminal of battery
IN1 till IN8 Signal inputs. Possible connection of detectors contacts
or alarm control panel outputs. GND terminal is
common for all inputs
TMP Connection of monitoring sabotage switch (the second
switch contact connected to GND terminal)
NC, NO, C Additional output indication relay. It may control
external device. During activation disconnects C
terminal from NC, and connects C to NO terminal
OUT1 Type OC sabotage output. It may control external
device. Provides ground during activation
+12V Supply voltage output. Provides up to 200mA
RING, TIP Terminals for an PSTN telephone
R1, T1 Connection to alarm control panel phone communicator
NOTES :
OUT1 output can sink up to 100mA. Don’t short this output to power supply
because it can cause permanent damage of output.
Don’t connect power supply when GSM antenna isn’t connected, because it
can cause permanent damage of GSM/GPRS modem.
After careful connections examination a battery may be connected (to +AKU and
GND terminals) and then power may be switched on for transformer and
programming procedure of transmitter may begin (See chapter 6).
Page 10

PX200N_Manual_en-1.11i7 Page 10 / 58
4. QUICK START PROCEDURE
NOTE :
Do not insert SIM card before the first programming of transmitter as it
may block the card if PIN code is required for the card.
This chapter is purposed for users that possess experience regarding GPRS
data transmission systems and who work with OSM.2007 server. Other
users shall skip this chapter and go to chapter 5 of this Manual.
As many users possess protected facilities spread at vast locations, local
programming of transmitter is not always available (with computer keyboard and
programming cable).
Two phases comprise programming in this option:
a) sending to transmitter of main parameters (with SMS) that enable connection
to communication server (OSM.2007 system).
b) full configuration of device with remote programming (GPRS transmitters
configurator and OSM.2007).
Quick start procedure:
a) insert into device SIM card with PIN code 1111 or without PIN code.
b) connect power supply for module,
c) send to SIM card number with SMS parameters related to connection of
device to communication server (OSM.2007)
d) waiting for moment, when device indicates connection to server
Note: Connection to server is possible if the device was registered into it.
Registration procedure has been described in OSM.2007 Operation Manual.
e) complete, remote programming with GPRS transmitters configurator.
SMS text message shall provide the following information:
<transmitter’s service code>█SERVER=<server address>█PORT=<server port>█
APN=<access point name>█UN=<user ID number>█
PW=<user password>
Where:
█: space (every parameter shall be separated with space – blank character)
<transmitter’s service code>: factory settings -1111
<server address>: address of communication server purposed for collection of
transmitter signals e.g. 89.123.115.8 In case address is provided as domain e.g.
block.autostrada.com, SMS message shall include DNS1 parameter (address of
main DNS server)
<server port>: Number of port in server that receives messages from a device
<access point name>: defines access point name to GSM network.
If private network is used, SMS message shall provide the following parameters:
UN=
<user ID number> and PW=<user password>.
Page 11

PX200N_Manual_en-1.11i7 Page 11 / 58
Exemplary SMS is as follows (if we use public network and provide server address
as IP):
1111█SERVER=89.123.115.8█PORT=6780█APN=general.t-mobile.uk
█
UN=█PW=
Where:
█: space character
Page 12

PX200N_Manual_en-1.11i7 Page 12 / 58
5. OPERATION
A device maintains communication via GSM-GPRS network. If any problem follows a
device automatically switch to SMS mode (if this mode has been programmed
before-See chapter 7 “Programmable parameters”). As a result the transmitter may
be used only at the territory covered with mobile phone operator network.
If status of inputs is the same as programmed one (NO or NC) a device stays
in a rest. Change of status on any input results in immediate signal transmitting of
this event by the device.
Note :
Each device input (from IN1 till IN8) may be individually defined as on open one
(NO) or closed one (NC). It means that when in NO, input shorting will be an active
state and, a non-shorting will be an active state in NC.
To avoid an excessive cost of use related in particular to false alarms a device
possesses a programmable analysis of inputs.
All inputs respond only to states change which means that transmitting will
follow only if an active state is on input and maintains during programmed minimum
time. Maintenance of active state longer than a minimum time will result in single
indicating. Another input activation (another transmitting) is possible only after
input reached based state.
Number of messages sent in SMS mode is limited (limit includes also text massages
or answers to orders sent by user).This function provides for cost reduction by
limiting messages e.g. in case of damage of sensor connected to any input. After
passage of programmed time new messages will be sent but only in a number
determined by the user.
Text message on events sent to private phone numbers may be edited.
All programmable parameters are saved in memory and in case of voltage
drop that are not lost. Supply of power starts the transmitter with saved settings.
Page 13

PX200N_Manual_en-1.11i7 Page 13 / 58
6. CONFIGURATION PROGRAM
6.1. INITIAL REMARKS
GPRS transmitters configurator software may be downloaded at
http://www.ebs.pl
(login: pxn@ebs.pl, password: pxn).
To install program an installation wizard shall be started that performs installation
in default place C:\Program Files\EBS\. During installation process shortcuts on
screen and Windows menu are created.
If device is to be used for the first time it shall be programmed with the
above program and after this procedure the SIM card may be inserted into the
device. Otherwise SIM card may be blocked if wrong PIN code is entered.
Alternatively SIM card may be used along with switched off PIN code.
In case of remote programming it is necessary to insert SIM card prior to
sending configuration settings. In this situation SIM card with switched off PIN code
shall be used or before card inserting, PIN code shall be changed with mobile
phone.
6.2. COMPUTER – REQUIREMENTS
Minimum requirements for computer system where configuration software is to be
installed :
Hardware:
o Processor Pentium II 400 Mhz,
o 64 MB RAM,
o 1 GB HD.
o CD-ROM,
o RS-232 serial port
o Colour monitor (minimum 15 inch , min. 800x600 resolution),
o Keyboard
o Mouse
Software:
o Operation system Windows 2000, Windows XP or Windows Vista
o NET Framework 2.0 (delivered along with installation wizard of configuration).
6.3. PROGRAM FUNCTIONS
After installation and program starting a main view shall be displayed on screen.
Thanks to this view an access to program or programmable parameters of device is
possible.(See chapter 7).
Main window of program is divided into some fields.
Page 14

PX200N_Manual_en-1.11i7 Page 14 / 58
Main menu: at upper part of window, contains control and configuration options.
Main menu contents:
Main menu is available as icons on fast access bar:
6.3.1. File -> New
Opens new set of parameters. Editing of configuration parameters is possible.
Select type of device – PX200N.
6.3.2. File -> Open
If file contains saved settings, they may be used to program next device. Firstly a
catalogue where file has been saved shall be chosen and then name of file shall be
provided. Obtained data collection may be modified by the user. Any amendments
are effective if send to device.
Page 15
PX200N_Manual_en-1.11i7 Page 15 / 58
6.3.3. File -> Save
During programming many devices in different configurations, it is not necessary to
have in mind each one as it may be saved on hard disc or floppy disk under any
name and it may be loaded later on. This function save on disc any information
from configuration wizard window. After activation of function a dialog window
appears with request to provide file name. Default data is saved with CMI extension
(Configuration Memory Image).
6.3.4. File -> Language
Allows for selection of any available languages (determined in attached exterior
language files).
6.3.5. File -> Connections
Before programming of devices, a connection type shall be defined. It is possible to
do it with two methods:
- locally
- remotely.
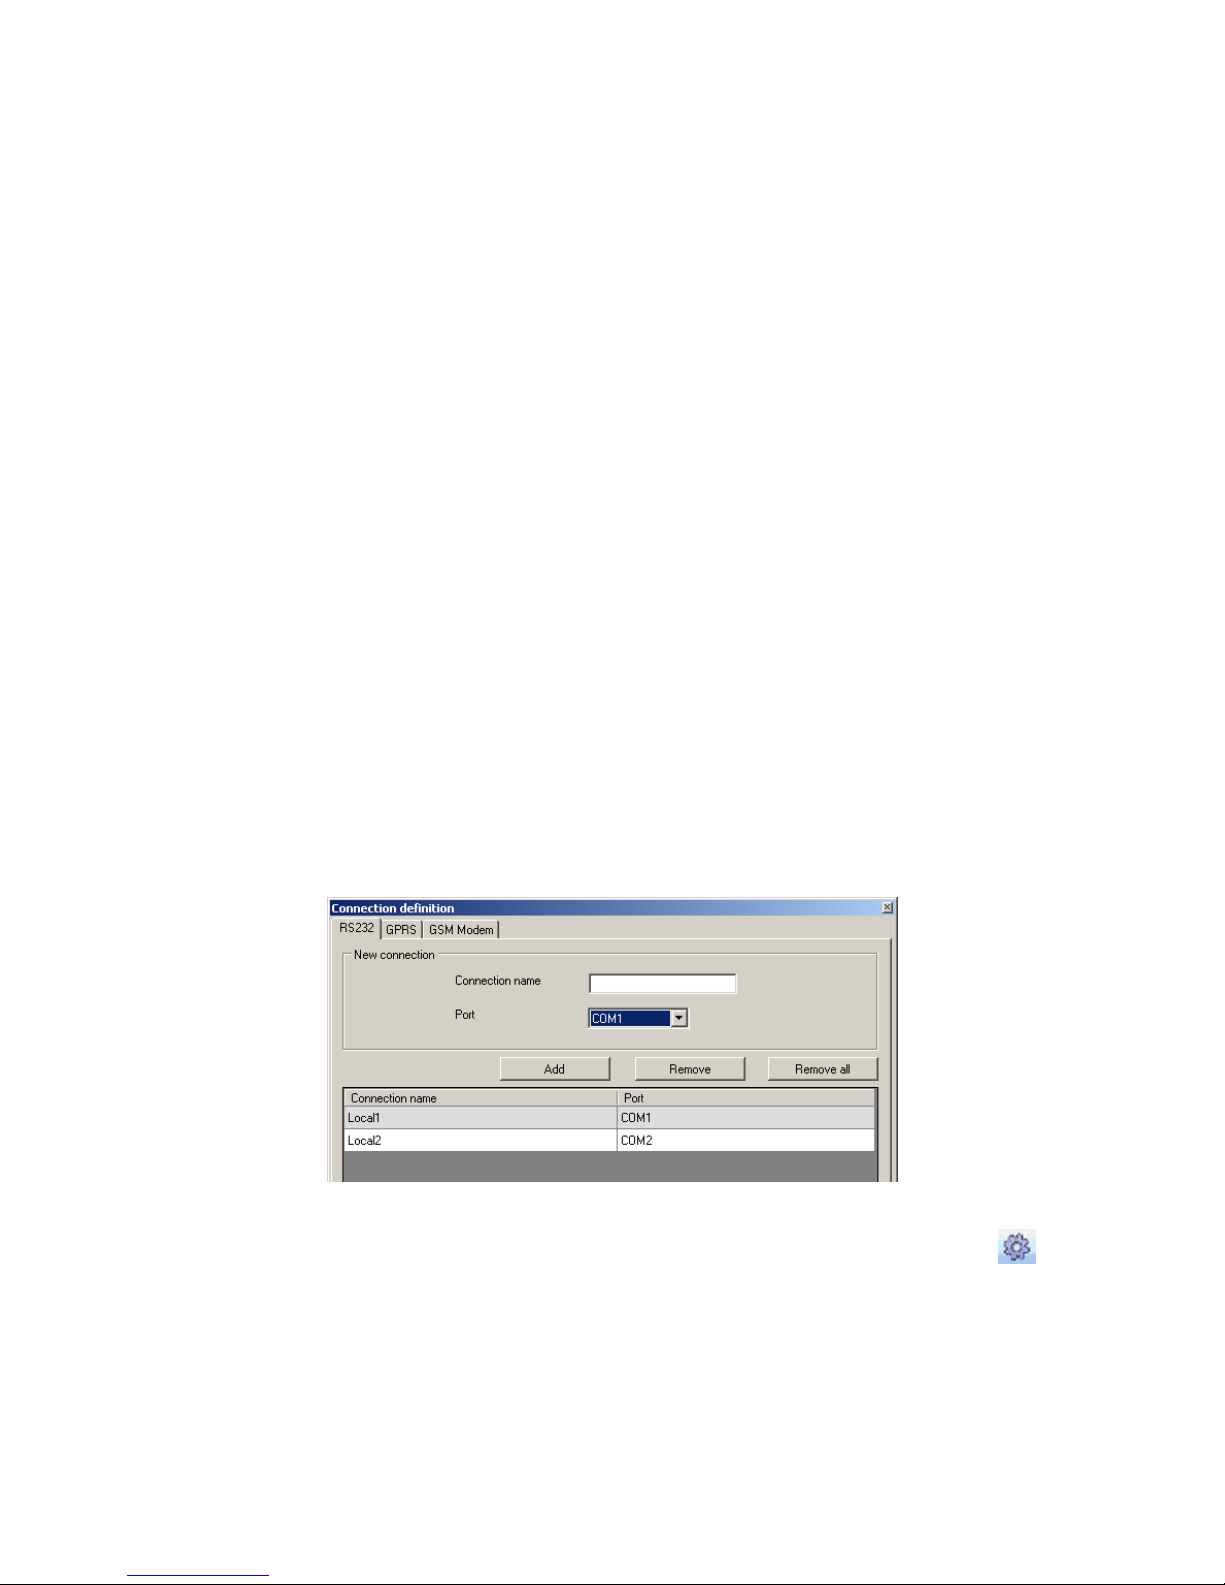
6.3.5.1. Local connection
Local connection means that configuration software (namely computer on which is
installed) is directly connected to proper terminal of transmitter. Connection is
possible owing to special wire and through RS-232 serial port.
To program device or make any other operations (e.g. reading of device settings,
firmware amendments, etc.) it is necessary firstly to define connection parameters.
It is possible to do so with the above window that is available after activation of
connection from Main Menu and selection Configuration tab or after clicking on
icon on fast access bar and clicking on RS-232 tab.
Define:
Name of connection e.g. Locally
Choose serial port e.g. COM 4
Page 16
PX200N_Manual_en-1.11i7 Page 16 / 58
Click on [Add] button to confirm settings. Connections shall be saved (and inserted
in table). From this time on program shall enable wires connection with device and
reading, and saving of parameters in memory will be possible.
6.3.5.2. Remote connection
As provided above the device and software makes for complete configuration with
GPRS link or CSD channel. This programming mode requires definition of linking
parameters.
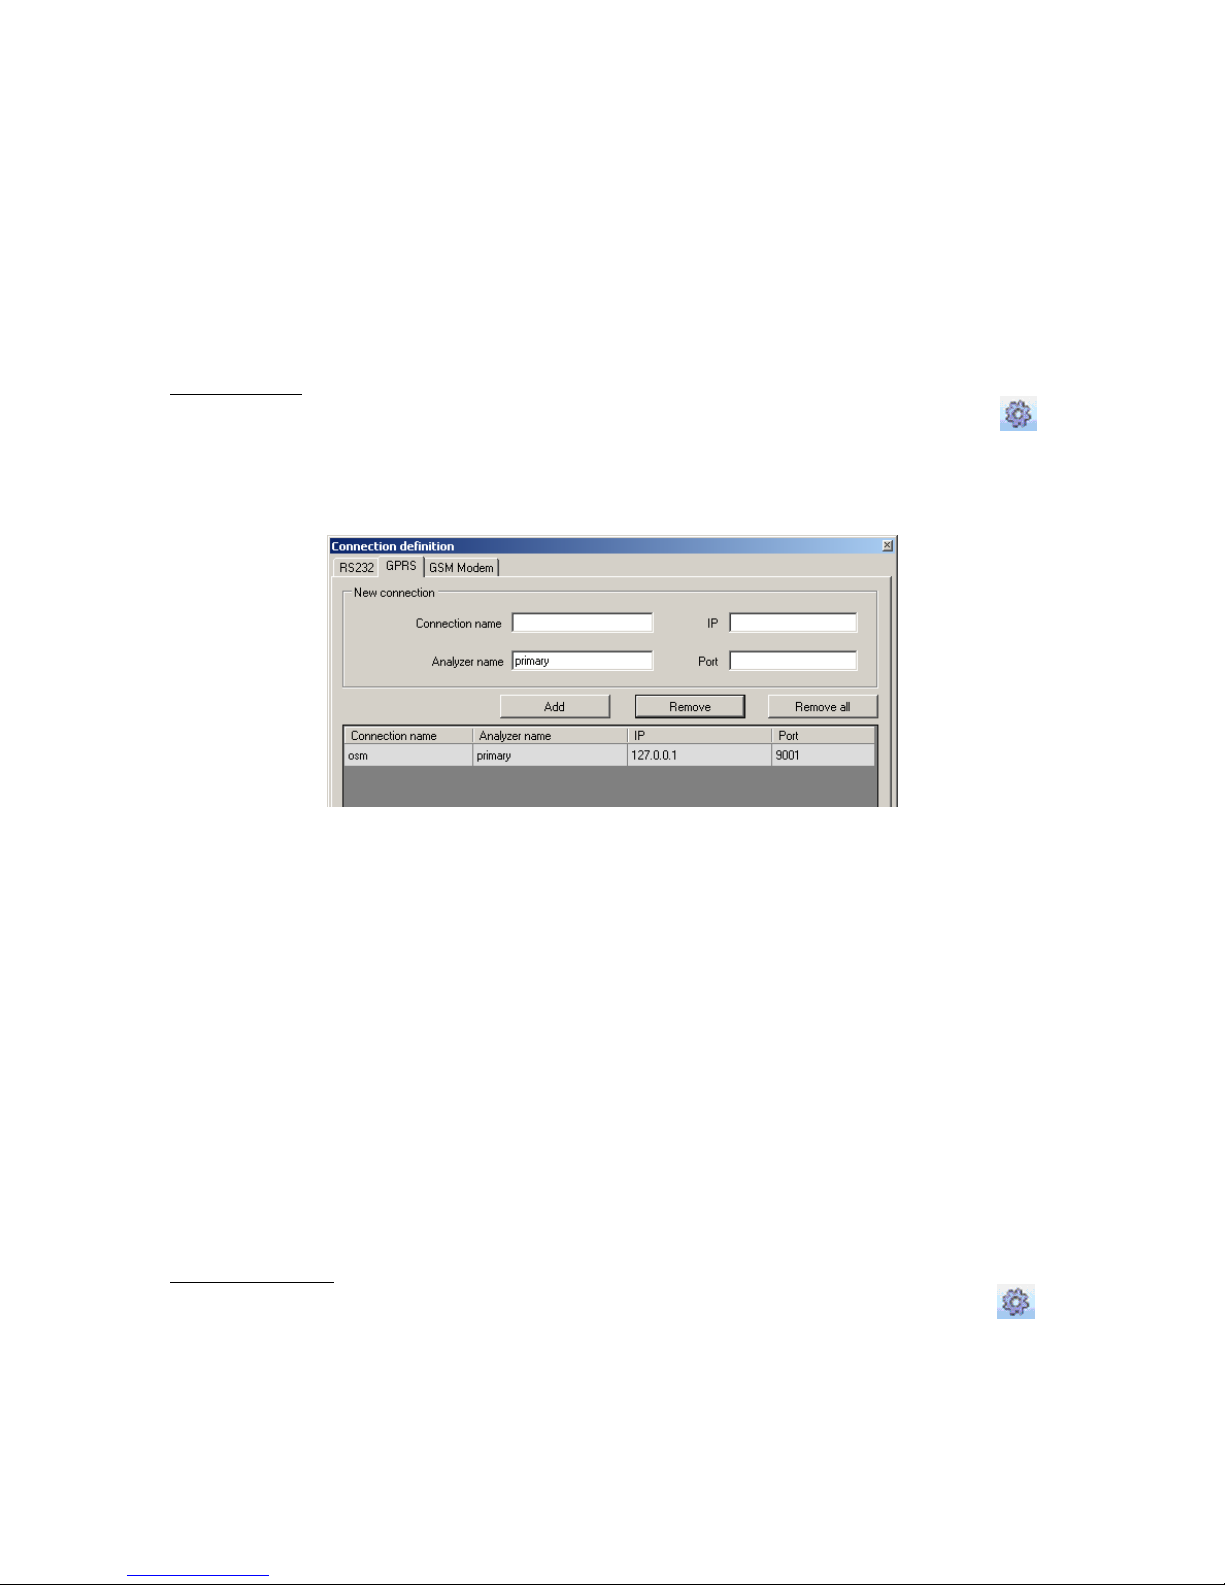
GPRS linking
Activate file in Main menu and select Connection function (or after clicking on
icon on fast access bar) and click on GPRS tab to carry out configuration of this
mode.
On screen the following window shall appear:
Define:
Name of connection e.g.: Remote
Select name of analyzer e.g.: Primary
Enter analyzer address e.g.: 87.128.125.8
Enter port on which analyzer operates e.g. 7000
Click on [Add] button to confirm settings. Connections shall be saved (and inserted
in table). From this time on program shall enable remote connection to device and
reading and saving of parameters in memory shall be possible.
Notice: The following parameters: analyzer name, analyze address, port
relate to settings of OSM.2007 receiver of monitoring system. Remote
programming is available only if above mentioned device (or software) is
used.
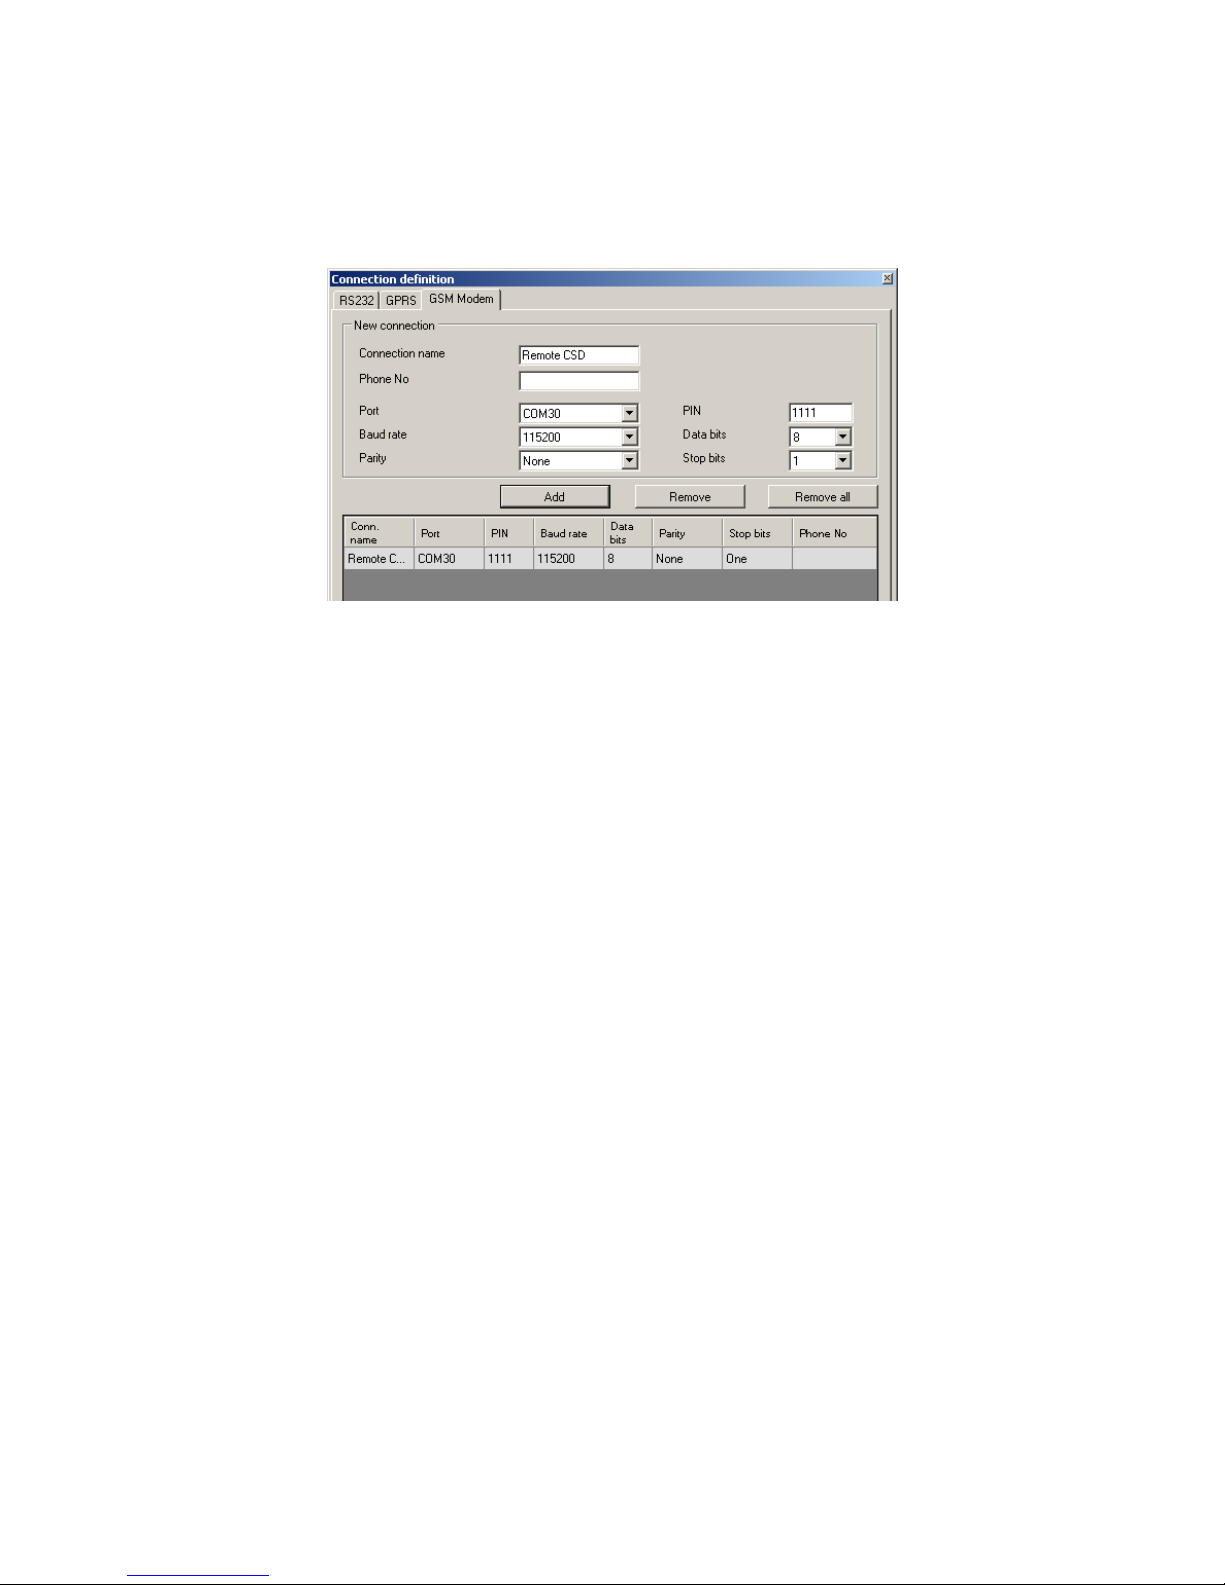
CSD connection
Activate file in Main Menu and select Connection function (or after clicking on
icon on fast access bar) and click on GSM Modem tab to carry out configuration of
this mode.
On screen the window shall appear where it is possible to define:
Page 17
PX200N_Manual_en-1.11i7 Page 17 / 58
Name of connection e.g. Remote CSD
Serial port where GSM modem is connected (e.g. Wavecom Fastrack)
PIN code of SIM card installed in GSM modem e.g. 1111
Serial port parameters: amount of bytes/sec. (e.g. 115200), data bytes (8),
parity (none), stop bytes (1)
Click [Add] button to confirm settings and save connection (settings are inserted
into table). Since that time a remote connection to device, reading and saving of
parameters in transmitter memory is possible.
Note : Remote configuration with CSD canal is possible if option of CSD data
sending has been activated both for SIM card inserted into a device and SIM card
installed in GSM modem. Beside, transmitter must enable to pick up data calls (see
7.5.2 GSM modems authorized phones)
Programming with CSD is also possible if OSM.2007 system has been installed, and
minimum one GSM modem is connected. If device has been entered onto server list
(factory number and SIM card telephone number –See OSM.2007 Operation
Manual) it is possible to use link via OSM. It is possible if device is not connected to
the OSM.2007 via GPRS. During programming procedure (with GPRS link- See
above) a question will be displayed if user want to use a modem connected to the
server. After confirmation procedure will follow as in case of other programming
channels.
6.3.6. File-> Automatic device settings backup
All configuration settings including reread from devices and saved on devices are to
be automatically saved on hard disc. If during installation on configuring tool
settings have not been changed, files will be saved as follows:
C:\Program Files\ EBS\KonfiguratorLX\configs\PX200N_20000
Catalog
PX200N
_20000 contains all files in respect of
PX200N
with factory number
of 20000 programming. The name contains date and time of operation and its type
(saving/ reading). Files have cmi extension.
6.3.7. File -> Exit
Finishes program operation.
Page 18
PX200N_Manual_en-1.11i7 Page 18 / 58
6.3.8. Operations -> Read
Function reads data saved in memory of GPRS module. Exchange of data follows on
port selected in section “Select Connection Type” (See below description of option
”Configuration”). Correct reading is confirmed with message on a screen. Data
downloaded from device may be saved on file (see clause 6.3.3) and use for other
devices.
To use this function it is necessary to define type and parameters of connection.
E.g. for local connection the following view is displayed:
where:
Connection kind - serial port to which module is connected
Access code- service code of transmitter
Detailed description of connections configuration is included in clause 6.3.5.
6.3.9. Operations -> Send
This function is analogical to the above one, at the same time it enables data saving
into EEPROM module. Correct saving is confirmed with message on a screen.
Page 19

PX200N_Manual_en-1.11i7 Page 19 / 58
6.3.10. Operation -> Device monitor
Function provides real-time information on device state. See chapter 7.11
DEVICE
MONITOR
.
6.3.11. Operation -> System events history
Function provides information about last events stored in PX200N device memory.
See chapter 7.12
EVENTS HISTORY
.
6.3.12. Operation -> Restore default settings
If operation “Read” finishes with error message (e.g. if access code is unknown) it
is possible to come back to default settings by selecting “Restore default settings”. e
“Do you want to overwrite current configuration with default values?”. After
confirming the following window shall appear :
This operation is possible only with local connection. After operation completing
device parameters shall come back to default settings.
6.3.13. Help -> About program
Select this information to view additional information about program.
Page 20

PX200N_Manual_en-1.11i7 Page 20 / 58
7. PROGRAMMABLE PARAMETERS
Parameters available in configuration program are divided into groups: Access,
Transmission, Inputs/Outputs, Monitoring, Restrictions, SMS Notifications, Link
control, RS-232, Phone line and Firmware. Every from these groups will be
described in detail in next part of this manual.
7.1. ACCESS
7.1.1. Parameters
7.1.1.1. Device mode
Depending of user preferences, a device may operate in 1 out 4 modes (available
from scrolled list) :
o GPRS & SMS: GPRS standard transmission (TCP/IP Protocol), and if any
problems follow with this link it automatically SMS mode will follow.
o SMS: Transmission only in SMS mode, without trial to establish GPRS link
o GPRS: GPRS standard transmission (TCP/IP Protocol), and in case of any
problems with this link no transmission will follow.
o Serverless: no transmission to the server with is possible, remote
communication possible only via SMS notifications to the user
Page 21

PX200N_Manual_en-1.11i7 Page 21 / 58
7.1.1.2. GPRS test time
The device sends signal “Test” with determined interval that informs monitoring
station that the device is in operation mode. In this field you can determine how
often this message will be sent (in seconds) .
7.1.1.3. SMS mode after unsuccessful attempts
Define number of reconnections to server. If during all reconnections fail the device
will go into SMS mode. In this mode device will try to make connection with server,
according to interval defined in clause 7.1.3.3.
7.1.1.4. SMS test time
This function is analogical to GPRS. It is activated when problems with GPRS
transmission follow when the device automatically goes into SMS mode (it relates to
operation mode in SMS). Usually it is undesirable to send text as SMS so often as
with GPRS transmission. Parameter this allow for significant extension of distance
between tests (time in minutes) or completely interlocking of this option.
7.1.1.5. Server phone number
If GSM modem is connected to server application (e.g. OSM.2007) enter in this field
its number. Any SMS will be sent to this number if transmitter has got problems
with GPRS transmission.
If this field is left blank or 0 was entered, the transmitter will be operating
exclusively in GPRS mode.
Note : This field will be inactive if device is to operate in GPRS mode.
7.1.1.6. Send events via SMS immediately
In case of GPRS connection lost device will send SMS reports immediately, even if
the device isn’t in SMS mode yet.
7.1.2. APN Parameters
7.1.2.1. APN
Parameter depending on GSM network operator that supplies GPRS (SMS) services.
It provides GSM network access point name.
It possible to obtain a private access point. In this case a name will be provided by
GSM network operator.
7.1.2.2. User ID
When using public APN , user ID is mostly not required. For private APN this
parameter shall be obtained from operator (it is impossible to be granted access to
GPRS network without it).
Page 22

PX200N_Manual_en-1.11i7 Page 22 / 58
7.1.2.3. User password
When using public APN , user ID is mostly not required. For private APN this
parameter shall be obtained from operator (it is impossible to be granted access to
GPRS network without it).
Note : Private APN provides for higher system security.
7.1.2.4. DNS1 and DNS2
It determines address of main and backup DNS server (Domain Name System).
If IP server address has been entered in form of domain it is required to provide
minimum one DNS address.
7.1.3. Main Server Parameters
7.1.3.1. Server IP Address
It is address of receiver of monitoring system (OSM.2007) or computer where
“Communication Server” software has been installed , e.g. 89.123.115.8. This
address may be provided in domain name of server, e.g. modul.gprs.com. In this
case it is required to provide minimum one address of DNS server.
7.1.3.2. Server port
It determines server port that was selected in server for collection of data from
transmitter.
7.1.3.3. Interval between subsequent connection attempts
Programmable and equipped with SIM card device will try to make automatic
connection with server. In this field you define interval (in seconds) after which next
connection will follow if the previous connection failed.
7.1.3.4. Number of connection attempts
In this filed you determine how many times device will try to make connection to
server. If connections fail, after execution of some connection device will start
procedure of connection to back up server. This option is active only if we define
parameters of backup server.
Page 23

PX200N_Manual_en-1.11i7 Page 23 / 58
7.1.3.5. Order of connection to servers
Mark this check box means, that the device will try in first order to connect to
primary server, without regard on definition of parameters for backup server (in
peculiarity of number of connection attempts).
7.1.4. Backup server parameters
7.1.4.1. IP server address
It is IP address of second (backup) receiver of monitoring system (OSM.2007) or
computer where “Communication Server” software has been installed , e.g.
89.130.125.82. This address may be provided in domain name of server, e.g.
monitor.gprs.com. In this case it is required to provide minimum one address of
DNS server.
7.1.4.2. Server port
It determines server port that was selected in server for collection of data from
transmitter.
7.1.4.3. Interval between subsequent connection
If device can not connect to primary server defined this after exhaustion for him
number of attempts, it will begin realizing the procedure of connecting to backup
server. We in this place define space of time (in seconds), after which test will
connecting renewed if previous finished with failure.
7.1.4.4. Number of connection attempts
In this field you determine how often device will try to make connection to backup
server. If connections fail, after execution of some connection, transmitter will back
to procedure of connection to primary server.
7.1.4.5. Disconnect after time limit
If you mark this choice field the device will disconnect from back up server after
passage of set time. Further operation depends on defined parameter Order of
connection (See clause 7.1.3.5). If this option is active the device reconnects to the
primary server. If this option is not active the device firstly completes connection to
backup server procedure and if this fails, the device will try to connect to the
primary server.
Page 24

PX200N_Manual_en-1.11i7 Page 24 / 58
7.1.5. Access
7.1.5.1. Service code
It provides security against unauthorized access. It is being used during
programming of device and during remote controlling (in TCP/IP or SMS mode).
Factory setting is 1111. During the first starting of device (programming) it shall
be changed. Code may consist of up to seven alpha numerical characters.
7.1.5.2. Restricted user’s service code
Allows restricted access to the parameters of device. When restricted user’s service
code is used following groups of parameters are unavailable: Access, Transmission,
Restrictions, SMS notifications, Link control, RS232 and Phone line. Choosing
unauthorized groups of parameters in “GPRS transmitter configurator” causes error
notification.
Default restricted user’s service code: 2222
7.1.5.3. PIN of SIM card
As a device operates via GSM network, SIM card is indispensable and it may be
received from phone operator. Before the first use PIN code of SIM card shall be
programmed for operation in given transmitter. PIN code is indispensable for
automatic system launching. In case of card without PIN code, it is possible to enter
any value e.g. 0000.
If you enter wrong PIN number after inserting card and switching on transmitter,
the system will not launch and you may be able to use card after entering PUK card
only (with use of any GSM mobile phone).
Factory setting of PIN in transmitter is 1111.
7.2. TRANSMISSION
For the purpose of maximum security of transmission, data is encrypted with AES
key. This option may be used for GPRS and SMS transmission.
After selection of encrypted transmission you may use your own code (256 bytes –
signs 0-9 and A-F) or use default settings.
Selection of not coded transmission means device operation similar to PX
transmitters.
Page 25

PX200N_Manual_en-1.11i7 Page 25 / 58
7.3. INPUTS/OUTPUTS
Transmitter has got 8 signal inputs and additional input for sabotage signal switchkey connection. Module is equipped with two outputs: indicating sabotage and an
additional one. In/Out option enable programmable configuration so that
transmitter operates pursuant to requirements of the user.
All inputs of the device are 24 hour alarm inputs.
7.3.1. Inputs configuration
For every input the following settings shall be determined respectively.
7.3.1.1. NC / NO
This parameter allow for setting of constant input . Change of this state results in
sending information on alarm. Allowable NC and NO input. NC input shall be shorted
to ground. Actuation follows after decay. NO input remains open. At this moment of
shortening to ground activation follows.
Page 26

PX200N_Manual_en-1.11i7 Page 26 / 58
7.3.1.2. Delay [ms]
This parameter means minimum time for change maintenance at input so that it
would be detected by transmitter. Factory setting is 400ms.
7.3.1.3. Lock
With this option you can lock any input of module, and as a result condition
changes on this input will be ignored and will not be reported to monitoring station.
Lock may be persistent or temporary.
In case of temporary lock – user can set lock time and number of input state
changes after which lock occurs. Lock time is counted from first input state change.
More detailed information about input locks is shown on a diagram.
Page 27

PX200N_Manual_en-1.11i7 Page 27 / 58
Temporary lock may be deactivated by SMS or GRPS command (RLIMIT command)
7.3.2. Outputs
7.3.2.1. Activation mode and timing
Thanks to this option you may choose output operation mode. There are two
operation modes available:
o Bistable- connection follows for indefinite time- up to the moment of
disconnection of power for module or remote command which switches
output off,
o Monostable- connection follows for time defined by user - every 100ms.
7.3.2.2. Conditions
Defines conditions for activating both of outputs. User can set following conditions:
• No connection to server (immediately after detection);
• No GSM signal (immediately after detection);
• Detection of incoming call from defined telephone number;
• Dependent on state transitions from non-active to active of one of the
inputs. Outputs can be also activated by internal watchdog (see 7.7 LINK
CONTROL).
Page 28

PX200N_Manual_en-1.11i7 Page 28 / 58
7.3.2.3. Additional conditions
If option “Dependent on state transitions from non-active to active of one of the
inputs” is chosen, we might configure additional conditions for output activations:
o Never: input disturbance does not cause operation of sabotage output,
o No network: input disturbance causes actuation of sabotage output if sending
of information to server is impossible.
o Always: every input disturbance causes actuation of sabotage output.
o Available network: input disturbance causes actuation of sabotage output if
sending of information to server is possible.
Note : Both outputs may be controlled by SMS commands.
7.3.3. Advanced outputs control
The user is able to determine an alternative course of action to go over basic
outputs configuration function described in 7.3.2 Outputs. In the “Advanced outputs
control” you may define separately the behavior of each of the outputs, depending
on events taking place. “Advanced outputs control” differs from the existing basic
“Outputs configuration” by:
o it is possible not only to turn on but also to turn off the output
o output can be activated temporarily for specified amount of time
o there is a complete list of events for which you can define the behavior of the
output
Note: where possible, use either the basic configuration of outputs (7.3.2
Outputs) or with an “Advanced outputs control”!
In particular, the basic configuration of existing options: “No GSM signal
(immediately after detection)” and “Dependent on state transitions from non-active
Page 29

PX200N_Manual_en-1.11i7 Page 29 / 58
to active of one of the inputs” should not be used with their replacements “[Off]
GSM” and “[On] Input x”.
7.3.3.1. Output 1/Output 2
These columns define which signals are to influence the status of a specific output.
Possible choices are:
o Do Nothing – output status will be not changed (default action)
o Turn on output – output will be permanently turned on
o Turn on output temporarily – output will be turned on for an amount of time
specified by parameter 7.3.3.2 Time of output activation
o Turn off output – output will be turned off
Press the [Reset] button to assign the action “Do Nothing” for each event.
The output state does not change if the current state of the output coincides with
the result of the action.
7.3.3.2. Time of output activation
Parameter defining amount of time for which the output is to be turned on for the
functions of advanced outputs control.
Page 30

PX200N_Manual_en-1.11i7 Page 30 / 58
7.4. MONITORING
Thanks to this option you may determine which of available signals generated by
the device shall be transmitted to monitoring station.
NOTE: “Configuration changed” event refer to configuration changes made
by SMS or GPRS commands.
7.4.1. GPRS On / GPRS Off
In this column you define signals that are to be reported to monitoring station with
GPRS transmission. There is possibility to send information on alarms (input state
change from rest to action status) and on returns of input state from action to rest
(normalization).
To transmit any signal you should only click it (proper square on your right).
Click on [Clear] button to remove all marked signals.
Click on [Invert] button to change markings to contrary.
7.4.2. SMS On / SMS Off
In this column you define signals that may be reported at monitoring station with
SMS messages – when there is no connection with server over GPRS. There is
possibility to send information on alarms (input state change from rest to action
status) and on returns of input state from action to rest (normalization).
To transmit any signal you should only click it (proper square on your right).
Click on [Clear] button to remove all marked signals.
Click on [Invert] button to change markings to contrary.
Page 31

PX200N_Manual_en-1.11i7 Page 31 / 58
7.4.3. Skip initial state
This option allow for locking of sending of information on status of active inputs at
power connection. Information on inputs will be sent to server after the first change
from inactive to active status.
For the events “Power” and “Battery” no selection “Skip initial state” will cause
sending information about the power supply / battery on boot device regardless of
the power supply / battery state.
7.4.4. Power loss
One of device additional options is monitoring of power supply voltage. As short
voltage drop may follows at some facilities, it is possible to avoid reporting by
entering time after which information will be sent.
Value of this parameter means that voltage drop shall follow within this determined
time so that device recognizes it as real voltage drop and that information might be
sent.
7.4.5. Sleep when the battery voltage less than
If you check an option “Sleep when the battery voltage less than” battery voltage
threshold field becomes available. The threshold is used when the transmitter goes
into Sleep mode. Due to the characteristics of the battery Sleep mode ensures
reliable operation of the device when the battery is the only source of power at the
time. If the option “Sleep when the battery voltage less than” will remain unchecked
transmitter will work as long as it allows the battery. This may adversely affect the
capacity of the battery for a further period of use as well as cause a generation of
false alarms.
Transition to Sleep mode occurs when the battery voltage falls below the defined
threshold (taken into account the 3 consecutive measurements performed in 10second interval). The following steps are then performed:
1. Too low voltage - sleep event is generated
2. Transmitter for up to 30 seconds is trying to send Too low voltage - sleep
event to the software
3. Device switches to Sleep mode, i.e. the modem goes to off, inputs are not
being monitored, outputs are turned off, an external telephone line is
attached
Sleep mode is indicated by alternating lighting and off LEDs: OK and ERR.
Exit from Sleep mode occurs when one of the following situations occurs:
Main power supply is connected and the battery voltage exceeded a value of
“threshold of sleep” + 0.6 V
Overall disconnect power and re-connect the battery and / or AC power
For transmitter inputs are reported only changes in relation to the state before
sleep.
Page 32

PX200N_Manual_en-1.11i7 Page 32 / 58
7.5. RESTRICTIONS
7.5.1. SMS Authorized phones
User may restrict remote access to the device (via SMS) for determined phone
numbers. A list of numbers (up to 5 numbers) determines which numbers are
allowed to connect with transmitter.
Available options:
Deny all: means no available telephone communication.
Allow all: means that telephone communication is possible from any phone.
Allow chosen: means that telephone communication is possible only from these
numbers that are on the list. It is possible to list up to 5 phone numbers.
Select “Allow chosen” to get access to edition window. Enter another numbers and
click on [Add] button to send them to the below table. Position cursor on line with
number and click on “Remove” to remove number from table.
Click on “Remove all” to remove all numbers from table.
Note:
a) authorizing of coming SMS comes through comparing number of oncoming SMS
with numbers from table. It is allowable to enter only a part of number e.g. 1234.
As a result all numbers with this sequence will be authorized e.g.600123456 or
601234567.
b) If modem connected to OSM.2007 server will be used to send SMS, its number
have to be entered on the list.
Page 33

PX200N_Manual_en-1.11i7 Page 33 / 58
7.5.2. GSM modems authorized phones
For connections on CSD channel the user may limit remote access to device from
GSM modems. Only numbers on the list (up to 5) allow for communication with
transmitter.
Available options:
Deny all: means no available telephone communication.
Allow all: means that telephone communication is possible from any phone.
Allow chosen: means that telephone communication is possible only from these
numbers that are on the list. It is possible to list up to 5 phone numbers.
Select “Allow chosen” to get access to edition window. Enter another numbers and
click on [Add] button to send them to the below table. Position cursor on line with
number and click on “Remove” to remove number from table.
Click on “Remove all” to remove all numbers from table.
Note:
a) authorizing of coming CSD comes through comparing of number from which it
was sent with numbers from table. It is allowable to enter only a part of number
e.g. 1234. As a result all numbers with this sequence will be authorized
e.g.600123456 or 601234567.
b) If modem connected to OSM.2007 server will be used to make connections CSD,
its number have to be entered on the list.
7.5.3. Validity period of outgoing SMS messages
User may limit time for the GSM operator to deliver information via SMS when
recipient is unavailable due to out of GSM signal coverage for example. Time limit
is defined separately for the following groups of information:
SMS test to server
SMS events sent to server
SMS events sent to user
Answers to commends
Selection is to be made from scrolled down values by clicking on arrow besides
selection area. Allowable options: 5, 10,15, 30 minutes; 1,2,6, 12 hours; 1, 7 days,
MAX (meaning no specified time).
7.5.4. SMS limits
User may limit number of SMS sending by transmitter. As the main way of
transmission should be GPRS this limitation is essential to reduce costs.
Mark field [Turn on SMS limits] to activate access to information groups that
shall subject to limitation:
SMS test to server
SMS event s sent to server
SMS events sent to user
Answers to commends
Page 34

PX200N_Manual_en-1.11i7 Page 34 / 58
Limitation are defined by providing two values:
SMS maximum number: determines maximum number of sent SMS messages per
time unit (see SMS counter reset). This option protects user against sending
too much of SMS messages e.g. in case of failure.
SMS counter reset: This parameter determines time schedule (in minutes)
according to which counter of sent SMS messages will be zeroed.
7.6. SMS NOTIFICATIONS
User may define messages that in case of any event (e.g. input state change) will
be sent to private phone numbers. At the same time it is worth to remember about
limitation in this respect.
7.6.1. Phone numbers
One way to limit amount of sent information (by SMS) is to define a list of 5 private
phone numbers. This list means that only telephones listed on it will receive
messages sent by transmitter.
To edit you shall follow this procedure:
o Enter due telephone number into edition field.
o Click on [Add] button to transfer number to the below table
o Repeat procedure (up to 5 phone numbers).
Page 35

PX200N_Manual_en-1.11i7 Page 35 / 58
Position cursor on line with phone number and click on “Remove” button to remove
number from table.
Click on “Remove all” button to remove all numbers from table.
7.6.2. Events
This tab is to configure and edit SMS messages to be sent to listed phone numbers.
You may define SMS text message with reference to any event from the list
(Tamper: Activation, Restore; Input1: Activation, Restore; etc) that will be sent if
this event follows. To define use edition field on the right of events list.
Follow the procedure:
a) Select event to edit from the list.
b) Mark square next to phone number that SMS is to sent to
c) Enter message text of SMS when field is active
d) If the “Copy the contents from first message” will be marked then selection
and text content will be automatically copied from the first message,
otherwise you may copy one text and paste to other field manually
Note :
o The total number of characters for all SMS messages shall not exceed 2000
o Mark any mistake and delete by pressing [Del] button
o You may copy one text and paste to other field.
Page 36

PX200N_Manual_en-1.11i7 Page 36 / 58
SMS user tests
SMS user tests sent to specified phone numbers are carried out independently of
the operating mode of the device (GPRS / SMS / GRPS & SMS / Serverless). To
enable the cyclic tests provide up to 5 phone numbers in “SMS Notifications” tab.
Then, for the event “Test message”, type your message and provide a period of the
test message. To do this, mark “Send test every” and indicate the period of the test
set out in the next field. The format of the test period field is “the total number of
days, number of hours:the number of minutes”. No selection in the “Send test
every” will disable SMS user tests.
7.6.3. Status
The device provides for remote enquiry about the status. Edit in this field message
text that is to be sent to the user as a reply to command regarding status checking.
Telephone numbers authorized to send enquiry about status are defined in option
Restrictions >Authorized SMS phones.
Reply from device shall be sent at number, from which enquiry was sent.
In reply about status a device shall send one SMS message containing proper text
defining actual output , input state and power supply.
Note : Counter “Allowed characters” informs about the total number of
characters that may be inserted into the table.
Page 37

PX200N_Manual_en-1.11i7 Page 37 / 58
7.6.4. SMS Forward
The device is able to forward received SMS messages according to the specified
rules. This function may be helpful for example when GSM operator sends messages
with account state to SIM card installed within device. In this window you may
provide up to 5 rules.
Each rule contains a pair: part of sender phone number and correct recipient phone
number. In some cases a part of sender phone number may be an empty string
which means that any phone number matches to the rule. All rules are processed
with given order. It means that in some cases one SMS message may be forwarded
to more than one recipients and/or some of them may be forwarded more than once
to the same recipient. The second case may occur when there are at least two rules
with the same recipient phone number and their part of sender phone number
matches with message sender phone number.
Note : It is a user’s responsibility to provide correct rules which will not create
loops of forwarded SMS messages.
Page 38

PX200N_Manual_en-1.11i7 Page 38 / 58
7.7. LINK CONTROL
These options enable automatic action of device if communication with monitoring
station was broken up. It relates to situations when device lost connection to GSM
network or if GPRS transmission is impossible.
7.7.1. GSM
Activate this function (mark [Turn On] field) to get access to parameters
determining action of device if outside GSM network.
Define time limit after which transmitter shall reconnect to network. Enter time
limit in field [Reset after ] and provide this value in minutes.
Next define action that the device shall perform. Select action by marking proper
square next action description:
o Modem Reset
o Device Reset
o Turn on output 1 (OUT1)
o Turn on output 2 (NC-NO-C)
In case of no connection with GSM network the device after recognizing the
situation shall wait during provided time limit and then shall perform programmed
actions.
Page 39

PX200N_Manual_en-1.11i7 Page 39 / 58
7.7.2. GPRS
Activate this function to (mark [Turn On] field) to get access to parameters
determining action of device if GPRS connections is lost.
Define time limit after which transmitter shall reconnect to network. Enter time
limit in field [Reset after] and provide this value in minutes.
Next define action that the device shall perform. Select action by marking proper
square next action description:
o Modem Reset
o Device Reset
o Turn on output 1 (OUT1)
o Turn on output 2 (NC-NO-C)
In case of no connection with GPRS network the device after recognizing the
situation shall wait during provided time limit and then shall perform programmed
actions.
Page 40

PX200N_Manual_en-1.11i7 Page 40 / 58
7.8. RS-232
7.8.1. Serial port settings
The device has been equipped with RS-232 serial port to enable obtaining additional
information. To make use of this link it is required to define its parameters. For this
purpose select parameters from the below table:
Parameter Value
Baud rate (bits/sec)
300,1200, 2400, 4800, 9600, 19200, 3840
0,
57600,
115200.
Data bits
5, 6, 7, 8
Parity
None,
even, odd, mark, space
Stop bits
1,2
Flow control
None, RTS, CTS, RTS/CTS
The selected parameters shall correspond to RS-232 port settings in device, with
which the transmitter is to cooperate.
7.8.2. Buffer flushing
Data received from connected device are stored in transmitter buffer. Buffer
capacity is 511 bytes. Define criteria that meeting shall mean data transmission to
monitoring system transmitter. The following options are available:
- After receiving ASCII character
- After expiry of defined time
- After receiving defined amount of characters
Page 41

PX200N_Manual_en-1.11i7 Page 41 / 58
For every option list of available values are provided, and they me be scrolled down
after clicking on adequate arrow.
The transmitter controls buffer contents in respect of meeting of determined
criteria. It is performed with the following order: selected character, time, number
of characters.
Discharge of buffer (transmission) follows if one criteria is fulfilled.
7.8.3. Advanced port options
7.8.3.1. Disable data receiving
This option allow for lock of data received from device connected to RS-232 port of
transmitter. It is used in case of failure or situation when transmitter is being used
to control the device.
7.8.3.2. Disable data sending
This option allow for lock of data sending to device connected to RS-232 port of
transmitter. This prevent accidental or unauthorized controlling of the device.
7.8.3.3. Half Duplex mode
This option provides for automatic lock of data receiving (via RTS) if transmitter
begin to send data to the device.
7.8.3.4. Tests of device connection to port
If the device connected to transmitter port generates periodical connection tests,
these tests may be under control. To provide for that (after this option activation)
enter text message and define frequency (in “Test presence every [s]” option).
Additionally user may determine if text messages will be sent to server. If this
option was not selected it is required to make sure that while the device connected
to transmitter port is not sending text message to transmitter, then transmitter
sends to server due message (See chapter 7.4 – option “RS232 tests”).
7.9. PHONE LINE
The device is equipped with an external, city telephone line. It may be used to
transmit data from an alarm control panel. Additionally transmitter may collect
information from an control panel using its a phone communicator, and next
transmit them via GPRS link. The mentioned below parameters shall be defined for
proper operation of the device.
7.9.1. Phone line settings
This tab is provided to determine settings of telephone line.
Page 42

PX200N_Manual_en-1.11i7 Page 42 / 58
7.9.1.1. Use external phone line
If this function has been chosen (Activation) the transmitter will be cooperating with
PSTN line. This way data transmission is possible from an alarm control panel with
two ways: via GPRS link and standard telephone line.
7.9.1.2. Monitor external phone line voltage
If transmission with two ways follows, it is necessary that operator of monitoring
system received information on access to an external telephone line. Choice of this
option will result in voltage drop on telephone line (longer that defined minimal time
of decay) that will be signalized with an adequate message sent via GPRS.
Note: The transmitter is to simulate a telephone line access if:
o A PSTN line is not connected
o A PSTN line is connected but has not been activated – option from clause 7.9.1.1
o Options from clause 7.9.1.1 and clause 7.9.1.2 are active and voltage on
terminals TIP-RING decreased below 8V.
7.9.1.3. Report off-hook
If a phone set is connected in parallel output of control panel communicator (to
terminals T1-R1 of transmitter), picking up of a phone prevent from exchange of
data between an control panel and a transmitter. There is possibility to control this
situation. Choice of this option result in sending a report to monitoring station if
time of picking up the phone exceeds determined time limit.
Page 43

PX200N_Manual_en-1.11i7 Page 43 / 58
Note: This operation of this device follows if it works with new protocol. If
transmitter is to work in emulation PX mode (See chapter 7.2) the above mentioned
situation will result in sending “No telephone line” message.
7.9.1.4. Report intervals between dialled digits
This option is being used if in configuration PSTN line- LX- Alarm Control Panel
there are not other telecommunication devices. If such device will be connected and
telephone number will be dialled (and a call will follow) after expiry defined time
limit (counted since conclusion of last digit dialling) the transmitter sends a
message. This operation prevents unauthorised installation of additional devices.
Note: This operation of this device follows if it works with new protocol. If
transmitter is to work in emulation PX mode (See chapter 7.2) the above mentioned
situation will result in sending “No telephone line” message.
7.9.1.5. Generate dial tone
Some alarm control panels require that during a receiver picking up a tone of
dialling was actuated. To enable cooperation with a transmitter it is possible to
make a transmitter to generate such tone.
7.9.2. First and Second phone number
To provide for proper cooperation between a transmitter and a control panel in
DTMF mode determination of some parameters is required. The below described
functions are analogous to the both telephone numbers that may be saved in the
device memory.
7.9.2.1. DTMF phone number
This is a number that has been saved in memory of an alarm control panel. If the
panel is to transmit information on an event it shall dialled this number.
Transmission of this information via GSM (GPRS) will be possible if this number will
be identical as a number entered into the transmitter.
7.9.2.2. Handshake delay
This defines time after which a transmitter generates confirmation to an alarm
control panel for correct phone number dial. Default setting is 2.0 sec. European
Standard determines this value at 0.5 to 12.5 sec.
7.9.2.3. Protocol
Select protocol of data transmission used by an alarm control panel and that is
acceptable for monitoring station. Available options: ContactID, Ademco Fast, and
DTMF.
Page 44

PX200N_Manual_en-1.11i7 Page 44 / 58
Note:
1) For all protocols you may use following options:
o [Enable SMS sending] which means that in case of no GPRS connection,
data will be sent via SMS (if this mode will be accessible).
o [Don’t transmit data when external phone line is available] which means
that when the external PSTN line is available then it will be used during
transmission from the control panel.
2) [Disable CRC checking] option may be used for ContactID and Ademco formats.
Some control panel generate improper messages regarding a control sum for
transmitted data, the device is not able to confirm collection of data, and as a result
the panel tries to send them again (until execution of all determined trials). Select
this option to avoid the above mentioned.
3) In case of DTMF protocol we gain access to specific parameters used to generate
some control signals.
Page 45

PX200N_Manual_en-1.11i7 Page 45 / 58
7.10. FIRMWARE
The device is equipped with built in bootloader that allow for updating and change of
firmware. During programming all information is displayed in respect of carried out
operation.
Follow the following procedure:
a) Launch configuration program
b) Open “Firmware” option of configuration wizard
c) Open file with new firmware (click [Open] button to locate where file is).
d) Select file transmission mode: local or remote.
Note: Procedure of assigning firmware to a device is analogous to
programming a device. For procedure refer to chapter 8 Programming of
the device.
e) Click [Start] button to start software exchange.
f) Loading course is displayed on special window.
g) Close the window after completed saving
From this time on the device will work under control of new firmware.
Note : The above procedure shall be carry out with due care to avoid
improper device operation.
Page 46

PX200N_Manual_en-1.11i7 Page 46 / 58
7.11. DEVICE MONITOR
“Device Monitor” provides real-time information on device state. To use this function
device must be connected to PC computer with LX-DATA cable (using DEBUG plug).
Correct RS232 port must be chosen in “Port” field. “Device monitor” provides
following information:
• AC power indication
• Battery power indication
• PSTN line indication
• GSM network signal level indication
• Bit-Error-Rate level measuring
• Inputs and outputs state monitoring
• Type or serial number of device
• Firmware and hardware revision
• Device time
These parameters are also shown in LOG window in text style. All data can be saved
to file.
Note: Outputs OUT1 and NC-NO-C in the Device Monitor window are presented as,
respectively, OUT1 and OUT2.
Page 47

PX200N_Manual_en-1.11i7 Page 47 / 58
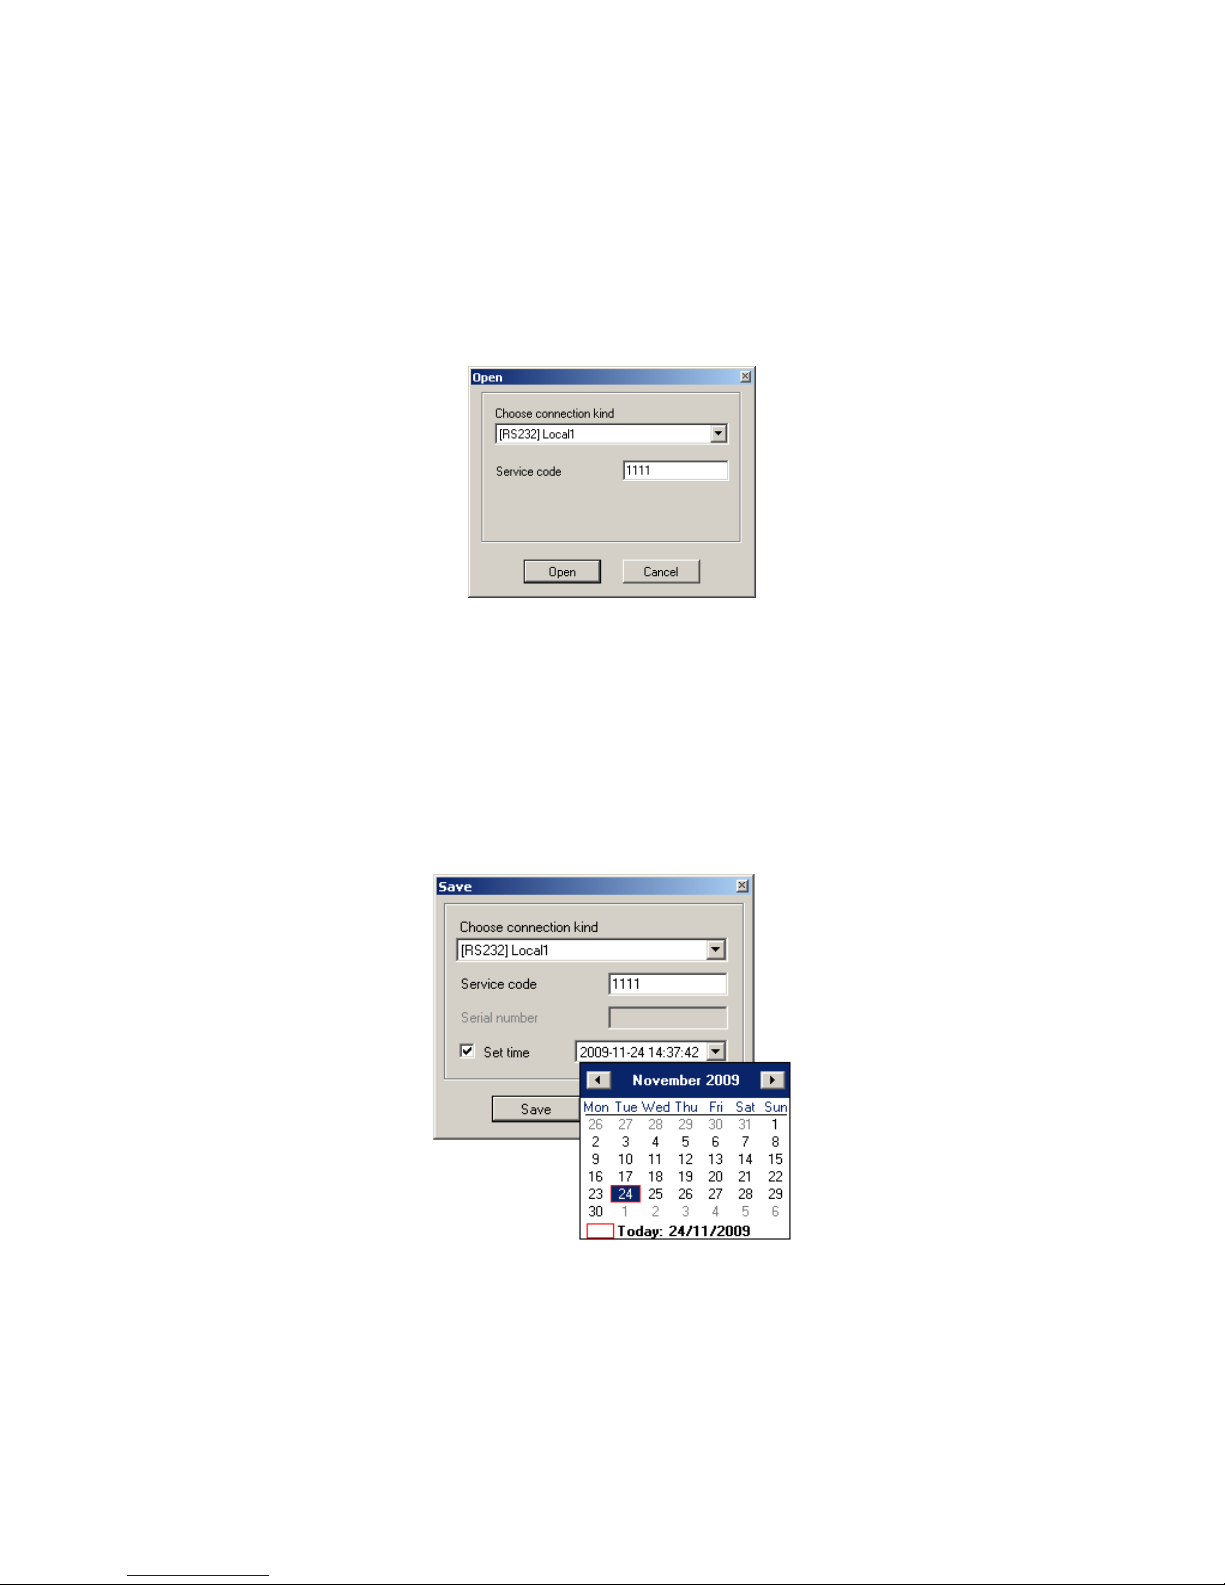
7.12. EVENTS HISTORY
„Events history” provides information about last events stored in PX200N device
memory. PX200N transmitter is able to save 192kB of data, which is about 8000
events. It is possible to read the history of both using a GPRS connection and
RS232. In the second case data can be send to PC only via LX-PROG cable (the
white one). Correct RS232 port or GPRS connection must be chosen in “Choose
connection kind” field. After providing Service code and clicking “Open” button
events data will be downloaded from PX200N memory. After properly reading
access to features such as the "Filtering" and "Charts" becomes possible. Both of
them may be used to quickly diagnose the device
.
Page 48

PX200N_Manual_en-1.11i7 Page 48 / 58
Page 49

PX200N_Manual_en-1.11i7 Page 49 / 58
8. DEVICE PROGRAMMING
Programming of device is possible with “GPRS transmitters configurator”
configuration program described in chapter 6. To program the device establish
connection with a device.
Depending on connection mode there are two ways for programming.
8.1. LOCAL PROGRAMING
To program a device locally follow the procedure:
a) Connect PROG joint (on printed circuit) with COM computer port by way of
service wire, defined in option -> RS-232.
b) Connect power supply to terminals +12V and GND. After connection and
detection of programming wire a module shall signal this with LED diodes: a
green one shall flash and red one shall flicker.
c) Launch software and define device options (description is in chapter 6 of this
Manual ). Provide right PIN code for SIM card.
d) Save settings into memory of device. Saving course is displayed in special
window.
e) After saving disconnect power supply and disassembly service wire.
f) Insert SIM card. Connect module wiring pursuant to guidelines from chapter
3. Turn power supply on.
g) The device is ready to transmit data.
8.2. REMOTE PROGRAMMING
Remote programming of device is possible if:
user uses GPRS transmitters configurator and GSM modem connected to PC
user uses OSM.2007 monitoring system receiver.
In first case remote programming is possible on CSD channel and its procedure is
analogous to local programming, remembering that “Modem GSM” shall be selected
from connection options (See chapter 6.3.5.2 – CSD connection).
Page 50

PX200N_Manual_en-1.11i7 Page 50 / 58
Note: Remote configuration with use of CSD canal is possible only if transmission of
CSD data is active both for SIM card inserted in the device, and for SIM card
installed in GSM modem.
In second case according to description in chapter 6.3.5.2 – GPRS linking , it is
required to define remote link on grounds of OSM.2007 parameters. As OSM.2007
collects (and transmits) information exclusively from devices saved in data base, the
first operation during remote programming is proper registration of the device. This
procedure has been described in OSM.2007 Operation Manual.
8.2.1. The first programming of device
As the device does not have defined access parameters in respect of GPRS network
and OSM.2007, programming shall be begun with providing parameters.
Irrespectively of providing these parameters the first operation shall be registration
of device in OSM.2007 data base.
Before remote programming user shall check that the device is furnished with SIM
card (with reservations provided in chapter 0) and is connected to power supply.
User shall know serial number of device and phone number for SIM card.
Follow the procedure:
a) With the use of OSM.2007 console position cursor on proper device in
“Devices” tab.
b) Click “Config.” option and then select “Set Configuration” function to display
lit of parameters.
c) Enter server address, server port and APN. Click OK and system shall send to
device provided parameters (SMS).
d) Wait till device addresses server (in “Devices” tab it will be marked with green
colour).
e) Launch software and define options of device (description is provided in
chapter 7 of this Manual).
f) Select “Send” to display a new window and select remote connection (GPRS
tab). Save settings in memory of device. Saving course is displayed on
special window.
g) After saving completion close Configuration Wizard.
h) The device is ready to transmit data.
8.2.2. Reprogramming of device
As the device has defined access parameters in respect of GPRS network and
OSM.2007, it is possible to program device at any time.
If device is installed in secured object and is furnished with SIM card and connected
to power supply follow the procedure:
a) Launch configuration wizard and define options of device (description is
provided in chapter 7 of this Manual).
b) Select “Send” to display a new window and select remote connection (GPRS
tab). Save settings in memory of device. Saving course is displayed in special
window.
c) After saving completion close Configuration Wizard
d) The device is ready to transmit data according to new settings.
Page 51

PX200N_Manual_en-1.11i7 Page 51 / 58
9. RECEIVING OF SMS MESSAGE
GPRS module receives specially prepared SMS. If received SMS is not correct it will
be automatically cancelled and device will not operate any action.
As mentioned above the device may operate in two modes:
o with a new encoded protocol
o with PX protocol
Depending on operation mode there are varied commands available to control the
device.
9.1. NEW PROTOCOL
The following format of message is acceptable allowing to send some commends
with one SMS (every command shall be separated with SPACE ):
SERVICE CODE█COMMAND█COMMAND█..........
Where:
SERVICE CODE - device service code
█
- SPACE
COMMAND - order (see the table below)
List of commands
DISC Disconnects active TCP connection.
KILL Reset modem; after execution of command a confirmation is
sent.
RESET Reset device. Note: all unsent events will be lost.
OUT=outNr, state Turn on or turn off outputs. outNr specifies output number (0
for OUT1, 1 for relay output), state specifies requested output
state (0 – switched off, 1 – switched on).
Examples:
OUT=1,0 – switches off relay output
OUT=1,1 – switches on relay output
CMD= [timeout],
command
Issues AT command to GSM modem and sends response back.
Optional timeout parameter defines time for modem response.
Time determined in seconds and ranges from 1-30 seconds. If
timeout isn’t specified, 3 seconds is assumed.
DESC Returns device description, serial number (hexadecimal
number) and firmware version.
GETSTATUS Download device status. Command sends text back according
to definition from chapter 7.6.3 Status
GETPARAM=
parameter_name
Gets inquired parameter :SERVER, PORT, APN, UN, PW, DNS1,
DNS2, SMS, SMSPERIOD
GETCFG Gets primary communication parameters of device in form:
SERVER:PORT,APN UN PW,DNS1
APN=apn Access point to GPRS network. Parameter should be obtained
from mobile network operator. If APN address contain space
sign put it with “” e.g. “my apn”.
Page 52

PX200N_Manual_en-1.11i7 Page 52 / 58
UN=un APN user name. Parameter should be obtained from mobile
network operator. If APN user name contain space sign put it
with “” e.g. “my user name”.
PW=pw APN password. Parameter should be obtained from mobile
network operator. If APN password contain space sign put it
with “” e.g. “my password”.
SERVER=server Server address; it can be in form of IP or domain name
address.
PORT=port Server port number.
DNS1=dns1 Specifies primary DNS server address (only needed when
domain name address is used as SERVER address)
DNS2=dns2 Specifies secondary DNS server address (only needed when
domain name address is used as SERVER address)
SMS=phone number Server phone number. When there is GPRS failure, SMS with
events will be sent to this number.
SMSPERIOD=time Defines in minutes time between SMS test messages sending to
the server.
OLD Switch device operating in encoded protocol mode into
operation in old PX device emulation mode.
RLIMIT Removes automatic temporary locks on all inputs
RLIMIT=inputs_mask Removes selected automatic temporary locks. Parameter is
decimal number made from 9-bit word: A9 … A2, A1, where A1
means TAMPER, A2 INPUT 1 and A9 INPUT8.
EXAMPLE:
RLIMIT=7 removes locks on inputs: TAMPER, IN1, IN2
RLIMIT=1 remove lock on input TAMPER
DT=YY/MM/DD,hh:mm:ss Sets date and time in the transmitter; must be putted in a
specific format (see the table on the left)
Note: DESC, CMD, GETSTATUS, GETPARAM, GETCFG commands require separate
SMS, so one command with only one SMS.
Samples of commands and device reaction:
Parameters setting:
1111█APN=general.t-mobile.uk█SERVER=89.112.43.78█PORT=6670
█
SMS=500445566█SMSPERIOD=25
Parameters verification:
Inquiry: 1111█GETCFG
Answer: 89.112.43.78:6670,general.t-mobile.uk██,
Inquiry: 1111█GETPARAM=SMS
Answer:: 500445566
Page 53

PX200N_Manual_en-1.11i7 Page 53 / 58
9.2.
OLD PROTOCOL
The following format of message is acceptable allowing to send some commends
with one SMS (every command shall be separated with SPACE):
SERVICE CODE█COMMAND█COMMAND█..........
Where:
SERVICE CODE - device service code
█
- SPACE
COMMAND - order (see the table below)
List of commands
NEW Switch device operating in PX emulation mode into encoding
protocol mode.
STAT Enquiry regarding actual module condition
VER Gets device firmware version
TMP1 Switches on OUT1 output
TMP0 Switches off OUT1 output
AUX1 Switches on relay output
AUX0 Switches off relay output
INT_ON TMP (sabotage) input lock
IN1_ON 1 input lock
IN2_ON 2 input lock
IN3_ON 3 input lock
IN4_ON 4 input lock
IN5_ON 5 input lock
IN6_ON 6 input lock
IN7_ON 7 input lock
IN8_ON 8 input lock
INA_ON All inputs lock (with no impact on sabotage input)
INT_OFF TMP (sabotage) input unlock
IN1_OFF 1 input unlock
IN2_OFF 2 input unlock
IN3_OFF 3 input unlock
IN4_OFF 4 input unlock
IN5_OFF 5 input unlock
IN6_OFF 6 input unlock
IN7_OFF 7 input unlock
IN8_OFF 8 input unlock
INA_OFF All inputs unlock (with no impact on sabotage input)
KILL GSM modem reset
Page 54

PX200N_Manual_en-1.11i7 Page 54 / 58
10. LED DIODES INDICATION
LED diodes, mounted directly on printed circuit, are purposed to show actual
condition of the device.
10.1.
LOGGING TO GSM NETWORK
Once SIM card has been inserted into the device and power supply was turned on
logging to GSM system follows.
LED Diodes
Description
Green Red
Logging to GSM
10.2. GSM RANGE
Flickering of a green diode indicates GSM signal (1-8 flickers).
Device operation mode is signalled with a green diode on during 2 seconds once the
range was detected. If after signalling range diode will not flash for 2 seconds the
device is in SMS mode. Range indication is interrupted during data transmission,
and after sending of data again GSM range is being indicated.
LED Diodes
Description
Green Red
GSM range = 8
GPRS mode
GSM range = 6
SMS mode
DTMF
ERR
OK STATUS
DTMF
ERR
OK STATUS
Page 55

PX200N_Manual_en-1.11i7 Page 55 / 58
10.3. DATA TRANSMISSION
During data transmission a green diode indicates data transmitting.
LED Diodes
Description
Green Red
GPRS Transmission
SMS Transmission
10.4. RECEIVING OF DTMF DATA
Yellow diodes marked as DTMF and STATUS indicate actual condition during
receiving data from a control panel.
LED Diode Signalling
STATUS
DTMF
(HandShake) (KissOff)
6 digits of phone 16 digits Cont
actID
DTMF
ERR
OK STATUS
DTMF
ERR
OK STATUS
DTMF
ERR
OK STATUS
Page 56

PX200N_Manual_en-1.11i7 Page 56 / 58
10.5. PROGRAMMING
After detection of programming wire diodes indicate programming.
LED Diodes
Description
Green Red
Connected
Service wire
Programming
in CSD mode
10.6. FIRMWARE UPDATING
During programming bootlader operating is indicated. If error follows during
updating there is bootloader in device and another programming of device is
possible.
LED Diodes
Description
Green Red
No program in
device
(1/sec)
Software updating
Received firmware
decoding
10 sec
DTMF
ERR
OK STATUS
DTMF
ERR
OK STATUS
Page 57

PX200N_Manual_en-1.11i7 Page 57 / 58
10.7. SIM CARD ERROR
In case of SIM card problems, device states this with OK and ERROR LEDs
LED diode Signalling
OK
(green)
ERROR
(red)
10.8. SLEEP MODE
Sleep mode (see 7.4.5 Sleep when the battery voltage less than) is indicated by
alternating lighting and off LEDs: OK and ERR
LED diode Signalling
OK
(green)
ERROR
(red)
10.9. SYSTEM ERROR
During operating errors may follow. Any error is indicated by constant flashing of a
red diode and mostly it means communication problem with modem or SIM card.
DTMF
ERR
OK STATUS
DTMF
ERR
OK STATUS
Page 58

PX200N_Manual_en-1.11i7 Page 58 / 58
11. CHANGELOG
Date / Version Description
26.08.2009 / 1.11i1 First version based on LX manual 1.10i1
22.10.2009 / 1.11i2 Added colourful drawings of diodes
25.11.2009 / 1.11i3 Firmware update and GPRS configurator update
28.01.2010 / 1.11i4 Added parameter of battery voltage at which the
transmitter goes into Sleep mode
05.02.2010 / 1.11i5 User SMS tests, reading history via GPRS, battery voltage
threshold for Sleep mode
15.03.2010 / 1.11i6 Amendment descriptions and screenshots for the outputs
18.03.2010 / 1.11i7 Amendment descriptions and screenshots for the outputs
 Loading...