

Page 1
SPECIFICATIONS
Nominal Input Level - 8 dBv
Input Impedance 10 Mohms (Ch A), 1 Mohms (Ch B)
Output Impedance 10 kohms
Frequency Response +0 / -3 dB 20 – 20 kHz
Tone Controls Bass +/- 15 dB @ 100 Hz
Treble +/- 15 dB @ 10 kHz shelving
Bright + 12 dB @ 10 kHz,15dB gain
Midrange +/- 12 dB
Frequency Range 50 –2.000 Hz
Q 0.80
Edge +/- 12 dB @ 7 kHz
Boost Control Gain 0 – 30 dB
Drive Control Gain 0 – 35 dB
Gain Type Class A Tube Emulator
Low End Compensation < 250 Hz
Balanced Output Impedance 500 ohms balanced
Nominal Level -10 dBv
Frequency Response +0/-3 dB 20 Hz – 30 kHz
XLR Connections 1-GND, 2-Hot, 3-Cold
Options GND Lift, Speaker Sim., Pre EQ
Phones Impedance 32 – 200 ohms recommended
Output Power 75 mW per channel @32 ohms
Power Requirements 9 V DC Regulated, 10 mA
Powering Modes DC Power Supply, Battery,
Dimensions 6.0” (153 mm) Width,
Weight 875 g (1.95 lb.)
Specifications are subject to change without notice!
80 mA with Phones
48V Phantom power,
EBS Phantom Power System
4.3” (110 mm) Height,
2.3” (58 mm) Depth
USERS MANUAL
BLACK LABEL SERIES
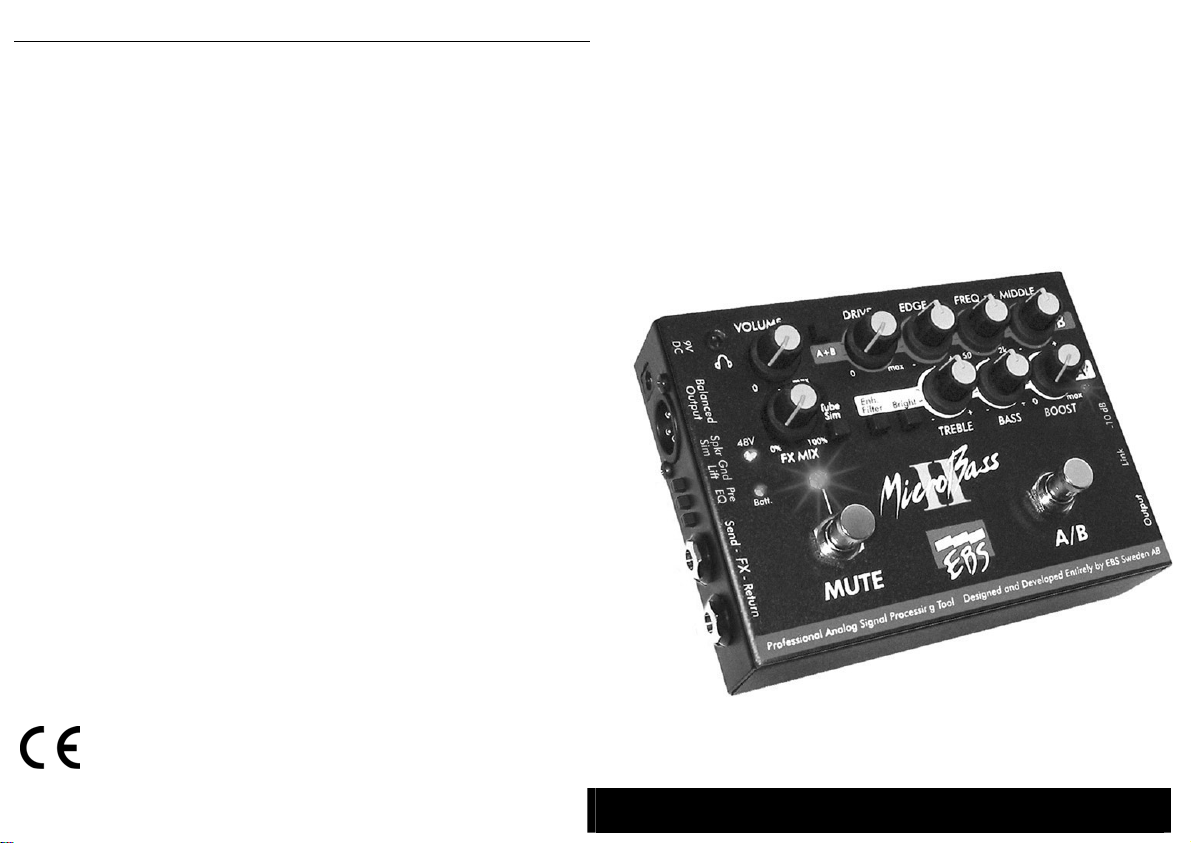
EBS MICROBASSII
Nov 2005
EBS MicroBassII
DESIGNED AND DEVELOPED BY EBS SWEDEN AB
GRINDSTUVÄGEN 44-46, SE-16733 BROMMA, SWEDEN
+46-8-735 00 10, FAX : +46-8-735 00 05
ebs.info@bass.se
www.ebssweden.com
EBS Professional Bass Equipment
Page 2
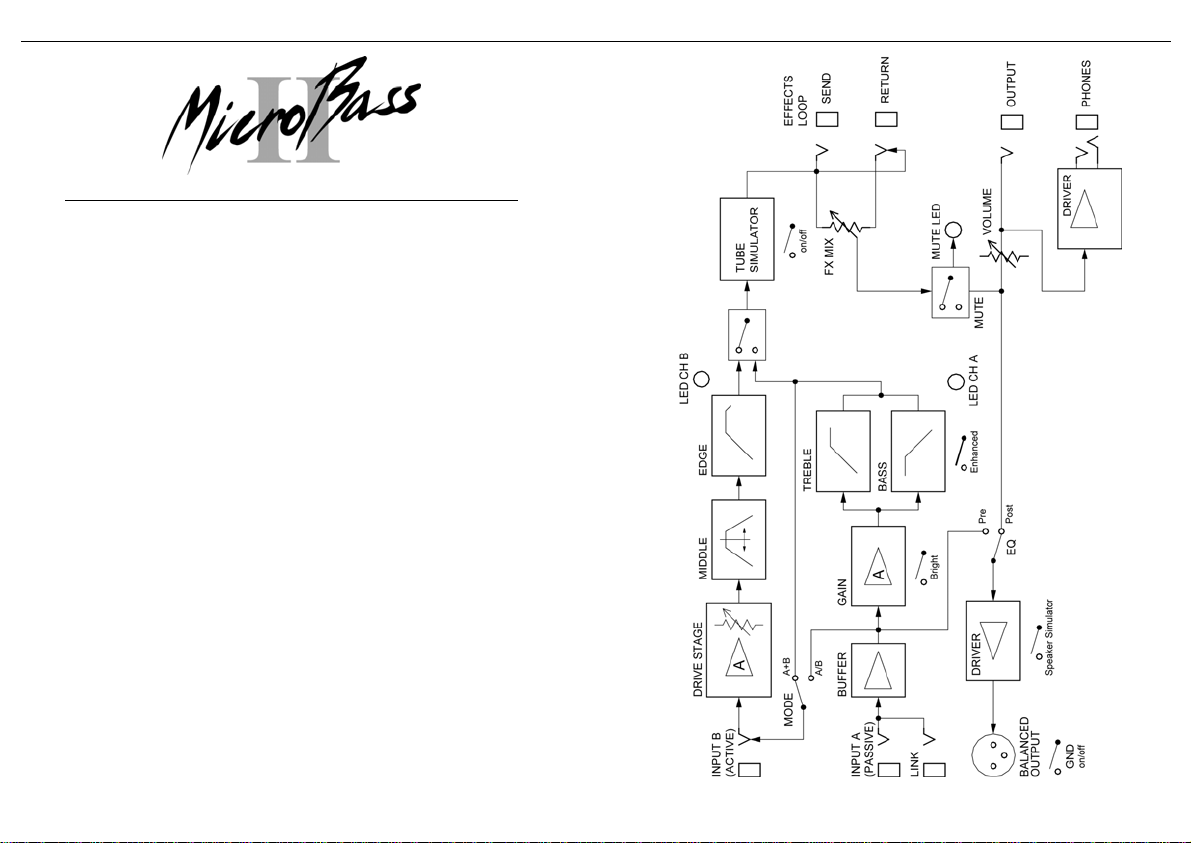
BLOCK DIAGRAM
CONTENTS: PAGE:
GETTING STARTED:
DIRECT INJECTION BOX
U
U
R
G
T
C
I
B
B
C
M
D
C
T
E
B
V
P
B
T
B
T
SING ONE INSTRUMENT
SING TWO INSTRUMENTS
EHEARSAL PREAMP
OOD TO KNOW
HE CONTROLS AND FUNCTIONS:
HANNEL A:
NPUT • -10 dB • BOOST
ASS • TREBLE
RIGHT • ENHANCED FILTER
HANNEL B:
IDDLE • EDGE
RIVE • MODE SWITCH
OMMON FEATURES:
UBE SIM • CONTROL SWITCHES
FFECTS LOOP
ALANCED OUTPUT
OLUME • INDICATORS
OWERING MODES
ATTERY REPLACEMENT
ECHNICAL REFERENCE:
LOCK DIAGRAM
ECHNICAL SPECIFICATIONS
3
4
5
6
7
8
9
10
11
12
13
14
15
16
2 15
Page 3
POWERING MODES GETTING STARTED
1. DC Adapter: EBS recommends the use of the EBS AD-9 DC
power supply, which supplies a well-stabilized power to the
EBS MicroBassII.
2. EBS Phantom Power™: The Phantom Power option allows
you to power the MicroBassII from another EBS product such
the GormET/Drome bass combos or EBS-active cabinets and so
on. When using the phantom power, you need to connect a
stereo ¼” cable between the OUTPUT from the EBSMicroBassII and the input jack of the amplifier, or if option is
available on the amp, to the effect return jack. Please refer to
the amps user manual on how to engage this on the amp.
3. 48V Phantom: This is the standard microphone phantom
power option found on mixing consoles and is fed through the
balanced XLR output. Refer to the operating instructions of the
mixing console being used for further reference on how to
activate the 48V phantom power.
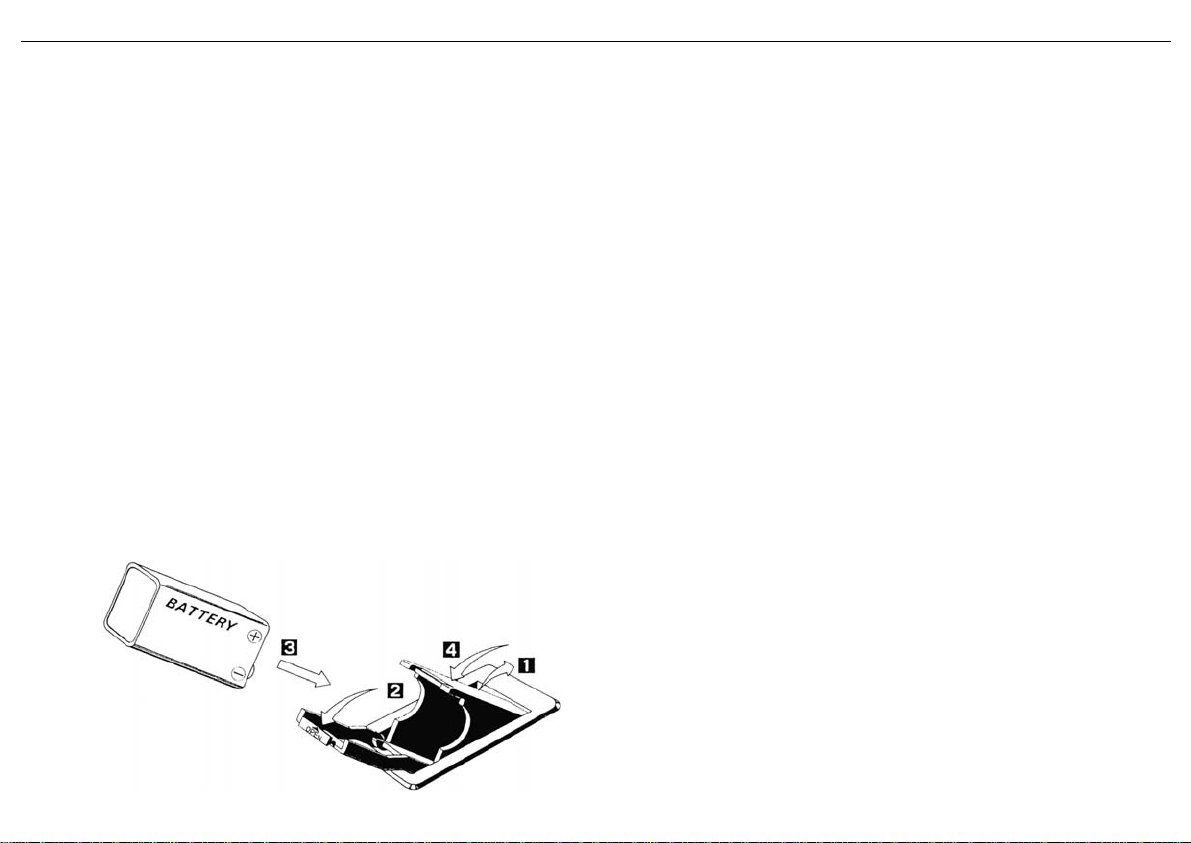
4. 9V Battery: Use a long-life alkaline battery for best
performance. Note that the battery doesn’t need to be removed
when using another powering mode. The battery will not be
surged or charged.
____________________________________________________
BATTERY REPLACEMENT:
Thank you for choosing the EBS MicroBassII professional
outboard preamp. This manual will describe how to get the
most out the MicroBassII preamp. In this first section we
will describe the basic modes of operation and give you a
couple of hints. The second section describes more in detail
the different function and options available for your use.
GOOD LUCK!
____________________________________________________
THE DIRECT INJECTION BOX MODE:
1) Connect your instrument to input A.
2) Connect to the amplifier from output LINK.
3) Set the A/B switch so that Channel A is active.
4) Set the BASS and TREBLE controls to 12 o’clock and
the BOOST to minimum position.
5) Make sure no option switches are selected into inner
position.
6) Connect to mixer from the Balanced XLR Output.
Now you have selected the active DI option with perfectly flat frequency
response. Depending upon your instrument you may change the input
sensitivity with the Boost control up to the choice of your own.
OR:
1) Connect your instrument to input A.
2) Connect to the amplifier from output LINK.
3) Push the PRE EQ switch.
4) Connect to mixer from the Balanced XLR Output.
14 3
Page 4

GETTING STARTED THE OUTPUTS
USING ONE INSTRUMENT MODE:
1) Connect your instrument to input A.
2) Connect the Output to power amplifier or amplifier head.
3) Set the A/B switch so that Channel A is active.
4) Set the BASS and TREBLE controls to 12 o’clock and
the BOOST to minimum position.
5) Set the DRIVE control to minimum position and the
MIDDLE and EDGE to 12 o’clock.
6) Make sure all switches are in the outer position.
7) Connect to mixer from the Balanced XLR Output if
required.
You can now dial in two different sound on the A and B
channels respectively. By engaging the A+B mode switch you
may now dial in your basic sound on channel A, and when
selecting B you will add the B to the A channel. This is useful
for overdriven sounds and lead playing. Both LED’s will now
light.
BALANCED OUTPUT - Is a high quality balanced output. The
balanced output functions as an interface for connecting to PA mixing
consoles or to studio or broadcast recording units.
Lifting ground is a great aid in many occasions. When required, set the
Gnd Lift switch to its’ inner position to disconnect the ground from the
output.
Note: You cannot use the 48V phantom powering option when the
ground is lifted!
The EBS MicroBassII features a speaker simulator for the balanced
output. This feature is tuned together with a speaker cabinet in order to
send the same sound image from the preamp as heard on stage. To
activate this function press the Spkr Sim switch.
The Pre EQ switch selects the source for the balanced output. When
pressed, the balanced output takes its’ source from the A input, pre filter
and gain stages, and the MUTE switch will not have any effect.
__________________________________________________________
VOLUME - The VOLUME knob controls the output volume for the
OUTPUT and PHONES outputs. The balanced output (XLR) is not
affected by the setting of this knob.
__________________________________________________________
HEADPHONES – The headphones output enables you to use the
MicroBassII as a rehearsal amp, or to play without a poweramp/speaker
cabinet configuration. When using the headphones you cannot not use
the 48V phantom power or the EBS Phantom Power System option
due to the high power consumption.
_________________________________________________________
THE INDICATORS:
• A: Channel A active.
• B: Channel B active.
• MUTE: Preamp is muted.
• 48V: Microphone phantom power is powering the preamp.
• Batt.: Low battery. Replace the battery immediately.
4 13
Page 5

COMMON FEATURES GETTING STARTED
TUBE SIM. – This switch engages the tube simulation circuitry for the
MicroBassII. In difference from the Drive circuitry this simulator is static
and works only on fairly high levels, giving a soft clip limiting effect.
__________________________________________________________
EFFECTS LOOP – EBS MicroBassII is provided with an effect loop for
the use of external units such as box or rack effects.
FX MIX - Controls the amount of effect, all from 0% up to 100%. When
set to 100%, the effects loop is purely serial, and when the effects blend is
50%, the effects loop works in parallel mode.
The effect loop is put before the balanced output, so the effect signal will
be present at the balanced output.
__________________________________________________________
THE CONTROL SWITCHES:
There are two footswitches for rapidly changing the state of the EBS
MicroBassII:
A/B: Selects active channel A or B. If the Mode switch on channel B is
set to A+B, this switch selects channel A active or channel A AND B.
When using both inputs and the A+B mode is selected, you have the A
and B mix mode selected, so then this switch has no effect and no channel
LED will light.
U
SING TWO INSTRUMENTS MODE:
1) Connect the first instrument to input A and the second to
input B. Normally you would connect the instrument with
lowest output to channel A.
2) Connect the Output to power amplifier or amplifier head.
3) Set the A/B switch so that Channel A is active.
4) Set the BASS and TREBLE controls to 12 o’clock and
the BOOST to minimum position.
5) Set the DRIVE control to minimum position and the
MIDDLE and EDGE to 12 o’clock.
6) Make sure all switches are in the outer position.
7) Connect to mixer from the Balanced XLR Output if
required.
You may now switch the instruments with the A/B foot switch.
Adjust the gain and EQ on the individual channels for personal
taste.
By engaging the A+B mode switch you will enter the mix
mode, and both channels will be mixed equally rather than
selected individually. This is useful for teaching purposes, but is
also a very good feature if you wish to mix two different pickup
systems, for example on an upright bass. Here is where a piezo
pickup would be connected to channel A, and the standard pickup
to channel B. In this mode no channel LED will light.
MUTE: Mutes the Output, Headphones output and Balanced Output.
This is useful when changing instruments or when tuning. The Link
output from channel A is not muted with this switch.
12 5
Page 6

GETTING STARTED DRIVE • MODE SWITCH
REHEARSAL PREAMP MODE:
1) Connect your instrument to input A.
2) Connect headphones to the headphones jack.
3) Set the A/B switch so that Channel A is active.
4) Set the BASS and TREBLE controls to 12 o’clock and
the BOOST to minimum position.
5) Set the DRIVE control to minimum position and the
MIDDLE and EDGE to 12 o’clock.
6) Make sure all switches are in the outer position.
7) Set the Volume to a moderate setting.
You have now a basic sound you may wish to adjust with a
different gain and EQ settings.
You may now connect a CD player or another external source
to the Effects Return jack. In this rehearsal mode, the FX MIX
control will act as a balance between the background as connected
to the return jack and your instrument. Very useful for practicing
and while rehearsing.
DRIVE – The DRIVE knob controls the amount of gain in the tube
emulation stage, and provides extra gain all the way up to 30 dB. When
pushing this control to distortion, a tube like limitation is achieved
The lower midrange and bass frequencies are bypassed in the Drive
stage, producing a warmer overdrive without saturation, allowing the
player to add more low bass than with conventional preamps. The bass is
compensated over the tube emulation stage, which gives the same bass
response up to mid distorted sounds.
The additional filters MIDDLE and EDGE are located post the DRIVE
control, which means that you are able to fine tune your overdriven tone
further.
__________________________________________________________
A+B MODE SWITCH – This switch controls how the B channel should
work together with channel A.
In the outer position the channels operate separately, either by using
one instrument connected to channel A, or two ones connected to A and B
respectively.
In the inner position you have the option of putting channel B in series
with channel A, so with the A/B switch you select either channel, A or
channel A and B. The two channel LED’s indicate the status accordingly.
If you however have two instruments connected you will mix together the
two channels equally. Since the A/B doesn’t have any function, no
channel LED will light. This last mode is very useful if you wish to mix
two different pickup systems on one instrument.
6 11
Page 7

MIDDLE • EDGE GOOD THINGS TO KNOW
MIDDLE FILTER – This filter has an extended frequency range from
50Hz to 2kHz and facilitates total control over the midrange, with a wide
bandwidth giving a natural and non-peaking result.
SOME HINTS:
• Once you have connected either input A or B, the battery
is engaged.
• You do not need to remove the battery if you are
powering the MicroBassII in another powering mode.
• If you are only using the OUTPUT, you may power up
and down the MicroBassII without audible pops if the
Volume knob is set to minimum.
• For normal operation, try to keep the Volume as high as
possible.
• For best results, always gain up the MicroBassII from the
__________________________________________________________
EDGE FILTER – The EDGE filter is a 'bell' type filter peaking at
around 7kHz controlling the higher mids and treble registers, giving
presence and “edge”.
Boost and the Drive controls in minimum position.
• The Gnd Lift option cannot be used together with 48V
phantom power. Either phantom or ground lift.
• Trim the gains between the A and B channel in standard
“A or B mode” with the Drive knob set to minimum.
Then trim the gain with the Boost in channel A .
• You cannot use the headphones while using the 48V
phantom power or The EBS Phantom Power System.
Both MIDDLE and EDGE filters are located after the DRIVE controls,
which make them perfect for fine-tuning the overdriven sound.
10 7
Page 8

INPUT • BOOST BRIGHT • ENHANCED FILTER
INPUT A - A very low noise input suited for all types of instrument. The
very high impedance (10Mohms) makes this input suitable for sensitive
piezo pickup systems. This is the default input.
__________________________________________________________
-10 dB – This switch changes the input sensitivity and impedance of the
A channel input. This option is useful when connecting active instruments
to the EBS MicroBassII.
__________________________________________________________
BOOST - Control to adjust the instruments' signal strength to the right
operating level in the EBS MicroBassII. This control goes from unity gain
all the way up to 30dB with low noise. For best results, always try to gain
from minimum position.
__________________________________________________________
BRIGHT – The bright is an advanced high pass filter capable of
producing bright high treble timbre, without adding practically any noise.
It gives 12dB boost at 10kHz and may give brightness to old passive
pickups.
__________________________________________________________
ENHANCED FILTER MODE – The enhanced mode switch allows the
Treble control to have effect on the midrange in this filter. When boosting
the treble, the middles will be cut and vice versa. This function is fully
separated from channel B’s MIDDLE filter.
Normal filter mode TREBLE:
THE FILTERS:
The MicroBassII is equipped with very efficient filter controls to help you
shape the sound further.
BASS and TREBLE FILTERS:
Enhanced filter mode TREBLE:
8 9
 Loading...