

Page 1

GSM/GPRS/SMS/UMTS TRANSMITTER
LX20B
Installation and
programming manual
Issue:
1.8
Release date:
04.06.2018
Firmware version:
2.5.0
GPRS transmitter configurator version:
1.4.81.6
OSM server version:
1.3.71.091
Page 2

LX20B – Manual Page 2 / 67
DECLARATION OF CONFORMITY
EBS Ltd. Co. hereby declares that mentioned product conforms to all the
applicable requirements of EU and Council Directive No.1999/5/EC of 9
March 1999. A copy of Conformity Declaration is available at:
http://www.ebs.pl/en/certificates/ .
IMPORTANT INFORMATION
This crossed out dustbin symbol indicates that when the last user wishes
to discard the product at the territory of European Union, it shall be
utilized at an authorized and approved collection point. It applies both to
the device and accessories marked with this symbol. Do not discard these
products along with unsorted municipal wastes.
The content of this document is presented as “it is”. The manufacturer does not
grant any guarantee both expressed or implied, including but not limited to any
understood guaranties in respect of merchantability and any warranty of fitness for
a particular purpose, unless required with effective legal provisions. The
manufacturer reserves the right to amend this document, or withdraw it any time
without prior notice.
Policy of the device manufacturer is to constantly develop the product. The
manufacturer reserves the right to make modifications and changes without prior
notice in respect of any model functions described in this document.
Depending on programming of devices there are varied available functions. Further
details available at Distributor of devices.
Under any circumstances the Manufacturer shall not bear responsibility for any data
or income loss, or any other peculiar, accidental or indirect damages caused in any
way.
MANUFACTURER
EBS Sp. z o.o.
59 Bronislawa Czecha St.
04-555 Warsaw, POLAND
E-mail : sales@ebs.pl
Technical support: support@ebs.pl
Webpage: www.ebs.pl
Page 3

LX20B – Manual Page 3 / 67
Table of contents
1. Introduction .................................................................................................... 6
2. Functional and technical parameters .................................................................. 7
3. Assembly and wiring ........................................................................................ 9
3.1. Connecting LX20B with single SIM card slot ................................................................ 9
3.2. Connecting LX20B-5D with dual SIM card slots ........................................................ 11
3.3. Lx-zas power supply ........................................................................................................ 12
3.4. Input configuration ........................................................................................................... 13
4. Quick start procedure ..................................................................................... 14
5. Operation ..................................................................................................... 15
6. Configuration program ................................................................................... 17
6.1. Initial remarks ................................................................................................................... 17
6.2. Computer – requirements .............................................................................................. 17
6.3. Program functions ............................................................................................................ 17
6.3.1. File-> New ......................................................................................... 18
6.3.2. File -> Open ....................................................................................... 18
6.3.3. File -> Save ....................................................................................... 18
6.3.4. File -> Language ................................................................................. 19
6.3.5. File -> Connections ............................................................................. 19
6.3.5.1. Local connection ........................................................................... 19
6.3.5.2. Remote connection ....................................................................... 20
6.3.6. File -> Automatic device settings backup ............................................... 22
6.3.7. File -> Exit ......................................................................................... 22
6.3.8. Operations -> Read ............................................................................. 22
6.3.9. Operations -> Send ............................................................................. 22
6.3.10. Operations -> System events history ................................................. 23
6.3.11. Operations -> Device monitor ........................................................... 23
6.3.12. Operations -> Restore default settings ............................................... 23
6.3.13. Help -> About program .................................................................... 23
7. Programmable parameters .............................................................................. 24
7.1. Access ................................................................................................................................. 24
7.1.1. Transmitter ........................................................................................ 24
7.1.1.1. Service Code ................................................................................ 24
7.1.1.2. Installer Code .............................................................................. 25
7.1.1.3. SIM Card PIN ............................................................................... 25
7.1.1.4. Use backup SIM Card .................................................................... 25
7.1.2. Servers .............................................................................................. 26
7.1.2.1. Servers – for the devices with single SIM Card slot ........................... 26
7.1.2.2. Servers - for the devices with two SIM Card slots ............................. 28
7.1.3. Communication ................................................................................... 30
7.1.3.1. Mobile Data Transmission .............................................................. 30
7.1.3.2. SMS ............................................................................................ 31
7.2. Transmission ...................................................................................................................... 32
7.3. Inputs/Outputs .................................................................................................................. 32
7.3.1. Inputs configuration ............................................................................ 32
7.3.1.1. Input mode .................................................................................. 32
7.3.1.2. Delay .......................................................................................... 33
7.3.1.3. Locks .......................................................................................... 33
7.3.2. Partitions ........................................................................................... 35
7.3.2.1. Partition arming input ................................................................... 35
7.3.2.2. Inputs assigned to partitions .......................................................... 35
7.3.2.3. Delayed inputs ............................................................................. 35
7.3.2.4. Exit time ..................................................................................... 36
7.3.2.5. Entry time ................................................................................... 36
7.3.3. Outputs ............................................................................................. 36
7.3.3.1. Activation mode and timing ........................................................... 36
Page 4

LX20B – Manual Page 4 / 67
7.3.3.2. Conditions ................................................................................... 36
7.3.3.3. Additional conditions ..................................................................... 37
7.3.4. Advanced outputs control ..................................................................... 37
7.3.4.1. Output 1/Output 2 ........................................................................ 38
7.3.4.2. Time of output activation ............................................................... 38
7.3.4.3. Event: CLIP ................................................................................. 39
7.4. Monitoring .......................................................................................................................... 39
7.4.1. GPRS On / GPRS Off ............................................................................ 39
7.4.2. SMS On / SMS Off ............................................................................... 39
7.4.3. Skip initial state .................................................................................. 40
7.4.4. Power loss .......................................................................................... 40
7.4.5. Event: CLIP ........................................................................................ 40
7.5. Restrictions ........................................................................................................................ 40
7.5.1. SMS Authorized phones ....................................................................... 40
7.5.2. GSM modems authorized phones .......................................................... 41
7.5.3. Validity period of outgoing SMS messages .............................................. 42
7.5.4. SMS limits .......................................................................................... 42
7.6. SMS notifications .............................................................................................................. 42
7.6.1. Phone numbers ................................................................................... 43
7.6.2. Events ............................................................................................... 43
7.6.3. SMS user tests .................................................................................... 44
7.6.4. Status ................................................................................................ 45
7.6.5. SMS Forward ...................................................................................... 46
7.7. Link control ........................................................................................................................ 47
7.7.1. GSM .................................................................................................. 47
7.7.2. GPRS ................................................................................................. 48
7.8. RS232 .................................................................................................................................. 48
7.8.1. Serial port settings .............................................................................. 49
7.8.2. Buffer flushing .................................................................................... 49
7.8.3. Advanced port options ......................................................................... 50
7.8.3.1. Disable data receiving ................................................................... 50
7.8.3.2. Disable data sending ..................................................................... 50
7.8.3.3. Half Duplex mode ......................................................................... 50
7.8.3.4. Tests of device connection to port................................................... 50
7.9. Phone line ........................................................................................................................... 50
7.9.1. Phone line .......................................................................................... 51
7.9.1.1. Use external phone line ................................................................. 51
7.9.1.2. Disconnect external phone when server connected ........................... 51
7.9.1.3. Monitor external phone line voltage ................................................ 51
7.9.1.4. Report off-hook ............................................................................ 52
7.9.1.5. Report intervals between dialled digits ............................................ 52
7.9.1.6. Generate dial tone ........................................................................ 52
7.9.1.7. Detect off-hook ............................................................................ 52
7.9.2. First and Second phone number ............................................................ 52
7.9.2.1. DTMF phone number ..................................................................... 52
7.9.2.2. Handshake delay .......................................................................... 53
7.9.2.3. Protocol ....................................................................................... 53
7.10. Firmware............................................................................................................................. 54
7.11. Device monitor .................................................................................................................. 54
7.12. Events history .................................................................................................................... 56
8. Device programming ...................................................................................... 58
8.1. Local programing .............................................................................................................. 58
8.2. Remote programming ...................................................................................................... 58
8.2.1. The first programming of device ............................................................ 59
8.2.2. Reprogramming of device ..................................................................... 59
9. Receiving of sms message .............................................................................. 61
9.1. Description of the protocol ............................................................................................. 61
Page 5

LX20B – Manual Page 5 / 67
10. Led diodes indication ...................................................................................... 64
10.1. Logging to GSM network ................................................................................................. 64
10.2. GSM range ......................................................................................................................... 64
10.3. Data transmission ............................................................................................................. 65
10.4. Receiving of dtmf data .................................................................................................... 65
10.5. Programming ..................................................................................................................... 66
10.6. Firmware updating ........................................................................................................... 66
10.7. SIM card error ................................................................................................................... 67
10.8. System error ...................................................................................................................... 67
11. Changelog .................................................................................................... 67
Page 6

LX20B – Manual Page 6 / 67
1. INTRODUCTION
Transmitter LX20B is a modern, microprocessor device for data transmission
in real time, with the transmission in the GSM. Connection with the monitoring
station, allowing you to transfer data from the control panel via the Contact ID
(DTMF) or SIA (FSK). There are available channels of transmission: GPRS / UMTS /
HSPA (3G) and SMS.
LX20B transmitter provides the highest security of data transmission through up
to transmission channels: / GPRS / UMTS / /HSPA (3G) / SMS. The primary purpose
is to use the device as a security systems transmission module. In addition, in the
LX20B-5D model there is possible to use two Nano SIM cards (two slots on the
PCB), which increases the reliability of the device for example in case of network
failure.
LX20B transmitter works with all most popular alarm systems. The addition of a
packet data transmission (GPRS / UMTS / HSPA), can reduce the cost of the alarm
systems. This device provides an opportunity to send text messages to private
mobile phones.
An advanced encoding methods like a 256 bytes encoding key and AES
(Advanced Encryption Standard) provides for security of data transmission. As a
result reception of this transmission is possible with OSM.Server monitoring receiver
system.
Furthermore there is possibility to transmit not coded messages that are to be
comprehensible by reception solutions and also by GPRS Server software.
Programming of receiver is possible:
o Locally on computer and with recommended “GPRS transmitter
configurator” software
o Remotely – via GPRS connection
– via SMS commands
– via transmission on CSD canal
Page 7

LX20B – Manual Page 7 / 67
2. FUNCTIONAL AND TECHNICAL PARAMETERS
Transmission channels
GPRS, SMS, PSTN*
*transparent, PSTN dialer required in a CP
Backup server
YES (GPRS, SMS)
User notifications
SMS (5 phone numbers)
Communication watchdog
YES
Inputs
5 (NO / NC / EOL-NO / EOL-NC / DEOL-NO /
DEOL-NC)
Partitions
2
Simulated PSTN Line
YES
Protocols supported on the phone input
SIA, ContactID
Control panel dialer bypass
YES
Voice gateway functions
-
Outputs
2 (OC, max. load 100mA)
Output functions
- unavailable GSM signal
- GSM jamming (only for BGS2-W module)
- from server or through SMS
- incoming CLIP
- in reaction on events and inputs
RC Receiver: 434 MHz
NO (optional)
Max.number supported keyfobs
-
Power output +12V
-
Serial interface
RS232 / RS485 (lines: RxD, TxD, RTS, CTS)
transmission speed up to 115200bps
Alarm events buffer size
-
Quantity of system events stored in
history
min. 5000
Event's timestamps
-
GPRS/SMS transmission security
AES encryption
Status LEDs
(functions)
4 LEDs (GSM signal level, device state, DTMF
communication)
Configuration
Remote: GPRS, SMS, CSD
Local: PC through RS232 (required cable: GDPROG or SP-PROG)
Remote firmware update
YES
Remote access to the control panels
-
Phone line protection circuit
YES
Dual SIM
only in LX20B-5D model
Multiantenna steering output
NO (optional)
Supported modems
model LX20B-50: Cinterion BGS2-W (Quad-Band
GSM: 850, 900, 1800, 1900 MHz);
model LX20B-5D: Cinterion BGS2-W (Quad-Band
GSM: 850, 900, 1800, 1900 MHz);
model LX20B-60: Cinterion EHS6 (Quad band
850/900/1800/1900MHz);
model LX20B-70: Cinterion EHS5-E (Dual-Band
UMTS: 900, 2100 MHz; GSM: 900, 1800 MHz);
model LX20B-80: Cinterion EHS5-US (Dual-Band
UMTS: 850, 1900 MHz; GSM: 850, 1900 MHz);
Ethernet
−
Page 8

LX20B – Manual Page 8 / 67
Power supply
parameters
- PCB
Voltage supply
13.8VDC (acceptable: 12-14VDC)
Power consumption
DC (AKU)
(average / max)
73mA/155mA@13.8VDC*
* Measured with full charged battery, modem
BGS2-W Cinterion
95mA/125mA@13.8VDC*
* Measured with full charged battery, modem
EHS5-E Cinterion
100mA/125mA@13,8VDC*
* Measured with full charged battery, modem
EHS6 Cinterion
Power consumption
AC (AC)
(average / max)
-
Power supply
parameters
- PCB in EBS
plastic casing
Voltage supply
230VAC (acceptable: 190-250VAC)
Power consumption
(average / max)
3W/10W@230VAC (recommended transformer
20W)
Charging module functions
-
Backup battery connection
-
Battery charging current
-
Threshold of signaling low AC voltage
(at secondary / at primary)
-
Threshold of signaling low battery
voltage
-
Cut-off battery voltage level
-
Dimension
PCB: 102 x 73 x 20mm
Working temperature
-10ºC … +55ºC
Working humidity
5% … 93%
Standards
CE
Page 9
LX20B – Manual Page 9 / 67
3. ASSEMBLY AND WIRING
Switch power off to perform any connection.
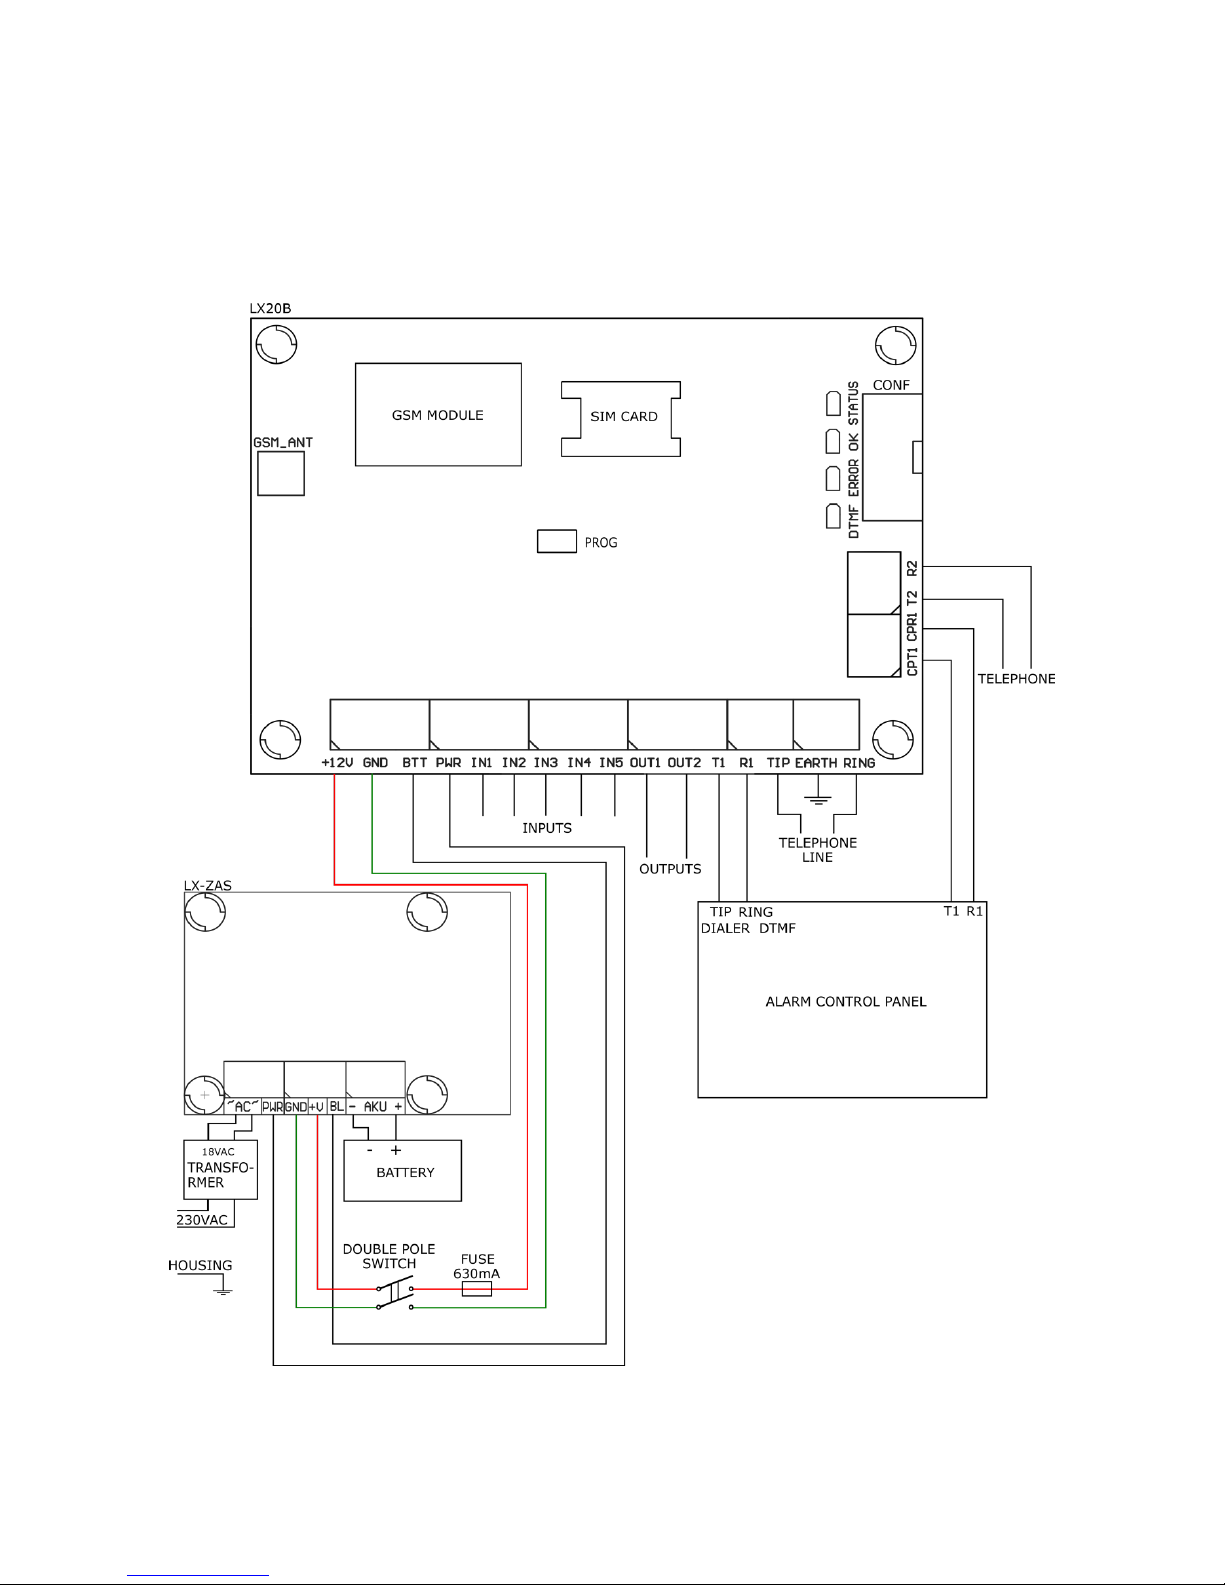
3.1. CONNECTING LX20B WITH SINGLE SIM CARD SLOT
Figure 1. LX20B Transmitter with LX-ZAS adapter
Page 10

LX20B – Manual Page 10 / 67
Connections of wires shall be made with due care to prevent any faults or dead
shorts. Places of connections shall be protected against weather conditions. For
safety reasons, on the DC power supply lines must be installed 630mA / 250VAC
fuse and double pole isolator that provides the ability to quickly disconnect the
power supply from an external transmitter.
According to the above figure terminals of transmitter shall be connected to:
Terminal
Connection description
+12V
The positive terminal of power supply 12-14VDC
GND
The negative terminal of power supply. Device weight. Mutual
terminal for inputs and outputs.
BTT
Control input. Works only with dedicated LX-ZAS adapter. Used
to verify the presence of a battery attached to the power supply.
PWR
Control input. Works only with dedicated LX-ZAS adapter.
Purposed for monitoring AC power supply.
IN1 – IN5
Signal inputs. For connection to control panel outputs (eg. Testing
outputs connection). GND terminal is common for all inputs.
OUT1, OUT2
OC type outputs. For connection to the control panel outputs (eg.
As feedback during system testing). When activating they give
mass.
T1 – R1
Terminals to connect to alarm control panel phone communicator
TIP – RING
Terminals to connect another transmitter (eg. working in another
GSM network)
EARTH
Earth
CPT1 – CPR1
Terminals for connecting control panel, in a place where
connection of telephone to panel is predicted
T2 – R2
Terminals for connecting to telephone
Length of the wires connecting between the transmitter and control
panel must not exceed 3m.
Outputs OUT1 and OUT2 are OC type. Do not connect the output directly
to a positive voltage relative to the ground. Do not apply a voltage
higher than 12V. The maximum current that can be controlled, should
not be greater than 100mA.
Don’t connect power supply when GSM antenna isn’t connected, because
it can cause permanent damage of GSM modem.
The procedure for programming the transmitter (see chapter 6).
THE FOLLOWING CONNECTIONS ARE PURPOSED FOR COOPERATION
WITH LX-ZAS POWER SUPPLY. IF OTHER POWER SUPPLY APPLIED,
INPUTS SHALL BE LEFT WITHOUT WIRING.
Page 11
LX20B – Manual Page 11 / 67
BTT
Control input for verification of battery connected to EBS
power supply.
PWR
Control input connected to adequate EBS power supply
output. Purposed for monitoring AC power supply.
Manufacturer reserves the right to amend appearance of printed circuit
with no effect on functionality of device.
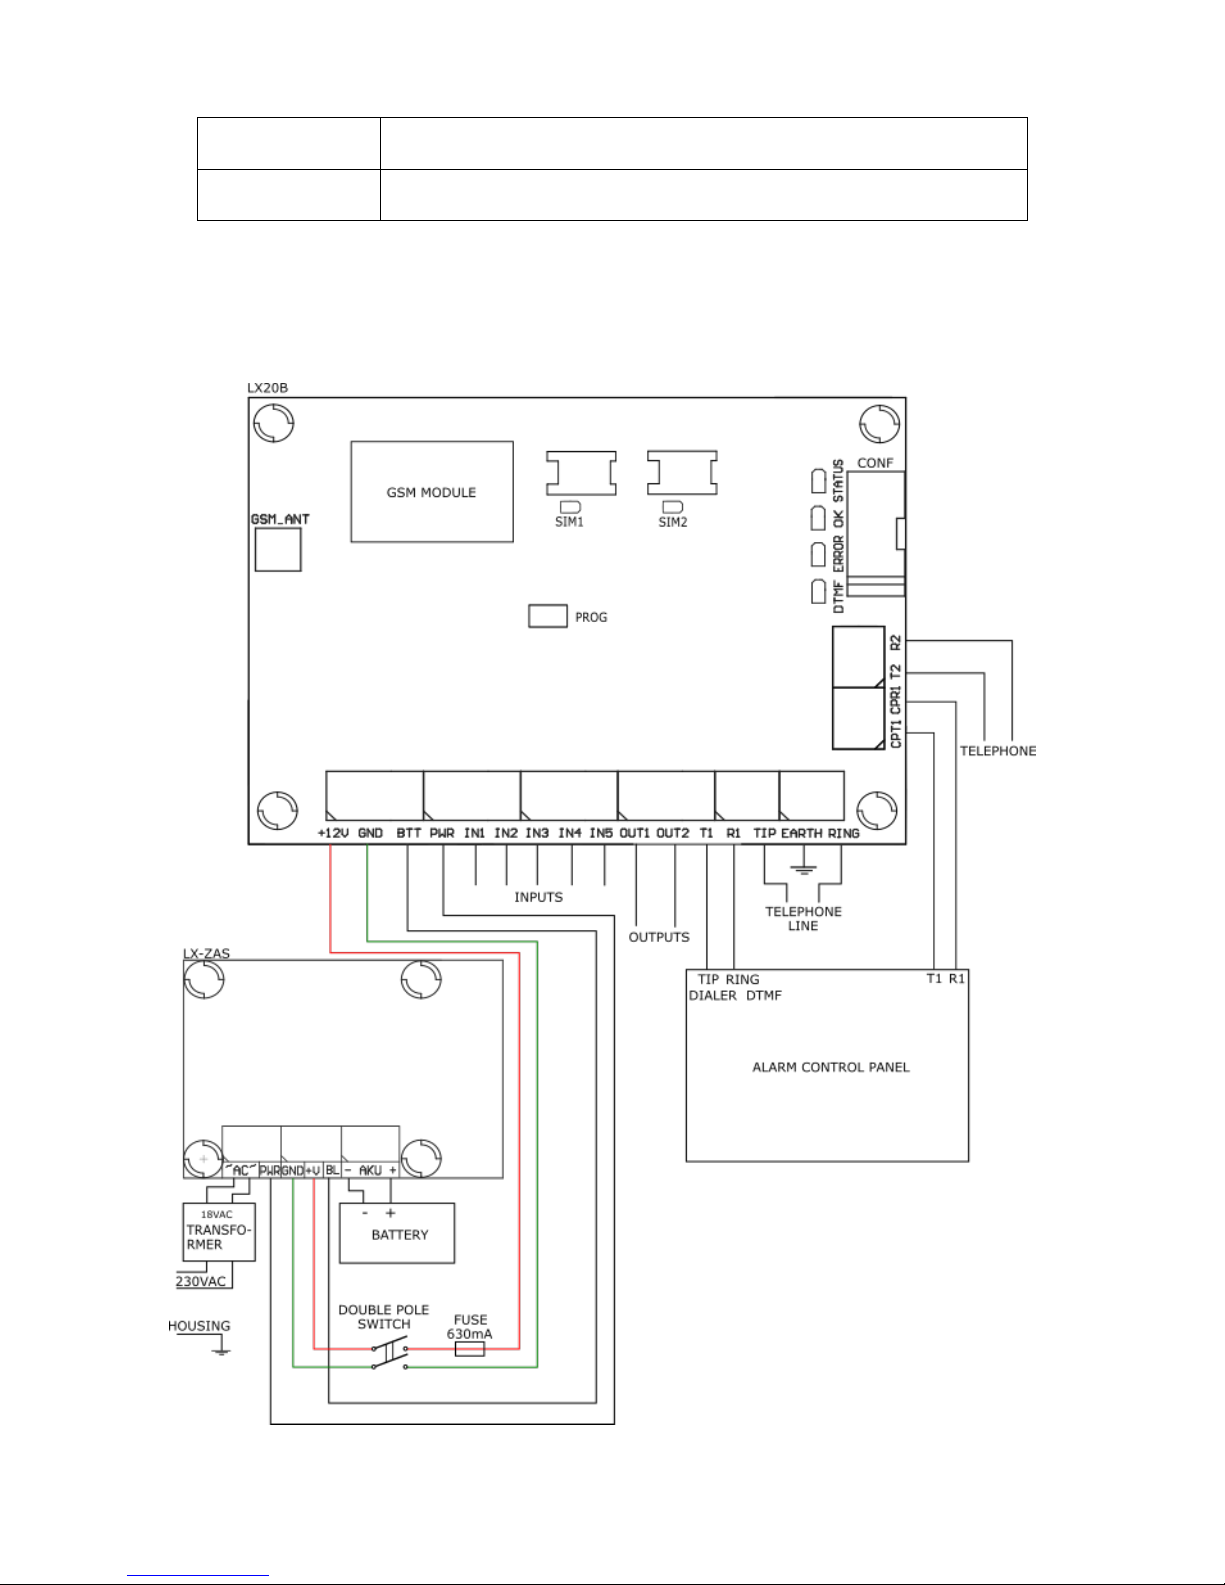
3.2. CONNECTING LX20B-5D WITH TWO SIM CARD SLOTS
Rys. 2. LX20B-5D Transmitter with LX-ZAS adapter
Page 12

LX20B – Manual Page 12 / 67
LX20B-5D PCB have two Nano SIM card slots and two LEDs indicating the status,
on which SIM card the device is currently working (the proper LED will lit green).
Pressing the PROG button will start switching to the second (inactive) card in order
to verify its correct work. After about 2 minutes of work on the second card, the
device will automatically switch to the first SIM 1 card (primary server) or stay on
it if the button is pressed when the device is on the second SIM 2 card.
Connections of wires in the LX20B-5D is identical to that of the LX20B with a single
SIM card slot.
3.3. LX-ZAS POWER SUPPLY
The dedicated power supply LX-ZAS (product of EBS) possesses the following
parameters:
Parameter
Value
Served batteries
Acid-leaded 12V
Maximum voltage of charging battery
13.8V
Charging current
0.2A or 1A (switched by jumper)
Voltage of signaling of low level
11V
Voltage of switch-off battery
9.5V
as well as it characterizes with following proprieties:
protection against opposite connecting battery.
protection against excessive unloading battery:
The battery protects before damage in case of long-lasting fading the AC. In
case of lack the AC and unloading below voltage 9.5V the battery becomes
separated from device automatically.
quick charging of the battery:
The jumper showed on Fig.2. place causes settlement of maximum current
of charging on 1A. We recommended jumper be taken off and the current of
charging battery carries out 0.2A.
Figure 2. Choice of current of charging the battery
Note: the applying the quick charging can bring to damage of battery.
Jumper ON => charging current 1A
Jumper OFF => charging current 0.2A
Page 13

LX20B – Manual Page 13 / 67
3.4. INPUT CONFIGURATION
Inputs IN1 – IN5 might work as normally closed (NC) or normally open (NO).
Additionally inputs might be configured as single end-of-line (EOL-NO or EOL-NC)
with resistors 2.2kΩ or as double end-of-line (DEOL-NO or DEOL-NC) with resistor
1.1kΩ.
Examples of connecting sensors to the inputs in various configurations are shown in
figure 3.
Fig. 3. Examples of connecting sensors to the inputs in various configurations
Page 14

LX20B – Manual Page 14 / 67
4. QUICK START PROCEDURE
NOTE:
Do not insert SIM card before the first programming of transmitter as it
may block the card if PIN code is required for the card.
This chapter is purposed for users that possess experience regarding GPRS
/ UMTS / HSPA (3G) data transmission systems and who work with
OSM.Server receiver for monitoring system. Other users shall skip this
chapter and go to chapter 5 of this Manual.
As many users possess protected facilities spread at vast locations, local
programming of transmitter is not always available (with PC computer and
programming cable).
Two phases comprise programming in this option:
a) sending to transmitter of main parameters (with SMS) that enable connection
to receiver (OSM.Server system).
b) full configuration of device with remote programming (GPRS transmitter
configurator and OSM.Server).
Quick start procedure:
a) insert into device SIM card with PIN code 1111 or disabled PIN code,
b) connect power supply for module,
c) send to SIM card number with SMS parameters related to connection of
device to receiver (OSM.Server)
d) waiting for moment, when device indicates connection to OSM.Server
Note: Connection to receiver is possible if the device was registered into it.
Registration procedure has been described in OSM.Server Operation Manual.
e) complete, remote programming with GPRS transmitter configurator.
SMS text message shall provide the following information:
<transmitter’s service code>█SERVER=<server address>█PORT=<server port>█
APN=<access point name>█UN=<user ID number>█
PW=<user password>
Where:
█: space (every parameter shall be separated with space – blank character)
<transmitter’s service code>: factory settings – 1111
<server address>: address of communication server purposed for collection of
transmitter signals e.g. 89.123.115.8. In case address is provided as domain e.g.
block.autostrada.com, SMS message shall include DNS1 parameter (address of main
DNS server)
<server port>: Number of port in server that receives messages from a device
<access point name>: defines access point name to GSM network.
If private network is used, SMS message shall provide the following parameters:
UN=<user ID number> and PW=<user password>.
Page 15

LX20B – Manual Page 15 / 67
Exemplary SMS is as follows (if we use public network and provide server address
as IP):
1111█SERVER=89.123.115.8█PORT=6780█APN=internet█UN=█PW=
Where:
█: space character
5. OPERATION
.A device can be configured to maintain communication via GPRS / UMTS / HSPA
network or SMS messages. Communication mode is configurable – see chapter 7.
for more information. As a result the transmitter may be used only at the territory
covered with mobile phone operator network.
If status of inputs is the same as programmed one (NO or NC) a device stays
in a rest. Change of status on any input results in immediate signal transmitting of
this event by the device.
Note:
Each device input (from IN1 till IN5) may be individually defined as on open one
(NO) or closed one (NC). It means that when in NO, input shorting will be an active
state and, a non-shorting will be an active state in NC.
To avoid an excessive cost of use related in particular to false alarms a device
possesses a programmable analysis of inputs.
All inputs respond only to states change which means that transmitting will
follow only if an active state is on input and maintains during programmed minimum
time. Maintenance of active state longer than a minimum time will result in single
indicating. Another input activation (another transmitting) is possible only after
input reached based state.
Number of messages sent in SMS mode is limited (limit includes also text massages
or answers to orders sent by user).This function provides for cost reduction by
limiting messages e.g. in case of damage of sensor connected to any input. After
passage of programmed time new messages will be sent but only in a number
determined by the user.
Text message on events sent to private phone numbers may be edited.
LX20B transmitter is equipped with input of a PSTN telephone line, and input
to connect telephone communicator module of alarm control panel.
Module constantly controls availability of an external telephone line. Decrease
of line voltage below around 5V is deemed as a line damage. If an exterior phone
line is operating, it is provided for output of telephone communicator module. If
damage of urban line follows, a module disconnects a urban line and provides a
voltage simulating telephone line to output of telephone communicator module.
Module always provides voltage corresponding to operating phone line for an alarm
control panel (namely to phone communicator module) regardless of urban line
status.
Page 16

LX20B – Manual Page 16 / 67
Configuration of transmitter for cooperation with an control panel’s phone
communicator requires entering into memory a phone number for which transmitter
is to answer.
Once a phone is picked up via an alarm control panel telephone
communicator , a telephone number is being dialled to make connection. After the
control panel dialled a number to which transmitter is to respond, a transmitter
takes over a phone line namely disconnects a urban line from an control panel and
provides to a phone communicator voltage that simulates an operating phone line.
Next it generates confirmation signal and awaits for data from a control panel –next
DTMF tones generated with communicator are treated as data. After transmitting
adequate number of DTMF signs (16 for ContactID) a transmitter generates Kissoff
signal. Collection of data from control panel finishes at hanging up a phone of a
control panel by phone communicator module. After that transmitter comes back to
standard operation –namely if urban line is operating, it is being connected to an
alarm control panel and awaits for dialling of new number.
If telephone number dialled with communicator is other than number GPRS
module answers, no operation follows and it waits until communicator hangs up a
phone and picks it up again – since picking up a telephone number dialled with a
communicator module is being checked.
All programmable parameters are saved in memory and in case of voltage
drop that are not lost. Supply of power starts the transmitter with saved settings.
Page 17

LX20B – Manual Page 17 / 67
6. CONFIGURATION PROGRAM
6.1. INITIAL REMARKS
GPRS transmitters configurator may be downloaded from www.ebs.pl (login:
ebs, password: ebs).
To install program an installation wizard shall be started that performs installation
in default place C:\Program Files\EBS\. During installation process shortcuts on
screen and Windows menu are created.
If device is to be used for the first time it shall be programmed with the
above program and after this procedure the SIM card may be inserted into the
device. Otherwise SIM card may be blocked if wrong PIN code is entered.
Alternatively SIM card may be used along with switched off PIN code.
In case of remote programming it is necessary to insert SIM card prior to
sending configuration settings. In this situation SIM card with switched off PIN code
shall be used or PIN code shall be changed to 1111 with mobile phone before
inserting card to the transmitter.
6.2. COMPUTER – REQUIREMENTS
Minimum requirements for computer system where configuration software is to be
installed:
Hardware:
o Processor 1GHz, 32-bit (x86) or 64-bit (x64),
o 1 GB RAM (for 32-bit) or 2 GB RAM (for 64-bit),
o 4,5 GB HDD.
Software:
o Operation system: Windows 7 or newer,
o NET Framework 4.5 software or newer.
6.3. PROGRAM FUNCTIONS
After installation and program starting a main view shall be displayed on screen.
Thanks to this view an access to program or programmable parameters of device is
possible (see chapter 7).
Main window of program is divided into some fields.
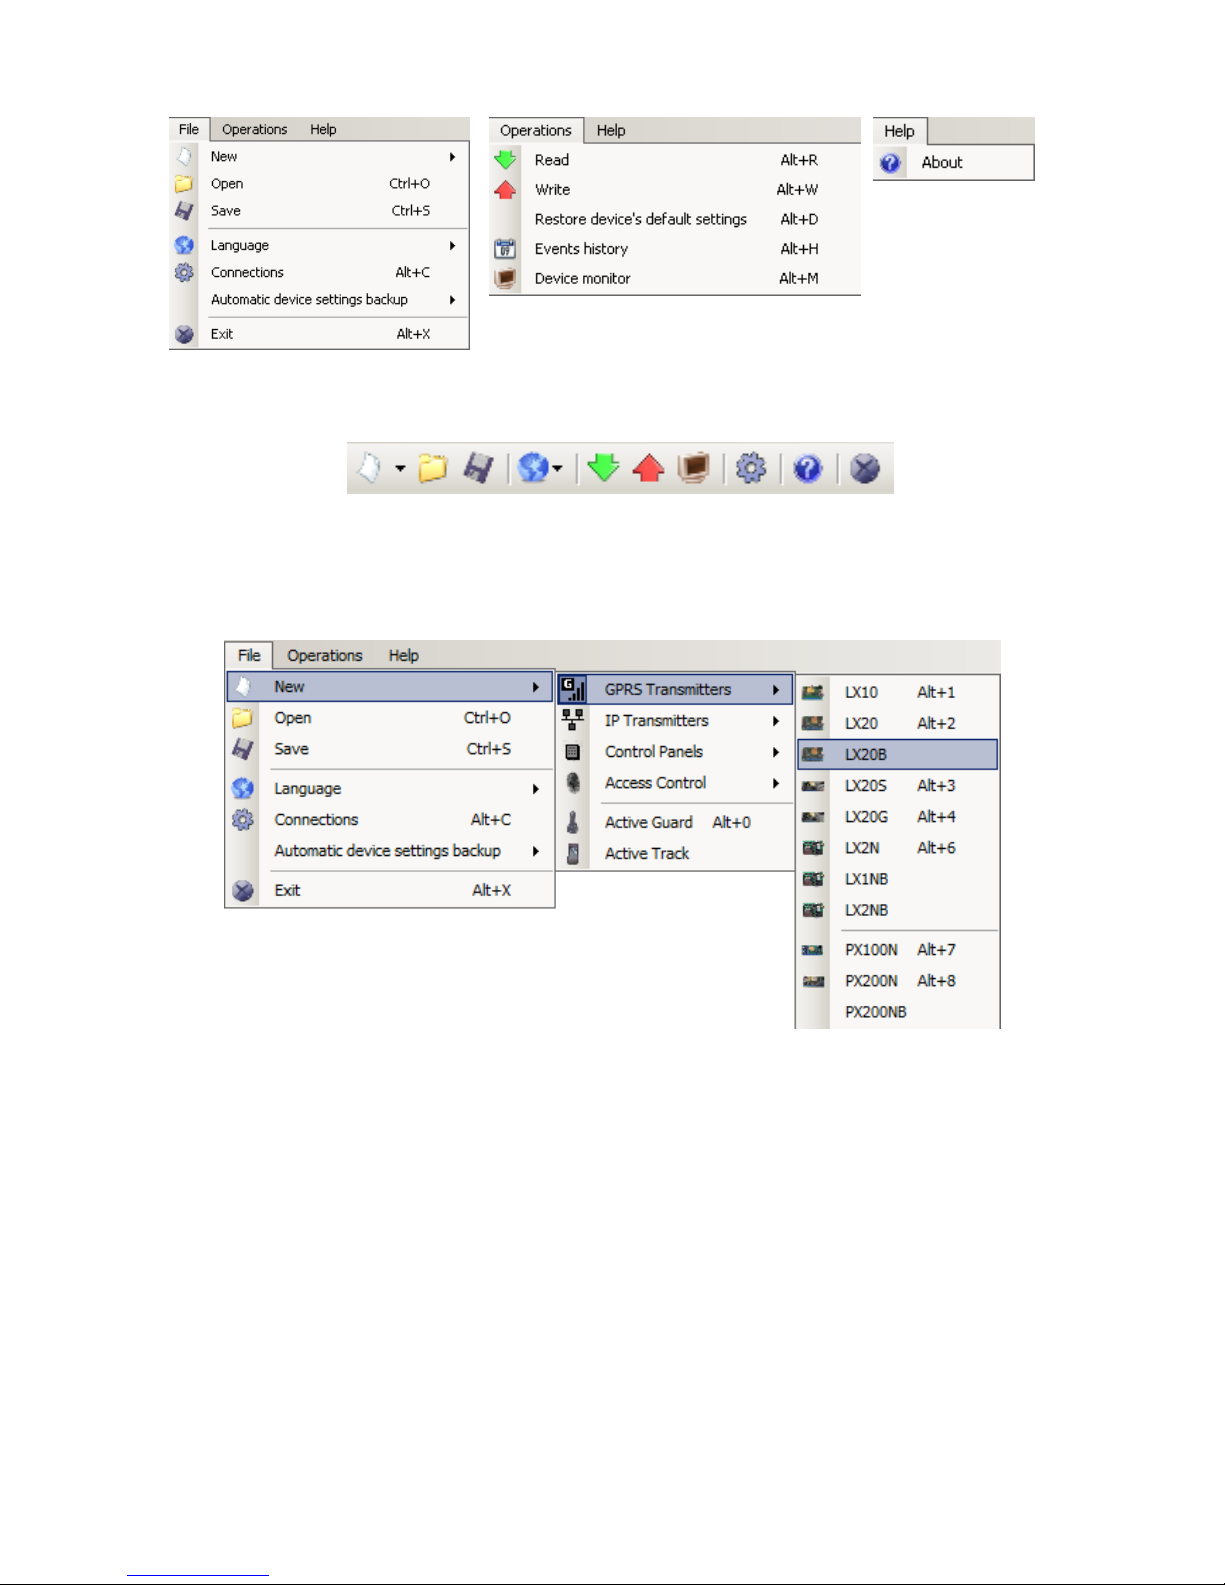
Main menu: at upper part of window, contains control and configuration options.
Main menu contents:
Page 18
LX20B – Manual Page 18 / 67
Main menu is available as icons on fast access bar:
6.3.1. File-> New
Opens new set of parameters. Editing of configuration parameters is possible.
Select type of device.
6.3.2. File -> Open
If file contains saved settings, they may be used to program next device. Firstly a
catalogue where file has been saved shall be chosen and then name of file shall be
provided. Obtained data collection may be modified by the user. Any amendments
are effective if send to device.
6.3.3. File -> Save
During programming many devices in different configurations, it is not necessary to
have in mind each one as it may be saved on hard disc or floppy disk under any
name and it may be loaded later on. This function save on disc any information from
configuration wizard window. After activation of function a dialog window appears
Page 19
LX20B – Manual Page 19 / 67
with request to provide file name. Default data is saved with CMI extension
(Configuration Memory Image).
6.3.4. File -> Language
Allows for selection of any available languages (determined in attached exterior
language files).
6.3.5. File -> Connections
Before programming of devices, a connection type shall be defined. It is possible to
do it with two methods:
- locally
- remotely
6.3.5.1. Local connection
Local connection means that configuration software (namely computer on which is
installed) is directly connected to proper terminal of transmitter via special wire and
through RS-232 serial port (GD-PROG) or USB port or Bluetooth (MINI-PROG-BT,
SP-PROG-BT). All channel connection (also USB and Bluetooth) "open" virtual COM
serial ports used in communication control panel-Configurator.
To program device or make any other operations (e.g. reading of device settings,
firmware amendments, etc.) it is necessary firstly to define connection parameters.
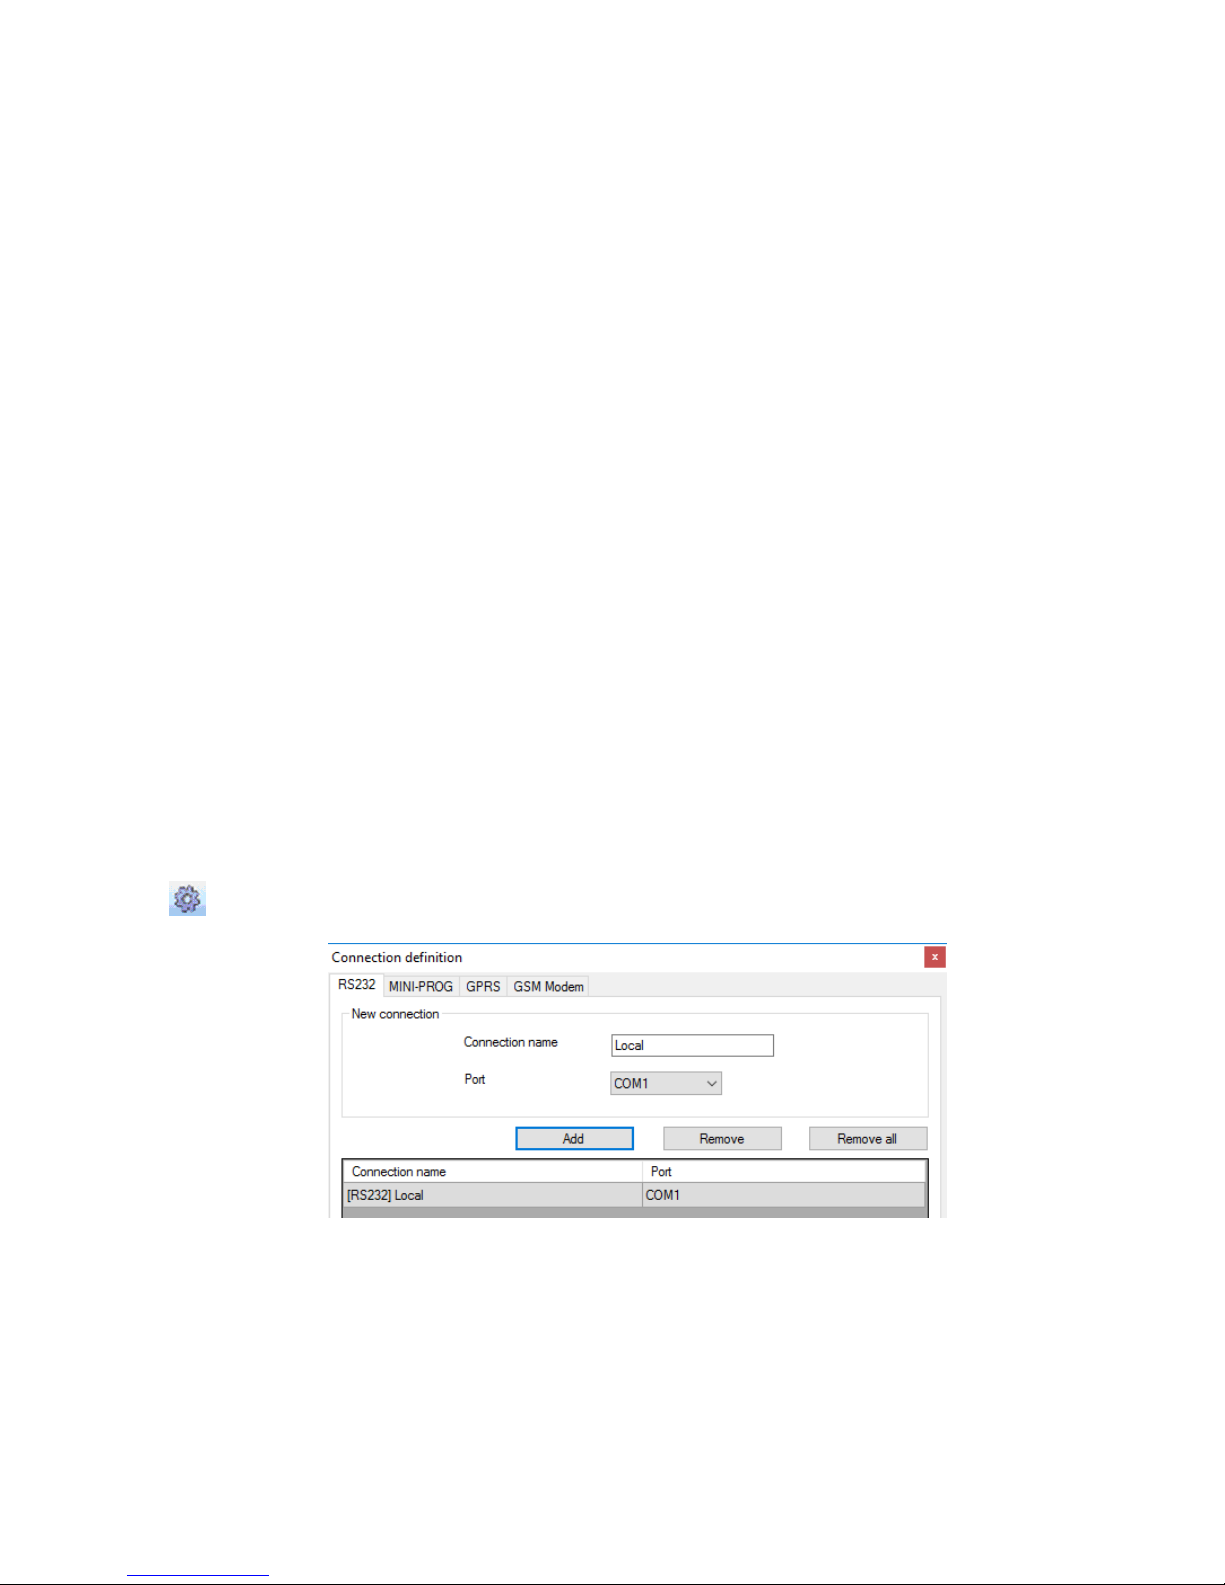
For the above purpose you shall use the following window, available after activating
File option from the Main Menu and selecting Connection function or after clicking on
icon on a taskbar and opening RS232 tab.
Define:
Name of connection e.g. Local
Choose serial port e.g. COM1
Click on [Add] button to confirm settings. Connections shall be saved (and inserted
in table). From this time on program shall enable wires connection with device and
reading, and saving of parameters in LX20B memory will be possible.
Page 20

LX20B – Manual Page 20 / 67
In the next tab "MINI-PROG" (the name derived from the programmer) you have to
also define the connection parameters.
Operations are the same as with the "RS232" tab. Specify the name, the correct
COM port and add a connection.
Programmers MINI-PROG-BT and SP-PROG-BT have microUSB ports, through which
we can connect to the computer using the USB port, but also have built-in Bluetooth
interface.
6.3.5.2. Remote connection
As provided above the device and software makes for complete configuration with
GPRS / UMTS / HSPA link or CSD channel. This programming mode requires
definition of linking parameters.
GPRS link
Activate file in Main menu and select Connection function (or after clicking on
icon on fast access bar) and click on GPRS tab to carry out configuration of this
mode.
On screen the following window shall appear:
Define:
Name of connection e.g.: Remote 1
Select name of analyzer e.g.: Primary
Enter analyzer address e.g.: www.ebs.pl
Page 21
LX20B – Manual Page 21 / 67
Enter port on which analyzer operates e.g. 9000
Click on [Add] button to confirm settings. Connections shall be saved (and inserted
in table). From this time on program shall enable remote connection to device and
reading and saving of parameters in LX memory shall be possible.
Notice: The following parameters: analyzer name, analyze address, port
relate to settings of OSM.Server receiver of monitoring system. Remote
programming is available only if above mentioned device (or software) is
used.
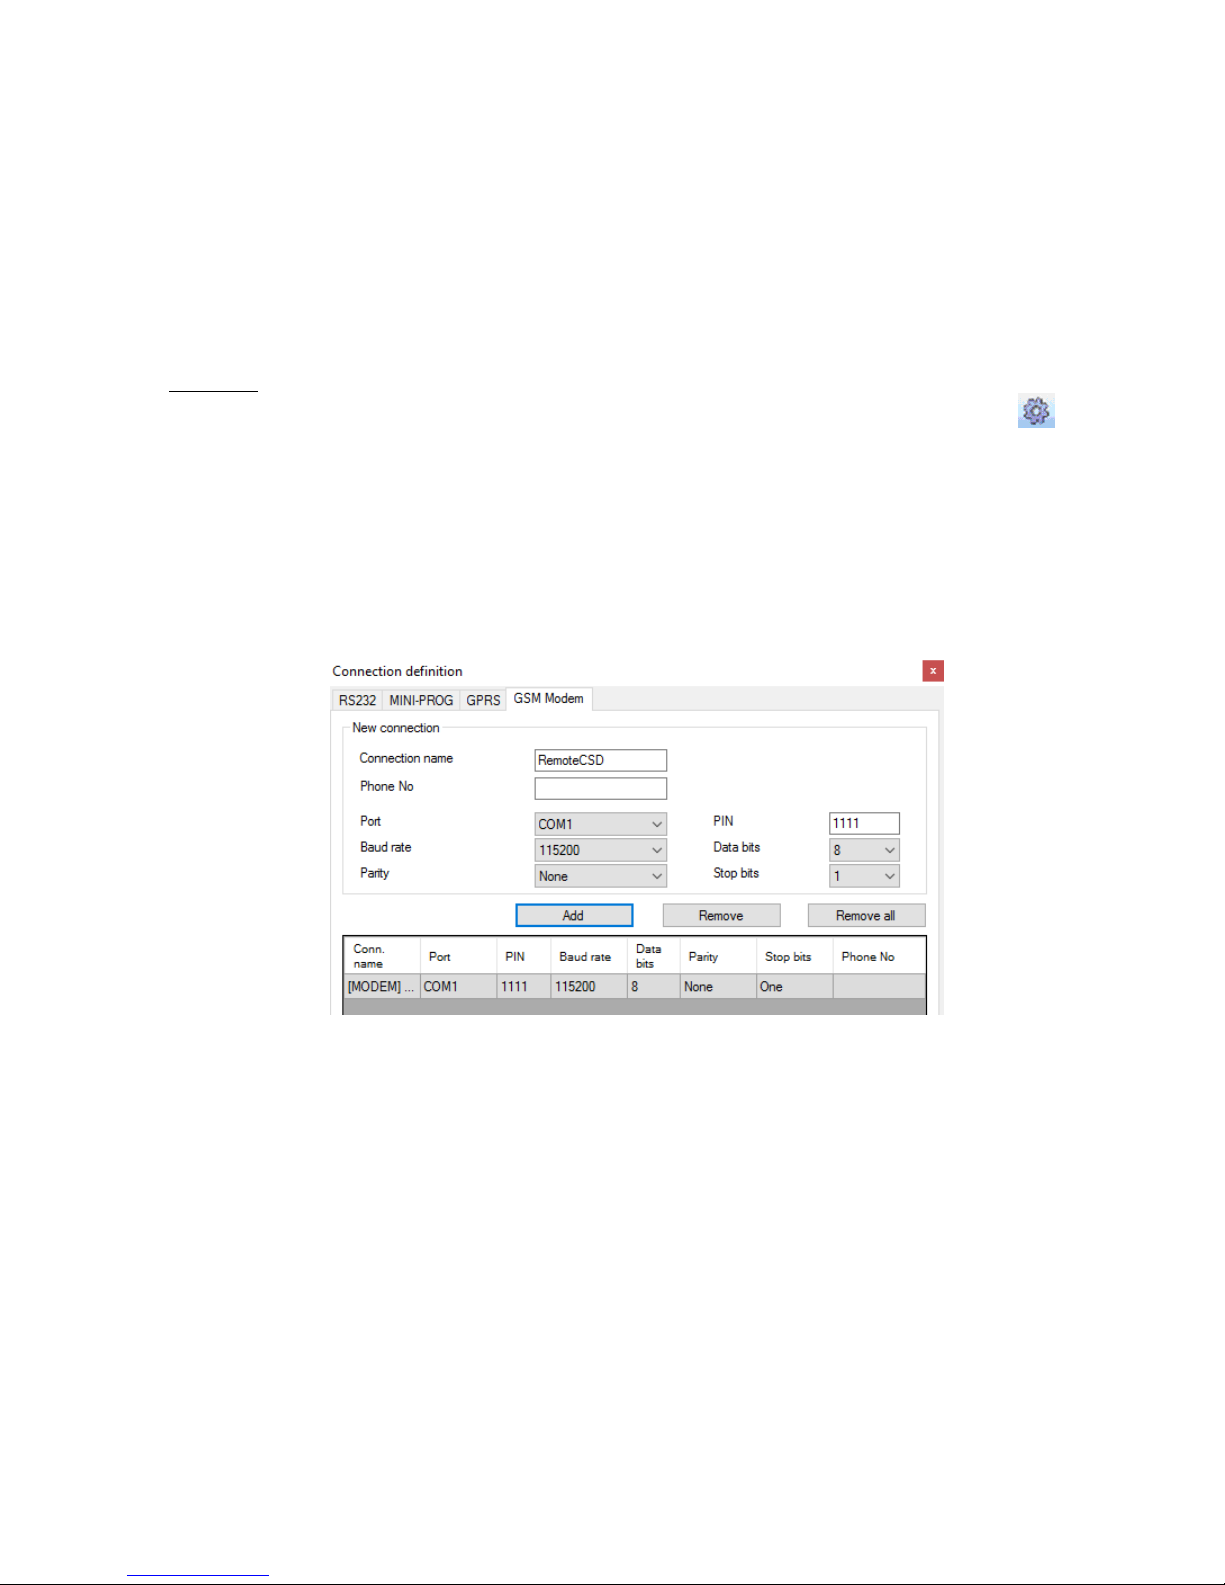
CSD link
Activate file in Main Menu and select Connection function (or after clicking on
icon on fast access bar) and click on GSM Modem tab to carry out configuration of
this mode.
On screen the window shall appear where it is possible to define:
Name of connection e.g. Remote CSD
Serial port where GSM modem is connected (e.g. Wavecom Fastrack)
PIN code of SIM card installed in GSM modem e.g. 1111
Serial port parameters: amount of bytes/sec. (e.g. 115200), data bytes (8),
parity (none), stop bytes (1)
Click [Add] button to confirm settings and save connection (settings are inserted
into table). Since that time a remote connection to device, reading and saving of
parameters in LX20B memory is possible.
Note: Remote configuration with CSD channel is possible if option of CSD data
sending has been activated both for SIM card inserted into a device and SIM card
installed in GSM modem. In addition, the transmitter must have turned on
permission to receive CSD data calls, see item 7.5.2. GSM modems authorized
phones.
Programming with CSD is also possible if OSM.Server system has been installed,
and minimum one GSM modem is connected. If device has been entered onto
server list (factory number and SIM card telephone number –See OSM.Server
Operation Manual) it is possible to use link via OSM. It is possible if device is not
connected to the OSM.Server via GPRS. During programming procedure (with GPRS
link- See above) a question will be displayed if user want to use a modem
Page 22

LX20B – Manual Page 22 / 67
connected to the server. After confirmation procedure will follow as in case of other
programming channels.
6.3.6. File -> Automatic device settings backup
All configuration settings including reread from devices and saved on devices are to
be automatically saved on hard disc. If during installation on configuring tool
settings have not been changed, files will be saved as follows:
C:\Program Files\ EBS\KonfiguratorLX\configs\LX20B_20000
Catalog LX20B_20000 contains all files in respect of LX20B with factory number of
20000 programming. The name contains date and time of operation and its type
(saving/ reading). Files have .cmi extension.
6.3.7. File -> Exit
Finishes program operation.
6.3.8. Operations -> Read
Function reads data saved in memory of GPRS module. Exchange of data follows on
port selected in section “Select Connection Type” (See below description of option
”Configuration”). Correct reading is confirmed with message on a screen. Data
downloaded from device may be saved on file (see clause 6.3.3) and use for other
devices.
To use this function it is necessary to define type and parameters of connection.
E.g. for local connection the following view is displayed:
where:
Connection kind – serial port to which module is connected
Access code- service code of transmitter
Detailed description of connections configuration is included in clause 6.3.5.
6.3.9. Operations -> Send
This function is analogical to the above one, at the same time it enables data saving
into EEPROM module. There is also possibility to set correct time into LX20B device.
For this purpose, select "Set Time" and enter the appropriate date with the time.
Correct saving is confirmed with message on a screen.
Page 23

LX20B – Manual Page 23 / 67
6.3.10. Operations -> System events history
„Events history” provides information about last events stored in LX20B device memory. See chapter
7.12. EVENTS HISTORY.
6.3.11. Operations -> Device monitor
“Device Monitor” provides real-time information on LX20B device state. See chapter 7.11. DEVICE
MONITOR.
6.3.12. Operations -> Restore default settings
If operation “Read” finishes with error message (e.g. if access code is unknown) it is
possible to come back to default settings by selecting “Restore default settings”. The
screen displays the message “Do you want to overwrite current configuration with
default values?”. After confirming the following window shall appear:
This operation is possible only with local connection. After operation completing
device parameters shall come back to default settings.
6.3.13. Help -> About program
Select this information to view additional information about program.
Page 24

LX20B – Manual Page 24 / 67
7. PROGRAMMABLE PARAMETERS
Parameters available in configuration program are divided into groups: Access,
Transmission, Inputs/Outputs, Monitoring, Restrictions, SMS Notifications, Link
control, RS232, Phone line and Firmware. Every from these groups will be described
in detail in next part of this manual.
7.1. ACCESS
NOTE: Presented appearances of tabs "Transmitter", "Servers" and
"Communication" are available from version 1.4.81.3 Configurator. This is due to
the addition of support for the new LX20B-5D model, which has two slots for Nano
SIM cards.
7.1.1. Transmitter
7.1.1.1. Service Code
It provides security against unauthorized access. It is being used during
programming of device and during remote controlling (in TCP/IP or SMS mode).
Factory setting is 1111. During the first starting of device (programming) it shall be
changed. Code may consist of up to seven alpha numerical characters.
Page 25

LX20B – Manual Page 25 / 67
7.1.1.2. Installer Code
Allows restricted access to the parameters of device. When istaller code is used
following groups of parameters are unavailable: Access, Transmission, Restrictions,
SMS notifications, RS232, Link control, and Phone line. An unauthorized attempt to
access to this parameters causes error notification.
Default restricted user’s service code: 2222.
7.1.1.3. SIM Card PIN
As a device operates via GSM network, SIM card is indispensable and it may be
received from phone operator. Before the first use PIN code of SIM card shall be
programmed for operation in given transmitter. PIN code is indispensable for
automatic system launching. In case of card without PIN number, it is possible to
enter any value e.g. 0000.
If you enter wrong PIN number after inserting card and switching on transmitter,
the system will not launch and you may be able to use card after entering PUK
number only (with use of any GSM mobile phone).
Factory setting of PIN in LX transmitter is 1111.
7.1.1.4. Use backup SIM Card
NOTE! This option is only for the LX20B-5D model, which has two slots for
Nano SIM cards.
After selecting this option the following section shall appear:
7.1.1.4.1. SIM Card 2 PIN
In case of a device with two Nano SIM cards, the PIN for the second card must be
entered. In case of card without PIN number, it is possible to enter any value e.g.
0000.
If the PIN number is entered incorrectly, in case of failure SIM 1 card or SIM 2 card
backup test, the device will not switch to the second card, and you may be able to
use card after entering PUK number only (with use of any GSM mobile phone).
Factory setting of PIN in LX transmitter is 1111.
7.1.1.4.2. Test inactive SIM Card every
Page 26

LX20B – Manual Page 26 / 67
In this field you can define how often will be test of inactive SIM card. Minimum
value that can be set is 1 hour, maximum 24 hours.
7.1.2. Servers
7.1.2.1. Servers – for the devices with single SIM Card slot
In case of the LX20B which has one slot for the SIM card, Server tab is as follows:
7.1.2.1.1. Working mode
Depending of user preferences, a device may operate in 1 out 4 modes (available
from scrolled list):
o GPRS & SMS: GPRS standard transmission (TCP/IP Protocol), and if any
problems follow with this link it automatically SMS mode will follow.
o SMS: Transmission only in SMS mode, without trial to establish GPRS link
o GPRS: GPRS standard transmission (TCP/IP Protocol), and in case of any
problems with this link no transmission will follow.
o Serverless: no transmission to the server with is possible, remote
communication possible only via SMS notifications.
7.1.2.1.2. Server IP address- primary server
Page 27

LX20B – Manual Page 27 / 67
It is address of receiver of monitoring system (OSM.Server) or computer where
“Communication Server” software has been installed , e.g. 89.123.115.8. This
address may be provided in domain name of server, e.g. modul.gprs.com.
7.1.2.1.3. Server port - primary server
It determines server port that was selected in server for collection of data from
transmitter.
7.1.2.1.4. Server IP address- secondary server
It is IP address of second (backup) receiver of monitoring system (OSM.Server) or
computer where “Communication Server” software has been installed , e.g.
89.130.125.82. This address may be provided in domain name of server, e.g.
monitor.gprs.com.
7.1.2.1.5. Server port - secondary server
It determines server port that was selected in server for collection of data from
transmitter.
7.1.2.1.6. Server phone number
If GSM modem is connected to server application (e.g. OSM.Server) enter in this
field its number. Any SMS will be sent to this number if transmitter has got
problems with GPRS transmission.
If this field is left blank or 0 was entered, the transmitter will be operating
exclusively in GPRS mode.
Note: This field will be inactive if device is to operate in GPRS mode.
7.1.2.1.7. APN Scheme
After entering the data in the boxes below, you can save the scheme with the
parameters by pressing "+" next to the APN field. In order to delete the scheme,
press "-".
7.1.2.1.8. APN
Parameter depending on GSM network operator that supplies GPRS (SMS) services.
It provides GSM network access point name.
It possible to obtain a private access point. In this case a name will be provided by
GSM network operator.
7.1.2.1.9. User ID
When using public APN, user ID is mostly not required. For private APN this
parameter shall be obtained from operator (it is impossible to be granted access to
GPRS network without it).
7.1.2.1.10. User password
Page 28

LX20B – Manual Page 28 / 67
When using public APN , user ID is mostly not required. For private APN this
parameter shall be obtained from operator (it is impossible to be granted access to
GPRS network without it).
Note: Private APN provides for higher system security.
7.1.2.2. Servers - for the devices with two SIM Card slots
In case of the LX20B – 5D which have two slots for the SIM card, Server tab is as
follows:
7.1.2.2.1 Primary server
Working mode
Depending of user preferences, a device may operate in 1 out 4 modes (available
from scrolled list):
o GPRS & SMS: GPRS standard transmission (TCP/IP Protocol), and if any
problems follow with this link it automatically SMS mode will follow.
o SMS: Transmission only in SMS mode, without trial to establish GPRS link
o GPRS: GPRS standard transmission (TCP/IP Protocol), and in case of any
problems with this link no transmission will follow.
o Serverless: no transmission to the server with is possible, remote
communication possible only via SMS notifications.
Page 29

LX20B – Manual Page 29 / 67
Server IP address
It is address of receiver of monitoring system (OSM.Server) or computer where
“Communication Server” software has been installed , e.g. 89.123.115.8. This
address may be provided in domain name of server, e.g. modul.gprs.com.
Server phone number
If GSM modem is connected to server application (e.g. OSM.Server) enter in this
field its number. Any SMS will be sent to this number if transmitter has got
problems with GPRS transmission.
If this field is left blank or 0 was entered, the transmitter will be operating
exclusively in GPRS mode.
Note: This field will be inactive if device is to operate in GPRS mode.
APN Scheme
After entering the data in the boxes below, you can save the scheme with the
parameters by pressing "+" next to the APN field. In order to delete the scheme,
press "-".
APN
Parameter depending on GSM network operator that supplies GPRS (SMS) services.
It provides GSM network access point name.
It possible to obtain a private access point. In this case a name will be provided by
GSM network operator.
User ID
When using public APN, user ID is mostly not required. For private APN this
parameter shall be obtained from operator (it is impossible to be granted access to
GPRS network without it).
User password
When using public APN, user ID is mostly not required. For private APN this
parameter shall be obtained from operator (it is impossible to be granted access to
GPRS network without it).
Note: Private APN provides for higher system security.
7.1.2.2.2. Secondary server
This section concerns the backup server and the SIM card 2. Fields should be
completed with data by analogy with the primary server.
Page 30

LX20B – Manual Page 30 / 67
7.1.3. Communication
After completing of data in the Servers tab, the gray box will display the address
and port of the primary and secondary server.
7.1.3.1. Mobile Data Transmission
If GPRS or GPRS & SMS working mode is selected for one of the servers, you can
define the parameters related to the connections between the device and the server
via GPRS in this section.
7.1.3.1.1. Primary server
Interval between subsequent connection attempts
Programmable and equipped with SIM card device will try to make automatic
connection with server. In this field you define interval (in seconds) after which next
connection will follow if the previous connection failed.
Number of connection attempts before switching to the other server
In this filed you determine how many times device will try to make connection to
server. If connections fail, LX20B after execution of some connection will start
procedure of connection to back up server. This option is active only if we define
parameters of backup server.
Page 31

LX20B – Manual Page 31 / 67
7.1.3.1.2. Secondary server
Interval between subsequent connection attempts
If device can not connect to primary server defined this after exhaustion for him
number of attempts, it will begin realizing the procedure of connecting to backup
server. We in this place define space of time (in seconds), after which test will
connecting renewed if previous finished with failure.
Number of connection attempts before switching to the other server
In this field you determine how often device will try to make connection to backup
server. If connections fail, LX20B after execution of some connection will back to
procedure of connection to primary server.
Disconnect after
If you mark this choice field the device will disconnect from back up server after
passage of set time. Further operation depends on defined parameter Order of
connection (See clause 1.1). If this option is active the device reconnects to the
primary server. If this option is not active the device firstly completes connection to
backup server procedure and if this fails, the device will try to connect to the
primary server.
7.1.3.1.3. Test events period
The device sends message “Test” with determined interval that informs monitoring
station that the device is in operation mode. In this field you can determine how
often this message will be sent (in seconds)
7.1.3.1.4. Start with Primary Server after connection failure
Mark this check box means, that the device will try in first order to connect to
primary server, without regard on definition of parameters for backup server
(especially number of connection attempts).
7.1.3.2. SMS
If SMS or GPRS & SMS working mode is selected for one of the servers, you can
define the parameters related to the connections between the device and the server
via GPRS in this section.
7.1.3.2.1. SMS mode after failed connection attempts attempts
Define number of reconnections to server. If during all reconnections fail the device
will go into SMS mode. In this mode LX20B will try to make connection with server,
according to interval defined in clause.
7.1.3.2.2. Test events period
This function is analogical to GPRS. It is activated when problems with GPRS
transmission follow when the device automatically goes into SMS mode (it relates to
operation mode in SMS). Usually it is undesirable to send text as SMS so often as
Page 32

LX20B – Manual Page 32 / 67
with GPRS transmission. Parameter this allow for significant extension of distance
between tests (time in minutes) or completely interlocking of this option.
7.1.3.2.3. Send events immediately
In case of GPRS/3G connection lost device will send SMS reports immediately, even
if the LX20B isn’t in SMS mode yet.
7.2. TRANSMISSION
For the purpose of maximum security of transmission, data is encrypted with AES
key. This option may be used for GPRS and SMS transmission.
After selection of encrypted transmission you may use your own code (256 bytes –
signs 0-9 and A-F) or use default settings.
7.3. INPUTS/OUTPUTS
Transmitter has got 5 signal inputs. Module is equipped with two outputs.
Inputs/Outputs option enable programmable configuration so that transmitter
operates pursuant to requirements of the user.
7.3.1. Inputs configuration
For every input the following settings shall be determined respectively.
7.3.1.1. Input mode
Page 33

LX20B – Manual Page 33 / 67
The parameter describes input configuration and stable state of input. Any change
of that state causes alarm message to be sent. The following configuration types are
available: NO / NC / EOL-NO / EOL-NC / DEOL-NO / DEOL-NC. NC type input must
be closed for the whole time. Line interruption causes its induction. NO type input
remains open. It activates when closed. EOL and DEOL (single end-of-line resistor
and double end-of-line resistor) differ with 1 or 2 resistors allowing distinguishing
alarm from sabotage. Electric diagrams for all configuration types were described in
chapter 3.4. INPUT CONFIGURATION.
7.3.1.2. Delay
This parameter means minimum time for change maintenance at input so that it
would be detected by transmitter. Factory setting is 400 ms.
7.3.1.3. Locks
With this option you can lock any input of transmitter, and as a result condition
changes on this input will be ignored and will not be reported to monitoring station.
Lock may be persistent or temporary.
In case of temporary lock – user can set lock time and number of input state
changes after which lock occurs. Lock time is counted from first input state change.
More detailed information about input locks is shown on a diagram below.
Both types of lock can be deactivated by SMS command (see RLIMIT command
described in chapter 9).
Page 34

LX20B – Manual Page 34 / 67
Event: automatic input lock
Event: automatic input unlock
Limit: N = 2 input changes during Tb time (3rd change activates input lock)
Tb
Tb Tb Tb Tb
Input activation and deactivation
Input activation and deactivation – no reaction
Temporary input lock
Events send to server
Event: input active
Event: input not active
- Locally there can be 2 x N – 1 input activations. In summary average number of activations during defined period of time will be preserved.
- N and Tb parameters may be set per input
Page 35

LX20B – Manual Page 35 / 67
7.3.2. Partitions
Partitions are configured using Partitions tab.
7.3.2.1. Partition arming input
Using this option, partition arming input can be selected. To selected input, arming
device (e.g. switch, remote controller receiver or coded lock) can be connected.
When this input is violated (armed), the partition is armed (after Exit Time). When
arming input is not violated (disarmed), partition is disarmed.
7.3.2.2. Inputs assigned to partitions
Assigning input to partition means that it is monitored only when partition to which
input belongs is armed. Input can be assigned up to one partition. Arming inputs
can not be assigned to any partition. If input is not assigned to any partition, it acts
as 24 hours input – it is monitored regardless of partitions state.
7.3.2.3. Delayed inputs
Here, delayed inputs can be selected. Delayed input switches on associated output,
ie. generates alarm, after expiry of Entry time, but only when partition to which
input belongs will not be disarmed before Entry time period.
Page 36

LX20B – Manual Page 36 / 67
7.3.2.4. Exit time
Partition exit time. Partition inputs will be monitored when this configured time
elapses after partition input had been armed.
7.3.2.5. Entry time
Time after which alarm will be generated after delayed input had been armed and
partition to which delayed input belongs will not be disarmed.
7.3.3. Outputs
Tab „Output 1 (OUT1)” and „ Output 2 (OUT2)” specify conditions of switch outputs.
Settings for all outputs are identical so they will be described in one chapter.
7.3.3.1. Activation mode and timing
Thanks to this option you may choose output operation mode. There are two
operation modes available:
o Bistable – connection follows for indefinite time – up to the moment of
disconnection of power for module or remote command which switches
output off,
o Monostable – connection follows for time defined by user – every 100ms.
7.3.3.2. Conditions
Page 37

LX20B – Manual Page 37 / 67
Defines conditions for activating both of outputs. User can set following conditions:
o No connection to server (immediately after detection);
o No GSM signal (immediately after detection);
o Detection of incoming call from defined telephone number;
After selecting this option can be generated CLIP event, if appropriate
position in the “Monitoring” group is set (see item 7.4.5.). You can enter full
phone number or only a part of number. The device will detect all numbers
with specified sequence. E.g. if entered number is 1234, the output will
activate after incoming call from number 123456789 or 600123456.
Note: The phone number must me entered without country code (e.g.
without prefix 0048 and +48).
o Dependent on state transitions from non-active to active of one of the inputs.
Outputs can be also activated by internal watchdog, which can be configured in
“Link control” group (see chapter 7.7.).
7.3.3.3. Additional conditions
If option “Dependent on state transitions from non-active to active of one of the
inputs” is chosen, we might configure additional conditions for output activations:
o Never: input disturbance does not cause operation of sabotage output,
o No network: input disturbance causes actuation of sabotage output if
sending of information to server is impossible.
o Always: every input disturbance causes actuation of sabotage output.
o Available network: input disturbance causes actuation of sabotage output if
sending of information to server is possible.
Note: Both outputs may be controlled by SMS commands.
7.3.4. Advanced outputs control
The user is able to determine an alternative course of action to go over basic
outputs configuration function described in section 7.3.3. Outputs. In the “Advanced
outputs control” you may define separately the behavior of each of the outputs,
depending on events taking place. “Advanced outputs control” differs from the
existing basic “Outputs configuration” by:
o it is possible not only to turn on but also to turn off the output
o output can be activated temporarily for specified amount of time
o there is a complete list of events for which you can define the behavior of the
output
Note: Do not use at the same time the basic configuration of outputs (7.3.3.
Outputs) and the “Advanced outputs control”!
In particular, the basic configuration of existing options: “No GSM signal
(immediately after detection)” and “Dependent on state transitions from non-active
to active of one of the inputs” should not be used with their replacements “[Off]
GSM” and “[On] Input x”. The use the basic configuration of outputs and “Advanced
outputs control” at the same time, may cause unexpected behavior of the
transmitter.
Page 38

LX20B – Manual Page 38 / 67
7.3.4.1. Output 1/Output 2
These columns define which signals are to influence the status of a specific output.
You can define the output operating mode and which signals control the outputs.
Available options for the output mode:
o Do Nothing – output status will be not changed (default action)
o Turn on output – output will be permanently turned on
o Turn on output temporarily – output will be turned on for an amount of time
specified by parameter 7.3.4.2 Time of output activation
o Turn off output – output will be turned off
Press the [Reset] button to assign the action “Do Nothing” for each event.
The output state does not change if the current state of the output coincides with
the result of the action.
7.3.4.2. Time of output activation
Parameter defining amount of time for which the output is to be turned on for the
functions of advanced outputs control.
Page 39

LX20B – Manual Page 39 / 67
7.3.4.3. Event: CLIP
Icoming call from the number defined in option: Inputs/Outputs –> Output 1
(OUT1) / Output 2 (OUT2). The phone number is entered at option: “When icoming
call detected from number” (see item 7.3.3.2.).
7.4. MONITORING
Thanks to this option you may determine which of available signals generated by
the device shall be transmitted to monitoring station.
NOTE: “Configuration changed” event refer to configuration changes made
by SMS or GPRS commands.
7.4.1. GPRS On / GPRS Off
In this column you define signals that are to be reported to monitoring station with
GPRS transmission. There is possibility to send information on alarms (input state
change from rest to action status) and on returns of input state from action to rest
(normalization).
To transmit any signal you should only click it (proper square on your right).
Click on [Clear] button to remove all marked signals.
Click on [Invert] button to change markings to contrary.
7.4.2. SMS On / SMS Off
Page 40

LX20B – Manual Page 40 / 67
In this column you define signals that may be reported at monitoring station with
SMS messages – when there is no connection with server over GPRS. There is
possibility to send information on alarms (input state change from rest to action
status) and on returns of input state from action to rest (normalization).
To transmit any signal you should only click it (proper square on your right).
Click on [Clear] button to remove all marked signals.
Click on [Invert] button to change markings to contrary.
7.4.3. Skip initial state
This option allow for locking of sending of information on status of active inputs at
power connection. Information on inputs will be sent to server after the first change
from inactive to active status.
For the events “Power” and “Battery” no selection “Skip initial state” will cause
sending information about the power supply / battery on boot device regardless of
the power supply / battery state.
7.4.4. Power loss
One of device additional options is monitoring of power supply voltage. As short
voltage drop may follows at some facilities, it is possible to avoid reporting by
entering time after which information will be sent.
Value of this parameter means that voltage drop shall follow within this determined
time so that device recognizes it as real voltage drop and that information might be
sent.
7.4.5. Event: CLIP
Icoming call from the number defined in option: Inputs/Outputs –>Output 1 (OUT1)
/ Output 2 (OUT2). The phone number is entered at option: “When icoming call
detected from number” (see item 7.3.3.2.).
7.5. RESTRICTIONS
In this section you can define the limits for the numbers of which SMS are sent to
the transmitter with commands and CSD connections are established. You can also
specify the period of validity of the sent SMS and SMS limits.
7.5.1. SMS Authorized phones
User may restrict remote access to the device (via SMS) for determined phone
numbers. A list of numbers (up to 5 numbers) determines which numbers are
allowed to connect with transmitter.
Available options:
Deny all: means no available telephone communication.
Allow all: means that telephone communication is possible from any phone.
Allow chosen: means that telephone communication is possible only from these
numbers that are on the list. It is possible to list up to 5 phone numbers.
Page 41

LX20B – Manual Page 41 / 67
Select “Allow chosen” to get access to edition window. Enter another numbers and
click on [Add] button to send them to the below table. Position cursor on line with
number and click on “Remove” to remove number from table.
Click on “Remove all” to remove all numbers from table.
Note:
a) authorizing of coming SMS comes through comparing number of oncoming SMS
with numbers from table. It is allowable to enter only a part of number e.g. 1234.
As a result all numbers with this sequence will be authorized e.g.600123456 or
601234567.
b) If modem connected to OSM.Server server will be used to send SMS, its number
have to be entered on the list.
7.5.2. GSM modems authorized phones
For connections on CSD channel the user may limit remote access to device from
GSM modems. Only numbers on the list (up to 5) allow for communication with
transmitter.
Available options:
Deny all: means no available telephone communication.
Allow all: means that telephone communication is possible from any phone.
Allow chosen: means that telephone communication is possible only from these
numbers that are on the list. It is possible to list up to 5 phone numbers.
Select “Allow chosen” to get access to edition window. Enter another numbers and
click on [Add] button to send them to the below table. Position cursor on line with
number and click on “Remove” to remove number from table.
Click on “Remove all” to remove all numbers from table.
Page 42

LX20B – Manual Page 42 / 67
Note:
a) authorizing of coming CSD comes through comparing of number from which it
was sent with numbers from table. It is allowable to enter only a part of number
e.g. 1234. As a result all numbers with this sequence will be authorized
e.g.600123456 or 601234567.
b) If modem connected to OSM.Server server will be used to make connections
CSD, its number have to be entered on the list.
7.5.3. Validity period of outgoing SMS messages
User may limit time for the GSM operator to deliver information via SMS when
recipient is unavailable due to out of GSM signal coverage for example. Time limit is
defined separately for the following groups of information:
SMS test to server
SMS events sent to server
SMS events sent to user
Answers to commends
Selection is to be made from scrolled down values by clicking on arrow besides
selection area. Allowable options: 5, 10, 15, 30 minutes; 1, 2, 6, 12 hours; 1, 7
days, MAX (meaning no specified time).
7.5.4. SMS limits
User may limit number of SMS sending by transmitter. As the main way of
transmission should be GPRS this limitation is essential to reduce costs.
Mark field [Turn on SMS limits] to activate access to information groups that
shall subject to limitation:
SMS test to server
SMS event s sent to server
SMS events sent to user
Answers to commends
Limitation are defined by providing two values:
SMS maximum number: determines maximum number of sent SMS messages per
time unit (see SMS counter reset). This option protects user against sending too
much of SMS messages e.g. in case of failure.
SMS counter reset: This parameter determines time schedule (in minutes)
according to which counter of sent SMS messages will be zeroed.
7.6. SMS NOTIFICATIONS
User may define messages that in case of any event (e.g. input state change) will
be sent to private phone numbers. At the same time it is worth to remember about
limitation in this respect.
Page 43

LX20B – Manual Page 43 / 67
7.6.1. Phone numbers
One way to limit amount of sent information (by SMS) is to define a list of 5 private
phone numbers. This list means that only telephones listed on it will receive
messages sent by transmitter.
To edit you shall follow this procedure:
o Enter due telephone number into edition field.
o Click on [Add] button to transfer number to the below table
o Repeat procedure (up to 5 phone numbers).
Position cursor on line with phone number and click on “Remove” button to remove
number from table.
Click on “Remove all” button to remove all numbers from table.
7.6.2. Events
This tab is to configure and edit SMS messages to be sent to listed phone numbers.
You may define SMS text message with reference to any event from the list
(Tamper: Activation, Restore; Input1: Activation, Restore; etc.) that will be sent if
this event follows. To define use edition field on the right of events list.
Follow the procedure:
a) Select event to edit from the list.
b) Mark square next to phone number that SMS is to sent to
c) Enter message text of SMS when field is active
d) If the “Copy the contents from first message” will be marked then selection
and text content will be automatically copied from the first message,
otherwise you may copy one text and paste to other field manually
Page 44

LX20B – Manual Page 44 / 67
Note:
o The total number of characters for all SMS messages shall not exceed 2000
o Mark any mistake and delete by pressing [Del] button
o You may copy one text and paste to other field
7.6.3. SMS user tests
SMS user tests sent to specified phone numbers are carried out independently of
the operating mode of the device (GPRS / SMS / GRPS & SMS / Serverless). To
enable the cyclic tests provide up to 5 phone numbers in “SMS Notifications” tab.
Then, for the event “Test message”, type your message and provide a period of the
test message. To do this, mark “Send test every” and indicate the period of the test
set out in the next field. The format of the test period field is “the total number of
days, number of hours:the number of minutes”. No selection in the “Send test
every” will disable SMS user tests.
Page 45

LX20B – Manual Page 45 / 67
7.6.4. Status
The device provides for remote enquiry about the status. Edit in this field message
text that is to be sent to the user as a reply to command regarding status checking.
Telephone numbers authorized to send enquiry about status are defined in option
Restrictions >Authorized SMS phones.
Reply from device shall be sent at number, from which enquiry was sent.
In reply about status a device shall send one SMS message containing proper text
defining actual output , input state and power supply.
Note: Counter “Allowed characters” informs about the total number of characters
that may be inserted into the table.
Page 46

LX20B – Manual Page 46 / 67
7.6.5. SMS Forward
The device is able to forward received SMS messages according to the specified rules. This function may
be helpful for example when GSM operator sends messages with account state to SIM card installed
within device. In this window you may provide up to 5 rules.
Each rule contains a pair: part of sender phone number and correct recipient phone number. In some
cases a part of sender phone number may be an empty string which means that any phone number
matches to the rule. All rules are processed with given order. It means that in some cases one SMS
message may be forwarded to more than one recipients and/or some of them may be forwarded more
than once to the same recipient. The second case may occur when there are at least two rules with the
same recipient phone number and their part of sender phone number matches with message sender
phone number.
Note: It is a user’s responsibility to provide correct rules which will not create loops
of forwarded SMS messages.
Page 47

LX20B – Manual Page 47 / 67
7.7. LINK CONTROL
These options enable automatic action of device if communication with monitoring
station was broken up. It relates to situations when device lost connection to GSM
network or if GPRS transmission is impossible.
7.7.1. GSM
Activate this function (mark [Turn On] field) to get access to parameters
determining action of device if outside GSM network.
Define time limit after which transmitter shall reconnect to network. Enter time limit
in field [Reset after ] and provide this value in minutes.
Next define action that the device shall perform. Select action by marking proper
square next action description:
o Modem reset
o Device reset
o Turn on output 1 (OUT1)
o Turn on output 2 (OUT2)
In case of no connection with GSM network the device after recognizing the
situation shall wait during provided time limit and then shall perform programmed
actions.
Page 48

LX20B – Manual Page 48 / 67
7.7.2. GPRS
Activate this function to (mark [Turn On] field) to get access to parameters
determining action of device if GPRS connections is lost.
Define time limit after which transmitter shall reconnect to network. Enter time limit
in field [Reset after] and provide this value in minutes.
Next define action that the device shall perform. Select action by marking proper
square next action description:
o Modem reset
o Device reset
o Turn on output 1 (OUT1)
o Turn on output 2 (OUT2)
In case of no connection with GPRS network the device after recognizing the
situation shall wait during provided time limit and then shall perform programmed
actions.
7.8. RS232
Page 49

LX20B – Manual Page 49 / 67
7.8.1. Serial port settings
The device has been equipped with RS-232 serial port to enable obtaining additional
information. To make use of this link it is required to enable checkbox RS232 and
define its parameters. For this purpose select parameters from the below table:
Parameter
Value
Baud rate (bits/sec)
1200, 2400, 4800, 9600, 19200, 38400, 57600,
115200
Data bits
5, 6, 7, 8
Parity
None, even, odd, mark, space
Stop bits
1, 2
Flow control
None, RTS, CTS, RTS/CTS
The selected parameters shall correspond to RS-232 port settings in device, with
which the transmitter is to cooperate.
If RS232 checkbox will not be enabled, data to the Event monitor will be sent on
device’s serial port. With this setting, GD-PROG cable can be used to observe device
state using GPRS transmitters configurator application and Monitor option described
in point 7.11.
7.8.2. Buffer flushing
Page 50

LX20B – Manual Page 50 / 67
Data received from connected device are stored in transmitter buffer. Buffer
capacity is 511 bytes. Define criteria that meeting shall mean data transmission to
monitoring system transmitter. The following options are available:
- After receiving ASCII character
- After expiry of defined time
- After receiving defined amount of characters
For every option list of available values are provided, and they me be scrolled down
after clicking on adequate arrow.
The transmitter controls buffer contents in respect of meeting of determined
criteria. It is performed with the following order: selected character, time, number
of characters.
Discharge of buffer (transmission) follows if one criteria is fulfilled.
7.8.3. Advanced port options
7.8.3.1. Disable data receiving
This option allow for lock of data received from device connected to RS-232 port of
transmitter. It is used in case of failure or situation when LX is being used to control
the device.
7.8.3.2. Disable data sending
This option allow for lock of data sending to device connected to RS-232 port of
transmitter. This prevent accidental or unauthorized controlling of the device.
7.8.3.3. Half Duplex mode
This option provides for automatic lock of data receiving (via RTS) if transmitter
begin to send data to the device. Useful for some RS-485 converters.
7.8.3.4. Tests of device connection to port
If the device connected to transmitter port generates periodical connection tests,
these tests may be under control. To provide for that (after this option activation)
enter text message and define frequency (in “Test presence every [s]” option).
Additionally user may determine if text messages will be sent to server. If this
option was not selected it is required to make sure that while the device connected
to transmitter port is not sending text message to transmitter, then transmitter
sends to server due message (See chapter 7.4. – Tests RS-232).
7.9. PHONE LINE
LX20B transmitter enables data transmission from control panel adapted to work
with external telephone line in case of lack of access to this line. The transmitter
receives information from the control panel through it’s telephone communicator,
Page 51

LX20B – Manual Page 51 / 67
then transmits them by one of the available links: GSM/ GPRS/ UMTS/ HSPA/ SMS.
For proper device operation you need to define the parameters described below.
7.9.1. Phone line
This tab is provided to determine settings of telephone line.
7.9.1.1. Use external phone line
If this function has been chosen (Activation) the transmitter will be cooperating with
PSTN line. This way data transmission is possible from an alarm control panel with
two ways: via GPRS link and standard telephone line.
7.9.1.2. Disconnect external phone when server connected
If enabled, PSTN line will be disconnected from T1-R1 port when connection with the
server is established. If events registered by the alarm control panel are supposed
to be sent by GPRS, this option can be used to separate external line from the alarm
control panel.
7.9.1.3. Monitor external phone line voltage
If transmission with two ways follows, it is necessary that operator of monitoring
system received information on access to an external telephone line. Choice of this
option will result in voltage drop on telephone line (longer that defined minimal time
of decay) that will be signalized with an adequate message sent via GPRS.
Page 52

LX20B – Manual Page 52 / 67
Note: The transmitter is to simulate a telephone line access if:
o A PSTN line is not connected
o A PSTN line is connected but has not been activated option from clause 7.9.1.1.
o Options from clause 7.9.1.1. and clause 7.9.1.3. are active and voltage on
terminals TIP-RING decreased below 8V.
7.9.1.4. Report off-hook
If a phone set is connected in parallel output of control panel communicator (to
terminals T1-R1 of transmitter), picking up of a phone prevent from exchange of
data between an control panel and a transmitter. There is possibility to control this
situation. Choice of this option result in sending a report to monitoring station if
time of picking up the phone exceeds determined time limit.
7.9.1.5. Report intervals between dialled digits
This option is being used if in configuration “PSTN line – LX20B – Alarm Control
Panel” there are not other telecommunication devices. If such device will be
connected and telephone number will be dialled (and a call will follow) after expiry
defined time limit (counted since conclusion of last digit dialling) the transmitter
sends a message. This operation prevents unauthorised installation of additional
devices.
7.9.1.6. Generate dial tone
Some alarm control panels require that during a receiver picking up a tone of
dialling was actuated. To enable cooperation with a transmitter it is possible to
make a transmitter to generate such tone.
7.9.1.7. Detect off-hook
The default value for the delay detection off-hook is 100ms. You can define your
own delay value by choosing option "After" and giving the number in milliseconds.
7.9.2. First and Second phone number
To provide for proper cooperation between a transmitter and a control panel in
DTMF mode determination of some parameters is required. The below described
functions are analogous to the both telephone numbers that may be saved in the
device memory.
7.9.2.1. DTMF phone number
This is a number that has been saved in memory of an alarm control panel. If the
panel is to transmit information on an event it shall dialled this number.
Transmission of this information via GSM (GPRS) will be possible if this number will
be identical as a number entered into the transmitter.
Page 53

LX20B – Manual Page 53 / 67
7.9.2.2. Handshake delay
This defines time after which a transmitter generates confirmation to an alarm
control panel for correct phone number dial. Default setting is 2.0 sec. European
Standard determines this value at 0.5 to 12.5 sec.
7.9.2.3. Protocol
Select protocol of data transmission used by an alarm control panel and that is
acceptable for monitoring station. Available options: ContactID.
Note:
1) For all protocols you may use following options:
o [Enable SMS sending] which means that in case of no GPRS connection,
data will be sent via SMS (if this mode will be accessible).
o [Don’t transmit data when external phone line is available] which means
that when the external PSTN line is available then it will be used during
transmission from the control panel.
2) [Disable CRC checking] option may be used for ContactID format. Some control
panel generate improper messages regarding a control sum for transmitted data,
the device is not able to confirm collection of data, and as a result the panel tries to
send them again (until execution of all determined trials). Select this option to avoid
the above mentioned.
Page 54

LX20B – Manual Page 54 / 67
7.10. FIRMWARE
The device is equipped with built in bootloader that allow for updating and change of
firmware. During programming all information is displayed in respect of carried out
operation.
Follow the following procedure:
a) Launch configuration program
b) Open “Firmware” option of configuration wizard
c) Open file with new firmware (click [Open] button to locate where file is).
d) Select file transmission mode: local or remote.
Note: Procedure of assigning firmware to a device is analogous to
programming a device. For procedure refer to chapter 8 Programming of
the device.
e) Click [Start] button to start software exchange.
f) Loading course is displayed on special window.
g) Close the window after completed saving
From this time on the device will work under control of new firmware.
Note: The above procedure shall be carry out with due care to avoid
improper device operation.
7.11. DEVICE MONITOR
Page 55

LX20B – Manual Page 55 / 67
“Device Monitor” provides real-time information about device state. To use this
function device must be connected to PC computer with GD-PROG cable (the switch
in position DEBUG) or SP-PROG programmer. Correct RS232 port must be chosen in
“Port” field.
“Device monitor” provides following information:
AC power indication
Battery power indication
PSTN line indication
GSM network signal level indication
Bit-Error-Rate level measuring
Inputs and outputs state monitoring
Type or serial number of device
Firmware and hardware revision
Device time
These parameters are also shown in LOG window in text style. All data can be saved
to file.
Page 56

LX20B – Manual Page 56 / 67
7.12. EVENTS HISTORY
„Events history” provides information about last events stored in device memory.
LX20B transmitter is able to save at least 5000 events. It is possible to read the
history using a GPRS connection or RS232. In the second case, data can be send
to PC only via GD-PROG cable (the switch in position PROG) or SP-PROG
programmer. Correct RS232 port or GPRS connection must be chosen in “Choose
connection kind” field. After providing Service code and clicking “Open” button
events data will be downloaded from LX20B memory. After properly reading
access to features such as the "Filtering" and "Charts" becomes possible. Both of
them may be used to quickly diagnose the device.
Page 57

LX20B – Manual Page 57 / 67
Page 58

LX20B – Manual Page 58 / 67
8. DEVICE PROGRAMMING
Programming of device is possible with “GPRS transmitters configurator”
configuration program described in chapter 5. To program the device establish
connection with a device.
Depending on connection mode there are two ways for programming.
8.1. LOCAL PROGRAMING
To program a device locally follow the procedure:
a) Connect PROG joint (on printed circuit) with COM computer port by way of
service wire, defined in option -> RS-232.
b) Connect power supply to terminals +12V and GND. After connection and
detection of programming wire a module shall signal this with LED diodes: a
green one shall flash and red one shall flicker.
c) Launch software and define device options (description is in chapter 6 of this
Manual). Provide right PIN code for SIM card.
d) Save settings into memory of device. Saving course is displayed in special
window.
e) After saving disconnect power supply and disassembly service wire.
f) Insert SIM card. Connect module wiring pursuant to guidelines from chapter 4.
Turn power supply on.
g) The device is ready to transmit data.
8.2. REMOTE PROGRAMMING
Remote programming of device is possible if:
user uses GPRS transmitter configurator and GSM modem connected to PC
user uses OSM.Server monitoring system receiver.
In first case remote programming is possible on CSD channel and its procedure is
analogous to local programming, remembering that “Modem GSM” shall be selected
from connection options (See chapter 6.3.5.2-CSD Link).
Note: Remote configuration with use of CSD canal is possible only if transmission
of CSD data is active both for SIM card inserted in the device, and for SIM card
installed in GSM modem.
Page 59

LX20B – Manual Page 59 / 67
In second case according to description in chapter 6.3.5.2. – GPRS Link, it is
required to define remote link on grounds of OSM.Server parameters. As
OSM.Server collects (and transmits) information exclusively from devices saved in
data base, the first operation during remote programming is proper registration of
the device. This procedure has been described in OSM.Server Operation Manual.
8.2.1. The first programming of device
As the device does not have defined access parameters in respect of GPRS network
and OSM.Server, programming shall be begun with providing parameters.
Irrespectively of providing these parameters the first operation shall be registration
of device in OSM.Serverdata base.
Before remote programming user shall check that the device is furnished with SIM
card (with reservations provided in chapter 1.1.) and is connected to power supply.
User shall know serial number of device and phone number for SIM card.
Follow the procedure:
a) With the use of OSM.Server console position cursor on proper device in “Devices”
tab.
b) Click “Config.” option and then select “Set Configuration” function to display lit of
parameters.
c) Enter server address, server port and APN. Click OK and system shall send to
device provided parameters (SMS).
d) Wait till device addresses server (in “Devices” tab it will be marked with green
colour).
e) Launch software and define options of device (description is provided in chapter
7 of this Manual).
f) Select “Send” to display a new window and select remote connection (GPRS tab).
Save settings in memory of device. Saving course is displayed on special
window.
g) After saving completion close configuration wizard.
h) The device is ready to transmit data.
8.2.2. Reprogramming of device
As the device has defined access parameters in respect of GPRS network and
OSM.Server, it is possible to program device at any time.
If device is installed in secured object and is furnished with SIM card and connected
to power supply follow the procedure:
a) Launch configuration wizard and define options of device (description is provided
in chapter 7 of this Manual).
b) Select “Send” to display a new window and select remote connection (GPRS tab).
Save settings in memory of device. Saving course is displayed in special window.
Page 60

LX20B – Manual Page 60 / 67
c) After saving completion close configuration wizard.
d) The device is ready to transmit data according to new settings.
Page 61

LX20B – Manual Page 61 / 67
9. RECEIVING OF SMS MESSAGE
GPRS module receives specially prepared SMS. If received SMS is not correct it will
be automatically cancelled and device will not operate any action. The device uses
an encrypted protocol for transmission.
9.1. DESCRIPTION OF THE PROTOCOL
The following format of message is acceptable allowing to send some commands
with one SMS (every command shall be separated with SPACE ):
SERVICE CODE█COMMAND█COMMAND█..........
Where:
SERVICE CODE - device service code
█ - SPACE
COMMAND - order (see the table below)
List of commands:
DISC
Disconnects active TCP connection.
KILL
Reset modem.
RESET
Resets device. Note: all unsent events will be lost.
OUT=outNr,state
Turn on or turn off outputs. outNr specifies output
number (0 for OUT1, 1 for OUT2), state specifies
requested output state (0 – switched off, 1 – switched
on).
Examples:
OUT=1,0 – output OUT2 off
OUT=1,1 – output OUT2 on
CMD=[timeout],command
Issues AT command to GSM modem and sends
response back. Optional timeout parameter defines
time for modem response. Time determined in
seconds and ranges from 1-30 seconds. If timeout
isn’t specified, 3 seconds is assumed.
DESC
Returns device description, serial number
(hexadecimal number) and firmware version.
GETSTATUS
Returns device status.
The message content depends on what was
configured at the programming stage in the "SMS
Notifications" tab, the "Status" submenu.
In reply about status a device shall send one SMS
message containing proper text defining inter alia
actual output , input state, power supply, phone line.
GETSIMSTATUS
(only for LX20B-5D model)
Returns SIM cards status.
Format of the message: SIMX, 1: Y, 2: Y
where X is the number of the active SIM card (1 or
2), and Y the status of SIM cards, where: OK - the
card works correctly, ERROR - there is a SIM card
error, UNKNOWN - the device do not known status of
the SIM card due to did not switched to the second
card yet.
Page 62

LX20B – Manual Page 62 / 67
SIMTEST
(only for LX20B-5D model)
The command is used to switch into the inactive SIM
card in the device and test its.
GETPARAM=parameter_name
Gets inquired parameter :SERVER, PORT, APN, UN,
PW, DNS1, DNS2, SMS, SMSPERIOD
GETCFG
Gets primary communication parameters of device in
form: SERVER:PORT,APN UN PW,DNS1
APN=apn
Access point to GPRS network via SIM 1 cards.
Parameter should be obtained from mobile network
operator. If APN address contain space sign put it
with “”, e.g. “my apn”.
APN2=apn
(only for LX20B-5D model)
Access point to GPRS network via SIM 2 cards.
Parameter should be obtained from mobile network
operator. If APN address contain space sign put it
with “”, e.g. “my apn”.
UN=un
APN user name for SIM 1 card. Parameter should be
obtained from mobile network operator. If APN user
name contain space sign put it with “”, e.g. “my user
name”.
UN2=un
(only for LX20B-5D model)
APN user name for SIM 2 card. Parameter should be
obtained from mobile network operator. If APN user
name contain space sign put it with “”, e.g. “my user
name”.
PW=pw
APN password for SIM 1 card. Parameter should be
obtained from mobile network operator. If APN
password contain space sign put it with “”, e.g. “my
password”.
PW2=pw
(only for LX20B-5D model)
APN password for SIM 2 card. Parameter should be
obtained from mobile network operator. If APN
password contain space sign put it with “”, e.g. “my
password”.
SERVER=server
Primary server address; it can be in form of IP or
domain name address.
SERVER2=server
(only for LX20B-5D model)
Secondary server address; it can be in form of IP or
domain name address.
PORT=port
Primary server port number.
PORT2=port
(only for LX20B-5D model)
Secondary server port number.
SMS=phone_number
Server phone number. When there is GPRS failure,
SMS with events will be sent to this number.
SMSPERIOD=time
Defines in minutes time between SMS test messages
sending to the server.
RLIMIT
Removes automatic temporary locks on all inputs
RLIMIT=inputs_mask
Removes selected automatic temporary locks.
Parameter is decimal number made from 6-bit word:
A5, A4, A3, A2, A1, A0; where A1 means INPUT 1, A2
– INPUT 2, A3 – INPUT 3, A4 – INPUT 4, A5 – INPUT
5, A0 is not used.
EXAMPLE:
RLIMIT=6 – removes locks on inputs: IN1, IN2
RLIMIT=2 – removes lock on input IN1
DT=YY/MM/DD,hh:mm:ss
Set time in the transmitter. Time must be specified in
a format compatible with the field on the left.
FLUSH=x
Flushes events buffer, where x:
2 – system events history
Page 63

LX20B – Manual Page 63 / 67
Note: DESC, CMD, GETSTATUS, GETPARAM, GETCFG commands require separate
SMS, so one command with only one SMS.
Samples of commands and device reaction:
Parameters setting:
1111█APN= general.t-mobile.uk█SERVER=89.112.43.78█PORT=6670█
SMS=500445566█SMSPERIOD=25
Parameters verification:
Inquiry: 1111█GETCFG
Answer: 89.112.43.78:6670,general.t-mobile.uk██,
Inquiry: 1111█GETPARAM=SMS
Answer: 500445566
Page 64

LX20B – Manual Page 64 / 67
10. LED DIODES INDICATION
4 LED diodes mounted directly on printed circuit, are purposed to show actual
condition of the device.
10.1. LOGGING TO GSM NETWORK
Once SIM card has been inserted into the device and power supply was turned on
logging to GSM system follows.
Description
LED Diodes
OK (green)
ERROR (red)
Logging to GSM
10.2. GSM RANGE
Flickering of a green diode OK indicates GSM signal (1-8 flickers).
Device operation mode is signalled with a green diode on during 2 seconds once the
range was detected. If after signalling range diode will not flash for 2 seconds the
device is in SMS mode. Range indication is interrupted during data transmission,
and after sending of data again GSM range is being indicated.
Description
LED Diodes
OK (green)
ERROR (red)
GSM range = 8
GPRS mode
GSM range = 6
SMS mode
DTMF ERROR OK STATUS
DTMF ERROR OK STATUS
Page 65

LX20B – Manual Page 65 / 67
10.3. DATA TRANSMISSION
During data transmission a green diode OK indicates data transmitting.
Description
LED Diodes
OK (green)
ERROR
(red)
GPRS Transmission
SMS Transmission
10.4. RECEIVING OF DTMF DATA
Diodes marked as DTMF and STATUS indicate actual condition during receiving data
from a control pane.
LED Diode
Signalling
STATUS
DTMF
(HandShake) (KissOff)
6 digits of phone 16 digits ContactID
DTMF ERROR OK STATUS
DTMF ERROR OK STATUS
DTMF ERROR OK STATUS
Page 66

LX20B – Manual Page 66 / 67
10.5. PROGRAMMING
After detection of programming wire, diodes indicate programming.
Description
LED Diodes
OK (green)
ERROR (red)
Connected Service
wire
Programming in
CSD mode
10.6. FIRMWARE UPDATING
During programming bootloader operating is indicated. If error follows during
updating there is bootloader in device and another programming of device is
possible.
Description
LED Diodes
OK (green)
ERROR (red)
No program in
device
(1/sec)
Software updating
Received firmware
decoding
10 sek
DTMF ERROR OK STATUS
DTMF ERROR OK STATUS
Page 67

LX20B – Manual Page 67 / 67
10.7. SIM CARD ERROR
In case of SIM card problems, device states this with OK and ERROR LEDs.
LED diode
Signalling
OK
(green)
ERROR
(red)
10.8. SYSTEM ERROR
During operating errors may follow. Any error is indicated by constant flashing of a
red diode ERROR and mostly it means communication problem with modem or SIM
card.
11. CHANGELOG
Date / Version
Description
23.06.2016/1.0
First version of documentation
18.07.2016/1.1
Minor changes
07.03.2017/1.2
Correction command KILL
14.03.2017/1.3
Updated technical parameters
17.03.2017/1.4
Updating information about GPRS Transmitter Configurator
16.05.2017/1.5
Substantive and editorial correction
23.10.2017/1.6
Minor changes
16.03.2018/1.7
Added infromation about LX20B-5D with two SIM card slots.
04.06.2018/1.8
Firmware upgrade
DTMF ERROR OK STATUS
 Loading...