

Page 1
Operating Manual
version: 20150330#1.0
EN English
HANDJET® EBS-260
Page 2
EN
A
19
20
18
21
22
23
24
25
26
13
6 5 11
12
8 7 16
15 4 3
2 1 10
9
14
17
B
2 EBS Ink Jet Systeme 20150330#1.0
Page 3
EN
C
30
27
13
31
33
32
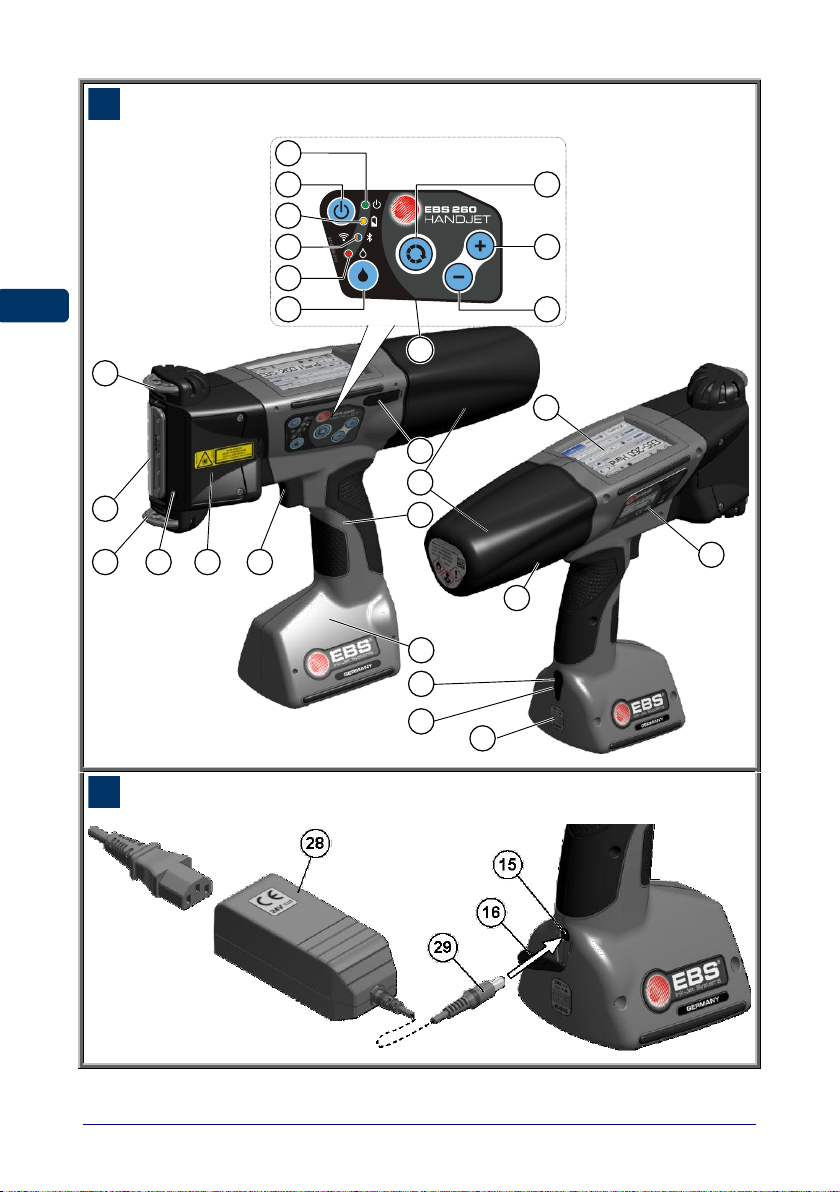
15. Battery charge socket.
Components of Portable
Printer System
See the figures: A B C.
1. Upper guide roll.
2. Nozzle plate - front part of the
print head (ink outlet).
3. Lower guide roll, to synchronize
printing.
4. Laser pointer (shows the position
of the lowest nozzle during
printing).
5. Openings with plugs for adjusting
electromagnets.
6. Trigger - a print release button,
also used by other functions.
7. Printer base, battery and magnet
compartment.
8. Printer holder.
9. USB port with a cap.
10. Keypad.
11. Name plate.
12. LCD touch screen.
13. Ink container.
14. Ink container labels.
16. Charge plug.
17. Guarantee seal.
18. Printer's ON/OFF button.
19. Printer ON LED indicator.
20. Battery charge LED indicator.
21. Radio communication LED
indicator.
22. PRINT ON/OFF LED indicator
(Print on state).
23. Print ON/OFF button.
24. Function key.
25. ”+” key.
26. ”-” key.
27. Printer middle line.
28. Power pack to charge printer
batteries.
29. Plug of power pack 28.
30. OPEN/CLOSED indicator for
ink container.
31. Container valve.
32. Ink system needle.
33. Ink container gasket.
34. Buzzer - a buzzing signal
generator, located inside element
8 of the printer.
20150330#1.0 EBS Ink Jet Systeme 3
Page 4
EN
EN
!
!
A B C
Figure numbering notation
The lamp flashes
The lamp glows
Buzzer
Signs
Information signs indicating:
that the actions described need to be taken with extra or special care,
the printer’s additional or specific functions or options, which are not
described anywhere else,
untypical behavior of the printer and other hints.
A warning not to perform the operation that might be unsafe or
critical for the printer. It requires the user to follow closely the
instructions given therein.
The meaning of LED and other indicators:
4
EBS Ink Jet Systeme 20150330#1.0
Page 5

EN
EN
T AB L E O F C O NT E N T S
LOW-BATTERY INDICATOR ..................... 26
DISPLAY PARAMETERS SETTINGS ......... 27
USER MANAGER ............................... 28
COMPONENTS OF
PORTABLE PRINTER
SYSTEM .................................... 3
SIGNS ....................................... 4
APPLICATION .......................... 7
OPERATIONAL SAFETY ......... 7
GENERAL SAFETY INSTRUCTIONS ......... 7
LASER RADIATION SAFETY ................... 8
PROTECTING THE BATTERY PACK ......... 9
WHEN INK OR WASH-UP SPILLS ............ 9
CONTROL OF ELECTROMAGNETIC
INTERFERENCE .................................. 10
IMPACT ON MEDICAL EQUIPMENT ........ 10
PACEMAKER AND OTHER MEDICAL
IMPLANTS ............................................. 10
OTHER MEDICAL EQUIPMENT ................ 10
OPERATION IN EXPLOSION HAZARD
AREAS ............................................. 10
OPERATION IN AREAS OF BLASTING .... 10
CONFORMITY MARKING ...................... 11
ENVIRONMENTAL PROTECTION ........... 11
PREPARING THE PRINTER
FOR OPERATION AND
SETTING BASIC
PARAMETERS........................ 12
OPERATING TOUCH SCREEN ............... 12
SIMPLE MENU ....................................... 14
LCD KEYPAD ....................................... 14
SWITCHING THE PRINTER ON AND
OFF ................................................. 16
SWITCHING THE PRINTER ON ................ 16
SWITCHING THE PRINTER OFF .............. 16
LOGGING IN .......................................... 18
INSTALLING AND REPLACING INK
CONTAINER ....................................... 19
INSTALLING INK CONTAINER IN THE
PRINTER .............................................. 19
INK LEVEL IN CONTAINER ...................... 20
REPLACING INK CONTAINER .................. 20
GENERAL SETTINGS .......................... 21
DATE AND TIME SETTINGS .................. 22
SOUND SETTINGS .............................. 23
ENERGY MANAGEMENT ...................... 25
CHARGING THE BATTERY ...................... 25
20150330#1.0 EBS Ink Jet Systeme
RADIO COMMUNICATION AMONG THE
PRINTER, A COMPUTER AND
EXTERNAL DEVICES .......................... 29
WIFI WIRELESS CONNECTION ............... 29
Connecting the Printer to a
New Network via WiFi ................... 30
BLUETOOTH INTERFACE........................ 32
Establishing Connection
between Printer and External
Device ............................................. 32
CONNECTING USB DISC TO THE
PRINTER ........................................... 34
IMPORTING PROJECTS .......................... 35
EXPORTING PROJECTS ......................... 35
UPDATING SOFTWARE .......................... 36
MESSAGES ....................................... 37
STATISTICS ....................................... 39
GETTING STARTED ............... 40
OPERATING THE PRINTER VIA
PRINTER TOUCH SCREEN ................... 40
FILE MANAGER ..................................... 40
CREATING A NEW PROJECT .................. 41
OPENING AND EDITING A PROJECT ........ 41
PROJECT PROCESSOR ......................... 42
Project Properties ......................... 44
List of Objects ............................... 44
Clipboard ........................................ 45
Trash ............................................... 45
Objects ........................................... 46
Repositioning an Object ................ 48
Re-sizing an Object ...................... 48
Common Parameters of Objects .. 49
Text Object – Normal text ............. 51
Text Object – Date/Time ............... 52
Text Object – Counter ................... 54
Text Object – Communications
port ................................................ 56
Text Object – Text File.................. 60
Shape-type Object – Line ............. 61
Shape-type Object – Rectangle .... 61
Shape-type Object – Ellipse ......... 62
Barcode ........................................ 63
Image ............................................ 64
Line Divider ................................... 65
PRINTING PARAMETERS ........................ 66
PROJECT RECOVERY ............................ 69
SERVICE .............................................. 70
Purging ........................................... 71
USB ................................................. 72
Unlocking Options ........................ 72
5
Page 6

EN
EN
Restoring Preliminary Settings .... 73
Tuning ............................................. 74
Information ..................................... 74
OPERATING THE PRINTER VIA
MOZILLA FIREFOX WEB BROWSER ..... 75
ESTABLISHING CONNECTION
BETWEEN PRINTER AND COMPUTER ...... 75
INSTALLING OFFLINE EBS WEB USER
INTERFACE ........................................... 75
LOGGING IN .......................................... 75
WORK SCREEN OF EBS WEB USER
INTERFACE ........................................... 75
FILE MANAGER ..................................... 76
PROJECTS ............................................ 76
Create a New Project ..................... 76
Open and Edit a Project ................ 77
Import a Project.............................. 79
Export Project ................................ 80
Project Processor .......................... 80
Printing Parameters ....................... 83
Objects ............................................ 87
Common Parameters of Objects ... 87
Text Objects ................................... 88
Text Object – Normal Text ............ 88
Text Object – Date/Time ............... 89
Text Object – Counter ................... 92
Text Object – Communications
port ................................................ 94
Text Object – Text File .................. 99
Image ............................................. 100
Barcode......................................... 101
Shape-type Objects ..................... 102
Shape-type Object – Line ............ 102
Shape-type Object – Rectangle .. 103
Shape-type Object – Ellipse ........ 104
Line Divider .................................. 104
List of Objects .............................. 105
Clipboard ...................................... 106
Trash ............................................. 106
TOOLS ................................................ 106
Image Manager ............................. 106
Font Manager ............................... 107
Text Files Manager....................... 108
Users Manager ............................. 109
Printers Network Manager .......... 110
Language Manager ...................... 111
Account Manager ......................... 112
Workspace width ......................... 112
Simulate Printout ......................... 113
SETTINGS ........................................... 113
General Settings .......................... 113
SERVICE ............................................. 114
Update ........................................... 114
Log ................................................ 115
Generate Service Report ............. 115
Install Option ................................ 116
LCD Preview ................................. 116
PRINTER CONTROL ............................. 116
INFO ................................................... 117
About ............................................ 117
Operating statistics ..................... 117
MESSAGES ......................................... 117
PRINTING .............................. 118
OPENING PROJECT FOR PRINTING ..... 118
OPENING A PROJECT FOR PRINTING
VIA PRINTER LCD ............................... 118
OPENING A PROJECT FOR PRINTING
VIA WEB BROWSER ............................. 119
PRINTING A PROJECT ....................... 119
PRINTING A PROJECT VIA PRINTER
LCD ................................................... 119
PRINTING A PROJECT VIA WEB
BROWSER .......................................... 122
MAINTENANCE, STORAGE
AND TRANSPORT ................ 123
USER SUPPORT ................... 124
PROBLEMS WITH FUNCTIONING AND
OPERATION OF THE PRINTER ............. 124
Some of the nozzles do not jet
ink ................................................ 124
The printer does not print ............ 124
Boldfaced or Blurred Prints ......... 124
QUESTIONS AND PROBLEMS ............. 125
TECHNICAL PARAMETERS 125
PRINTER ACCESSORIES .................... 128
6
EBS Ink Jet Systeme 20150330#1.0
Page 7

EN
EN
!
Before you start your printer for the first time read the hints given below
and follow the underlying principles for your own and other persons’
safety.
Dear Users of EBS Ink Jet Systeme equipment,
Please read this manual necessarily in order to get full information about the
operation of your device.
Disclaimer:
We shall bear no responsibility for damage to the device if it is operated
improperly, i.e., inconsistently with this manual.
The application and use of the products are beyond our control and
therefore fall exclusively into your scope of responsibility.
As we wish to keep pace with permanently progressing technological
development and individual requirements of our clients, we need to reserve
the right to change the form, make and technical solutions of our devices.
Therefore no data, illustrations or descriptions of this manual shall form any
grounds for claims.
We spare no effort to ensure that this manual is reliable, includes all
modifications and is free from errors. However, the drawing up and
publication process is complex and an error can occur in spite of our
endeavors and wishes. We shall bear no responsibility for the
consequences of editorial and printing errors in this manual.
If your device contains a particular piece of equipment or needs performing an
operation that have not been illustrated or described in this manual, or if you
have queries on reading this manual, please contact any representative of
EBS Ink Jet Systeme for additional information.
This manual applies to Offline EBS Web User Interface (Offline WUI) in version
1.4 and the EBS-260 printers equipped with the control system in version
1.02.08. In order to view the printer system version go to:
On the printer LCD: Tools – Service – Information – System version,
In EBS Web User Interface (WUI): Information – About the program –
System version.
Application
The HANDJET® EBS-260 printer is designed for marking, labeling, putting prints
and simple graphics wherever the use of a manual labeling device is required or
preferred.
Prints are put on articles with the application of the INK-JET method.
Operational Safety
General Safety Instructions
1. The printer must not be operated in rooms where explosion hazard exists.
20150330#1.0 EBS Ink Jet Systeme
7
Page 8

EN
EN
2. No prints can be made on objects whose temperature exceeds 100°C at
the time of printing.
3. No open fire or spark producing devices or objects are allowed in the area
where the device operates.
4. During printing ink drops invisible to people’s eye are jetted out of the head
at pressure. Do not aim head outlet 2 at any persons, animals or casual
objects because they may get splashed with ink unintentionally.
5. The following requirements need to be met when washing, cleaning and
maintenance operations are performed or ink containers are replaced:
The operations can only be performed in a workplace that is especially
designed for that purpose, when the device is switched off and
protective clothing is worn. A fire extinguisher designed to extinguish
electrical devices and flammable solvent fires must be placed within
easy reach of the device. Air ventilation needs to be ensured at the
workplace.
WARNING: The ink is inflammable!
Be careful not to splash the ink. Especially eyes need protecting. It is
advisable to wear protective glasses.
Protect the ink and the solvent (also waste fluid remaining after the
printer has been washed) against fire, high temperature, sparks,
electric arc and other electric discharge as they may cause ignition of
these inflammable fluids!
Do not use plastic vessels to do the washing. Metal vessels are
recommended.
6. Protect the printer against dirt, heavy dust and excessive moisture.
7. EBS Ink Jet Systeme is able to ensure perfect and safe operation of the
printer only when original, printer-specific accessories and consumables
are used.
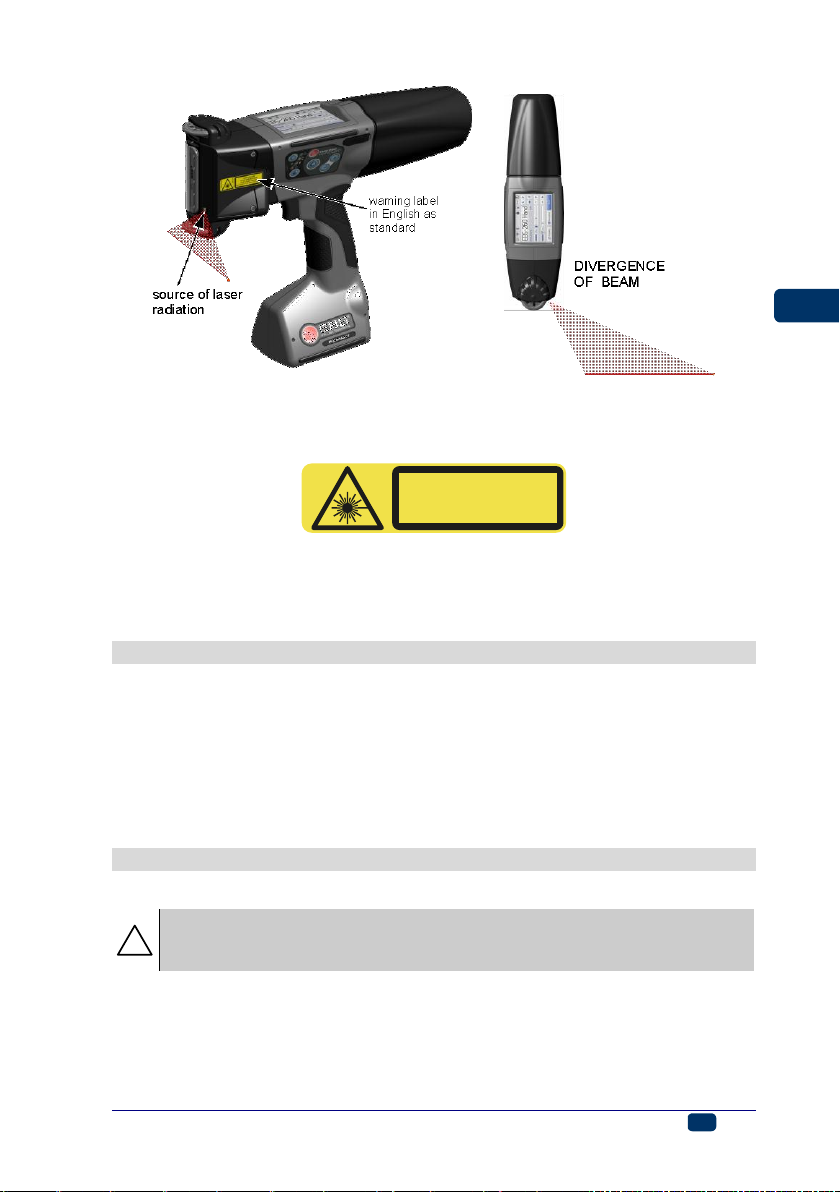
Laser Radiation Safety
Laser pointer 4 is activated during printing for print positioning. The pointer
emits class 2 laser radiation (according to IEC 60825-1) at the wavelength of
650 nm, with a maximum output power < 1 mW. The leser beam is not
generated in pulses.
1. Do not direct the laser beam of a radiation emitting laser device toward
persons or animals, or stare at the beam. The laser light can damage sight.
2. Do not stare at the beam or look directly through optical instruments
(magnifying glasses, magnifiers, microscopes, binoculars, telescopes). The
looking through certain optical instruments (e.g. loupes, magnifying glasses
and microscopes) at an output laser beam from a distance of up to 100 mm
may generate hazard to the eyes.
3. Avoid directing the beam toward the planes that reflect laser radiation well
(mirrors or other glossy surfaces) so that the reflected beam(s) does not
shine in the eyes.
8
EBS Ink Jet Systeme 20150330#1.0
Page 9
EN
EN
K170117 -000
IEC/EN 60825-1:2007
+ AC1 :2008
LASER RADIATION
DO NOT STARE INTO BEAM
CLASS 2 LASER PRODU CT
MAX OUTPUT: < 1 mW, WAVE LENGTH: 650 nm
!
EYES rinse the eyes with running water for at least 15 minutes, then
see your oculist.
SKIN wash the skin with water and soap.
The printer is marked with the following warning label in English, as standard.
The label is put on the left-hand side of the printer on plug 5 covering the hole
through which electromagnets can be adjusted.
Labels in several languages come together with the printer. If you prefer a
different language than English, replace the label with a more suitable one. If
the label is not available in your language, translate the label contents into your
language and hand it over to the printer users.
Protecting the Battery Pack
The following principles need to be obeyed to protect the batteries that are built
into the printer:
Protect the printer against excessive temperature and fire. Do not expose it
to strong solar radiation for a longer time.
Avoid a sudden change in temperature (cold hot) that might cause vapor
condensation inside the printer and thereby speed up battery discharge
and electronic circuit corrosion. Condition the printer for about 1 hour
before use after it has been moved from a cool place to a warm one.
When Ink or Wash-up Spills
Should the eyes or skin get irritated with ink or wash-up:
If the clothing has been splashed, take it off as soon as possible.
When ink or wash-up spill, wipe out the spilled fluid with a piece of
absorbent material, and then remove the material in compliance with fire
and health and safety-at-work regulations.
20150330#1.0 EBS Ink Jet Systeme
9
Page 10

EN
EN
Control of Electromagnetic Interference
1. Properties of high-frequency devices.
Your Ink-Jet printer contains a high-frequency transmitter and receiver. When it
is in the ON state, the printer receives and transmits high-frequency (HF)
signals.
The controller of the Ink-Jet printer system controls energy emitted during
printer operation on an on-going basis.
The HANDJET® EBS-260 printer complies with all the requirements of the
regulations concerning the impact of the HF energy on humans in your country
– see Conformity Marking (p. 11).
2. Printer accessories.
If you do not use original EBS parts or printer accessories, including batteries or
electronic components, the statutory requirements may not be met and the HF
electromagnetic emission limits may be exceeded.
Impact on Medical Equipment
Pacemaker and Other Medical Implants
The printer contains built-in high-frequency transmitters and receivers. Persons
having medical implants should not approach the printer to a distance smaller
than 20 cm (8 inches) from the implants not to disturb implant operation.
Other Medical Equipment
If you use a piece of medical equipment, please ask the equipment
manufacturer whether the equipment is sufficiently shielded against
electromagnetic radiation. In certain circumstances your doctor may help you
gain the information you require.
Operation in Explosion Hazard Areas
If you work in an explosion hazard area, switch your Ink-Jet printer off, do not
replace the batteries or do not remove them from the printer and follow all
instructions and precautions. Sparking generated by batteries may cause an
explosion and/or fire in this hazardous area and result in personal injuries or
even death.
The regions where a potential explosion hazard exists are usually marked
appropriately. The examples of such regions are: solvent storage areas, fuel
storage areas and petrol stations, below-decks onboard ships, storage areas for
explosive gases, air mixtures, chemicals and metal or flour powders.
Operation in Areas of Blasting
In order to avoid disturbance during blasting operations, the printer should be
switched off in the areas where such operations are performed or where the use
of radio equipment is forbidden.
Follow the operating instructions and information signs.
10
EBS Ink Jet Systeme 20150330#1.0
Page 11
EN
EN
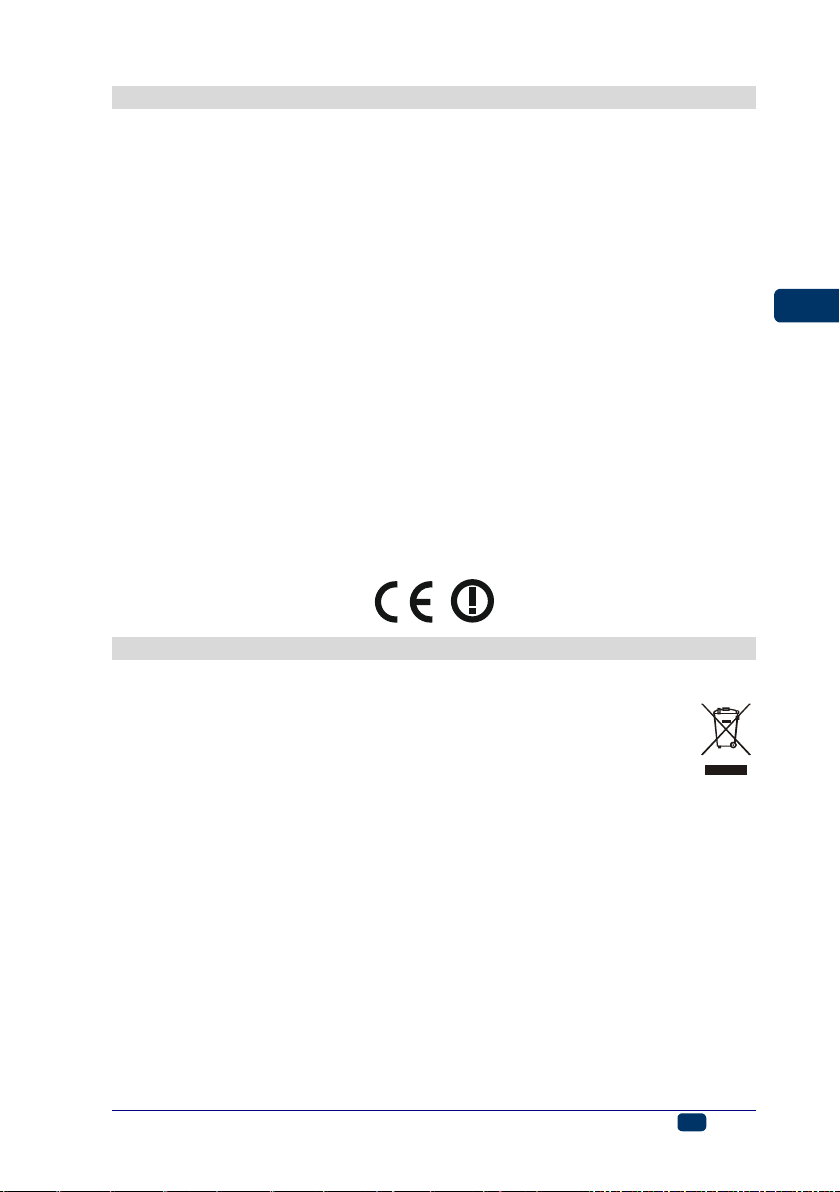
After the printer has been put out of service, do not take it out together
with other domestic waste.
According to Directive No 2012/19/EU of the European Council on
electrical and electronic equipment waste, the HANDJET® EBS-260
printer and USB-Bluet
ooth modules that have been put out of service must be separated from
domestic waste and processed in an environmentally friendly way.
Conformity Marking
The HANDJET® EBS-260 printer has followed the conformity assessment
procedure which resulted in the issue of Declaration of Conformity. This forms
the basis for the statement that the HANDJET® EBS-260 printer and the
manufacturer’s accessories, to which this Declaration relates, meet the general
requirements and other relevant provisions of the Directive if the printer and the
accessories are installed and used in compliance with the manufacturer's
instructions:
1999/5/EC, 2006/95/EC, 2004/108/EC
and that they meet the following norms that are harmonized with the above
Directives
EN 60950-1:2006 + A11:2009 + A1:2010,
EN 60825-1:2007 + AC1:2008,
ETSI EN 301 489-1 V1.9.2:2011,
ETSI EN 301 489-17 V2.2.1:2012,
EN 55022:2011,
EN 61000-3-2:2006 + A1:2009 + A2:2009,
EN 61000-3-3:2013,
EN 61000-4-2:2009,
EN 61000-4-3:2006 + A1:2008 + IS1:2009 + A2:2010,
EN 300 328 V1.8.1:2012.
The HANDJET® EBS–260 printer will bear the following mark:
Environmental Protection
20150330#1.0 EBS Ink Jet Systeme
11
Page 12
EN
EN
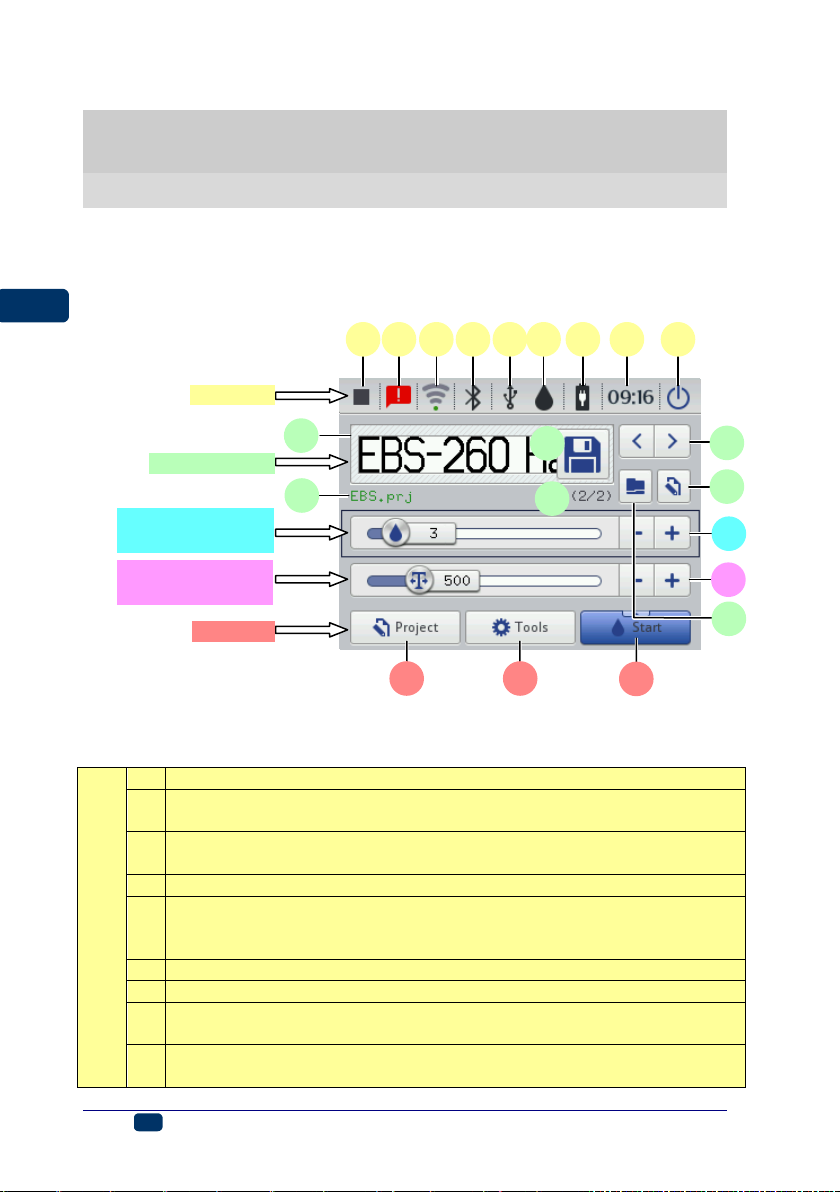
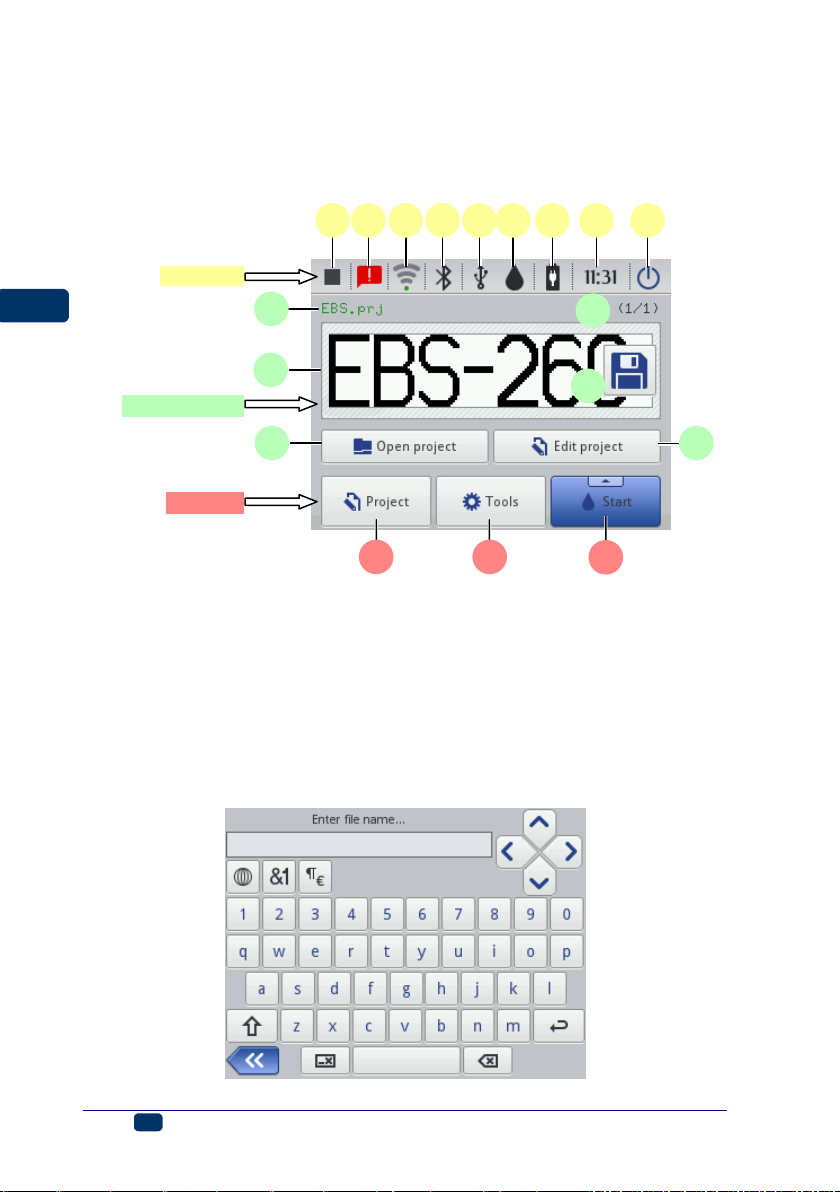
status bar
A
Printing status – see Printing a Project via Printer LCD (p. 119),
B
Messages containing the information on printer operation (the icon
displayed when the messages are available) – see Messages (p. 37),
C
Status and the settings of WiFi wireless network – see WiFi Wireless
Connection (p. 29),
D
Bluetooth status and settings – see Bluetooth Interface (p. 32),
E
Pendrive/USB disc status (the icon is not displayed, when the disc is
not connected to the printer) – see Connecting USB Disc to the
Printer (p. 34),
F
Ink container status – see Ink Level in Container (p. 20),
G
Battery status – see Energy Management (p. 25),
H
The current time of the printer and the date and time settings – see
Date and Time Settings (p. 22),
I
Switch the printer off and then on again, log out the user and disable
the screen – see also Switching the Printer Off (p. 16).
status bar
project window
Intensity printing
parameter window
Resolution printing
parameter window
menu bar
S B C D E F G H J K P R I A L MW U T N O
Preparing the Printer for Operation and Setting Basic
Parameters
Operating Touch Screen
The main screen of the printer consists of the following elements:
12
EBS Ink Jet Systeme 20150330#1.0
Page 13
EN
EN
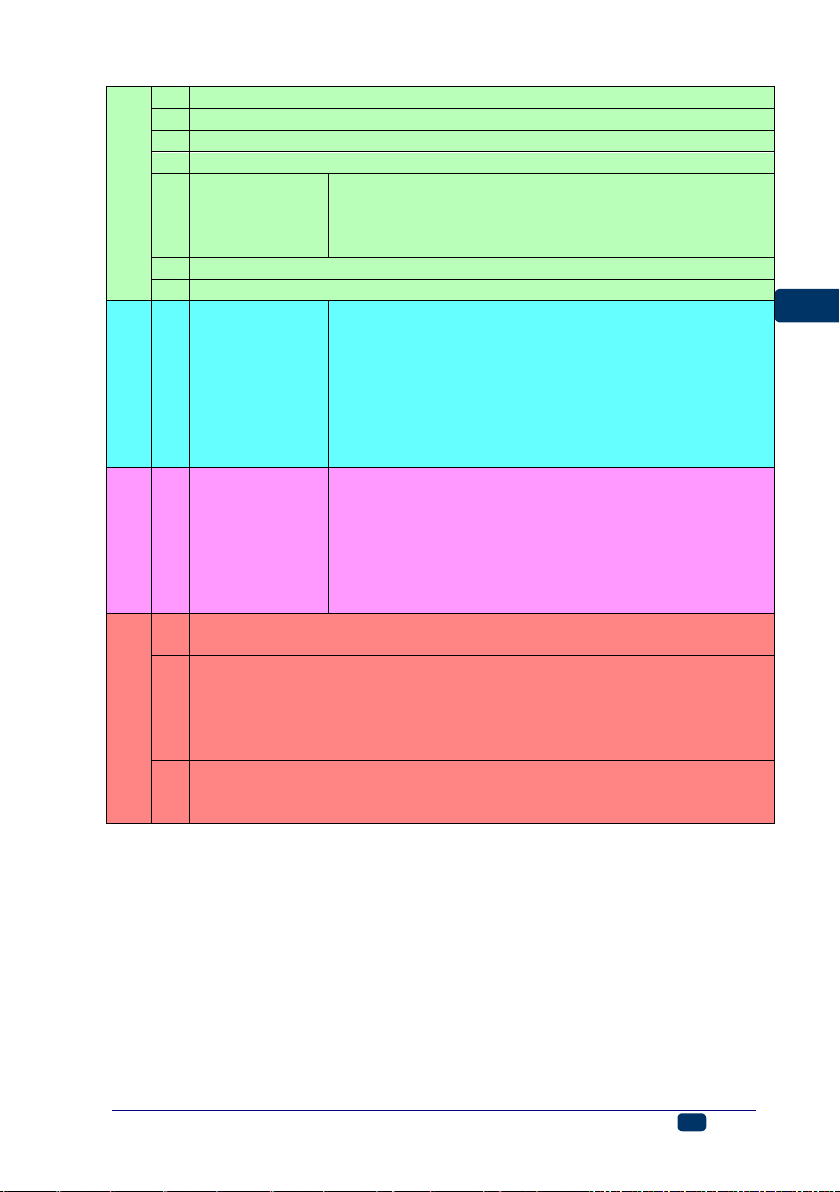
project window
J
Preview a project to be printed
K
Select projects to be printed, from the same folder
L
Open a project to be printed
M
Edit a project to be printed and printing parameters of that project
N
Save the
project
parameters
modified
If a modification is not saved, the project can be
printed with the modified parameter only until a new
project is opened or the printer is switched off.
O
Project number in the folder / the number of projects in the folder
P
Project name (if the name is in green, the project is ready for printing)
print intensity
R
Decrease or
increase print
intensity
A change in the intensity setting results in a lower or
higher saturation of a printout with ink of a given
color.
You can change the intensity of a printout of a
chosen project by pressing the - or + button or by
shifting the slider handle. If the parameter setting is
modified, press the N button to save the
modifications to the project.
print resolution
S
Increase or
decrease print
resolution
A change in the width of characters printed and the
length of the entire project are the visual effects of a
modification to the resolution setting.
You can change the resolution of a chosen project
by pressing the – or + button or by shifting the slider
handle. If the parameter setting is modified, press
the N button to save the modifications to the project.
menu bar
T
Create a new project and edit an existing project – see Creating a
New Project (p. 41) and Opening and Editing a Project (p. 41)
U
Set the language, date and time format (General Settings (p. 21)),
sound (Sound Settings (p. 23)), energy (Energy Management (p.
25)), users (User Manager (p. 28)), WiFi (WiFi Wireless Connection
(p. 29)) and Bluetooth (Bluetooth Interface (p. 32)), service options –
see Service (p. 70)
W
Enable and disable printing – see Printing a Project via Printer LCD
(p. 119), rinse the nozzles – see also Purging (p. 71) and Measure
(p. 119)
Make sure that the edges of the housing are not touched while LCD buttons are
being touched on the screen touch – this may disrupt the detection of a touch.
If the touch screen cannot be used (e.g. the operator wears gloves), the keys
available on the keypad 10 can be used instead. With the key 24 you can switch
over between the project window and printing parameter windows. The active
window is framed in black. The keys 25 and 26 are designed for choosing a
project and changing the parameter settings.
20150330#1.0 EBS Ink Jet Systeme
13
Page 14
EN
EN
status bar
project window
menu bar
B C D E FG H J P I A MW U T N O
L
Simple menu
You can switch between the main screen and the simplified screen by touching the
selection button that is by the Simple menu option in the General Settings
Common sheet tab (see General Settings p. 21)).
Use can use the keys 25 and 26 on the keypad 10 to choose a project for
printing (within one folder).
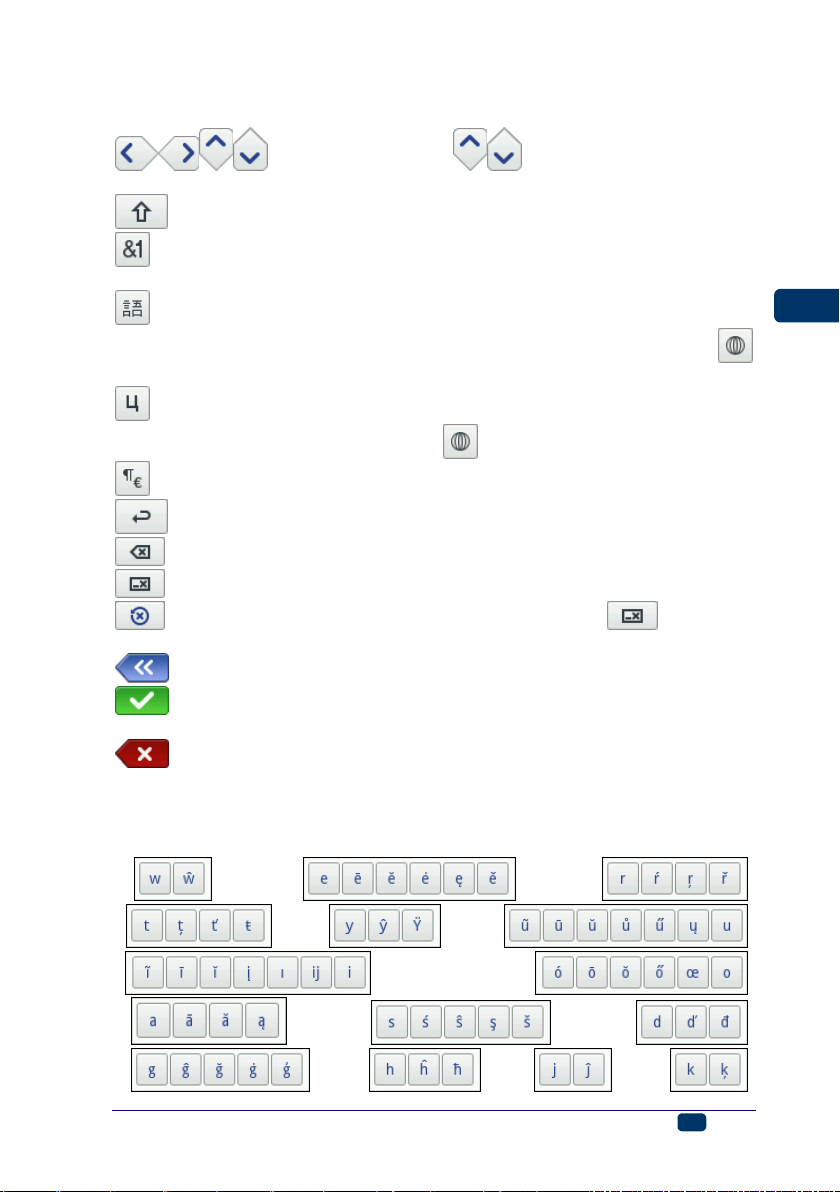
LCD Keypad
The on-screen keypad can be used for changing the settings of parameter and
inputting text files from the printer touch screen (LCD) level. It is displayed on
the LCD display after a given parameter field has been chosen, while the
password is being typed in during logging in operation or while a text is being
input to a project.
14
EBS Ink Jet Systeme 20150330#1.0
Page 15
EN
EN
The keypad contains a full set of Latin letters and a set of digits; moreover it
also contains special buttons:
– to move the cursor ( are available for the keypads
that are displayed while multiple-line text objects are being edited),
– to shift between small letters to capital letters and the other way round,
– to shift between letters and punctuation marks and digits and the other
way round,
– to convert the Latin letters into Chinese characters (mode of input:
pinyin) and the other way round (the button is available after the
button has been touched),
– to convert the Latin letters into Cyrillic letters and the other way round
(the button is available after the button has been touched),
– to convert letters into special symbols and the other way round,
– ENTER – to move to the following line,
– to delete the character that is on the left of the cursor,
– to delete an entire text (to clear the edit field),
– to undo deletion (the button is available after the button has
been touched),
– to move back to the previous display,
– to confirm that you want to input a text you have typed in (the button is
available after you have started typing in),
– to abandon inputting a text (the button is available after you have
started typing in).
Moreover, diacritical characters are hidden under certain buttons (the are available
after a given button has been touched and held on). These buttons include:
w- ; e- ; r- ;
t- ; y- ; u– ;
i- ; o- ;
a- ; s- ; d- ;
g- ; h- ; j- ; k- ;
20150330#1.0 EBS Ink Jet Systeme
15
Page 16
EN
EN
l- ; z- ; c- ;
n- ;
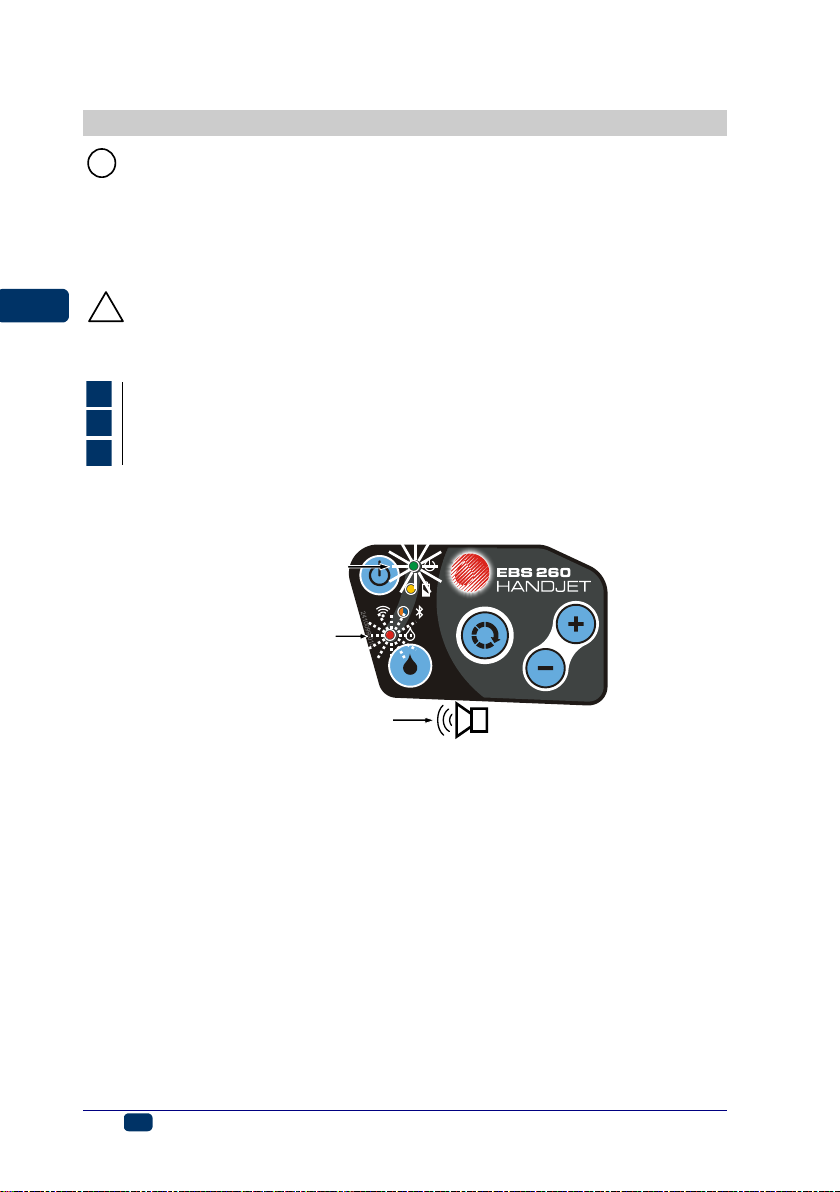
Switching the Printer On and Off
See figure A.
Switching the Printer On
Touch button 18 (and hold it on for about 1s) on the printer keypad 10. The
switching on is done properly when diode 19 emits lights and an audible signal
is heard from buzzer 34 . The printer is ready for operation when the main
screen is displayed (in about 30 s from the switching on).
When the printer is switched on, you can move to print a text file from printer
memory.
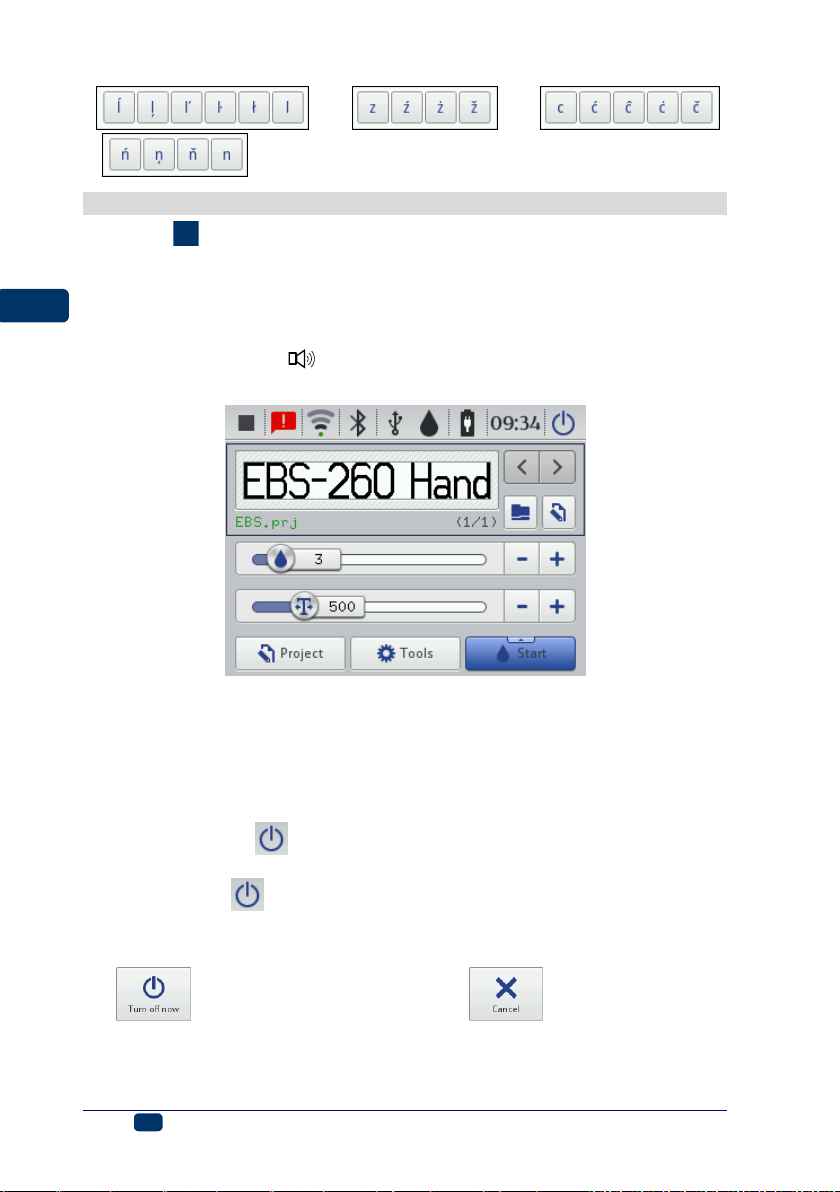
Switching the Printer Off
The printer can be switched off in three ways:
by means of button 18 on the printer keypad 10,
by means of the (I) button on the printer touch screen 12,
remotely, with EBS Web User Interface available via a Web Browser, by
means of the button.
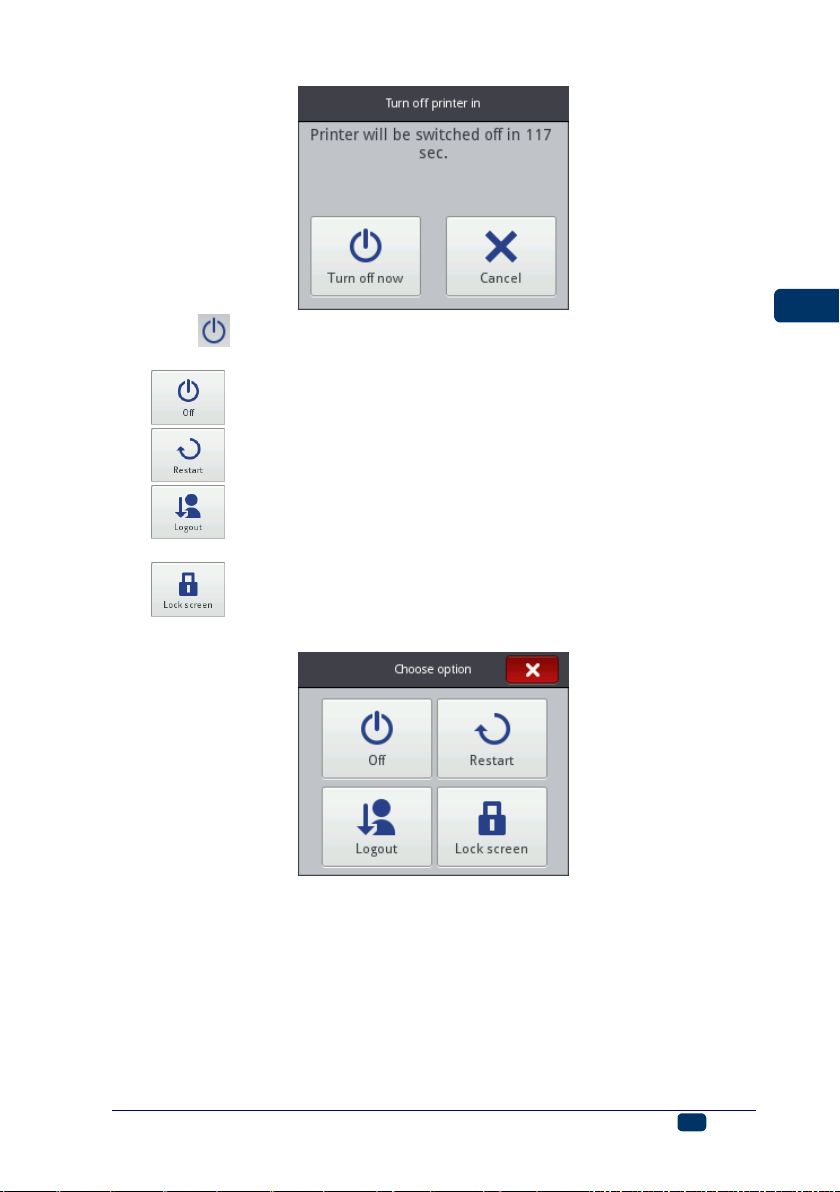
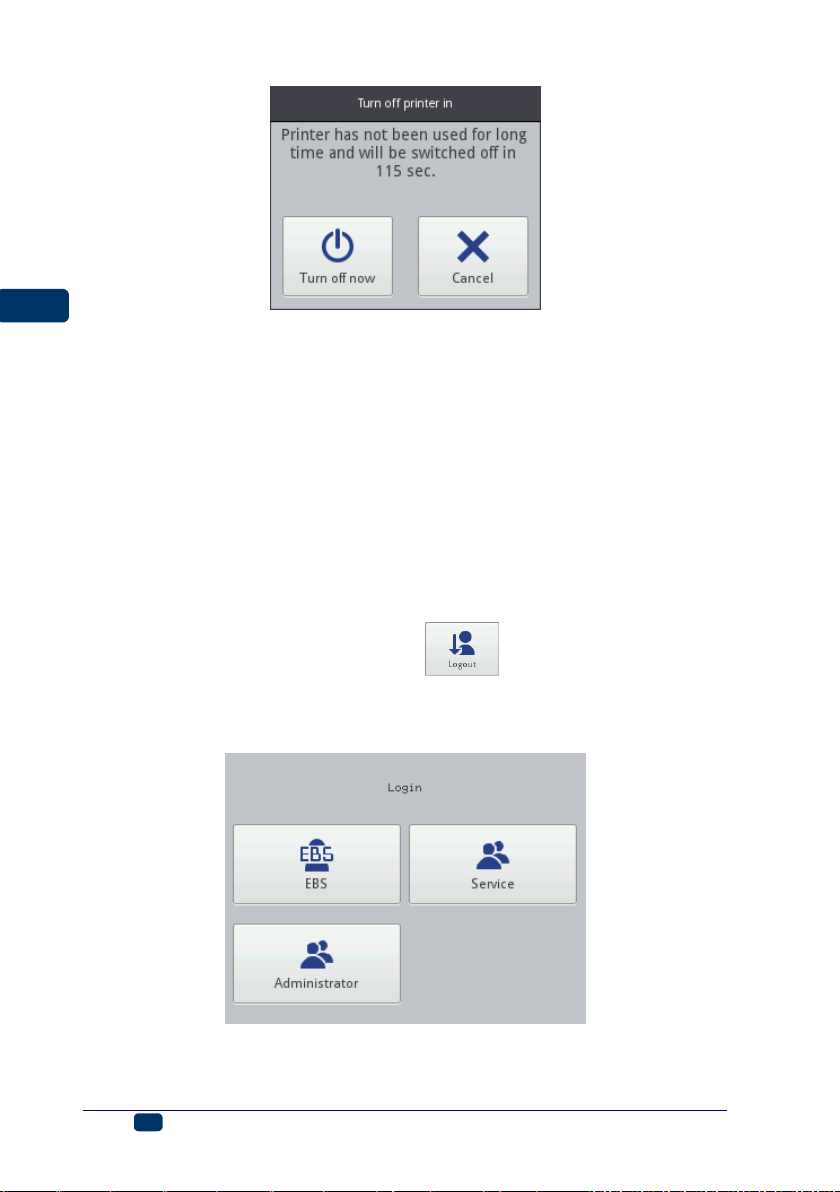
When you press button 18, the display shows the message that the printer will
be switched off in 120 seconds. You can speed up this operation by touching
the button or cancel it by touching the button.
16
EBS Ink Jet Systeme 20150330#1.0
Page 17
EN
EN
When the (I) button is touched, the window containing the following options
is displayed on the printer touch screen and also in EBS Web User Interface:
– to switch off promptly after the button is touched,
– to switch off and restart the printer,
– to log out the current user and display the log in display –
see Logging In (p. 18),
– to enable the screen lock (this option is available only on the
printer screen) – see Display Parameters Settings (p. 27).
The switching off is done properly, when diode 19 goes out and screen 12
switches off. It can also be signaled with an audible signal (see Sound Settings
(p. 23)).
The printer can be switched off automatically after a period of inactivity – see
Display Parameters Settings (p. 27).
20150330#1.0 EBS Ink Jet Systeme
17
Page 18
EN
EN
In an emergency situation, when the above mentioned ways of printer switch off
turn out ineffective or when the printer needs to be switched off immediately,
you can do that in two ways:
by holding button 18 on keypad 10 over a minimum of 4 second or
by touching button 18 and holding it together with trigger 6 at the same
time.
After emergency switch off the settings of the printer counters and unsaved
projects are lost. If the emergency switch off occurs too frequently, it may lead
to printer damage (e.g. damage to the file system).
Logging In
You can be logged in automatically as Administrator by default (the default
password is 1). You can disable automatic logging in or change the default
account - see User Manager (p. 28).
If the current user is logged out with the button (see Switching the
Printer Off (p. 16)), a list of user is displayed on the printer acreen. After a user
name has been chosen, a keypad is displayed (see LCD (p. 14)) with which to
type in the password.
18
EBS Ink Jet Systeme 20150330#1.0
Page 19
EN
EN
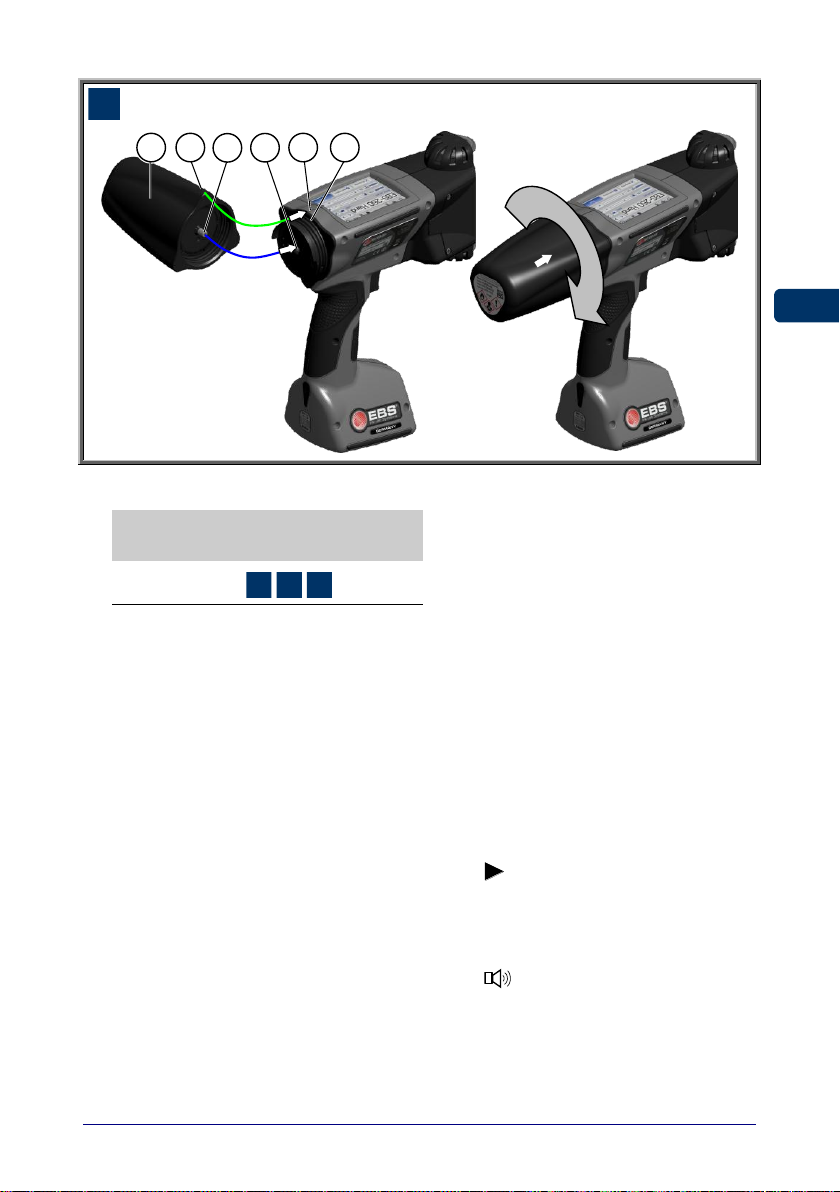
Installing and Replacing Ink Container
See figure C.
Installing Ink Container in the Printer
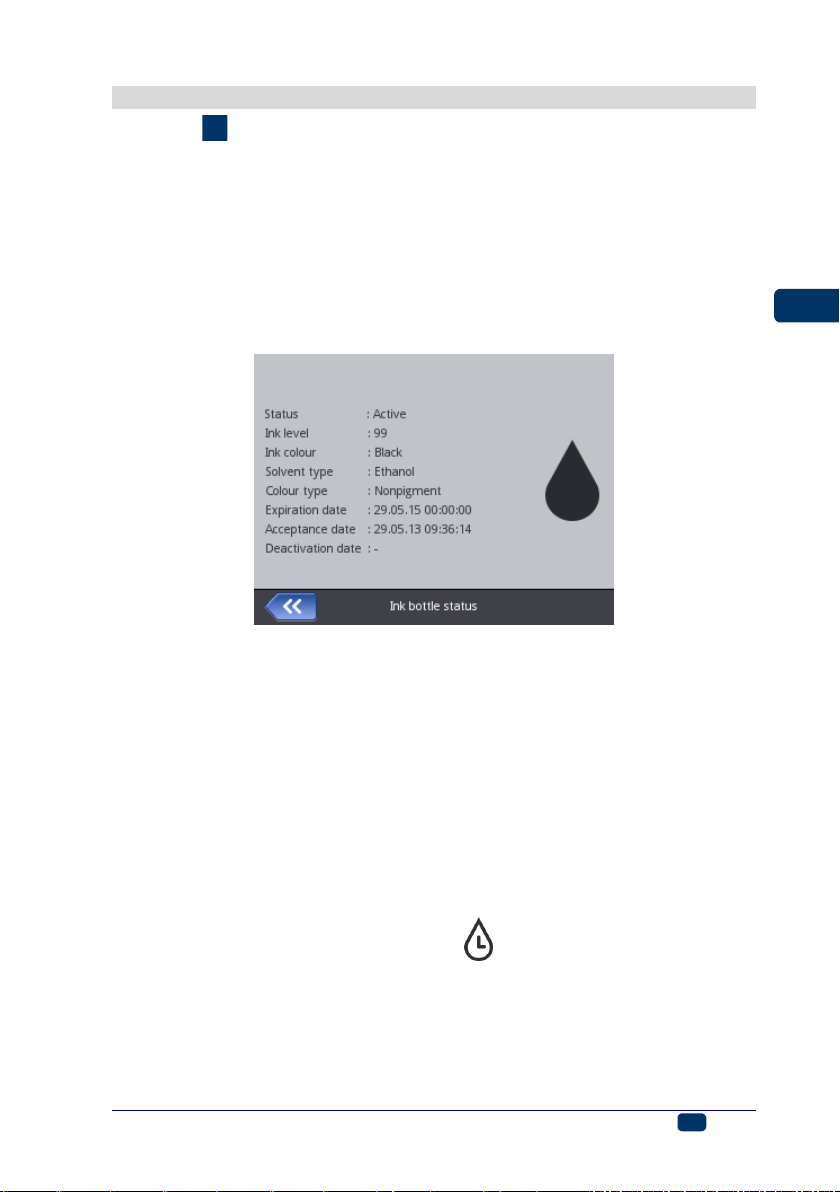
Every ink container is equipped with a transponder that stores the information
on the type of ink and its date of manufacture. The printer has a built-in circuit
that scans the data from the transponder and thereby it helps check whether the
ink used is of the proper quality. The detailed information on ink (the container
fill-in level, the ink color, the type of solvent, the type of dye, the expiration date
for the ink, the date when the container has been accepted) is available after
the drop-shape icon on the main display top bar has been touched.
When the printer is delivered, the ink container is detached. Follow the steps
below in order to install the container:
1. Remove the container from packing 13.
2. Position the container 13 relative to the back part of the printer so that the
triangular mark on the container is directly opposite the printer middle line 27
and that the printer's pin goes into the container's non-return valve opening.
3. Press the container against the printer and turn it clockwise by 270
degrees.
The a new container is accepted, the following message is displayed: New ink
container successfully accepted.
Should problems with the acceptance of an appropriat and correct container occur,
the service staff can make temporary acceptance of such a container possible (for
50 hours) – see Unlocking Options (p. 72). The information on such a temporarily
accepted container appears in the form of the icon (F) on the status bar.
20150330#1.0 EBS Ink Jet Systeme
19
Page 20

EN
EN
0%
1–9%
10–30%
31–60%
61–80%
81–100%
!
If possible, replace the container in dustfree conditions so as to minimise
the amount of contaminants getting in to the printer’s ink system.
Do not leave the printer with the ink container detached for a longer time
than that required to replace the container. While detaching or installing
the container be careful not to splash anyone or anything with the ink that
may flow out of needle 32.
1. Turn the printer off - see
Switching the Printer Off
(p. 16).
2. Put the printer in such a way that
the container points downwards,
turn empty container 13 to the
left (a). Wait about 3 seconds
while holding the container to
equalize the pressure.
3. Remove the container carefully
(b).
b
a
13
Ink Level in Container
When the printer stops printing, make sure that it is because the ink container
has been emptied. The level of ink in the container is displayed on screen 12
with the icon (F):
In addition, the and icons displayed alternatively can indicate that:
There is no ink container in the printer,
There is a problem with ink, e.g. the ink is past its use-by date, or the print
limit assigned to the printer has been exceeded. The information about the
problem is displayed after the icon (F) has been touched, and also in
message form after the message icon (B) has been touched.
There is no communication with the container controller – restart the
printer, and when the problem does not subside, contact your service point.
Replacing Ink Container
4
20
EBS Ink Jet Systeme 20150330#1.0
Page 21

EN
EN
See figure C.
4. If gasket 33 is dirty, remove ink leftovers from it with wash-up.
5. Install a new container - see In stalling Ink Container in the Printer (p.
19).
Ink may flow out of a worn out container. Secure the container valve with
transport cap 31 that you can take from a new container, in order to avoid
spontaneous outflow of the ink.
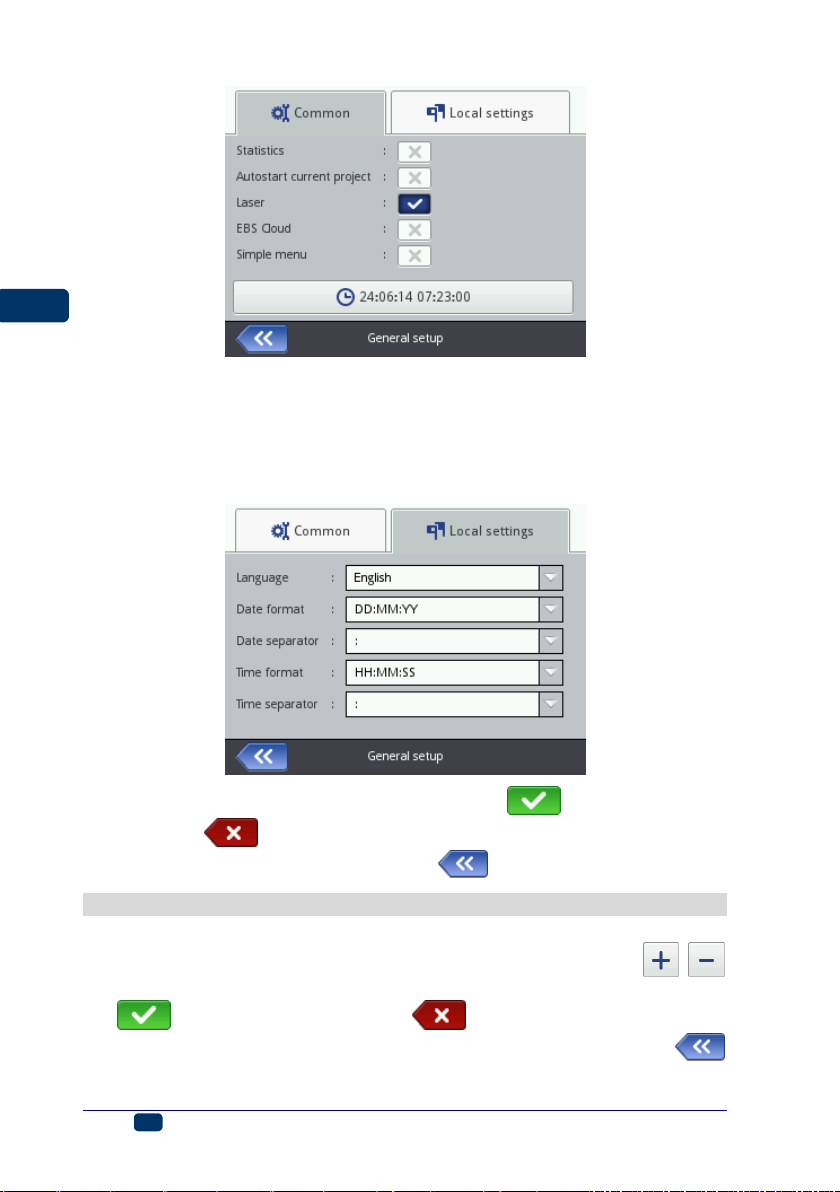
General Settings
The general settings are accessible by touching the following buttons in turn:
Tools (U), Settings and General.
In the Common sheet tab you can:
Change the settings concerning the generation of Statistics. You can
collect the data on the number of prints made for each of the projects. The
report is available EBS Web User Interface in the Info menu – see
Operating statistics (p. 117).
Enable/disable the Autostart current project option – after the printer has
been switched on, the recently printed project is read-in automatically, and
the printer moves to the Print on (waiting) state. Press the trigger and
move the printer along an article to be labeled in order to start printing.
Switch on/off the Laser, which is used for indicating the lowest nozzle
position. It is helpful in positioning the printer on the surface to be labeled.
The laser is on from the moment the project is enabled for printing and the
print release button is pressed until the printing of a given print is finished.
Switch on/off EBS Cloud, a tool that enables you to maintain and monitor
the state of the printer remotely.
Switch to the simplified menu – see Simple menu (p. 14).
Re-set the printer date and time settings by touching the button – see
Date and Time Settings (p. 22).
20150330#1.0 EBS Ink Jet Systeme
21
Page 22
EN
EN
In the Local settings sheet tab you can change the interface Language (after
a new language setting has been confirmed, the interface software on the LCD
starts running again within 10 seconds), date and time format (the sequence
and the number of date and time components), and also change separators
between the date and time components as default formats for newly created
Date/Time-type text objects.
Confirm the modified parameter settings with the button or abandon
them with the button. If no modifications have been made, you can go
back to the previous screen by touching the button.
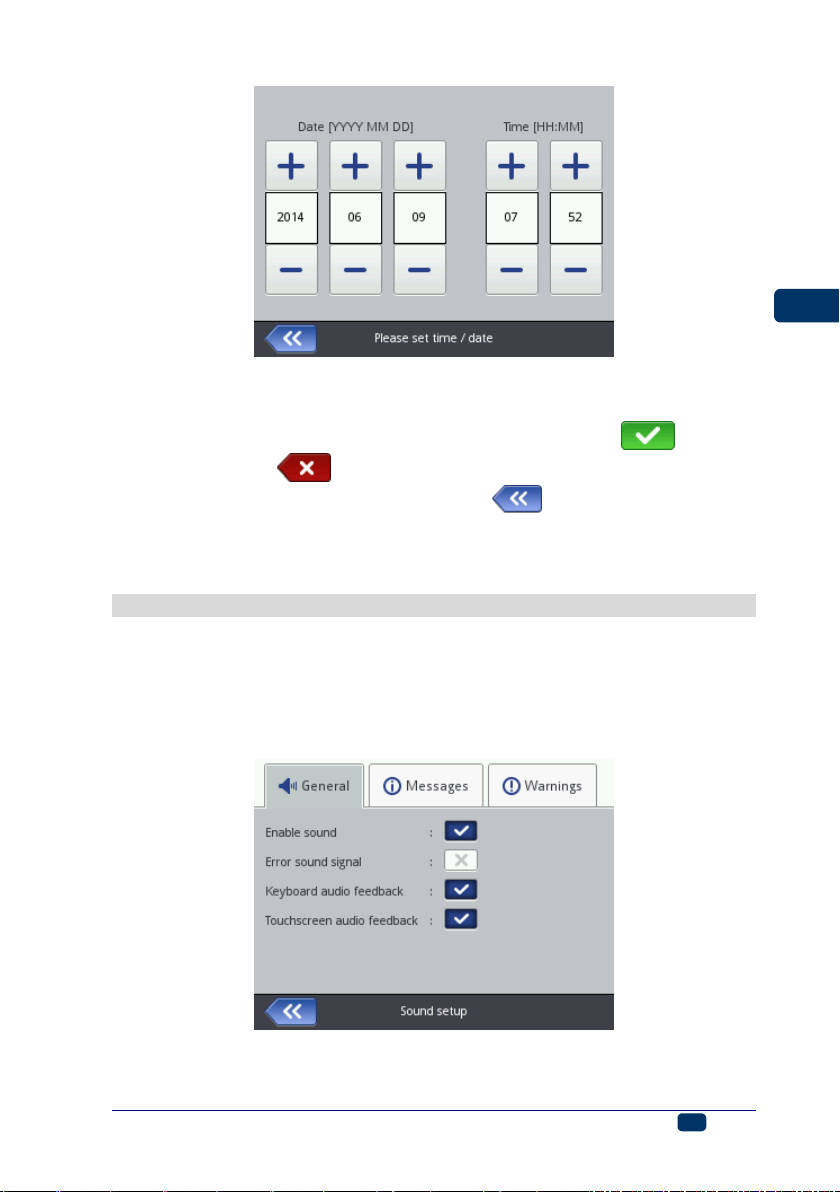
Date and Time Settings
The date and time are accessible for modification by touching time H displayed
on the top bar of main screen 12. Modifications can be made with the ,
buttons or by typing in a setting via the keypad. Confirm the modification with
the button or abandon it with the button. If no modifications have
been made, you can return to the previous screen by touching the
button.
22
EBS Ink Jet Systeme 20150330#1.0
Page 23
EN
EN
The date and time themselves and their formats can be modified in the general
settings menu – see General Settings (p. 113).
The modified parameter settings should be confirmed with the button or
abandoned with the button. If no modifications have been made, you can
go back to the previous screen by touching the button.
The date and time settings can also be modified with EBS Web User Interface –
see General Settings (p. 113).
Sound Settings
The sound settings are accessible by touching the following buttons in turn:
Tools (U), Settings and Sound.
In the General sheet tab you can set Error sound signal, Keyboard audio
feedback, Touchscreen audio feedback. If the Enable sound check box is
unticked, the sound is silenced completely, irrespective of what the settings of
the other options are.
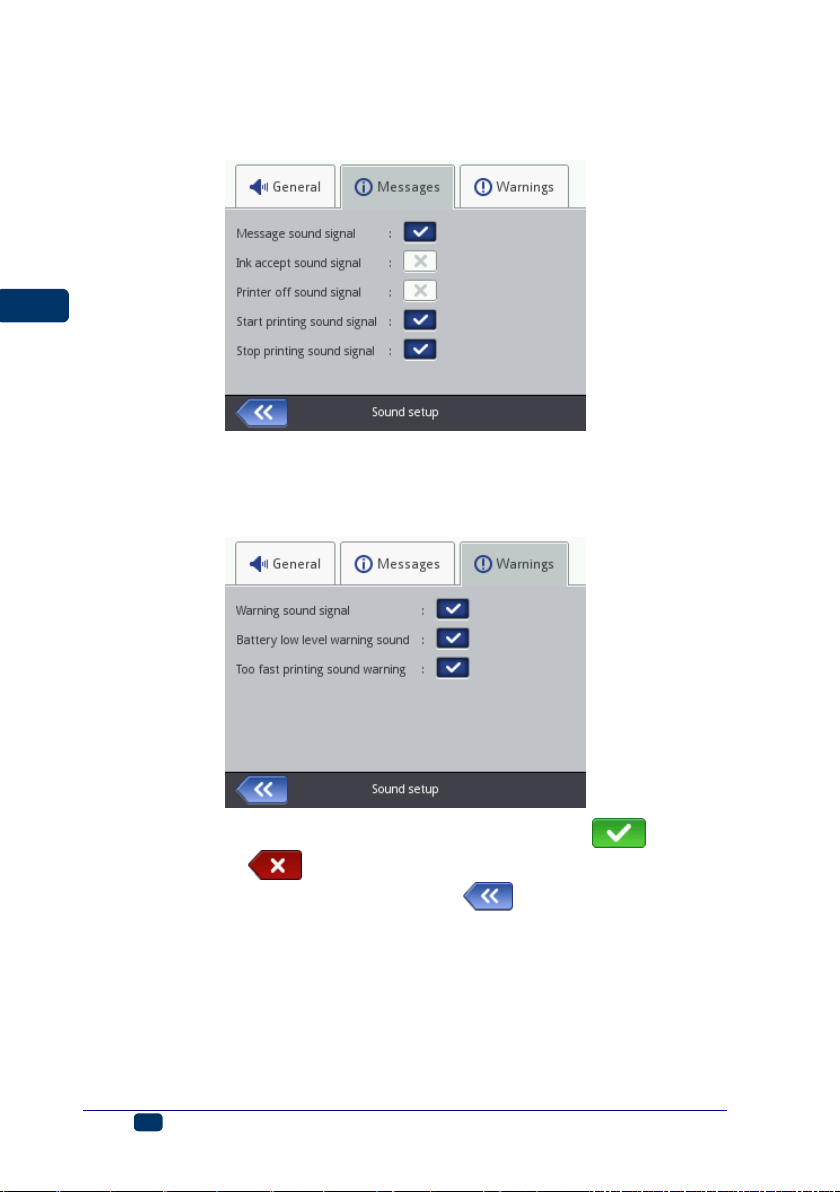
In the Messages sheet tab you can modify the sound settings for starting and
stopping printing (Start printing sound signal and Stop printing sound
signal), accepting an ink container (Ink akcept sound signal), and also for
20150330#1.0 EBS Ink Jet Systeme
23
Page 24
EN
EN
switching the printer off (Printer off sound signal). If the Message sound
signal check box is unticked, the sound that goes with every message is
disabled:
In the Warnings sheet tab you can modify the sound settings for the following
warnings: low battery level (Battery low level warning sound) and too fast
printing (Too fast printing sound warning). If the Warning sound signal
check box is unticked, the sound that goes with every warning is disabled.
The modified parameter settings should be confirmed with the button or
abandoned with the button. If no modifications have been made, you can
go back to the previous screen by touching the button.
24
EBS Ink Jet Systeme 20150330#1.0
Page 25
EN
EN
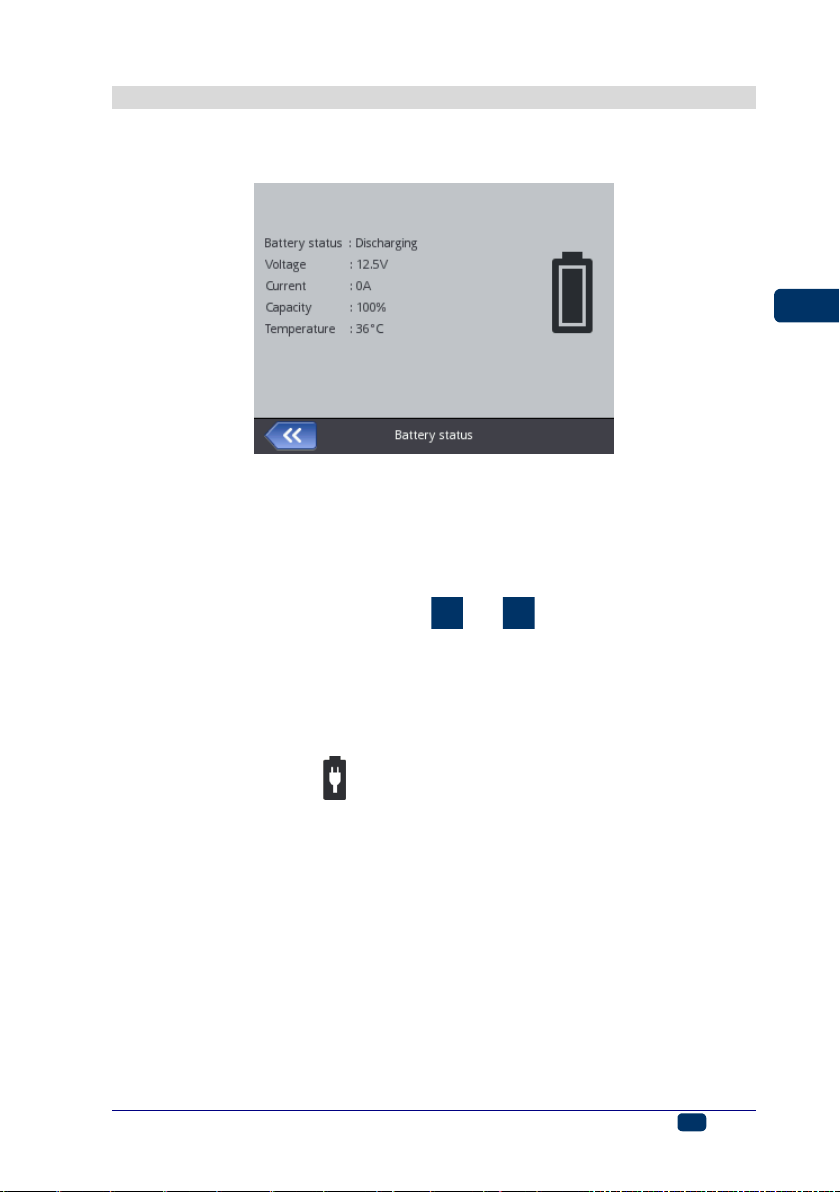
Energy Management
The detailed information on the batteries (the battery status, voltage, current,
charge level, temperature) is available after the battery icon on the main display
top bar has been touched.
Charging the Battery
A LI-ION top-quality battery has been installed in the printer. It can be
recharged at any stage of printer operation.
The battery that is new or has not been used for a long time cannot be charged
up to its full capacity. Therefore, in order to form the battery follow three charge-
and-then-discharge cycles. See figures A and B.
1. Pull out plug 16 from socket 15 and tilt it.
2. Insert power pack connector 29 to socket 15 and the outlet plug of the
power pack 28 to a wall outlet.
3. When the battery is in the process of being recharged, diode 20 flickers,
and the battery-and-lightning-bolt icon appears on printer screen 12. Wait
until the recharging finishes, which is signaled with continuous light emitted
by diode 20 and the icon (G) displayed on screen 12. Do not turn the
mains electricity off or remove the power pack connector from socket 15
while recharging is in progress.
4. Remove power pack plug 29 and secure socket 15 with plug 16. Detach the
power pack from the mains and place it into the bag.
5. In order to maintain battery efficiency for a long time, the battery should not
be recharged until it is discharged completely – see Low-battery Indicator
(p. 26).
20150330#1.0 EBS Ink Jet Systeme
25
Page 26
EN
EN
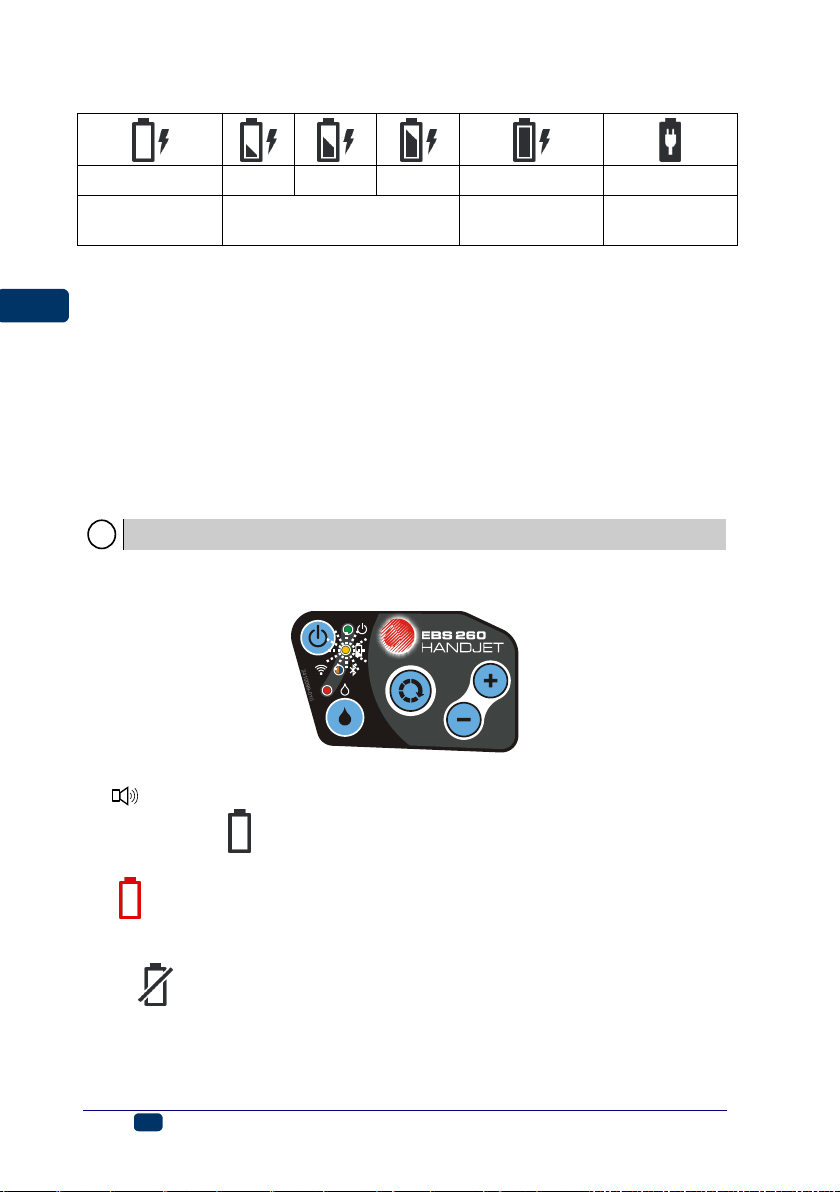
0-4%
5-24%
25-49%
50-74%
75-99%
99-100%
diode 20 flickers
4 x per second
diode 20
flickers 2 x per second
diode 20
flickers every 1s
diode 20 emits
cont. light
!
The battery is not replaceable as standard.
Recharging indicators:
The HANDJET® EBS-260 printer should be stored with its batteries charged. If
the printer is to be stored for a longer time (6 months or longer) and its batteries
are not recharged, it may work for a shorter time after it has been recharged
afterwards or in certain circumstances even stop working. Such a phenomena is
caused by the properties of the batteries, which are always subject to the
process of self-discharging. In the consequence of self-discharging and longterm storage in the discharge state, the maximum capacity of the batteries may
lower or the batteries may get damaged completely.
In order to avoid such a situation, it is necessary to charge batteries of the
HANDJET® EBS-260 printer at least twice a year (however not less
frequently than every 6 months). Otherwise, the printer may stop working or
the printer operation time after recharging may shorten dramatically.
Low-battery Indicator
The printer indicates a low-battery condition with a buzzing signal from buzzer
34 (provided that an appropriate alarm has been set – see Sound Settings
(p. 23)) and the icon (G) displayed on screen 12. An extreme discharge
condition (below 5%) is signaled with a very fast, uniform flicker of diode 20 and
the icon (G) displayed on screen 12. When the battery reaches its critical
condition, any further use of the printer is interrupted and the printer switches off
automatically. The battery should be recharged.
If the icon (G) is additionally displayed, this may mean that there is no
communication with the battery controller or that the battery is damaged – when
such an icon is displayed, restart the printer; when the problem does not
subside, contact your service point.
26
EBS Ink Jet Systeme 20150330#1.0
Page 27

EN
EN
Display Parameters Settings
You can save the energy of printer batteries by making appropriate settings for
display parameters. Touch the following buttons in turn: Tools (U), Settings
and Power.
On screen displayed you can do the following:
Set Normal screen brightness,
Blank the screen after a time with the Turn off screen after command,
Dim the screen after a time with the Dim screen after command,
Modify the setting of the Dimmed screen brightness parameter,
Allow the screen to be locked with the Enable screen lock command,
Set the time after which the printer switches off automatically, with the
Printer turn off time parameter (the time is counted from the moment
when screen 12, keypad 10 or trigger 6) is last touched.
The screen lock can be enabled when the setting of the Turn off screen after
parameter is different than never. In addition, when the Dim screen after
parameter is enabled, the screen locks after the sum of both of the times, Dim
screen after and Printer turn off time, expires. The screen lock can be
disabled after the two buttons (1 and 2) displayed are touched quickly. The
screen lock can be enabled at any time by holding button 24 or by touching the
(I) and buttons.
20150330#1.0 EBS Ink Jet Systeme
27
Page 28
EN
EN
The modified parameter settings should be confirmed with the button or
abandoned with the button. If no modifications have been made, you can
go back to the previous screen by touching the button.
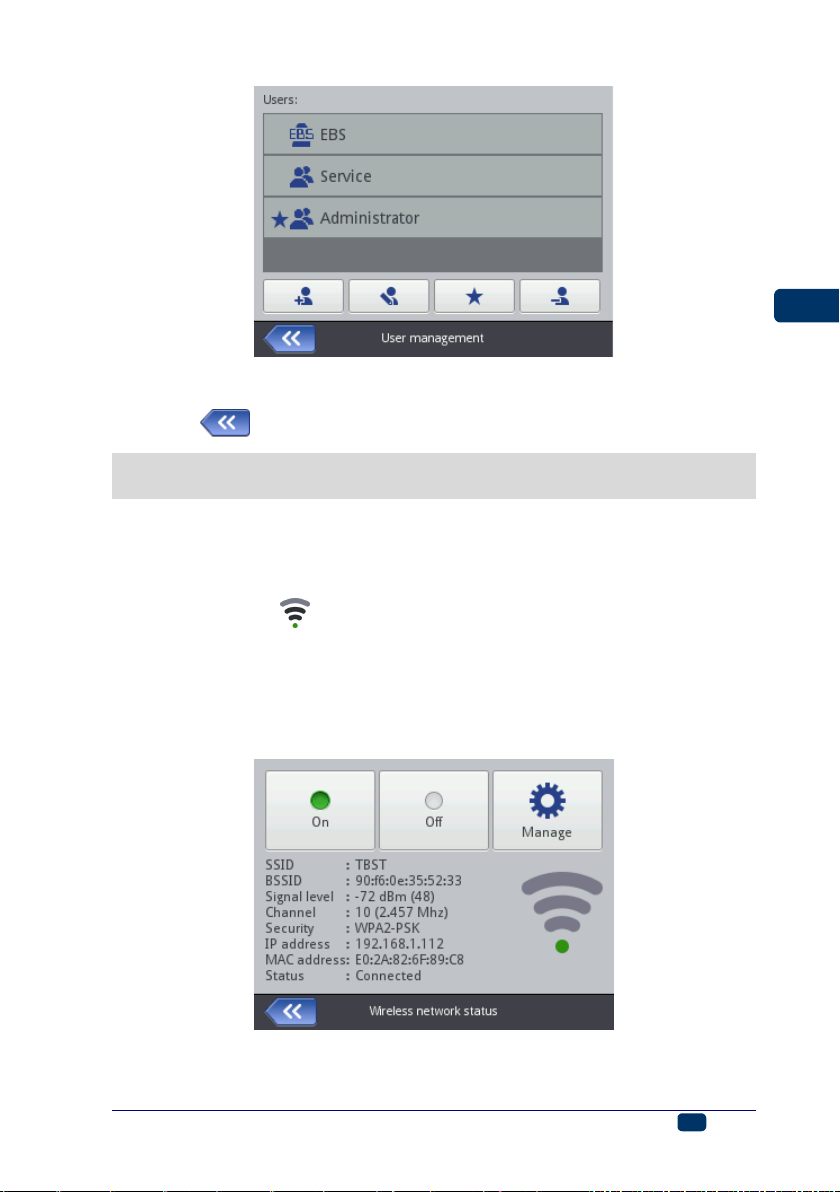
User Manager
The printer can be used by a few users; each of them have different
authorizations. Touch the Tools (U), Settings and Users buttons in turn to
open User Manager.
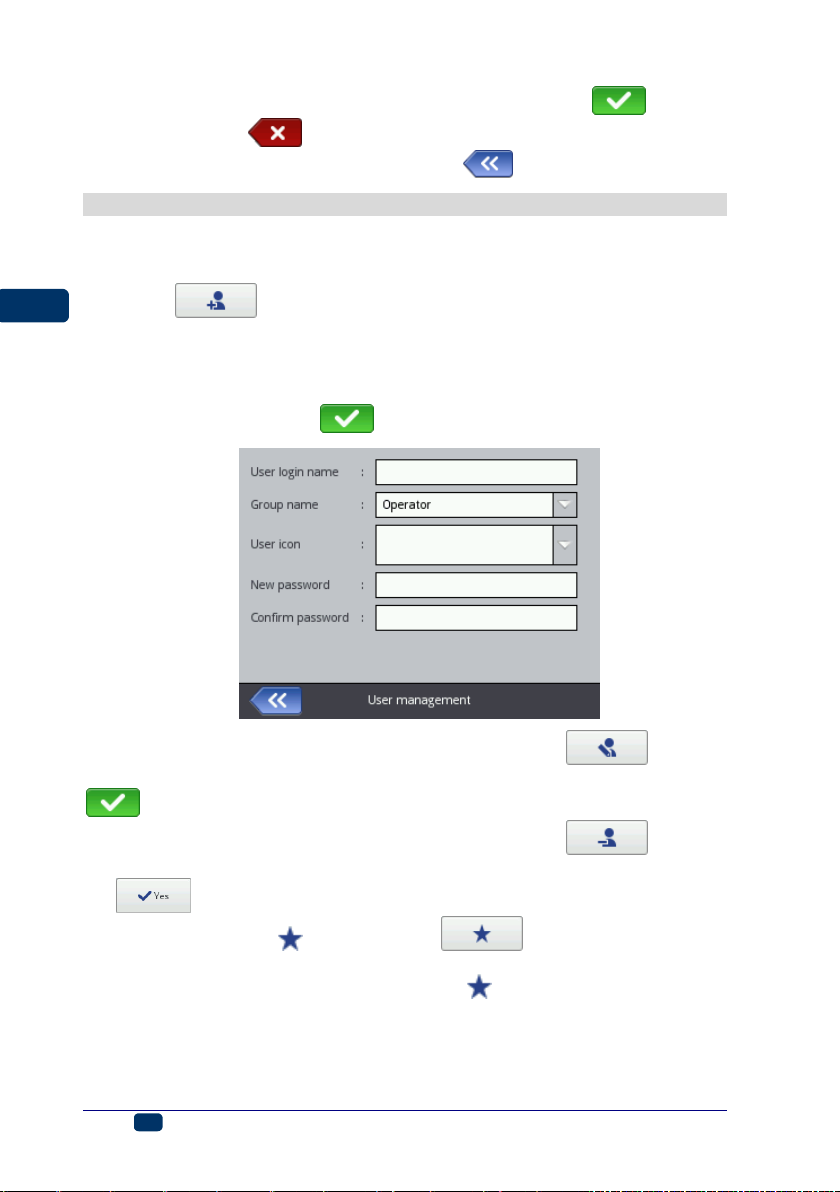
Touch the button to add a new user. In the window displayed fill in
the User login name, New password, Confirm password fields, and also
choose the group to which the new user is to be assigned. You can also choose
an icon for identifying the user (the icon must saved in printer memory in
advance – see Image Manager (p. 106)). The modified parameter settings
should be confirmed with the button.
Highlight the name of a user in the user list and touch the button in
order to edit the user data. The modified data should be confirmed with the
button.
Highlight the name of a user in the user list and touch the button in
order to remove the user. The user removal operation should be confirmed with
the button on the screen.
If a user is marked with (by touching the button after the user has
been highlighted), this user will be logged in automatically after the printer has
been switched on. Administrator is marked with , by default.
28
EBS Ink Jet Systeme 20150330#1.0
Page 29
EN
EN
The User Manager is also available via a Web Browser – see Tools – Users
Manager (p. 109).
Touch the button to return to the previous screen.
Radio Communication among the Printer, a Computer and External
Devices
WiFi Wireless Connection
You can use WiFi for communicating the printer with a computer.
The WiFi parameter settings are accessible in two ways:
By touching the icon (C) on the status bar of main screen 12, or
By touching the Tools (U), Settings and WIFI buttons in turn.
The display shows the parameters of the network into which the printer is linked.
You can use the buttons available for activating and deactivating the network, and
also to scan the environment in search for a new network. When the printer is
linked into a given network via WiFi, then diode 21 emits orange light.
A signal strength icon is displayed in the top left corner of main screen 12.
20150330#1.0 EBS Ink Jet Systeme
29
Page 30
EN
EN
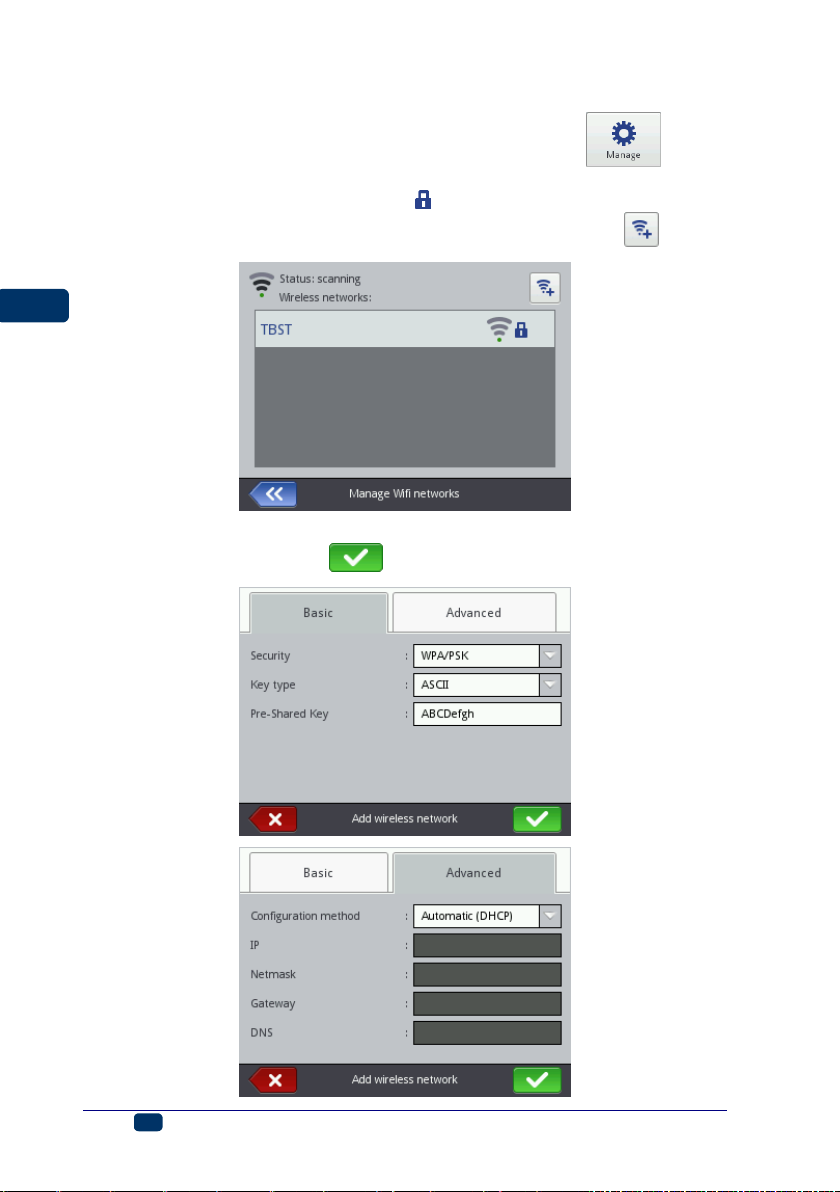
Connecting the Printer to a New Network via WiFi
1. Move to the WiFi parameter setting window and touch the button.
A list of the networks available is displayed, together with the information
whether a given network is secured ( ) or not.
2. Choose the network you wish to link to in the list and touch the button.
3. Type in the network data in the Basic and Advanced sheet tabs. Confirm
the modifications with the button.
30
EBS Ink Jet Systeme 20150330#1.0
Page 31

EN
EN
4. The successful connection with the selected network is confirmed with the
icon that is displayed by the network name.
5. If you wish to modify the settings of a WiFi network, highlight the network in
the list and touch the button. The Basic sheet tab contains the
parameter called Do not connect to this network. The parameter is useful
when there are several networks with a similar signal strength in the list (the
printer might switch among the networks then). If the check box of that
parameter is ticked, no connection to a given network is made automatically.
Confirm the modification to the data with the button. You can delete
the configuration data for a given WiFi network with the button.
A WiFi status icon is displayed in the left top corner of main screen 12:
– connection via WiFi is available (the number of black arcs shows the
signal strength),
– unknown WiFi status or an error,
20150330#1.0 EBS Ink Jet Systeme
31
Page 32

EN
EN
– WiFi disconnected.
Confirm the modification to the parameters with the button.
Bluetooth Interface
You can use Bluetooth technology to communicate the printer with an external
device from which data for printing comes (e.g. automatic scales, a barcode
reader, etc.).
The Bluetooth parameter settings are accessible in two ways:
By touching the icon (D) on the status bar of main screen 12, or
By touching the Tools (U), Settings and Bluetooth buttons in turn.
The display shows the state, name and address of the Bluetooth module of the
printer. The Bluetooth name can be modified by touching the white box where
the name is given. If the printer is connected with an external device, the
address of that device is also displayed. With the buttons available you can
switch the Bluetooth module on and off and also move to the device search
display (Bluetooth must be active before you start doing that).
A Bluetooth status icon is displayed in the top left-hand corner of main screen 12:
– Bluetooth active
– Bluetooth inactive
– the printer is connected with an external device.
Establishing Connection between Printer and External Device
1. Move to the Bluetooth parameter settings, activate Bluetooth (with the
button) and touch the button.
32
EBS Ink Jet Systeme 20150330#1.0
Page 33

EN
EN
Touch the button on the screen displayed in order to find new devices.
The external devices available are shown in the list.
2. Choose a device you wish to connect to in the list and touch the button.
20150330#1.0 EBS Ink Jet Systeme
33
Page 34

EN
EN
3. When the connection to the chosen device is made successfully, the
button is displayed on the Bluetooth settings screen, so is the icon on the
status bar, and diode 21 emits blue light.
Touch the button in order to finish the connection.
Connecting USB Disc to the Printer
If you connect a disc to the printer via USB port 9, you can import and export
files and update printer software.
The USB disc must be formatted in the FAT or FAT32 file system.
The USB disc tools are accessible in two ways:
By touching icon E on the status bar of the main screen (the icon is
displayed when a disc is connected to the printer), or
By touching the Tools (U), Service and USB buttons in turn:
34
EBS Ink Jet Systeme 20150330#1.0
Page 35

EN
EN
Importing Projects
With the project import function you can download projects made with Offline
EBS Web User Interface or created in another printer to the printer.
Touch the button. Choose a file with the extension EXP in the file list
on the screen displayed or touch the text field and type in the name of a file via
the keypad displayed, and then confirm with the button. On choosing the
file or typing in its name, confirm the selection with the button. When the
file is imported successfully, the following message is displayed:
Exporting Projects
With the export project function you can save the projects that are in printer
memory in order to use them in another printer and make a backup copy.
NOTE! It is recommended that backup copies are made regularly to protect the
data against loss.
Touch the button. Choose a mode of export on the screen displayed:
All projects or Single project.
Touch the button to export a single file. On the screen displayed
choose a file with the extension PRJ in the list or touch the text field at the top of
the screen and type in the mane of a file via the keypad displayed and confirm
20150330#1.0 EBS Ink Jet Systeme
35
Page 36

EN
EN
with the button. On selecting the file or typing in its name, confirm the
selection with the button.
Touch the button in order to export all projects. If a single project
or all projects are exported successfully, the following message is displayed:
Updating Software
Owing to software updates, the printer always has up-to-date and improved
software, which makes it function better.
New versions of the software are stored at http://www.ebs-inkjet.pl/ebs260 in the
sheet tagged Information Materials. The update may involve a loss of projects and
user-specific settings, and also the deletion of fonts and images installed. Make sure
that the projects and files you wish to save have been backed up before updating –
see Exporting Projects (p. 35) via the printer (only projects are exported) or
Export Project (p. 80) via EBS Web User Interface (projects and images are
exported).
Touch the button. On the screen displayed choose an update file with
the extension EBS in the list. On selecting the file, touch the button.
You may not be able to update your software in the following cases:
The version of the software installed on the printer is too early; before you
commence to install the latest version, you are required to install a
previous-version update pack,
The printer software is already up-to-date,
The version of the software installed on the printer is later than the update
chosen.
36
EBS Ink Jet Systeme 20150330#1.0
Page 37

EN
EN
Wait until the printer switches off and then switch it on again and wait until the
updating finishes. The following report is displayed when the software is
updated successfully:
Messages
Important information about printer operation is signaled with the icon (B)
displayed on the status bar (the color of the icon indicates the type of message)
and the following window shown in the printer screen:
20150330#1.0 EBS Ink Jet Systeme
37
Page 38

EN
EN
A list of messages is displayed after the button has been
touched.
The message list can also be displayed by touching the Tools (U) and
Messages buttons in turn.
The list is divided into four sheet tabs:
All messages ,
Error messages (the messages are displayed in red, and the icon
is shown on the status bar),
Warning messages (the messages are displayed in yellow, and the
icon is shown on the status bar),
Info messages (the messages are displayed in blue, and the icon
is shown on the status bar).
The following buttons are designed for use in order to view and delete
messages:
– to display the previous message,
38
EBS Ink Jet Systeme 20150330#1.0
Page 39

EN
EN
– to display the following message,
– to delete a single message,
– to delete all messages.
If there are no messages at any time, the view buttons are inactive.
Statistics
The statistics are accessible after the Tools (U) and Statistics buttons are
touched in turn.
On the screen displayed, in the Basic sheet tab you can view the data on the
number of hours the printer has run (work time) and on the number of prints
made, presented in a user report and a service report (general statistics). Every
report is updated after printing has been disabled (see Printing a Project (p.
119)) and the statistics window re-opened.
The user report is generated for all users generally. If you wish to obtain a
separate report for a given user, clear the statistics at the beginning of work. For
that purpose, go to the Clear sheet tab and touch the
button.
The general statistics (service report) can be deleted by a Service-type user.
20150330#1.0 EBS Ink Jet Systeme
39
Page 40

EN
EN
Getting Started
Projects for printing can be created and edited in two ways: via the touch screen
of the printer and with a processor that is available via a Web Browser.
Operating the Printer via Printer Touch Screen
File Manager
File Manager is available after Create project, Edit project have been touched
(they are accessible with the Project button (T)) or after the open-project-
for-printing button (L) accessible on the main screen has been touched. Touch
the button to move to the File Manager. In the newly displayed screen you
can manage files and folders. Touch the button in order to create a new
folder. Type in a name of the new folder on the screen displayed and confirm
with the button.
Highlight a file or folder name in the list and then touch the button, in order
to delete the file or folder. Highlight a file or folder name in the list, and then
touch the button in order to change the name of the file or folder.
If you wish to open a folder or return to the (higher-level) folder, highlight the
folder name in the list and then touch the button.
You can copy files and move them among folders with the copy button and
the move button. Touch the button in order to close the File Manager
and return to the previous screen.
40
EBS Ink Jet Systeme 20150330#1.0
Page 41

EN
EN
Creating a New Project
Touch the Project button (T) and then Create project.
On the screen displayed, touch the white box at the top of the screen, type in a
name via the keypad displayed and confirm it with the button. In the
following screen confirm the creation of the project with the button.
Opening and Editing a Project
Touch the Project button (T) and then Edit project.
On the screen displayed, choose a project in the list or touch the white box at
the top of the acreen, type in the name of a project via the keypad displayed
and confirm it with the button. In the following screen confirm the
opening of the project (for editing) with the button.
If an attempt is made to open a project, when a project is already opened in
EBS Web User Interface, the following message is displayed:
20150330#1.0 EBS Ink Jet Systeme
41
Page 42

EN
EN
The project opened in EBS Web User Interface must be saved before any
project is opened on the printer. If you do not do that, the project is closed
unsaved and any modification to it are lost.
If you wish to continue editing the project that is opened in WUI, touch the
Project button (T) and then Continue edition.
Project Processor
The processor installed on the printer allows you to modify a project from the
LCD panel of the printer without any use of a PC.
The edit window is divided into 4 parts:
Top bar with tool icons,
Edit area (gray), inside which a project is displayed (white),
Bottom bar with tool icons,
Footnote, where there is the name of a project to be edited and the button
designed for closing the processor:
– to save the project currently edited and exit the processor,
– to exit the processor without saving the project,
– to return to the previous screen when no modifications have
been made.
42
EBS Ink Jet Systeme 20150330#1.0
Page 43

EN
EN
The processor footnote shows the project name, whose color changes after the
project has been modified (from gray to yellow). When the project is saved, the
color of the name changes back to gray.
Part of the buttons can be disabled if a given function is not available for a given
type or state of object. When a button is active, the corresponding option is
available.
The meaning of the buttons:
– to save a project,
– to set a width of the edit area and printing parameters,
– to open the list objects/clipboard/trash,
– to copy objects to the clipboard (the button is active after an object has
been highlighted),
– to paste the object (the button is active after an object has been copied
to the clipboard and no object is highlighted),
– to magnify the project inside the edit area,
– to decrease the project inside the edit area,
– to change the initial setting of a counter,
– to add a new object,
20150330#1.0 EBS Ink Jet Systeme
43
Page 44

EN
EN
– to modify the parameters of an object highlighted,
– to delete the highlighted object,
– to reposition the highlighted object,
– to resize the highlighted object.
Project Properties
The Project Properties window is displayed with the button. With this tool
you can set the width of the working area precisely. The setting can be given as
a number of pixels (px) or centimeters (cm), and the unit needs to be chosen.
Any modified setting needs to be confirmed with the button.
You can also move to set the printing parameters with the
button – see Printing Parameters (p. 66).
List of Objects
The list of all objects used for a project is accessible with the button. The
following operations can be performed on objects in the list:
a highlighted object can be deleted with the button – the deleted object
is moved to the trash – see Trash (p. 45),
a highlighted object can be copied with the button – the copied object
is moved to the clipboard – see Clipboard (p. 45),
a highlighted object can be edited; when the button is touched, the
object parameter window opens.
44
EBS Ink Jet Systeme 20150330#1.0
Page 45

EN
EN
Clipboard
The clipboard is accessible with the button (the button is available when
an object is copied to the clipboard and no object is highlighted). The following
operations can be performed on objects in the clipboard:
a highlighted object can be deleted from the clipboard with the button,
a highlighted object can be pasted from the clipboard to a project with the
button.
Trash
The trash is accessible by touching the object-list button or the
clipboard button and by switching to the Trash sheet tab. The following
operations can be performed on trash objects:
a highlighted object can be deleted from the trash with the button,
20150330#1.0 EBS Ink Jet Systeme
45
Page 46

EN
EN
a highlighted object can be restored into the list of objects with the
button,
Objects
In order to add a new object to a project, touch the button and then
choose an appropriate object on the screen displayed. Objects are grouped in
sheet tabs by type: Text (text objects), Shapes and Others.
46
EBS Ink Jet Systeme 20150330#1.0
Page 47

EN
EN
When you choose an object, the object parameter window is displayed so that
the parameters could be modified.
You can use the cursor to choose (highlight) the object whose parameters you
wish to modify within the edit area. The appearance of a red setting-out frame
around the object is tantamount to choosing an object.
Touch the button to modify the parameters of a given object. The
window displayed as the result contains the parameters that are specific for a
given type of object and whose settings can be modified. If a new setting is of a
wrong type or out of the permissible range, the text field is highlighted in red.
Amend the setting accordingly.
Save the project with the button. The project is saved with the name that
was given to it when it was created or it had when it was opened. The button is
disabled when the project is already saved or when no modifications have been
made. If the project is not saved, the button is enabled; in addition, the
project name displayed at the top of the processor window is red (after saving it
changes the color to white).
20150330#1.0 EBS Ink Jet Systeme
47
Page 48

EN
EN
A project can also be saved with another name by means of the button.
You can exit the processor with the button. In this way you abandon
editing and the project is not saved.
Repositioning an Object
Highlight an object in the edit area in order to change its position (a red setting-
out frame appears), and then touch the button – the setting-out frame
changes its color to green.
You can reposition an object in two ways:
by touching the screen anywhere in the edit area. The point of touch
defines the position of the top left-hand corner of an object (the entire
object framed in green is moved in relation to the given point).
By means of the , , , buttons. The object is
moved by 1 pixel with every touch.
The object is shifted provided that the project area is greater than the object to
be relocated.
Confirm the change in position with the button or abandon the change
with the button.
Re-sizing an Object
In the edit area, highlight an object whose size you wish to change (a red
setting out frame occurs), and then touch the button – the setting-out
frame changes color to violet.
You can change the size of an object in two ways:
By touching the screen below and on the right of the fixed, top left-hand
corner of the object. The indicated point defines the position of the bottom
right-hand corner.
By means of the and buttons (to shift the top edge of the
object), the and buttons (to shift the bottom edge of the
object), the and (to shift the left-hand edge of the object) as
well as the and buttons (to shift the right-hand edge of the
object).
48
EBS Ink Jet Systeme 20150330#1.0
Page 49

EN
EN
The object is magnified provided that the project area is greater than the object
whose size is changed.
Touch the button in order to confirm the change in size or the
button in order to abandon the change.
NOTE! The Normal text, Counter and Date/Time objects can be resized only
when the Scaling parameter is different then Fit frame to content; otherwise
the size of the object does not change. The size of a text can be changed with
the Font Size parameter (for True Type fonts) or by changing the type of font
(for EBS built-in fonts).
Common Parameters of Objects
The following object parameters are available in the Geometry sheet tab:
Object name. The type of object is used as the object name, as standard
(e.g. Counter 1, Image 2). You can name objects at your choice to facilitate
identification, but the same names must not be used, i.e. they must be
unique within one project. If you use a name that has already been used
within the project, an error is reported when you try to save the parameters
of the object named so.
The Position parameter shows the coordinates of the top left-hand corner
of the object frame. You can modify the coordinates and thereby change
the position of an object. Place the cursor in the Position field and modify
the coordinates in the window displayed. The first coordinate determines
the location in the horizontal direction (Object position x), the second one
determines the location in the vertical direction (Object position y). An
object can also be repositioned in the edit area – see Repositioning an
Object (p. 48).
The Size of an object is displayed as a number of pixels (dots). The first
size component is the width and the second – the height. You can re-size
an object by editing the values. The resizing operation can also be
performed in the edit area – see Re-sizing an Object (p. 48).
The Position and Size parameters are particularly useful when you need
to arrange or align two or more objects precisely.
The Scaling parameter allows you to adjust the object frame size to the
size of the object. If the Scaling parameter is set to Fit frame to content,
the object frame is the same as the size of the object. If the Scaling
parameter is set to Fit content to frame, the size of the object is equal to
the size of the frame (not available to text objects where an EBS built-in
font is used and to barcode-type objects). If Without scaling is chosen, the
frame size can be modified without resizing the object.
The Object rotation parameter allows you to rotate the entire object
clockwise (the setting of 90), counterclockwise (the setting of 270) or
"upside down" (the setting of 180).
If the Transparent parameter check box is ticked, the object is transparent
and you can see an object that is 'under' it. This property is useful when a
number of objects have been placed in the edit area and there is a risk that
objects overlap each other.
20150330#1.0 EBS Ink Jet Systeme
49
Page 50

EN
EN
In the Text sheet tab (available for text objects):
You can change the type of font by modifying the Font name parameter.
EBS built-in fonts and True Type ( or ) fonts are available. If a
font is marked with (with the button after the font name has been
highlighted), it is added to favorites and moved to the beginning of the font
list.
For the EBS built-in fonts you can modify the Row multiply and
Letter spacing parameters. The Row multiply parameter defines how
many times printing of every vertical row of text is to be repeated. The
multiplication of rows is used in order to increase intensity of prints on
porous materials, which absorb ink heavily, and on which the characters
(consisting of the same size dots) printed are not well visible due to their
grainy structure. The Letter spacing parameter defines the space between
object characters. The space is given as a number of vertical rows (up to
1000 rows).
For the True Type fonts (default fonts and user fonts ) you can modify
the Font size parameter (given as a number of pixels). The parameter is
linked with the Constrain font proportions parameter. The Font size (the
font width and height) can be modified proportionally (when the check box
of the Constrain font proportions parameter is ticked) or either of the
components, the width (Font width) and the height (Font height) can be
modified independently (the check box of the Constrain font proportions
parameter is unticked).
With the Line spacing parameter you can add spaces between lines of
text. The spaces are measured in pixels (dots). Up to 20 pixel spaces can
be added. The space is added after every end-of-line character.
50
EBS Ink Jet Systeme 20150330#1.0
Page 51

EN
EN
Touch the button in order to confirm the modifications or the
button in order to abandon any changes. If no changes have been made, you
can return to the previous screen by touching button.
Text Object – Normal text
Touch the button and then the button in order to
add a new text object - Normal text, to a project.
20150330#1.0 EBS Ink Jet Systeme
51
Page 52

EN
EN
You can type in any string of characters in the Text field of the Main sheet tab.
The division of a text into lines can be done by touching the ENTER button on
the keypad displayed. On finishing the typing in, confirm the text with the
button. Touch the button in order to add the object to a project or the
button in order to abandon the addition. If no changes have been made,
you can return to the previous screen by touching button.
Text Object – Date/Time
The Date/Time text object allows you to print the current date and the current
time and also an expiration date automatically.
Touch the button and then the button in order to
add a new, Date/Time-type text object to a project.
The current date and time generated by the printer clock are given in the Main
sheet tab, where you can also preview a time and/or date print. With the
clock icon or the calendar icon you can choose components for printing –
52
EBS Ink Jet Systeme 20150330#1.0
Page 53

EN
EN
the date, the time or both of them. You can change the order of these
components with the arrow icon.
The Date offset parameter allows you to shift the current date by a set number of
days, in order to include an expiration date, for example.
The Time offset parameter allows you to readjust the current time by a set
number of hours (up to 24). The modification can impact on date shifting. Such a
change may cause a calendar day to start at a different time than 00:00 (e.g. at 6
o'clock a.m., when a morning shift in the factory starts).
In the Advanced sheet tab you can modify the Date separator and Time
separator parameters (for selecting separators to be used between date/time
components) and also Date format and Time format (for selecting the
sequence of the date/time components).
The default settings of date and time formats and separators for newly created
Date/Time-type text objects can be modified in the Settings menu – see
General Settings (p. 21).
The Formatting string parameter is available when the Allow formatting
string edition check box is ticked. Below there are the characters with which
the date and time components are coded. Any characters that are different from
those mentioned below and also spaces can precede, separate or follow the
successive components of the universal-date special registers. If no local name
exists, an English equivalent is displayed.
%a – local short form for the name of day of the week (Mon, ... , Sun),
%A – local full name of day of the week (Monday, ..., Sunday),
%b – local short form of the name of month (Jan, ... , Dec),
%B – local full name of month (January, ... , December),
%c – local date and time in the following format: short form for the name of day
of the week, short form for the name of month, day of the month, hours,
minutes, seconds, year,
%C – number of century,
%d – day of month (01, ... , 31)
%D – date in the format: mm/dd/yy,
%e – day of month (1, ..., 31),
%F – date in the format: yyyy–mm–dd,
20150330#1.0 EBS Ink Jet Systeme
53
Page 54

EN
EN
%g – 2–digit year corresponding to the number of week %V,
%G – 4–digit year corresponding to the number of week %V,
%h – local short form for the name of month (Jan, ... , Dec),
%H – hour, in 24–hour system (00–23),
%I – hour, in 12–hour system (01–12),
%j – day of year (001, ... , 366),
%k – hour, in 24–hour system (0–23),
%l – hour, in 12–hour system (1–12),
%m – month (01, ... , 12),
%M – minute (00, ... , 59),
%p – local equivalent to AM or PM (empty on many sites),
%P – local equivalent to a.m. or p.m. (empty on many sites),
%r – time in 12–hour system in the format: hh:mm:ss [AM] or [PM],
%R – time in 24–hour system in the format: hh:mm,
%s – number of seconds from 00:00:00, 1 January 1970 (extension GNU),
%S – second (00, ..., 60); 60 means a leap second,
%T – time in 24–hour system in the format: hh:mm:ss,
%u – day of the week (1, ... ,7); 1 means Monday,
%U – number of the week in year (00, ... , 53), Sunday starts the week,
%V – number of the week in year (01, ... , 53), Monday starts the week,
%w – number of day of the week, 0–Sunday, 1–Monday, etc..,
%W – number of the week in year (00, ... , 53), Monday starts the week,
%x – local representation of the date,
%X – local representation of the time,
%y – two last digits of year (00, ... , 99),
%Y – year in the format yyyy,
%z – time zone in numerical format compliant with RFC–2822 (e.g. +0100)
(non-standard extension),
%Z – time zone (e.g. EDT) or nothing, if no zone can be determined.
Touch the button in order to add the object to a project or the
button to abandon the addition. If no changes have been made, you can return
to the previous screen by touching the button.
Text Object – Counter
The Counter text object allows you to print automatically a consecutive number
on every successive article to be labeled. The setting of the counter changes
each time the trigger is pressed.
Touch the button and then the button in order to
add a new, Counter-type text object to a project.
54
EBS Ink Jet Systeme 20150330#1.0
Page 55

EN
EN
In the Main sheet tab you can choose how many sections the Counter is to have.
For simple counting of articles, it is enough to use one, the first section and the
default settings to create a counter–type object. You can use a cascade of up to 3
identical sections. Each of the sections can be visible (displayed) or not.
By touching ( ) you can
change the Priority increment. The parameter defines which of the sections is
considered as first and what the timing order is. The section timed first receives a
timing pulse whenever a print is to be made. Every successive section receives a
timing pulse from the previous section, when that section has counted to the end
(that is, to the Max setting when the counter is incremented or to the Min setting
when it is decremented). The timing pulse modifies the counter by a set Step.
In every counter section you can configure each of the following parameters:
Min – the setting from which counting starts (for counting up), or with which
counting finishes (for counting down).
Max – the setting at which a counter overflows. When a counter overflows,
counting starts again from the Min setting.
Start mode – the parameter allows you to set the value from which
counting starts after printer operation has been resumed. Four options are
available:
Min,
20150330#1.0 EBS Ink Jet Systeme
55
Page 56

EN
EN
Max,
Start value,
Last value.
Start value – the counter setting from which counting starts after operation
has been interrupted, e.g. when the batteries discharge. This is effective
when the Start mode parameter is set to Start value.
Last value – the last setting of a counter, which is saved after the printer
has been switched off in regular mode.
Step – a counter increment. When the setting is a positive number,
counting is incremental, and when it is a negative number, counting is
decremental.
The Length parameter is used to adjust the number of counter digit
positions to that required by the user.
The Fill in parameter is used to define a replacement for insignificant digits
of a counter: 0 or space.
Suffix – any character string to follow the counter printout, limited to 41
characters.
Touch the button in order to add the object to a project or the
button to abandon the addition. If no changes have been made, you can return
to the previous screen by touching the button.
Text Object – Communications port
The Communications port text object is used to print automatically the data
that is transferred from external devices (e.g. a computer, automatic scales, a
barcode reader) to the printer.
Touch the button and then the button in order to
add a new, Communications port-type text object to a project.
56
EBS Ink Jet Systeme 20150330#1.0
Page 57

EN
EN
In the Main sheet tab you can set the parameters that are significant for
establishing communication between the printer and an external device. The
printer and the device must have the same settings of the following parameters
to communicate successfully:
Port – it defines the name of a printer port to which an external device is
connected as a source of serial transmission signals in RS–232 standard,
for example. There is no physical RS–232 interface in the printer, so you
need to apply an USB – RS232 converter in order to connect an external
device. With such a converter you can connect an external device (e.g. a
computer, automatic scales, a barcode reader) to a USB port. External
devices can be connected to the printer via a Bluetooth interface, which is a
source of serial transmission signals and can be chosen for this object. The
list of ports is fixed and contains Bluetooth and ports, from COM1 to COM9.
Baud rate – it signifies a rate of transmission (a number of symbols per
second) through the port. The list to choose from contains the most typical
rates used for serial communication. If the Port parameter is set to
Bluetooth, the Baud rate setting cannot be modified.
The Bit count parameter defines the number of bits in every portion of the
data transferred. If the Port parameter is set to Bluetooth, the Bit count
setting cannot be modified.
In addition, you can enable Expert settings (see the Advanced (p. 59) sheet
tab) in the Main sheet tab and create a text that will precede (Prefix) or follow
(Postfix) the data to be received from an external device.
In the Communication sheet tab you can set communication parameters,
which define the rules for communication between the printer and an external
device:
Sending messages format – this parameter defines the format of data to
be transferred from the printer to a device. Two modes are available:
Normal and Hexadecimal. In the normal mode, the data is transferred as
ASCII characters, whereas in the hexadecimal mode it is transferred as hex
numbers.
20150330#1.0 EBS Ink Jet Systeme
57
Page 58

EN
EN
Data buffering – it is used for storing successive data portions in a special
register, Communications port. Two modes can be set:
Enabled – a successive portion of the data received by the special
register is stored if the end condition is met – see Ready to print after.
The buffer size is 20, which means that 20 various, ready-to-print pieces
of data can be received and stored. When any other data comes, it will
overwrite the data at the 20th position and a long sound is heard at the
same time to inform about the overflow. The data buffer forms a kind of
queue, the data is printed in the same sequence in which it has been
received by the special register. If all the data buffered is printed out, and
another print is released, the printer behaves according to the No-data
action parameter setting.
Disabled – a successive portion of the data received by the special
register overwrites the data that has been received earlier but has not
been printed yet. The data is overwritten until it is printed. If no other
data is received subsequently, the printer behaves according to the
No-data action parameter setting. In this mode, the last data received
is the first printed.
No-data action – it defines printer behavior when no data has come from
an external device (when the end condition is not met – see Ready to print
after) and printing of a project containing a Communications port object
has been released. The following modes of operation can be set:
Do nothing – if printing is released when data is not received properly
or the end condition is not met (see Ready to print after), the project
is not printed. The message informing about this fact is displayed.
Print blank object – the project is printed as usual, with the entire
Communications port object being empty.
Print last message – the project is printed together with the
Communications port object, with the object being filled with the last
message received successfully from an external device. If such a
printout is made as a first, the project is printed but the area where the
data should be is empty.
Ready to print after – it defines how the printer decides whether it has
received complete data (the end condition) from an external device or not.
The following modes can be set in this parameter:
Time interval [ms] – the printer waits for data over a certain time. The
time is counted from the moment when a last project is printed or, if the
On data process field (in the expert settings – see the Advanced
(p. 59) sheet tab) is filled in – from the moment when an end-ofprinting acknowledgement is sent. The time is typed in in the field
below the parameter as a number of milliseconds (between 4 and
1000 ms). If no data is received within the defined time, the printer
behaves according to the No-data action parameter setting.
Data count – the printer is ready for printing a project containing a
Communications port object when it receives a number (from 1 to 255)
of characters from an external device; with the number being defined in
the field below the parameter. If printing is released although the condition
58
EBS Ink Jet Systeme 20150330#1.0
Page 59

EN
EN
is not met (the defined number of characters has not been received) the
printer behaves according to the No-data action parameter setting.
End character – the printer is ready for printing a project containing a
Communications port object when it receives data ending with a
defined character from an external device, with the character being
defined in the field below the parameter. In this mode you can also
define an ASCII character that is to be the end of a portion of the data
received. For that purpose, tick the ASCII code check box and type in
the decimal value of the ASCII code. If printing is released when the
condition is not met (the defined end-of-data character is not received)
the printer behaves according to the No-data action parameter
setting.
In the Advanced sheet tab you can modify the Expert settings, which define
the rules for processing of the data received from an external device, and also
the mode of acknowledgement of printer states (starting printing, stopping
printing, project printed) to the device:
On print start – it defines the data to be transferred from the printer to the
external device immediately after printing has been initiated (the
button (W) has been touched).
On data process – it defines the data to be transferred from the printer to
the external device each time a project containing the Communications
port object has been printed.
On print finish – it defines the data to be transferred from the printer to the
external device immediately after printing has been stopped (with the
button (W)).
Formatting string – this is an advanced mode of formatting of the data
transferred from an external device to the printer. It describes how the
incoming data is interpreted by Printing Manager. Marks applied: %s – a
character string, %d – a number.
Touch the button in order to add the object to a project or the
button to abandon the addition. If no changes have been made, you can return
to the previous screen by touching the button.
20150330#1.0 EBS Ink Jet Systeme
59
Page 60

EN
EN
Text Object – Text File
The Text file text object is used to print the data saved in a TXT file.
Touch the button and then the button in order to
add a new, Text file-type text object to a project.
Touch the File path text field in order to roll-in a text file. On the screen
displayed, choose the file name out of those listed (or type in the file name in
the text field), and then touch the button.
In the Main sheet tab you can set the following parameters:
Line count – the number of lines to be added to the object from a text file.
Line step – the number of lines by which text file data moves each time a
print is made. If the Line count is greater than the Line step, the data
moves by the number of lines given in the Line count.
Line maximum value – the last line of a text to be included in a printout.
The Start mode parameter is used to define which line of a text file is to be
rolled-in after printer operation has been resumed. Two options are
possible:
Start value – the line defined by the setting of the Line start value
parameter is to be rolled-in,
Last value – the line shifted by the Line step in relation to the line on
which printing finished is to be rolled-in.
Line start value – the text line to be added to an object as a first one.
Line last value – it indicates the line that has been printed as the last. The
line is memorized provided that the printer is switched off properly – see
Switching the Printer Off (p. 16).
Touch the button in order to add the object to a project or the
button to abandon the addition. If no changes have been made, you can return
to the previous screen by touching the button.
60
EBS Ink Jet Systeme 20150330#1.0
Page 61

EN
EN
Shape-type Object – Line
Touch the button, choose the Shapes sheet tab, and then touch the
button in order to add a new, shape-type object, a Line, to
a project.
The Line width can range from 1 to 30. The Line width is given as a number of
dots.
Touch the button in order to add the object to a project or the
button to abandon the addition. If no changes have been made, you can return
to the previous screen by touching the button.
Shape-type Object – Rectangle
Touch the button and choose the Shapes sheet tab, and then touch the
button in order to add a new, shape-type object,
a Rectangle, to a project.
20150330#1.0 EBS Ink Jet Systeme
61
Page 62

EN
EN
The Rectangle object allows you to print any rectangle: an outline only or the
entire figure (in the latter case the Filled check box needs to be ticked).
If the Invert check box is ticked, then where the Rectangle ”covers” another
object that is in a lower layer, the common part of the rectangle and that another
object is not printed.
The Line width parameter can be used to set the outline thickness.
Touch the button in order to add the object to a project or the
button to abandon the addition. If no changes have been made, you can return
to the previous screen by touching the button.
Shape-type Object – Ellipse
Touch the button, choose the Shapes sheet tab, and then touch the
button in order to add a new, shape-type object, an
Ellipse, to a project.
The Ellipse object allows you to print any ellipse: an outline only or the entire
figure (in the latter case the Filled check box needs to be ticked).
If the Invert check box is ticked, then where the Ellipse ”covers” another object
tthat is in a lower layer, the common section of the ellipse and that another
object is not printed.
The Line width parameter can be used to set the outline thickness.
Touch the button in order to add the object to a project or the
button to abandon the addition. If no changes have been made, you can return
to the previous screen by touching the button.
62
EBS Ink Jet Systeme 20150330#1.0
Page 63

EN
EN
Barcode
Touch the button, choose the Others sheet tab, and then touch the
button in order to add a new, Barcode-type object to
a project.
In the Main sheet tab, choose Barcode type and in the Text field, type in
a character string that is to be presented as a barcode. Make sure that the code
type fits the number and type of characters. When the Text field changes its
color to red, this means that the character string typed in is not appropriate to a
given type of code (a wrong number or type of characters). The detailed
information on code formats is displayed while a type of code is being chosen in
the Barcode short description field.
The following types of barcodes are available:
Numerical: EAN–2, EAN–5,EAN–8, EAN–13, EAN–5 + EAN–2, EAN–8
+EAN–2, EAN–8 + EAN–5, EAN–13 +EAN–2, EAN–13 + EAN–5, Code 25,
Code 11, Code 25 Industrial, Code 25 Interleaved, Code25 IATA, Code 25
Data Logic, Codabar, Leticode, Identcode, GS1 DataBar–14, GS1 DataBar
Limited, GS1 DataBar Expanted, UPC–A, UPC–E, PostNet, MSI Plessey,
Pharmacde One–Track, Pharmacde Two–Track, ITF–14, PZN.
Alphanumerical: Code 39, Code 39 Extented, GS!–128 (UCC/EAN–128),
Code 128, Code 16k, Code 93, Telepen Alpha, 2D:PDF417, 2D:PDF417
Turncated, 2D:QR Code, Australia Post 4–State, Royal Mail 4–State
(RM4SCC), 2D:Data Matrix, 2D:MicroPDF417.
20150330#1.0 EBS Ink Jet Systeme
63
Page 64

EN
EN
In the Advanced sheet tab you can modify the following parameters:
If the Enable resizing check box is ticked, the code can be resized. If you
change the code size and then untick the check box, the barcode regains
its original size.
Signature – the digital description of a code is to be printed beneath the
code (it is available for selected codes).
Border type – the type of barcode frame (it is available for selected
codes); three types are available:
none – no frame,
bind – frame lines at the top and bottom of a code,
box – a code is framed on each side.
If the bind or box option is chosen, set the Border size to a different
setting than 0 to make the frame visible.
Border size – the width of a barcode frame; it allows you to modify the
frame width when the Border type is set to bind or box.
Touch the button in order to add the object to a project or the
button to abandon the addition. If no changes have been made, you can return
to the previous screen by touching the button.
Image
Touch the button, choose the Others sheet tab, and then touch the
button in order to add a new, Image-type object to a project.
64
EBS Ink Jet Systeme 20150330#1.0
Page 65

EN
EN
In the Main sheet tab touch the Image path check box. On the screen
displayed, choose a file name out of those listed (or type in the file name in the
white field), and then touch button. The printer uses PNG files.
Touch the button in order to add the object to a project or the
button to abandon the addition. If no changes have been made, you can return
to the previous screen by touching the button.
Line Divider
If a division mark is added to a project, you can make printouts of several text
files quickly on successive lines or on various spots on an article.
Touch the button, choose the Others sheet tab, and then touch the
button in order to add a new, Line divider-type text object
to a project. With the Position parameter you can define the number of the
vertical row on which the division should be made.
20150330#1.0 EBS Ink Jet Systeme
65
Page 66

EN
EN
You can start modifying and printing divided projects by pressing trigger 6.
Touch the button in order to add the object to a project or the
button to abandon the addition. If no changes have been made, you can return
to the previous screen by touching the button.
Printing Parameters
The printing parameter window is displayed after the
and buttons have been touched in turn – see Project
Processor (p. 42).
In the Dot settings sheet tab:
The Dot size parameter is used in order to increase the intensity of prints
on porous materials, which absorb ink heavily, on which the characters
printed (consisting of the same size dots) are not well visible due to their
grainy structure. An increase in the setting of that parameter results in
higher intensity of prints made, owing to a bigger size of ink drops jetted out
of the printer head. Increased intensity involves higher consumption of ink.
66
EBS Ink Jet Systeme 20150330#1.0
Page 67

EN
EN
Intensity is physically constrained by the real speed at which the head can
print – it means that when the intensity is too high for a given printing
speed, the printer signals an error with an audible signal (provided that an
appropriate warning is set – see Sound Settings (p. 23)), and higher
intensity also limits the printing speed.
The parameter is also available on the main screen– see Operating Touch
Screen (p. 12), item R.
The Resolution parameter impacts on the visibility of the project
characters after they have been printed. It decides on print resolution,
which is given as a number of rows/meter. In other words, a change in the
width of characters printed and in the length of the entire project are the
visual effects of a change in the setting of the Resolution parameter.
This parameter is available also on the main screen – see Operating
Touch Screen (p. 12), item S.
The printer is equipped with a practical tool, Measure, which is designed
for adjustment of print resolution to the length of the surface to be labeled –
see page 119.
With the Pressure parameter you can adjust the force by which ink drops
are jetted, to the type of surface to be labeled. Lower pressure is
recommended for smooth, non-absorbing materials, and higher – for
porous, absorbing materials. Pressure settings can vary from 15 to 45 bars.
If too low pressure is set, ink may solidify on nozzles. If too high pressure is
set, irregular ink splashes (so called satellites) may occur around a print.
Detach the ink container from the printer in order to reduce the pressure of
the ink in the container, if you need to print a project where lower pressure
is set than that in the project printed before.
The Printout repetition parameter defines how many times a print is to
be re-printed after the trigger has been pressed. It allows you to make a
print repeatedly on the same article (repetition). Continuous repetition
of prints can be set for continuous articles (e.g. cables, hose, tubes,
pipes) (Printout repetition = ). The distance between successive
prints is set with the Print spacing parameter – see the Position (p.
68) sheet tab.
20150330#1.0 EBS Ink Jet Systeme
67
Page 68

EN
EN
In the Position sheet tab:
The Initial distance parameter defines the distance from the point where the
print release button is pressed to the point where printing of a print should
start. The distance is given as a number of millimeters, and it is measured
after the trigger has been pressed and before printing starts. It enables you to
adjust the print position in relation to the beginning of the article.
The Print spacing parameter defines the distance between the beginnings
of prints that are made repeatedly (Printout repetition >1). The distance is
given as a number of millimeters.
NOTE: If the distance set with the Print spacing parameter is smaller than
the print length, prints are printed one just after another.
The Flip vertical parameter defines the mode of printing in the vertical
direction: normal or turned upside down. It can be useful when an article to
be labeled is turned.
Normal print
Reversed print
The Flip horizontal parameter can be useful if you need to label articles
from right to left or if you print on transparent materials and the prints
should be legible from the opposite side.
Normal print ,
68
EBS Ink Jet Systeme 20150330#1.0
Page 69

EN
EN
Reversed print .
The Print direction parameter defines in which direction the printer should
be moved in order to make a print.
↔ – a print is made when the printer is moved left and right.
– a print is made only when the printer moves right. The system
detects any movement of the printer in the opposite direction
automatically and interrupts printing. When the printer starts moving
right again, it resumes the printing from the point at which it moved in
the opposite direction. In order to ensure that a printout hits precisely
the point at which the printer moved in the opposite direction and the
printing was interrupted, lower roll 3 of the printer must have
continuous contact with the surface to be labeled.
– a print is made only when the printer moves left. The system
detects any movement of the printer in the opposite direction
automatically and interrupts printing. When the printer starts moving
left again, it resumes the printing from the point at which it moved in
the opposite direction. In order to ensure that a printout hits precisely
the point at which the printer moved back and the printing was
interrupted, lower roll 3 of the printer must have continuous contact
with the surface to be labeled.
– a print is made when the printer moves left or right. The
⇌
direction of printing is chosen with a first movement of a roll. Printing
can continue only in the direction originally chosen. The system
detects any movement of the printer in the opposite direction
automatically and interrupts printing. When the printer moves in the
original direction again, it resumes printing from the point at which it
moved in the opposite direction. In order to ensure that the printout hits
precisely the point at which the printer moved in the opposite direction
and the printing was interrupted, lower roll 3 of the printer must have
continuous contact with the surface to be labeled.
Touch the button in order to approve the changes to the parameters, or
the button to abandon the changes. If no changes have been made, you
can return to the previous screen by touching the button.
Project Recovery
If the printer is switched off, e.g. in emergency mode, while a project is being
edited but has not been saved jet, then when the printer is switched on again
and the project is opened for editing, a project recovery tool starts running.
20150330#1.0 EBS Ink Jet Systeme
69
Page 70

EN
EN
In the screen displayed, touch the check box of a project that you wish to edit. If
you choose the original project and approve your choice with the button,
the recovered project is deleted (the deletion needs confirming on the screen
displayed). If you choose the recovered project, then it is saved in printer
memory under a name you may choose.
Service
With the service options available in the Service menu you can do the following:
make your printer ready for operation – by purging the head in order to vent
it, e.g. after transportation, or to clear choked nozzles,
update printer software, export or import projects,
enable additional options,
restore preliminary settings and data stored in printer memory,
adjust electromagnets in nozzle valves,
view the manufacturer's contact details and the version of printer software.
70
EBS Ink Jet Systeme 20150330#1.0
Page 71

EN
EN
When air accumulates in the ink
container (e.g. when the container
is removed and installed again), the
ink system should be vented by
purging. In order to purge the
system you should position the
printer with the container
downwards and start purging. Hold
trigger 6 until ink starts flowing out
of the nozzles.
Purging
NOTE: Before starting purging direct the outlet of the nozzles 2 to a vessel, e.g.
the one that is used for washing the printer!!!
The purging function is used for clearing slightly chocked nozzles or for removing air
from the head. Make several sample prints after purging. If the print quality turns out
to be unsatisfactory, start purging again. If the printer has not been used for
several minutes, it is also recommended that the purging function be performed
before a subsequent printout is made. The purging is initiated by pressing trigger 6
and holding it in that position. When you do that, all head electromagnets open and
ink starts flowing out at pressure! When you relax the trigger, the purging stops.
Purging can be initiated in several ways:
by touching the Tools (U), Service and Purge buttons in turn,
by touching the button (W) and holding it until a drop-down
menu appears; then choosing ,
by pressing trigger 6 quickly three times and holding it for a few seconds.
NOTE! As the result, an audible warning signal is generated by buzzer 34 ,
then all head electromagnets open and ink starts flowing out at pressure!
20150330#1.0 EBS Ink Jet Systeme
71
Page 72

EN
EN
USB
See Connecting USB Disc to the Printer (p. 34).
Unlocking Options
You can use additional options to extend printer functionality or enable the
functions that have been constrained in order to protect the printer against
accidental damage (e.g. which may occur when a wrong type of ink is used).
Touch the Tools (U), Service and Unlock buttons in turn.
The options can be unlocked in two ways:
standard mode – after you have given the Unlock code, a serviceperson
gives you an activation code in return. The activation code should be typed
in in the Activation code field via the keypad displayed and confirmed with
the button. Then the button should be
touched.
remote mode – a serviceperson unlocks the printer remotely, without any
need for giving a one-off code and typing in an activation code. Touch the
button and wait until the option is unlocked. The
72
EBS Ink Jet Systeme 20150330#1.0
Page 73

EN
EN
unlocking procedure may take up to 5 minutes. Remote unlocking of
options requires that the printer be connected to the Internet.
Before starting the standard or remote unlocking procedure you should contact
an authorized serviceperson by phone.
Restoring Preliminary Settings
Touch the Tools (U), Service and Restore in turn.
Preliminary settings of the printer can be restored after the password has been
typed in on the screen displayed. When the Restore function is used, the user
projects, fonts and images as well as energy, sound, language and date and
time format settings are erased. The restoration of the preliminary settings is
irreversible and for that reason it is recommended that data is exported
beforehand – see Export Project (p. 80).
The Restore function is available only for Administrators. Preliminary settings
should be restored only when the batteries are fully charged or when mains
electricity supply is connected.
20150330#1.0 EBS Ink Jet Systeme
73
Page 74

EN
EN
Tuning
The tuning function is used for adjusting badly printing nozzles of the printer.
The function can be performed by the staff who have been trained in servicing
EBS printers.
Information
Touch the Tools (U), Service and Information buttons in turn.
On the Product information screen you can view the manufacturer's contact
details and the version of printer software.
For the user who operates the printer on a standard basis, it is important to
have the information on the System version. Owing to it you can check
whether you have up-to-date software version installed on the printer.
The other data, such as the version number or the serial number of the printer
(available after the Detailed information box has been touched) is necessary
for service persons to perform diagnostic operations.
74
EBS Ink Jet Systeme 20150330#1.0
Page 75

EN
EN
Operating the Printer via Mozilla Firefox Web Browser
The printer can be operated via a Web Browser in two ways:
by establishing connection with the printer via WIFI and running EBS Web
User Interface (WUI) – see Establishing Connection between Printer
and Computer (p. 75).
by using Offline EBS Web User Interface (Offline WUI) after it has been
installed on the computer in advance.
The Service (p. 114) and Printer Control (p. 116) menus are not available in
Offline WUI.
Establishing Connection between Printer and Computer
Follow the below given steps to connect the printer with a computer:
1. Configure a WiFi wireless network,
2. Set the WiFi network parameters on the printer – see Connecting the
Printer to a New Network via WiFi (p. 30).
3. Read the IP Address of the printer on the Wireless Network Status screen
– see WiFi Wireless Connection (p. 29), and type it in into the Web
Browser (Mozilla Firefox).
EBS Web User Interface (WUI) displays on the computer screen.
Installing Offline EBS Web User Interface
The Offline EBS Web User Interface installation file is available on the printer
web site at http://www.ebs-inkjet.pl/ebs260 in the Information Materials sheet
tab. Follow the installation manual attached to the installation file.
Logging In
You are logged in automatically as Administrator by default (default password:
1). You can disable automatic logging in or change the default account - see
Users Manager (p. 109).
When the automatic logging in is disabled and EBS Web User Interface (WUI)
starts running, A list of users is displayed on the startup screen. Point at the
name of a user with the cursor and type in the password in the text field. After
you have logged in, you will see that printer interface functions vary according
to the user group you are assigned to – see Users Manager (p. 109).
Work Screen of EBS Web User Interface
The work screen consists of the following:
WUI MENU (Projects (p. 76), Tools (p. 106), Settings (p. 113), Service
(p. 114), Printer Control (p. 116), Info (p. 117) and user status as well as
the OFF/restart/log out button),
WUI module (Create a New Project (p. 76), Open and Edit a Project, (p.
77) Change editor settings (p. 113)),
Printer control module (Open project for printing (p. 119), Printer
Control (p. 116)).
20150330#1.0 EBS Ink Jet Systeme
75
Page 76

EN
EN
Message bar – see Messages (p. 117), and a printer network.
Description of the window title bar buttons:
– background view,
– help,
– close the window (hot key: U).
File Manager
You can manage file and folder names in the following windows: Create new
project, Open project (Open project for editing) or Save as....
Touch the button in order to create a new folder. Type in the name of the
new folder in the window displayed and confirm with the button.
Highlight the name of a file or folder in the list, and then touch the button to
delete the file or folder. Highlight the name of a file or folder in the list and touch
the button in order to change the name. Type in a new name in the window
displayed and confirm with the button.
Projects
Create a New Project
In the Projects menu, which is on the menu bar, you can choose the Create
new project command. Type in a name for your project in the Filename field in
the window displayed. If you tick the Create project in separate folder check
76
EBS Ink Jet Systeme 20150330#1.0
Page 77

EN
EN
box, a folder is created with the same name as the name of the project. In the
drop-down list choose the type of the printer for which the project is designed
(only when Offline WUI is used), and then touch the button.
Open and Edit a Project
In the Projects menu, which is on the menu bar, choose the Open project
command. Highlight the name of a project in the list you can see in the window
displayed, and then touch the button. When the name is
highlighted, a Project preview section is displayed next to the project list
whereas beneath the window you find the information about the project: when
Last modification was made and with the Printer type option - the type of
printer for which the project is designed.
20150330#1.0 EBS Ink Jet Systeme
77
Page 78

EN
EN
If you open a project while a project is already open on the printer, the following
message is displayed:
The project open on the printer must be saved before any project can be
opened in WUI. Otherwise, the project is closed but not saved and any
modifications made to it are lost.
If you open a project on the printer LCD while the same project is being edited
by means of WUI, the WUI project is closed automatically. No project can be
edited on the printer screen and in WUI at the same time.
78
EBS Ink Jet Systeme 20150330#1.0
Page 79

EN
EN
If you wish to continue editing the project that is open on the printer, touch the
Continue editing button on the WUI working screen.
Import a Project
In the Projects menu, which is on the menu bar, choose the Import project
command. You can import projects that are saved on another computer or have
been created and edited on the printer itself. In the Import EBS WWW Editor
project sheet tab, choose a file to be imported (by touching the text field or the
button) and touch the button.
You can also import projects created for the HANDJET EBS-250 printer.
In the Import EBS-250 project file sheet tab, type in a name for the project in
the Filename field, and then choose the file to be imported (by touching the text
field or the button) and touch the button.
When you have imported the entire project library, the name typed in in the
Filename field becomes the folder name and the library projects are numbered
with successive numbers.
20150330#1.0 EBS Ink Jet Systeme
79
Page 80

EN
EN
Export Project
In the Projects menu, which is on the menu bar, choose the Export project
command. Projects and also images that are on printer disc can be exported for use
on another printer or as a backup copy.
You can copy the following:
All images saved in the Images folder – with the button.
One, selected project (highlighted in the list) – with the
button.
All projects saved in internal memory of the printer – with the
button.
They are exported to:
A disc file – files are exported as .exp files (choose the Save to disk
circle),
A printer to be chosen in the drop-down list (choose the Send to printer
circle). If the printer you would like to export to is not in the drop-down list,
you can add such a printer to the list (see Printers Network Manager (p.
110)).
Project Processor
Open a project with the Create new project or Open project command – the
project processor window opens.
The project processor consists of several parts: an edit area, four tool bars and
auxiliary rulers.
80
EBS Ink Jet Systeme 20150330#1.0
Page 81

EN
EN
first horizontal bar
save project
open and edit project
project name
printing parameters for project – see Printing Parameters
(p. 83)
edit area width – see Workspace width (p. 112)
print preview (hot keys: «+0, successive print:¡, return
to first printout: ¢, re-scaling of print preview (real size /fit to
window width): :)
zoom in edit area (hot key: P)
zoom out edit area (hot key: Q)
restore original size of edit area (hot key: )
magnification scale
The edit area height is adjusted to the type of print head to be used and fits a
maximum print height. The edit area width can be modified. Touch and hold the
re-sizing marker, which is on the right-hand tool bar, and move it right or left.
The edit area width can also be modified with the Workspace width (p. 112)
function that is available in the Tools menu.
Tool bars:
20150330#1.0 EBS Ink Jet Systeme
81
Page 82

EN
EN
second horizontal bar
list of objects
set object position (move
a selected object within edit
area by 1px)
up (hot key: £)
down (hot key: ¤)
left (hot key: ¢)
right (hot key: ¡)
object parameters
delete object (hot key: ¦)
justify object within edit area
left justify
center
right justify
cut objects (hot key: «+8)
copy objects (hot key: «+#)
left vertical bar
normal cursor
add text object
type: Normal Text – see Text Object – Normal
Text (p. 88)
type: Date/Time – see Text Object – Date/Time
(p. 89)
type: Counter – see Text Object – Counter (p.
92)
type: Communications port – see Text Object –
Communications port (p. 94)
type Text File – see Text Object – Text File (p.
99)
add Image-type object – see Image (p. 100)
add barcode-type
object – see
Barcode (p. 101)
Barcode
Date/Time as barcode
Counter as barcode
82
EBS Ink Jet Systeme 20150330#1.0
Page 83

EN
EN
data transferred via Communications Port as
barcode
text file data as barcode
add shape-
type object
Line – see Shape-type Object – Line (p. 102)
Rectangle – see Shape-type Object – Rectangle
(p. 103)
Ellipse – see Shape-type Object – Ellipse (p. 104)
add special
object
Division Mark – see Line Divider (p. 104)
right vertical bar
list of project objects – see List of Objects (p. 105)
clipboard (hot key: «+6) – see Clipboard (p. 106)
deleted objects (hot key: «+4) – see Trash (p. 106)
With the auxiliary rulers you can estimate the real size of a printout. The ruler is
scaled in centimeters.
Choose Save (hot key: «+3) in the Projects menu in order to save
a project. You can also save modifications with the button that is on the
first horizontal tool bar.
Choose Save as... (hot key: «+Y+3) in the Projects menu in order
to save a project with any name.
Choose Close project in the Projects menu in order to close a project.
Printing Parameters
The printing parameters window is displayed by touching the button (see
Project Processor (p. 80)) or choosing Printing parameters in the Projects
menu (the parameters are available in the menu list, when a project is open and
can be edited).
The printing parameters are set to their default settings that are specific to a
given type of printer.
20150330#1.0 EBS Ink Jet Systeme
83
Page 84

EN
EN
The printing parameters can be set in a table (Parameters source: Local
parameters) and they are different for every project.
You can also import the parameters from a file that must be compiled in
advance (Parameters source: External parameters). This option is very
useful when a set of parameters is common for a number of projects. Any
modification to the parameter file will apply at the same time to all the projects
where a given parameter file is used.
Touch the button in order to read-in parameters
from an external file; highlight a parameter file in the list in the ”Review
parameter files” window, and then touch the button.
In the ”Review parameter files” window you can save the parameter settings to
a file by touching the Create new file button. Type in a name of the file
and confirm with the button in the window that follows.
The ranges of the parameters are given in the upper part of the window (above
the division line) after the field of a parameter has been highlighted.
The Resolution parameter impacts on the visibility of the project
characters after they have been printed. It decides on print resolution,
which is given as a number of rows/meter. In other words, a change in the
width of characters printed and in the length of the entire project are the
visual effects of a change in the setting of the Resolution parameter.
84
EBS Ink Jet Systeme 20150330#1.0
Page 85

EN
EN
NOTE: The setting of the Resolution parameter is limited not only by the
setting range. The real setting is controlled by the printer control program
and can be constrained by the settings of other printing parameters. An
automatic protection against too high a printing speed setting is applied.
Therefore it may happen that certain settings are not accepted once other
parameters are set.
The Printout repetition parameter defines how many times a print is to be
re-printed after the trigger has been pressed. It allows you to make a print
repeatedly on the same article (repetition). Continuous repetition of prints
can be set for continuous articles (e.g. cables, hose, tubes, pipes)
(Printout repetition = Continuous). The distance between successive
prints is set with the Print spacing parameter.
The Print spacing parameter defines the distance between the beginnings
of prints that are made repeatedly (Printout repetition >1). The distance is
given as a number of millimeters.
NOTE: If the distance set with the Print spacing parameter is smaller than
the print length, prints are printed one just after another.
The Print direction parameter defines in which side the printer should be
moved in order to make a print.
– a print is made when the printer is moved left and right,
– a print is made only when the printer moves right. The system
detects any movement of the printer in the opposite direction
automatically and interrupts printing. When the printer starts moving
right again, it resumes the printing from the point at which it moved in
the opposite direction. In order to ensure that a printout hits precisely
the point at which the printer moved in the opposite direction and the
printing was interrupted, lower roll 3 of the printer must have
continuous contact with the surface to be labeled.
– a print is made only when the printer moves left. The system
detects any movement of the printer in the opposite direction
automatically and interrupts printing. When the printer starts moving
left again, it resumes the printing from the point at which it moved in
the opposite direction. In order to ensure that a printout hits precisely
the point at which the printer moved back and the printing was
interrupted, lower roll 3 of the printer must have continuous contact
with the surface to be labeled.
– a print is made when the printer moves left or right. The direction
of printing is chosen with a first movement of a roll. Printing can
continue only in the direction originally chosen. The system detects
any movement of the printer in the opposite direction automatically and
interrupts printing. When the printer moves in the original direction
again, it resumes printing from the point at which it moved in the
opposite direction. In order to ensure that the printout hits precisely the
point at which the printer moved in the opposite direction and the
printing was interrupted, lower roll 3 of the printer must have
continuous contact with the surface to be labeled.
20150330#1.0 EBS Ink Jet Systeme
85
Page 86

EN
EN
The Flip horizontal parameter can be useful if you need to label articles
from right to left or if you print on transparent materials and the prints
should be legible from the opposite side.
disabled,
enabled.
The Flip vertical parameter defines the mode of printing in the vertical
direction. It can be normal (mirror image: disabled) or turned upside down
(mirror image: enabled). The parameter is useful when an article to be
labeled is turned.
disabled,
enabled.
The Initial distance parameter defines the distance from the point where
the print release button is pressed to the point where printing of a print
should start. The distance is given as a number of millimeters, and it is
measured after the trigger has been pressed and before printing starts. It
enables you to adjust the print position in relation to the beginning of the
article.
The Dot size parameter is used in order to increase the intensity of prints
on porous materials, which absorb ink heavily, on which the characters
printed are not well visible due to their grainy structure. An increase in the
setting of that parameter results in higher intensity of prints made, owing to
a bigger size of ink drops jetted out of the printer head. Increased intensity
involves higher consumption of ink.
Intensity is physically constrained by the real speed at which the head can
print – it means that when the intensity is too high for a given printing
speed, the printer signals an error with a sound signal (provided that an
appropriate warning is set – see Sound Settings (p. 23)), and higher
intensity also limits the printing speed.
With the Pressure parameter you can adjust the force by which ink drops
are jetted, to the type of surface to be labeled. Lower pressure is
recommended for smooth, non-absorbing materials, and higher – for
porous, absorbing materials.
86
EBS Ink Jet Systeme 20150330#1.0
Page 87

EN
EN
If too low pressure is set, ink may solidify on nozzles. If too high pressure is
set, irregular ink splashes (so called satellites) may occur around a print.
Detach the ink container from the printer in order to reduce the pressure of
the ink in the container, if you need to print a project where lower pressure
is set than that in the project printed before.
Touch the button in order to save the settings of the parameters.
Touch the button in order to set the
parameters that are recommended for a given head type.
Objects
In order to add a new object to a project, choose the type of object from the
vertical left-hand, tool bar, and then use the cursor to point out where the object
is to be placed within the edit area and press the left mouse button.
Each of the objects can be given an appropriate format, size and location by
setting the right parameters. All the objects used in the project are put on the list
of objects – see List of Objects (p. 105).
Common Parameters of Objects
For text objects you can change the type of font by choosing a new or another
font in Font name drop-down list. If there is no font that you might be interested
in in the drop-down list, you can add your own font by touching the button
(see Font Manager (p. 107)).
When EBS built-in fonts are used, you can modify the Row multiply and Letter
spacing parameters. The Row multiply parameter defines how many times
printing of every vertical row of text is to be repeated. The multiplication of rows
is used in order to increase intensity of prints on porous materials, which absorb
ink heavily, on which and the characters printed (consisting of the same size
dots) are not well visible due to their grainy structure or in order to increase the
text width. The Letter spacing parameter defines the space between object
characters. The space is given as a number of vertical rows (up to 1000 rows).
When True Type fonts (default and user fonts) are used, you can modify the
Font size parameter (given as a number of pixels). The parameter is linked with
the Constrain proportions parameter. The Font size (font width and height)
can be modified proportionally (when the Constrain proportions check box is
ticked) or either of the components, the width (X) and the height (Y) can be
modified independently (the Constrain proportions check box is unticked).
With the Line spacing parameter you can add spaces between lines of text.
The spaces are measured in pixels (dots). Up to 20 pixel spaces can be added.
The space is added after every end-of-line character.
The object and object frame sizes are subject to Scaling. Three options are
available:
Without scaling – it enables you to modify the size of an object frame
without changing the size of the object.
Fit frame to content – when the object frame is to be of the same size as
the object.
20150330#1.0 EBS Ink Jet Systeme
87
Page 88

EN
EN
Fit content to frame (not available to text objects where an EBS built-in
font is used and to barcode-type objects) – when the size of an object is to
be the same as the size of the frame.
If the Transparent parameter check box is ticked, the object is transparent and
you can see an object that is 'under' it. This property is useful when a number of
objects have been placed in the edit area and there is a risk that objects overlap
each other.
The Object rotation parameter allows you to rotate the entire object clockwise
(the setting of 90), counterclockwise (the setting of 270) or "upside down" (the
setting of 180).
The Position parameter shows the coordinates of the top left-hand corner of
the object frame. You can modify the coordinates and thereby change the
position of the object. Place the cursor in the Position field and modify the
coordinates in the window displayed. The first coordinate determines the
location in the horizontal direction (x coordinate), the second one determines
the location in the vertical direction (y coordinate). The repositioning operation
can also be performed in the edit area by holding the cursor on the object and
shifting it in any direction.
The Object size parameter defines the size of an object frame. Place the cursor
in the Object size field and modify the size components, (width and height) in
the window displayed. The resizing operation can also be performed in the edit
area, by holding the cursor on the bottom right-hand corner of the object and
dragging it in any direction (no frame can be resized if Scaling is set to Fit
frame to content).
The Position and Object size parameters are particularly useful when you
need to arrange or align two or more objects precisely.
The Object name parameter is designed for identification of an object in the
object list. The type of object and a number are used as the object name, as
standard (e.g. Text 1, Counter 2). You can give your own name to objects to
facilitate identification, but the same names must not be used, i.e. they must be
unique within one project. If you use a name that has already been used within
the project, an error is reported when you try to save the parameters of the
object named so.
If you tick the Show preview check box, an object preview is displayed in the
top left-hand corner of the screen.
Text Objects
Text Object – Normal Text
Touch the button and then in order to add a new, Normal Text-type
text object to a project.
88
EBS Ink Jet Systeme 20150330#1.0
Page 89

EN
EN
You can type in any characters string in the Text field. The division of a text into
lines can be done by pressing the ENTER button on the computer keypad.
You can convert a Normal Text-type object into another text object with the
button.
If the Object linked check box is ticked, the object assumes the setting of the
object chosen in the drop-down list. Another text object or a barcode can be
used as object linked.
If you need to edit your text just before it is printed, tick the check box for This
object must be edited before printing is started. The object parameters can
be modified in the window that is displayed when the button is
touched.
Touch the button in order to confirm the settings and to add the object to
a project.
Text Object – Date/Time
The Date/Time text object allows you to print the current date and the current
time and also an expiration date automatically.
Touch the button and then the button in order to add a new,
Date/Time-type text object to a project.
20150330#1.0 EBS Ink Jet Systeme
89
Page 90

EN
EN
The Current printer date parameter shows the current date indicated by the
printer
The Current printer time parameter shows the current time indicated by the
printer.
The Date offset parameter allows you to shift the current date by a set number of
days, in order to include the expiration date, for example.
The Time offset parameter allows you to readjust the current time by a set
number of hours (up to 24). The modification can impact on date shifting. Such a
change may cause a calendar day to start at a different time than 00:00 (e.g. at 6
o'clock a.m., when a morning shift in the factory starts).
By touching the calendar or clock button you can choose
components for printing – the date, the time or both of them. With the arrow
icon you can change the order of these components.
When more advanced functions are needed, use expert mode (Show experts
settings). In the expert mode you can modify separators and date and time
format, and also choose other date and time components and separators that
90
EBS Ink Jet Systeme 20150330#1.0
Page 91

EN
EN
are not available in the standard version (with the Formatting string
parameter).
The Date separator parameter allows you to choose a separator to be used
between date components for a project. The Time separator parameter allows
you to choose a separator to be used between time components for a project.
The Date format parameter allows you to choose the sequence of date
components for a project. The Time format parameter allows you to choose the
sequence of time components for a project.
The default settings of the date and time formats and separators for newly
created Date/Time-type text objects can be modified in the Settings menu – see
General Settings (p. 113).
The Formatting string parameter is available when the relevant check box is
ticked. Below there are the characters that are used to code the date and time
components. Any characters that are different from the below listed, and also
spaces, can precede, separate or follow the components of the universal-date
variable field. If no local name exists, an equivalent in English is displayed.
%a – local abbreviation for day of the week (Mon, ... , Sun),
%A – local full name of day of the week (Monday, ..., Sunday),
%b – local abbreviation for month (Jan, ... , Dec),
%B – local full name of month (January, ... , December),
%c – local date and time in the following format: abbreviation for day of the
week, abbreviation for month, day of the month, hours, minutes,
seconds, year,
%C – number of century,
%d – day of month (01, ... , 31),
%D – date in mm/dd/yy format,
%e – day of month (1, ..., 31),
%F – date in yyyy-mm-dd format,
%g – 2-figure year corresponding to week number %V,
%G – 4-figure year corresponding to week number %V,
%h – local abbreviation for the name of month (Jan, ... , Dec),
%H – hour, in the 24-hour system (00-23),
%I – hour, in the 12-hour system (01-12),
%j – day of the year (001, ... , 366),
%k – hour, in the 24-hour system (0-23),
%l – hour, in the 12-hour system (1-12),
%m – number of month (01, ... , 12),
%M – minute (00, ... , 59),
%p – local equivalent of AM or PM (empty in many localizations),
%P – local equivalent of a.m. or p.m. (empty in many localizations),
%r – time in the 12-hour system in the following format: gg:mm:ss [AM] or
[PM],
%R – time in the 24-hour system in the following format: gg:mm,
%s - number of seconds from 00:00:00, 1 January 1970 (the GNU extension),
%S – second (00, ..., 60); 60 means leap second,
%T – time in the 24-hour system in gg:mm:ss format,
20150330#1.0 EBS Ink Jet Systeme
91
Page 92

EN
EN
%u – day of the week (1, ... ,7); 1 stands for Monday,
%U – number of week in the year (00, ... , 53), Sunday is the first day of the
week,
%V – number of week in the year (01, ... , 53), Monday is the first day of the
week,
%w – number of day in the week, 0-Sunday, 1-Monday, etc.,
%W – number of week in the year (00, ... , 53), Monday is the first day of the
week,
%x – local representation of date,
%X – local representation of time,
%y – last two digits of year (00, ... , 99),
%Y – year in yyyy format,
%z – time zone in the numerical form of RFC-2822 (e.g. +0100) (non-standard
extension),
%Z – time zone (e.g. EDT) or nothing, if no time zone can be defined.
You can convert a Date/Time-type object into a different type of text object with
the button.
Touch the button in order to confirm the settings and to add the object to
a project.
Text Object – Counter
The Counter text object allows you to print automatically a consecutive number
on every successive article to be labeled. The setting of the counter changes
each time the trigger is pressed.
Touch the button and then the button in order to add a new, Countertype text object to a project.
92
EBS Ink Jet Systeme 20150330#1.0
Page 93

EN
EN
The Counter consists of a cascade of three identical sections. For simple
counting of articles, it is enough to use one, the first section and the default
settings to create a counter–type object. When more advanced functions are
needed, use expert mode (Show experts settings). All counter sections are
visible in the expert mode. Each of the sections can be visible (displayed) or
not. If you know the configuration of one section, you can easily configure the
other as they are identical.
By touching ( ) you can change the
Increment order. The parameter defines which of the sections is considered as
first and what the timing order is. The section timed first receives a timing pulse
whenever a print is to be made. Every successive section receives a timing pulse
from the previous section, when that section has counted to the end (that is, to the
Max setting when the counter is incremented or to the Min setting when it is
decremented). The timing pulse modifies the counter by a set Step.
20150330#1.0 EBS Ink Jet Systeme
93
Page 94

EN
EN
Counter parameters:
Min – the setting from which counting starts (for counting up), or with which
counting finishes (for counting down).
Max – the setting at which a counter overflows. When the counter
overflows, counting starts again from the Min setting.
Start mode – the parameter allows you to set the value from which
counting starts after printer operation has been resumed. Four options are
available:
Min,
Max,
Start value,
Last value.
Start value – the counter setting from which counting starts after operation
has been interrupted, e.g. when the batteries discharge. This is effective
when the Start mode parameter is set to Start value.
Last value – the last setting of a counter, which is saved after the printer
has been switched off in regular mode.
Step – a counter increment. When the setting is a positive number,
counting is incremental, and when it is a negative number, counting is
decremental.
The Length parameter is used to adjust the number of counter digit
positions to that required by the user.
The Fill in parameter is used to define a replacement for insignificant digits
of a counter: 0 or space.
Suffix – any character string to follow the counter printout, limited to 41
characters.
With the button you can modify Start value and Last value. The
parameter is available for the counters that have their Start mode parameters
set to Start value.
If you need to edit your counter just before it is printed, tick the check box for
This object must be edited before printing is started. The value from which
counting starts can be modified in the window that is displayed when the
button is touched.
You can convert a Counter-type object into another type of text object with the
button.
Touch the button in order to confirm the settings and to add the object to
a project.
Text Object – Communications port
The Communications port text object is used to print automatically the data
received by the printer from external devices (e.g. a computer, automatic
scales, a barcode reader).
94
EBS Ink Jet Systeme 20150330#1.0
Page 95

EN
EN
Touch the button and then the button in order to add a new,
Communications port-type text object to a project.
When added to a project, the Communications Port object is highlighted (e.g.
in blue). This means that its contents during printing depends on data
transferred to the communication port. If a greater number of Communications
Port objects are used, each of them is highlighted in a different color.
For a Communications Port object you can set the parameters that are
significant for establishing communication between the printer and an external
device. The printer and the device must have the same settings of the following
parameters to communicate successfully:
Port – it defines the name of a printer port to which an external device is
connected as a source of serial transmission signals in RS–232 standard,
for example. There is no physical RS–232 interface in the printer, so you
need to apply a USB – RS232 converter in order to connect an external
device. With such a converter you can connect an external device (e.g. a
20150330#1.0 EBS Ink Jet Systeme
95
Page 96

EN
EN
computer, automatic scales, a barcode reader) to a USB port. External
devices can be connected to the printer via a Bluetooth interface, which is a
source of serial transmission signals and can be chosen in this object. The
list of ports is fixed and contains Bluetooth and ports, from COM1 to COM9.
Baud rate – it signifies a rate of transmission (a number of symbols per
second) through the port. The list to choose from contains the most typical
rates used for serial communication. If the Port parameter is set to
Bluetooth, the Baud rate setting cannot be modified.
The Bit count parameter defines the number of bits in every portion of the
data transferred. If the Port parameter is set to Bluetooth, the Bit count
setting cannot be modified.
Communication Parameters – they define the rules for communication
between the printer and an external device:
Sending messages format – this parameter defines the format of data to be
transferred from the printer to a device. Two modes are available: Normal and
Hexadecimal. In the normal mode, the data is transferred as ASCII characters,
whereas in the hexadecimal mode it is transferred as hex numbers.
Ready to print after – it defines how the printer decides whether it has
received complete data (the end condition) from en external device or not.
The following modes can be set in this parameter:
Time interval [ms] – the printer waits for data over a certain time. The
time is counted from the moment when a last project is printed or, if the
On data process field (in expert settings) is filled in – from the
moment when an end-of-printing acknowledgement is sent. The time is
typed in in the field next to the parameter as a number of milliseconds
(between 4 and 1000 ms). If no data is received within the defined
time, the printer behaves according to the No-data action setting.
Data amount – the printer is ready for printing a project containing a
Communications port object when it receives a number (from 1 to 255)
of characters from the external device; with the number being defined in
the field next to the parameter. If printing is released although the condition
is not met (the defined number of characters has not been received) the
printer behaves according to the No-data action setting.
End character – the printer is ready for printing a project containing a
Communications port object when it receives data ending with a
defined character from an external device, with the character being
defined in the field next to the parameter. In this mode you can also
define an ASCII character that is to be the end of a portion of the data
received. For that purpose, tick the ASCII code check box and type in
the ASCII code in decimal notation. If printing is released when the
condition is not met (a defined end-of-data character is not received)
the printer behaves according to the No-data action setting.
Data buffering – it is used for storing successive data portions in a
variable field, Communications port. Two modes can be set:
Enabled – a successive portion of the data received by the variable field is
stored if the end condition is met – see Ready to print after. The buffer
size is 20, which means that 20 various, ready-to-print pieces of data can
be received and stored. When any other data comes, it will overwrite the
96
EBS Ink Jet Systeme 20150330#1.0
Page 97

EN
EN
data at the 20th position and a long sound is heard at the same time to
inform about an overflow. The buffered data forms a kind of queue, the
data is printed in the same sequence in which it has been received by the
variable field. If all the data buffered is printed, and another print is
released, the printer behaves according to the No-data action setting.
Disabled – a successive portion of the data received by the variable
field overwrites the data that has been received earlier but has not
been printed yet. The data is overwritten until it is printed. If no other
data is received subsequently, the printer behaves according to the
No-data action setting. In this mode, the printer always prints the last
or latest data received.
No-data action – it defines printer behavior when no data has come from
an external device (when the end condition is not met – see Ready to print
after) and printing of a project containing a Communications port object
has been released. The following modes of operation can be set:
Nothing – if printing is released when data is not received properly or
the end condition is not met (see Ready to print after), the project is
not printed. The message informing about this fact is displayed.
Print blank object – the project is printed as usual, with the entire
Communications port object being empty. NOTE! If a Prefix and/or a
Suffix are defined by the user, they will not be printed.
Print last message – the project is printed together with the
Communications port object, with the object being filled with the last
message received successfully from the external device. If such a
printout is made as a first, the project is printed but the area where the
data should be is empty. NOTE! If a Prefix and/or a Suffix are defined
by the user, they will be printed. The maximum number of repetitions
defines how many time the last message can be printed. If the number
of printouts is achieved, every successive release of printing make the
printer react according to the Nothing mode.
Printing Parameters – they define how the data transferred via a
communications port is to be printed. The parameters are hidden by more
advanced, expert mode parameters that correspond to them – see below.
Prefix – a text in a Communications Port object, which is printed before
the data received from an external device.
Suffix – a text in a Communications Port object, which is printed after the
data received from an external device.
Expert Settings – they define the rules for processing of the data received from
an external device, and also the mode of acknowledgement of printer states
transferred to the device, i.e. starting printing, stopping printing, project printed:
On starting printing – it defines the data to be transferred from the printer
to the external device immediately after printing has been initiated (with the
button on the Printer control panel).
20150330#1.0 EBS Ink Jet Systeme
97
Page 98

EN
EN
On processing data – it defines the data to be transferred from the printer
to the external device each time a project containing the Communications
port object has been printed.
On finishing printing – it defines the data to be transferred from the
printer to the external device immediately after printing has been stopped
(with the button on the Printer control panel).
Script name – with this field you can choose a script to which data is
transferred for processing before it is printed (it allows you to search for
data for printing in, for example, a database, Excel files, a csv file, etc.).
Scripted files must be stored in the custom_data folder in the user partition
of internal printer memory. The partition can be accessed in a network
environment. For more information on the subject of scripts refer to the
document entitled Managing the processing of data transferred by
COMMUNICATIONS PORT in the EBS printers.
Formatting string – this is an advanced mode of formatting of the data
transferred from an external device to the printer. It describes how the
incoming data is interpreted by the Printing Manager. Markers applied: %s
– a character string, %d – a number.
Separator data count defines to how many parts the data transferred via
the communications port is to be divided. If the parameter is set to 1,
everything transferred to the communications port is to be printed in the
object. Otherwise, the user can choose to which of the objects each of the
data portions transferred via the communications port should go, with the
first part always going to that object. When the Separator data count
parameter is set to a value greater than 1, the following options are
additionally available:
Separator character – it defines the character that separates portions
of the data transferred via the communications port from each other.
Additionally, you can give the ASCII code of the character that is used
as a separator of the data to be received. For that purpose tick the
ASCII code check box, and type in the ASCII code of the data
separator in decimal notation in the Separator character field.
Object X – it means the name of an object to which the separated data
portion received via the port and defined by X should go. You can only
choose from the objects that are used for a given project and to which
this data can go. The maximum number of separated portions of data
is 10 (if a project contains 12 objects, the data can be divided into 10
of them). The object containing a portion of the data transferred via the
communications port is additionally highlighted in a color.
98
EBS Ink Jet Systeme 20150330#1.0
Page 99

EN
EN
You can convert a Communications Port-type object into another text object
with the button.
Touch the button in order to confirm the settings and to add the object to
a project.
Text Object – Text File
The Text file text object is used for printing the data stored in a TXT file.
Touch the button and then the button in order to add a new Text file-
type text object to a project.
Touch the button and choose a file name out of those listed in the
window displayed, and then touch the button in order to roll-in the
text file.
The parameters of a Text file object are as follow:
Line count – the number of lines to be added to the object from the text file.
Line step – the number of lines by which text file data moves each time a
print is made. If the Line count is greater than the Line step, the data
moves by the number of lines given in the Line count.
Line max – the last line of text to be included in a printout.
Line start value – the text line to be added to an object as a first one.
The Start mode parameter is used to define which line of the text file is to be
rolled-in after printer operation has been resumed. Two options are possible:
20150330#1.0 EBS Ink Jet Systeme
99
Page 100

EN
EN
Start value – the line defined by the setting of the Line start value
parameter is to be rolled-in,
Last value – the line shifted by the Line step in relation to the line on
which printing finished is to be rolled-in.
Line last value indicates the line that has been last printed. The line is
stored in memory provided that the printer is switched off properly – see
Switching the Printer Off (p. 16).
With the button you can modify the Line start value parameter. The
parameter is available for the counters whose Start mode parameter is set to
Start value.
You can convert a Text file-type object into another type of object with the
button.
Touch the button in order to confirm the settings and to add the object to
a project.
Image
Touch the button in order to add a new, Image-type object to a project.
Touch the button in order to roll-in an image from printer memory
for printing, choose a file name in the window displayed, and then touch the
button (see Image Manager (p. 106)). The printer can process
PNG files.
Touch the button in order to confirm the settings and to add the object to
a project.
100
EBS Ink Jet Systeme 20150330#1.0
 Loading...