

Ebony SV-45 Operation Manual
SV45
USER'S GUIDE
21
8
16
21
19
20
22
3
9
17
4
5
10
23
24
25
26
11
13
18
27
12
7
61514
38
39 40
28
29
30
31
32
33
34
41
42
43
44
• The lowest position of the
rear standard is zero position.
4535
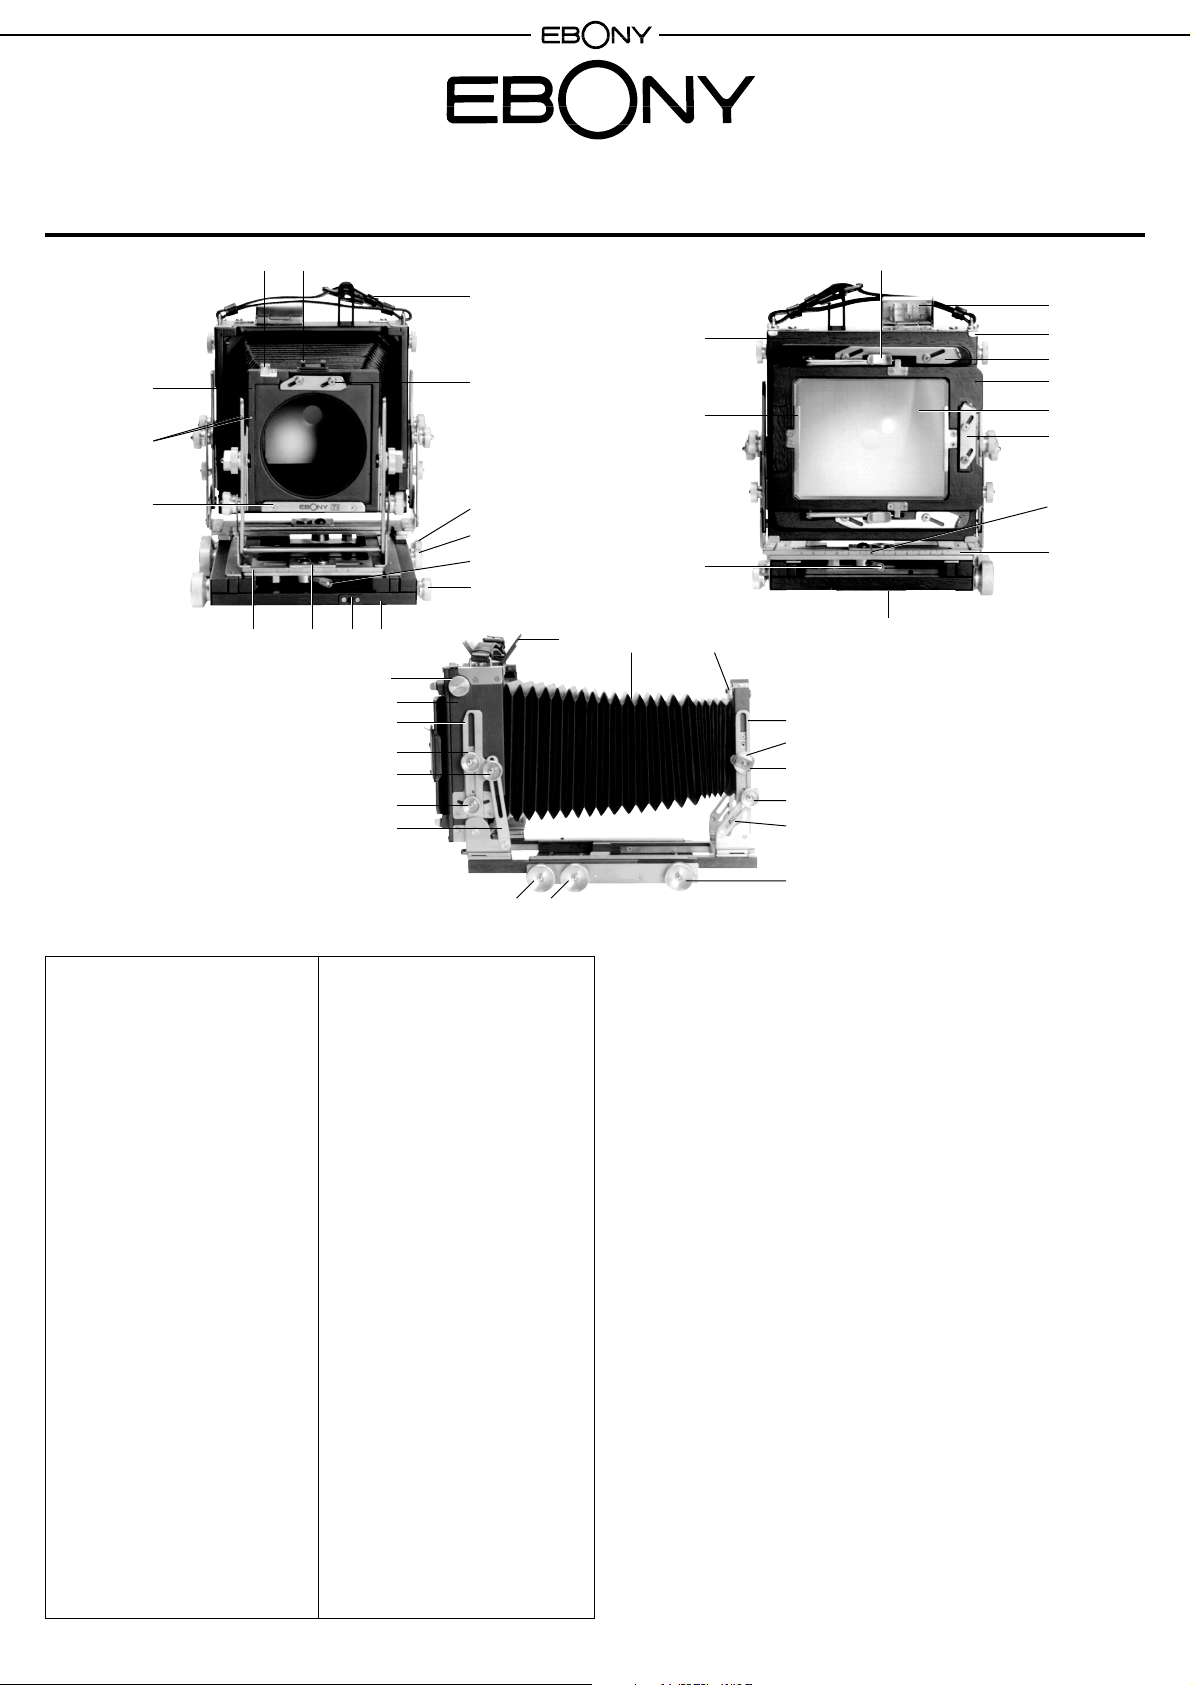
PART NAMES
1 Accessory shoe
2 Spirit level
3 Front standard
4 Alignment points indicating
front rise/fall zero position
5 Lensboard slot
6 Shift scale
7 Alignment points indicating
front shift zero position
8 Hand strap
9 Sliding latch for lensboard
10 Rear focusing lock knob
11 Front focusing lock knob
12 Front focusing lock knob
13 Front shift/swing locking lever
(shown in locked position)
14 Camera Bed
15 Latch pin
16 Film holder back
17 Spring tab for focusing screen
18 Rear shift/swing locking lever
(shown in locked position)
19 Two-way spirit level with mirror
20 Sliding latch for removable back
21 Focusing frame release lever
22 Sliding latch for roll film holder
36 37
23 Focusing frame
24 Focusing screen
25 Sliding latch for focusing hood
26 Alignment points indicating
rear shift zero position
27 Shift scale
28 Tripod mounting plate
29 Bellows release knob
30 Rear standard
31 Rear rise arm
32 Rear rise knob
33 Rear base tilts knob
34 Rear center tilts knob
35 Rear base tilts arm
36 Rear focusing knob
37 Front focusing knob
38 Latch to secure folded camera
39 Bellows
40 Sliding latch for bellows
release
41 Front rise/fall arm
42 Front rise/fall knob
43 Front center tilts knob
44 Front base tilts knob
45 Front base tilts arm
46 Front focusing knob
46
How to adjust the movements:
(In all cases adjustments refer to both the knob indicated
and the corresponding knob on the other side of the
camera)
(a) Rise/Fall
Front: Loosen knob 42, and while holding it raise or lower front standard.
Rear: Loosen knob 32, and while holding it raise or lower rear standard.
(b) Center Tilts
Front: Loosen knob 43, and holding lower part of front standard, push
forward or pull back.
Rear: Loosen knob 34, and holding lower part of rear standard, push
forward or pull back.
(c) Base Tilts
Front: Loosen knob 44, then release from notch in front base tilts arm (45).
Rear: Loosen knob 33, then release from notch in rear base tilts arm (35).
(d) Shift/Swing
Front: Unlock front locking lever (13), then swing or push front standard to
the left or right.
Rear: Unlock rear locking lever (18), then swing or push rear standard to
the left or right.
Points to remember:
1) After making each adjustment, be sure to retighten the knobs or lever. If two
pairs of knobs are loose at the same time, particularly 33 and 34, the camera
becomes difficult to handle.
2) Loosen lock knobs 11 and 12 before making front focusing adjustments, and
lock knob 10 before making rear adjustments. Tighten again afterwards.
• To install/remove focusing frame (23), pull focusing frame release lever (21).
47mm-75mm lenses:
Various wide-angle combinations are possible using base
tilts, center tilts and rise.
Please see
http://www.ebonycamera.com/cam/wa.lenses.SV.html
for more information about using wide-angle lenses with
Ebony SV45 cameras.
• Wide-angle lenses may be used without bed drop
Alignment point
• When using lenses wider than 90mm, universal or
wide-angle bellows are necessary.
To install bellows, place rear in rear standard first
and secure with bellows release knob (29), then
place front in front standard, and secure with sliding
latch (40). To remove bellows, reverse this
procedure and start with the front. To ensure that
the bellows are the right way up, check that the
alignment point is at the top.
• For maximum extension of standard or universal bellows
use rise, base tilts and center tilts at front and back.
○○○○○○○○○○○○○○○○○○○○○○○○○○○○○○○○○○○○○○○○○○○○○○○○○○○○○○○○○○○○○○○○
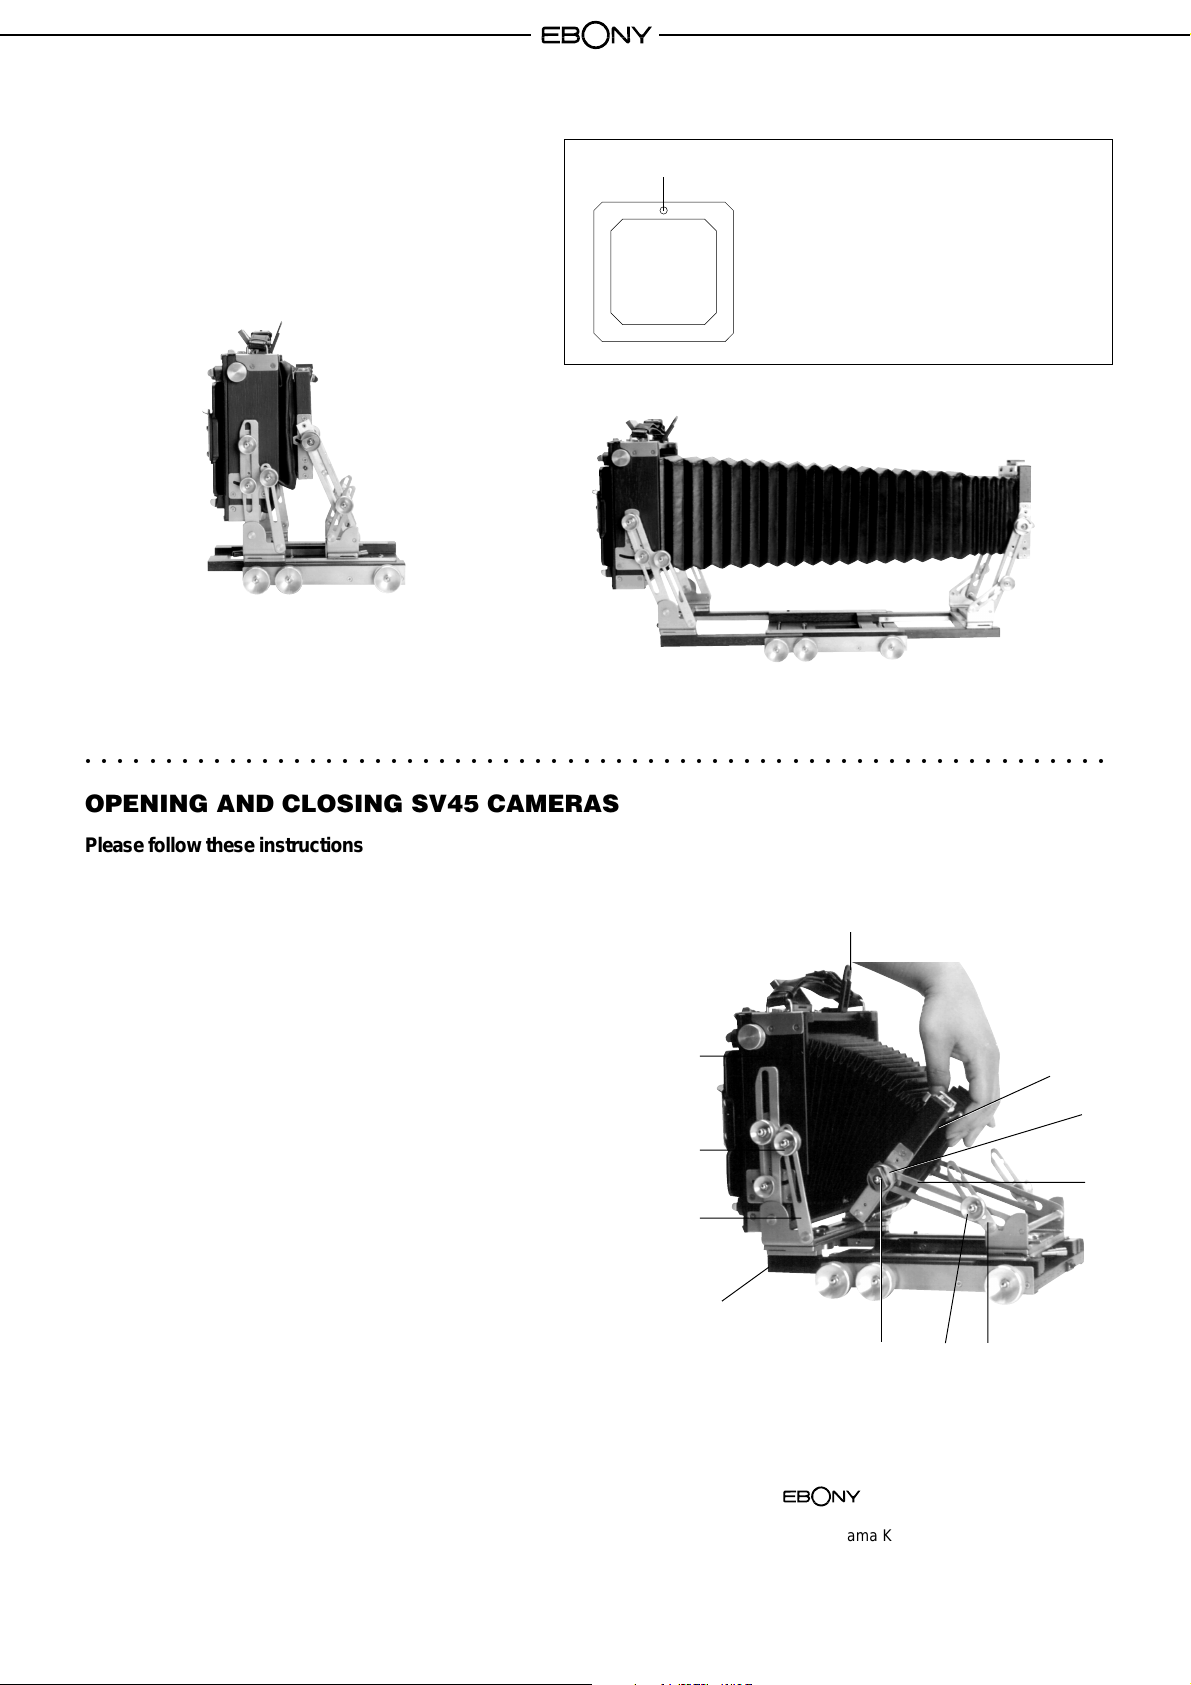
OPENING AND CLOSING SV45 CAMERAS
Please follow these instructions to avoid damaging the bellows.
The procedure is easier if the camera is placed on a tripod.
To open:
1) Lock rear shift/swing locking lever (18).
2) Squeeze camera and release latch (38) from pin.
3) Pull up rear standard (30) until vertical. Rear base tilts knobs (33) should enter
notches in rear base tilts arms (35). Tighten rear base tilts knobs (33).
4) Pull up front standard (3) with front rise/fall knobs (42) until it reaches maximum rise.
5) Lower front standard (3) until point on right front rise/fall arm (41) and
point on right of front standard are aligned (rise/fall zero position).
6) Tighten front rise/fall knobs (42). Front base tilts knobs (44) should enter
notches in front base arms (45). Tighten front base tilts knobs (44).
To close:
1) Ensure that all movements are returned to zero position, and front center
tilts knobs (43) are tightened.
2) Loosen front base tilts knobs (44), then front rise/fall knobs (42).
3) Pull front standard (3) up to maximum rise with front rise/fall knobs (42).
4) Pull front standard (3) backwards using front rise/fall knobs (42). While doing this
ensure that front standard remains at maximum rise. It will tilt towards the camera
bed (14) as it compresses the bellows (39).
5) Push front standard (3) down until it almost touches camera bed (14). Front base
tilts arms (45) should rest comfortably between front rise/fall arms (41) and front
rise/fall knobs (42).
6) Loosen rear base tilts knobs (33). Free them from notches in rear base tilts arms (35).
Push camera body down into closed position.
7) Squeeze camera shut and secure latch (38) to pin.
8) Unlock rear shift/swing locking lever (18).
30
33
35
14
38
43
CO. LTD.
Shin Oyama Building, 1st Fl.,
38-12 Oyama Kanai-cho,
Itabashi-ku, Tokyo 173-0024, Japan
Tel No. (03) 3972-3170
Fax No.(03) 5995-3738
4544
3
42
41
 Loading...