

Page 1

1
OWNER’S MANUAL
and installation instructions
State-of-the-Art Wireless Portable AudioRock
Installs in 5 minutes or less!
Note: The AudioRock is an add on unit to an existing LightSpeaker® System. You need a
LightSpeaker® Transmitter to supply audio and control the music on this unit.
The Transmitter and Remote discussed in the manual are sold separately.
User guide 2
Bedienungsanleitung 18
Gebruiksaanwijzing 34
Användermanual 50
Guide utilisateur 66
Guía del usuario 82
Manual do utilizador 98
Manuale per l’utente 114
Page 2

2
User Guide AudioRock
RM
The AudioRock speaker uses a 12 volt Lithium Ion Battery for
operation. Please review the following safety instructions before use:
Li Ion Battery Safety Instructions:
Misuse can result in the batteries short-circuiting, the insulator melting and
damage to the safety valves or safety mechanisms, leading to leakage, heat
generation or rupturing. Please observe the following precautions when using
batteries.
• Do not dispose in fire or expose to high temperature. (60oC)
• Do not under any circumstances insert the batteries with the positive and
negative poles reversed.
• If the connection with the charger does not operate correctly, do not force the
battery in, but instead check the direction of the positive and negative poles.
• Do not charge with chargers not specified for this product.
• Do not short the positive terminal and the negative terminal with metals
such as wire, coins, etc. Also, do not store or carry the batteries with metal
necklaces, etc.
• Do not disassemble or modify the battery.
• Do not puncture the battery.
• Do not directly solder the battery.
• Do not use the battery if it shows signs of leakage, a change of color or shape
or any other changes in appearance.
• Do not wet the battery or place it in water or sea water. This may lead to the
battery generating heat or rusting.
• Store the battery out of reach of small children.
• When not using the battery, or not using the device for a prolonged period,
remove the battery from the device and store it in a dry place between the
temperatures of -20oC and +21oC (-4°F- and +70°F). This prevents decreased
battery performance and service life.
• The battery (battery or batteries or battery pack) shall not be exposed to
excessive heat such as sunshine, fire or the like.
CAUTION/MISE EN GARDE
Risk of Electric Shock, Do Not Open
Page 3

3
The lightning flash with arrowhead symbol, within an equilateral
triangle, is intended to alert the user to the presence of
uninsulated “dangerous voltage” within the product’s enclosure
that may be of sufficient magnitude to constitute a risk of electric
shock to persons.
The exclamation point within an equilateral triangle is intended
to alert the user to the presence of important operating and
maintenance (servicing) instructions in the literature
accompanying the appliance.
CAUTION: Risk of Electrical Shock - Do not submerge the product in water
CAUTION: To reduce the risk of electric shock, do not remove cover (or back). No
user serviceable parts – refer servicing to qualified service personnel only.
IMPORTANT SAFETY INSTRUCTIONS
1. Read these instructions. Keep these instructions. Heed all warnings. Follow
all instructions.
2. Do not use this apparatus in water. The apparatus can be exposed to
rain, snow or any weather element without risk of injury or damage. Do not
submerge in water or other liquids. The product is water resistant not water
proof.
3. Clean only with a wet rag or light spray of water from garden hose. Do not
use high pressure hoses or washers to clean the product.
4. Do not block any ventilation openings. Install in accordance with the
manufacturer’s instructions.
5. Do not install near any heat sources such as radiators, heat registers, stoves,
or other apparatus (including amplifiers) that produce heat.
6. Only use approved batteries in this product in accordance with the
manufacturers’ instructions.
7. Only use attachments/accessories specified by the manufacturer.
8. Refer all servicing to qualified service personnel. Servicing is required when
the apparatus has been damaged in any way, such as power-supply cord
or plug is damaged, liquid has been spilled or objects have fallen into the
apparatus, the apparatus has been exposed to rain or moisture, does not
operate normally, or has been dropped.
9. The weight of this device may cause instability of a
free-standing table or stand near a pool, pond or other
standing water. Insure that the surface or object that
the product is placed on is stable and cannot be tipped
over causing the product to be immearsed in water.
Page 4

4
Congratulations
Thank you for choosing the wireless, portable AudioRockTM
from ebode electronics. With proper installation and
operation, you will enjoy years of trouble-free use. ebode
electronics offers numerous loudspeakers for use
inside or outside your home. To see the complete ebode
electronics product assortment, visit us on the Internet at:
www.ebodeelectronics.eu.
Page 5

5
Table of Contents
AudioRock Overview.............................................................................6
What is in this box................................................................................7
Installation Considerations................................................................8
Selecting Locations...............................................................................8
Setting up Zones.................................................................................9
Preparing AudioRock for Installation.......................................10
Installation Instructions...................................................................11
Pairing the AudioRock to the Transmitter..............................12
Operating and Controlling Your AudioRock..........................14
Specifications......................................................................15
Accessories........................................................................15
Warranty...............................................................................................16
CE Declaration of Conformity.....................................................130
Technical Support Information...................................Back Cover
Page 6

6
AudioRock
TM
Overview
This wireless portable
AudioRock is intended to
install in a few minutes.
Since it runs on batteries
it increases the flexibility of
where these speakers can
be used. The transmitter
can support up to 8 wireless AudioRocks and provide
audio to your entire outdoor area. You can even divide
your outdoor spaces into unique areas, selecting between
two sources, with variable sound control allowing you the
flexibility to easily configure and install an outdoor system
to be enjoyed by all.
Additionally, the system can be expanded by adding
our patented LightSpeakers®. These LightSpeakers
install in minutes and fit into table lamps as well as
hanging lamps or anywhere you find a standard E27
Edison socket. The LED provides “green” lighting and the
speaker provides outstanding sound throughout your
home. The LightSpeakers are available from your retailer
or at www.
ebodeelectronics
.eu.
The entire system provides even greater flexibility to
you as the owner because you can take it with you if you
move. If you do need to remove it, it leaves no trace that
the system was ever installed or used.
Page 7

7
NOTE: The AudioRock can only be used with the
ebode electronics
wireless LightSpeaker transmitter. It
cannot be used or operated without the LightSpeaker
transmitter.
What’s in this Box
Wireless AudioRock
Owner’s Manual
One Charger
One Rechargeable Lithium-ion Battery
Remote and transmitter also sold separately.
Page 8

8
Installation Considerations
Remember the outdoor line-of-sight range of the system
is up to 35 meter, so as long as the distance from the
transmitter to the farthest AudioRock, in any direction, is
less than 35 meter, the placement of the transmitter is
up to you.
Selecting AudioRock Locations
Your wireless AudioRock can be placed anywhere it is
convenient in your outdoor listening areas. You can
even space multiple AudioRocks so that no one speaker
is further than 10 meter from the other speaker.
This provides the best and most even coverage for
outstanding sound quality.
Page 9

9
Setting Up Zones
If you have more than one AudioRock and you want to
set up separate listening zones in your outdoor area, you
have the option of setting up a second zone. An audio
zone is any area or group of areas where you want the
same audio source playing and want the volume of the
speakers to be about the same. If you want an area to
have different volume level or play a different set of music
then use the two zone option. Please note that there is no
right or wrong way to do this, it is simply how you think you
want to use your AudioRock system. If you try an option
and don’t like it, it is easy to change and try another one.
NOTE: You have some control over an area being on or
off by using the power switch that is on the rear of the
AudioRock. Simply turn it off and there will not be any
sound in that area.
Page 10

10
Preparing AudioRock for Installation
Please charge your battery for your rock by plugging
in the power supply and inserting the battery into the
charger. Allow at least 8 hours for the first charge.
Charging the AudioRock Battery
Step 1: Plug adapter into the charger.
Step 2: Plug adapter into AC socket.
Step 3: Slide battery into the charger making sure that it
is inserted correctly and that you do not have to force the
battery into the charger.
Step 4: When the battery is fully charged the LED on the
front of the charger will turn GREEN.
Step 5: Remove Battery from charger and place it into
the AudioRock.
NOTE: Leaving the battery in the charger for periods
longer than 24 hours may reduce battery life. When an
uncharged battery is placed in the charger the LED on
the front of the charger will shine RED; when charging is
complete the LED will turn GREEN.
Page 11

11
Installation Instruction
Step 1:
After the battery has been charged, install it into the
battery compartment. Be sure it is pushed all the way in.
Secure the battery by sliding the tabs over the battery until
they are pointing straight at each other.
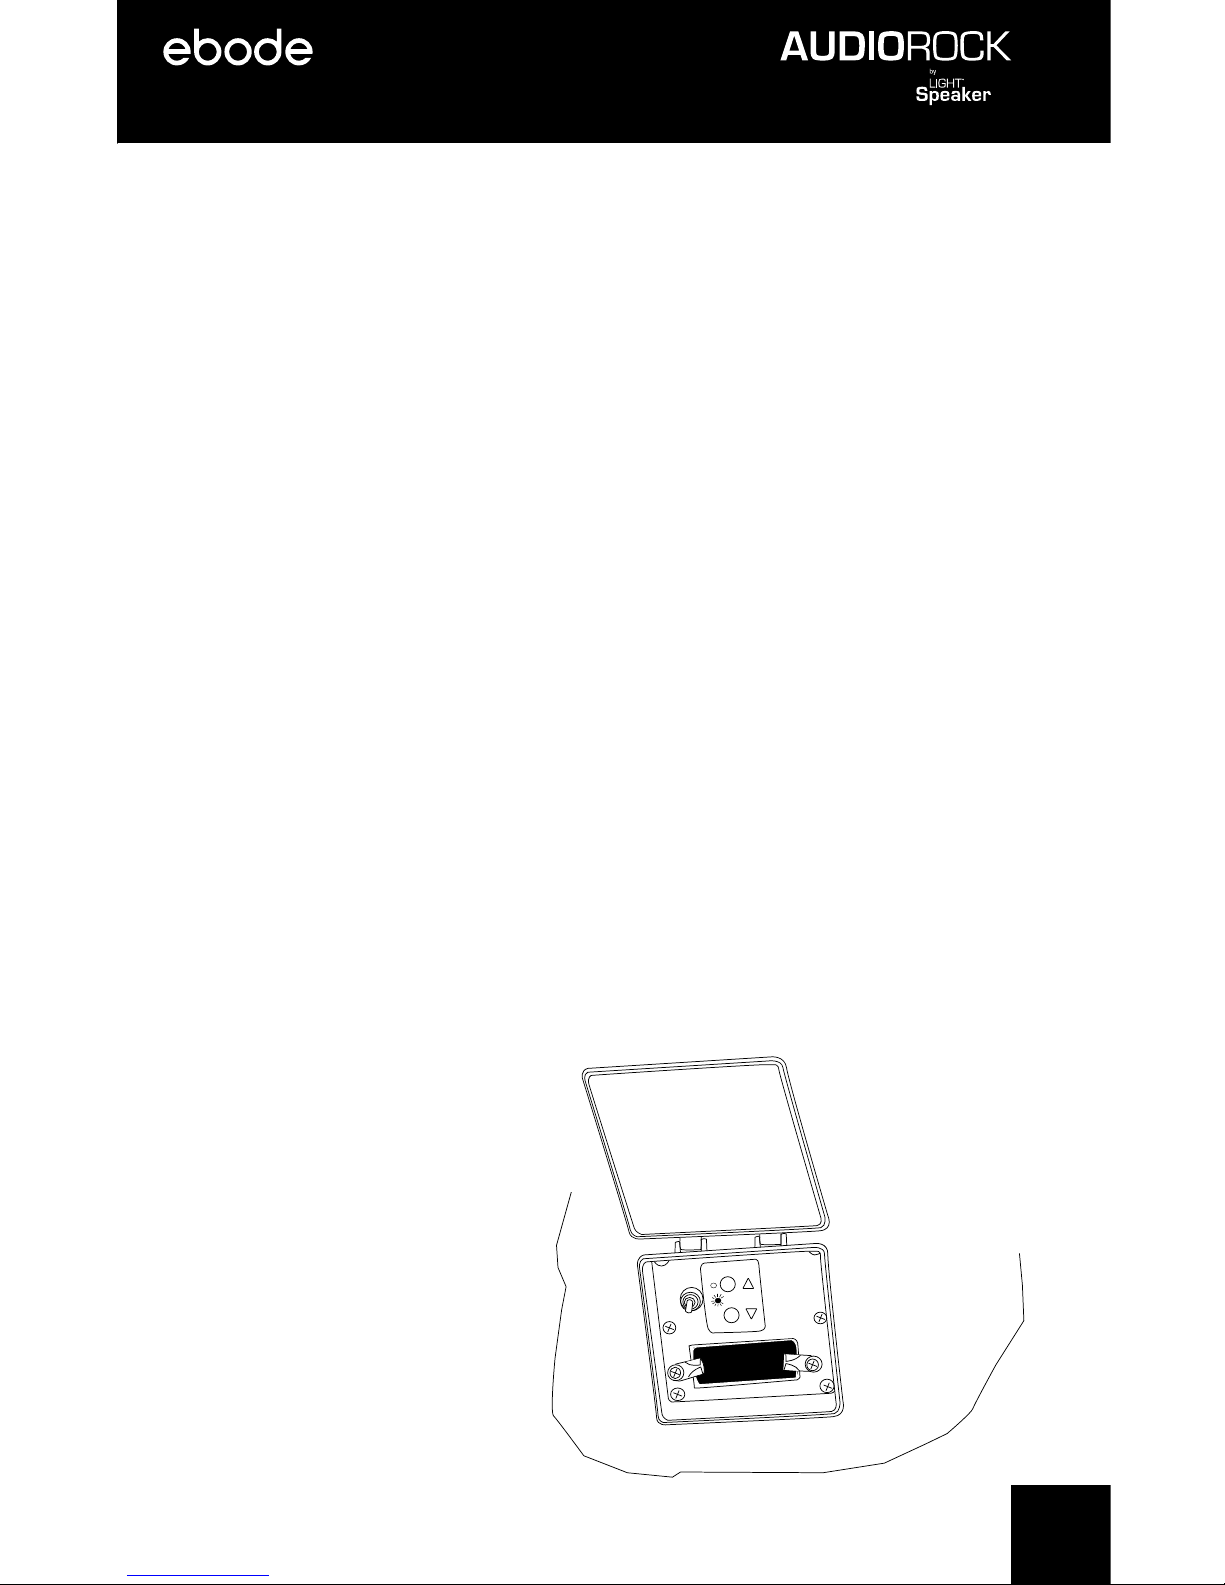
Step 2: Be sure the zone switch on the back of your
AudioRock is set to zone 1 unless you are setting up
a two zone system. If you intend to set up a two zone
system, be certain the zone switch is set to the number
corresponding to the zone you intend to place it in.
Zone Volume
1
2
Pairing
Page 12

12
Pairing the AudioRock to the Transmitter
Before you can begin using and enjoying your new
portable wireless AudioRock system, it is necessary to
“teach” your AudioRock
the identity of the transmitter you
are using; this teaching is called “pairing” and is very easy
to do.
Step 1: With the Transmitter power on (LED on front will be
lit), find and press the pairing button on the back of the unit.
You may need a sharp object, like a pen, to press the button
in. When you do, you will see the LED on the front of the
transmitter flash.
This means the unit is in the “pairing” mode.
Step 2: Quickly set the power switch, located at the back
of your AudioRock, to “ON” and press the pairing button
also located on the back of the AudioRock.
You have a total of 30
seconds to get this done.
If you take too long, leave
the units you have already
switched the power on, ON.
Press the pairing button
again and proceed through
the other areas.
Page 13

13
You will know if the unit is ON because LEDs on the back
of your AudioRock will light up as you flip the switch.
If no LEDs light up, check to be certain the battery is
charged.
When the pairing light turns solid GREEN, the pairing is
complete. You have about 30 seconds to get this done.
If this is not enough time to pair all of your AudioRocks,
simply repeat for each AudioRock in your system.
Step 3: When all units are paired, you are ready to start
using and controlling the system.
Step 4: If you have more AudioRocks, LightSpeakers or
other speakers designed to work on the LightSpeaker
network, make sure they are all paired. If not, pair them
per the instructions in the owner’s manual for that
speaker. When all units are paired, you are ready to start
enjoying your entire LightSpeaker network.
Zone Volume
1
2
Pairing
Page 14

14
Operating and Controlling Your AudioRock
AudioRock Electronics
The battery compartment accepts the supplied
rechargeable battery and provides up to 8 hours of
playback. Playback time will depend upon how loud you
listen to your music; the lower the average level, the
longer the battery will last.
Built-in wireless receiver allows reception and control
of the AudioRock up to 35 meter away from your
LightSpeaker transmitter and remote control.
You can also control: “ON/OFF” and “Volume” from the
adjustment buttons on the back of your AudioRock.
Weatherproof sealing of electronics assures reliability
of unit over time when left outdoors. This unit is built to
withstand severe weather conditions and the affects of
sprinklers and other watering systems. It is, however, not
designed to be submerged, or left to sit in open water
pools more than 2,5 cm deep.
Page 15

15
AudioRock Specifications:
This stereo outdoor wireless rock speaker, with a 5¼” woofer,
is optimally tuned for outdoor performance. The sound is
electronically equalized to provide superior acoustic performance
in open-air environments. Neutral Granite styling allows this
system to blend unobtrusively into most outdoor environments.
This single-speaker stereo unit provides dual-channel audio from
a single enclosure.
Electronics
• Battery compartment accepts supplied rechargeable battery providing up to
8 hours of playback (depending on type of music and volume)
• Built-in 2.4 GHz wireless receiver and 40 watts peak total audio
amplifier power.
• On-board on/off control and volume control allow direct volume adjustment
without need of the supplied RF remote
• Weatherproof sealing of electronics assures reliability of unit over time when
left outdoors
Acoustics
• Dual Voice Coil 5¼” Environmental Injection Molded Polypropylene Woofer
• Dual ¾” Polypropylene Tweeters
• Drivers are angled upward 20 degrees to deliver great sound when system is
placed at ground level
• System uses active acoustic equalization to smooth, enhance and extend
frequency response
Mechanics and Reliability
• Fully weatherproof enclosure and drivers are UV protected with rustproof
hardware and grille (IEC 60529, IPX4, IPX5)
• All components tested to withstand temperature and humidity extremes
Accessories
• Long-lasting rechargeable lithium-ion Battery Pack provides up to 8 hours
of audio when fully charged. Recharges in 4 hours
• Separate Charging Base for the Battery
• DC Power Supply for Battery Charger
Page 16

16
Warranty - Home and Commercial Audio
Limited Liability
ebode electronics warrants its loudspeaker products to the original
purchaser to be free of manufacturing defects in material and workmanship
for a period of two years from date of purchase. This warranty is subject to
the following additional conditions and limitations.
The warranty is void and inapplicable if ebode electronics deems that the
product has been used or handled other than in accordance with the
instructions provided by the manufacturer, including but not limited to
damage caused by accident, mishandling, improper installation, abuse,
negligence, or normal wear and tear, or any defect caused by repair to the
product by anyone other than ebode electronics.
To obtain warranty service, please visit your dealer. A factory return
authorization number will be sent to you. Do not return any unit without first
receiving written authorization and shipping instructions from your dealer.
There are no other warranties, including without limitation, either express or
implied warranties of merchantability or fitness for a particular purpose, with
respect to the product.
Repair or replacement as provided under this warranty is the exclusive
remedy of the consumer/purchaser. ebode electronics shall not be
responsible for any incidental or consequential damages except to the extent
provided (or prohibited) by applicable law.
Some COUNTRIES do not allow the exclusion or limitation of incidental or
consequential damages, so the above limitation may not apply to you.
This warranty gives you specific legal rights, and you may also have other
rights which vary from COUNTRY TO COUNTRY.
Page 17

17
Questions? Contact your local dealer!
Have a question about your ebode electronics speakers? Talk to the
people who know them best! We’re waiting to hear from you!
WRITE THE PART NUMBER AND SERIAL NUMBER FROM YOUR
PRODUCT BOX HERE AND RETAIN FOR PRODUCT REGISTRATION
Part Number:______________________________________________
Serial Number:_____________________________________________
Page 18

18
Der AudioRock Lautsprecher wird mit einem 12-Volt Lithium-IonenAkku versorgt. Bitte lesen Sie die nachstehenden Sicherheitshinweise
vor der Benutzung:
Sicherheitshinweise für Lithium-Ionen-Akkus:
Zweckentfremdung kann zu einem Kurzschluss des Akkus, schmelzender
Isolierung, Schäden an den Sicherheitsventilen oder Sicherheitsmechanismen,
Auslaufen, Wärmeentwicklung oder Aufplatzen führen. Bitte beachten Sie bei der
Benutzung von Akkus und Batterien die nachstehenden Sicherheitshinweise.
• Werfen Sie Batterien nicht ins Feuer und setzen Sie sie nicht hohen Temperaturen
(60oC) aus.
• Setzen Sie Batterien unter keinen Umständen mit vertauschten Polen ein.
• Ist die Verbindung mit dem Ladegerät nicht einwandfrei, dann wenden Sie beim
Einsetzen des Akkus keine Kraft auf. Überprüfen Sie die Ausrichtung der Pole.
• Laden Sie nicht mit Ladegeräten, die für dieses Gerät nicht spezifiziert sind.
• Schließen Sie Plus- und Minuspol nicht kurz, beispielsweise mit Drähten, Münzen
usw. Bewahren Sie Akkus nicht gemeinsam mit metallischen Gegenständen
auf.
• Zerlegen Sie Akkus nicht.
• Bohren Sie keine Löcher in Akkus.
• Löten Sie nicht direkt auf einem Akku.
• Benutzen Sie Akkus nicht, wenn sie auslaufen, Form- oder Farbveränderungen
zeigen oder anderweitig „anders“ aussehen.
• Lassen Sie Akkus nicht nass werden, tauchen Sie Akkus nicht in Wasser oder
Seewasser. Das kann zu Hitzeentwicklung oder Korrosion führen.
• Bewahren Sie Akkus vor Kindern geschützt auf.
• Bei Nichtgebrauch des Akkus oder des Geräts für einen längeren Zeitraum
nehmen Sie den Akku aus dem Gerät und lagern Sie ihn trocken bei Temperaturen
zwischen -20oC und +21oC. Hierdurch vermeiden Sie eine Leistungsminderung
und die Lebenserwartung wird verlängert.
Bedienungsanleitung AudioRock
®
CAUTION/MISE EN GARDE
Risk of Electric Shock, Do Not Open
Page 19

19
Der Blitz im gleichseitigen Dreieck weist auf gefährliche
Hochspannung im Gerät hin, die zu Stromschlag führen kann.
Das Ausrufungszeichen im gleichseitigen Dreieck weist auf wichtige
Bedienungs- und Wartungsanleitungen hin.
VORSICHT: Stromschlaggefahr – Gerät nicht in Wasser eintauchen
VORSICHT: Zur Vermeidung von Stromschlag Gerätegehäuse nicht öffnen. Es befinden
sich keine vom Verbraucher wartbaren Teile im Innern des Geräts. Reparatur und
Wartung nur durch Fachpersonal.
WICHTIGE SICHERHEITSHINWEISE
1. Lesen Sie die Anleitungen. Bewahren Sie die Anleitungen auf. Beachten Sie alle
Warnungen. Befolgen Sie alle Anleitungen.
2. Benutzen Sie dieses Gerät nicht im Wasser. Das Gerät kann Regen, Schnee und
anderen Wetterbedingungen ohne Verletzungs- oder Schadenrisiko ausgesetzt
werden. Gerät nicht in Wasser oder sonstigen Flüssigkeiten eintauchen. Das Gerät ist
wassergeschützt, jedoch nicht wasserdicht.
3. Reinigen Sie das Gerät nur mit einem feuchten Tuch oder einer leichten Dusche mit
dem Gartenschlauch. Benutzen Sie keinen Hochdruckreiniger.
4. Blockieren Sie keine Entlüftungsöffnungen. Installieren Sie das Gerät entsprechend
den Anleitungen des Herstellers.
5. Installieren Sie das Gerät nicht in unmittelbarer Nähe von Wärmequellen wie
Heizkörper, Heizungen, Herde oder sonstigen Wärme erzeugenden Geräten
(einschließlich Verstärker).
6. Betreiben Sie das Gerät ausschließlich mit zugelassenem Akku entsprechend der
Anleitungen des Herstellers.
7. Benutzen Sie ausschließlich durch den Hersteller spezifizierte Zubehörteile.
8. Wenden Sie sich mit Wartungs- und Reparaturarbeiten ausschließlich an den
autorisierten Kundendienst. Das Gerät muss gewartet oder repariert werden, wenn es
selbst oder das Netzkabel oder der Netzstecker in irgendeiner Weise beschädigt ist,
Fremdkörper oder Flüssigkeiten in das Gerät eingedrungen sind, das Gerät Regen oder
Feuchtigkeit ausgesetzt war, nicht wie gewöhnlich funktioniert oder heruntergefallen ist.
9. Das Eigengewicht des Geräts kann zu Labilität führen, wenn es
auf einem freistehenden Tisch oder Aufsteller in der Nähe eines
Swimming Pools, Fischteichs oder stehendem Wasser aufgestellt
wird. Vergewissern Sie sich, dass die Stellfläche stabil ist und dass
das Gerät nicht ins Wasser fallen kann.
Page 20

20
Herzlichen Glückwunsch
Vielen Dank, dass Sie sich für den drahtlosen tragbaren
AudioRockTM von ebode electronics entschieden haben.
Bei sachgemäßer Installation und Benutzung werden
Sie das Gerät für viele Jahre problemlos nutzen können.
ebode electronics bietet eine Vielzahl von Lautsprechern
für Innen- und Außenmontage in Ihrem Haus an.
Besuchen Sie uns im Internet bei www.ebodeelectronics.
eu, um die gesamte Produktpalette von ebode electronics
zu sehen.
Page 21

21
Inhalt
AudioRock Überblick..........................................................................22
Lieferumfang...........................................................................23
Installationshinweise................................................................24
Standorte wählen................................................................................24
Zonen einrichten.................................................................................25
AudioRock zur Installation vorbereiten....................................26
Installationsanleitungen..............................................................27
AudioRock und Sender aufeinander abstimmen (Pairing).28
Bedienung und Steuerung Ihres AudioRock..........................30
Spezifikationen......................................................................31
Zubehör.............................................................................31
Garantie.............................................................................................32
CE-Erklärung..........................................................................130
Kundendienst..............................................................Umschlagseite
Page 22

22
AudioRock
TM
Überblick
Der drahtlose tragbare
AudioRock ist innerhalb
weniger Minuten installiert.
Mit seiner Akkuversorgung
erhöht sich noch die
Flexibilität beim Einsatz
dieser Lautsprecher.
Der Sender unterstützt bis zu 8 drahtlose AudioRocks
und versorgt Ihren gesamten Außenbereich mit Audio.
Sie können Ihre Außenbereiche auch unterteilen und
zwischen zwei Quellen mit variabler Klangsteuerung
wählen, womit Sie ganz einfach ein außenmontiertes
System zur Freude aller konfigurieren und installieren
können.
Das System kann weiterhin um unsere patentierten
LightSpeaker® Lautsprecher erweitert werden. Die
LightSpeaker sind in Minutenschnelle installiert und
passen in Tischleuchten, Hängeleuchten oder überall
dort, wo sich eine standardgemäße E27 Edison
Lampenfassung befindet. Sie liefern eine „grüne“
Beleuchtung und überragenden Klang im gesamten Haus.
LightSpeaker finden Sie bei Ihrem Fachhändler oder bei
www.ebodeelectronics.eu.
Das gesamte System bietet Ihnen als Eigentümer
noch größere Flexibilität, da Sie es bei einem Umzug
ganz einfach mitnehmen können. Nach dem Ausbau
bleiben keine Anzeichen zurück, dass das System jemals
installiert war.
Page 23

23
BITTE BEACHTEN SIE: Der AudioRock kann nur mit
dem ebode electronics drahtlosen LightSpeaker Sender
benutzt werden. Er kann nicht ohne den LightSpeaker
Sender betrieben werden.
Lieferumfang
Drahtloser AudioRock
Bedienungsanleitung
Ein Ladegerät
Ein Lithium-Ionen-Akku
Fernbedienung und Sender werden ebenfalls
einzeln verkauft.
Page 24

24
Installationshinweise
Bitte denken Sie daran, dass die Sichtlinienreichweite
des Systems im Freien bis zu 35 m beträgt, daher ist die
Aufstellung des Senders ganz Ihnen überlassen, solange
die Entfernung vom Sender in allen Richtungen zum
entferntesten AudioRock geringer als 35 m ist.
Standorte für AudioRocks wählen
Ihr drahtloser AudioRock kann in Ihren Hörbereichen im
Freien an beliebiger Stelle aufgestellt werden. Sie können
auch mehrere AudioRocks so aufstellen, dass sie nicht
mehr als 10 m voneinander entfernt stehen. Hiermit
haben Sie die beste und ausgeglichene Abdeckung für
eine außergewöhnliche Klangqualität.
Page 25

25
Zonen einrichten
Haben Sie mehr als einen AudioRock und Sie möchten
separate Hörzonen in Ihrem Außenbereich einrichten, so
können Sie eine zweite Zone einstellen. Eine Audiozone
ist ein Bereich oder eine Gruppe von Bereichen, in
denen Sie die gleiche Audioquelle mit etwa der gleichen
Lautstärke wiedergeben möchten. Möchten Sie für einen
Bereich eine abweichende Lautstärke oder eine andere
Musikrichtung, so nutzen Sie die Zwei-Zonenoption. Bitte
beachten Sie, dass es hierbei kein richtig oder falsch gibt,
es ist ganz allein Ihnen überlassen, wie Sie Ihr AudioRock
System benutzen möchten. Probieren Sie eine Option
aus und das Ergebnis gefällt Ihnen nicht, dann ist eine
Änderung kinderleicht.
BITTE BEACHTEN SIE: Sie können einen Bereich ein- oder
ausschalten, hierzu haben Sie den Hauptschalter auf der
Rückseite des AudioRock. Schalten Sie ihn aus, damit
haben Sie keinen Ton in diesem Bereich.
Page 26

26
AudioRock zur Installation vorbereiten
Laden Sie den Akku, indem Sie das Netzkabel anschließen
und den Akku in das Ladegerät einsetzen. Die erste
Ladung sollte wenigstens 8 Stunden betragen.
Akku des AudioRock laden
Schritt 1: Schließen Sie das Netzteil am Ladegerät an.
Schritt 2: Stecken Sie das Netzteil in die Steckdose.
Schritt 3: Setzen Sie den Akku korrekt in das Ladegerät
ein, wenden Sie hierbei keine Kraft an.
Schritt 4: Sobald der Akku voll geladen ist, schaltet die
LED auf der Frontblende des Ladegeräts auf GRÜN um.
Schritt 5: Nehmen Sie den Akku aus dem Ladegerät und
setzen Sie ihn im AudioRock ein.
BITTE BEACHTEN SIE: Lassen Sie den Akku nicht länger
als 24 Stunden am Ladegerät angeschlossen, ansonsten
kann sich die Lebensdauer des Akkus verringern. Beim
Einsetzen eines erschöpften Akkus in das Ladegerät
leuchtet die LED auf der Frontblende ROT. Nach
beendeter Ladung schaltet die LED auf GRÜN um.
Page 27

27
Installationsanleitung
Schritt 1: Nachdem der Akku voll geladen ist, setzen Sie ihn
im Batteriefach ein. Schieben Sie ihn ganz ein. Sichern Sie
den Akku mit den Nasen, bis sie aufeinander ausgerichtet
sind.
Schritt 2: Achten Sie darauf, dass der Zonenschalter
auf der Rückseite Ihres AudioRock auf Zone 1 eingestellt
ist, es sein denn, Sie richten ein Zwei-Zonensystem ein.
Möchten Sie ein Zwei-Zonensystem einrichten, so muss der
Zonenschalter auf die entsprechende Zone eingestellt sein.
Zone Volume
1
2
Pairing
Page 28

28
AudioRock und Sender aufeinander abstimmen (Pairing)
Bevor Sie Ihr neues tragbares drahtloses AudioRock
System benutzen und sich daran erfreuen können, muss
Ihr AudioRock die Identität des von Ihnen benutzten
Senders „übernehmen“; dieses „Pairing“ ist kinderleicht.
Schritt 1: Mit dem Sender eingeschaltet (die LED auf der
Frontblende leuchtet), drücken Sie die Pairingtaste auf der
Geräterückseite. Sie benötigen einen spitzen Gegenstand
(wie einen Kugelschreiber), um die Taste zu drücken.
Während Sie drücken, blinkt die LED auf der Frontblende
des Senders.
Das Gerät ist jetzt im Pairingmodus.
Schritt 2: Schalten Sie nun den Hauptschalter auf der
Geräterückseite Ihres AudioRock auf „ON“ und drücken
Sie gleichzeitig die Pairingtaste auf der Rückseite des
AudioRock.
Sie haben hierzu 30 Sekunden
Zeit. Dauert es länger, so
lassen Sie die Geräte, die Sie
bereits eingeschaltet haben, an.
Drücken
Sie erneut die Pairingtaste
und gehen Sie wie vorstehend
beschrieben vor.
Page 29
29
An den leuchtenden LEDs auf der Rückseite Ihres
AudioRock erkennen Sie, ob das Gerät eingeschaltet ist.
Leuchten keine LEDs, dann vergewissern Sie sich, dass
der Akku geladen ist.
Sobald die Pairinganzeige auf GRÜN umschaltet, ist das
Pairing abgeschlossen. Sie haben hierzu 30 Sekunden
Zeit. Ist diese Zeit nicht ausreichend, um all Ihre
AudioRocks abzustimmen, dann wiederholen Sie den
Vorgang einfach für jeden AudioRock in Ihrem System.
Schritt 3: Nachdem alle Geräte abgestimmt sind, können
Sie das System benutzen und steuern.
Schritt 4: Haben Sie weitere AudioRocks, LightSpeaker
oder sonstige Lautsprecher zum Betrieb mit dem
LightSpeaker Netzwerk konzipiert, dann sollten diese nun
alle abgeglichen sein. Sollte das nicht der Fall sein, so
gleichen Sie sie entsprechend der Bedienungsanleitung
für den jeweiligen Lautsprecher ab. Nachdem alle Geräte
abgestimmt sind, können Sie sich an Ihrem gesamten
LightSpeaker Netzwerk
erfreuen.
Bedienung und
Steuerung Ihres
Zone Volume
1
2
Pairing
Page 30

30
AudioRock
AudioRock Elektronik
Das Batteriefach nimmt den mitgelieferten Akku
auf und liefert bis zu 8 Stunden Wiedergabe. Die
Wiedergabedauer richtet sich nach der Lautstärke der
Musik; je geringer der Durchschnittspegel, desto länger
hält der Akku.
Der integrierte drahtlose Empfänger ermöglicht Empfang
und Steuerung des AudioRock bis zu 35 m von Ihrem
LightSpeaker Sender und der Fernbedienung entfernt.
Sie steuern ebenfalls Ein/Aus und die Lautstärke mit den
Bedienelementen auf der Rückseite Ihres AudioRock.
Die wetterfeste Versiegelung der Elektronik gewährleistet
die Zuverlässigkeit des Geräts im Freien. Das Gerät ist
für schwierige Wetterverhältnisse sowie Sprinkler und
andere Bewässerungssysteme ausgelegt. Es ist jedoch
nicht konzipiert, untergetaucht oder in Pfützen von mehr
als 2,5 cm Tiefe belassen zu werden.
Page 31

31
AudioRock Spezifikationen:
Dieser drahtlose Stereolautsprecher zur Außenmontage mit einem 5¼-Zoll
Tieftöner ist optimal auf die Leistung im Freien eingestellt. Der Klang wird
elektronisch entzerrt, um eine überlegene akustische Leistung im Freien zu
bieten. Das neutrale Granitstyling ermöglicht, dass sich das System dezent
in die meisten Umgebungen einfügt. Dieser Einzel-Stereolautsprecher liefert
2-Kanal-Audio in einem einzigen Gehäuse.
Elektronik
• Das Batteriefach nimmt den mitgelieferten Akku auf und liefert bis zu 8
Stunden Wiedergabe (abhängig von der Musik und der Lautstärke).
• Eingebauter 2.4 GHz Funkempfänger und 40 Watt Spitzenleistung des
Audioverstärkers.
• Integrierte Ein-/Ausschaltung und Lautstärkeregelung zur direkten
Einstellung ohne die mitgelieferte RF-Fernbedienung.
• Die wetterfeste Versiegelung der Elektronik gewährleistet die
Zuverlässigkeit des Geräts bei Außenmontage.
Akustik
• 5¼ Zoll ökologischer Spritzguss-Polypropylen-Tieftöner mit doppelter
Schwingspule.
• Zwei ¾ Zoll Polypropylen-Hochtöner.
• Die Treiber sind aufwärts in einem Winkel von 20 Grad montiert, um bei
Bodenaufstellung hervorragenden Klang zu liefern.
• Das System benutzt aktive Akustikentzerrung für Filterung, Verbesserung
und erweiterten Frequenzgang.
Mechanik und Zuverlässigkeit
• Vollkommen wettergeschütztes Gehäuse und Treiber UV-beständig mit
rostgeschützten Beschlägen und Grill (IEC 60529, IPX4, IPX5).
• Alle Komponenten sind auf extreme Temperaturen und Luftfeuchtigkeit
getestet.
Zubehör
• Langzeit-Lithium-Ionen-Akku für bis zu 8 Stunden Audio mit voller Ladung;
Ladedauer 4 Stunden.
• Separate Ladestation für Akku.
• Netzteil für Ladegerät.
Page 32

32
Garantie – Heim und gewerbliches Audio
Eingeschränkte Haftung
ebode electronics garantiert seine Lautsprecherprodukte für den
Ersterwerber für Fertigungs- und Materialfehler für zwei Jahre ab
Kaufdatum. Diese Garantie unterliegt den nachstehenden Bedingungen und
Beschränkungen.
Die Garantie ist ungültig und verfällt, wenn ebode electronics
davon ausgehend muss, dass das Produkt nicht entsprechend den
Herstelleranleitungen benutzt oder behandelt wurde, einschließlich, jedoch
nicht darauf beschränkt, Schäden durch Unfall, falsche Handhabung,
unsachgemäße Installation, Missbrauch, Fahrlässigkeit oder normalen
Verschleiß oder Schäden durch Eingriffe Dritter (außer ebode electronics).
Zur Inanspruchnahme der Garantie bitte wenden Sie sich an Ihren Fachhändler.
Ihnen wird eine Rückgabenummer übersandt. Geben Sie kein Gerät zurück, ohne
zuvor schriftliche Bestätigung und Versandanleitungen von Ihren Fachhändler
erhalten zu haben.
Andere Garantiezusagen werden nicht gemacht, einschließlich und ohne
Beschränkung, ausdrücklich oder impliziert, Marktgängigkeit oder Eignung
des Geräts für einen bestimmten Zweck.
Reparatur oder Austausch gemäß dieser Garantie ist der einzige Anspruch
des Kunden/Käufers. ebode electronics übernimmt keine Verantwortung
für beiläufige oder Folgeschäden, außer wie gesetzlich geregelt (oder
ausgeschlossen).
Einige LÄNDER lassen den Ausschluss oder die Beschränkung beiläufiger
oder Folgeschäden nicht zu, daher trifft die obige Beschränkung für Sie
möglicherweise nicht zu.
Diese Garantie gibt Ihnen bestimmte Rechte neben gesetzlichen Ansprüchen,
die von LAND ZU LAND unterschiedlich sind.
Page 33

33
Fragen? Bitte wenden Sie sich an Ihren Fachhändler!
Haben Sie Fragen zu Ihren LightSpeaker® Lautsprechern?
Wenden Sie sich an die Menschen, die davon am meisten verstehen!
NOTIEREN SIE HIER MODELLNUMMER UND
SERIENNUMMER
Modellnummer:________________________
Seriennummer:________________________
Page 34

34
De AudioRock luidspreker werkt op een 12 volt Lithium-ion batterij.
Lees voor het gebruik de volgende veiligheidsinstructies zorgvuldig door:
Veiligheidsinstructies voor Li-ion batterijen:
Door verkeerd gebruik kunnen de batterijen kortsluiting veroorzaken, waardoor
de isolatie kan smelten, de veiligheidskleppen en het veiligheidsmechanisme
beschadigd kunnen raken en er lekkage, overmatige warmte of breuk op kan
treden. Neem de volgende voorzorgsmaatregelen in acht indien u batterijen
gebruikt.
• Gooi de batterijen niet in het vuur en stel ze niet bloot aan hoge
temperaturen. (60oC)
• Zorg ervoor dat u nooit de positieve en de negatieve pool van de batterijen in
de verkeerde richting in het apparaat plaatst.
• Als u de batterij niet goed in de oplader kunt plaatsen, forceer de batterij dan
niet op zijn plaats, maar controleer in plaats daarvan of de batterijpolen in de
juiste richting wijzen.
• Laad het apparaat niet op met opladers die niet voor dit product zijn
bestemd.
• Breng de positieve en de negatieve contacten niet met metalen voorwerpen
zoals draad, muntjes enz. in contact. Zorg er ook voor dat u de batterijen niet
opbergt of draagt in de buurt van metalen kettingen enz.
• Demonteer de batterij niet en breng geen er geen veranderingen in aan.
• Boor geen gat in de batterij.
• Soldeer niets direct op de batterij.
• Gebruik de batterij niet als u tekenen van lekkage, een verandering van kleur
of vorm of enige andere wijziging aan het uiterlijk van de batterij bemerkt.
• Maak de batterij niet nat en dompel hem niet in water of zeewater. Hierdoor
kan de batterij gaan roesten of overmatige hitte veroorzaken.
• Houd de batterij buiten bereik van kleine kinderen.
• Als u de batterij niet gebruikt of het apparaat voor een langere periode niet
gebruikt, verwijder dan de batterij uit het apparaat en berg hem op op een
droge plaats met temperaturen tussen de -20oC en +21oC. Op deze manier
blijft de levensduur en het prestatievermogen van de batterij behouden.
• De batterij (batterij, batterijen of verpakkingen met meerdere batterijen)
mogen niet aan overmatige hitte zoals zonlicht, vuur o.i.d., worden
blootgesteld.
CAUTION/MISE EN GARDE
Risk of Electric Shock, Do Not Open
Gebruiksaanwijzing AudioRock
®
Page 35

35
Het bliksemteken in de gelijkzijdige driehoek dient om de gebruiker te
waarschuwen dat er mogelijk gevaarlijke hoge spanning in het toestel
aanwezig is, die voldoende kracht heeft om het risico op elektrische
schokken te vormen.
Het uitroepteken binnen een gelijkzijdige driehoek dient om de gebruiker te
waarschuwen dat er belangrijke gebruiksaanwijzingen te lezen zijn in de
handleiding
PAS OP: Gevaar voor elektrische schokken - Dompel dit product niet onder in water
PAS OP: Om het risico op elektrische schokken te verminderen mag de deksel (of
achterkant) niet worden verwijderd. Onderdelen kunnen niet door de gebruiker worden
gerepareerd - Schakel voor onderhoud en reparatie alleen erkend servicepersoneel in.
BELANGRIJKE VEILIGHEIDSINSTRUCTIES
1. Lees deze instructies Bewaar deze instructies Neem alle waarschuwingen in acht.
Volg alle instructies op.
2. - Gebruik dit apparaat niet in water. Dit apparaat kan blootgesteld worden aan
regen, sneeuw of andere weersomstandigheden zonder risico op verwondingen of
beschadigingen. Dompel het apparaat niet onder in water of andere vloeistoffen.
Het product is waterbestendig, maar niet waterproof.
3. Maak het apparaat alleen schoon met een natte doek of een kleine waterstraal uit
de tuinslang. Gebruik geen hogedrukreinigers of hogedrukslangen om het apparaat
schoon te maken.
4. Blokkeer geen enkele ventilatieopening. Installeer het apparaat volgens de
instructies van de fabrikant.
5. - Plaats het apparaat niet in de buurt van warmtebronnen zoals radiatoren, kachels,
ovens of andere apparaten die warmte produceren (inclusief versterkers).
6. Gebruik alleen goedgekeurde batterijen voor dit product, overeenkomstig de
instructies van de fabrikant.
7. Gebruik uitsluitend accessoires/aansluitingen die door de fabrikant worden
aangegeven.
8. Schakel voor onderhoud en reparatie alleen erkend servicepersoneel in. Een
servicebeurt is noodzakelijk indien het apparaat op enige wijze is beschadigd, zoals
bijvoorbeeld een beschadiging aan het netsnoer of de stekker, als er vloeistoffen
overheen zijn gekomen, als er voorwerpen in het apparaat zelf zijn gevallen, als het
product aan regen of vocht is blootgesteld, als het niet normaal meer werkt of als
het gevallen is.
9. Het gewicht van het apparaat kan ervoor zorgen dat een
vrijstaande tafel of een stellage die zich dichtbij een zwembad,
vijver of ander wateroppervlak bevindt, instabiel wordt. Zorg
ervoor dat het oppervlak of het voorwerp waarop het product is
geplaatst stabiel is en niet om kan vallen, zodat het product niet
in het water terecht kan komen.
Page 36

36
Gefeliciteerd
Hartelijk dank voor het kiezen van de draadloze, draagbare
AudioRockTM van ebode electronics. Met de juiste
installatie en bediening zult u jarenlang probleemloos
kunnen genieten van dit apparaat. ebode electronics biedt
u een grote keuze aan luidsprekers zowel voor binnen als
voor buiten. Om het hele productassortiment van ebode
electronics te bekijken, kunt u onze website bezoeken op:
www.ebodeelectronics.eu.
Page 37

37
Inhoudsopgave
AudioRock Overzicht...........................................................................38
Wat zit er in deze doos..................................................................39
Aandachtspunten voor de installatie...........................................40
Plaats bepalen.......................................................................................40
Zones installeren.................................................................................41
De AudioRock gereedmaken voor installatie....................42
Installatie-instructies.......................................................43
De AudioRock koppelen aan de zender.....................................44
Het bedienen van uw AudioRock...................................................46
Specificaties................................................................................47
Accessoires..............................................................................47
Garantie...............................................................................................49
CE Declaratie......................................................................................130
Informatie voor Technische ondersteuning..................................
....................................................................Achterkant van de omslag
Page 38

38
AudioRock
TM
Overzicht
Deze draadloze, draagbare
AudioRock is zo ontworpen
dat hij binnen enkele
minuten kan worden
geïnstalleerd. Omdat de
AudioRock op batterijen
werkt, bent u veel flexibeler
in plaatsing van de AudioRock. De zender ondersteunt
tot 8 draadloze AudioRocks, zodat u in uw hele tuin
kunt genieten van uw muziek. Door twee verschillende
bronnen te kiezen, kunt u uw tuin zelfs onderverdelen
in aparte zones met variabele geluidscontrole, zodat u
kunt profiteren van de flexibiliteit van een makkelijk te
installeren en te configureren audiosysteem voor buiten,
waar iedereen van kan genieten.
Bovendien kan het systeem ook nog uitgebreid worden
door toevoeging van onze gepatenteerde LightSpeakers®.
Deze LightSpeakers® kunnen binnen enkele minuten
worden geïnstalleerd en passen zowel in tafellampen als
hanglampen en verder overal waar u een standaard E27
Edison fitting vindt. Dankzij de LED zijn de LightSpeaker®
energiezuinig en hebben ze een uitstekend geluid overal in
uw huis. De LightSpeakers® zijn verkrijgbaar via uw dealer
of via www.ebodeelectronics.eu.
Het hele systeem biedt u als eigenaar nog meer
flexibiliteit, omdat u het met u mee kunt nemen indien u
verhuist. Mocht u het systeem ooit willen verwijderen, dan
laat het geen sporen van gebruik of installatie achter.
Page 39

39
OPMERKING: De AudioRock kan alleen worden gebruikt
in combinatie met de draadloze LightSpeaker zender
van ebode electronics . De AudioRock kan niet worden
gebruikt of bediend zonder de LightSpeaker zender.
Wat zit er in deze doos
Draadloze AudioRock
Handleiding voor de eigenaar
Een oplader
Een oplaadbare Lithium-ion Batterij
De afstandsbediening en zender worden apart verkocht.
Page 40

40
Aandachtspunten bij de installatie
Houd rekening met het feit dat de reikwijdte van het
systeem voor buiten 35 meter is. Zolang de afstand
tussen de zender en de verst verwijderde AudioRock
(ongeacht welke richting) kleiner is dan 35 meter, kunt u
de plaats van de zender vrij bepalen.
De plaats van de AudioRocks bepalen
Uw draadloze AudioRock kan buiten overal waar u dat wilt
geplaatst worden. U kunt ook meerdere AudioRocks in
de tuin plaatsen. U krijgt de beste en meest gelijkmatige
dekking als u de AudioRocks niet meer dan 10 meter uit
elkaar plaatst.
Page 41

41
Zones installeren
Als u meer dan één AudioRock heeft en u verschillende
luisterzones in uw tuin wilt installeren, dan heeft u de
mogelijkheid om een tweede zone te creëren. Een
audiozone is een zone of een aantal zones waarbinnen u
dezelfde audiobron wilt beluisteren en waar het volume
van alle luidsprekers ongeveer gelijk is. Als u een zone
wilt creëren met een afwijkend volume of in deze zone
naar andere muziek wilt luisteren, kunt u de twee zonesoptie gebruiken. Wij wijzen u erop dat er geen goede of
verkeerde manier is om dit te doen; het hangt gewoon af
van wat u met uw AudioRocksysteem wilt doen. Als u een
optie uitprobeert en dit niet bevalt, dan kunt u makkelijk
weer veranderen en een andere optie proberen.
OPMERKING: U kunt enige controle uitoefenen op het
geluid in de zones door de aan/uit knop te gebruiken die
zich aan de achterkant van de AudioRock bevindt. Zet de
knop gewoon uit, er zal dan geen geluid meer te horen zijn
in de desbetreffende zone.
Page 42

42
De AudioRock gereedmaken voor installatie
Laad de batterij van uw AudioRock op door de oplader in
het stopcontact te steken en de batterij in de oplader te
plaatsen. Wacht ten minste 8 uur waneer u de batterij
voor het eerst oplaadt.
De AudioRock Batterij opladen
Stap 1: Steek de adapter in de oplader.
Stap 2: Steek de stekker van de adapter in het
stopcontact.
Stap 3: Plaats de batterij op de juiste plaats, zorg ervoor
dat de batterij correct is geplaatst en dat u niet hoeft te
forceren om de batterij in de oplader te plaatsen.
Stap 4: Als de batterij geheel is opgeladen dan zal het
LED-lampje aan de voorzijde van de oplader GROEN
oplichten.
Stap 5: Haal de batterij uit de oplader en plaats deze in
de AudioRock.
OPMERKING: De levensduur van de batterij kan mogelijk
verminderen wanneer u deze langer dan 24 uur in
de oplader plaatst. Als een lege batterij in de oplader
wordt geplaatst zal het LED lampje op de voorkant rood
oplichten. Als het opladen is voltooid wordt de LED groen.
Page 43

43
Installation Instructies
Stap 1: Zodra de batterij is opgeladen kunt u deze in het
batterijvakje plaatsen. Controleer of de batterij er helemaal
in past. Zet de batterij vast door de klepjes over de batterij
heen te draaien totdat deze recht naar elkaar toe wijzen.
Stap 2: Zorg ervoor dat de zone-knop aan de achterkant
van uw AudioRock op zone 1 staat, tenzij u een twee-zones
systeem op wilt zetten. Indien u een twee-zones systeem op
wilt zetten, controleer dan of de zone-knop is ingesteld op het
nummer van de zone waarin u de AudioRock wilt plaatsen.
Zone Volume
1
2
Pairing
Page 44

44
De AudioRock pairen aan de zender
Voordat u kunt beginnen en kunt genieten van uw nieuwe
draagbare, draadloze AudioRocksysteem, dient u uw
AudioRock te “leren” welke zender u gebruikt; dit leren
noemen we ‘pairen’, en is heel eenvoudig te doen.
Stap 1: Zet de zender aan (het LED-lampje aan de
voorkant zal oplichten), zoek de pairing-knop op de
achterkant van het toestel en druk erop. U heeft
misschien een scherp voorwerp nodig, zoals een pen, om
de knop in te drukken. Als u op de knop drukt ziet u dat het
LED-lampje aan de voorkant gaat knipperen.
Dit betekent dat het toestel in de pairing mode staat.
Stap 2: Druk snel op de aan/uit knop die zich op de
achterkant van uw AudioRock bevindt en zet deze op
“AAN” (on) en druk op de pairing-knop die zich ook op de
achterkant van de Audiorock bevindt.
U heeft in totaal 30
seconden om dit te doen.
Als u er te lang over doet,
laat de AudioRocks die u
al heeft aangezet dan op
“AAN’ Staan.
Druk opnieuw op de pairingknop en ga verder met de
volgende stappen.
Page 45

45
U kunt zien dat de speaker aanstaat doordat de LEDlampjes aan de achterkant van de AudioRock oplichten
zodra u de knop omzet. Als er geen LED-lampjes gaan
branden, controleer dan of de batterij wel is opgeladen.
Als het pairing-lampje ononderbroken GROEN oplicht, is
het pairen afgerond. U heeft in totaal 30 seconden om
dit te doen. Als deze tijd te kort is om al uw AudioRocks
te pairen, herhaal dan gewoon de procedure voor iedere
AudioRock in uw systeem.
Stap 3: Als alle speakers gekoppeld zijn, bent u klaar om
uw systeem te gebruiken en te bedienen.
Stap 4: Indien u meer AudioRocks, LightSpeakers
of andere luidsprekers heeft die geschikt zijn om
aangesloten te worden op het LightSpeaker-netwerk,
verzeker u er dan van dat ze allemaal gepaird zijn. Indien
dat niet het geval is, pair de speakers dan volgens
de aanwijzingen in de gebruiksaanwijzing voor de
desbetreffende luidspreker. A
ls alle speakers
gekoppeld zijn, bent u
klaar om te genieten
van uw complete
LightSpeaker-netwerk.
Bediening van uw
Zone Volume
1
2
Pairing
Page 46

46
AudioRock
AudioRock elektronica
Het batterijvakje is geschikt voor de meegeleverde
oplaadbare batterij, waarmee u tot 8 uur lang muziek
kunt afspelen. De duur van de afspeeltijd is afhankelijk van
de hoogte van het volume van de muziek; hoe lager het
gemiddelde volume, hoe langer de batterij zal meegaan.
De ingebouwde draadloze ontvanger zorgt voor de
ontvangst en de bediening van de AudioRock binnen een
bereik van 35 meter, gerekend vanaf de LightSpeakerzender en afstandsbediening.
Extra bedieningsfuncties: “AAN/UIT” en “VOLUME” via
de regelknoppen aan de achterkant van uw AudioRock.
De weerbestendige afdichting van de elektronica
garandeert een langdurige betrouwbaarheid van het
toestel, als deze buiten wordt geplaatst. Dit toestel is erop
gebouwd om zware weersomstandigheden te weerstaan,
naast alle effecten van sproeisystemen en andere
irrigatiesystemen. Het toestel is echter niet ontworpen
om ondergedompeld te worden, of om in open water te
laten staan dat dieper is dan 2,5 cm.
Page 47

47
AudioRock Specificaties:
Deze draadloze stereo AudioRock met een 5¼ inch woofer is optimaal
afgesteld voor gebruik buitenshuis. Het geluid is elektronisch geregeld om de
allerbeste akoestische reslutaten in de open lucht te garanderen. Dankzij de
neutrale graniet-vormgeving vormt het systeem een onopvallend geheel in uw
tuin. De AudioRock levert stereo geluid vanuit één enkele behuizing.
Elektronica
•Het batterijvakje is geschikt voor de meegeleverde oplaadbare batterij,
waarmee u tot 8 uur lang muziek kunt afspelen (afhankelijk van het type
muziek en het volume)
•Ingebouwde 2.4 GHz draadloze ontvanger en audioversterker met een
totaal piekvermogen van 40 watt
• Dankzij de volume- en aan/uit regelknop op het apparaat zelf, kunt u het
volume aanpassen zonder gebruik te hoeven maken van de meegeleverde
RF-afstandsbediening.
• Indien het apparaat buiten wordt geplaatst, garandeert de weerbestendige
afdichting van de elektronica u langdurige betrouwbaarheid.
Akoestiek
• Dubbele spreekspoel (Dual Voice Coil) van 5¼ inch (13,35 cm). In een
natuurlijke ogende, gespuitgiete polypropyleen Woofer.
• Duale 3/4 inch (8,25 cm) hogetonenluidsprekers van polypropyleen
• De stuurbuizen zijn in een opwaartse hoek van 20 graden geplaatst en
zorgen zodoende voor een uitstekende geluidsweergave wanneer het
systeem op de grond wordt geplaatst.
• Het systeem gebruikt een actieve akoestieke equalisatie om het
frequentierespons vloeiender de laten verlopen, te versterken en uit te
breiden.
Mechaniek en betrouwbaarheid
• Het geheel weerbestendige omhulsel en de stuurbuizen zijn beschermd
tegen UV-straling en uitgerust met roestbestendige hardware en rooster
(IEC 60529, IPX4, IPX5)
• Alle onderdelen zijn getest op hun bestendigheid tegen extreme
temperaturen en vochtigheid.
Accessoires
• De duurzame, oplaadbare lithium-ion Batterij biedt - indien volledig
opgeladen - tot 8 uur lang audio. Laadt in 4 uur op.
• Aparte oplader voor de batterij
• DC voedingsaansluiting voor de batterijoplader
Page 48

48
Garantie – Audio voor Commercieel en Thuisgebruik
Beperkte Aansprakelijkheid
ebode electronics garandeert aan de oorspronkelijke koper dat haar
luidsprekerproducten vrij zijn van materiaal –en fabricagefouten voor een
periode van twee jaar vanaf de aankoopdatum. Deze garantie is geldig onder
de volgende aanvullende condities en beperkingen.
De garantie komt te vervallen als ebode electronics bepaalt dat het product
gebruikt of gehanteerd is in strijd met de instructies verstrekt door de
fabrikant, inclusief, maar niet beperkt tot, beschadiging wegens ongelukken,
misbruik, onjuiste installatie, incorrect gebruik, nalatigheid, natuurlijke slijtage,
of enig defect veroorzaakt door reparatie van het product uitgevoerd door
iemand anders dan ebode electronics.
Bezoek voor garantieservice uw dealer. Hij kan een autorisatienummer
verstrekken voor een retour. Stuur geen product terug zonder eerst een
schriftelijke autorisatie samen met de transportinstructies te hebben
ontvangen van uw dealer.
Dit product valt niet onder enige andere garanties.
Reparatie of vervanging zoals verstrekt onder deze garantie is de exclusieve
oplossing voor de consument/koper. ebode electronics kan niet aansprakelijk
worden gesteld voor incidentele schade of gevolgschade, tenzij binnen de
omvang zoals bepaald (of verboden) door de toepasbare wetgeving.
Sommige LANDEN staan de exclusie of beperking van incidentele schade
of gevolgschade niet toe, wat betekent dat de bovengenoemde beperking
eventueel niet op u van toepassing is.
Deze garantie geeft u specifieke legale rechten naast uw andere rechten die
van LAND TOT LAND variëren.
Page 49

49
Vragen? Neem contact op met uw lokale dealer!
Heeft u een vraag over uw Lightspeaker Systeem?
Praat met de mensen die er het meest van weten!
U kunt hier het model- en serienummer
opschrijven. U vindt deze op de verpakking.
Model Nummer:_______________________
Serie Nummer:________________________
Page 50

50
AudioRock-högtalaren har ett 12 volts litiumjon-batteri som
driftskälla. Läs igenom säkerhetsanvisningarna före användning:
Säkerhetsanvisningar för litiumjon-batteri:
Missbruk kan leda till att batterierna kortsluts, isoleringen smälter och skador
på säkerhetsventiler eller säkerhetsmekanismer som kan leda till läckage,
värmealstring eller explosion. Iaktta följande säkerhetsföreskrifter vid användning
av batterier.
• Släng inte i öppen eld eller utsätt inte för höga temperaturer. (140oF/60oC)
• Sätt aldrig i batterierna med positiva och negativa polerna felvända.
• Om anslutningen med laddaren inte fungerar som den ska, tvinga inte
batterierna på plats utan kontrollera istället polariteten.
• Ladda aldrig denna produkt med någon annan laddare än den anvisade.
• Kortslut inte den positiva eller den negativa polen med metallobjekt som
ståltråd, mynt eller liknande. Förvara eller bär aldrig batterierna tillsammans
med halsband och armband eller liknande i metall.
• Ta aldrig isär eller modifiera batteriet.
• Gör inte hål i batteriet.
• Löd inte på batteriet.
• Använd inte batteriet om det finns tecken på läckage, färg- eller formändringar
eller annan synlig förändring.
• Utsätt inte batteriet för väta och sänk inte ner det i vätska. Det kan göra att
batteriet alstrar värme eller rostar.
• Förvara batteriet utom räckhåll för småbarn.
• När inte batteriet används, eller om enheten inte ska användas under en
längre tidsperiod ska du ta ur batteriet ur enheten och förvara det på en torr
plats i temperatur mellan -20oC och +21oC (-4°F- och +70°F). På så sätt
förhindrar du att batteriets prestanda försämras och förlänger dess livslängd.
• Batteriet (batteriet, batterierna eller batteripaketet) får inte exponeras för
extrem hetta som direkt solljus, eld eller liknande.
CAUTION/MISE EN GARDE
Risk of Electric Shock, Do Not Open
Användermanual AudioRock
®
Page 51

51
Den blinkande pilen i den liksidiga triangeln är för att uppmärksamma
användaren på icke isolerad “farlig spänning” i närheten av produkten.
Det kan innebära en risk för elektrisk stöt och följande personskador.
Utropstecknet i den liksidiga triangeln är för att uppmärksamma
användaren på viktig information om drift och underhåll (service) i
den medföljande bruksanvisningen.
VARNING: Risk för elektrisk stöt - Sänk inte ner produkten i vatten
FÖRSIKTIGHET: Plocka inte isär produkten så undviker du risken för
elektrisk stöt. Det finns inga delar att göra service eller underhåll på. Lämna
servicearbetet till utbildad personal.
VARNING: Minska risken för brand eller elektrisk stöt och sänk inte ner denna
produkt i vatten
VIKTIG SÄKERHETSINFORMATION
1. Läs igenom instruktionerna. Behåll instruktionerna. Uppmärksamma alla
varningar. Följ alla instruktioner.
2. Använd inte apparaten i vatten. Apparaten kan exponeras för regn, snö eller
andra väderförhållande utan risk för personskada eller skada. Sänk inte ner
produkten i vatten eller annan vätska. Produkten är vattentålig men inte
vattentät.
3. Rengör enbart med våt trasa eller genom att skölja av den försiktigt med
vattenslang. Använd inte högtrycksslang eller -tvätt för att rengöra produkten.
4. Blockera inga ventilationsöppningar. Installera enligt tillverkarens
instruktioner.
5. Installera inte i närheten av värmekällor som radiatorer, värmegeneratorer,
ugnar eller andra apparater (inklusive förstärkare) som genererar värme.
6. Använd enbart godkända batterier i produkten enligt tillverkarens
instruktioner.
7. Använd enbart tillbehör/accessoarer som specificerats av tillverkaren.
8. Överlåt allt servicearbete till utbildad servicepersonal. Serviceåtgärder krävs
när apparaten har skadats på något sätt, som att elkabeln är skadad, vätska
har spillts ut och trängt in i apparaten, apparaten har exponerats för regn
eller fukt, den fungerar inte som den ska eller har tappats.
9. Produktens tyngd kan påverka stabiliteten på fristående bord
eller ställningar nära en pool, damm eller annan vattensamling.
Se till att ytan eller föremålet som produkten placeras på står
stadigt och inte kan välta så att produkten faller ner i vatten.
Page 52

52
Gratulerar
Tack för att du valt trådlösa, bärbara AudioRockTM
från ebode electronics. Med korrekt installation och
användning kommer du att ha många års glädje av
problemfri användning. ebode electronics säljer ett stort
antal högtalare för både utomhus- och inomhusbruk. Vill
du se ebode electronics hela produktsortiment är du
välkommen att besöka oss på: www.ebodeelectronics.eu.
Page 53

53
Innehåll
AudioRock översikt............................................................................54
Vad finns i lådan................................................................................55
Att tänka på vid installation............................................................56
Välja placering......................................................................................56
Ställa in zoner.......................................................................................57
Förbereda AudioRock för installation........................................58
Installationsanvisningar.......................................................59
Parkoppla AudioRock med sändaren......................................60
Använda och kontrollera AudioRock.........................................62
Specifikationer.......................................................................63
Tillbehör........................................................................63
Garanti..............................................................................64
CE-deklaration...................................................................130
Teknisk supportinformation.........................omslagets baksida
Page 54

54
AudioRockTM översikt
Trådlösa bärbara
AudioRock är tänkt att
kunna installeras på några
minuter. Eftersom den
är batteridriven finns det
stor valfrihet för placering
av högtalaren. Sändaren
kan stödja upp till 8 trådlösa AudioRock och spela upp
ljud överallt utomhus. Du kan också dela upp området
utomhus i olika områden, välja mellan två källor och med
ljudkontroll så att du har möjlighet att enkelt ställa in ditt
utomhussystem så att alla kan njuta av det.
Dessutom kan systemet byggas ut genom att lägga
till våra patenterade LightSpeakers®. LightSpeakers
installeras på några minuter och passar i bordslampor,
taklampor och överallt där det finns standard E27 Edison
lampsockel. De ger ett “grönt” ljus och enastående
ljud i hela ditt hem. LightSpeakers kan köpas av våra
återförsäljare eller på www.ebodeelectronics.eu.
Systemet som helhet ger större flexibilitet för dig
eftersom du enkelt kan at med dig det om du flyttar. Och
om du skulle behöva ta bort det så lämnar det inga hål
eller andra spår efter systemet.
Page 55

55
OBS: AudioRock kan enbart användas med ebode
electronics trådlösa LightSpeaker-sändare. Den kan inte
användas eller styras utan LightSpeaker-sändaren.
Vad finns i lådan
Trådlösa AudioRock
Bruksanvisning
En laddare
Ett laddningsbart litiumjonbatteri
Fjärrkontroll och sändare säljs även separat.
Page 56

56
Att tänka på vid installation
Kom ihåg att synligheten utomhus utan hinder är upp till
35 meter så att så länge som det längsta avståndet från
sändaren till den AudioRock som är längst bort är mindre
än 35 meter kan du placera sändaren var som helst.
Välja placering
Trådlösa AudioRock kan placeras var som helst där du
önskar utomhus. Du kan även placera ut flera AudioRock
så att ingen är längre bort från en annan högtalare än 10
meter. Det ger den bästa och mest jämna ljudbilden och
överlägsen ljudkvalitet.
Page 57

57
Ställa in zoner
Om du har mer än en AudioRock och du vill ha olika
lyssningszoner utomhus kan du välja att ställa in en andra
zon. En ljudzon är ett eller flera områden där du vill att
samma ljudkälla spelas upp och vill att volymen på de
separata högtalarna är ungefär lika. Om du vill att ett
område ska ha annan volym eller spela upp en annan källa
så kan du använda alternativet med två zoner. Observera
att det inte finns något rätt eller fel sätt att göra det här
på, det är helt upp till hur du vill använda ditt AudioRocksystem. Om du provar ett alternativ och inte tycker det är
bra är det enkelt att ändra och prova ett annat alternativ.
OBS: Du kan styra till viss del inom området med
strömbrytaren på baksidan av de enskilda AudioRockhögtalarna. Det är bara att stänga av för att inte ha ljud i
just det området.
Page 58

58
Förbereda AudioRock för installation
Ladda batteriet för AudioRock genom att koppla in
laddaren och sätta batteriet i laddaren. Låt batteriet
ladda minst 8 timmar vid första laddningen.
Ladda batteriet i AudioRock
Steg 1: Sätt i adaptern i laddaren.
Steg 2: Anslut adaptern till ett vägguttag.
Steg 3: Sätt i batteriet i laddaren, kontrollera att det
placeras rätt och att du inte behöver tvinga i batteriet i
laddaren.
Steg 4: När batteriet är fulladdat kommer LED-indikatorn
på framsidan att lysa GRÖNT.
Steg 5: Ta ur batteriet ur laddaren och sätt i det i
AudioRock.
OBS!: Om batteriet kvarlämnas i laddaren under längre
tid än 24 timmar kan detta förkorta batteriets livslängd.
När ett oladdad batteri placeras i laddaren kommer
LED-lampan på laddarens framsida att lysa rött; när
laddningen är slutförd kommer LED-lampan att lysa grönt.
Page 59

59
Installationsanvisningar
Steg 1: När batteriet är laddat sätter du i det i batterifacket.
Se till att det sitter i ordentligt. Säkra batteriet genom att
föra flikarna över batteriet tills de pekar rakt mot varandra.
Steg 2: Se till att zonväljaren på baksidan av
AudioRock står på zon 1 om du inte tänker ställa in ett
tvåzonssystem. Om du tänker ställa in ett tvåzonssystem
ska du se till att zonväljaren står rätt beroende på vilken
zon högtalaren ska vara i.
Zone Volume
1
2
Pairing
Page 60

60
Parkoppla AudioRock med sändaren
Innan du kan börja använda ditt nya, trådlösa, flyttbara
AudioRock-system måste du “lära” AudioRock att
identifiera sändaren du använder. Det kallas parkoppling
och är väldigt enkelt att göra.
Steg 1: Sätt igång sändaren (LED-indikatorn på framsidan
lyser), leta reda på och tryck på parkopplingsknappen på
baksidan. Du kanske behöver ett spetsigt föremål, som en
penna, för att trycka på knappen. När du trycker på den
kommer LED-indikatorn på sändarens framsida att börja
blinka.
Det innebär att enheten är i parkopplingsläge.
Steg 2: Sätt omedelbart strömbrytaren på baksidan av
AudioRock i läge ON och tryck på parkopplingsknappen
på baksidan av AudioRock. Du har totalt 30 sekunder
på dig för att göra det här. Om du tar för lång tid på dig
så lämna enheterna
påslagna. Tryck på
parkopplingsknappen
på nytt och fortsätt
med de andra delarna.
Du märker att enheten
är i läge ON genom
att LED-indikatorn på
baksidan av AudioRock
tänds när du slår till
brytaren. Om LED-
Page 61

61
indikatorn inte tänds ska du kontrollera att batteriet är
laddat.
När parkopplingsindikatorn lyser fast GRÖNT är
parkopplingen färdig. Du har ungefär 30 sekunder på dig
för detta. Om tiden inte räcker till för att parkoppla alla
AudioRock är det bara att upprepa proceduren för alla
AudioRock i systemet.
Steg 3: När samtliga enheter är parkopplade kan du
börja använda och kontrollera systemet.
Steg 4: Om du har flera AudioRock, LightSpeaker eller andra
högtalare som fungerar i LightSpeaker-nätverket ska du se
till att alla är parkopplade. Om de inte är det parkopplar du
dem enligt anvisningarna i bruksanvisningen för just den
högtalaren. Näs samtliga enheter är parkopplade kan du
börja uppleva hela LightSpeaker-nätverket.
Zone Volume
1
2
Pairing
Page 62

62
Använda och kontrollera AudioRock
AudioRock Electronics
AudioRock Electronics
Batterifacket är gjort för det medföljande batteriet som
ger upp till 8 timmars speltid. Speltiden beror på hör högt
du spelar. Ju lägre volym, desto längre räcker batteriet.
Den inbyggda trådlösa mottagaren tar emot och
styr AudioRock på upp till 35 meters avstånd från
LightSpeaker-sändaren och fjärrkontrollen.
Du kan också styra: “ON/OFF” och “Volume” med
justeringsknapparna på baksidan av AudioRock.
Den vattentäta förslutningen av elektroniken gör att
pålitligheten för enheten behålls under lång tid även om
enheten är placerad utomhus. Enheten är byggd för att
tåla tuffa väderförhållanden och även sprinklers och andra
bevattningssystem. Men den tål inte att sänkas ner eller
lämnas i vatten över 2,5 cm djup.
Page 63

63
AudioRock specifikationer:
Denna trådlösa utomhusstereohögtalare med 5¼-tums woofer
är optimerad för utomhusbruk. Ljudet är justerat elektroniskt
för att ge bästa akustiska resultat utomhus. Utformningen
i neutral granit gör att systemet naturligt smälter in i de
flesta utomhusmiljöer. Denna enhögtalars stereoenhet ger
tvåkanalsljud från en enda enhet.
Elektronik
• Batterifacket är avsett för det medföljande uppladdningsbara batteriet som
ger upp till 8 timmars speltid (beroende på musiktyp och volym).
• Inbyggd 2,4 GHz trådlös mottagare och 40 watts förstärkare.
• Enheten har ON/OFF- och volymkontroll för direkt volyminställning utan behov
av den medföljande fjärrkontrollen.
• Den vattentäta förslutningen av elektroniken gör att pålitligheten för enheten
bibehålls under lång tid även om enheten är placerad utomhus.
Akustik
• Dubbla Voice Coil 5¼-tums Environmental Injection Molded Polypropylene
Woofers
• Dubbla ¾-tums Polypropylene diskanthögtalare
• Enheterna är vinklade 20 grader uppåt för att ge bästa ljud när systemet är
placerat på marken.
• Systemet har aktiv akustisk ljudbild för mjuk, förstärkt och utökad frekvensoch ljudåtergivning.
Mekanik och pålitlighet
• Helt vattentåligt hölje och enheter som är UV-skyddade med rostfritt material
och rostfri grill (IEC 60529, IPX4, IPX5).
• Alla komponenter är testade för att tåla extrem temperatur och luftfuktighet.
Tillbehör
• Uppladdningsbart litiumjonbatteri med lång livslängd ger upp till 8
timmars speltid efter full laddning. 4 timmars uppladdningstid efter första
laddning.
• Separat laddningsbas för batteri.
• Likströmsströmkälla för batteriladdare.
Page 64

64
Garanti - Audio för hemma- och kommersiellt bruk
Begränsat ansvar
ebode electronics garanterar sina högtalarprodukter till den ursprungliga
köparen att vara fri från tillverknings- och sammansättningsfel under en tid
på två år från inköpsdatum. Garantin gäller med följande ytterligare villkor
och begränsningar.
Garantin är hävd och ogiltig om ebode electronics bedömer att produkten
har använts på ett sätt som inte är i enlighet med instruktionerna från
tillverkaren, inklusive, men inte begränsat till, skador som kan uppkomma
genom olyckshändelse, missbruk, felaktig installation, nonchalans eller
normalt slitage, eller något fel orsakat av reparation av produkten utförd av
annan än ebode electronics.
För att åberopa garantiservice, besök din lokala
återförsäljare. Ett godkänt
hanteringsnummer från fabriken kommer att skickas till dig. Returnera ingen
produkt utan att först ha fått skriftligt godkännande och fraktinstruktioner
från din lokala återförsäljare.
Det finns inga andra garantier, inklusive, men utan begränsning till, antingen
uttryckliga eller implicita garantier om säljbarhet eller lämplighet för något
speciellt syfte gällande produkten.
Reparation eller utbyte som sker under denna garanti är den enda
korrigerande åtgärd för konsumenten/köparen. ebode electronics är inte
ansvarigt för någon olyckshändelse eller följdskada förutom i den omfattning
som anges (eller undantas) i gällande lag.
Vissa länder godkänner inte exklusion eller begränsning av olyckshändelser
eller följdskador och i sådana fall gäller ovanstående begränsning inte dig.
Denna garanti ger dig specifika formella rättigheter och du kan också ha
andra rättigheter som kan variera från land till land.
Page 65

65
Frågor? Kontakta din lokala återförsäljare!
Har du någon fråga om dina LightSpeaker® högtalare?
Fråga de som kan produkterna bäst
SKRIV NER MODELLNUMMER
OCH SERIENUMMER FRÅN DIN
PRODUKTFÖRPACKNING HÄR
Modellnummer:_______________________
Serienummer:________________________
Page 66

66
Guide utilisateur AudioRock
®
Le haut-parleur AudioRock utilise une pile au lithium-Ion de 12 volts pour
fonctionner. Veuillez lire les consignes de sécurité ci-dessous avant de
vous en servir :
Consignes de sécurité concernant la pile Lithium-Ion :
Un emploi non conforme aux consignes de sécurité risquerait de causer les
problèmes suivants : court-circuit de la pile, fusion de l’isolateur et endommagement
des soupapes de sûreté ou autres mécanismes de sécurité, causant des fuites, un
dégagement de chaleur ou la rupture. Veuillez observer les précautions suivantes
lorsque vous utilisez une pile.
• Ne la jetez pas dans un feu et ne l’exposez pas à une température élevée (60 °C).
• N’insérez en aucune circonstance la pile en inversant les polarités.
• Si la connexion avec le chargeur ne fonctionne pas correctement, ne forcez pas
la pile à l’intérieur; au lieu de cela, vérifiez le sens du pôle positif et le sens du pôle
négatif.
• Ne chargez pas la pile avec des chargeurs qui ne sont pas indiqués pour ce produit.
• Ne court-circuitez pas la borne positive et la borne négative avec des objets en
métal tels que du fil de fer, des pièces de monnaie, etc. Il ne faut pas non plus
ranger ou transporter la pile avec un collier en métal, etc.
• Il ne faut ni démonter, ni altérer la pile.
• Ne percez pas la pile.
• Ne soudez pas directement la pile.
• N’utilisez pas la pile si vous constatez des traces de fuites, une décoloration ou une
déformation, ou d’autres changements dans son apparence physique.
• N’humidifiez pas la pile, et ne l’immergez pas dans de l’eau ou dans la mer. La pile
pourrait alors rouiller ou dégager de la chaleur.
• Rangez la pile hors de la portée des petits enfants.
• Lorsque vous ne vous servez pas de la pile ou si vous ne pensez pas utiliser
l’appareil pendant un certain temps, retirez la pile de l’appareil et rangez-la dans un
endroit sec entre les températures de -20 °C et +35 °C. Ceci évitera une perte de
performance de la pile et un raccourcissement de sa durée de vie.
• La pile (ceci s’applique à une pile, à plusieurs piles ou à un bloc-piles) ne doit pas être
exposée à une chaleur excessive, telle que celle qui pourrait résulter de l’exposition
directe à la lumière du soleil, à un feu ou à une source de chaleur équivalente.
MISE EN GARDE
Risque de choc électrique - Ne pas ouvrir
Page 67

67
Le symbole d’éclair avec une tête de flèche dans un triangle
équilatéral a pour but d’alerter l’utilisateur de la présence d’une «
tension dangereuse » non isolée à l’intérieur de l’enceinte du produit
dont l’ampleur pourrait être suffisante pour constituer un risque
de choc électrique pour les personnes entrant en contact avec le
produit.
Le point d’exclamation dans un triangle équilatéral a pour but
d’alerter l’utilisateur de la présence d’instructions de fonctionnement
et d’entretien importantes dans la littérature accompagnant
l’appareil.
MISE EN GARDE : Risque de choc électrique - Ne pas submerger le produit dans
de l’eau.
MISE EN GARDE : Pour réduire le risque de choc électrique, ne pas retirer le
cache (ou l’arrière). Il n’y a pas de pièces réparables par l’utilisateur à l’intérieur faire réparer par des réparateurs professionnels exclusivement.
CONSIGNES DE SÉCURITÉ IMPORTANTES
1. Lisez ces consignes de sécurité. Conservez ces consignes de sécurité. Tenez compte
de tous les avertissements. Suivez toutes les instructions.
2. N’utilisez pas cet appareil dans de l’eau. L’appareil peut être exposé à la pluie, à la
neige ou aux intempéries sans risque de blessures ou de dommages. Ne le submergez
pas dans de l’eau ou dans d’autres liquides. Le produit est protégé contre les
projections d’eau mais il n’est pas étanche.
3. Ne nettoyez qu’avec un chiffon humide ou un léger jet d’eau d’un tuyau d’arrosage.
N’utilisez pas de tuyaux ou d’appareils de lavage à haute pression pour nettoyer le
produit.
4. Ne bloquez pas d’ouvertures de ventilation. Installez conformément aux instructions
du fabricant.
5. N’installez pas à proximité de sources de chaleur telles que des radiateurs, des
registres de chaleur, des poêles ou d’autres appareils (y compris des amplificateurs) qui
produisent de la chaleur.
6. Utilisez seulement des piles approuvées dans ce produit conformément aux
instructions du fabricant.
7. Utilisez seulement des compléments/accessoires indiqués par le fabricant.
8. Confiez toutes les réparations à des réparateurs professionnels. Une réparation est
nécessaire lorsque l’appareil a été endommagé d’une façon quelconque (par ex., si la
fiche ou le cordon d’alimentation est endommagé, si du liquide a été renversé ou si des
objets sont tombés dans l’appareil, si l’appareil a été exposé à la pluie ou à de l’humidité,
s’il ne fonctionne pas normalement ou s’il est tombé).
9. Le poids de cet appareil peut causer l’instabilité d’une table ou
d’un support non assujetti à proximité d’une piscine, d’un lac ou d’un
autre plan d’eau. Assurez-vous que la surface ou l’objet sur lequel
le produit est placé est stable et ne risque pas de basculer, ce qui
pourrait causer la chute du produit et son immersion dans l’eau.
Page 68

68
Félicitations
Merci d’avoir choisi l’AudioRock™ portatif sans fil de
ebode electronics. Vous pourrez profiter de ce produit
pendant des années sans problèmes si vous l’installez
et l’utilisez correctement. ebode electronics offre de
nombreux haut-parleurs pour emploi à l’intérieur ou à
l’extérieur chez vous. Pour voir l’assortiment complet de
produits de ebode electronics, visitez notre site Internet
à : www.ebodeelectronics.eu.
Page 69

69
Table des matières
Présentation générale de l’AudioRock........................................70
Contenu de cette boîte......................................................................71
Considérations relatives à l’installation.......................................72
Sélection du lieu d’installation........................................................72
Configuration des zones..................................................................73
Préparation de l’AudioRock en vue de son installation.....74
Charge de la pile AudioRock.........................................................74
Instructions pour l’installation......................................................75
Pairage de l’AudioRock avec l’émetteur...............................76
Utilisation et contrôle de votre AudioRock...........................78
Spécifications..............................................................................79
Accessoires.................................................................................79
Garantie...............................................................................................80
Déclaration de conformité CE....................................................130
Renseignements pour le support technique..........Plat verso
Page 70

70
Présentation générale de l’AudioRock™
Cet AudioRock portatif sans fil est conçu pour une
installation en quelques minutes seulement. Grâce à son
alimentation par piles, il augmente la flexibilité en ce qui
concerne les endroits où ces haut-parleurs peuvent être
utilisés. Le système peut utiliser jusqu’à 8 AudioRocks
sans fil (quand ils sont employés avec un émetteur
LightSpeaker® de ebode electronics) pour diffuser du
son dans votre jardin. Vous pouvez même diviser vos
espaces à l’extérieur en zones distinctes dans lesquelles
des sources différentes et un système de contrôle du son
vous donnent la flexibilité nécessaire pour configurer et
installer facilement un système en plein air dont tout le
monde pourra profiter.
De plus, le système peut être agrandi par l’ajout de
nos haut-parleurs LightSpeakers® brevetés. Ces hautparleurs s’installent en quelques minutes dans des
lampes de table, des lampes pendantes ou à n’importe
quel endroit où vous avez une douille Edison standard.
Ils peuvent vous fournir un éclairage « vert » et un son
exceptionnel dans toute votre maison. Les haut-parleurs
Page 71

71
Contenu de cette boîte
AudioRock sans fil
Guide d’utilisation
Un chargeur
Une pile Lithium-Ion rechargeable
LightSpeakers sont en vente chez votre revendeur, ou sur
www.ebodeelectronics.eu.
L’ensemble du système vous donne encore plus de
flexibilité, en tant que propriétaire, parce que vous pouvez
l’emporter avec vous si vous déménagez. Si vous avez
besoin de le retirer, le système ne laisse pas la moindre
trace de son installation ou de son utilisation.
NOTA: l’AudioRock ne peut être utilisé qu’avec l’émetteur
LightSpeaker sans fil de ebode electronics. Il ne peut pas
être utilisé ou fonctionner sans l’émetteur LightSpeaker.
Télécommande et transmetteur vendu séparément.
Page 72

72
Considérations relatives à l’installation
Rappelez-vous que la portée maximum du système à
l’extérieur est de 35 mètres*; par conséquent, tant que
la distance entre l’émetteur et l’AudioRock le plus éloigné
dans n’importe quel sens est inférieure à 35 mètres*,
vous pouvez placer l’émetteur à l’endroit de votre choix.
Sélection du lieu d’installation de l’AudioRock™
Votre AudioRock portatif peut être placé à n’importe
quel endroit que vous jugerez pratique dans vos zones
d’écoute en plein air. Vous pouvez même espacer de
multiples AudioRocks de façon qu’aucun haut-parleur
ne soit à plus d’une dizaine de mètres d’un autre.
Ceci assurera la meilleure couverture possible, et
la couverture la plus uniforme, pour vous permettre
d’écouter un son de qualité exceptionnelle.
*La portée d’utilisation varie selon l’environnement
d’utilisation.
Page 73

73
Configuration des zones
Si vous avez plusieurs AudioRocks et si vous souhaitez
établir plusieurs zones d’écoute distinctes dans votre
espace extérieur, vous avez la possibilité de constituer
une seconde zone. Une zone d’écoute est un espace
quelconque, ou plusieurs espaces, où vous voulez écouter
la même source audio et où vous souhaitez que le volume
sonore diffusé par les haut-parleurs soit à peu près le
même. Si vous voulez que la musique ou le volume sonore
soit différent dans une zone, vous pouvez utiliser l’option
d’avoir deux zones distinctes. Veuillez noter qu’il n’y a
pas de façon correcte ou incorrecte de faire ceci - c’est
simplement à vous qu’il appartient de décider comment
vous voulez utiliser votre système AudioRock. Si vous
expérimentez avec une option et n’en êtes pas satisfait(e),
vous pouvez facilement changer la configuration et
essayer une autre option.
NOTA : vous avez la possibilité de contrôler le son dans
une zone en utilisant l’interrupteur marche-arrêt qui
est situé à l’arrière de chaque AudioRock. Éteignez-le
simplement et vous n’entendrez pas le son dans la zone
correspondante.
Page 74

74
Préparation de l’AudioRock™ en vue de son installation
Veuillez chargez la pile pour votre AudioRock en
branchant le cordon d’alimentation et en insérant la pile
dans le chargeur. Laissez charger pendant au moins huit
heures avant de vous en servir pour la première fois.
Charge de la pile AudioRock™
Première étape : branchez l’adaptateur sur le chargeur.
Deuxième étape : branchez l’adaptateur dans la prise de
courant c.a.
Troisième étape : faites glisser la pile dans le chargeur
en vous assurant qu’elle est insérée correctement et que
vous n’avez pas besoin de forcer la pile dans le chargeur.
Quatrième étape : lorsque la pile sera totalement
chargée, la LED sur le devant du chargeur passera au
vert.
Cinquième étape : retirez la pile du chargeur et placez-la
dans l’AudioRock.
NOTA : Laisser la pile dans le chargeur pendant plus de
24h peut réduire la durée de vie de la pile. Quand une
pile déchargée est placée dans le chargeur, la LED sur le
devant du chargeur s’allume en rouge; quand la charge
est terminée, la LED s’allume en vert.
Page 75

75
Instructions pour l’installation
Première étape : une fois la pile totalement chargée,
installez-la dans le compartiment prévu à cet effet. Enfoncezla bien au maximum. Bloquez la pile en faisant glisser les
onglets jusqu’à ce qu’ils soient en face l’un de l’autre.
Deuxième étape :assurez-vous que le commutateur de
zone à l’arrière de votre AudioRock est réglé sur la zone 1,
à moins que vous ne vouliez configurer un système à deux
zones. Si vous avez l’intention de configurer un système à
deux zones, assurez-vous que le commutateur de zone est
réglé sur le chiffre correspondant à la zone dans laquelle
vous voulez placer cet AudioRock.
Zone Volume
1
2
Pairing
Page 76

76
Pairage de l’AudioRock™ avec l’émetteur
Avant que vous ne puissiez commencer à utiliser votre
nouveau système AudioRock portatif sans fil pour écouter
de la musique, il est nécessaire « d’apprendre » à votre
AudioRock à reconnaître l’émetteur que vous utilisez; cet
apprentissage est appelé « pairage »; il est très facile à
réaliser.
Première étape : après avoir mis l’émetteur sous tension (la
LED sur le devant s’allumera), localisez et enfoncez le bouton
de pairage à l’arrière du haut-parleur. Vous aurez peutêtre besoin d’un objet pointu tel qu’un stylo pour enfoncer
le bouton. Après l’avoir enfoncé, vous verrez la LED sur le
devant de l’émetteur clignoter.
Cela signifie que le haut-parleur est dans le mode de pairage.
Deuxième étape : mettez rapidement l’interrupteur, qui se
trouve à l’arrière de votre AudioRock, dans la position de
marche (« ON »), et appuyez sur le bouton de pairage, qui se
trouve également à l’arrière
de l’AudioRock. Vous avez un
maximum de 30 secondes
pour faire cela. Si vous
prenez trop longtemps,
laissez sous tension les
haut-parleurs que vous avez
déjà activés. Puis appuyez
à nouveau sur le bouton de
pairage et passez alors aux
autres zones. Vous saurez si
le haut-parleur est sous
Page 77

77
tension parce que les LED à l’arrière de votre AudioRock
s’illumineront lorsque vous ferez basculer l’interrupteur.
Si aucune LED ne s’allume, assurez-vous que la pile est
chargée.
Lorsque le voyant de pairage est allumé (en vert) de façon
continue, cela signifie que de pairage a été réalisé. Vous
disposez d’à peu près 30 secondes pour y parvenir. Si cela
ne vous donne pas assez de temps pour de pairer tous vos
AudioRocks, recommencez simplement la procédure pour
chaque AudioRock de votre système.
Troisième étape : lorsque tous les haut-parleurs sont
pairés, cela signifie que vous pouvez commencer à utiliser et
contrôler le système.
Quatrième étape : si vous avez d’autres AudioRocks,
LightSpeakers ou autres haut-parleurs conçus pour
fonctionner dans le réseau LightSpeaker, assurez-vous
qu’ils sont tous pairés; si ce n’est pas le cas, appariez-les en
suivant les instructions
du Guide d’utilisation
pour ce haut-parleur.
Lorsque tous les
éléments auront été
pairés, vous pourrez
commencer à profiter
de l’ensemble de votre
réseau LightSpeaker.
Utilisation et
contrôle de votre
Zone Volume
1
2
Pairing
Page 78

78
AudioRock™
L’électronique de l’AudioRock
Un compartiment est prévu pour contenir la pile
rechargeable incluse, qui assure une autonomie d’écoute
pouvant atteindre huit heures. La durée d’écoute
dépendra du volume sonore de votre musique; la pile
se déchargera d’autant plus vite que le volume sonore
moyen sera élevé.
Le récepteur sans fil incorporé permet de recevoir le son
et de contrôler le haut-parleur jusqu’à 35 mètres de votre
émetteur LightSpeaker et de la télécommande.
Vous pouvez également contrôler : l’interrupteur
de marche-arrêt et le volume sonore - en utilisant les
boutons de réglage situés à l’arrière de votre AudioRock.
L’enveloppe étanche protégeant l’électronique assure
un fonctionnement fiable du haut-parleur même s’il a été
laissé en plein air pendant une période prolongée. Ce
haut-parleur a été construit pour résister aux intempéries
et aux effets des gicleurs et autres systèmes d’arrosage.
Cependant, il n’est pas conçu pour être submergé ou
pour rester constamment immergé dans des plans d’eau
de plus de 2,5 cm de profondeur.
Page 79

79
Spécifications de l’AudioRock :
Ce haut-parleur stéréo sans fil en forme de rocher, conçu pour être
utilisé en plein air et incorporant un woofer de 5” 1/4, est réglé
pour un fonctionnement optimal à l’extérieur. Le son est égalisé
électroniquement de façon à fournir une qualité d’écoute supérieure
dans un environnement à l’air libre. Le style granit neutre permet à ce
système d’être placé dans la plupart des environnements extérieurs
sans qu’on ne le remarque. Cet appareil stéréo à un seul woofer fournit
un son à double voie provenant d’une seule enceinte.
Électronique
• Un compartiment est prévu pour contenir la pile rechargeable incluse, qui assure
une autonomie d’écoute pouvant atteindre huit heures (selon le type de musique et le
volume sonore).
• Récepteur sans fil incorporé de 2,4 GHz et 40 watts de puissance d’amplification
audio totale.
• Des boutons de marche-arrêt et de contrôle du volume sonore sur chaque appareil
permettent de régler directement le volume sans nécessiter l’utilisation de la
télécommande RF fournie.
• L’enveloppe étanche protégeant l’électronique assure un fonctionnement fiable du
haut-parleur même s’il a été laissé en plein air pendant une période prolongée.
Acoustique
• Haut-parleur de graves en polypropylène moulé à injection écologique de 5” ¼ à
double bobine acoustique
• Haut-parleurs d’aigus doubles en polypropylène de 3/4”
• Les moteurs de haut-parleur sont orientés vers le haut à un angle de 20° de manière
à produire un son d’excellente qualité lorsque le système est placé au niveau du sol.
• Le système utilise une égalisation acoustique active pour uniformiser, améliorer et
étendre la réponse de fréquence.
Considérations mécaniques et fiabilité
• Enceinte complètement à l’épreuve des intempéries, moteurs protégés contre les
rayons UV, quincaillerie et grille à l’épreuve de la rouille (CEI 60529, IPX4, IPX5)
• Tous les composants ont été soumis à des essais pour assurer leur résistance aux
extrêmes de température et d’humidité.
Accessoires
• Le bloc-piles au lithium-ion rechargeable longue durée assure une
autonomie d’écoute pouvant atteindre huit heures s’il est totalement
chargé. Il se recharge en quatre heures.
• Base de charge séparée pour la pile
• Alimentation c.c. pour le chargeur de pile
Page 80

80
Garantie – équipements audio pour la maison et le bureau
Responsabilité limitée
ebode electronics garantit à l’acheteur final que ses produits sonores sont
exempts de défauts de fabrication et de main d’œuvre pour une période de
deux ans à partir de la date d’achat. Cette garantie est sujette aux limitations
et conditions suivantes.
La garantie s’annule et devient inapplicable lorsque ebode electronics
considère que le produit a été utilisé ou manipulé d’une manière différente
aux instructions fournies par le fabricant, incluant mais ne se limitant pas aux
dommages causés par des accidents, erreur de manipulation, installation
incorrecte, abus, négligence, l’usure normale ou autre défaut causé par une
réparation du produit effectuée par une personne autre que le personnel de
ebode electronics.
Pour faire valoir votre garantie, veuillez visiter votre revendeur local. Un
numéro d’autorisation de retour en usine vous sera envoyé. Veuillez ne pas
retourner l’unité avant d’avoir reçu l’autorisation écrite et les instructions
d’envoi de la part de votre revendeur local.
Il n’existe aucune autre garantie, incluant mais sans limitation, expresse
ou tacite garantissant la marchandabilité ou l’aptitude à l’emploi à des fins
particulières, en respect du produit.
Toute réparation ou remplacement effectué sous cette garantie est un droit
exclusif accordé à l’acheteur/consommateur.
ebode electronics ne sera en aucun cas tenu responsable de tout dommage
accessoire ou conséquent à l’exception des étendues offertes (ou interdites)
par les lois applicables.
Certains territoires administratifs ne permettent pas qu’on exclu ou qu’on
limite les dommages indirects ou consécutifs, de sorte que la restriction
énoncée ci-dessus pourrait ne pas s’appliquer dans votre cas.
Cette garantie vous donne certains droits légaux bien définis et vous pourriez
avoir également d’autres droits qui varient selon le territoire administratif.
Page 81

81
Des questions ? Contactez votre revendeur local !
Vous avez une question concernant les haut-parleurs LightSpeaker®?
Parlez-en à des experts !
NOTEZ ICI LE NUMERO DE MODELE ET
LE NUMERO DE SERIE SITUES SUR
L’EMBALLAGE
Numéro de modèle :____________________
Numéro de série :______________________
Page 82

82
Guía del usuario AudioRock
®
El parlante AudioRock usa una batería de 12 voltios de iones de
litio para su funcionamiento. Lea las siguientes instrucciones de
seguridad antes del uso:
Instrucciones de seguridad para la batería Lilon
El uso indebido puede causar que las baterías tengan un cortocircuito, que el
aislador se derrita y que se dañen las válvulas de seguridad o los mecanismos de
seguridad, lo que puede causar pérdidas, generación de calor o ruptura. Observe
las siguientes precauciones cuando use baterías.
• No las tire al fuego ni las exponga a temperaturas elevadas (140°F/60°C).
• Jamás ponga las baterías con los polos positivo y negativo al revés.
• Si la conexión con el cargador no funciona correctamente, no fuerce la batería
En lugar de ello fíjese en la dirección de los polos positivo y negativo.
• No cargue con cargadores no especificados para este producto.
• No haga un corto circuito con el terminal positivo y el terminal negativo con
metales como alambres, monedas, etc. Tampoco guarde o lleve las baterías
con collares de metal, etc.
• No desarme ni modifique la batería.
• No pinche la batería.
• No suelde directamente la batería.
• No use la batería si tiene signos de pérdidas, un cambio de color o de forma u
otros cambios en su apariencia.
• No moje la batería ni la ponga en agua o agua de mar. Eso puede causar que la
batería genere calor o se herrumbre.
• Guarde la batería fuera del alcance de niños pequeños.
• Cuando no esté usando la batería o no esté usando el aparato por un período
de tiempo prolongado, saque la batería del aparato y póngalo en un lugar con
una temperatura entre -20oC and +21oC (-4°F- and +70°F). Esto previene que la
batería no funcione al máximo y prolonga su vida útil.
• La batería (batería, baterías o “battery pack”) no se debe exponer a calor
excesivo, como luz solar, fuego o algo similar.
PRECAUCIÓN
Riego de choque eléctrico, No Abrir
Page 83

83
El símbolo de relámpago, una flecha dentro de un triángulo equilátero,
tiene por objetivo alertar al usuario la presencia de
“tensión peligrosa” no aislada” dentro de la cada del producto que puede
ser de suficiente magnitud como para constituir un riesgo de choque
eléctrico a las personas.
El símbolo de admiración dentro de un triángulo equilátero tiene por
objetivo alertar
al usuario la presencia de instrucciones importantes de de operación u
mantenimiento (servicio) en la documentación que acompaña el aparato.
PRECAUCIÓN: Riego de choque de electricidad – No sumergir el producto en agua
PRECAUCIÓN: Para reducir el riesgo de choque eléctrico, no quitar la tapa (o la parte
de atrás). No tiene partes que las pueda reparar el usuario. Consulte únicamente a
personal de servicio cualificado.
INSTRUCCIONES DE SEGURIDAD IMPORTANTES
1. Lea estas instrucciones. Guarde estas instrucciones. Tenga en cuenta todas las
advertencias. Siga todas las instrucciones.
2. No use este aparato en agua. El aparato puede estar expuesto a lluvia, nieve o
cualquier elemento del tiempo sin peligro de lesión o daño. No sumergir en agua u
otros líquidos. El producto es resistente al agua, pero no es impermeable.
3. Límpielo únicamente con un trapo húmero o rocíelo ligeramente con una manguera
de jardín. No use mangueras de alta presión ni lavadores para limpiar el producto.
4. No bloquee ninguna de las aberturas de ventilación. Instálelo de conformidad con las
instrucciones del fabricante.
5. No instalar cerca de ningún tipo de fuente de calor, como radiadores, registradores
de calor, cocinas o cualquier otro aparato (incluyendo amplificadores) que produzcan
calor.
6. Use únicamente baterías aprobadas en este producto, de conformidad con las
instrucciones del fabricante.
7. User únicamente los adjuntos o accesorios especificados por el fabricante.
8. Remitir todas las reparaciones a personal técnico cualificado. Se requieren
reparaciones cuando el aparato está dañado de cualquier manera, por ejemplo si el
cable de electricidad
o el enchufe están dañados, se derramó líquido o cayeron objetos dentro del aparato,
el aparato ha sido expuesto a la lluvia o a la humedad, no funciona normalmente o se
lo dejó caer.
9. El peso de este aparato puede causar inestabilidad a una
mesa o soporte no amarrados cerca de una piscina, laguna
u otra masa de agua. Verifique que la superficie o el objeto
en el que ponga el producto sea estable y no se pueda voltear,
causando que el producto quede inmerso en agua.
Page 84

84
Felicitaciones
Gracias por haber elegido los parlantes AudioRockTM
from ebode electronics inalámbricos y portátiles. Con la
instalación y el funcionamiento correctos, usted disfrutará
años de uso sin problemas. ebode electronics Speakers
ofrece numerosos parlantes para uso adentro o afuera
de su hogar. Para ver todos los prima productos ebode
electronics, visítenos en Internet en:
www.ebodeelectronics.eu.
Page 85

85
Índice
Descripción general de AudioRock.............................................86
Qué hay en esta caja.........................................................................87
Consideraciones de instalación..................................................88
Selección de ubicaciones................................................................88
Fijación de zonas..............................................................................89
Preparación del AudioRock para instalación.......................90
Instrucciones de instalación.........................................................91
Pareamiento el AudioRock con el transmisor....................92
Funcionamiento y control de su AudioRock........................94
Especificaciones.............................................................95
Accesorios..............................................................95
Garantía......................................................................................96
Declaración CE..................................................................................130
Información sobre apoyo técnico.............................tapa trasera
Page 86

86
Descripción general de AudioRockTM
Este AudioRock inalámbrico
portátil está diseñado para
ser instalado en unos pocos
minutos y como funciona con
baterías aumenta la flexibilidad
de donde se pueden usar estos
parlantes. El sistema puede
usar hasta 8 AudioRocks
inalámbricas (si se usan con
un transmisor LightSpeaker® de
ebode electronics
), para
proporcionar sonido a todo su espacio al aire libre. Hasta
puede dividir sus espacios al aire libre en zonas únicas en
las que diferentes fuentes y diferente control de sonido le
otorga la flexibilidad de configurar e instalar fácilmente un
sistema al aire libre que pueda ser disfrutado por todos.
Además, el sistema se puede expandir añadiendo
nuestros LightSpeakers® patentados. Estos
LightSpeakers® se instalan en minutos y caben en
lámparas de mesa, arañas o en cualquier lugar en que
encuentre un portalámparas Edison estándar. Pueden
proporcionar iluminación “verde” y sonido sobresaliente
por todo su hogar. Puede adquirir los LightSpeakers® en
un minorista o en www.
ebodeelectronics
.eu.
El sistema completo le proporciona una mayor flexibilidad
a usted, el dueño, porque se lo puede llevar cuando se
muda. Si lo tiene que quitar, no deja ningún rastro de que
el sistema fue instalado o usado.
Page 87

87
NOTA: El AudioRock sólo se puede usar con el transmisor
inalámbrico LightSpeaker de
ebode electronics
. No
se puede usar ni hacer funcionar sin el transmisor
LightSpeaker.
Qué hay en esta caja
Wireless AudioRock
Manual del propietario
Un cargador
Una batería recargable de iones de litio
Remoto y transmisor también se vende por separado.
Page 88

88
Consideraciones de instalación
Recuerde que el alcance al aire libre de línea visual del
sistema es de hasta 35 metros*, así que si la distancia
entre el transmisor y el AudioRock más lejano, en
cualquier dirección, es de menos de 35 metros*, puede
colocar el transmisor donde lo desee.
Selección de ubicaciones del AudioRock
Puede colocar el AudioRock en cualquier lugar que le
resulte cómodo en los lugares en que escucha música
al aire libre. Hasta puede espaciar AudioRocks múltiples
de manera tal que ninguno de los parlantes esté a más
de 10 metros del otro parlante. Esto proporciona la
mejor cobertura e incluso más por la calidad de sonido
excepcional.
* El alcance depende de las condiciones
medioambientales
Page 89

89
Fijación de zonas
Si tiene más de un AudioRock y desea fijar zonas
separadas para escuchar al aire libre, tiene la opción de
fijar una segunda zona. Una zona de sonido es un área o
un grupo de áreas en los que desea que toque la misma
fuente de sonido y desea que el volumen de los parlantes
sea más o menos igual. Si desea que una zona tenga un
volumen de sonido diferente o que toque otra música,
use la opción de dos zonas. Note que no hay una manera
correcta o incorrecta de hacer esto, es simplemente la
manera en que usted desee usar su sistema AudioRock.
Si prueba una opción y no le gusta, es fácil cambiar y
probar otra.
NOTA: Usted tiene un cierto control sobre que un área
esté prendida o apagada usando el interruptor en la
parte de atrás del AudioRock. Simplemente apáguelo y no
habrá ningún sonido en esa área.
Page 90

90
Preparación de la batería del AudioRock para instalació
Cargue la batería para su roca enchufando la fuente de
potencia e insertando la batería en el cargador. Permita
al menos 8 horas para la primera carga.
Cómo cargar la batería del AudioRock
Paso 1: Enchufe el adaptador en el cargador.
Paso 2: Enchufe el adaptador en un enchufe de CA
Paso 3: Deslice la batería en el cargador cerciorándose
de que esté insertada correctamente y de que no tenga
que forzar la batería en el cargador.
Paso 4: Cuando la batería está completamente cargada
el LED en el frente del cargador se pone verde.
Paso 5: Saque la batería del cargador y póngala en el
AudioRock.
NOTA: Dejar la batería en el cargador por más de 24
horas puede reducir la vida útil de la batería. Cuando una
batería descargada se pone en el cargador, el LED en el
frente del cargador se pone ROJO; cuando la carga está
completa el LED se pone verde.
Page 91

91
Instrucciones para la instalación
Paso 1: Cuando la batería está cargada, instálela en el
compartimiento de la batería. Verifique que la batería esté
empujada toda hasta adentro.
Paso 2: Verifique que el interruptor de zona en la parte
de atrás de su AudioRock esté puesto en la Zona 1,
excepto si está instalando un sistema de dos zonas.
Si va a instalar un sistema de dos zonas, verifique que
el interruptor de zona esté puesto en el número que
corresponda a la zona en que piense ponerlo.
Zone Volume
1
2
Pairing
Page 92

92
Pareamiento el AudioRock con el transmisor
Antes de empezar a usar y disfrutar su nuevo sistema
inalámbrico portátil AudioRock es necesario “enseñarle”
a su AudioRock la identidad del transmisor que está
usando: esta enseñanza se llama “Pareamiento” y es muy
fácil de hacer.
Paso 1: Con el transmisor encendido (el LED en el
frente estará iluminado), encuentre y oprima el botón de
pareamiento en la parte de atrás de la unidad. Es posible
que necesite un objeto puntiagudo, como una lapicera, para
oprimir el botón. Cuando lo haga, verá que el LED en el frente
del transmisor se pondrá intermitente.
Esto quiere decir que la unidad está en la modalidad de
“pareamiento”.
Paso 2: Ponga rápidamente el interruptor de potencia,
situado en la parte de atrás de su AudioRock en la
posición “ON” y oprima el botón de pareamiento, también
situado en la parte de
atrás del AudioRock.
Tiene un total de 30
segundo para hacer esto.
Si toma demasiado tiempo,
deje las unidades para las
que prendió la potencia en
ON. Vuelva a oprimir el botón
de pareamiento y
Page 93

93
siga por las otras áreas. Sabrá que la unidad está encendida
(ON) porque los LED en la parte de atrás de su AudioRock se
prenderán cuando mueva el interruptor.
Si no se enciende la luz LED, verifique que la batería esté
cargada.
Cuando la luz de pareamiento se pone verde sólido, el
proceso de pareamiento está completo. Tiene cerca de 30
segundos para hacer esto. Si eso no es suficiente tiempo
como para pareamiento todos sus AudioRock, simplemente
repita el proceso para cada AudioRock en su sistema.
Paso 3: Cuando pareamiento todas las unidades, estará listo
para empezar a usar y controlar su sistema.
Paso 4: Si tiene más AudioRocks, LightSpeakers u otros
parlantes diseñados para funcionar con la red LightSpeaker,
verifique que todos se pareamiento, si no, hágalos coincidir
según las instrucciones en el manual del propietario
correspondiente a ese
parlante. Cuando se
pareamiento todas las
unidades, usted está
listo para disfrutar toda
su red LightSpeaker.
Zone
Volume
1
2
Pairing
Page 94

94
De operación y controlar sus AudioRock
Electrónica AudioRock
El compartimiento de la batería acepta las baterías
recargables suministradas, que proveen hasta 8 horas
de música. El tiempo de música depende del volumen
con que escucha música; cuanto más bajo sea el nivel
promedio, más durará la batería.
El receptor inalámbrico incorporado permite recepción y
control del parlante hasta 35 metros de distancia de su
transmisor LightSpeaker y control remoto.
También puede controlar: Encendido y apagado “(ON/
OFF)” y el “Volumen” con los botones de ajuste en la parte
de atrás de su AudioRock.
El sello a prueba de agua de los componentes
electrónicos garantiza la fiabilidad de la unidad a lo largo
del tiempo cuando se la deja a la intemperie. Esta unidad
está construida para tolerar condiciones de mal tiempo
y los efectos de los rociadores y otros sistemas de riego.
Sin embargo, no está diseñada para ser sumergida o
dejada en piscinas de agua de más de 1 pulgada de
profundidad.
Especificaciones del AudioRock:
Este parlante inalámbrico con forma de roca para usar al aire libre con
woofer de 5 1/4” está afinado óptimamente para funcionamiento al
aire libre. El sonido está igualado electrónicamente para proporcionar
un desempeño acústico superior al aire libre. El diseño granito
neutral permite que el sistema quede desapercibido en la mayoría
Page 95

95
de los entornos al aire libre. Esta unidad estéreo de un solo parlante
proporciona sonido de canal doble desde un solo armazón.
Electrónica
• El compartimiento de la batería acepta una batería recargable
suministrada que proporciona hasta 8 horas de música (dependiendo
del tipo de música y del volumen)
• Receptor inalámbrico incorporado de 2.4 GHz y 40 vatios de potencia
total de amplificador de sonido.
• El interruptor prendido/apagado y el control de volumen incorporados
permiten ajuste directo del volumen sin necesidad del control remoto RF
suministrado.
• El sello a prueba de agua de los componentes electrónicos garantiza
la fiabilidad de la unidad a lo largo del tiempo cuando se la deja a la
intemperie.
Acústica
• Woofer de polipropileno ambiental moldeado a inyección de 5 1/4
pulgadas con bobina dual para voz
• Tweeters duales de polipropileno de ¾”
• Los impulsores están en un ángulo hacia arriba de 20 grados para
proporcionar sonido sobresaliente cuando el sistema está puesto a nivel
del suelo.
• El sistema emplea igualación acústica para alisar, mejorar y extender la
reacción de frecuencia
Mecánica y fiabilidad
• Armazón completamente impermeable e impulsores protegidos contra
los rayos UV con ferretería y grille inoxidables (IEC 60529, IPX4, IPX5)
• Todos los componentes fueron puestos a prueba para tolerar extremos
de temperatura y humedad.
Accesorios
• Pack de batería recargable de iones de litio de hasta 8 horas de
duraciónde sonido cuando está completamente cargado. Se
recarga en 4 horas
• Base separada para cargar la batería
• Fuente DC para el cargador de la batería
Page 96

96
Garantía – Audio doméstico y comercial
Responsabilidad limitada
ebode electronics le garantiza al comprador original que sus productos de
altavoces están libres de defectos de fabricación en material y mano de obra
por un período de dos años a partir de la fecha de compra. Esta garantía
está sujeta a las siguientes condiciones y limitaciones adicionales.
La garantía quedará anulada e inaplicable si ebode electronics considera
que el producto ha sido usado o manipulado de una manera distinta que
lo establecido en las instrucciones proporcionadas por el fabricante,
incluyendo pero sin limitarse a estos, daños causados por accidente, mala
manipulación, instalación inadecuada, abuso, negligencia, o uso y desgaste
normales, o cualquier defecto causado por reparar el producto con
cualquiera que no sea otro que ebode electronics.
Para obtener el servicio de garantía, visite con su concesionario local.
Se le enviará un número de autorización de devolución a fábrica. No
devuelva ninguna unidad sin antes recibir una autorización por escrito y las
instrucciones de envío desde con su concesionario local.
No hay otras garantías, incluyendo sin limitación, ya sean garantías expresas
o implícitas de comerciabilidad o adecuación para un propósito particular,
con respecto al producto.
La reparación o la sustitución según lo previsto bajo esta garantía es el
remedio exclusivo del consumidor o comprador. ebode electronics no será
responsable por ningún daño incidental o resultante excepto en la medida
proporcionada (o prohibida) por las leyes aplicables.
Algunos PAÍSES no permiten la exclusión o limitación de daños incidentales o
resultantes, de modo que es posible que la limitación anterior no se aplique
en su caso.
Esta garantía le otorga derechos legales específicos y usted puede tener
también otros derechos legales que varían de un PAÍS a otro.
Page 97

97
¿Preguntas? ¡Contacte con su concesionario local!
¿Tiene alguna pregunta relacionada con sus altavoces Lightspeaker®?
¡Hable con las personas que mejor lo conocen!
ESCRIBA AQUÍ EL NÚMERO DEL MODELO Y
EL NÚMERO DE SERIE QUE APARECEN EN
LA CAJA DE SU PRODUCTO
Número del modelo:____________________
Número de serie: ______________________
Page 98

98
Os altifalantes AudioRock requerem uma bateria de iões de lítio de
12V para funcionar.
Leia as instruções de segurança a seguir antes de utilizar o produto:
Instruções de segurança da bateria de iões de lítio:
Utilizações inadequadas podem causar curto-circuito na bateria, derretimento
do isolante, danos às válvulas ou mecanismos de segurança, geração de calor e
ruptura. Por favor tenha as seguintes precauções ao utilizar a bateria.
• Não a atire ao fogo nem a exponha a altas temperaturas. (140oF/60oC)
• Não insira em nenhuma circunstância a bateria com a polaridade invertida.
• Se a conexão com o carregador não estiver a funcionar, não force a bateria.
Verifique a polaridade da bateria.
• Não a carregue com carregadores específicos para outros aparelhos.
• Não coloque os terminais positivos e negativo em curto-circuito com metais
como fios, moedas, etc. Além disso, não guarde nem carregue a bateria com
colares de metal, etc.
• Não desmonte nem modifique sua bateria.
• Não fure a bateria.
• Não solde a bateria diretamente.
• Não utilize a bateria se mostrar sinais de vazamento, mudança de coloração ou
forma ou qualquer outra alteração de aparência.
• Não molhe a bateria nem a coloque na água ou no mar. Isto pode causar
aquecimento ou oxidação da bateria.
• Guarde a bateria fora do alcance de crianças.
• Se não estiver a utilizar a bateria ou se prever utilizar o aparelho por um
período de tempo elevado, retire a bateria do aparelho e guarde-a em local
seco entre as temperaturas de -20oC e +21oC (-4°F- e +70°F). Isto evita
perdas de autonomia e vida útil da bateria.
• A bateria (pilhas ou conjunto de baterias) não deve ser exposta a calor
excessivo como luz solar, fogo ou similar.
CAUTION/MISE EN GARDE
Risk of Electric Shock, Do Not Open
Manual do utilizador AudioRock
®
Page 99

99
O flash luminoso com o símbolo de perigo de electrocussão, dentro dum
triângulo equilátero, tem o objectivo de alertar o utilizador para a presença
de “voltagem perigosa” não isolada, no interior do compartimento do produto
que pode ser de magnitude suficiente para constituir “um risco de choque
eléctrico das pessoas.
O ponto de exclamação dentro dum triângulo equilátero tem o objectivo
de alertar o utilizador para a presença de instruções importantes de
funcionamento e de manutenção (reparação), na literatura que acompanha
o aparelho.
CUIDADO: Risco de eletrocussão – não mergulhe o aparelho em água.
CUIDADO: Para reduzir o risco de eletrocussão, não remova a tampa (ou parte
de trás). Não há peças reparáveis pelo utilizador – leve o aparelho a um técnico
autorizado se este precisar de reparação.
INSTRUÇÕES IMPORTANTES DE SEGURANÇA
1. Leia estas instruções. Guarde estas instruções. Atenção a todos os avisos. Siga
todas as instruções.
2. Não utilize este aparelho em água. O aparelho pode ser exposto a chuvas, neve ou
outros fenómenos climáticos sem risco de lesões ou danos. Não o mergulhe em água
ou outros líquidos. O produto é resistente a água, não à prova de água.
3. Limpe apenas com um pano húmido ou borrifadas leves de água com uma
mangueira. Não utilize mangueiras de alta pressão para limpar o produto.
4. Não bloqueie as fendas de ventilação. Instale o aparelho de acordo com as
instruções do fabricante.
5. Não instale o aparelho perto de fontes de calor, como radiadores, aquecedores,
fornos ou outros aparelhos (incluindo amplificadores) que produzam calor.
6. Utilize apenas as baterias aprovadas com este produto, de acordo com as
instruções do fabricante.
7. Utilize apenas os acessórios especificados pelo fabricante.
8. As reparações devem ser realizadas por pessoal qualificado. As reparações
efectuam-se quando o aparelho for danificado, dor exemplo: se o cabo elétrico ou a
ficha estiverem danificados, se houver algum líquido ou objeto dentro do aparelho, se
tiver sido exposto a chuvas ou humidade, se não funcionar normalmente e se tiver
sofrido uma queda.
9. O peso deste aparelho pode causar instabilidade se for colocado
numa mesa sem apoio ou perto de piscinas, lagos, ou outros locais
que contenham água. A superfície ou objeto sobre os quais o
produto for colocado devem ser estáveis e impedir que o aparelho
caia na água.
Page 100

100
Parabéns
Obrigado pela escolha do AudioRockTM portátil sem fios
da ebode electronics. Se adequadamente instalado
e utilizado, o produto durará por vários anos sem
problemas. A ebode electronics oferece vários altifalantes
para utilização em ambientes internos ou externos. Para
ver a lista completa de produtos da ebode electronics,
visite-nos na Internet em: www.ebodeelectronics.eu.
 Loading...