

Ebisu AKA Full User Manual
Ebisu Series AKA USB Board
For the AKA Viking and Excalibur
Full manual available at www.tadaotechnologies.com
FEATURES
• Fully functional in the AKA Viking and Excalibur (single and dual solenoid operation)
• Ebisu Series LED display system shows eye status, battery life, and menu system
• Microchip PIC18F2550 microcontroller runs at up to 48 Mhz and provides Full Speed USB 2.0 (12Mbit/s)
• Tengu USB interface for Windows 7, Vista, and XP provides free firmware updates from home, settings
adjustments, and more
• Zero power drain while turned off
• Industry first anti-breech bounce software reduces chopping when a loader is running out of paintballs
• RF socket and wiring harness included to support Magna, Pulse, and other RF transmitters
• Multiple modes of fire ensure compliance with all major tournament series: unlimited semi-automatic,
adjustable semi-automatic, PSP ramping, PSP 3 round burst, NXL full-automatic, Millennium ramping,
custom ramping, auto-response, 3 round burst, and full-automatic
• Tadao trigger logic asynchronously monitors the trigger switch, using an interrupt based scan at up to 12
million times per second for the quickest response time and fastest semi-automatic
• Tadao dynamic eye logic watches for the bolt to return every shot, cycling the marker as fast as possible
• Rate of fire adjustable from 5 to 30 bps in 0.1 bps inc rements, plus unlimited rate of fire
• Extremely easy to use LED based menu system for changing settings
• All settings are stored in non-volatile memory so they are not lost when the battery is disconnected
• Five custom user profiles allow you to save settings for specific tournament series or performance tuning
• Additional features include adjustable debounce, anti-mechanical bounce, cycle percentage filter, anti-bolt
stick, ball in place delay, bolt delay, eye modes, ramp start, ramp percentage, breakout modes, and more
INSTALLATION
Installation of the Ebisu board must be carefully done to avoid damaging the electronics or wiring harnesses.
1. Remove one grip panel from the side of the frame, and unplug the battery.
2. Remove the two screws that attach the frame to the gun body.
3. Gently pull the frame and tray away from the gun body.
4. Remove the 2 nylon screws that secure the board inside the tray.
5. Gently pull the stock board out of the tray and unplug all the wiring harnesses.
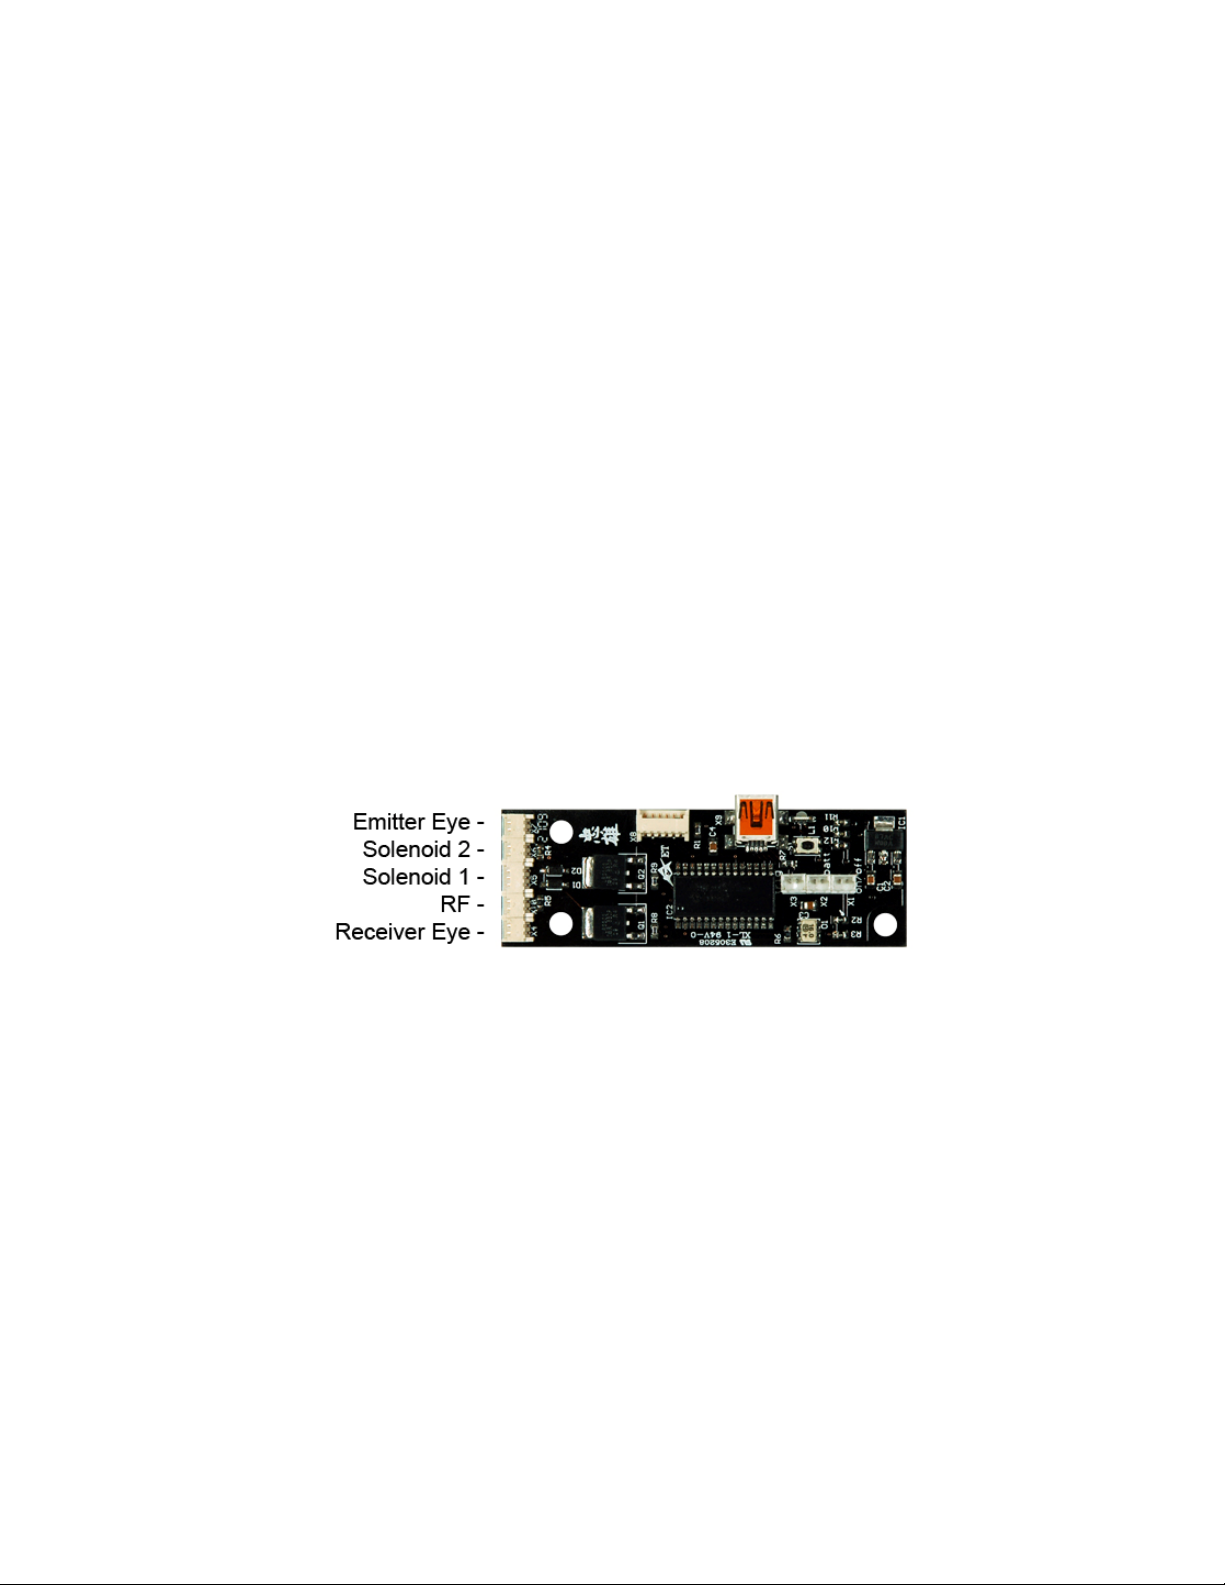
6. Plug all the wiring harnesses into the appropriate sockets on the Ebisu board.
7. Insert the Ebisu board back into the tray and install the two nylon screws.
8. Tuck all the wiring harnesses inside the tray and gun body, and then reattach the frame/tray with the two
frame screws.
9. Replace the battery and grip panel.
BOARD OPERATION
Turn on the board by sliding the power switch to the on position.
Turn off the board by sliding the power switch to the off position.
The eye system is toggled on and off by pressing and holding the trigger for 3 seconds. The LED will reflect the eye
status as it changes.
The multicolor LED will display different colors based on which mode of operation the marker is in:
Flickering Red – at boot time indicates an exhausted battery.
Flickering Yellow – at boot time indicates a low battery.

Flickering Green – at boot time indicates a good batt ery.
Solid Blue – eyes on, ball in breech, ready to fire.
Slow Blinking Blue – eyes on, empty breech.
Slow Blinking Red – eyes off.
Slow Blinking Yellow – eye malfunction caused by the bolt not seen cycling.
If used, the eye system cycles the marker as fast as possible. During each shot the eyes watch for the bolt to return,
ending the current firing cycle and starting another as quickly as the pneumatics allow. If the eye system is
continually blocked (e.g. putting your finger in fron t of the eyes) an d is unab le to see the b o lt return after ev ery sh o t,
the max rate of fire will be reduced to prevent further chopping, and the LED will show an eye malfunction by
slowly blinking yellow. Firing the marker with paint and air will utilize the eye system correctly, maximizing the
rate of fire.
USB
Your Ebisu Series USB board has full USB 2.0 functionality, and works in tandem with the Tengu USB interface,
which can be downloaded online at
http://www.tadaotechnologies.com/productcart/pc/viewContent.asp?idpage=15.
Tengu allows you to update the firmware on your board, modify all the settings, and more. To run the Tengu
interface you need a mini-B USB cable and a PC running Windows 7, Vista, or XP. XP users will also need to
download the Microsoft .NET Framework 2.0 or newer. Refer to the Tengu user guide for information regarding
USB installation and using the Tengu USB interface.
MENU SYSTEM
The Ebisu series boards use a color coded menu system. Each setting has its own LED color and/or sequence
assigned to it. To enter the menu system, hold down the trigger while turning the board on. The LED will show a
rainbow sequence, followed by the last viewed setting.
The tournament lock must be disabled in order to change settings on the board. Toggle the tournament lock by
pushing the small switch located next to the LED. While the marker is turned on (but not in programming mode),
push and hold the lock button. The LED will flash red or green to indicate the status of the lock . Red means the
lock is on; green means the lock is off. When the lock and the marker are off, pull and hold the trigger, and turn the
board on. The marker will boot into programming mode, showing a rainbow sequence before stopping at solid
green. The board will remember the previously viewed setting after consecutive boots into programming mode.
Pull and release the trigger quickly to scroll forward through the settings. When the last setting is reached, it will
wrap around to the beginning.
Green Fire mode
Purple Max rate of fire
Yellow Fine rate of fire
Blue Debounce
Red Anti mechanical bounce
White Cycle percentage filter
Aqua Dwell
Flickering Green Anti bolt stick
Flickering Purple Ball in place delay
Flickering Yellow Bolt delay (Viking only)
Flickering Blue Eye mode (Viking only)
Flickering Red Ramp start
Flickering White Ramp percentage
Flickering Aqua G-mode breakout
Double Blink Green Board mode
Double Blink Purple Bolt open delay (Excalibur only)
Double Blink Yellow Bolt open time (Excalibur only)
Double Blink Blue Watch time (Excalibur only)
Double Blink Red Bolt close delay (Excalibur only)
Alternating Yellow/Blue Save current settings to profile 1-5
Alternating Yellow/Green Load profile 1-5 to current settings
Alternating Yellow/Red Reset all settings to defaults
When the LED is lit for the desired setting, press and hold the trigger until the LED goes out. When you release the
trigger, the LED will blink to show the current setting. For example, if the current setting for debounce is 5, the LED
 Loading...