

Page 1

War Bird
Remote Control Helicopter
User Guide
#XC9970 © 2011 EB Excalibur, Inc.
XC9970IS01EXCRA
5 x 7 7/26/11; revised 7/28/11
SAVE THESE INSTRUCTIONS.
READ COMPLETE INSTRUCTIONS BEFORE USE.
XC9970IS01EXCRA.indd 1XC9970IS01EXCRA.indd 1 7/28/11 2:35 PM7/28/11 2:35 PM
Page 2

HELICOPTER LAYOUT
CONTROLLER LAYOUT
2
Power Switch
Charging Socket
Stabilizer
Tail
Rotor
Landing Skid
Main Rotor Blade
Main
Rotor Blade
Power
Switch
Throttle
Stick
Trim Control
Switch
Direction
Joystick
Power Indicator
Charger
Charging Plug
Charger
Main Blade A
Main Blade B
Tail Blade C
A
B
C
Missile Light
Switch
XC9970IS01EXCRA.indd 2XC9970IS01EXCRA.indd 2 7/28/11 2:35 PM7/28/11 2:35 PM
Page 3

3
C
ongratulations on your new EXRC
TM
purchase! EXRC
TM
pilots experience
superior remote control ight and excellence in the look and feel of our
products while commanding the skies. Now that you are an honorary EXRC
TM
pilot, we recommend reading through this manual thoroughly before
attempting your rst ight. Inside this manual you will nd ight tips, safety
precautions, and care instructions to keep your EXRC
TM
helicopter in tip-top
shape for multiple ight missions.
No need to make sure your seats and tray tables are in the upright and locked
position, no need to worry about loss of cabin pressure, and no ight
attendants to do a nal check before air-craft take o . Just follow the
instructions, enjoy your EXRCTM helicopter to the fullest, and command the skies.
BATTERY INSTALLATION & CHARGING
Installing Batteries in the Remote Control:
1. Using a Phillips-head screwdriver, remove the screw from the battery
compartment cover.
2. Insert 6 AA batteries, making sure to follow the battery polarity (+ and -)
drawing on product.
3. Replace the battery compartment cover and secure with the screw.
XC9970IS01EXCRA.indd 3XC9970IS01EXCRA.indd 3 7/28/11 2:35 PM7/28/11 2:35 PM
Page 4

Charging the Helicopter:
1. Turn the helicopter power OFF.
2. Insert the charging plug into the socket
on the helicopter. Then plug the charger
into the wall.
3. The LED will be o when charging.
When the product is fully charged, the
LED will turn on. Remove the plug
from the helicopter.
FLYING YOUR HELICOPTER
GETTING STARTED
• Switch the helicopter’s ON/OFF switch to the ON position. The power
light will turn on.
• Place the helicopter on the ground with the tail pointed toward you and
the nose facing away from you.
• Make sure your surroundings are clear of obstacles before ying.
• Do not y if the helicopter has become damaged in any way.
• NEVER y the helicopter around another person or animal.
OPERATING YOUR HELICOPTER
LEFT joystick - Slowly press UP on the Left joystick to increase the speed of
the rotor blades to cause the helicopter to ascend into the air. Slowly release
the Left joystick to cause the helicopter to descend.
RIGHT joystick - Move the Right joystick to the left or right to turn the
helicopter left or right.
4
Requires approximately 120 minutes
charge for a full 8 minute ight.
DO NOT OVERCHARGE
XC9970IS01EXCRA.indd 4XC9970IS01EXCRA.indd 4 7/28/11 2:35 PM7/28/11 2:35 PM
Page 5
5
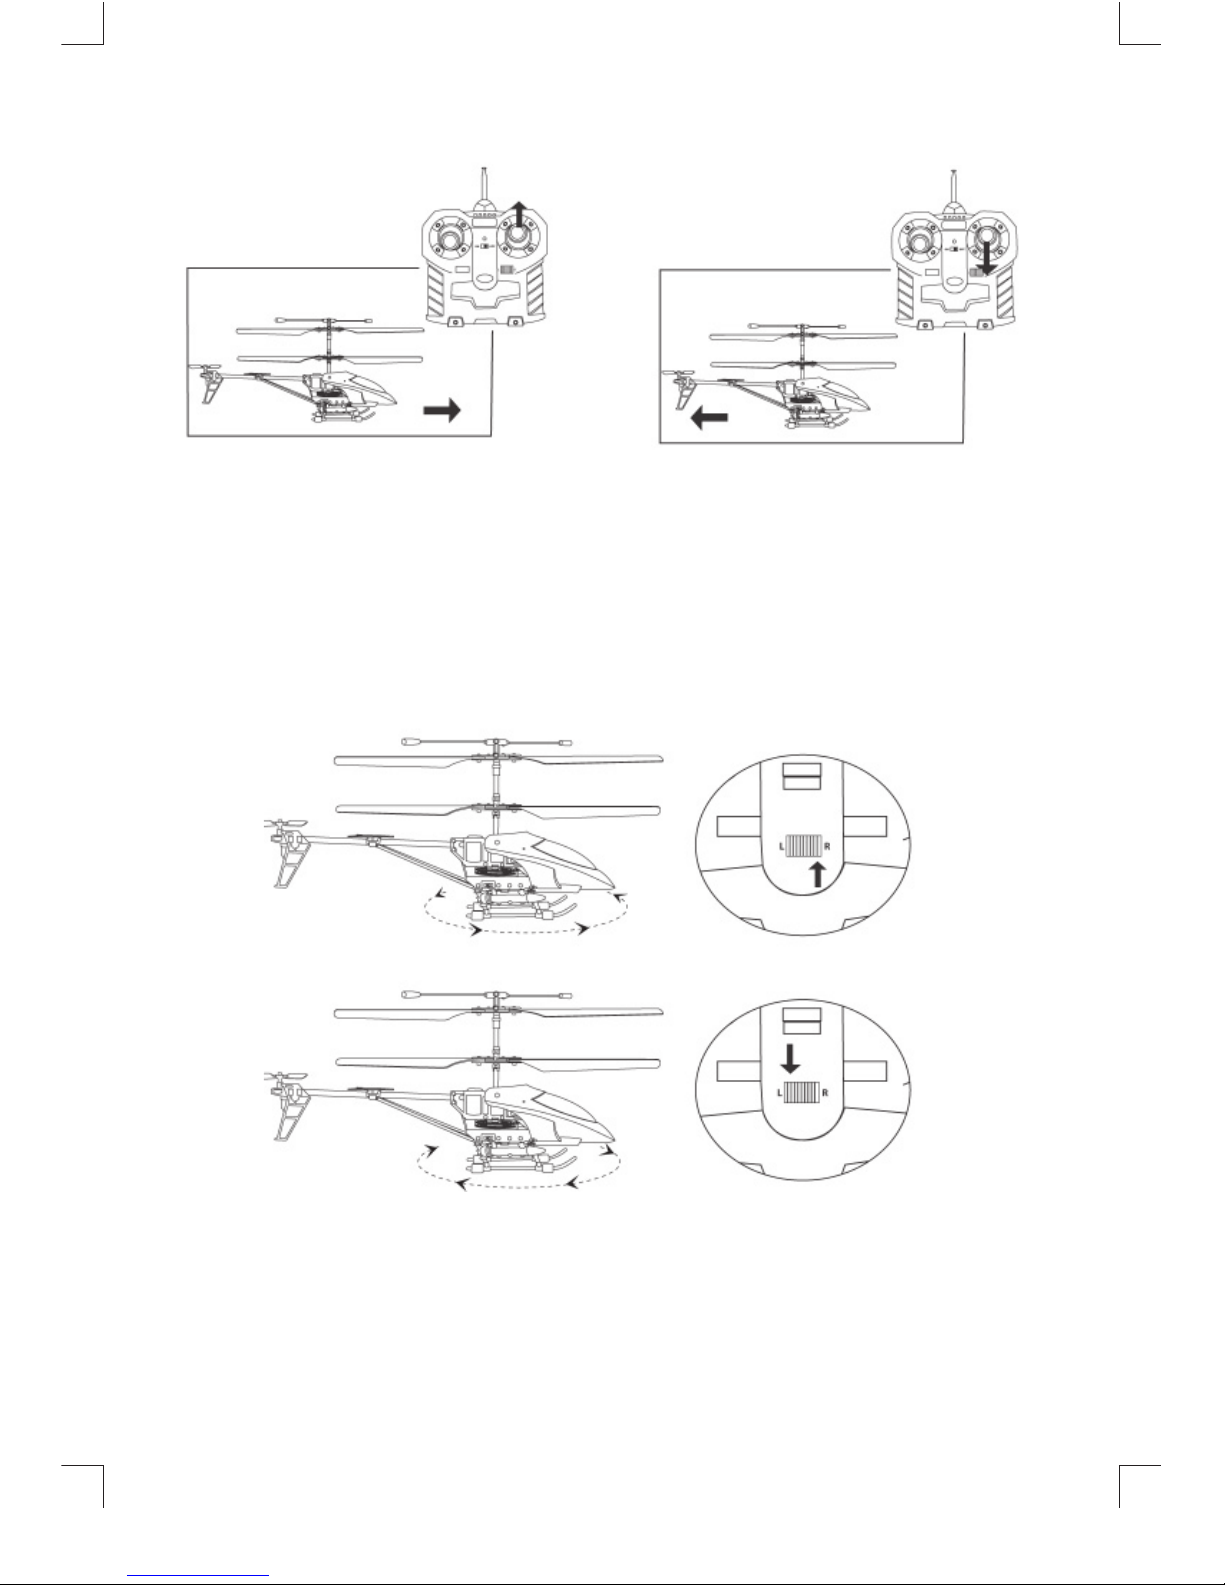
Move the Right joystick up or down to move the helicopter forward or
backward.
DIRECTION CONTROL - TRIM KNOB
Located on the top of the Controller is the Trim Control Switch. When the
helicopter does not y straight, use the Trim Control to adjust the alignment.
1. Clockwise Rotation - when the helicopter is spinning counterclockwise,
press the trim button on the right side.
2. Counterclockwise Rotation - when the helicopter is spinning clockwise,
press the trim button on the left side.
FLIGHT CONDITIONS
Please ensure the following conditions for your ight location:
• Indoor environment with little air conditioning. Heavy air-conditioning
can be too strong for heli ight. It is highly recommended to turn o all
fans, air conditioning units, or reading lamps that could impair ying.
• We recommend that the area/space for ight be at least 10 x 15 x 10 feet.
XC9970IS01EXCRA.indd 5XC9970IS01EXCRA.indd 5 7/28/11 2:35 PM7/28/11 2:35 PM
Page 6

6
CONTROL TIPS
• It is best to start with both joysticks on the remote control in the middle
position. Do not immediately push into extreme positions. Start by gently
easing the joystick into the position of the direction you would like to go.
• EXRC
TM
recommends for initial piloting of the helicopter, focus on learning
to control the throttle joystick rst. During your rst ight we recommend
you work at learning to keep the helicopter at a constant 3 foot altitude
before attempting to learn directional control of the helicopter. After the
pilot has mastered the throttle joystick, then start learning to turn with
the direction joystick.
SAFETY TIPS
• Read the entire manual before attempting to pilot your helicopter.
• This product is intended for indoor use, and works best indoors. We do
not recommend using the product outdoors.
• Never attempt to y your helicopter in a cluttered space. This helicopter
was intended for obstacle-free wide area spaces.
• Make sure all people and animals are 3-5 feet from the helicopter before
you start ying it.
• Always keep focus on your helicopter, and do not attempt to y/land/or
crash anywhere on or near any other people or animals.
• The rotating parts on the helicopter could lead to injury. Never put any
body part including the hands and face, close to the rotating parts. Only
operate this product standing, as it allows for quick movement away from
the helicopter if necessary.
• Never operate the helicopter using parts that are altered in shape or
damaged in any form.
TROUBLESHOOTING
Cause
Correction
Incorrect channel
selection on the
remote
Gently press forward on the left
joystick and switch between all 3
channels until the helicopter takes
ight. This is the correct channel.
Problem
Helicopter is
not responding
to remote
XC9970IS01EXCRA.indd 6XC9970IS01EXCRA.indd 6 7/28/11 2:35 PM7/28/11 2:35 PM
Page 7

7
TROUBLESHOOTING (continued)
CARE & HANDLING
• Do not submerge in water or other liquids.
• Do not disassemble the product for any reason.
• Do not expose to extreme temperatures.
• Do not drop, throw, smash or otherwise cause physical shock.
• Clean using only a slightly damp cloth.
• Do not use cleaners with chemical agents.
• Do not short-circuit the battery terminals.
Set the ON/OFF Switch to the ON
position.
Recharge the helicopter battery.
If this does not work, replace
the batteries in the remote and
recharge o fresh batteries.
Problem
Cause
Correction
Drops in
mid ight
or performs
poorly
Weak battery
power
Recharge the helicopter battery.
If this does not work, replace
the batteries in the remote and
recharge o fresh batteries.
Propellers are not
moving
Helicopter is
powered o
Weak battery
power
Interference of
another remote
controlled device
Interference by
other conditions
such as lighting
Avoid all other remote controlled
devices running on the same
channel.
Change environment to better
suited conditions.
Loss of control
Helicopter
spinning out of
control
Incorrect trim
adjustment
Adjust the trim as shown above
to nd the proper adjustment.
WARNING
CHOKING HAZARD - Small Parts.
Not for children under 3 years.
XC9970IS01EXCRA.indd 7XC9970IS01EXCRA.indd 7 7/28/11 2:35 PM7/28/11 2:35 PM
Page 8

CAUTION – Battery Safety Information
• Non-rechargeable batteries are not to be recharged
• The pre-installed battery is non-replaceable
• Rechargeable batteries should only be recharged under adult supervision
• Do not mix alkaline, standard (carbon-zinc), or rechargeable
(nickel-cadmium) batteries
• Exhausted batteries are to be removed
• Do not mix old and new batteries
• Do not dispose of product in re; batteries may explode or leak
• If this product will not be used for an extended period, remove the
batteries from the product
• The supply terminals are not to be short-circuited
• Batteries are to be inserted with correct polarity
• Clean the battery contacts and also those of the product prior to
battery installation
• As always, dispose of batteries in an eco-friendly manner
FCC Part 15 Compliance
The device complies with Part 15 of the FCC Rules. Operation is subject to the following two conditions: (1) this device may not
cause harmful interference, and (2) this device must accept any interference received, including interference that may cause
undesired operation. Changes or modi cations not expressly approved by the party responsible for compliance could void the
user’s authority to operate the product.
Note: This equipment has been tested and found to comply with the limits for a Class B digital device, pursuant to Part 15 of the
FCC Rules. These limits are designed to provide reasonable protection against harmful interference in a residential installation.
This equipment generates, uses and can radiate radio frequency energy and, if not installed and used in accordance with the
instructions, may cause harmful interference to radio communications. However, there is no guarantee that interference will not
occur in a particular installation. If this equipment does cause harmful interference to radio or television reception, which can be
determined by turning the equipment o and on, the user is encouraged to try to correct the interference by one or more of the
following measures:
• Reorient or relocate the receiving antenna.
• Increase the separation between the transmitting equipment and receiver.
• Connect the equipment into an outlet on a circuit di erent from that to which the receiver is connected.
• Consult the dealer or an experienced radio technician for help.
EB Excalibur, Inc.
Miami, Florida
www.EBExcalibur.com
service@ebexcalibur.com
Distributed in the United Kingdom by:
EB Brands UK, Worcester WR4 9FA
Actual product may di er slightly from photography.
XC9970IS01EXCRA
XC9970IS01EXCRA.indd 8XC9970IS01EXCRA.indd 8 7/28/11 2:35 PM7/28/11 2:35 PM
 Loading...