

Page 1
Module timer
EN
Operating Instructions
Valid for heaters versions:
Air heater Water heater
Order number module timer
Display Display
DE
22 1000 30 38 00 22 1000 30 34 00
EN
22 1000 30 40 00 22 1000 30 36 00
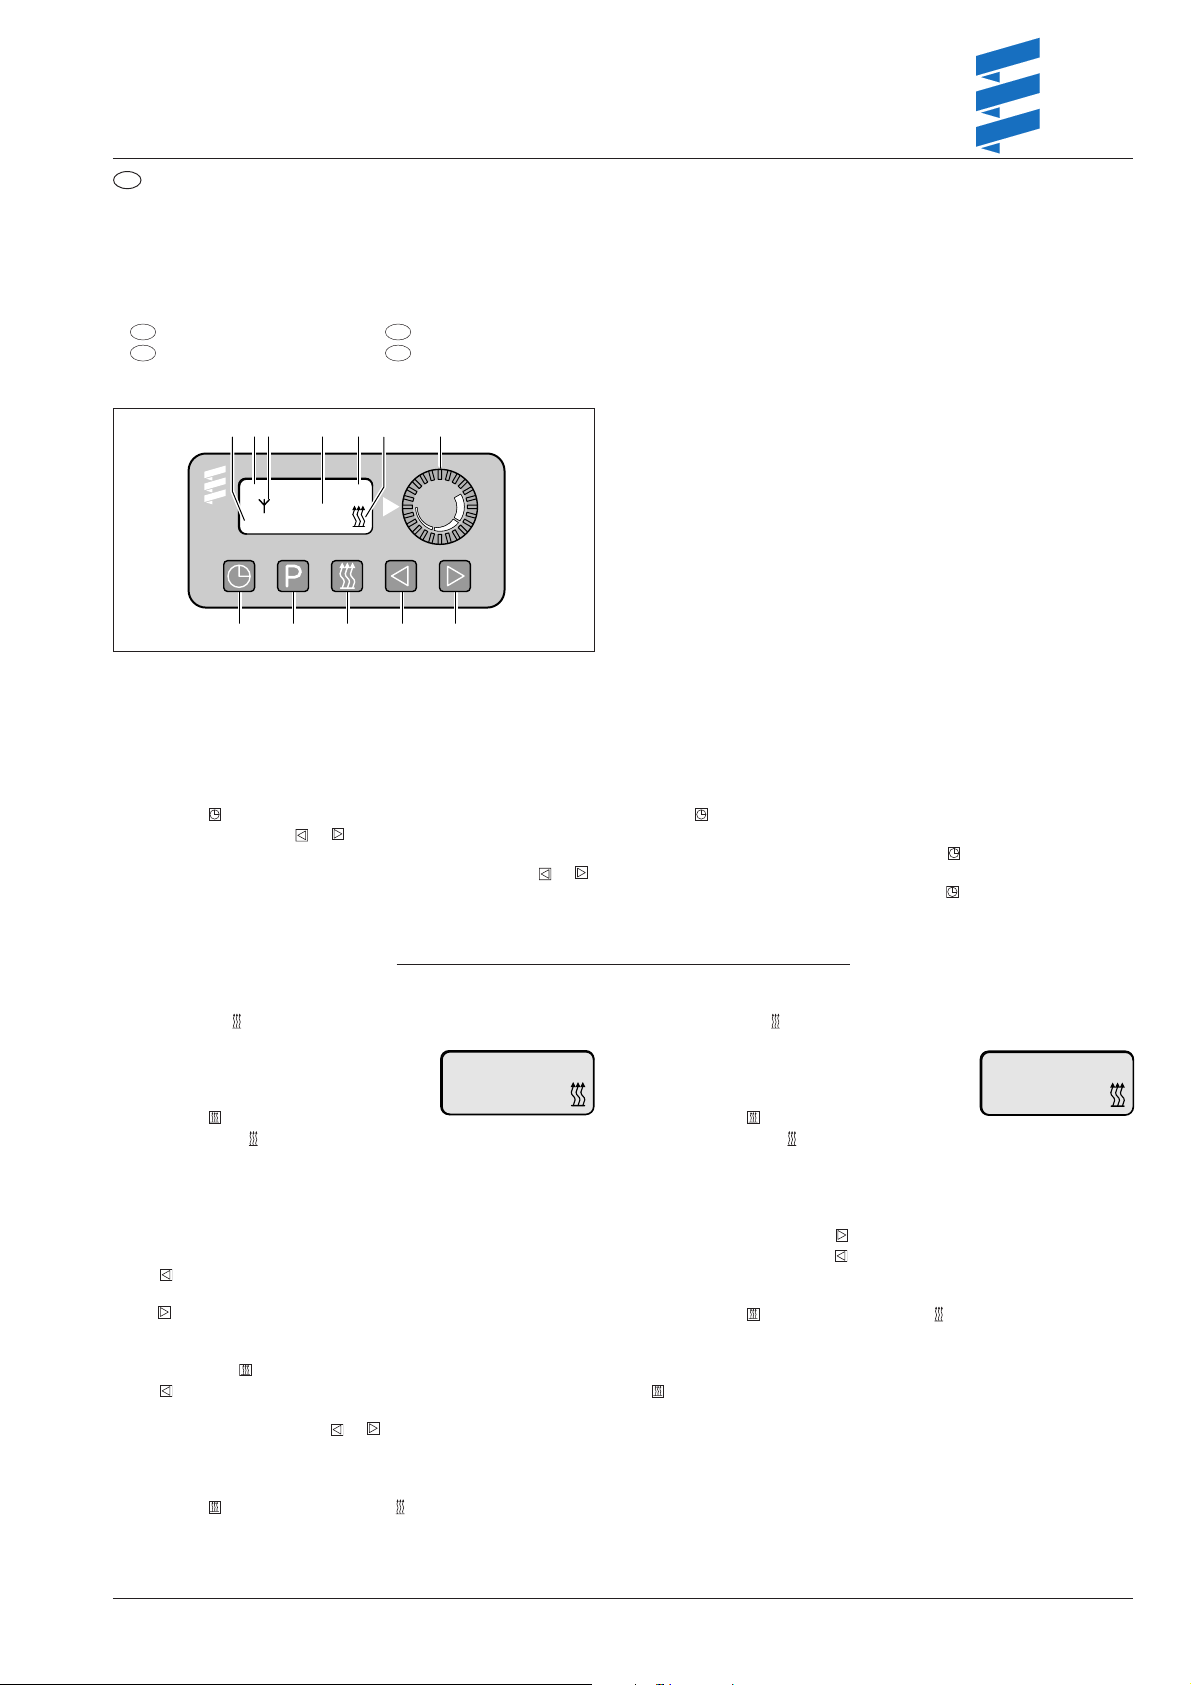
6
87 9 1011 12
M0 °C
20:30
3
12345
All signals will start to flash on the display when the module timer
is connected to the power supply.
The switching clock must be entirely set. The heater cannot be
switched on when the clock is in this state.
DE
EN
Eberspächer
J. Eberspächer
GmbH & Co. KG
Eberspächerstr. 24
D-73730 Esslingen
11 Actual time
12 Preset
13 Heat
14 Setting backwards
15 Setting forwards
16 Memory display
17 Symbol for radio remote control
18 Weekday or preset day
19 Current time or preset time
10 Temperature display
11 Operating display
12 Temperature preselection – Range 10 to 30 °C
(Air heater only)
Telefon (zentral)
(0711) 9 39-00
Telefax
(0711) 9 39- 05 00
www.eberspaecher.com
Setting the time and weekday for the first time
Briefly press . Time display flashes 12:00.
Set the current time with or .
The time is stored as soon as it stops flashing.
The weekday will then flash. Set the current weekday with or .
The weekday is stored as soon as it stops flashing. The display is
retained with ignition “ON”; the display is turned off after 10 seconds with ignition “OFF”.
Heater operation without preselection in ignition “OFF” state
Heating symbol = observe operating display.
Switching on the heater
120
Briefly press .
Operating display and display of heating duration: The heating
duration is works adjusted to 120 minutes. It can be changed for
a single heating period or permanently changed.
Changing the heating duration for a single heating period
After switch-on:
Shorten heating duration (down to minimum 1 minute):
Press .
Lengthen heating duration (up to maximum 120 minutes):
Press .
Changing the heating duration permanently
Do not switch on .
Press and hold down (approx. 3 seconds) until the display
appears and flashes. Release. Now set the heating duration
(from 10 to 120 minutes) with or . The new heating duration
has been stored when the display disappears.
Changing the time and weekday
Keep depressed until the time flashes.
Then proceed as described on the left-hand side.
If only the time is to be reset, then press twice after the time
has been reset to skip flashing and weekday setting.
After the weekday has been reset press to shorten the duration
of weekday flashing.
Heater operation without preselection in ignition “ON” state
Heating symbol = observe operating display.
Switching on the heater
M0
20:45
Briefly press .
Operating display as well as time and weekday.
The heater will continue to operate for as long as the ignition
remains switched on.
A residual heating time of 15 minutes continues after the ignition
has been switched off. This can be lengthened to maximum
120 minutes by pressing , or shortened down to a minimum
of 1 minute) by pressing .
Switching off the heater
Briefly press . The operating display disappears.
The fan automatically continues to run to cool down the heater.
External switch “Heater ON / OFF”
If an additional switch has been mounted, then the heater can
be turned off from a remote point in the manner described above.
Turning off the heating
Briefly press . The operating display disappears.
The fan continues to run to cool down the heater.
22 1000 90 95 53 01.2003 Subject to changes Printed in Germany © J. Eberspächer GmbH & Co. KG
Page 2
Preselect heating start
4. Checking the activated memory
Three switch-on times within the next 24 hours can be selected
or one switch-on time within up to 7 days.
Only 1 switch-on time can be activated at any given time!
1. Select memory and activate:
(proceeding from a neutral setting as long as the display is
visible)
First memory – Press P once
Memory display: 1 (basic setting 12 00)
Second memory – Press P twice
Memory display: 2 (basic setting 12 00)
Third memory – Press P three times
Memory display: 3 (basic setting 12 00)
Neutral setting – No memory is activated.
Continue pressing P until the memory display disappears.
2. Start heating within 24 hours
Setting a preselected day:
The preselected day is automatically obtained and does not have
to be set.
Setting a preselected time:
M0
12 00
i
Continue pressing P until the required memory display (1, 2, 3)
flashes on the display.
Briefly press or and release.
The preset time flashes on the display. Use or to set the
preselected time for heating.
Setting is only possible as long as the preselected time flashes
on the display.
Renewed selection: Press P.
3. Start heating later than 24 hours (max. 7 days)
The preselected time of the displayed memory is shown for
approximately 5 seconds. This is then either turned off or the time
is displayed (with ignition “ON”). The display of the preselected
time and preselected data for approx. 5 seconds can be called
by pressing P once.
Temperature display
With connected outside temperature sensor
(Order No. 25 1482 89 41 00) the temperature can be permanently displayed when the ignition is switched on by pressing
once. When the ignition is switched off, the temperature can be
displayed for 15 seconds by pressing twice.
Please note!
Brief power interruptions will be bridged by the module timer.
All symbols will flash on the display after an extended power
failure. The module clock will have to be totally reset.
The time and weekday are permanently displayed when the ignition is switched on. Their display is switched off after 15 seconds
if the ignition is switched off.
Operation with radio remote control is possible with an additional
facility (receiver module).
If a fault arises while the heating is on and when a diagnosis line
is connected, then the operating display will flash and the
Code No. of the fault will be displayed (consult an authorised
workshop).
On road tankers equipped in conformity with ADR / ADR99, the
module timer is only used to switch the heating on and off. The
time does not have to be set in order to start the heater.
Continuous heating
or heating for a limited period are possible.
As a result of statutory requirements the following functions
cannot be activated:
1. Preselecting heater operation with the module timer.
2. Operation with the radio remote control.
3. Connecting an outside temperature sensor.
Setting a preselected time
M0
12 00
i
Continue pressing P until the required memory display (1, 2, 3)
flashes on the display.
Briefly press or and release. The preset time flashes on the
display. Use or to set the preselected time for heating.
Setting a preselected day:
The preselected day starts to flash approximately
5 seconds after the preselected time has been set.
Use or to set the preselected day for heating.
The preselected time and preselected day are stored as soon as
the time display disappears or when the display is changed over
to indicate the time. The memory display indicates the activated
memory. A flashing heating key ( ) additionally indicates an
activated memory.
 Loading...