

Page 1

EasyStart T
Operating instructions.
Comfort Timer
with 7-day preset capability.
22 1000 32 88 06
03.2009
Page 2

Contents
Introduction
• Please read first...................................................................................................... 3
• Safety information ..................................................................................................3
• General information ................................................................................................ 3
• Purpose ................................................................................................................. 3
Overview
• Timer ..................................................................................................................... 4
• Displays ................................................................................................................. 5
Operation and Adjustment
• Basic operation and adjustment rules ..................................................................... 6
• Activate timer ......................................................................................................... 7
• Set weekday, time and operating time ............................................................... 8
• Switch on heater ................................................................................................ 9
• Switch off heater .............................................................................................. 10
• Switch on ventilation ........................................................................................ 11
• Switch off ventilation ........................................................................................ 12
• General notes on ”ventilate“ mode ................................................................... 13
• Switch on add-on unit ...................................................................................... 14
• Switch off add-on unit ...................................................................................... 15
• General information on the add-on unit ............................................................ 15
• General information on programming the preset time ....................................... 16
• Program preset times ................................................................................ 17, 18
• Delete preset times .......................................................................................... 19
• Set heating level – of water heaters .................................................................. 20
• Set heating level – of air heaters ....................................................................... 21
What to do if …?
• Displays ......................................................................................................... 22, 23
• Preset time not programmable / Display disappears ............................................. 23
Service
• Hotline ................................................................................................................. 24
2
Page 3

Important Information
Please read fi rst
Please ensure you read through these
operating instructions carefully before you
start to set and use the timer.
These operating instructions contain
important information, which you require
to set and use the timer.
Please store these operating instructions
in a safe place so you can refer to them at
a later date.
Safety information
Danger!
– All information and notes, in particular
the safety information in the heater’s
technical description must be observed
at all times!
– The heater must be switched off when
refuelling.
– Only use original spare parts.
General information
The timer has a simple control structure.
With only 4 keys, it is possible to set all
functions, change them if necessary and
program the preset times.
We recommend use of the temperature
sensor, available as an option, in order to
be able to utilise all the timer’s functions.
If a vehicle was disconnected from the
power supply (battery disconnected) and
the power supply is reinstated, the time
appears when the timer is activated. This
must then be adjusted. See description on page 8 “Set weekday, time and
operating time”.
Operation of the timer is described in
detail from page 6.
Purpose
The EasyStart T timer is used to switch
on / off and preset the switching on time,
operating time and operating mode of the
heater and / or add-on unit installed in
the vehicle.
Please note!
Improper use and use outside the specified area of use cancels all liability and
warranty.
3
Page 4
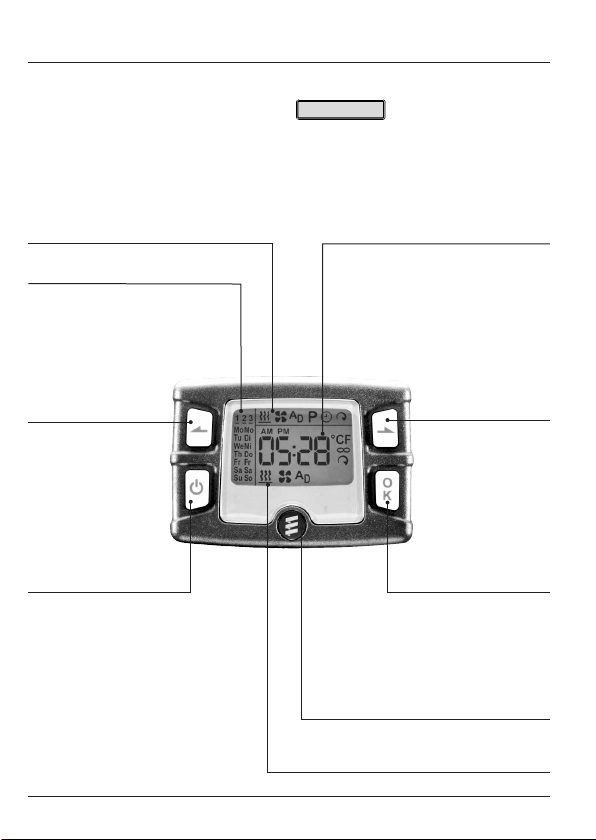
Overview
Timer
The timer can be used to make the
settings and adjustments necessary for
operation of the heater and to switch various units on and off.
Please note!
The number of symbols and displays differs depending on the installed heater and
feature options.
Menu bar
Program bar
Display of the active
program memory
and corresponding
weekday
Control key –
Back
Select a function in
the menu bar and
adjust values
Activation key
• Timer – ON / OFF
• Switch over in the display bar
between
– Temperature
– Time
– Operating time
– Temperature setpoint value
• Switch back to the
menu bar
4
Display bar
Control key –
Next
Select a function in
the menu bar and
adjust values
OK key
Select the flashing
symbol or confirm
inputs
Covering cap and
fixing screw
Status display
Page 5
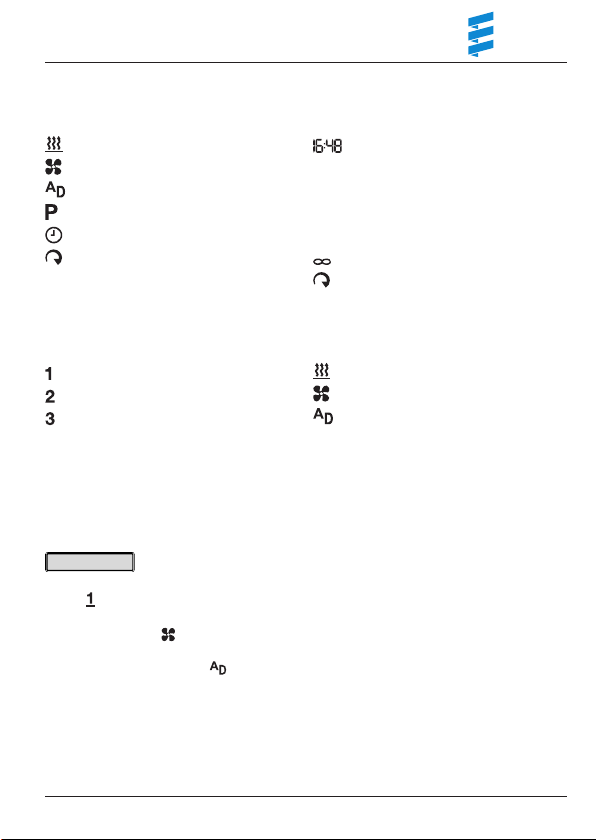
Overview
Displays
Menu bar
Display bar
Heater ON / OFF
Ventilation ON / OFF
Add-on unit ON / OFF
Program preset time
Set the time / operating time
Set heating level
Program bar
Preset memory 1
Preset memory 2
Preset memory 3
Mo – So Weekdays
Mo – Su English weekdays
Please note!
• If the program number is underlined,
e.g. this program will be executed
next.
• “Ventilate” mode is not possible in all
heater models.
• The add-on unit function is not possible with all heater models and must be
activated by the installation workshop.
Numerical and text displays
AM Time in the morning (English)
PM Time in the afternoon (English)
°C Temperature in degrees Celsius
F Temperature in degrees Fahrenheit
Unlimited operating time
Heating level set
Status display
Heating mode active
Ventilation mode active
Add-on unit active
5
Page 6
Operation and Adjustment
Basic operation and adjustment rules
Activate timer
If the display is not lit, the timer must be
activated before each use.
The timer must be activated before each
operation or adjustment.
To do this, press until the menu bar
appears in the display, then release the
key and continue with the operation or
adjustment (see also page 7).
Flashing symbols
Each flashing symbol
in the menu, program
and display bar can be
changed with or and
confirmed with .
Confirm input
Settings and changes must always be
confirmed with , otherwise they are lost
(exception: operating time).
Terminate / quit settings
You can use to terminate or quit enter-
ing settings in a menu.
Display disappears
If the vehicle lighting is switched off, no
heater or additional unit is switched on,
or no setting or actuation is made, the
display disappears within 10 seconds, i.e.
the timer switches to idle state.
For renewed input you must press
again.
Set operating time
(one-off or permanent)
The operating time can be individually set
with or .
In preset mode from 10 – 120 minutes.
In immediate operation from 10 – 120
minutes or continuous operation .
See pages 8, 9, 11 and 14 for a descrip-
tion.
Display if a temperature sensor is
connected.
If the optional tempera-
ture sensor is connected
the time and temperature
can be alternately dis-
played by pressing .
In the settings and opera-
tions described below it
is assumed that a temperature sensor is
connected.
6
Page 7
Operation and Adjustment
Activate timer
press until the menu bar appears in the display and
the temperature is displayed.
The timer is activated.
Please note!
• Possible displays such as and are described
in the chapter “What to do if …?” from page 22.
• If the heater or additional unit is in use or the vehicle
lighting is switch on (terminal 58), the timer does not
have to be activated.
The following actions are possible:
• Switch from temperature display to time and back,
press .
• Select functions in the menu bar with or ,
confirm selection with .
The further procedure is described in the relevant sec-
tion for the selected function.
Display
7
Page 8
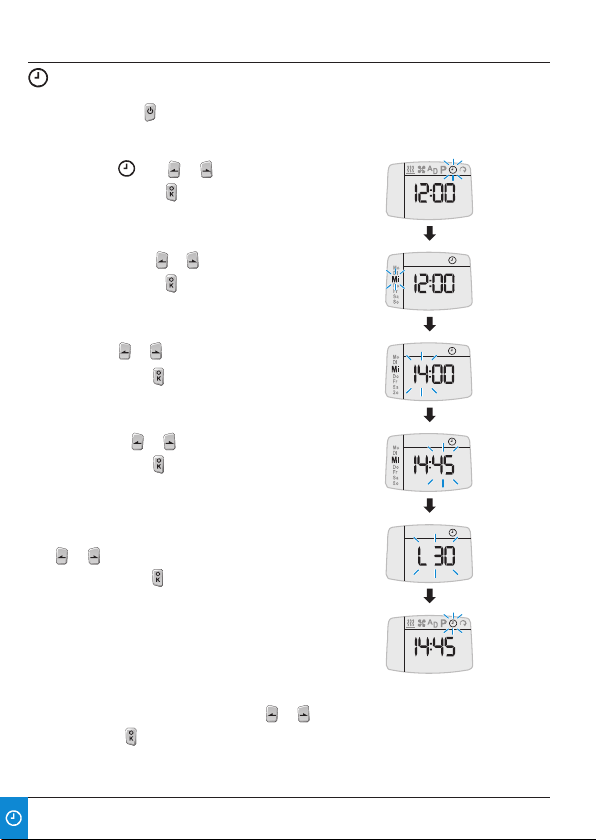
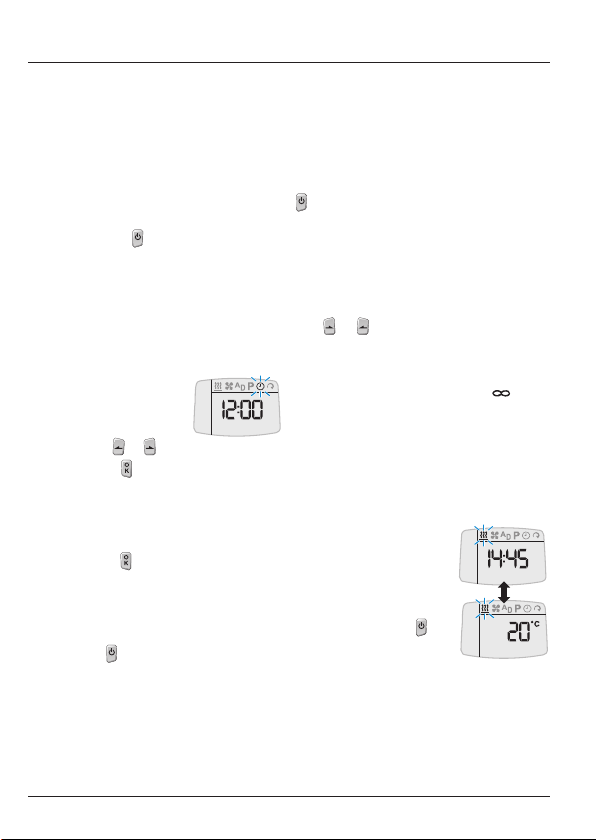
Operation and Adjustment
Set weekday, time and operating time
Activate timer with (see page 7).
Select symbol with or .
Confirm selection with .
Select weekday with or .
Confirm selection with .
Set hours with or .
Confirm setting with .
Set minutes with or .
Confirm setting with .
Permanently set operating time for immediate operation
with or .
Confirm setting with .
The set, current time is displayed.
The adjustment is completed.
Display
The following action is possible:
• Select functions in the menu bar with or , confirm
selection with .
The further procedure is described in the relevant sec-
tion for the selected function.
8
Page 9
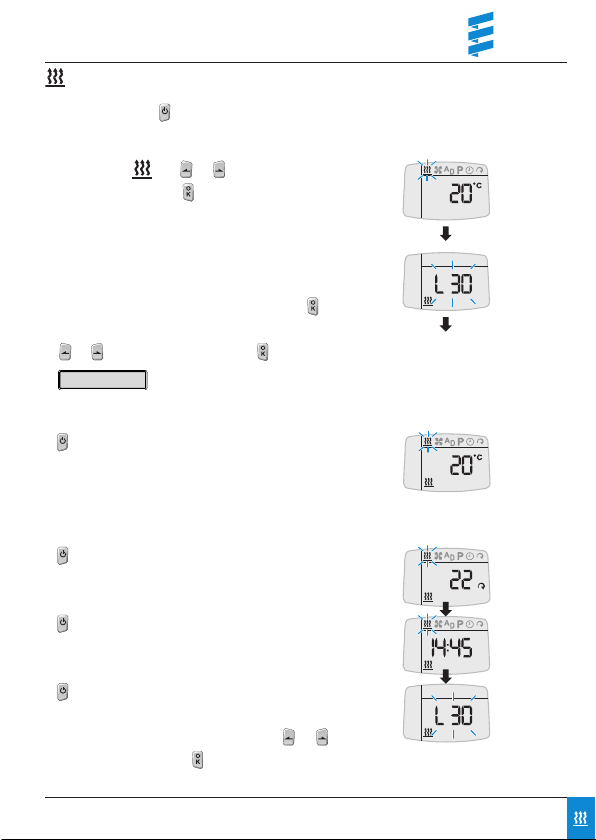
Operation and Adjustment
Switch on heater
Activate timer with (see page 7).
Select symbol with or .
Confirm selection with .
Heater is switched on.
The following actions are possible for the operating
time:
• The operating time can be accepted with .
• The operating time can be changed as a one-off with
or and then confirmed with .
Please note!
The operating time last displayed is adopted without
confirmation.
• press to display the temperature, the last saved
operating time remains valid.
The following actions are possible:
• Call up display.
press, the current heating level is displayed
(for air heaters only)
press to display the time.
Display
press to display the operating time.
See above for adjustment.
• Select functions in the menu bar with or ,
confirm selection with .
The further procedure is described in the relevant section for the selected function.
9
Page 10

Operation and Adjustment
Switch off heater
Select symbol with or .
Confirm selection with .
Heater is switched off.
The following actions are possible:
• Switch from temperature display to time and back,
press .
• Select functions in the menu bar with or , confirm
selection with .
The further procedure is described in the relevant sec-
tion for the selected function.
Display
10
Page 11

Operation and Adjustment
Switch on ventilation – only possible if symbol is displayed
in the menu bar (for general information, see page 13).
Activate timer with (see page 7).
Display
Select symbol with or .
Confirm selection with .
Ventilation is switched on.
The following actions are possible for the operating
time:
• The operating time can be accepted with .
• The operating time can be changed as a one-off with
or and then confirmed with .
Please note!
The operating time last displayed is adopted without
confirmation.
• press to display the temperature, the last saved
operating time remains valid.
The following actions are possible:
• Call up display.
press to display the time.
press to display the operating time.
See above for adjustment.
• Select functions in the menu bar with or ,
confirm selection with .
The further procedure is described in the relevant sec-
tion for the selected function.
11
Page 12

Operation and Adjustment
Switch off ventilation– only possible if symbol is displayed
in the menu bar (for general information, see page 13).
Display
Select symbol with or .
Confirm selection with .
Ventilation is switched off.
The following actions are possible:
• Switch from temperature display to time and back,
press .
• Select functions in the menu bar with or ,
confirm selection with .
The further procedure is described in the relevant sec-
tion for the selected function.
12
Page 13

Operation and Adjustment
General notes on ”ventilat“ mode
If the symbol is not displayed in the
menu bar, „ventilate“ mode is only possible in the heater for the heater models
under certain prerequisites:
• With the water heaters HYDRONIC
(B / D 4 W S, B / D 5 W S,
B / D 4 W SC and B / D 5 W SC): the
“heat / ventilate” switch (Order No. 22
1000 31 89 00) must be installed.
• With the air heaters AIRTRONIC /
AIRTRONIC M: the mini controller
(Order No. 22 1000 32 07 00) must be
installed.
Please note!
“Ventilate” mode is not provided for
upgraded independent heaters.
Select „ventilate“ or „heat“ for the
heater models listed above and
switch on.
Use the “heat / ventilate” switch or the
mini controller to select “ventilate” or
“heat” mode and then switch on the
heater with the timer.
Switching between “ventilate” and
“heat” mode
If you switch mode while “ventilate” or
“heat” is running, you must use the timer
to switch of the heater (see page 12 and
10).
If the heater is switched off in “heat”
mode the heater runs on. Once this afterrun has ended use the “heat / ventilate”
switch or the “mini controller” to switch to
“ventilate” mode. Then use the timer to
switch the heater back on.
After the heater has been switched off in
“ventilate” mode, you can immediately
switch to “heat” mode using the “heat /
ventilate” switch or the “mini controller”.
Then use the timer to switch the heater
back on.
Switch of “ventilate” or “heat” mode
Use the timer to switch off the heater (see
page 12 resp. 10).
Please note!
• “Ventilate” or “heat” mode must be
selected before switching on the
heater.
• In the “ventilate” switch setting of
HYDRONIC water heaters the vehicle
blower is directly controlled by bypassing heat mode and in AIRTRONIC air
heaters the heater’s blower is bypassed
in the same way.
• If you have any further questions regarding “ventilate” mode please contact your
installation workshop or call the service
phone number (see page 24).
13
Page 14

Operation and Adjustment
Switch on add-on unit – only possible if symbol is displayed
in the menu bar (for general information, see page 15 ).
Activate timer with (see page 7).
Display
Select symbol with or .
Confirm selection with .
Add-on unit is switched on.
The following actions are possible for the operating
time:
• The operating time can be accepted with .
• The operating time can be changed as a one-off with
or and then confirmed with .
Please note!
The operating time last displayed is adopted without
confirmation.
• press to display the temperature, the last saved
operating time remains valid.
The following actions are possible:
• Call up display.
press to display the time.
press to display the operating time.
See above for adjustment.
• Select functions in the menu bar with or ,
confirm selection with .
The further procedure is described in the relevant sec-
tion for the selected function.
14
Page 15

Operation and Adjustment
Switch off add-on unit– only possible if symbol is displayed
in the menu bar.
Select symbol with or .
Confirm selection with .
Add-on unit is switched off.
The following actions are possible:
• Switch from temperature display to time and back,
press .
• Select functions in the menu bar with or ,
confirm selection with .
The further procedure is described in the relevant sec-
tion for the selected function.
General information on the add-on unit
An add-on unit can be e.g. a second
heater or parking air conditioning.
It is also possible to combine a heater
with a blower. The blower is used to circulate air within the inside of the vehicle.
The heaters or blower can be operated
simultaneously or independently of each
other.
The “add-on unit” function must be activated by the workshop.
Display
15
Page 16

Operation and Adjustment
General information on programming the preset time
The timer can be used to program 3
preset times.
The 3 preset times can either all be
spread over one weekday or be spread
between different weekdays.
In water heaters and if a temperature
sensor is connected to the timer the
heater start is automatically calculated
depending on the measured room temperature and the selected heating level
(ECO or HIGH). The operating time can
be between 5 and 60 minutes before the
programmed departure time, whereby
operation is always stopped 5 minutes
after the programmed departure time.
Therefore, the minimum possible operating time is 10 minutes and the max possible operating time is 65 minutes.
In this case, the operating time set in the
“set time” menu (page 8) is ineffective.
In all other configurations the start takes
place according to the preset operating
time.
Please note!
• The preselected times are always
departure times, even if runtime calculation is deactivated.
• You cannot program more than 3 preselection times.
• The maximum operating time of 65 minutes for automatic runtime calculation is
a factory setting. If necessary, this can
be reduced by the installation workshop
to a minimum of 15 minutes.
Identical preset times
If several identical preset times are
programmed for a specific weekday in
programs 1, 2 or 3 the last entered preset
time is valid. When the timer is activated,
the identical preset times saved are
deleted.
If identical preset times are programmed
for different weekdays there is not conflict.
Overlapping of preset times
Example:
You have set the “Heater” operating mode
on a weekday for your departure time at
13 hrs. At the same time the ”Ventilation“
mode has been programmed for the
same day for 12.45 hrs and with an operating time of 15 minutes. What happens?
The timer calculates the start of heating
for the ”heater“ mode which, depending
on the ambient temperature measured
can lie between 5 and 60 minutes before
the programmed departure time. If the
calculated heater start is after 12.45 hrs,
the vehicle is ventilated between
12.30 hrs and 12.45 hrs and is then
heated.
If the calculated heater start is before
12.45 hrs, the vehicle is heated until
12.30 hrs, then the heater is stopped and
the heater switches to “ventilation” mode.
After the set “ventilation” mode operating
time has expire the heater switches off.
16
Page 17

Operation and Adjustment
Program preset times
Activate timer with (see page 7).
Select symbol with or .
Confirm selection with .
Select preset memory 1, 2 or 3 with or and confirm
with .
Select weekday Mo – Su with or and confirm
with .
Set hours with or and confirm with .
Set minutes with or and confirm with .
Select the required function , or with or and
confirm with .
Display
Continued on page 18
17
Page 18

Operation and Adjustment
Program preset times
The operating time is only displayed if (heat with
deactivated runtime calculation), or is selected
and can be accepted with or adjusted with or
and confirmed with .
The adjustment is completed.
Please note!
The assigned preset memory locations
appear in the display. The next preset
memory to be activated is underlined in
the display and the corresponding weekday is also displayed.
The following actions are possible:
• Switch from temperature display to time and back,
press .
• Select functions in the menu bar with or ,
confirm selection with .
The further procedure is described in the relevant sec-
tion for the selected function.
The same procedure is required to program preset times in the preset memory
2 and 3.
Display
18
Page 19

Operation and Adjustment
Delete preset times
The steps for deleting preset times are the same as for
adjusting / setting the preset time, until the current func-
tion flashes in the status bar.
or press until appears in the display.
Confirm with .
The preset time is deleted.
The following actions are possible:
• Switch from temperature display to time and back,
press .
• Select functions in the menu bar with or ,
confirm selection with .
The further procedure is described in the relevant sec-
tion for the selected function.
Display
19
Page 20

Operation and Adjustment
Set heating level – of water heaters
In water heaters you can choose between the
ECO heating level (normal heating) and HIGH
(comfort heating).
The selected heating level is required to calculate
the “heat” operating time depending on the measured ambient temperature.
Please note!
The heating levels ECO and HIGH are only effective in conjunction with a programmed preset
time.
Activate timer with (see page 7).
Select symbol with or .
Confirm selection with .
Select ECO or HIGH heating level with or and
confirm with .
The selected heating level (e.g. HIGH) is set.
Display
20
Page 21

Operation and Adjustment
Set heating level – of air heaters
Air heaters can be individually set to a heating level of 8
to 36 in immediate and preset mode.
Please note!
Heating levels 8 to 36 only approximately correspond to
a temperature reading and therefore may differ from the
actual temperature in the vehicle.
Activate timer with (see page 7).
Select symbol with or .
Confirm selection with .
Change the heating level with or and
confirm with .
The new heating level is set.
Anzeige im Display
21
Page 22

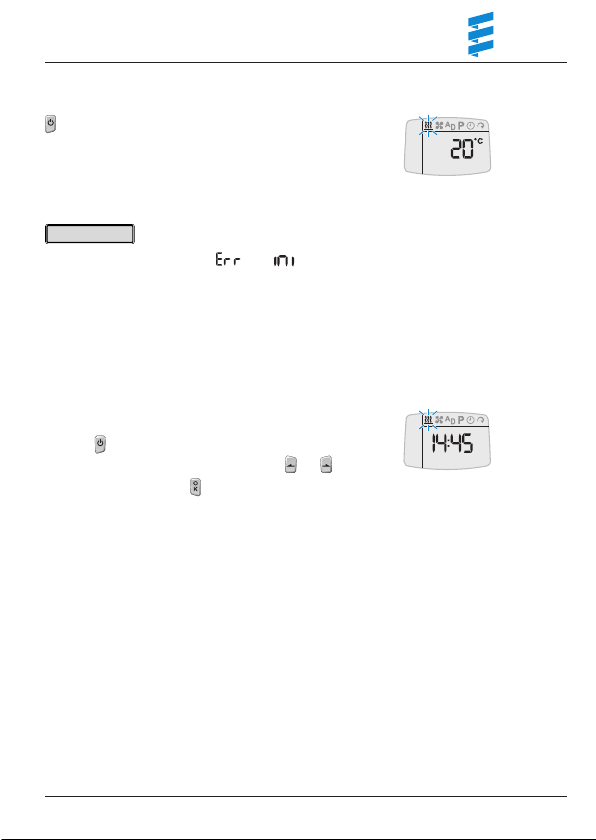
What to do if …?
Displays
Description Remedy
A fault occurs in the heater during operation (e.g. fuel shortage or interruption in
the diagnostics cable).
Description
Automatic hardware detection is currently active.
Possible cause Remedy
Timer has been disconnected from the
voltage and reconnected.
Description
The ”Set timer“ display appears after the timer is activated.
Possible cause Remedy
The timer’s power supply was interrupted. All programmed preset times have
been deleted.
See heater’s installation instructions for
troubleshooting advice.
Wait until the automatic hardware detection has finished.
Set time (see page 8).
(only for combinations of 2 controls EasyStart T / T, R+ / T, R / T)
Description
No communication between the controls.
Possible cause Remedy
Overlapping during data transfer Repeat operator action.
22
Page 23

What to do if …?
Anzeigen
(only for combinations of 2 controls EasyStart R+ / T, R / T )
Description
Radio remote control is in teach mode.
Possible cause Remedy
Timer has been disconnected from the
voltage and reconnected..
Preset time cannot be programmed / display disappears
It is not possible to program a preset time.
Possible cause
ADR mode is active. It is not permitted to program preset times in this mode
( is not available in the menu bar).
Display disappears.
Possible cause Remedy
Terminal 58 (lighting) not connected. Connect terminal 58 (lighting).
Wait until teach mode has ended.
Please note!
If you are unable to remedy the fault
or error, please contact an authorised
JE workshop or dial the service phone
number given on page 24.
23
Page 24

Service
Hotline
If you have any technical question, a
problem with your timer or the heater, dial
the following service phone number:
Telephone hotline
Phone 0800 / 12 34 300
Fax hotline
Fax 01805 / 26 26 24
Outside of Germany, please contact the
respective national Eberspächer service
agent.
24
Page 25

Page 26

Page 27

Page 28

www.eberspaecher.com
J. Eberspächer
GmbH & Co. KG
Eberspächerstraße 24
D-73730 Esslingen
Telefon 0711 939-00
Telefax 0711 939-0643
info@eberspaecher.com
We reserve the right to make changes Printed in Germany © J. Eberspächer GmbH & Co. KG
 Loading...