

Page 1
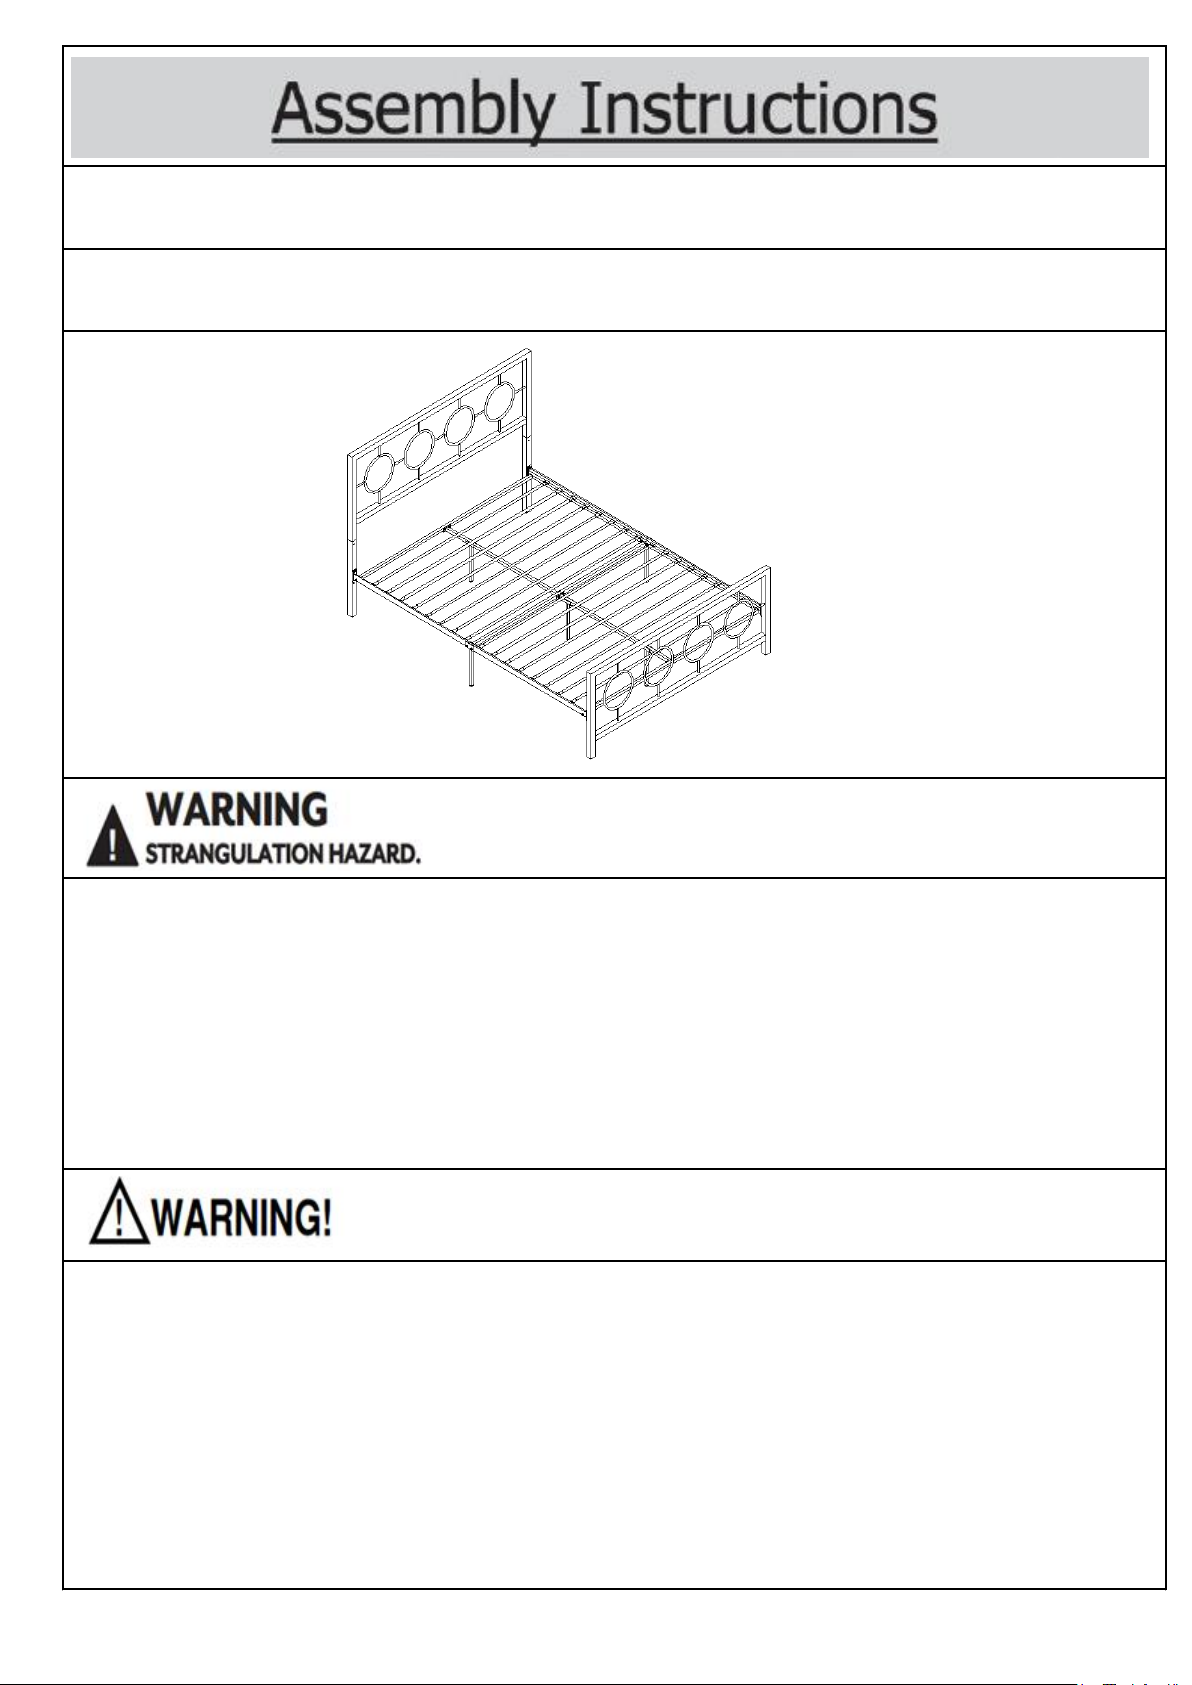
Not intended for children under the age of six. INFANTS HAVE DIED FROM
BECOMING ENTRAPPED IN BEDS. Openings in and between bed parts
can entrap the neck and head of a small child. NEVER use bed for child
under the age of six.
The mattress must be appropriately sized for the bed. If the mattress is
undersized, dangerous gaps can exist and a person can become entrapped
or entangled in the frame and suffocate.
Caution: You must read this before you proceed
BED
NEVER place bed near windows where cords from blinds or drapes may
strangle a child.
NEVER suspend strings over bed.
NEVER place items with a string, cord, or ribbon, such as hood strings or
pacifier cords, around a child’s neck.
These items may catch on bed parts.
ALWAYS follow assembly instructions.
Page 1 OF 10
Page 2
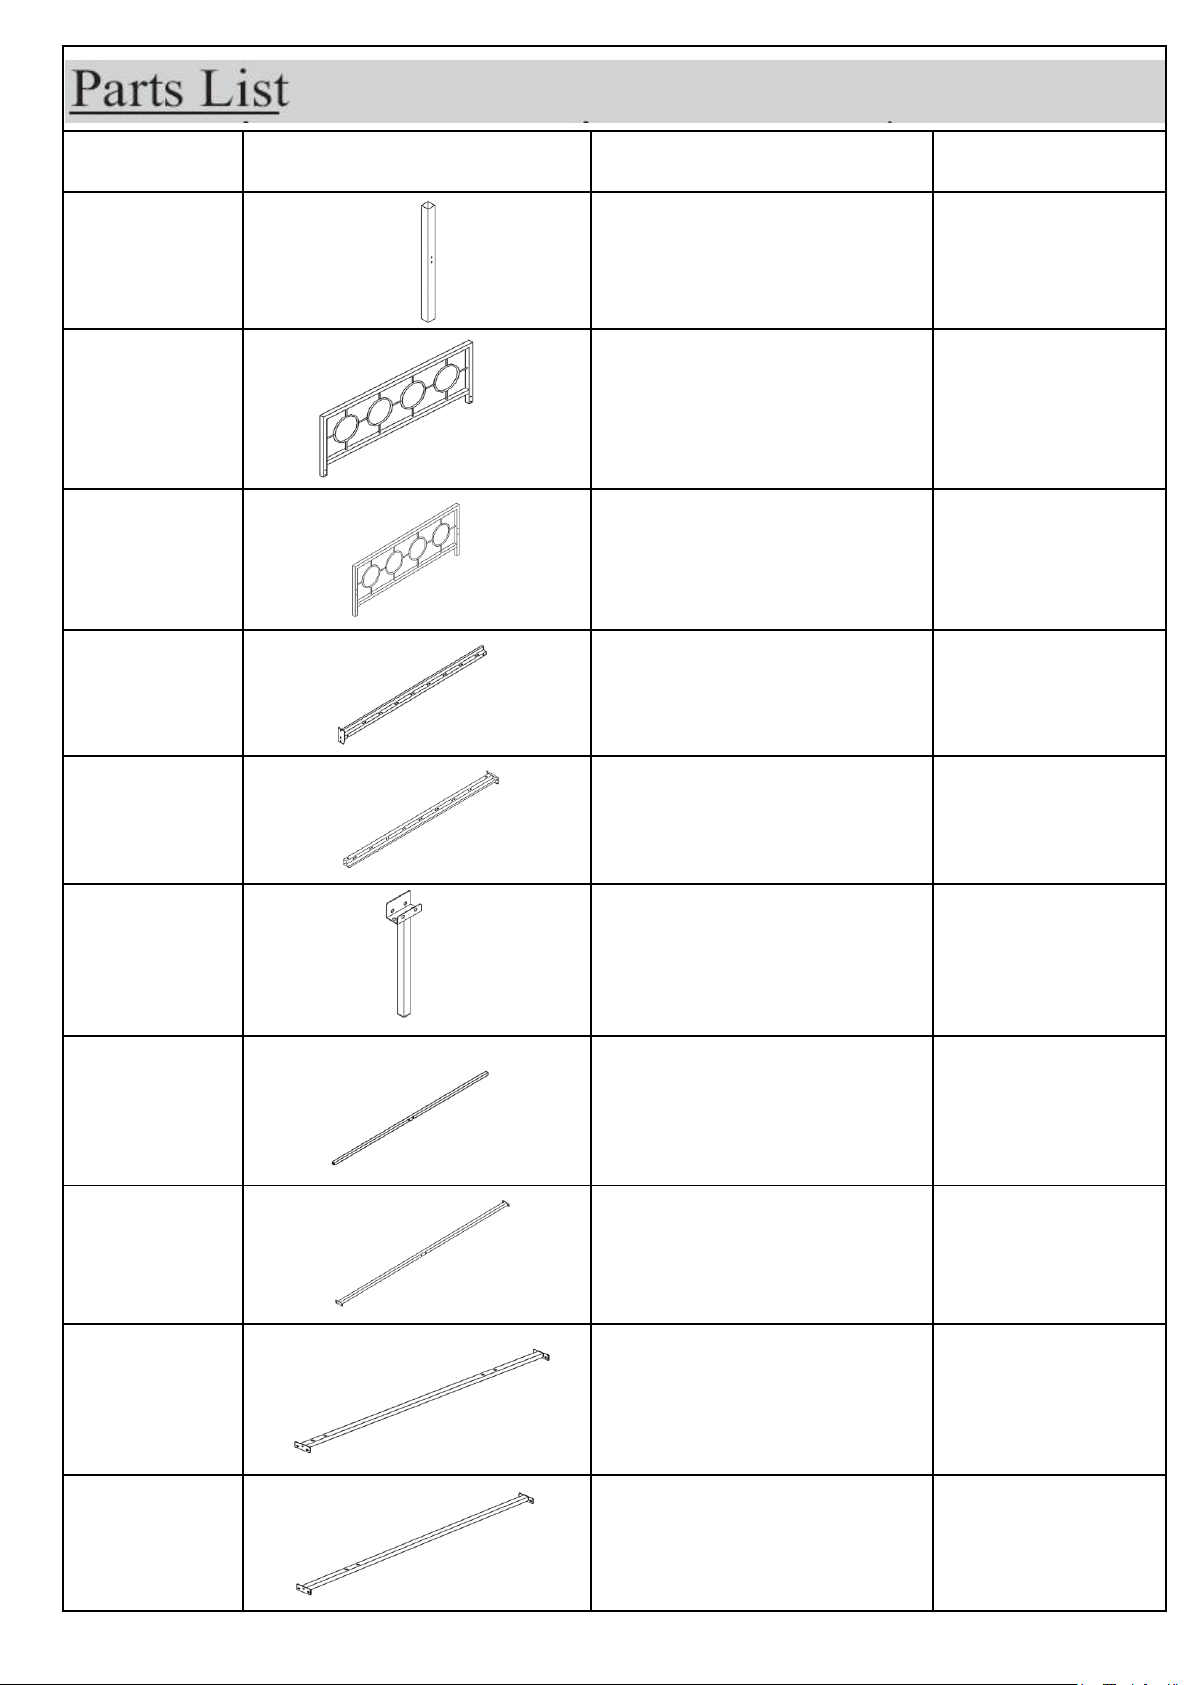
Label Picture Description QTY
A Headboard Foot 2
B Headboard 1
C Footboard 1
D Side Rail(Labelled 'D') 2
E Side Rail(Labelled 'E') 2
F Rail Support Leg 2
G Support Rail 2
H
Cross Center Support
Rail
1
I
Vertical Front Center
Rail
1
J
Vertical Rear Center
Rail
1
Page 2 OF 10
Page 3
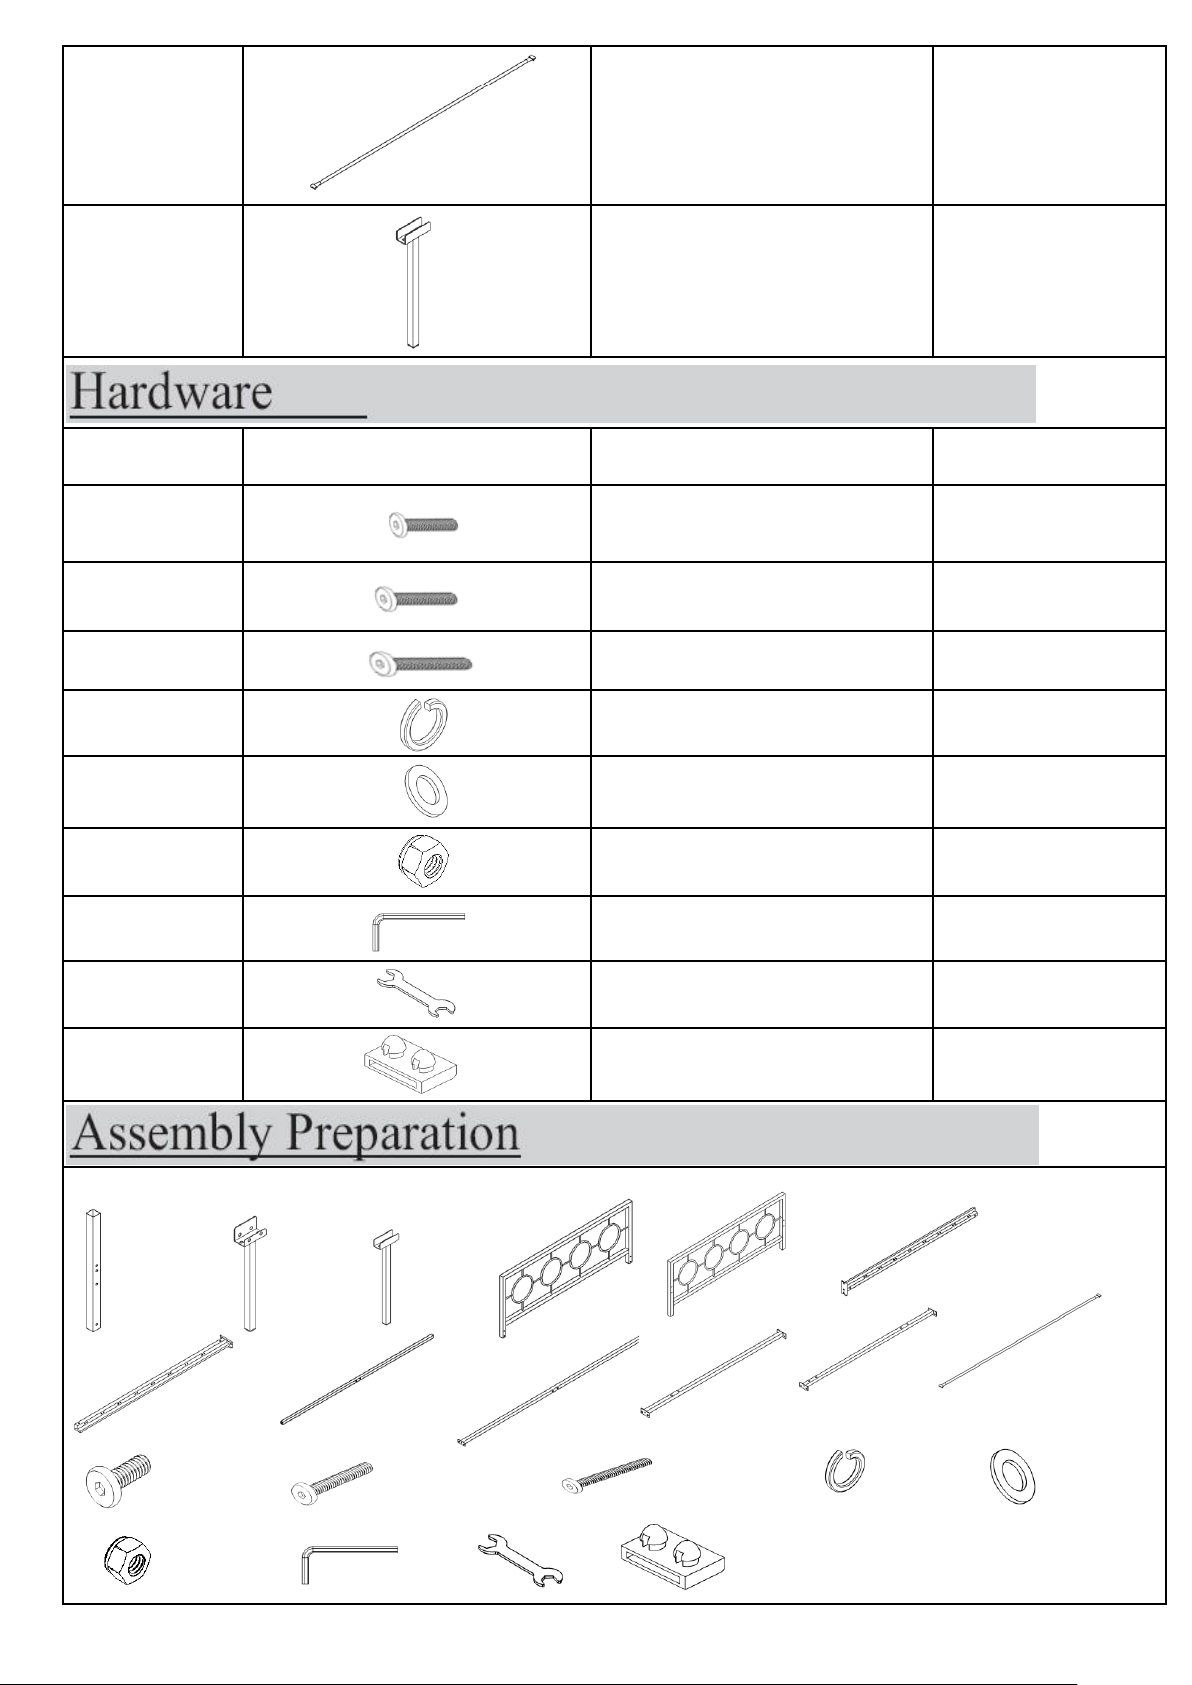
K Slat 16
L Center Support Leg 3
Label Picture Description QTY
①
Bolt(M6x16mm) 27
② Bolt(M6x36mm) 3
③ Bolt(M6x46mm) 9
④
Spring Washer(φ6.5mm)
9
⑤
Flat Washer(φ6.5mm) 9
⑥
Nut(M6) 7
⑦
Allen Key(4mm) 1
⑧
Wrench 1
⑨
Slat Connector 38
Before Beginning Assembly:
x 2
x 2
x 2
x 2
x 2
x 16
x 3
x 27
x 3
x 9
x 9
x 9
x 7
x 38
Page 3 OF 10
Page 4
This bed has multiple parts and may require up to some 60 minutes to
assemble.
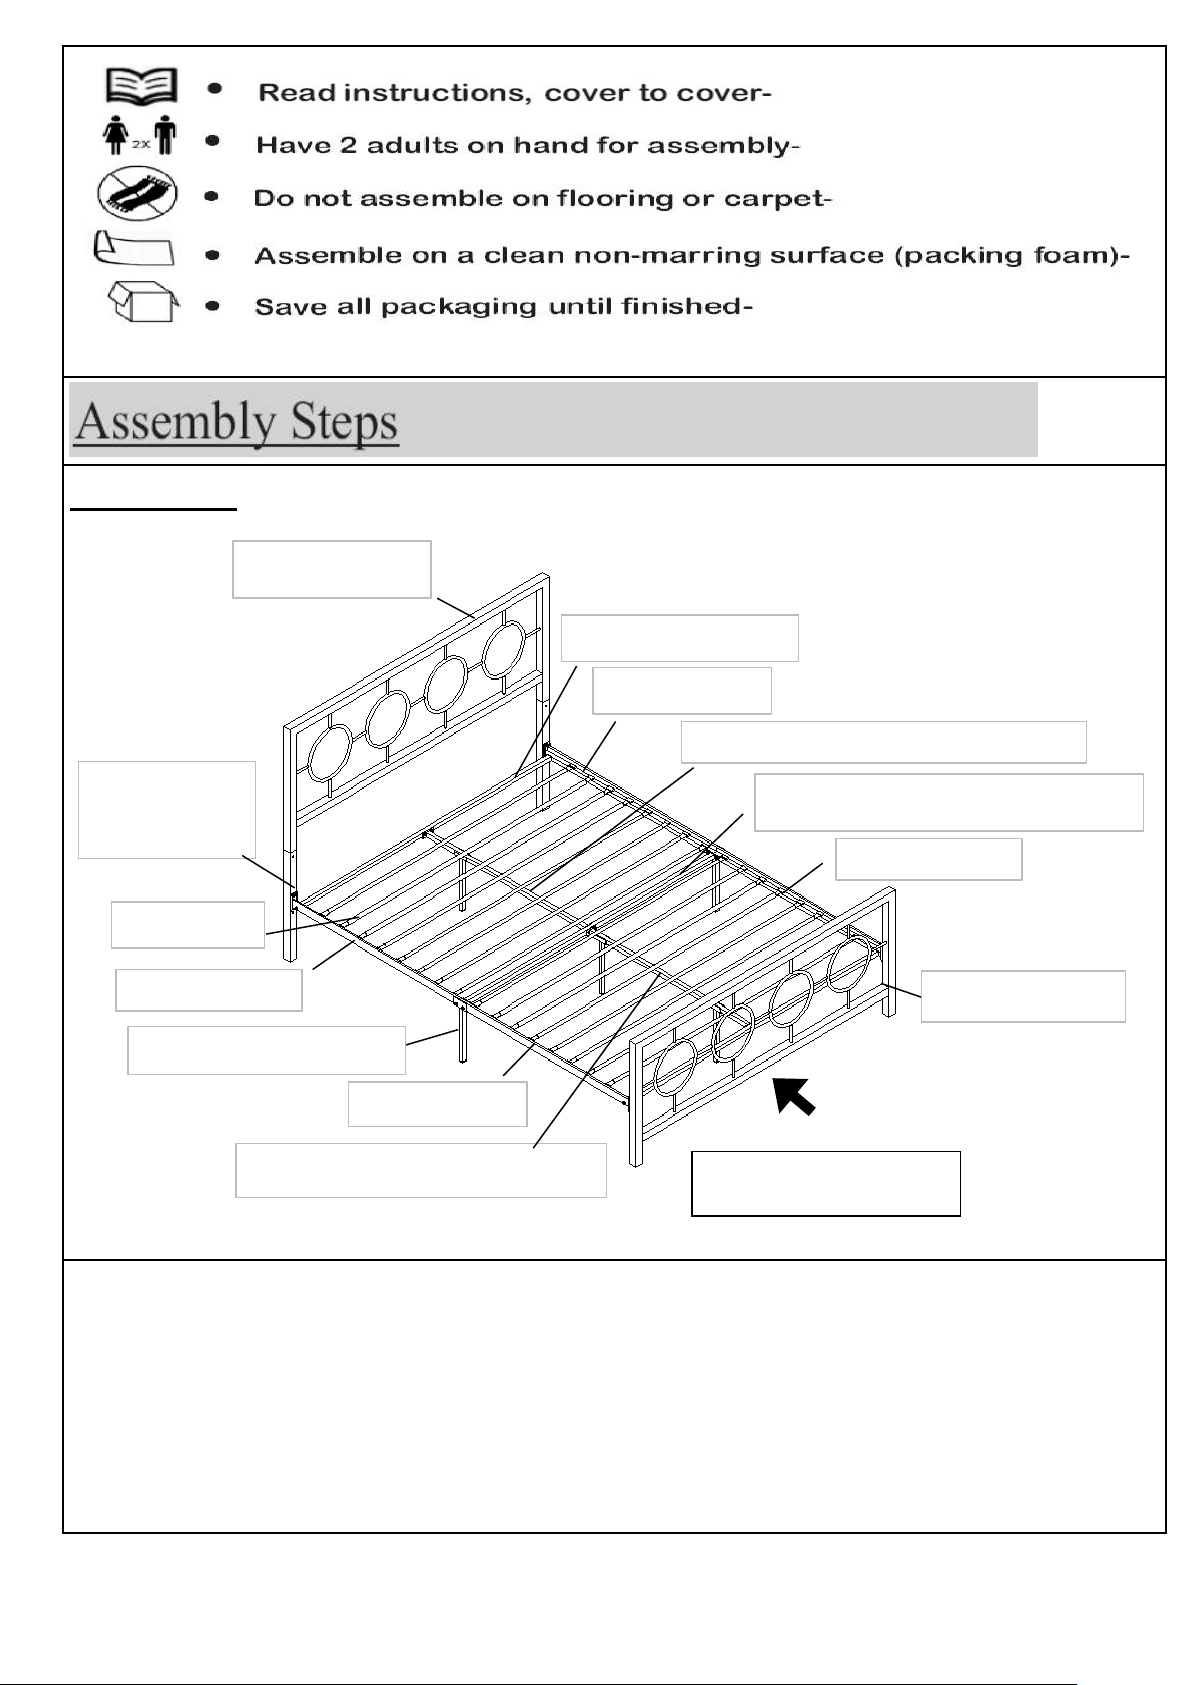
To give you an overview of the bed parts, the above picture is to help you put
the various parts into perspective.
Please read through the instructions below to familiarise yourself with the
parts and steps before assembly.
Overview
FRONT FACING
Headboard(B)
Headboard
Foot(A)
Footboard(C)
Side Rail(D)
Side Rail(E)
Rail Support Leg(F)
Cross Center Support Rail(H)
Vertical Rear Center Rail(J)
Vertical Front Center Rail(I)
Support Rail(G)
Slat(K)
Side Rail(E)
Side Rail(D)
Page 4 OF 10
Page 5
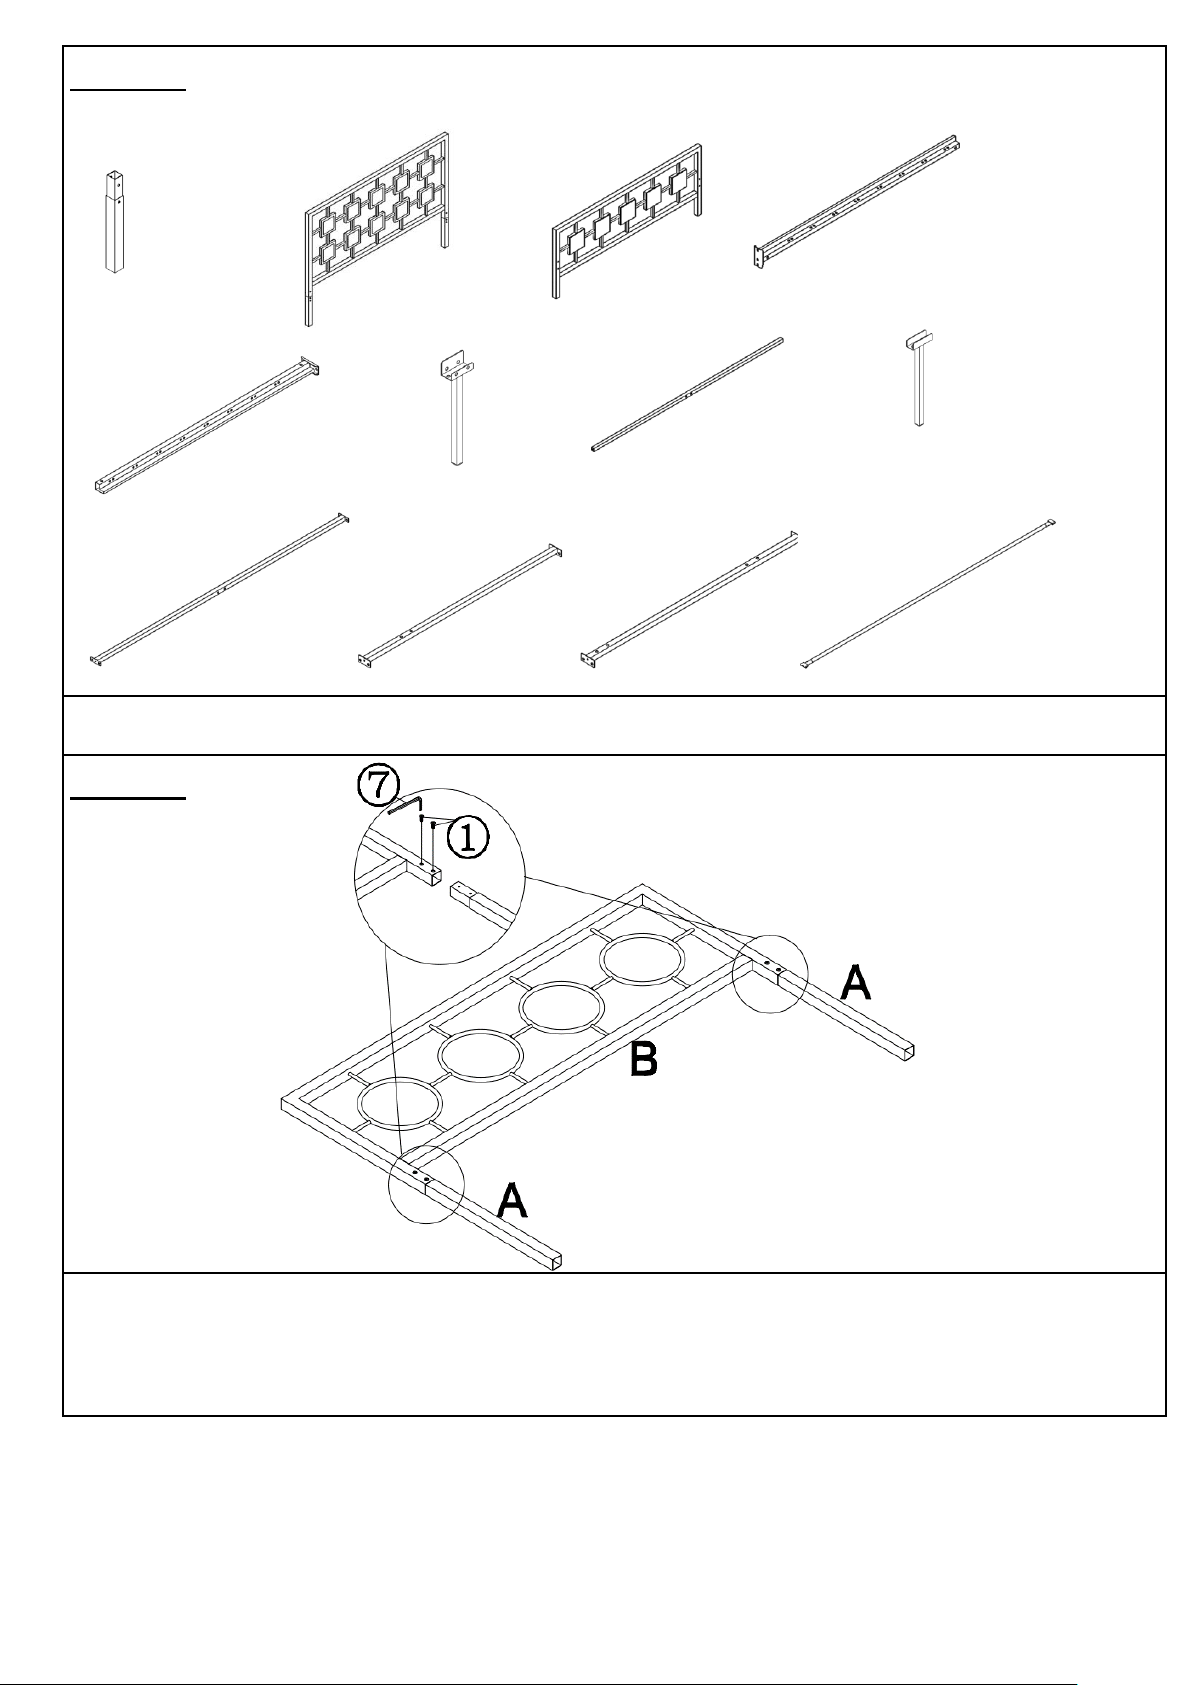
Step 2
Lay Headboard(B) facedown onto a flat, soft, clean surface.
Insert Headboard Foot(A) into the Headboard(B), then use Bolt(①) with Allen
Key(⑦), as shown in above picture.
Step 1
Unpack and place all parts for clear visibility.
x 2
x 2
x 2
x 2
x 2
x 16
x 3
Page 5 OF 10
Page 6
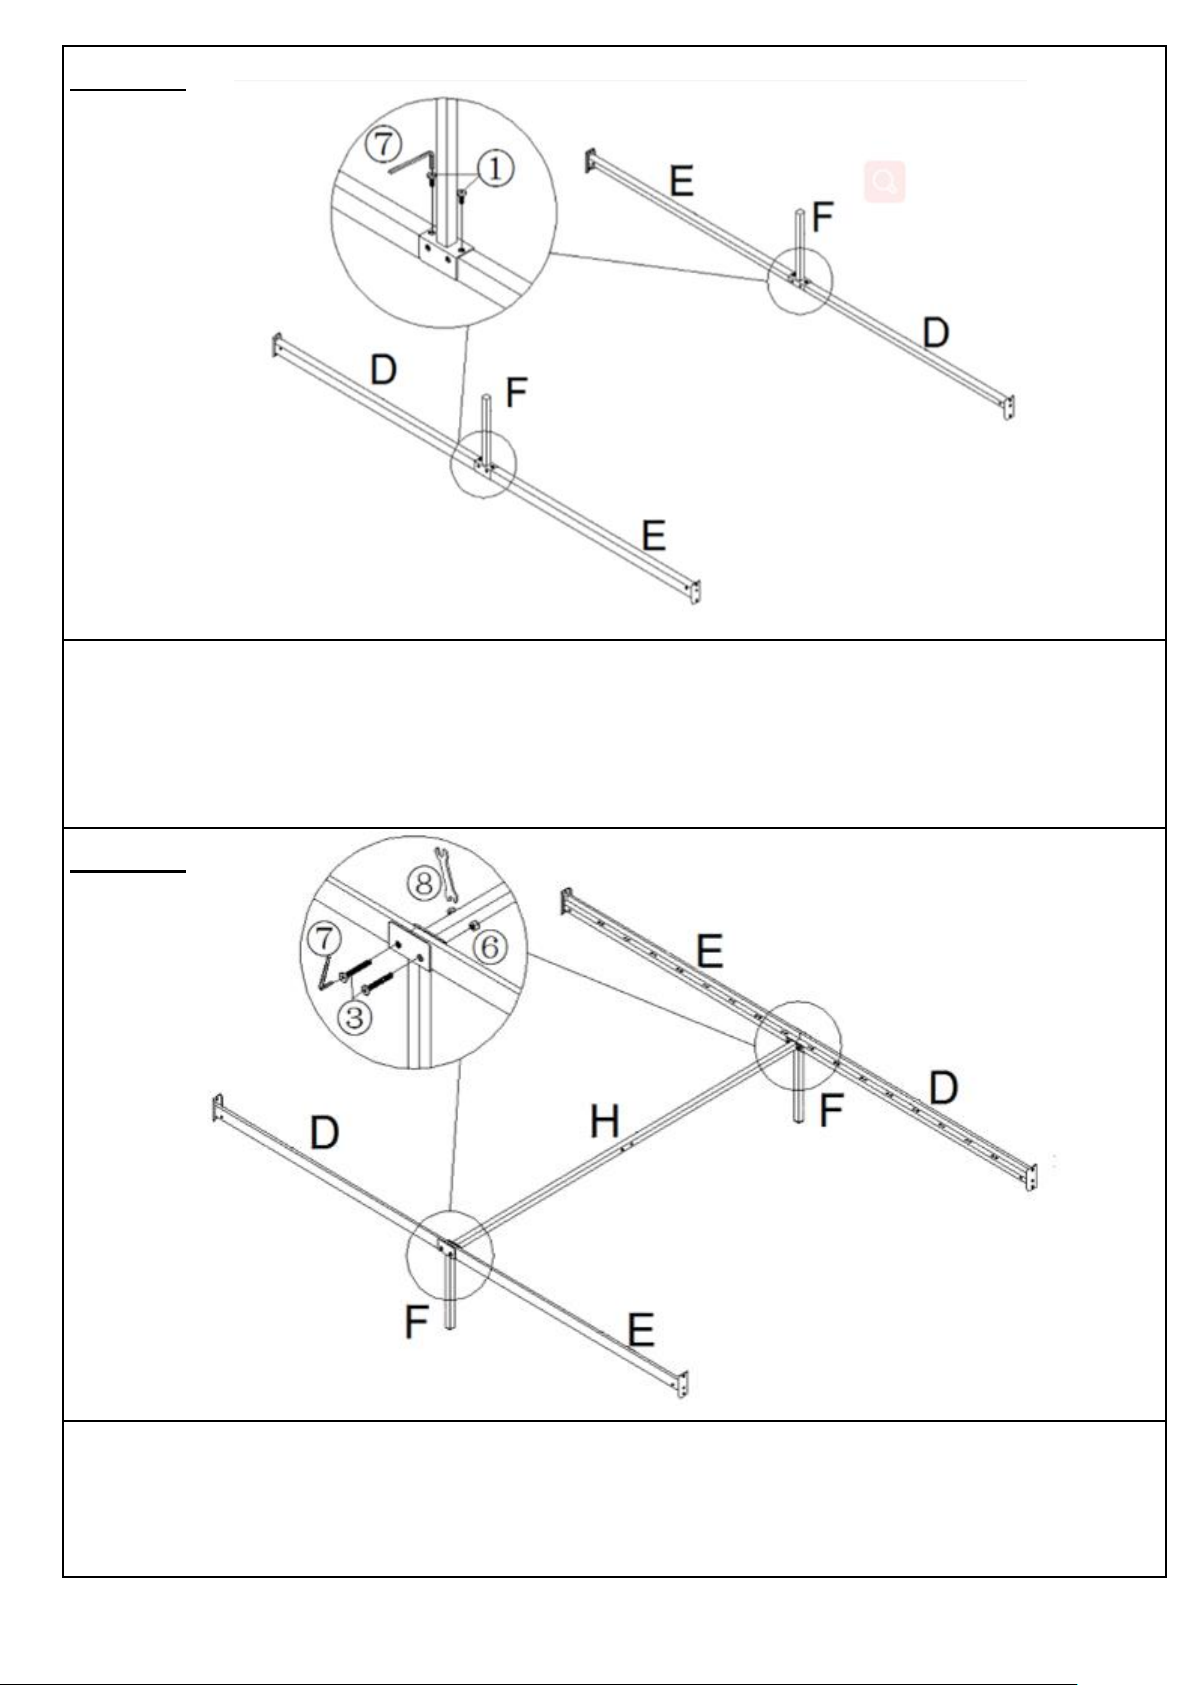
Step 3
Align the mounting positions of Rail Support Leg(F) to Side Rail(D&E).
Attach Rail Support Leg(F) to Side Rail(D&E) using Bolt(①) with Allen
Key(⑦).
Repeat same step to assemble the other Side Rail(D&E).
Step 4
With the assistance of your adult partners, turn over the asembled rails.
Attach Cross Center Support Rail(H) to the assembled Rail(E&F) using
Blot(③) and Nut(⑥) with Allen Key(⑦) and Wrench(⑧).
Page 6 OF 10
Page 7
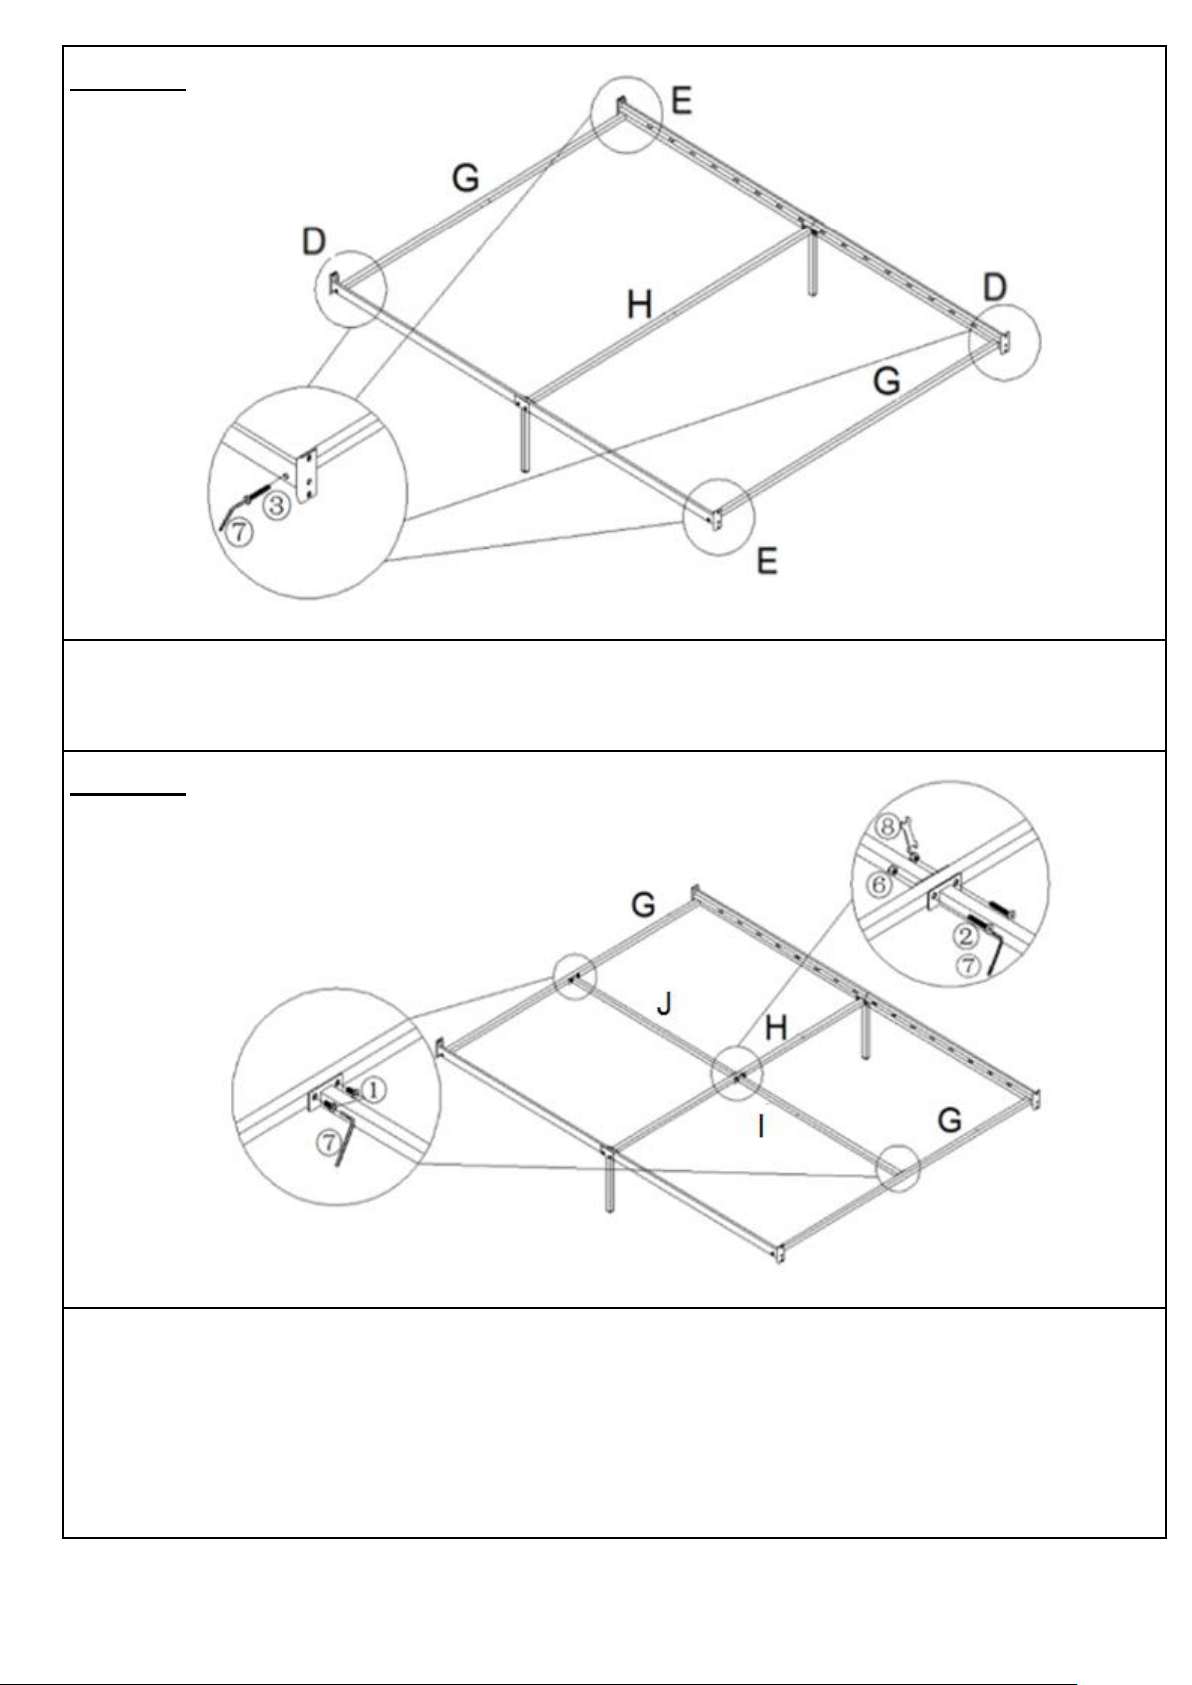
Step 6
Step 5
Attach Support Rail(G) to the Side Rail(D&E) using Blot(③) with Allen
Key(⑦).
6.1: Attach Vertical Front Center Rail(I) and Vertical Rear Center Rail(J) to
Support Rail(G) using Blot(①) with Allen Key(⑦).
6.2: Attach Vertical Rear Center Rail(J) and Vertical Front Center Rail(I) to
Cross Center Support Rail(H) using Bolt(②) and Nut(⑥) with Allen Key(⑦)
and Wrench(⑧).
6.2
6.1
Page 7 OF 10
Page 8
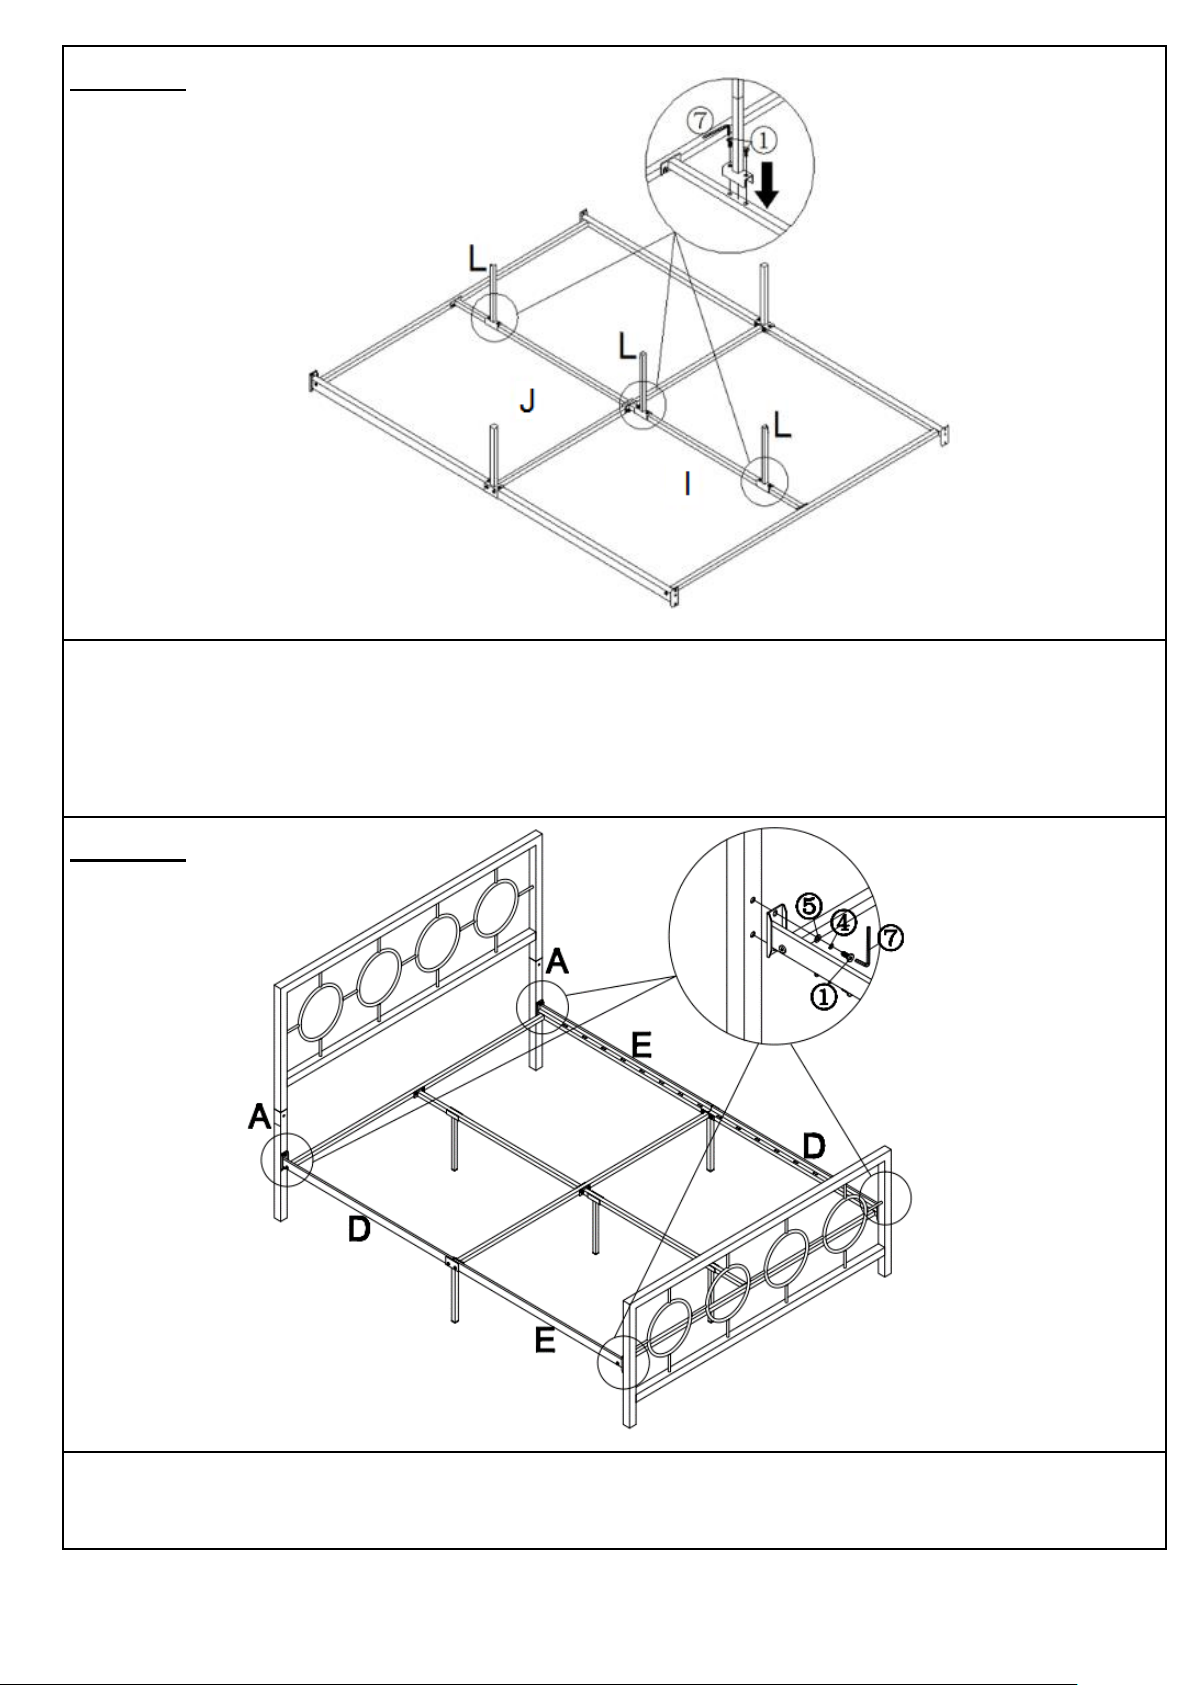
Step 8
Step 7
With the assistance of your adult partners, turn over the asembled frame.
Attach Center Support Leg(L) to the Vertical Front Center Rail(I) and Vertical
Rear Center Rail(J) using Blot(①) with Allen Key(⑦).
Note: After assembling, turn the asembled frame rightside up.
Attach metal frame toHeadboard Foot(A) and Footboard(C) using Blot(①),
Spring Washer(④) and Flat Washer(⑤) with Allen Key(⑦).
Page 8 OF 10
Page 9
Now, fully and securely, tighten all nuts, at all joints.
Inspect it and make sure all parts are adequately connected.
Your bed is ready for use.
Caution: This Bed can only be used on a flat, level surface.
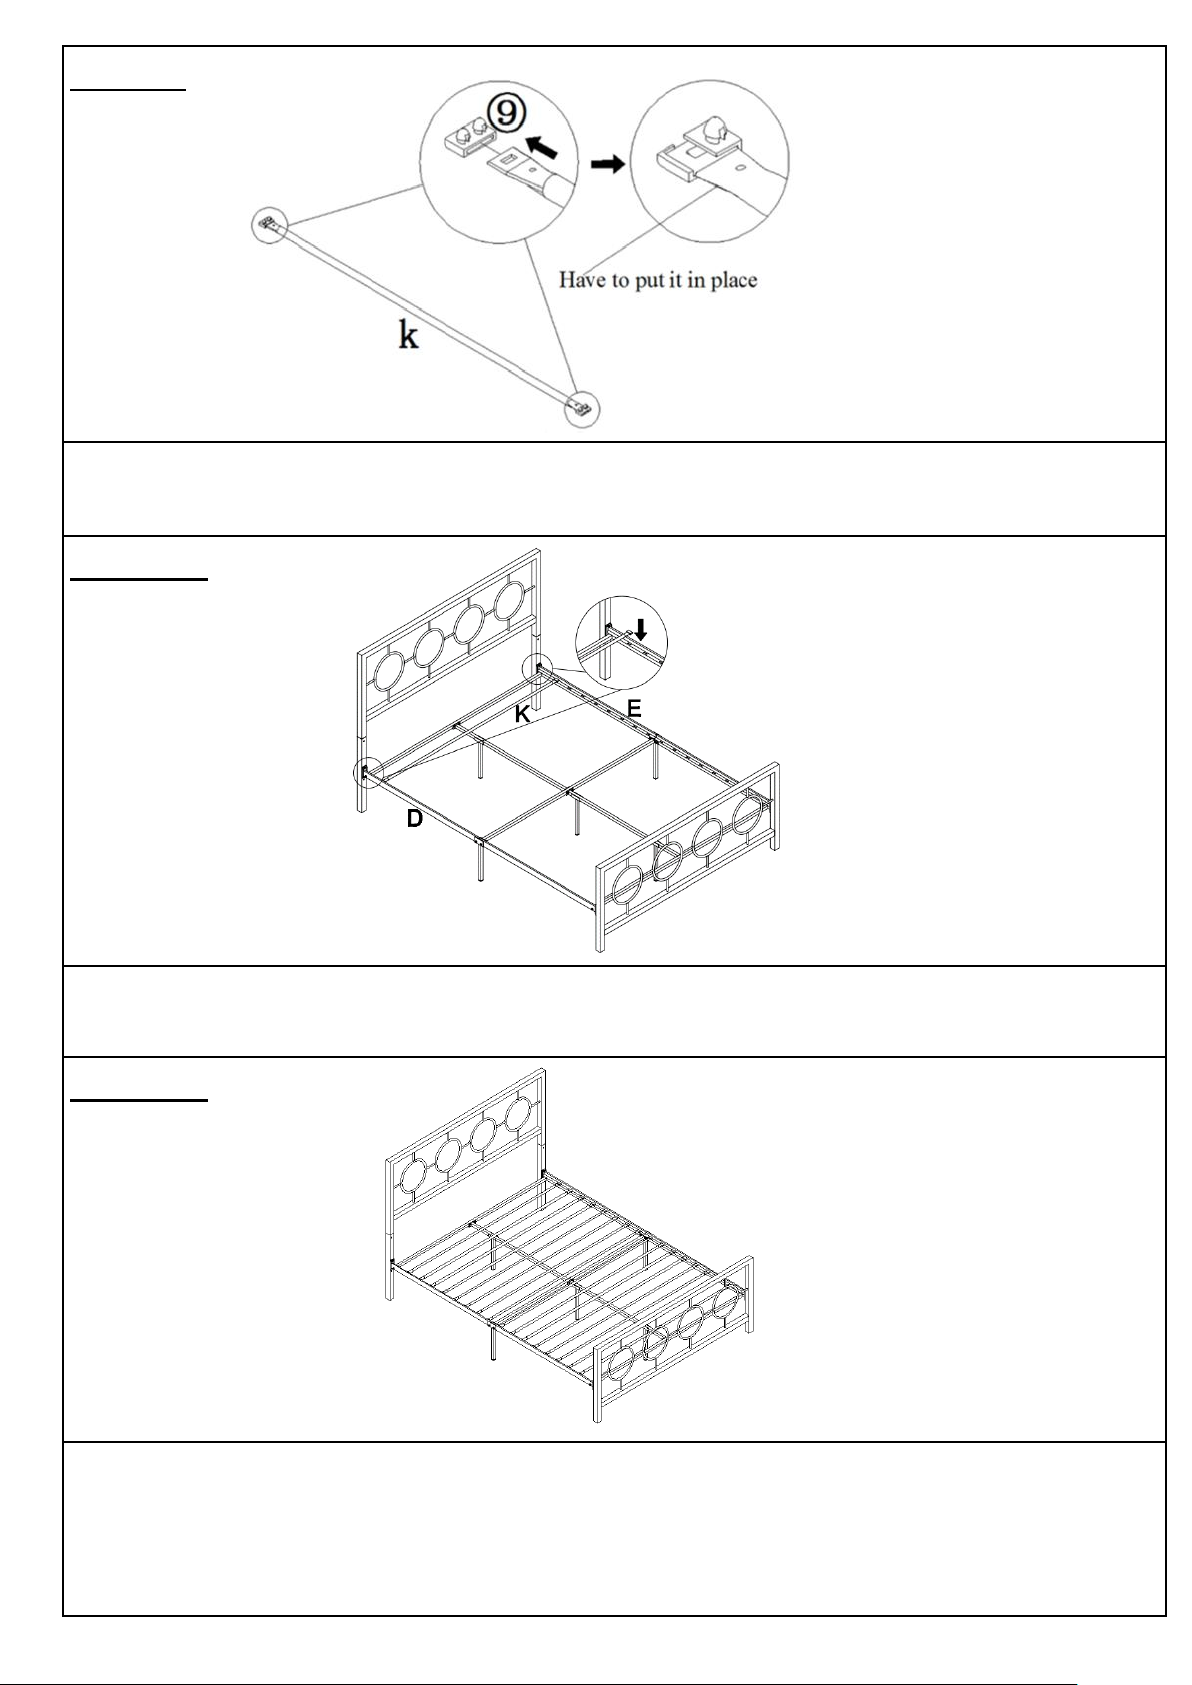
Step 9
Step 11
Attach assembled Slat(K) to the mounting position of Side Rails(D&E).
Repeat the same step to assemble remaining Slat.
Step 10
Insert Slat Connectors(⑨) into both sides of Slat(K), the connectors have to
put it in place.
Page 9 OF 10
Page 10
Page 10 OF 10
 Loading...