

Page 1
INSTRUCTION
MANUAL
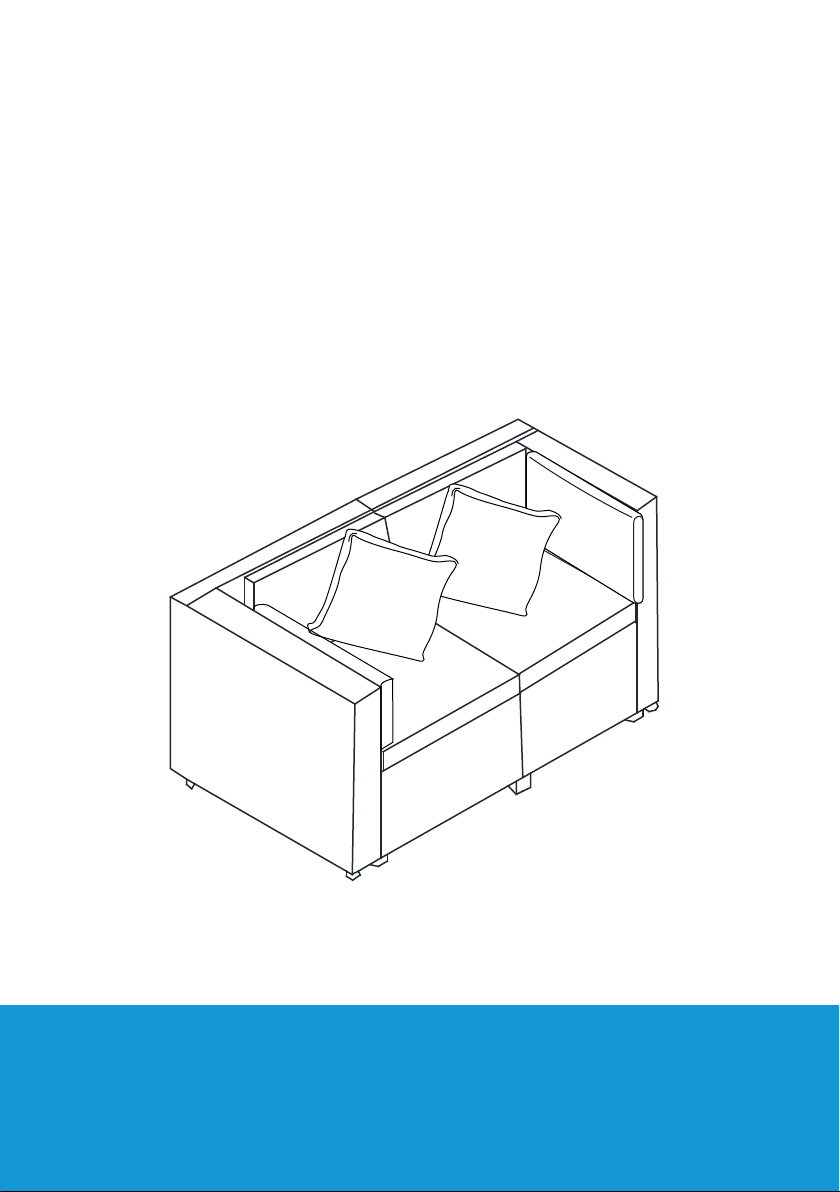
Logan Rattan Corner Sofa
with Cushions & Pillow (Set of 2)
SKU: OP112-A
V 1.0
Page 2
NOTICE
Do not overtighten screws. (Insert all screws before tighten screws.)
• Please do not exceed the weight limitations of this item.
• Do not stand on or use any part of this item as a step ladder.
• Firmly secure all bolts, screws and nuts before use.
• Reconfirm that all bolts, screws, and nuts are secure every 90 days.
• Do not use or store this item in the proximity of open flame or flammable/combustible chemicals.
• Be aware that some parts are heavy and have sharp edges.
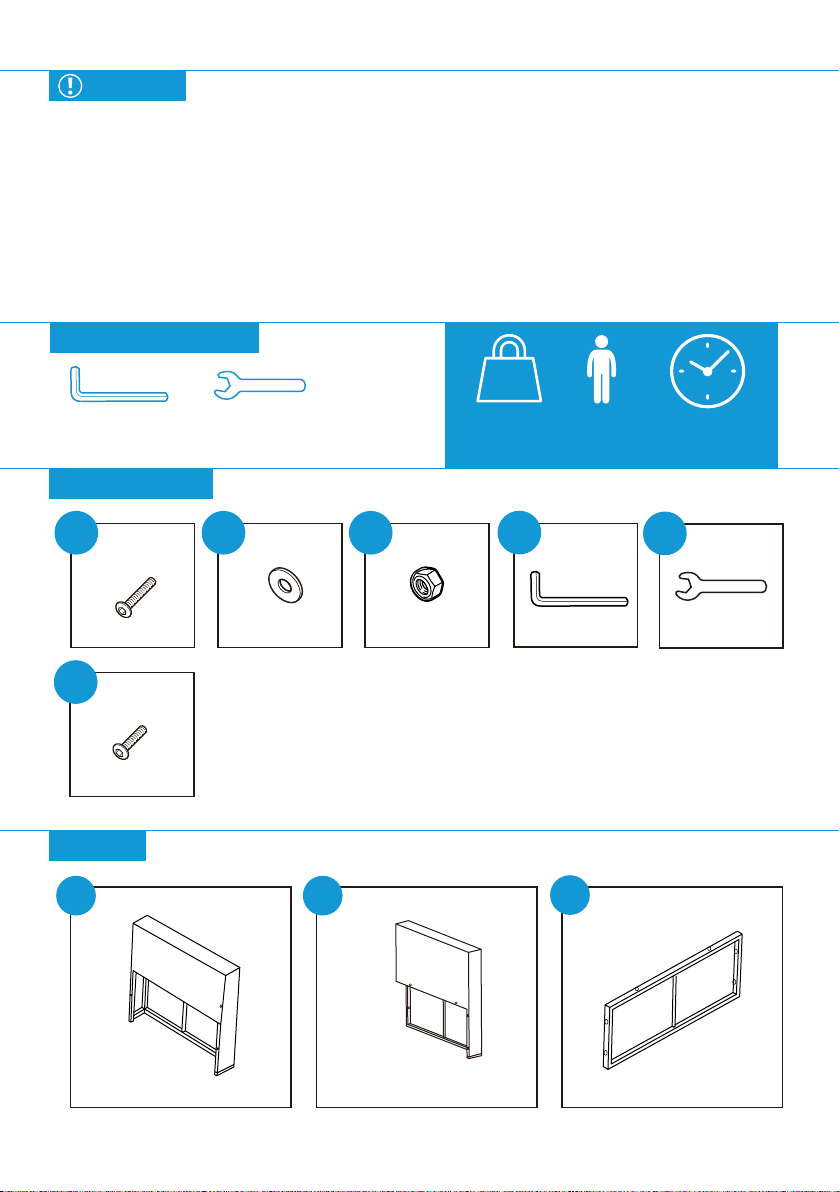
TOOLS REQUIRED
LBS
ALLEN WRENCH
(PROVIDED)
HARDWARE
1
M6 x 50mm
BOLT
20 PCS
6
M6 x 35mm
BOLT
8 PCS
PARTS
A
CORNER BACKREST
WRENCH
(PROVIDED)
2 3
M6 WASHER
48 PCS
B
330 LBS
CAPACITY
M6 NUT
20 PCS
CORNER LEFT SIDE
CHAIR
4
1 PERSON
ASSEMBLY
ALLEN
WRENCH
1 PC
C
CORNER SIDE PANEL
UP TO 60 MIN.
ASSEMBLY
WRENCH
5
1 PC
2 PCS
1 PC
2 PCS
Page 1 of 6
Page 3
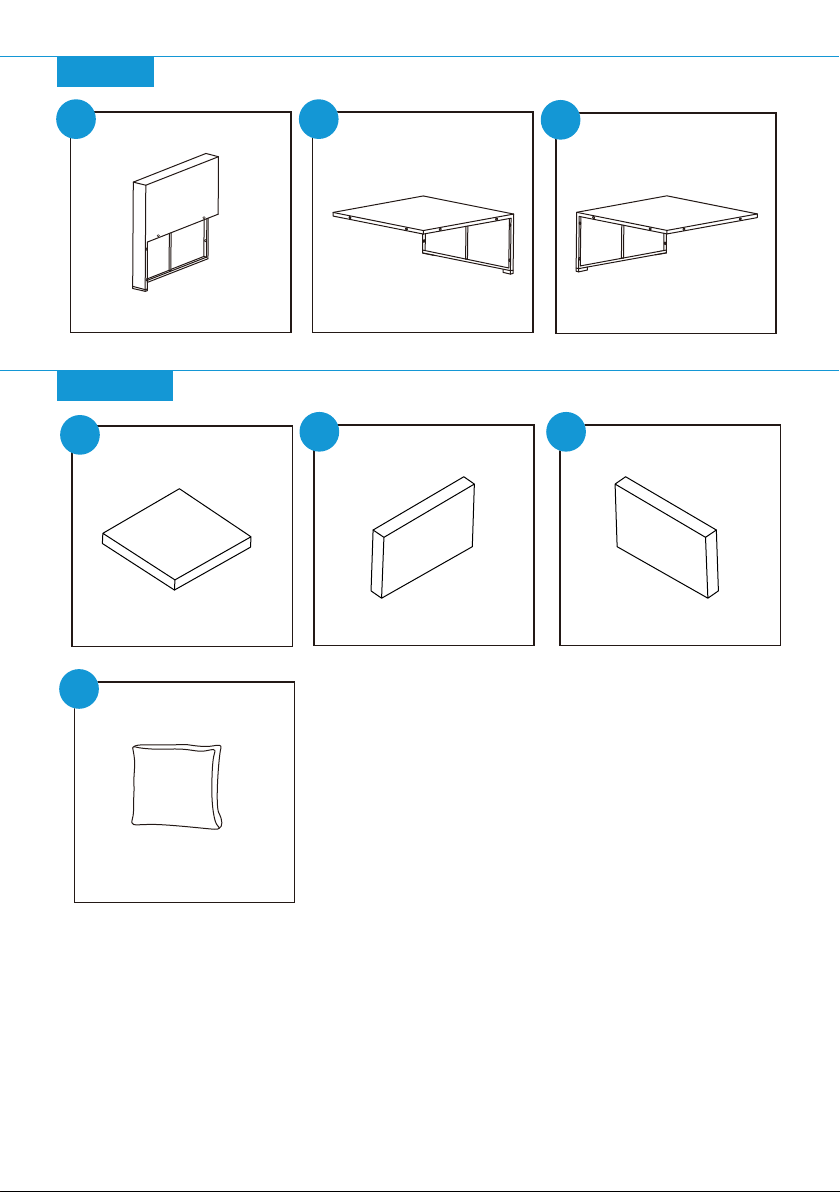
PARTS
D
CORNER RIGHT SIDE
CUSHION
Z1
Z4
SEAT CUSHION
I
1 PC
2 PCS
PILLOW
E
CORNER SEAT - LEFT
Z2
SIDE CUSHION
I
F
CORNER SEAT - RIGHT
1 PC
Z3
2 PCS 2 PCS
1 PC
BACK CUSHION
2 PCS
Page 2 of 6
Page 4
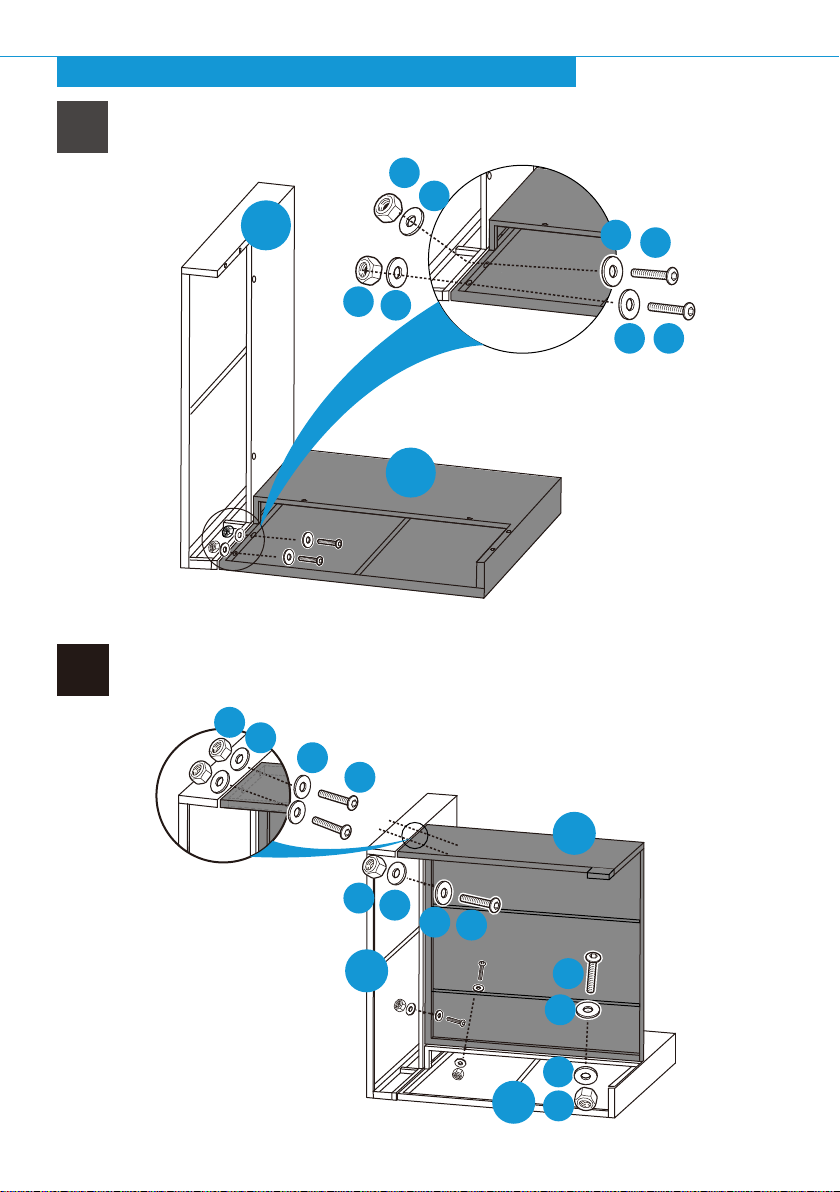
PRODUCT ASSEMBLY - CORNER SEAT - LEFT
Attach the part B Corner Left Side to part A Corner Backrest with 2 PCS of part 1 bolt
and part 3 nut and 4 PCS of part 2 washer.
1
3
2
A
3
2
2
2
B
Attach the part E Corner Seat to part A Corner Backrest and part B Corner Left Side
2
with 6 PCS of part 1 bolt and part 3 Nut as well as 12 PCS of part 2 washer.
1
1
3
2
2
1
E
3
2
2
1
A
B
1
2
2
3
Page 3 of 6
Page 5
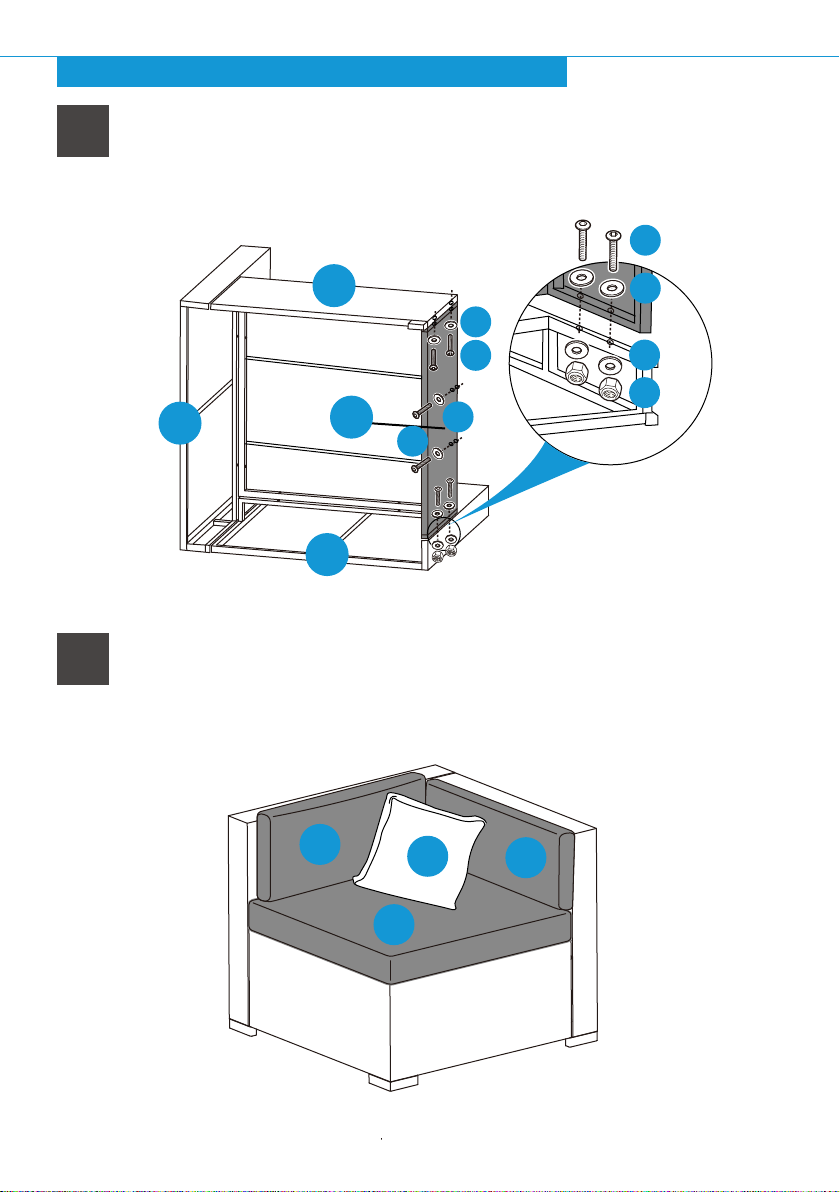
PRODUCT ASSEMBLY - CORNER SEAT - LEFT
Attach part C Corner Side Panel with part B Corner Left Side with 2 pcs of part 1 Bolt, 2 pcs
of part 3 Nut as well as 4 pcs of part 2 washer.
3
Attach part C Corner Side Panel with part E Corner Seat with 4 pcs of bolt 6 and part 2
Washer.
1
2
2
3
A
E
C
2
6
2
6
B
Place part Z1 Seat Cushion, part Z3 Back Cushions and part Z2 Side Cushion onto the Corner
Seat. as below.
4
The assembly of Left corner seat finishes.
Z3
Z4
Z2
Z1
Page 4 of 6
Page 6
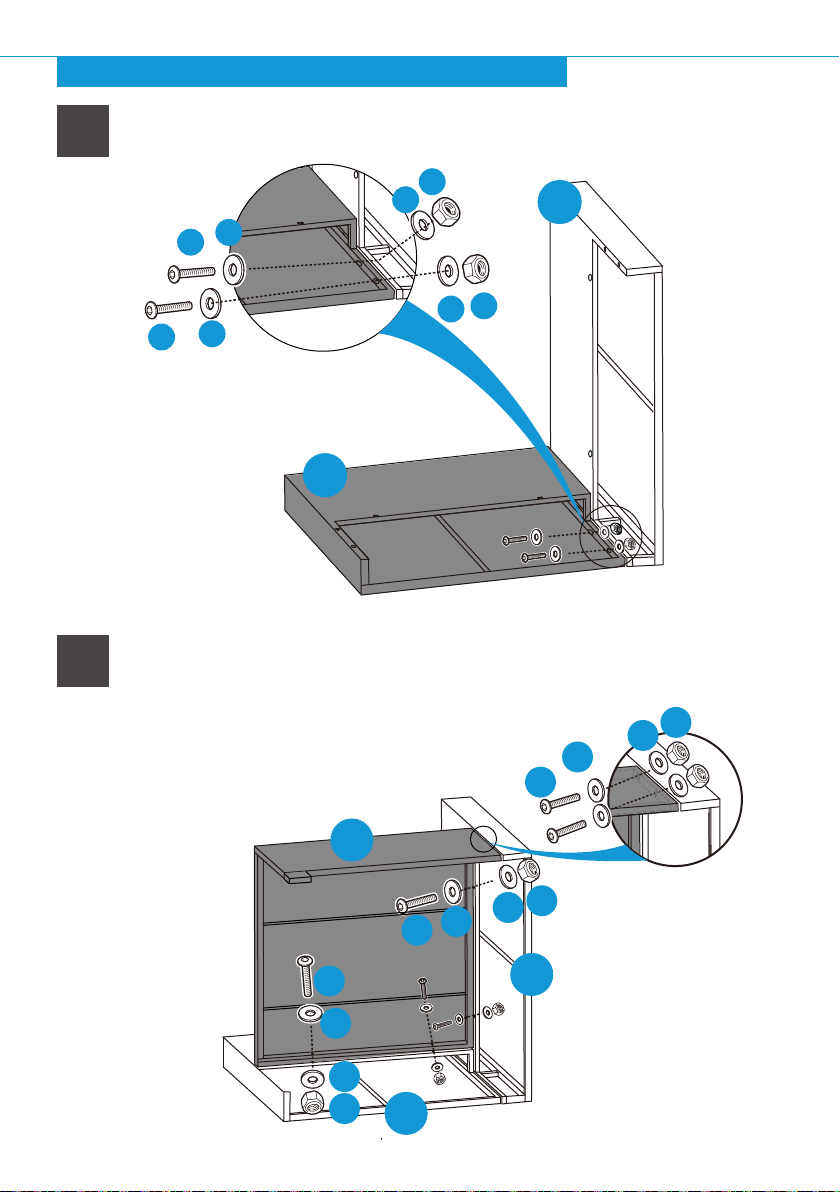
PRODUCT ASSEMBLY - CORNER SEAT - RIGHT
Attach the part D Corner Right Side to part A Corner Backrest with 2 PCS of part 1 bolt
and part 3 nut as well as 4 PCS of part 2 washer
5
3
2
2
1
3
2
2
1
A
D
Attach the part F Corner Seat - Right to part A Corner Backrest with 4 PCS of
part 1 bolt and part 3 nut as well as 8 PCS of part 2 washer.
6
Attach the part F Corner Seat - Right to part D Corner
Right Side with 2 PCS of part 1 bolt and part 3 nut
as well as 4 PCS of part 2 washer.
2
1
2
3
F
3
2
2
1
1
2
2
3
D
A
Page 5 of 6
Page 7
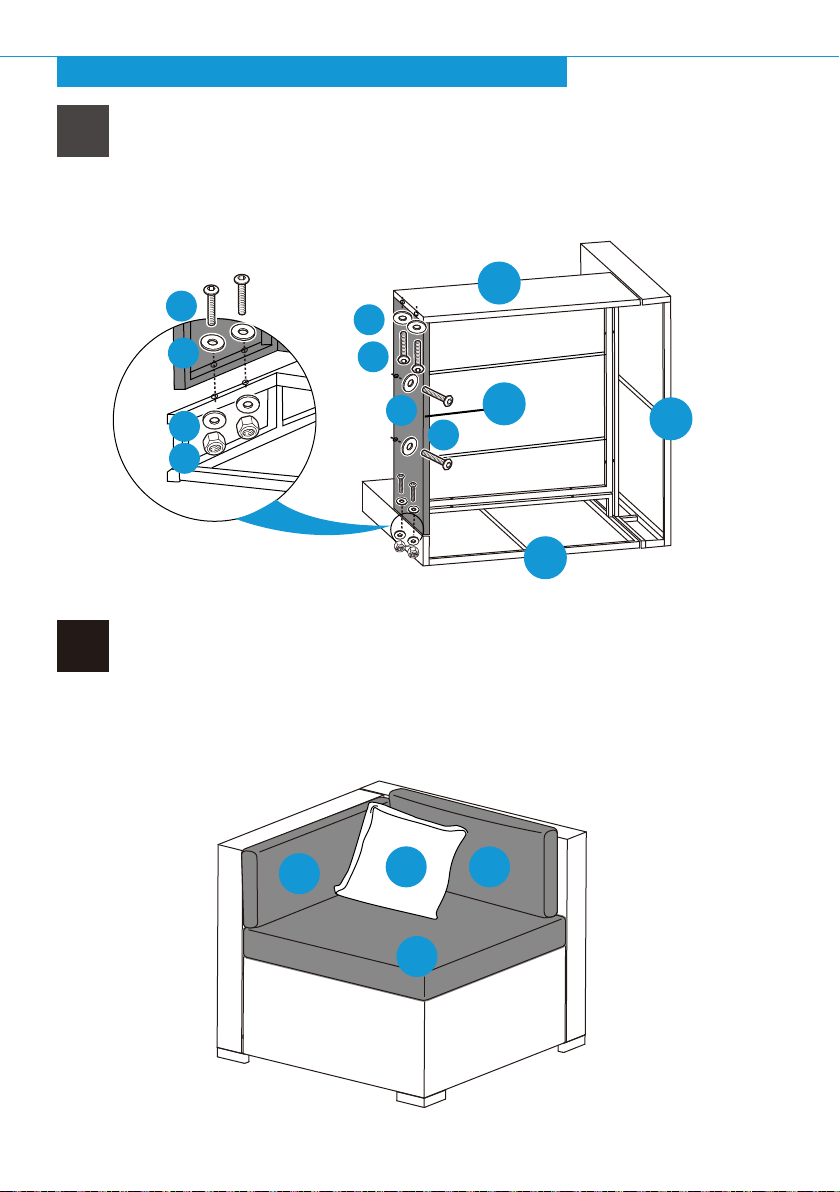
PRODUCT ASSEMBLY - CORNER SEAT - RIGHT
Attach part C Corner Side Panel to part D Corner Right Side with 2 pcs of part 1 Bolt,
part 3 Nut as well as 4 pcs of part 2 Washer.
7
Attach part C Corner Side Panel to part F Corner Seat with 4 PCS of part 6 bolt and
part 2 Washer.
F
1
2
2
6
8
2
3
2
C
6
A
D
Place part Z1 Seat Cushion, part Z3 Back Cushions and part Z2 Side Cushion onto the Corner
Seat..
The assembly of Right corner seat finishes.
Z2
Z4
Z1
Z3
Page 6 of 6
 Loading...