

Page 1

KOMPERNASS GMBH · BURGSTRASSE 21 ·
D-44867 BOCHUM
www.kompernass.com
ID-Nr.: KH2201_02-10/07-V2
KH 2201
KH 2202
5
RELOJ CON PROYECCIÓN
OROLOGIO PROIETTORE
Reloj con proyección
Instrucciones de uso
Orologio proiettore
Istruzioni per l'uso
Projection Clock
Operating instructions
Projektionsuhr
Bedienungsanleitung
CV_KH2201_02_AR909_LB5 09.11.2007 10:54 Uhr Seite 1
Page 2
KH 2201
rewq
t
y
u
i
a
s
d
f
g
h
j
k
l
;
o
KH 2202
wui
e
r
a
2)
j
h
yt
fg
;
q
olk
d
s
CV_KH2201_02_AR909_LB5 09.11.2007 10:55 Uhr Seite 5
Page 3
ÍNDICE PÁGINA
Indicaciones de seguridad 4
Uso conforme al previsto 5
Volumen de suministro 6
Elementos de mando 6
Características técnicas 7
Emplazamiento 8
Manejo 8
Funcionamiento de la radio 9
Orientar la antena telescópica 9
Ajustar la hora 10
Ajustar la hora del despertador 10
Función Snooze 11
Proyección 11
Iluminación de fondo para la pantalla y la proyección 11
Limpieza 11
Declaración de conformidad CE 12
Eliminación 12
Garantía y asistencia técnica 13
Importador 14
- 3 -
Lea con atención las instrucciones de uso antes del primer uso y consérvelas
para posteriores utilizaciones. Entréguelas en caso de traspasar el aparato
a terceros.
IB_KH2201_02_AR909_ES.qxd 09.11.2007 10:22 Uhr Seite 3
Page 4
RELOJ DE PROYECCIÓN
Indicaciones de seguridad
Para evitar peligro de muerte por descarga eléctrica:
• Utilice el aparato sólo en locales secos.
• Asegúrese de que no puedan penetrar nunca líquidos o bien objetos dentro
del aparato.
• No coloque objetos con líquidos tales como p. ej. jarrones sobre el aparato.
Para evitar el riesgo de incendio y otros daños:
• Coloque el aparato de modo que no se pueda producir ninguna acumulación de calor, es decir, libre de objetos y bien ventilado. ¡Nunca cubra
las aperturas de ventilación!
• No coloque sobre el aparato fuentes de fuego abierto, como p. ej. velas.
• ¡Evite el suministro de calor adicional, como p. ej. debido a la radiación
directa del sol, radiadores u otros aparatos, etc.!
• No permita utilizar el aparato a personas (incluidos los niños) cuyas facultades
físicas, sensoriales o mentales, así como su falta de conocimientos o de
experiencia, les impida hacer un uso seguro del mismo si no están bajo
vigilancia o han sido instruidos correctamente.
• Vigile a los niños para asegurarse de que no juegan con el aparato.
Campos electromagnéticos
¡Este aparato respeta los límites legales de compatibilidad electromagnética!
Sin embargo, si no está convencido de lo que la colocación en el dormitorio
se refiere:
- 4 -
IB_KH2201_02_AR909_ES.qxd 09.11.2007 10:22 Uhr Seite 4
Page 5
• Coloque el aparato a medio metro de distancia de la cama.
A partir de esta distancia no hay campos que afecten siquiera a las personas
electrosensibles.
Nota:
Este aparato está equipado con pies de goma antideslizantes. Ya que la
superficie del suelo o de los muebles están compuestas de los más diversos
materiales y están tratadas con diferentes productos, no se puede excluir
totalmente la posibilidad de que alguno de estos materiales incluyan componentes que puedan afectar a los apoyos de goma y reblandecerlos.
Coloque en su caso una base antideslizante debajo de los pies del aparato.
Nota:
En distintos países pueden regir normativas diferentes acerca de las gamas
de frecuencia de radiotransmisión autorizadas.
Tenga en cuenta que la información de los servicios de radiotransmisión que
se puedan recibir no debe ser utilizada, cedida a terceros, ni se debe hacer
un mal uso de ella, no conforme a lo previsto.
Uso conforme al previsto
El aparato es apto como despertador mediante una señal de alarma así como
para la recepción de emisoras de radio. Cualquier otro uso o modificación
del aparato se considerará no conforme al uso previsto e implica peligros
de accidentes considerables.
El fabricante no se hace responsable de los daños derivados por el uso no
conforme al previsto o por manejo inadecuado. No está destinado para uso
profesional.
- 5 -
IB_KH2201_02_AR909_ES.qxd 09.11.2007 10:22 Uhr Seite 5
Page 6
Volumen de suministro
Después de desempaquetar el producto, compruebe que el volumen de
suministro es el correcto y que el aparato está en buenas condiciones.
1 Reloj proyector con radio, 1 Instrucciones de uso
Las pilas necesarias para el funcionamiento así como una posible fuente de
alimentación de 3 V (accesorio), no están contenidas en el volumen de suministro.
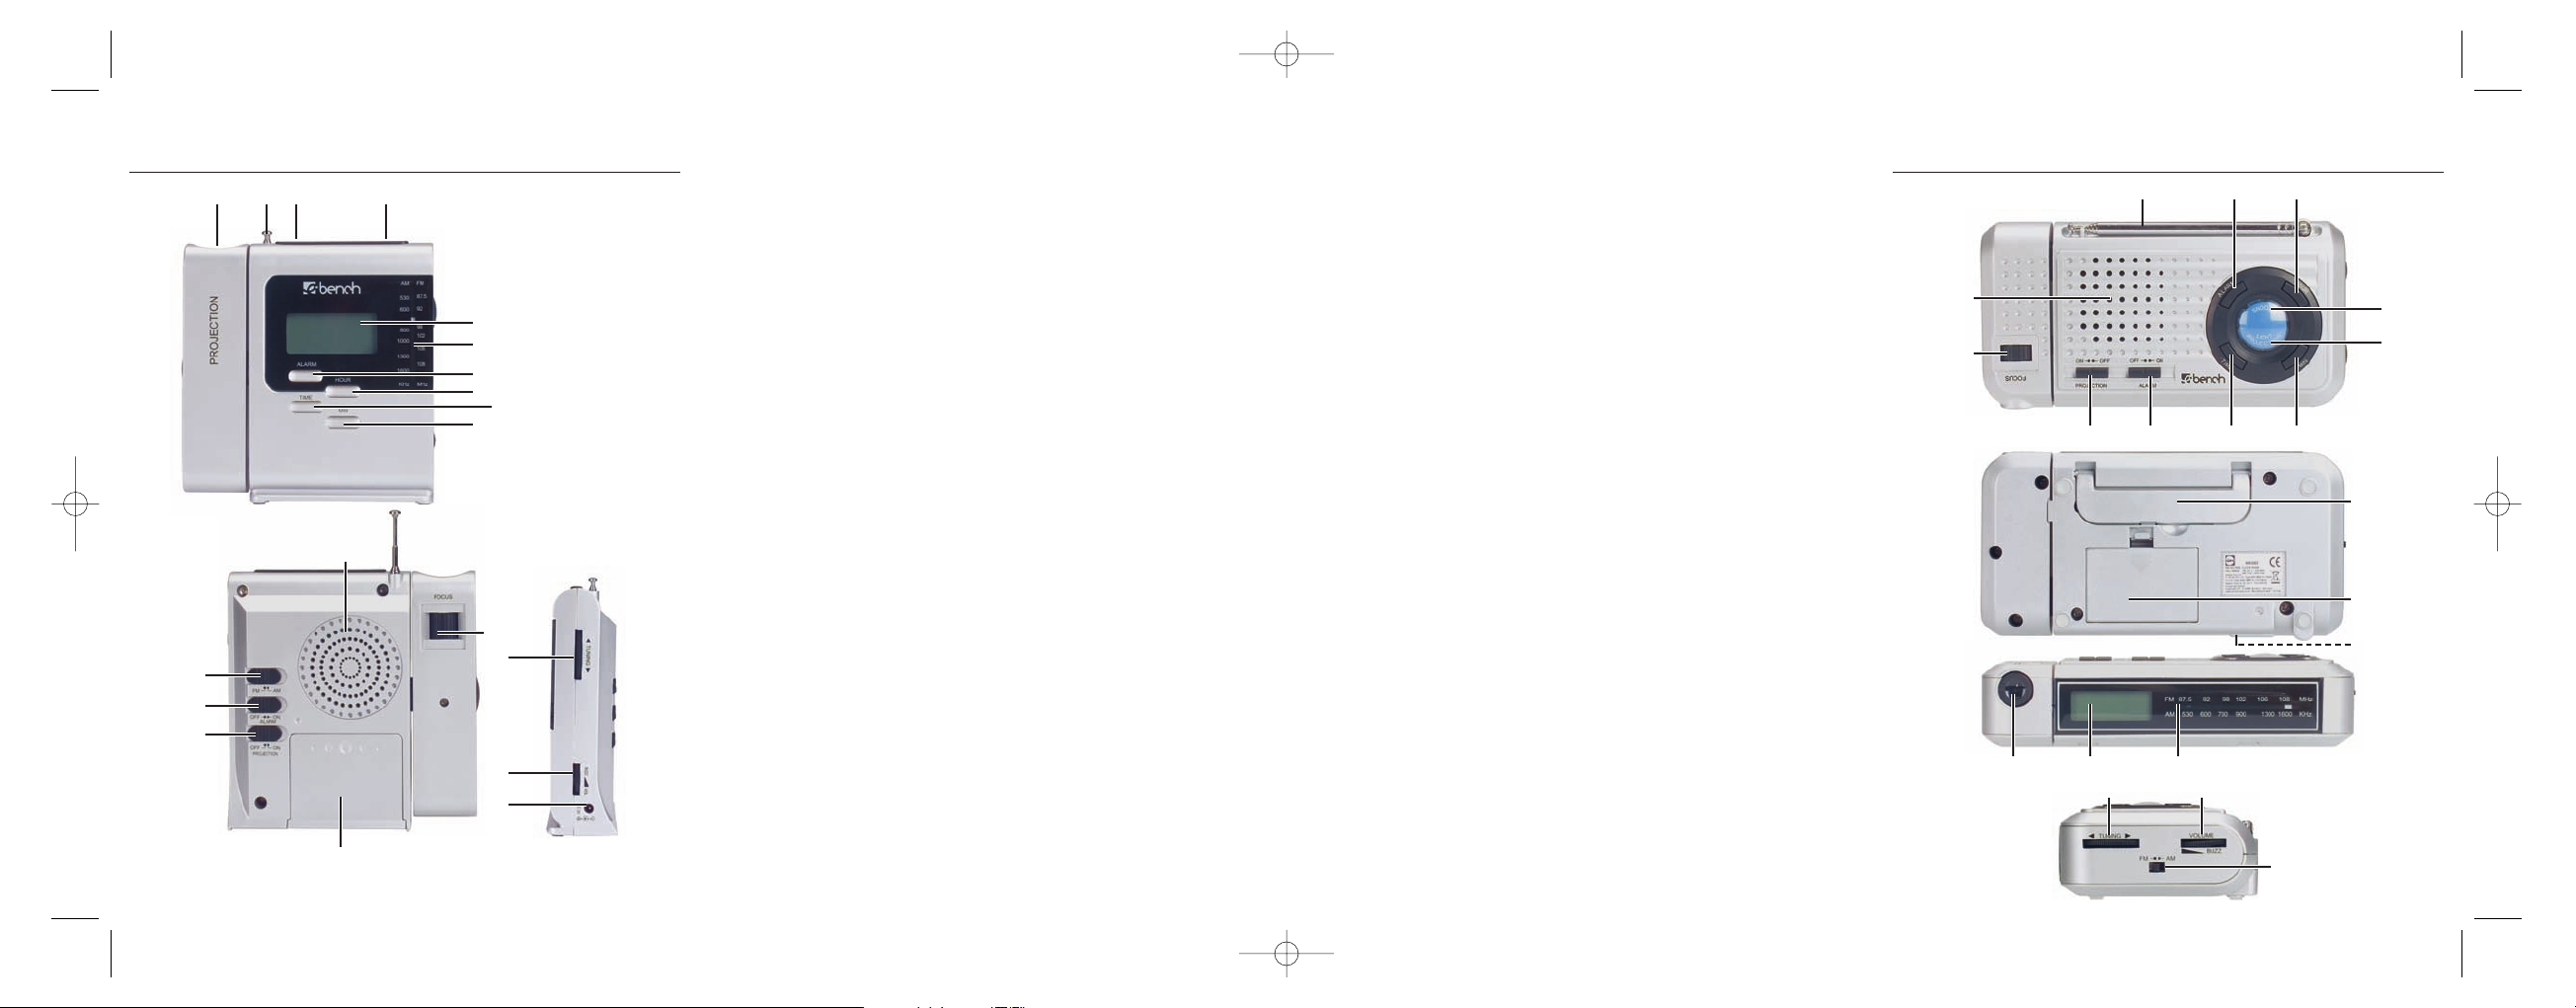
Elementos de mando
q
Lente de proyección
w
Antena telescópica
e
Tecla Snooze
r
Proyección, iluminación del display
t
Pantalla
y
Escala de frecuencias
u
Tecla Alarm
i
Tecla Hour (Horas)
o
Tecla Time
a
Tecla Min (Minutos)
s
Altavoz
d
Foco proyector
f
Sintonizador
g
Regulador de volumen VOLUME / BUZZ
h
Conector de corriente continua externo de 3V para clavija
hueca de 4,0 mm x 1,7 mm
j
Compartimiento de pilas
k
Interruptor de proyección encendida/apagada (ON/OFF)
l
Interruptor de alarma encendida/apagada (ON/OFF)
;
Selector de banda FM/AM
2)
Brida de posicionamiento (sólo modelo KH 2202)
- 6 -
IB_KH2201_02_AR909_ES.qxd 09.11.2007 10:22 Uhr Seite 6
Page 7
Características técnicas
Tensión nominal: 3 V
Corriente nominal : 300 mA
Gama de frecuencias:
FM (UKW) 87,5 - 108 MHz
AM (MW) 530 - 1600 kHz
Dimensiones:
KH 2201: 14,2 cm x 13,1 cm x 3,8 cm
KH 2202: 17 cm x 8,8 cm x 4,2 cm
Peso :
KH 2201 y KH 2202: aprox. 245 gr.
Temperatura de servicio : 5°C - 40°C a <85% de humedad ambiental relativa
Pilas:
(No incluidas en el volumen de suministro)
• Modelo KH 2201: 1,5 V tipo Mignon/AA
• Modelo KH 2202: 1,5 V tipo Micro/AAA
• 2 x 1,5 V la radio, la iluminación del display y la proyección
• 1 x 1,5 V para el reloj LCD (el alojamiento tiene grabado el texto
„CLOCK USE“)
Fuente de alimentación:
(No incluidas en el volumen de suministro)
Tensión nominal: CC 3V (+/- 5%)
Corriente nominal: mín. 300 mA
Clavija hueca: 4,0 mm x 1,7 mm
Para utilizar un bloque de alimentación de 3 V deberá estar colocada la pila
en el compartimiento “CLOCK USE”. En caso contrario el reloj no funciona.
- 7 -
IB_KH2201_02_AR909_ES.qxd 09.11.2007 10:22 Uhr Seite 7
Page 8
Emplazamiento
• Coloque el reloj proyector sobre una superficie recta.
• Coloque el reloj proyector de modo que la lente de proyección
q
apunte
a una zona vacía.
Solo el modelo KH 2202:
• Despliegue la brida de posicionamiento
2)
.
Manejo
Conectar la fuente de alimentación externa
Es posible utilizar este aparato con un bloque de alimentación externo.
Utilice por ello sólo fuentes de alimentación con estas especificaciones:
Tensión nominal: CC 3V (+/- 5%)
Corriente nominal: mín. 300 mA
Clavija hueca: 4,0 mm x 1,7 mm
ATENCIÓN:
Tenga en cuenta mantener la polaridad correcta - tanto con las pilas, como
también con el alimentador de corriente externo. Observe la inscripción del
conector corriente continua de 3V
h
. Con una polaridad incorrecta
el aparato se dañará.
- 8 -
IB_KH2201_02_AR909_ES.qxd 09.11.2007 10:22 Uhr Seite 8
Page 9
Funcionamiento de la radio
1. Para encenderla gire el regulador de volumen VOLUME / BUZZ ghasta
oír un »click«.
2. Ajuste ahora el volumen deseado con el regulador de volumen VOLUME /
BUZZ
g
.
3. Ajuste el selector de banda
;
a la banda de frecuencia deseada
(FM/AM).
4. Con el sintonizador
f
seleccione la emisora deseada.
Las frecuencias se pueden ver en la escala de frecuencias
y
.
5. Para apagarla gire el regulador de volumen VOLUME / BUZZ
g
hasta
oír un »click« (KH 2201: girar el regulador de volumen hacia arriba,
KH 2202: girar el regulador de volumen hacia atrás).
Orientar la antena telescópica
Modelo KH 2201:
• Despliegue totalmente la antena telescópica
w
.
La antena telescópica
w
no se puede girar en el modelo KH 2201.
Al girar la antena telescópica
w
se dañará la base de la antena.
Modelo KH 2202:
• Saque la antena telescópica wdel soporte y colóquela usted.
• Extraiga completamente la antena telescópica
w
.
Para mejorar la recepción de emisoras en la banda de frecuencia FM, gire
despacio el extremo de la antena telescópica wen diferentes direcciones.
Si ha conseguido una buena recepción de la emisora ajustada, deje la antena
telescópica
w
en esta posición. Para la recepción de emisoras de radio AM
la antena de recepción se encuentra integrada en el aparato. Para mejorar
la recepción cambie la posición del aparato con la radio conectada.
- 9 -
IB_KH2201_02_AR909_ES.qxd 09.11.2007 10:22 Uhr Seite 9
Page 10

Ajustar la hora
Mientras mantiene pulsada la tecla TIME o:
1. Pulse repetidas veces o mantenga pulsada la tecla HOUR
i
para ajustar
las horas.
2. Suelte la tecla HOUR
i
en cuanto se muestre en la pantalla tla hora
deseada.
3. Pulse repetidas veces o mantenga pulsada la tecla MIN
a
para ajustar
los minutos.
4. Suelte la tecla MIN
a
en cuanto se muestren en la pantalla tlos minutos
deseados.
La hora ajustada es aceptada automáticamente, al momento soltar la tecla
TIME
o
.
Ajustar la hora del despertador
Si ha ajustado la hora correctamente tal como se ha descrito anteriormente:
1. Apagar la radio: Ajuste el regulador de volumen VOLUME / BUZZ
g
en
la posición BUZZ (se oirá un »click«).
Mientras mantiene pulsada la tecla ALARM
u
:
2. Pulse repetidas veces o mantenga pulsada la tecla HOUR
i
para ajustar
las horas.
3. Suelte la tecla HOUR
i
en cuanto se muestre en la pantalla tla hora
deseada.
4. Pulse repetidas veces o mantenga pulsada la tecla MIN
a
para ajustar
los minutos.
5. Suelte la tecla MIN
a
en cuanto se muestren en la pantalla tlos minutos
deseados.
La hora de alarma del despertador ajustada se acepta automáticamente al
soltar la tecla ALARM
u
.
6. Para activar la función de despertador ajuste el interruptor
l
ALARM
encendida/apagada en la posición „ON”.
- 10 -
IB_KH2201_02_AR909_ES.qxd 09.11.2007 10:22 Uhr Seite 10
Page 11
Función Snooze
Al activar la tecla SNOOZE ese interrumpe el tono de alarma durante 8
minutos. Transcurridos los 8 minutos se repite de nuevo el tono del despertador.
Ajuste el interruptor
l
ALARM encendida/apagada en la posición „OFF“
para apagar totalmente el despertador.
Proyección
¡Atención! La potencia de radiación de la proyección no entraña ningún riesgo
si se utiliza correctamente. Evite mirar directamente el rayo de luz y no lo
dirija a otras personas o animales.Para representar correctamente la hora en
la pared o el techo, el elemento de proyección oscilante debe estar orientado
hacia delante y en la habitación debe haber suficiente oscuridad.
1. Ponga el interruptor de proyección encendida/apagada
k
en la posición ON.
2. Oriente el elemento de proyección tal como lo desee. La hora es proyectada
hacia el lugar deseado. La distancia para la proyección es de aprox. 40cm - 3m.
3. Ajuste la nitidez de la proyección con el foco de proyección
d
.
Iluminación de fondo para la pantalla y la proyección
Pulsando una vez la tecla para la iluminación de la proyección/pantalla
r
se activa durante aprox. 10 segundos la iluminación de la pantalla y la
proyección de la hora.
Limpieza
• Mantenga siempre limpio el aparato y la rejilla de ventilación.
• No permita que penetre líquido en el interior del aparato.
• Limpie la carcasa con un paño suave.
• No utilice nunca gasolina, disolvente ni productos de limpieza perjudiciales
para el plástico.
- 11 -
IB_KH2201_02_AR909_ES.qxd 09.11.2007 10:22 Uhr Seite 11
Page 12
Declaración de conformidad CE
Este aparato de electrónica de entretenimiento cumple los requisitos básicos
y normas relevantes de la normativa EMC 2004/108/CE y la normativa
para aparatos de baja tensión 2006/95/CE.
Eliminación
En ningún caso deberá tirar el aparato a la basura doméstica.
Este producto está sujeto a la normativa europea 2002/96/CE.
Evacue el aparato en un centro de evacuación autorizado o a través de las
instalaciones de evacuación comunitarias.
Tenga en cuenta las normativas actuales en vigor. En caso de dudas póngase
en contacto con su centro de evacuación.
¡Evacuar las pilas!
Las pilas no deben evacuarse en la basura doméstica normal. Cada consumidor está obligado legalmente a entregar las pilas/baterías en un punto
de recogida de residuos de su municipio, barrio o en un establecimiento.
Esta obligatoriedad tiene el objetivo de que se evacuen las pilas favorables
al medio ambiente. Devuelva las pilas/acumuladores en estado descargado.
El material de embalaje debe desecharse de forma respetuosa con el
medio ambiente.
- 12 -
IB_KH2201_02_AR909_ES.qxd 09.11.2007 10:22 Uhr Seite 12
Page 13
Garantía y asistencia técnica
Con este aparato recibe usted 3 años de garantía desde la fecha de compra.
El aparato ha sido fabricado cuidadosamente y ha sido probado antes de
su entrega.
Guarde el comprobante de caja como justificante de compra. Si necesitara
hacer uso de la garantía, póngase en contacto por teléfono con su punto de
servicio habitual. Éste es el único modo de garantizar un envío gratuito.
La garantía cubre los defectos de fabricación o del material, pero no las piezas
sujetas a desgaste y los daños sufridos por las piezas frágiles (p.ej. el interruptor o las pilas). Este producto ha sido diseñado exclusivamente para el
uso particular y no para el uso industrial. En caso de manipulación indebida
e incorrecta, uso de la fuerza y en caso de abrir el aparato personas extrañas
a nuestros centros de asistencia técnica autorizados, la garantía pierde su
validez. Esta garantía no reduce en forma alguna sus derechos legales.
Kompernass Service España
C/Invención 7
Polígono Industrial Los Olivos
28906 Getafe – Madrid
Tel.: 902/430758
Fax: 91/6652551
e-mail: support.es@kompernass.com
- 13 -
IB_KH2201_02_AR909_ES.qxd 09.11.2007 10:22 Uhr Seite 13
Page 14
Importador
KOMPERNASS GMBH
BURGSTRASSE 21
D-44867 BOCHUM
www.kompernass.com
- 14 -
IB_KH2201_02_AR909_ES.qxd 09.11.2007 10:22 Uhr Seite 14
Page 15

INDICE PAGINA
Indicazioni di sicurezza 16
Uso conforme 17
Fornitura 18
Elementi di comando 18
Dati tecnici 19
Montaggio 20
Utilizzo 20
Funzionamento della radio: 21
Orientamento dell'antenna telescopica 21
Impostazione dell'ora 22
Impostazione della sveglia 22
Funzione di allarme ritardato - Snooze 23
Proiezione 23
Retroilluminazione del display e proiezione. 23
Pulizia 23
Conformità CE 24
Smaltimento 24
Garanzia e assistenza 25
Importatore 25
- 15 -
Leggere attentamente le istruzioni per l'uso prima del primo impiego
e conservarle per l'impiego successivo. In caso di cessione dell'apparecchio
a terzi, consegnare anche le istruzioni.
IB_KH2201_02_AR909_IT.qxd 09.11.2007 10:24 Uhr Seite 15
Page 16

OROLOGIO PROIETTORE
Indicazioni di sicurezza
Per evitare il pericolo di morte a causa di scossa elettrica:
• Utilizzare l'apparecchio solo in ambienti asciutti.
• Accertarsi che nell'apparecchio non penetrino mai liquidi o altri oggetti.
• Non collocare sull'apparecchio oggetti pieni di liquidi, come ad es. vasi.
Per evitare il pericolo di incendio e lesioni:
• Posizionare l'apparecchio in modo tale da evitare il ristagno di calore,
tenendolo quindi libero e ben aerato. Non coprire mai le aperture di
aerazione!
• Non collocare sorgenti di fiamme libere, come ad es. candele, sull'appa-
recchio.
• Evitare un afflusso di calore supplementare, ad es. con l'irradiazione diretta
del sole, riscaldamento, altre apparecchiature ecc.!
• Questo apparecchio non è indicato per l'uso da parte di persone (inclusi
bambini) con limitate capacità fisiche, sensoriali o mentali o prive dell'es-
perienza e/o della conoscenza necessaria, a meno che tali persone non
vengano sorvegliate da un responsabile per la sicurezza o abbiano rice-
vuto indicazioni sull'impiego dell'apparecchio.
• Sorvegliare i bambini per assicurarsi che non giochino con l'apparecchio.
Campi elettromagnetici
Questo apparecchio è conforme ai valori soglia di legge per la compatibilità
elettromagnetica! Qualora si avessero ancora riserve in relazione al collocamento in camera da letto:
- 16 -
IB_KH2201_02_AR909_IT.qxd 09.11.2007 10:24 Uhr Seite 16
Page 17

• posizionare l'apparecchio a circa mezzo metro di distanza dal letto.
A partire da questa distanza i campi non sono più avvertibili neanche dalle
persone elettrosensibili.
Avviso:
Questo apparecchio è provvisto di piedini in gomma antisdrucciolo. Poiché
le superfici dei pavimenti o dei mobili sono composte di materiali fra i più
disparati, trattati con vari tipi di agenti, non si può escludere completamente
che tali agenti contengano sostanze in grado di attaccare e ammorbidire i
piedini in gommaCollocare eventualmente un supporto antisdrucciolo sotto
i piedini dell'apparecchio.
Avviso:
In varie nazioni potrebbero essere in vigore regolamenti diversi in relazione
all'attribuzione delle frequenze radiofoniche.
Ricordare che non è permesso utilizzare, inoltrare a terzi o abusare delle
informazioni ottenute da servizi radiofonici eventualmente captati.
Uso conforme
L'apparecchio è destinato a essere utilizzato come sveglia tramite suoneria e
per la ricezione di emittenti radiofoniche. Qualunque altro impiego e qualunque
modifica dell'apparecchio è da considerarsi non conforme alla destinazione
e comporta il rischio di infortuni.
La casa produttrice non è responsabile per i danni causati da un impiego
non conforme o da un uso non corretto. Non destinato all'impiego commerciale.
- 17 -
IB_KH2201_02_AR909_IT.qxd 09.11.2007 10:24 Uhr Seite 17
Page 18

Fornitura
Dopo aver prelevato l'apparecchio dall'imballaggio, controllare subito se il
materiale compreso nella fornitura è completo e se l'apparecchio funziona
correttamente.
1 radio con orologio a proiezione, 1 manuale di istruzioni per l'uso
Le pile necessarie per il funzionamento e l'alimentatore da 3V (accessorio)
non sono incluse nella fornitura.
Elementi di comando
q
Lente di proiezione
w
Antenna telescopica
e
Tasto di allarme ritardato Snooze
r
Proiezione, illuminazione display
t
Display
y
Scala di frequenze
u
Tasto Alarm
i
Tasto Hour (ora)
o
Tasto Time
a
Tasto Min (minuto)
s
Altoparlante
d
Fuoco di proiezione
f
Regolatore Tuning
g
Regolatore volume VOLUME / BUZZ
h
Connessione CC esterna da 3V per spinotto cavo da 4,0 mm x 1,7 mm
j
Vano pile
k
Interruttore proiezione accesa/spenta (ON/OFF)
l
Interruttore allarme acceso/spento (ON/OFF)
;
Selettore di banda FM/AM
2)
Staffa di supporto (solo modello KH 2202)
- 18 -
IB_KH2201_02_AR909_IT.qxd 09.11.2007 10:24 Uhr Seite 18
Page 19

Dati tecnici
Tensione nominale: 3 V
Corrente nominale : 300 mA
Gamma di frequenze:
FM (onde ultracorte) 87,5 - 108 MHz
AM 530 - 1600 kHz
Dimensioni:
KH 2201: 14,2 cm x 13,1 cm x 3,8 cm
KH 2202: 17 cm x 8,8 cm x 4,2 cm
Peso:
KH 2201 e KH 2202: ca. 245 gr.
Temperatura di esercizio : 5°C - 40°C a <85% di umidità relativa dell'aria
Pile:
(non incluse nella fornitura)
• Modello KH 2201: 1,5 V tipo mignon/AA
• Modello KH 2202: 1,5 V tipo micro/AAA
• 2 x 1,5 V per il funzionamento della radio,
l'illuminazione del display e la proiezione
• 1 x 1,5 V per l'orologio LCD (il vano riporta la scritta „CLOCK USE“)
Alimentatore:
(non incluse nella fornitura)
Tensione nominale: CC 3V (+/- 5%)
Corrente nominale: min. 300 mA
Spinotto cavo: 4,0 mm x 1,7 mm
Con l'uso di un alimentatore da 3 V la pila dev'essere inserita nel vano
“CLOCK USE” altrimenti l'orologio non funzionerà.
- 19 -
IB_KH2201_02_AR909_IT.qxd 09.11.2007 10:24 Uhr Seite 19
Page 20

Montaggio
• Collocare l'orologio a proiezione su una superficie piana.
• Collocare l'orologio a proiezione in modo che la lente di proiezione
q
sia rivolta su una superficie libera.
Solo modello KH 2202:
• Estrarre la staffa di supporto
2)
.
Utilizzo
Collegamento dell'alimentatore esterno
L'apparecchio può funzionare anche utilizzando un alimentatore esterno.
Utilizzare solo ed esclusivamente alimentatori con le seguenti specifiche
tecniche:
Tensione nominale: CC 3V (+/- 5%)
Corrente nominale : min. 300 mA
Spinotto cavo: 4,0 mm x 1,7 mm
Attenzione:
rispettare la polarità corretta, sia con le pile, sia con l'alimentazione esterna.
Rispettare le diciture sulla connessione CC da 3V
h
.
L'apparecchio subisce danni in caso di polarità errata.
- 20 -
IB_KH2201_02_AR909_IT.qxd 09.11.2007 10:24 Uhr Seite 20
Page 21

Funzionamento della radio:
1. Per accendere, girare il regolatore del volume VOLUME / BUZZ g, fino
a sentire un »clic«.
2. Con il regolatore del volume VOLUME / BUZZ
g
impostare il volume
desiderato.
3. Impostare il selettore di banda
;
sul campo di onde desiderato
(FM/AM).
4. Con il regolatore Tuning
f
impostare l'emittente desiderata.
Le frequenze si possono leggere sull'apposita scala di frequenze
y
.
5. Per spegnere, ruotare il regolatore del volume VOLUME / BUZZ
g
, fino
a sentire un »clic« (KH 2201:ruotare verso l'alto il regolatore del volume,
KH 2202: ruotare verso il retro il regolatore del volume).
Orientamento dell'antenna telescopica
Per il modello KH 2201:
• Estrarre completamente l'antenna telescopica
w
.
L'antenna telescopica
w
non è estraibile per il modello KH 2201.
Ruotando l'antenna telescopica
w
si danneggia il piede dell'antenna.
Per il modello KH 2202:
• Staccare l'antenna telescopica wdal supporto e posizionarla.
• Estrarre completamente l'antenna telescopica
w
.
Per migliorare la ricezione delle emittenti radiofoniche nel campo di frequenze
FM, ruotare lentamente l'estremità dell'antenna telescopica win varie direzioni.
Se si rileva una buona ricezione delle emittenti impostate, lasciare l'antenna
telescopica
w
in tale posizione. Per la ricezione delle emittenti radiofoniche
in modulazione di ampiezza (AM), è già presente un'antenna di ricezione
integrata nell'apparecchio. Per migliorare la ricezione, modificare la posizione
dell'apparecchio acceso in modalità radio.
- 21 -
IB_KH2201_02_AR909_IT.qxd 09.11.2007 10:24 Uhr Seite 21
Page 22

Impostazione dell'ora
tenendo premuto il tasto TIME o:
1. Premere più volte consecutivamente, oppure premere e mantenere premuto
il tasto HOUR
i
, per impostare le ore.
2. Rilasciare il tasto HOUR
i
, non appena nel display tviene visualizzata
l'ora desiderata.
3. Premere più volte consecutivamente, oppure premere e mantenere premuto il
tasto MIN
a
, per impostare i minuti.
4. Rilasciare il tasto MIN
a
, non appena nel display tvengono visuali-
zzati i minuti desiderati.
L'orario impostato viene inserito automaticamente, subito dopo il rilascio del
tasto TIME
o
.
Impostazione della sveglia
Se l'ora è stata impostata in modo corretto come descritto precedentemente:
1. Spegnimento della radio: impostare il regolatore del volume VOLUME /
BUZZ
g
, su BUZZ (si sentirà un »clic«).
Tenendo premuto il tasto ALARM
u
:
2. Premere più volte consecutivamente, oppure premere e mantenere premuto
il tasto HOUR
i
, per impostare le ore.
3. Rilasciare il tasto HOUR
i
, non appena nel display tviene visualizzata
l'ora desiderata.
4. Premere più volte consecutivamente, oppure premere e mantenere premuto
il tasto MIN
a
, per impostare i minuti.
5. Rilasciare il tasto MIN
a
, non appena nel display tvengono visualizzati
i minuti desiderati.
L'ora di sveglia impostata viene automaticamente inserita non appena rilasciato il
tasto ALARM
u
.
6. Per attivare la funzione di sveglia, impostare l'interruttore
l
ALARM
On/Off su „ON”.
- 22 -
IB_KH2201_02_AR909_IT.qxd 09.11.2007 11:07 Uhr Seite 22
Page 23

Funzione di allarme ritardato - Snooze
Se si aziona il tasto SNOOZE e, il segnale acustico della sveglia verrà
interrotto per 8 minuti. Trascorsi 8 minuti, l'allarme viene ripetuto. Per disattivare
completamente la funzione di sveglia, impostare l'interruttore
l
ALARM
On/Off su „OFF“.
Proiezione
Attenzione! Se l'apparecchio è usato in modo conforme alle norme, la potenza
di irradiazione della proiezione non costituisce alcuna forma di pericolo. Evitare
tuttavia di guardare direttamente nel raggio luminoso e non puntarlo in nessun
caso in direzione di altre persone o animali.
Per una corretta visualizzazione dell'orario sulla parete o sul soffitto, l'elemento di
proiezione orientabile deve essere orientato in avanti e l'ambiente deve essere
adeguatamente oscurato.
1. Impostare l'interruttore per la proiezione On/Off
k
su ON.
2. Dirigere l'elemento di proiezione nella direzione desiderata. L'ora verrà
proiettata sul punto desiderato. Distanza di proiezione ca. 40 cm - 3 m.
3. Con il fuoco di proiezione
d
impostare la nitidezza della proiezione.
Retroilluminazione del display e proiezione.
Un tocco del tasto Proiezione/Illuminazione display rattiva per ca. 10 secondi
l'illuminazione del display e la proiezione dell'orario.
Pulizia
• Tenere sempre pulito l'apparecchio e le aperture di aerazione.
• Impedire la penetrazione di liquidi all'interno dell'apparecchio.
• Per pulire l'alloggiamento, utilizzare un panno morbido.
• Non utilizzare mai benzina, solventi o detergenti che attaccano la plastica.
- 23 -
IB_KH2201_02_AR909_IT.qxd 09.11.2007 10:24 Uhr Seite 23
Page 24

Conformità CE
Il presente apparecchio per elettronica da intrattenimento corrisponde ai
requisiti fondamentali in relazione alla conformità e alle relative prescrizioni
della direttiva EMC 2004/108/CE e della direttiva per gli apparecchio a
bassa tensione 2000/95/CE.
Smaltimento
Non smaltire assolutamente l'apparecchio assieme ai normali rifiuti
domestici.
Questo prodotto è conforme alla direttiva europea 2002/96/CE.
Smaltire l'apparecchio tramite l'ente di smaltimento autorizzato o l'azienda
di smaltimento comunale.
Rispettare le prescrizioni attualmente in vigore. In caso di dubbio mettersi in
contatto con l'ente di smaltimento competente.
Smaltimento delle pile!
Non gettare le pile nel contenitore per i rifiuti domestici. Ogni utente è obbligato
per legge a consegnare le pile o batterie usate presso gli appositi centri di
raccolta della propria città o del proprio quartiere, o presso i punti vendita.
Tale obbligo serve a consentire lo smaltimento ecologico delle pile. Restituire
le pile/gli accumulatori solo se scarichi.
Smaltire tutti i materiali dell'imballaggio in modo ecologicamente
conforme.
- 24 -
IB_KH2201_02_AR909_IT.qxd 09.11.2007 11:07 Uhr Seite 24
Page 25

Garanzia e assistenza
Questo apparecchio è garantito per tre anni a partire dalla data di acquisto.
L'apparecchio è stato prodotto con cura e debitamente collaudato prima della
consegna.
Conservare lo scontrino come prova d'acquisto. Nei casi contemplati dalla
garanzia, mettersi in comunicazione telefonicamente con il centro di assistenza
più vicino. Solo in questo modo è possibile garantire una spedizione gratuita
della merce.
La prestazione della garanzia vale solo per difetti del materiale o di fabbricazione. Il prodotto è destinato esclusivamente all'uso domestico e non a
quello commerciale. La garanzia decade in caso di impiego improprio o
manomissione, uso della forza e interventi non eseguiti dalla nostra filiale di
assistenza autorizzata. Questa garanzia non costituisce alcun limite ai diritti
legali del consumatore.
Kompernass Service Italia
Corso Lino Zanussi 11
33080 Porcia (PN)
Tel.: 0434/550833
Fax: 0434/550833
e-mail: support.it@kompernass.com
Importatore
KOMPERNASS GMBH
BURGSTRASSE 21
D-44867 BOCHUM
www.kompernass.com
- 25 -
IB_KH2201_02_AR909_IT.qxd 09.11.2007 10:24 Uhr Seite 25
Page 26

- 26 -
IB_KH2201_02_AR909_IT.qxd 09.11.2007 10:24 Uhr Seite 26
Page 27

LIST OF CONTENTS PAGE
Safety instructions 28
Intended Use 29
Items supplied 30
Operating Elements 30
Technical data 31
Placement 32
Operation 32
Radio operation 33
Setting up the telescope aerial 33
Setting the time 34
Setting the alarm time 34
Snooze Function 35
Projection 35
Background lighting for the display and projection 35
Cleaning 35
CE- Conformity 36
Disposal 36
Warranty and Service 37
Importer 38
- 27 -
Read these operating instructions carefully before using the appliance for the
first time and preserve this manual for later reference. Pass this manual on to
whoever might acquire the appliance at a future date.
IB_KH2201_02_AR909_UK_5.qxd 09.11.2007 10:26 Uhr Seite 27
Page 28

PROJECTION CLOCK
Safety instructions
To avoid fatal injury through electric shock:
• Use the clock in dry environments only.
• Make sure that fluids or any other objects do not get inside the device.
• Do not place objects containing fluids, e.g. flower vases, on the appliance.
To avoid burn and other injuries:
• Place the appliance in an open and well-ventilated area so that heat
pockets cannot be created within it. Never cover the ventilation slits!
• Do not place open fire sources, e.g. candles, on the appliance.
• Avoid close proximity to heat sources, e.g. direct solar radiation, heaters
and other appliances etc.!
• This appliance is not intended for use by individuals (including children)
with restricted physical, physiological or intellectual abilities or deficiences
in experience and/or knowledge unless they are supervised by a person
responsible for their safety or receive from this person instruction in how
the appliance is to be used.
• Children should be supervised to ensure that they do not play with the
appliance..
Electro-magnetic fields
This appliance complies with the statutory limits for electro-magnetic compatibility!
If you still have any doubts regarding its use in bedrooms:
• Place the appliance about half a meter from the bed.
From this distance the electro magnetic fields are no longer effective even for
electro sensitive people itself.
- 28 -
IB_KH2201_02_AR909_UK_5.qxd 09.11.2007 10:26 Uhr Seite 28
Page 29

Note:
This appliance is equipped with non-slip rubber feet. As floor and furniture
upper surfaces comprise of various materials and are cleaned with various
types of polishes and/or cleaning agents, it cannot be completely excluded
that some of these substances contain components that could attack the rubber
pads and soften them. If possible place an anti-slip material under the feet
of the appliance.
Note:
In certain countries there could be special regulations in force regarding the
allocated radio frequency ranges.
Take note that you may not exploit these radio services, pass details heard
from them on to third parties or otherwise improperly misuse them.
Intended Use
The equipment is intended for employment as an alarm clock, using a tone
signal, and for receiving radio transmissions. Any other usage of, or modification
to, the appliance is deemed to be improper usage and carries the risk of
serious personal injury.
The manufacturer accepts no liability for damages that result from improper
use of the appliance or are caused by the incorrect operation of it. Not intended
for commercial use.
- 29 -
IB_KH2201_02_AR909_UK_5.qxd 09.11.2007 10:26 Uhr Seite 29
Page 30

Items supplied
After unpacking the appliance, immediately check to determine that all listed
items are present and that the appliance is in a faultless condition.
1 Projection clock with radio, 1 Operating manual
The batteries and a 3V-mains adaptor (accessories), required for operation,
are not included in the supply.
Operating Elements
q
Projection lens
w
Telescopic antenna
e
Button Snooze
r
Projection, Display illumination
t
Display
y
Frequency scale
u
Button Alarm
i
Button Hour
o
Button Time
a
Button Min (Minute)
s
Loudspeakers
d
Projection focus
f
Tuning wheel
g
Volume controller VOLUME / BUZZ
h
External 3V Direct current connection for 4.0 mm x 1.7 mm barrel connector
j
Battery Compartment
k
Switch-Projection ON/OFF
l
Switch - Alarm ON/OFF
;
Waveband selector FM/AM
2)
Stand-up support (only Model KH 2202)
- 30 -
IB_KH2201_02_AR909_UK_5.qxd 09.11.2007 10:26 Uhr Seite 30
Page 31

Technical data
Power rating: 3 V
Rated current : 300 mA
Frequency range :
FM (VHF) 87.5 - 108 MHz
AM (MW) 530 - 1600 kHz
Dimensions:
KH 2201 14.2 cm x 13.1 cm x 3.8 cm
KH 2202 17 cm x 8.8 cm x 4.2 cm
Weight :
KH 2201 and KH 2202: ca. 245 gr.
Operating temperature : 5°C - 40°C at <85% rel. humidity
Batteries:
(Batteries not supplied)
• Model KH 2201: 1.5 V Type Mignon/AA
• Model KH 2202: 1.5 V Type Micro/AAA
• 2 x 1.5 V for radio operation, display illumination and projection
• 1 x 1.5 V for the LCD clock (the compartment is described in “CLOCK USE“)
Mains adapter:
(Item not supplied)
Rated voltage: DC 3V (+/- 5%)
Rated current : min. 300 mA
Barrel connector: 4.0 mm x 1.7 mm
When using a 3 V mains adaptor, a battery must be inserted into the
compartment “CLOCK USE”. Otherwise, the clock will not function.
- 31 -
IB_KH2201_02_AR909_UK_5.qxd 09.11.2007 10:26 Uhr Seite 31
Page 32

Placement
• Place the projection clock onto a level surface.
• Position the projection clock such that the projection lens
q
is directed
onto an empty surface.
Only Model KH 2202:
• Fold out the stand-up support
2)
.
Operation
Connect the external mains adaptor
This appliance can be operated with an external mains adaptor.
Please use only mains adaptors that meet these specifications:
Rated voltage: DC 3V (+/- 5%)
Rated current : min. 300 mA
Barrel connector: 4.0 mm x 1.7 mm
Attention:
Make certain that the polarity is correct – both for the batteries as well as for
the mains adaptor. Take note of the markings on the 3V direct current connection
h
. False polarity will damage the appliance.
- 32 -
IB_KH2201_02_AR909_UK_5.qxd 09.11.2007 10:26 Uhr Seite 32
Page 33

Radio operation
1. To switch on, turn the volume controller VOLUME / BUZZ g, until an audible
»Click« is heard.
2. Using the volume controller VOLUME / BUZZ
g
now set the desired volume.
3. Set the waveband selector switch
;
to the desired wavelength range
(FM/AM).
4. Adjust the tuning wheel
f
to select the desired radio station. The frequencies
can be read off from the frequency scale
y
.
5. To switch off, turn the volume controller VOLUME / BUZZ
g
until an
audible »Click« is heard (KH 2201.Turn the volume controller upwards,
KH 2202: Turn the volume controller to the rear).
Setting up the telescope aerial
On Model KH 2201:
• Extend the telescope aerial
w
completely.
The telescope aerial
w
on Model KH 2201 is not rotatable.
If you try to turn the telescope aerial
w
, the aerial mounting will be damaged.
On Model KH 2202:
• Remove the telescope aerial wfrom its retainer and set it up.
• Extend the telescope aerial
w
completely.
To improve reception in the FM frequency range, slowly turn the end of the
telescope aerial win various directions. As soon as you have found a position
with good reception from your desired radio station, leave the telescope aerial
w
in this position. For the reception of AM transmitters, an aerial is built into
the appliance. For improved reception, alter the position of the appliance in
radio mode.
- 33 -
IB_KH2201_02_AR909_UK_5.qxd 09.11.2007 10:26 Uhr Seite 33
Page 34

Setting the time
Whilst holding the button TIME opressed down:
1. Press several times consecutively, or press and hold, the button HOUR
i
,
to set the hours.
2. Release the button HOUR
i
, as soon as the desired hours setting is shown
in the Display
t
.
3. Press several times consecutively, or press and hold, the button MIN
a
,
to set the minutes.
4. Release the button MIN
a
, as soon as the desired minutes setting is shown
in the Display
t
.
The set time is automatically accepted as soon as the TIME button
o
is released.
Setting the alarm time
If the clock is set correctly, as described above:
1. Switch the radio off: Place the volume controller VOLUME / BUZZ
g
to
BUZZ (a »Click« is audible).
Whilst holding the button ALARM
u
pressed down:
2. Press several times consecutively, or press and hold, the button HOUR
i
,
to set the hours.
3. Release the button HOUR
i
, as soon as the desired hours setting is shown
in the Display
t
.
4. Press several times consecutively, or press and hold, the button MIN
a
,
to set the minutes.
5. Release the button MIN
a
, as soon as the desired minutes setting is shown
in the Display
t
.
The adjusted alarm time will be automatically accepted as soon as the button
ALARM uis released.
6. To activate the alarm time function, place the switch
l
ALARM On/Off to
“ON”.
- 34 -
IB_KH2201_02_AR909_UK_5.qxd 09.11.2007 11:09 Uhr Seite 34
Page 35

Snooze Function
Pressing the SNOOZE ebutton interrupts the alarm tone for 8 minutes.
After these 8 minutes, the alarm tone is repeated. Place the switch
l
ALARM
On/Off to “OFF“ to completely switch off the alarm function.
Projection
Attention! When used properly, the radiation from the projection of the display is
not at all dangerous! However, avoid looking directly into the light beam
and do not aim the beam at other persons or at animals.
To display the correct time on the wall or the ceiling, the hinged projection
element must be swung forwards and the room must be appropriately darkened.
1. Place the switch Projection On/Off
k
to position ON.
2. Set the projection element as desired. The time is projected onto the required
position. Projection distance approx. 40cm - 3m.
3. Adjust the clarity of the projection with the projection focus
d
.
Background lighting for the display and projection
Pressing the button Projection/Display Illumination ractivates the display
illumination and the time projection for approx. 10 seconds.
Cleaning
• Keep the appliance and the ventilation openings clean at all times.
• Fluids may not, under any circumstances, penetrate into the interior of
the appliance.
• Use a soft cloth to clean the appliance housing.
• Never use detergents or solvents that could damage plastics.
- 35 -
IB_KH2201_02_AR909_UK_5.qxd 09.11.2007 10:26 Uhr Seite 35
Page 36

CE- Conformity
This consumer electronics appliance, being in conformity with their fundamental
requirements and directions, complies with the relevant regulations of both
the EMC Guidelines 2004/108/EG and the Guidelines for Low Voltage
Appliances 2006/95/EG.
Disposal
Do not dispose of the appliance in your normal domestic waste.
This appliance is subject to the European Guidelines 2002/96/EG.
Dispose of the appliance through an approved disposal centre or at your
community waste facility.
Observe the currently applicable regulations. In case of doubt, please
contact your waste disposal centre.
Disposing of batteries!
Do not dispose of the batteries with household waste. Every consumer is obliged
by law to deposit all batteries at a collecting point of his community/his precinct or
to return them to a shop.
This obligation is intended to ensure that batteries are disposed of in an
environmentally safe fashion. Only dispose of batteries when they are fully
discharged.
Dispose of all packaging materials in an environmentally friendly
manner.
- 36 -
IB_KH2201_02_AR909_UK_5.qxd 09.11.2007 10:26 Uhr Seite 36
Page 37

Warranty and Service
The warranty given for this appliance is for 3 years from the date of purchase.
The appliance has been manufactured with care and meticulously examined
before delivery.
Please retain your receipt as proof of purchase. In the case of a warranty
claim, please make contact by telephone with our service department. Only
in this way can a post-free despatch for your goods be assured.
The warranty covers only claims for material and maufacturing defects, not
for wearing parts or for damage to fragile components, e.g. buttons or batteries.
This product is for private use only and is not intended for commercial use.
The warranty is void in the case of abusive and improper handling, use of
force and internal tampering not carried out by our authorized service
branch. Your statutory rights are not restricted in any way by this warranty.
DES Ltd
Units 14-15
Bilston Industrial Estate
Oxford Street
Bilston
WV14 7EG
Tel.: 0870/787-6177
Fax: 0870/787-6168
e-mail: support.uk@kompernass.com
- 37 -
IB_KH2201_02_AR909_UK_5.qxd 09.11.2007 10:26 Uhr Seite 37
Page 38

Kompernass Service Ireland
c/o Irish Connection
41 Harbour view
Howth Co. Dublin
Tel: 087-99 62 077
Fax: 18398056
e-mail: support.ie@kompernass.com
Importer
KOMPERNASS GMBH
BURGSTRASSE 21
D-44867 BOCHUM
www.kompernass.com
- 38 -
IB_KH2201_02_AR909_UK_5.qxd 09.11.2007 10:26 Uhr Seite 38
Page 39

INHALTSVERZEICHNIS SEITE
Sicherheitshinweise 40
Bestimmungsgemäßer Gebrauch 41
Lieferumfang 42
Bedienelemente 42
Technische Daten 43
Aufstellen 44
Bedienung 44
Radiobetrieb 45
Teleskopantenne ausrichten 45
Uhrzeit einstellen 46
Weckzeit einstellen 46
Snooze Funktion 47
Projektion 47
Hintergrundbeleuchtung für Display und Projektion 47
Reinigung 47
CE-Konformität 48
Entsorgung 48
Garantie und Service 49
Importeur 50
- 39 -
Lesen Sie die Bedienungsanleitung vor der ersten Verwendung aufmerksam
durch und heben Sie diese für den späteren Gebrauch auf. Händigen Sie
bei Weitergabe des Gerätes an Dritte auch die Anleitung aus.
IB_KH2201_02_AR909_DE_5 09.11.2007 10:28 Uhr Seite 39
Page 40

PROJEKTIONSUHR
Sicherheitshinweise
Um Lebensgefahr durch elektrischen Schlag zu vermeiden:
• Verwenden Sie das Gerät nur in trockenen Räumen.
• Stellen Sie sicher , dass niemals Flüssigkeiten oder Gegenstände in das
Gerät gelangen können.
• Stellen Sie keine mit Flüssigkeiten gefüllten Gegenstände, wie z.B. Vasen,
auf das Gerät.
Um Brand- und Verletzungsgefahr zu vermeiden:
• Stellen Sie das Gerät so auf, dass kein Hitzestau entstehen kann, also frei
und gut belüftet. Decken Sie nie die Belüftungsöffnungen zu!
• Stellen Sie keine offenen Brandquellen, wie z.B. Kerzen, auf das Gerät.
• Vermeiden Sie zusätzliche Wärmezufuhr, z.B. durch direkte Sonneneinstrahlung, Heizungen, andere Geräte usw.!
• Dieses Gerät ist nicht dafür bestimmt, durch Personen (einschließlich Kinder) mit eingeschränkten, physischen, sensorischen oder geistigen Fähigkeiten oder mangels Erfahrung und/oder mangels Wissen benutzt zu werden, es sei denn, sie werden durch eine für ihre Sicherheit zuständige
Person beaufsichtigt oder erhielten von ihr Anweisungen, wie das Gerät
zu benutzen ist.
• Kinder sollten beaufsichtigt werden, um sicherzustellen, dass sie nicht mit
dem Gerät spielen.
Elektromagnetische Felder
Dieses Gerät hält die gesetzlichen Grenzwerte für die elektromagnetische
Verträglichkeit ein! Falls Sie dennoch Bedenken haben, was das Aufstellen im
Schlafzimmer betrifft:
• Stellen Sie das Gerät etwa einen halben Meter vom Bett entfernt auf.
- 40 -
IB_KH2201_02_AR909_DE_5 09.11.2007 10:28 Uhr Seite 40
Page 41

Ab dieser Entfernung sind spätestens die Felder selbst für elektrosensible
Menschen nicht mehr vorhanden.
Hinweis:
Dieses Gerät ist mit rutschfesten Gummifüßen ausgestattet. Da die Bodenoder Möbeloberflächen aus den verschiedensten Materialien bestehen und
mit unterschiedlichsten Pflegemitteln behandelt werden, kann es nicht völlig
ausgeschlossen werden, dass manche dieser Stoffe Bestandteile enthalten,
die die Gummifüße angreifen und aufweichen. Legen Sie gegebenenfalls
eine rutschfeste Unterlage unter die Füße des Gerätes.
Hinweis:
In verschiedenen Ländern können abweichende Regelungen zu den zugewiesenen Rundfunkfrequenzbereichen bestehen.
Beachten Sie, dass Sie Informationen von evtl. empfangenen Funkdiensten
nicht verwerten, an Dritte weiterleiten oder zweckentfremdet missbräuchlich
verwenden dürfen.
Bestimmungsgemäßer Gebrauch
Das Gerät ist zum Wecken durch Signalton und zum Empfang von Radiosendern geeignet. Jede andere Verwendung oder Veränderung des Gerätes gilt
als nicht bestimmungsgemäß und birgt erhebliche Unfallgefahren.
Der Hersteller haftet nicht für Schäden, die durch nicht bestimmungsgemäßen
Gebrauch oder falsche Bedienung verursacht werden. Nicht für den gewerblichen Einsatz vorgesehen.
- 41 -
IB_KH2201_02_AR909_DE_5 09.11.2007 10:28 Uhr Seite 41
Page 42

Lieferumfang
Kontrollieren Sie unmittelbar nach dem Auspacken immer den Lieferumfang
auf Vollständigkeit und den einwandfreien Zustand des Gerätes.
1 Projektionsuhrenradio, 1 Bedienungsanleitung
Die zum Betrieb notwendigen Batterien und ein mögliches 3V-Netzteil
(Zubehör) sind nicht im Lieferumfang enthalten.
Bedienelemente
q
Projektionslinse
w
Teleskopantenne
e
Taste Snooze
r
Projektion, Displaybeleuchtung
t
Display
y
Frequenzskala
u
Taste Alarm
i
Taste Hour (Stunde)
o
Taste Time
a
Taste Min (Minute)
s
Lautsprecher
d
Projektionsfokus
f
Tuning-Regler
g
Lautstärkeregler VOLUME / BUZZ
h
Externer 3V Gleichstrom-Anschluss für 4,0 mm x 1,7 mm Hohlstecker
j
Batteriefach
k
Schalter Projektion Ein/Aus (ON/OFF)
l
Schalter Alarm Ein/Aus (ON/OFF)
;
Bandwahlschalter FM/AM
2)
Aufstellbügel (nur Modell KH 2202)
- 42 -
IB_KH2201_02_AR909_DE_5 09.11.2007 10:28 Uhr Seite 42
Page 43

Technische Daten
Nennspannung: 3 V
Nennstrom: 300 mA
Frequenzbereich:
FM (UKW) 87,5 - 108 MHz
AM (MW) 530 - 1600 kHz
Maße:
KH 2201: 14,2 cm x 13,1 cm x 3,8 cm
KH 2202: 17 cm x 8,8 cm x 4,2 cm
Gewicht:
KH 2201 und KH 2202: ca. 245 gr.
Betriebstemperatur: 5°C - 40°C bei <85% rel. Luftfeuchtigkeit
Batterien:
(nicht im Lieferumfang enthalten)
• Modell KH 2201: 1,5 V Typ Mignon/AA
• Modell KH 2202: 1,5 V Typ Micro/AAA
• 2 x 1,5 V für Radiobetrieb, Displaybeleuchtung und Projektion
• 1 x 1,5 V für die LCD-Uhr (das Fach ist beschrieben mit „CLOCK USE“)
Netzteil:
(nicht im Lieferumfang enthalten)
Nennspannung: DC 3 V (+/- 5%)
Nennstrom: min. 300 mA
Hohlstecker: 4,0 mm x 1,7 mm
Bei Verwendung eines 3 V-Netzteils muss die Batterie in dem Fach “CLOCK
USE” eingelegt sein. Anderenfalls funktioniert die Uhr nicht.
- 43 -
IB_KH2201_02_AR909_DE_5 09.11.2007 10:28 Uhr Seite 43
Page 44

Aufstellen
• Stellen Sie die Projektionsuhr auf einen ebenen Untergrund auf.
• Stellen Sie die Projektionsuhr so ein, dass die Projektionslinse
q
auf eine
leere Fläche zeigt.
Nur Modell KH 2202:
• Klappen Sie den Aufstellbügel
2)
heraus.
Bedienung
Externes Netzteil anschließen
Es ist möglich, dieses Gerät mit einem externen Netzteil zu betreiben. Bitte
nutzen Sie nur Netzteile mit diesen Spezifikationen:
Nennspannung: DC 3 V (+/- 5%)
Nennstrom: min. 300 mA
Hohlstecker: 4,0 mm x 1,7 mm
Achtung:
Achten Sie auf die richtige Polung - sowohl bei den Batterien, als auch bei
der externen Stromversorgung. Beachten Sie die Beschriftung am 3V Gleichstrom-Anschluss
h
. Das Gerät wird bei falscher Polung beschädigt.
- 44 -
IB_KH2201_02_AR909_DE_5 09.11.2007 10:28 Uhr Seite 44
Page 45

Radiobetrieb
1. Drehen Sie zum Einschalten den Lautstärkeregler VOLUME / BUZZ g,
bis ein »Klick« zu hören ist.
2. Stellen Sie nun mit dem Lautstärkeregler VOLUME / BUZZ
g
die ge-
wünschte Lautstärke ein.
3. Stellen Sie den Bandwahlschalter
;
auf den gewünschten Wellenbereich
(FM/AM) ein.
4. Stellen Sie mit dem Tuning-Regler
f
den gewünschten Sender ein. Die
Frequenzen können Sie an der Frequenzskala
y
ablesen.
5. Drehen Sie zum Ausschalten den Lautstärkeregler VOLUME / BUZZ
g
bis ein »Klick« hörbar ist (KH 2201: Lautstärkeregler nach oben drehen,
KH 2202: Lautstärkeregler nach hinten drehen).
Teleskopantenne ausrichten
Bei Modell KH 2201:
• Ziehen Sie die Teleskopantenne
w
komplett heraus.
Die Teleskopantenne
w
ist bei dem Modell KH 2201 nicht drehbar. Bei Dre-
hung der Teleskopantenne
w
wird der Antennenfuß beschädigt.
Bei Modell KH 2202:
• Lösen Sie die Teleskopantenne waus der Halterung und stellen Sie sie
auf.
• Ziehen Sie die Teleskopantenne
w
komplett heraus.
Um den Empfang von Radiosendern im FM-Frequenzbereich zu verbessern,
drehen Sie das Ende der Teleskopantenne wlangsam in verschiedene Richtungen. Sollten Sie einen guten Empfang für den eingestellten Radiosender
gefunden haben, belassen Sie die Teleskopantenne
w
in dieser Position. Für
den Empfang von AM-Radiosendern ist eine Empfangsantenne im Gerät fest
eingebaut. Verändern Sie zur Empfangsverbesserung die Position des Gerätes im Radiobetrieb.
- 45 -
IB_KH2201_02_AR909_DE_5 09.11.2007 10:28 Uhr Seite 45
Page 46

Uhrzeit einstellen
Während Sie die Taste TIME ogedrückt halten:
1. Drücken Sie mehrfach hintereinander, oder drücken und halten Sie die Ta-
ste HOUR
i
, um die Stunden einzustellen.
2. Lösen Sie die Taste HOUR
i
, sobald die gewünschte Stundenanzeige im
Display
t
dargestellt wird.
3. Drücken Sie mehrfach hintereinander, oder drücken und halten Sie die Ta-
ste MIN
a
, um die Minuten einzustellen.
4. Lösen Sie die Taste MIN
a
, sobald die gewünschte Minutenanzeige im
Display
t
dargestellt wird.
Die eingestellte Uhrzeit wird automatisch übernommen, sobald die Taste
TIME
o
gelöst wird.
Weckzeit einstellen
Wenn die Uhrzeit richtig eingestellt ist, wie zuvor beschrieben:
1. Radio ausschalten: Stellen Sie den Lautstärkeregler VOLUME / BUZZ
g
auf BUZZ (ein »Klick« ist hörbar).
Während Sie die Taste ALARM
u
gedrückt halten:
2. Drücken Sie mehrfach hintereinander, oder drücken und halten Sie die Ta-
ste HOUR
i
, um die Stunden einzustellen.
3. Lösen Sie die Taste HOUR
i
, sobald die gewünschte Stundenanzeige im
Display
t
dargestellt wird.
4. Drücken Sie mehrfach hintereinander, oder drücken und halten Sie die Ta-
ste MIN
a
, um die Minuten einzustellen.
5. Lösen Sie die Taste MIN
a
, sobald die gewünschte Minutenanzeige im
Display
t
dargestellt wird.
Die eingestellte Weckzeit wird automatisch übernommen, sobald die Taste
ALARM ugelöst wird.
6. Stellen Sie zum Aktivieren der Weckzeitfunktion den Schalter
l
ALARM
Ein/Aus auf „ON”.
- 46 -
IB_KH2201_02_AR909_DE_5 09.11.2007 10:28 Uhr Seite 46
Page 47

Snooze Funktion
Betätigen der Taste SNOOZE eunterbricht den Weckton für 8 Minuten.
Nach Ablauf der 8 Minuten wird der Weckton wiederholt. Stellen Sie den
Schalter
l
ALARM Ein/Aus auf „OFF“, um den Wecker ganz abzuschalten.
Projektion
Achtung! Die Strahlungsleistung der Projektion stellt bei ordnungsgemäßem
Gebrauch keinerlei Gefahr dar. Vermeiden Sie dennoch, direkt in den Lichtstrahl zu schauen und richten Sie ihn nicht auf andere Personen oder Tiere.
Zur korrekten Darstellung der Uhrzeit an Wand oder Decke muss das
schwenkbare Projektionselement nach vorne geschwenkt werden und der
Raum entsprechend abgedunkelt sein.
1. Stellen Sie den Schalter Projektion Ein/Aus
k
auf ON.
2. Richten Sie das Projektionselement wie gewünscht aus. Die Uhrzeit wird
an die gewünschte Stelle projiziert. Projektionsdistanz ca. 40cm - 3m.
3. Stellen Sie die Schärfe der Projektion mit dem Projektionsfokus
d
ein.
Hintergrundbeleuchtung für Display und Projektion
Einmaliges Betätigen der Taste Projektion/Displaybeleuchtung raktiviert für
ca. 10 Sekunden die Displaybeleuchtung und die Zeitprojektion.
Reinigung
• Halten Sie das Gerät und die Lüftungsschlitze stets sauber.
• Es dürfen keine Flüssigkeiten in das Innere des Gerätes gelangen.
• Verwenden Sie zum Reinigen des Gehäuses ein weiches Tuch.
• Verwenden Sie niemals Benzin, Lösungsmittel oder Reiniger, die Kunststoff
angreifen.
- 47 -
IB_KH2201_02_AR909_DE_5 09.11.2007 10:28 Uhr Seite 47
Page 48

CE-Konformität
Dieses Gerät der Unterhaltungselektronik entspricht hinsichtlich Übereinstimmung mit den grundlegenden Anforderungen und den relevanten
Vorschriften der EMV-Richtlinie 2004/108/EG und der Richtlinie für
Niederspannungsgeräte 2006/95/EG.
Entsorgung
Werfen Sie das Gerät keinesfalls in den normalen Hausmüll.
Dieses Produkt unterliegt der europäischen Richtlinie 2002/96/EG.
Entsorgen Sie das Gerät über einen zugelassenen Entsorgungsbetrieb oder
über Ihre kommunale Entsorgungseinrichtung.
Beachten Sie die aktuell geltenden Vorschriften. Setzen Sie sich im Zweifelsfall mit Ihrer Entsorgungseinrichtung in Verbindung.
Batterien entsorgen!
Batterien dürfen nicht im Hausmüll entsorgt werden. Jeder Verbraucher ist
gesetzlich verpflichtet, Batterien/Akkus bei einer Sammelstelle seiner Gemeinde / seines Stadtteils oder im Handel abzugeben.
Diese Verpflichtung dient dazu, dass Batterien einer umweltschonenden Entsorgung zugeführt werden können. Geben Sie Batterien/Akkus nur im entladenen Zustand zurück.
Führen Sie alle Verpackungsmaterialien einer umweltgerechten Entsorgung zu.
- 48 -
IB_KH2201_02_AR909_DE_5 09.11.2007 10:28 Uhr Seite 48
Page 49

Garantie und Service
Sie erhalten auf dieses Gerät 3 Jahre Garantie ab Kaufdatum. Das Gerät
wurde sorgfältig produziert und vor Anlieferung gewissenhaft geprüft. Bitte
bewahren Sie den Kassenbon als Nachweis für den Kauf auf. Bitte setzen Sie
sich im Garantiefall mit Ihrer Servicestelle telefonisch in Verbindung. Nur so
kann eine kostenlose Einsendung Ihrer Ware gewährleistet werden.
Die Garantieleistung gilt nur für Material- oder Fabrikationsfehler, nicht aber
für Verschleißteile oder für Beschädigungen an zerbrechlichen Teilen, z. B.
Schalter oder Akkus. Das Produkt ist lediglich für den privaten und nicht für
den gewerblichen Gebrauch bestimmt. Bei missbräuchlicher und unsachgemäßer Behandlung, Gewaltanwendung und bei Eingriffen, die nicht von
unserer autorisierten Service-Niederlassung vorgenommen wurden, erlischt
die Garantie. Ihre gesetzlichen Rechte werden durch diese Garantie nicht
eingeschränkt.
Schraven Service- und Dienstleistungs GmbH
Gewerbering 14
D-47623 Kevelaer
Tel.: +49 (0) 180 5 008107
(14 Ct/Min. aus dem dt. Festnetz)
Fax: +49 (0) 2832 3532
e-mail: support.de@kompernass.com
Kompernaß Service Österreich
Rittenschober KG
Gmundner Strasse 10
A-4816 Gschwandt
Tel.: +43 (0) 7612 6260516
Fax: +43 (0) 7612 626056
e-mail: support.at@kompernass.com
- 49 -
IB_KH2201_02_AR909_DE_5 09.11.2007 10:28 Uhr Seite 49
Page 50

Importeur
KOMPERNASS GMBH
BURGSTRASSE 21
D-44867 BOCHUM
www.kompernass.com
- 50 -
IB_KH2201_02_AR909_DE_5 09.11.2007 10:28 Uhr Seite 50
 Loading...