

Page 1

Userguide
www.e-beam.com
Page 2
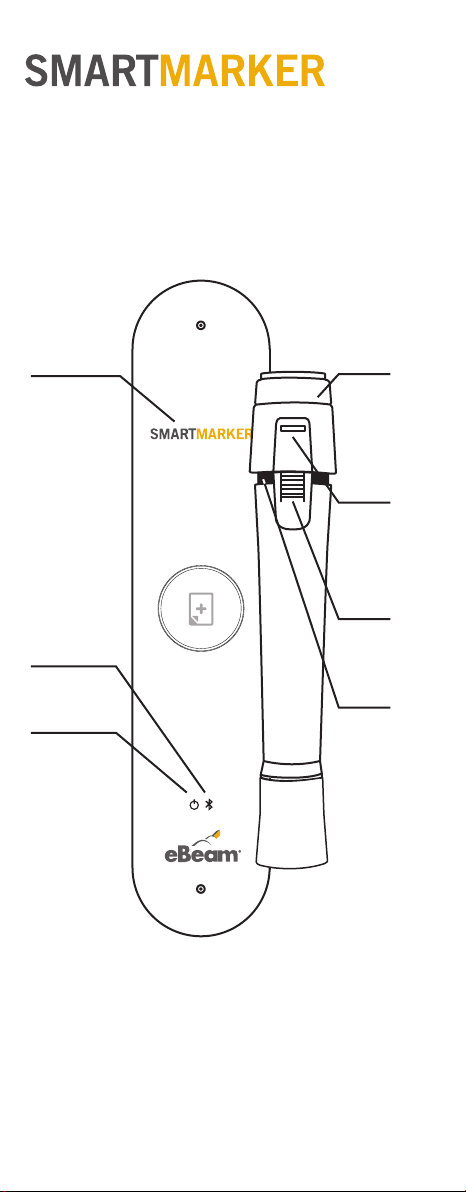
Components
Smartmarker
Sensor
Bluetooth
status
Power status
Digital
Marker
Sleeve
power
status
marker
release
Digital
Marker
color ring
1
Page 3
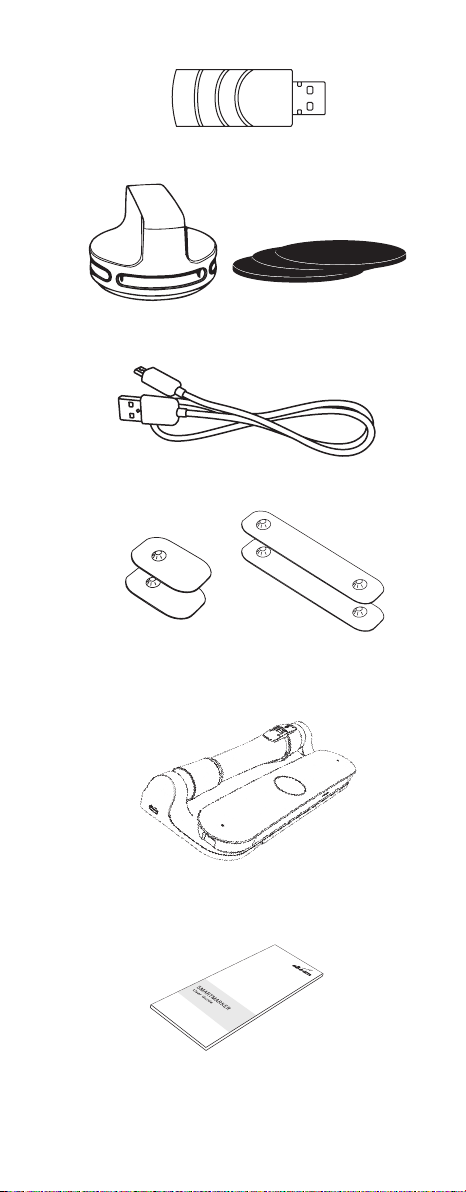
USB dongle
eraser
USB cable
magnetic plate
for sensor
single charger
eraser felt
magnetic plate
for eraser
w
w
w.e-b
w
eam
w
w.e-b
.
com
ea
m
.
co
A
m
Lu
i
d
i
a
te
c
h
n
o
l
o
g
y
manual
2
Page 4

Main Key Features
power on/off
new page or
duplicate page
memory mode
Bluetooth mode
3
Page 5

Download and Install
eBeam Note
eBeam Note platform available on
iOS the App Store
Phone
Android™ Google Play™
Tablet
Computer
Mac OS X® the Mac App Store
Windows e-beam.com
About the USB Dongle
The USB dongle is for Windows users only.
In order to connect to the eBeam
Smartmarker, plug the USB dongle in to your
Windows PC. Make sure you install eBeam
Note from www.e-beam.com
4
Page 6
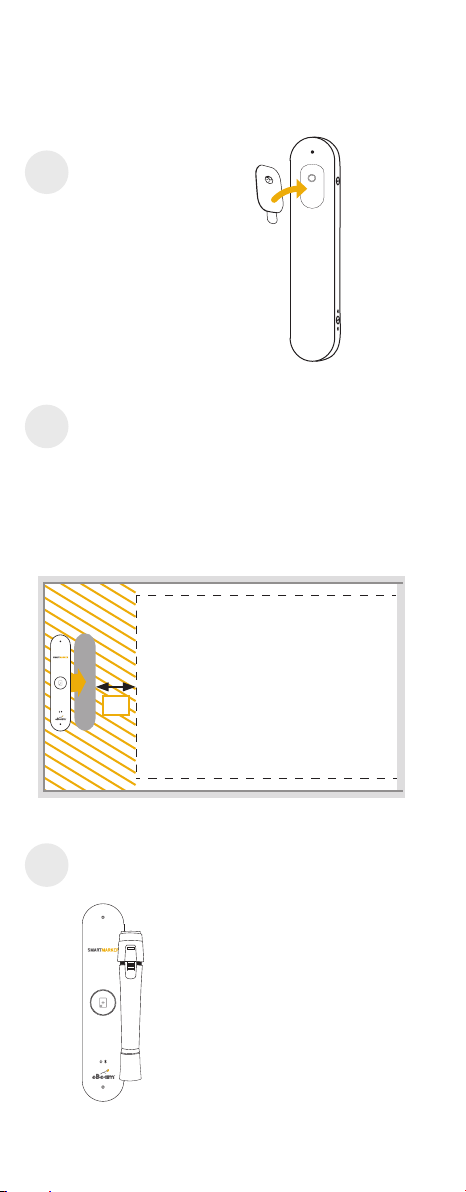
Installing the
eBeam Smartmarker
Attach the magnetic
1
mounting bracket
to the back of the
sensor by lining
up the bump on
the bracket with
the indent on the
back of the sensor.
Remove the protective backing
2
on the tape and place the sensor
firmly onto the surface. Press firmly
for best adhesion.
* When you attach it to the surface, make sure you
leave a 2in (5cm) margin between the capture area
and the side of the sensor.
2in
Complete the installation by making
3
sure your devices are charged.
capture area
Sensor
• 3 hours of charging
• 8 hours of
continuous usage
Digital Marker
• 3 hours of charging
• 15 hours of
continuous usage
5
Page 7

Download the app.
4
iPhone & iPad
iPhone & iPad
Android
Windows
www.e-beam.com/smgo
Power on the sensor.
5
power on/off
Windows users
should connect the
USB dongle to their
computer at this time.
6
Page 8

Start the eBeam Note application.
6
eBeam Note will search for your sensor.
7
Once the sensor is found, select the sensor
8
name on the list.
If the sensor is not found, check the scenarios listed
in the message box to help you find a solution.
1) Check if the sensor is powered on
2) Check if the sensor is on Bluetooth mode
3) Check if the sensor is already connected with other users
4) Check if the sensor and device are located within 5m
7
Page 9

The application will notify you when your
9
sensor is connected.
TIP: No matter where you are in the mobile application, when
you start writing, you will automatically be navigated to a new
page screen where everything you write is captured.
Main Menu Screen
Page Screen
Previews Screen
8
Page 10

Memory Mode
Memory mode lets you write and save notes to the
sensor without connecting a device.
Bluetooth mode
or
Memory mode
Press the Bluetooth button once on the bottom
left side of the sensor. When the LED light beside
memory mode is on, everything you write will be
saved to memory.
Sensor memory can save up to 20,000 pages.
TIP: Notes saved on the sensor can only be
downloaded by connecting the USB cable to your
PC (Windows/Mac).
For more details, navigate to the ‘help’ menu in the
eBeam Note desktop application.
9
Page 11

Downloading Memory Data
(Windows/Mac)
Download steps:
1
Connect the eBeam Smartmarker Sensor to
your PC using the provided USB cable.
2
Power the sensor on.
3
To start the download, in eBeam Note,
navigate to:
Menu --> Memory --> Download Memory
If the memory cannot be found, follow the
above steps.
If the memory does not work properly, navigate to the menu and select
Memory --> Memory reset
10
Page 12

Set Up Your Board Size
The default board size is 8ft x 5ft and set for
the sensor to be placed on the left side of the
whiteboard or capture area.
Leave a 2 inch space between the sensor and
your capture area. This 2 inche area is too close
to capture writing from the digital marker.
2in
capture area
To change the location of the sensor, navigate to
the menu and select Settings --> Board size.
11
Page 13

Board Size - Maximum Size
The default board size is set to the maximum
capture area, 8ft x 5ft.
On the diagram, choose the location of where
you installed your sensor.
5ft
8ft
capture area
If you choose the right sensor location, the board
size will automatically be adjusted to 8ft x 5ft with
the capture area on the left side of the sensor.
Using both sides of the sensor
If you would like to capture writing on both sides
of the sensor, select the Dual Sided button.
capture area capture area
12
Page 14

Inserting the Whiteboard Marker
into the Digital Marker Sleeve.
Press the side button with the ridges to open
1
the end of the digital marker.
2
Insert the marker and
close the end.
Compatible whiteboard markers:
Expo
bold color dry marker low odor
Sharpie
Sharpie
Whiteboard marker
For more information about Luidia brand whiteboard markers,
contact your seller sales.
13
Legamaster
e-boardmarker
Luidia
Whiteboard marker
e-boardmarker
Page 15

The Eraser
The eraser is powered using a single AA battery.
To replace the battery, slide the top cover open and
insert a new one.
When the LED light turns in red, it means the
battery power is low.
–
+
Sensor LED Meanings
Color Action Meaning
White
White
Red
Slowly
blinking
Blinking,
circling
clockwise
Fast blinking in
4 directions
Digital Marker
in use
Next page/
Duplicate
page
Out of range of
captured area
14
Page 16

Tips for Best Usage
For best results, the digital marker should be used at
close to a 90 degree angle from the board. More than
a 15 degree tilt may cause errant strokes.
15 degrees
Board
Please read the following carefully to avoid
technical difficulties.
Make sure that…
…there are no obstacles between the sensor
1
and the digital marker
…the sensor is not covered when you write.
2
…when you write, the marker tilt is no more
3
than 15 degrees.
…your hand is holding the digital marker away
4
from the tilt.
…your sensor is placed according to the board
5
setup diagram in the board size menu.
…the capturing area is 2 inches away from
6
the sensor
…there are no environmental issues (loud metal
7
clinking sound, too strong air conditioning or
heating, high humidity etc)
This product uses IR and ultra sound technology.
Therefore, external sounds may influence the signal.
This product may be affected in different temperature environments such as air conditioned or heated
locations.
The capture signal may be influenced by loud
sounds such as vacuum cleaners or metal clinking
sounds.
The capture signal may be influenced by other IR
or ultra sound products. Please disable these other
products before using eBeam Smartmarker.
15
Page 17

eBeam Note Key Features
Write anything, anywhere on the board. The
1
application automatically opens a new page
and captures everything you write.
Use the icon shown below to connect or
2
disconnect the Smartmarker sensor.
Press the icon to disconnect
Press the icon to connect
Converting handwriting to text
3
Convert full page
Convert selected
eBeam
16
Page 18

Create a Meeting to share notes in real-time.
4
To create a meeting, navigate to Meeting -->
Create meeting.
Mobile PC
After creating the meeting, invite as many people
as you would like.
For a dynamic and interactive meeting experience,
the meeting host can give participants write
permissions allowing them to write on the board.
17
Page 19

FCC Information to User
This equipment has been tested and found to comply with the limits
for a Class B digital device, pursuant to Part 15 of the FCC Rules.
These limits are designed to provide reasonable protection against
harmful interference in a residential installation. This equipment
generates, uses and can radiate radio frequency energy and, if not
installed and used in accordance with the instructions, may cause
harmful interference to radio communications. However, there is no
guarantee that interference will not occur in a particular installation.
If this equipment does cause harmful interference to radio or television reception, which can be determined by turning the equipment
off and on, the user is encouraged to try to correct the interference
by one of the following measures:
• Reorient or relocate the receiving antenna.
• Increase the separation between the equipment
and receiver.
• Connect the equipment into an outlet on a circuit
different from that to which the receiver
is connected.
• Consult the dealer or an experienced radio/TV
technician for help.
Caution
Modifications not expressly approved by the party responsible for
compliance could void the user’s authority to operate the equipment.
FCC Compliance Information: This device complies with Part 15 of
the FCC Rules. Operation is subject to the following two conditions:
(1) This device may not cause harmful interference, and (2) this
device must accept any interference received, including interference
that may cause undesired operation.
CAUTION: RISK OF EXPLOSION IF BATTERY IS REPLACED BY AN
INCORRECT TYPE. DISPOSE OF USED BATTERIES ACCORDING TO
THE INSTRUCTIONS.
Complies with
IDA Standards
DA103548
18
Page 20

www.e-beam.com
Designed in California by Luidia, Inc.
Manufactured in Korea by PNF Co., Ltd.
“Made for iPod,” “Made for iPhone,” and “Made for iPad” indicates an electronic
accessory has been designed to connect specifically to iPod, iPhone, or iPad,
respectively, and has been certified by the developer to meet Apple performance standards. Apple is not responsible for the operation of this device or its
compliance with safety and regulatory standards. Please note that the use of this
accessory with iPod, iPhone, or iPad may affect wireless performance.
© 2017 PNF Co., Ltd. All Rights Reserved. eBeam and the eBeam Logo are
registered trademarks of PNF Co., Ltd.
 Loading...