

Page 1

GRUPPI AUTOMATICI DI PRESSURIZZAZIONE 1GP
Manuale d’istruzione all’uso e alla manutenzione ................................................................................................................2
......................................................
ISTRUZIONI ORIGINALI
IT
1GP AUTOMATIC PRESSURE BOOSTER SETS
Operating and maintenance manual ................................................................................................................................... 10
GROUPES AUTOMATIQUES DE PRESSURISATION 1GP
Manuel d’utilisation et d’entretien ...................................................................................................................................... 18
AUTOMATISCHE DRUCKVERDICHTUNGSAGGREGATE 1GP
Benutzungs- und wartungshandbuch ................................................................................................................................. 26
GRUPOS AUTOMÁTICOS DE PRESURIZACIÓN 1GP
Manual de instrucciones de empleo y manutención.......................................................................................................... 34
................................
.............
TRANSLATION FROM ORIGINAL INSTRUCTIONS
...............
....
ÜBERSETZUNG DER ORIGINAL ANWEISUNGEN
TRADUCCIÓN DE LAS INSTRUCCIONES ORIGINALES
TRADUCTION DES INSTRUCTIONS D’ORIGINE
1GP
EN
FR
DE
ES
Stampato su carta reciclata - Nessun albero è stata abbattuto
- Marchio “Angelo Blu” ⁄ Printed on resycled paper - no trees have
been cutted down - mark “Blue Angel”
Page 2

MANUALE D’ISTRUZIONE ALL’USO E ALLA MANUTENZIONE
PARTE 3
DA CONSERVARE A CURA DELL’UTILIZZATORE
1. INTRODUZIONE
Il presente manuale istruzioni è costituito da 4 fascicoli: la PARTE 1, contenente informazioni generali a tutta la ns. produzione;
la PARTE 2 contenente informazioni speciche delle elettropom
IT
pe, il presente fascicolo, PARTE 3, contenente le informazioni
speciche del gruppo di pressurizzazione; il manuale del vaso
di espansione, ed il manuale del ussostato elettronico, se pre
visto.
Attenersi alle disposizioni indicate in tutti i fascicoli per il corretto funzionamento ed il rendimento ottimale del gruppo. In
particolare raccomandiamo di leggere e rispettare le “AVVER
TENZE GENERALI DI SICUREZZA” del capitolo 5 della parte
1 relativa alla pompa e il capitolo 3 del presente manuale.Per
ulteriori informazioni interpellare il rivenditore autorizzato o
centro di assistenza più vicino.
È VIETATA A QUALSIASI TITOLO LA RIPRODUZIONE, ANCHE
PARZIALE, DELLE ILLUSTRAZIONI E/O DEL TESTO.
Nella stesura del libretto istruzioni è stata utilizzata la se
guente simbologia:
ATTENZIONE
2. INDICE
1. INTRODUZIONE pag. 2
2. INDICE pag. 2
3. AVVERTENZE GENERALI DI SICUREZZA pag. 2
3.2. Protezioni e cautele signicative pag. 3
4. GARANZIA ED ASSISTENZA TECNICA pag. 3
5. DATI E DESCRIZIONE DEL GRUPPO pag. 3
5.1. Costruttore pag. 3
5.2. Dati gruppo pag. 3
5.3. Descrizione funzionale pag. 3
5.4. Condizioni d’uso previste pag. 3
5.5. Condizioni d’uso non previste pag. 4
5.6. Condizioni d’impiego pag. 4
5.7. Caratteristiche pressostati pag. 4
5.8.1. Caratteristiche modelli FSG-FYG pag. 4
5.8.2. Caratteristiche modelli XMP pag. 4
5.9. Caratteristiche ussostato elettronico pag. 4
6. CARATTERISTICHE TECNICHE COSTRUTTIVE pag. 4
7. DATI TECNICI pag. 4
8. INSTALLAZIONE, DISINSTALLAZZIONE E TRASPORTO pag. 4
8.1. Accorgimenti generali per l’installazione pag. 5
8.2. Installazione pag. 5
8.3. Disinstallazione pag. 5
8.4. Trasporto pag. 5
9. COLLEGAMENTO ELETTRICO pag. 5
10. AVVIAMENTO E UTILIZZAZIONE DEL GRUPPO pag. 5
10.1. Avvertenze generali pag. 5
10.2. Riempimento d’acqua del gruppo pag. 5
2
Rischio di arrecare danno alla pompa o
all’impianto
Rischio di arrecare danno alle persone
o alle cose
Rischio di natura elettrica
3.1. Misure di prevenzione a cura dell’utilizzatore pag. 2
10.3. Avviamento del gruppo pag. 5
10.4. Funzionamento pag. 6
10.5. Arresto totale del gruppo pag. 6
10.6. Avviamento del gruppo con ussostato pag. 6
11. MANUTENZIONE E RIPARAZIONE pag. 6
11.1. Veriche e controlli periodici pag. 6
11.2. Manutenzione pag. 6
11.3. Ricerca e guasti pag. 6
-
12. SMALTIMENTO pag. 7
13. SCHEMI E DISEGNI pag. 7
-
14. DICHIARAZIONE DI CONFORMITÀ pag. 42
3. AVVERTENZE GENERALI DI SICUREZZA
-
-
Sulle elettropompe e sui dispositivi elettrici e idraulici dei quali
sono equipaggiati i gruppi di pressurizzazione non sono presenti
“rischi residui”, (vedere avvertenze generali sui punti 5.1., 5.2.,
5.3. e punto 6 del manuale PARTE 1), ad esclusione del rischio
dovuto all’aria in pressione all’interno del vaso di espansione.
I valori limite delle pressioni di esercizio e di precarica, i valori
delle temperature di esercizio e di ambiente, indicati nell’eti
chetta del vaso di espansione non devono essere superati.
Si raccomanda di attenersi alle istruzioni contenute nel ma
nuale del vaso di espansione. I vasi installati dalla EBARA
PUMPS EUROPE S.P.A. sono esclusivamente omologati alla
Direttiva 97/23/CE. Le elettropompe sono escluse dalla pre
sente direttiva, gli accessori rimanenti interessati sono esenti
dal marchio CE, in quanto appartenenti alla categoria dell’ar
ticolo 3 paragrafo 3.
Sui gruppi automatici 1GP viene eseguita una prova di pres
sione idrostatica su lotto di produzione.
3.1. MISURE DI PREVENZIONE A CURA DELL’UTILIZZATORE
– LA MANCATA OSSERVAZIONE DI QUESTE AV-
VERTENZE E/O L’EVENTUALE MANOMISSIONE
DELL’IMPIANTO ESONERANO LA EBARA PUMPS
EUROPE S.P.A.. DA QUALSIASI RESPONSABILITA’
IN CASO DI INCIDENTI A PERSONE, DANNI ALLE
COSE O ALL’IMPIANTO STESSO.
–
Prima di mettere in funzione il gruppo, è indispensabile che l’utilizzatore sappia eseguire
e si attenga a tutte le operazioni descritte nel
presente manuale, nei manuali della singola
elettropompa (PARTE 1 e PARTE 2), nel ma
nuale istruzione del vaso di espansione, o nel
manuale del ussostato elettronico.
–
L’installazione, la manutenzione o la riparazione (idraulica ed elettrica) devono essere fatte
da personale specializzato e qualicato.
Gli utilizzatori devono osservare tassativamente
norme e regolamenti di enti distributori locali, e
inoltre, devono osservare scrupolosamente quanto
prescritto nel presente manuale.
– Durante l’installazione, la manutenzione, la ripa-
razione e/o la sostituzione di qualsiasi parte del
gruppo di pressurizzazione 1GP, il gruppo stesso
e l’intero impianto deve essere privo di energia
elettrica.
– Ogni utilizzatore deve osservare tassativamente
le norme di sicurezza e antinfortunistica in vigo
re nei rispettivi paesi. Ogni operazione di installazione, manutenzione o riparazione, effettuate
con impianto sotto tensione può provocare gravi
incidenti, anche mortali, alle persone.
-
-
-
-
-
-
-
Page 3

– Verificare, prima di avviare l’impianto, che tutti i
dispositivi e componenti elettrici, cavi compresi,
siano efficienti.
– Nell’avviare il gruppo evitare di essere a piedi
nudi o, peggio, nell’acqua e di avere mani ba
gnate.
– L’utilizzatore non deve eseguire di propria iniziati
va operazioni o interventi che non siano ammessi
in questo manuale.
3.2. PROTEZIONI E CAUTELE SIGNIFICATIVE
– La elettropompa e tutti i componenti dell’im-
pianto sono progettati in modo tale che tutte le
parti in movimento siano rese inoffensive tramite
l’uso di carter di protezione. La EBARA PUMPS
EUROPE s.p.a., declina ogni responsabilità nel
caso di danni provocati dalla manomissione di
questi dispositivi.
–
Tutti i conduttori o parti in tensione sono elettrica-
mente isolati rispetto alla massa, vi è comunque
una sicurezza supplementare costituita dal collegamento delle parti conduttrici accessibili ad un
conduttore di terra, per far in modo che queste
parti non possano diventare pericolose in caso di
guasto all’isolamento principale.
4. GARANZIA ED ASSISTENZA TECNICA
L’inosservanza delle indicazioni fornite in questo libretto istru
zioni e/o l’eventuale intervento sul gruppo non effettuato dai
nostri centri assistenza, invalideranno la garanzia e solleve
ranno il costruttore da qualsiasi responsabilità in caso di inci-
denti a persone o danni alle cose e/o al gruppo stesso.
Ricevuto il gruppo automatico, vericare che non abbia subito
rotture o ammaccature rilevanti, altrimenti farlo presente im
mediatamente a chi ha effettuato la consegna. Quindi, dopo
aver estratto il gruppo dall’imballo, vericare che non abbia
subito danni durante il trasporto; se ciò è accaduto, informare
entro 8 giorni dalla consegna il rivenditore. Controllare quindi
sulla targhetta del gruppo di pressione che le caratteristiche
riportate siano quelle da Voi richieste.
La garanzia decade nel caso in cui:
− siano stati effettuati smontaggi od interventi di ripa
razione da parte di operatori non autorizzati da Ebara
Pumps Europe S.p.A.;
− il mal funzionamento derivi dalla errata installazione e/
o collegamento elettrico, manomissioni, uso improprio
od oltre i limiti d’impiego indicati nel presente manua
le;
− siano stati pompati liquidi corrosivi, acque sabbiose, li
quidi chimicamente o sicamente aggressivi, senza preventiva verica e autorizzazione di Ebara Pumps Europe
S.p.A.;
− qualora i vizi lamentati siano stati denunciati oltre due
mesi dopo la scoperta;
− il danno lamentato dipenda dalla normale usura conse
guente all’uso.
Le seguenti parti, in quanto normalmente soggette ad usura,
godono di una garanzia limitata: cuscinetti, tenuta meccani
ca, anelli di tenuta, condensatori, membrana del serbatoio
autoclave, pressostato regolabile, manometro.
Nel caso un’eventuale guasto non rientri tra quelli previsti
nella tabella “RICERCA GUASTI” (par. 11.3.), contattare il ri
venditore autorizzato più vicino.
Per ogni controversia eventualmente originatasi nell’interpretazione e/o dall’esecuzione dei contratti, è competente esclusivamente il Foro di Trento.
5. DATI E DESCRIZIONE DEL GRUPPO
-
5.1. COSTRUTTORE
EBARA PUMPS EUROPE S.p.A.
5.2. DATI GRUPPO
Ciascun gruppo è identicato da una sigla che è esplicativa
del tipo di pompa e della propria congurazione come segue:
1GP 2CDM 70/10 --- 24 S
Per i dati della pompa vedere il manuale d’istruzione PARTE 2
della pompa installata.
I gruppi 1GP vengono forniti (g. 6) completi di:
– elettropompa monofase con cavo e spina
– manometro
-
– pressostato
– raccordo 5 o 3 vie in mandata
-
– vaso a membrana tipo verticale od orizzontale (versioni
“P” gruppo predisposto senza vaso se richiesto).
I gruppi 1GP con ussostato vengono forniti (g. 7) completi
di:
– elettropompa monofase con cavo e spina
-
– ussostato elettronico.
5.3. DESCRIZIONE FUNZIONALE
I gruppi 1GP sono impianti automatici di rifornimento idrico ad
1 pompa, equipaggiati o predisposti per il collegamento a ser
batoi autoclave a membrana. Il gruppo è comandato da un pressostato con valore di taratura di fabbrica come indicato nella tabella paragrafo 5.7. Il prelievo d’acqua dell’utenza, a pompa fer-
-
ma, provoca l’abbassamento della pressione e la conseguente
chiusura del contatto di inserzione pompa del pressostato che
determina la partenza della pompa. Il ripristino della pressione
sull’impianto provoca la chiusura del contatto di disinserzione
pompa del pressostato e la fermata della pompa.
Nei gruppi 1GP con ussostato l’avviamento e l’arresto della
pompa avviene tramite un controllore elettronico in esso con
-
tenuto. Alla domanda d’acqua della rete, il ussostato avvia
la pompa fornendo la portata utile a pressione costante no
alla cessazione della richiesta e al ripristino della pressione im
pianto alle condizioni normali. In caso di mancanza d’acqua c’è
l’arresto della pompa. I dati di taratura e le caratteristiche det
tagliate sono contenuti nel manuale istruzioni del ussostato.
-
5.4. CONDIZIONI D’USO PREVISTE
I gruppi di pressurizzazione 1GP Ebara, sono utilizzabili, nelle
-
versioni standard, per applicazioni civili, industriali ed agrico
le, in particolare per: sollevamento o movimentazione d’acqua
per uso domestico, raffreddamento, irrigazione, impianti di la
vaggio. L’acqua può essere: acqua pulita, potabile, piovana,
-
da falda, miscelata, e comunque priva di corpi solidi o bre in
sospensione ed esente da sostanze chimiche aggressive.
S = Serbatoio sulla mandata della pompa
H = Serbatoio che supporta la pompa
P = predisposta senza vaso
Capacità del serbatoio a membrana
PRESSCONTROL
PRESSCOMFORT
Sigla che identica la pompa
Sigla comune a tutti i gruppi ad una pompa
Versione con
ussostato
IT
-
-
-
-
-
-
3
Page 4

5.5. CONDIZIONI D’USO NON PREVISTE
Il gruppo non è utilizzabile per movimentare:
− acqua sporca o con corpi in sospensione;
− acqua con presenza di acidi o basi ed in genere liquidi
corrosivi;
− acqua con temperature superiori a quanto riportato nel
cap. 5.6.;
− acqua di mare;
IT
− liquidi inammabili ed in genere pericolosi;
− i gruppi GP non sono previsti per usi trasportabili e all’
aperto.
ATTENZIONE
NB: LA ELETTROPOMPA NON DEVE MAI FUN-
ZIONARE IN ASSENZA DEL LIQUIDO.
5.6. CONDIZIONI D’IMPIEGO
Per le condizioni d’impiego vedere il capitolo 4 della parte 2
“DATI TECNICI” della pompa. La massima temperatura del li
quido pompato è 40-55°C a seconda del tipo di pompa instal-
lata (vedere manuale istruzione singola pompa).
5.7. CARATTERISTICHE PRESSOSTATI
CAMPO DI
PRESSOSTATO
TIPO
FSG 2NE SP53 1,4 ÷ 4,6 1,0 – 1,2 1,2 – 2,3 1,4 – 2,8
FSG 9NE SP53 1,4 ÷ 4,6 1,0 – 1,2 1,2 – 2,3 1,4 – 2,8
FSG 9NE SP54 1,4 ÷ 4,6 1,0 – 1,2 1,2 – 2,3 2,5 – 3,7
FYG 22NE SP53 2,8 ÷ 7,0 1,2 – 2,3 1,6 – 2.7 5,4 – 7,0
XMP A06 1 ÷ 6 0.8 1.2 – 4.2 2.8 – 4.8
XMP A12 1.3 ÷ 12 1 1,7 – 8.4 5-8
ATTENZIONE
5.8.1. CARATTERISTICHE MODELLI FSG-FYG (FIG.1)
Apparecchio conforme alle norme europee EN 60730-1 ED
EN 60730-2-6.
Filettatura attacco pressione: G ¼ UNI ISO 228/1 (FSG 2NE/
FYG 22NE) - UNI ISO 7/1 R ¼ (FSG 9NE).
2 entrate passacavi Din Pg 13.5.
Grado di protezione: IP65 (IEC/EN 60529).
Pressioni:
• servizio continuo: (FSG 2NE-9NE) 4.6 bar max; pressio
ne di rottura: 20 bar min.
• servizio continuo: (FYG 22NE) 7.0 bar max; pressione di
rottura: 28 bar min.
Regolazione:
1. Inserzione: per aumentare il punto d’intervento al decrescere
della pressione avvitare il dado di taratura 1 (FIG. 1);
2. Disinserzione: per aumentare il punto d’intervento al-
l’aumentare della pressione avvitare il dado di regolazione del differenziale 2 (FIG.1).
4
REGOLAZIONE
ALL’AUMENTARE
DELLA
PRESSIONE bar
NB: A SECONDA DEL TIPO DI CAVO ELETTRICO
I PRESSOSTATI SONO DOTATI DI PRESSACAVO
PG13.5 PREDISPOSTO PER CAVO DA Ø 6-9MM
O PG 13.5 PREDISPOSTO PER CAVI DA Ø 9-
12.5MM.
CARATTERISTICHE ELETTRICHE
1 Phase~ 3 Phase~
1,5 kW – 230V 2,2 kW – 400V
DIFFERENZIALE
ALLA MIN.
TARATURA
bar
ALLA MAX.
TARATURA
bar
TARATURA
DI
FABBRICA
bar
5.8.2. CARATTERISTICHE MODELLI XMP (FIG. 2)
Apparecchio conforme alle norme europee IEC 947, EN
60947-4-1, UL 508, CSA C22-2 n°14.
-
Filettatura attacco pressione: G ¼ UNI ISO 228/1.
2 entrate passacavi Din Pg 13.5.
Grado di protezione: IP54 (IEC/EN 60529).
Pressioni:
•
servizio continuo: (XMP A06) 6 bar max; rottura: 30 bar min.
• servizio continuo: (XMP A12) 12 bar max; rottura: 30
bar min.
CARATTERISTICHE ELETTRICHE
1 Phase~ 3 Phase~
1,5 kW – 230V 3,0 kW – 400V
Regolazione:
1 Inserzione: per aumentare il punto d’intervento al decre-
-
-
scere della pressione avvitare il dado di taratura A (FIG.2);
2 Disinserzione: per aumentare il punto d’intervento al-
l’aumentare della pressione avvitare il dado di regolazione del differenziale B (FIG.2).
5.9 CARATTERISTICHE FLUSSOSTATO ELETTRONICO (FIG.7-9)
5.9.1 Caratteristiche Presscomfort:
- Filettatura attacchi maschio G1” UNI ISO 228/1.
- Grado di protezione IP 65.
- Pressione massima d’esercizio 10 bar.
-
Campi di regolazione della pressione di avviamento: 1.5-2.5 bar.
Per la regolazione leggere la pressione che indica il manometro all’avviamento e operare sulla vite nel senso desiderato.
5.9.2 Caratteristiche Presscontrol:
- Filettatura attacchi maschio G1” UNI ISO 228/1.
- Grado di protezione IP 65.
- Pressione massima d’esercizio 10 bar.
- Tarature sse 1.5 bar standard (oppure 1.2 o 2.2 bar su
richiesta).
Per ulteriori caratteristiche vedere apposito manuale del re
lativo ussostato.
6. CARATTERISTICHE TECNICHE COSTRUTTIVE
Il gruppo di pressione 1GP è stato progettato e costruito ri
spettando le seguenti norme:
− Vedere punto 6 del manuale PARTE 1;
− RISCHI DI NATURA MECCANICA DIRETTIVA MACCHINE
2006/42/CE;
− RISCHI DI NATURA ELETTRICA DIRETTIVA MACCHINE
2006/42/CE;
− DIRETTIVA BASSA TENSIONE 2006/95/EC;
− DIRETTIVA COMPATIBILITA’ ELETTROMAGNETICA
2004/108/EC;
− RISCHIO DI PRESSIONE DIRETTIVA 97/23/CE, vedere
istruzioni d’uso vaso espansione.
7. DATI TECNICI
Per i dati tecnici delle pompe vedere manuali PARTE 1 e PAR
TE 2 e targhetta dati sulla pompa.
Per i dati tecnici del vaso di espansione vedere paragrafo 2
delle relative istruzioni d’uso.
Per i dati tecnici del ussostato vedere punto 5.9. e le relative
istruzioni d’uso.
8. INSTALLAZIONE, DISINSTALLAZIONE E TRASPORTO
ATTENZIONE
L’INSTALLAZIONE DEVE ESSERE EFFETTUATA
DA UN TECNICO QUALIFICATO.
-
-
-
Page 5

8.1. ACCORGIMENTI GENERALI PER L’INSTALLAZIONE
Dopo il disimballo movimentare il gruppo manualmente con
cura. Se il peso supera 30 kg (vedi punto 8.4.), è consigliabile
sollevare il gruppo con mezzi meccanici:
a) Utilizzare tubazioni metalliche o in materiale plastico con
un certo grado di rigidezza, per evitare che possano cede
re sotto la depressione che si crea in aspirazione;
b) Supportare ed allineare le tubazioni in modo che non crei
no sollecitazioni sul gruppo;
c) Evitare, se si utilizzano tubi essibili di aspirazione e di
mandata, di piegarli al ne di evitare strozzature;
d) Sigillare le eventuali connessioni delle condutture: inltra
zioni d’aria nel tubo di aspirazione inuiscono negativa-
mente sul funzionamento della pompa;
e) Sul tubo di mandata, all’ uscita dal raccordo a 3/5 vie è
consigliabile montare una saracinesca;
f) Fissare le tubazioni alla vasca, o comunque a parti sse,
in modo che non siano sopportate dal gruppo;
g) Evitare di impiegare nell’impianto troppe curve (colli
d’oca) e valvole;
h) Quando il gruppo è installato sopra battente, il tubo di
aspirazione deve essere dotato di una valvola di fondo e
ltro per impedire l’entrata di corpi estranei e la sua estre
mità dovrebbe essere immersa ad una profondità di almeno due volte il diametro del tubo; inoltre dovrebbe avere
una distanza di una volta e mezza il diametro del tubo dal
fondo della vasca;
Per aspirazioni superiori ai 4 metri utilizzare, per un miglior
rendimento, un tubo di diametro maggiorato (consigliato ¼ di
pollice superiore in aspirazione).
8.2 INSTALLAZIONE (VED. SCHEMI TIPICI IN FIG. 8-9)
a) Posizionare il gruppo su una supercie piana il più vicino
possibile alla fonte d’acqua lasciandovi intorno spazio li
bero sufciente per consentire le operazioni di uso e ma-
nutenzione in condizioni di sicurezza. In ogni caso lasciare
uno spazio libero di almeno 100 mm davanti alla ventola
di raffreddamento del motore;
b) Utilizzare tubazioni del diametro appropriato (vedi PARTE
2 par. 4) dotate di manicotti lettati, che andranno avvitati
al raccordo a 3/5 vie;
c) Sostegni, ancoraggi, tubazioni e altri componenti d’impian-
to, devono essere indipendenti dal gruppo, in modo tale da
non provocare ulteriori carichi o sollecitazioni sullo stesso.
8.3. DISINSTALLAZIONE
Per movimentare o disinstallare il gruppo è necessario:
a) interrompere l’alimentazione elettrica;
b) scaricare la pressione impianto e la pressione di carica
del vaso di espansione;
c) staccare i tubi di mandata e aspirazione (ove presente) se
troppo lunghi o ingombranti;
d) se presenti svitare le viti che bloccano il gruppo sulla su
percie d’appoggio;
e) riavvolgere il cavo d’alimentazione e ssarlo al gruppo in
modo che non possa subire danni durante il trasporto;
f) sollevare il gruppo con mezzi idonei in funzione del peso e
dimensioni dello stesso (ved. punto 8.4.).
8.4. TRASPORTO
Il gruppo è imballato in una scatola di cartone o, se peso e
dimensioni lo richiedono, ssato su di un pallet in legno.
Fino a 25 o 30 kg trasporto a mano, sopra utilizzare solleva
tore meccanico.
-
-
9. COLLEGAMENTO ELETTRICO
-
ATTENZIONE
NB: IL COLLEGAMENTO ELETTRICO DEVE ESSERE FATTO DA UN TECNICO QUALIFICATO.
– Il collegamento si esegue semplicemente inse-
rendo la spina in una presa di rete collocata in un
apposito quadretto contenente un interruttore
magneto-termico ed un interruttore differenziale
ad alta sensibilità (0.03 A).
– La rete deve avere un efficiente impianto di mes
sa a terra secondo le norme elettriche esistenti
nel Paese: questa responsabilità è a carico del
-
10. AVVIAMENTO E UTILIZZAZIONE DEL GRUPPO
NON FARE MAI FUNZIONARE L’ELETTROPOMPA IN ASSEN
-
ZA DI ACQUA: LA MANCANZA D’ACQUA CAUSA SERI DANNI
AI COMPONENTI INTERNI.
10.1 AVVERTENZE GENERALI
Sono valide le avvertenze riportate al par. 9.1 della parte 1
relative alla pompa.
10.2. RIEMPIMENTO D’ACQUA DEL GRUPPO
ATTENZIONE
-
10.3. AVVIAMENTO DEL GRUPPO
Il pressostato dei gruppi 1GP è tarato, in base al modello, se-
l’installatore.
– Il quadretto con la presa dovrà essere collocato
in un ambiente interno lontano da spruzzi, get
ti d’acqua o pioggia e in modo che la spina sia
accessibile.
– Durante l’allacciamento evitare assolutamente
di bagnare o inumidire la morsettiera, il motore
o il pressostato.
OPERAZIONE DA EFFETTUARE CON IL GRUPPO
COMPLETAMENTE PRIVO DI ENERGIA ELETTRICA.
• Gruppo con battente positivo (vasca di pescaggio con livello superiore alla bocca di
asp. della pompa).
Aprire le valvole di intercettazione in aspirazio
ne del gruppo, e chiudere quelle in mandata,
togliere il tappo del foro superiore delle pompe
e attendere fino alla fuoriuscita d’acqua. Nel
caso non ci fosse trafilamento (es. pescaggio
orizzontale) dalla valvola di ritegno riempire
fino al trabocco dal foro superiore delle pom
pe, quindi richiudere con il relativo tappo.
• Gruppo con battente negativo.(vasca di pe
scaggio con livello inferiore alla bocca di
asp. della pompa).
Aprire le valvole di intercettazione in aspirazio
ne del gruppo, togliere il tappo del foro supe-
riore delle pompe e riempire fino al trabocco.
IT
-
-
-
-
-
-
-
-
5
Page 6

condo i valori indicati nella tabella del paragrafo 5.7. Tali valori
possono essere aggiustati alle esigenze dell’utenza entro certi
limiti come specicato in seguito. Per vericare la taratura avviare la pompa (interruttore su “on”/spina inserita) e chiudere
lentamente la valvola d’intercettazione in mandata. La pres
sione aumenterà rapidamente, come indicato dal manometro,
e la pompa si fermerà, per intervento dei contatti del pressostato al valore di taratura. NB: vericare il valore di precarica
IT
di fabbrica del vaso, indicata sulla targhetta, che comunque
dovrà essere regolato ad una pressione di 0.3÷0.5 bar infe
riore alla pressione di avvio della pompa Se la pressione non
aumenta staccare la pompa (interruttore su “off”/ disinseri
re la spina elettrica) e vericare il riempimento poi riavviare.
Alla fermata della pompa, aprire la valvola d’intercettazione in
mandata e vericare che la pompa riparta per intervento del
pressostato ad una pressione circa uguale a quella minima di
taratura. La pressione di fermata della pompa (pressione di
utilizzo impianto) può essere aumentata o diminuita avvitando
o svitando il dado di taratura 1 (g. 1) mentre quella di avvio
può essere variata avvitando o svitando il dado 2 (g. 1) (dif
ferenziale). Nel caso in cui si volesse aumentare la pressione
di fermata della pompa (pressione impianto) vericare che il
valore desiderato non superi la pressione massima fornita dal
la pompa altrimenti il gruppo non potrà mai fermarsi. (Come
specicato anche nella tabella “Anomalie ed interventi”). Ri
cordarsi che ogni qualvolta si varia la taratura del pressostato
si dovrà adeguare anche la precarica del vaso a membrana.
10.4. FUNZIONAMENTO
Dopo aver vericato l’avviamento e la fermata della pompa
alle pressioni impostate il gruppo è pronto all’uso.
Il funzionamento è automatico.
Controllare che rumore, vibrazioni, pressione e tensione elet
trica siano a livello normale.
10.5. ARRESTO TOTALE DEL GRUPPO
Per fermare totalmente il gruppo riportare l’interruttore di co
mando su off e, per sicurezza, staccare la spina dalla presa.
10.6. AVVIAMENTO DEL GRUPPO CON FLUSSOSTATO
Vericare il corretto adescamento della pompa, quindi aprire
parzialmente un rubinetto del circuito utilizzatore.
ANOMALIA PROBABILE CAUSA INTERVENTI
- Manca corrente di rete
- Spina non inserita bene - Inserire bene la spina
Mancato avvio
dell’elettropompa
Il motore gira ma la pom
pa non manda acqua
La pompa funziona con
portata ridotta rispetto
alla nomale
- Salvavita scattato
- Intervento della protezione termica
- Motore o condensatore difettosi - Contattare il rivenditore più vicino
- Pressione di inserzione pressostato troppo bassa - Ritarare il pressostato
- Filtro in aspirazione ostruito - Pulire il ltro
-
- Mancanza di acqua nella pompa - Riempire la pompa (vedi cap. 10.2.)
- Mancanza d’acqua nel pozzo o nella vasca
- Livello acqua troppo basso - Abbassare la pompa
- Difcoltà d’aspirazione
Collegare il ussostato alla rete elettrica e vericare la pre-
senza di tensione.
La pompa si avvia automaticamente con il led presenza ten
sione e/o led pompa in funzione accesi.
-
Ad utilizzo nito e ripristino pressione impianto il ussostato
ferma automaticamente le pompe.
Per la taratura e maggiori dettagli vedere il relativo libretto
istruzione.
-
11. MANUTENZIONE E RIPARAZIONE
-
ATTENZIONE
11.1. VERIFICHE E CONTROLLI PERIODICI
Si consiglia di controllare periodicamente il regolare funzio
namento, ed in particolare prestare attenzione all’eventuale
insorgere di rumorosità e vibrazioni anomale e, per le pompe
-
di supercie, ad eventuali perdite della tenuta meccanica.
I gruppi di pressurizzazione 1GP richiedono solo poche veri
che periodiche che sono:
- verica della precarica del serbatoio a membrana (0.3-
-
Eventuali inconvenienti possono essere affrontati consultando la tabella a seguire. Consultare anche il manuale istruzioni
della pompa.
-
11.2. MANUTENZIONE
Per le operazioni principali e più ricorrenti di manutenzione
vedere manuale parte 2 pompa, manuale vaso d’ espansio
ne, manuale ussostato se in dotazione.
-
Per parti di ricambio vedere posizioni su g. 6-7.
11.3. RICERCA GUASTI GRUPPO
Consultare anche i manuali istruzione della pompa, del vaso
a membrana, e del ussostato se installati.
Qualsiasi intervento di manutenzione e riparazione deve essere sempre effettuato con
alimentazione elettrica disinserita. Questi in
terventi vanno eseguiti solamente da personale
qualicato: l’inosservanza di tale regola compor
ta il decadimento della garanzia.
0.5 inferiore alla pressione di avvio del pressostato);
verica della pressione di inserzione/disinserzione pompa.
- Vericare le altre utenze a valle dello stesso contatore o
il contatore stesso
- Riarmare. Se scatta di nuovo rivolgersi ad un elettricista
qualicato per identicare il punto di dispersione e ripri
stinare l’isolamento
- Si riarma da solo dopo pochi minuti. Se riscatta contatta
re il rivenditore più vicino
- Allungare il tubo di aspirazione o attendere
il ripristino del livello
- Pulire la valvola di fondo e il tubo d’aspirazione
- Tubo d’aspirazione di diametro maggiore
- Sostituire eventuali gomiti con curve larghe
- Calo della tensione di alimentazione al di sotto del valore
minimo accettabile (Ved. libretto pompa)
-
-
-
-
-
-
-
-
6
Page 7

ANOMALIA PROBABILE CAUSA INTERVENTI
- Precarica d’aria nell’autoclave insufciente
Avviamenti troppo frequenti
La pompa non si ferma Pressostato fuori campo di taratura
La pompa vibra o fa eccessivo
rumore durante il funzionamento
- Differenziale pressostato troppo basso - Ritarare aumentando il differenziale
- Perdite d’acqua della valvola di fondo o delle
tubazioni
- Cavitazione per eccessiva portata
- Cavitazione per difcoltà di aspirazione
- Corpi estranei tra parti sse e rotanti (ventola) - Rimuovere i corpi estranei
- Cuscinetti usurati o danneggiati - Interpellare il rivenditore più vicino
- Ripristinare la precarica o sostituire la membra
na se rotta
- Eliminare le perdite
Ritarare diminuendo il differenziale (vedi cap. 5.7.)
- Chiudere un po’ la valvola d’intercettazione in
mandata
- Intervenire come quando la pompa fornisce una
portata ridotta
-
IT
12. SMALTIMENTO
Nello smaltimento del gruppo 1GP attenersi rigorosamente
alle disposizioni in vigore nel proprio paese, accertandosi
di non lasciare all’interno della pompa residui del uido
trattato.
13. SCHEMI E DISEGNI
Massima coppia di serraggio del dado coperchio 6 Kg x cm
FIG. 1 Pressostato FSG-NE / FYG-NE FIG. 2 Pressostato XMP
2
FIG. 3 Chisura FIG. 4 Apertura FIG. 5 Collegamento pompa con pressostato
I vasi a membrana vanno scaricati dalla pressione interna di
precarica.
La maggior parte delle nostre pompe non contengono mate
riali particolarmente inquinanti. Casi specici vengono indicati nell’eventuale capitolo “DEMOLIZIONE” nella PARTE 2.
B
-
7
Page 8

FIG. 6 Gruppo 1 GP standard
IT
Legenda
1. POMPA
2. RACCORDO 5 VIE
2/A. RACCORDO 3 VIE
3. PRESSOSTATO
4. MANOMETRO
5. PRESSACAVO
FIG. 7 Gruppo 1GP con ussostato
Posizione manometro
e pressostato su gruppi
1GP pompe serie “AGA”
6. SERBATOIO
7. TUBO FLESSIBILE
8. GUARNIZIONE
9. CAVO DI COLLEGAMENTO ELETTRICO
10. CAVO MOTORE PRESSOSTATO
Legenda
1. POMPA
9. CAVO CON SPINA
10. CAVO COLLEGAMENTO MOTORE-FLUSSOSTATO
11. FLUSSOSTATO
8
Page 9

FIG. 8 Schema tipico di installazione gruppo 1GP standard
FIG. 9 Schema tipico di installazione 1GP con ussostato elettronico
Quadro solo per versione trifase
IT
Legenda
1. FILTRO
2. VALVOLA A SFERA MF
3. GIUNTO 3 PZ.
4. VALVOLA DI NON RITORNO
5. VALVOLA DI FONDO
Ha ALTEZZA SOPRABATTENTE
Hb ALTEZZA SOTTOBATTENTE
Legenda
1. FILTRO
2. VALVOLA A SFERA MF
3. VALVOLA DI NON RITORNO
4. BOCCHETTONE 3 PZ.
5. GIUNTO ANTIVIBRANTE O
TUBO FLESSIBILE
6. VALVOLA DI FONDO
Ha ALTEZZA SOPRABATTENTE
Hb ALTEZZA SOTTOBATTENTE
9
Page 10

OPERATING AND MAINTENANCE MANUAL PART 3
THE USER SHOULD KEEP THIS DOCUMENT
1. INTRODUCTION
This instruction manual is split into 4 booklets: PART 1, containing general information regarding our whole product range;
PART 2, containing information specic to the motor-driven
pumps; this booklet, PART 3, containing information specic to
the pressure booster set; the expansion tank manual; and the
electronic ow switch manual, where applicable.
Comply with the instructions given in all booklets to get the most
EN
out of your set and assure its proper operation. Most importantly,
we advise you to read and comply with the “GENERAL SAFETY
WARNINGS” given in chapter 5 in part 1 relating to the pump and
chapter 3 of this manual. For further information, get in touch
with your nearest authorized dealer or assistance centre.
NO PART OF THESE ILLUSTRATIONS AND/OR TEXT MAY BE
REPRODUCED FOR ANY REASON.
The following symbols have been used in the compilation of
this instruction booklet:
WARNING
2. CONTENTS
1. INTRODUCTION page 10
2. CONTENTS page 10
3. GENERAL SAFETY WARNINGS page 10
3.1. Prevention measures to be taken by user page 10
3.2. Guards and signicant precautions page 11
4. WARRANTY AND TECHNICAL ASSISTANCE page 11
5. BOOSTER SET DATA AND DESCRIPTION page 11
5.1. Manufacturer page 11
5.2. Booster set data page 11
5.3. Description of operation page 11
5.4. Operating conditions for which
equipment is designed page 11
5.5. Operating conditions for which
equipment is not designed page 12
5.6. Operating conditions page 12
5.7. Pressure switch specications page 12
5.8.1. Specications of FSG-FYG models page 12
5.8.2. Specications of XMP models page 12
5.9. Specications of electronic ow switch page 12
6. TECHNICAL DESIGN FEATURES page 12
7. TECHNICAL SPECIFICATIONS page 12
8. INSTALLATION, REMOVAL AND TRANSPORT page 12
8.1. General installation practices page 13
8.2. Installation page 13
8.3. Removal page 13
8.4. Transport page 13
9. WIRING page 13
10. STARTING AND USING THE SET page 13
10.1. General instructions page 13
10.2. Filling the set with water page 13
10.3. Starting the set page 13
10
Risk of damaging the pump or system
Risk of causing injury or damaging property
Electrical hazard
10.4. Operation page 14
10.5. Booster set shutdown page 14
10.6. Starting the set with ow switch page 14
11. MAINTENANCE AND REPAIR page 14
11.1. Routine inspections and checks page 14
11.2. Maintenance page 14
11.3. Troubleshooting page 14
12. DISPOSAL page 15
13. DIAGRAMS AND DRAWINGS page 15
14. DECLARATION OF CONFORMITY page 42
3. GENERAL SAFETY WARNINGS
– IF YOU FAIL TO COMPLY WITH THESE WARN-
INGS AND/OR TAMPER WITH THE SYSTEM,
EBARA PUMPS EUROPE S.P.A. SHALL BE RE
LIEVED OF ANY LIABILITY IN THE EVENT OF
INJURY OR DAMAGE TO PROPERTY OR THE
ACTUAL SYSTEM.
– Before starting the set, you must be familiar
with the operations described in this manual,
in the manuals relating to the individual mo
tor-driven pump (PART 1 and PART 2), in the
expansion tank instruction manual, or in the
electronic ow switch manual, and perform
operations as instructed in each.
– Installation, maintenance or repair (plumbing
and electrical) must be carried out by special
ized, qualied personnel.
There are no “residual risks” on motor-driven pumps or on
electric and hydraulic devices tted on the pressure booster
sets (see general warnings in points 5.1, 5.2, 5.3 and point 6
of the manual called PART 1), except for the risk simply attrib
utable to the air under pressure in the expansion tank.
Values must be kept within the operating and precharge pres
sure ranges, and operating and ambient temperature ranges,
as indicated on the expansion tank’s label.
You are strongly advised to comply with the instructions
contained in the expansion tank manual. Tanks installed by
EBARA PUMPS EUROPE S.P.A. are only approved to Directive
97/23/EC. The motor-driven pumps are not contemplated in
this directive. The rest of the accessories concerned do not
feature EC marking as they belong to the category specied
in article 3, section 3.
The 1GP automatic sets are subjected to hydrostatic pressure
testing on a production lot basis.
3.1. PREVENTION MEASURES TO BE TAKEN BY USER
Users must abide by the rules and regulations
laid down by local bodies the products are dis
tributed through and, in addition, must follow
to the letter the instructions set out herein.
– While installing, maintaining, repairing and/
or replacing any part of the 1GP pressure
booster set, the power supply to the set itself
and to the whole system must be cut off.
– You must abide by the safety and accident
prevention laws in force in your country
without fail. Any installation, maintenance
or repair work carried out with the system
powered can result in serious accidents, and
possibly even death.
-
-
-
-
-
-
Page 11

– Before starting the system, make sure all
electrical devices and parts, including ca
bles, are in proper working order.
– Do not start the set in your bare feet, or
worse yet, while standing in water or when
your hands are wet.
– Do not undertake any operation or work on
your own initiative unless allowed by this
manual.
3.2. GUARDS AND SIGNIFICANT PRECAUTIONS
– The motor-driven pump and all components
of the system have been designed so that all
moving parts are rendered harmless by the
use of safety guards. EBARA PUMPS EUROPE
s.p.a. declines all responsibility in the event of
damage or injury caused as a result of these
devices being tampered with.
– All live wires or parts are electrically isolated
from the earth. However, there is an addition
al safety feature, which consists in all accessible conducting parts being connected to an
earth wire so that these parts cannot become
hazardous if the main isolating system fails.
4. WARRANTY AND TECHNICAL ASSISTANCE
Failure to comply with the instructions given herein and/or
any work on the set not performed by our assistance centres
will void the warranty and relieve the manufacturer of any li
ability in the event of accidents involving people or damage to
property and/or to the set itself.
When you receive the automatic pressure booster set, make
sure no part of it has been broken or is badly dented. If you
nd any such damage, point it out to the person making the
delivery immediately. Then, once you have removed the set
from its packaging, make sure it has not been damaged dur
ing transit. If it has, advise the dealer thereof within 8 days of
delivery. Next, check that the specications indicated on the
booster set’s nameplate are the ones you ordered.
The warranty becomes void in the event:
− parts have been disassembled or repair work performed
by any operator not authorized by Ebara Pumps Europe
S.p.A.;
− malfunction is the result of incorrect installation and/or
wiring, tampering, improper use or use outside the oper
ating range indicated herein;
− the equipment in question has been used to pump cor
rosive liquids, sandy water, chemically or physically aggressive liquids without Ebara Pumps Europe S.p.A.’s
prior examination and permission;
− defects claimed are reported more than two months af
ter they were discovered;
− damage claimed is a result of normal wear and tear.
The following parts are subject to normal wear and tear and,
as a result, are covered by a limited warranty: bearings, me
chanical seal, O-rings, capacitors, pressure vessel diaphragm,
adjustable pressure switch, pressure gauge.
If you encounter a fault that is not contemplated in the
“TROUBLESHOOTING” chart (sect. 11.3). contact the nearest
authorized dealer.
For the settlement of any dispute that might arise from the in
terpretation and/or performance of the agreements, the sole
court of competent jurisdiction shall be the Court of Trento.
-
5. BOOSTER SET DATA AND DESCRIPTION
5.1. MANUFACTURER
EBARA PUMPS EUROPE S.p.A.
5.2. BOOSTER SET DATA
Each set is identied by a code, which reveals what type of
pump it has and how it is congured, as follows:
1GP 2CDM 70/10 --- 24 S
-
For the pump’s data, refer to PART 2, i.e. the user manual for
the pump installed.
1GP sets come (g. 6) complete with:
– single-phase motor-driven pump with cable and plug
– pressure gauge
– pressure switch
– 5- or 3-way tting on delivery
– vertical- or horizontal-type diaphragm tank (“P” versions
-
-
-
-
-
-
-
- set with no tank but supplied with provision for one, if
so requested).
1GP sets with ow switch come (g. 7) complete with:
– single-phase motor-driven pump with cable and plug
– electronic ow switch
5.3. DESCRIPTION OF OPERATION
1GP sets are automatic water supply systems with 1 pump,
tted with or supplied ready for connection to diaphragm
pressure vessels. The set is controlled by a pressure switch
with a factory setting as indicated in the table in section 5.7.
If water is drawn from the system, with the pump stopped,
pressure drops and the pressure switch pump start contact
consequently closes, causing the pump to start. When pres
sure is restored in the system, the pressure switch pump stop
contact closes and the pump stops.
In 1GP sets with ow switch, the pump is star ted and stopped
by means of an electronic controller built into the ow switch.
The ow switch reacts to a water-use demand on the system
by starting the pump, which delivers the required ow at con
stant pressure until the demand ceases and system pressure
is restored to normal conditions. If the pump runs out of wa
ter, it stops automatically. The settings and detailed specications are contained in the ow switch’s user manual.
5.4. OPERATING CONDITIONS FOR WHICH EQUIPMENT IS
DESIGNED
The 1GP Ebara pressure booster sets, in standard versions,
can be used for residential, commercial, industrial and ag
ricultural applications, namely for: domestic water lifting or
handling, cooling, irrigation, washing systems. Water can be:
clean water, drinking water, rainwater, well water, mixed wa
ter, provided it does not contain solids or bres in suspension
and is free of aggressive chemical substances.
S = Tank on pump delivery
H = Tank supporting the pump
P = No tank but supplied with provision for one
Capacity of diaphragm tank
PRESSCONTROL
PRESSCOMFORT
Code identifying the pump
Code common to all one-pump sets
Version with
ow switch
EN
-
-
-
-
-
11
Page 12

5.5. OPERATING CONDITIONS FOR WHICH EQUIPMENT IS
NOT DESIGNED
The set cannot be used to handle:
− dirty water or water with solids in suspension;
− water containing acids or bases, and corrosive liquids in
general;
− water with a temperature over the temperature limit
given in chap. 5.6;
− seawater;
− ammable liquids and hazardous liquids in general;
− GP sets are not designed for portable use or use out
EN
12
doors.
WARNING
NB: THE MOTOR-DRIVEN PUMP MUST NEVER
BE MADE TO WORK WITHOUT LIQUID.
5.6. OPERATING CONDITIONS
For operating conditions, refer to chapter 4 in part 2 “TECHNICAL
SPECIFICATIONS” relating to the pump. Maximum temperature
of liquid pumped is in the range 40-55 °C depending on the kind
of pump installed (see the individual pump’s user manual).
5.7. PRESSURE SWITCH SPECIFICATIONS
ADJUSTMENT
PRESSURE
SWITCH TYPE
FSG 2NE SP53 1,4 ÷ 4,6 1,0 – 1,2 1,2 – 2,3 1,4 – 2,8
FSG 9NE SP53 1,4 ÷ 4,6 1,0 – 1,2 1,2 – 2,3 1,4 – 2,8
FSG 9NE SP54 1,4 ÷ 4,6 1,0 – 1,2 1,2 – 2,3 2,5 – 3,7
FYG 22NE SP53 2,8 ÷ 7,0 1,2 – 2,3 1,6 – 2.7 5,4 – 7,0
XMP A06 1 ÷ 6 0.8 1.2 – 4.2 2.8 – 4.8
XMP A12 1.3 ÷ 12 1 1,7 – 8.4 5-8
WARNING
5.8.1. SPECIFICATIONS OF FSG-FYG MODELS (FIG.1)
Device conforming to European standards EN 60730-1 and
EN 60730-2-6
Pressure connection thread: G ¼ ISO 228/1 (FSG 2NE/FYG
22NE) - ISO 7/1 R ¼ (FSG 9NE)
2 cable entries Din Pg 13.5
Insulation protection: IP65 (IEC/EN 60529)
Pressures:
• continuous duty: (FSG 2NE-9NE) max. 4.6 bar; rupture
pressure: min. 20 bar.
• continuous duty: (FYG 22NE) max. 7.0 bar; rupture pres
sure: min. 28 bar.
Adjustment:
1. Starting: to increase the tripping point as pressure de
creases, tighten setting nut 1 (FIG. 1).
2. Stopping: to increase the tripping point as pressure in-
creases, tighten the differential adjustment nut 2 (FIG. 1).
RANGE AS
PRESSURE
INCREASES
bar
NB: DEPENDING ON THE TYPE OF POWER CA-
BLE, PRESSURE SWITCHES ARE SUPPLIED
WITH CABLE CLAMP PG13.5 FOR USE WITH CA
BLE FROM Ø 6-9MM OR PG 13.5 FOR USE WITH
CABLES FROM Ø 9-12.5MM.
MOTOR RATING
1 Phase~ 3 Phase~
1,5 kW – 230V 2,2 kW – 400V
DIFFERENTIAL
AT MIN.
SETTING
bar
AT MAX.
SETTING
bar
FACTORY
SETTING
bar
5.8.2. SPECIFICATIONS OF XMP MODELS (FIG.2)
Device conforming to European standards IEC 947, EN
60947-4-1, UL 508, CSA C22-2 n°14
Pressure connection thread: G ¼ ISO 228/1
2 cable entries Din Pg 13.5
Insulation protection: IP54 (IEC/EN 60529)
Pressures:
• continuous duty: (XMP A06) max. 6 bar; rupture pres
sure: min. 30 bar.
• continuous duty: (XMP A12) max. 12 bar; rupture pres
-
-
-
-
sure: min. 30 bar.
MOTOR RATING
1 Phase~ 3 Phase~
1,5 kW – 230V 3,0 kW – 400V
Adjustment:
1. Starting: to increase the tripping point as pressure de
creases, tighten setting nut A (FIG. 2).
2.
Stopping: to increase the tripping point as pressure
increases, tighten the differential adjustment nut B
(FIG. 2).
5.9 SPECIFICATIONS OF ELECTRONIC FLOW SWITCH (FIG. 7-9)
5.9.1 Presscomfort specications:
- Male connection thread G1” ISO 228/1.
- Insulation protection IP65.
- Maximum working pressure 10 bar.
- Starting pressure adjustment ranges: 1.5-2.5 bar.
To adjust, note the pressure gauge reading at start-up and
turn the screw accordingly.
5.9.2 Presscontrol specications:
- Male connection thread G1” ISO 228/1.
- Insulation protection IP65.
- Maximum working pressure 10 bar.
- Fixed settings standard 1.5 bar (or 1.2 or 2.2 bar on re
quest).
For additional specications, see the relevant ow switch’s
specic manual.
6. TECHNICAL DESIGN FEATURES
The 1GP pressure booster set has been designed and built
according to the following standards:
− See point 6 in PART 1 manual
−
MECHANICAL RISKS MACHINERY DIRECTIVE 2006/42/CE
−
ELECTRICAL RISKS MACHINERY DIRECTIVE 2006/42/CE
− LOW VOLTAGE DIRECTIVE 2006/95/EC
−
ELECTROMAGNETIC COMPATIBILITY DIRECTIVE
2004/108/EC
− PRESSURE RISK DIRECTIVE 97/23/EC, see expansion
tank operating instructions
7. TECHNICAL SPECIFICATIONS
For the pumps’ technical specications, refer to manuals
PART 1 and PART 2 and the data plate on the pump.
For the expansion tank’s technical specications, refer to sec
tion 2 in the relevant operating instructions.
For the ow switch’s technical specications, refer to point
5.9 and the relevant operating instructions.
8. INSTALLATION, REMOVAL AND TRANSPORT
WARNING
INSTALLATION MUST BE CARRIED OUT BY A
QUALIFIED TECHNICIAN.
-
-
-
-
-
Page 13

8.1. GENERAL INSTALLATION PRACTICES
Once unpacked, handle the set manually with care. If weight
is over 30 kg (see point 8.4), it is advisable to lift the set using
mechanical means:
a) Use metal pipes, or sufciently rigid plastic pipes, to ensure
that they will not collapse under the vacuum created in the
suction line;
b) Support and align pipework so that it does not generate
stress on the set;
c) If using hoses for suction or delivery lines, do not bend
them to avoid constrictions;
d) If there are any connections between pipes, seal them: air
getting into the suction pipe will have a negative effect on
pump operation;
e) It is advisable to t a gate valve on the delivery pipe, at the
outlet of the 3/5-way tting;
f) Fasten the pipes to the tank, or to xed parts in any case, so
that they are not supported by the set;
g) Do not use too many bends (goosenecks) and valves in
the system;
h) When the set is installed with the liquid source lower than
the pump, the suction pipe must be tted with a foot valve
and lter to prevent foreign matter getting inside, and its
end must be immersed to a depth that is at least twice the
diameter of the pipe. Moreover, the distance from the pipe
to the bottom of the tank must be one and a half times the
diameter of the pipe;
If the suction line is longer than 4 metres, use a pipe with a
larger diameter (¼ of an inch bigger is recommended for suc
tion) to improve performance.
8.2 INSTALLATION (SEE TYPICAL DIAGRAMS IN FIG. 8-9)
a) Place the set on a at surface as near to the water source
as possible, leaving enough space round it to be able to op
erate and perform maintenance safely. Whatever the case,
leave at least a 100mm clearance in front of the motor’s
cooling fan;
b) Use pipes with an appropriate diameter (see PART 2 sec
tion 4) featuring threaded manifolds, which will be screwed
on to the 3/5-way tting;
c) Supports, xing systems, piping and other components of
the system must be independent from the set so that they
do not generate additional loads or stress on the booster.
8.3. REMOVAL
To handle or remove the set, you must:
a) turn off the power supply;
b) vent pressure from the system and precharge pressure
from the expansion tank;
c) disconnect the delivery and suction pipes (where tted) if
they are too long or get in the way;
d) if the set has been bolted down on the surface it stands
on, remove the relevant screws;
e) rewind the power cable and fasten it to the set so that it
will not be damage during transit;
f) lift the set with means that are suitable for the weight and
size of the set (see point 8.4).
8.4. TRANSPORT
The set is packed in a cardboard box or, where weight and
size dictate, fastened on a wooden pallet.
Packages up to 25 or 30 kg can be carried manually, heavier
packages should be handled with a mechanical lift.
9. WIRING
WARNING
NB: WIRING MUST BE CARRIED OUT BY A QUALIFIED TECHNICIAN.
– The set is connected by simply plugging it into
a power socket on a suitable board or cabinet
featuring a thermomagnetic circuit breaker and
a high-sensitivity (0.03 A) residual current circuit
breaker.
– The power mains must have an efficient earth
ing system according to the electrical standards
in force in your country: this is the installer’s re
sponsibility.
– The board or cabinet with the socket must be
located in an indoor room away from spray, jets
of water or rain, in a position where the plug is
easy to reach.
– During connection, be extremely careful not to
-
10. STARTING AND USING THE SET
NEVER RUN THE MOTOR-DRIVEN PUMP WITHOUT WATER:
-
THE ABSENCE OF WATER RESULTS IN SERIOUS DAMAGE
TO INTERNAL PARTS.
10.1 GENERAL INSTRUCTIONS
The warnings given in section 9.1 of part 1 relating to the
pump are applicable.
10.2. FILLING THE SET WITH WATER
WARNING
10.3. STARTING THE SET
The 1GP sets’ pressure switch is set, depending on the model,
get the terminal board, motor or pressure switch
wet or damp at all.
OPERATION TO BE PERFORMED WITH ELECTRICITY SUPPLY TO THE SET COMPLETELY CUT OFF.
• Set with flooded suction (liquid drawn from
a tank higher than the pump’s suction
port).
Open the isolating valves on the set’s suc
tion line and close the discharge ones, re-
move the cap from the pumps’ top hole and
wait for water to come out. If there is no leak
ing (e.g. pump is on a level with the liquid)
from the nonreturn valve, fill to overflowing
through the pumps’ top hole, then close
again with the relevant cap.
• Set with suction lift (liquid drawn from a
tank lower than the pump’s suction port).
Open the isolating valves on the set’s suc
tion line, remove the cap from the pumps’
top hole and fill to overflowing.
EN
-
-
-
-
-
13
Page 14

according to the values indicated in the table in section 5.7.
These values can be adjusted to meet water-use needs within
a certain range as specied below. To check the setting, start
the pump (set switch to “on”/plug in) and slowly close the
delivery isolating valve. Pressure will increase quickly, as in
dicated by the pressure gauge, and the pump will stop at the
set value as a result of the pressure switch contacts closing.
NB: check the tank’s precharge factory setting, as indicated
on the nameplate - whatever the case, it should be adjusted to
a pressure that is 0.3 to 0.5 bar lower than the pump starting
pressure. If pressure does not increase, turn off the set (set
EN
switch to “off”/unplug from power socket), check lling and
then restart. When the pump stops, open the delivery isolating
valve and check that the pump restarts due to the pressure
switch tripping at a pressure roughly equal to the minimum
pressure setting. The pump stopping pressure (system oper
ating pressure) can be increased or decreased by tightening
or unscrewing setting nut 1 (g. 1), whilst starting pressure
can be altered by tightening or unscrewing nut 2 (g. 1) (dif
ferential). Should you want to increase the pump stopping
pressure (system pressure), make sure the value you want is
not higher than the maximum pressure delivered by the pump,
otherwise the set will never be able to stop. (As also specied
in the “Troubleshooting” table). Remember that every time the
pressure switch setting is changed, you will also have to adjust
the diaphragm tank’s precharge accordingly.
10.4. OPERATION
Once you have checked that the pump starts and stops at the
set pressures, the set is ready to use.
Operation is automatic.
Make sure noise, vibration, pressure and voltage levels are
normal.
10.5. BOOSTER SET SHUTDOWN
To shut down the set completely, set the control switch to off
and, for added safety, unplug the set from the power socket.
10.6. STARTING THE SET WITH FLOW SWITCH
Make sure the pump primes properly, then partially open a
cock on the water-use circuit.
TROUBLE PROBABLE CAUSE ACTION
- No mains power
- Not plugged in properly - Plug in properly
Pump fails to start
Motor runs but pump is
not delivering water
Pump works with lower
ow rate than normal
- Circuit breaker has tripped
- Thermal overload cutout tripped
- Motor or capacitor faulty - Contact your nearest dealer
- Pressure switch starting pressure too low - Correct pressure switch settings
- Suction lter clogged - Clean the lter
- No water in pump - Fill the pump (see chap. 10.2)
- No water in well or tank
- Water level too low - Lower the pump
- Suction problems
Connect the ow switch to the mains and make sure it receives power.
The pump starts automatically, with the power ON LED and/or
pump running LED lit.
Once water use demand has ceased and system pressure has
-
been restored, the ow switch automatically stops the pumps.
For setting and further details, refer to the relevant instruc-
tion booklet.
11. MAINTENANCE AND REPAIR
WARNING
-
-
11.1. ROUTINE INSPECTIONS AND CHECKS
We recommend you check that the set is operating correctly
at regular intervals - look out, above all, for abnormal vibra
tions and noise and, in the case of surface pumps, for leaking
mechanical seals.
1GP pressure booster sets require just a few routine checks,
as follows:
–
– pump starting/stopping pressure must be checked.
If problems are encountered, they can be dealt with by con
sulting the following chart. Also consult the pump’s user
manual.
11.2. MAINTENANCE
See pump manual part 2, the expansion tank manual, and
manual relating to the ow switch, if tted, for the main and
most common maintenance procedures.
For spare parts, see positions in g. 6-7.
11.3. BOOSTER SET TROUBLESHOOTING
Also consult the user manuals relating to the pump, dia
phragm tank and ow switch, if installed.
Any maintenance or repair work must always
be performed with the power supply discon
nected. Such work must be carried out by quali-
ed personal only: failure to comply with this
rule will void the warranty.
precharge of the diaphragm tank must be checked (0.3-0.5
bar lower than the pressure switch’s starting pressure);
- Check other loads downstream of this contactor or the
contactor itself
- Reset. If it trips again, call in a qualied electrician to
locate the leakage point and repair insulation.
- It resets on its own after a few minutes. If it trips again,
contact your nearest dealer
- Lengthen suction pipe or
wait for level to be restored
- Clean the foot valve and suction pipe
- Suction pipe with greater diameter
- Replace any elbows installed with wide bends
- Supply voltage has dropped below minimum acceptable
value (see pump booklet)
-
-
-
-
14
Page 15

TROUBLE PROBABLE CAUSE ACTION
- Air precharge in pressure vessel insufcient
Starting too frequent
Pump does not stop Pressure switch outside setting range
Pump vibrates or makes too much
noise during operation
- Pressure switch differential too low - Correct setting by increasing the differential
- Water leaking from foot valve or piping - Eliminate leaks
- Cavitation due to excessive ow rate - Close delivery isolating valve slightly
- Cavitation due to suction problems
- Foreign matter between xed and
rotating parts (fan)
- Bearings worn or damaged - Contact your nearest dealer
- Restore precharge or replace diaphragm
if broken
Correct setting by decreasing the differential (see
chap. 5.7)
- Take the same action as you would when the
pump is delivering low ow rate
- Remove foreign matter
EN
12. DISPOSAL
When disposing of the 1GP set, comply strictly with the regulations in force in your country, making sure none of the uid
treated is left inside the pump. Precharge pressure in the
diaphragm tanks must be vented.
13. DIAGRAMS AND DRAWINGS
Maximum tightening torque for nut on cover 6 Kg x cm
FIG. 1 FSG-NE / FYG-NE pressure switch FIG. 2 XMP pressure switch
2
FIG. 3 Closing FIG. 4 Opening FIG. 5 Connection of pump with pressure switch
Most of our pumps do not contain particularly pollutant ma
terials. Specic cases are indicated in the “DEMOLITION”
chapter in PART 2, where applicable.
B
-
15
Page 16

FIG. 6 Standard 1 GP set
EN
Key
1. PUMP
2. 5-WAY FITTING
2/A. 3-WAY FITTING
3. PRESSURE SWITCH
4. PRESSURE GAUGE
5. CABLE CLAMP
FIG. 7 1GP set with ow switch
Pressure gauge and
pressure switch position
on 1GP sets with “AGA”-
series pumps
6. TANK
7. HOSE
8. SEAL
9. CONNECTING POWER CABLE
10. PRESSURE SWITCH MOTOR CABLE
Key
1. PUMP
9. CABLE WITH PLUG
10. MOTOR-FLOW SWITCH CONNECTING CABLE
11. FLOW SWITCH
16
Page 17

FIG. 8 Typical installation diagram 1GP 24 C
FIG. 9 Typical installation diagram 1GP with electronic ow switch
Board for three-phase version only
EN
Key
1. FILTER
2. MF BALL VALVE
3. 3-WAY FITTING
4. NONRETURN VALVE
5. FOOT VALVE
Ha SUCTION LIFT
Hb SUCTION HEAD
Key
1. FILTER
2. MF BALL VALVE
3. NONRETURN VALVE
4. 3-WAY PORT
5. VIBRATION-DAMPING
COUPLING OR HOSE
6. FOOT VALVE
Ha SUCTION LIFT
Hb SUCTION HEAD
17
Page 18

MANUEL D’UTILISATION ET D’ENTRETIEN 3
ème
À CONSERVER SOIGNEUSEMENT
1. INTRODUCTION
Le présent manuel est constitué de 4 fascicules: la 1
contenant des informations générales sur l’ensemble de notre
production; la 2
ques sur les électropompes, la 3
ème
PARTIE contenant des informations spéci-
ème
PARTIE, le présent fascicule, contenant des informations spéciques sur le groupe de
pressurisation; le manuel du vase d’expansion et le manuel du
uxostat électronique, s’il est prévu.
Se conformer aux indications reportées dans tous les fasci
cules pour que le groupe fonctionne correctement et ait un
rendement optimal. Il est recommandé en particulier de lire
FR
et de respecter les «CONSIGNES GÉNÉRALES DE SÉCURITÉ»
au chapitre 5 de la 1
ère
partie relative à la pompe et le chapitre
3 du présent manuel. Pour avoir de plus amples informations,
prière de contacter le revendeur agréé ou le Service aprèsvente le plus proche.
TOUTE REPRODUCTION, MÊME PARTIELLE, DES ILLUSTRA
TIONS ET/OU DU TEXTE EST INTERDITE, QUEL QU’EN SOIT LE
MOTIF.
Les symboles suivants ont été utilisés pour rédiger ce manuel:
ATTENTION
Risque d’abîmer la pompe ou l’installation
Risque d’accident ou d’endommager les biens
Risque de nature électrique
2. SOMMAIRE
1. INTRODUCTION page 18
2. SOMMAIRE page 18
3. CONSIGNES GÉNÉRALES DE SÉCURITÉ page 18
3.1. Mesures de prévention à la charge de l’utilisateur
3.2. Protections et précautions à prendre page 19
4. GARANTIE ET ASSISTANCE TECHNIQUE page 19
5. DONNÉES ET DESCRIPTION DU GROUPE page 19
5.1. Fabricant page 19
5.2. Données du groupe page 19
5.3. Description du fonctionnement page 19
5.4. Usage prévu page 19
5.5. Usage non conforme page 20
5.6. Conditions d’emploi page 20
5.7. Caractéristiques des pressostats page 20
5.8.1. Caractéristiques des modèles FSG-FYG page 20
5.8.2. Caractéristiques des modèles XMP page 20
5.9. Caractéristiques du uxostat électronique page 20
6.
CARACTÉRISTIQUES TECHNIQUES DE FABRICATION
7. DONNÉES TECHNIQUES page 20
8. MONTAGE, DÉMONTAGE ET TRANSPORT page 20
8.1.
Précautions générales à prendre pour le montage
8.2. Montage page 21
8.3. Démontage page 21
8.4. Transport page 21
9. BRANCHEMENT ÉLECTRIQUE page 21
10. MISE EN SERVICE ET UTILISATION DU GROUPE page 21
10.1. Avertissements généraux page 21
10.2. Remplissage d’eau du groupe page 21
18
PARTIE
ère
page 21
PARTIE,
page 18
page 20
10.3. Mise en service du groupe page 21
10.4. Fonctionnement page 22
10.5. Arrêt total du groupe page 22
10.6. Mise en service du groupe avec uxostat page 22
11. ENTRETIEN ET RÉPARATION page 22
11.1. Contrôles périodiques page 22
11.2. Entretien page 22
11.3. Recherche des pannes page 22
12. ÉLIMINATION page 23
13. SCHÉMAS ET DESSINS page 23
14. DÉCLARATION DE CONFORMITÉ page 43
-
3. CONSIGNES GÉNÉRALES DE SÉCURITÉ
– EBARA PUMPS EUROPE S.P.A. DÉCLINE TOUTE
RESPONSABILITÉ EN CAS D’ACCIDENT ET DE
DOMMAGES AUX BIENS OU À L’INSTALLATION
SI CES INDICATIONS NE SONT PAS RESPECTÉES
-
ET/OU SI L’INSTALLATION A ÉTÉ ALTÉRÉE.
–
Avant de mettre le groupe en marche, l’utilisateur doit savoir comment effectuer les opérations décrites dans le présent manuel, dans les
manuels de l’électropompe (1
dans le manuel du vase d’expansion ou dans
celui du uxostat électronique et se conformer
aux procédures.
–
Le montage, l’entretien ou les réparations (hydraulique ou électrique) doivent être faits par
du personnel spécialisé et qualié.
ère
et 2e PARTIES),
Les électropompes et les dispositifs électriques et hydrauliques montés sur les groupes de pressurisation ne présentent
aucun «risque résiduel» (voir avertissements généraux aux
points 5.1., 5.2., 5.3. et au point 6 du manuel 2
à l’exclusion du risque dû à l’air sous pression à l’intérieur du
vase d’expansion.
Ne pas dépasser les valeurs limite des pressions de service
et de pré-charge ni les valeurs des températures de service et
ambiante indiquées sur l’étiquette du vase d’expansion.
Il est recommandé de suivre les indications contenues dans
le manuel du vase d’expansion. Seuls les vases montés par
EBARA PUMPS EUROPE S.p.A. sont homologués par rapport à
la Directive 97/23/CE. Les électropompes sont exclues de la
présente directive, les accessoires restants ne portent pas le
label CE car ils font partie de la catégorie de l’article 3 para
graphe 3.
Les groupes automatiques 1GP sont soumis à un test de pres
sion hydrostatique sur le lot de production.
3.1. MESURES DE PREVENTION A LA CHARGE DE L’UTILISATEUR
Les utilisateurs doivent se conformer strictement
aux normes et aux règlements des organismes
distributeurs locaux. Ils doivent par ailleurs suivre
scrupuleusement les indications de ce manuel.
– Couper le courant du groupe et de l’installation
complète durant le montage, l’entretien, la répa
ration et/ou le remplacement d’une pièce quelconque du groupe de pressurisation 1GP.
Chaque utilisateur doit respecter scrupuleusement
–
les normes de sécurité et de prévention des acci
dents en vigueur dans les pays respectifs. Toute
opération relative au montage, à l’entretien ou à
la réparation faite avec l’installation sous tension
peut provoquer un accident grave et même mortel.
ème
PARTIE),
-
-
-
-
Page 19

– Avant de mettre l’installation en marche, vérifier
si tous les dispositifs et les composants électri
ques, y compris les câbles, sont efficaces.
–
Veiller à ne pas être à pieds nus ou pire, avec les pieds
dans l’eau, et à ne pas avoir les mains mouillées au
moment de mettre le groupe en marche.
– L’utilisateur ne doit jamais prendre l’initiative de
faire des opérations ou des interventions qui ne
sont pas prévues dans ce manuel.
3.2. PROTECTIONS ET PRÉCAUTIONS À PRENDRE
– L’électropompe et tous les composants de l’ins-
tallation ont été conçus de façon à ce que les
organes en mouvement soient protégés par des
carters pour éviter tout risque de blessures.
EBARA PUMPS EUROPE S.p.A. décline toute responsabilité en cas de dommages provoqués par
l’altération de ces dispositifs.
–
Les conducteurs ou parties sous tension sont iso-
lés électriquement par rapport à la masse. Une
sécurité supplémentaire est néanmoins prévue:
en effet, les parties conductrices accessibles sont
branchées à un conducteur de terre pour qu’elles
ne soient pas dangereuses en cas de panne de
l’isolation principale.
4. GARANTIE ET ASSISTANCE TECHNIQUE
Il y a déchéance de la garantie et le fabricant décline toute
responsabilité en cas d’accident ou de dommages aux biens
et/ou au groupe si les indications reportées dans ce manuel
ne sont pas respectées et/ou si du personnel ne faisant pas
partie de nos Services après-vente agréés a effectué une in
tervention quelconque sur le groupe.
À la livraison, s’assurer que l’emballage du groupe automati
que n’est pas abîmé ni bosselé et le signaler immédiatement
au transporteur si c’est le cas. Déballer le groupe et vérier
s’il n’a pas subi de dommages durant le transport. Si c’est
le cas, le signaler au revendeur dans les 8 jours qui suivent
la livraison. Contrôler si les caractéristiques reportées sur la
plaque du groupe de pressurisation sont celles requises.
La garantie cesse immédiatement d’être valable si:
− du personnel non autorisé par Ebara Pumps Europa S.p.A.
a démonté ou essayé de réparer le groupe;
− le mauvais fonctionnement est dû à un montage et/ou à
un branchement électrique erroné, à une altération, à un
usage impropre ou dérive des limites d’emploi indiquées
dans le présent manuel;
− des liquides corrosifs, de l’eau sablonneuse ou des liqui
des chimiquement ou physiquement agressifs ont été
pompés sans le contrôle et l’autorisation au préalable
d’Ebara Pumps Europe S.p.A.;
− les défauts éventuels ont été signalés plus de deux mois
après qu’ils aient été découverts;
− le dommage en question dépend de l’usure normale du
groupe.
Les parties suivantes, qui sont normalement sujettes à usure,
ont une garantie limitée: roulements, garniture mécanique,
bagues d’étanchéité, condensateurs, membrane du réservoir
autoclave, pressostat réglable et manomètre.
Si une panne éventuelle ne fait pas partie de celles prévues
dans le tableau «RECHERCHE DES PANNES» (par. 11.3.),
contacter le revendeur agréé le plus proche.
Le Tribunal de Trente est le seul compétent en cas de litige
éventuel concernant l’interprétation et/ou l’exécution des
contrats.
-
5. DONNÉES ET DESCRIPTION DU GROUPE
5.1. FABRICANT
EBARA PUMPS EUROPE S.p.A.
5.2. DONNÉES DU GROUPE
Chaque groupe se distingue par un sigle qui indique le type
de pompe et la conguration, comme reporté ci-dessous:
1GP 2CDM 70/10 --- 24 S
Pour les données de la pompe, voir le manuel 2
la pompe installée.
Les groupes 1GP comprennent ce qui suit (g. 6):
– électropompe monophasée avec câble et che;
– manomètre;
– pressostat;
– raccord 5 ou 3 voies en refoulement;
– vase à membrane de type vertical ou horizontal (ver
sions « P » groupe prévu sans vase sur demande).
Les groupes 1GP avec uxostat comprennent ce qui suit (g. 7):
– électropompe monophasée avec câble et che – uxos-
-
-
-
tat électronique.
5.3. DESCRIPTION DU FONCTIONNEMENT
Les groupes 1GP sont des installations automatiques de ravi-
taillement hydrique à 1 pompe, équipés ou prévus pour le raccordement à des réservoirs autoclaves à membrane. Le groupe est
commandé par un pressostat avec une valeur de réglage en usine
comme indiqué dans le tableau du paragraphe 5.7. Le prélèvement
d’eau de l’appareil, lorsque la pompe est arrêtée, provoque la ré
duction de la pression et par conséquent la fermeture du contact
d’activation de la pompe du pressostat qui détermine la mise en
marche de cette dernière. Le rétablissement de la pression dans
l’installation provoque la fermeture du contact de désactivation de
la pompe du pressostat et l’arrêt de cette dernière.
Dans les groupes 1GP avec uxostat, la mise en marche et l’arrêt
de la pompe ont lieu à l’aide du contrôleur électronique qui y est
contenu. À la demande d’eau du réseau, le uxostat fait démarrer
la pompe en fournissant le débit utile à une pression constante
jusqu’à ce que la demande cesse et que la pression soit rétablie
aux conditions normales dans l’installation. Il y a arrêt de la pom
pe en cas de manque d’eau. Les données de réglage et les carac-
téristiques détaillées sont reportées dans le manuel du uxostat.
5.4. USAGE PRÉVU
Les groupes de pressurisation 1GP Ebara peuvent être utilisés, dans les versions standard, pour des applications civiles,
industrielles et agricoles, en particulier pour: soulever ou dé
placer l’eau pour usage domestique, pour le refroidissement,
l’irrigation ou les installations de lavage. Il peut s’agir: d’eau
claire, d’eau potable, d’eau de pluie, d’eau de nappe ou d’eau
mélangée mais sans corps solides ou bres en suspension et
sans substances chimiques agressives.
S =
Réservoir sur le refoulement de la pompe
H = Réservoir qui ravitaille la pompe
P = Prévue sans vase
Capacité du réservoir à membrane
PRESSCONTROL
PRESSCOMFORT
Sigle qui indique la pompe
Sigle commun à tous les groupes à une pompe
Version avec
uxostat
ème
PARTIE de
FR
-
-
-
-
19
Page 20

5.5. USAGE NON CONFORME
Le groupe ne doit pas être utilisé pour acheminer:
− de l’eau sale ou avec des corps en suspension;
− de l’eau contenant des acides, des bases ou en général
des liquides corrosifs;
− de l’eau ayant une température supérieure à celles re
portées au chap. 5.6.;
− de l’eau de mer;
− des liquides inammables ou tout au moins dangereux;
− les groupes GP ne sont pas prévus pour être transportés
ni pour fonctionner en plein air.
ATTENTION
NB: L’ÉLECTROPOMPE NE DOIT JAMAIS FONC-
TIONNER À SEC.
FR
5.6. CONDITIONS D’EMPLOI
Pour les conditions d’emploi, voir le chapitre 4 de la 2ème
partie «DONNÉES TECHNIQUES» de la pompe. La température
maximale du liquide pompé est de 40-55°C selon le type de
pompe installée (voir manuel de la pompe).
5.7. CARACTÉRISTIQUES DES PRESSOSTATS
PRESSOSTAT
TYPE
PLAGE DE
RÉGLAGE
LORSQUE LA
PRESSION
AUGMENTE bar
DIFFÉRENTIEL
AU
RÉGLAGE
MIN. bar
AU
RÉGLAGE
MAX. bar
FSG 2NE SP53 1,4 ÷ 4,6 1,0 – 1,2 1,2 – 2,3 1,4 – 2,8
FSG 9NE SP53 1,4 ÷ 4,6 1,0 – 1,2 1,2 – 2,3 1,4 – 2,8
FSG 9NE SP54 1,4 ÷ 4,6 1,0 – 1,2 1,2 – 2,3 2,5 – 3,7
FYG 22NE SP53 2,8 ÷ 7,0 1,2 – 2,3 1,6 – 2.7 5,4 – 7,0
XMP A06 1 ÷ 6 0.8 1.2 – 4.2 2.8 – 4.8
XMP A12 1.3 ÷ 12 1 1,7 – 8.4 5-8
ATTENTION
NB: SELON LE TYPE DE CÂBLE ÉLECTRIQUE, LES
PRESSOSTATS SONT ÉQUIPÉS D’UN SERRE-CÂ
BLE PG 13.5 PRÉVU POUR UN CÂBLE DE Ø 6-9
MM OU PG 13.5 PRÉVU POUR DES CÂBLES DE
Ø 9-12,5 MM.
5.8.1. CARACTÉRISTIQUES DES MODÈLES FYG (FIG. 1)
Appareil conforme aux normes européennes EN 60730-1 ED
EN 60730-2-6.
Filetage raccord pression: G ¼ UNI ISO 228/1 (FSG 2NE/FYG
22NE) - UNI ISO 7/1 R ¼ (FSG 9NE).
2 entrées serre-câble Din Pg 13.5.
Degré de protection: IP65 (IEC/EN 60529).
Pressions:
• service continu: (FSG 2NE-9NE) 4,6 bar max.; pression
de rupture: 20 bar min.
• service continu: (FYG 22NE) 7 bar max.; pression de
rupture: 28 bar min.
CARACTÉRISTIQUES ÉLECTRIQUES
1 Phase~ 3 Phase~
1,5 kW – 230V 2,2 kW – 400V
Réglage:
1. Activation: pour augmenter le point d’intervention lorsque la
pression diminue, visser l’écrou de réglage A (FIG. 2).
2. Désactivation: pour augmenter le point d’intervention lorsque
la pression augmente visser l’écrou de réglage du différentiel
B (FIG. 2).
20
RÉGLAGE
EN USINE
bar
5.8.2. CARACTÉRISTIQUES DES MODÈLES XMP (FIG. 2)
Appareil conforme aux normes européennes IEC 947, EN
60947-4-1, UL 508, CSA C22-2 n°14.
Filetage raccord pression: G ¼ UNI ISO 228/1.
2 entrées serre-câble Din Pg 13.5.
-
Degré de protection: IP54 (IEC/EN 60529).
Pressions:
•
service continu: (XMP A06) 6 bar max.; rupture: 30 bar min.
•
service continu: (XMP A06) 12 bar max.; rupture: 30 bar min.
CARACTÉRISTIQUES ÉLECTRIQUES
1 Phase~ 3 Phase~
1,5 kW – 230V 3,0 kW – 400V
Réglage:
1.
Activation: pour augmenter le point d’intervention lorsque
la pression diminue, visser l’écrou de réglage A (FIG. 2).
2. Désactivation: pour augmenter le point d’intervention
lorsque la pression augmente visser l’écrou de réglage
du différentiel B (FIG. 2).
5.9 CARACTÉRISTIQUES DU FLUXOSTAT ÉLECTRONIQUE (FIG. 7-9)
5.9.1 Caractéristiques Presscomfort:
- Filetage raccords mâle G1” UNI ISO 228/1.
- Degré de protection IP 65.
- Pression maximale de service 10 bar.
-
Plages de réglage de la pression de démarrage: 1,5-2,5 bar.
Pour le réglage, lire la pression qu’indique le manomètre au
démarrage et tourner la vis dans le sens désiré.
5.9.2 Caractéristiques Presscontrol:
- Filetage raccords mâle G1” UNI ISO 228/1.
- Degré de protection IP 65.
- Pression maximale de service 10 bar.
- Réglages xes 1,5 bar standard (ou 1,2 ou 2,2 bar sur de-
mande).
Pour connaître les autres caractéristiques, voir le manuel du
uxostat correspondant.
-
6. CARACTÉRISTIQUES TECHNIQUES DE FABRICATION
Le groupe de pressurisation 1GP a été conçu et fabriqué en
respectant les normes suivantes:
− Voir le point 6 du manuel de la 1ère PARTIE
− RISQUES DE NATURE MÉCANIQUE DIRECTIVE MACHI
NES
2006/42/CE
− RISQUES DE NATURE ÉLECTRIQUE DIRECTIVE MACHI-
NES
2006/42/CE
− DIRECTIVE BASSE TENSION 2006/95/EC
− DIRECTIVE COMPATIBILITÉ ÉLECTROMAGNÉTIQUE
2004/108/EC
− RISQUE DE PRESSION DIRECTIVE 97/23/CE, voir mode
d’emploi du vase d’expansion
7. DONNÉES TECHNIQUES
Pour les données techniques des pompes, voir les manuels
de la 1
ère
et de la 2
ème
PARTIE et la plaque des données sur
la pompe.
Pour les données techniques du vase d’expansion, voir le pa
ragraphe 2 du mode d’emploi correspondant.
Pour les données techniques du uxostat, voir le point 5.9 et
le mode d’emploi correspondant.
8. MONTAGE, DÉMONTAGE ET TRANSPORT
ATTENTION
LE MONTAGE DOIT ÊTRE EFFECTUÉ PAR UN
TECHNICIEN QUALIFIÉ.
-
-
Page 21

8.1. PRÉCAUTIONS GÉNÉRALES À PRENDRE POUR LE MONTAGE
Déplacer délicatement le groupe à la main après l’avoir déballé. Si le groupe pèse plus de 30 kg (voir point 8.4), il est
conseillé de le lever avec des moyens mécaniques:
a) Utiliser des tuyaux métalliques ou en plastique avec un
certain degré de rigidité, pour éviter qu’ils ne cèdent
sous la dépression qui se crée en aspiration;
b) Mettre des supports pour soutenir les tuyaux et les aligner
pour qu’ils ne créent aucune contrainte sur le groupe;
c) Si les tuyaux d’aspiration et de refoulement sont exi-
bles, ne pas les plier pour éviter de les étrangler;
d) Sceller les raccords éventuels des conduits: les inltra
tions d’air dans le tuyau d’aspiration inuent négative-
ment sur le fonctionnement de la pompe;
e) Il est conseillé de monter une vanne sur le tuyau de
refoulement, à la sortie du raccord à 3/5 voies;
f) Fixer les tuyaux à la cuve ou à des parties xes an qu’ils
ne soient pas soutenus par le groupe;
g) Éviter d’utiliser trop de coudes (becs de cygne) et de
soupapes dans l’installation;
h) Quand le groupe est monté au-dessus de la surface
libre du liquide, le tuyau d’aspiration doit être équipé
d’un clapet de pied et d’un ltre pour empêcher aux
corps étrangers d’y pénétrer et son extrémité devrait
être plongée à une profondeur d’au moins deux fois le
diamètre du tuyau; la distance entre cette dernière et
le fond de la cuve devrait par ailleurs être égale à une
fois et demi le diamètre du tuyau;
En cas d’aspiration supérieure à 4 mètres, utiliser un tuyau
ayant un plus grand diamètre (il est conseillé d’avoir ¼ de pou
ce en plus en aspiration) pour obtenir un meilleur rendement.
8.2 MONTAGE (VOIR SCHÉMAS TYPIQUES SUR LA FIG. 8-9)
a) Positionner le groupe sur une surface plate, le plus près
possible de la source d’eau, en laissant tout autour un
espace sufsant pour permettre le montage, l’utilisa
tion et l’entretien en toute sécurité. Laisser en tout cas
un espace libre d’au moins 100 mm devant le ventila
teur de refroidissement du moteur;
b) Utiliser des tuyaux d’un diamètre approprié (voir 2
PARTIE par. 4) dotés de manchons letés, qui devront
être vissés au raccord à 3/5 voies;
c) Les supports, les ancrages, les tuyaux et autres com
posants de l’installation doivent être indépendants du
groupe, an de ne provoquer aucune autre charge ni
contrainte sur ce dernier.
8.3. DÉMONTAGE
Pour déplacer ou démonter le groupe, il faut:
a) couper le courant électrique;
b) évacuer la pression de l’installation et la pression de
charge du vase d’expansion;
c) détacher les tuyaux de refoulement et d’aspiration (quand
ils sont présents) s’ils sont trop longs ou encombrants;
d) dévisser éventuellement les vis qui bloquent le groupe
sur la surface de support;
e) enrouler le câble d’alimentation et le xer au groupe
pour qu’il ne soit pas abîmé durant le transport;
f) lever le groupe avec des moyens appropriés à son poids
et à ses dimensions (voir point 8.4).
8.4. TRANSPORT
Le groupe est emballé dans une boîte en carton et xé sur
une palette en bois, si cela s’avère nécessaire vu son poids
et ses dimensions. Transport à la main jusqu’à 25 ou 30 kg,
avec un engin de levage mécanique s’il est plus lourd.
ème
9. BRANCHEMENT ÉLECTRIQUE
-
ATTENTION
NB: LE BRANCHEMENT ÉLECTRIQUE DOIT ÊTRE
FAIT PAR UN TECHNICIEN QUALIFIÉ.
– Il suffit pour cela de brancher la fiche sur une prise
de courant située dans un tableau spécifique conte
nant un interrupteur magnétothermique et un interrupteur différentiel à haute sensibilité (0,03A).
– Le circuit doit avoir un système de mise à la terre
efficace, conformément à la réglementation en
vigueur dans le pays intéressé: c’est l’installa
teur qui doit s’assumer cette responsabilité.
– Le tableau avec la prise doit être monté dans
un local à l’abri d’éclaboussures, de jets d’eau
ou de la pluie et de façon à ce que la fiche soit
accessible.
– Au cours du branchement, il faut éviter absolu
ment de mouiller, même légèrement, le bornier,
-
10. MISE EN MARCHE ET UTILISATION DU GROUPE
NE JAMAIS FAIRE FONCTIONNER L’ÉLECTROPOMPE À
VIDE: LE MANQUE D’EAU PEUT ABÎMER SÉRIEUSEMENT
LES COMPOSANTS INTERNES.
-
10.1 AVERTISSEMENTS GÉNÉRAUX
-
Voir les avertissements reportés au par. 9.1 de la 1ère partie
relatifs à la pompe.
10.2. REMPLISSAGE D’EAU DU GROUPE
-
ATTENTION
10.3. MISE EN SERVICE DU GROUPE
Le pressostat des groupes 1GP est réglé, selon le modèle,
d’après les valeurs indiquées sur le tableau du paragraphe
le moteur ou le pressostat.
CETTE OPÉRATION DOIT ÊTRE EFFECTUÉE APRÈS
AVOIR COUPÉ LE COURANT DU GROUPE.
• Groupe avec charge positive (cuve de
prélèvement avec niveau supérieur à la bou
che d’aspiration de la pompe)
Ouvrir les soupapes d’arrêt en aspiration du
groupe et fermer celles en refoulement, en
lever le bouchon du trou supérieur des pompes et attendre que l’eau s’écoule. Si l’eau
ne s’écoule pas (ex. prélèvement horizontal)
de la soupape de retenue, remplir jusqu’à ce
qu’elle déborde du trou supérieur des pompes
et remettre le bouchon correspondant.
• Groupe avec charge négative (cuve de
prélèvement avec niveau inférieur à la bou
che d’aspiration de la pompe)
Ouvrir les soupapes d’arrêt en aspiration du
groupe, enlever le bouchon du trou supérieur des
pompes et remplir jusqu’à ce que l’eau déborde.
FR
-
-
-
-
-
-
21
Page 22

5.7. Ces valeurs peuvent être ajustées dans certaines limites
pour répondre aux exigences, comme indiqué ci-dessous. Pour
vérier le réglage, mettre la pompe en marche (interrupteur sur
«on»/che branchée) et fermer lentement la soupape d’arrêt
en refoulement. La pression augmentera rapidement, comme
indiqué sur le manomètre, et la pompe s’arrêtera suite à l’in
tervention des contacts du pressostat à la valeur de réglage.
N.B.: vérier la valeur de pré-charge réglée en usine du vase,
indiquée sur la plaque, qui devra toutefois être réglée à une
pression de 0,3÷0,5 bar inférieure à la pression de démarrage
de la pompe. Si la pression n’augmente pas, isoler la pompe
(interrupteur sur «off»/ débrancher la che) et vérier le rem
plissage avant de la rebrancher. À l’arrêt de la pompe, ouvrir la
soupape d’arrêt en refoulement et vérier si la pompe se remet
en marche suite à l’intervention du pressostat à une pression
FR
environ égale à celle minimale de réglage. La pression d’arrêt
de la pompe (pression d’utilisation de l’installation) peut être
augmentée ou réduite en vissant ou en dévissant l’écrou de
réglage 1 (g. 1), tandis que celle de démarrage peut être mo
diée en vissant ou en dévissant l’écrou 2 (g. 1) (différentiel).
Pour augmenter la pression d’arrêt de la pompe (pression de
l’installation), s’assurer que la valeur désirée ne dépasse pas
la pression maximale fournie par la pompe, sinon le groupe ne
pourra pas s’arrêter. (Comme spécié également dans le ta
bleau «Anomalies et interventions»). Ne pas oublier d’adapter
également la pré-charge du vase à membrane chaque fois qu’il
faut modier le réglage du pressostat.
10.4. FONCTIONNEMENT
Après avoir vérié le démarrage et l’arrêt de la pompe aux
pressions saisies, le groupe est prêt à l’emploi.
Le fonctionnement est automatique.
Vérier si le bruit, les vibrations et la tension électrique sont
à un niveau normal.
10.5. ARRÊT TOTAL DU GROUPE
Pour arrêter entièrement le groupe, remettre l’interrupteur de commande sur «off» et débrancher la che de la prise par sécurité.
10.6. MISE EN SERVICE DU GROUPE AVEC FLUXOSTAT
Vérier si l’amorçage de la pompe est correct et ouvrir partiel
lement un robinet du circuit d’utilisation.
ANOMALIE CAUSE PROBABLE REMÈDES
- Il n’y a pas de courant
- La che n’est pas bien branchée - Bien brancher la che
L’électropompe ne
démarre pas
Le moteur tourne mais
la pompe n’envoie pas
d’eau
La pompe fonctionne
avec un débit réduit par
rapport à la normale
- Le disjoncteur s’est déclenché
- Intervention de la protection thermique
- Moteur ou condensateur défectueux - Contacter le revendeur le plus proche
- Pression d’activation du pressostat trop basse - Régler de nouveau le pressostat
- Filtre en aspiration bouché - Nettoyer le ltre
- Il n’y a pas d’eau dans la pompe - Remplir la pompe (voir chap. 10.2)
- Il n’y a pas d’eau dans le puits ou dans la cuve
- Niveau d’eau trop bas - Baisser la pompe
- Difculté d’aspiration
Brancher le uxostat au circuit électrique et vérier s’il y a
du courant.
La pompe se met automatiquement en marche avec le voyant présence de la tension et/ou le voyant pompe en marche allumés.
Le uxostat arrête automatiquement les pompes en n d’utili-
sation, lorsque la pression de l’installation a été rétablie.
-
Voir le manuel correspondant pour le réglage et avoir davan
tage de détails.
11. ENTRETIEN ET RÉPARATION
-
ATTENTION
-
11.1. CONTRÔLES PÉRIODIQUES
Il est conseillé de vérier régulièrement si la pompe fonc
tionne correctement et de faire en particulier attention aux
vibrations et aux bruits anormaux éventuels. S’assurer égale
ment que la garniture mécanique ne fuit pas s’il s’agit d’une
-
pompe de surface.
Les groupes de pressurisation 1GP ne nécessitent que de
quelques contrôles périodiques, c’est-à-dire:
-
- contrôle de la pression d’activation/désactivation de la
Les inconvénients éventuels peuvent être éliminés en consultant
le tableau qui suit. Consulter également le manuel de la pompe.
11.2. ENTRETIEN
Pour les opérations d’entretien les plus courantes, voir la 2
partie du manuel de la pompe, le manuel du vase d’expan
sion et le manuel du uxostat s’il est fourni.
Voir la position sur les g. 6-7 pour les pièces détachées.
11.3. RECHERCHE DES PANNES DU GROUPE
Consulter également les manuels de la pompe, du vase à
membrane et du uxostat s’ils sont montés.
Toujours couper le courant électrique avant de
faire une opération d’entretien ou de réparation
quelconque. Ces opérations ne doivent être ef
fectuées par du personnel qualié: l’inobservation de cette règle implique la déchéance de la
garantie.
contrôle de la pré-charge du réservoir à membrane (0,30,5 inférieure à la pression de démarrage du pressostat);
pompe.
- Vérier les autres appareils en aval du compteur ou le compteur
- Réenclencher. S’il se déclenche de nouveau, s’adresser
à un électricien qualié pour localiser le point de disper
sion et rétablir l’isolation
- Il se réenclenche tout seul au bout de quelques minutes.
Contacter le revendeur le plus proche s’il se déclenche
de nouveau
- Rallonger le tuyau d’aspiration ou attendre que le niveau
soit rétabli
- Nettoyer le clapet de pied et le tuyau d’aspiration
- Tuyau d’aspiration d’un diamètre supérieur
- Remplacer les coudes éventuels par des coudes plus larges
- Baisse de la tension d’alimentation en dessous de la
valeur minimale acceptable (Voir manuel de la pompe)
-
-
-
-
ème
-
-
22
Page 23

ANOMALIE CAUSE PROBABLE REMÈDES
- Pré-charge d’air insufsante dans l’autoclave
Démarrages trop fréquents
La pompe ne s’arrête pas Pressostat hors plage de réglage
La pompe vibre ou fait trop de
bruit durant le fonctionnement
- Différentiel pressostat trop bas - Régler de nouveau en augmentant le différentiel
- Fuites d’eau du clapet de pied ou des tuyaux - Éliminer les fuites
- Cavitation due au débit excessif
- Cavitation à cause de la difculté d’aspiration
- Corps étrangers entre les parties xes et tour
nantes (ventilateur)
- Roulements usés ou abîmés - Contacter le revendeur le plus proche
- Rétablir la pré-charge ou remplacer la membrane si elle est déchirée
Régler de nouveau en diminuant le différentiel
(voir chap. 5.7)
- Fermer légèrement la soupape d’arrêt en re
foulement
- Intervenir comme quand la pompe fournit un
débit réduit
-
- Enlever les corps étrangers
-
FR
12. ELIMINATION
Lorsqu’il faut éliminer le groupe 1GP, se conformer scrupuleusement aux dispositions en vigueur dans le pays intéressé, en s’assurant de ne laisser aucun résidu du uide traité
13. SCHÉMAS ET DESSINS
Couple maximal de serrage de l’écrou du couvercle 6 Kg x cm
FIG. 1 Pressostat FSG-NE / FYG-NE FIG. 2 Pressostat XMP
dans la pompe. Évacuer la pression de pré-charge des vases
à membrane.
Nos pompes ne contiennent en général aucun matériau parti-
culièrement polluant. Les cas spéciques sont indiqués dans
le chapitre « DÉMOLITION » éventuel dans la 2
B
2
FIG. 3 Fermeture FIG. 4 Ouverture FIG. 5 Raccordement de la pompe au pressostat
ème
PARTIE.
23
Page 24

FIG. 6 Groupe 1 GP standard
FR
Légende
1. POMPE
2. RACCORD 5 VOIES
2/A. RACCORD 3 VOIES
3. PRESSOSTAT
4. MANOMÈTRE
5. SERRE-CÂBLE
FIG. 7 Groupe 1GP avec uxostat
Position du manomètre
et du pressostat sur les
groupes 1GP pompes
série « AGA »
6. RÉSERVOIR
7. TUYAU FLEXIBLE
8. JOINT
9. CÂBLE DE BRANCHEMENT
ÉLECTRIQUE
10. CÂBLE MOTEUR DU PRESSOSTAT
Légende
1. POMPE
9. CÂBLE AVEC FICHE
10. CÂBLE DE BRANCHEMENT MOTEUR FLUXOSTAT
11. FLUXOSTAT
24
Page 25

FIG. 8 Schéma typique de montage 1GP 24 C
FIG. 9 Schéma typique de montage 1GP avec uxostat électronique
Tableau uniquement pour la version triphasée
FR
Légende
1. FILTRE
2. SOUPAPE À BILLE MF
3. JOINT 3 PIÈCES
4. CLAPET DE NON RETOUR
5. CLAPET DE FOND
Ha HAUTEUR AU-DESSUS DE LA
SURFACE LIBRE DU LIQUIDE
Hb HAUTEUR EN DESSOUS DE LA
SURFACE LIBRE DU LIQUIDE
Légende
1. FILTRE
2. SOUPAPE À BILLE MF
3. CLAPET DE NON RETOUR
4. BOUCHE 3 PIÈCES
5. JOINT ANTI-VIBRATIONS OU
TUYAU FLEXIBLE
6. CLAPET DE FOND
Ha HAUTEUR AU-DESSUS DE LA
SURFACE LIBRE DU LIQUIDE
Hb HAUTEUR EN DESSOUS DE LA
SURFACE LIBRE DU LIQUIDE
25
Page 26

BENUTZUNGS- UND WARTUNGSHANDBUCH TEIL 3
MUSS VOM BENUTZER AUFBEWAHRT WERDEN
1. EINLEITUNG
Das vorliegende Anweisungshandbuch besteht aus 4 Teilen: dem
TEIL 1, der die allgemeinen Informationen zu unserer Produktion
enthält, dem TEIL 2, der die spezischen Informationen zu den
Elektropumpen enthält, dem vorliegenden TEIL 3, der die spezi
schen Informationen zum Druckverdichtungsaggregat enthält,
dem Handbuch des Expansionsgefäßes und des elektronischen
Flusswächters, falls vorgesehen.
Beachten Sie die in ihnen enthaltenen Anweisungen, um die Er
zielung der optimalen Leistungen sowie den ordnungsgemäßen
Betrieb des Aggregats sicherzustellen. Insbesondere empfehlen
wir die Lektüre und die Beachtung der ”ALLGEMEINEN SICHER
HEITSHINWEISE” in Kapitel 5 von Teil 1 für die Pumpe sowie in
Kapitel 3 des vorliegenden Handbuches. Bitte wenden Sie sich für
weitergehenden Informationen an den Vertragshändler oder die
DE
nächste Kundendienststelle.
JEDE WIEDERGABE, AUCH AUSZUGSWEISE, DER ABBILDUNGEN
UND/ODER DES TEXTES IST UNTERSAGT.
Bei der Erstellung des Anweisungshandbuches wurden die folgen
den Symbole verwendet:
ACHTUNG
2. INHALT
1. EINLEITUNG Seite 26
2. INHALT Seite 26
3. ALLGEMEINE HINWEISE ZUR SICHERHEIT Seite 26
3.1. Vorbeugemaßnahmen zu Lasten des Benutzers Seite 26
3.2. Schutzvorrichtungen und wichtige
Vorsichtsmaßnahmen Seite 27
4. GARANTIE UND KUNDENDIENST Seite 27
5. DATEN UND BESCHREIBUNG DES AGGREGATS Seite 27
5.1. Hersteller Seite 27
5.2. Daten des Aggregats Seite 27
5.3. Funktionsbeschreibung Seite 27
5.4. Vorgesehene Einsatzbedingungen Seite 27
5.5. Nicht vorgesehene Einsatzbedingungen Seite 28
5.6. Vorgesehene Einsatzbedingungen Seite 28
5.7. Eigenschaften der Druckwächter Seite 28
5.8.1. Eigenschaften der Modelle FSG-FYG Seite 28
5.8.2. Eigenschaften der Modelle XMP Seite 28
5.9.
6. TECHNISCH KONSTRUKTIVE EIGENSCHAFTEN Seite 28
7. TECHNISCHE DATEN Seite 28
8. INSTALLATION, DEINSTALLATON UND TRANSPORT Seite 28
8.1. Allgemeine Maßnahmen für die Installation Seite 29
8.2. Installation Seite 29
8.3. Disinstallation Seite 29
8.4. Transport Seite 29
9. ELEKTRISCHER ANSCHLUSS Seite 29
10.
10.1. Allgemeine Hinweise Seite 29
10.2. Anfüllen des Aggregats mit Wasser Seite 29
26
Gefahr der Beschädigung der Pumpe oder der
Anlage
Gefahr der Verletzung oder der Sachbeschädigung
Gefahr durch elektrischen Strom
Eigenschaften des elektronischen Flusswächters
INBETRIEBNAHME UND BENUTZUNG DES AGGREGATS
Seite 28
Seite 29
10.3. Inbetriebnahme des Aggregats Seite 29
10.4. Funktionsweise Seite 30
10.5. Vollständiges Anhalten des Aggregats Seite 30
10.6.
Inbetriebnahme des Aggregats mit Flusswächter
11. WARTUNG UND REPARATUR Seite 30
11.1. Periodische Überprüfungen und Kontrollen Seite 30
11.2. Wartung Seite 30
11.3. Fehlersuche Seite 30
-
12. ENTSORGUNG Seite 31
13. PLÄNE UND ZEICHNUNGEN Seite 31
14. KONFORMITÄTSERKLÄRUNG Seite 44
-
3. ALLGEMEINE HINWEISE ZUR SICHERHEIT
-
-
Die Elektropumpen und die elektrischen und hydraulischen Vor
richtungen, mit denen die Druckverdichtungsaggregate ausgestattet sind, weisen keine Restrisiken auf, (siehe allgemeine Hinweise
zu den Punkten 5.1, 5.2, 5.3 und Punkt 6 des Handbuches TEIL 1),
mit Ausnahme der Gefahr durch das Vorhandensein von Luft unter
Druck im Expansionsgefäß.
Die Grenzwerte für de Betriebsdruck und den Vorladedruck sowie
die Werte für die Betriebs- und Umgebungstemperatur, die auf
dem Etikett des Expansionsgefäßes angegeben werden, dürfen nie
überschritten werden.
Wir empfehlen die Einhaltung der Anweisungen im Handbuch
des Expansionsgefäßes. Die von EBARA PUMPS EUROPE S.P.A.
installierten Expansionsgefäße entsprechen alle der EU-Richtlinie
97/23. Die Elektropumpen sind aus der vorliegenden Richtlinie
ausgeschlossen und die übrigen betroffenen Zubehörvorrichtun
gen weisen keine CE-Kennzeichnung auf, da sie der Kategorie von
Artikel 3 von Abschnitt angehören.
Die Automatikaggregate 1GP wurden einem hydrostatischen Test
bei Nenndruck unterzogen.
3.1. VORBEUGEMASSNAHMEN ZU LASTEN DES BENUTZERS
– DIE NICHTBEACHTUNG DIESER ANWEISUNGEN
UND/ODER DIE EVENTUELLE ABÄNDERUNG DER
ELEKTROPUMPE ENTBINDET EBARA PUMPS EU
ROPE S.P.A. VON JEGLICHER HAFTUNG FÜR UNFÄLLE VON PERSONEN, SACHSCHÄDEN SOWIE
BESCHÄDIGUNGEN DES AGGREGATS.
– Vor der Inbetriebnahme des Aggregats muss
sich der Benutzer mit allen Operationen vertraut
machen, die im vorliegenden Handbuch, in den
Handbüchern der einzelnen Elektropumpe (TEIL
1 und TEL 2), im Handbuch des Expansionsge
fäßes sowie im Handbuch des elektronischen
Flusswächters beschrieben werden.
– Die Installation, die Wartung oder die Reparatur
(hydraulisch oder elektrisch) müssen von quali
ziertem Fachpersonal vorgenommen werden.
Die Benutzer müssen die in den einzelnen Ländern
geltenden Normen und Bestimmungen unbedingt
beachten; außerdem müssen sie die Bestimmungen
des vorliegenden Handbuches genau eingehalten.
–
Während der Installation, der Wartung, der Reparatur und/oder der Ersetzung von Bauteilen des
Druckverdichtungsaggregats 1GP müssen das Ag
gregat und die gesamte Anlage spannungsfrei sein.
– Alle Benutzer müssen die im Benutzungsland
geltenden Sicherheits- und Unfallverhütungsbe
stimmungen unbedingt einhalten. Sämtliche Installations-, Wartungs- oder Reparaturarbeiten,
die mit Anlage unter Spannung vorgenommen
werden, können zu schweren und auch tödlichen
Verletzungen führen.
Seite 30
-
-
-
-
-
-
-
Page 27

– Stellen Sie vor der Inbetriebnahme der Anlage
sicher, dass das Kabel und die elektrischen Vor
richtungen in einwandfreiem Zustand sind.
– Tragen Sie beim Starten des Aggregats stets
Schuhwerk und achten Sie darauf, dass Ihre
Hände trocken sind.
– Der Benutzer darf keinerlei Eingriffe vornehmen,
die im vorliegenden Handbuch nicht beschrieben
werden.
3.2. SCHUTZVORRICHTUNGEN UND WICHTIGE VORSICHTSMASS
NAHMEN
– Die Elektropumpe und alle Komponenten wurden
so konzipiert, dass alle beweglichen Bauteile
durch Verkleidungen geschützt werden. EBARA
PUMPS EUROPE S.p.A. lehnt jegliche Haftung für
Schäden ab, die auf Eingriffe an diesen Schutz
vorrichtungen zurückzuführen sind.
–
Alle Leiter und spannungsführenden Bauteile sind
elektrisch gegen Masse isoliert; eine zusätzliche
Sicherheit wird erzielt, indem die zugänglichen
spannungsführenden Leiter an einen Erdungslei
ter angeschlossen werden, um Gefahren bei einer
Beschädigung der Hauptisolierung zu vermeiden.
4. GARANTIE UND KUNDENDIENST
Die Nichtbeachtung der im vorliegenden Handbuch angegebenen
Anweisungen und/oder Eingriffe am Aggregat, die nicht von unse
ren Kundendienststellen vorgenommen werden, führen zum Verfall
des Gewährleistungsanspruches und entbinden den Hersteller von
jeglicher Haftung im Fall von Unfällen von Personen, Sachschäden
und/oder Beschädigungen des Aggregats.
Stellen Sie Bei Empfang des Automatikaggregats sofort sicher,
dass es keinerlei Beschädigungen aufweist und erstatten Sie
anderenfalls umgehend Meldung an den Lieferanten. Stellen Sie
nach der Entnahme des Aggregats aus der Verpackung sicher, dass
es während des Transports keine Beschädigungen erlitten hat; er
statten Sie anderenfalls innerhalb von 8 Tagen von der Lieferung
Meldung an den Händler. Überprüfen Sie auf dem Typenschild des
Druckaggregats, ob die angegebenen Eigenschaften mit den von
Ihnen bestellten übereinstimmen.
Der Gewährleistungsanspruch verfällt in den folgenden Fällen:
− Durchführung von Engriffen oder Reparaturmaßnahmen
durch nicht von Ebara Pumps Europe S.p.A. dazu befugtes
Personal;
− Funktionsstörungen, die auf eine falsche Installation und/
oder einen falschen elektrischen Anschluss, Eingriffe und/
oder Abänderungen, unsachgemäßen Einsatz oder Einsatz
außerhalb der im vorliegenden Handbuch angegebenen
Grenzwerte zurückzuführen sind;
− Pumpen von ätzenden Flüssigkeiten, sandhaltigem Wasser,
chemisch oder physikalisch Aggressiven Flüssigkeiten ohne
voraussehende Überprüfung und Genehmigung von Ebara
Pumps Europe S.p.A.;
− Bei Meldung der beanstandeten Mängel nach Ablauf von
mehr als zwei Monaten seit der Feststellung;
− bei Abhängigkeit des beanstandeten Schaden von der nor
malen Abnutzung.
Für die folgenden Bauteile, die einer normalen Abnutzung aus
gesetzt sind, wird eine eingeschränkte Garantie gewährt: Lager,
mechanische Dichtung, Dichtungsringe, Kondensatoren, Membran
des Autoklavtanks, einstellbarer Druckwächter, Manometer.
Bitten wenden Sie sich an die nächste Kundendienststelle, falls der
-
-
-
Defekt nicht in der Tabelle FEHLERSUCHE (Kap. 11.3) beschrieben
wird.
Trient ist Gerichtsstand für alle Rechtssachen, die aus der Ausle
gung und/oder Ausführung der Verträge hervorgehen.
5. DATEN UND BESCHREIBUNG DES AGGREGATS
5.1. HERSTELLER
EBARA PUMPS EUROPE S.p.A.
5.2. DATEN DES AGGREGATS
-
Jedes Aggregat wird durch eine Abkürzung gekennzeichnet, die
den Typ der Pumpe und ihre Kongurierung wie folgt angibt:
1GP 2CDM 70/10 --- 24 S
Für die technischen Daten der Pumpe siehe das Handbuch TEIL 2
der installierten Pumpe.
Die Aggregate 1GP werden geliefert (Abb. 6) mit:
– Einphasenelektropumpe mit Kabel und Stecker;
– Manometer;
– Druckwächter;
– 2- oder 5-Wegeanschluss Auslass;
– vertikales oder horizontales Membrangefäß (Versionen “P”
vorbereitetes Aggregat ohne Gefäß auf Anfrage).
Die Aggregate 1GP mit Flusswächter werden geliefert (Abb. 7) mit:
– Einphasenelektropumpe mit Kabel und Stecker – elektroni
schem Flusswächter.
5.3. FUNKTIONSBESCHREIBUNG
-
Die Aggregate 1GP sind automatische Wassertankanlagen mit
einer Pumpe, ausgestattet oder vorbereitet für den Anschluss
an Membranautoklavtanks. Das Aggregat wird von einem Druck
wächter mit werksseitig eingestelltem Tarierungswert gesteuert,
wie in der Tabelle in Abschnitt 5.7 angegeben. Die Wasserentnah
me durch den Verbraucher bei stehender Pumpe führt zu einem
Druckabfall und folglich zur Schließung des Kontakts des Druck
wächter für das Starten der Pumpe, der die Pumpe startet. Die
Wiederherstellung des Drucks in der Anlage führt zur Schließung
des Kontakts des Druckwächters für das Anhalten der Pumpe und
die Pumpe wird angehalten.
Bei den Aggregaten 1GP mit Flusswächter erfolgt das Starten und
das Anhalten der Pumpe über einen integrierten elektronischen
Controller. Auf Anforderung des Wasserleitungsnetzes startet der
Flusswächter die Pumpe und liefert einen konstanten Durchsatz,
bis die Anforderung endet und der Druck in der Anlage unter nor
malen Bedingungen wieder hergestellt wird. Wenn kein Wasser
vorhanden ist, wird die Pumpe angehalten. Die Tarierungsdaten
und die detaillierten Eigenschaften werden im Handbuch des
Flusswächters angegeben.
5.4. VORGESEHENE EINSATZBEDINGUNGEN
Die Druckverdichtungsaggregate 1GP Ebara können in der Standar
-
dausführung für zivile, industrielle und landwirtschaftliche Anwendungen eingesetzt werden: Förderung und Pumpen von Wasser für
den Haushalt, die Kühlung, die Bewässerung und Waschanlagen.
Das Wasser kann sein: sauberes Wasser, Trinkwasser, Regenwas
ser, Grundwasser oder gemischtes Wasser und in jedem Fall frei
von Festkörpern oder gelösten Fasern und frei von aggressiven
Chemikalien.
S = Tank am Auslass der Pumpe
H = Tank, der die Pumpe trägt
P = vorbereitet ohne Gefäß
Fassungsvermögen Membrantank
PRESSCONTROL
PRESSCOMFORT
Abkürzung zur identizierung der Pumpe
Gemeinsame Abkürzung aller Aggregate mit einer Pumpe
Version mit
Flusswächter
-
DE
-
-
-
-
-
-
-
27
Page 28

5.5. NICHT VORGESEHENE EINSATZBEDINGUNGEN
Das Aggregat kann nicht eingesetzt werden zum Pumpen von:
− Schmutzwasser oder Wasser mit gelösten Festkörpern;
− Wasser, das Säuren, Laugen oder ätzende Flüssigkeiten im
Allgemeinen enthält;
− Wasser mit Temperaturen, die die Angaben in Kapitel 5.6
übersteigen;
− Salzwasser;
− entzündlichen Flüssigkeiten oder gefährlichen Flüssigkeiten
im Allgemeinen;
− die Aggregate 1GP sind nicht für den mobilen Einsatz oder
den Einsatz im Freien vorgesehen.
ACHTUNG
ANM: DIE ELEKTROPUMPE DARF NIE TROCKEN
LAUFEN.
5.6. VORGESEHENE EINSATZBEDINGUNGEN
Für die Einsatzbedingungen siehe Kapitel 2 in TEIL 2 „TECHNISCHE
DE
DATEN“ der Pumpe. Die max. Temperatur der gepumpten Flüssig
keit beträgt in Abhängigkeit vom installierten Pumpentyp 40-55°C
(siehe Handbuch der einzelnen Pumpe).
5.7. EIGENSCHAFTEN DER DRUCKWÄCHTER
EINSTELLBEREICH
DRUCK-
WÄCHTER TYP
FSG 2NE SP53 1,4 ÷ 4,6 1,0 – 1,2 1,2 – 2,3 1,4 – 2,8
FSG 9NE SP53 1,4 ÷ 4,6 1,0 – 1,2 1,2 – 2,3 1,4 – 2,8
FSG 9NE SP54 1,4 ÷ 4,6 1,0 – 1,2 1,2 – 2,3 2,5 – 3,7
FYG 22NE SP53 2,8 ÷ 7,0 1,2 – 2,3 1,6 – 2.7 5,4 – 7,0
XMP A06 1 ÷ 6 0.8 1.2 – 4.2 2.8 – 4.8
XMP A12 1.3 ÷ 12 1 1,7 – 8.4 5-8
ACHTUNG
5.8.1. EIGENSCHAFTEN DER MODELLE FSG-FYG (Abb. 1)
Das Gerät entspricht den EU-Normen EN 60730-1 und EN 607302-6
Gewinde Druckanschluss: G ¼ UNI ISO 228/1 (FSG 2NE/FYG
22NE) - UNI ISO 7/1 R ¼ (FSG 9NE)
2 Eingänge mit Kabeldurchlass DIN Pg 13.5
Schutzgrad: IP65 (IEC/EN 60529)
Druckwerte:
• Dauerbetrieb: (FSG 2NE-9NE) 4,6 bar max.; Bruchdruck: 20
bar min.
• Dauerbetrieb: (FYG 22NE) 7,0 bar max; Bruchdruck: 28 bar
min.
Einstellung:
1. Einschaltung: Ziehen Sie zum Anheben des Eingriffspunkts
beim Abfall des Druck die Tarierungsmutter 1 (Abb. 1) an.
2. Abschaltung: Ziehen Sie zum Anheben des Eingriffspunkts
beim Anstieg des Druck die Einstellmutter des Differentials
2 (Abb. 1) an.
5.8.2. EIGENSCHAFTEN DER MODELLE XMP (Abb. 2)
28
BEIM ANHEBEN
DES DRUCKS
bar
ANM: IN ABHÄNGIGKEIT VOM KABELTYP AUSGE-
STATTET MIT KABELDURCHLASS PG13.5 FÜR KABEL MIT Ø 6-9MM ODER PG 13.5 FÜR KABEL MIT Ø
9-12.5MM.
ELEKTRISCHE EIGENSCHAFTEN
1 Phase~ 3 Phase~
1,5 kW – 230V 2,2 kW – 400V
DIFFERENTIAL
BEI MIN.
TARIERUNG
bar
BEI MAX.
TARIERUNG
bar
WERKS-
TARIERUNG
bar
Das Gerät entspricht den EU-Normen IEC 947, EN 60947-4-1, UL
508 und CSA C22-2 Nr.14
Gewinde Druckanschluss: G ¼ UNI ISO 228/1
2 Eingänge mit Kabeldurchlass DIN Pg 13.5
Schutzgrad: IP54 (IEC/EN 60529)
Druckwerte:
• Dauerbetrieb: (XMP A06) 6 bar max.; Bruch: 30 bar min.
• Dauerbetrieb: (XMP A12) 12 bar max.; Bruch: 30 bar min.
ELEKTRISCHE EIGENSCHAFTEN
1 Phase~ 3 Phase~
1,5 kW – 230V 3,0 kW – 400V
Einstellung:
1. Einschaltung: Ziehen Sie zum Anheben des Eingriffspunkts beim
Abfall des Druck die Tarierungsmutter A (Abb. 2) an.
2. Abschaltung: Ziehen Sie zum Anheben des Eingriffspunkts beim
Anstieg des Druck die Einstellmutter des Differentials B (Abb.
2) an.
-
5.9 EIGENSCHAFTEN DES ELEKTRONISCHEN FLUSSWÄCHTERS
(Abb. 7-9)
5.9.1 Eigenschaften Presscomfort:
- Außengewindeanschlüsse G1” UNI ISO 228/1.
- Schutzgrad IP 65
- Max. Betriebsdruck 10 bar
- Einstellbereiche des Startdrucks: 1,5-2,5 bar.
Lesen Sie für die Einstellung den Druck ab, der beim Starten auf
dem Manometer angezeigt wird, und drehen Sie die Schraube in
die gewünschte Richtung.
5.9.2 Eigenschaften Presscontrol:
- Außengewindeanschlüsse G1” UNI ISO 228/1.
- Schutzgrad IP 65
- Max. Betriebsdruck 10 bar
- Feste Tarierung 1,5 bar Standard (oder 1,2 oder 2,2 bar auf An
frage).
Für weitere Eigenschaften siehe das Handbuch des entsprechen
den Flusswächters.
6. TECHNISCH KONSTRUKTIVE EIGENSCHAFTEN
Das Druckverdichtungsaggregat 1GP wurde unter Einhaltung der
folgenden Normen konstruiert:
− Siehe Punkt 6 des Handbuches TEIL 1
− GEFAHREN MECHANISCHER ART EU-MASCHINIENRICHTLINIE
2006/42
− GEFAHREN ELEKTRISCHER ART EU-MASCHINIENRICHTLINIE
2006/42
− EU-NIEDERSPANNUNGSRICHTLINIE 2006/95
− EU-RICHTLINIE ZUR ELEKTROMAGNETISCHEN KOMPATIBILI
− EU-RICHTLINIE ZUR GEFAHR DURCH DRUCK 97/23, siehe
7. TECHNISCHE DATEN
Für die technischen Daten der Pumpen siehe die Handbücher TEIL
1 und TEIL 2 und die Daten auf dem Typenschild der Pumpe.
Für die technischen Daten des Expansionsgefäßes siehe Abschnitt
2 der entsprechenden Bedienungsanleitung.
Für die technischen Daten des Flusswächters siehe Abschnitt 5.9
der entsprechenden Bedienungsanleitung.
8. INSTALLATION, DEINSTALLATON UND TRANSPORT
ACHTUNG
TÄT 2004/108
Anweisungen zum Druckgefäß
DIE INSTALLATION MUSS VON EINEM QUALIFIZIER-
TEN TECHNIKERN VORGENOMMEN WERDEN.
-
-
-
Page 29

8.1. ALLGEMEINE MASSNAHMEN FÜR DIE INSTALLATION
Bewegen Sie das Aggregat nach dem Auspacken vorsichtig von
Hand. Falls das Gewicht 30 kg überschreitet (siehe Punkt 8.4) soll
te das Aggregat mit einem Hubwagen bewegt werden.
a) Verwenden Sie Leitungen aus Metall oder Kunststoff mit einer
gewissen Starrheit, um zu vermeiden, dass sie dem Unterdruck
nachgeben, der in der Ansaugleitung entsteht;
b) richten Sie die Leitungen so aus und stützen Sie sie so ab, das
keine Belastungen auf das Aggregat ausgeübt werden;
c) vermeiden Sie die Verwendung von Schläuchen für die Ansaug-
und die Auslassleitung; biegen Sie sie nicht und vermeiden Sie
Drosselungen;
d) versiegeln Sie die eventuellen Anschlüsse der Leitungen: das
Eindringen von Luft in die Ansaugleitung wirkt sich negativ auf
den Betrieb der Pumpe aus;
e) an der Auslassleitung am Auslass des 3- oder 5-Wegeanschlus
ses sollte ein Schieber montiert werden;
f) befestigen Sie die Leitungen so am Becken oder an festen Tei
len, dass sie nicht vom Aggregat getragen werden;
vermeiden Sie die Verwendung von zu vielen Kurven und Ventilen;
g)
h) Wenn das Aggregat über dem Wasserspiegel installiert wird,
sollte die Ansaugleitung ein Grundventil und einen Filter auf
weisen, um das Eindringen von Fremdkörpern zu vermeiden,
und das Ende der Ansaugleitung muss auf eine Tiefe einge
taucht werden, die zumindest dem Doppelten des Durchmes-
sers der Leitung entspricht; außerdem muss es einen Abstand
vom Boden des Beckens aufweisen, der zumindest das Andert
halbfache des Durchmessers der Leitung beträgt;
Bei Ansaugleitungen mit einer Länge von mehr als 4 Meter sollte
zur Erzielung einer besseren Leistung eine Leitung mit größerem
Durchmesser verwendet werden (¼” größer als die Ansaugung).
8.2 INSTALLATION (SIEHE TYPISCHE PLÄNE AUF ABB. 8-9)
a) Positionieren Sie das Aggregat auf einer ebenen Fläche in der
Nähe der Wasserquelle und lassen Sie um es herum einen
ausreichenden Freiraum für die sichere Durchführung der Be
dienungs- und Wartungsarbeiten. Halten Sie vor dem Luftrad
des Motors einen Abstand von zumindest 100 mm ein;
b) verwenden Sie Leitungen mit angemessenem Durchmesser
(siehe TEIL 2 Abschnitt 4) mit Gewindeanschlüssen, die an den
3- oder 5-Wegeanschluss angeschraubt werden;
c) Halterungen, Verankerungen, Leitungen und sonstige Kompo
nenten der Anlage müssen von der Anlage unabhängig sein, so
dass keine weiteren Lasten oder Belastungen verursachen.
8.3. DISINSTALLATION
Gehen Sie bei der Bewegung oder dem Ausbau des Aggregats wie
folgt vor:
a) unterbrechen Sie die elektrische Speisung;
b) lassen Sie den Anlagendruck und des Vorladedruck des Expan
sionsgefäßes ab;
c) bauen Sie die Auslass- und die Ansaugleitung (wo vorhanden)
ab, falls sie zu lang oder sperrig sind;
d) lösen Sie falls vorhanden die Schrauben, mit denen das Aggre
gat an der Auageäche befestigt ist;
e) Wickeln Sie das Netzkabel auf und befestigen Sie es so am Ag
gregat, dass es während des Transports nicht beschädigt wird;
f) heben Sie das Aggregat in Abhängigkeit von seinem Gewicht
und seinen Abmessungen (siehe Punkt 8.4) mit einer geeigne
ten Vorrichtung.
8.4. TRANSPORT
Das Aggregat ist in einem Karton verpackt; falls das Gewicht
und die Abmessungen es erforderlich machen, wird sie auf einer
Holzpalette befestigt.
Bis zu 25 oder 30 kg Transport von Hand, darüber einen Hubwa
gen benutzen.
-
-
9. ELEKTRISCHER ANSCHLUSS
ACHTUNG
ANM: DER ELEKTRISCHE ANSCHLUSS MUSS VON
EINEM QUALIFIZIERTEN TECHNIKER VORGENOM
MEN WERDEN.
-
-
-
-
-
10. INBETRIEBNAHME UND BENUTZUNG DES AGGREGATS
DIE ELEKTROPUMPEN DÜRFEN TROCKEN LAUFEN. DURCH DAS
TROCKENLAUFEN KÖNNEN DIE INTERNEN BAUTEILE SCHWER
BESCHÄDIGT WERDEN.
-
10.1 ALLGEMEINE HINWEISE
Es gelten die Hinweise in Abschnitt 9.1 von Teil 1 des Handbuches
der Pumpe.
10.2. ANFÜLLEN DES AGGREGATS MIT WASSER
-
ACHTUNG
-
-
-
-
10.3. INBETRIEBNAHME DES AGGREGATS
Der Druckwächter der Aggregate 1GP ist bei den Basismodellen
– Der Anschluss erfolgt einfach durch Einstecken
des Steckers in eine Netzsteckdose in einer
Schalttafel mit thermomagnetischem Schutz
schalter und einem Differentialschalter mit hoher Empfindlichkeit (0,03 A).
Das Stromnetz muss eine Erdung aufweisen, die
–
den elektrischen Bestimmungen des Einsatzlands
entspricht. Die geht zu Lasten des Installateurs.
– Die Schalttafel mit der Steckdose muss sich an
einer Stelle befinden, die vor Spritzern, Wasser
strahlen und Regen geschützt ist und der Stekker muss gut zugänglich sein.
Während des Anschlusses muss in jedem Fall ver-
–
mieden werden, dass die Klemmleiste, der Motor
oder der Druckwächter nass oder feucht werden.
DIESE VORGANG MUSS AUSGEFÜHRT WERDEN,
WENN DAS AGGREGAT VOLLKOMMEN FREI VON
ELEKTRISCHER ENERGIE IST.
• Aggregat mit positivem Wasserspiegel (Ansaugbecken mit Wasserspiegel oberhalb der
Ansaugöffnung der Pumpe)
Öffnen Sie das Absperrventil in der Ansaugung der
Pumpe, schließen Sie die Absperrventile im Aus
lass, entfernen Sie den Stopfen der oberen Öff-
nung der Pumpen und warten Sie, bis das Wasser
austritt. Füllen Sie die Pumpen durch die obere
Öffnung, falls kein Wasser durch das Rückschlag
ventil austritt (z.B. horizontale Ansaugung) und
schließen Sie dann die entsprechende Öffnung.
• Aggregat mit negativem Wasserspiegel (Ansaugbecken mit Wasserspiegel unterhalb der
Ansaugöffnung der Pumpe)
Öffnen Sie das Absperrventil in der Ansaugung
des Aggregats, entfernen Sie den Stopfen der
oberen Öffnung der Pumpen und warten Sie, bis
das Wasser austritt.
-
-
DE
-
-
-
29
Page 30

auf die Werte tariert, die in der Tabelle im Abschnitt 5.7 angegeben
werden. Diese Werte können innerhalb bestimmter Grenzen wie im
Folgenden angegeben auf die Anforderungen des Verbrauchers ein
gestellt werden. Starten Sie die Pumpe (Schalter auf “On” / Stecker
eingesteckt) zum Überprüfen der Tarierung und schließen Sie das Ab
sperrventil der Auslassleitung langsam. Der Druck steigt schnell an,
wie auf dem Manometer angezeigt, und die Pumpe hält durch den
Eingriff der Kantakte des Druckwächters auf dem Tarierungswert an.
Anm: Überprüfen Sie den auf dem Typenschild angegebenen werk
seitig eingestellten Vorladedruck des Gefäßes, der immer auf einen
Druck von 0,3÷0,5 bar niedriger als der Startdruck der Pumpe eingestellt werden muss. Schalten Sie die Pumpe ab (Schalter auf „Off“ /
Netzstecker herausgezogen), falls der Druck nicht steigt, überprüfen
Sie die Anfüllung und schalten Sie sie dann wieder ein. Öffnen Sie
beim Anhalten der Pumpe das Absperrventil der Auslassleitung und
stellen Sie sicher, dass die Pumpe durch den Eingriff des Druckwäch
ters bei einem Druck neu startet, der dem Mindesttarierungsdruck
entspricht. Der Anhaltedruck der Pumpe (Betriebsdruck der Anlage)
DE
kann durch Drehen der Tarierungsmutter 1 angehoben oder gesenkt
werden (Abb. 1), während der Startdruck durch Drehen der Mutter
2 (Abb. 1) (Differential) eingestellt werden kann. Stellen Sie beim
Anheben des Anhaltedrucks der Pumpe (Anlagendruck) sicher, dass
der gewünschte Druck den max. Druck der Pumpe nicht übersteigt;
anderenfalls hält die Pumpe nie an. (Wie auch in der Tabelle “Stö
rungen und Behebung” angegeben). Bedenken Sie, dass bei jeder
Änderung der Tarierung des Druckwächters auch die Vorladung des
Expansionsgefäßes angepasst werden muss.
10.4. FUNKTIONSWEISE
Nach der Überprüfung der Ein- und Ausschaltung der Pumpe und
der eingestellten Druckwerte ist das Aggregat betriebsbereit.
Der Betrieb ist automatisch
Stellen Sie sicher, dass das Geräusch, die Vibrationen, die Druck
werte und die elektrische Spannung normal sind.
10.5. VOLLSTÄNDIGES ANHALTEN DES AGGREGATS
Bringen Sie zum vollständigen Anhalten des Aggregats den Schal
ter in die Stellung Off und ziehen Sie zur Sicherheit den Stecker
aus der Steckdose.
10.6. INBETRIEBNAHME DES AGGREGATS MIT FLUSSWÄCHTER
Stellen Sie sicher, dass die Pumpe ordnungsgemäß angesaugt ist
STÖRUNG MÖGLICHE URSACHE BEHEBUNG
- Kein Netzstrom
- Stecker nicht richtig eingesteckt - Stecken Sie den Stecker richtig ein
Die Elektropumpe
startet nicht
Der Motor läuft, aber
die Pumpe fördert kein
Wasser
Die Pumpe arbeitet mit
reduziertem Durchsatz
- Eingriff des Automatikschalters
- Eingriff des Thermoschalters
- Motor oder Kondensator defekt
- Einschaltdruck des Druckwächters zu niedrig - Den Druckwächter neu tarieren
- Ansauglter verstopft - Filter reinigen
- Kein Wasser in der Pumpe - Füllen Sie die Pumpe (siehe Kap. 10.2)
- Kein Wasser im Schacht oder im Becken
- Wasserpegel zu niedrig - Senken Sie die Pumpe ab
- Ansaugschwierigkeiten
und öffnen Sie dann teilweise den Hahn des Verbraucherkreislaufs.
Schließen Sie den Flusswächter an das Stromnetz an und stellen
Sie sicher, dass Spannung vorhanden ist.
-
Die Pumpe startet automatisch und die Led Spannung vorhanden
-
und/oder Pumpe in Betrieb leuchtet auf.
Nach der Benutzung und der Wiederherstellung des Drucks hält
der Flusswächter die Pumpen automatisch an.
Für die Tarierung und weitere Details siehe das entsprechende
-
Handbuch.
11. WARTUNG UND REPARATUR
ACHTUNG
-
11.1. PERIODISCHE ÜBERPRÜFUNGEN UND KONTROLLEN
Wir empfehlen, den Betrieb in regelmäßigen Abständen zu kontrollieren und vor allem auf das Auftreten von anomalen Geräuschen und
Vibrationen zu achten; bei Oberächenpumpen muss auch auf even
tuelle Undichtigkeiten der mechanischen Dichtung geachtet werden.
Die Druckverdichtungsaggregaten 1GP machen wenige regelmäßige Überprüfungen erforderlich; dies sind:
– Überprüfung des Vorladedruck des Membrangefäßes (0,3-
– Überprüfung des Einschalt- und Ausschaltdrucks der Pumpe
Eventuelle Störungen können anhand der folgenden Tabelle beho
ben werden. Konsultieren Sie auch das Handbuch der Pumpe.
-
11.2. WARTUNG
Für die wichtigsten Arbeiten und die häugsten Wartungsarbeiten
siehe Handbuch Teil 2 Pumpe. Handbuch Expansionsgefäß und
Handbuch Flusswächter, falls vorhanden.
-
Für die Ersatzteile siehe Positionen auf Abb. 6-7.
11.3. FEHLERSUCHE AGGREGAT
Konsultieren Sie auch die Handbücher der Pumpe, des Expansi
onsgefäßes und des Flusswächters, falls installiert.
Sämtliche Wartungs- und Reparaturarbeiten
müssen mit abgeschalteter elektrischer Speisung vorgenommen werden. Diese Eingriffe
werden normalerweise von qualiziertem Fachpersonal vorgenommen: Die Nichtbeachtung
dieser Vorschrift führt zum Verfall des Gewährleistungsanspruchs.
0,5 unter dem Startdruck des Druckwächters)
- Überprüfen Sie die anderen dem Zähler nachgeschalte
ten Verbraucher oder den Zähler selbst
- Zurückstellen. Wenden Sie sich für die Identizierung
der Störung und die Wiederherstellung der Isolierung an
einen qualizierten Elektriker, falls er erneut auslöst
- Stellt sich nach einigen Minuten automatisch zurück - Wenden Sie sich an den nächsten Händler, falls er erneut auslöst
- Wenden Sie sich an den nächsten Händler, falls er erneut auslöst
- Verlängern Sie die Ansaugleitung oder warten Sie auf die
Wiederherstellung des Pegels
- Reinigen Sie das Grundventil und die Ansaugleitung
- Ansaugleitung mit größerem Durchmesser
- Ersetzen Sie eventuelle Bögen durch weite Kurven
- Abfall der Netzspannung unter akzeptablen Mindestwert
(siehe Handbuch der Pumpe)
-
-
-
-
30
Page 31

STÖRUNG MÖGLICHE URSACHE BEHEBUNG
- Luftvorladung im Autoklav unzureichend
Zu häuges Starten
Die Pumpe hält nicht an Druckwächter außerhalb des Tarierungsbereiches
Die Pumpe vibriert oder ist wäh-
rend des Betriebs zu laut
- Differential des Druckwächters zu niedrig - Stellen Sie ein größeres Differential ein
-
Wasserverlust des Grundventils oder der Leitungen
- Hohlsog durch zu großen Durchsatz
- Hohlsog durch Ansaugschwierigkeiten
-
Fremdkörper zwischen den feststehenden und
den rotierenden Bauteilen (Luftrad)
- Lager abgenutzt oder beschädigt - Wenden Sie sich an den nächsten Händler
- Stellen Sie die Vorladung wieder her oder erset
zen Sie die Membran, falls defekt
- Beseitigen Sie die Verluste
Stellen Sie ein kleineres Differential ein (siehe
Kap. 5.7)
- Schließen Sie das Absperrventil der Auslasslei
tung ein wenig
- Gehen Sie wie bei Pumpe mit reduziertem
Durchsatz vor
- Entfernen Sie die Fremdkörper
-
-
12. ENTSORGUNG
Bei der Entsorgung des Aggregats 1GP müssen die geltenden
gesetzlichen Bestimmungen des Benutzungslandes streng eingehalten werden; dabei muss sichergestellt werden, dass keine
Rückstände der gepumpten Flüssigkeit in der Pumpe bleiben.
13. PLÄNE UND ZEICHNUNGEN
Max. Anzugsmoment des Mutter der Abdeckung 6 Kg x cm
ABB. 1 Druckwächter FSG-NE / FYG-NE ABB. 2 Druckwächter XMP
2
ABB. 3 Schließen ABB. 4 Öffnen ABB. 5 Anschluss Pumpe mit Druckwächter
Der Vorladedruck muss aus den Membrangefäßen abgelassen
werden.
Die meisten unserer Aggregate enthalten keine besonders um
weltverschmutzenden Materialien. Spezische Fälle werden im
eventuellen Kapitel “VERSCHROTTUNG” in TEIL 2 angegeben.
B
DE
-
31
Page 32
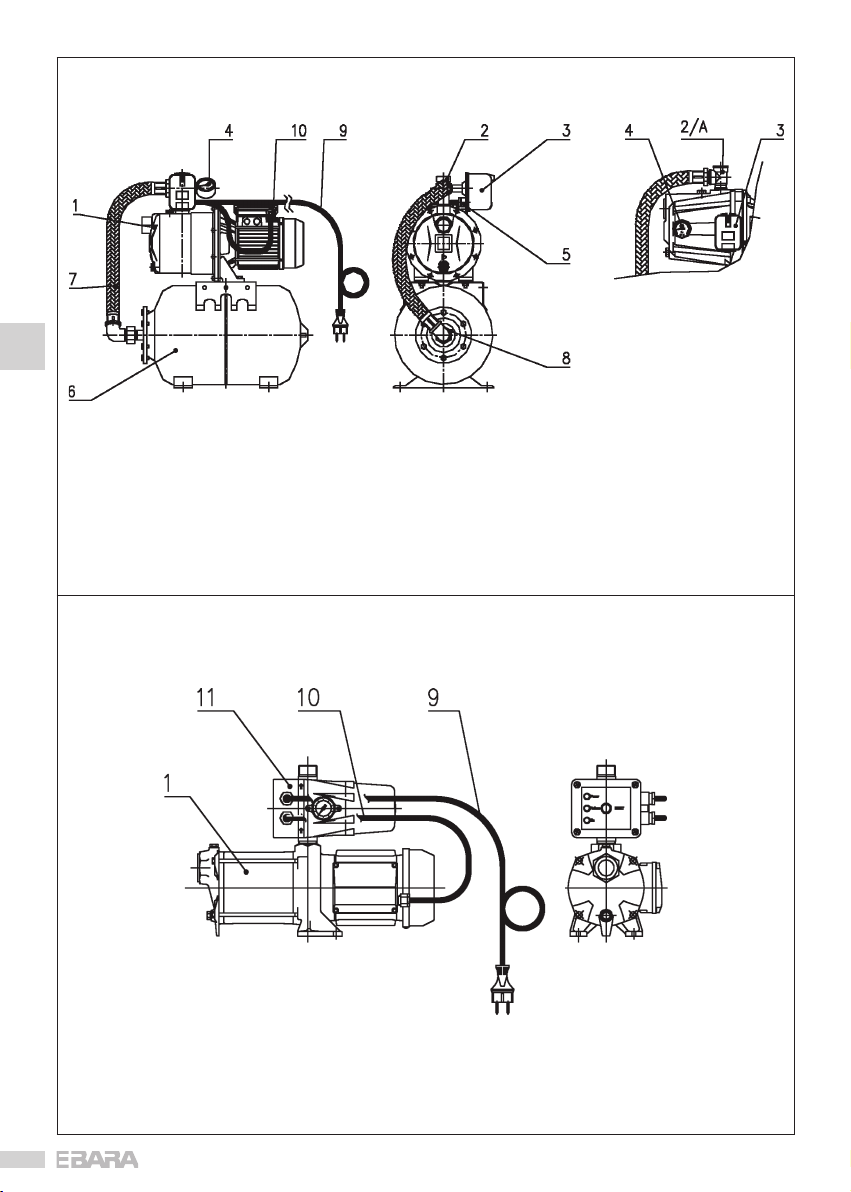
ABB. 6 Aggregat 1 GP Standard
DE
Legende
1. PUMPE
2. 5-WEGE-ANSCHLUSS
2/A. 3-WEGE-ANSCHLUSS
3. DRUCKWÄCHTER
4. MANOMETER
5. KABELDURCHLASS
ABB. 7 Aggregat 1 GP mit Flusswächter
Position des Manometers
und der Druckwächters
bei Aggregaten 1GP
Pumpen Serie “AGA”
6. TANK
7. SCHLAUCH
8. DICHTUNG
9. ELEKTRISCHES ANSCHLUSSKABEL
10. KABEL MOTOR DRUCKWÄCHTER
Legende
1. PUMPE
9. KABEL MIT STECKER
10. ANSCHLUSSKABEL MOTOR-FLUSSWÄCHTER
11. FLUSSWÄCHTER
32
Page 33

ABB. 8 Typisches Installationsschema 1GP 24 C
ABB. 9 Typisches Installationsschema 1GP mit elektronischem Flusswächter
Schalttafel nur für Drehstromversion
DE
Legende
1. FILTER
2. KUGELVENTIL MF
3. KUPPLUNG 3 ST.
4. RÜCKSCHLAGVENTIL
5. GRUNDVENTIL
Ha HÖHE ÜBER WASSERSPIEGEL
Hb HÖHE UNTER WASSERSPIEGEL
Legende
1. FILTER
2. KUGELVENTIL MF
3. RÜCKSCHLAGVENTIL
4. STUTZEN 3 ST.
5. VIBRATIONSDÄMPFUNG ODER
SCHLAUCH
6. GRUNDVENTIL
Ha HÖHE ÜBER WASSERSPIEGEL
Hb HÖHE UNTER WASSERSPIEGEL
33
Page 34

MANUAL DE INSTRUCCIONES DE EMPLEO Y MANUTENCIÓN
PARTE 3
EL EXPLOTADOR SE DEBE ENCARGAR DE LA CONSERVACIÓN
DE ESTE MANUAL
1. INTRODUCCIÓN
El presente manual de instrucciones está compuesto por 4 par-
tes: la PARTE 1 contiene informaciones generales sobre toda
nuestra producción; la PARTE 2 contiene informaciones especí
cas sobre las electrobombas; esta parte, PARTE 3, que contiene
informaciones especícas sobre el grupo de presurización; el
manual del vaso de expansión, y el manual del ujostato elec
trónico, si está previsto.
Atenerse a las disposiciones indicadas en todas las partes para
garantizar el correcto funcionamiento y el rendimiento óptimo
del grupo. En especial recomendamos leer y respetar las “AD
VERTENCIAS GENERALES DE SEGURIDAD” del capítulo 5 de la
parte 1, relativa a la bomba y el capítulo 3 del presente manual.
Para ulteriores informaciones ponerse en contacto con un distri
buidor autorizado o el centro de asistencia más cercano.
SE PROHÍBE TOTALMENTE LA REPRODUCCIÓN, INCLUSO
ES
PARCIAL, DE LAS ILUSTRACIONES Y/O DEL TEXTO.
En este manual de instrucciones se ha utilizado la siguiente
simbología:
CUIDADO!
2. ÍNDICE
1. INTRODUCCIÓN pág. 34
2. ÍNDICE pág. 34
3. ADVERTENCIAS GENERALES DE SEGURIDAD pág. 34
3.1.
3.2. Protección Y Cuidados Signicativos pág. 35
4. GARANTÍA Y ASISTENCIA TÉCNICA pág. 35
5. DATOS Y DESCRIPCIONES DEL GRUPO pág. 35
5.1. Constructor pág. 35
5.2. Datos Del Grupo pág. 35
5.3. Descripción Funcional pág. 35
5.4. Condiciones De Empleo Previstas pág. 35
5.5. Condiciones De Empleo No Previstas pág. 36
5.6. Condiciones De Empleo pág. 36
5.7. Características Funcionales pág. 36
5.8.1.
5.8.2. Características De Los Modelos Xmp pág. 36
5.9. Características Del Flujostato Electrónico pág. 36
6. CARACTERÍSTICAS TÉCNICO-CONSTRUCTIVAS pág. 36
7. DATOS TÉCNICOS pág. 36
8. INSTALACIÓN, DESMONTAJE Y TRANSPORTE pág. 36
8.1. Notas generales para la instalación pág. 37
8.2. Instalación pág. 37
8.3. Desmontaje pág. 37
8.4. Transporte pág. 37
9. CONEXIÓN ELÉCTRICA pág. 37
10. ARRANQUE Y UTILIZACIÓN DEL GRUPO pág. 37
10.1. Advertencias generales pág. 37
34
Riesgo de provocar daños a la bomba o a la
instalación
Riesgo de provocar daños a las personas o a las
cosas
Riesgos de naturaleza eléctrica
Medidas De Prevención A Cargo Del Explotador
Características De Los Modelos Fsg-fyg
pág. 34
pág. 36
10.2. Llenado de agua en el grupo pág. 37
10.3. Arranque del grupo pág. 37
10.4. Funcionamiento pág. 38
10.5. Parada total del grupo pág. 38
10.6. Arranque del grupo con ujostato pág. 38
11. MANUTENCIÓN Y REPARACIÓN pág. 38
11.1. Comprobaciones y controles periódicos pág. 38
11.2. Manutención pág. 38
11.3. Localización de averías pág. 38
-
12. ELIMINACIÓN pág. 39
13. ESQUEMAS Y PLANOS pág. 39
-
14. DECLARACIÓN DE CONFORMIDAD pág. 45
3. ADVERTENCIAS GENERALES DE SEGURIDAD
-
-
En las electrobombas y en los dispositivos eléctricos e hidráulicos
con los que cuentan los grupos de presurización no existen RIES
GOS RESIDUOS, (ver las advertencias generales en los puntos 5.1,
5.2, 5.3 y punto 6 del manual, PARTE 1), excluyendo el riesgo debi
do exclusivamente al aire bajo presión en el vaso de expansión.
Los valores límites de las presiones de ejercicio y de precarga
y los valores de las temperaturas de ejercicio y de entorno indi
cados en la etiqueta del vaso de expansión no se deben superar.
Se recomienda atenerse a las instrucciones contenidas en el ma-
nual del vaso de expansión. Los vasos instalados por EBARA PUMPS
EUROPE S.P.A. están exclusivamente homologados por la Directiva
97/23/CE. Las electrobombas están excluidas de dicha directiva,
los demás accesorios interesados están exentos de la marca CE ya
que pertenecen a la categoría del artículo 3 sección 3.
En los grupos automáticos 1GP se realiza una prueba de pre-
sión hidrostática en el lote de producción.
3.1. MEDIDAS DE PREVENCIÓN A CARGO DEL EXPLOTADOR
– EL HECHO DE NO RESPETAR ESTAS ADVERTEN-
CIAS Y/O LA POSIBLE ALTERACIÓN DE LA INSTALACIÓN EXONERAN A EBARA PUMPS EUROPE
S.P.A. DE CUALQUIER RESPONSABILIDAD EN
CASO DE ACCIDENTES A PERSONAS, DAÑOS A
COSAS O A LA INSTALACIÓN.
–
Antes de poner en funcionamiento el grupo es
indispensable que el explotador sepa ejecutar
y se atenga a todas las operaciones descritas
en el presente manual, en los manuales de la
electrobomba (PARTE 1 y PARTE 2), en el ma
nual de instrucciones del vaso de expansión o
en el manual del ujostato electrónico.
–
La instalación, la manutención o la reparación
(hidráulica y eléctrica) deben ser realizadas por
personal especializado y calicado.
Los explotadores deben respetar taxativamente las
normas y los reglamentos de los entes locales de
distribución y, además, deben respetar escrupulosa
mente lo prescrito en el presente manual.
– Durante la instalación, la manutención, la repara-
ción y/o la sustitución de cualquier parte del grupo
de presurización 1GP, el grupo y toda la instalación
se deben desconectar de la alimentación eléctrica.
– Los explotadores deben respetar taxativamente las
normas de seguridad y de protección contra acci
dentes en vigor en los respectivos países. Las operaciones de instalación, manutención o reparación
efectuadas con la instalación baja tensión pueden
provocar graves accidentes, incluso mortales, a las
personas.
-
-
-
-
-
-
Page 35

– Verificar, antes de arrancar la instalación, que to-
dos los dispositivos y componentes eléctricos, incluyendo los cables, funcionen correctamente.
– Cuando se arranca el grupo se debe evitar estar
descalzo, con pies mojados o con manos mojadas.
– El explotador no debe ejecutar por su cuenta ope
raciones o actividades que no estén contempladas
en este manual.
3.2. PROTECCIÓN Y CUIDADOS SIGNIFICATIVOS
– La electrobomba y todos los componentes de
la instalación están proyectados para qué todas
las partes en movimiento sen inofensivas debido a la utilización de cárteres de protección.
EBARA PUMPS EUROPE S.p.A. declina cual
quier responsabilidad por daños provocados por
la alteración de dichos dispositivos.
– Todos los conductores o las partes bajo tensión
están aislados respecto a tierra. Existe un dis
positivo de seguridad suplementario que prevé
la conexión de las partes conductoras accesibles a un conductor de tierra para que dichas
partes no sean peligrosas en caso de rotura del
aislamiento principal.
4. GARANTÍA Y ASISTENCIA TÉCNICA
El hecho de no respetar las indicaciones suministradas en
este manual de instrucciones y/o la posible intervención en
el grupo no efectuada por nuestros centros de asistencia
invalidan la garantía y exoneran al constructor de cualquier
responsabilidad en caso de accidentes a personas o daños
a cosas y/o al grupo.
Una vez que ha recibido el grupo automático, vericar que no
tenga roturas ni golpes importantes, de lo contrario, informar
inmediatamente a quien lo ha entregado. Luego, después de
haber extraído el grupo del embalaje, vericar que no haya
sufrido daños durante el transporte; en caso de daños, in
formar al distribuidor dentro de 8 días a partir de la fecha de
entrega. Controlar que en la placa del grupo de presión las
características indicadas sean las solicitadas por usted.
La garantía queda invalidada si:
− se han efectuado actividades de desmontaje o repara
ción por parte de operadores no autorizados por EBARA
PUMPS EUROPE S.p.A.;
− el funcionamiento incorrecto deriva de la instalación y/o
conexión eléctrica incorrecta, alteraciones, uso indebi
do o si se superan los límites de empleo e indicados en
el presente manual;
− se han bombeado líquidos corrosivos, aguas arenosas,
líquidos químicamente o físicamente agresivos, sin la
vericación previa y la autorización de EBARA PUMPS
EUROPE S.p.A.;
− los problemas encontrados se notican pasados dos
meses después de haberlos descubiertos;
− el daño depende del desgaste normal por utilización.
Las siguientes partes tiene una garantía limitada ya que es
tán sujetas a desgaste: cojinetes, sello mecánico, anillos de
retención, condensadores, membrana del depósito autocla
ve, presostato regulable, manómetro.
Si una rotura no está contemplada entre las previstas en la
tabla “LOCALIZACIÓN DE AVERÍAS” (par. 11.3.), contactar al
distribuidor autorizado más cercano.
Para cualquier controversia originada durante la interpretación y/o la ejecución de los contratos, la competencia exclusiva es del Tribunal de Trento.
5. DATOS Y DESCRIPCIONES DEL GRUPO
-
5.1. CONSTRUCTOR
EBARA PUMPS EUROPE S.p.A.
5.2. DATOS DEL GRUPO
Cada grupo está identicado por una sigla que dene el tipo
de bomba y la conguración como sigue:
1GP 2CDM 70/10 --- 24 S
-
-
Para los datos de la bomba consultar el manual de instruccio-
nes PARTE 2 de la bomba instalada.
Los grupos 1GP se suministran (g. 6) con:
– electrobomba monofásica con cable y enchufe
– manómetro
– presostato
– racor de 5 o 3 vías de descarga
– vaso de membrana tipo vertical u horizontal (versiones
“P” grupo preparado sin vaso si se solicita).
Los grupos 1GP con ujostato se suministran (g. 7) con:
– electrobomba monofásica con cable y enchufe
– ujostato electrónico
5.3. DESCRIPCIÓN FUNCIONAL
-
Los grupos 1GP son instalaciones automáticas de suministro
hídrico con 1 bomba, equipados o preparados para la conexión
a depósitos autoclave de membrana. El grupo está accionado
por un presostato con valor de calibración de fábrica como se
indica en la tabla del párrafo 5.7. La extracción del agua a uti
lizar, con la bomba parada, provoca la bajada de la presión y
-
el consiguiente cierre del contacto de activación de la bomba
del presostato, lo que provoca el arranque de la misma. El res
tablecimiento de la presión en la instalación provoca el cierre
del contacto de desactivación de la bomba del presostato y la
parada de la misma.
En los grupos 1GP con ujostato el arranque y la parada de
la bomba se producen mediante un controlador electrónico
presente en el ujostato. Cuando la red necesita agua, el ujos
tato arranca la bomba, que suministra el caudal útil a presión
constante mientras sea necesario y hasta que se restablezca
la presión de la instalación en condiciones normales. En caso
de falta de agua la bomba se detiene. Los datos de calibración
y las características detalladas están contenidos en el manual
de instrucciones del ujostato.
5.4. CONDICIONES DE EMPLEO PREVISTAS
-
Los grupos de presurización 1GP Ebara, se utilizan, en las
versiones estándares, para aplicaciones civiles, industriales y
-
agrícolas, en especial para: subida o desplazamiento de agua
para uso doméstico, enfriamiento, irrigación, instalaciones de
lavado. El agua puede ser: agua limpia, potable, de lluvia, de
falda, mezclada, pero siempre sin cuerpos sólidos o bras en
suspensión y sin sustancias químicas a agresivas.
S = Depósito en la descarga de la bomba
H = Depósito que soporta la bomba
P = Preparada sin vaso
Capacidad del depósito de membrana
PRESSCONTROL
PRESSCOMFORT
Sigla que identica a la bomba
Sigla común a todos los grupos de una bomba
Versión con
ujostato
ES
-
-
-
35
Page 36

5.5. CONDICIONES DE EMPLEO NO PREVISTAS
El grupo no es utilizable para desplazar:
− agua sucia o con cuerpos en suspensión;
− agua con presencia de ácidos o bases y, en general,
líquidos corrosivos;
−
Agua con temperaturas superiores a las indicadas en el
cap. 5.6;
− agua de mar;
− líquidos inamables y, en general, peligrosos;
− los grupos GP no han sido previstos para usos transpor
tables o a la intemperie.
CUIDADO!
NOTA: LA ELECTROBOMBA NO DEBEN FUNCIO-
NAR NUNCA EN AUSENCIA DE LIQUIDO.
5.6. CONDICIONES DE EMPLEO
Para las condiciones de empleo ver el capítulo 4 de la parte
2 “DATOS TÉCNICOS” de la bomba. La máxima temperatura
del líquido bombeado es 40-55°C según el tipo de bomba
instalada (ver el manual de instrucciones de la bomba).
5.7. CARACTERÍSTICAS FUNCIONALES
ES
CAMPO DE
PRESOSTATO
TIPO
FSG 2NE SP53 1,4 ÷ 4,6 1,0 – 1,2 1,2 – 2,3 1,4 – 2,8
FSG 9NE SP53 1,4 ÷ 4,6 1,0 – 1,2 1,2 – 2,3 1,4 – 2,8
FSG 9NE SP54 1,4 ÷ 4,6 1,0 – 1,2 1,2 – 2,3 2,5 – 3,7
FYG 22NE SP53 2,8 ÷ 7,0 1,2 – 2,3 1,6 – 2.7 5,4 – 7,0
XMP A06 1 ÷ 6 0.8 1.2 – 4.2 2.8 – 4.8
XMP A12 1.3 ÷ 12 1 1,7 – 8.4 5-8
CUIDADO!
5.8.1. CARACTERÍSTICAS DE LOS MODELOS FSG-FYG (FIG.1)
Equipo conforme con las normas europeas EN 60730-1 ED
EN 60730-2-6.
Rosca de la conexión de presión: G ¼ UNI ISO 228/1 (FSG
2NE/FYG 22NE) - UNI ISO 7/1 R ¼ (FSG 9NE).
2 entradas pasacables Din Pg 13.5.
Grado de protección: IP65 (IEC/EN 60529).
Presiones:
• funcionamiento continuo: (FSG 2NE-9NE) 4.6 bar máx;
presión de ruptura: 20 bar mín.
• funcionamiento continuo: (FSG 22NE) 7.0 bar máx; pre
sión de ruptura: 28 bar mín.
Regulación:
1. Activación: Para aumentar el punto de activación al disminuir la
presión apretar la tuerca de calibración 1 (FIG. 1).
2. Desactivación: para aumentar el punto de activación al aumen
tar la presión apretar la tuerca de regulación del diferencial 2
(FIG.1)
36
REGULACIÓN AL
AUMENTAR LA
PRESIÓN
bar
NOTA: SEGÚN EL TIPO DE CABLE ELÉCTRICO,
LOS PRESOSTATOS ESTÁN EQUIPADOS CON
PRENSACABLES PG13.5 PREPARADO PARA
CABLES DE Ø 6-9MM O PG 13.5, PREPARADO
PARA CABLES DE Ø 9-12.5MM.
CARACTERÍSTICAS ELÉCTRICAS
1 Phase~ 3 Phase~
1,5 kW – 230V 2,2 kW – 400V
DIFERENCIAL
A LA MÍN.
CALIBRACIÓN
bar
A LA MÁX.
CALIBRACIÓN
bar
CALIBRACIÓN
DE FÁBRICA
bar
5.8.2. CARACTERÍSTICAS DE LOS MODELOS XMP (FIG. 2)
Equipo conforme con las normas europeas IEC 947, EN
60947-4-1, UL 508, CSA C22-2 n°14
Rosca de la conexión de presión: G ¼ UNI ISO 228/1
2 entradas pasacables Din Pg 13.5
Grado de protección: IP54 (IEC/EN 60529)
Presiones:
• funcionamiento continuo: (XMP A06) 6 bar máx; ruptu
-
-
-
ra: 30 bar mín.
• funcionamiento continuo: (XMP A12) 12 bar máx; ruptu
ra: 30 bar mín.
CARACTERÍSTICAS ELÉCTRICAS
1 Phase~ 3 Phase~
1,5 kW – 230V 3,0 kW – 400V
Regulación:
1.
Activación: Para aumentar el punto de activación al disminuir la presión apretar la tuerca de calibración A (FIG.2);
2. Desactivación: para aumentar el punto de activación al
aumentar la presión apretar la tuerca de regulación del
diferencial B (FIG.2).
5.9 CARACTERÍSTICAS DEL FLUJOSTATO ELECTRÓNICO (FIG.7-9)
5.9.1 Características Presscomfort:
- Rosca de las conexiones macho G1” UNI ISO 228/1.
- Grado de protección IP 65.
- Presión máxima de ejercicio 10 bar.
-
Campos de regulación de la presión de arranque: 1.5-2.5 bar.
Para la regulación, leer la presión que indica el manómetro durante el arranque y regular el tornillo en el sentido deseado.
5.9.2 Características Presscontrol:
- Rosca de las conexiones macho G1” UNI ISO 228/1.
- Grado de protección IP 65.
- Presión máxima de ejercicio 10 bar.
-
Calibraciones jas 1.5 bar estándar (1.2 o 2.2 bar opcionales).
Para las demás características consultar el manual del u-
jostato relativo.
6. CARACTERÍSTICAS TÉCNICO-CONSTRUCTIVAS
El grupo de presión 1GP ha sido proyectado y construido res
petando las siguientes normas:
− Ver punto 6 del manual PARTE 1;
− RIESGOS DE NATURALEZA MECÁNICA DIRECTIVA DE MÁ
QUINAS
− RIESGOS DE NATURALEZA ELÉCTRICA DIRECTIVA DE
− DIRECTIVA DE BAJA TENSIÓN 2006/95/EC;
− DIRECTIVA DE COMPATIBILIDAD ELECTROMAGNÉTICA
− RIESGO DE PRESIÓN DIRECTIVA 97/23/CE, ver las ins
7. DATOS TÉCNICOS
Para los datos técnicos de las bombas ver los manuales PAR
TE 1 y PARTE 2 y la placa de datos aplicada en la bomba.
Para los datos técnicos del vaso de expansión ver el párrafo 2
de las instrucciones de empleo relativas.
Para los datos técnicos del ujostato ver el párrafo 5.9 y las
instrucciones de empleo relativas.
8. INSTALACIÓN, DESMONTAJE Y TRANSPORTE
CUIDADO!
2006/42/CE
MÁQUINAS
2004/108/EC;
trucciones de empleo del vaso de expansión.
LA INSTALACIÓN DEBE SER EFECTUADA POR
UN TÉCNICO CALIFICADO.
;
2006/42/CE
;
-
-
-
-
-
-
Page 37

8.1. NOTAS GENERALES PARA LA INSTALACIÓN
Después del desembalaje, mover a mano el grupo con cuida
do. Si el peso es superior a 30 kg (ver el punto 8.4) se aconseja levantar el grupo utilizando equipos mecánicos:
a) Utilizar tuberías metálicas o de material plástico con un
cierto grado de rigidez para evitar que puedan ceder debido a
la depresión que se crea en la aspiración,
b) Apoyar y alinear las tuberías para que no creen esfuer
zos en el grupo;
c)
Evitar, si se utilizan tubos exibles de aspiración y de descarga, doblarlos para no provocar estrangulamientos;
d) Sellar las eventuales conexiones de los conductos: las
ltraciones d aire en el tubo de aspiración inuyen ne
gativamente sobre el funcionamiento de la bomba;
e) En el tubo de descarga, a la salida del racor de 3/5
vías, se aconseja montar una compuerta;
f) Fijar las tuberías a la cubeta, o a partes jas, para que
no queden soportadas por el grupo;
g) Evitar emplear en la instalación demasiadas curvas
(cuellos de oca) y válvulas;
h)
Cuando el grupo se instala sobre el nivel de líquido, el
tubo de aspiración debe estar equipado con una válvula
de pie y un ltro para impedir la entrada de cuerpos ex
traños, y su extremo se debiera sumergir a una profundidad de por lo menos dos veces el diámetro del tubo;
además, debiera tener una distancia de una vez y me
dia el diámetro del tubo desde el fondo de la cubeta;
Para aspiraciones superiores a 4 m, para mejorar el rendimiento se debe utilizar un tubo de diámetro superior (se
aconseja ¼ de pulgada superior en aspiración).
8.2 INSTALACIÓN (VER ESQUEMAS TÍPICOS EN FIG. 8-9)
a)
Colocar el grupo sobre una supercie plana, lo más cerca posible de la fuente de agua y dejando alrededor un
espacio libre suciente para permitir las operaciones de
empleo y manutención en condiciones de seguridad. En
todo caso, dejar un espacio libre de por lo menos 100
mm de delante del ventilador de enfriamiento del motor;
b) Utilizar tuberías con el diámetro apropiado (ver PARTE
2 par. 4 equipadas con manguitos roscados, que se de
ben en enroscar al racor de 3/5 vías;
c)
Los sostenes, anclajes, tuberías y demás componentes de
la instalación deben ser independientes del grupo para no
provocar ulteriores cargas o esfuerzos sobre el mismo.
8.3. DESMONTAJE
Para desplazar o desmontar el grupo es necesario:
a) cortar la alimentación eléctrica;
b) descargar la presión de la instalación y la presión de
carga del vaso de expansión;
c)
desconectar los tubos de descarga y aspiración (donde existan) si son demasiado largos u ocupan mucho espacio;
d) si están presentes, aojar los tornillos que bloquean el
grupo en la supercie de apoyo;
e) enrollar el cable de alimentación y jarlo al grupo para
que no pueda ser dañado durante el transporte;
f) levantar el grupo con medios idóneos según el peso y
las dimensiones del mismo (ver punto 8.4).
8.4. TRANSPORTE
El grupo está embalado en una caja de cartón o, si el peso y
las dimensiones lo requieren, se ja en un pallet de madera.
Hasta 25 o 30 kg el transporte se realiza manualmente, por
encima, se debe utilizar un equipo mecánico.
-
-
9. CONEXIÓN ELÉCTRICA
CUIDADO!
-
-
-
NUNCA PONER A FUNCIONAR LA ELECTROBOMBA EN AU
SENCIA DE AGUA: LA FALTA DE AGUA CAUSA SERIOS DAÑOS A LOS COMPONENTES INTERNOS.
10.1 ADVERTENCIAS GENERALES
Son válidas las advertencias indicadas en el párr. 9.1 de la
parte 1 relativas a la bomba.
10.2. LLENADO DE AGUA EN EL GRUPO
-
10.3. ARRANQUE DEL GRUPO
El presostato de los grupos 1GP está calibrado, en base al modelo, según los valores indicados en la tabla del párrafo 5.7. Dichos
NOTA: LA CONEXIÓN ELÉCTRICA DEBE SER REALIZADA POR UN TÉCNICO CALIFICADO.
- La conexión se realiza simplemente insertando el
enchufe en una toma de alimentación colocada
en un cuadro que contiene un interruptor mag
netotérmico y un interruptor diferencial de alta
sensibilidad (0.03 A).
- La red desde tener una instalación de tierra efi
ciente según las normativas eléctricas existentes
en el país: esta responsabilidad es del instalador.
- el cuadro con la toma se deberá colocar en un am
biente interno lejano de chorros de agua o lluvia,
y de modo tal que el enchufe sea accesible.
- Durante la conexión evitar absolutamente mojar
o humedecer el panel de bornes, el motor o el
presostato.
10. ARRANQUE Y UTILIZACIÓN DEL GRUPO
CUIDADO!
OPERACIÓN A EFECTUAR CON EL GRUPO COMPLETAMENTE DESCONECTADO DE LA ENERGÍA
ELÉCTRICA.
• Grupo con nivel de líquido positivo (cubeta
de aspiración con nivel superior al orificio
de aspiración de la bomba).
Abrir las válvulas de cierre en la aspiración del
grupo y cerrar la válvula de la descarga, quitar
el tapón del orificio superior de las bombas
y esperar a que salga el agua. Si el agua no
sale (ej. aspiración horizontal) de la válvula
de retención, llenar hasta que desborde por el
orificio superior de las bombas, y luego volver
a cerrar con el tapón relativo.
• Grupo con nivel de líquido negativo (cubeta
de aspiración con nivel inferior al orificio de
aspiración de la bomba).
Abrir las válvulas de cierre en la aspiración
del grupo, quitar el tapón del orificio superior
de las bombas y llenar con agua hasta que
desborde.
-
-
ES
-
-
37
Page 38

valores se pueden ajustar a las exigencias del usuario dentro
ciertos límites como se especica a continuación. Para compro
bar la calibración, arrancar la bomba (interruptor en “on”/enchufe insertado) y cerrar lentamente la válvula de cierre en la
descarga. La presión aumentará rápidamente, como lo indica el
manómetro, y la bomba se detendrá, a causa de la activación
de los contactos del presostato en el valor de calibración. NOTA:
comprobar el valor de precarga de fábrica del vaso, indicado en
la placa, que se deberá regular a una presión de 0.3÷0.5 bar
inferior a la presión de arranque de la bomba. Si la presión no
aumenta, desconectar la bomba (interruptor en “off”/desconec
tar el enchufe), comprobar el llenado y volver a arrancar. Cuando
se detiene la bomba, abrir la válvula de cierre en la descarga y
comprobar que la bomba vuelva a arrancar a causa de la inter
vención del presostato a una presión aproximadamente igual a
la mínima de calibración. La presión de parada de la bomba (pre
sión de utilización de la instalación) se puede aumentar o disminuir apretando o aojando la tuerca de calibración 1 (g. 1), la de
arranque se puede variar apretando o aojando la tuerca 2 (g.
1) (diferencial). Si se desea aumentar la presión de parada de
la bomba (presión de instalación), vericar que el valor deseado
ES
no supere la presión máxima suministrada por la bomba, de lo
contrario, el grupo no se podrá parar nunca. (Como se especica
también en la tabla “Anomalías e intervenciones”) Recordarse
que cada vez que se cambia la calibración del presostato se de
berá adecuar también la precarga del vaso de membrana.
10.4. FUNCIONAMIENTO
Después de haber vericado el arranque y la parada de la bomba a las presiones conguradas, el grupo está listo para el uso.
El funcionamiento es automático.
Controlar que el ruido, las vibraciones, la presión y la tensión
eléctrica estén a nivel normal
10.5. PARADA TOTAL DEL GRUPO
P
ara detener completamente el grupo, colocar el interruptor de
mando en off y, por seguridad, desconectar el enchufe de la toma.
10.6. ARRANQUE DEL GRUPO CON FLUJOSTATO
Vericar el cebado correcto de la bomba, luego abrir parcial
mente la válvula del circuito utilizador.
ANOMALÍA CAUSA PROBABLE INTERVENCIONES
- Falta corriente eléctrica
- Enchufe no insertado bien - Insertar bien el enchufe
La electrobomba no
arranca
El motor gira pero la
bomba no descarga
agua
La bomba funciona
con caudal reducido
respecto al normal
- Interruptor de protección activado
- Activación de la protección térmica
- Motor o condensador defectuosos - Contactar con el distribuidor más cercano
- Presión de activación del presostato demasiado baja
- Filtro en la aspiración obstruido - Limpiar el ltro
- Falta de agua en la bomba - Llenar la bomba (ver cap. 10.2)
- Falta de agua en el pozo o en la cubeta
- Nivel de agua demasiado bajo - Bajar la bomba
- Dicultad de aspiración
Conectar el ujostato a la red eléctrica y comprobar la pre-
sencia de tensión.
La bomba arranca automáticamente con el led de presencia
de tensión y/o el led de bomba funcionando encendidos.
Cuando termina la utilización y se restablece la presión de la
instalación, el ujostato detiene automáticamente las bombas.
Para la calibración y mayores detalles ver el manual de ins-
trucciones.
11. MANUTENCIÓN Y REPARACIÓN
-
CUIDADO!
-
-
11.1. COMPROBACIONES Y CONTROLES PERIÓDICOS
Se aconseja controlar periódicamente el funcionamiento co
rrecto, y en especial, prestar atención al posible surgimiento
de ruidos y vibraciones anómalas. Para las bombas de super
cie controlar las eventuales pérdidas del sello mecánico.
Los grupos de presurización 1GP necesitan sólo pocos con
troles periódicos que son:
-
- control de la precarga del depósito de membrana (0.3-
- control de la presión de activación/desactivación de la
Los posibles problemas se pueden afrontar consultando la
tabla que sigue. Consultar también el manual de instruccio
nes de la bomba.
11.2. MANUTENCIÓN
Para las operaciones principales y más frecuentes de manutención, ver el manual parte 2 de la bomba, el manual del vaso
de expansión y el manual del ujostato, si está presente.
Para las partes de recambio verla posiciones en g. 6-7.
11.3. LOCALIZACIÓN DE AVERÍAS
Consultar también los manuales de instrucciones de la bomba,
-
del vaso de membrana y del ujostato, si están instalados.
Cualquier actividad de manutención y reparación debe ser efectuada con la alimentación
eléctrica desconectada. Estas actividades se
deben llevar a cabo solamente por personal ca
licado: si no se respeta dicha regla, la garantía
pierde validez.
0.5 inferior a la presión de arranque del presostato);
bomba.
- Vericar los demás usuarios después del contador o
vericar el contador
- Rearmar. Si se dispara de nuevo dirigirse a un electri
cista calicado para identicar el punto de dispersión y
restablecer el aislamiento
- Se rearma solo pasados algunos minutos. Si se dispara
de nuevo contactar con el distribuidor más cercano
- Volver a calibrar el presostato
- Alargar el tubo de aspiración o esperar el restablecimien
to del nivel
- Limpiar la válvula de pie y el tubo de aspiración
- Tubo de aspiración de diámetro mayor
- Sustituir los eventuales codos con curvas anchas
- Disminución de la tensión de alimentación por debajo
del valor mínimo aceptable (ver el manual de la bomba)
-
-
-
-
-
-
-
38
Page 39

ANOMALÍA CAUSA PROBABLE INTERVENCIONES
- Precarga de aire en el autoclave insuciente
Arranques demasiado frecuentes
La bomba no se para Presostato fuera del campo de calibración
La bomba vibra, o hace dema
siado ruido durante el funcionamiento
- Diferencial del presostato demasiado bajo - Volver a calibrar aumentando el diferencial
Pérdidas de agua de la válvula de pie o de las tuberías
-
- Cavitación por caudal excesivo -
- Cavitación por dicultad de aspiración
-
- Cuerpos extraños entre partes jas y giratorias
(ventilador)
- Cojinetes desgastados o dañados - Contactar con el distribuidor más cercano
- Restablecer la precarga o sustituir la membrana
si está rota
- Eliminar las pérdidas
Volver a calibrar disminuyendo el diferencial (ver
cap. 5.7)
Cerrar un poco la válvula de cierre en la descarga
- Intervenir como cuando la bomba suministra un
caudal reducido
- Quitar los cuerpos extraños
12. ELIMINACIÓN
Cuando se elimina el grupo 1GP atenerse rigurosamente a
las disposiciones en vigor en el país de instalación, asegu
rándose de no dejar dentro de la bomba residuos del uido
13. ESQUEMAS Y PLANOS
Máximo par de apretado de la tuerca de la tapa 6 Kg x cm
FIG. 1 Presostato FSG-NE / FYG-NE FIG. 2 Presostato XMP
FIG. 3 Cierre FIG. 4 Abertura FIG. 5 Conexión de la bomba con el presostato
bombeado. Los vasos de membrana se deben descargar de
la presión interior de precarga.
La mayor parte de nuestras bombas no contiene materiales
-
contaminantes. Los casos especícos se tratan en el capítu
lo “DEMOLICIÓN en la PARTE 2.
B
-
ES
39
Page 40

FIG. 6 Grupo 1 GP estándar
ES
Leyenda
1. BOMBA
2. RACOR 5 VÍAS
2/A. RACOR 3 VÍAS
3. PRESOSTATO
4. MANÓMETRO
5. PRENSACABLES
FIG. 7 Grupo 1GP con ujostato
Posición del manómetro
y presostato en grupos
1GP bombas serie “AGA”
6. DEPÓSITO
7. TUBO FLEXIBLE
8. GUARNICIÓN
9. CABLE DE CONEXIÓN ELÉCTRICA
10. CABLE MOTOR PRESOSTATO
Leyenda
1. BOMBA
9. CABLE CON ENCHUFE
10. CABLE DE CONEXIÓN MOTOR-FLUJOSTATO
11. FLUJOSTATO
40
Page 41

FIG. 8 Esquema típico de instalación 1GP 24 C
FIG. 9 Esquema típico de instalación 1GP con ujostato electrónico
Cuadro sólo para versiones trifásicas
ES
Leyenda
1. FILTRO
2. VÁLVULA DE BOLAS MF
3. ACOPLAMIENTO 3 PC.
4. VÁLVULA ANTIRRETORNO
5. VÁLVULA DE PIE
Ha ALTURA SOBRE NIVEL DE LÍQUIDO
Hb ALTURA BAJO EL NIVEL DE LÍQUIDO
Leyenda
1. FILTRO
2. VÁLVULA DE BOLAS MF
3. VÁLVULA ANTIRRETORNO
4. BOCA 3 PC.
5. ACOPLAMIENTO ANTIVIBRACIONES
O TUBO FLEXIBLE
6. VÁLVULA DE PIE
Ha ALTURA SOBRE NIVEL DE LÍQUIDO
Hb ALTURA BAJO EL NIVEL DE LÍQUIDO
41
Page 42

14. DICHIARAZIONE DI CONFORMITÀ
- DECLARATION OF CONFORMITY
42
Page 43

14.
DÉCLARATION DE CONFORMITÉ
43
Page 44

14. KONFORMITÄTSERKLÄRUNG
44
Page 45

14.
DECLARACIÓN DE CONFORMIDAD
45
Page 46

Page 47

Page 48

EBARA Pumps Europe S.p.A.
Via Torri di Conne 2/1 int. C
36053 Gambellara (Vicenza), Italy
Phone: +39 0444 706811
Fax: +39 0444 405811
ebara_pumps@ebaraeurope.com
www.ebaraeurope.com
Cod.
442180303
Rev. C
- 02.2018
EBARA Pumps Europe S.p.A. UK
Unit A, Park 34
Collett Way - Didcot
Oxfordshire - OX11 7WB, United Kingdom
Tel.: +44 1895 439027 - Fax +44 1235 815770
e-mail: mktguk@ebaraeurope.com
EBARA Pumps Europe S.p.A. FRANCE
555, Rue Juliette Recamier
69970 Chaponnay, France
Tel. +33 4 72769482 - Fax +33 805101071
e-mail: mktgf@ebaraeurope.com
EBARA POMPY POLSKA Sp. z o.o.
ul. Działkowa 115 A
02-234 Warszawa, Poland
Tel. +48 22 3909920 - Fax +48 22 3909929
e-mail: mktgpl@ebaraeurope.com
EBARA Pumps Europe S.p.A. GERMANY
Elisabeth-Selbert-Straße 2
63110 Rodgau, Germany
Tel. +49 (0) 6106 66099-0 - Fax +49 (0) 6106
66099-45
e-mail: mktgd@ebaraeurope.com
EBARA Pumps RUS Ltd.
Prospekt Andropov 18, building 7, floor 11
115432 Moscow
Tel. +7 499 6830133
e-mail: mktgrus@ebaraeurope.com
EBARA ESPAÑA BOMBAS S.A.
C/Cormoranes 6 Y 8
Poligono Ind. La Estación
28320 Pinto (Madrid), Spain
Tel. +34 916.923.630 - Fax +34 916.910.818
e-mail: marketing@ebara.es
EBARA PUMPS SOUTH AFRICA (PTY) LTD
26 Kyalami Boulevard,Kyalami Business Park,
1684, Midrand, Gauteng
South Africa
Phone: +27 11 466 1844
Fax: +27 11 466 1933
EBARA Pumps Europe S.p.A.
Tel.: +966 11 810 4561 - Fax: +966 11 810 4562
SAUDI ARABIA
 Loading...